

Page 1

SETUP GUIDE
Check out setup videos at
www.TERK.com/Setup
AMPLIFIED INDOOR HDTV ANTENNA
WITH
WIFI EXTENDER
Instrucciones en español ...............21
Page 2
2
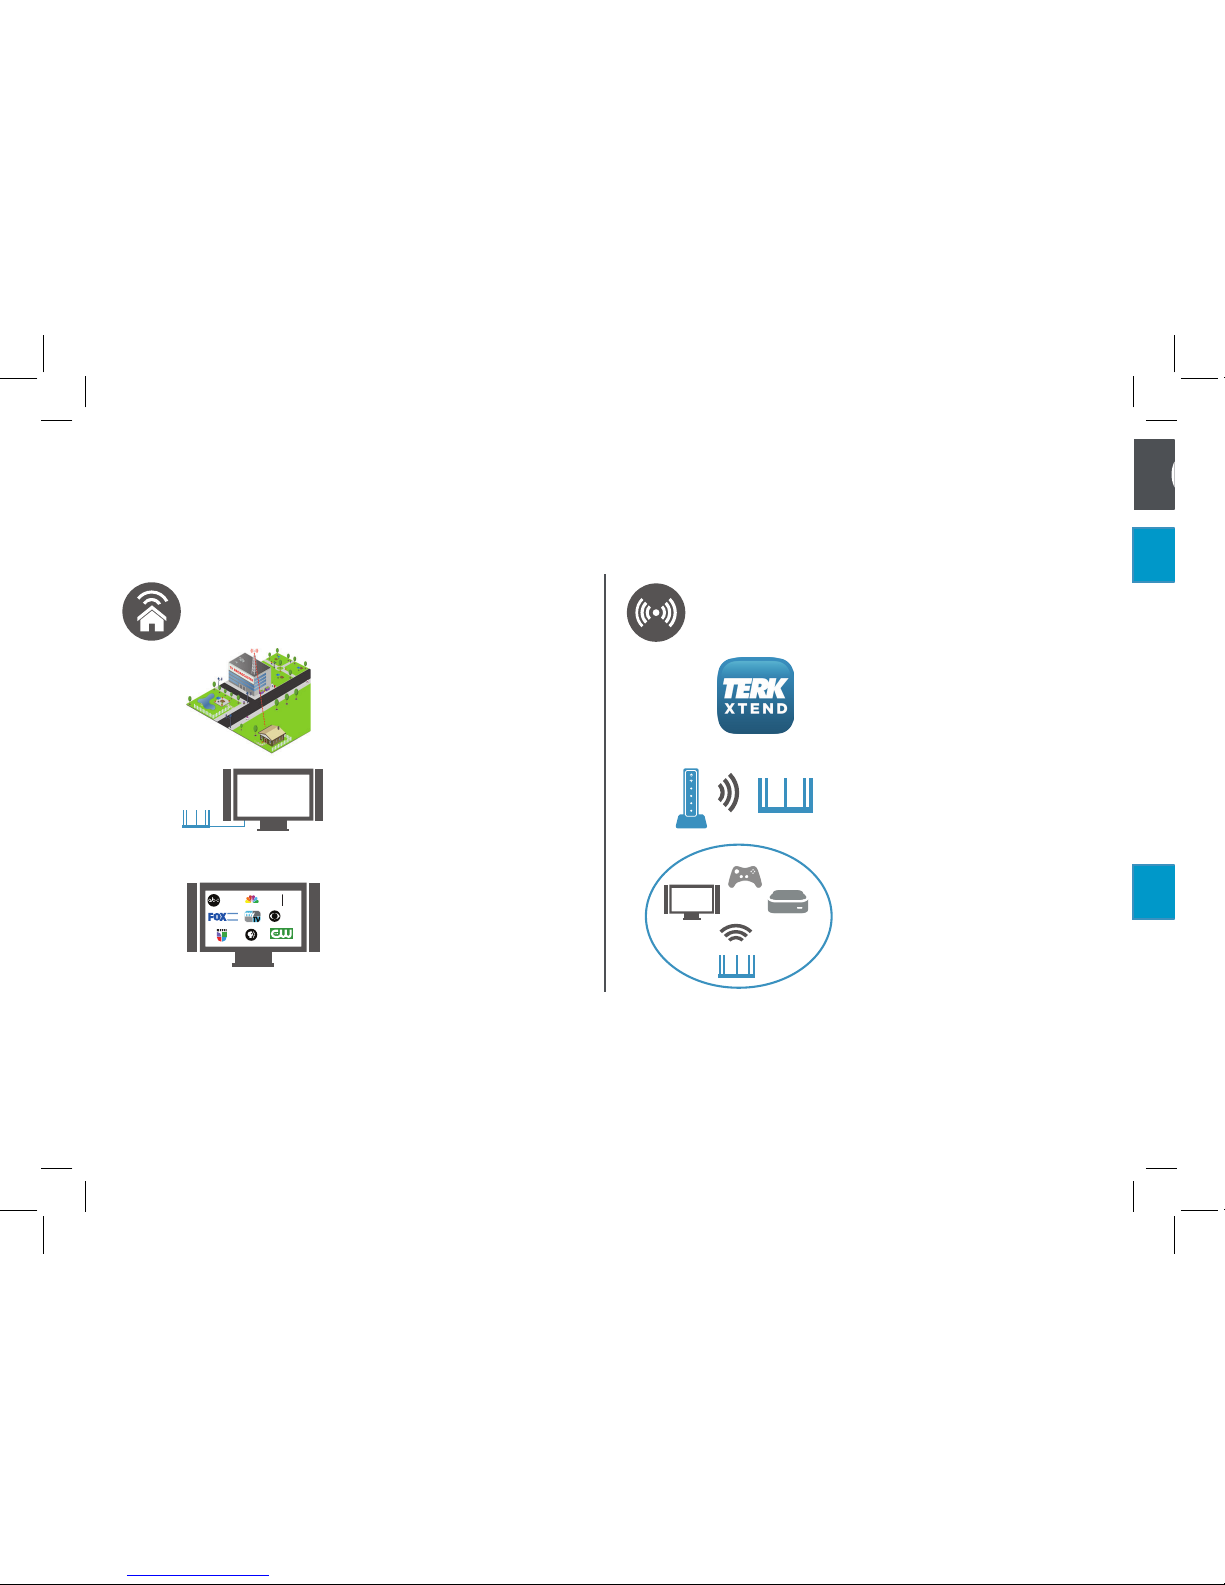
Setup is easy!
Getting up and running with the Trinity Xtend has two parts.
1
2
Download the TERK
XTEND App on your
phone or tablet.
HDTV ANTENNA SETUP
(for free local HDTV)
WIFI EXTENDER SETUP
(for better Wi-Fi coverage around the Xtend)
Find the best place
for the Xtend.
Connect the Xtend to
your TV.
Scan for channels...
and enjoy free HDTV!
HD
HD
HD
NBC
HD
Use the XTEND App to
connect the Xtend to
your WiFi network.
HD
HD
HD
NBC
HD
Switch your streaming
devices to the Xtend’s
network...and enjoy
better Wi-Fi coverage
for your streaming
devices.
Page 3
3
TV antennas perform best when facing the direction of
the broadcaster’s tower.
For help finding your local broadcast towers, go to
www.TERK.com
Antenna Placement Tips
Avoid metal surfaces (like a metal stand).
Move the antenna close to or in a window.
Position the antenna as high as possible.
Place the antenna.
Place the antenna on a flat surface next to your TV, facing the direction where most of
your broadcast towers are located.
Alternate Mounting Option
This antenna can be mounted to a wall as well. To mount this antenna to a wall: Install the included wallmount screws (and anchors, if needed) where desired. Align the keyholes on the bottom of the antenna with
wall-mounted screws, then lock the antenna into place.
Find the best location for your antenna.
1
HD ANTENNA SETUP
2
Page 4
4
IMPORTANT: Make sure your TV is turned off.
Raise the five elements to their upright position for
best performance.
For wall-mounting, raise the five antenna elements to their
full 180-degree position.
Raise the antenna’s five elements.
Connect the antenna’s coaxial cable to your TV.
HD ANTENNA SETUP
(continued)
Amplifier
TV or
convert
er
box
(back)
ANTENNA
IN
3
Side view
4
5
6
Page 5
5
Plug in the antenna’s power cord to a power outlet.
Most TVs have a channel scan option in their menu system, many times in a SETUP or
CHANNEL menu under ANTENNA. For detailed instructions on performing a channel
scan, see the owner’s manual that came with your TV.
Scan for channels on your TV.
IMPORTANT: For some channels you might get better performance with the Trinity Xtend antenna in
a different position or facing a different direction. Sometimes just a little bit of adjustment can make a
difference!
HD ANTENNA SETUP (continued)
The Trinity Xtend’s POWER light
illuminates to show that the Xtend is on.
Amplifier
TIP: The AMP / BYPASS switch lets you turn the amplifier for TV signals
on (AMP) or off (BYPASS). Most TV channels will perform better
with this switch left in the AMP position. However, if a channel is not
providing the performance you expect, try watching it with this switch
in the BYPASS position to see if that makes a difference.
5
6
Page 6
6
Download the TERK XTEND App on your phone or tablet.
WIFI EXTENDER SETUP with the APP
1
2
IMPORTANT: The Terk Xtend WiFi Extender can also be set up via
web browser. See the WIFI EXTENDER SETUP with Computer section
on page 14 for more information.
In the Google Play or Apple App Stores, search for “TERK XTEND” and
look for the icon shown here. Then download and install the App.
Note: If you have a QR code reader on your phone or tablet, you can also go directly
to the App using the QR codes on the bottom of the Xtend.
IMPORTANT: Screenshots are for illustration purposes only—
your phone/tablet’s screens might look different.
Page 7

7
ANDROI D
Wi-Fi Name (SSID): XTN-000000
Web browser link: http://192.168.168.1/
User Name: admin Password: admin
Wi-Fi Password: 12345678
iOS
Connect your phone or tablet to the Terk Xtend.
Go to the WiFi connections menu on
your phone or tablet (in the Settings
menu).
Look at the Wi-Fi Name (SSID) listed
on the bottom of the TERK XTEND.
Find that network listed in the list of
WiFi connection options on your phone
or tablet. Choose that SSID to connect
to it.
Enter the password listed on the
bottom of the Xtend when prompted.
Please note that the password is case-
sensitive.
WIFI EXTENDER SETUP with the APP (continued)
2
Bottom of the
Terk Xtend
iPhone menuAndroid menu
IMPORTANT: Screenshots are for illustration purposes only—
your phone/tablet’s screens might look different.
Page 8
8
WIFI EXTENDER SETUP with the APP (continued)
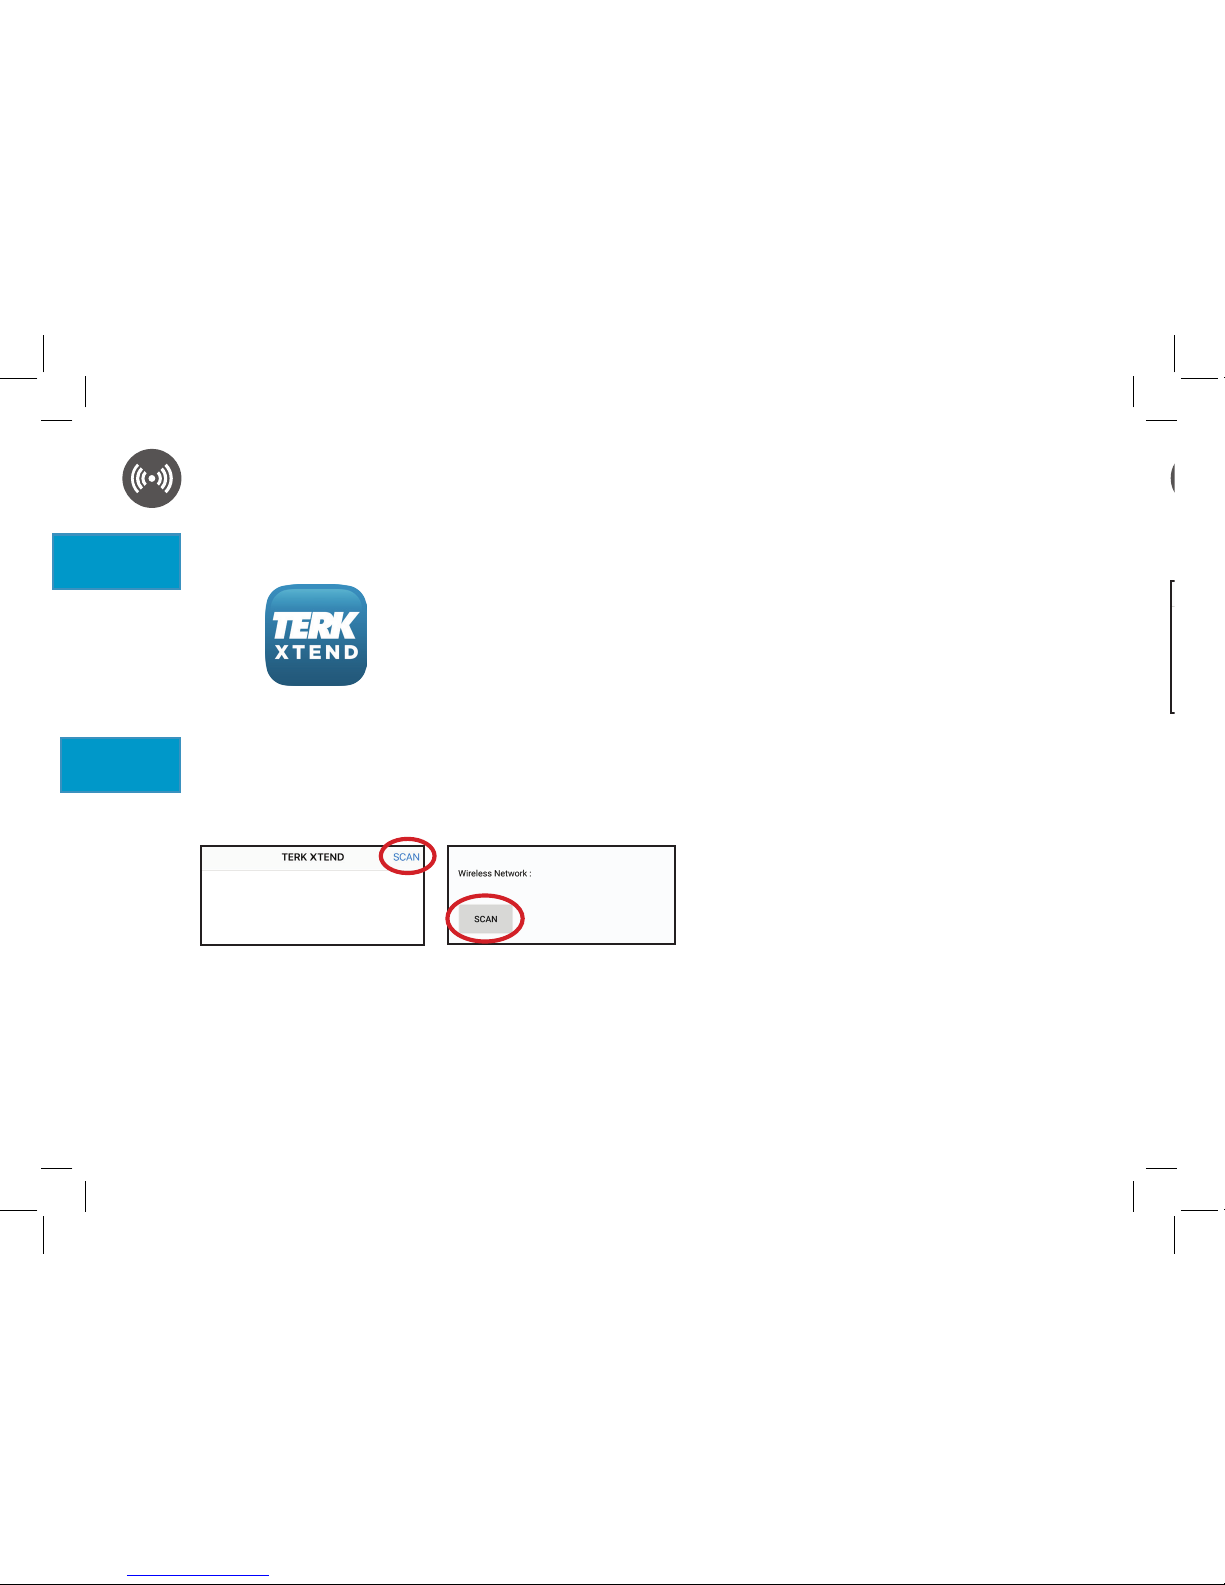
Connect the Terk Xtend to your network.
In the first screen of the TERK
XTEND App, press the SCAN
button to start scanning for
available networks.
4
Launch the TERK XTEND App on your phone or tablet.
Press on the TERK XTEND App icon to launch the App.
3
iPhone screen
Android screen
IMPORTANT: Screenshots are for illustration purposes
only—your phone/tablet’s screens might look different.
IMPORTANT: Screenshots are for illustration purposes
only—your phone/tablet’s screens might look different.
Page 9

9
Find your WiFi network in the list and
select it.
WHAT IF I DON’T SEE MY WIFI NETWORK?
• If your network does not broadcast its SSID,
it will show up in the list as [Hidden]. You
can enter the SSID manually by choosing the
[Hidden] option in the list and typing in the
name on the following screen.
• The Terk Xtend supports all password protection
schemes except WEP, which is a older and less
secure. Check how your Wi-Fi network appears
on your computer—if it uses WEP security, it
probably won’t appear in the XTEND App’s list.
Consider changing to a different security option.
• The Terk Xtend supports 2.4GHz 802.11 B/G/N
only. Check your wireless router to see if it is
supported.
WIFI EXTENDER SETUP with the APP (continued)
iPhone screen
Android screen
IMPORTANT: Screenshots are for illustration purposes
only—your phone/tablet’s screens might look different.
Page 10
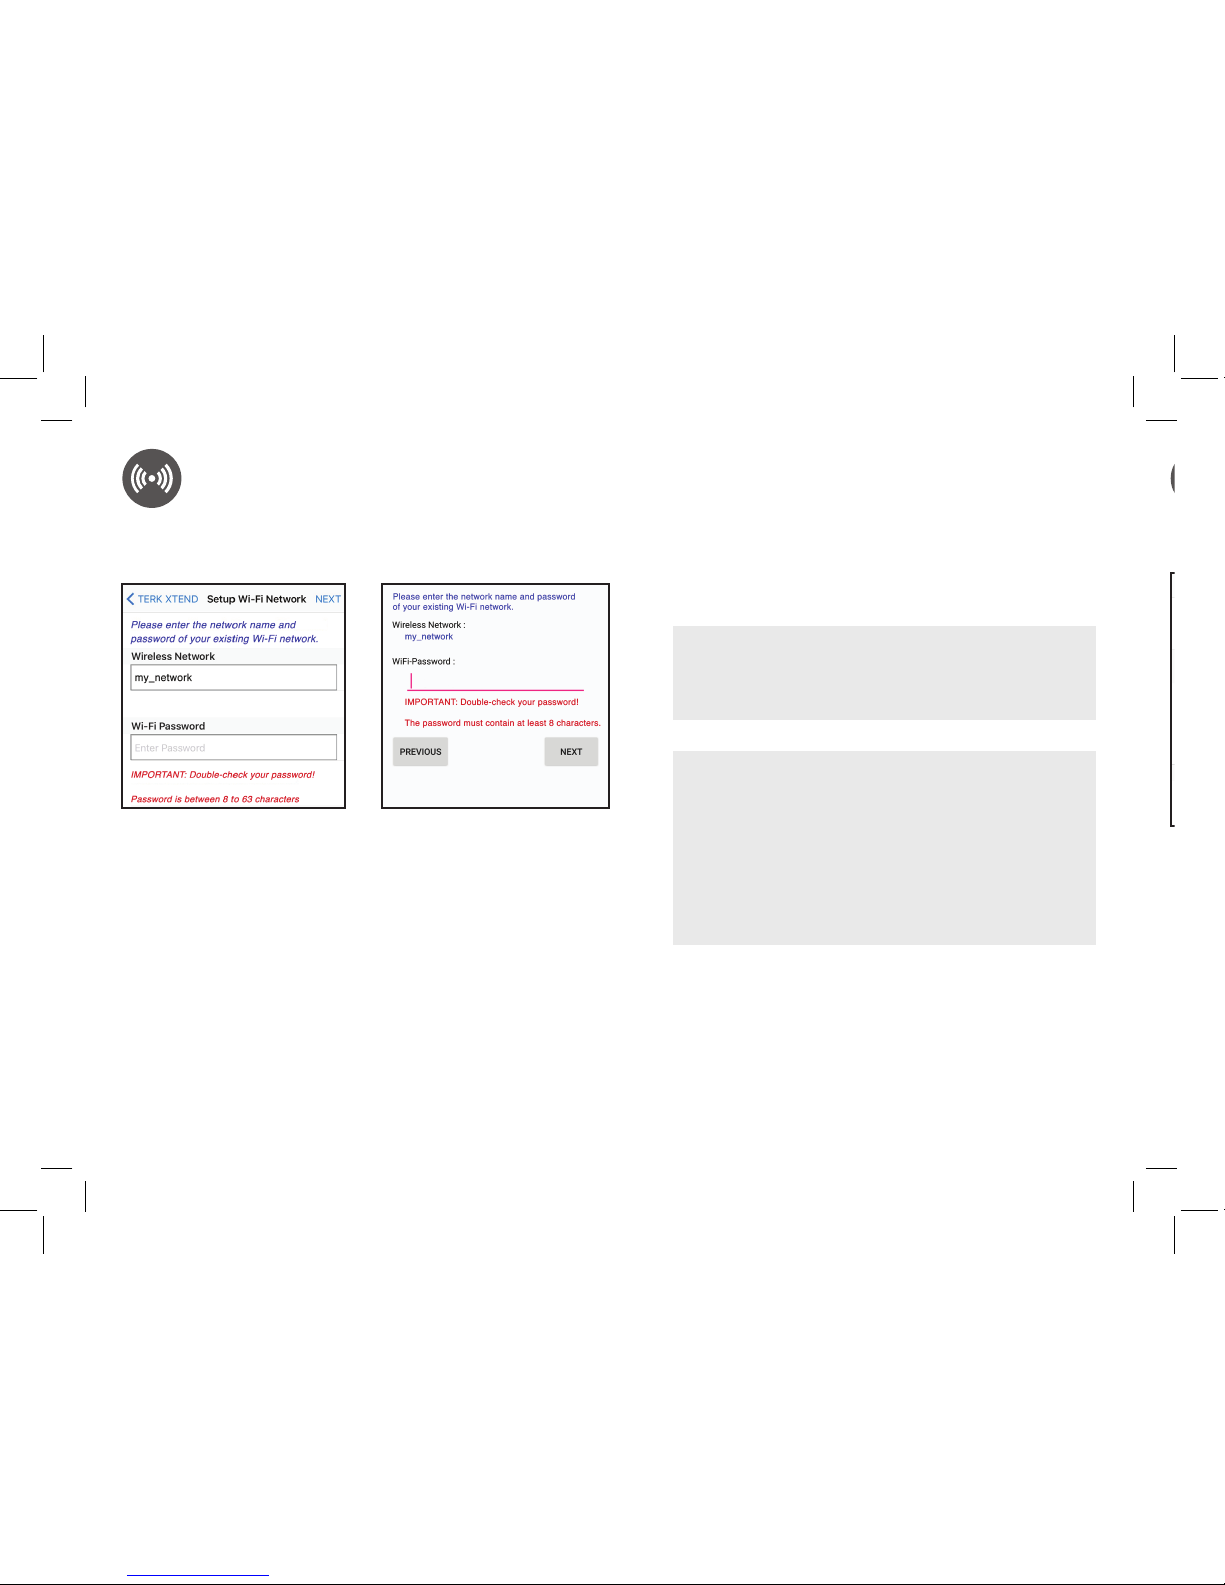
10
Enter the password for your WiFi
network when prompted. Then press the
Next button.
IMPORTANT: If you chose [Hidden] from the list
of available networks, enter the name of your
WiFi network in the SSID field on this screen
before you enter your password.
iPhone screen
Android screen
WIFI EXTENDER SETUP with the APP (continued)
IMPORTANT: Screenshots are for illustration purposes
only—your phone/tablet’s screens might look different.
DOUBLE-CHECK YOUR WIFI
NETWORK’S PASSWORD!!!
The router for your existing WiFi network won’t
tell the Xtend if the password in this step is
incorrect—it will simply not connect after the
Xtend reboots at the end of setup. So, it pays
to be extra careful entering the password in this
step!
IMPORTANT: Screenshots are for illustration purposes
only—your phone/tablet’s screens might look different.
Page 11
11
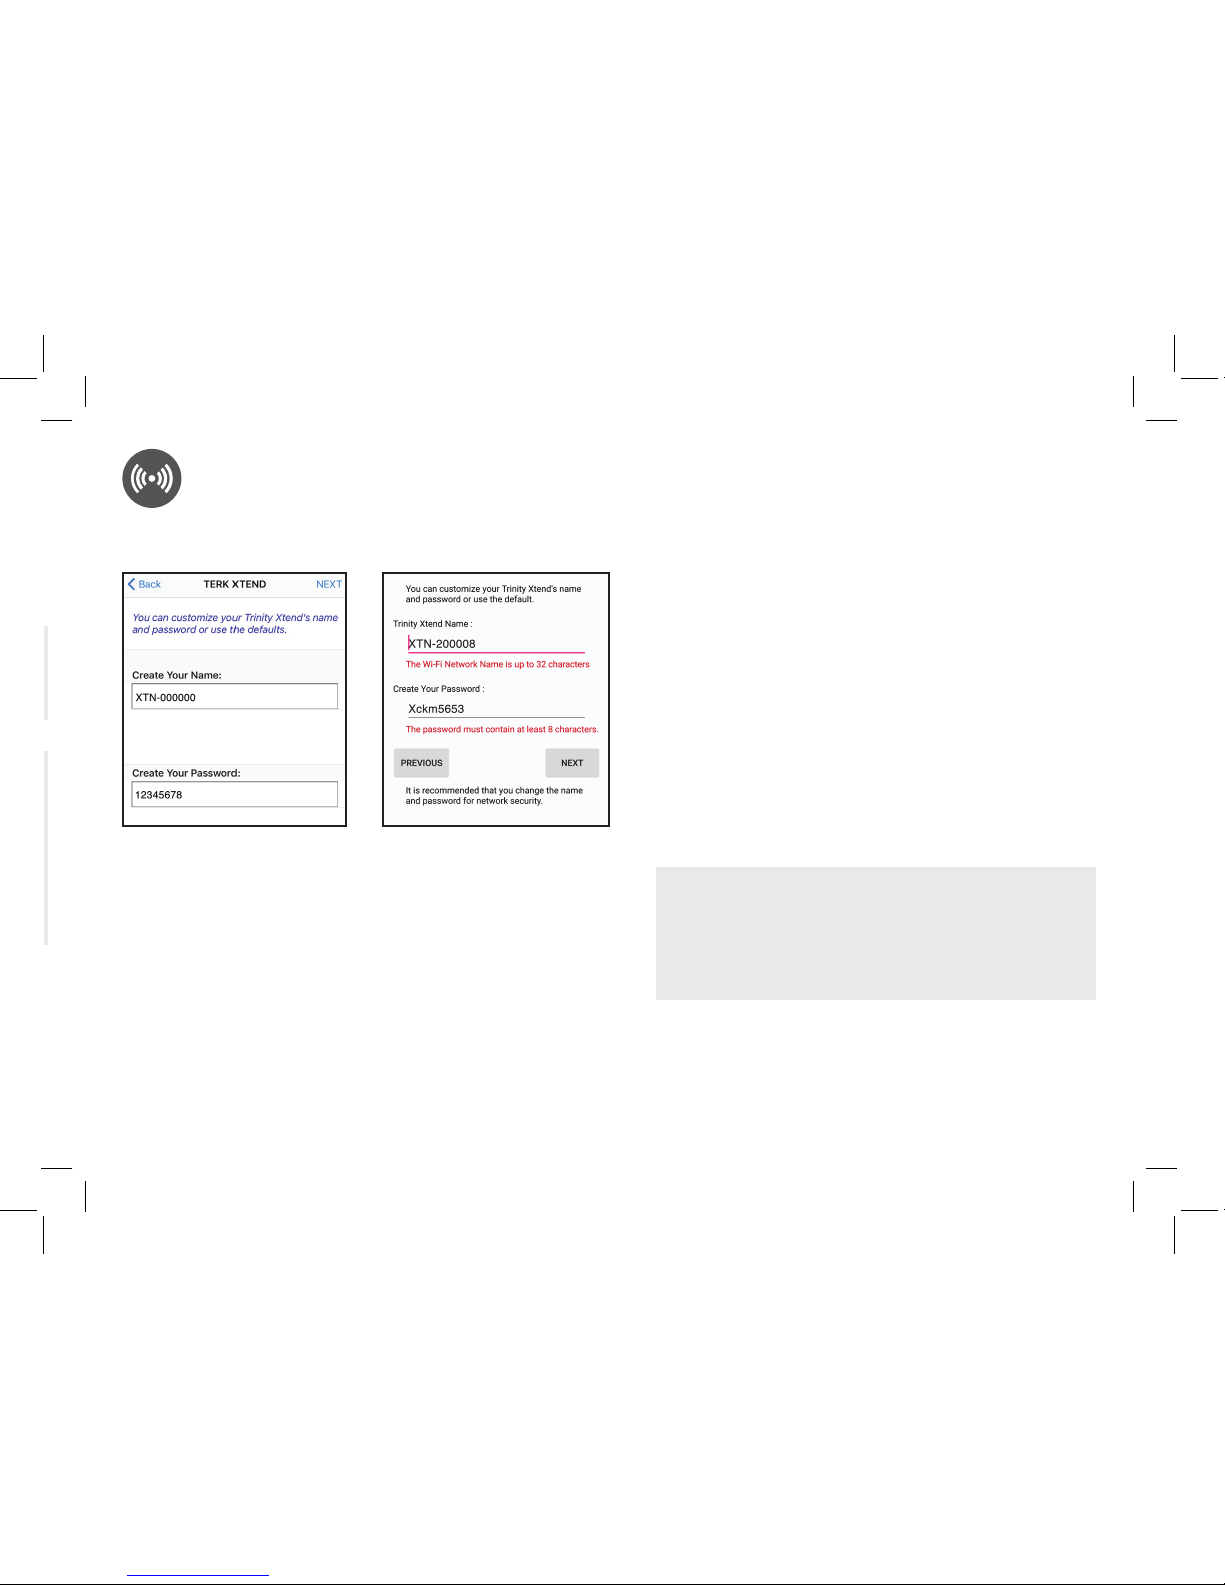
WIFI EXTENDER SETUP with the APP (continued)
The next screen lets you change the name
and password of the Xtend from what’s
listed on the bottom of the Xtend to a
name and password of your choice (like
“upstairs-xtend,” for example). This step is
optional but recommended.
Just tap on each area, delete the old name
and password, and type new ones. Then
press NEXT to continue.
Note: If you want to customize the Xtend’s name
and password later, simply go through the App
setup again later.
iPhone screen
Android screen
MAKE A NOTE
If you change your Xtend’s name and password,
make sure to make a note of it so that you don’t
forget. You’ll need this name and password to
connect your streaming devices to it!
IMPORTANT: Screenshots are for illustration purposes
only—your phone/tablet’s screens might look different.
Page 12

12
5
iPhone screen
Android screen
The final screen of the Xtend setup shows
you the name and password of your
existing Wi-Fi network and the name and
password of the Xtend. You might want to
take a screenshot of this screen for your
records.
Press FINISH when you’re ready to
continue.
The final screen confirms that you’ve
finished setup and reboots the Xtend to
apply the network settings.
WIFI EXTENDER SETUP with the APP (continued)
WAIT FOR THE XTEND TO REBOOT!
Allow a minute or so for the Trinity Xtend to restart
before you start connecting devices to it. The LINK
light on the front of the Xtend will turn solid blue
when it’s ready to accept connections from your
devices.
Page 13

13
Connect your devices to the Terk Xtend.
5
Once you’ve finished setup, wait for the Xtend to reboot with its new settings.
When the LINK light on the Xtend’s front panel turns solid blue, go into the WiFi
connection menus of the devices you want to use with the Xtend’s extended WiFi
range and choose the Xtend from the list of available devices to connect to.
IMPORTANT: You must connect to the Xtend in order to use it—otherwise, you
will still be using your existing WiFi router and you won’t get the benefits of the
extended WiFi range.
WIFI EXTENDER SETUP with the APP (continued)
What to expect...
Once you’ve connected all of the streaming devices near the Xtend to the Xtend’s
network, you’re ready to take advantage of the Xtend’s enhanced WiFi coverage.
You should notice a stronger WiFi signal, which gives your streaming devices a
better chance to perform to their full potential given then speed of the connection
from your provider!
Keep in mind, however, that the connection speed you experience in your home
depends ultimately on the speed of the Internet connection you receive from your
service provider.
Page 14

14
Top
Bottom
TOUR OF THE TRINITY XTEND
Using browser-based setup
The Terk Xtend WiFi Extender can also be set up via web browser on your computer.
1. In your computer’s WiFi connection menu, choose the Wi-Fi Name (SSID) from the bottom
sticker of the Terk Xtend. The password is also on the bottom sticker.
Give your computer a full minute to connect to this new network. You’ll see limited
connectivity.
2. Launch your web browser and enter the following URL:
http://192.168.168.1
If prompted for a user name and password, use admin for the user name and admin for the
password.
3. Follow the directions in the browser-based setup to configure the Xtend with your network.
4. When you’ve finished browser-based setup, wait for the Xtend to restart (about a minute or
so—the LINK light will turn solid blue), then connect the streaming devices you want to use
with the Xtend to the Xtend’s network.
WIFI EXTENDER SETUP with COMPUTER
Page 15

15
POWER indicator illuminates when the Trinity Xtend is
plugged in.
LINK indicator illuminates when the Xtend is linked to
your home network.
ACTIVITY indicator flashes to show that there is WiFi
activity.
RESET button returns the Xtend to its factory default
settings, clearing all of your network information.
Reception elements pick up local television broadcast
and WiFi signals.
Mounting keyholes let you mount the Xtend to a wall
using the supplied mounting hardware.
SSID and password label gives you the information
necessary to set up the Xtend with your WiFi network.
This label also has QR codes for quick access to the
XTEND App for Android or iOS devices.
Top
Bottom
Mounting
keyhole
SSID / password
label
Reception element
TOUR OF THE TRINITY XTEND
ANDROID
Wi-Fi Name (SSID): XTN-000000
Web browser link: http://192.168.168.1/
User Name: admin Password: admin
Wi-Fi Password: 12345678
SN: GMA1B2T31E0001
MAC: 70F8E7200004
iOS
Page 16

16
Amplifier
AMP / BYPASS switch lets you turn the amplifier
for TV signals on (AMP) or off (BYPASS). Most
TV channels will perform better with this switch
left in the AMP position. However, if a channel is
not providing the performance you expect, try
watching it with this switch in the BYPASS position
to see if that makes a difference.
TOUR OF THE TRINITY XTEND (continued)
Antenna Reception Problems
I’m having trouble receiving certain channels.
• There are lots of factors that can affect your reception. Tall buildings, mature trees, even hills between
you and the broadcast towers can interfere and change the direction of the signals you receive. You
might still need to make adjustments after you position the antenna to account for these factors. Any
time you change the antenna’s position, make sure you re-scan for channels on your TV or digital TV
converter box. The channels you receive may have changed.
• Is the antenna sitting on a metal surface (like a metal stand)? Move it to a non-metal surface (metal
interferes with reception).
• Try using the antenna without the amplifier. Move the switch on the Xtend’s amplifier to the BYPASS
position.
• Move the antenna close to a window. Some construction materials (such as aluminum siding) make it
more difficult to get good reception. Re-scan for channels when you’re finished.
• Position the antenna as high as possible. Most of the time, this increases your chances of reception. Re-
scan for channels when you’re finished.
• Make sure you uncoil the antenna’s cable completely. Leaving it coiled will reduce reception
performance.
TROUBLESHOOTING
Page 17

17
Antenna Reception Problems
I’m having trouble receiving certain channels.
• There are lots of factors that can affect your reception. Tall buildings, mature trees, even hills between
you and the broadcast towers can interfere and change the direction of the signals you receive. You
might still need to make adjustments after you position the antenna to account for these factors. Any
time you change the antenna’s position, make sure you re-scan for channels on your TV or digital TV
converter box. The channels you receive may have changed.
• Is the antenna sitting on a metal surface (like a metal stand)? Move it to a non-metal surface (metal
interferes with reception).
• Try using the antenna without the amplifier. Move the switch on the Xtend’s amplifier to the BYPASS
position.
• Move the antenna close to a window. Some construction materials (such as aluminum siding) make it
more difficult to get good reception. Re-scan for channels when you’re finished.
• Position the antenna as high as possible. Most of the time, this increases your chances of reception. Rescan for channels when you’re finished.
• Make sure you uncoil the antenna’s cable completely. Leaving it coiled will reduce reception
performance.
TROUBLESHOOTING
Page 18

18
WiFi Extender Problems
I don’t have an iPhone/iPad or Android phone/tablet. How can I set the Trinity Xtend up?
• The Terk Xtend WiFi Extender can also be set up via web browser. See the Using Browser-Based Setup
section on page 14 for more information.
I can’t connect my phone, tablet, or computer to the Trinity Xtend
• Make sure your phone, tablet, or computer has WiFi turned on.
• The Trinity Xtend will appear by its SSID in the list of available networks. Your Xtend’s SSID is listed on
the label on the bottom of the Xtend.
• You must enter the password listed with the SSID on the bottom of the Xtend in order to connect to
the Xtend.
I can’t connect to my WiFi network from the TRINITY XTEND App.
• Press the Scan button on the screen of the App in order to list the available networks in your area.
• If your network does not broadcast its SSID, it will show up in the list as [Hidden]. You can enter the
SSID manually by choosing the [Hidden] option in the list and typing in the name on the following
screen.
• The Terk Xtend supports all password protection schemes except WEP, which is a older and less
secure. Check how your Wi-Fi network appears on your computer—if it uses WEP security, it probably
won’t appear in the XTEND App’s list. Consider changing to a different security option.
• The Terk Xtend supports 2.4GHz 802.11 B/G/N only. Check your wireless router to see if it is supported.
TROUBLESHOOTING (continued)
My WiFi coverage and/or performance isn’t as good as I expected.
• Make sure you’ve connected each device you want to use to the Trinity Xtend, not directly to your WiFi
router. For example, if you want to use your streaming box, go to the WiFi connection settings on your
streaming box and find your Xtend’s SSID in the list of available connections (if you customized the
Xtend’s name and password, then connect to the customized name with the customized password—
otherwise, look at the label on the bottom of the Xtend for your unit’s default SSID and password).
• Use the TERK XTEND App to check the strength of the WiFi signal the Xtend is receiving from your
WiFi router. If the signal strength is less than two or three bars, you might need to move the Terk Xtend
and WiFi router closer together.
• Once you’ve connected all of your nearby devices to the Xtend, you should notice a stronger WiFi
signal, which gives your streaming devices a better chance to perform to their full potential given then
speed of the connection from your provider! Keep in mind, however, that the connection speed you
experience in your home depends ultimately on the speed of the Internet connection you receive from
your service provider.
I can’t reconnect to the Trinity Xtend.
• Make sure you haven’t automatically reconnected directly to your WiFi router. Go to the WiFi
connection settings for each of your devices and find your Xtend’s name (either the customized one
you created or the default on the bottom of the unit) in the list of available connections.
TROUBLESHOOTING (continued)
Page 19

19
My WiFi coverage and/or performance isn’t as good as I expected.
• Make sure you’ve connected each device you want to use to the Trinity Xtend, not directly to your WiFi
router. For example, if you want to use your streaming box, go to the WiFi connection settings on your
streaming box and find your Xtend’s SSID in the list of available connections (if you customized the
Xtend’s name and password, then connect to the customized name with the customized password—
otherwise, look at the label on the bottom of the Xtend for your unit’s default SSID and password).
• Use the TERK XTEND App to check the strength of the WiFi signal the Xtend is receiving from your
WiFi router. If the signal strength is less than two or three bars, you might need to move the Terk Xtend
and WiFi router closer together.
• Once you’ve connected all of your nearby devices to the Xtend, you should notice a stronger WiFi
signal, which gives your streaming devices a better chance to perform to their full potential given then
speed of the connection from your provider! Keep in mind, however, that the connection speed you
experience in your home depends ultimately on the speed of the Internet connection you receive from
your service provider.
I can’t reconnect to the Trinity Xtend.
• Make sure you haven’t automatically reconnected directly to your WiFi router. Go to the WiFi
connection settings for each of your devices and find your Xtend’s name (either the customized one
you created or the default on the bottom of the unit) in the list of available connections.
TROUBLESHOOTING (continued)
Page 20

20
QUESTIONS? We’re here to help!
Please call our toll-free help line at 1-800-768-1969 or visit TERK.com
I’m having intermittent connection problems.
• Make sure you’re connected to the Trinity Xtend, not directly to your WiFi router. Go to the WiFi
connection settings for each of your devices and find your Xtend’s name (either the customized one
you created or the default on the bottom of the unit) in the list of available connections.
• Use the TERK XTEND App to check the strength of the WiFi signal the Xtend is receiving from your
WiFi router. If the signal strength is less than two or three bars, you might need to move the Terk Xtend
and WiFi router closer together.
TROUBLESHOOTING (continued)
Page 21

21
GUÍA DE CONFIGURACIÓN
Consulte los videos de instalación en
www.TERK.com/Setup
ANTENA INTERIOR HDTV AMPLIFICADA
CON
EXTENSOR WIFI
Page 22

22
¡Es fácil de configurar!
La instalación y puesta en marcha con la Trinity Xtend tiene dos partes.
1
2
Descargue la aplicación
TERK XTEND en su
teléfono o tablet.
CONFIGURACIÓN DE LA ANTENA HDTV
(para HDTV local gratis)
CONFIGURACIÓN DEL EXTENSOR WIFI
(para una mejor cobertura Wi-Fi alrededor del Xtend)
Encuentre la mejor
ubicación para el Xtend.
Conecte el Xtend a
su TV.
¡Busque canales…
y disfrute de los
programas HDTV gratis!
HD
HD
HD
NBC
HD
Utilice la aplicación
XTEND para conectar
el Xtend a su red WiFi.
HD
HD
HD
NBC
HD
Cambie sus dispositivos
de canalización a la red
del Xtend... y disfrute
de una mejor cobertura
para sus dispositivos
de canalización.
Page 23

23
Las antenas de TV funcionan mejor cuando están orientadas
hacia la torre de radiodifusión.
Si necesita ayuda para encontrar la ubicación de las torres
de radiodifusión locales, visite www.TERK.com
Consejos para la ubicación de la antena
Evite las superficies de metal (tal como un soporte de metal).
Mueva la antena a una ventana o cerca de ella.
Coloque la antena lo más alto posible.
Coloque la antena.
Coloque la antena en una superficie plana al lado de su TV, orientada en la dirección donde se
encuentran la mayoría de las torres de radiodifusión.
Opción de montaje alterno
Esta antena también puede montarse en una pared. Para montar la antena en una pared: instale los tornillos para montaje
en pared incluidos (y anclajes, si es necesario) en el lugar deseado. Alinee los agujeros de montaje en la parte inferior de
la antena con los tornillos montados en la pared, luego fije la antena en posición.
Encuentre la mejor ubicación para su antena.
1
CONFIGURACIÓN DE LA ANTENA HD
2
Page 24

24
IMPORTANTE: Asegúrese que el TV esté apagado.
Para lograr un mejor desempeño levante los cinco
elementos a su posición vertical.
Para el montaje en pared, levante los cinco elementos de la antena a
su posición de 180 grados.
Levante los cinco elementos de la antena.
Conecte el cable coaxial de la antena a su TV.
INSTALACIÓN DE LA ANTENA HD
(continuación)
Amplifier
TV or
converter
box
(back)
ANTENNA
IN
3
Vista lateral
4
5
6
Amplificador
TV o
convertidor
(parte
posterior)
Page 25

25
Enchufe el cordón de alimentación de la antena en un tomacorriente.
La mayoría de televisores tienen una opción para buscar canales en el sistema de menús,
frecuentemente como un menú de configuración o lista de canales bajo la función de antena.
Para obtener instrucciones detalladas sobre cómo llevar a cabo una búsqueda de canales,
consulte el manual del propietario incluido con el TV.
Busque canales en su TV.
IMPORTANTE: Para algunos canales es posible que pueda obtener un mejor desempeño con la antena Trinity Xtend en
una posición diferente u orientada en una dirección diferente. ¡A veces un ajuste pequeño es todo lo que se necesita!
CONFIGURACIÓN DE LA ANTENA HD (continuación)
La luz POWER del Trinity Xtend se ilumina
para mostrar que el Xtend está encendido.
Amplificador
CONSEJO: El interruptor AMP / BYPASS le permite activar la función de
amplificación de las señales de TV (AMP) o desactivar la misma (BYPASS)
en el amplificador. La mayoría de los canales de TV funcionarán mejor con este
interruptor en la posición AMP. Sin embargo, si un canal no funciona en la forma
esperada, intente verlo con el interruptor en la posición BYPASS para ver si hay
alguna diferencia.
5
6
Page 26

26
Descargue la aplicación TERK XTEND en su teléfono o tablet.
CONFIGURACIÓN DEL EXTENSOR WIFI con la aplicación
1
2
IMPORTANTE: El extensor WiFi Terk Xtend también puede configurarse vía un
navegador web. Consulte la sección CONFIGURACIÓN DEL EXTENSOR WIFI
con una computadora en la página 34 para obtener más información.
En las tiendas Google Play o Apple App, busque “TERK XTEND” y el icono
mostrado aquí. Luego, descargue e instale la aplicación.
Aviso: Si usted tiene un lector de código de Respuesta Rápida (QR) en su teléfono o tablet,
también puede ir directamente a la aplicación usando los códigos QR indicados en la parte
inferior del Xtend.
IMPORTANTE: Las imágenes de pantalla son para propósitos
de ilustración solamente— las pantallas de su teléfono o
tablet podrían ser diferentes.
Page 27

27
ANDROI D
Wi-Fi Name (SSID): XTN-000000
Web browser link: http://192.168.168.1/
User Name: admin Password: admin
Wi-Fi Password: 12345678
iOS
Conecte su teléfono o tablet al Terk Xtend.
Acceda al menú de conexiones WiFi en
su teléfono o tablet, en el menú Settings
(Ajustes).
Fíjese en el Nombre WiFi (SSID, código
identificador) indicado en la parte inferior
del TERK XTEND. Busque esa red en la
lista de opciones de conexión WiFi en
su teléfono o tablet. Elija ese SSID para
conectar a él.
Introduzca la contraseña indicada en
la parte inferior del Xtend cuando se le
pida. Tenga en cuenta que la contraseña
distingue entre mayúsculas y minúsculas.
CONFIGURACIÓN DEL EXTENSOR WIFI con la aplicación (continuación)
2
Parte inferior del
Terk Xtend
Menú iPhoneMenú Android
IMPORTANTE: Las imágenes de pantalla son para propósitos
de ilustración solamente— las pantallas de su teléfono o
tablet podrían ser diferentes.
Page 28

28
CONFIGURACIÓN DEL EXTENSOR WIFI con la aplicación (continuación)
Conecte el Terk Xtend a su red.
En la primera pantalla de la aplicación
TERK XTEND, oprima el botón SCAN
(Buscar) para comenzar a buscar
redes disponibles.
4
Inicie la aplicación TERK XTEND en su teléfono o tablet.
Oprima el icono de la aplicación TERK XTEND para iniciar la aplicación.
3
Menú iPhone
Menú Android
IMPORTANTE: Las imágenes de pantalla son para propósitos
de ilustración solamente— las pantallas de su teléfono o
tablet podrían ser diferentes.
IMPORTANTE: Las imágenes de pantalla son para propósitos
de ilustración solamente— las pantallas de su teléfono o
tablet podrían ser diferentes.
Page 29

29
Encuentre su red WiFi en la lista
y selecciónela.
¿QUÉ HAGO SI NO VEO MI RED WIFI?
• Si su red no retransmite su SSID, aparecerá en la
lista como oculta [Hidden]. Usted puede introducir
manualmente el SSID, para lo cual deberá elegir la
opción [Hidden] en la lista e ingresar el nombre
en la siguiente pantalla.
• El Terk Xtend es compatible con todos los esquemas
de protección de contraseña excepto WEP (Privacidad
Equivalente a Cableado), el cual es más antiguo y
menos seguro. Verifique cómo aparece su red Wi-Fi
en su computadora—si utiliza la seguridad WEP,
probablemente no aparecerá en la lista de la aplicación
XTEND. Considere cambiar a una opción de seguridad
diferente.
• El Terk Xtend es compatible con 2.4GHz 802.11 B/G/N
únicamente. Verifique su enrutador inalámbrico para
ver si es compatible.
CONFIGURACIÓN DEL EXTENSOR WIFI con la aplicación (continuación)
Menú iPhone
Menú Android
IMPORTANTE: Las imágenes de pantalla son para propósitos
de ilustración solamente— las pantallas de su teléfono o
tablet podrían ser diferentes.
Page 30

30
Introduzca la contraseña para su red WiFi
cuando se le pida. Luego oprima el botón
Next (Siguiente).
IMPORTANTE: Si selecciona [Hidden] en la lista de
redes disponibles, introduzca el nombre de su red WiFi
en el campo SSID en esta pantalla antes de introducir
la contraseña.
Menú iPhone
Menú Android
IMPORTANTE: Las imágenes de pantalla son para propósitos
de ilustración solamente— las pantallas de su teléfono o
tablet podrían ser diferentes.
¡VERIFIQUE NUEVAMENTE LA
CONTRASEÑA DE SU RED WIFI!
El enrutador para su red WIFI existente no le avisará
al Xtend si la contraseña en este paso es incorrecta—
el enrutador sencillamente no conectará después de
que el Xtend se reinicie al finalizar la configuración
Asi que, ¡tenga mucho cuidado al introducir la
contraseña en este paso!
IMPORTANTE: Las imágenes de pantalla son para propósitos
de ilustración solamente— las pantallas de su teléfono o
tablet podrían ser diferentes.
CONFIGURACIÓN DEL EXTENSOR WIFI con la aplicación (continuación)
Page 31

31
La siguiente pantalla le permite cambiar
el nombre y la contraseña del Xtend con
respecto a lo que aparece indicado en la
parte inferior del Xtend a un nombre y
contraseña elegidos por usted (como por
ejemplo: “xtend-primer piso”). Este paso
es opcional, pero se recomienda hacerlo.
Sencillamente toque en cada área, borre el
nombre y la contraseña antiguos, y escriba
un nombre y contraseña nuevos. Luego,
pulse NEXT (Siguiente) para continuar.
Aviso: Si posteriormente desea personalizar el nombre y
la contraseña del Xtend, sencillamente repita el proceso
de configuración de la aplicación posteriormente.
Menú iPhone
Menú Android
TOME NOTA
Si usted cambia el nombre y la contraseña de su Xtend,
asegúrese de anotarlos para no olvidarlos. ¡Usted
necesitará ese nombre y esa contraseña para conectar
sus dispositivos de canalización al Xtend!
IMPORTANTE: Las imágenes de pantalla son para propósitos
de ilustración solamente— las pantallas de su teléfono o
tablet podrían ser diferentes.
CONFIGURACIÓN DEL EXTENSOR WIFI con la aplicación (continuación)
Page 32

32
5
Menú iPhone
Menú Android
La pantalla final de configuración del Xtend
le muestra el nombre y la contraseña de su red
Wi-Fi existente, y el nombre y la contraseña
del Xtend. Si lo desea, usted puede capturar
esta pantalla para sus registros.
Oprima FINISH (Finalizar) cuando esté listo
para continuar.
La pantalla final confirma que usted ha
finalizado la configuración y reinicia el
Xtend para aplicar los ajustes de red.
¡ESPERE HASTA QUE EL XTEND SE REINICIE!
Permita aproximadamente un minuto para que el Trinity
Xtend se reinicie antes de comenzar a conectar dispositivos
a él. La luz LINK (Enlazar) en la parte delantera del Xtend se
tornará azul continuo cuando el Xtend esté listo para aceptar
conexiones de sus dispositivos.
CONFIGURACIÓN DEL EXTENSOR WIFI con la aplicación (continuación)
Page 33

33
Conecte sus dispositivos al Terk Xtend.
5
Una vez que haya finalizado la configuración, espere para que el Xtend se reinicie con sus
nuevos ajustes.
Cuando la luz LINK (Enlazar) en el panel frontal del Xtend se torne azul continuo, vaya a los
menús de conexión WiFi de los dispositivos que usted quiere usar con el alcance WiFi extendido
del Xtend y elija el Xtend en la lista de dispositivos disponibles a los que conectar.
IMPORTANTE: Usted debe conectarse con el Xtend para poder utilizarlo—de lo contrario,
aún seguirá usando su enrutador WiFi existente y no obtendrá los beneficios del alcance
WiFi extendido.
Qué esperar…
Una vez que haya conectado todos los dispositivos de canalización situados cerca del
Xtend a la red del Xtend, estará listo para aprovechar la cobertura WiFi mejorada del Xtend.
¡Usted observará una señal WiFi más potente, lo cual brinda a sus dispositivos de canalización
una mejor probabilidad de funcionar a su pleno potencial con la velocidad de conexión
suministrada por su proveedor!
Sin embargo, tenga en cuenta que la velocidad de conexión que usted experimente en su
hogar depende en último término de la velocidad de conexión a la red internet que usted
reciba de su proveedor de servicio internet.
CONFIGURACIÓN DEL EXTENSOR WIFI con la aplicación (continuación)
Page 34

34
Parte superior
Parte inferior
RECORRIDO DEL TRINITY XTEND
Uso de un navegador para la configuración
El extensor WiFi Terk Xtend también puede configurarse vía un navegador en su computadora.
1. En el menú de conexiones WiFi de su computadora, elija el Nombre Wi-Fi (SSID) indicado en la
etiqueta en la parte inferior del Terk Xtend. La contraseña también está en la etiqueta inferior.
Espere un minuto para que su computadora se conecte a esta nueva red. Usted percibirá una
conectividad limitada.
2. Inicie su navegador web e introduzca el siguiente URL (dirección de internet):
http://192.168.168.1
Si se le pide un nombre de usuario y contraseña, utilice admin para el nombre de usuario y admin
para la contraseña.
3. Siga las instrucciones de configuración por navegador para configurar el Xtend con su red.
4. Una vez que haya finalizado la configuración por navegador, espere hasta que el Xtend se reinicie
(aproximadamente un minuto—la luz LINK (Enlazar) se tornará azul continuo), luego conecte los
dispositivos de canalización que usted quiera usar con el Xtend en la red del Xtend.
CONFIGURACIÓN DEL EXTENSOR WIFI con una COMPUTADORA
Page 35

35
POWER – el indicador de POTENCIA se ilumina cuando el
Trinity Xtend está enchufado.
LINK – el indicador de ENLACE se ilumina cuando el Xtend
está enlazado o conectado con la red de su casa.
ACTIVITY – el indicador de ACTIVIDAD destella para mostrar
que hay actividad WiFi.
RESET – el botón de REPOSICIÓN retorna el Xtend a
sus ajustes predeterminados de fábrica, y borra toda la
información de red.
Elementos de recepción – éstos captan las señales de
radiodifusión televisiva y WiFi locales.
Agujeros de montaje – le permiten montar el Xtend en
una pared usando la tornilllería de montaje suministrada.
Etiqueta de SSID y contraseña – le brinda la información
necesaria para configurar el Xtend con su red WiFi.
Esta etiqueta también tiene los códigos QR para acceder
rápidamente a la aplicación XTEND para dispositivos
con sistemas operativos Android o iOS.
Parte superior
Parte inferior
Agujero de
montaje
Etiqueta de
SSID / contraseña
Elemento de recepción
RECORRIDO DEL TRINITY XTEND
ANDROID
Wi-Fi Name (SSID): XTN-000000
Web browser link: http://192.168.168.1/
User Name: admin Password: admin
Wi-Fi Password: 12345678
SN: GMA1B2T31E0001
MAC: 70F8E7200004
iOS
Page 36

36
Amplificador
AMP / BYPASS – este interruptor le permite activar
la función de amplificación de las señales de TV (AMP)
o desactivar la misma (BYPASS) en el amplificador.
La mayoría de los canales de TV funcionaran mejor
cuando se deja este interruptor en la posición AMP.
Sin embargo, si un canal no funciona en la forma
esperada, intente verlo con el interruptor en la
posición BYPASS para ver si hay alguna diferencia.
RECORRIDO DEL TRINITY XTEND (continuación)
Problemas de recepción de la antena
Tengo problemas con la recepción de ciertos canales.
• Son muchos los factores que pueden afectar la recepción. Los edificios altos, los árboles maduros e
incluso las colinas que hay entre su vivienda y las torres de transmisión pueden interferir y cambiar la
dirección de las señales que usted recibe. Es posible que tenga que realizar ajustes después de situar la
antena para compensar estos factores. Siempre que cambie la antena de posición, asegúrese de volver
a buscar canales en el TV o convertidor de TV digital. Los canales que recibe podrían haber cambiado.
• ¿Se encuentra la antena colocada sobre una superficie de metal (tal como un soporte de metal)?
Muévala a una superficie no metálica (el metal interfiere con la recepción).
• Intente utilizar la antena sin el amplificador. Mueva el interruptor en el amplificador del Xtend a la
posición BYPASS.
• Coloque la antena cerca de una ventana. Algunos materiales de construcción (tal como los desviaderos
de aluminio) impiden obtener una buena recepción. Vuelva a buscar canales cuando finalice.
• Coloque la antena lo más alto posible. La mayor parte de las veces, esto aumenta las posibilidades
de obtener una buena recepción. Vuelva a buscar canales cuando finalice.
• Asegúrese de desenrollar completamente el cable de la antena. Un cable enrollado afectará la
calidad de la recepción.
RESOLUCIÓN DE PROBLEMAS
Page 37

37
Problemas de recepción de la antena
Tengo problemas con la recepción de ciertos canales.
• Son muchos los factores que pueden afectar la recepción. Los edificios altos, los árboles maduros e
incluso las colinas que hay entre su vivienda y las torres de transmisión pueden interferir y cambiar la
dirección de las señales que usted recibe. Es posible que tenga que realizar ajustes después de situar la
antena para compensar estos factores. Siempre que cambie la antena de posición, asegúrese de volver
a buscar canales en el TV o convertidor de TV digital. Los canales que recibe podrían haber cambiado.
• ¿Se encuentra la antena colocada sobre una superficie de metal (tal como un soporte de metal)?
Muévala a una superficie no metálica (el metal interfiere con la recepción).
• Intente utilizar la antena sin el amplificador. Mueva el interruptor en el amplificador del Xtend a la
posición BYPASS.
• Coloque la antena cerca de una ventana. Algunos materiales de construcción (tal como los desviaderos
de aluminio) impiden obtener una buena recepción. Vuelva a buscar canales cuando finalice.
• Coloque la antena lo más alto posible. La mayor parte de las veces, esto aumenta las posibilidades
de obtener una buena recepción. Vuelva a buscar canales cuando finalice.
• Asegúrese de desenrollar completamente el cable de la antena. Un cable enrollado afectará la
calidad de la recepción.
RESOLUCIÓN DE PROBLEMAS
Page 38

38
Problemas del extensor WiFi
No tengo un teléfono o tablet iPhone/iPad o Android. ¿Cómo puedo configurar el Trinity Xtend?
• El extensor WiFi Terk Xtend también puede configurarse vía un navegador web. Consulte la sección Uso de
un navegador para la configuración en la página 34 para obtener más información.
No puedo conectar mi teléfono, tablet o computadora con el Trinity Xtend.
• Cerciórese de que el WiFi esté activado en su teléfono, tablet o computadora.
• El Trinity Xtend aparecerá por su SSID en la lista de redes disponibles. El SSID de su Xtend está indicado en
la etiqueta en la parte inferior del Xtend.
• Usted debe introducir la contraseña indicada con el SSID en la parte inferior del Xtend para poder conectar con el Xtend.
No puedo conectar con mi red WiFi a través de la aplicación TRINITY XTEND.
• Oprima el botón Scan (Buscar) en la pantalla de la aplicación para poder ver las redes disponibles en su área.
• Si su red no retransmite su SSID, aparecerá en la lista como oculta [Hidden]. Usted puede introducir manualmente
el SSID, para lo cual deberá elegir la opción [Hidden] en la lista e ingresar el nombre en la siguiente pantalla.
• El Terk Xtend es compatible con todos los esquemas de protección de contraseña excepto WEP (Privacidad
Equivalente a Cableado), el cual es más antiguo y menos seguro. Verifique cómo aparece su red Wi-Fi en su
computadora—si utiliza la seguridad WEP, probablemente no aparecerá en la lista de la aplicación XTEND.
Considere cambiar a una opción de seguridad diferente.
• El Terk Xtend es compatible con 2.4GHz 802.11 B/G/N únicamente. Verifique su enrutador inalámbrico para ver
si es compatible.
La cobertura de mi WiFi y/o su desempeño no son tan buenos como esperaba.
• Asegúrese de que haya conectado todos los dispositivos que usted quiere usar al Trinity Xtend, no directamente
al enrutador WiFi. Por ejemplo, si quiere usar su aparato canalizador, acceda a los ajustes de conexión WiFi en
su aparato canalizador y busque el SSID del Xtend en la lista de conexiones disponibles (si usted personalizó
el nombre y la contraseña del Xtend, entonces conecte a ese nombre personalizado con la contraseña
personalizada—de lo contrario, fíjese en la etiqueta en la parte inferior del Xtend para obtener el SSID y
la contraseña predeterminados de la unidad).
RESOLUCIÓN DE PROBLEMAS (continuación)
• Use la aplicación TERK XTEND para verificar la intensidad de la señal WiFi que está recibiendo el Xtend proveniente
de su enrutador WiFi. Si la intensidad de la señal es menos de dos o tres barras, quizá tenga que acercar el Terk
Xtend y el enrutador WiFi uno al otro.
• Una vez que haya conectado todos los dispositivos cercanos al Xtend, ¡usted observará una señal WiFi más potente,
lo cual brinda a sus dispositivos de canalización una mejor probabilidad de funcionar a su pleno potencial con la
velocidad de conexión suministrada por su proveedor! Sin embargo, tenga en cuenta que la velocidad de conexión
que usted experimente en su hogar depende en último término de la velocidad de conexión a la red internet que
usted reciba de su proveedor de servicio internet.
No puedo volver a conectar con el Trinity Xtend.
• Asegúrese que no haya reconectado directamente en forma automática con el enrutador WiFi. Acceda a los
ajustes de conexión WiFi para cada uno de sus dispositivos y busque el nombre de su Xtend (ya sea el nombre
personalizado que usted creó o el nombre predeterminado que está en la parte inferior de la unidad) en la lista
de conexiones disponibles.
Tengo problemas de conexión intermitente.
• Asegúrese que esté conectado con el Trinity Xtend, no directamente al enrutador WiFi. Acceda a los ajustes de
conexión WiFi para cada uno de sus dispositivos y busque el nombre de su Xtend (ya sea el nombre personalizado
que usted creó o el nombre predeterminado que está en la parte inferior de la unidad) en la lista de conexiones
disponibles.
• Use la aplicación TERK XTEND para verificar la intensidad de la señal WiFi que está recibiendo el Xtend proveniente
de su enrutador WiFi. Si la intensidad de la señal es menos de dos o tres barras, quizá tenga que acercar el Terk
Xtend y el enrutador WiFi uno al otro.
RESOLUCIÓN DE PROBLEMAS (continuación)
¿PREGUNTAS? ¡Estamos aquí para ayudarle!
Llame a nuestra línea de ayuda libre de cargo al 1-800-768-1969 o
visite TERK.com
Page 39

39
• Use la aplicación TERK XTEND para verificar la intensidad de la señal WiFi que está recibiendo el Xtend proveniente
de su enrutador WiFi. Si la intensidad de la señal es menos de dos o tres barras, quizá tenga que acercar el Terk
Xtend y el enrutador WiFi uno al otro.
• Una vez que haya conectado todos los dispositivos cercanos al Xtend, ¡usted observará una señal WiFi más potente,
lo cual brinda a sus dispositivos de canalización una mejor probabilidad de funcionar a su pleno potencial con la
velocidad de conexión suministrada por su proveedor! Sin embargo, tenga en cuenta que la velocidad de conexión
que usted experimente en su hogar depende en último término de la velocidad de conexión a la red internet que
usted reciba de su proveedor de servicio internet.
No puedo volver a conectar con el Trinity Xtend.
• Asegúrese que no haya reconectado directamente en forma automática con el enrutador WiFi. Acceda a los
ajustes de conexión WiFi para cada uno de sus dispositivos y busque el nombre de su Xtend (ya sea el nombre
personalizado que usted creó o el nombre predeterminado que está en la parte inferior de la unidad) en la lista
de conexiones disponibles.
Tengo problemas de conexión intermitente.
• Asegúrese que esté conectado con el Trinity Xtend, no directamente al enrutador WiFi. Acceda a los ajustes de
conexión WiFi para cada uno de sus dispositivos y busque el nombre de su Xtend (ya sea el nombre personalizado
que usted creó o el nombre predeterminado que está en la parte inferior de la unidad) en la lista de conexiones
disponibles.
• Use la aplicación TERK XTEND para verificar la intensidad de la señal WiFi que está recibiendo el Xtend proveniente
de su enrutador WiFi. Si la intensidad de la señal es menos de dos o tres barras, quizá tenga que acercar el Terk
Xtend y el enrutador WiFi uno al otro.
RESOLUCIÓN DE PROBLEMAS (continuación)
¿PREGUNTAS? ¡Estamos aquí para ayudarle!
Llame a nuestra línea de ayuda libre de cargo al 1-800-768-1969 o
visite TERK.com
Page 40

© 2016 Voxx Accessories Corp.
3502 Woodview Trace, Suite 220
Indianapolis, IN 46268
Trademark(s)® Registered
Marcas comerciales registradas®
QUESTIONS? We’re here to help!
Please call our toll-free help line at 1-800-768-1969 or visit TERK.com
¿PREGUNTAS? ¡Estamos aquí para ayudarle!
Llame a nuestra línea de ayuda libre de cargo al 1-800-768-1969 o
visite TERK.com
TRINITYXTN IB 03
 Loading...