

Page 1

RMTHINTV1A
Owner’s Manual
RMTHINTV1A Ultra-Thin
Indoor Amplified HDTV
Antenna
FCC Statement
This device complies with part 15 of the FCC Rules. Operation is subject
to the following two conditions: (1) This device may not cause harmful
interference, and (2) this device must accept any interference received,
including interference that may cause undesired operation.
This equipment has been tested and found to comply with the limits for a
Class B Digital Device, pursuant to Part 15 of the FCC Rules. These limits
are designed to provide reasonable protection against harmful interference
in a residential installation. This equipment generates, uses, and can radiate
radio frequency energy and, if not installed and used in accordance with
the instructions, may cause harmful interference to radio communications.
However, there is no guarantee that interference will not occur in a particular
installation. If this equipment does cause harmful interference to radio or
television reception, which can be determined by turning the equipment off
and on, the user is encouraged to try to correct interference by one or more
of the following measures:
• Reorient or relocate the receiving antenna.
• Increase the separation between the equipment and receiver.
• Connect the equipment into an outlet on another circuit.
• Consult the dealer or an experienced radio/TV technician for help.
Caution: Any changes or modifications not expressly approved by the party
responsible for compliance could void the user’s authority to operate this
equipment.
Industry Canada Regulatory Information
CAN ICES-3 (B)/NMB-3 (B)
Avis d’Industrie Canada
CAN ICES-3 (B)/NMB-3 (B)
Page 2

1
TERK MultiDirectional Antennas
Congratulations on your purchase of the THINTV1A
Ultra-Thin Indoor Amplified HDTV Antenna. This
antenna’s paper-thin design lets you hang it virtually
anywhere on walls or windows. Its 12-foot cable gives
you room to roam to find the best spot for optimum
reception, with a multi-directional reception pattern
that gets signals from every direction. And this
antenna’s new amplifier design outperforms all other
brands.
Multi-Directional Antennas
A TERK multi-directional antenna is able to receive
signals from any direction. Useful for both analog
and digital reception, the THINTV1A has a paper-thin
design that hangs virtually anywhere. The multidirectional technology ensures that the antenna
does not need to be adjusted according to the location
of the transmitting signal.
Page 3

2
English
RMTHINTV1A Features
The RMTHINTV1A Ultra-Thin Indoor Amplified HDTV
Antenna is packed with features that make it a great addition
to your home theater. Because the RMTHINTV1A is multidirectional, there is no need to constantly turn the antenna to
improve reception. And, with its ultra-thin design, the
RMTHINTV1A hangs virtually anywhere, disappearing into
any decor. The RMTHINTV1A:
• Features a optimized amplifier design that
outperforms other antennas
• Hangs virtually anywhere
• Eliminates constant adjustments with multidirectional reception pattern
• Installs easily, with a 12-foot cable and in-line
amplifier
Page 4
3
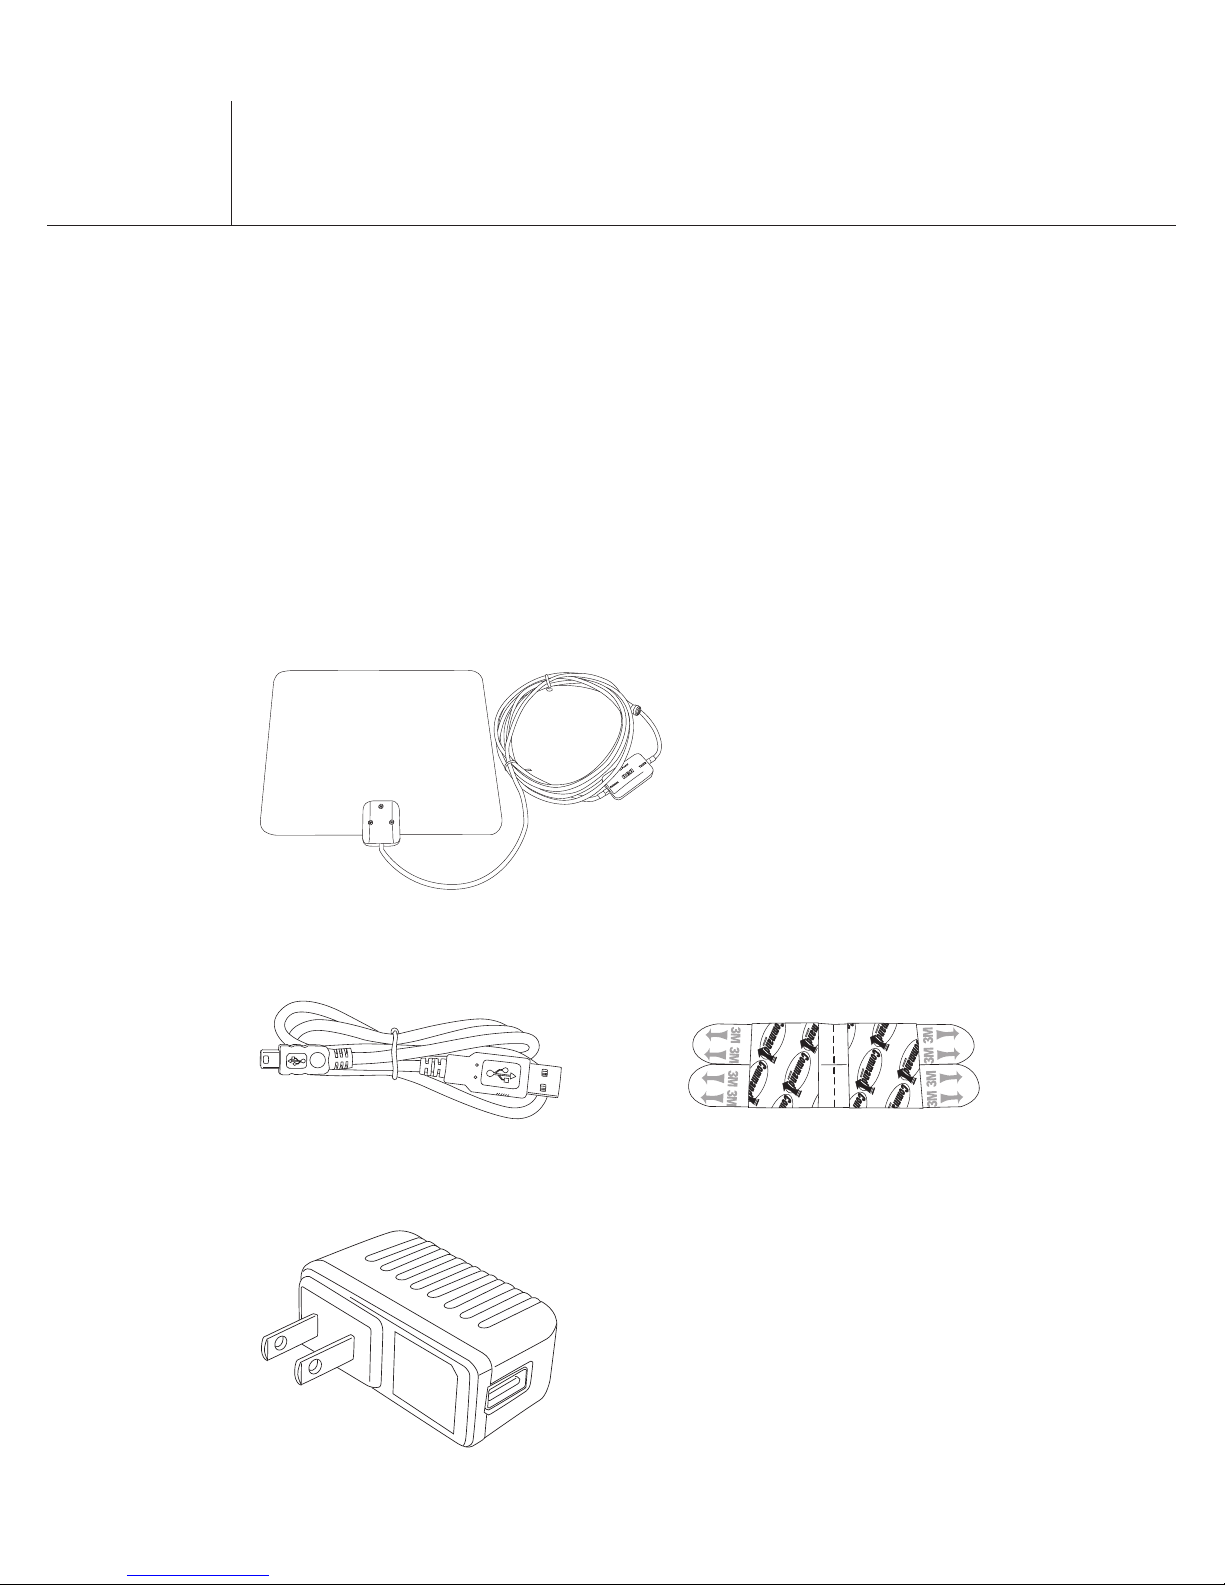
Hardware
Before
attempting to use your antenna, please remove
all parts from the box and read the instructions
carefully. The antenna package includes the following
items:
1 Ultra-Thin Indoor Amplified HDTV
Antenna with Built-In 12-Foot Coaxial
Cable and In-Line Amplifier
1 USB to mini-USB cable
1 USB power adapter 1 USB power adapter
RMTHINTV1A Features
Removable two-sided
mounting tape
Page 5

4
English
Setting Up the RM
THINTV1A
Find the best location for the antenna
Before you connect the antenna, determine the best
spot in your home for optimum reception. Visit
www.antennaweb.org to see where your local
broadcasts are coming from. Then, try as much
as possible to avoid obstructions between these
transmitters and your antenna.
It is highly recommended that the flat surface of the
antenna should face the broadcast tower or as close
as practical.
Because
of its multi-directional capabilities, the
receives UHF, VHF, and local high-definition
broadcasts, providing quality reception from most
locations.
Note: Placing the antenna on a metal surface
may interfere with reception. If the antenna isn’t
performing as well as expected, try placing it on
another surface. Then, re-scan for channels on your
TV or converter box.
Page 6

5
Setting Up
the RMTHINTV1A
(continued)
Test the Location
Broadcast signal strength can vary significantly
inside your home even within the same room. In most
homes, the best signal strength will usually be in a
window or as high on the wall as possible.
Before you mount the antenna to the wall using
the provided mounting tape, it’s a good idea to test
the location you want to use. Temporarily mount
the antenna using 2-3 pieces of scotch tape. Then
continue with the connection instructions below. Once
you’ve scanned for channels on your TV, you’ll be able
to tell if this is a good location to use or not. If it is,
you can continue with the mounting instructions that
follow. If it isn’t, you can try for better channel scan
results with the antenna in a different location in the
room.
Page 7
6
English
Setting Up
the RMTHINTV1A
(continued)
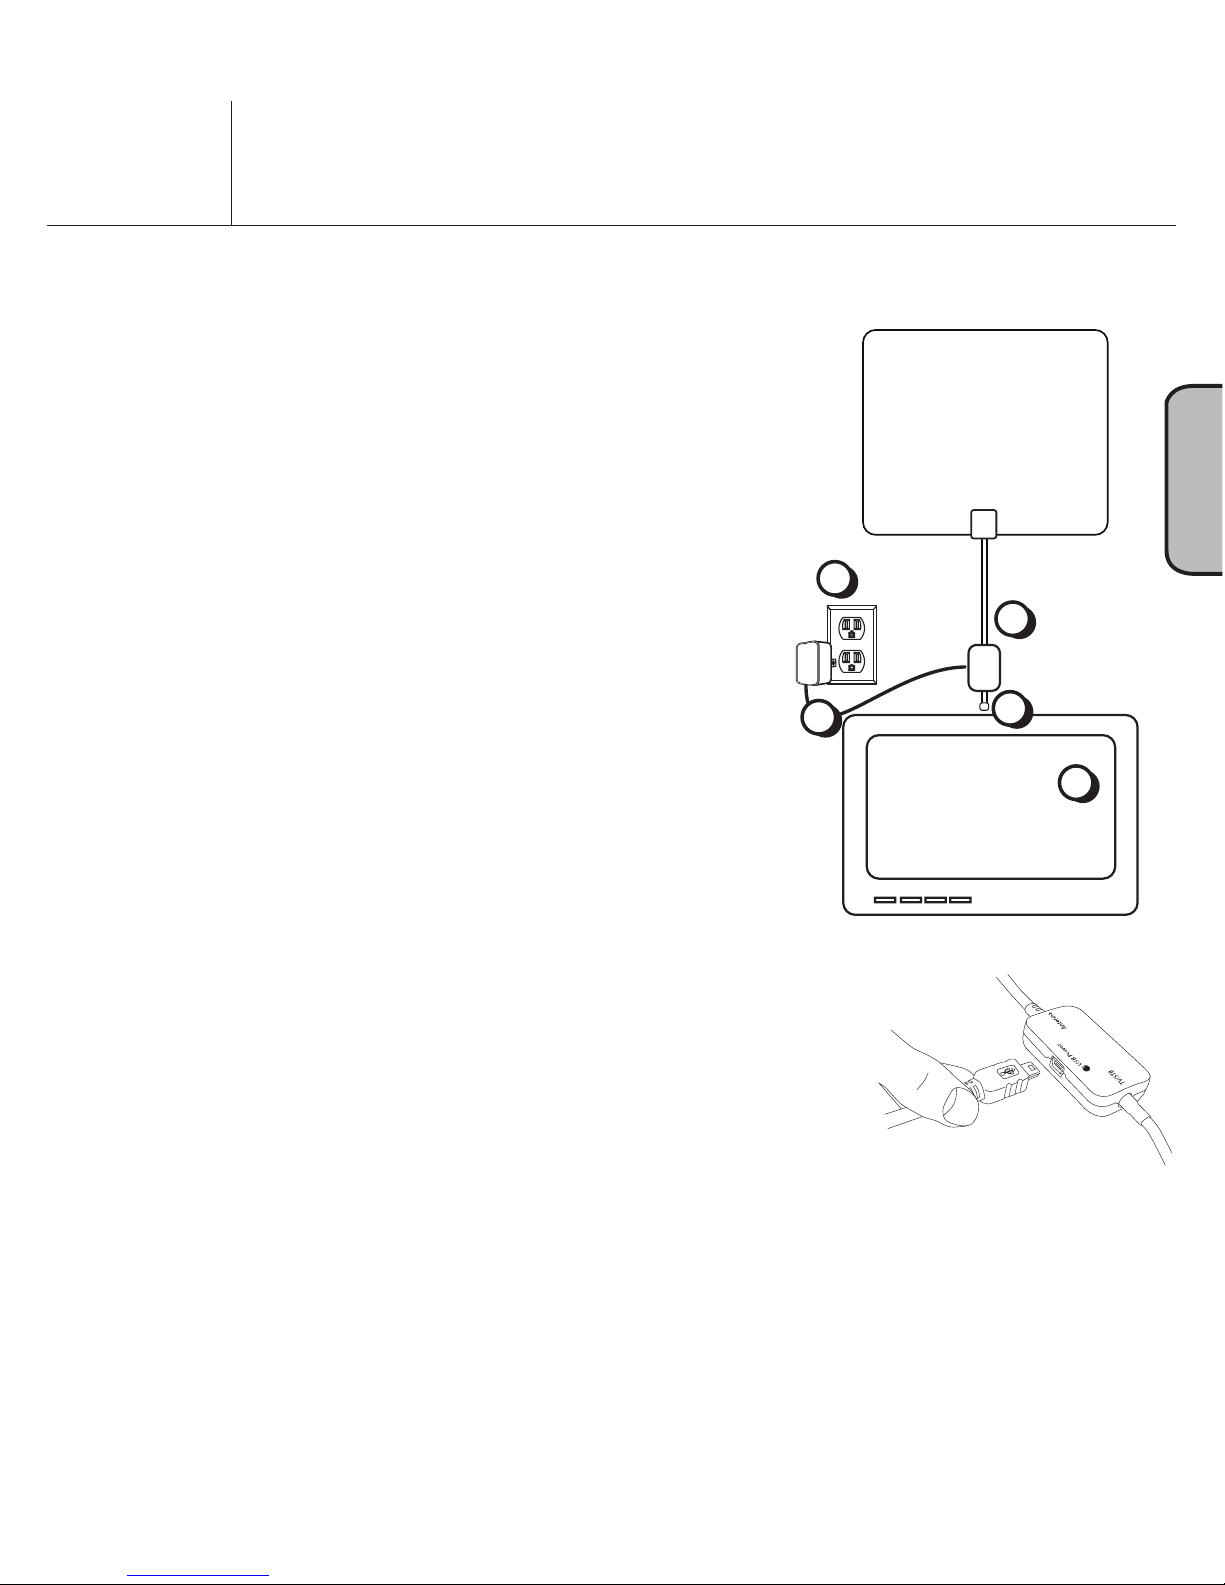
Connecting the
RMTHINTV1A to Your TV
1. Make sure your TV is turned
off.
2.
Connect the built-
in cable to the antenna input
on your TV.
IMPORTANT: Make sure you
uncoil the antenna’s coaxial
cable completely. Leaving it
coiled will reduce reception
performance.
3. Plug one end of the included
USB to mini-USB cable into the
amplifier on the THINTV1A’s builtin cable.
TV
In-Line Amplifer
ANT1150F
Built-In
Coaxial Cable
ANTENNA
TV/STB
4
5
3
2
6
THINTV1A
Page 8
THINTV1A
7
Setting Up the THINTV1A
(continued)
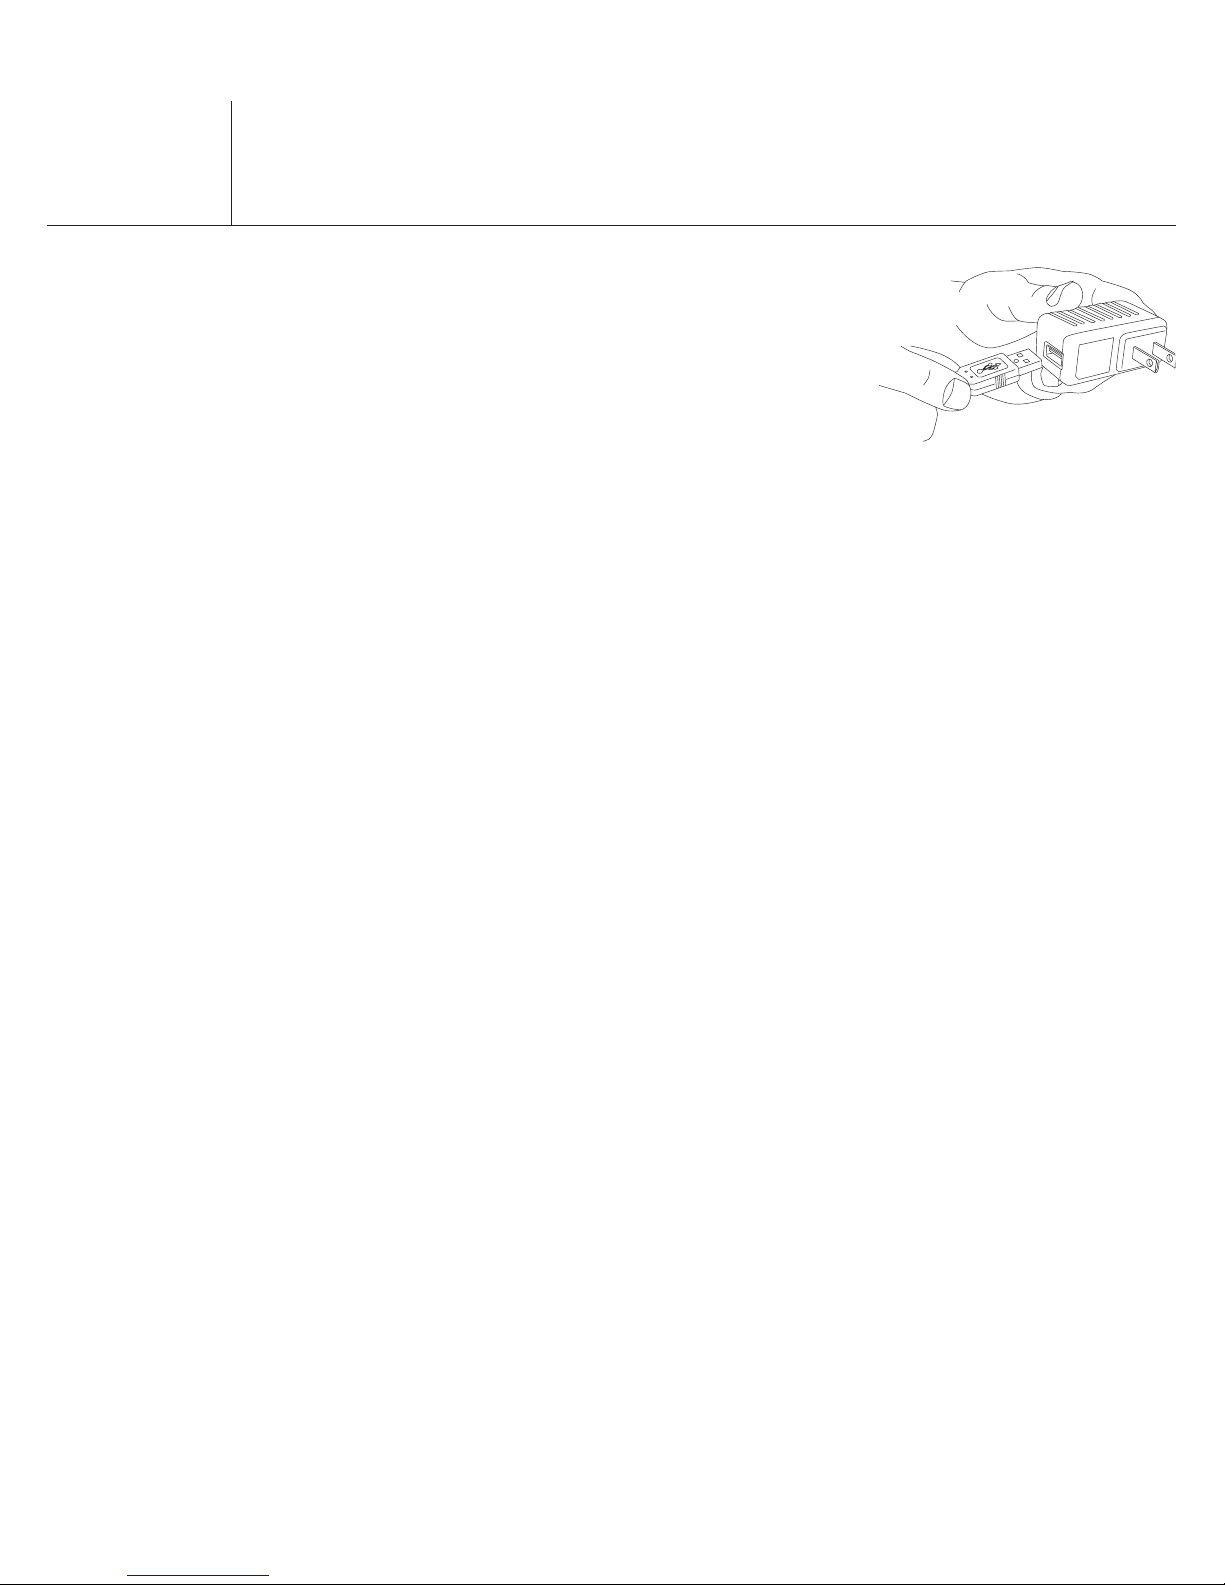
4. Plug the other end of the included
USB to mini-USB cable into the
power adapter provided.
Note: If your TV has a USB power
outlet, you can plug the USB to
mini-USB cable directly into it for power instead
of using the power adapter. If you use a TV USB
power outlet, you can skip step 5.
5. Plug the power adapter’s power cord into an
electrical outlet.
IMPORTANT: This power unit should be plugged in
so that it stays vertical or lies flat.
6. Scan for channels on your TV.
Note: You can bypass the amplifier on this
antenna if you notice that some channels are
not coming in as consistently as you’d expect.
Simply unplug the power supply (see step 3). This
bypasses the amplifier.
Page 9
THINTV1A
8
English
Setting Up the THINTV1A
(continued)
Mounting the Antenna to the Wall
Once you’ve confirmed the best location for your
antenna and scanned for channels, you’re ready
to mount the antenna to that location, using the
mounting strips included. If you decide to move
the antenna after you’ve mounted it, no problem:
the mounting strips detach from the wall easily,
without harming your wall’s surface, and are easily
replaceable at most retail and drug stores.
Caution: DO NOT use the mounting strips with
wallpaper. The mounting strips may not adhere well
to vinyl surfaces. Apply to surfaces above 50°F (10°C).
Adhesive could lose adhesion above 105°F (40°C).
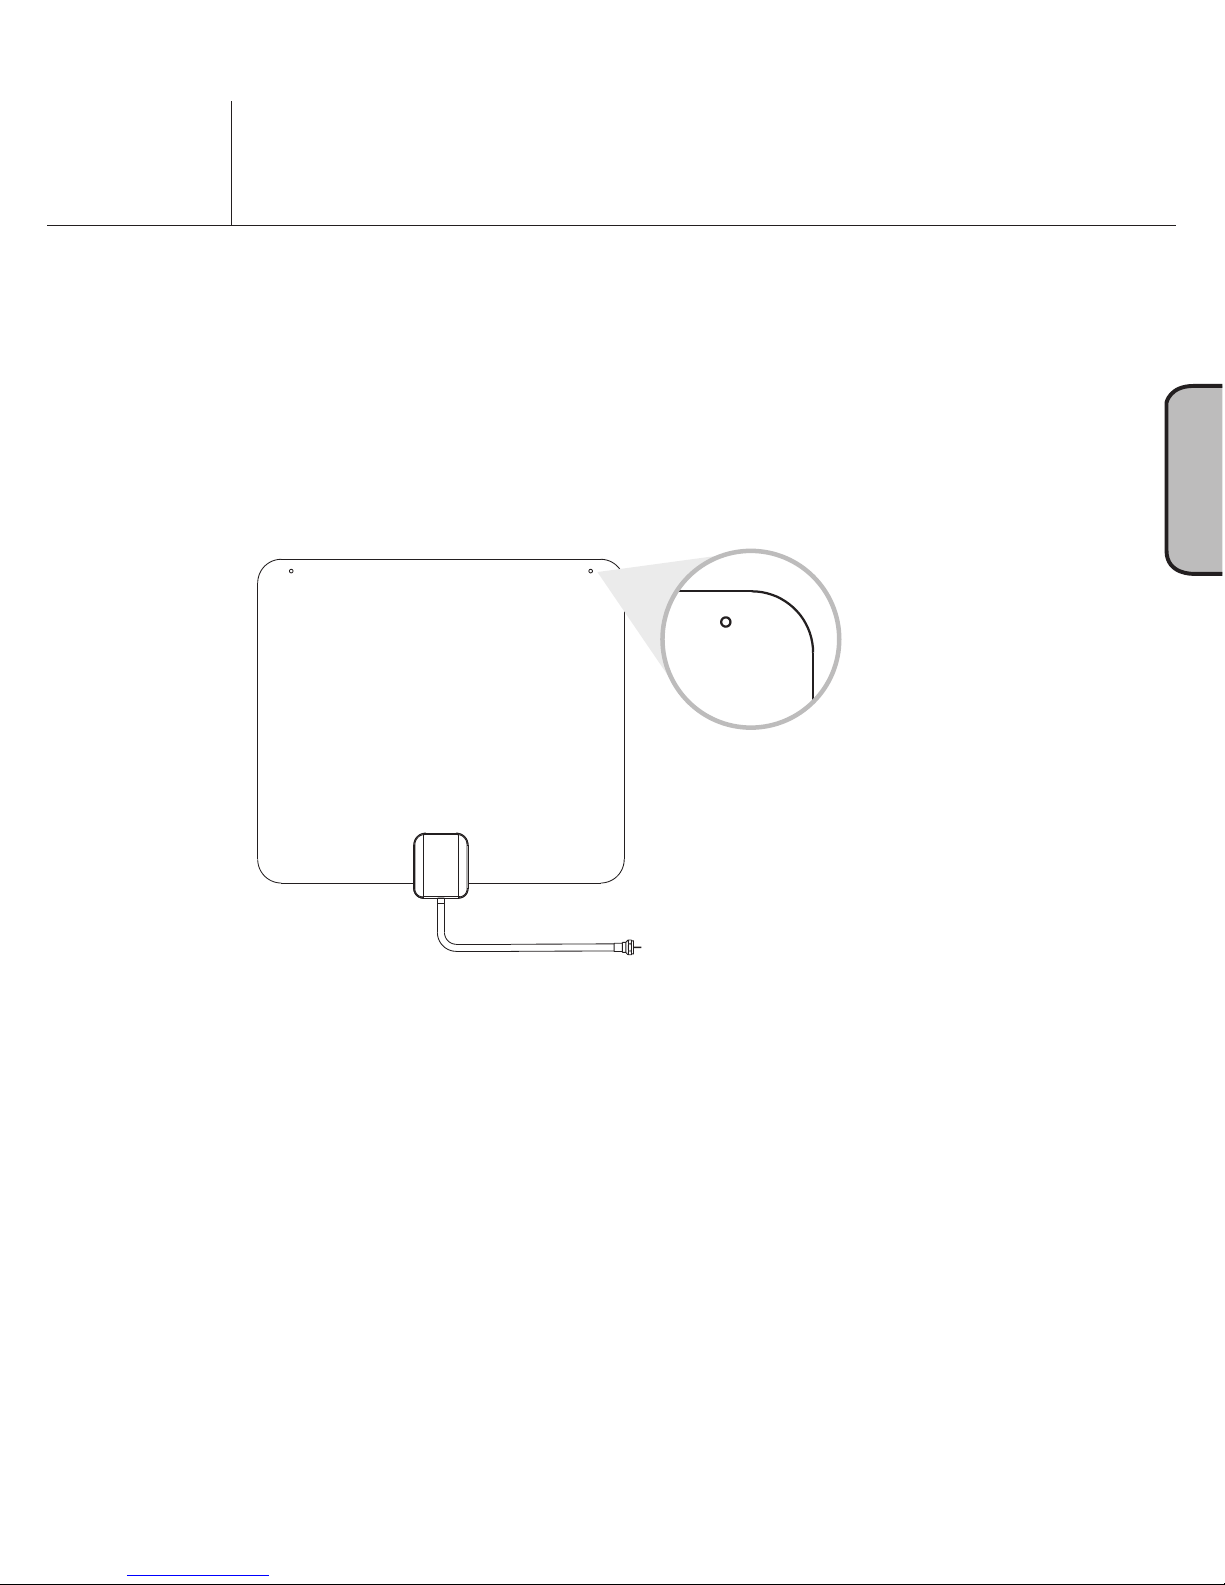
Note: The antenna also has two holes along its
top edge for hanging it using screws or tacks (not
included).
Page 10
THINTV1A
9
Setting Up the THINTV1A
(continued)
To mount the antenna using the mounting strips:
1. Clean the surface of the location with isopropyl
rubbing alcohol. Wipe gently, then let the area dry.
IMPORTANT: Do not use household cleaners.
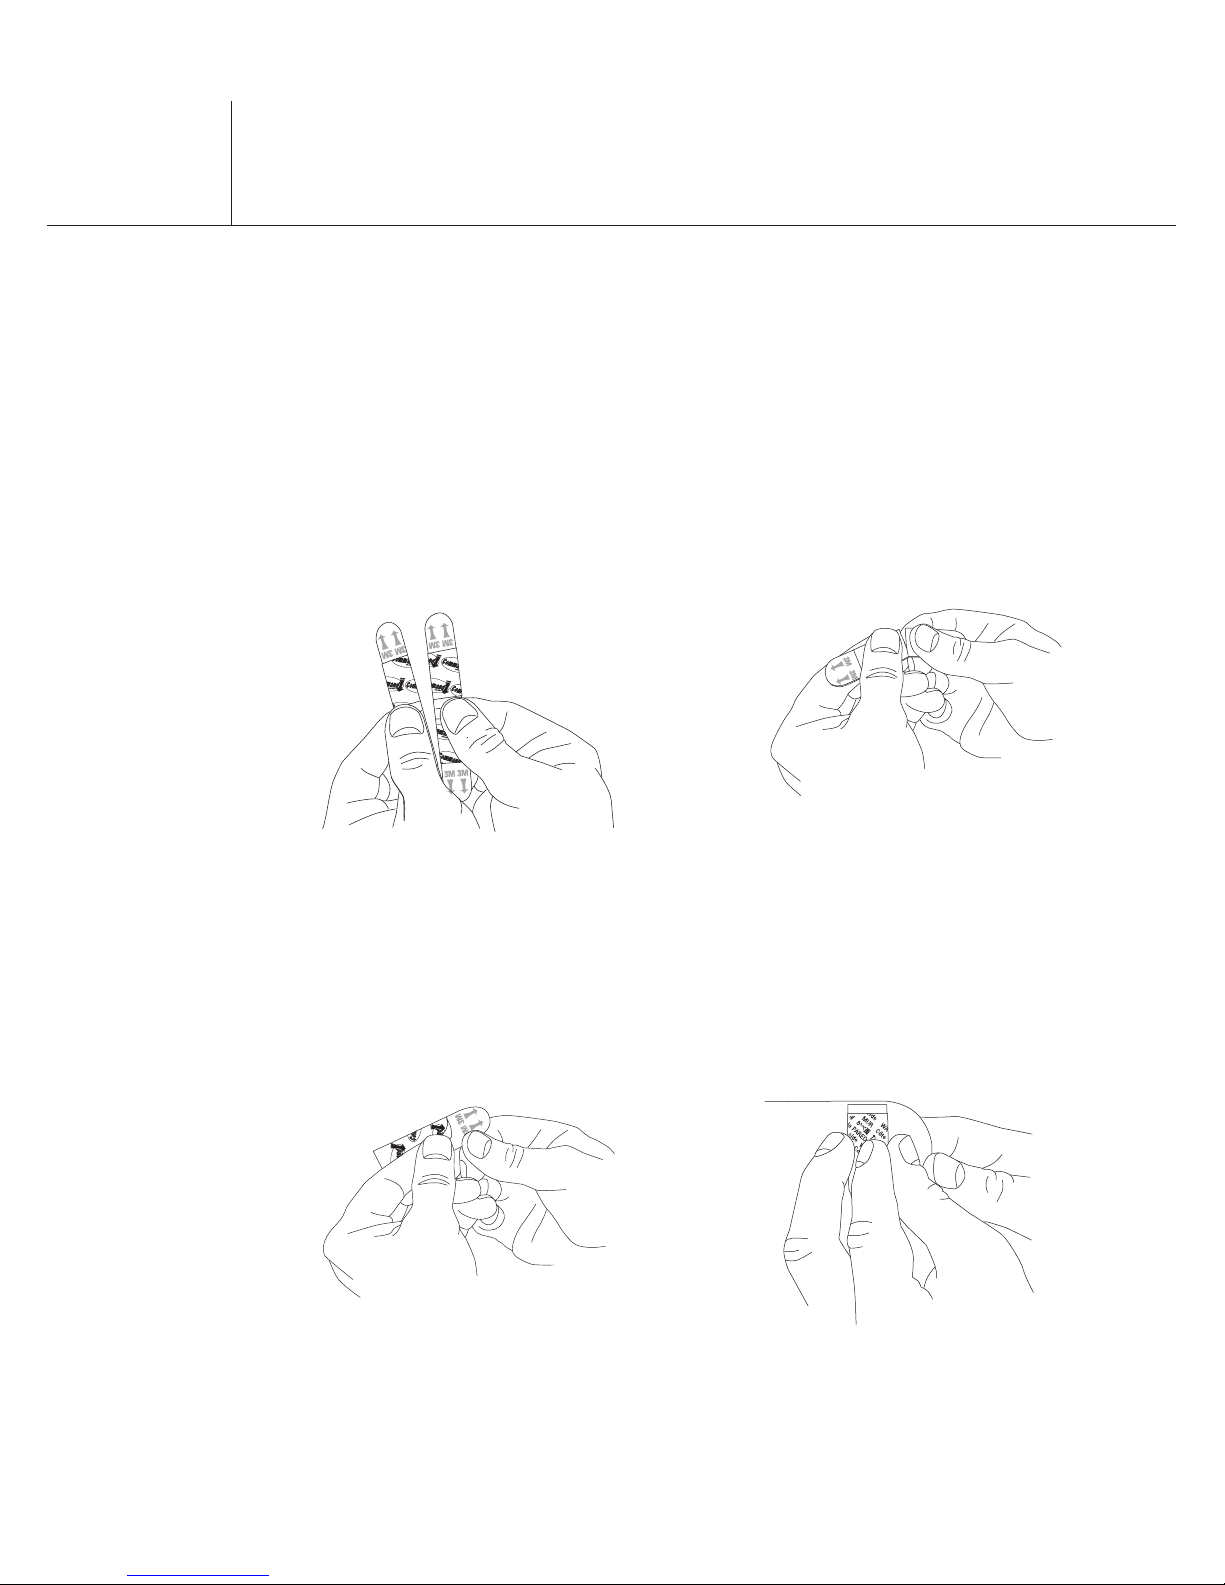
2. While the area is drying, separate the mounting
strips. Snap them apart length-wise first, then
snap each of the resulting strips in half.
3. Remove the red liner. Press the adhesive strip
onto one of the top corners of the back of the
antenna. Repeat for the other top corner. Then
place a single mounting strip on the metal section
in the bottom middle of the antenna, with the strip
facing down.
Page 11
THINTV1A
10
English
Setting Up the THINTV1A
(continued)
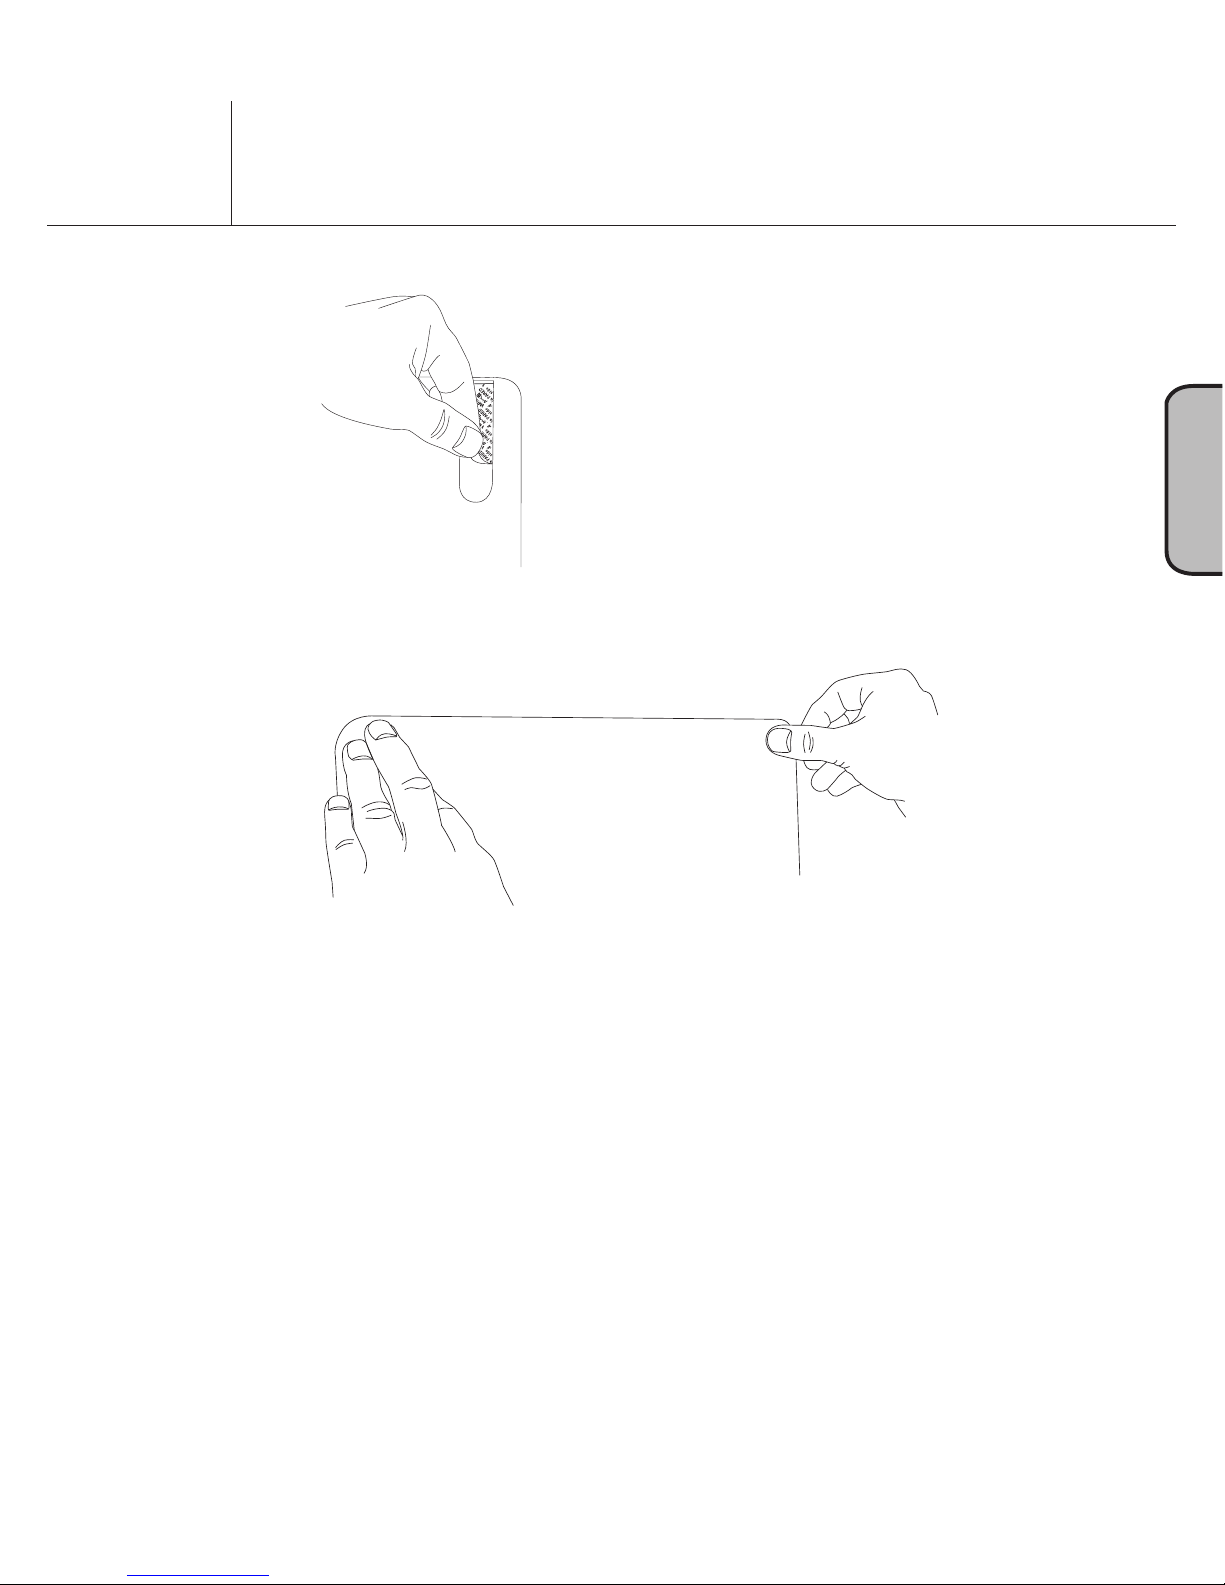
4. Remove the black liner for each strip.
5. Line up the antenna where you want to put it, then
press it against the wall for 10 seconds.
6. Stop pressing the antenna against the wall and
confirm that it’s firmly attached to the wall. Then
press an additional 30 seconds.
IMPORTANT: The mounting strips have tabs that
extend beyond the borders of the adhesive. Leave
these in place--they will allow you to remove the
antenna without damaging your wall.
Page 12
THINTV1A
11
Setting Up the THINTV1A
(continued)
To remove the antenna (and mounting strips) from
the wall:
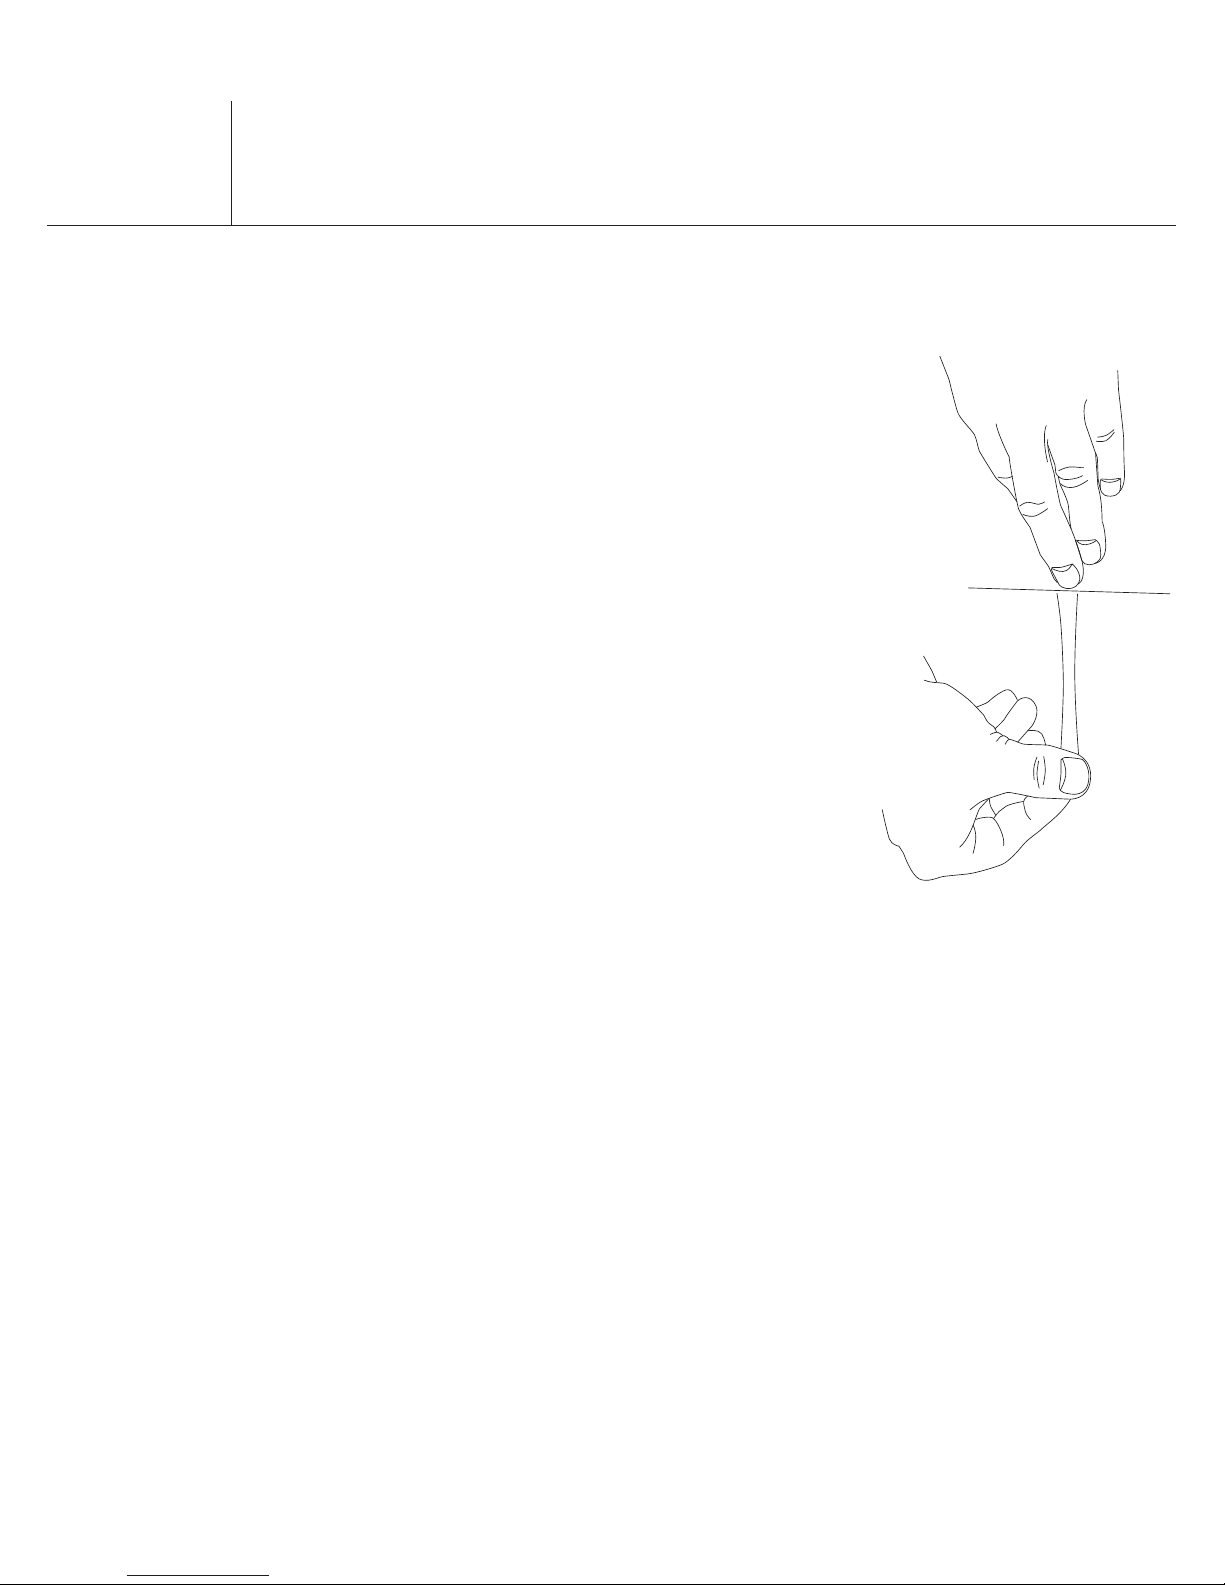
1. Hold the antenna against the wall
gently to keep it in place. DO NOT
press the antenna against wall.
2. Find the tab for the single
mounting strip at the bottom of
the antenna (on the metal part).
Stretch the tab straight down
(away from the antenna) at least 12
inches until the strip releases.
IMPORTANT: NEVER pull the strip
tab towards you.
3. Pull the antenna off the wall
slightly so that you can reach the
tabs for the two mounting strips at the top of the
antenna. Repeat step 2 for each of these tabs as
well.
Note: If you can’t reach the tabs, you can remove
the antenna from the mounting strips using a
piece of dental floss. Gently run the floss behind
the antenna, between the strips and the antenna,
until the strips separate. Then perform step 2
above for each of the strips by themselves.
4. Remove the mounting strips from the antenna.
If you want to mount the antenna to the wall again,
you can find replacement strips at most retail or drug
stores.
Page 13
THINTV1A
12
English
Setting Up the THINTV1A
(continued)
To mount the antenna using thumbtacks (not
included):
Insert two thumbtacks (not included) into the two
holes on the top of the antenna. Hold the thumbtacks
in place and lower the holes onto the thumbtacks.
Make sure to line up the holes with the thumbtacks.
Page 14

THINTV1A
13
Setting Up the THINTV1A
(continued)
Coaxial Cable Installation Precautions
• Do not bend coaxial cables into less than a threeinch radius. Tighter bends can cause shorts and can
change a cable’s impedance.
• Do not install a coaxial cable where it will have
a pulling tension greater than 15 pounds during
installation. After installation, make sure there is no
tension on the cable.
• Use only round-headed staples. Any clamps or
securing devices used with coax should grip the
cable evenly about the circumference without
crushing the cable. Flat staples can damage the
coaxial cable.
• Do not expose a coaxial cable to a temperature
greater than 176 degrees Fahrenheit. Keep the
cable away from heating vents and water heaters.
• Make sure you uncoil the antenna’s coaxial cable
completely. Leaving it coiled will reduce reception
performance.
Page 15

For customer service and
technical information::1.800.290.6650
THINTV1A US IB 00
For Customer Service
Product Information, Photos,
FAQ’s, Owner’s Manuals
Page 16

THINTV1A
Guía del Usuario
Antena HDTV amplificada
ultradelgada para interiores
Declaración de la Comisión Federal de Comunicaciones de los Estados
Unidos
Este dispositivo cumple con la Sección 15 de las Normas de la FCC.
Su funcionamiento está sujeto a las siguientes dos condiciones: (1)
Este dispositivo no debe causar interferencia y (2) este dispositivo debe
aceptar toda interferencia recibida, incluida aquélla que puede causar un
funcionamiento no deseado.
Este equipo ha sido probado, y se consideró que cumple con los límites de los
aparatos digitales de Clase B, de acuerdo
con las especificaciones de la Parte 15 de las Reglas de la FCC. El objetivo de
estos límites es ofrecer una protección
razonable contra interferencias nocivas en una instalación residencial. Este
equipo genera, utiliza y puede radiar energía
de radiofrecuencia y, si no se instala y utiliza de acuerdo con estas
instrucciones, puede generar interferencia perjudicial para las
radiocomunicaciones. Sin embargo, no se garantiza que no se producirá
interferencia en una instalación en particular.
Si su equipo causa interferencia perjudicial para la recepción de radio o
televisión, que puede averiguar apagando y encendiendo el equipo, intente
corregirla mediante uno o varios de los siguientes procedimientos:
• Vuelva a orientar o cambie de lugar la antena receptora.
• Aumente la separación entre el equipo y el receptor.
• Conecte el equipo a un tomacorriente en otro circuito.
• Consulte al distribuidor o a un técnico experimentado de radio y televisión
para solicitar asistencia.
Atención: Cualesquiera cambios o modificaciones no aprobados
expresamente por la parte responsable para el cumplimiento podrían anular
la autoridad del usuario conferida para utilizar este equipo.
Información Regulatoria de la Industria Canadiense
CAN ICES-3 (B)/NMB-3 (B)
Avis d’Industrie Canada
CAN ICES-3 (B)/NMB-3 (B)
Page 17

THINTV1A
1
Español
Antenas
multidireccionales
Felicidades por su adquisición de la Antena HDTV
amplificada ultradelgada para interiores THINTV1A.
Esta antena, de diseño ultradelgado, se puede colgar
prácticamente en cualquier lugar
en ventanas o paredes. Su cable de 3,65 m (12
pies) de largo le brinda movilidad para encontrar el
mejor lugar donde obtener la mejor recepción, con
un patrón de recepción multidireccional que capta
señales provenientes de cualquier dirección. Y el
nuevo diseño del amplificador de esta antena supera
todas las demás marcas.
Antenas multidireccionales
Una antena multidireccional TERK tiene la capacidad
de recibir señales provenientes de cualquier dirección.
Útil tanto para recepción analógica como digital,
esta antena THINTV1A, de diseño ultradelgado, se
puede colgar prácticamente en cualquier lugar.
La tecnología multidireccional garantiza que no es
necesario tener que ajustar la antena de acuerdo a la
ubicación de la señal transmisora.
Page 18

THINTV1A
2
Características de la antena
THINTV1A
La antena HDTV amplificada ultradelgada para
interiores THINTV1A está llena de características
que la convierten en un componente excelente para
su sistema de teatro en el hogar. Dado que la antena
THINTV1A es un modelo multidireccional, no hay
necesidad de moverla constantemente para obtener
una mejor recepción. Y, con su diseño ultradelgado,
la antena THINTV1A se puede colgar prácticamente
en cualquier lugar, convirtiéndose en parte de la
decoración. La antena THINTV1A:
• Incluye un diseño de amplificador optimizado que
supera otras antenas
• Se puede colgar prácticamente en cualquier lugar
• El patrón de recepción multidireccional elimina
los ajustes constantes
• Se instala fácilmente, con un cable de 3,65 m (12
pies) y un amplificador en línea
Page 19

THINTV1A
3
Español
Herraje para la antena THINTV1A
Antes de intentar montar su antena, extraiga todas
las piezas de esta caja y lea las instrucciones
cuidadosamente. El paquete de la antena THINTV1A
incluye los siguientes artículos:
1 Antena HDTV amplificada ultradelgada
para interiores THINTV1A con cable coaxial de
3,65 m (12 pies) integrado y amplificador de línea
1 Cable USB a mini-USB
1 Adaptador de potencia USB
Características de la
antena THINTV1A
Cinta de montaje con
adhesivo por ambos lados,
fácil de despegar
Page 20

THINTV1A
4
Configuración de la antena
THINTV1A
Encuentre la mejor ubicación para la
antena
Antes de conectar la antena, determine la mejor
ubicación en su hogar donde se pueda obtener una
recepción óptima. Visite www.antennaweb.org para
informarse de dónde provienen las transmisiones
locales. Luego, intente tanto como sea posible evitar
obstrucciones entre estos transmisores y su antena.
Le recomendamos enfáticamente que la superficie
plana de la antena quede orientada hacia la
torre de transmisión o lo más cercano posible a ella.
Debido a sus capacidades multidireccionales, la
antena THINTV1A recibe transmisiones de UHF, VHF
y locales de alta definición, brindando recepción de
calidad desde casi cualquier ubicación.
Aviso: La recepción podría verse afectada si se
coloca la antena sobre una superficie de metal. Si el
desempeño de la antena no es el esperado, intente
colocarla sobre otra superficie. Luego, vuelva a buscar
canales en su TV o convertidor.
Page 21

THINTV1A
5
Español
Configuración de la antena
THINTV1A (continúa)
Pruebe la ubicación
La potencia de la señal de transmisión puede variar
significativamente dentro de su hogar aun dentro de
la misma habitación. En la mayoría de hogares, la
mejor potencia de señal se recibe cerca de ventanas o
montando la antena en la pared lo más alto posible.
Antes de montar la antena en la pared con la cinta de
montaje suministrada, sería bueno probar
la ubicación seleccionada. Monte de manera temporal
la antena utilizando de 2 a 3 pedazos de cinta
adhesiva. Luego, prosiga con las instrucciones de
conexión que se indican abajo. Una vez haya buscado
canales en su TV, podrá decidir si esta ubicación es
conveniente o no. Si lo es, puede continuar con las
instrucciones de montaje a continuación. Si no lo es,
puede colocar la antena en otra ubicación dentro de la
habitación para tratar de obtener mejores resultados.
Page 22

THINTV1A
6
Configuración de la antena
THINTV1A (continúa)
Conexión de la antena THINTV1A a su TV
1. Asegúrese que el TV esté
apagado.
2. Conecte el cable integrado
de la antena THINTV1A a la
entrada para antena del TV.
IMPORTANTE: Asegúrese de
desenrollar completamente el
cable coaxial de la antena. Si
lo deja enrollado se afectará
la calidad de la recepción.
3. Conecte un extremo del cable USB
a mini-USB incluido al amplificador
en el cable integrado de la antena
THINTV1A.
TV
In-Line Amplifer
ANT1150F
Built-In
Coaxial Cable
ANTENNA
TV/STB
4
5
3
2
6
THINTV1A
Câble coaxial
intégré
Amplificateur
en ligne
Page 23

THINTV1A
7
Español
Configuración de la antena
THINTV1A (continúa)
4. Conecte el otro extremo del
cable USB a mini-USB incluido
al adaptador de potencia
suministrado.
Aviso: Si su TV incluye una
entrada de potencia USB, puede conectar el
cable USB a mini-USB directamente a la entrada
para alimentar la unidad en lugar de utilizar el
adaptador de potencia.
Si utiliza la entrada de potencia USB, puede omitir
el paso 5.
5.Conecte el cordón de alimentación del adaptador
de potencia al tomacorriente eléctrico.
IMPORTANTE: Esta unidad de potencia debe
enchufarse de manera
que permanezca en posición vertical o recostada.
6. Busque canales en su TV.
Aviso: Puede omitir el amplificador de esta antena
si advierte que la transmisión de algunos canales
no es constante. Simplemente desconecte el
suministro de potencia (consulte el paso 3). Esto
omite el amplificador.
Page 24

THINTV1A
8
Configuración de la antena
THINTV1A (continúa)
Montaje de la antena en la pared
Una vez haya seleccionado la mejor ubicación para
su antena, y haya buscado los canales, estará listo
para montar la antena en dicha ubicación, usando las
tiras de montaje incluidas. Si decide mover la antena
luego de haberla montado, no se preocupe: las tiras
de montaje se despegan de la pared con facilidad, sin
dañar la superficie de la pared, y podrá conseguirlas
fácilmente en la mayoría de farmacias y tiendas de
venta al detal.
Atención: NO use las tiras de montaje sobre papel
para empapelar. Las tiras de montaje quizá no se
adhieran completamente a las superficies de vinilo.
Aplíquelas a superficies por encima de 10°C (50°F). El
adhesivo podría perder su capacidad de adhesión si se
aplica a temperaturas por encima de 40°C (105°F).
Aviso: La antena además tiene dos agujeros a lo largo
del borde superior para colgarla utilizando tornillos
o tachuelas (no incluidos).
Page 25

THINTV1A
9
Español
Configuración de la antena
THINTV1A (continúa)
Para montar la antena usando las tiras de montaje:
1. Limpie la superficie de la ubicación con alcohol
isopropílico. Limpie con cuidado, luego permita
que el área se seque.
IMPORTANTE: No utilice limpiadores de uso
doméstico.
2.Mientras se seca el área, separe las tiras de
montaje. Sepárelas primero a lo largo, y luego
separe las tiras resultantes en dos.
3. Remueva el revestimiento rojo. Presione la cinta
adhesiva en una de las esquinas superiores
de la parte posterior de la antena. Repita para
la otra esquina superior. Luego coloque una tira
de montaje sencilla en la sección de metal en la
parte inferior central de la antena, con la tira boca
abajo.
Page 26

THINTV1A
10
Configuración de la antena
THINTV1A (continúa)
4. Retire el revestimiento negro de cada tira.
5. Alinee la antena donde desea montarla, luego
presiónela contra la pared durante 10 segundos.
6. Deténgase y verifique que la antena esté bien
sujeta a la pared. Presione nuevamente durante
30 segundos.
IMPORTANTE: Las tiras de montaje incluyen
lengüetas que sobrepasan los bordes del
adhesivo. Manténgalas en su lugar – éstas le
permitirán retirar la antena sin dañar la pared.
Page 27

THINTV1A
11
Español
Configuración de la antena
THINTV1A (continúa)
Para retirar la antena (y las tiras de montaje) de la
pared:
1. Sostenga la antena contra la pared
con cuidado para mantenerla en
su posición. NO presione la antena
contra la pared.
2. Encuentre la lengüeta para la tira
de montaje sencilla en la parte
inferior de la antena (en la pieza
de metal). Estire la lengüeta
completamente hacia abajo (en
dirección contraria a la antena) al
menos 30 cm (12 pulg.) hasta que
la tira se suelte.
IMPORTANTE: NUNCA tire de la
lengüeta de la tira hacia usted.
3.Despegue levemente la antena de la pared de
manera que pueda alcanzar las lengüetas para
las dos tiras de montaje en la parte superior de la
antena. Repita el paso 2 para cada una de estas
lengüetas.
Aviso: Si no puede alcanzar las lengüetas, puede
retirar la antena de las tiras de montaje utilizando
un pedazo de hilo dental. Con cuidado pase el hilo
dental por detrás de la antena, entre las tiras y
la antena, hasta que las tiras se separen. Luego
lleve a cabo el paso 2 descrito arriba para cada
una de las tiras.
Page 28

THINTV1A
12
Configuración de la antena
THINTV1A (continúa)
4. Reitre las tiras de montaje de la antena.
Si desea montar nuevamente la antena en la pared,
puede encontrar tiras de reemplazo en la mayoría de
farmacias o tiendas de venta al detal.Para montar la
antena usando tachuelas
(no incluidas):
Inserte dos tachuelas (no incluidas) en los dos
agujeros en la parte superior de la antena. Sostenga
las tachuelas en su lugar y baje los agujeros en las
tachuelas. Asegúrese de alinear
los agujeros con las tachuelas.
Page 29

THINTV1A
13
Español
Configuración de la antena
THINTV1A (continúa)
Precauciones acerca de la instalación del cable
coaxial
• No doble los cables coaxiales en un radio menor de
7,5 cm (3 pulg.). Los dobleces más tensos podrían
ocasionar cortocircuitos y modificar la impedancia
del cable.
• No instale un cable coaxial donde su tensión de tiro
sea mayor de 6,8 kg (15 lb.) durante la instalación.
Luego de finalizar la instalación, asegúrese que no
haya tensión en el cable.
• Utilice únicamente grapas de cabeza redonda. Las
abrazaderas o dispositivos de sujeción utilizados
con el cable coaxial deberán afianzar el cable por su
circunferencia de manera uniforme sin aplastar el
cable. Las grapas planas podrían ocasionar daños
al cable coaxial.
• No exponga un cable coaxial a temperaturas
mayores de 80 °C (176 °F). Mantenga el cable
alejado de conductos de calefacción y calentadores
de agua.
• Asegúrese de desenrollar completamente el cable
coaxial de la antena. Si lo deja enrollado se afectará
la calidad de la recepción.
Page 30

Para información técnica y de servicio al cliente:
1.800.290.6650
THINTV1A US IB 00
For Customer Service
Visit Our Website At
www.audiovox.com
Product Information, Photos,
FAQ’s, Owner’s Manuals
Para Servicio al Cliente
Visite Nuestro Sitio Web en
http://www.terk.com/
Información de Producto, Fotos,
Preguntas Frecuentes, Manuales
del Propietario
Page 31

THINTV1A
Guide de l’utilisateur
Antenne TVHD intérieure
amplifiée ultramince
Déclaration de la FCC
Cet appareil est conforme à la partie 15 du règlement de la FCC. Le
fonctionnement est sujet aux deux conditions suivantes : (1) cet appareil ne
doit pas provoquer de brouillage préjudiciable et (2) cet appareil doit accepter
tout brouillage reçu,
y compris le brouillage susceptible de provoquer un fonctionnement
indésirable.
Cet équipement a été soumis à des essais et a été déclaré conforme aux
limites stipulées pour un appareil numérique de classe B, conformément
aux spécifications de la partie 15 du règlement de la FCC. Ces limites
ont pour but d’assurer une protection raisonnable contre le brouillage
nuisible dans une installation résidentielle. Cet équipement produit, utilise
et peut émettre de l’énergie en radiofréquence et, s’il n’est pas installé et
utilisé conformément aux directives, il peut causer un brouillage nuisible
dans les communications radio. Cependant, il est impossible de garantir
qu’aucun brouillage ne se produira dans une installation particulière. Si cet
équipement cause un brouillage de la réception de radio ou de télévision, ce
qu’il est possible de déterminer en éteignant puis en rallumant l’équipement,
l’utilisateur est prié d’essayer de corriger le brouillage au moyen de l’une ou
de plusieurs des mesures suivantes :
• Réorienter ou déplacer l’antenne de réception.
• Éloigner davantage la distance entre l’équipement et le récepteur.
• Connecter l’équipement à une prise secteur ou à un autre circuit.
• Consulter le revendeur ou un technicien expérimenté de radio/télévision.
Attention : Les changements ou les modifications effectuées qui ne sont pas
expressément approuvés par la partie responsable de la conformité peuvent
annuler l’autorisation accordée à l’utilisateur de se servir de l’équipement.
Information sur la réglementation d’Industrie Canada
CAN ICES-3 (B)/NMB-3 (B)
Avis d’Industrie Canada
CAN ICES-3 (B)/NMB-3 (B)
Page 32

THINTV1A
1
Antennes
multidirectionnelles
Nous vous félicitons d’avoir acheté l’antenne TVHD
intérieure amplifiée ultramince THINTV1A. Cette
antenne ultramince peut s’accrocher n’importe où
sur les murs ou les fenêtres. Son câble de 3,65 m
(12 pi) laisse toute liberté de déplacer l’antenne
pour trouver le meilleur emplacement assurant une
réception optimale, grâce au diagramme de réception
multidirectionnel qui reçoit les signaux de toutes les
directions. Et la conception du nouvel amplificateur de
cette antenne éclipse toutes les autres marques.
Antennes multidirectionnelles
Une antenne multidirectionnelle TERK est une
antenne capable de recevoir les signaux de n’importe
quelle direction. Utile à la fois pour la réception
analogique et numérique, l’antenne THINTV1A est
ultramince ce qui permet de l’accrocher à peu près
n’importe où. La technologie multidirectionnelle
garantit que l’antenne n’a pas besoin d’être orientée
en fonction de l’endroit d’où provient le signal de
transmission.
Page 33

THINTV1A
2
Français
Fonctionnalités de l’antenne
THINTV1A
L’antenne TVHD intérieure amplifiée ultramince
THINTV1A offre de nombreuses fonctionnalités qui
font d’elle un atout important pour tout système
de cinéma maison. L’antenne THINTV1A étant
multidirectionnelle, il n’est pas nécessaire de
constamment l’orienter afin d’améliorer la réception.
Et, grâce à sa conception ultramince, l’antenne
THINTV1A peut être accrochée pratiquement partout,
lui permettant de se fondre dans tout décor. L’antenne
THINTV1A :
• est dotée d’une conception d’amplificateur
optimisé qui éclipse celle des autres antennes
• peut être accrochée pratiquement partout
• évite les réorientations constantes grâce à son
diagramme de réception multidirectionnel
• s’installe facilement, avec un câble de 3,65 m (12
pi) et un amplificateur en ligne
Page 34

THINTV1A
3
Matériel compris avec l’antenne THINTV1A
Avant d’essayer d’utiliser l’antenne, enlever toutes les
pièces de l’emballage et lire attentivement
les instructions. L’emballage de l’antenne THINTV1A
comprend les articles suivants :
1 antenne TVHD intérieure amplifiée ultramince
THINTV1A avec câble coaxial intégré de
3,65 m (12 pi) et amplificateur en ligne
1 câble USB vers mini-USB
1 adaptateur d’alimentation USB
Fonctionnalités de
l’antenne THINTV1A
Ruban adhésif doubleface amovible
Page 35

THINTV1A
4
Français
Mise en place de l’antenne
THINTV1A
Détermination du meilleur emplacement
pour l’antenne
Avant de connecter l’antenne, déterminer le meilleur
endroit de la maison pour une réception optimale.
Visiter le site www.antennaweb.org pour savoir d’où
proviennent les émissions locales.
Puis, essayer autant que possible d’éviter toute
obstruction entre ces émetteurs et l’antenne.
Il est vivement conseillé d’orienter la surface plane
de l’antenne vers la tour de radiodiffusion aussi
précisément que possible.
Grâce à ses capacités multidirectionnelles, l’antenne
THINTV1A reçoit les émissions UHF, VHF
et locales en haute définition, offrant une réception de
qualité dans la plupart des emplacements.
Remarque : La réception peut être perturbée si
l’antenne est placée sur une surface métallique. Si
l’antenne ne reçoit pas aussi bien que prévu, essayer
de la placer sur une autre surface. Puis effectuer un
balayage d’acquisition des chaînes sur le téléviseur ou
le convertisseur.
Page 36

THINTV1A
5
Mise en place de l’antenne
THINTV1A (suite)
Évaluation de l’emplacement
La force du signal d’émission peut varier
considérablement à l’intérieur de la maison ou même
d’une pièce. Dans la plupart des maisons, le plus fort
signal sera obtenu sur une fenêtre ou le plus haut
possible sur un mur.
Avant d’installer définitivement l’antenne sur le
mur en utilisant le ruban adhésif fourni, il est
conseillé d’essayer l’emplacement visé. Installer
temporairement l’antenne avec 2 ou 3 morceaux
de ruban adhésif. Puis suivre les instructions de
connexion ci-après. Une fois achevé le balayage
d’acquisition des chaînes sur le téléviseur, il est
possible de dire si l’emplacement est bon ou s’il ne
l’est pas. S’il est bon, continuer l’installation en se
référant aux instructions qui suivent. S’il n’est pas
bon, essayer d’obtenir de meilleurs résultats de
balayage d’acquisition des chaînes en changeant
l’emplacement de l’antenne dans la pièce.
Page 37

THINTV1A
6
Français
Mise en place de l’antenne
THINTV1A (suite)
Connexion de l’antenne THINTV1A au
téléviseur
1. Vérifier que le téléviseur est
éteint.
2. Connecter le câble intégré
de l’antenne THINTV1A à
l’entrée câble d’antenne du
téléviseur.
IMPORTANT: Vérifier que le
câble coaxial de l’antenne
est complètement déroulé.
Le laisser enroulé fait
baisser la capacité de
réception.
3. Brancher une extrémité du câble
USB vers mini USB fourni dans
l’amplificateur situé sur le câble
intégré de l’antenne THINTV1A.
TV
In-Line Amplifer
ANT1150F
Built-In
Coaxial Cable
ANTENNA
TV/STB
4
5
3
2
6
THINTV1A
Page 38

THINTV1A
7
Mise en place de l’antenne
THINTV1A (suite)
4.Brancher l’autre extrémité du
câble USB vers mini USB dans
l’adaptateur d’alimentation fourni.
Remarque : Si le téléviseur dispose
d’une prise d’alimentation USB, il
est possible d’y brancher le câble USB vers mini
USB directement au lieu d’utiliser l’adaptateur
d’alimentation. L’utilisation d’une alimentation
USB de téléviseur permet d’éviter l’étape 5.
5. Brancher le câble d’alimentation de l’adaptateur
d’alimentation dans une prise secteur.
IMPORTANT: Cette unité d’alimentation doit être
branchée de manière à rester en position verticale
ou à plat.
6. Effectuer un balayage d’acquisition des chaînes
sur le téléviseur.
Remarque : Il est possible de contourner
l’amplificateur de cette antenne si l’utilisateur
remarque que certaines chaînes ne sont
pas reçues comme prévu. Débrancher simplement
l’alimentation (voir l’étape 3). Cette action permet
de contourner l’amplificateur.
Page 39

THINTV1A
8
Français
Mise en place de l’antenne
THINTV1A (suite)
Installation de l’antenne sur un mur
Une fois que le meilleur emplacement pour l’antenne
est confirmé et que les chaînes de réception ont
été balayées, l’antenne est prête à être installée
à cet emplacement en utilisant les morceaux de
ruban adhésif fournis. Si l’utilisateur décide de
changer l’antenne de place après l’avoir installée,
pas de problème : les morceaux de ruban adhésif
se détachent du mur facilement, sans en abîmer
la surface et peuvent s’obtenir dans la plupart des
magasins de vente au détail et dans les pharmacies.
Attention : NE PAS utiliser les morceaux de ruban
adhésif sur du papier peint. Les morceaux de ruban
adhésif pourraient ne pas très bien coller sur des
surfaces en vinyle. Appliquer sur des surfaces dont
la température excède 10 °C (50 °F). L’adhésif peut
perdre son pouvoir collant au-dessus de 40 °C (105
°F).
Remarque : L’antenne dispose aussi de deux trous le
long de son bord supérieur pour l’accrocher avec des
vis ou des punaises (non incluses).
Page 40

THINTV1A
9
Mise en place de l’antenne
THINTV1A (suite)
Installation de l’antenne avec les morceaux de ruban
adhésif :
1. Nettoyer la surface de l’emplacement avec
de l’alcool isopropylique à friction. Essuyer
délicatement, puis laisser sécher la zone.
IMPORTANT: Ne pas utiliser de nettoyants
ménagers.
2. Pendant que la zone sèche, séparer les morceaux
de ruban adhésif. Les détacher dans le sens de la
longueur d’abord, puis séparer chaque longueur
résultante en deux.
3. Enlever la doublure antiadhésive rouge. Appliquer
le morceau de ruban adhésif sur un des coins
supérieurs au dos de l’antenne. Répéter
l’opération pour l’autre coin supérieur. Puis placer
un morceau unique de ruban adhésif, orienté vers
le bas, sur la partie métallique au milieu et au bas
de l’antenne.
Page 41

THINTV1A
10
Français
Mise en place de l’antenne
THINTV1A (suite)
4. Enlever la doublure antiadhésive noire sur chaque
morceau.
5. Installer l’antenne à l’emplacement désiré puis la
maintenir appliquée contre le mur pendant
10 secondes.
6. Cesser d’appliquer l’antenne contre le mur et
vérifier qu’elle est fermement fixée au mur.
Puis exercer une pression pendant 30 secondes
supplémentaires.
IMPORTANT: Les morceaux de ruban adhésif
disposent d’onglets qui dépassent des bords
du ruban adhésif. Les laisser en place--ils
permettront d’enlever l’antenne sans abîmer le
mur.
Page 42

THINTV1A
11
Mise en place de l’antenne
THINTV1A (suite)
Retrait de l’antenne (et des morceaux de ruban
adhésif) du mur :
1. Maintenir délicatement l’antenne
contre le mur pour l’empêcher de
bouger. NE PAS appliquer l’antenne
contre le mur.
2. Repérer l’onglet du morceau de
ruban adhésif unique au bas de
l’antenne (sur la partie métallique).
Étirer l’onglet droit vers le bas (à
l’écart de l’antenne) sur au moins
30 cm (12 po) jusqu’à ce que le
morceau de ruban adhésif lâche.
IMPORTANT: NE JAMAIS tirer vers
soi l’onglet du morceau de ruban.
3. Écarter légèrement l’antenne du mur pour pouvoir
accéder aux onglets des deux morceaux de ruban
adhésif supérieurs. Répéter l’étape 2 pour chacun
de ces onglets.
Remarque : S’il n’est pas possible d’atteindre
les onglets, l’antenne peut être détachée des
morceaux de ruban adhésif en utilisant de la
soie dentaire. Faire passer délicatement la soie
dentaire derrière l’antenne, entre les morceaux
de ruban adhésif et l’antenne, jusqu’à ce que les
morceaux de ruban adhésif se décollent. Puis
effectuer l’étape 2 ci-dessus indépendamment
pour chacun des morceaux de ruban adhésif.
Page 43

THINTV1A
12
Français
Mise en place de l’antenne
THINTV1A (suite)
4. Détacher les morceaux de ruban adhésif de
l’antenne.
S’il est nécessaire de réinstaller ultérieurement
l’antenne sur le mur, il est possible de trouver
des morceaux de ruban adhésif de remplacement
dans la plupart des magasins de détail ou dans
les pharmacies.Installation de l’antenne avec des
punaises (non incluses) :
Insérer deux punaises (non incluses) dans
les deux trous situés sur le haut de l’antenne.
Maintenir les punaises en place et abaisser
les trous sur les punaises. Vérifier que les trous sont
bien alignés avec les punaises.
Page 44

THINTV1A
13
Mise en place de l’antenne
THINTV1A (suite)
Précautions d’installation du câble coaxial
• Ne pas courber les câbles coaxiaux en dessous
d’un rayon de 7,5 cm (3 po). Des rayons plus courts
peuvent provoquer des courts-circuits et changer
l’impédance du câble.
• Ne pas installer un câble coaxial là où il pourrait
être soumis à un effort de traction supérieur
à 6,8 kg (15 lb) pendant son installation. Après
l’installation, vérifier qu’il ne subsiste pas de
traction sur le câble.
• Utiliser uniquement des agrafes à dos arrondis.
Toute attache ou fixation utilisée avec du câble
coaxial doit maintenir uniformément le câble sur
sa circonférence sans l’écraser. Des agrafes à dos
plats peuvent endommager le câble.
• Ne pas exposer pas un câble coaxial à une
température supérieure à 80 °C (176 °F). Tenir le
câble à l’écart des bouches de chauffage et des
chauffe-eaux.
• Vérifier que le câble coaxial d’antenne est
complètement déroulé. Le laisser enroulé fait
baisser la capacité de réception.
Page 45

Pour le service à la clientèle et le soutien technique :
1.800.290.6650
THINTV1A US IB 00
For Customer Service
Visit Our Website At
www.audiovox.com
Product Information, Photos,
FAQ’s, Owner’s Manuals
Pour le service à la clientèle
Visitez notre site web sur
http://www.terk.com/
Renseignements sur nos produits,
photos,
FAQ, guides de l’utilisateur
 Loading...