

Page 1

User Guide for
Ingenium and Integrum loudspeakers
Teresonic
1215 Fiddlers Green • San Jose,
95125 California, USA
Phone 408.973.8813 • www.teresonic.com
Teres: rounded, polished, smooth, fine, elegant in Latin
Page 2

Table of Contents
CHAPTER 1
INTRODUCTION 1
New life for your music yet perfectly
natural 1
Big performance even at 4 Watts per
channel 2
Exceptionally detailed and clean sound 2
Designed & handcrafted to endure the test
of time 3
CHAPTER 2
UNPACKING INSTRUCTIONS 4
Contents 4
CHAPTER 3
INSTALLATION AND WIRING 5
Wiring 5
Installation and operation 5
Installation of Lowther drivers (optional) 6
Important! Brake-in period 7
CHAPTER 5
ROOM ACOUSTICS 11
Improve the sound stage & image depth 11
Getting fast, tight, realistic bass 12
Improve musical detail 12
Improve bass in your system 13
CHAPTER 6
TECHNICAL SPECIFICATIONS 14
Integrum technical specifications 14
Ingenium technical specifications 15
CHAPTER 7
WARRANTY AND SERVICE 16
In the unlikely event of a problem 16
Warranty Statement 17
Final Instructions 18
CHAPTER 4
FINE TUNING 8
Speaker Placement 8
Positioning (Toe-In) 8
Room acoustics and corner treatment 9
Taking Care of Your Speakers 10
Page 3

DESIGN CUSTOMIZATION
Chapter
1
T
Introduction
Congratulations on making the investment in T eresonic speakers that will enable the
musical reality of a concert hall or a jazz club trans ferred to your liste ni ng room.
eresonic Audio speakers are designed to produce the most natural sound o f exceptional clarity and
levels of detail, neutrality and stereo imaging that are beyond anything else in their category. That is
accomplished using unique and very advanced acoustic design, finest components and materials
available, and by avoiding every unnecessary component or gimmick that can introduce sound
coloration, interference or distortion – leading to musical reality of a concert hall or a jazz club transferred to
your listening room.
New life for your music yet perfectly natural
Every sound source in nature is “punctual” radiating sound waves around them – whether it’s a violin, a
trumpet, or a human voice. Teresonic speakers follow that basic design rule of the Nature. Multi -driver designs
introduce multiple interfering sound sources (speaker drivers in the cabinet) which lead to complex and
unpredictable cancellations and reinforcements between sound waves – leading to sound colorations and
distortions. Teresonic one-way speaker design using full range high-efficiency drivers, provides natural sound
with a wealth of detail, exceptional dynamic range and a sense o f musical “livens” that yo u don’t often hear
elsewhere.
The challenge is to make speakers that we can call transcendental - something that breaks boundaries and
creates emotion, but keeping sound natural and intact, as it was in the concert hall or recording studio.
Teresonic speakers operate legendary Lowther full-range speakers without any electrical components such as
filters or crossovers between the amplifiers and the speakers. Conventional designs put a crossover in the midrange to split the signal to the bass driver and the tweeter. This is exactly the region where our hearing is most
sensitive. These crossovers introduce phase and balance problems that cause deterioration in detail,
transparency and imaging. Even worse, most speakers go from a cone driver for the bass to a tweeter with
totally different sonic characteristics, such as a dome or ribbon tweeter, for the treble.
The ability of the Teresonic speakers to speak across the full frequency spectrum with one voice, and with such
speed and lack of coloration, makes them seem all the more electrostatic. In the end, however, Teresonic
speakers will play much louder than all except the largest electrostatic speakers and they will best any
electrostatics in bass power and dynamic wallop. You can hit these speakers with hard transients and they not
1
Page 4

DESIGN CUSTOMIZATION
only do not flinch, they start and stop on a dime and deliver the full frequency and dynamic range of the signal.
It is actually kind of hard to truly convey the full abilities of these speakers. Teresonic speakers so well pass on
the sonic thumbprints of the rest of the components in the system that they themselves tend to be pretty
chameleon-like in their own sound.
Big performance even at 4 Wa tts per channel
The high sensitivity of Teresonic speakers enables low power amplifiers, or high power amplifiers operated at
low power levels, to achieve realistic sound levels in all but the largest rooms. The Teresonic will sound
outstanding and play plenty loudly with an 8 wpc 300B-based tube stereo amplifier, as well as a 25 wpc 845based tube amplifier, or any other SET designs. They also sound excellent, if not as totally pure and direct as
when partnered with the single-ended models, powered by a set of the push-pull monoblocs that are rated at
100 wpc. With Teresonic speakers even sonic “gems” such as 2A3-based amplifiers will deliver big
performance, they will come to life and deliver extraordinary m usical reality even at few Watts of power. If 1
watt is good for 102 db, then 4 watts are good for a peak output of about 108 db and 8 watts of about 111 db
at one meter distance - and with the l owest distortion you have ever heard in a loudspeaker.
Higher power solid-state amplifiers will benefit from operating on low power levels where the distortions are
lowest – or almost non-existent. Despite manufacturers “paper specifications” even the finest high-end
amplifiers will introduce some sound distortions and colorations when played at high power levels. This is
simply driven by laws of physics and various components’ characteristics that are different at different load
levels. Higher the load, more stress on the component, more difficult for designer to get perfect r esults – even
harder at the high end. The simple solution is to operate at lower power levels and enjoy your musi c unspoiled,
as it was created in its natural environment, and still have a big performance of concert hall.
Exceptionally detailed and clean sound
ETQWT© (E nhanced Tapered Quarter Wave Tube) transmission line design, the result of some 20 years of
research and experimentation, is the key for Teresonic speakers’ extremely clean and accurate midrange, the
widest range of sound audible to our ears, and extended low frequency response – up to one -half octave below
the fundamental resonance of the driver. It is also the simplest, purest, most uncolored approach to design a
system which allows the speaker drivers to operate in "free air," duplicating the motion of sound waves
emanating from both sides of a musical instrument in live performance.
This, however, is extremely difficult to achieve as any dynamic speaker with a cabinet has to manipulate the
back-wave of the driver. In a sealed-box design, you’re tuning against a certain air pressure to obtain a certain
response characteristic. In a vented box, you employ resonances to achieve a lower cutoff frequency. The only
box where you have the same air pressure behind the driver as in front is the transmission line.
The transmission line is a long folded or unfolded passageway designed to be 1/4-wa velength long at the free
air resonance frequency of the driver, so that the acoustical output radiated from the line opening mixes with
the front-wave from the driver, to cause partial cancellation of the signal, only at the resonance frequency. This
technique leaves the driver free to accelerate and decelerate with ease, except at the resonance frequency where
its motion is inhibited. This "frequency-selective damping" quality is largely responsible for the superior sound
2
Page 5

DESIGN CUSTOMIZATION
quality of properly designed and implemented transmission line systems, including Teresonic Ingenium and
Integrum loudspeakers.
Fine tuning for the perfect end results is accomplished with Helmholtz resonators designed for picking out
particular frequencies from a complex sound. They are purely acoustical, rather than electronic elements,
responsible for exceptionally smooth response of Teresonic speakers without distortions and unwanted
colorations.
Designed & handcrafted to endure the test of time
Form follows function and our enclosures tend to be very attractive, sculpture-like shapes – a welcome
addition to any room. Any way you consider them – as a piece of art that sounds great or great sounding
speakers in an eye pleasing package, Teresonic speakers are built entirely by hand to highest standards us ing the
finest materials available. High gloss finish, applied in several layers of highest-quality varnish, enhances natural
wood veneer and superb craftsmanship that one may expect from the finest cabinet makers and speakers
costing many thousands more.
True high end speakers such as Teresonic, need top quality drive units. We use the top of the line DX-series of
legendary Lowther drivers, considered the Rolls-Royce of the speaker industry, that are still literally hand-made
by Lowther-Voigt Ltd in England. They incorporate extremely powerful magnets of 2 Tesla or more and
ultra-light paper cones, leading to extraordinary sensitivity, transient response, and low distortion. They are
possessed of a stunning sense of aliveness and vitality, and have a degree of sonic invisibility that is both
seductive and addictive.
Many high-end speakers on the market will use standard wiring inside the box between drivers and connectors
in the back of the box. Not so with Teresonic speakers that are equipped wit h the world best WBT connectors
and the same high-end Clarison cables inside the box that are offered to connect to your amplifier. Matching
speaker cables and wiring inside the box is also important to maintain th e same sonic character in the entire
audio chain – fr om your amplifier to the speaker and the drive-u nit.
3
Page 6

4
Unpacking Instructions
Chapter
2
Y
Important! Before you s ta rt unpac king, inspect the oute r ca rton for any si gns of shipping
damage. If you see or suspect that there is dama ge , inform the sell e r as soon as possible .
our Teresonic Ingenium speakers were shipped in heavy-duty wooden crates for safe transportation.
It is recommended that you save the crates and other packing material such as cotton b ags that are
protecting the fine lacquer on your speakers for possible future use. Due to the weight of the speakers,
it is highly recommended to have two people to un-crate them and position them for listening. After
taking the speaker out of the crate, untie the cotton bag at the bottom of the speaker and the bag can be sli d off
the top.
Your Integrum speakers are shipped in cartons. If the shipping carton looks intact, proceed as follows: Gently
turn the box upside-down, and open the bottom end of the shipping carton, folding the four bottom flaps
outward. Now, holding the inner packing material in place, tip the box over o nto the open bottom end, and
simply lift the carton away. Be sure to save the cartons and all packing materials.
At this time, please fill out the warranty card on the internet (www.teresonic.com/warranty), putting both serial
numbers and the date of purchase on the card. The serial numbers are on the rear of the speakers below the
input terminals and on your invoice.
Contents
The shipping crates (always shipped in pairs) contain the following items: 1)Loudspeakers, 2)Removable grille
assemblies, 3)The owner’s manual, and 4)Adjustable spikes and floor discs
It is extremely important that the Teresonic floor standing loudspeakers are correctly fitted with the
provided spikes to ensure speaker stability. Remember to tighten the locknut well once you have
adjusted the height of the four spikes. It is also important to use the provided floor discs underneath
the spikes in order to ensure that there is no damage to the floor. This is especially important for
hardwood and similar floors.
For optimal results use Teresonic “zero interference” Clarison speaker cables to connect the
loudspeakers with your amplifier. The same ultra-high quality Clarison cables are used inside the
speaker cabinet to connect speaker terminals in the back of the speaker to the speaker driver. Using
the same cables will ensure the same character of the sound and the best overall sonic quality without
coloration or distortions.
Page 7

Installation and Wiring
Chapter
3
Y
Before making any connections always turn off you r am p l ifier . Installing and wiring
your speakers is an easy and straightforward process. Enjoy your new Teresonic sound!
our speakers are equipped with highest quality WBT binding posts that are a true five-way design and
will accept 6mm (1/4") or 8mm (5/16") spades, 4mm bananas, bare wire etc. There is no need for the
complicated and extra costs of bi-wiring, there are no crossovers to adjust…just connect th e speaker
cables and enjoy the music.
For optimal results Teresonic “zero interference” Clarison speaker cables are recommended to connect the
loudspeakers with your amplifier. Namely, the same ultra-high quality Clarison cables that are used inside the
speaker cabinet to connect speaker terminals in the back to the speaker driver. Using the same cables will
ensure the same character of the sound and the best overall sonic quality without coloration or distortions
Wiring
Connect the speaker wires to the terminals in the back of the speakers. For the perfect sound experience, the
right speaker must be connected to the output terminal marked "R" or "Right" on your amplifier and the left
speaker to the terminal marked "L" or "Left". A detail that is often overlooked is connect ion in correct phase,
i.e. the red terminal (+) on the amplifier should be connected to the re d terminal (+) on the speaker, and the
white terminal (-) on the amplifier should be connected to the white terminal (-) on the speaker. (see Fig.1). If
just one speaker in a stereo or surround sound system is not connected in phase, the bass will be weak and the
overall sound will be diffuse.
Fig. 1
5
Page 8
Correct phasing of the speakers is vital for sound quality so check your amplifier manual for
instructions. Some vacuum tube amplifiers may require that you change the phase between amplifier
and the speakers by reversing the cable connections (e.g. Red amplifier terminal to White/Black
speaker terminal) on both speakers.
Very tight and positive connections are necessary but do not over-tighten the screws! Care should be
taken to ensure that the connections are neat, and there are no loose wires, which could cause a short
circuit and damage the amplifier.
Always turn off your amplifier before connecting any cables or altering any connections!
Installation of Lowther drivers (optional)
Your Teresonic speakers are usually shipped with Lowther drivers installed, and ready for use. In certain
situations, such as to avoid driver damage during the transport, the drivers may be shipped separately in thei r
original packaging. In this case you need to install the drivers – an easy and straightforward process. It will also
give you opportunity to see inside your speaker’s fine acoustic chamber.
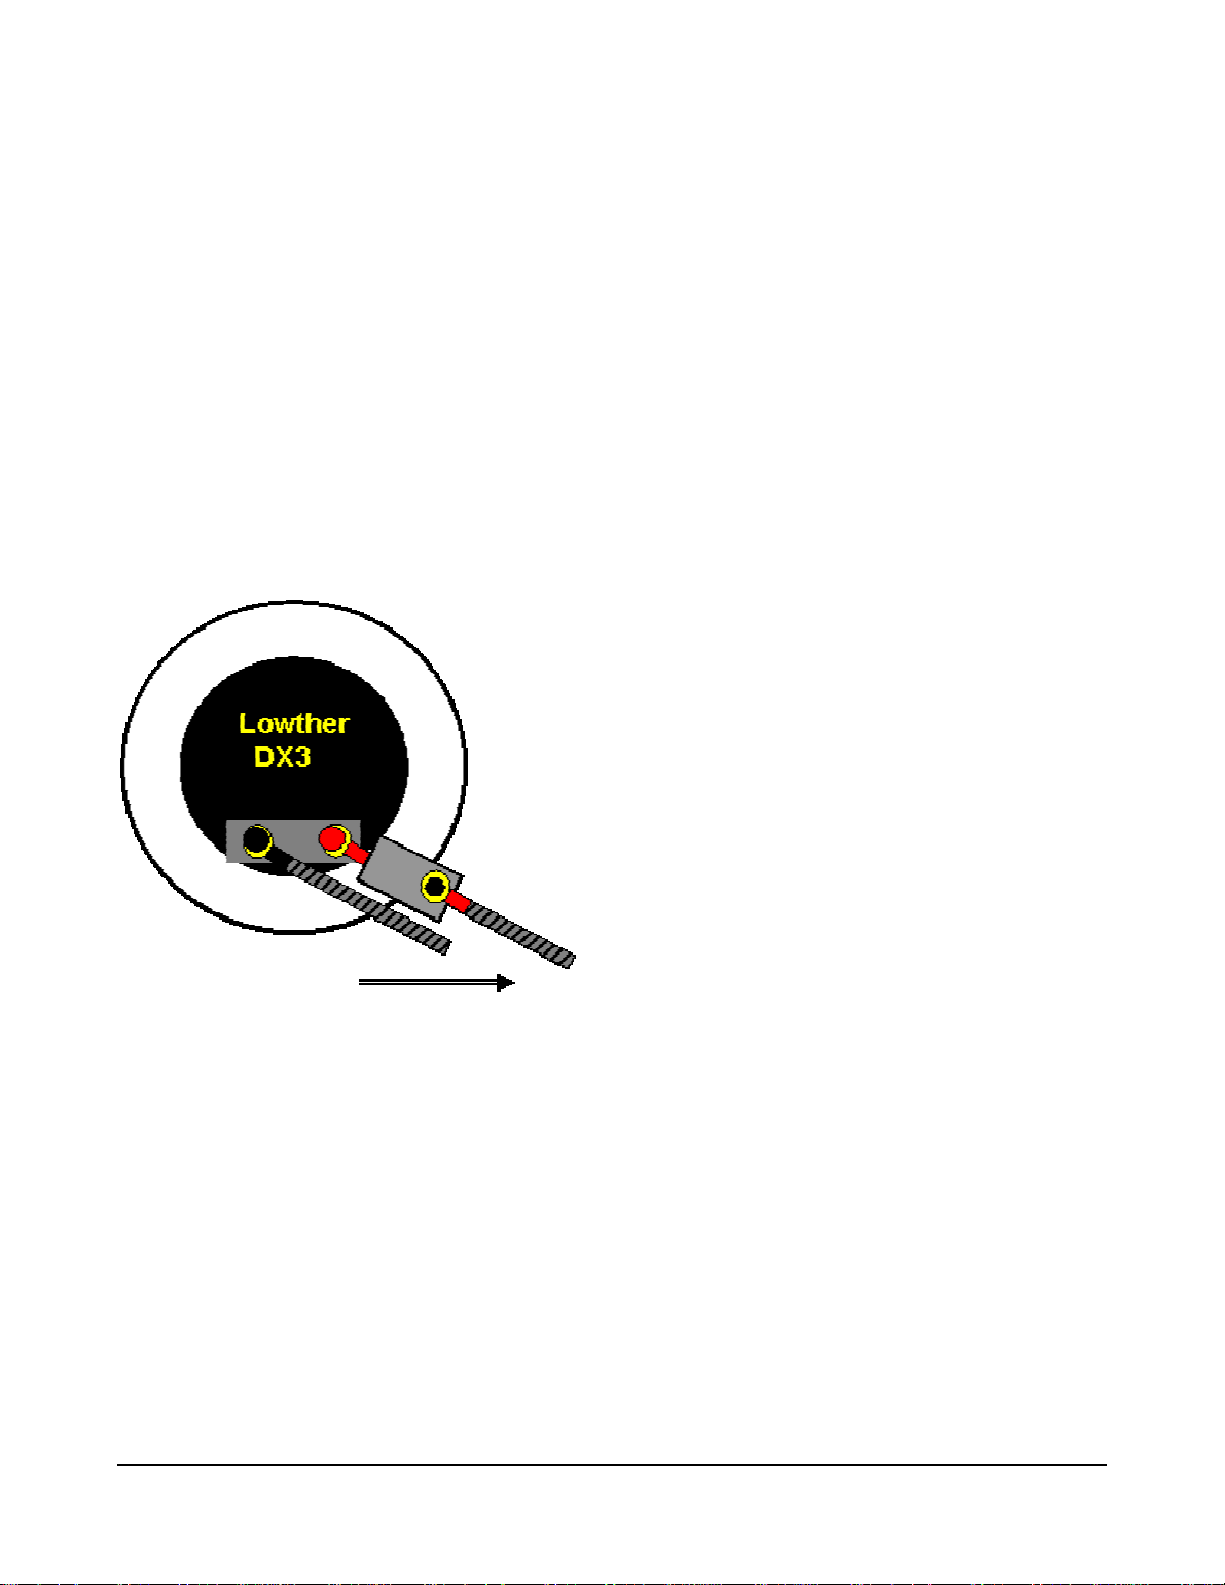
Inside the baffle opening you will see two internal cables
fixed around driver’s back support with a plastic tape.
Cables are equipped with gold plated Red (+) and Black
(-) O-rings. In order to prevent unlocking (unscrew or
loosening) the terminals, place the cables angled to the
right, looking from the back of the driver, as shown in
the Figure 2. This way contact loosening will be
prevented even if cable moves slightly.
After cables are properly attached to the driver, they can
be put in place and tightened with four screws that are
provided together with an appropriate tool. The back of
the driver should be touching the back support rod that
is designed to eliminate driver vibrations and assure the
optimal sounding of the drivers.
Fig. 2
Installation and operation
Place the speakers in their approximate location following recommendations in chapters four (Fine Tuning)
and five (Room Acoustics) for the best results.
It is worth noting that when the tone controls on your pre-amp are turned above the neutral setting this
significantly burdens both speakers and amplifier. In a good sound system tone controls should only be used to
compensate for poor recordings and not to permanently compen sate for weaknesses elsewhere in the system.
Teresonic recommends that the tone controls generally be set to the neutral position, and you achieve your
desired sound image through correct positioning of the speakers.
Ensuring that you keep the volume low enough so the sound rem ains clear and undistorted will minimize the
strain on both speakers and amplifier. Care should be taken when using the loudspeakers with very high
powered amplifiers. Although Teresonic speakers are reasonably tolerant and have power handling of up to
6
Page 9
100W, they are also extremely efficient and therefore require considerably less power than most louds peakers in
the market. If audible distortion occurs, the amplifier or the loudspeaker is being overloaded and damage is
likely to result.
Should you be unfortunate enough to damage a drive unit eith er by accident or misuse, please ensure that it is
replaced only with an original DX3 or DX4 Lowther driver. This will maintain the speakers’ performance.
Important! Break-in Period
With very few exceptions, dynamic loudspeakers have a break- in period, where the drive units “loosen
up”, during this time the bass will not display its full lower bandwidth and the speaker will sound brighter
than when “broken-in.” As the suspension material of the driver “softens up”, the fullness of the bass
and the smoothness of the treble will start to emerge.
The break-in process occurs naturally as music is played through your system. To reduce the time
required, it is recommended that the system be played continuously, using either a digital source in the
repeat mode (CD) or an FM broadcast signal (tuner).
1. Your Teresonic speakers went through a 100 hour initial break -in period in the factory
2. Your recommended break-in period is at least 200 hours best accomplished with relatively loud
and dynamic source material.
During the break-in period you will notice improvements such as increase in bass content and control, sound
image opening up, and the overall sound gaining in better and more involving presentation. It is therefore
recommended that the fine tuning of the entire system be delayed until after the break-in period is completed.
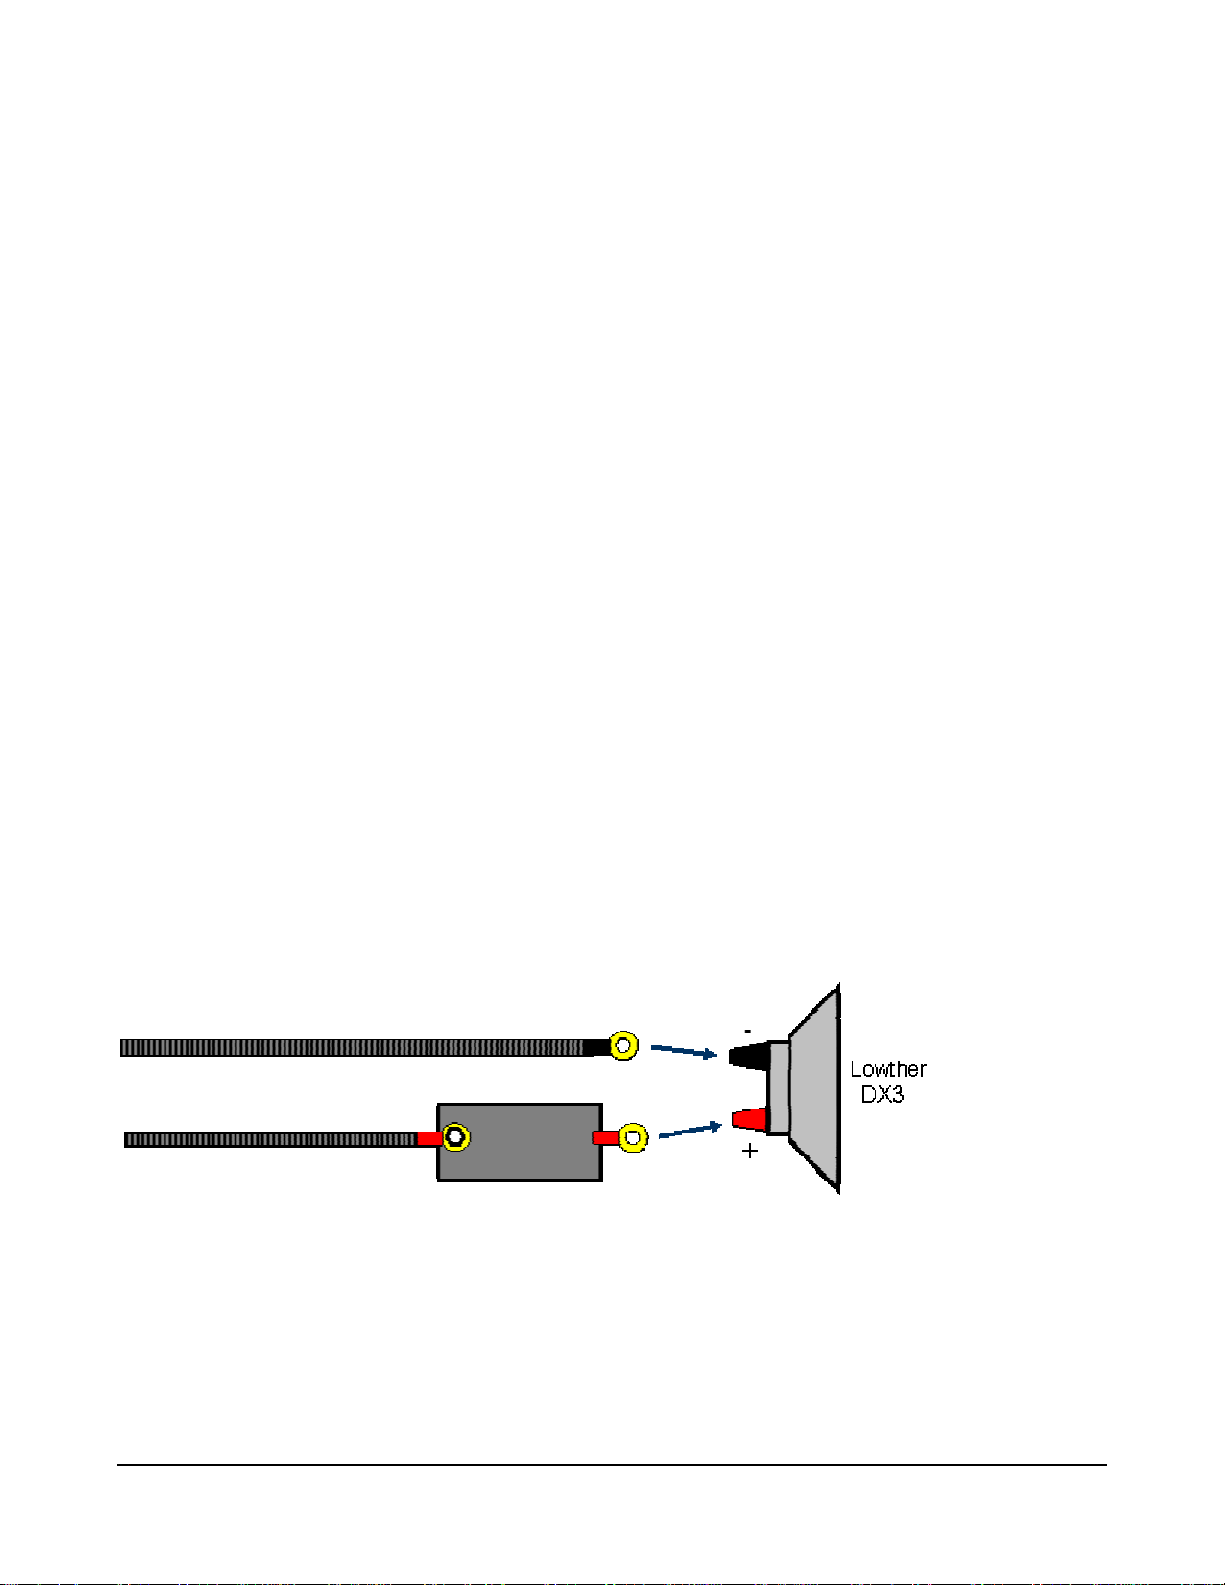
The sound of Lowther drivers during the break-in period may be experienced as “ bright” a nd even “harsh.” To
eliminate some of the “brightness” and “harshness” of the sound and to make the li stening experience more
pleasant during the break-in period a special filter has been developed and connected at the end of the RED
cable (black box in Figure 3).
Fig. 3
This black box should be removed after the break-in period – usually after approximately 300 hours of
operation. It can be left in place for a longer time, even indefinitely, but the most natural sound will be
obtained when the filter is removed.
7
Page 10

Fine Tuning
Chapter
4
Y
Following these recommendations is critical to obtaining optimum results from your speakers.
our Teresonic speakers are among the finest loudspeakers ever designed to o ffer exceptionally natural
sound and highest sensitivity (over 100 dB) in its class. Still, fine tuning recommendations and room
acoustics suggestions are imperative to obtaining the best results. For example, selecting the proper
room position for your speakers can dramatically improve their overall performance.
Speaker Placement
Although your Teresonic speakers may be placed in a wide variety of positions relative to the walls of the
room, including corners of the room, it is still recommended to experiment a bit to achieve optimal results. The
recommended position is close to the back wall. This back wall loading will improve the bass response in many
rooms. See the following chapter five for details how to improve the room acoustics.
There is no suggested upper limit for the distances to the walls, even 10 feet to one wall and 15 feet to the other
wall will provide good results. However, regardless of the absolute numbers used, the most even bass response
will be attained if the distances from the side wall and rear wall are not overly similar. The following points
highlight the fundamental concepts in loudspeaker positioning covered in details in the next chapter five:
Left to right room symmetry aids in producing a balanced image
The best bass response will be achieved with speakers positioned close to the back wall
Optimal sound stage will be attained when the distances between speakers doesn’t exceed 8ft (2.5m)
Positioning (Toe-In)
Adjusting the toe-in angle of the speakers is useful in tailoring the sound to match the characteristics of your
system and the listening room. When the speakers are facing straight forward, they tend to create a large,
expansive sound stage. As they are rotated toward the listening position, the image becomes more compact,
with increased focus, creating a greater sense of intimacy. Pointing the speakers inward is also helpful in
situations where strong reflections from the side walls are a problem.
Start with loudspeaker facing straight forward, which is according to our experience the preferred position for
listening, i.e. 20-30 degrees relative to the optimal listener position (see Fig.2), and play either a mono source, or
8
Page 11
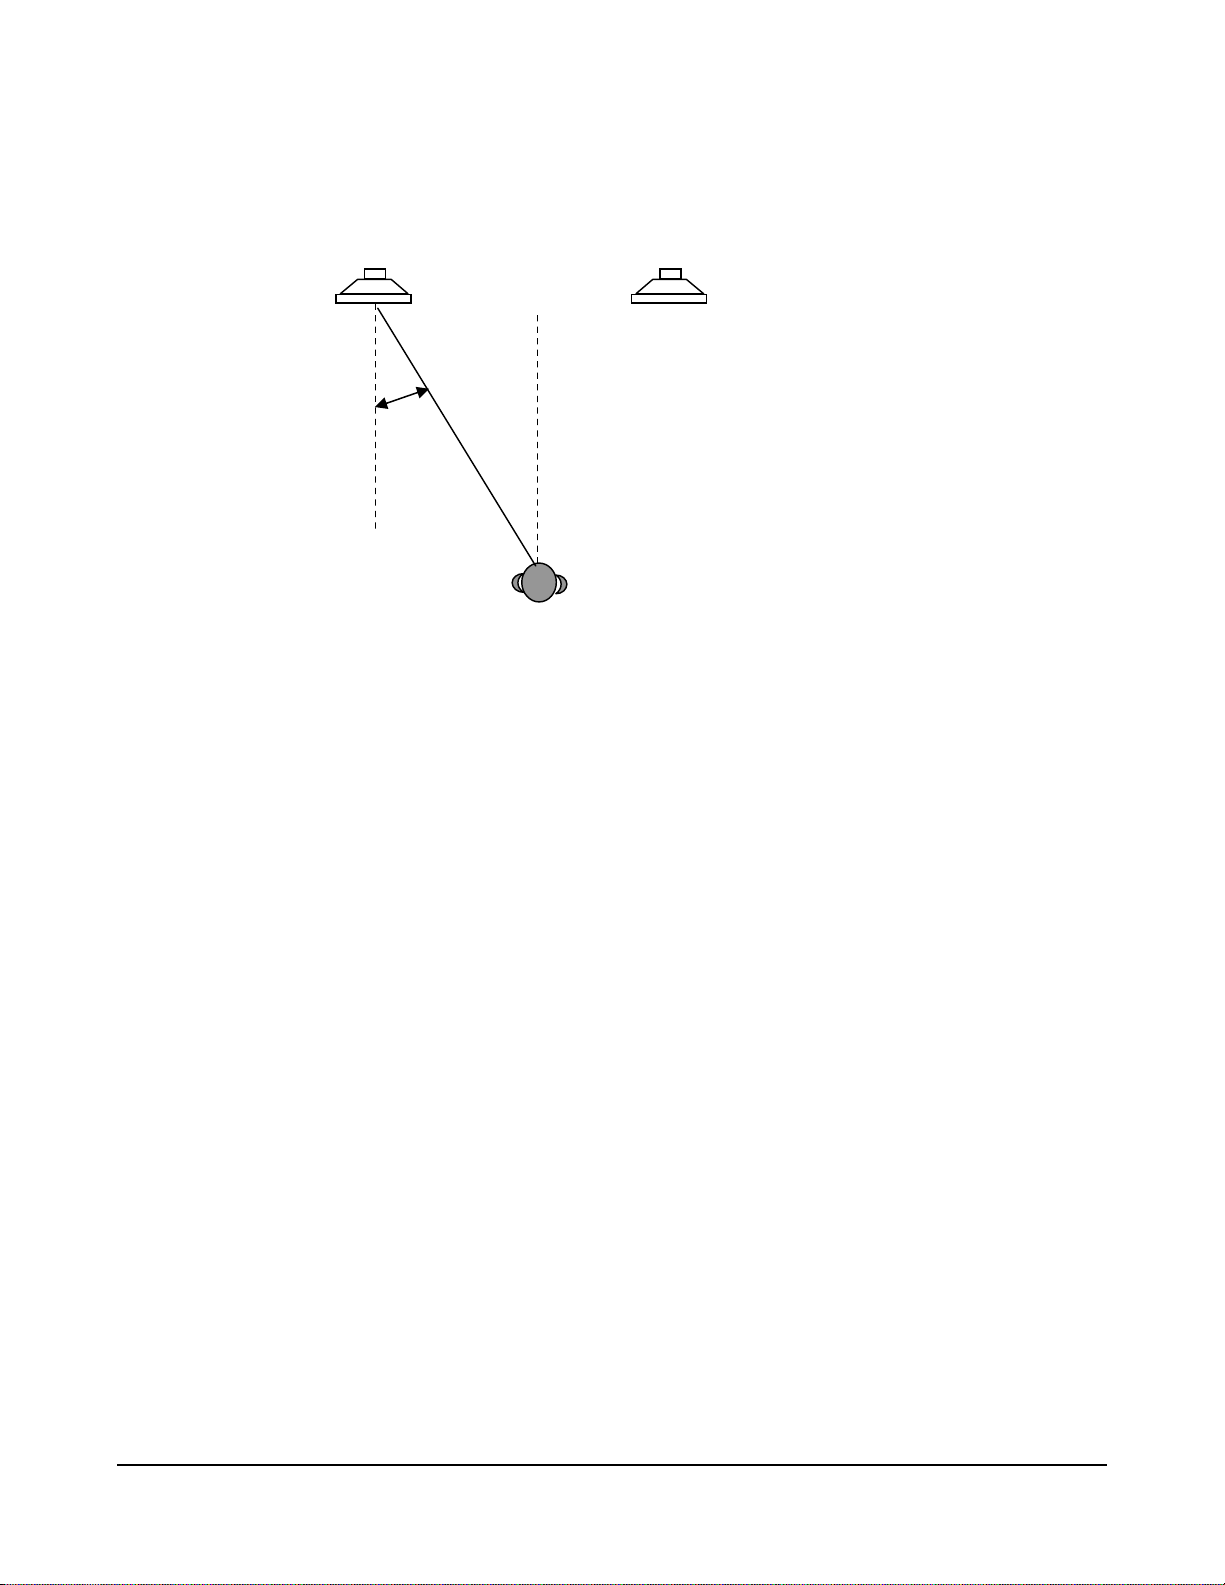
a stereo source with a distinct center image (e.g. solo instrument, human voice), thro ugh both channels. If the
20-30
image is not in the center carefully rotate the loudspeakers inward in small increments to bring the image in
precise center focus. Toe-in is rather delicate, and exper imentation is necessary to achieve proper angle for your
listening situation. The optimum angle is usually 3-10 degrees inward.
0
Once you are happy with the positioning of your speakers, it is important to ensure that they are completely
stable. For floor models it is essential that you use the accompanying spikes.
Room acoustics and corner treatment
Listening your Teresonic speakers in a properly set-up room can be a startling experience. The listening room is
the final link of the playback system, as important – or more important, than other components in the chain:
1)Turntable, CD or SACD player, 2)Interconnect cables, 3)Amplifier, 4)Speaker cables, 5)Loudspeakers, and
6)Listening room! Some simple and relatively inexpensive adju stments can lead to superb results as described in
the following chapter five.
Some of the sound you hear comes not from the actual speakers but fro m reflections from floor, ceiling and
walls. These reflections are dampened by objects such as furniture, plants and carpets. If the sound is bright,
soft items such as curtains and carpets can help. I f the room h as large window panes, drawing th e c urt ains will
prevent reflections from the glass surfaces.
Both the amount and quality of the deep bass depend on the size and shape of the room and the position of
the speakers. If positioned near a side or back wall, this will accentuate the bass. A corner location will
accentuate it even more, but will also increase the reflections. The decision is yours, so experiment with
different positions to find which provides the ideal sound for you.
Damping with a sonically absorbent material on the side and rear walls near the speakers is strongly
recommended in order to get well balanced sound stage and image depth (see “Improve the sound stage and
image depth” section in the chapter five. In addition, it’s critical to contro l the first reflection s of low frequency
sound, which normally occurs at the corners behind the loudspeakers. Placing Tube-Traps (available from
Acoustic Sciences Corp) at the room corners can significantly improve the quickness of bass transients ( see
“Getting fast, tight, realistic bass” section in the chapter five.
9
Page 12

Taking Care of Y our Speakers
Your Teresonic speakers are finished with several layers of a high quality furniture lacquer. Use only high quality
furniture polish to properly care for your speakers. Do NOT use cleaners that contain ammonia, strong
solvents, or abrasive materials. Use of these materials can degrade, scratch, or even DESTROY the
finish.
Apply only a finest furniture polish to a clean, lint-free polishing cloth (or use cotton cloth that is clean and lintfree), and carefully wipe it on the cabinet. Be careful NOT to apply the polish to the loudspeaker drivers.
Wipe off the excess polish until the desired luster is achieved.
The loudspeaker drivers require no regular maintenance. Do not attempt to clean the drivers as they are
easily damaged. In addition, do NOT place the speakers face down on carpets or other surfaces as
exceptionally powerful speaker magnets may collect dust particles that can damage the driver.
10
Page 13

Room Acoustics
Chapter
5
E
Listening your Teresonic speakers in a properly set-up room can be a startling experience.
very room has its own distinctive acoustics, which influence the way we experience the sound from a
speaker. In fact, it's a matter of how the room accommodates the sound and then dissipates it. You
can influence the acoustics of your listening room in various ways. Some simple and relatively
inexpensive adjustments can lead to superb results.
The great majority of listening rooms are rectangular, with parallel surfaces made of hard materials that are
acoustically reflective and can produce standing waves, flutter echo, and unwanted reflections that need to be
eliminated. These large areas are the predominant factors in the overall room acoustics, although the other
items in the room such as furnishings, carpeting, wall hangings, doo rways etc. will also play a role. Here are
some recommendations.
Improve the sound stage and image depth
Reflected sound waves that reach the listener within 10-20 milliseconds of the direct signal from the
loudspeaker are sometimes called “early reflections” that can reduce the subjective quality of reproduced sound.
When a reflected sound reaches the listener more than 40 millisecond later than the direct sound, the reflection
is heard as a discrete echo. This is a desired effect that helps our brain to interpret spaciousness of the room as
any musical performance is heard in some room – jazz club, concert hall… However, if the reflected sound
arrives within around 10-20 milliseconds, the ear/brain system tends to integrate the two sounds so that only
one sound is heard. “Early reflections” in the listening room will tend to obscure the ambient information in
the recording (that portrays the original record ing site), leading to a loss o f dimensionality and spaciousness.
Secondary arrivals within the first 10 milliseconds are especially problematic, becoming less troublesome as the
arrival time gets to 20 milliseconds or so.
How to deal with these unwanted reflections? When arranging furnishings in your listening room,
remember that reflective objects should not be within a six (6) foot radius of either the speaker or
listener to avoid “early reflections.” If you wish to achieve an even more spacious sound stage, it may
be useful to place a sonically absorbent material on the side and rear walls near the speakers. This can
be particularly effective at the points where the sound wave is directly reflected to the listening
position (a mirror can be used to determine these points). As the distance to the wall becomes
smaller, the suppression of these reflections becomes more important.
11
Page 14

“Early reflections” will tend to diminish the sound stage in the direction of the reflections – “early reflections”
from the side walls tend to reduce sound stage width, while “early reflect ions” from the back wall will reduce
image depth. Some listeners are finding that a strong sense of depth enhances the feeling of involvement when
listening, due to three-dimensional solidity of images. Therefore, it’s more important to have a greater distance
from the speakers to the rear wall than to the side walls. Typically, this is easier to ach ieve if the speakers are
placed along the short wall of the listening room.
Getting fast, tight, realistic bass
The parallel surfaces of most listening rooms can lead to a potent ial problem in the low frequencies. A Sound
wave can be repeatedly reflected from opposing surfaces, back and forth. If the distance between the surfaces is
a multiple of one-half the sound wavelength, a standing wave will be set up. This means that the incident and
reflected waves combine so that a stationary pattern of high a low sound pressures is established in the room.
This irregular distribution of sound level is caused by cancellation and reinforc ement between the reflected and
direct sound waves.
At high frequencies, this pattern of high and low sound pressure levels within the room becomes too finely
spaced to be discerned. However, when the dimensions of the room are comparable to the wavelength of the
musical notes, there will be obvious changes in the intensity of cert ain bass notes in different locations within
the room. Additionally, the existence of the standing wave implies a resonant condition where acoustic energy is
stored in the room. This energy storage can result in “heavy”, “muddy”, or “slow” bass.
Since the presence of standing waves is caused by parallel reflective surfaces, practically every listening room
suffers from this problem to some degree. However, several factors are working in our favor here. First, as the
room size increases, the affected frequencies become lower and thereby less audibly apparent. Second, the
presence of shelving or furniture against the walls will break up the large surfaces, reducing the magnitude of
the problem. Third, upholstered furniture can absorb a significant amo unt o f bass, diminishing the b uild-up of
resonant energy. Finally, typical wall construction isn’t completely reflective at low frequencies.
However, in some cases audibly objectionable standing waves will still be present in the listening room. This
can be noted by large variations of the intensity of certain bass notes in different areas of the room. Another
indicator is an unevenness of loudness of different bass notes. (this is sometimes what is actually on the
recording, so be sure that this is consistently a problem on a variety of recordings).
In order to reduce or eliminate standing waves that may exist in your room causing “heavy”,
“muddy” or “slow” bass, it will be necessary to reduce the low-frequency reflectiveness of at least one
of the parallel surfaces opposite of each other. The most effective method is to use Tube-Traps,
available from Acoustic Sciences Corp. This is the only commercially available sound t reatment that
absorbs significant amounts of energy bellow 400 Hz. Experimentation will be needed to determine
the optimal locations.
Improve musical detail
Parallel, reflective surfaces can also produce a different audible problem. If there is little absorption at higher
frequencies, musical transients containing high frequencies, such as a hand clap or strike of a percussion
instrument, can be heard bouncing repeatedly between the surfaces. This effect is called flutter echo (or slap
echo), and such multiple reflections can obscure music detail. The situation is analogous to standing bet ween
two parallel mirrors, when the outline of your reflections becomes more difficult to discern, due to the
additional reflected images present.
12
Page 15

Again, it’s only necessary to reduce the reflectiveness of one of the surfaces in each pair of surfaces to
eliminate flutter echo. Since this is concerning the high frequencies, any soft material is appropriate.
Drapery or fabric wall hangings are quite effective on the walls. Bookshelves also work well by
breaking up the flat surfaces. Carpeting should eliminate potential problems between the floor and
ceiling.
Additionally, it is desirable to maintain a degree of left/right symmetry in the room to preserve a
balanced acoustic “space”. For example, if your listening room has full length draperies along the
right wall, and the left wall is bare, slap echo will not be a problem. Nonetheless, the sound stage ma y
be somewhat distorted, and it could be beneficial to place a fabric or tapest ry on the wall opposit e the
draperies.
Improve bass in your system
It is widely known that speaker placement relative to the floor and walls can affect the relative am ount of bass
that the system produces. Similar to the way that mirror reflects the light of a light source, so can the surfaces
near the loudspeaker reflect the sound waves back into the listening room. However, when th e path length
difference of the reflected wave is short relative to the wavelength of the sound, the reflected wave is
substantially in-phase with the original wave. When such conditions are met, the coupling coefficient between
the speaker diaphragm and the air increases, and the speaker efficiency increases. This changes the actual
frequency response of the speaker, and is not attributable to standing waves or other room resonances.
There are typically three reflective surface s near each speaker: the floor, the rear wall, and the side wall. Each of
these surfaces produces its own reflections, and hence its own cancellation and reinforcement. By properly
selecting the distances to each surface, we can provide a uniform and extended bass response. Conversely,
improper placement of the loudspeakers can result in uneven frequency response and lower bass quality.
In order to take full advantage of the room to provide the most uniform and extended bass response,
it is recommended that the loudspeaker be placed between three (3) and six (6) feet from sid e walls,
less than one (1) feet from the rear wall, and at least (6) to (12) feet from the op posite wall – more room
length is better to allow long wavelengths (low frequencies) to “unfold.” The measurements are made
from the wall to center of the speaker cone. The exact distances are not critical, although the two
distances should not be within about 33% of each other. A good rule of thumb is that the distan ce to
the side wall is about 25% (or less) of the room width, and the distance from speaker to speaker is
about 50% (or more) of room width.
13
Page 16

14
T echnical Specifications
Chapter
6
W orld’ s most natural sounding speakers provide the highest performance in its class
Integrum Loudspeaker T echnical Specifications
Description One-way floor standing dynamic loudspeaker
Enclosure type ETQWT™ t ransmission line with Helmholtz resonators
Bandwidth 30Hz-22kHz ± 3dB
Sensitivity (1W/1kHz/1m) 101.5dB
Drive unit One 8” Lowther DX 3 driver
Impedance 8 Ohms
Magnet type Hi-Ferric ™ Rare Earth
Flux density 2.0 Tesla
Crossover/Filter None
Power handling 4 - 100 Watts into 8 Ohms
Connections WBT gold plated terminals
Internal wiring Zero interference Clarison cables
Dimensions (HxWxD) 47 x 10.5 x 20in (122 x 26 x 51cm) max. – with spikes
Net weight 70lb (32kg)
Shipping weight 74 lb (34kg)
Access. supplied Spikes and floor discs – gold finish, adjustable
Speakers grill – black cloth, removable
Cabinet Real wood veneer finishes: Rosewood/Black
(Other colors available as special order)
Specifications subject to change without prior notice.
Page 17

Ingenium Loudspeaker T echnical Specifications
Description One-way floor standing dynamic loudspeaker
Enclosure type ETQWT™ t ransmission line with Helmholtz resonators
Bandwidth 30Hz-22kHz ± 3dB
Sensitivity (1W/1kHz/1m) 101.5dB
Drive unit One 8” Lowther DX 3 driver
Impedance 8 Ohms
Magnet type Hi-Ferric ™ Rare Earth
Flux density 2.0 Tesla
Crossover/Filter None
Power handling 4 - 100 Watts into 8 Ohms
Connections WBT gold plated terminals
Internal wiring Zero interference Clarison cables
Dimensions (HxWxD) 73 x 10.3 x 20i n (185 x 26 x 51cm) max.. – with spikes
Net weight 80 lb (36kg)
Shipping weight 120 lb (54kg)
Access. supplied Spikes and floor discs – gold finish, adjustable
Speakers grill – black cloth, removable
Cabinet Real wood veneer finishes: Rosewood/Black
(Other colors available as special order)
Specifications subject to change without prior notice.
15
Page 18

Warranty an d Service
Chapter
7
Y
Your Teresonic speake rs are made of highest quality materials and components. In the
unlikely event o f a problem this product is covered by a full three (3) year warranty.
our Teresonic speakers are warranted against defects in workmanship and materials for a period of
three (3) years, provided that you register on www.teresonic.com web site within thirty (30) days of
the purchase date. If the registration is not done within the 30 days period, this warranty is null and
void. This warranty is transferable to subsequent purchasers within the original three year period. A
complete statement of warranty is given bellow. Please take the time to register on the web site.
In the unlikely ev ent of a problem
In the unlikely event of a problem with your Teresonic speakers, the only component susceptible to failure is
the drive unit since there are no other mechanical or electronic components in your loudspeakers to guaranty
the most natural sound and the highest performance possible. If driver replacement is required, have your
dealer contact Teresonic who will provide an exact replacement unit, ensuring continued operation at the
highest level of performance and sound quality. The defective driver must then be returned to the factory for
inspection to determine the status of the warranty claim. This on-site replacement of the driver unit eliminates
the time and expense of shipping the entire speaker to the factory for repair. All warranty claims must be
made through an authorized Teresonic dealer or distributor or factory direct.
CAUTION: TO REDUCE THE RISK OF ELECTRIC SHOCK, DO NOT REMOVE
THE BACK P ANEL. NO USER-SERVICEABLE P ARTS INSIDE. REFER
SERVICING TO QUALIFIED PERSONNEL.
16
Page 19

Warranty Statem ent
1. Teresonic warrants the mate rials, workmanship, and proper functioning of this product for a period of three
(3) years, provided that you register on www.teresonic.com web site within thirty (30) days of the
purchase date. If the registration is not done within the 30 days period, this warranty is null and void.
If any defects are found in the materials or workmanship of this Teresonic product, or if the product ceases to
function properly within the appropriate warranty period from the date of first purchase, the unit will be
repaired or replaced by Teresonic or its authorized agent after receiving authorization from the factory or
dealer.
2. Purchaser must return the product, packaged in the original shipping box, freight prepaid to:
Teresonic
1215 Fiddlers Green
San Jose, California 95125
3. Teresonic reserves the right to inspect any products which are subject to any warranty claim prior to
repairing or replacing. Final determination of warranty coverage lies solely with Teresonic. Any
products which do not conform to this warranty shall be replaced or repaired by Te resonic as soon as
possible following receipt of the product and claim, but in no event later than thirty (30) days aft er
receipt of the product. Out-of-warranty claims will be billed for labor, materials, return fright, and
insurance as required. Any product for which a warranty claim is accepted will be returned to the
purchaser and cost of shipping and insurance will be factory prepaid within the boundaries of the
USA. Units to be shipped outside the USA will be shipped freight collect only. This warranty gives
specific legal rights. The purchaser also has limited warranty rights, and may also have other rights
which vary from state to state.
4. This warranty is extended to the p urchaser and any purchaser from h im for value. A proof of purchase (e.g.
sales invoice) must be provided.
5. Teresonic strives to manufacture the very finest possible equipment, and therefore reserves the right to make
changes in design and improvements upon its products, without necessarily assuming an obligation to retrofit
such changes upon its previously manufactured models.
17
Page 20

Final Instructions
1. Read Instructions - All the safety and operating instructions should be read before the
product is operated.
2. Retain Instructions - The safety and operating instructions should be retained for future
reference.
3. Heed Warnings - All warnings on the product and in the user manual should be adhered
to.
4. Follow Instructions - All operating and use instructions should be followed.
5. Water and Moisture - The product should not be used near water - for example, near a
bathtub, washbowl, kitchen sink, laundry tub, in a wet basement, near a swimming pool etc.
6. Carts and Stands - This product is floor standing model and no use with carts or stands is
recommended by the manufacturer.
7. Wall or Ceiling Mounting - This product is floor standing model and is not designed to be
mounted to a wall or ceiling - not recommended by the manufacturer.
8. Ventilation - This product should be situated so that its location or position does not
interfere with proper ventilation. For example, it should not be situated on a bed, sofa, rug,
or similar surface that may block the ventilation openings; or placed in a built-in installation,
such as a bookcase.
9. Heat - This product should be situated away from heat sources such as radiators, heat
registers, stoves, or other appliances that produce heat.
10. Cleaning - Do not use any liquid cleaners. Use only a dry cloth to wipe off dust and
grease or high-quality wood polishing products.
11. Object and Liquid Entry - Care should be taken so that objects do not fall and liquids are
not spilled onto the product or into the enclosure through openings.
12. Damage Requiring Service - This product should be serviced by qualified personnel on ly
especially when
a) Product have fallen, or liquid has been spilled onto or into the product; or
b) The product has been exposed to rain; or
c) The product does not appear to operate normally, or exhibits a marked change in
performance; or
d) The product has been dropped, or the enclosure damaged.
13. Servicing - The user should not attempt to service the product beyond that described in
the opera-ting instructions.
14. All other servicing should be referred to qualified service personnel.
18
 Loading...