


USER MANUAL
The newgen is household electronics and certified for electronic wave safety. It can be used in anywhere.

Player fe a t u r e s
1. 4 functions (Digital camera, digital voice recorder. MP3 Player, Portable data storage)in one device
make it easy to use and carry it around.
2. Newgen is compatible to various operating systems, Mac 8.1 or above, win 98/98 SE/ME12000/XP.
Connect the USB cable to the USB port of th PC, PC will automatically recognize it as a portable data
storage. you can use it freely as it's hard disk driver.
All the files in PC can be stored in Newgen by Drag &Drop(12 megabites per sec.)
3. Voice file can be attached on photo taken.
4. Four folders, voice folder A, B, MP3 folder, Picture folder can save up tp 1000 files in each folder.
5. Application software can control sound electronic photo album. Memorable pictures can be stored
with voice. Recorded voice can be sent by e-mail. in exe. file and receiptor can listen to voice file
without program installed.
6. Play speed, repeating tracks and section make it useful for language studying.
7. Volume Automatic System keeps the even sound.
8.
Files in Newgen is executable in PC and Newgen is compatible to various application software.
■Visit our website at http//www.teravalue.com to update your application software or download driver.
4 5
목 차
C o n t e n t s
Ⅰ. Individual use Ⅱ.Connecting the Newgen to PC
player features
Parts description
Display panel
Inserting the battery
Basic functions(turn on & off the
power, selecting files, setting the volume)
c a m e r a
Attaching voice file on photo taken
Listening to the recorded voice
attached on photo
R e c o r d i n g
Additional recording on recorded file
4
Recording through external microphone
1 0
and recording phone conversation
1 2
Listening to recorded file
Repeat segmentation
1 3
Forword/Reverse/Search within a file
1 4
Searching files
1 6
Listening to MP3
1 8
V A S
1 9
Erasing files
2 1
2 2
2 3
2 4
2 5
2 6
2 7
2 8
2 9
3 0
Connecting Newgen to PC
Installing Win98 driver on PC
Newgen folders in PC
Download MP3 files
PC to NewGen
Saving data in Newgen
Send files in
3 2
3 3
3 5
Newgen to PC
Installing application software
Application softwares
Electronic photo album with sound
3 7
Special effects on photo
3 8
3 9
4 0
4 1
4 4
4 7
6 7
Greeting card with pictures and sound
Voice playback & sending voice mail
Recording voice on wav file
Attaching audio & visual effects on file
Trouble shooting
4 8
Technical specification
5 0
W a r r a n t y
5 2
■Number of picture is equal to number of description.
5 3
5 8
6 2
6 4
Ⅰ. I nd ividual use
Safety precaution
8
5 6
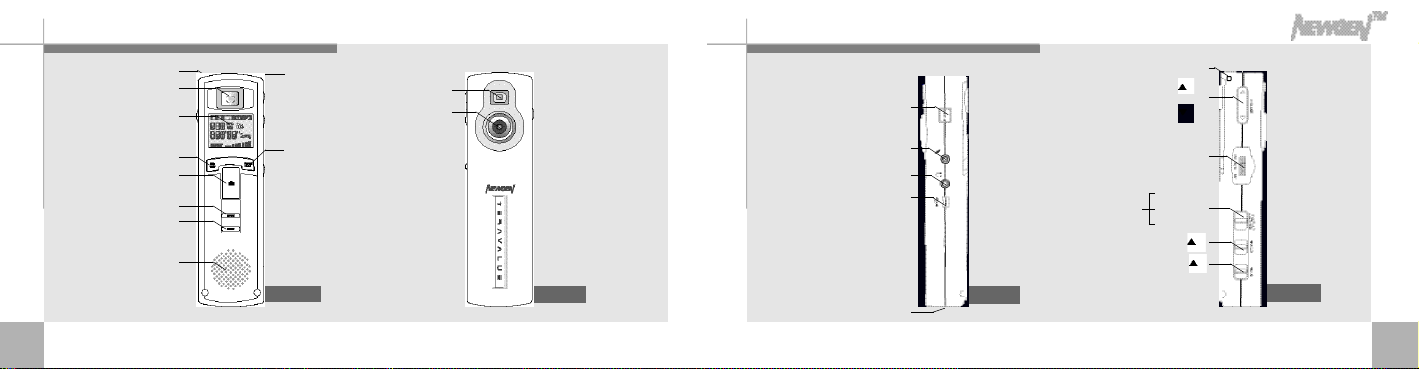
Pa rts description
Build in microphone
View finder
L C D
Recording /Stop button
Camera shutter button
Repeat button
Erase button
S p e a k e r
Lace hole
F o l d e r
/pause button
Front panel
View finder
L e n s
Power button
External microphone jack
Stereo earphone jack
USB connector
Rear panel Right panel
Battery door
Left panel
Forward / reverse / stop button
Play speed switch
volume antaratcc switch(VAS )
Lace hole
Volume control
S l o w
F a s t
N o r m a l
Hold switch(HOLD )
1 0 1 1

Display panel
▶LCD display panel
v o i c e r e c o r d i n g
f i l d e r
Voice recording
i c o n
File numbering
V A S
Recording &
playback time
( m i n u t e’s e c o n d”)
Each bar among eight bars of memory capacity has a capacity
as below
M o d e l
T N 3 2 0 3 A
Capacity
4 m e g a b i t e s
Picture folder
MP3 folder
T N 6 4 0 3 A
8 m e g a b i t e s
battary icon
volume icon
section
repeat icon
Repeat icon
Memory capacity
T N 2 8 0 3 A
1 6 m e g a b i t e s
▶P a r t s
user's mannual, phone connecter cable,
phone recording adaptor AAA type
batteries(2), necklace strap, application
software installation CD Microphone,
audio cable, stereo earphone, USB cable.
▶Battery installation.
1. Open the battery door below the main unit,
insert 2 AAA type alkaline batteries and close
the battery door (battery : AAA type or equal type)
Playing tire (AAA Avahel)
B a t t e r i e s
"AAA"Alkaline batteries
■For efficient battery use, it will power off automatically when it's not in use for more than 10 minmtes.
■Pay attention to the orientation of the + and - ends of the batteries.
I n s e r ting the battery
R e c o r d i n g
Listening through speakers
9 h r s
(medium volume)
8hrs
2. Battery capacity icons are as follows
enough, lightly used, heavily used, empty.
e n o u g h l i g h t l y
u s e d
Listening through earphone
1 4 h r s
h e a v i l y
u s e d
Taking photo(consecutive shooting)
e m p t y
1,600 photos
1 2 1 3
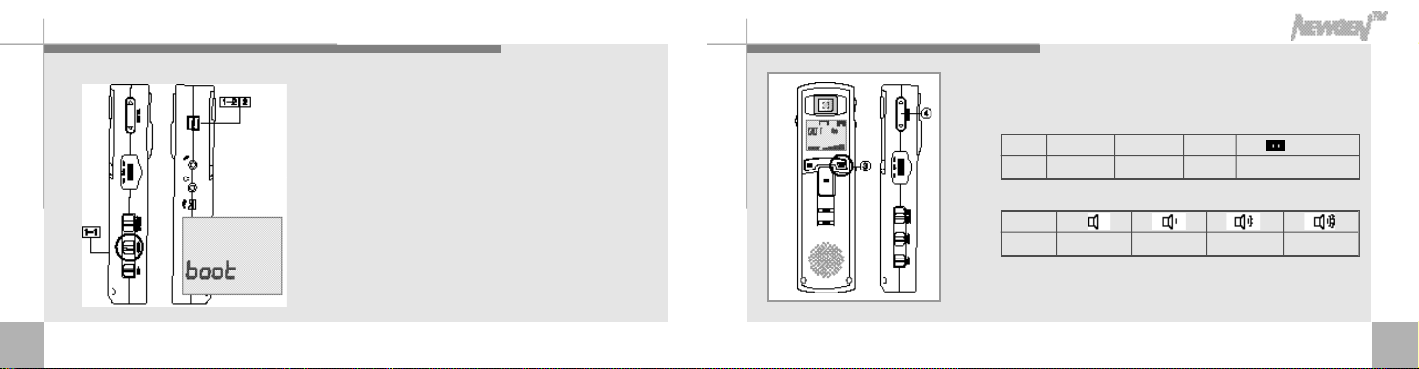
Basic functions(turn on & off the power, selecting files, setting the volume)
1 4
1. Turn on the powe - While the hold switch is off, press
power button. “b o o t”appears on
the display panel and it's for use.
While the hold switch is on, “H o l d”
will appear on the display panel
and automatically turned off.
2. Turn off the power - If the unit is in the stop mode for
more than 10 minutes, it will
power off automatically. Press
Power button in the stop mode to
power off manually.
3. There are four folders as below - Press Folder/Pause button
in stop mode to select file
in sequence.
D i v i s i o n
U s e
" A " f o l d e r
voice recording
voice recording
" B " f o l d e r
" M P 3 " f o l d e r
M P 3
" "folder
Taking pictures and recording
4. Control volume with the volume control button.
I n d i c a t i o n
V o l u m e 1 ~ 2 3 ~ 4 5 ~ 6 7 ~ 8
※while the hold switch on, buttons on the Newgen won't work.
(Hold switch on in stop mode more than 10 minutes, it will power off
automatically)
1 5
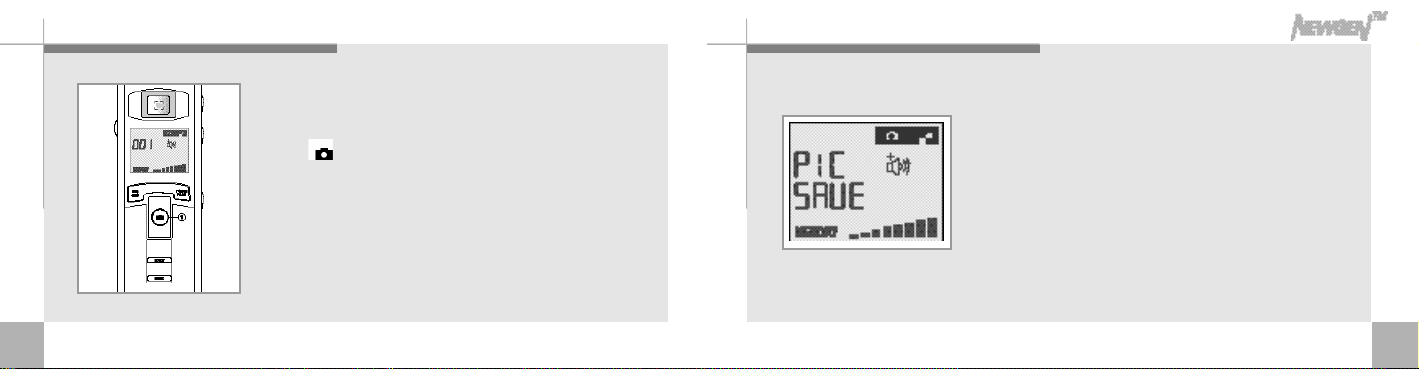
Taking picture s
1. Using view finder, get an right angel of the object and
press shutter. Hold still until it makes “b e e”sound to
get good quality pictures. (Up to 1,000 pictures can be
saved in the folder. In case of sound attached pictures,
numbers can be varied)
■Up to 1,000 files can be stored in one folder. In case of files with photo
attached, attached voice files are also saved in the folder and max.
number of photos in the file may vary.
2. While pictures are being compresed, “PIC SAVE”
will appear on the LCD, you can take next picture
when the sign is off.
■Be carefull not to cover the lens with your hand or necklace.
1 6
1 7
Attaching sound re c o rding on picture
Listening to the attached re c o r ding on picture
1 8
1. You can attach your voice on the picture by pressing
REC/STOP button within 10 seconds after shooting.
2. Press Folder/Pause button to pause recording. You can
resume the recording by pressing again FOLDER/ P A U S E
button.
3. Press REC/STOP button to finish recording.
■If the memory is full, Newgen will automatically shut off the recording.
1. Press Folder/Pause button to select folder.
2. Select the file you want to listen by pressing
, button.
■photo file with voice show Anot and photo only file shows a number
s i g n .
3. Press Play/Stop button to playback attached
voice recording.
4. While playback, you can playback previous or
next recording by pressing , buttons.
■photo file with voice. ■photo file
1 9
Re c o rd i n g
2 0
5. Pull down and hold to move forward or backward
within the current file.
6. To pause playback, press Folder/Pause button.
Press Folder/Pause button again, it will resume
p l a y b a c k .
7. Press the / button of your Newgen player to
stop playback.
■When earphone is connected to Newgen, speaker will be shut
o f f .
< F o l d e r >
Up to 1,000 files can be saved in each A & B folder.
1. Face the Newgen to the source of the sound Press
Rec/Stop button, the voice will be recorded in the
sequence of the file numbers.
(All voice files will be stored in folder A unless you choose B folder.
Voice file attached to photo will be stored in photo file)
2. Press REC/STOP button to stop recording.
■Testing recording is recommended.
■The player will automatically stop recording when the memory becomes full.
■Adjust volume level before recording.
2 1

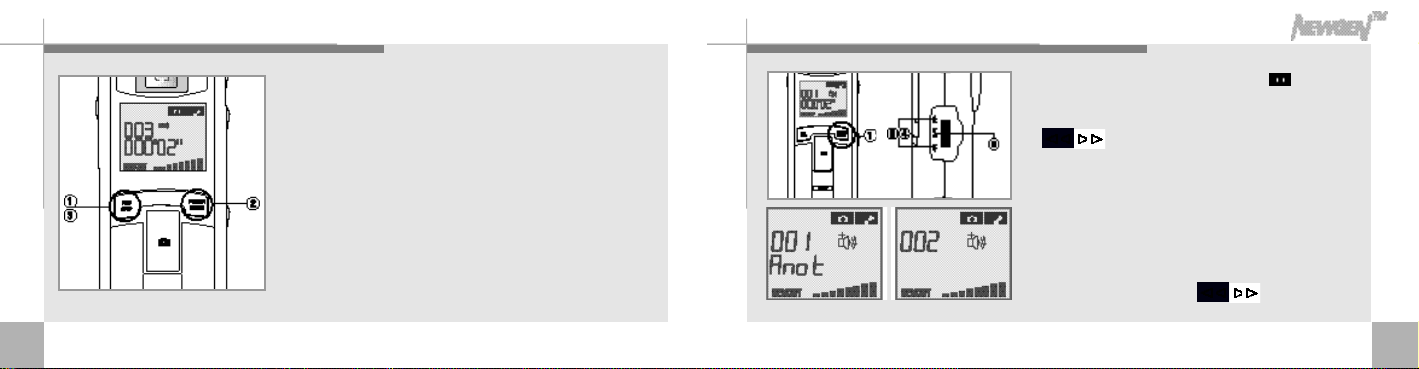
Additional re c o rding on re c o rded file
1. Use the Folder/Pause button to select the file you
prefer to add additional recording.
2. press , button to select the file.
3. Press and hold REC/STOP button for more than 2seconds
for additional recording following the selected file.
4. Press REC/STOP button againg to stop recording.
■Additional recording is not made on the voice file attached
to photo.
Recording through external microphone and recording phone conversation
<Recording through external microphone>
External micorphone connected to Newgen excludes the
built in microphone and voice can be recorded through
external microphone.
<Recording phone converstaion>
After connecting recording adapter and cable, press
Rec/Stop button while phone conversation. (This feature
is made only with same modular jack telephone)
2 2
2 3

Listening to re c o rded file
1. Use Folder/Pause button to select the voice folder
that you prefer.
2. Press , button to select file number.
3. Press / button to playback the selected file.
4. Control volume with the volume control button.
5.
You can pause the track by pressing Folder/Pause
button, press Folder/Pause button again to resume
p l a y b a c k .
■The last recorded file will be played back when
you press Play / Stop button right after recording.
6. Press / button to stop playback.
Repeat segmentation
<Repeary file> <Repeary section>
(Repeating folder)
<Repeating folder>
1. The folder will be continuously repeated. To cancel this
<Repecrg file>
1. Press and hold Repeat button for more than 2 seconds
<Repeating section>
1. Press the Repeat button at the start point of the section
displays and the selected section will be automatically repeated.
■Without selecting end point of the section, it will repeat the start point of
function, press any button.
during playback, displays and the file will be repeated.
Press Repeat button again to stop.
that you want to repeat and press Repeat button again at
the end point of the section that you want to repeat.
the section to end of the file that you want to repeat.
2 4
2 5

Fa s t f o rw a r d / Rewind / Se a rch within a file
Se a rching files
2 6
<Fastforward, Rewind>
■To search a file in stop mode - Prers the , button & to select a file.
To search a file while another
■ - Press , b wtt o n sto more onl track
file is being played back
<To search within a file being played back>
1.
Press and hold
resume playback. (This feature allows you to easily search a section in lengthy
r e c o r d i n g )
,
for word or back ward.
buttons to fast forward or rewind. Release the button to
<Search mode>
1. In stop mode, press and hold / button for more than 2
seconds. First 5 seconds of each file in current folder will be
played back in sequence.
2. Picss / button again to playback the file you prefer to
listen, when its first 5 seconds is being played back.
2 7

Listening to MP3
1. Select MP3 foler by pressing FOLDER/PAUSE button.
2. Press , button to setect the number of file you prefer.
3. Pess / button to playback.
4. Contrl volume with the volume control button.
5. Press anain / button to stop playback.
■
Download MP3 files? (Please refer to Downloading files PC to Newgen)
VAS
<VAS(Volume Automatic System)>
1. While VAS switch on, it keeps the sound level evenly.
2 8
2 9

3 0
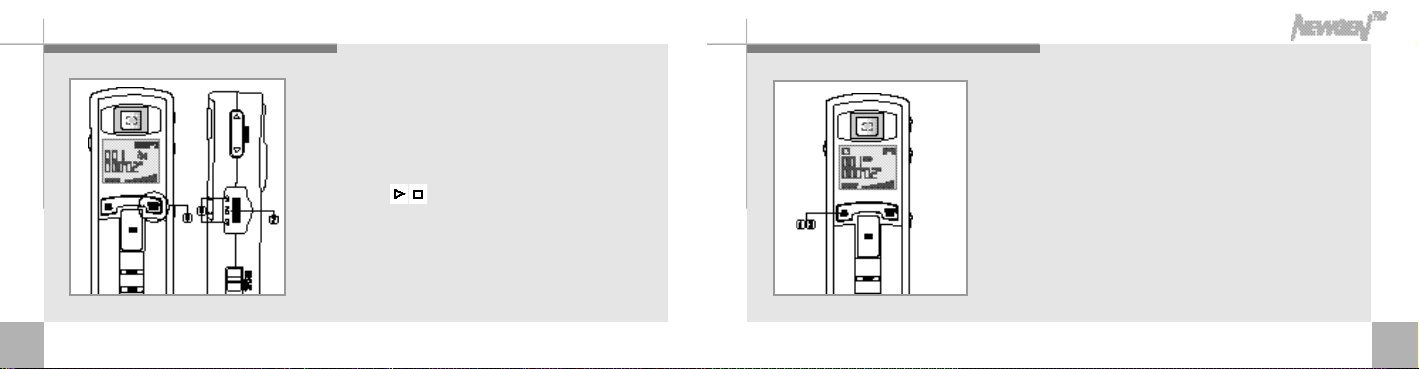
E rasing files
<Erasing one file>
1-1. Oress FOLDER/PAUSE button and choose the folder that has the file you
want to erase.
1-2. In stop mode, press ◀◀, ▶▶button and choose the file you want to erase.
Press and hold the Erase button for more than 3 seconds to erase seledted
f i l e .
<Erasing a folder>
2-1. Press and hold Erase button and Volume ▲buttons for at least 2 seconds
in stop mode. “FOL ERASE”will be displayed and entire folder will be erased.
<Formatting the memory>
3-1. Press Erase and Folder/Pause buttons for at least 2 seconds in stop mode.
“ALL ERASE”will be displayed and format the entire memory.
Ⅱ. Use New gen co n ne cted to PC

Connecting the Newgen to PC
(Connected to PC with USB cable, Newgen works as a storage.)
1. Connect the USB cable to the USB port of the PC and
2. PC will automatically recognize the Newgen as a portable
(PC automatically recognize Newgen as a portatble disk storage
without software installation on window2000/Me/XP, Mac 8.1 or above)
(Power will be turned off automatically when USB code is unplugged, turn
on the power before you use it agian.)
T M
connect the other end of the cable to the USB connector.
disk storage.
Installing Win98 driver on PC
1. Click the next button on each window. 2. Chck the next button on each window.
(PC automatically recognize Newgen as a portatble disk storage without software installation on window2000/Me/XP,
Mac 8.1 or above)
3 2
3 3

3. Click the next button
on each window.
4. Click the next button
on each window.
Opening Newgen fo l d e r s on PC
1. Connected to PC, the Newgen will be recognized
and displayed on window as a portable disk
d r i v e r .
(Newgen stores and executes all the files in PC, same as
disk driver.)
5. Driver is installed, click Finish.
3 4
3 5

2. Click portable disk driver, there are 4 folders,
MP3, picture, voiceA&B. You can copy music files
to playback in Newgen in MP3 folder. There are
photos taken and attached voice file in picture
folder. Voice A&B folders have recorded voice
f i l e s .
(Do not erase MP3, picture, Voice A&B folders.)
Download MP3 files PC to NewGen
1. Click and drag selected MP3 file from PC and
drop into MP3 folder or you can copy the MP3
file in PC and paste it in MP3 folder.
D r a g
3 6
3 7

Saving data in Newgen
D r a g
1. While Newgen is connected to PC, execute
search window. Click and drag file to download
to Newgen and drop into portable disk driver.
While transmission “On copy”will be displayed. Do not unplug
USB port until “On Copy”sign disappears. Otherwise it may
cause data loss.
D r a g
Saving files to PC
1. While Newgen is connected to PC, click
and drag file and drop into the folder
that you want to save in PC.
3 8
3 9

Installing the application software
Photo special effects can easily edit photos
Photo EZ can make electronic photo album with attached voice file.
Photo greeting cards can send greeting cards with photo and voice combined Jet voice
mail can send voice mail and let you listen to recorded voice.
1. Insert the application software CD into CD-Rom drive.
2. Press Install button. From this page on, please follow instructions on the screen.
3. After installation, Newgen and Jet voice mail icons will be displayed on the screen.
M ove to application software s
Click on Newgen on the screen to move
to next page.
This button is to search files. When it's in
search mode, the related files appear on the
middle of the visual control screen. Click and
drag file that you want to erase into Trash on
right end of the corner. In case all the files
don't appear on screen, use arrow sign below
to move page up and down.
4 0
4 1

This button is to arrange files. Files can be arranged alphabetically upward or
downward, and in icon groups.
It is to delete files. Click this button to see the list of deleted files. You can choose to
delete permanently or restore files. Files in Trash stays until permanently deleted.
4 2
Click this button to move to each application program (Please refer to Help for additional
a s s i s t a n c e )
■Photo special effects can easily edit photos.
■Photo EZ can make electronic photo album with attached voice file.
■Photo greeting cards can send greeting cards with photo and voice combined.
(In case there is restrictions to send email due to server administration and security reasons, photo card can be mailed out with
attached music file in execute file.)
■Jet voice mail can edit, playback recorded voice file and email voice file in execute file.
It is to close Image manager.
It is to minimize the screen.
It is Help section.
4 3

G e n e r ating electronic photo album with sound
Photo EZ edit and store photos taken by Newgen
2
1
7 8
1 3 1 4
and create electronic photo album.
1. Press “Add album”button and state name and theme of
the album.
2. Press “Load picture" button.
3. Press “S e a r c h ”button and collect pictures you like to add
on your album. (portable disk “E”or “G”has MP3, Picture,
Voice A, Voice B folders. Click Picture folder and collect
p i c t u r e s )
4. Among pictures click the pictures that you want to be on
your album, selected photo will have yellow outer frame.
5. Click “S a v e”button on the low end of left corner to save
pictures in the album.
(If you want to save pictures in the picture folder, press
“S a v e ”button on the low end of right corner)
6. Click on “Previous screen”, first page of Photo EZ appears
36
4
5
with selected pictures on 4 windows. In case there are too
many pictures, use “A r r o w ”keys to move page down.
7. There are sign on the top of pictures on 4 windows. the
sign indicates attached voice file. You can listen to the
voice file by clicking it. You can see the pictures in full size
by clicking.
8. For special effects, click picture on 4 windows.
9. Among the pictures below, click and drag the picture that
you want to add special effects to big screen on left. (In case
there are six pictures or more, click "Arrow"key on low right
end to see more pictures)
10. Click the icom on above right end to add special effects
to the picture. According to the effect that you select,
4 4
4 5

Special effects on photo
none different pictures will appear on screen to right. click
on the picture that you prefer, the selected picture will
appear on left screen.
1 2
11. The icons on low end of left corner have Save / Picture
print / Print out / Text / Recording features. Edit the
1 0
1 1
9
picture as you want and press “S a v e”to save the edited
pictures. You can erase the picture by clicking “d e l e t e ”
button. Using “Picture print”or “Print out”, you can print
out picture. To add text on your album, click “T e x t”a n d
click on “p l a y b a c k ”to listen to voice file.
12. Click “Previous page”to go to first page of Photo EZ.
13. Your album can be saved as a execute file by clicking
exe. file icon. Among the icons on right side of screen.
The exe.file can be emailed out as attached file.
14. Click on “P r e s e n t a t i o n”among the icons on right side,
your album will be displayed as a slide.
2
1
34567
8
1 . Click on “O p e n ”and drag the picture that you prefer to add special
effets. (click on “P i c t u r e ”folder in portable disk and collect pictures)
2. On left side of screen, 8 pictures with different effects will appear. You
can add more special effets by clicking A,B,C,D,E,F and more pictures
will appear on screen. Click the picture that you prefer.
3. To cancel the special effets on picture, press “c a n c e l ”and the picture
will go back one step before the last change.
4. Click on “r e s o t o r e”to go back to original picture.
5. Click on “s a v e”to store edited picture.
6. Finish Photo special effet by clicking “c l o s e ”b u t t o n .
7. Any question? Click on “H e l p”.
8. Click on “m i n i m i z e ”button to minimize the screen.
4 74 6

G reeting cards with photo and sound combined
3. Click “o p e n ”button and collect picture that you want to be on your card.
4. Adjust size and resolution by clicking two buttons below.
5. Press left button on your mouse to bring out “text input box”on your
screen. After selecting color and types of letter, input the text on
your card. Press right button on your mouse, “card adjustment box”
will appear on the screen. Choose on among overlap or non-
overlap. non-overlap will offer better resolution. With overlap, picture
will appear blended with background on your card.
6. Click on “R e c o r d ”and select music to be attached on your card.
7. After completing the card, click on “s a v e”.
*You can send the card via email or print out. (In case there is
restrictions to send email due to server administration and security
reasons, you can send email with recorded file attached)
1. Select type of card. 2. Select card.
3
5
4
7
6
4 8 4 9

Voice playback / sending out voice mail
Opening voice file S a v i n g
New recording
F a s t f o r w a r d
Rewind
Play back
Pause / Stop
R e c o r d
Erase start point of the file to current point
Erase currnet point to end of the file
This program allows you to edit, playback
and email(in EXE.file) recorded voice file.
Double click on voice file to playback.
Special effects
Sending voice mail and Player
(In case receiving party does not have a Jet vcice Mail : Send email
in exe. file.)
Sending voice mail
(In case receiving party has a Jet vcice Mail )
V o l u m e
1. Click on “O p e n”and select the file that you want to playback.
2. Click on “P l a y”to playback selected file.
(or you can double click the voice file)
3. Click on button on right end to attach selected file on emial. State
the email address of receiving party, the email will be sent out in exe.
file and your receiving party can listen to voice mail without voice
playback program.
5 15 0

Re c o rding voice on wav. file
Attaching audio & visual effects on file
Write a text with photo and voice attached on Microsoft Word.
5 2
1. click on “F i l e”and “Save as”to bring out “S a v e
as box”.
2. Select the file that you want to save as Wav file.
3. Select Wav file (*.wav) among types of files to
save as .wav file
(file saved as wav can be attached on Powerp o i n t ,
Word and Excell.)
1. Execute Microsoft word, click Insert, Picture
and Picture file.
2. Select the photo file that you want to attach
on text on Picture Insert Box.
3. Click on “I n s e r t”to attach photo on the text.
5 3

6. Speaker sign appears next to the photo and
4. Click again on “I n s e r t ”and select “O b j e c t ”.
5. Select “Wave sound"”on “Object box”.
“Object box”will appear on screen.
7. Click on “E d i t”and “File insert”.
8. Select the voice file in wav on “File insert box”.
Text with photo and voice is completed.
5 4 5 5

Sa fe ty pre c a u t i o n
Please read following rathers and use at with care.
■Avoid following areas.
- Near source of heat (above 60°C )
- High humidity area
- Dusty area
- In closed automobile (specially in summer)
■Keep away magnetic cards from the speaker It may
disable magnetic cards.
■Non-original parts can cause malfunctions.
■
Connect USB cable in stop mode, otherwise it can
cause data loss.
■
Newgen will be automatically formated when flash
memory is broken by outer pressure
■Warranty is not applicable in cases of losses and
law suit caused by using Newgen.
■Warranty is not applicable in loss of data caused
by malfunctions, repair etc.
■Sand can cause defects beyond repair. Keep
Newgen away form sand.
■Data can be preserved in Newgen permanently
but unexpected conditions may cause memory
loss. It's safe to have backup files in PC.
.
■ Do not short circuit, disassemble and throw in
fire. Electrolytic solution such as alkali can
flow out and cause heat and explosion.
■ In case of contact with electrolytic solution on
your skin and clothes, wash out as soon as
possible. In case of contact on eyes, wash out
with clean water and seek for medical profession.
■ Take out batteries, when it is not in use for
long period of time.
Battery information
Safety precautions
■Do not repair, disassemble and rebuild on
your own.
■Remove the batteries, when you sense smoke
and deformation caused by heat.
■Don't use Newgen where electronic divices
are banned such as a plane.
■Don't use Newgen while walking or driving. It
can cause accidents.
■ Warranty is not applicable in loss of data
caused by malfunctions, repair etc.
5 75 6

Trouble shooting
T r o u b l e s h o o t i n g .
Nothing is displayed on the LCD.
Check the capacity of batteries. ▶Replace with new batteries.
Check the polarity of the batteries. ▶Attention to the orientation of the + and - ends of the
b a t t e r i e s .
The Newgen doesn't work.
Check the hold switch, Switch off hold. ▶Switch off HOLD.
Check the memory capacity. ▶Erase unnecessary contents.
Check the capacity of batteries. ▶Replace with new batteries.
T r o u b l e s h o o t i n g .
The Newgen does not playback.
Check the hold switch, Switch off hold. ▶Switch off HOLD.
Check that files are stored, check the file numbers. ▶Check recording number.
Check the capacity of batteries. ▶Replace with new batteries.
The speaker does not work.
Check the volume control.
Check that earphone is connected. ▶Unplug earphone.
▶Control volume.
5 95 8

T r o u b l e s h o o t i n g .
Only "boot" sign appears on LCD and power doesn't come on.
Check 1. Aren't the batteries all used up? ▶Replace with new batteries.
Check2. Isn't flash memory broken? ▶
There is no audio produced in earphone.
Check the volume control.
Check that earphone is fully connected. ▶Fully insert earphone plug to earphone jack.
The buttons on camera does not work.
Check camera malfunction and
remove batteries and re-work the player ▶Cutt off power(batteries) and properly operate from the
The buttons on camera does not work.
Check the battery capacity. ▶Insert new batteries before use.
Connect USB port and format on Window. Unplug USB port
and press and hold “E r a s e”button and“F o l d e r / P a u s e ”b u t t o n
for more than 2seconds to execute “All Erase”
▶Control volume.
b e g i n n i n g .
.
Troubleshooting .
Newgen does not work properly with low batteries.
The software won't be installed.
Check minimum PC system requirements. ▶Check the minimum system requirements.
remained after program installation remained after program installation)
Data in Newgen does not execute and erase.
Check 1. Didn't you disconnect USB port during transmission?
Check 2. Didn't you save a file bigger
than remaining memory capacity.
(Additional hard drive capacity should be
▶Connect USB port and format on Window.
Unplug USB port and press and hold “E r a s e ”
button and “F o l d e r / P a u s e”button for more
t h a n2seconds to execute “All Erase”.
6 16 0

NewGen
TM
S p e c i f i c a t i o n s
Article
Model no
Flash memory
Memoryforimages
Pixels
Focus range
Exposure
View finder
Max.recordingtime(HQ)
No. of files
■The specifications may vary according to usage. ■Each folder may have different memory consumption because four
TN3203A
32MB
460 copies
VGA CMOS IMAGE SENSOR (640×480Pixel)
20cm~ Infinity (F/2.4), Macro focus range
540min 1,080min 2,160min
folders share one memory .
Specs
TN6403A
64MB
920 copies
Auto
Optical viewfinder
4 foldersX1,000 files
TN2803A
128MB
1,000 copies
Max. output
USB storagecapacity
No. of MP3 files
Usage conditions
Accessories
■Newgen is compatible to various operating system, such as Mac 8.1 or above, Windows 98/98SE/2000/XP.
Input
Output
Size
Weight
Power
100mW
Built in mic, external pin mic. And 2.5 Φ stereo jack
Built in speaker and 2.5Φ stereo jack
32MB
8songs (4MB/곡 기준)
64MB
16songs
128MB
32songs
34×122×22mm(W×H×D)
62g(exception of batteries)
USB or AAA alkaline×2
0℃~50℃
Manual, stereo earphone, USB cable, phone recording adapter, phone connecting wire,
audio cable, pin mic., hand strap, AAA batteries ×2, soft ware CD
6 36 2

FCC RF INTERFERNCE STATEMENT
THIS DEVICE COMPLIES WITH PART IS OF THE FCC FULES OPERATION IS SUBJECT TO THE FOLLOWING TWO
CONDITIONS:(1)THIS DEVICE MAY NOT CAUSE HARMFUL INTERFERENCE AND (2) THIS DEVICE MUST ACCEPT
ANY INTERFERENCE RECEIVED, INCLUDING INTERFENCE THAT MAY CAUSE UNDESIRED OPERATION.
This equipment has been tested and found to comly with the limits for a Class B digital device, pursuant to Part 15 of
the FCC Rules. These limits are designed to provide reasonable protection against harmful interference in a residential
i n s t a l l a t i o n .
This equipment generates, uses and can radiate radio frequency and, if not installed and used in accordance with the
instructions, may cause harmful interference to radio communications. However, there is no guarantee that interference
will not occur in a particular installation.
If the equipment does cause harmful interference to radio or television reception which can be determined by turning the
equipment off and on, the user is encouraged to try to correct the interference by one or more of the following measures.
-Reorient or relocate the receiving antenna.
-Increase the separation between the equipment and receiver.
-Connect the equipment into an outlet on a circuit different from that to which the receiver is connected.
-Consult the dealer or an experienced radio, TV technical for help.
-Only shielded interface cable should be used.
Finally, any changes or modifications to the equipment by the user not expressly approved by the grantee or manufacturer
could void the users authority to operate such equipment.
6564

6 6
W a r r a n t y
1. This product is produced under strict quality control and inspection.
2. Under the condition of normal usage, free 1 year warranty will be
p r o v i d e d .
3. In case of paid services payment may be demanded during warranty
p e r i o d .
4. Please fill out warranty forms when you purchase NewGen™and
keep it.
5. In case of trouble contact the store or number below
·Troubles caused by careless usage ·Troubles caused by user's internal rebuilding·Troubles caused by natural disasters such as fire, seawater, flooding, earth quake.
Paid service
·For assistance :0 3 1 - 7 8 8 - 7 3 8 2·h t t p : / / w w w . t e r a v a l u e . c o m
Model name
purchase date
S t o r e Purchasing price
Telephone number
C u s t o m e r
T M
New Gen
TN3203A, TN6403A, TN2803AModel name
y e a r Month D a t e
A d d r e s s
N a m e
Telephone number
1 Y e a rWarranty period
₩
 Loading...