

Page 1
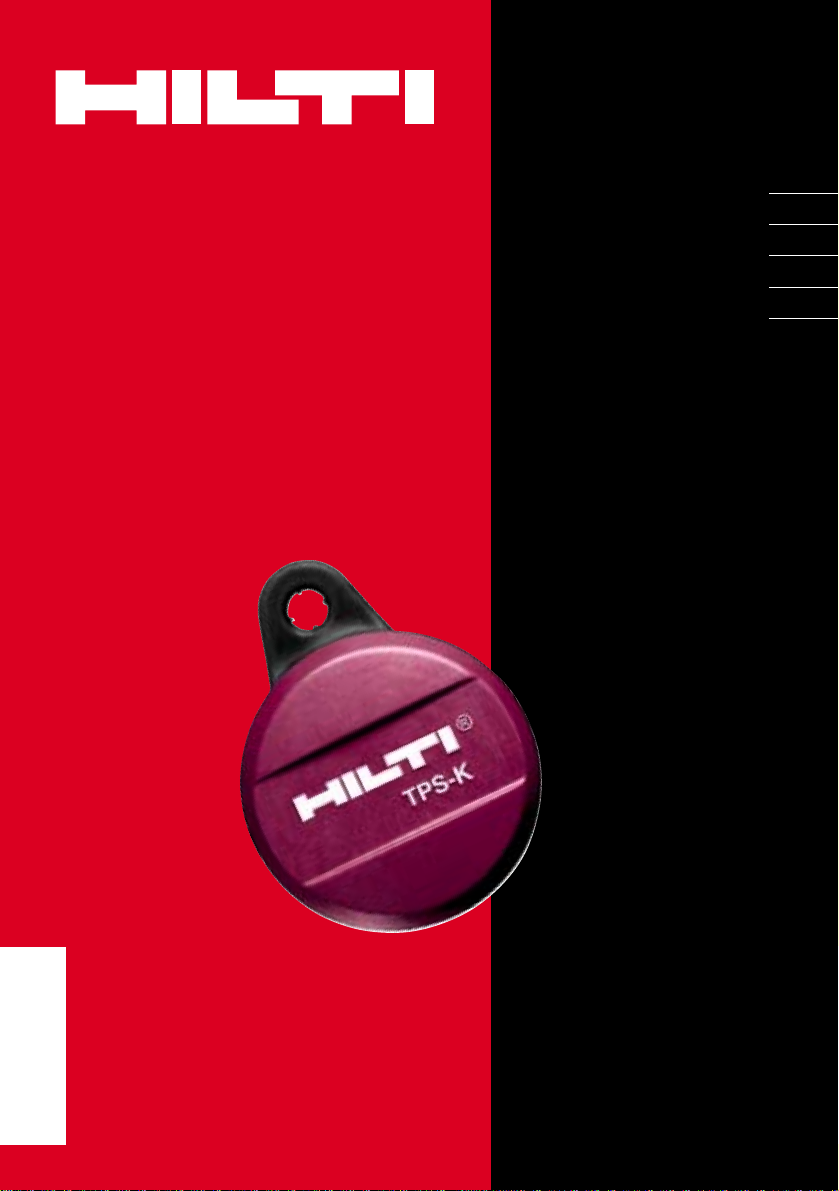
TPS-K
377271
*377271*
377271
Bedienungsanleitung de
Operating instructions en
Mode d’emploi fr
Istruzioni d’uso it
Manual de instrucciones es
Page 2
1
햳
햲
Page 3

2
1
2
3
4
3
Page 4

Hilti Corporation
FL-9494 Schaan
Tel.:+423/ 234211 1
Fax: +423/2342965
www.hilti.com
Hilti = registered trademark of Hilti Corp., Schaan W 2777 0103 10-Pos. 1 1 Printed in Liechtenstein © 2003
Right of technical and programme changes reserved S. E. & O.
377254/C
Page 5
1
de
TPS Diebstahlschutz
1. Allgemeine Hinweise
1.1 Signalworte und ihre Bedeutung
-VORSICHT-
Für eine möglicherweise gefährliche Situation, die zu
leichten Körperverletzungen oder zu Sachschaden führen
könnte.
-HINWEIS-
Für Anwendungshinweise und andere nützliche Informationen.
1.2 Piktogramme
Inhalt Seite
1. Allgemeine Hinweise 1
2. Beschreibung 2
3. Zubehör 2
4. Technische Daten 2
5. Sicherheitshinweise 2
6. Bedienung 2
7. Pflege und Instandhaltung 3
8. Fehlersuche 4
9. Entsorgung 4
10. Garantie 4
11. EG-Konformitätserklärung 5
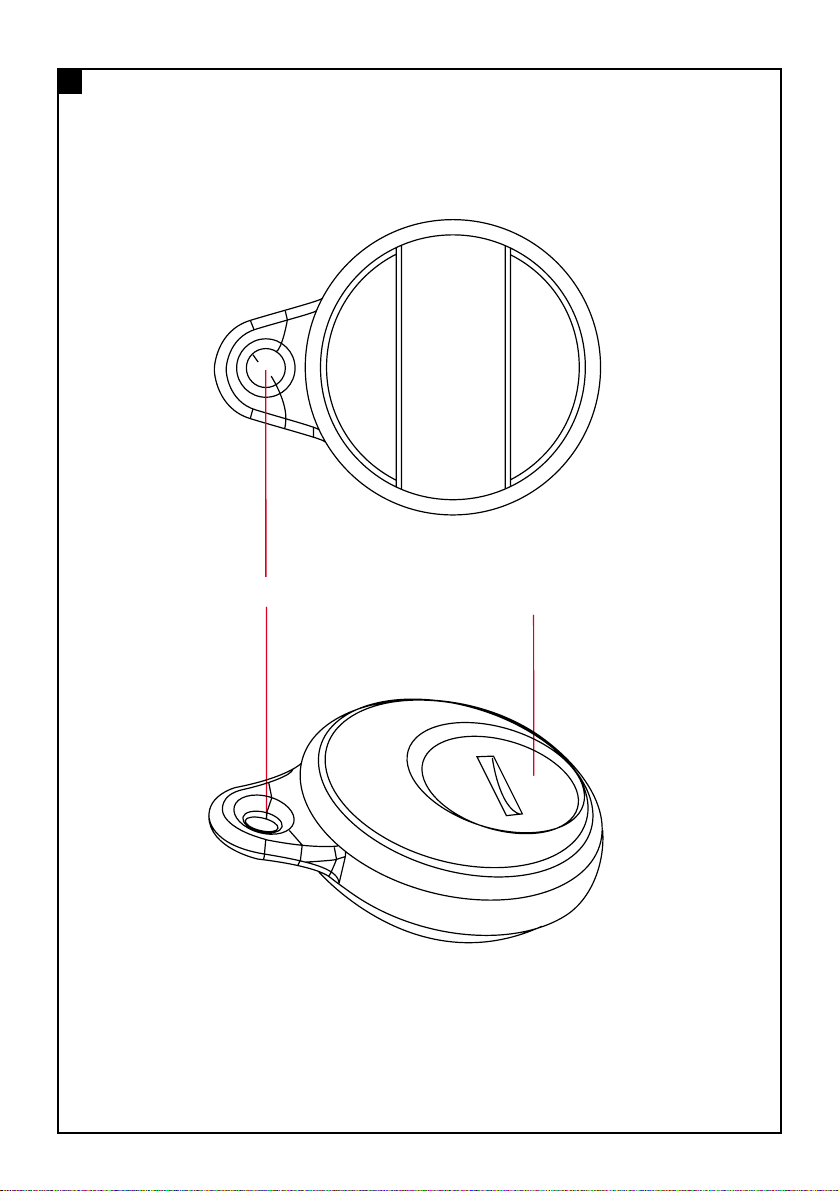
Abbildung
Batteriefach
Anhängeöse
Die Zahlen verweisen jeweils auf Abbildungen. Die
Abbildungen zum Text finden Sie auf den ausklappbaren
Umschlagseiten. Halten Sie diese beim Studium der Anleitung geöffnet.
Ort der Identifizierungsdetails auf dem Freischaltschlüssel
Die Typenbezeichnung und die Serienkennzeichnung sind
auf dem Typenschild Ihres Freischaltschlüssels angebracht. Übertragen Sie diese Angaben in Ihre Bedienungsanleitung und beziehen Sie sich bei Anfragen an
unsere Vertretung oder Servicestelle immer auf diese
Angaben.
Typ: TPS
Serien Nr .:
Warnzeichen
Warnung
vor allgemeiner
Gefahr
Vor Benutzung
Bedienungs-
anleitung lesen
Die Batterien dürfen nicht
über den Müll entsorgt
werden
Hinweis auf
Diebstahl-
schutz
Symbole
Lesen Sie die Bedienungsanleitung vor
Inbetriebnahme unbedingt durch.
Bewahren Sie diese Bedienungsanleitung
immer beim Gerät auf.
Geben Sie das Gerät nur mit Bedienungsanleitung an andere Personen weiter .
Page 6

allen Hilti-Freischaltschlüsseln dieses speziellen Kunden
freischalten.
Anzeigen mit Lichtsignal:
– Anzeige von Diebstahlschutz am Gerät (gelb blinkend).
Zum Lieferumfang der Standardausrüstung
gehören:
– Einbauteile im Gerät
– Freischaltschlüssel
2
de
2. Beschreibung
Der Diebstahlschutz (TPS) für handgeführte Elektrowerkzeuge von Hilti schützt diese wirkungsvoll vor unberechtigter Benutzung.
Das Gerät kann bei vorhandenem Diebstahlschutz (TPSModul ist im Gerät integriert) nur betrieben werden, wenn
der Benutzer im Besitz eines elektronischen Freischaltschlüssels ist. Freischaltschlüssel sind bei Hilti erhältlich. Die Freischaltschlüssel sind kundenbezogen; das
heisst alle von einem Kunden bei Hilti erworbenen Geräte, die über Diebstahlschutz verfügen, lassen sich von
3. Zubehör
Freischaltschlüssel TPS-K
Karte für Arbeitsgemeinschaft (Aktivieren)
Karte für Arbeitsgemeinschaft (Deaktivieren)
4. T echnische Daten
Reichweite mit Batterie 50–70 cm
Lithium-Batterie CR2032
Technische Änderungen vorbehalten
5. Sicherheitshinweise
●Die Batterie darf nicht in die Hände von Kindern gelangen. Hat ein Kind eine Batterie geschluckt, kontaktieren
Sie sofort einen Arzt.
● Überhitzen Sie die Batterie nicht und setzen Sie sie
nicht dem Feuer aus. Die Batterie kann explodieren oder
es können toxische Stoffe freigesetzt werden.
●Vermeiden Sie eine schnelle Entladung.
●Laden Sie die Batterie nicht auf.
●Verlöten Sie die Batterie nicht im Freischaltschlüssel.
●-VORSICHT- Schliessen Sie die Batterie nicht kurz, sie
kann sich dadurch überhitzen und Verbrennungen verursachen.
● Öffnen Sie die Batterie nicht und setzen Sie sie nicht
übermässiger mechanischer Belastung aus.
6. Bedienung
6.1 Gerät
6.1.1 Gerät Freischalten
1. Stecken Sie den Netzstecker des Geräts in die Steckdose. Die gelbe Diebstahlschutzlampe blinkt. (Das
Gerät ist nun aktiviert und sucht mittels Funkübertragung nach einem gültigen Freischaltschlüssel.)
2. Bringen Sie den Freischaltschlüssel in die Nähe des
Geräts (ca. 50–70 cm). Sobald die gelbe Diebstahlschutzlampe erlischt, ist das Gerät freigeschaltet. (Das
System ist so gestaltet, dass der Freischaltschlüssel
für die Freigabe des Geräts üblicherweise nicht aus
der Hosentasche genommen werden muss.)
-HINWEIS-
Die Freischaltung des Geräts bleibt erhalten, solange das
Gerät nicht von der Netzspannung getrennt wird.
Page 7

3
de
6.1.2 Notbetrieb
Um eine komfortable Reichweite zu erhalten, sind die
Freischaltschlüssel mit einer Batterie (CR2032 LithiumBatterie) ausgestattet. Das Gerät lässt sich auch bei leerer oder nicht vorhandener Batterie im Freischaltschlüssel freischalten, indem der Freischaltschlüssel dicht an
die mit dem in der Abbildung dargestellten Symbol
gekennzeichneten Stelle auf dem Gerät gehalten wird.
-VORSICHT-
Entfernen Sie entladene Batterien aus dem Freischaltschlüssel.
6.2 Freischaltschlüssel
6.2.1 Batteriewechsel beim Freischaltschlüssel
1. Öffnen Sie die Verschlussschraube mit einer Münze
(Linksdrehung).
2. Entnehmen Sie die Batterie aus dem Batteriefach.
3. Setzen Sie die neue Batterie, mit dem „+“ Zeichen nach
oben, in das Batteriefach.
4. Schliessen Sie das Batteriefach mit der Verschlussschraube.
6.2.2 Nachbestellen von Freischaltschlüsseln
Freischaltschlüssel können bei Hilti nachbestellt werden.
Der Verkauf eines Freischaltschlüssels erfolgt unter Angabe der Kundennummer im Hilti Center oder Customer
Service. Der Freischaltschlüssel wird an die jeweils zu
der Kundennummer gespeicherten Adresse versendet,
bzw. ausgehändigt, wenn sich der Kunde ausweist.
6.2.3 Überprüfen des Freischaltschlüssels
Wechseln Sie die Batterie im Freischaltschlüssel (siehe
Punkt 6.2.1), falls die Reichweite zum Freischalten des
Geräts abnimmt oder nur mehr ein Freischalten im Notbetrieb (vergleiche auch Punkt 6.1.2) möglich ist.
Ein nicht funktionierender Freischaltschlüssel kann im
Hilti Center auf Fehler analysiert werden. Falls er sich als
defekt herausstellt, muss ein neuer Freischaltschlüssel
mit den kundenspezifischen Daten programmiert werden.
6.3 Arbeitsgemeinschaftskarte
Um das Freischalten des Geräts durch Freischaltschlüssel von Partnerfirmen in einer Arbeitsgemeinschaft zu
ermöglichen, kann beim Hilti Center oder Customer Service eine Arbeitsgemeinschaftskarte bestellt werden.
Um die Arbeitsgemeinschaft im Gerät zu aktivieren, gehen
Sie bitte folgendermassen vor:
1. Stecken Sie den Netzstecker des Geräts in die Steckdose. Die gelbe Diebstahlschutzlampe blinkt.
2. Sorgen Sie dafür, dass sich kein Freischaltschlüssel
in der Nähe der Maschine befindet, da eine Programmierung mit der Arbeitsgemeinschaftskarte aus Sicherheitsgründen nur im nicht freigeschalteten Zustand
des Geräts möglich ist.
3. Halten Sie die Arbeitsgemeinschaftskarte an die mit
dem in der Abbildung dargestellten Symbol gekennzeichneten Stelle auf das Gerät bis die Diebstahlschutzlampe erlischt.
-HINWEIS-
Vor diesem Schritt muss die gelbe Diebstahlschutzlampe noch blinken (Gerät ist nicht freigeschaltet). Die
erfolgreiche Programmierung wird mit einem Freischalten des Geräts bestätigt (Diebstahlschutzlampe erlischt).
4. Stecken Sie den Stecker des Geräts aus der Steckdose.
5. Testen Sie das Freischalten des Geräts mit einem
Schlüssel einer Partnerfirma (siehe Punkt 6.1.1).
6.4 Arbeitsgemeinschafts-Lösch-Karte
1. Stecken Sie den Netzstecker des Geräts in die Steckdose. Die gelbe Diebstahlschutzlampe blinkt.
2. Sorgen Sie bitte dafür, dass kein Freischaltschlüssel
sich in der Nähe der Maschine befindet, da eine Programmierung mit der Löschkarte aus Sicherheitsgründen nur im nicht freigeschalteten Zustand des
Gerätes möglich ist.
3. Halten Sie die Löschkarte an die mit dem in der Abbildung dargestellten Symbol gekennzeichneten Stelle auf das Gerät bis die Diebstahlschutzlampe erlischt.
-HINWEIS-
Vor diesem Schritt muss die gelbe Diebstahlschutzlampe noch blinken (Gerät ist nicht freigeschaltet). Die
erfolgreiche Programmierung wird mit einem Freischalten des Geräts bestätigt (Diebstahlschutzlampe erlischt).
4. Ziehen Sie den Netzstecker aus der Steckdose
5. Stecken Sie den Netzstecker in die Steckdose.
6. Testen Sie das Löschen der Arbeitsgemeinschaft im
Gerät mit einem Schlüssel einer Partnerfirma (siehe
Punkt 6.1.1). Das Gerät darf sich von diesem Schlüssel nicht mehr freischalten lassen.
7. Pflege
7.1 Pflege des Freischaltschlüssels
Die äussere Gehäuseschale des Freischaltschlüssels ist
aus einem schlagfesten Kunststoff gefertigt. Reinigen
Sie die Aussenseite regelmässig mit einem leicht ange-
feuchteten Tuch. V erwenden Sie kein fliessendes Wasser zur Reinigung (Die Funktion des Freischaltschlüssels
kann beeinträchtigt werden. Dies hat aber keinen Einfluss auf die elektrische Sicherheit des Geräts).
Page 8

4
de
8. Fehlersuche
Fehler Mögliche Ursache Behebung
Freischalten nur bei Schwache Batterie Batteriewechsel
geringem Freischaltabstand
möglich
Freischalten nur im Schwache oder leere Batterie Batteriewechsel
Notbetrieb möglich
Mehrere Freischaltschlüssel befinden Alle Freischaltschlüssel bis auf einen aus
sich gleichzeitig in der Nähe des Geräts der Nähe des Geräts entfernen und
Freischaltvorgang wiederholen
Programmierung der Gerät war zum Zeitpunkt der 1. Stecker aus der Steckdose ziehen
Arbeitsgemeinschaft nicht Programmierung der Arbeits- 2. Sicherstellen, dass kein Freischaltmöglich gemeinschaft bereits freigeschaltet schlüssel in der Nähe des Geräts
vorhanden ist (Diebstahlschutzlampe
blinkt)
3. Programmierung wiederholen
Löschen der Arbeitsge- Gerät war zum Zeitpunkt des Löschens 1. Stecker aus der Steckdose ziehen
meinschaft nicht möglich der Arbeitsgemeinschaft bereits 2. Sicherstellen, dass kein Freischalt-
freigeschaltet schlüssel in der Nähe des Geräts
vorhanden ist (Diebstahlschutzlampe
blinkt)
3. Löschvorgang wiederholen
10. Garantie
Hilti garantiert, dass das gelieferte Gerät frei von Materialoder Fertigungsfehlern ist. Diese Garantie gilt unter der
Voraussetzung, dass das Gerät in Übereinstimmung mit
der Hilti Bedienungsanleitung richtig eingesetzt und gehandhabt, gepflegt und gereinigt wird, dass alle Garantieansprüche innerhalb von 12 Monaten (sofern nicht zwingende nationale Vorschriften eine längere Mindestdauer
vorschreiben) ab dem Verkaufsdatum (Rechnungsdatum)
erfolgen und dass die technische Einheit gewahrt wird,
d.h. dass nur Original Hilti Verbrauchsmaterial, Zubehörund Ersatzteile mit dem Gerät verwendet werden.
Diese Garantie umfasst die kostenlose Reparatur oder
den kostenlosen Ersatz der defekten Teile. Teile, die dem
normalen Verschleiss unterliegen, fallen nicht unter diese
Garantie.
Weitergehende Ansprüche sind ausgeschlossen, soweit
nicht zwingende nationale Vorschriften entgegenste-
9. Entsorgung
Entsorgen Sie die Batterien nach den nationalen oder
regionalen Vorschriften
hen. Insbesondere haftet Hilti nicht für unmittelbare
oder mittelbare, Mangel- oder Mangelfolgeschäden,
Verluste oder Kosten im Zusammenhang mit der Verwendung oder wegen der Unmöglichkeit der Verwendung des Geräts für irgendeinen Zweck. Stillschweigende Zusicherungen für Verwendung oder Eignung
für einen bestimmten Zweck werden ausdrücklich ausgeschlossen.
Für Reparatur oder Ersatz sind Gerät und/oder betroffene Teile unverzüglich nach Feststellung des Mangels an
die zuständige Hilti Marktorganisation zu senden.
Die vorliegende Garantie umfasst sämtliche Garantieverpflichtungen seitens Hilti und ersetzt alle früheren oder
gleichzeitigen Erklärungen, schriftlichen oder mündlichen Verabredungen betreffend Garantien.
Page 9

5
de
11. EG-Konformitätserklärung
Bezeichnung: Diebstahlschutz
Typenbezeichnung: PS mit TPS-K
Konstruktionsjahr: 2002
Wir erklären in alleiniger Verantwortung, dass dieses Produkt mit den folgenden Richtlinien und Normen übereinstimmt: EN 300220-1, -3 / EN 300330 / EN 301489-1, -3 /
EN 60950.
Hilti Corporation
Daniel Schillinger David Hruza
Senior Vice President Development
Drilling and Demolition Drilling and Demolition
Business Unit Business Unit
December 2002 December 2002
Page 10

7
en
TPS theft protection system
1. General information
1.1 Signal words and their meaning
-CAUTION-
Used to draw attention to a potentially dangerous situation which could lead to minor personal injury or damage to the equipment or other property.
-NOTE-
Used to draw attention to an instruction or other useful
information.
1.2 Pictograms
Contents Page
1. General information 7
2. Description 8
3. Accessories 8
4. Technical data 8
5. Safety precautions 8
6. Operation 8
7. Care and maintenance 9
8. Troubleshooting 10
9. Disposal 10
10. Warranty 10
11. EC declaration of conformity 11
Illustration
Battery compartment
Securing eye
These numbers refer to the corresponding illustrations. The illustrations can be found on the fold-out cover pages. Keep these pages open while studying the operating instructions.
Location of identification data on the tool
The type designation and serial number can be found on
the rating plate on the tool. Make a note of this data in
your operating instructions and always refer to it when
making an enquiry to your Hilti representative or service
department.
Type: TPS
Serial no.:
Warning signs
General
warning
Read the
operating
instructions
before use.
Do not dispose of batteries
with general refuse.
Equipped
with theft
protection
system
Symbols
It is essential that the operating instructions
are read before the tool is operated for the
first time.
Always keep these operating instructions
together with the tool.
Ensure that the operating instructions are
with the tool when it is given to other
persons.
Page 11

Indicator lamp
– Indicates that the theft protection system is active (blinks
yellow).
The basic system consists of the following items:
– Built-in module in the electric tool
– Activation key
8
en
2. Description
The theft protection system (TPS) for Hilti hand-held
electric tools effectively prevents unauthorized use.
When equipped with the theft protection system (the TPS
module is an integral part of the electric tool), the tool
can be operated only when the user is in possession of
an electronic activation key. Activation keys are available
from Hilti. Activation keys are customer-specific; this
means that all tools purchased from Hilti, which are
equipped with the theft protection system, can be activated by all Hilti activation keys for this specific customer.
3. Accessories
Activation key TPS-K
Work group card (activation of group mode)
Work group card (cancellation of group mode)
4. T echnical data
Range with battery 50–70 cm
Lithium battery CR2032
Right of technical changes reserved
5. Safety precautions
●The battery must not be allowed to fall into the hands
of children. Contact a doctor immediately if a battery is
swallowed by a child.
●Do not expose the battery to heat or fire. The battery
may explode or may release toxic substances.
●Avoid rapid discharge.
●Do not recharge the battery.
●Do not solder the battery into the activation key.
●-CAUTION- Do not discharge the battery by short-cir-
cuiting the terminals as it may overheat and cause burns.
●Do not attempt to open the battery and do not subject
it to excessive mechanical stress.
6. Operation
6.1 Electric tool
6.1.1 Activating the tool
1. Plug the supply cord of the electric tool into the mains
socket. The yellow theft protection indicator lamp
blinks. (The tool is now under power and ready for
activation by contactless communication with a valid
electronic activation key.)
2. Bring the activation key within range of the tool (approx.
50–70 cm). The tool is then activated and ready for
use as soon as the yellow theft protection indicator
lamp no longer lights. (The system is designed so that
the activation key for the tool normally does not have
to be taken out of the trouser pocket.)
-NOTE-
The tool remains activated and ready for use so long it
is not disconnected from the mains supply.
Page 12

9
en
6.1.2 Activation in backup mode
The activation key is equipped with a battery (CR2032
lithium battery) to permit a comfortable operating range.
When no battery is installed in the activation key, or if the
battery has become discharged, the tool can be activated in backup mode by holding the activation key close
to the tool, between the motor section and grip, as shown
in the illustration .
-CAUTION-
Remove a discharged battery from the activation key.
6.2 The activation key
6.2.1 Changing the battery in the activation key
1. Use a coin to unscrew the cover (turn in a counterclockwise direction).
2. Remove the battery from the battery compartment.
3. Insert the new battery in the battery compartment with
the "+" symbol facing upwards.
4. Close the battery compartment by screwing on the
cover.
6.2.2 Reordering activation keys
Activation keys can be reordered from Hilti. The customer's number must be stated when purchasing an activation key at a Hilti center or through Hilti Customer Service. The activation key will be sent to the address in Hilti's
records for this customer number or , alternatively , handed over to the customer on presentation of identification.
6.2.3 Checking operation of the activation key
Fit a new battery in the activation key (see 6.2.1) if the
activation range decreases or when activation is possible
only as described at 6.1.2 "Activation in backup mode". A
defective activation key can be checked for faults at a Hilti
center. A new activation key must be programmed with
the customer's data if the old key is found to be defective.
6.3 Work group mode activation card
Cards for setting the tool to work group mode, thus permitting activation of the electric tool by activation keys
owned by partner companies in a work group, can be
ordered from a Hilti Center or Hilti Customer Service.
To set the tool to work group mode, proceed as follows:
1. Plug the supply cord of the electric tool into the mains
socket. The yellow theft protection indicator lamp
blinks.
2. Check that no activation key is in the vicinity of the
electric tool as, for security reasons, setting to work
group mode with the card is possible only when the
tool is in a deactivated state.
3. Hold the work group mode card against the electric
tool at the position marked with the symbol as shown
in the illustration until the theft protection lamp no
longer lights.
-NOTE-
The theft protection indicator lamp must be blinking
before the card is held against the tool (tool not yet
activated). Confirmation that setting to work group
mode has been successful is given by the theft protection indicator lamp (lamp goes out), showing that
the tool has been activated.
4. Plug the supply cord of the electric tool into the mains
socket.
5. Check that the tool can be activated by a key belonging to a partner company in the work group (see 6.1.1).
6.4 Work group mode cancellation card
1. Plug the supply cord of the electric tool into the mains
socket. The yellow theft protection indicator lamp blinks.
2. Check that no activation key is in the vicinity of the
electric tool as, for security reasons, cancellation of
work group mode with the card is possible only when
the tool is in a deactivated state.
3. Hold the work group mode cancellation card against
the electric tool at the position marked with the symbol as shown in the illustration until the theft protection lamp no longer lights.
-NOTE-
The theft protection indicator lamp must be blinking
before the card is held against the tool (tool not yet
activated). Confirmation that cancellation of work group
mode has been successful is given by the theft protection indicator lamp (lamp goes out), showing that
the tool has been activated.
4. Unplug the supply cord of the electric tool from the
mains socket.
5. Plug the supply cord of the electric tool into the mains
socket.
6. Check that the tool is no longer in work group mode
by attempting to activate it with a key from a partner
company (see 6.1.1). Activation by a key belonging to
a partner company should now be impossible.
"This device complies with Part 15 of the FCC rules.
Operation is subject to the following two conditions:
1. This device may not cause harmful interference.
2. This device must accept any interference received,
including interference that may cause undesired operation"
"Changes or modifications to this unit not expressly
approved by the party responsible for compliance could
void the user authority to operate this equipment."
7. Care and maintenance
7.1 Care and maintenance of the activation key
The outer casing of the activation key is made from impactresistant plastic. Clean its outer surface at regular intervals using a slightly damp cloth. Do not use running water
for cleaning. (This may negatively affect functionality of
the activation key but has no influence on the electrical
safety of the tool).
Page 13

10
en
8. T roubleshooting
Fault Possible cause Remedy
The tool can be activated Weak battery Fit a new battery.
only when the key is held
close to it.
Activation possible only Weak or dead battery Fit a new battery.
in backup mode
Several activation keys are in the Remove all activation keys except one from
vicinity of the electric tool at the same the vicinity of the electric tool and repeat the
time activation procedure.
Work group mode cannot The tool was already activated before 1. Unplug the supply cord from the mains
be set attempting to set it to work group socket.
mode. 2. Ensure that no activation key is in the
vicinity of the electric tool (theft protection indicator must be blinking).
3. Repeat the procedure for setting work
group mode.
Work group mode cannot The tool was already activated before 1. Unplug the supply cord from the mains
be cancelled attempting to cancel work group socket.
mode. 2. Ensure that no activation key is in the
vicinity of the electric tool (theft protection indicator must be blinking).
3. Repeat the procedure for canceling work
group mode.
10. Warranty
Hilti warrants that the tool supplied is free of defects in
material and workmanship. This warranty is valid as long
as the tool is operated and handled correctly, cleaned
and serviced properly and in accordance with the Hilti
operating instructions, all warranty claims are made within
12 months (unless other mandatory national regulations
prescribe a longer minimum period) from the date of the
sale (invoice date), and the technical system is maintained. This means that only original Hilti consumables,
components and spare parts may be used in the tool.
This warranty provides the free-of-charge repair or replacement of defective parts only. Parts requiring repair or
replacement as a result of normal wear and tear are not
covered by this warranty.
Hilti is not obligated for direct, indirect, incidental or
consequential damages, losses or expenses in con-
9. Disposal
Dispose of batteries in accordance with the applicable
national or local regulations.
nection with, or by reason of, the use of, or inability to
use the tool for any purpose. Implied warranties of
merchantability or fitness for a particular purpose are
specifically excluded.
Send the tool and/or related parts immediately upon discovery of a defect to the local Hilti marketing organisation for repair or replacement.
This constitutes Hilti’s entire obligation with regard to
warranty and supersedes all prior or contemporaneous
comments and oral or written agreements concerning
warranties.
Page 14

11
en
11. EC declaration of conformity
Designation: Theft protection system
Type: TPS with TPS-K
Year of design: 2002
We declare, on our sole responsibility , that this product
complies with the following directives and standards:
EN 300220-1, -3 / EN 300330/ EN 301489-1, -3 /
EN 60950.
Hilti Corporation
Daniel Schillinger David Hruza
Senior Vice President Development
Drilling and Demolition Drilling and Demolition
Business Unit Business Unit
December 2002 December 2002
 Loading...