

Page 1

DC200/300
Counting Scale
Operation Manual
DC - 300 OPERATION MANUAL
TERAOKA WEIGH-SYSTEM PTE.LTD
V1.17 (APRI2003)
Page 2

CONTENT
Page
1. GENERAL INFORMATION 1 ~ 9
2. REPORT MODE 10 ~ 15
3. PROGRAM MODE 16 ~ 57
4. PROGRAM PASSWORD MODE 58 ~ 63
DC - 300 OPERATION MANUAL
Page 3

1. GENERAL INFORMATION
1.1 SPECIFICATIONS..................................................................................................... 2
1.2 EXTERNAL VIEW .................................................................................................... 3
1.2.1 Overall View .................................................................................................................................3
1.2.2 Display Panel and Key Sheet Layout............................................................................................3
1.3 KEYS FUNCTIONS ................................................................................................... 4
1.4 TABLE OF CHARACTERS CODE......................................................................... 6
1.4.1 ASCII Code...................................................................................................................................6
1.4.2 TERAOKA Code ..........................................................................................................................7
1.5 INDICATORS ............................................................................................................. 8
1.6 ALPHABETIC DATA ENTRY IN PROGRAM MODE ....................................... 9
1.6.1 Character size and the number of characters available for label printing .....................................9
GENERAL INFORMATION
1
Page 4

1.1 SPECIFICATIONS
Power
Display
Operation Temperature
Humidity
Operation Frequency
Dimensions (in mm)
Loadcell
Scale Capacity (Internal Loadcell)
Accuracy
Keyboard
Printer (Thermal printer)
Print Speed
Memory
Standard Interface
Optional Interface
AC Supply 100V ~ 110V or 220V ~ 240V (Factory preset)
:
LCD - Dot Matrix
:
Weight
Unit Weight
Quantity
-10 °C to 40 °C (14 °F to 104 °F)
:
15 % to 85 % RH
:
50 / 60 Hz
:
410 (L) X 378 (W) X 140 (H)
:
One internal and one external (Amphenol 14-pin)
:
Sensitivity --- 0.4 ~ 2.46mV/V
500g, 1kg, 2.5kg, 5kg, 10kg & 25kg.
:
1lb, 2.5lb, 5lb, 10lb, 25lb & 50lb.
Display resolution 1/10,000, 1/5,000 or 1/2,500
:
Counting resolution 1/1,000,000 or 1/500,000
23 Normal Keys and 32 Character Keys
:
Drawer Type
:
*Label --- 60mm width (MAX)
*Receipt--- 40, 50 or 60mm.
Label--- 80mm / sec
:
Receipt--- 100 mm / sec
1 Mbyte or 2 Mbyte
:
1. RS-232C Interface (For Force Balance, PC, Barcode Scanner or Barcode
:
Code Label Printer)
2. IBM Keyboard Interface
1. 2 X RS-232 Interface
:
2. Ethernet Interface
5 Digits
:
5 Digits
:
7 Digits
:
Remarks: * Printing area is 56mm width (max) for Label or Receipt.
GENERAL INFORMATION
- 2 -
Page 5
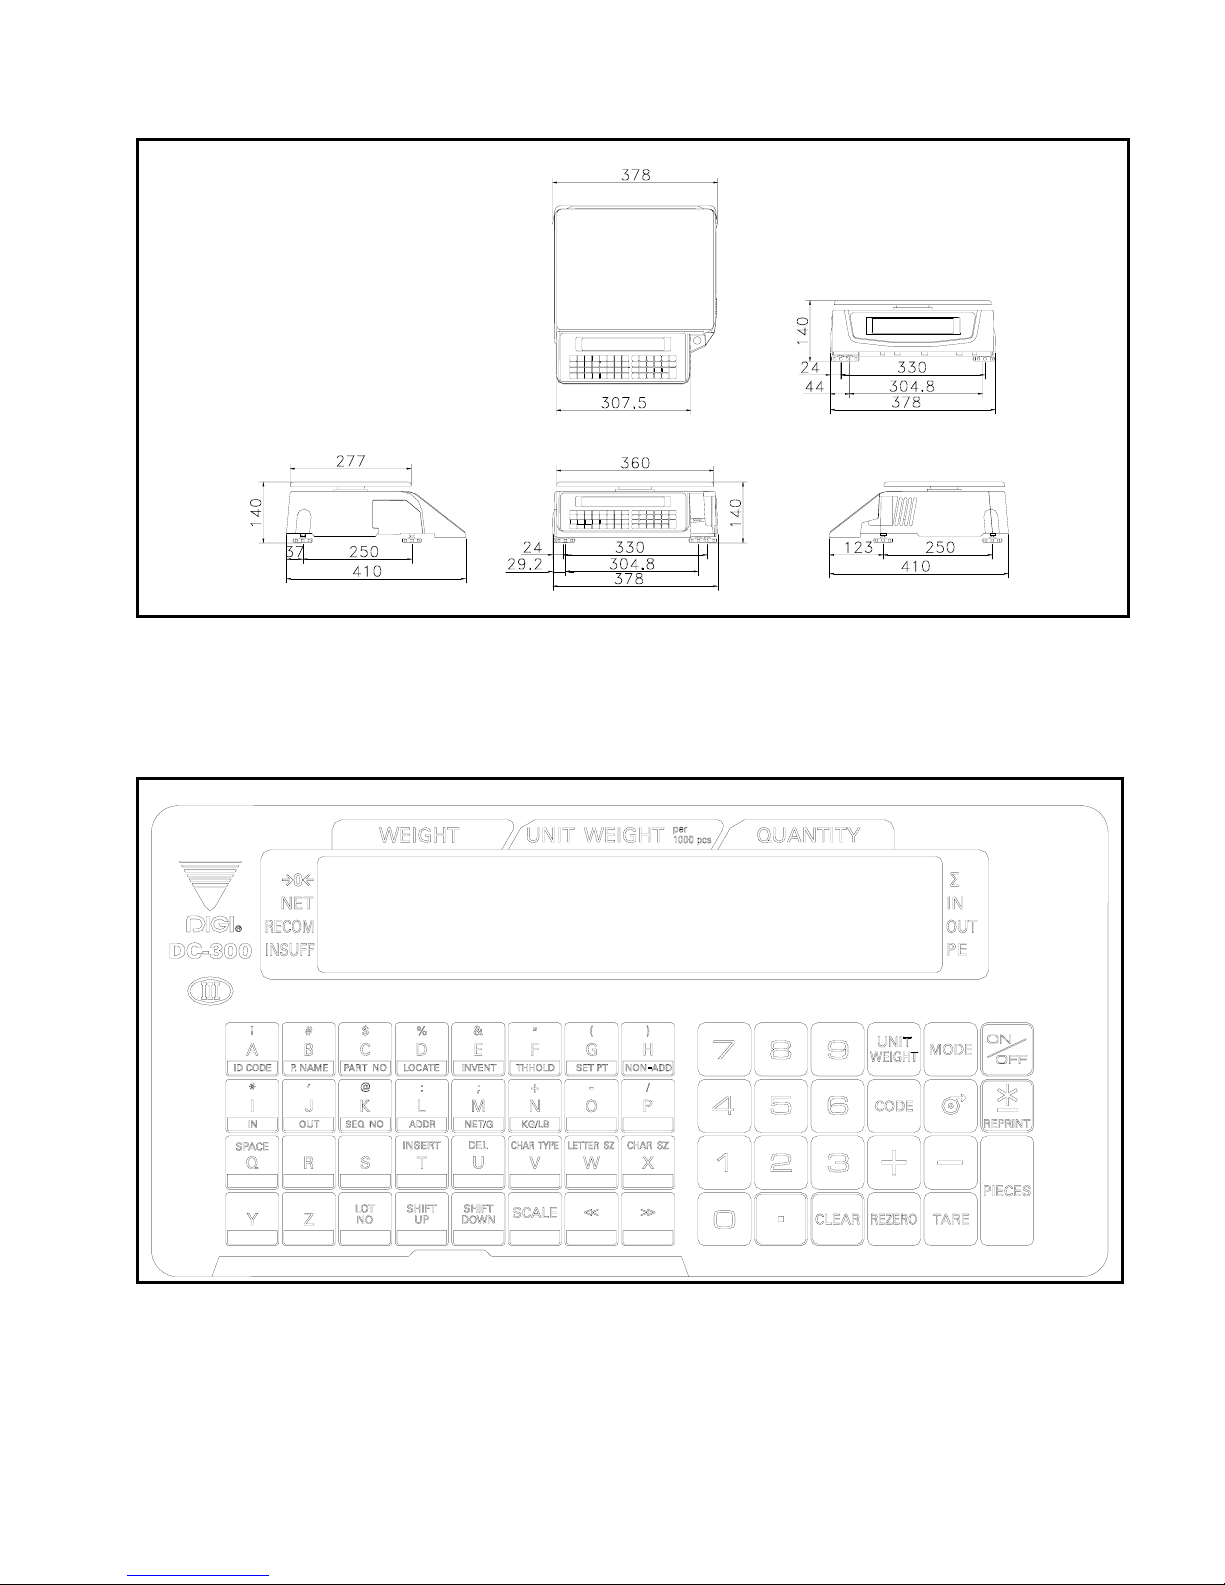
1.2 EXTERNAL VIEW
1.2.1 Overall View
1.2.2 Display Panel and Key Sheet Layout
GENERAL INFORMATION
- 3 -
Page 6
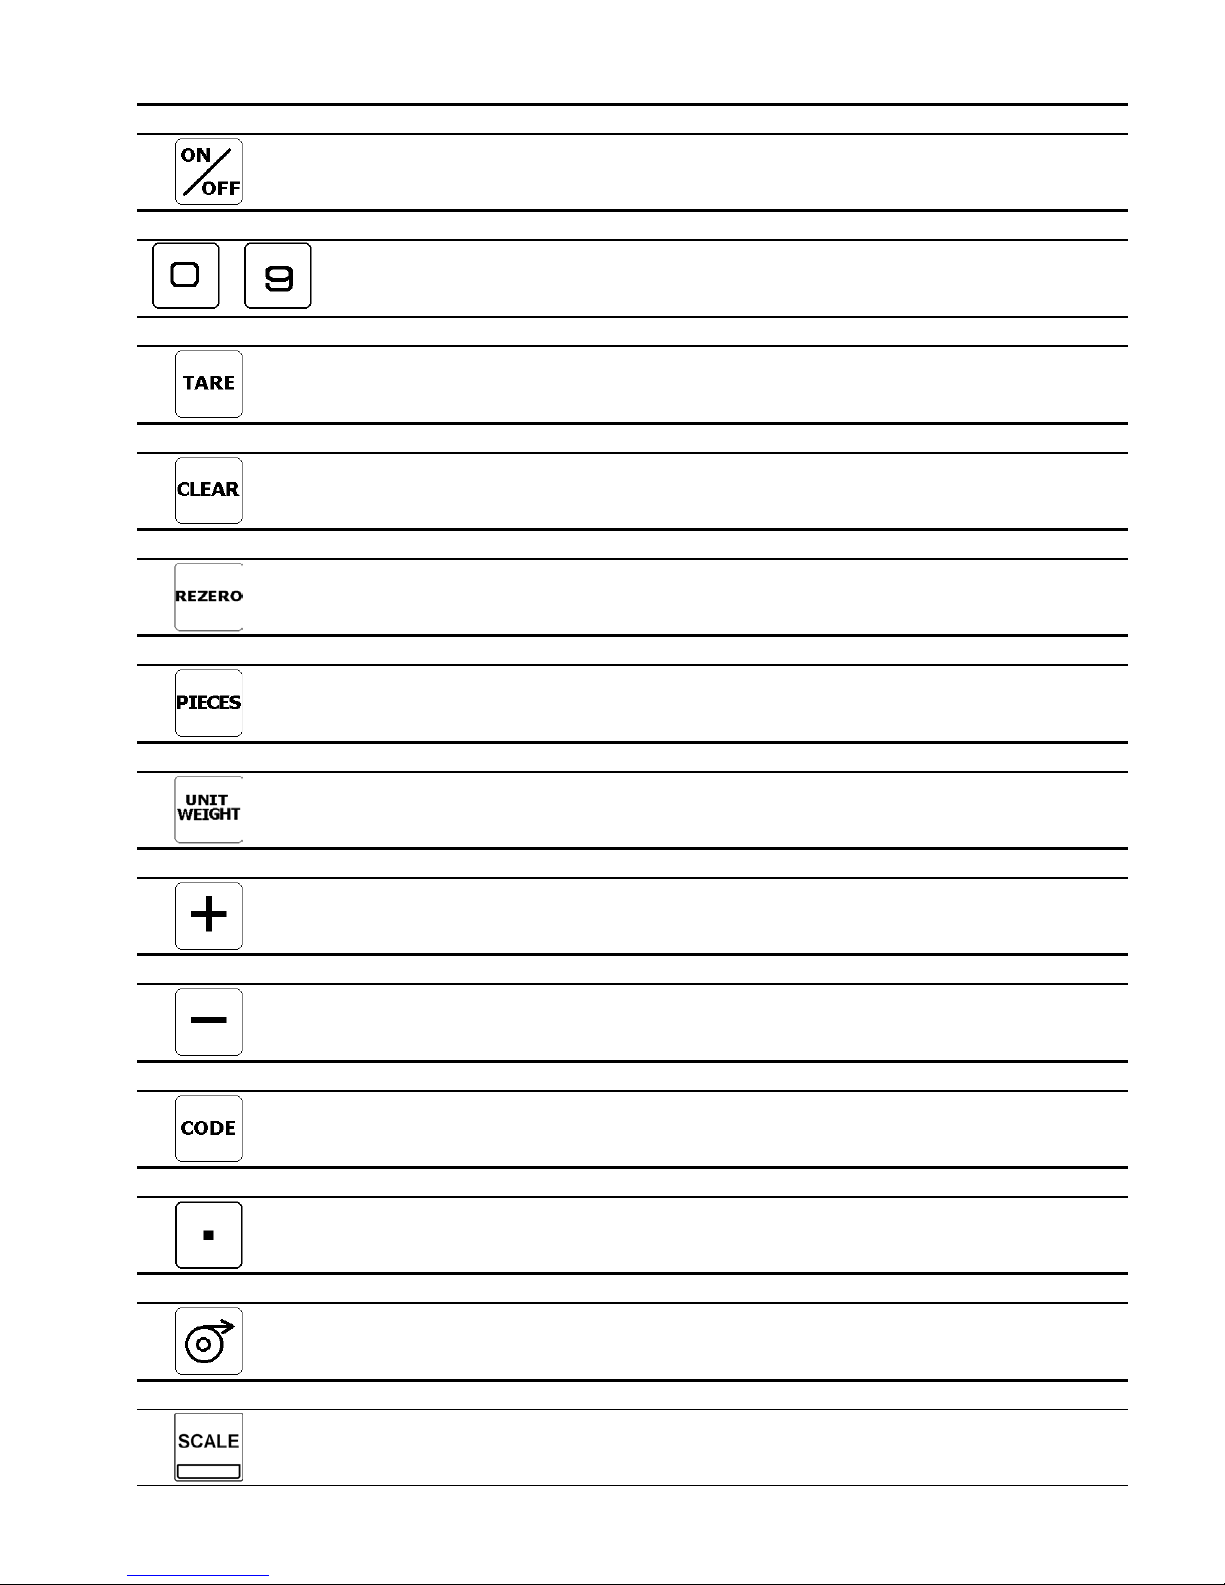
1.3 KEYS FUNCTIONS
ON/OFF KEY
Turn display "ON" or "OFF".
NUMERIC KEYS
Enter numeric data.
to
TARE KEY
Set or Clear Tare value.
Select "NO" in S, X and Z mode.
CLEAR KEY
RE-ZERO KEY
PCS KEY
Item test print in S mode.
Clear Alphanumeric Data.
Select "YES" in S, X and Z mode.
Reset weight to ZERO.
UNIT WEIGHT KEY
PLUS KEY
MINUS KEY
CODE KEY
DOT KEY
FEED KEY
To computing unit weight by sampling.
Escape the Programming screen without saving data in X and S mode.
To set Unit Weight in Registration mode.
Accumulate the Total Quantity.
Select programming item such as Item Code, Factory Name in S mode.
Select Report Type in X Mode.
Correct the sales data.
Select programming item such as Item Code, Factory Name in S mode.
Select Report Type in X mode.
Call up PLU data in Registration mode.
Store the programmed data in S mode.
To enter Decimal point.
Feed Label or Receipt paper
SCALE KEY
To switching between Scale A, B, C & D.
GENERAL INFORMATION
- 4 -
Page 7
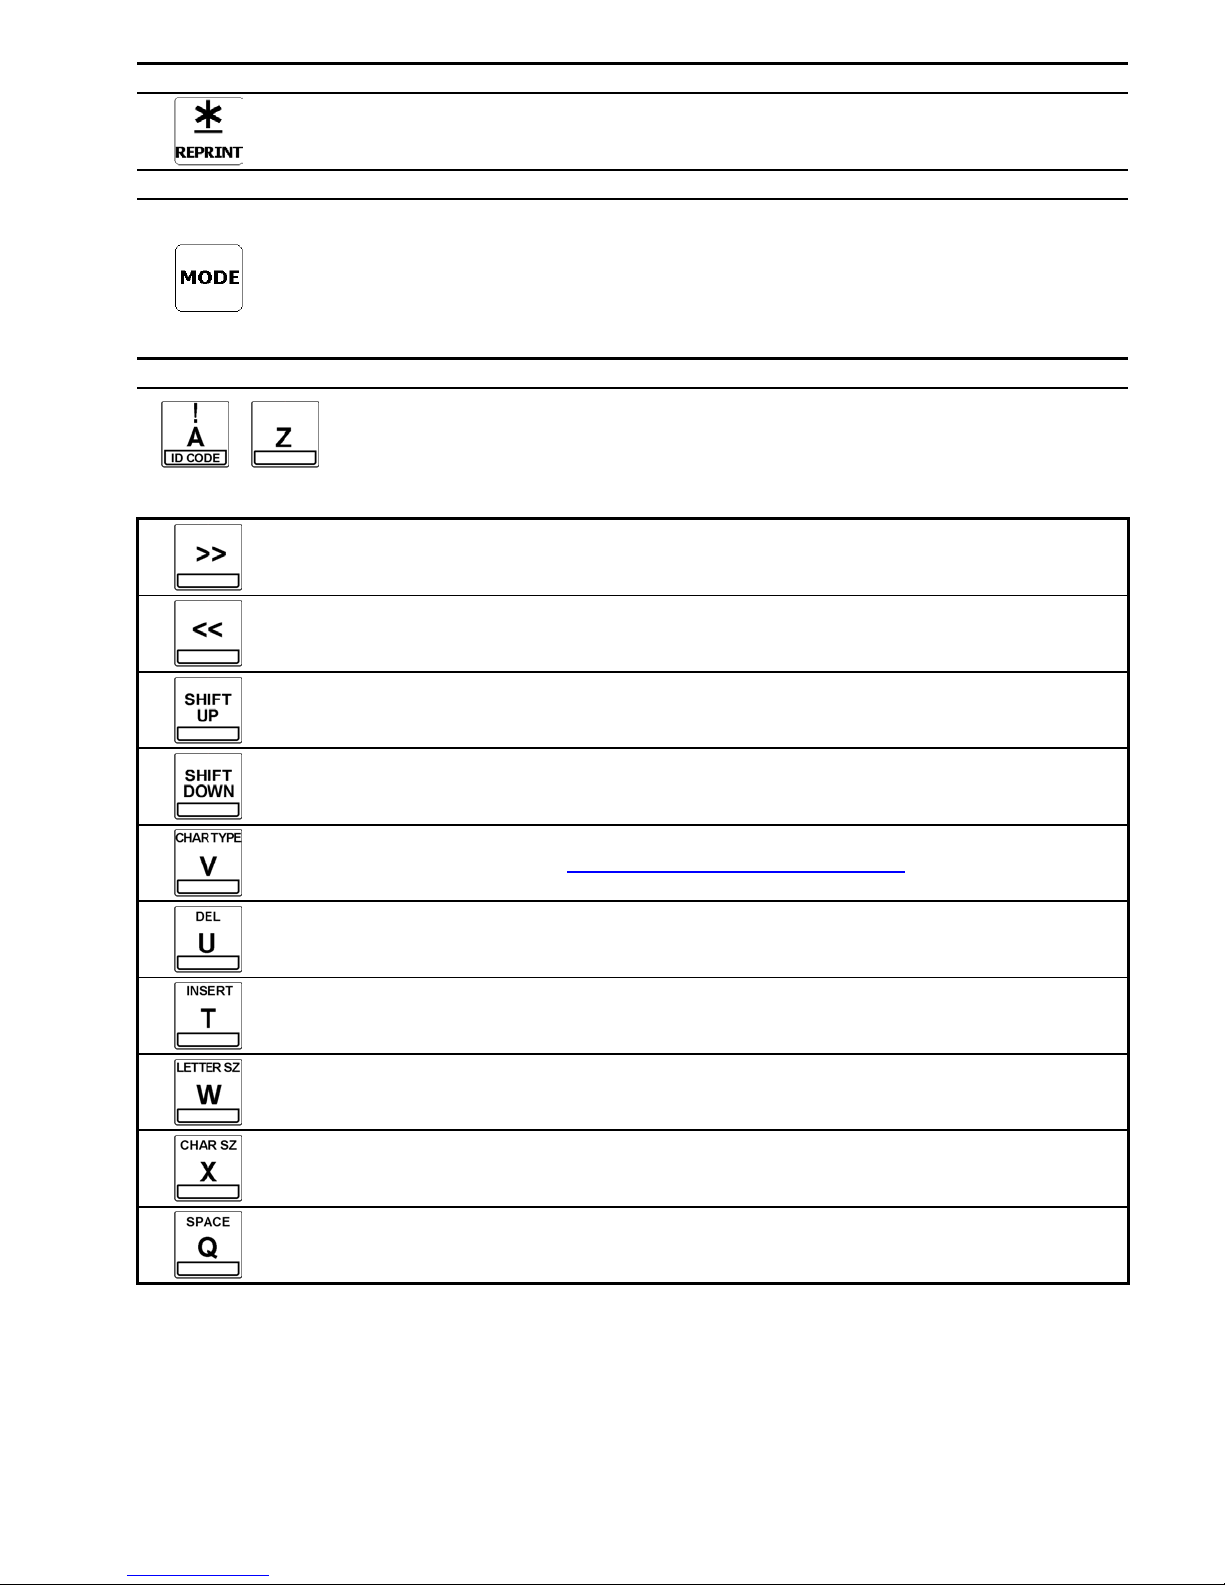
PRINT KEY
MODE SELECT KEY
CHARACTER KEYS
Note: 1 The following Character Keys are used in entering Alphabetic for DC - 300.
to
Issue label or receipt at R mode.
Print out report at X mode.
To enter item programmed mode.
Three Modes can be selected using this key.
• REGISTRATION MODE (All the sales transactions are performed.)
• Indicator X - REPORT MODE (Print Item Report, Inventory Report and Shelf
Location Print.)
• Indicator S - PROGRAM MODE (Programming such as products data, factory name,
etc.)
• Indicator Z - SERVICE MODE.
To view the Preset data such as ID CODE, PART NAME in Reg. mode.
Enter Alphabetic data in Reg. mode (ID CODE) and S mode.
Move the cursor Change the entry to Right.
Move the cursor Change the entry to left.
To select Top function or character of a desired Character Key.
To select Bottom function or character of a desired Character Key.
Code type entered. Please refer to 1.4 Table of Characters Code.
Delete the Data.
Insert Data.
Switch Cap / Lower case.
Change Font size.
GENERAL INFORMATION
To SPACE the entering characters or numbers.
- 5 -
Page 8
1.4 TABLE OF CHARACTERS CODE
1.4.1 ASCII Code
The table shown below is the common use of characters of ASCII code in HEX value. Please enter the hex value when entering
part name, part number, factory name, address, text etc. when using the DC-300.
K L J I
18 19 1A 1B
SP ! " # $ % & ' ( )
½
+ , - . /
20 21 22 23 24 25 26 27 28 29 2A 2B 2C 2D 2E 2F
0 1 2 3 4 5 6 7 8 9 : ; < = > ?
30 31 32 33 34 35 36 37 38 39 3A 3B 3C 3D 3E 3F
@ A B C D E F G H I J K L M N O
40 41 42 43 44 45 46 47 48 49 4A 4B 4C 4D 4E 4F
P Q R S T U V W X Y Z ^ _
50 51 52 53 54 55 56 57 58 59 5A 5E 5F
a b c d e f g h i j k l m n o
61 62 63 64 65 66 67 68 69 6A 6B 6C 6D 6E 6F
p q r s t u v w x y z
70 71 72 73 74 75 76 77 78 79 7A
Ç ü é â ä à ç ê ë è Ä
80 81 82 83 84 85 87 88 89 8A 8E
É æ Æ ô ö ù Ö Ü £ ƒ
90 91 92 93 94 97 99 9A 9C 9F
á í ó ú ñ Ñ Ĕ C° ã ∆ ρ
χ
A0 A1 A2 A3 A4 A5 A9 AA AC AD AE AF
Ë ≠ Œ œ
½
ĉ Á À Ů Ó
B0 B1 B2 B3 B4 B5 B6 B7 B9 BD
 Ã
C1 C7
Ê È Í
D2 D4 D6
β Ô õ Õ Ú
E1 E2 E4 E5 E9
± ≥ ≤
Left € Right
€
§
°
F1 F2 F3 F4 F5 F6 F8
GENERAL INFORMATION
- 6 -
Page 9
1.4.2 TERAOKA Code
The table shown below is the common use of characters of TERAOKA code in numerical value. Please enter the numerical
value when entering part name, part number, factory name, address, text etc. when using the DC-300.
Space A B C D E F G H I
00 01 02 03 04 05 06 07 08 09
J K L M N O P Q R S
10 11 12 13 14 15 16 17 18 19
T U V W X Y Z , . -
20 21 22 23 24 25 26 27 28 29
0 1 2 3 4 5 6 7 8 9
30 31 32 33 34 35 36 37 38 39
@ ! ” # $ % & / ( )
40 41 42 43 44 45 46 47 48 49
’ < > + :
½
À Â È Ê
50 58 59 69 72 73 77 78 79 80
É Ô Ç ? → ←
81 82 83 96 97 98
GENERAL INFORMATION
- 7 -
Page 10

1.5 INDICATORS
There are fifteen different indicators on Display Panel as shown below:
1)
³
´
0
"
" Zero Indicator
Lights when Scale is stable at the zero point.
:
"NET" Net Indicator
2)
3)
"RECOM" Re-computing Indicator
4)
"INSUFF"
5)
"Σ" Memory Indicator
6)
"IN" Inventory IN Indicator
7)
"OUT"
"PE" Paper End Indicator
8)
9)
"A" Scale A Indicator
10)
"B" Scale B Indicator
11)
"C" Scale C Indicator
12)
"D" Scale D Indicator
13)
"S" Programming Mode Indicator
14)
"X"
15)
"Z" Service Mode Indicator
16)
“R” Registration Mode Indicator
Insufficient Indicator
Inventory OUT Indicator
Report Mode Indicator
Lights when Tare subtraction is being performed.
:
Light when Unit Weight re-computing is possible.
:
Light when Net weight is below a specific percentage of the capacity weight.
:
Light when Quantity accumulation is done.
:
Light when Inventory IN (For Counting Mode)
:
Light when Inventory OUT (For Counting Mode)
:
Lights when paper ends.
:
Lights when Scale A is selected.
:
Lights when Scale B is selected.
:
Lights when Scale C is selected.
:
Lights when Scale D is selected.
:
Lights when Scale in Programming Mode.
:
Lights when Scale in Report Mode.
:
Lights when Scale in Service Mode.
:
Not used.
:
GENERAL INFORMATION
- 8 -
Page 11
1.6 ALPHABETIC DATA ENTRY IN PROGRAM MODE
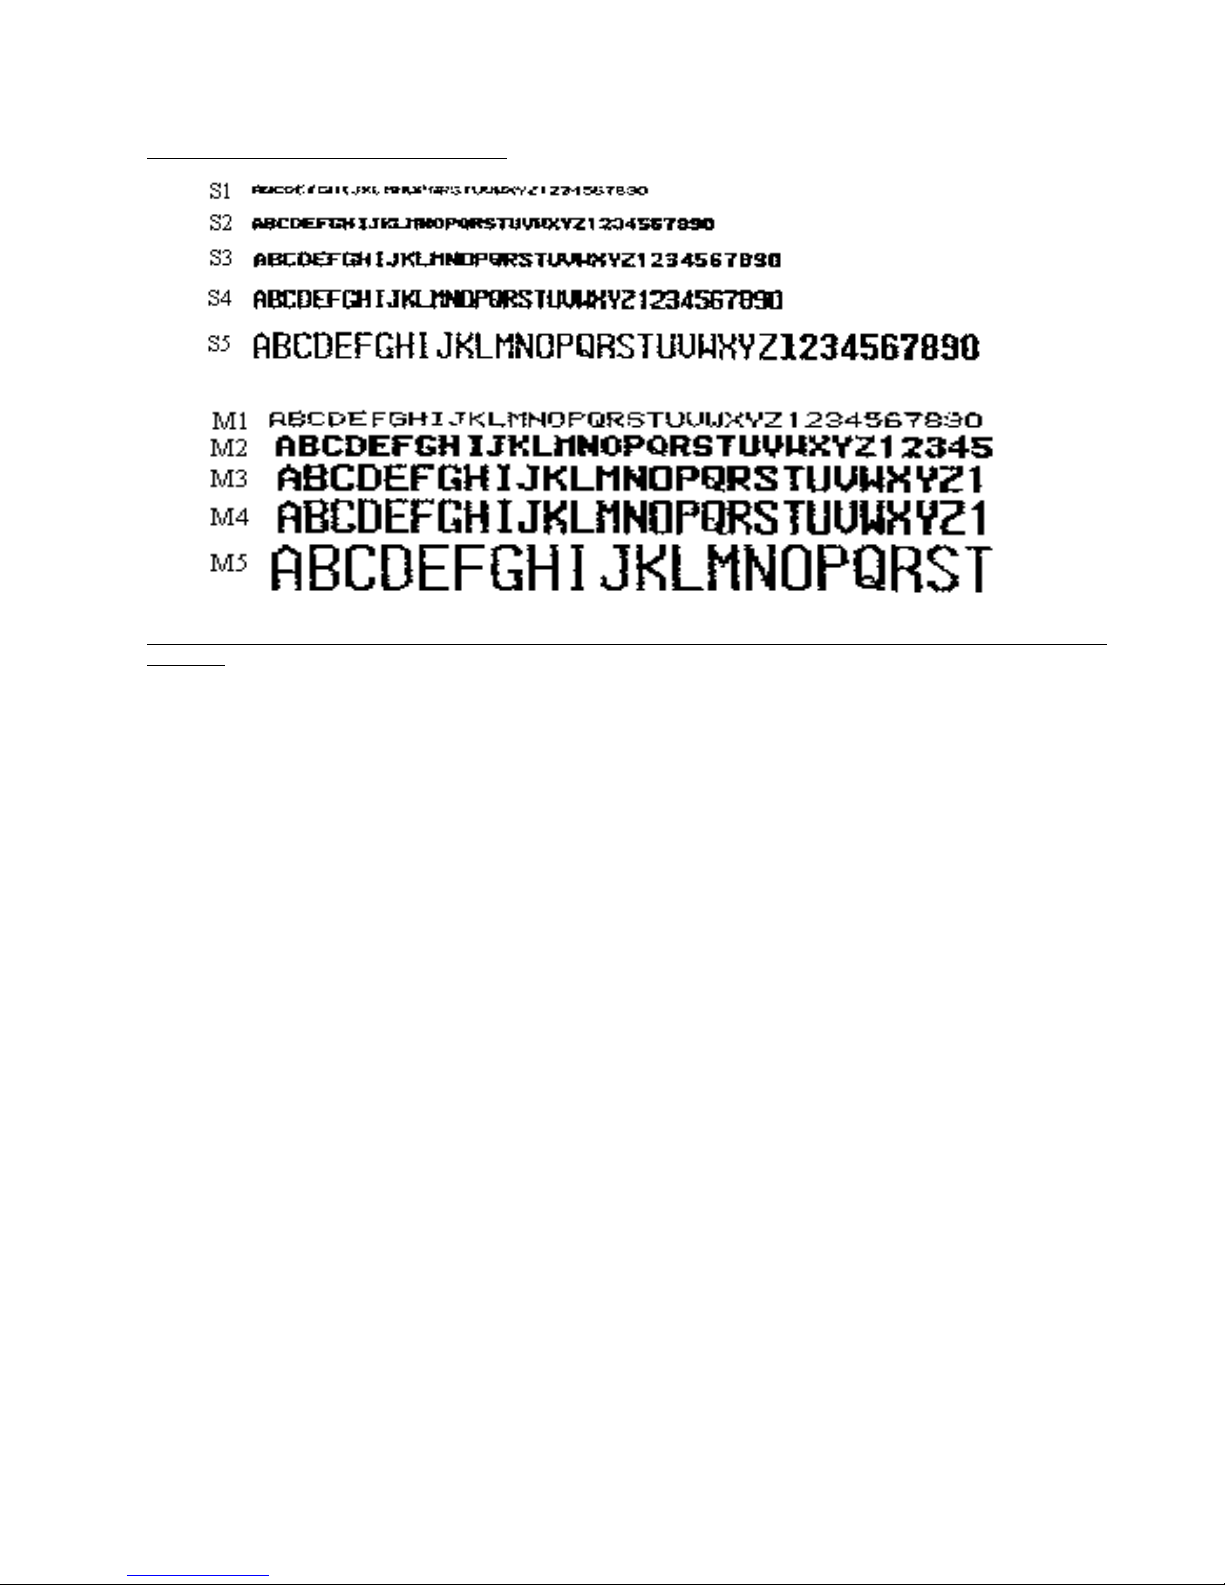
1.6.1 Character size and the number of characters available for label printing
10 kinds of letter sizes are available as follows:
The number of letters per line for Id Code, Part Name, Part No, Lot No and Location depend on the label format (maximum 32
chracters)
GENERAL INFORMATION
- 9 -
Page 12

2. REPORT MODE (‘X’ MODE)
2.1 REPORT MODE DESCRIPTION.......................................................................... 11
2.2 PROCEDURE TO ENTER REPORT MODE ......................................................11
2.3 ITEM REPORT ........................................................................................................ 12
2.3.1 One Item Report Print .................................................................................................................12
2.3.2 All Report Print...........................................................................................................................13
2.4 INVENTORY REPORT .......................................................................................... 14
2.4.1 Print Threshold Report................................................................................................................14
2.5 SHELF LOCATION PRINT ................................................................................... 16
REPORT MODE
- 10 -
Page 13
2.1 REPORT MODE DESCRIPTION
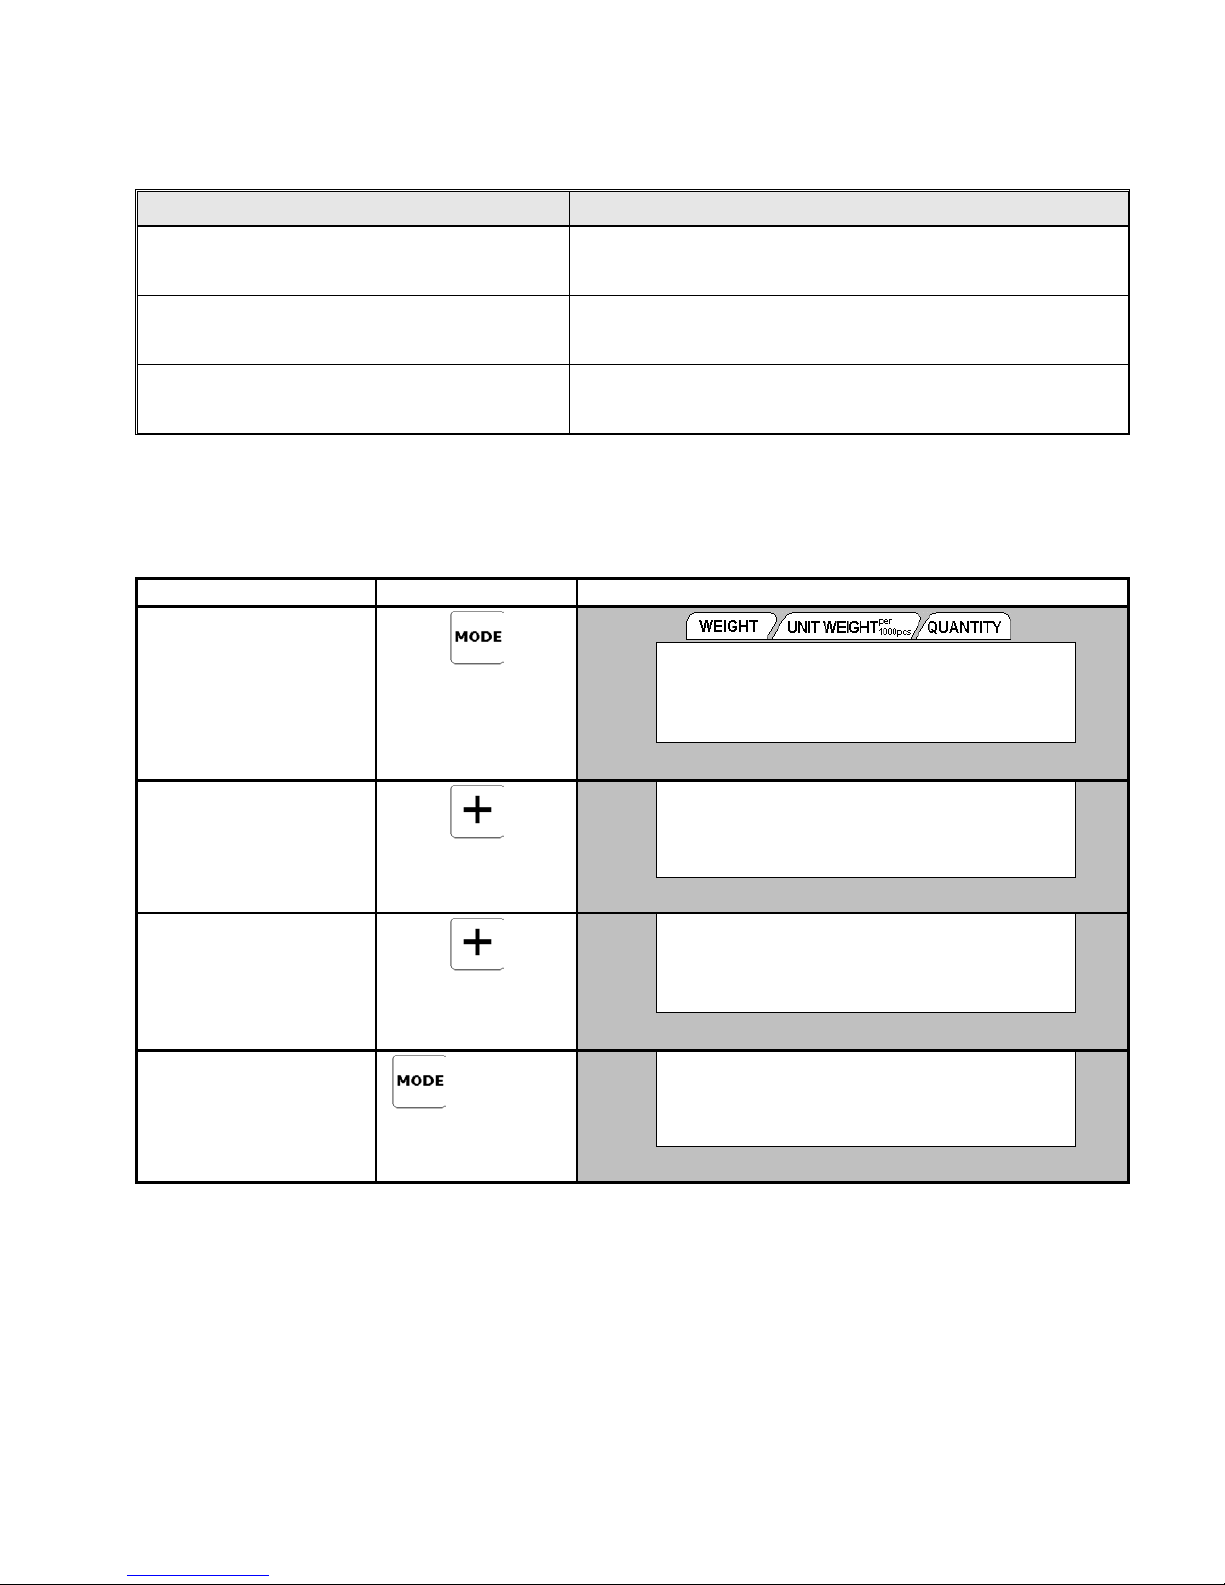
The DC-300 has report function to print out various kinds of transaction reports for analysis and checking. The types of reports
are as shown in the table below.
Note: To select the Report Type, press [+] or [-] key at Report Mode.
Report Type Contents
ITEM REPORT Print item data programmed.
INVENTORY REPORT Print item inventory data and item in/out count.
SHELF LOCATION PRINT Print Shelf Location label.
2.2 PROCEDURE TO ENTER REPORT MODE
OPERATION KEYS DISPLAY
1. At Stand-by status, press
[MODE] key to enter
Report Mode.
2. Press [+] key to select the
Inventory Report type.
Press
key back to
[-]
previous report type.
3. Press [+] key to select the
Shelf Location Print.
Press [-] key back to
previous report type.
4. Return to Registration
Mode, press
[MODE]
keys X 4 times.
X 4 times
´0³
NET
RECOM
INSUFF
´0³
NET
RECOM
INSUFF
´0³
NET
RECOM
INSUFF
´0³
NET
RECOM
INSUFF
X MODE: SELECT REPORT
1: ITEM REPORT
X MODE: SELECT REPORT
2: INVENTORY REPORT
X MODE: SELECT REPORT
3: SHELF LOCATION PRINT
W
W
0.000kg 0 0
X
W or X : display's status indicator
X
X
A
Σ
IN
OUT
PE
Σ
IN
OUT
PE
Σ
IN
OUT
PE
Σ
IN
OUT
PE
REPORT MODE
- 11 -
Page 14
2.3 ITEM REPORT
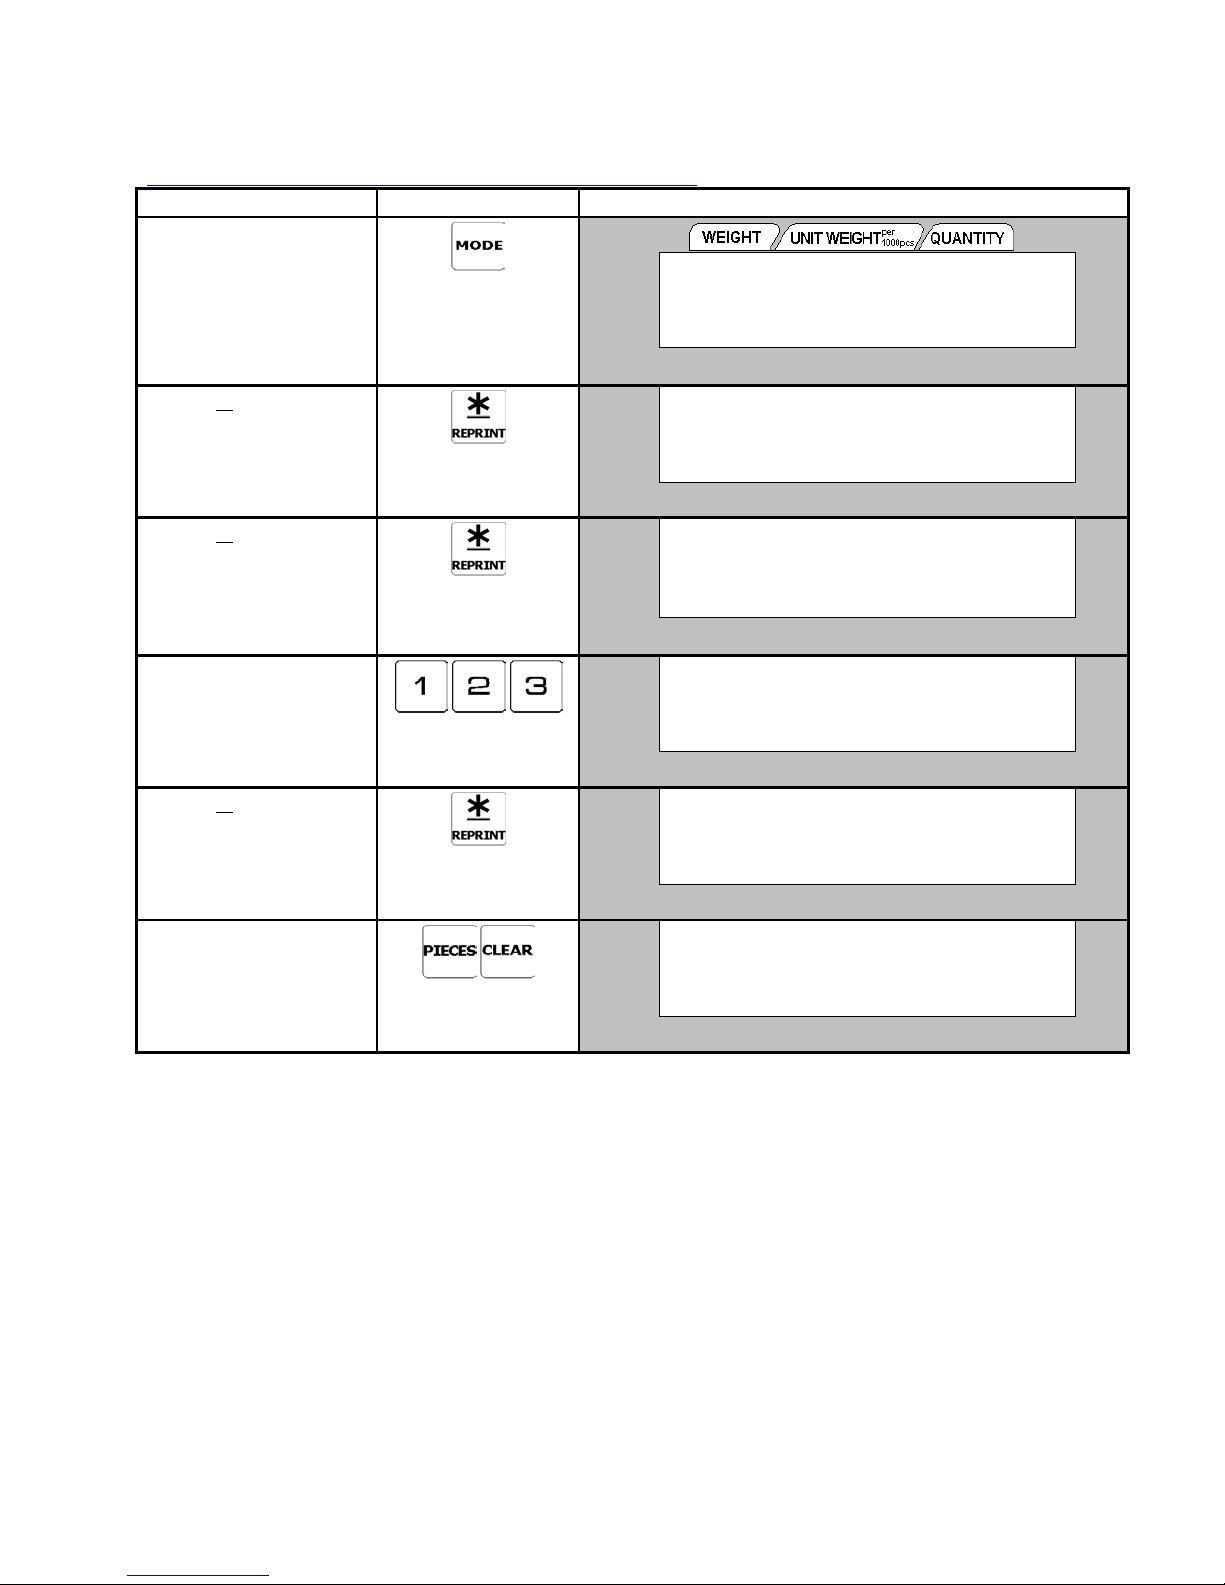
The item report can be printed on
receipt paper.
only one Item data that is being selected in One Item Report.
2.3.1 One Item Print
Continued from the procedure 1 on 2.2 Procedure to enter Report Mode.
OPERATION KEYS DISPLAY
1. At Registration mode,
press [MODE] key to
enter Select report mode.
1. Press [
Item Report mode.
2. Press [
One Item Print mode.
3. Enter the existing Item
Code for One Item Report
printing (Ex. 123).
4. Press [
the report.
To stop printing, press
[FEED] key.
5. Return to Select Report
Mode, press [PIECES]
and [CLEAR] key.
Press [PIECES] and
[TARE] key to cancel.
] key to enter
¾
¾
] key to enter
] key to printout
¾
You can print all programmed Items in
´0³
NET
RECOM
INSUFF
´0³
NET
RECOM
INSUFF
´0³
NET
RECOM
INSUFF
´0³
NET
RECOM
INSUFF
´0³
NET
RECOM
INSUFF
´0³
NET
RECOM
INSUFF
X MODE: SELECT REPORT
1: ITEM REPORT
1: ITEM REPORT
1. ONE ITEM PRINT
1. ONE ITEM PRINT
ITEM:
1. ONE ITEM PRINT
ITEM: 123
1. ONE ITEM PRINT
ITEM: 123
X MODE: SELECT REPORT
1: ITEM REPORT
All Item Report
printing mode or print
X
W or X : display's status indicator
X
X
X
X
X
Σ
IN
OUT
PE
Σ
IN
OUT
PE
Σ
IN
OUT
PE
Σ
IN
OUT
PE
Σ
IN
OUT
PE
Σ
IN
OUT
PE
REPORT MODE
- 12 -
Page 15
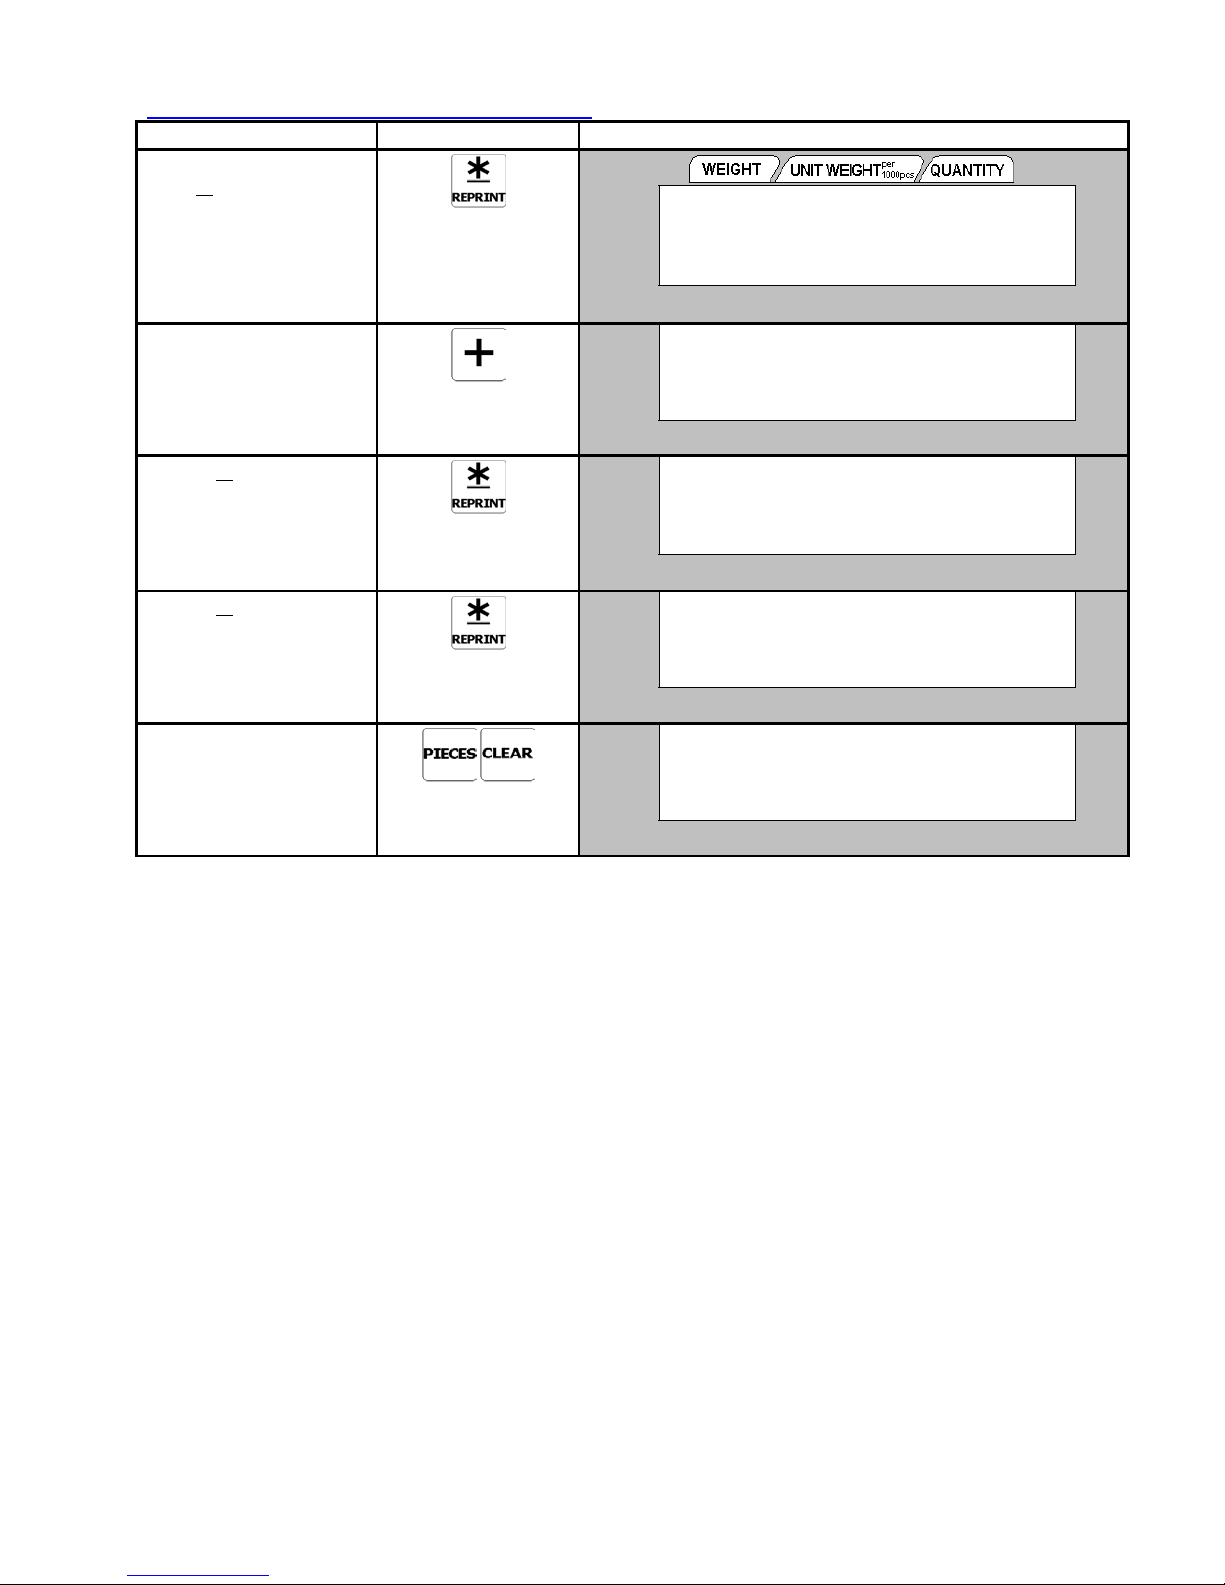
2.3.2 All Item Print
Continued from the procedure 1 on 2.2.1.1 One Item Print.
OPERATION KEYS DISPLAY
1. At Select Report mode
press
Report mode.
key to enter Item
¾
]
[
1. At One Item Report mode,
press [+] key to enter All
Item printing mode.
Press [-] key back to
previous display.
2. Press [
¾
] key.
3. Press [
the report.
To stop printing, press
[FEED]
] key to printout
¾
key.
4. Return to Select Report
Mode, press [PIECES]
and [CLEAR] key.
Press [PIECES] and
[TARE] key to cancel.
´0³
NET
RECOM
INSUFF
´0³
NET
RECOM
INSUFF
´0³
NET
RECOM
INSUFF
´0³
NET
RECOM
INSUFF
´0³
NET
RECOM
INSUFF
1: ITEM REPORT
1. ONE ITEM PRINT
1: ITEM REPORT
2. ALL ITEM PRINT
2. ALL ITEM PRINT
PRESS: PRINT / FEED (STOP)
2. ALL ITEM PRINT
PRESS: PRINT / FEED (STOP)
X MODE: SELECT REPORT
1: ITEM REPORT
X
W or X : display's status indicator
X
X
X
X
Σ
IN
OUT
PE
Σ
IN
OUT
PE
Σ
IN
OUT
PE
Σ
IN
OUT
PE
Σ
IN
OUT
PE
REPORT MODE
- 13 -
Page 16
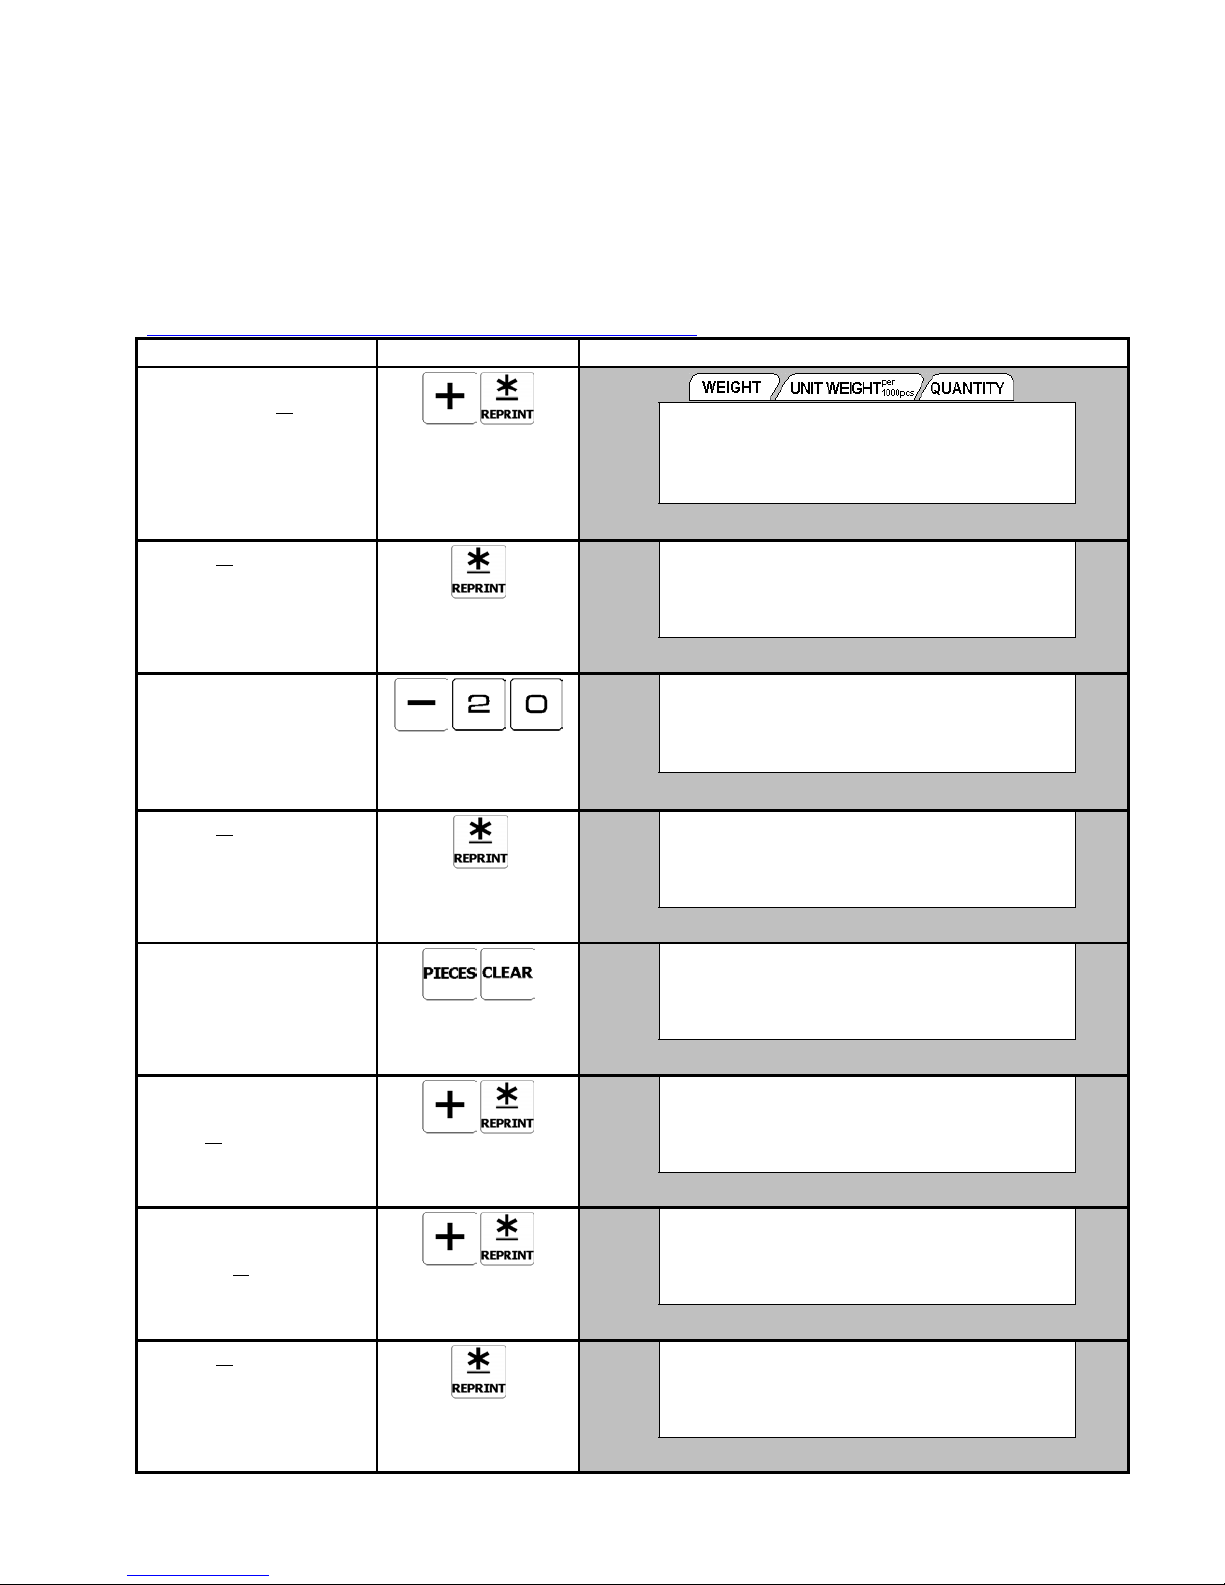
2.4 INVENTORY REPORT
On Inventory Report, there have three report can be select in this mode, Threshold Print, IN and OUT Count Print and Clear
IN and OUT count file. The report will print on receipt paper.
2.4.1 Print Threshold Report
Threshold Report is to shows under-stocked or over-stocked items at various levels by presetting the optimal stock levels. This
prevents stock outs and keeps optimum inventory balance. Threshold report can be printed, by entering the stock level
percentage. The formula for Stock Level is shown as follows:
Stock Level (%) = [(Inventory - Threshold) / Threshold] x 100
Note: Only the items Stock level equal or below the entering percentage will printed on the report.
Continued from the procedure 2 on 2.2 Procedure to enter Report Mode.
OPERATION KEYS DISPLAY
1. At Select Report mode,
or
]
¾
[
key to
[-]
key.
key to
]
press
[+]
and
enter Inventory report
mode.
Press
[+]
select Report types.
2. Press [
¾
] key.
3. Enter the percentage of
the stock level (Ex. 20%).
Press [+] key to select
Positive.
4. Press
key to printout
¾
]
[
the report.
To stop printing, press
[FEED]
key.
5. Return to Select Report
Mode, press [PIECES]
and [CLEAR] key.
Press [PIECES] and
[TARE] key to cancel.
6. Return to Inventory
Report Mode, Press [+]
¾
and [
] key.
7. Select and enter IN/OUT
Count Print Mode Press
and
[+]
¾
[
8. Press [
¾
] key to printout
the report.
To stop printing, press
[FEED] key.
REPORT MODE
´0³
NET
RECOM
INSUFF
´0³
NET
RECOM
INSUFF
´0³
NET
RECOM
INSUFF
´0³
NET
RECOM
INSUFF
´0³
NET
RECOM
INSUFF
´0³
NET
RECOM
INSUFF
´0³
NET
RECOM
INSUFF
´0³
NET
RECOM
INSUFF
- 14 -
2: INVENTORY REPORT
1. THRESHOLD PRINT
W or X : display's status indicator
1. THRESHOLD PRINT
STOCK LEVEL (%) : +
1. THRESHOLD PRINT
STOCK LEVEL (%) : - 20
1. THRESHOLD PRINT
STOCK LEVEL (%) : - 20
X MODE: SELECT REPORT
1: ITEM REPORT
2 : INVENTORY REPORT
1. THRESHOLD PRINT
2 : IN/OUT COUNT PRINT
PRESS : PRINT / FEED (STOP)
2 : IN/OUT COUNT PRINT
PRESS : PRINT / FEED (STOP)
X
X
X
X
X
X
X
X
Σ
IN
OUT
PE
Σ
IN
OUT
PE
Σ
IN
OUT
PE
Σ
IN
OUT
PE
Σ
IN
OUT
PE
Σ
IN
OUT
PE
Σ
IN
OUT
PE
Σ
IN
OUT
PE
Page 17
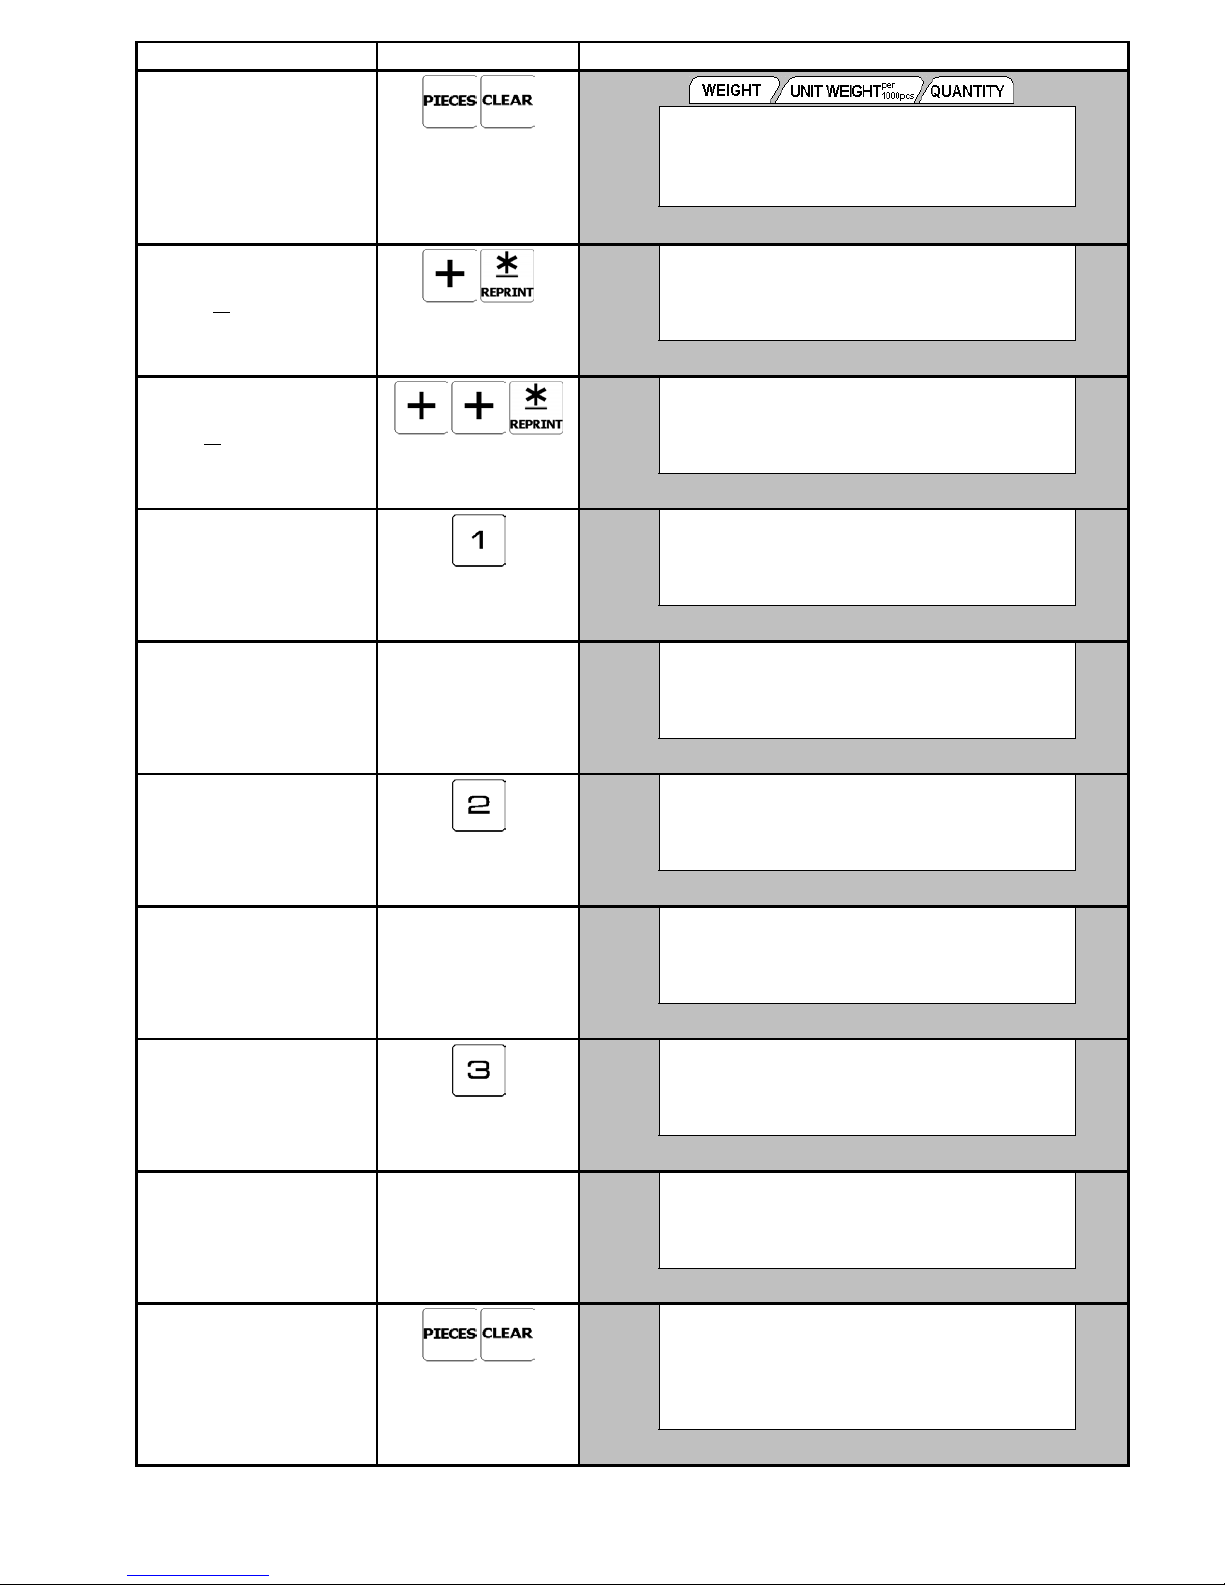
OPERATION KEYS DISPLAY
9. Return to Select Report
Mode, press [PIECES]
and [CLEAR] key.
Press [PIECES] and
[TARE] key to cancel.
10. Return to Inventory
Report Mode, Press [+]
and
key.
¾
[
]
Press [+] key to select
Positive.
11. Select Clear In/Out
Count Mode Press
] key.
[+][
¾
[+]
Press [+] key to select
Positive.
12. Press [1] key to clear the
Daily report.
13. After Clear Daily report
is completed, the display
will return back to Clear
In/Out Count Mode.
14. Press
key to clear the
[2]
Term report.
15. After Clear Term report
is completed, the display
will return back to Clear
In/Out Count Mode.
16. Press [3] key to clear the
All report.
17. After Clear All report is
completed, the display
will return back to Clear
In/Out Count Mode.
18. Return to Select Report
Mode, press
[PIECES]
and [CLEAR] key.
Press [PIECES] and
[TARE]
key to cancel.
´0³
NET
RECOM
INSUFF
´0³
NET
RECOM
INSUFF
´0³
NET
RECOM
INSUFF
´0³
NET
RECOM
INSUFF
´0³
NET
RECOM
INSUFF
´0³
NET
RECOM
INSUFF
´0³
NET
RECOM
INSUFF
´0³
NET
RECOM
INSUFF
´0³
NET
RECOM
INSUFF
´0³
NET
RECOM
INSUFF
X MODE: SELECT REPORT
1: ITEM REPORT
2 : INVENTORY REPORT
1. THRESHOLD PRINT
3. CLEAR IN/OUT COUNT
1:DAILY / 2:TERM / 3:ALL
3. CLEAR IN/OUT COUNT
1:DAILY / 2:TERM / 3:ALL
3. CLEAR IN/OUT COUNT
1:DAILY / 2:TERM / 3:ALL
3. CLEAR IN/OUT COUNT
1:DAILY / 2:TERM / 3:ALL
X MODE: SELECT REPORT
1: ITEM REPORT
DAILY CLEAR
PLEASE WAIT . . .
PLEASE WAIT . . .
PLEASE WAIT . . .
W or X : display's status indicator
TERM CLEAR
ALL CLEAR
X
X
X
X
X
X
X
X
X
X
Σ
IN
OUT
PE
Σ
IN
OUT
PE
Σ
IN
OUT
PE
Σ
IN
OUT
PE
Σ
IN
OUT
PE
Σ
IN
OUT
PE
Σ
IN
OUT
PE
Σ
IN
OUT
PE
Σ
IN
OUT
PE
Σ
IN
OUT
PE
REPORT MODE
- 15 -
Page 18
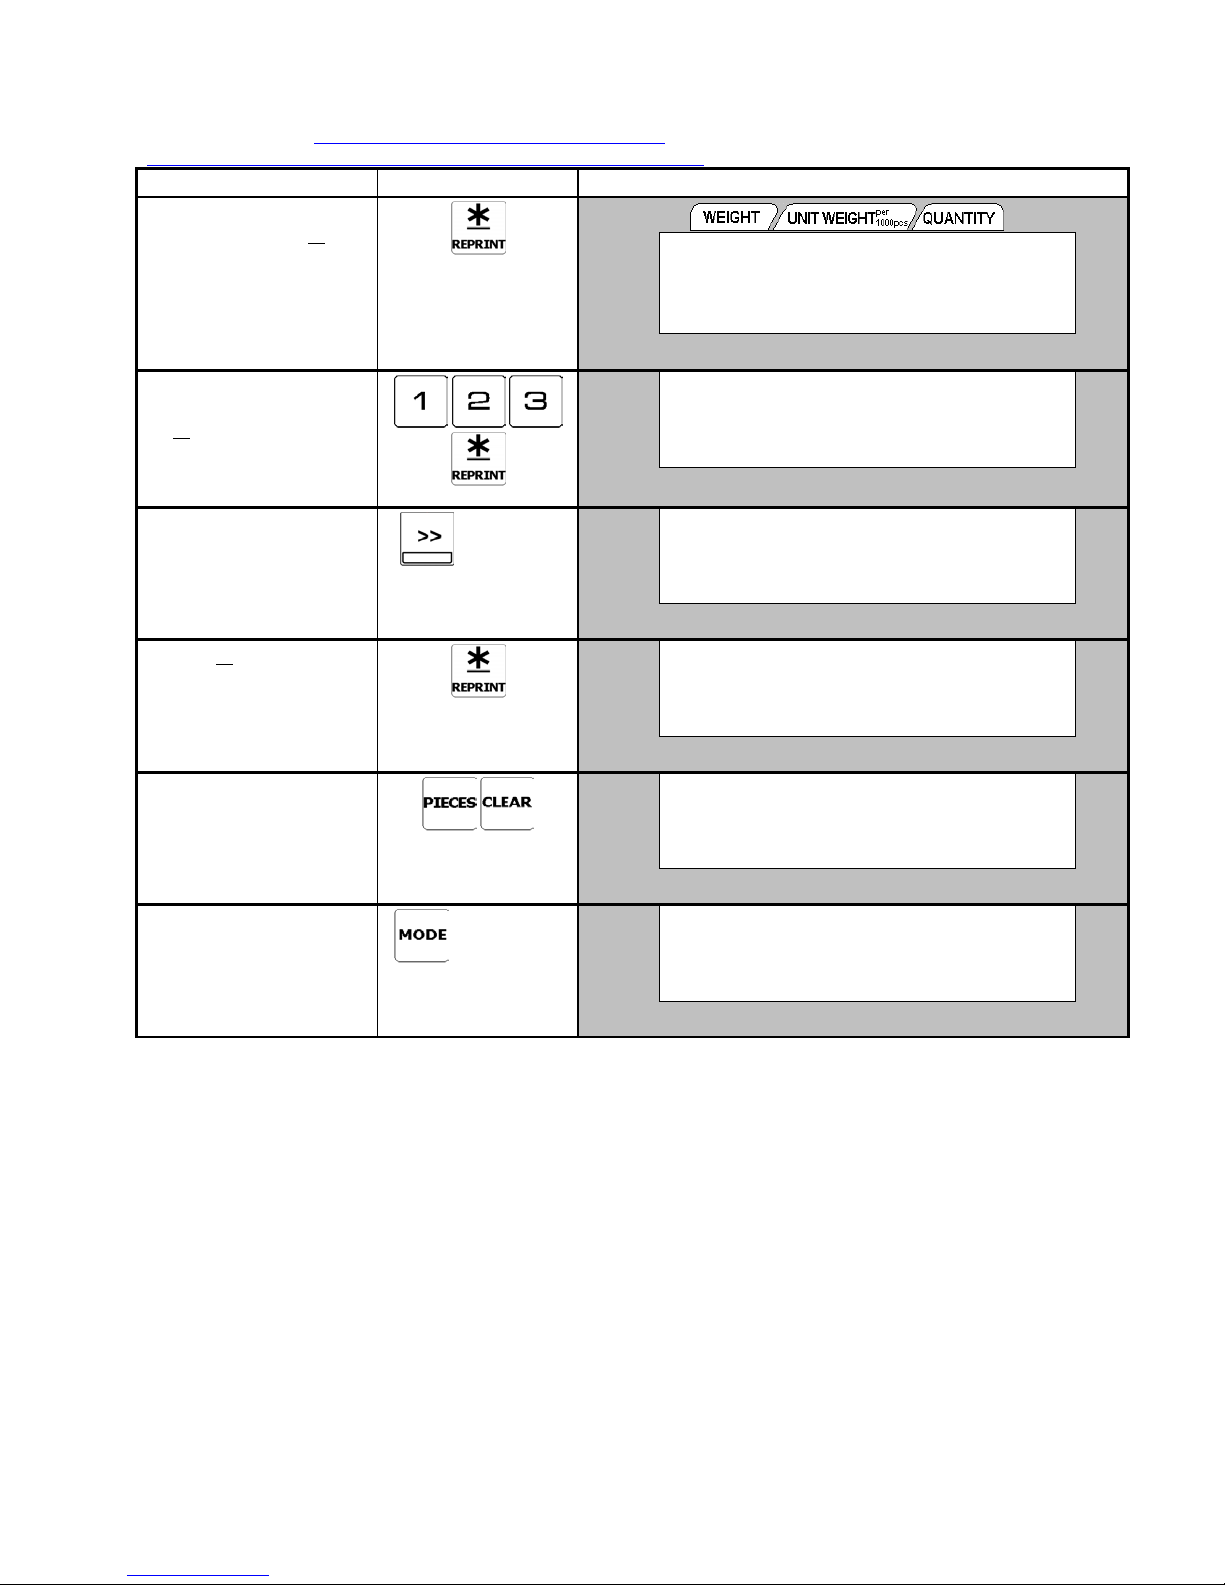
2.5 SHELF LOCATION PRINT
This section is used to select shipping label format of the item for shipment. If standard format does not have the print area for
programmed shipping data you want, so it is required to use a free format with the print area for programmed shipping data you
want. (Please refer to 3. PROGRAM MODE of 3.8 Free Format File
Continued from the procedure 3 on 2.2 Procedure to enter Report Mode.`
OPERATION KEYS DISPLAY
1. At Select Report mode,
press
[+], [+]
and
to enter Shelf Location
key
¾
]
[
Print mode.
RECOM
INSUFF
2. Enter the existing Item
Code (Ex. 123) and press
¾
] key.
[
The original label format
for the Item will appear on
the display (F1/ 17).
RECOM
INSUFF
3. Press [<<] or [>>] key to
select an existing label
format (Ex F5).
4. Press [
¾
] key and with
label print out.
5. Press
[PIECES]
[CLEAR] key to exit.
Press [PIECES] [TARE]
key to cancel.
4 times
X
RECOM
INSUFF
RECOM
INSUFF
RECOM
INSUFF
6. Return to Registration
Mode, press [MODE] key
X 4 times.
X 4 times
RECOM
INSUFF
).
´0³
NET
´0³
NET
´0³
NET
´0³
NET
´0³
NET
´0³
NET
3: SHELF LOCATION PRINT
ITEM:
W or X : display's status indicator
3: SHELF LOCATION PRINT
LABEL FORMAT 1: F1/ 17
3: SHELF LOCATION PRINT
LABEL FORMAT 1: F5/ 21
3: SHELF LOCATION PRINT
LABEL FORMAT 1: F5/ 21
X MODE: SELECT REPORT
1: ITEM REPORT
W
0.000kg 0 0
W
A
X
X
X
X
X
Σ
IN
OUT
PE
Σ
IN
OUT
PE
Σ
IN
OUT
PE
Σ
IN
OUT
PE
Σ
IN
OUT
PE
Σ
IN
OUT
PE
REPORT MODE
- 16 -
Page 19

3. PROGRAM MODE (‘S’ MODE)
3.1 GENERAL INFORMATION.................................................................................. 18
3.1.1 Key Functions in Program Mode ................................................................................................18
3.1.2 Programmable Files ....................................................................................................................20
3.1.3 Programming Mode Entry ..........................................................................................................20
3.2 ITEM FILES ............................................................................................................. 21
3.2.1 Program Item File .......................................................................................................................21
3.2.2 Delete Item Code ........................................................................................................................26
3.2.3 Label Format List........................................................................................................................27
3.3 FACTORY NAME FILES....................................................................................... 28
3.3.1 Program Factory Name File ........................................................................................................28
3.3.2 Print Factory Name File..............................................................................................................29
3.3.3 Delete Factory Name File ...........................................................................................................29
3.4 PROGRAM DATE AND TIME.............................................................................. 30
3.5 ADDRESS FILES ..................................................................................................... 31
3.5.1 Program Address File..................................................................................................................31
3.5.2 Print Address File........................................................................................................................32
3.5.3 Delete Address File.....................................................................................................................32
3.6 GENERAL LABEL PROGRAM............................................................................ 33
3.7 TEXT FILES ............................................................................................................. 34
3.7.1 Program Text File .......................................................................................................................34
3.7.2 Print Text File .............................................................................................................................35
3.7.3 Delete Text File...........................................................................................................................35
3.8 FREE FORMAT FILE............................................................................................. 36
3.8.1 General Information....................................................................................................................36
3.8.2 Print Area, Print Position and Print Angles ................................................................................36
3.8.3 Free Format Mode Entry.............................................................................................................38
3.8.4 Item Data Position.......................................................................................................................39
3.8.5 Type 1 Data Setting.....................................................................................................................40
3.8.6 Type 2 Data Setting.....................................................................................................................41
3.8.7 Type 3 Data Setting.....................................................................................................................42
3.8.8 Type 4 Data Setting.....................................................................................................................43
3.8.9 Test Print .....................................................................................................................................46
3.8.10 Print Free Format File ...............................................................................................................47
PROGRAM MODE
16
Page 20

3.8.11 Delete Free Format File ............................................................................................................47
3.8.12 Sample of Program a Format by modifying the existing format. .............................................48
3.9 LOGO FILE .............................................................................................................. 52
3.9.1 Pre-programming Logo Data ......................................................................................................52
3.9.2 Program Display & Keys Function .............................................................................................53
3.9.3 Programming Order ....................................................................................................................53
3.9.4 Program Logo File ......................................................................................................................54
3.9.5 Print Logo File ............................................................................................................................55
3.9.6 Delete Logo File..........................................................................................................................55
3.10 MEMORY STATUS............................................................................................... 56
3.11 JOB SEQUENCE.................................................................................................... 57
3.11.1 Program Job Sequence Number File.........................................................................................57
3.11.2 Delete Job Sequence Number ...................................................................................................58
PROGRAM MODE
17
Page 21
3.1 GENERAL INFORMATION
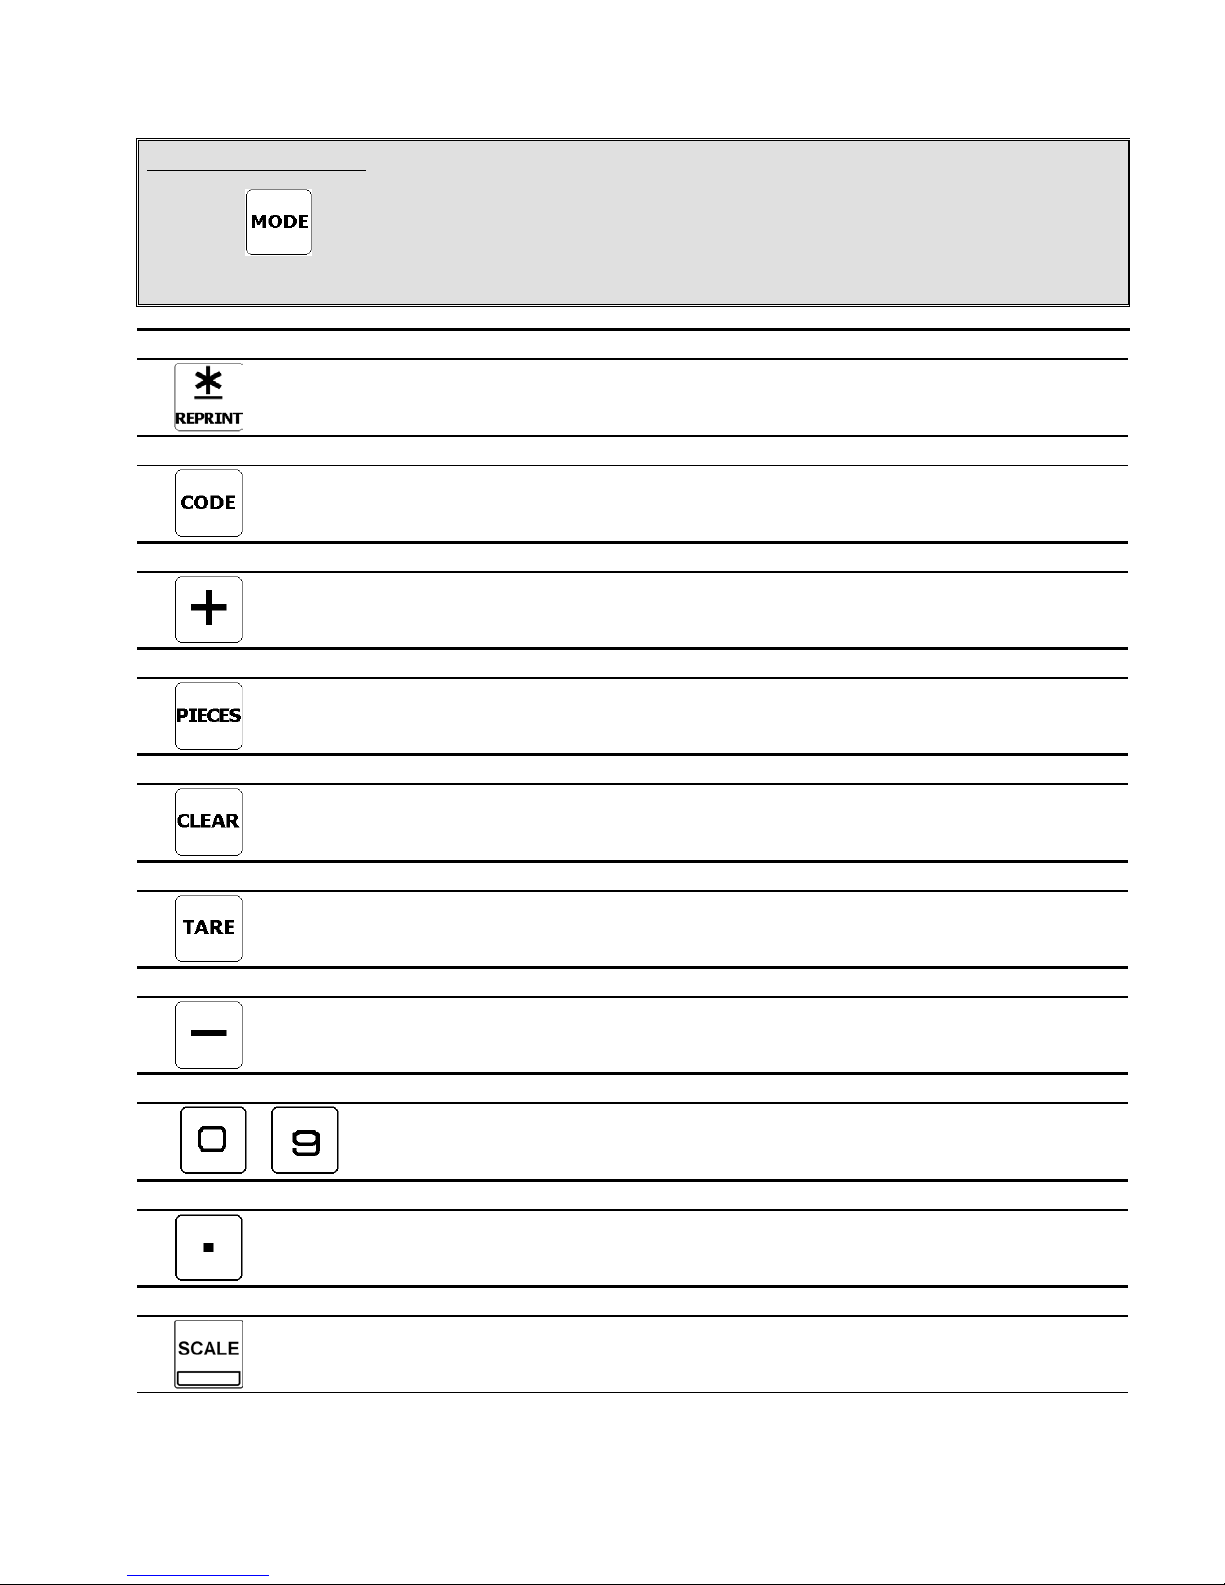
3.1.1 Key Functions in Program Mode
Used to enter Program Mode
- MODE SELECTION KEY
To enter Program Mode from Registration Mode, press MODE KEY first and then depress MODE KEY again.
PRINT KEY
CODE KEY
PLUS KEY
PCS KEY
Set Data.
Store the data & Move to next setting display in ITEM and Free Format Programming.
Store the programmed data.
Select programming item.
Select Set Point Type in item programming.
CLEAR KEY
TARE KEY
MINUS KEY
NUMERIC KEYS
to
DOT KEY
SCALE KEY
Escape from the Programming.
Set Unit Weight by weight sampling or Re-computing Unit Weight in Item programming.
For Back space or Clear Data.
Select the parameter "YES" on programming mode.
Select the parameter "NO" on programming mode.
Set or Clear Tare Value in Item Programming.
Print out report of programming data.
Delete a file.
Return to the previous setting display in Item and Free Format Programming.
Enter numeric data.
To enter Decimal point for Unit Weight setting in ITEM programming.
To switch between Scale A, B, C & D.
PROGRAM MODE
- 18 -
Page 22
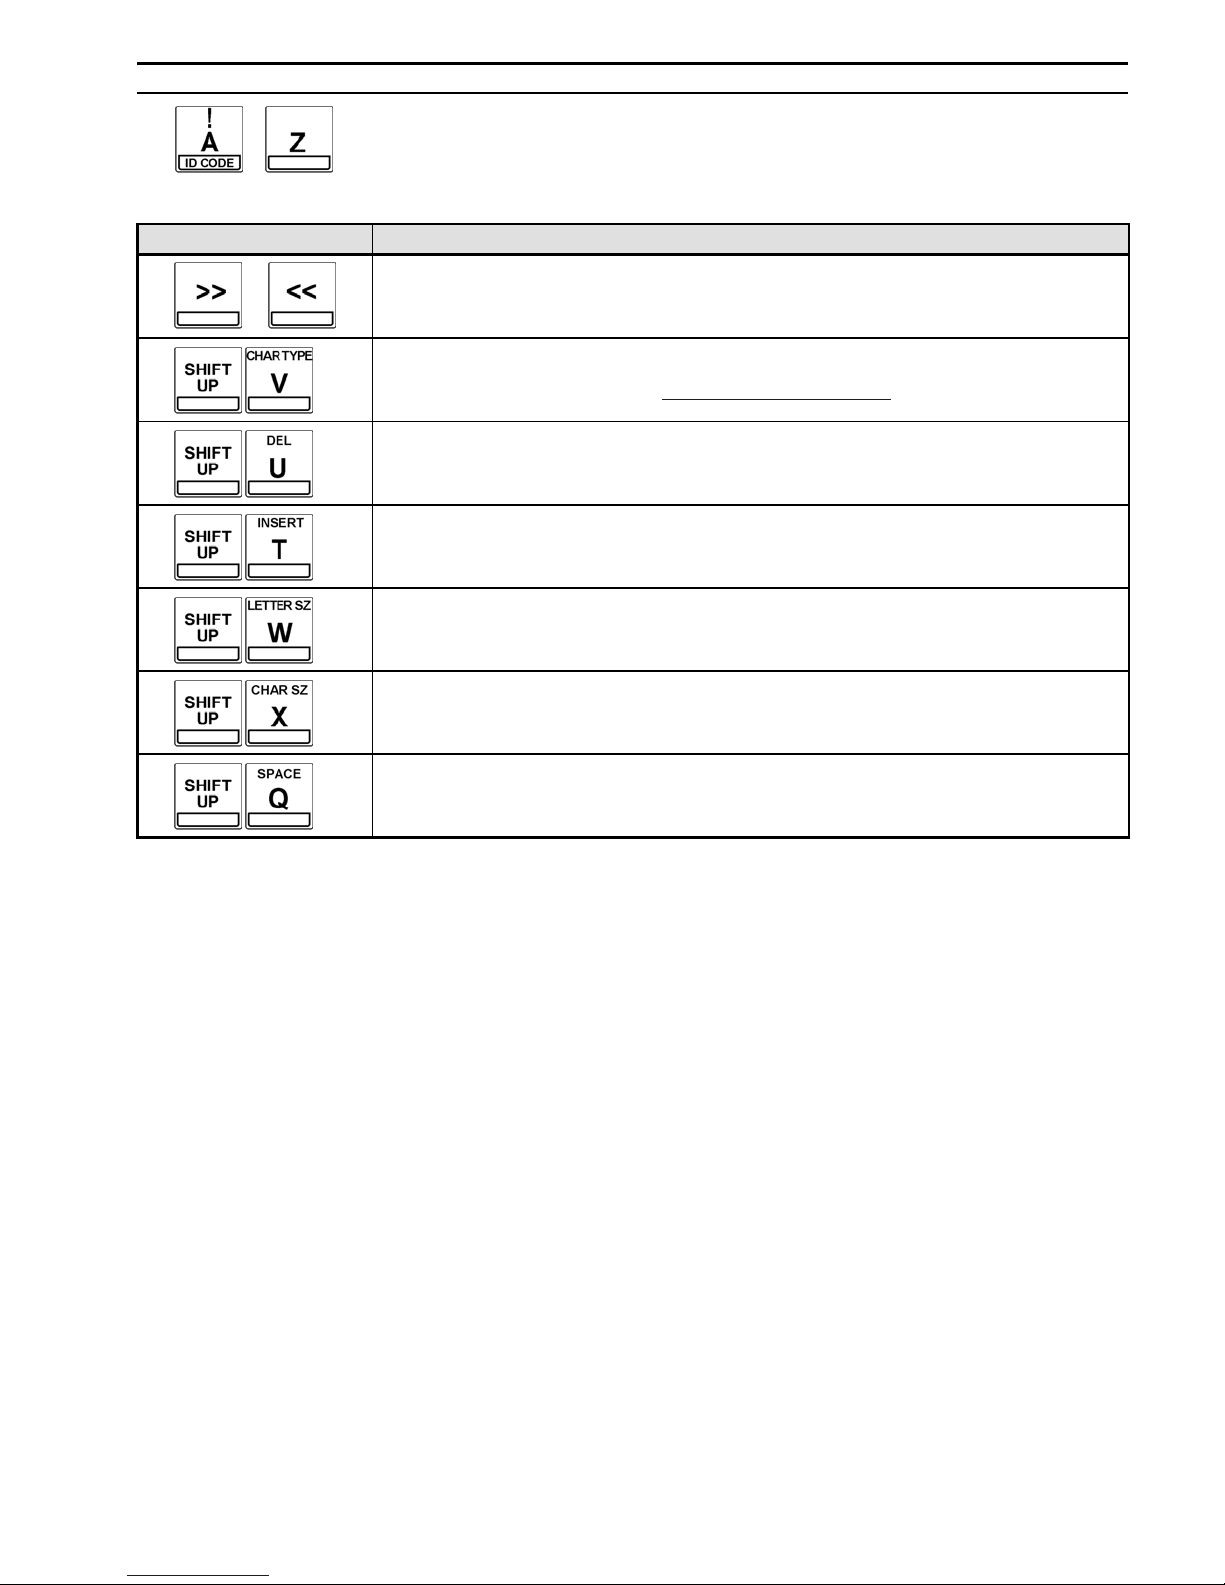
CHARACTER KEYS IN PROGRAM MODE
Enter ID Code, Part Name, Address or Factory Name etc.
Note: 1
to
The following Character Keys are used for entering Character Parameter or Text Data in DC300.
Key operation
or
Move cursor left or right.
Select Label Format in ITEM Programming.
Select Code types (Preset key, ASCII Code or Teraoka Code) for enter Part Name, Address or
Factory Name etc. Please refer to 1.4 Table of Characters Code.
Delete unnecessary Data.
Switch INSERT or OVERWRITE alternatively.
Change Letter (Capital or Lowercase) size.
Purpose
Change Font size.
To SPACE the entering characters or numbers.
PROGRAM MODE
- 19 -
Page 23
3.1.2 Programmable Files
There are 10 files available for programming as follows.
Note: Press [+] key to go to next Data File or press [-] key to go back to previous Data File.
DATA FILES CHAPTER # (Reference)
ITEM CODE PROGRAMMING 3.2 ITEM FILES
FACTORY PROGRAMMING 3.3 FACTORY NAME FILES
PROGRAM JOB SEQUENCE 3.11 JOB SEQUENCE
PROGRAM DATE 3.4 PROGRAM DATE AND TIME
ADDRESS PROGRAM 3.5 ADDRESS FILES
GENERAL LABEL PROGRAM 3.6 GENERAL LABEL PROGRAM
TEXT PROGRAMMING 3.7 TEXT FILES
PROGRAM FREE FORMAT 3.8 FREE FORMAT FILE
LOGO PROGRAMMING 3.9 LOGO FILE
ITEMS PROGRAMMED 3.10 MEMORY STATUS
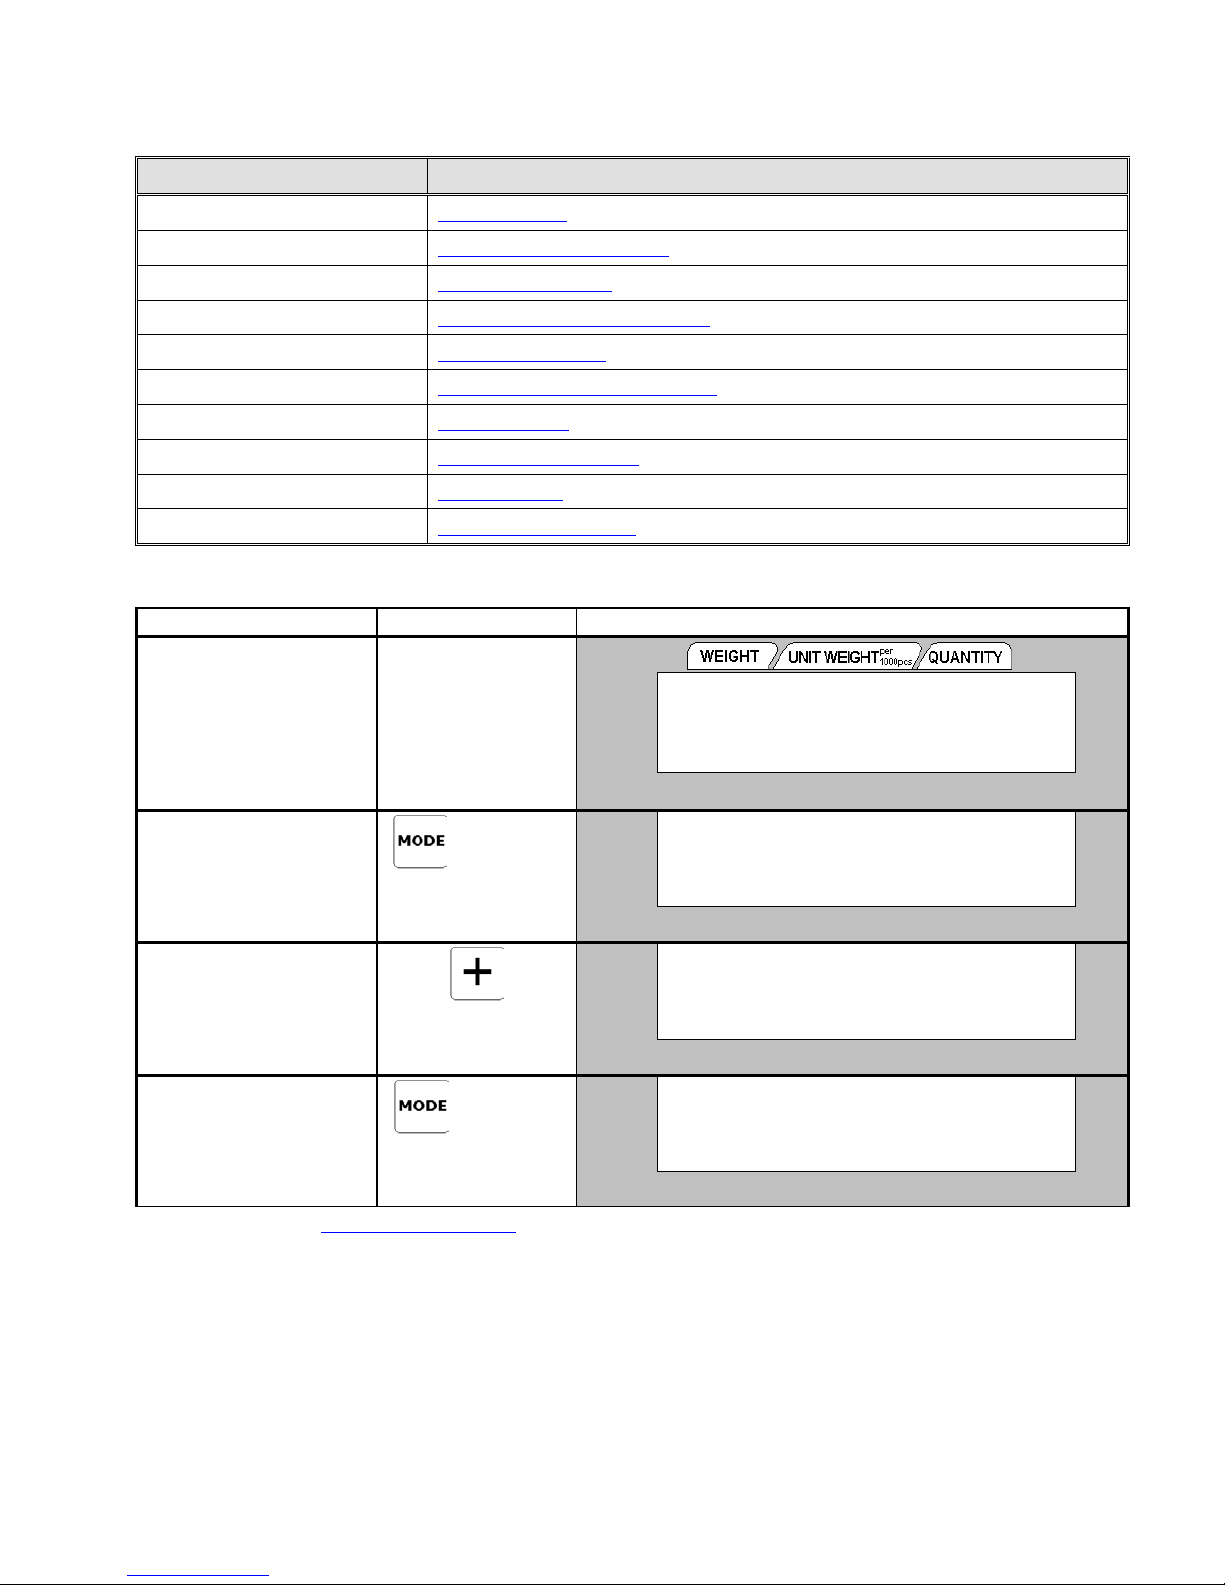
3.1.3 Programming Mode Entry
OPERATION KEYS DISPLAY
Stand-by status
1. Press [MODE] key two
times to enter
Programming Mode.
2. Press [+] key to select
next programming file.
Press
[+]
or
key to
[-]
search the programming
files. *Refer to Note 1.
3. To return to Registration
Mode, press [MODE] key
X 3 times.
X 2 times
X 3 times
´0³
NET
RECOM
INSUFF
´0³
NET
RECOM
INSUFF
´0³
NET
RECOM
INSUFF
´0³
NET
RECOM
INSUFF
W
0.000kg 0 0
W
W
W
ITEM CODE PROGRAMMING
PRINT KEY TO ENTER
FACTORY PROGRAMMING
ENT FACTORY# (1-32): 0
0.000kg 0 0
A
W or X : display's status indicator
S
S
A
Σ
IN
OUT
PE
Σ
IN
OUT
PE
Σ
IN
OUT
PE
Σ
IN
OUT
PE
Note 1: Please refer to 3.1.2 Programmable Files
PROGRAM MODE
for selecting Programming Item by pressing [+] or [-] key.
- 20 -
Page 24
3.2 ITEM FILES
The following items can be programmed in ITEM CODE PROGRAMMING mode.
1. ID CODE ENTRY 5. PART NAME 9. INVENTORY
2. UNIT WEIGHT 6. PART NUMBER 10. THRESHOLD
3. TARE WEIGHT 7. LOT NUMBER 11. SET POINT 1 & 2
4. LABEL FORMAT 8. LOCATION 12. ADDRESS NUMBER (if Address exist)
3.2.1 Program Item File
Item data is programmed by the following procedure.
If the selected Label Format does not has print area for the items, the items data will not be printed out on the label.
1. ID CODE Entry
There are three types of ID CODE (Numeric Code, Alphabets Code and Alphanumeric Code) can be entered using Numeric Key
and Characters Key. Maximum 32 characters can be programmed for each ID CODE in 1 line. The ID CODE character size
used depends on the label type programmed for the Item.
´0³
NET
RECOM
INSUFF
´0³
NET
RECOM
INSUFF
´0³
NET
RECOM
INSUFF
Σ
IN
OUT
PE
Σ
IN
OUT
PE
Σ
IN
OUT
PE
PROG ID CODE P: KEY
ENTER:
W or X : display's status indicator
PROG ID CODE P: KEY
ENTER: 10
W
0.000kg 0 0
PROG UNIT WT: 0
W
S
S
A
S
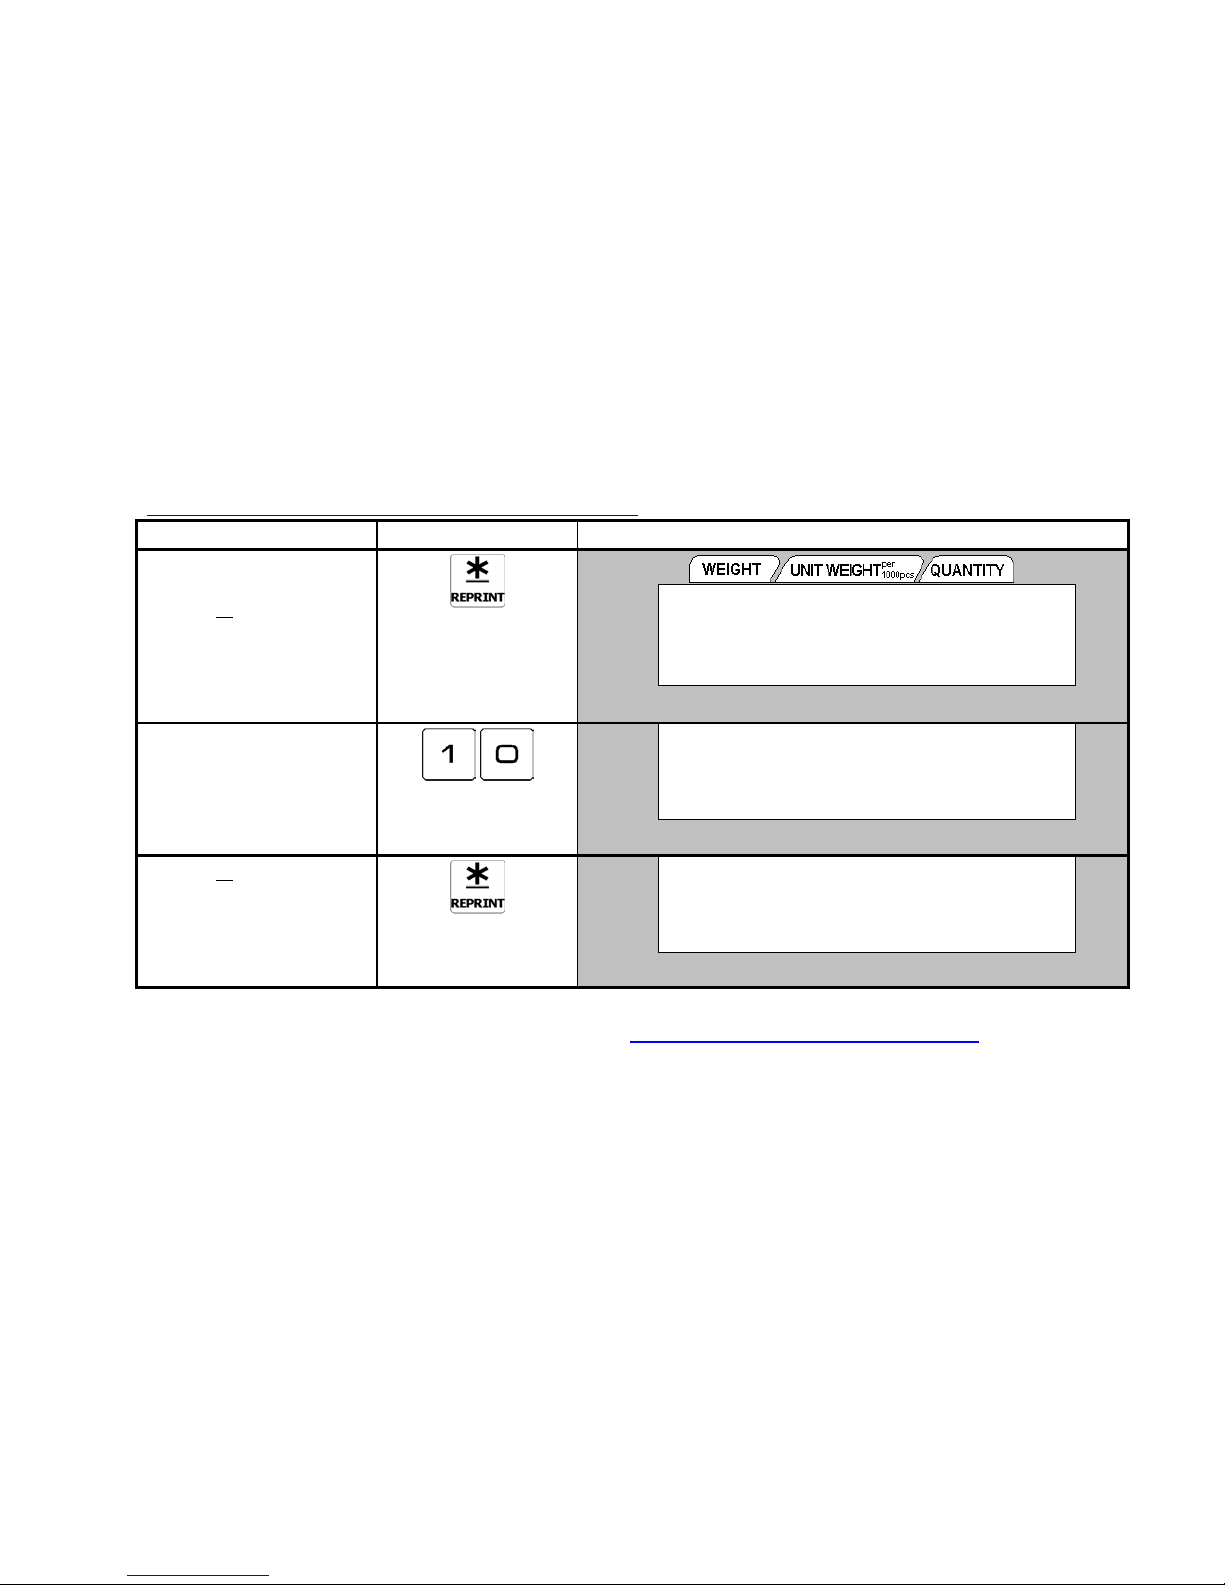
Continued from procedure 1 on 3.1.3 Programming Mode Entry.
OPERATION KEYS DISPLAY
1. At ID CODE
Programming Mode,
½
press [
] key to enter
Item Code program mode.
2. Enter new ID CODE by
numeric keypad. (Ex. 10).
Maximum 32 characters
can be entered.
Refer to Note 1.
3. Press [
½
] key to enter
Item File programmed.
Note 1: Please refer to 3.1.1 Key Function in Program Mode of CHARACTER KEYS IN PROGRAM MODE
PROGRAM MODE
.
- 21 -
Page 25
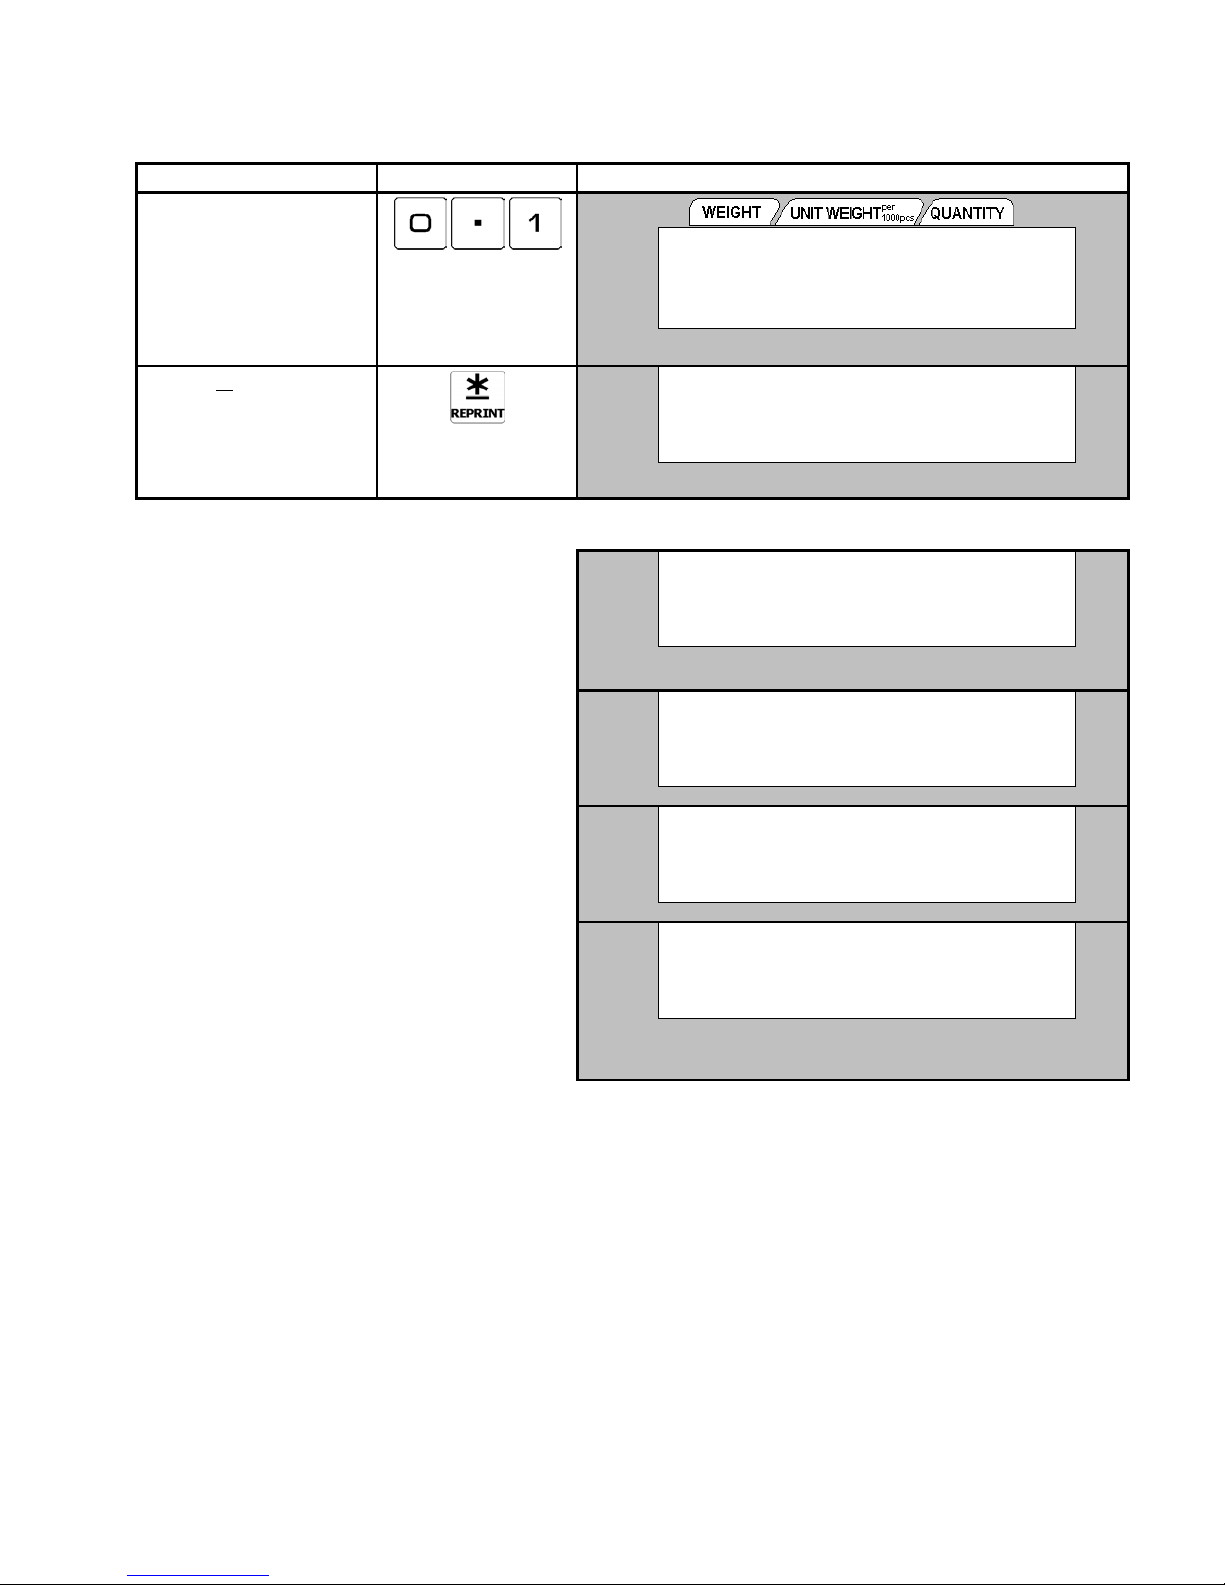
2. Unit Weight Entry
Unit Weight per 1000pcs is used to calculate the Quantity with place the product on the platter. Maximum 5 digits & 1 decimal
point can be entered for Unit Weight. There are two ways to enter Unit Weight value, by Numeric Key or by Weight
Sampling.
OPERATION KEYS DISPLAY
4. Enter Unit Weight value
by numeric key (Ex.
0.1000).
Another way to enter the
Unit Weight, please refer to
Note 1.
5. Press [
Unit Weight data.
] key to store the
½
Note 1: There have two ways to enter Unit Weight value by weight sampling, place the product on platter when Insufficient
indicator ON or OFF.
1 a) Place the 10pcs of product on platter (Insufficient
indicator lighted up) and then press
[PIECES]
key to
do sampling.
After a few seconds, a message "ADD 3" will
appear on the display. If the samples are heavy
enough, the insufficient indicator light will be off.
b) Add 3pcs of product on platter and press
[PIECES] key.
After a few seconds, the Unit Weight value will
appear on Unit Weight column and Unit weight
entering column.
2 a) Insufficient Indicator light will be OFF, if the
weight exceeded the insufficient weight setting.
Place the product on platter (Ex. 1kg =100pcs).
b) Enter the known Quantity (Ex. 100) and press
[PIECES] key (If the Quantity is 10pcs, press
[PIECES] key to sample without entering the
Quantity).
Wait for a while for Unit Weight computation to be
completed. The Unit Weight value will appear on Unit
Weight column and the Unit Weight entering column.
´0³
NET
RECOM
INSUFF
´0³
NET
RECOM
INSUFF
´0³
NET
RECOM
INSUFF
´0³
NET
RECOM
INSUFF
´0³
NET
RECOM
INSUFF
´0³
NET
RECOM
INSUFF
W
0.000kg 0 0
PROG UNIT WT: 0.1
W
or X : display's status indicator
W
W
0.000kg 0 0
PROG TARE WT: 0
W
0.020kg ADD 3
PROG UNIT WT: 0
W
0.026kg 2.0030 13
PROG UNIT WT: 2.0030
1.000kg 2.0030 500
PROG UNIT WT: 2.0030
1.000kg 10.005 100
PROG UNIT WT: 10.005
A
A
A
A
A
A
Σ
IN
S
OUT
PE
Σ
IN
S
OUT
PE
Σ
IN
S
OUT
PE
Σ
IN
S
OUT
PE
Σ
IN
S
OUT
PE
Σ
IN
S
OUT
PE
PROGRAM MODE
- 22 -
Page 26
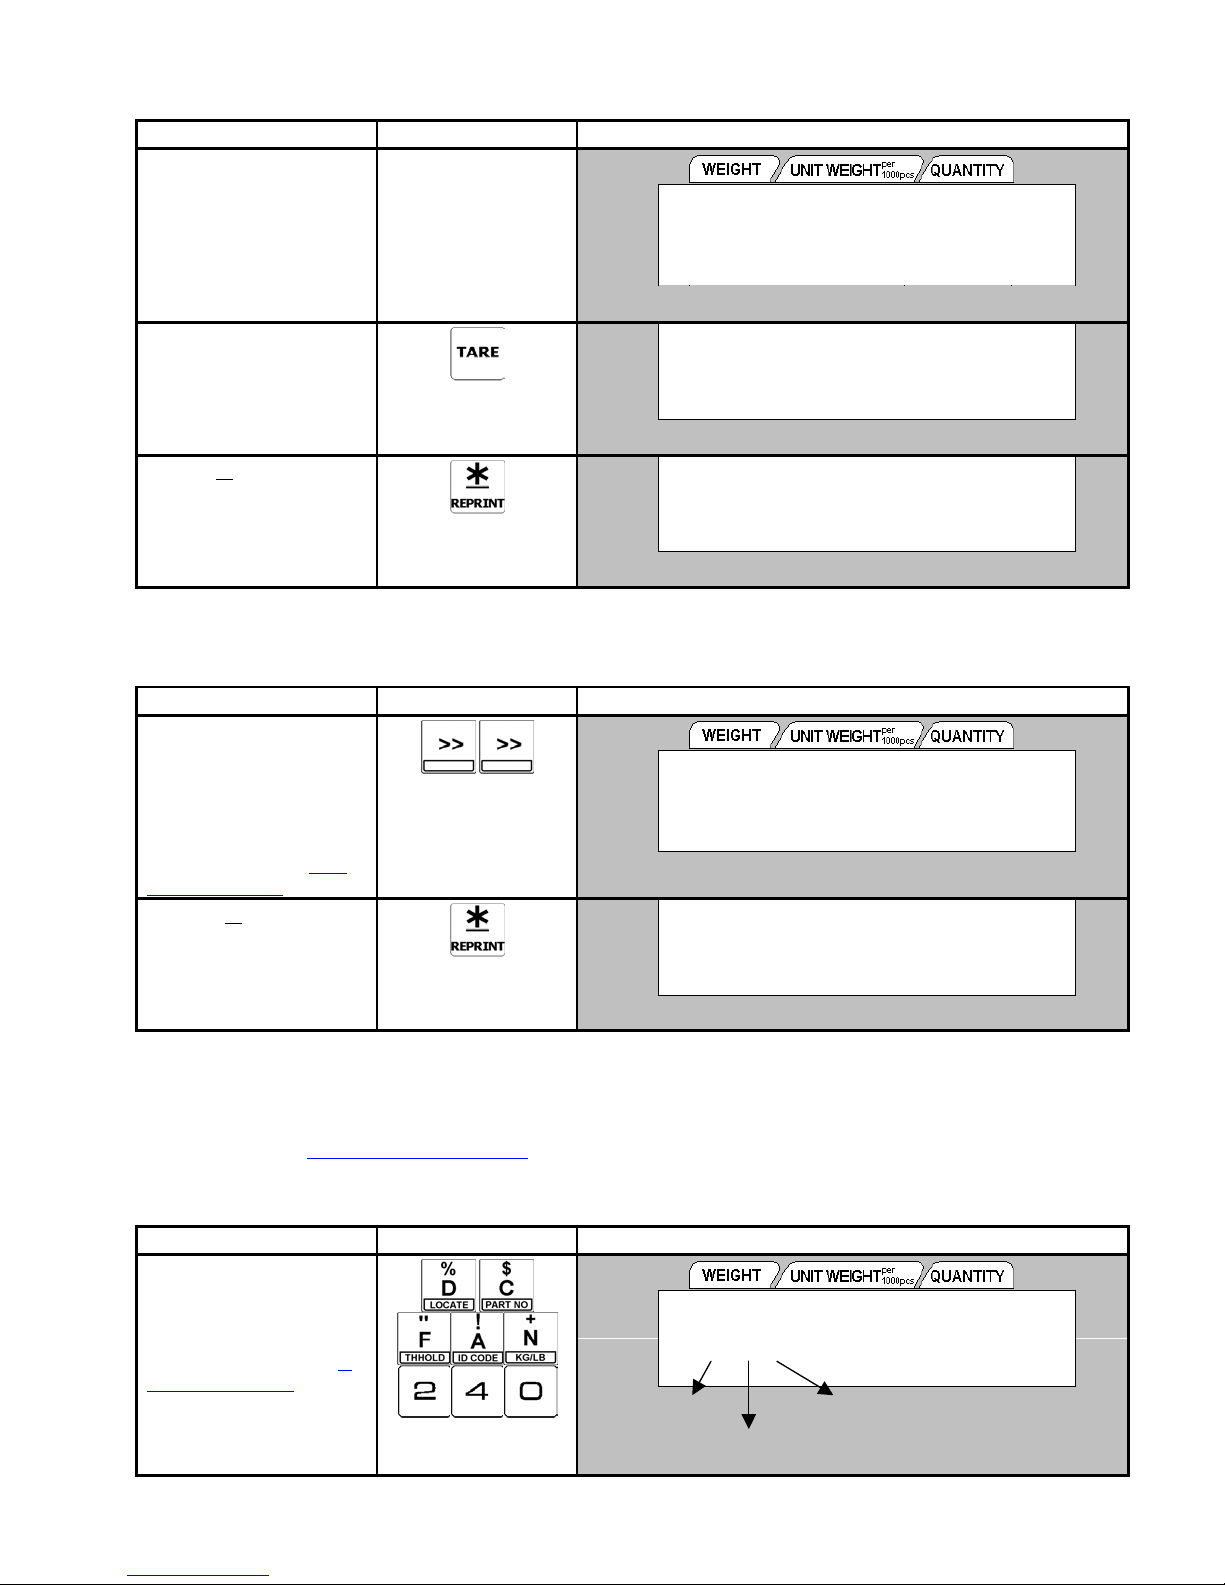
3. Tare Weight Entry
This parameter is used to enter the tare value in ITEM File and the maximum tare value is depends on SPEC 620 setting.
OPERATION KEYS DISPLAY
6. Place a tare weight on
platter (Ex. 100g).
If the tare value is known,
enter the tare value by
numeric keys.
7. Press [TARE] key.
Insufficient Indicator and
Net Indicator will ON.
8. Press [
½
] key to next
parameter.
´0³
NET
RECOM
INSUFF
´0³
NET
RECOM
INSUFF
´0³
NET
RECOM
INSUFF
0.100kg 0 0
PROG TARE WT: 0
W or X : display's status indicator
0.000kg 0 0
W
PROG TARE WT: 0.100
W
PROGRAM LABEL FORMAT
LABEL FORMAT 1: DEF/T1
A
S
A
S
S
4. Label Format Entry
Select a label format for label printing. Free format label F1 ~ F99 must be programmed in advance, if this format are to be
selected in Item programming mode. The number of characters and character size that can be entered depends on the type of
label selected.
OPERATION KEYS DISPLAY
9. Select existing Label
Format (Ex. T2) by press
[<<] or [>>] preset key.
Another way to select the
Label Format is by enter the
Format Number by Numeric
keys. (Please refer to 3.2.3
Label Format List)
10. Press [
] key to next
½
parameter.
´0³
NET
RECOM
INSUFF
´0³
NET
RECOM
INSUFF
PROGRAM PLU:
LABEL FORMAT 1: T2 / 2
W or X : display's status indicator
PROG PART NAME P: KEY
M2/32/01:
S
S
Σ
IN
OUT
PE
Σ
IN
OUT
PE
Σ
IN
OUT
PE
Σ
IN
OUT
PE
Σ
IN
OUT
PE
5. Part Name Entry
Maximum 1 line can be programmed for Part Name and number of characters entry is depends on the Character Size entry or
size of the print area. If selected label format with out print area for Part Name, maximum 1 line of 32 characters can be enter.
Note: Please refer to 1.4 Table of Characters Code
Please press [SHIFT UP] + [V] key to selected between ASCII Code, TERAOKA Code and Preset key code entry.
OPERATION KEYS DISPLAY
11. Enter the Part Name (Ex.
DCFAN240) by numeric
keys and character keys.
Enter the Part Name data
as the same procedure as 1.
ID CODE ENTRY.
PROGRAM MODE
when using ASCII Code (A) or TERAOKA Code (T) for Part Name Entry.
´0³
NET
RECOM
INSUFF
PROG PART NAME P: KEY
M2/24/01: DCFAN240
Character size Line no
No of Characters can be entered
or X : display's status indicator
W
- 23 -
S
Σ
IN
OUT
PE
Page 27
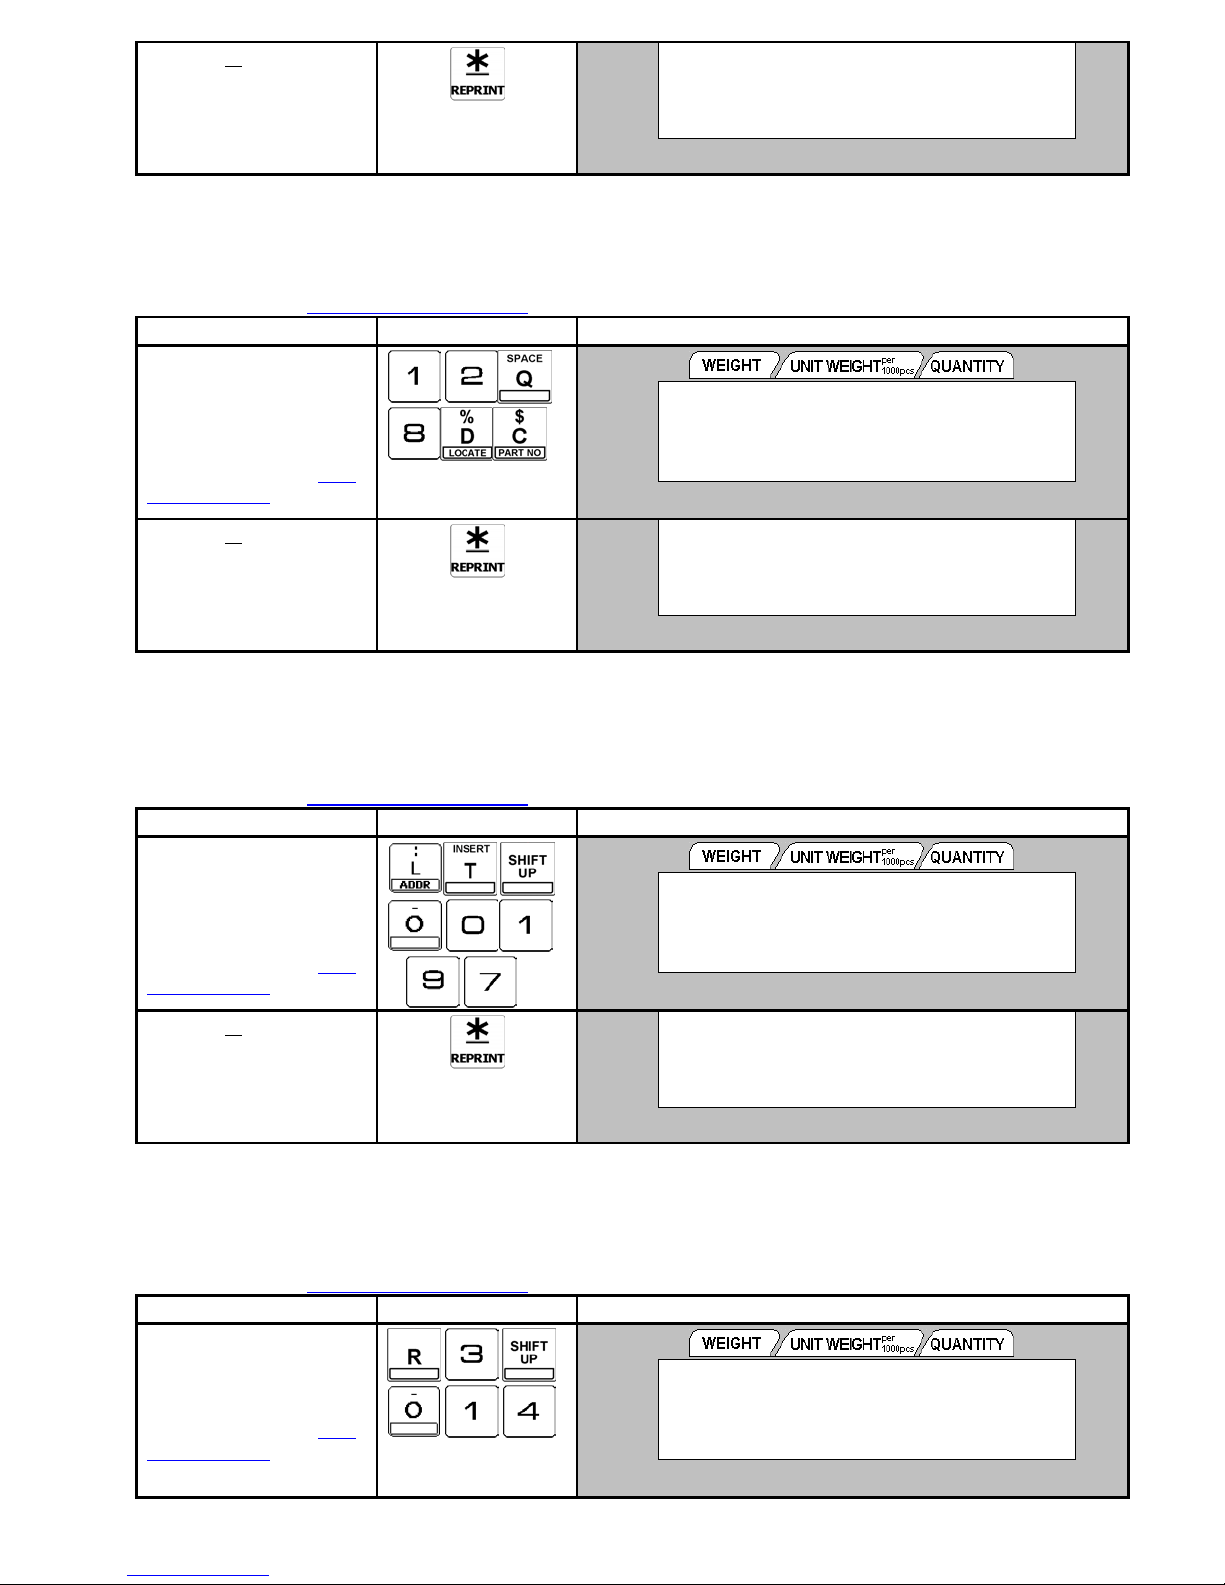
12. Press [
½
] key to store
the data and go to next
parameter.
´0³
NET
RECOM
INSUFF
PROG PART NO P: KEY
M2/32/01:
Σ
IN
S
OUT
PE
6. Part Number Entry
Maximum 1 line can be programmed for Part Number and number of characters entry is depends on the Character Size entry or
size of the print area. If selected label format with out print area for Part Number, maximum 1 line of 32 characters can be enter.
Note: Please refer to 1.4 Table of Characters Code
OPERATION KEYS DISPLAY
13. Enter the Part Number
(Ex. 12Q8DC) by
numeric keys and
character keys.
Enter the Part Number as
the same procedure as 1. ID
CODE ENTRY.
14. Press [
] key to store
½
the data and go to next
parameter.
when using ASCII Code (A) or TERAOKA Code (T) for Part Number Entry.
´0³
NET
RECOM
INSUFF
´0³
NET
RECOM
INSUFF
PROG PART NO P: KEY
M2/ 26/01: 12Q8DC
W or X : display's status indicator
PROG LOT NO P: KEY
M2/32/01:
S
S
Σ
IN
OUT
PE
Σ
IN
OUT
PE
7. Lot Number Entry
Maximum 1 line can be programmed for Lot Number and number of characters entry is depends on the Character Size entry or
size of the print area. If selected label format with out print area for Lot Number, maximum 1 line of 32 characters can be enter.
Note: Please refer to 1.4 Table of Characters Code
OPERATION KEYS DISPLAY
15. Enter the Lot Number
(Ex. LT-0197) by
numeric keys and
character keys.
Enter the Lot Number as
the same procedure as 1. ID
CODE ENTRY.
16. Press [
½
] key to store
the data and go to next
parameter.
8. Location Entry
Maximum 1 line can be programmed for Location data and number of characters entry is depends on the Character Size entry or
size of the print area. If selected label format with out print area for Location, maximum 1 line of 32 characters can be enter.
Note: Please refer to 1.4 Table of Characters Code
OPERATION KEYS DISPLAY
17. Enter the Location data
(Ex. R3-14) by numeric
keys and character keys.
Enter the Location data as
the same procedure as 1. ID
CODE ENTRY.
PROGRAM MODE
when using ASCII Code (A) or TERAOKA Code (T) for Lot Number Entry.
when using ASCII Code (A) or TERAOKA Code (T) for Location Entry.
´0³
NET
RECOM
INSUFF
´0³
NET
RECOM
INSUFF
´0³
NET
RECOM
INSUFF
- 24 -
PROG LOT NO P: KEY
M2/25/01: LT-0197
W or X : display's status indicator
PROG LOCATION P: KEY
M3/32/01:
PROG LOCATION P: KEY
M3/27/01: R3-14
or X : display's status indicator
W
S
S
S
Σ
IN
OUT
PE
Σ
IN
OUT
PE
Σ
IN
OUT
PE
Page 28
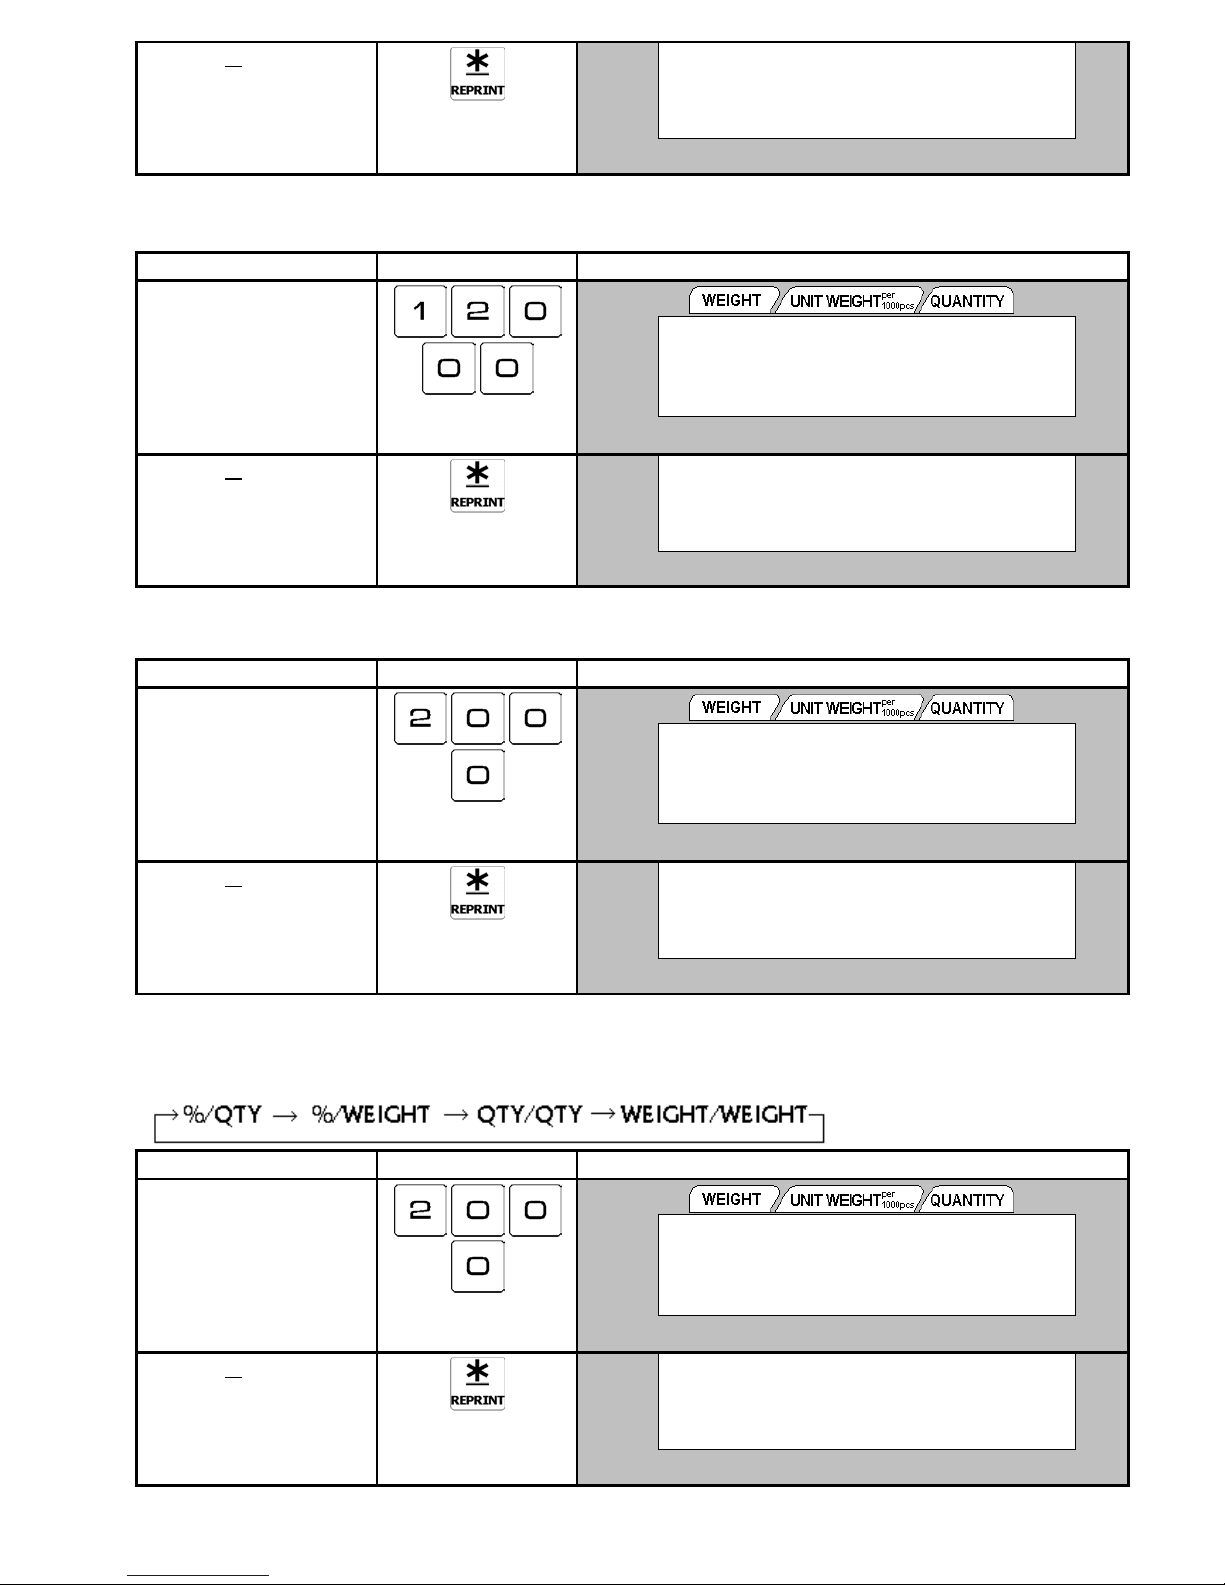
18. Press [
½
] key to store
the data and go to next
parameter.
´0³
NET
RECOM
INSUFF
PROGRAM INVENTORY
INVENTORY: 0
9. Inventory Entry
OPERATION KEYS DISPLAY
19. Enter the Inventory data
(Ex. 12000) by numeric
keys.
Maximum of 8 digits can
be entered.
20. Press [
½
] key to store
the data and go to next
parameter.
´0³
NET
RECOM
INSUFF
´0³
NET
RECOM
INSUFF
PROGRAM INVENTORY
INVENTORY: 12000
PROGRAM THRESHOLD
THRESHOLD: 0
S
S
W or X : display's status indicator
S
Σ
IN
OUT
PE
Σ
IN
OUT
PE
Σ
IN
OUT
PE
10. Threshold Entry
OPERATION KEYS DISPLAY
21. Enter the Threshold data
(Ex. 2000) by numeric
keys.
Maximum of 8 digits can
be entered.
22. Press [
½
] key to store
the data and go to next
parameter.
´0³
NET
RECOM
INSUFF
´0³
NET
RECOM
INSUFF
PROGRAM THRESHOLD
THRESHOLD: 2000
W or X : display's status indicator
PROG SET POINT 1 (% QTY)
SET POINT 1: 0
S
S
11. Set Point Programming
There have 4 types of Set Point can be select in this parameter. Refer to the following rotation for selecting Set Point type by
pressing
23. Enter the Quantity value
for Set Point (Ex. 2000)
by numeric keys.
Maximum of 7 digits can
be entered.
Press [+] key to select
others Set Point Type.
24. Press [
key.
[+]
OPERATION KEYS DISPLAY
´0³
NET
RECOM
INSUFF
´0³
NET
RECOM
INSUFF
PROG SET POINT 1 (% QTY)
SET POINT 1: 2000
W or X : display's status indicator
PROGRAM SET POINT 2
SET POINT 2: 0
½
] key.
S
S
Σ
IN
OUT
PE
Σ
IN
OUT
PE
Σ
IN
OUT
PE
Σ
IN
OUT
PE
PROGRAM MODE
- 25 -
Page 29
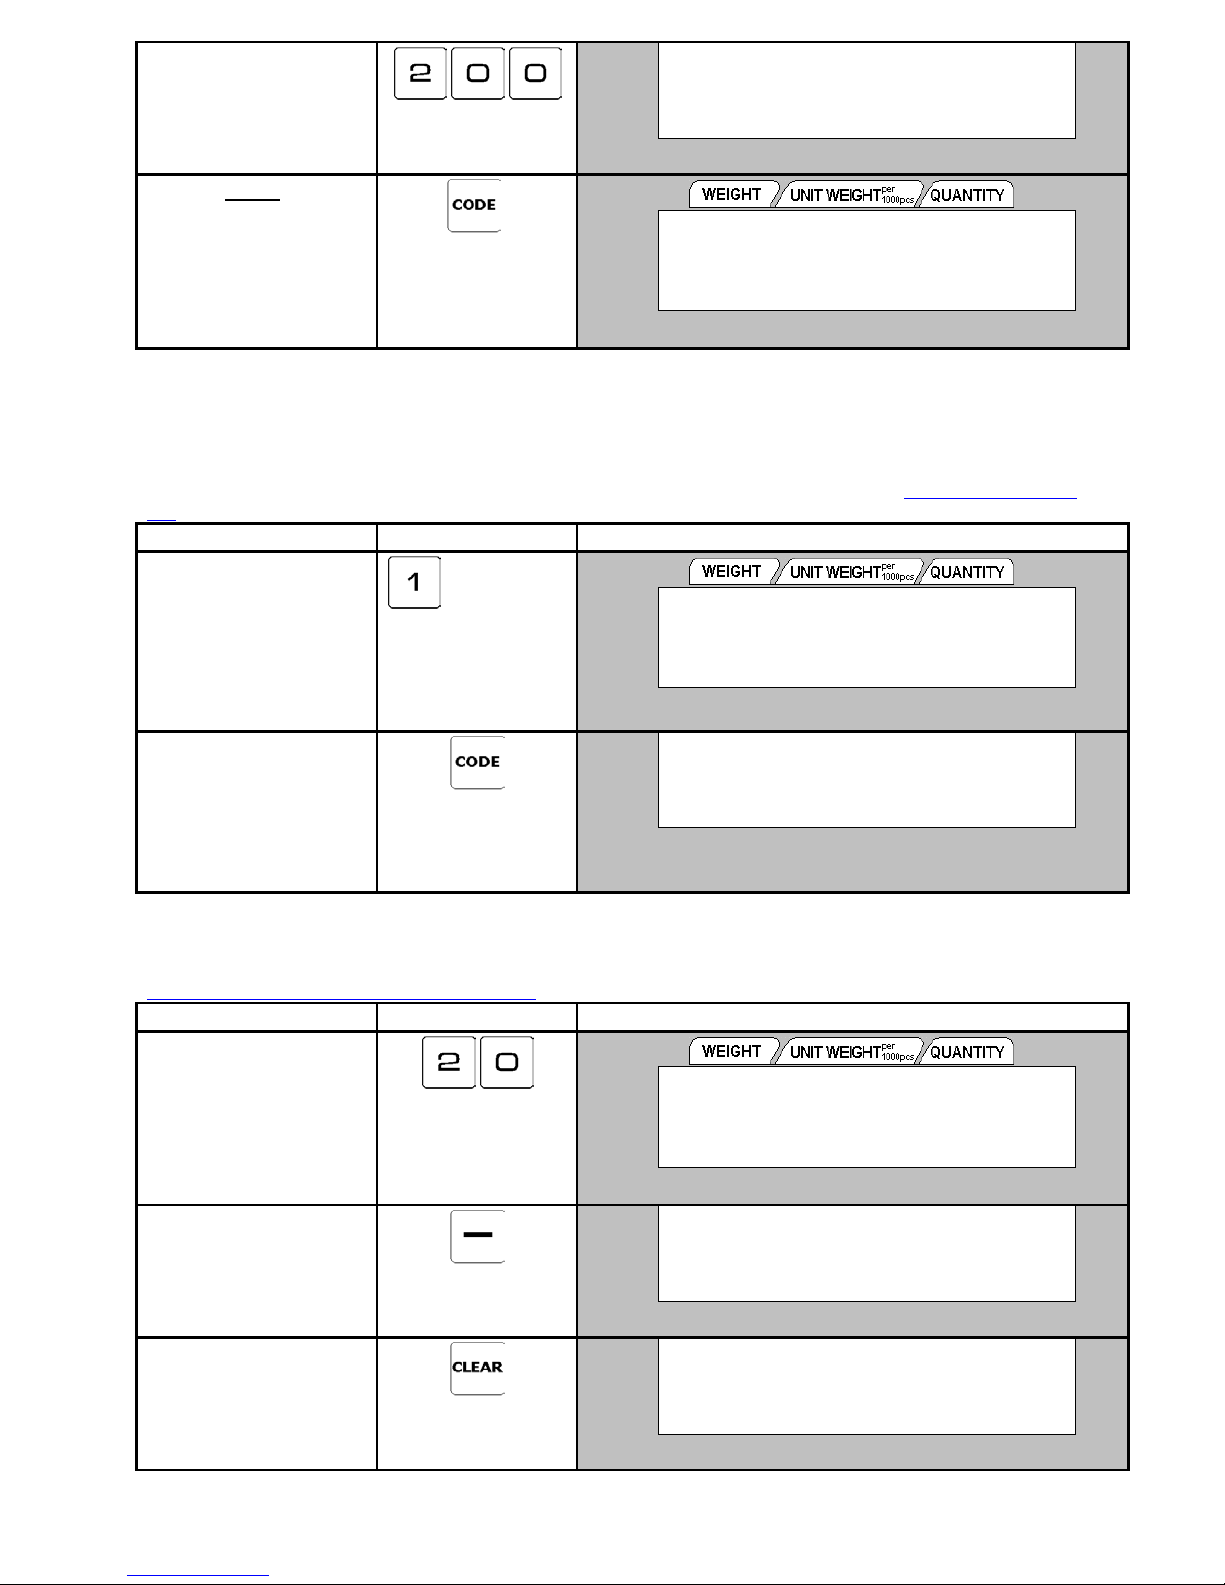
25. Enter percentage value
for Set Point 2 (Ex.
200%).
Refer to Note 1.
´0³
NET
RECOM
INSUFF
PROGRAM SET POINT 2
SET POINT 2: 200
Σ
IN
S
OUT
PE
26. Press [CODE
save the Item data.
] key to
´0³
NET
RECOM
INSUFF
ITEM CODE PROGRAMMING
PRINT KEY TO ENTER
or X : display's status indicator
W
S
Note 1: Up to 999% can be entered for Set Point 2. Set Point 2 must set according to Set Point 1 setting. For example: If Set
Point 1 set to 9999999, the Set Point 2 cannot be set more than 100%.
12. Address Number Entry
Address Number can be selected from Master Address data programmed in advance (Please refer to 3.5.1 Program Address
File). This parameter will skip if selected label format are without print area for Address.
OPERATION KEYS DISPLAY
27. If the label format
contains address
information, you will go
to Addess No entry
selection. Enter the
existing Address Number
by numeric keypad. (Ex.
1).
28. Press [CODE] key to
save the data and return
to Item Code
programming display.
Press [PIECES] key &
[CLEAR] key to exist
without saving the data.
´0³
NET
RECOM
INSUFF
´0³
NET
RECOM
INSUFF
PROGRAM ITEM:
ENTER ADDRESS# 1
or X : display's status indicator
W
ITEM CODE PROGRAMMING
PRINT KEY TO ENTER
S
S
Σ
IN
OUT
PE
Σ
IN
OUT
PE
Σ
IN
OUT
PE
3.2.2 Delete Item Code
Continued from procedure 1 on 1. ID CODE Entry.
OPERATION KEYS DISPLAY
1. At Item Code program
mode, enter the Item
Code (Ex. 20) to be
deleted.
2. Press [-] key and it will go
to delete Item display.
3. Press [CLEAR] key to
delete the data.
Press
[TARE]
cancel the deletion.
PROGRAM MODE
key to
´0³
NET
RECOM
INSUFF
´0³
NET
RECOM
INSUFF
´0³
NET
RECOM
INSUFF
- 26 -
PROG ID CODE P: KEY
ENTER: 20
W or X : display's status indicator
DELETE?
CLEAR (YES) / TARE (NO)
PROG ID CODE P: KEY
M3/32/01:
S
S
S
Σ
IN
OUT
PE
Σ
IN
OUT
PE
Σ
IN
OUT
PE
Page 30
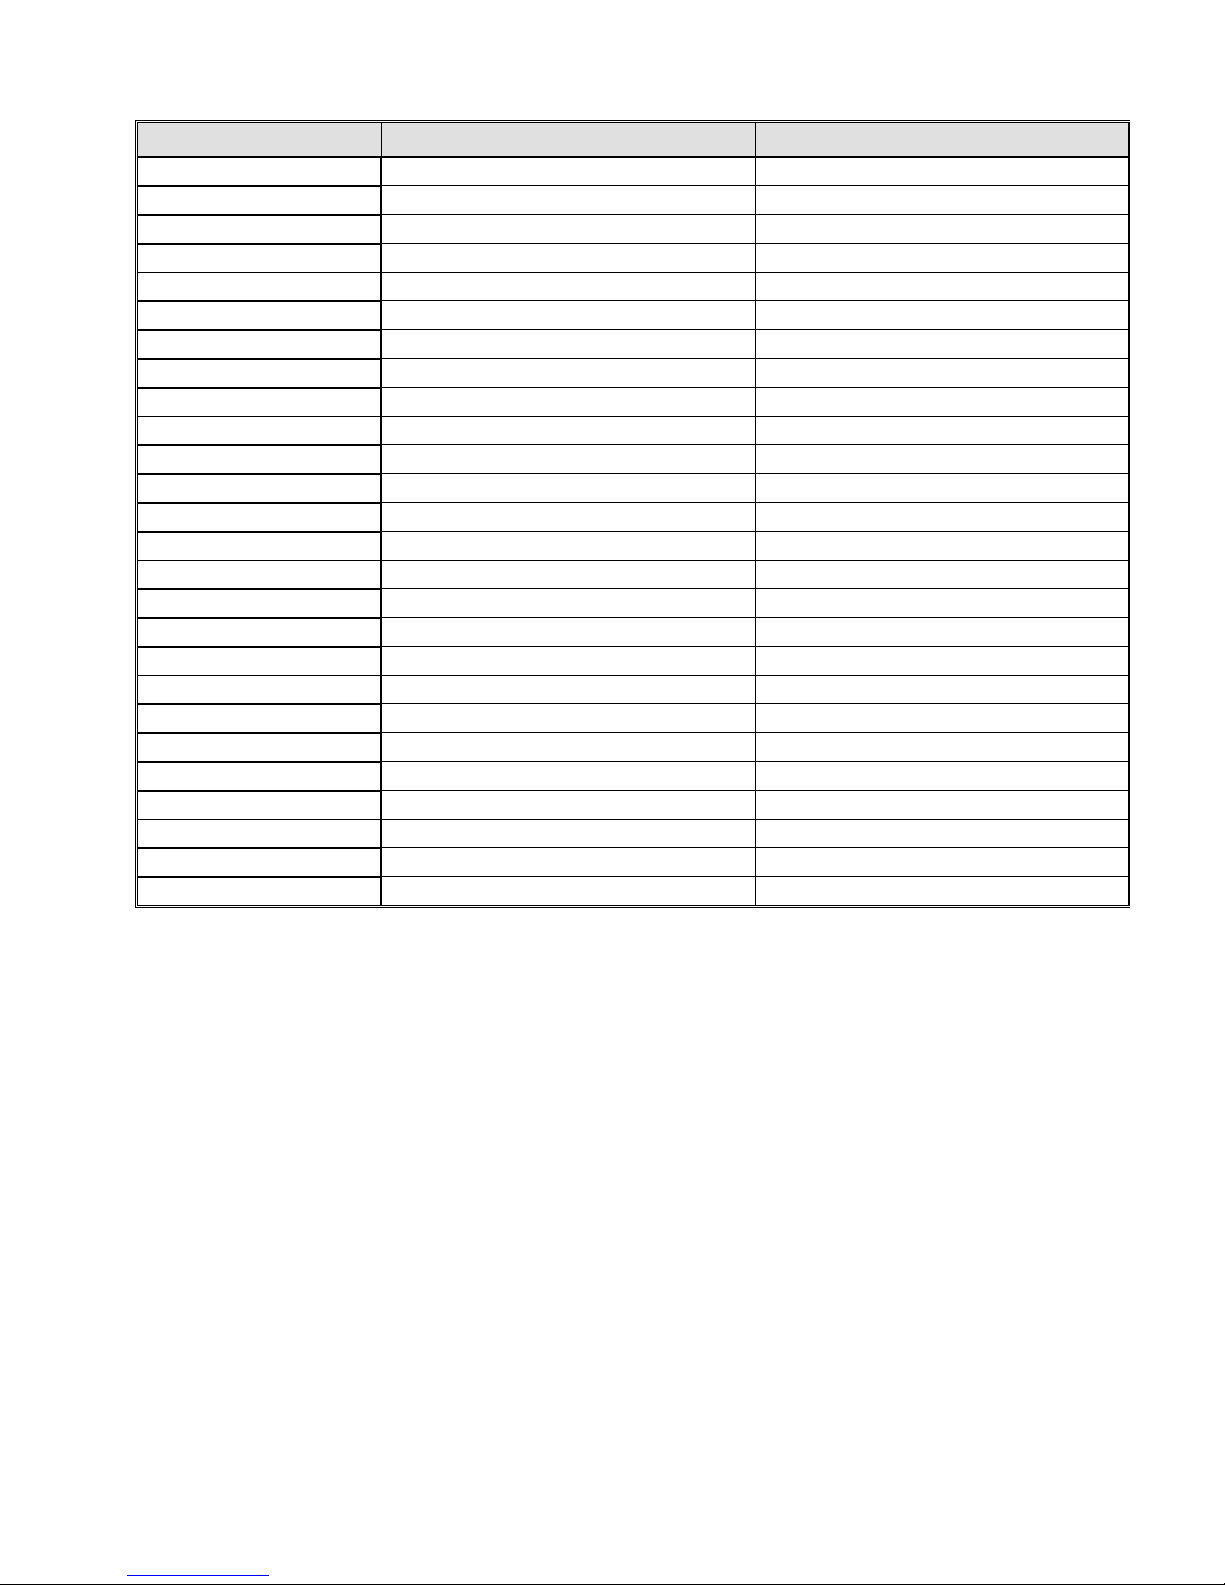
3.2.3 Label Format List
The table shown below is Standard Label Format List.
LABEL FORMAT NO.: FOR STANDARD LABEL SIZE (mm)
0 DEFAULT Label size set in specification setting
1 T1 56 X 55
2 T2 56 X 55
3 T3 56 X 55
4 T4 56 X 55
5 T5 56 X 95
6 T6 56 X 95
7 T7 56 X 95
8 T8 56 X 95
9 T9 56 X 120
10 T10 56 X 120
11 T11 56 X 120
12 T12 56 X 120
13 S 56 X 120
14 A 56 X 120
15 B 56 X 120
16 C 56 X 120
17 F1 *
18 F2 *
19 F3 *
20 F4 *
21 F5 *
22 F6 *
23 F7 *
24 F8 *
25~115 F9~F99 *
Note: F1 to F99 --- available only when free format is programmed.
PROGRAM MODE
- 27 -
Page 31
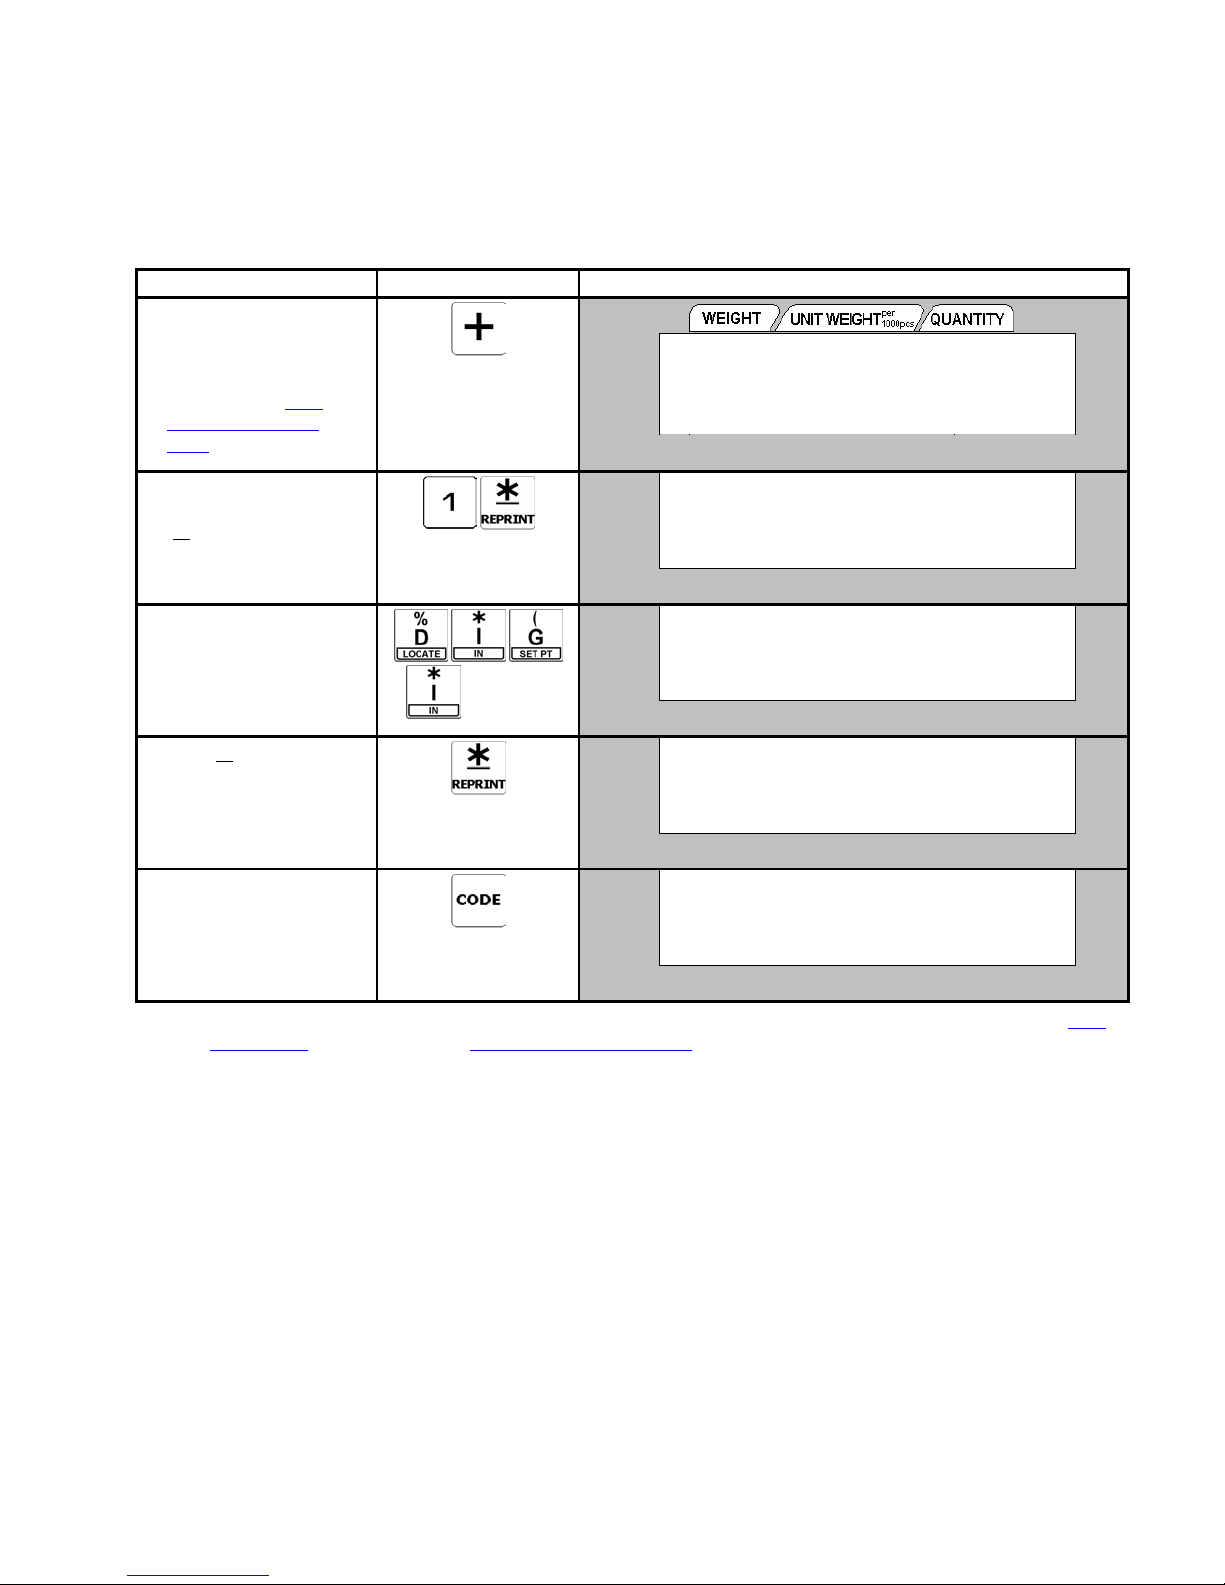
3.3 FACTORY NAME FILES
Factory Name data need to be printed on the label, can be programmed in this file. The maximum number of characters possible to
enter varies according to the size of print area or character size entry. Up to 32 Factory Names (No.1 ~ 32) can be programmed with
each with maximum of 3 lines and the number of line depends on the character size. The default Factory Name print on label can be
set in SPEC 56 & print centering of Factory Name on label can be selected at SPEC 57.
Note: Factory Name will not printed on the label if the selected label format without print area for Factory Name or SPEC 55 set to
"0: NO PRINT"
3.3.1 Program Factory Name File
OPERATION KEYS DISPLAY
1. At Item Code
Programming mode, press
ey to select Factory
[+] k
Programming mode.
(Please refer to 3.1.3
Programming Mode
Entry)
2. Enter new Factory
Number (Ex. 1) and press
] key.
[
¾
3. Enter 1st line of Factory
Name data (Ex. DIGI
STORE).
Refer to Note 1.
4. Press [
Enter Factory Name data
in the 2
not press [CODE] key to
save the data.
5. Press [CODE] key to save
the data.
Press [PIECES] key &
[CLEAR] key to exit
without saving the data.
] key.
¾
nd
line if necessary. If
.
and etc
´0³
NET
RECOM
INSUFF
´0³
NET
RECOM
INSUFF
´0³
NET
RECOM
INSUFF
´0³
NET
RECOM
INSUFF
´0³
NET
RECOM
INSUFF
FACTORY PROGRAMMING
ENT FACTORY# (1-32): 0
W or X : display's status indicator
FACTORY #0001 P: KEY
S4/53/01:
FACTORY #0001 P: KEY
S4/43/01: DIGI STORE
FACTORY #0001 P: KEY
S4/53/02:
FACTORY PROGRAMMING
ENT FACTORY# (1-32): 0
Σ
IN
S
OUT
PE
Σ
IN
S
OUT
PE
Σ
IN
S
OUT
PE
Σ
IN
S
OUT
PE
Σ
IN
S
OUT
PE
Note 1: Enter the Factory Name data as the same procedure as ID CODE entry. Please refer to 3.2.1 Program Item File of 1. ID
CODE Entry. And please refer to 1.4 Table of Characters Code when using ASCII Code (A) or TERAOKA Code (T)
for Factory Name Entry.
PROGRAM MODE
- 28 -
Page 32
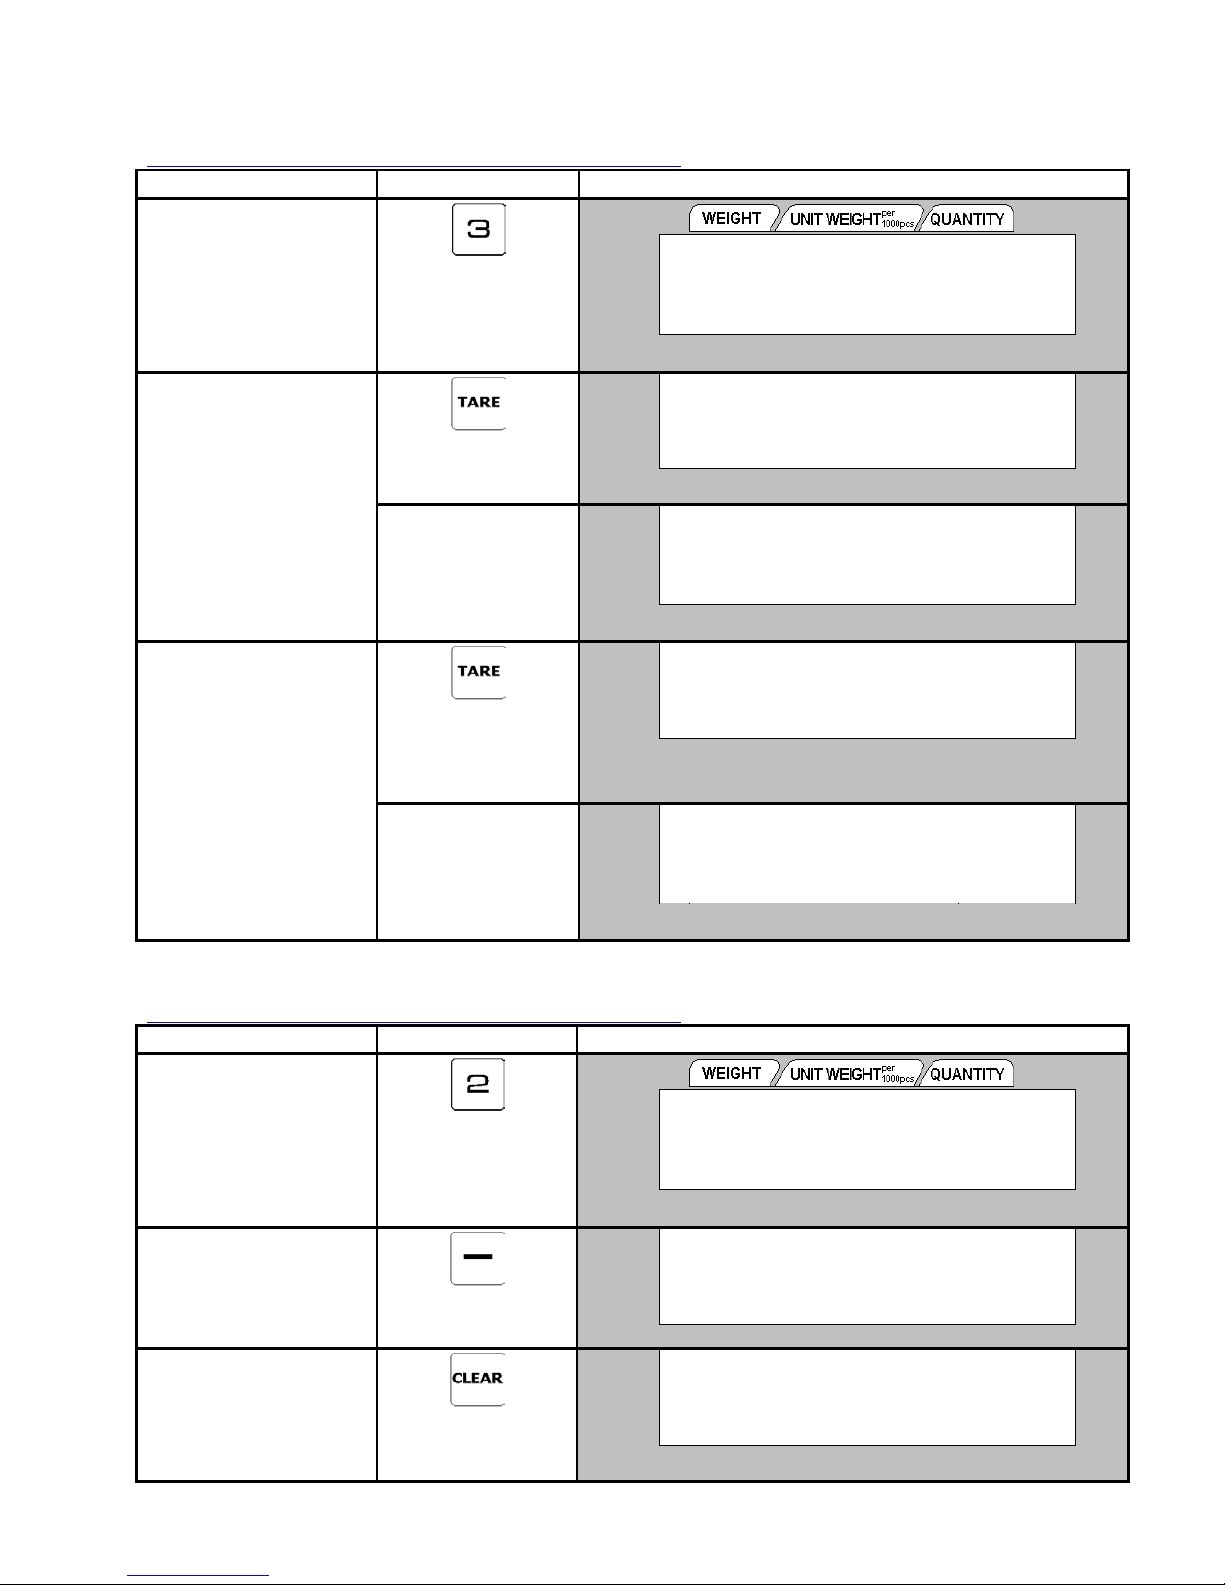
3.3.2 Print Factory Name File
The Factory Name report can be printed on receipt paper. You can print a FULL Report that includes all programmed Factory
Names or print a Single Report that only includes one Factory Name data.
Continued from the procedure 1 on 3.3.1 Program Factory Name File.
OPERATION KEYS DISPLAY
1. At Factory Programming
mode, enter the existing
Factory Number (Ex. 3)
for Single Report printing.
2. Press [TARE] key to print
out the report for Factory
Number 3.
3. To print out Full report,
make sure the Factory
Programming Entry
column is 0. Then press
[TARE]
key.
To stop printing, press
´0³
NET
RECOM
INSUFF
´0³
NET
RECOM
INSUFF
´0³
NET
RECOM
INSUFF
´0³
NET
RECOM
INSUFF
[FEED] key.
´0³
NET
RECOM
INSUFF
FACTORY PROGRAMMING
ENT FACTORY# (1-32): 3
W or X : display's status indicator
FACTORY PROGRAMMING
ENT FACTORY# (1-32): 0
FACTORY PROGRAMMING
ENT FACTORY# (1-32): 0
PRINTING …
PRINTING …
Σ
IN
S
OUT
PE
Σ
IN
S
OUT
PE
Σ
IN
S
OUT
PE
Σ
IN
S
OUT
PE
Σ
IN
S
OUT
PE
3.3.3 Delete Factory Name File
Continued from the procedure 1 on 3.3.1 Program Factory Name File.
OPERATION KEYS DISPLAY
1. At Factory Programming
mode, enter the Factory
Number (Ex. 2) to be
deleted.
2. Press [-] key to enter
deleting display.
3. Press [CLEAR] key to
delete the data.
Press [TARE] key to
cancel the deletion.
PROGRAM MODE
´0³
NET
RECOM
INSUFF
´0³
NET
RECOM
INSUFF
´0³
NET
RECOM
INSUFF
FACTORY PROGRAMMING
ENT FACTORY# (1-32): 2
W or X : display's status indicator
DELETE?
CLEAR (YES) / TARE (NO)
FACTORY PROGRAMMING
ENT FACTORY# (1-32): 0
S
S
S
Σ
IN
OUT
PE
Σ
IN
OUT
PE
Σ
IN
OUT
PE
- 29 -
Page 33
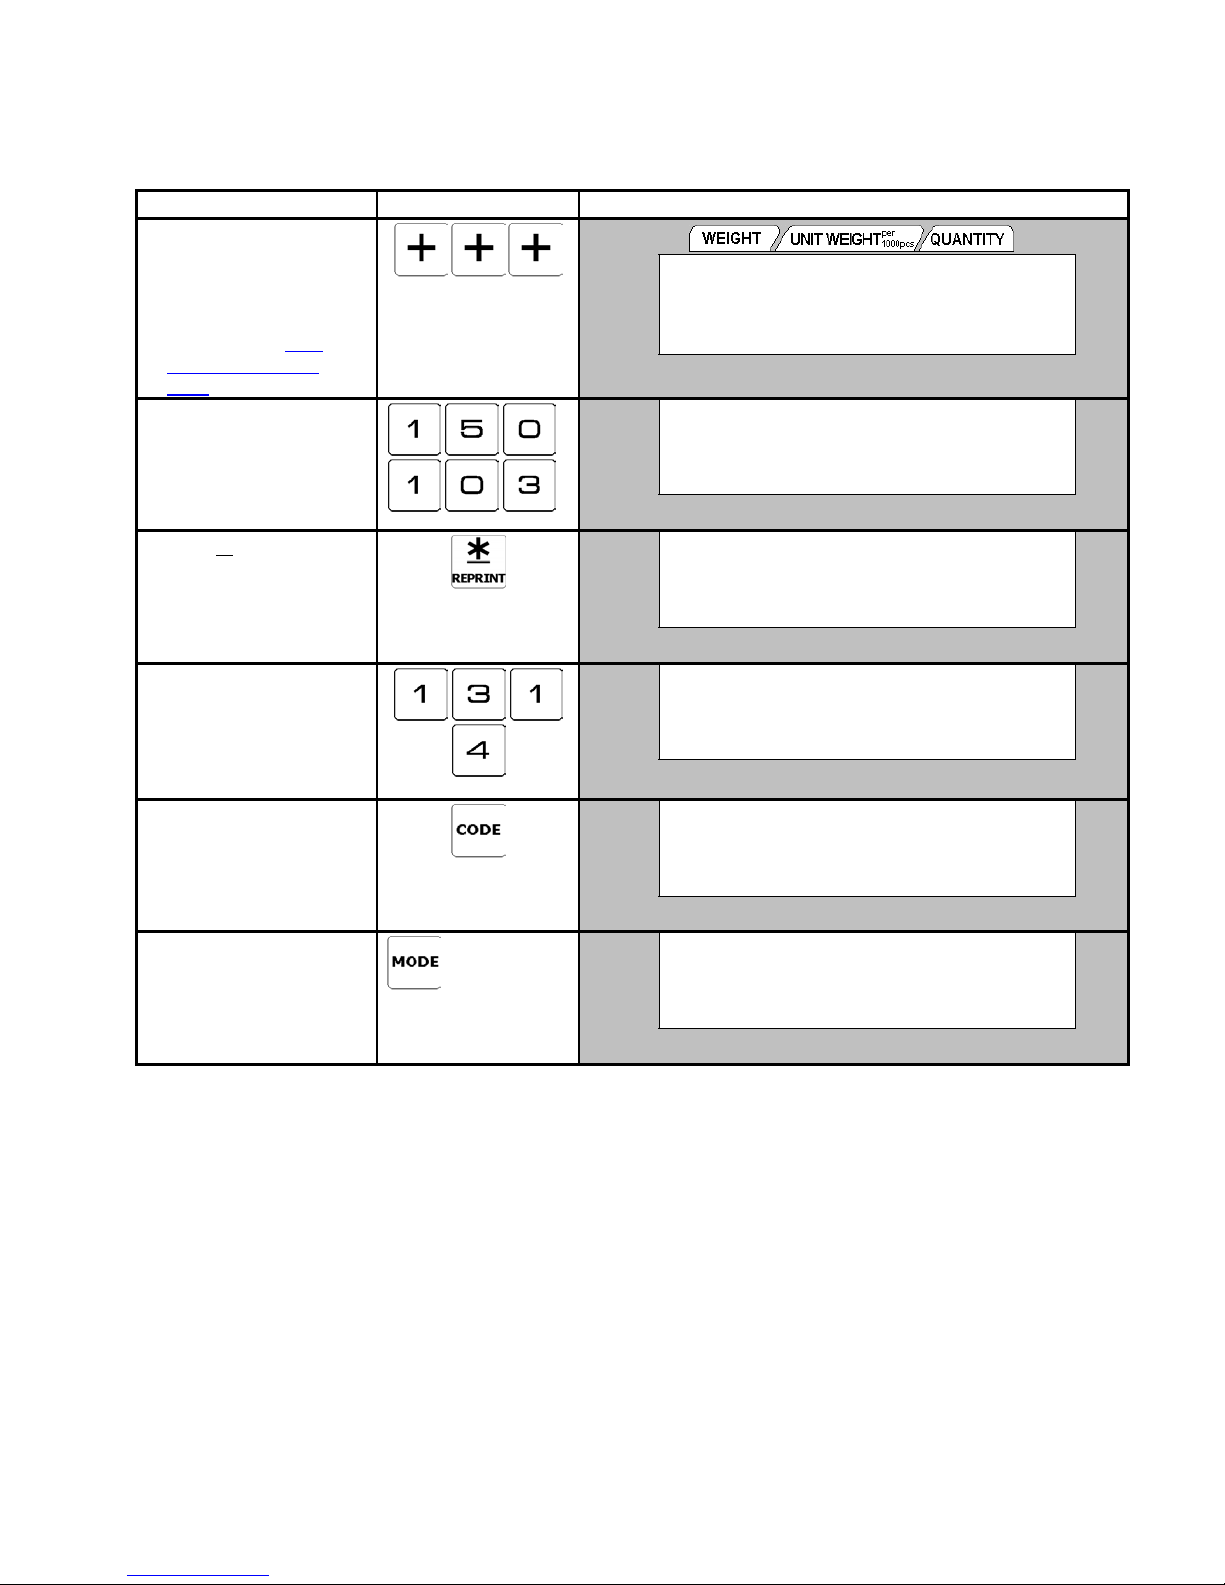
3.4 PROGRAM DATE AND TIME
The built-in clock automatically works once they are set.
Date (Month/Day/Year) -------2 digits for each part
Time ----------------------------- 4 digits
Note: Date Format can be selected in SPEC 5 and Time Format can be selected in SPEC 6.
OPERATION KEYS DISPLAY
1. At Item Code
Programming mode, press
[+] or [-] key to search
Date and Time
programming mode.
(Please refer to 3.1.3
Programming Mode
Entry)
2. Enter current Date by
numeric key (Ex. 15 Jan
2003).
3. Press [
¾
] key to store the
data and enter Time
programming mode.
4. Enter current Time by
numeric key (Ex. 13:14)
If SPEC 6 set to 12
HOUR (AM / PM), used
[<<] or [>>] to toggle AM or
PM.
5. Press [CODE] key to save
the data.
Press
[PIECES]
key &
[CLEAR] key to exit
without saving the data.
3. To return to Registration
Mode, press
[MODE]
key
X 3 times.
X 3 times
´0³
NET
RECOM
INSUFF
´0³
NET
RECOM
INSUFF
´0³
NET
RECOM
INSUFF
´0³
NET
RECOM
INSUFF
´0³
NET
RECOM
INSUFF
´0³
NET
RECOM
INSUFF
PROGRAM DATE: 21-04-02
IN FORMAT OF DD-MM-YY
PROGRAM DATE: 15-01-03
IN FORMAT OF DD-MM-YY
PROGRAM TIME: 15:30
PRESS CODE KEY TO SAVE
PROGRAM TIME: 13:14
PRESS CODE KEY TO SAVE
PROGRAM DATE: 15-01-03
IN FORMAT OF DD-MM-YY
W
0.000kg 0 0
W
S
W or X : display's status indicator
S
S
S
S
Σ
IN
OUT
PE
Σ
IN
OUT
PE
Σ
IN
OUT
PE
Σ
IN
OUT
PE
Σ
IN
OUT
PE
A
OUT
PE
PROGRAM MODE
- 30 -
Page 34
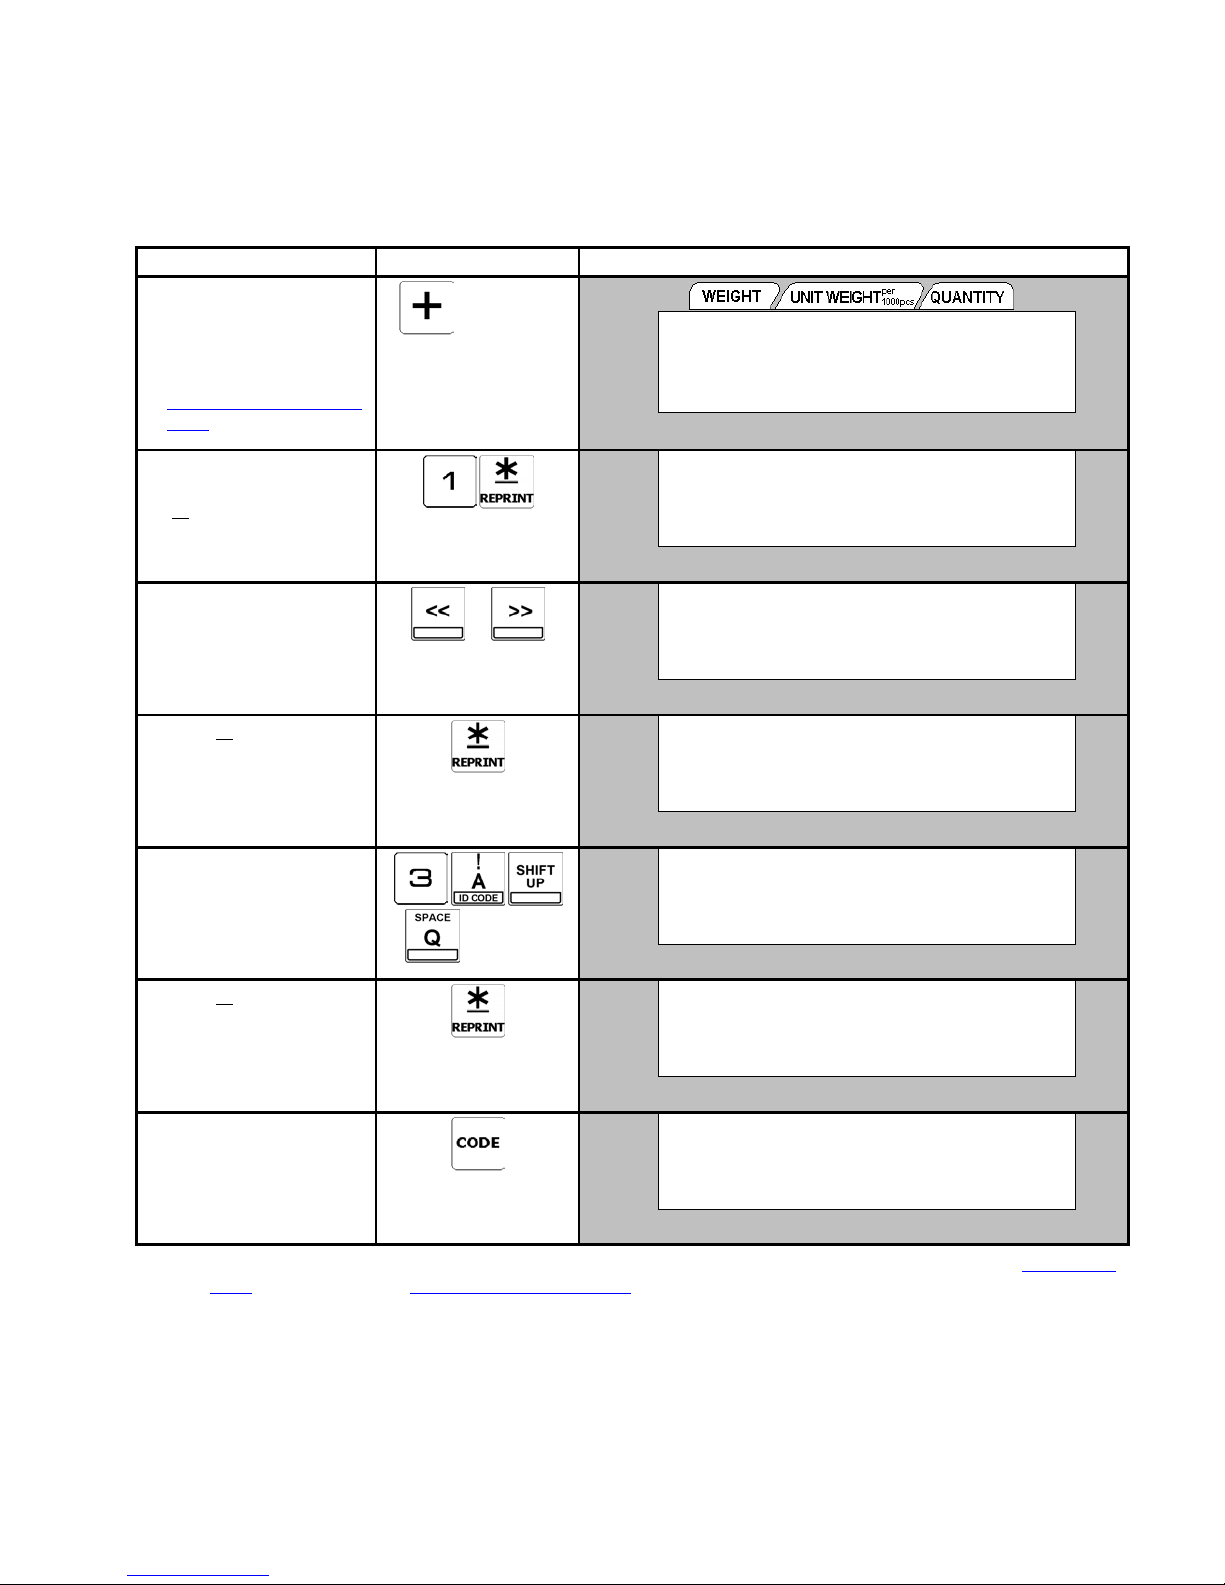
3.5 ADDRESS FILES
Address file is used to program factory address, which can be assigned in each Item and to be printed on the label. Since
standard format does not have a print area set for Address, the Address cannot be printed when using these formats. To print
Address on the label, a Free Format with an Address print area programmed must be used. Maximum 16 Address (No. 1 ~ 16)
can be programmed with each up to 8 programmable lines. Number of line depends on the size of the print area or Character Size
entry.
3.5.1 Program Address File
OPERATION KEYS DISPLAY
1. At Item Code
Programming mode, press
[+] key to search for
Address programming
mode. (Please refer to
3.1.3 Programming Mode
Entry)
2. Enter new Address
number (Ex. 1) and press
¾
] key.
[
3. Press [<<] or [>>] key to
select a label format (Ex.
F1) available for Address.
Only the available label
format will be display.
4. Press
key.
¾
]
[
5. Enter Address data (Ex.
3A Tuas Avenue 8) by
Character keys and
Numeric keys.
Refer to Note 1.
6. Press [
Enter Address data in the
2
¾
] key.
nd
line if necessary. If not
press [CODE] key to save
the data.
7. Press [CODE] key to save
the data.
Press [PIECES] key &
[CLEAR] key to exit
without saving the data.
x
4 times
or
and etc
´0³
NET
RECOM
INSUFF
´0³
NET
RECOM
INSUFF
´0³
NET
RECOM
INSUFF
´0³
NET
RECOM
INSUFF
´0³
NET
RECOM
INSUFF
´0³
NET
RECOM
INSUFF
´0³
NET
RECOM
INSUFF
ADDRESS PROGRAMMING
ENTER ADDR # (1-16): 0
or X : display's status indicator
W
ADDRESS # 0001
LABEL FORMAT 1: C / 16
ADDRESS # 0001
LABEL FORMAT 1: C / 16
ADDRESS #0001 P: KEY
M4/27/01:
ADDRESS #0001 P: KEY
M4/14/01: 3A TUAS AVE 8
ADDRESS #0001 P: KEY
M4/27/02:
ADDRESS PROGRAMMING
ENTER ADDR # (1-16): 0
Σ
IN
S
OUT
PE
Σ
IN
S
OUT
PE
Σ
IN
S
OUT
PE
Σ
IN
S
OUT
PE
Σ
IN
S
OUT
PE
Σ
IN
S
OUT
PE
Σ
IN
S
OUT
PE
Note 1: Enter the Address data as the same procedure as ID CODE entry. Please refer to 3.2.1 Program Item File of 1. ID CODE
Entry. And please refer to 1.4 Table of Characters Code when using ASCII Code (A) or TERAOKA Code (T) for
Address data entry.
PROGRAM MODE
- 31 -
Page 35
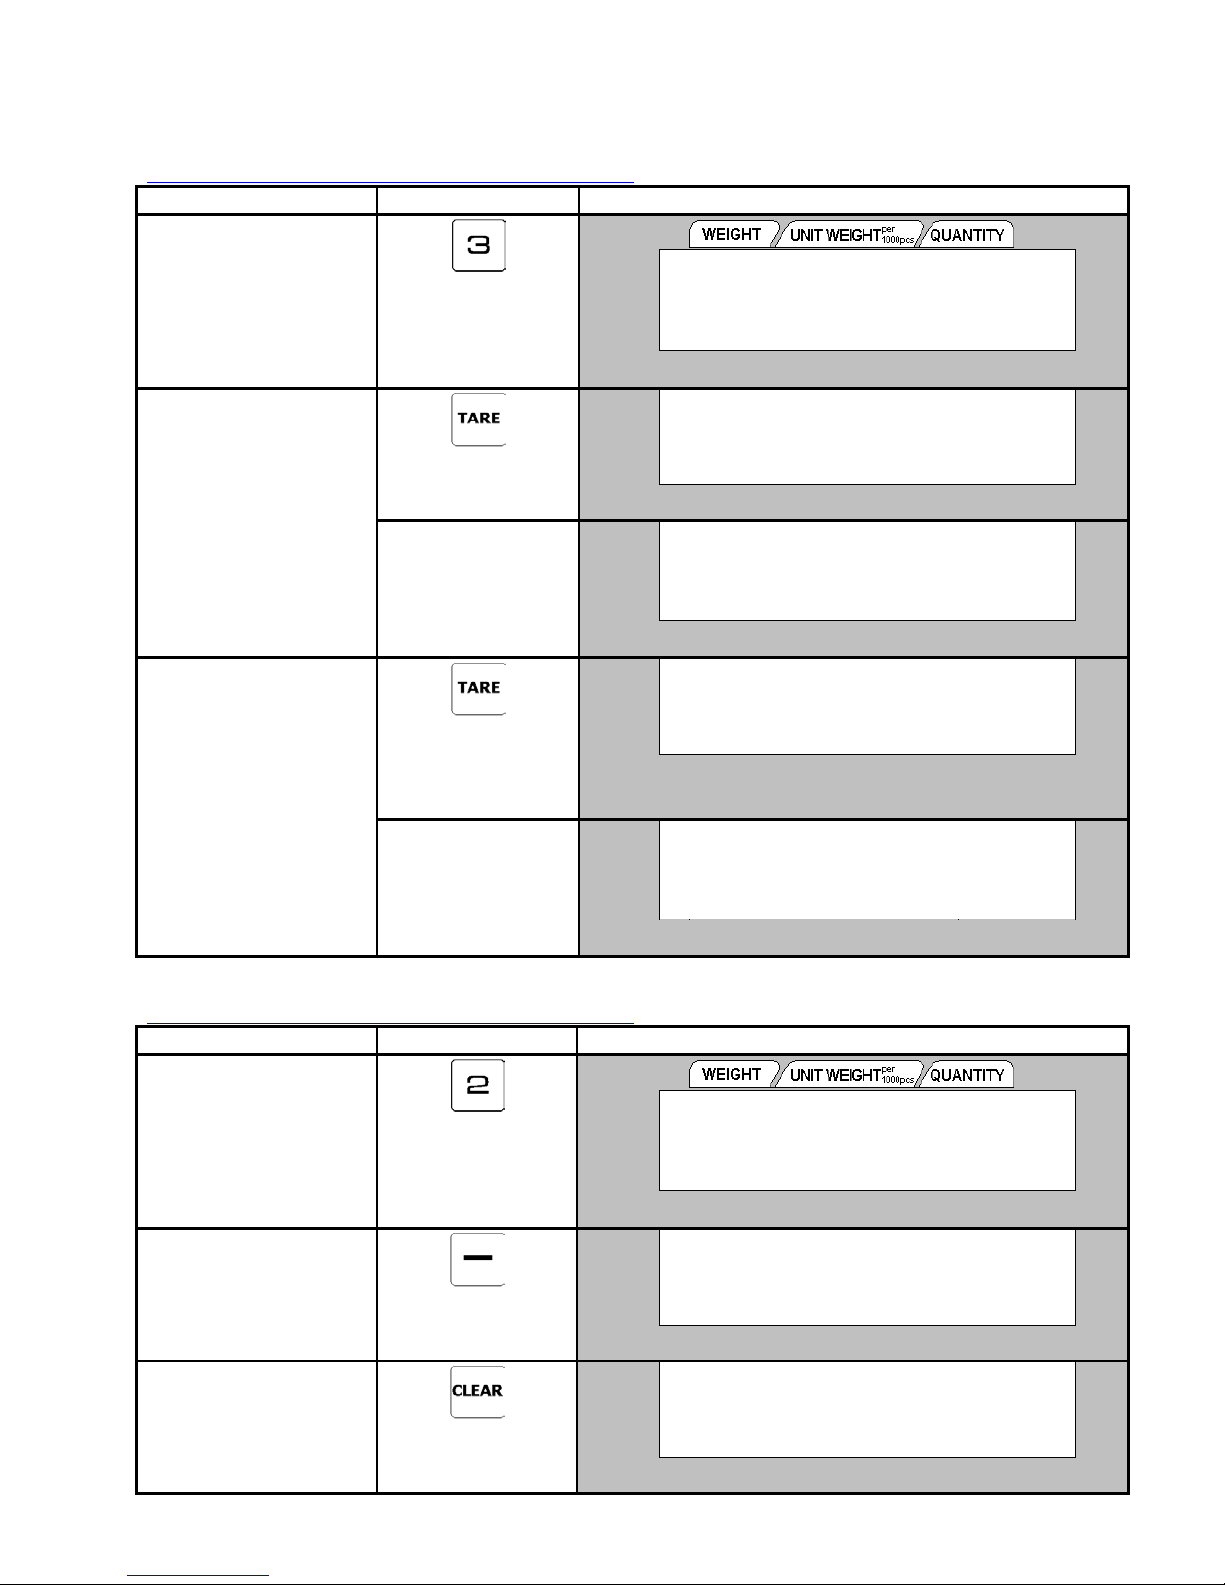
3.5.2 Print Address File
The following operation is used for checking Address Data programmed. The report is printed on receipt paper and there are
two different print types, Full report & Single report. The Full report includes all the Address programmed data, and the single
report only includes one Address data.
Continued from the procedure 1 on 3.5.1 Program Address File.
OPERATION KEYS DISPLAY
1. At Address Programming
mode, enter the existing
Address Number (Ex. 3)
for Single Report printing.
2. Press [TARE] key to print
out the report for Address
Number 3.
3. To print out Full report,
make sure the Factory
Programming Entry
column is 0. Then press
[TARE] key.
To stop printing, press
[FEED]
key.
´0³
NET
RECOM
INSUFF
´0³
NET
RECOM
INSUFF
´0³
NET
RECOM
INSUFF
´0³
NET
RECOM
INSUFF
´0³
NET
RECOM
INSUFF
ADDRESS PROGRAMMING
ENTER ADDR # (1-16): 3
W or X : display's status indicator
ADDRESS PROGRAMMING
ENTER ADDR # (1-16): 0
ADDRESS PROGRAMMING
ENTER ADDR # (1-16): 0
PRINTING …
PRINTING …
S
S
S
S
S
Σ
IN
OUT
PE
Σ
IN
OUT
PE
Σ
IN
OUT
PE
Σ
IN
OUT
PE
Σ
IN
OUT
PE
3.5.3 Delete Address File
Continued from the procedure 1 on 3.5.1 Program Address File.
OPERATION KEYS DISPLAY
1. At Address Programming
mode, enter the Address
Number (Ex. 2) to be
deleted.
2. Press [-] key to go to
Address deleting display.
Address Numbers are
linked to ITEM file cannot
be deleted.
3. Press [CLEAR] key to
delete the data.
Press [TARE] key to
cancel the deletion.
PROGRAM MODE
´0³
NET
RECOM
INSUFF
´0³
NET
RECOM
INSUFF
´0³
NET
RECOM
INSUFF
ADDRESS PROGRAMMING
ENTER ADDR # (1-16): 2
or X : display's status indicator
W
DELETE?
CLEAR (YES) / TARE (NO)
ADDRESS PROGRAMMING
ENTER ADDR # (1-16): 0
S
S
S
Σ
IN
OUT
PE
Σ
IN
OUT
PE
Σ
IN
OUT
PE
- 32 -
Page 36
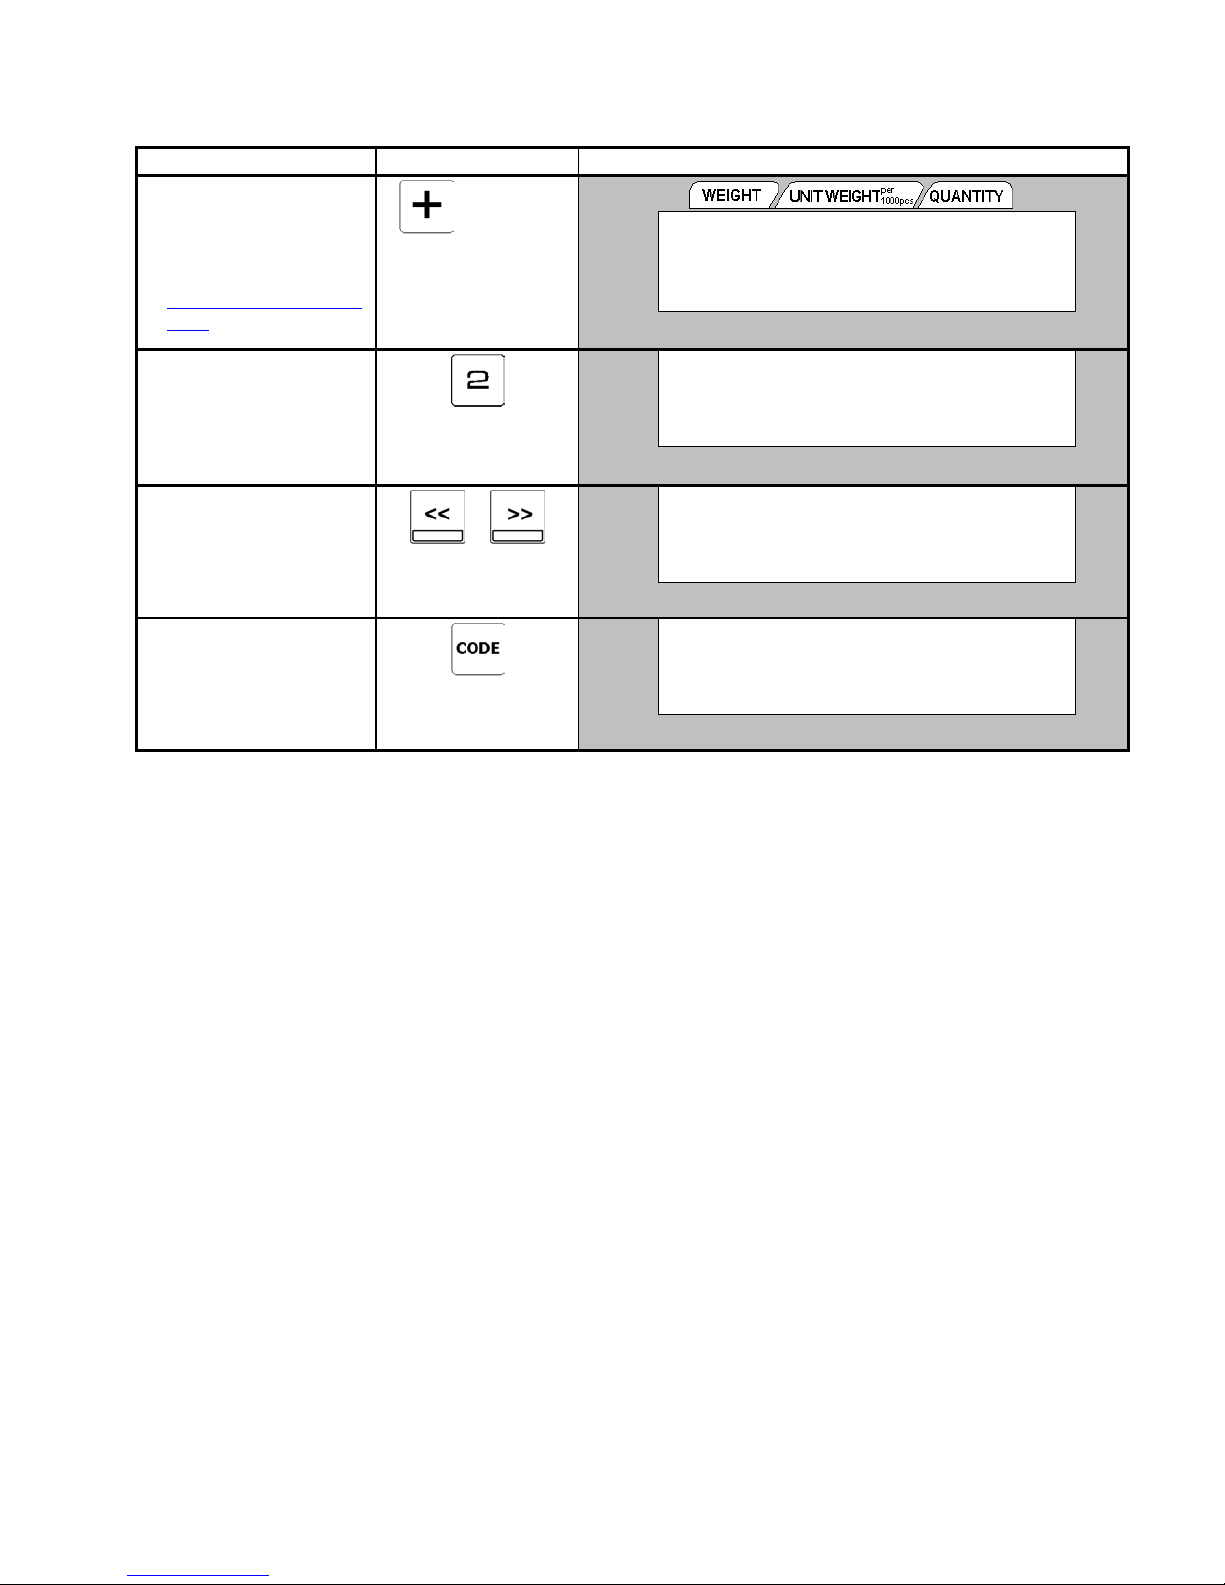
3.6 GENERAL LABEL PROGRAM
The following operation is to view or change the default Label Format for NON-ID or DEFAULT printing in Registration
Mode.
OPERATION KEYS DISPLAY
1. At Item Code
Programming mode, press
key to search for Non-
[+]
PLU Label Programming
mode. (Please refer to
3.1.3 Programming Mode
Entry)
2. Press [2] key to enter
label format selection
mode for Default Label.
Press [1] key to select
default label format for
NON-ID.
3. Press [<<] or [>>] key to
select a label format (Ex.
F1).
Only the existing label
formats will display.
4. Press [CODE] key to save
the data.
Press [PIECES] key &
[CLEAR] key to exist
without saving the data.
5 times
x
or
´0³
NET
RECOM
INSUFF
´0³
NET
RECOM
INSUFF
´0³
NET
RECOM
INSUFF
´0³
NET
RECOM
INSUFF
GENERAL LABEL PROGRAM
1: NON-ID / 2: DEFAULT
W or X : display's status indicator
SELECT DEFAULT LABEL
LABEL FORMAT 1: F1 / 17
SELECT DEFAULT LABEL
LABEL FORMAT 1: T7 / 7
GENERAL LABEL PROGRAM
1: NON-ID / 2: DEFAULT
S
S
S
S
Σ
IN
OUT
PE
Σ
IN
OUT
PE
Σ
IN
OUT
PE
Σ
IN
OUT
PE
Note: If necessary to change the default label format for Non ID, at step 2, press [1] to enter Non Id label format mode and
repeat procedure 3 & 4.
PROGRAM MODE
- 33 -
Page 37
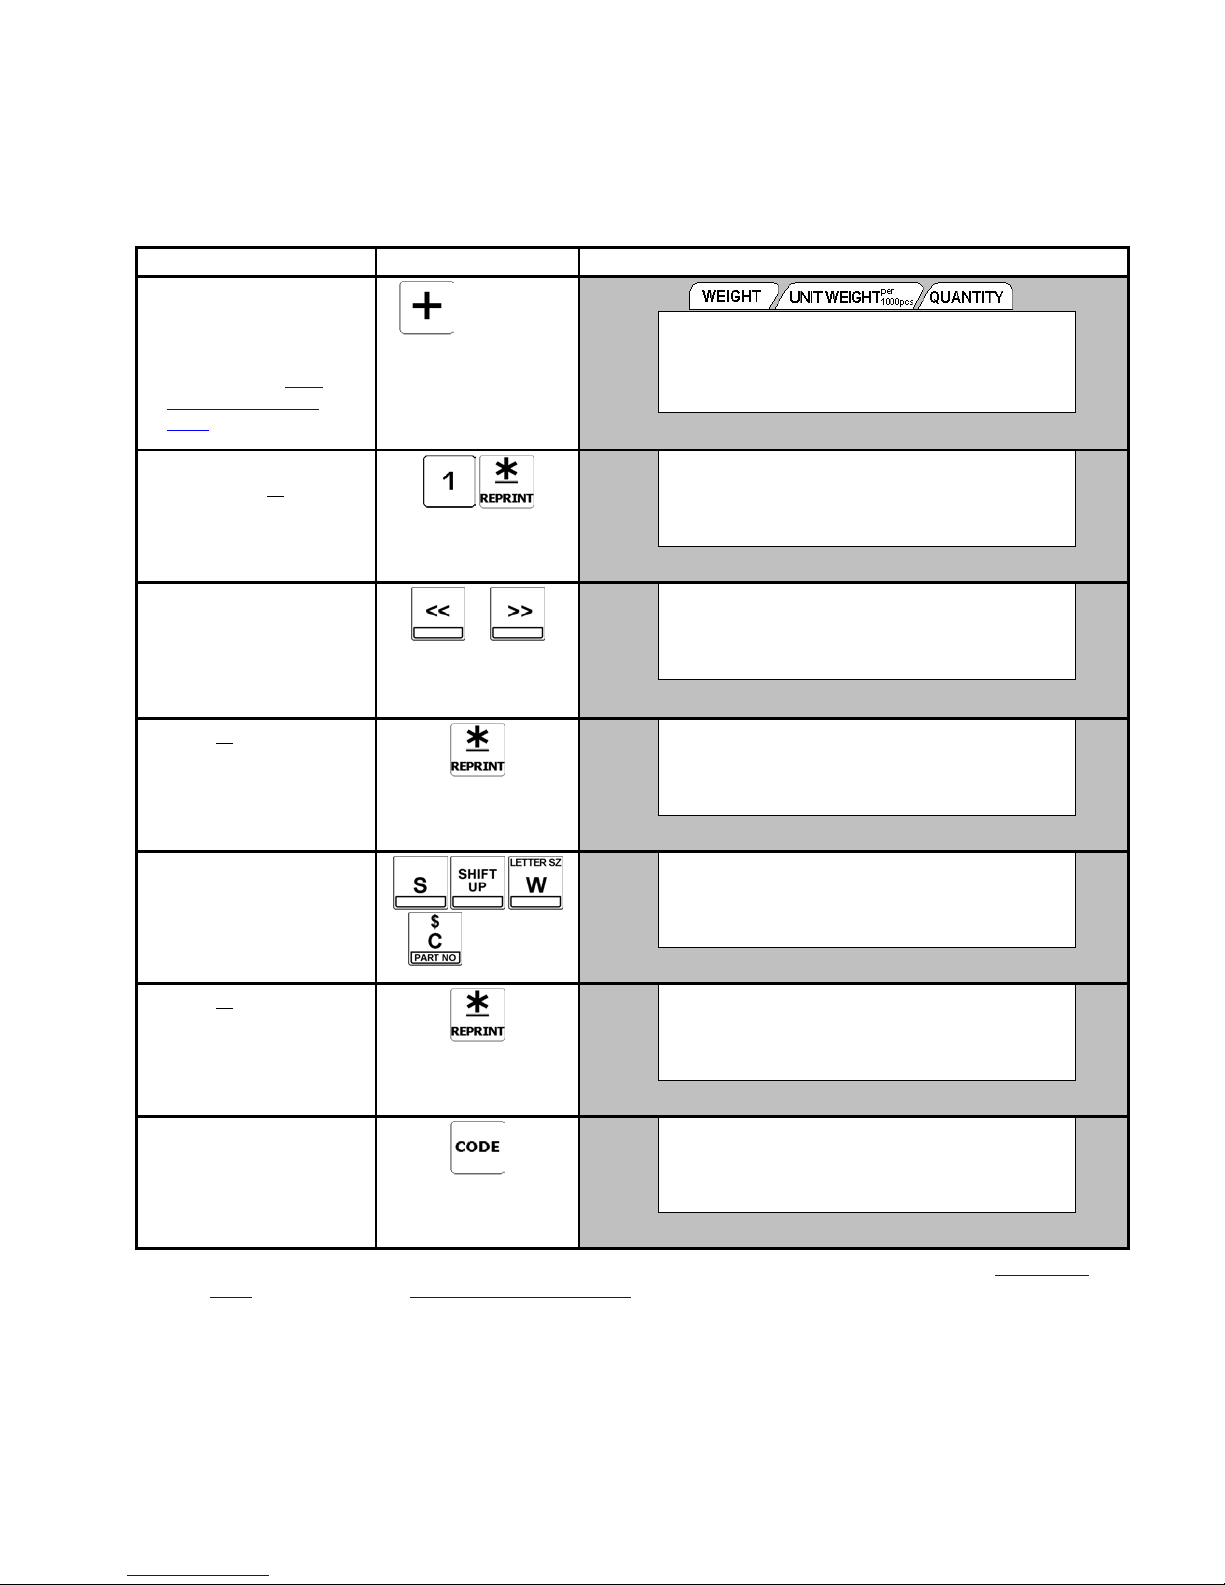
3.7 TEXT FILES
Maximum 20 Texts are available (Text number 1~16 are for Item label and text number 17~20 are for Total label). Text is used
for printing the fixed data on label such as “scale number” or “machine no”. Text No 1, 2, 3, 4, 5, 6, 17 and 18 are default text
and cannot be use as it’s currently being used by standard label format. However, you can change the these text data if you want
to. But once scale memory is cleared, the default text will be generated. Maximum 2 lines per text can be programmed and
number of line depends on the size of print area of the selected label format or the character size.
3.7.1 Program Text File
OPERATION KEYS DISPLAY
1. At Item Code
Programming mode, press
[+] key to search Text
Programming mode.
(Please refer to 3.1.3
Programming Mode
Entry)
2. Enter Text Number (Ex.
1) and press [
¾
] key.
3. Press [<<] or [>>] key to
select a label format that
has available text print
area (Ex. F1).
Only the available label
format will display.
4. Press
key.
¾
]
[
5. Enter the Text data by
Character keys (Ex.
Scale#).
Refer to Note 1.
6. Press [
Enter Text data in the 2
¾
] key.
nd
line if necessary. If not press
[CODE] key to save the
data.
7. Press [CODE] key to save
the data.
Press [PIECES] key &
[CLEAR] key to exit
without saving the data.
x
6 times
or
and etc
´0³
NET
RECOM
INSUFF
´0³
NET
RECOM
INSUFF
´0³
NET
RECOM
INSUFF
´0³
NET
RECOM
INSUFF
´0³
NET
RECOM
INSUFF
´0³
NET
RECOM
INSUFF
´0³
NET
RECOM
INSUFF
TEXT PROGRAMMING
ENTER TEXT # (1-20): 0
or X : display's status indicator
W
TEXT # 0001
LABEL FORMAT 1: DEF / F1
TEXT # 0001
LABEL FORMAT 1: F1 / 17
TEXT # 0001 P: KEY
S1/26/01:
TEXT # 0001 P: KEY
S1/ 20/01: Scale#
TEXT # 0001 P: KEY
S1/26/02:
TEXT PROGRAMMING
ENTER TEXT # (1-20): 0
S
S
S
S
S
S
S
Σ
IN
OUT
PE
Σ
IN
OUT
PE
Σ
IN
OUT
PE
Σ
IN
OUT
PE
Σ
IN
OUT
PE
Σ
IN
OUT
PE
Σ
IN
OUT
PE
Note 1: Enter the Text data as the same procedure as ID CODE entry. Please refer to 3.2.1 Program Item File of 1. ID CODE
Entry. And please refer to 1.4 Table of Characters Code when using ASCII Code (A) or TERAOKA Code (T) for Text
data entry.
PROGRAM MODE
- 34 -
Page 38
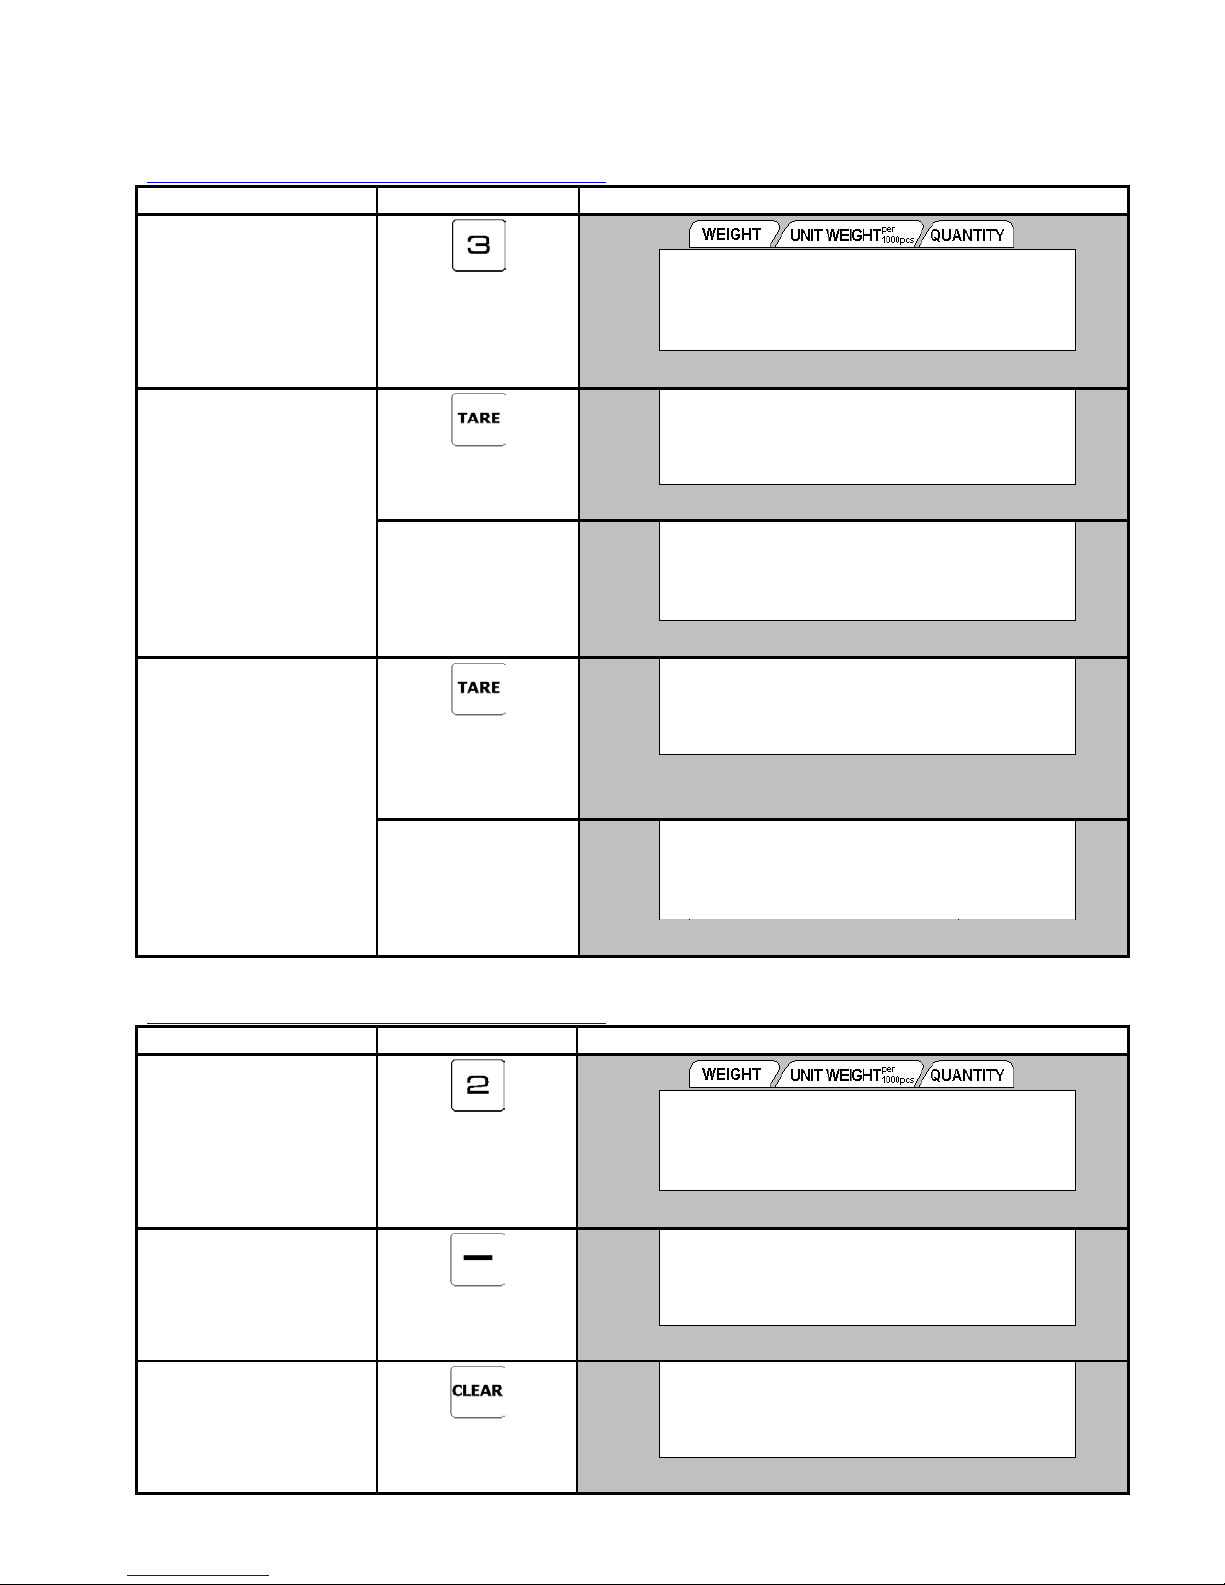
3.7.2 Print Text File
The following operation is used for checking Text Data programmed. The report is printed on receipt paper and there are two
different print types, Full report & Single report. The Full report includes all the Text programmed data, and the single report
only includes one Text data.
Continued from the procedure 1 on 3.7.1 Program Text File.
OPERATION KEYS DISPLAY
1. At Text Programming
mode, enter the existing
Text Number (Ex. 3) for
Single Report printing.
2. Press [TARE] key to print
out the report for Text
Number 3.
3. To print out Full report,
make sure the Factory
Programming Entry
column is 0. Then press
[TARE] key.
To stop printing, press
[FEED]
key.
´0³
NET
RECOM
INSUFF
´0³
NET
RECOM
INSUFF
´0³
NET
RECOM
INSUFF
´0³
NET
RECOM
INSUFF
´0³
NET
RECOM
INSUFF
TEXT PROGRAMMING
ENTER TEXT # (1-20): 3
W or X : display's status indicator
ENTER TEXT # (1-20): 0
ENTER TEXT # (1-20): 0
PRINTING …
TEXT PROGRAMMING
PRINTING …
TEXT PROGRAMMING
Σ
IN
S
OUT
PE
Σ
IN
S
OUT
PE
Σ
IN
S
OUT
PE
Σ
IN
S
OUT
PE
Σ
IN
S
OUT
PE
3.7.3 Delete Text File
Continued from the procedure 1 on 3.7.1 Program Text File.
OPERATION KEYS DISPLAY
1. At Text Programming
mode, enter the Text
Number (Ex. 2) to be
deleted.
2. Press [-] key to go to Text
deleting display.
3. Press [CLEAR] key to
delete the data.
Press [TARE] key to
cancel the deletion.
PROGRAM MODE
´0³
NET
RECOM
INSUFF
´0³
NET
RECOM
INSUFF
´0³
NET
RECOM
INSUFF
TEXT PROGRAMMING
ENTER TEXT # (1-20): 2
or X : display's status indicator
W
DELETE?
CLEAR (YES) / TARE (NO)
TEXT PROGRAMMING
ENTER TEXT # (1-20): 0
S
S
S
Σ
IN
OUT
PE
Σ
IN
OUT
PE
Σ
IN
OUT
PE
- 35 -
Page 39
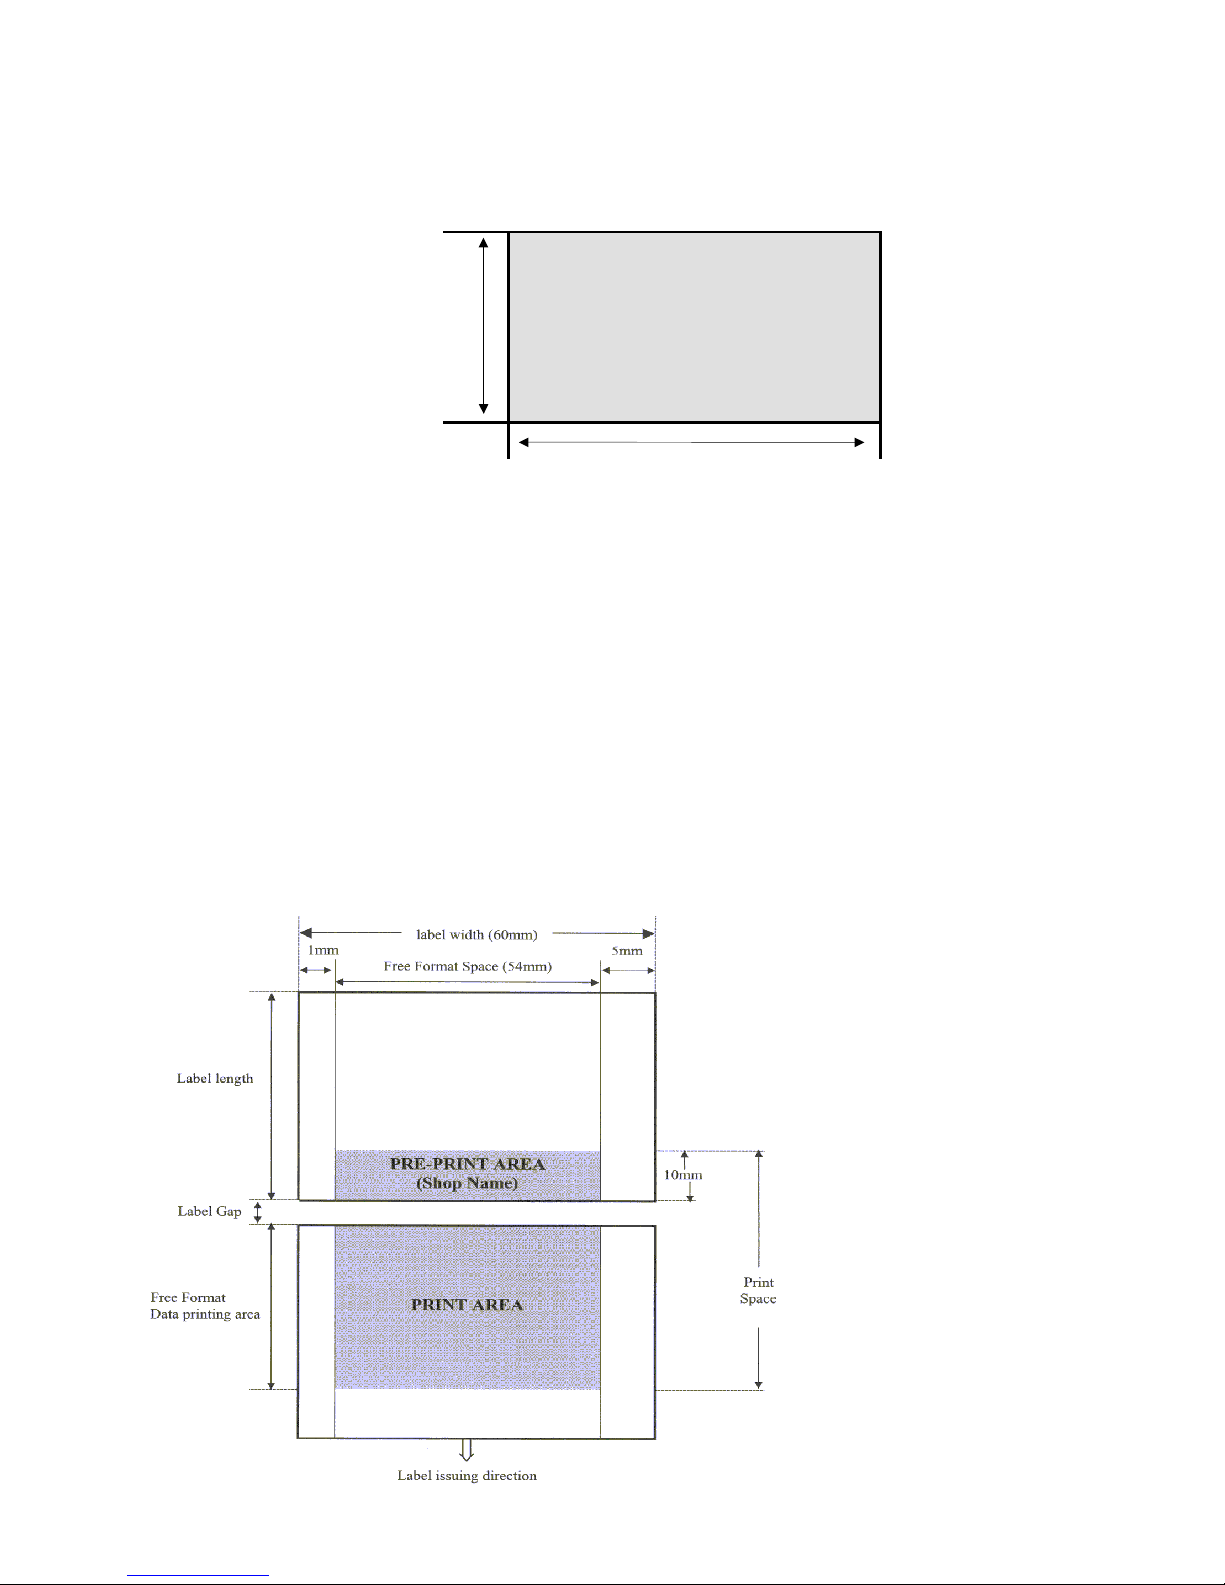
3.8 FREE FORMAT FILE
The Free Format enables you to design your own label format, by setting print angles, print positions, character size and other
programmable items. You can create a new format by copying an existing label format and use it as a base or make a totally new
label format.
3.8.1 General Information
Label format within the following height and width can be created.
Length: 19mm~111mm
• Up to 99 Free Formats can be stored in the memory, apart from the other 16 standard formats.
• Standard format can be used as a basic format for creating a new format.
• Print position of each item is programmed using "mm" or "dots".
• One Item label or one Total label is available for each Free Format number (F1~F99).
• 4 Print Angles can be set for all item data: 0, 90, 180 and 270 degrees.
Width: 32mm~56mm
3.8.2 Print Area, Print Position and Print Angles
All changeable item data should be programmed 8mm above the bottom of the label. The bottom 8 mm of the label should be
used for invariable data such as factory name, since this area is printed when issuing the last label. Please do not program any
item closer than 1mm to the edges of the label.
The print position of each item is determined by setting the interval from "0" point (X=0, Y=0) to the base position of the
programmed item. X and Y values need to be entered by "mm" or "dots".
1 dot (horizontal) = 0.135 mm
1 dot (vertical) = 0.155 mm
3.8.2.1 Print AREA
The item data cannot be printed at the bottom 10 mm of labels. Pre-print data such as factory name or logo data is programmed
at the bottom 10mm. Also the item data should not be printed within 1mm from the left edge or the right edge of the label as the
following drawing shows.
PROGRAM MODE
- 36 -
Page 40
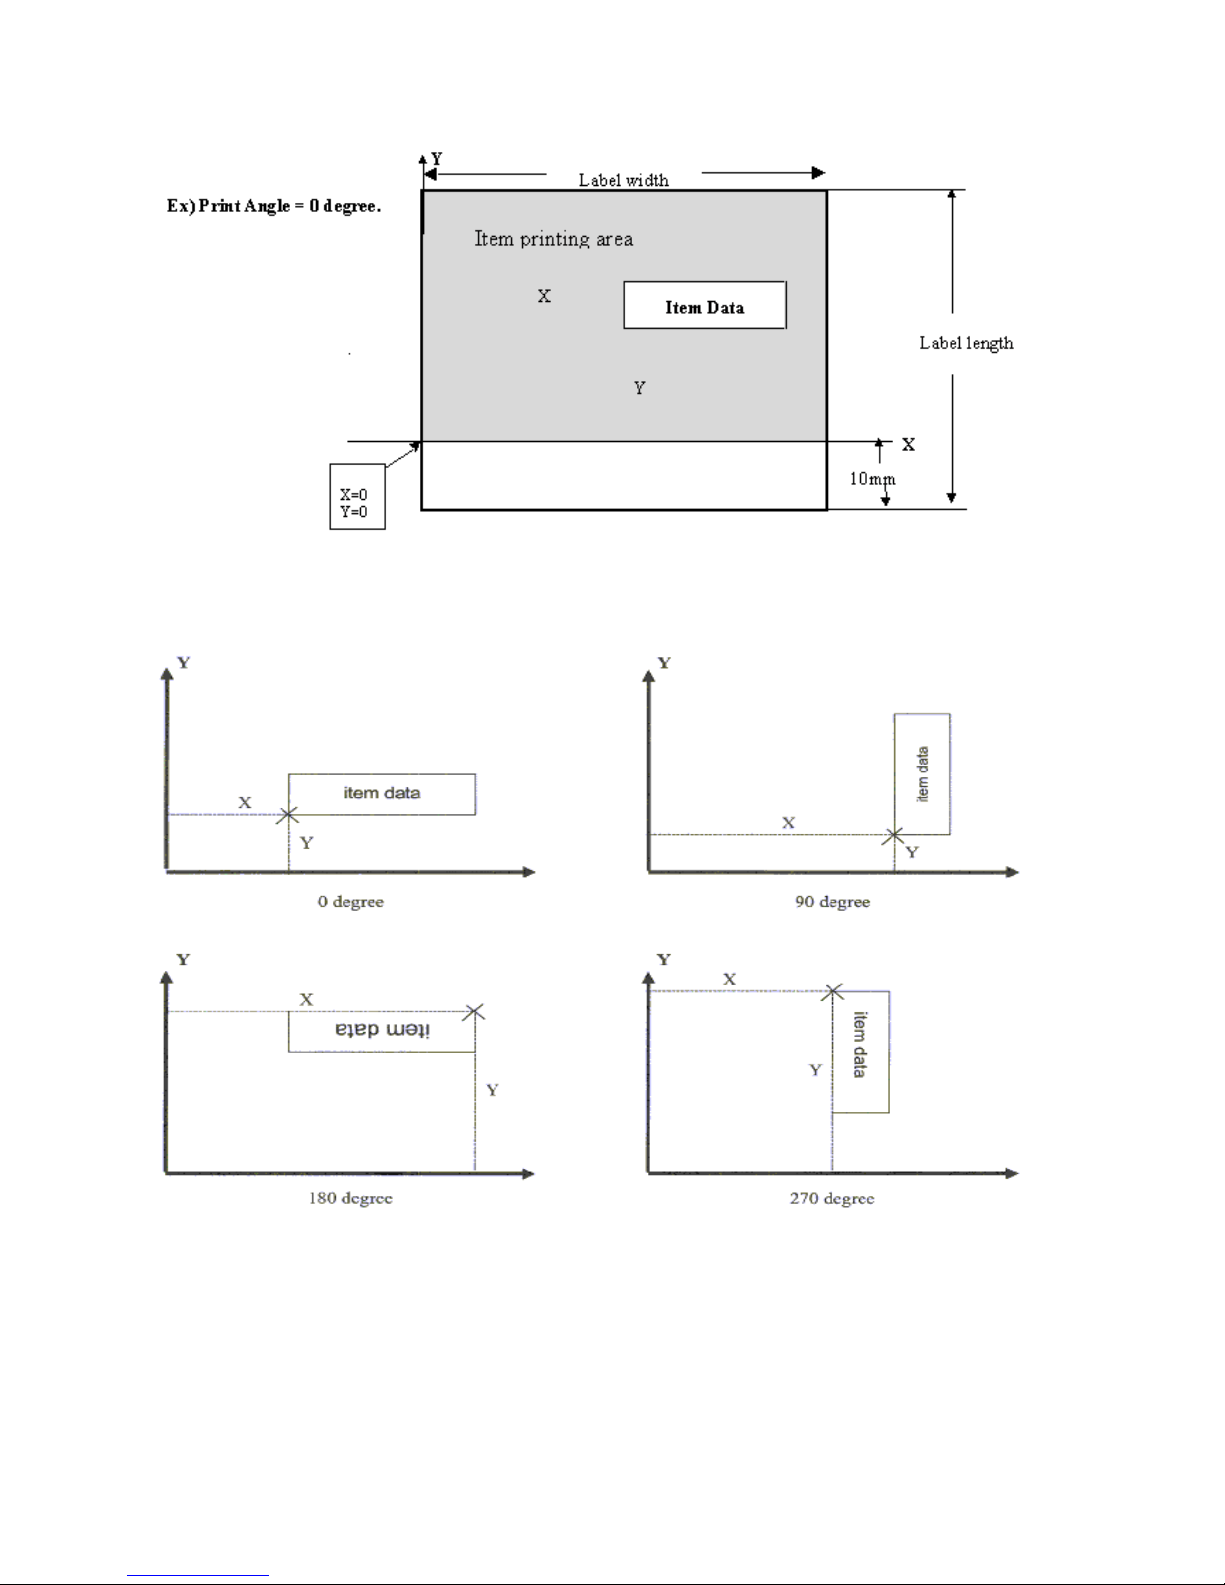
3.8.2.2 Print Position
The printing position of each item data is decided by setting the distance from 0 point (X=0, Y=0) to the base position (X value,
Y value).
3.8.2.3 Print Angle
Print angle of each Print Item can be selected from 4 different angles, 0 degree, 90 degree, 180 degree, and 270 degree. A whole
format base or each Item Data-base may set print angle. According to the selected print angle, the status of print position differs
as the following samples.
PROGRAM MODE
- 37 -
Page 41
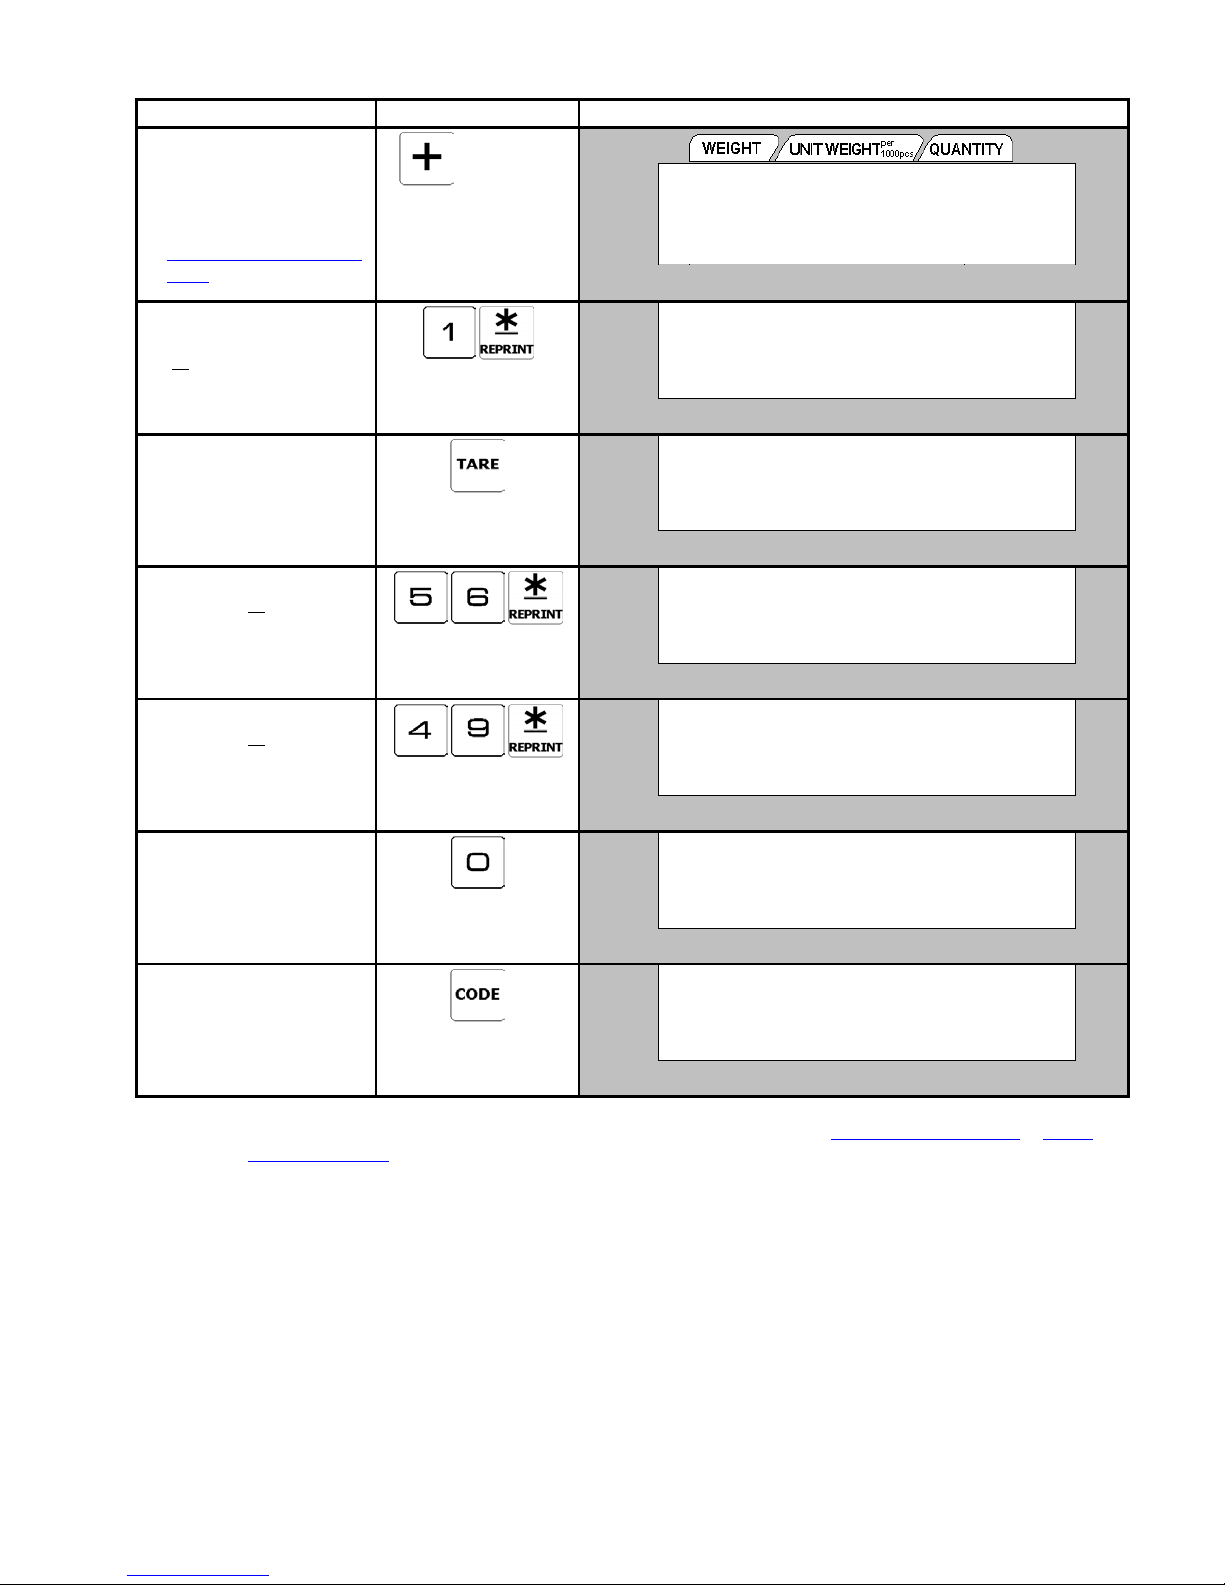
3.8.3 Free Format Model Entry
OPERATION KEYS DISPLAY
1. At Item Code
Programming mode, press
key to search for Free
[+]
7 times
x
format Programming
mode. (Please refer to
3.1.3 Programming Mode
Entry)
2. Enter new Free Format
Number (Ex. 1) and press
] key.
[
¾
3. Press [TARE] key to
select "NO COPY" from
existing label format.
Press [CLEAR] key to
enter Copy Mode.
4. Enter label width (Ex. 56)
and press [
Maximum 56mm can be
¾
] key.
entered.
5. Enter label height (Ex. 49)
and press
Maximum 111mm can be
[
¾
key.
]
entering.
6. Press [0] key to enter Item
Label programming ([1]
key to enter Total Label
Programming)
Refer to Note 1.
7. Press [CODE] key to save
the data.
Press [PIECES] key &
[CLEAR] key to exit
without saving the data.
Note 1:
There are two ways to select the Item Data in Free Format programming by using different keys such as:
- Enter the Item Number and then press [+] key (For Item Number, Please refer to 3.8.4.1 Item Label Format
Total Label Format
- Press
[+]
key or
key to search the Item Data.
[-]
Note 2: The Item Label can be programmed with up to 45 different item data used for printing in Operation Mode.
Note 3: The Total Label can be programmed with up to 13 item data used for accumulation transaction in Operation Mode
´0³
NET
RECOM
INSUFF
´0³
NET
RECOM
INSUFF
´0³
NET
RECOM
INSUFF
´0³
NET
RECOM
INSUFF
´0³
NET
RECOM
INSUFF
´0³
NET
RECOM
INSUFF
´0³
NET
RECOM
INSUFF
PROGRAM FREE FORMAT
ENTER FREE FORMAT # 0
W or X : display's status indicator
COPY EXISTING FORMAT?
CLEAR (YES) / TARE (NO)
ENTER LABEL WIDTH
(32 - 56 mm): 0
ENTER LABEL HEIGHT
(19 - 120 mm): 0
SELECT LABEL TYPE
ITEM: 0 / TOTAL: 1
FREE FMT: ID CODE
1 ID CODE
PROGRAM FREE FORMAT
ENTER FREE FORMAT # 0
S
S
S
S
S
S
S
& 3.8.4.2
Σ
IN
OUT
PE
Σ
IN
OUT
PE
Σ
IN
OUT
PE
Σ
IN
OUT
PE
Σ
IN
OUT
PE
Σ
IN
OUT
PE
Σ
IN
OUT
PE
PROGRAM MODE
- 38 -
Page 42
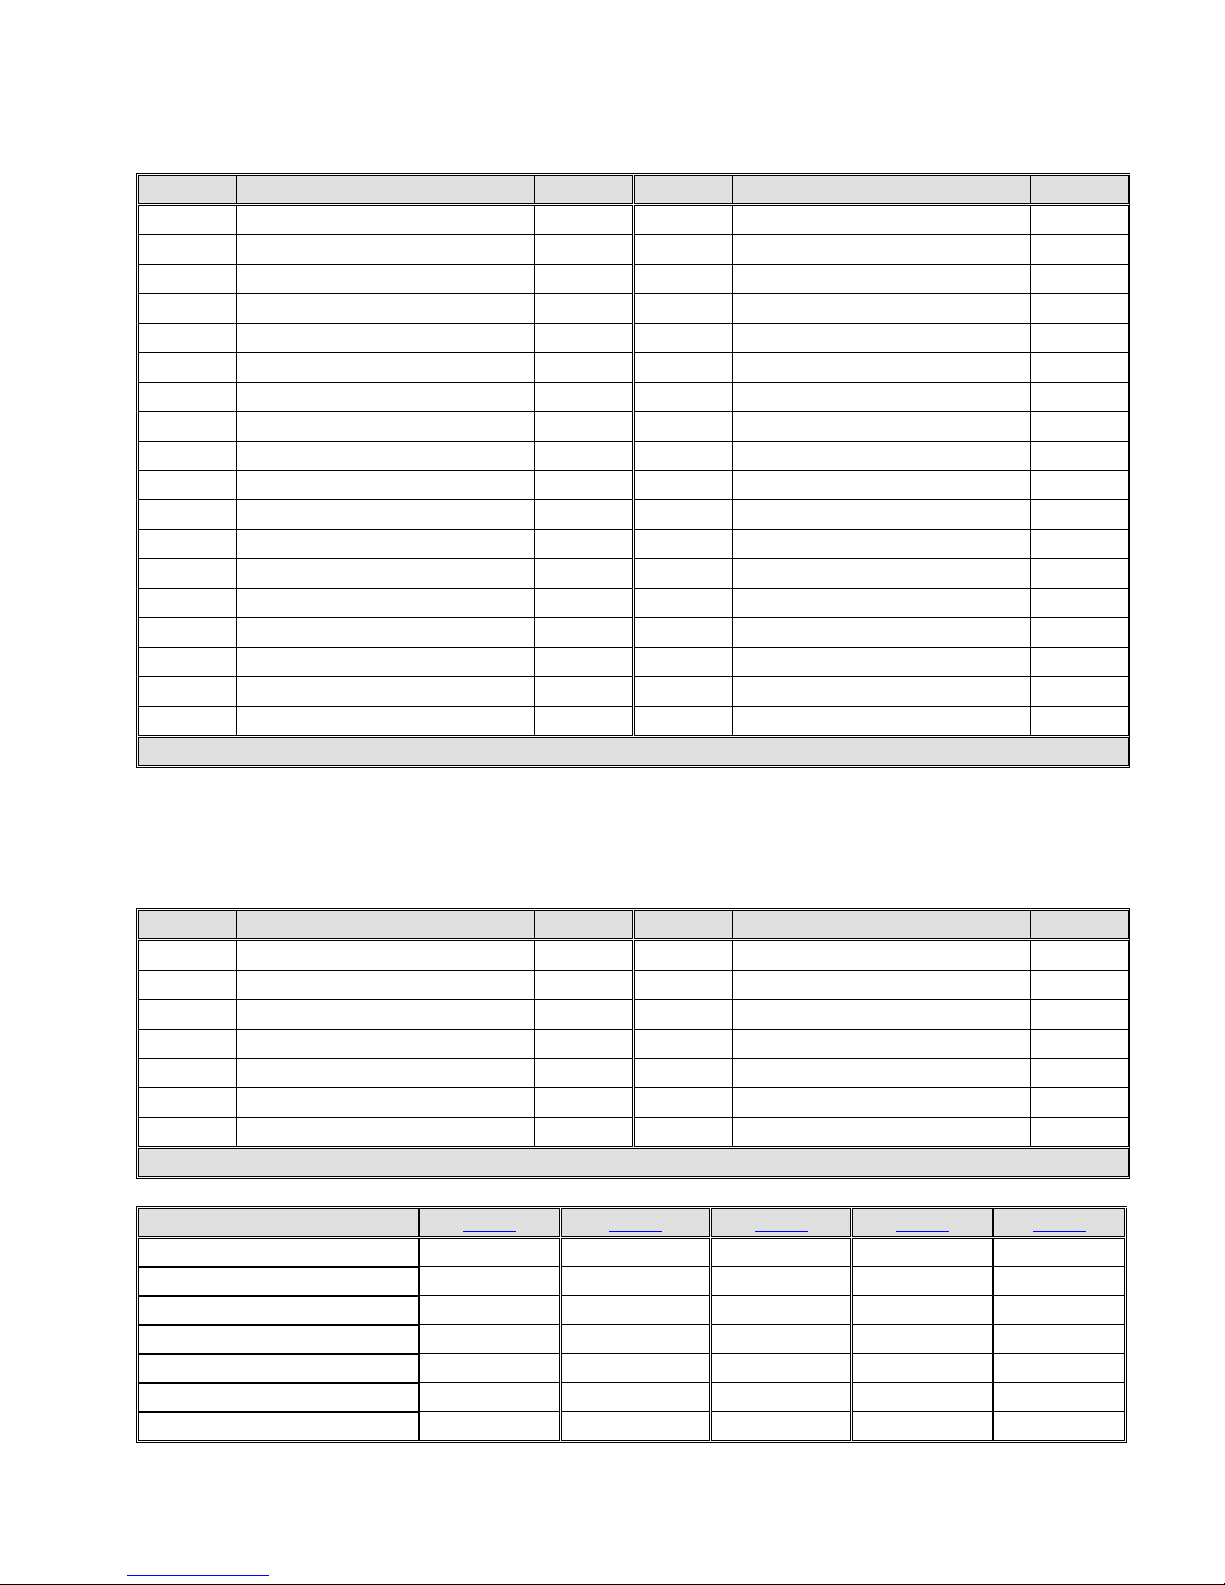
3.8.4 Item Data Position
The method of setting the Item Data of label format differs and is therefore grouped into 4 types as follows:
3.8.4.1 Item Label Format
Up to 45 different item data can be programmed in Item Label Format and it’s used for printing in Operation mode.
Item No. Item Data Type Item No. Item Data Type
1 ID CODE 5 19 ADDRESS 2
2 GROSS WEIGHT 1 20 LOCATION 5
3 UNIT WEIHGT 1 21 SEQ NUMBER 1
4 NET WEIGHT 1 22 STATUS 1
5 QUANTITY 1 23 FRAME 1 4
6 PACK DATE 1 24 FRAME 2 4
7 PACK TIME 1 25 TEXT 1 2
8 PART NUMBER 5 ↕ ↕ ↕
9 QUANTITY UNIT 1 40 TEXT 16 2
10 PART NAME 5 41 SEQ TITLE 1
11 LOT NUMBER 5 42 ID CODE TITLE 1
12 BARCODE *
13 FACTORY 2 44 PART NAME TITLE 1
14 INVENTORY 1 45 PART NO TITLE 1
15 THRESHOLD 1 46 LOT NO TITLE 1
16 LOGO 2 47 NET WEIGHT TITLE 1
17 TARE WEIGHT 1 48 GROSS WEIGHT TITLE 1
18 SCALE NUMBER 1 49 TARE TITLE 1
Remarks: Item No.46 is the test print mode for checking the programmed print format.
Note 1: There have 4 items (1. ID CODE, 2. UNIT WEIGHT, 3. TARE WEIGHT & 4. QUANTITY) of barcode data that can
be programmed and printed on item label.
Refer to Note 1.
3 43 LOCATION TITLE 1
3.8.4.2 Total Label Format
Up to 13 different item data can be programmed in Total Label Format and is used for printing multiple transaction labels for
counter sales at Registration Mode.
Item No. Item Data Type Item No. Item Data Type
1 TOTAL QUANTITY 1 8 TEXT 17 2
2 TOTAL QUANTITY UNIT 1 9 TEXT 18 2
3 UNIT WEIGHT 1 10 TEXT 19 2
4 PACK DATE 1 11 TEXT 20 2
5 PACK TIME 1 12 SEQ NUMBER 1
6 TOTAL TITLE 1 13 SEQ TITLE 1
7 TOTAL BARCODE 3 14 ACCUMULATE 1
Remarks: Item No.12 is the test print mode for checking the programmed print format.
Programmable data Type 1 Type 2 Type 3 Type 4 Type 5
X position YES YES YES YES YES
Y position YES YES YES YES YES
Angle YES YES YES NO YES
Width NO YES NO NO YES
Height NO YES YES NO YES
Status YES YES YES YES YES
Character Size YES NO NO NO YES
PROGRAM MODE
- 39 -
Page 43
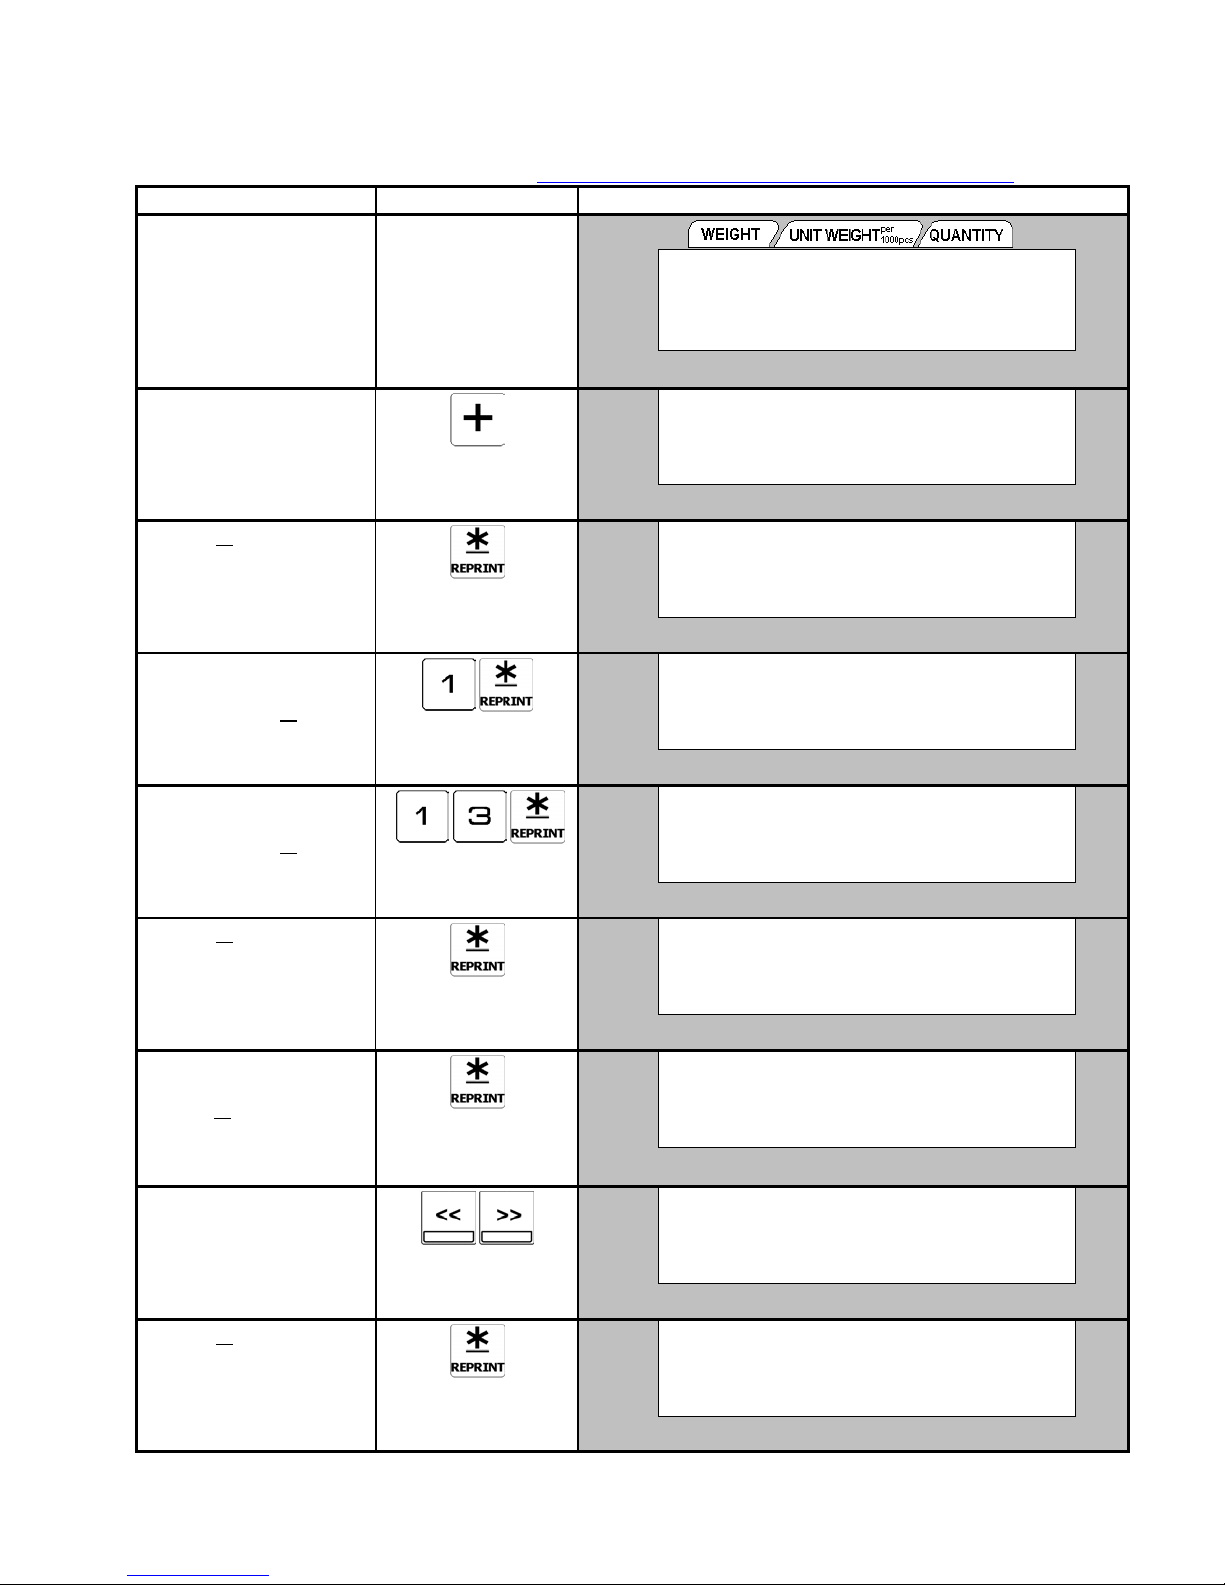
3.8.5 Type 1 Data Setting
The Type1 data setting is the numeric and fixed data. The position of Type 1 item data is decided by X, Y values, character size,
angle and status. 10 different character sizes are available. The size of the print area varies according to the selected character
size.
For example:
Procedure to set
GROSS WEIGHT
Continued from procedure 6 on 3.8.3 Free Format Mode Entry
OPERATION KEYS DISPLAY
´0³
NET
RECOM
INSUFF
´0³
NET
RECOM
INSUFF
´0³
NET
RECOM
INSUFF
´0³
NET
RECOM
INSUFF
´0³
NET
RECOM
INSUFF
´0³
NET
RECOM
INSUFF
´0³
NET
RECOM
INSUFF
´0³
NET
RECOM
INSUFF
´0³
NET
RECOM
INSUFF
FREE FMT: ID CODE
1 ID CODE
FREE FMT: GROSS WT
2 GROSS WT
FREE FMT: GROSS WT
X POSITION: 0 mm
FREE FMT: GROSS WT
Y POSITION: 0 mm
FREE FMT: GROSS WT
ANGLE: 0 DG
FREE FMT: GROSS WT
STATUS: 0 NO PRINT
FREE FMT: GROSS WT
CHAR SIZE: S1
FREE FMT: GROSS WT
CHAR SIZE: M4
FREE FMT: GROSS WT
2 GROSS WT
At ID Code setting Mode
1. Select GROSS WEIGHT
by press
2. Press [
key.
[+]
] key to enter
¾
programming mode.
3. Enter X-Position value
(Ex. 1mm) by numeric
key and press [
] key.
¾
Press [<<] or [>>] key to
select "dot".
4. Enter Y-Position value
(Ex. 13mm) by numeric
key and press [
5. Press [
¾
¾
] key.
] key for NO
Change print angle.
If necessary to change the
Angle, Press [<<] or [>>]
key to select.
6. Select print status by
press numeric key and
¾
press [
] key.
Enter [0] key for NO
print [1] key for Weight
print & [2] key for All print.
7. Change the Char. Size
(Ex. M4) by press [<<] or
Key.
[>>]
8. Press [
¾
] key to save the
Data.
Press [CODE] key save
and exit from Free Format
programming mode.
W or X : display's status indicator
Σ
IN
S
OUT
PE
Σ
IN
S
OUT
PE
Σ
IN
S
OUT
PE
Σ
IN
S
OUT
PE
Σ
IN
S
OUT
PE
Σ
IN
S
OUT
PE
Σ
IN
S
OUT
PE
Σ
IN
S
OUT
PE
Σ
IN
S
OUT
PE
PROGRAM MODE
- 40 -
Page 44
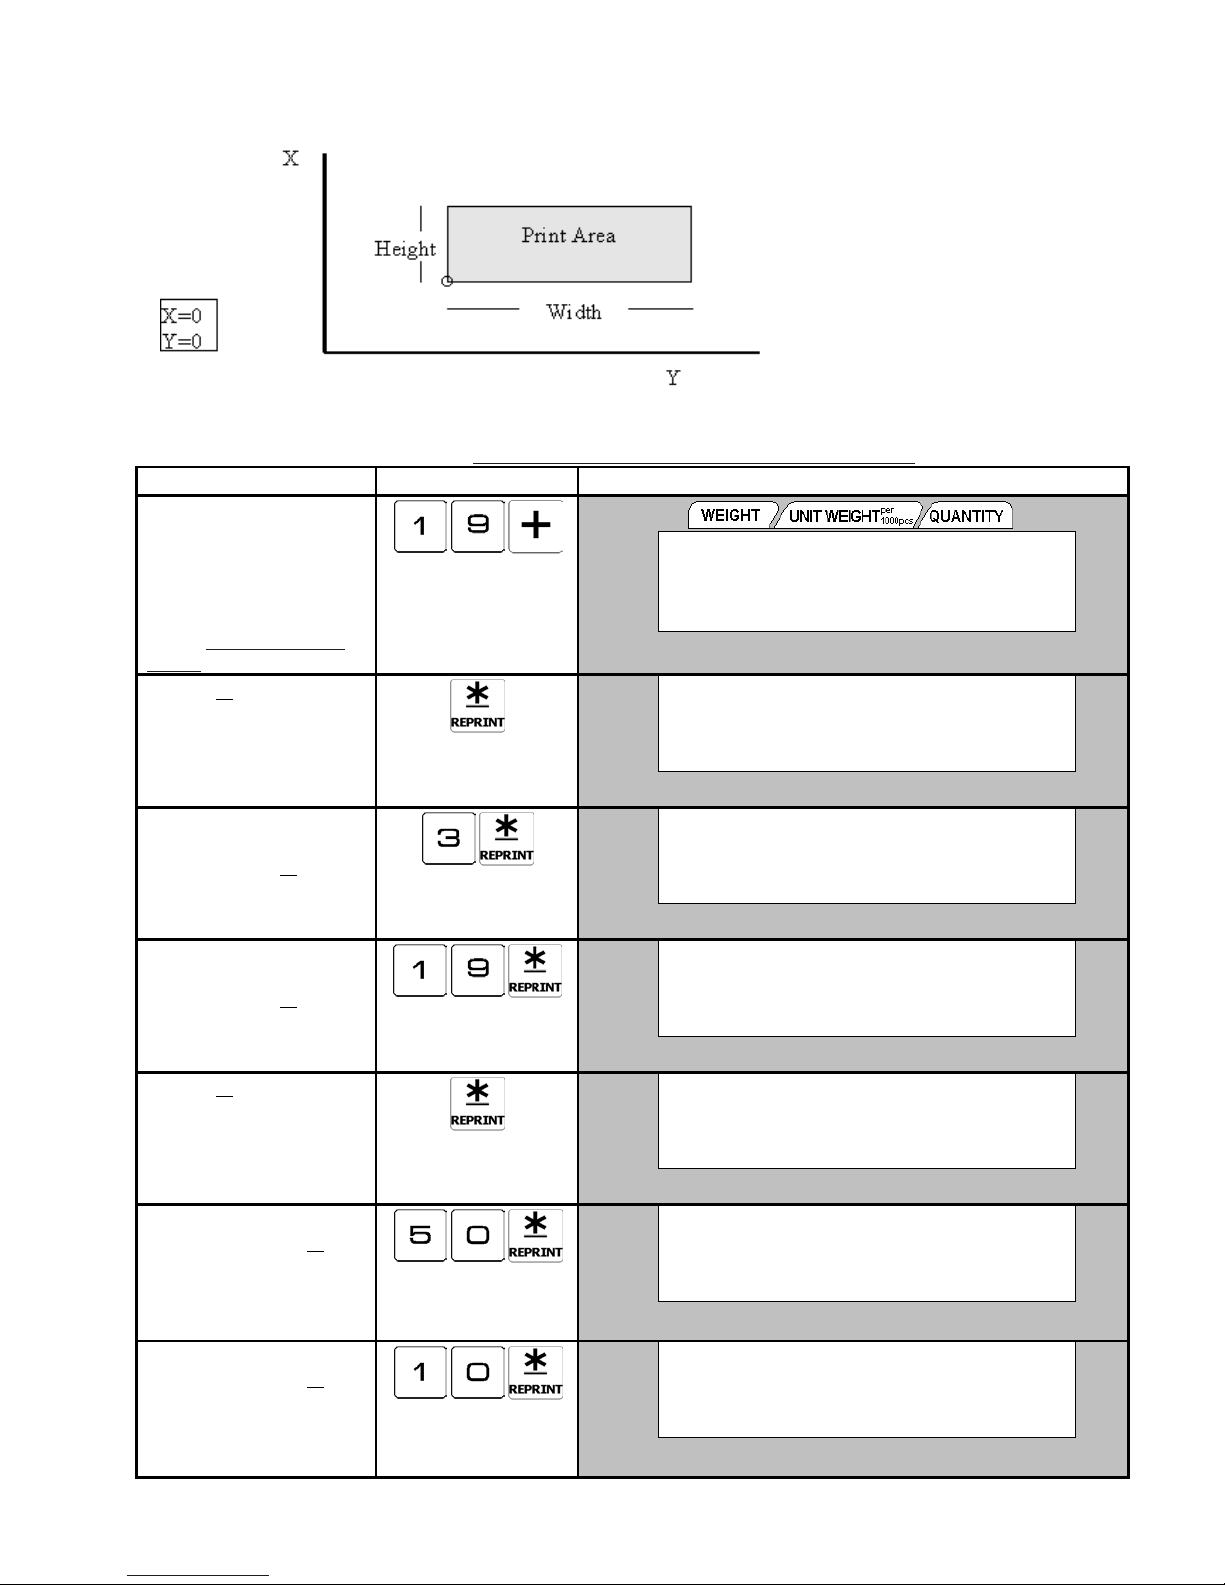
3.8.6 Type 2 Data Setting
Type 2 Data setting is to decide the position of alphanumeric data. The positions of type 2 data is decided by X, Y values,
height, width, angle and status. The height and width decide the print area size as shown below.
Note: The number of lines printed on the label will depend on the selected character size and the size of the programmed print
area.
For example: Procedure to set ADDRESS Continued from procedure 8 on 3.8.5 Type 1 Data Setting.
OPERATION KEYS DISPLAY
1. At GROSS WEIGHT
setting mode, enter the
item number for
ADDRESS and press [+]
key.
For item number, please
refer to 3.8.4.1 Item Label
Format.
2. Press
key to enter
¾
]
[
Address programming
mode.
3. Enter X-Position value
(Ex. 3mm) by numeric
key and press
key.
¾
]
[
Press [<<] or [>>] key to
select "dot".
4. Enter Y-Position value
(Ex. 19mm) by numeric
key and press [
¾
] key.
Press [<<] or [>>] key to
select "dot".
5. Press [
] key for NO
¾
Change print angle.
If necessary to change the
Angle, Press [<<] or [>>]
key to select.
6. Enter WIDTH value (Ex.
50mm) and press
[¾]
key.
If necessary to change the
Angle, Press
[<<]
or
[>>]
key to select.
7. Enter HEIGHT value (Ex.
10mm) and press [
¾
]
key.
If necessary to change
Angle, Press [<<] or [>>]
key to select.
´0³
NET
RECOM
INSUFF
´0³
NET
RECOM
INSUFF
´0³
NET
RECOM
INSUFF
´0³
NET
RECOM
INSUFF
´0³
NET
RECOM
INSUFF
´0³
NET
RECOM
INSUFF
´0³
NET
RECOM
INSUFF
FREE FMT: ADDRESS
19 ADDRESS
W or X : display's status indicator
FREE FMT: ADDRESS
X POSITION: 0 mm
FREE FMT: ADDRESS
Y POSITION: 0 mm
FREE FMT: ADDRESS
ANGLE: 0 DG
FREE FMT: ADDRESS
TTL WIDTH: 0 mm
FREE FMT: ADDRESS
TTL HEIGHT: 0 mm
FREE FMT: ADDRESS
STATUS: 0 NO PRINT
Σ
IN
S
OUT
PE
Σ
IN
S
OUT
PE
Σ
IN
S
OUT
PE
Σ
IN
S
OUT
PE
Σ
IN
S
OUT
PE
Σ
IN
S
OUT
PE
Σ
IN
S
OUT
PE
PROGRAM MODE
- 41 -
Page 45
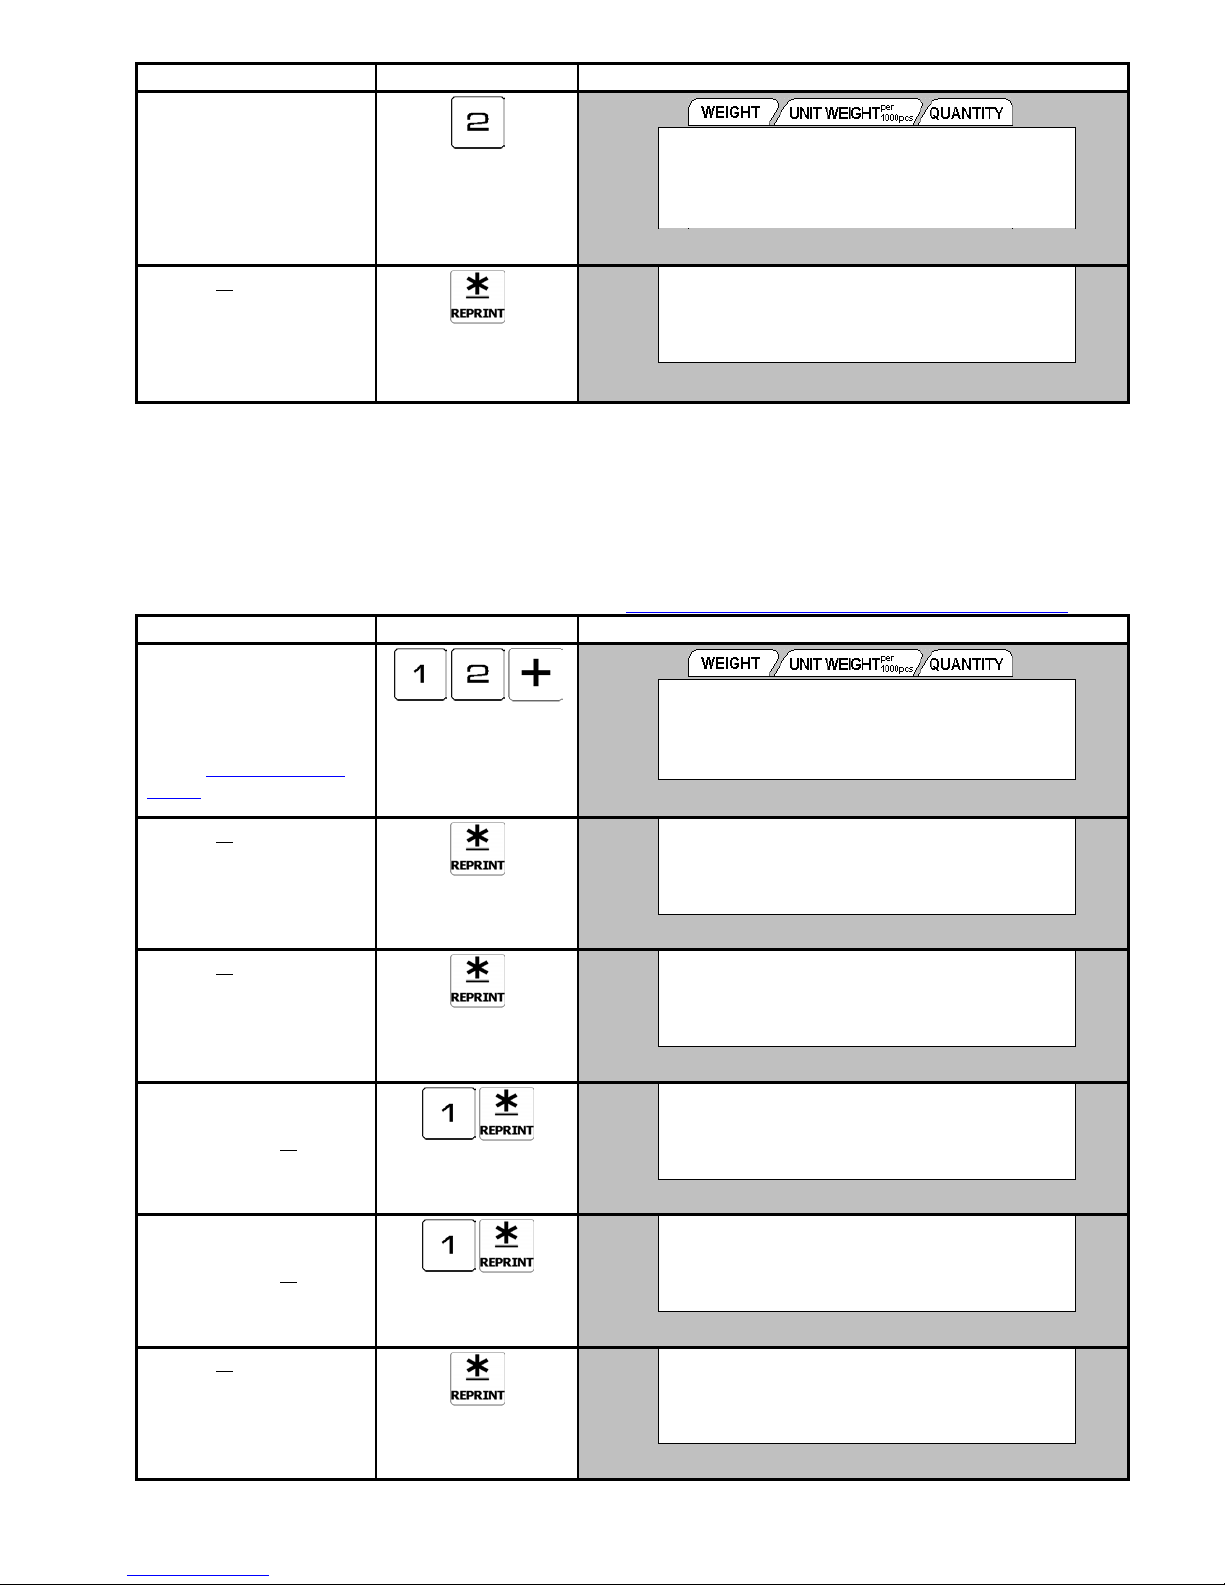
OPERATION KEYS DISPLAY
8. Select print status by
press numeric key.
Enter [0] key for NO
print [1] key for Weight
print & [2] key for All print.
9. Press [
¾
] key for return
back to Address setting
mode.
Press [CODE] key for
save and exit from Free
Format programming mode.
´0³
NET
RECOM
INSUFF
´0³
NET
RECOM
INSUFF
FREE FMT: ADDRESS
STATUS: 2 ALL PRINT
W or X : display's status indicator
FREE FMT: ADDRESS
19 ADDRESS
Σ
IN
S
OUT
PE
Σ
IN
S
OUT
PE
3.8.7 Type 3 Data Setting
The type 3 Data setting is the Barcodes. Barcode position is decided by X, Y values and there have 4 items barcode (ID CODE,
UNIT WEIGHT, TARE WEIGHT or QUANTITY) can be programmed in this mode.
For example: Procedure to set BARCODE Type of ID CODE. Continued from procedure 9 on 3.8.6 Type 2 Data Setting.
OPERATION KEYS DISPLAY
1. At ADDRESS setting
mode, enter the item
number for BARCODE
and press [+] key.
For item number, please
refer to 3.8.4.1 Item Label
Format.
2. Press [
¾
] key to enter
Barcode type selection
mode.
Press [+] or [-] key to
select item barcode.
3. Press
key to enter
¾
]
[
programming mode.
4. Enter X-Position value
(Ex. 1mm) by numeric
key and press [
] key.
¾
Press [<<] or [>>] key to
select "dot" or "mm".
5. Enter Y-Position value
(Ex. 1mm) by numeric
or
¾
[>>]
] key.
key to
key and press [
Press
[<<]
select "dot" or "mm".
6. Press [
] key for NO
¾
Change print angle.
If necessary to change the
Angle, Press [<<] or [>>]
key to select.
´0³
NET
RECOM
INSUFF
´0³
NET
RECOM
INSUFF
´0³
NET
RECOM
INSUFF
´0³
NET
RECOM
INSUFF
´0³
NET
RECOM
INSUFF
´0³
NET
RECOM
INSUFF
FREE FMT: BARCODE
12 BARCODE
W or X : display's status indicator
FREE FMT: BARCODE
ITEM: 1 ID CODE
FREE FMT: BARCODE
X POSITION: 0 mm
FREE FMT: BARCODE
Y POSITION: 0 mm
FREE FMT: BARCODE
ANGLE: 0 DG
FREE FMT: BARCODE
TTL HEIGHT: 0 mm
Σ
IN
S
OUT
PE
Σ
IN
S
OUT
PE
Σ
IN
S
OUT
PE
Σ
IN
S
OUT
PE
Σ
IN
S
OUT
PE
Σ
IN
S
OUT
PE
PROGRAM MODE
- 42 -
Page 46
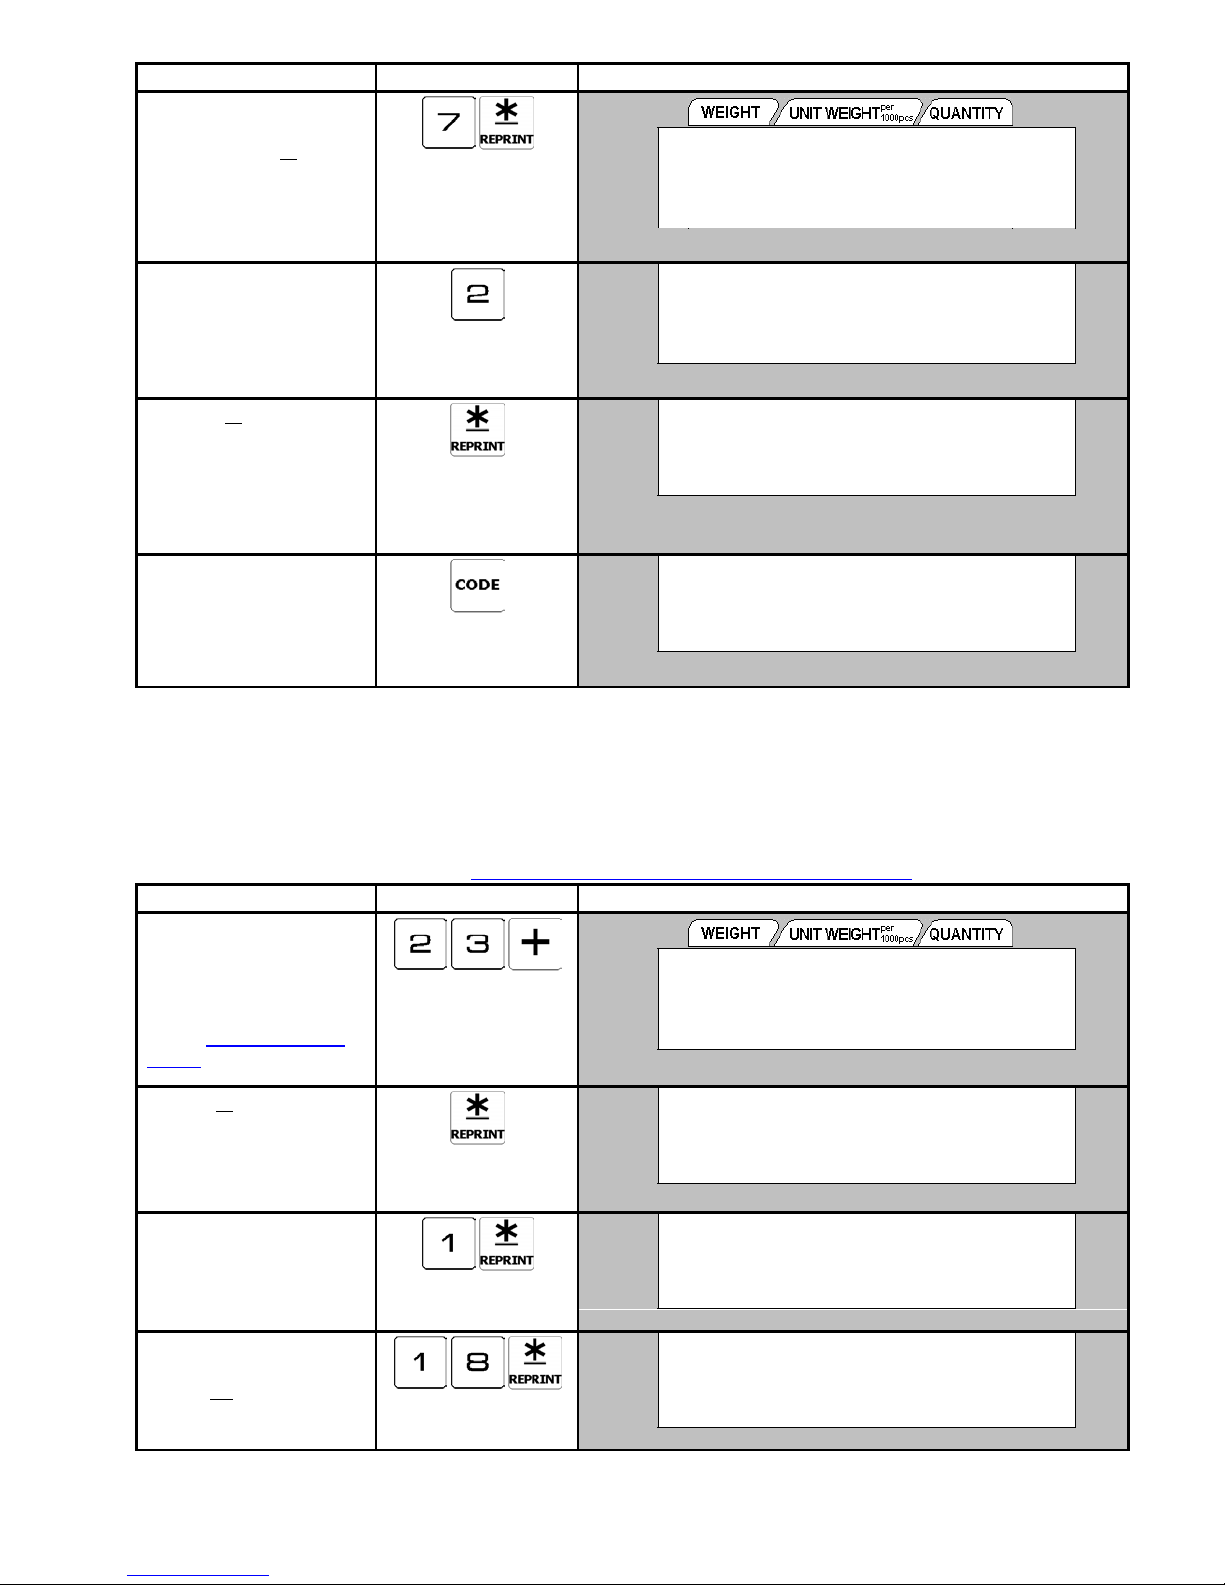
OPERATION KEYS DISPLAY
Enter new HEIGHT value
7.
(Ex. 7mm) by numeric
key and press [
] key.
¾
Press [<<] or [>>] key to
select "dot" or "mm".
8. Select print status by
press numeric key.
Enter [0] key for NO
print [1] key for Weight
print & [2] key for All print.
10. Press [
] key for return
¾
back to Barcode setting
mode. If
[TARE]
key is
pressed after that, it will
´0³
NET
RECOM
INSUFF
´0³
NET
RECOM
INSUFF
´0³
NET
RECOM
INSUFF
FREE FMT: BARCODE
STATUS: 0 NO PRINT
W or X : display's status indicator
FREE FMT: BARCODE
STATUS: 2 ALL PRINT
FREE FMT: BARCODE
ITEM: 1 ID CODE
exit to barcode free
format mode.
10. Press
[CODE]
key for
save and exit from Free
Format programming
mode.
´0³
NET
RECOM
INSUFF
PROGRAM FREE FORMAT
ENTER FREE FORMAT # 0
3.8.8 Type 4 Data Setting
Type 4 is to decide the position of frame file. 2 frames can be set per Format.
For example: Procedure to set FRAME 1. Continued from procedure 9 on 3.8.6 Type 2 Data Setting.
OPERATION KEYS DISPLAY
1. At ID CODE setting
mode, enter the item
number for FRAME 1and
press [+] key.
For item number, please
refer to 3.8.4.1 Item Label
Format.
2. Press [
¾
] key to enter
Frame 1 programming
mode.
3. Enter X-AXIS value (Ex.
1mm) by numeric
Press [<<] or [>>] key to
select "dot".
4. Enter Y-AXIS value (Ex.
18mm) by numeric and
¾
press [
Press
] key.
[<<]
or
[>>]
key to
select "dot".
´0³
NET
RECOM
INSUFF
´0³
NET
RECOM
INSUFF
´0³
NET
RECOM
INSUFF
´0³
NET
RECOM
INSUFF
FREE FMT: FRAME 1
22 FRAME 1
FREE FMT: FRAME 1
X - AXIS BASE: 0 mm
FREE FMT: FRAME 1
Y - AXIS BASE: 0 mm
FREE FMT: FRAME 1
X DIAGONAL: 0 mm
W or X : display's status indicator
S
S
S
S
Σ
IN
OUT
PE
Σ
IN
OUT
PE
Σ
IN
OUT
PE
Σ
IN
OUT
PE
S
S
S
S
Σ
IN
OUT
PE
Σ
IN
OUT
PE
Σ
IN
OUT
PE
Σ
IN
OUT
PE
PROGRAM MODE
- 43 -
Page 47
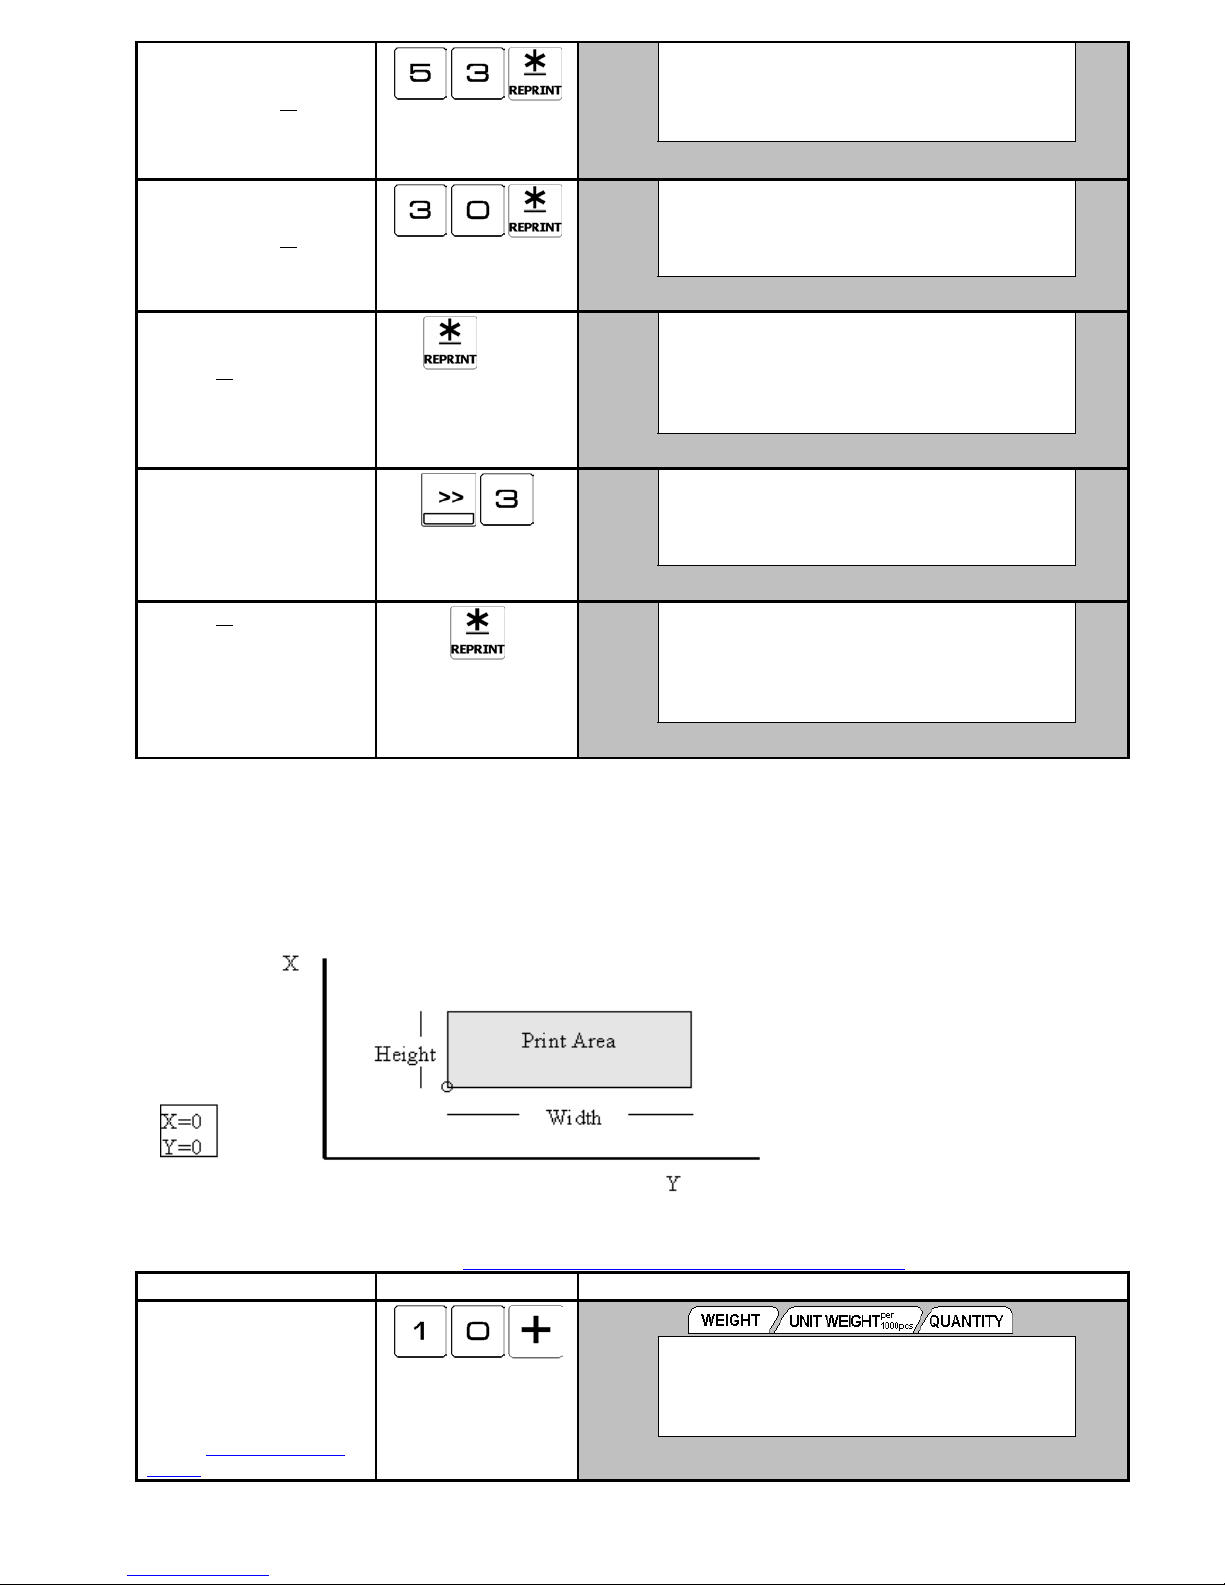
´0³
NET
RECOM
INSUFF
´0³
NET
RECOM
INSUFF
´0³
NET
RECOM
INSUFF
´0³
NET
RECOM
INSUFF
´0³
NET
RECOM
INSUFF
FREE FMT: FRAME 1
Y DIAGONAL: 0 mm
W or X : display's status indicator
FREE FMT: FRAME 1
STATUS: 0 NO PRINT
FREE FMT: FRAME 1
THICKNESS: 0 mm
FREE FMT: FRAME 1
THICKNESS: 3 dot
FREE FMT: FRAME 1
22 FRAME 1
S
S
S
S
S
5. Enter X Diagonal value
(Ex. 53mm) by numeric
key and press
key.
¾
]
[
Press [<<] or [>>] key to
select "dot".
6. Enter Y Diagonal value
(Ex. 30mm) by numeric
key and press
key.
¾
]
[
Press [<<] or [>>] key to
select "dot".
7. Select print status by
press numeric key and
¾
press [
] key.
Enter [0] key for NO
Print &
key for Weight
[1]
Print & [2] key for All Print.
8. Enter Line Weight value
(Ex. 3 dots).
Press [<<] or [>>] key to
toggle mm or dot. (1 dot =
0.125mm)
9. Press [
] key for return
¾
back to Frame setting
mode.
Press [CODE] key for
save and exit from Free
Format programming mode.
3.8.9 Type 5 Data Setting
Type 5 Data setting is to decide the position of alphanumeric data. The positions of type 5 data is decided by X, Y values,
height, width, angle, character size and status. The height and width decide the print area size as shown below while the
character size define the character size of the data being printed on this print area.
Σ
IN
OUT
PE
Σ
IN
OUT
PE
Σ
IN
OUT
PE
Σ
IN
OUT
PE
Σ
IN
OUT
PE
Note: The number of lines printed on the label will depend on the selected character size and the size of the programmed print
area.
For example: Procedure to set ID CODE Continued from procedure 8 on 3.8.5 Type 1 Data Setting.
OPERATION KEYS DISPLAY
1. At GROSS WEIGHT
setting mode, enter the
item number for
ADDRESS and press
[+]
key.
For item number, please
refer to 3.8.4.1 Item Label
Format.
PROGRAM MODE
´0³
NET
RECOM
INSUFF
- 44 -
FREE FMT: PART NAME
10 PART NAME
W or X : display's status indicator
S
Σ
IN
OUT
PE
Page 48
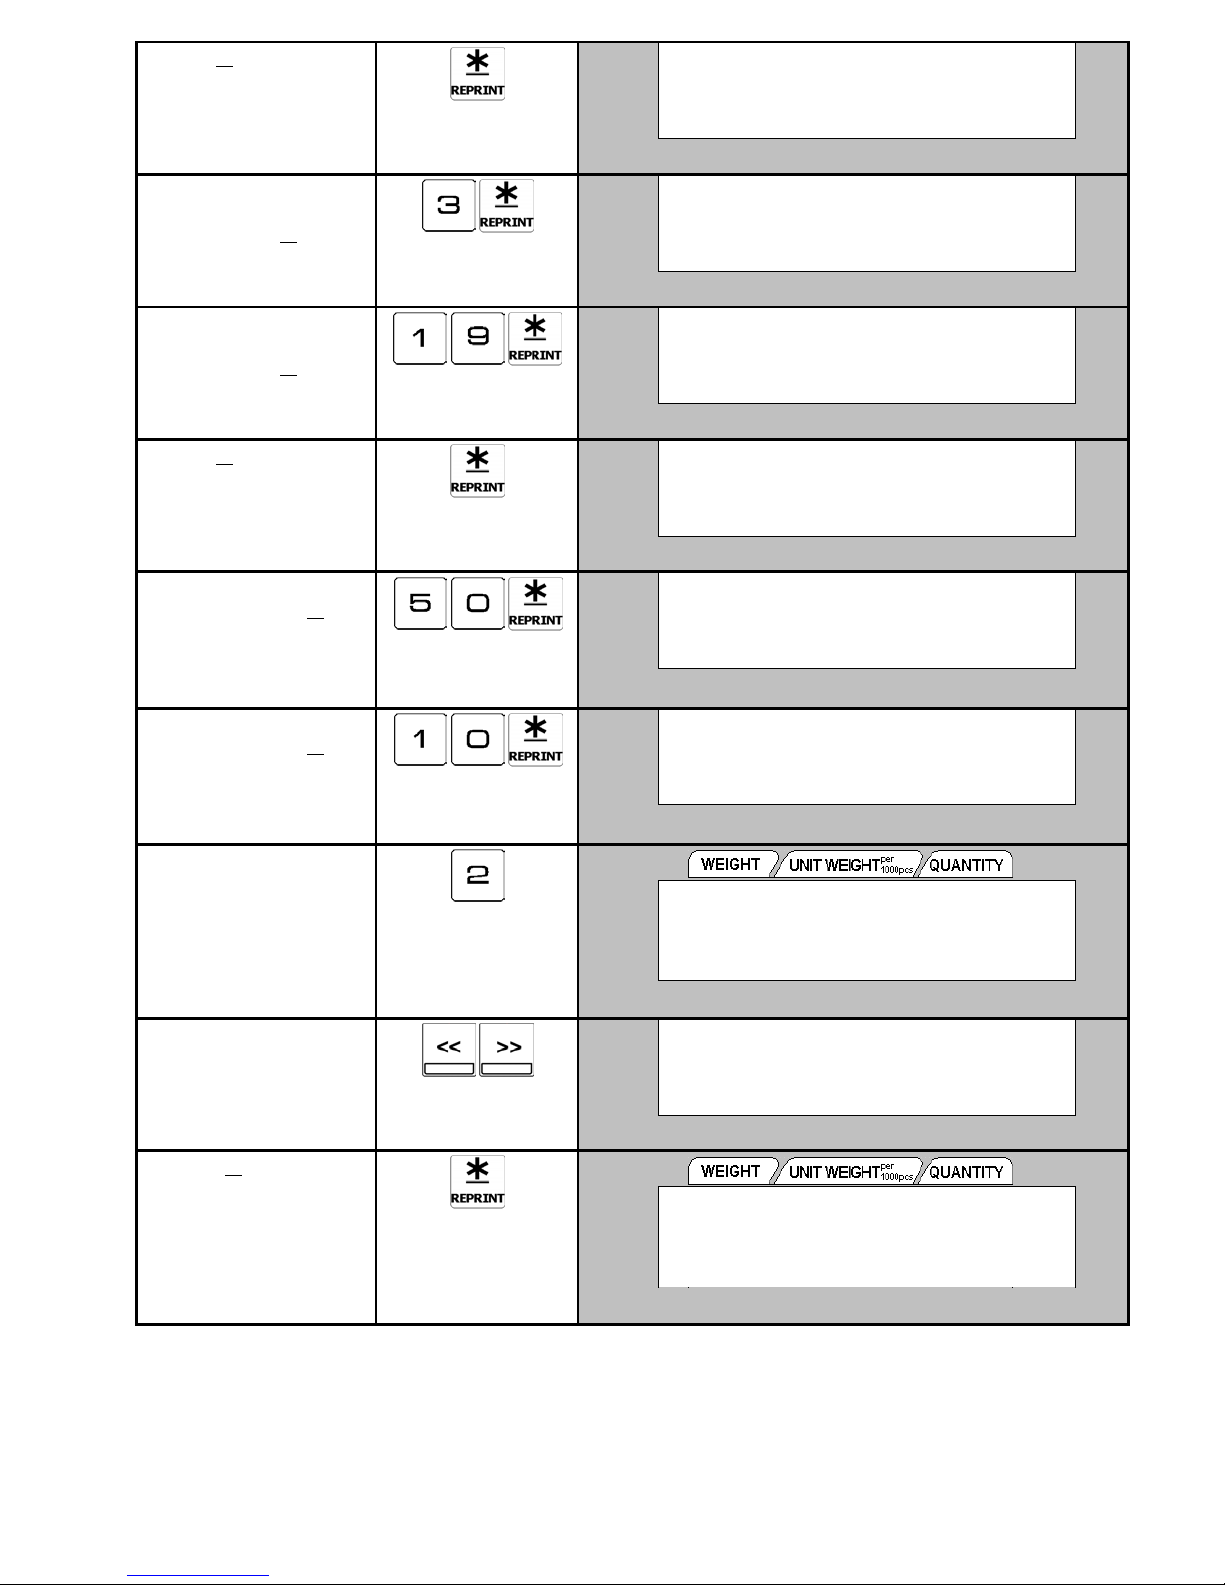
2. Press [
¾
] key to enter
Address programming
mode.
3. Enter X-Position value
(Ex. 3mm) by numeric
key and press [
¾
] key.
Press [<<] or [>>] key to
select "dot".
4. Enter Y-Position value
(Ex. 19mm) by numeric
key and press [
¾
] key.
Press [<<] or [>>] key to
select "dot".
5. Press [
¾
] key for NO
Change print angle.
If necessary to change the
Angle, Press [<<] or [>>]
key to select.
6. Enter WIDTH value (Ex.
50mm) and press
[¾]
key.
If necessary to change the
Angle, Press [<<] or [>>]
key to select.
7. Enter HEIGHT value (Ex.
10mm) and press [
¾
]
key.
If necessary to change
Angle, Press [<<] or [>>]
key to select.
8. Select print status by
press numeric key.
Enter [0] key for NO
print
key for Weight
[1]
print & [2] key for All print.
7. Change the Char. Size
(Ex. M1) by press [<<] or
[>>] Key.
´0³
NET
RECOM
INSUFF
´0³
NET
RECOM
INSUFF
´0³
NET
RECOM
INSUFF
´0³
NET
RECOM
INSUFF
´0³
NET
RECOM
INSUFF
´0³
NET
RECOM
INSUFF
´0³
NET
RECOM
INSUFF
´0³
NET
RECOM
INSUFF
FREE FMT: PART NAME
X POSITION: 0 mm
FREE FMT: PART NAME
Y POSITION: 0 mm
FREE FMT: PART NAME
ANGLE: 0 DG
FREE FMT: PART NAME
TTL WIDTH: 0 mm
FREE FMT: PART NAME
TTL HEIGHT: 0 mm
FREE FMT: PART NAME
STATUS: 0 NO PRINT
FREE FMT: PART NAME
STATUS: 2 ALL PRINT
or X : display's status indicator
W
FREE FMT: PART NAME
CHAR SIZE: M1
Σ
IN
S
OUT
PE
Σ
IN
S
OUT
PE
Σ
IN
S
OUT
PE
Σ
IN
S
OUT
PE
Σ
IN
S
OUT
PE
Σ
IN
S
OUT
PE
Σ
IN
S
OUT
PE
Σ
IN
S
OUT
PE
10. Press [
¾
] key for return
back to Address setting
mode.
Press [CODE] key for
save and exit from Free
Format programming mode.
PROGRAM MODE
´0³
NET
RECOM
INSUFF
FREE FMT: PART NAME
10 PART NAME
W or X : display's status indicator
S
Σ
IN
OUT
PE
- 45 -
Page 49
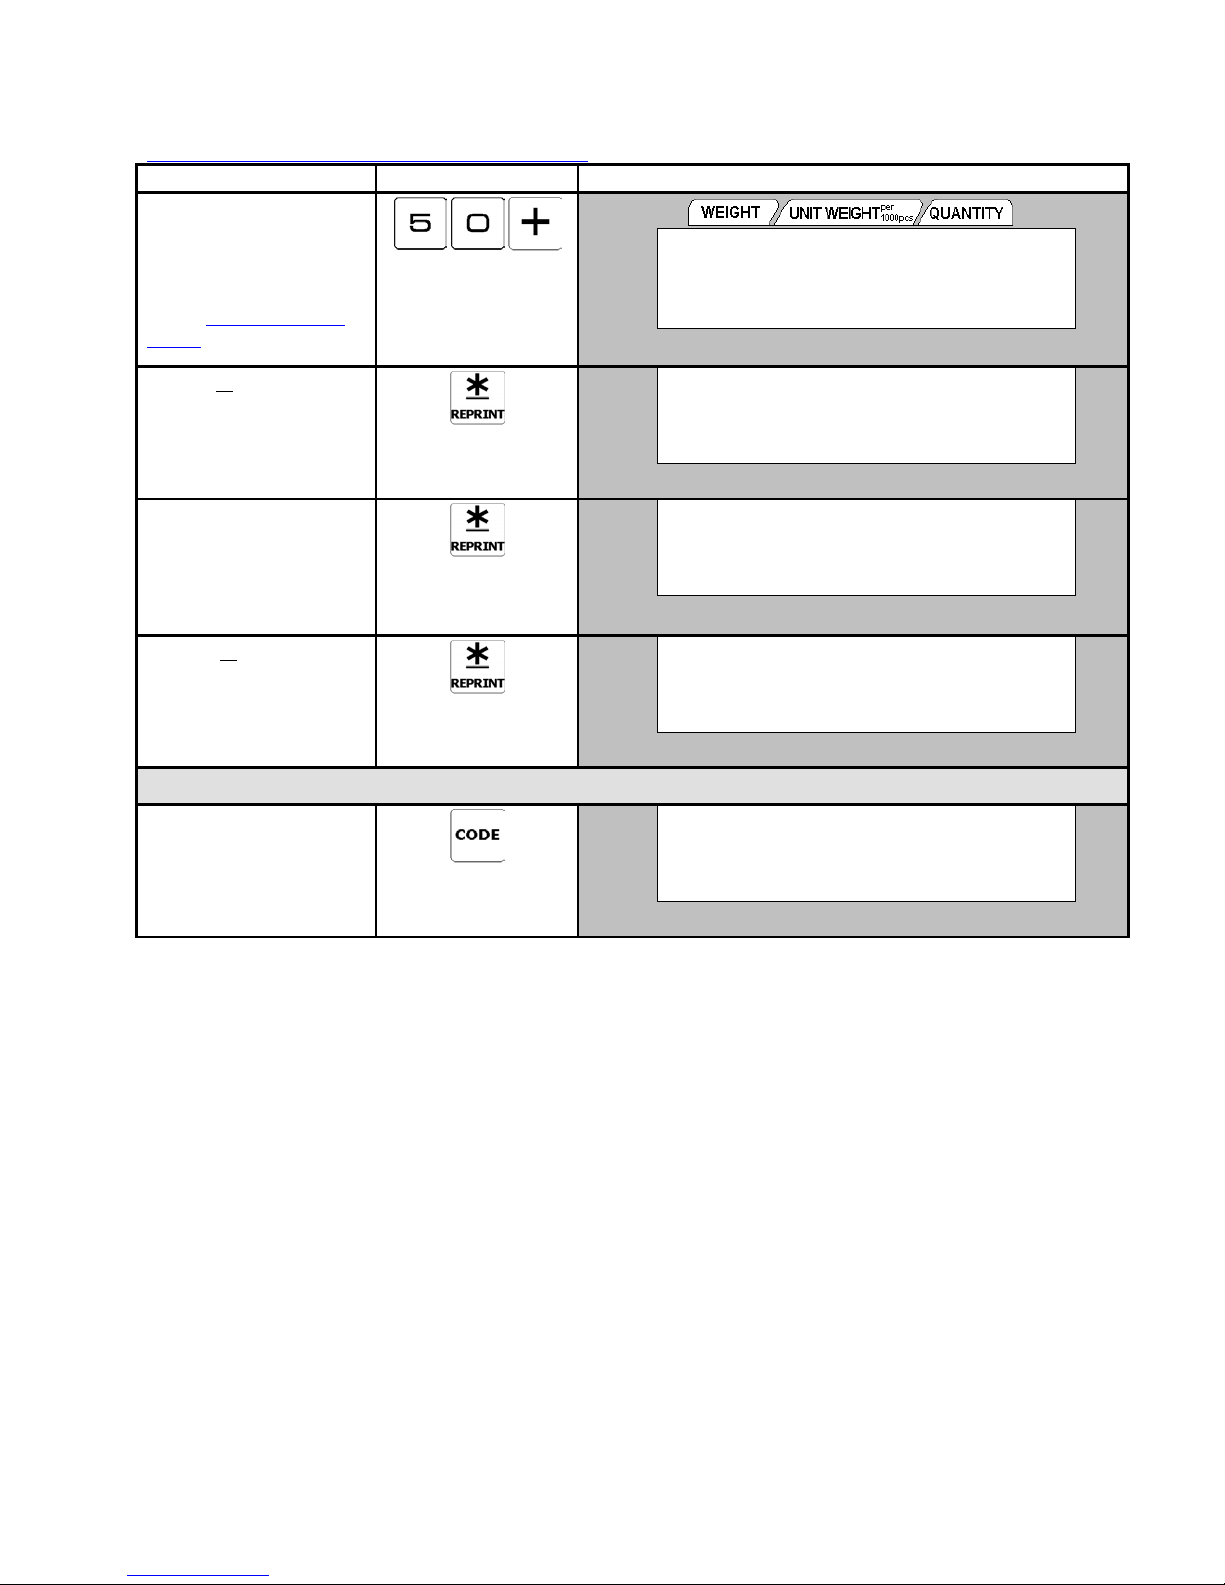
3.8.10 Test Print
You can print out a sample label with all the programmed item data to refer to the position and sizes.
Note: For Test Printing please used Label roll and SPEC 43 set to PRINT LABEL.
´0³
NET
RECOM
INSUFF
´0³
NET
RECOM
INSUFF
´0³
NET
RECOM
INSUFF
´0³
NET
RECOM
INSUFF
FREE FMT: TEST PRINT
50 TEST PRINT
W or X : display's status indicator
FREE FMT: TEST PRINT
STATUS: 2 ALL PRINT
FREE FMT: TEST PRINT
STATUS: 2 ALL PRINT
FREE FMT: FRAME 1
50 TEST PRINT
Continued from procedure 9 on 3.8.8 Type 4 Data Setting.
OPERATION KEYS DISPLAY
1. At FRAME 1 setting
mode Enter the item
number for TEST PRINT
and press [+] key.
For item number, please
refer to 3.8.4.1 Item Label
Format.
2. Press [
¾
] key to enter test
print mode.
3. Select print status by
pressing print key to start
test print.
Enter [0] key for No Print
[1] key for Weight print &
[2] key for All Print.
4. Press [
a sample label.
] key to print out
¾
S
S
S
S
Σ
IN
OUT
PE
Σ
IN
OUT
PE
Σ
IN
OUT
PE
Σ
IN
OUT
PE
Check the print position or size of each Item data. If necessary, adjust the position or size and issue a sample label again.
´0³
5. Press
save.
[CODE]
key for
NET
RECOM
INSUFF
PROGRAM FREE FORMAT
ENTER FREE FORMAT # 0
S
Σ
IN
OUT
PE
PROGRAM MODE
- 46 -
Page 50
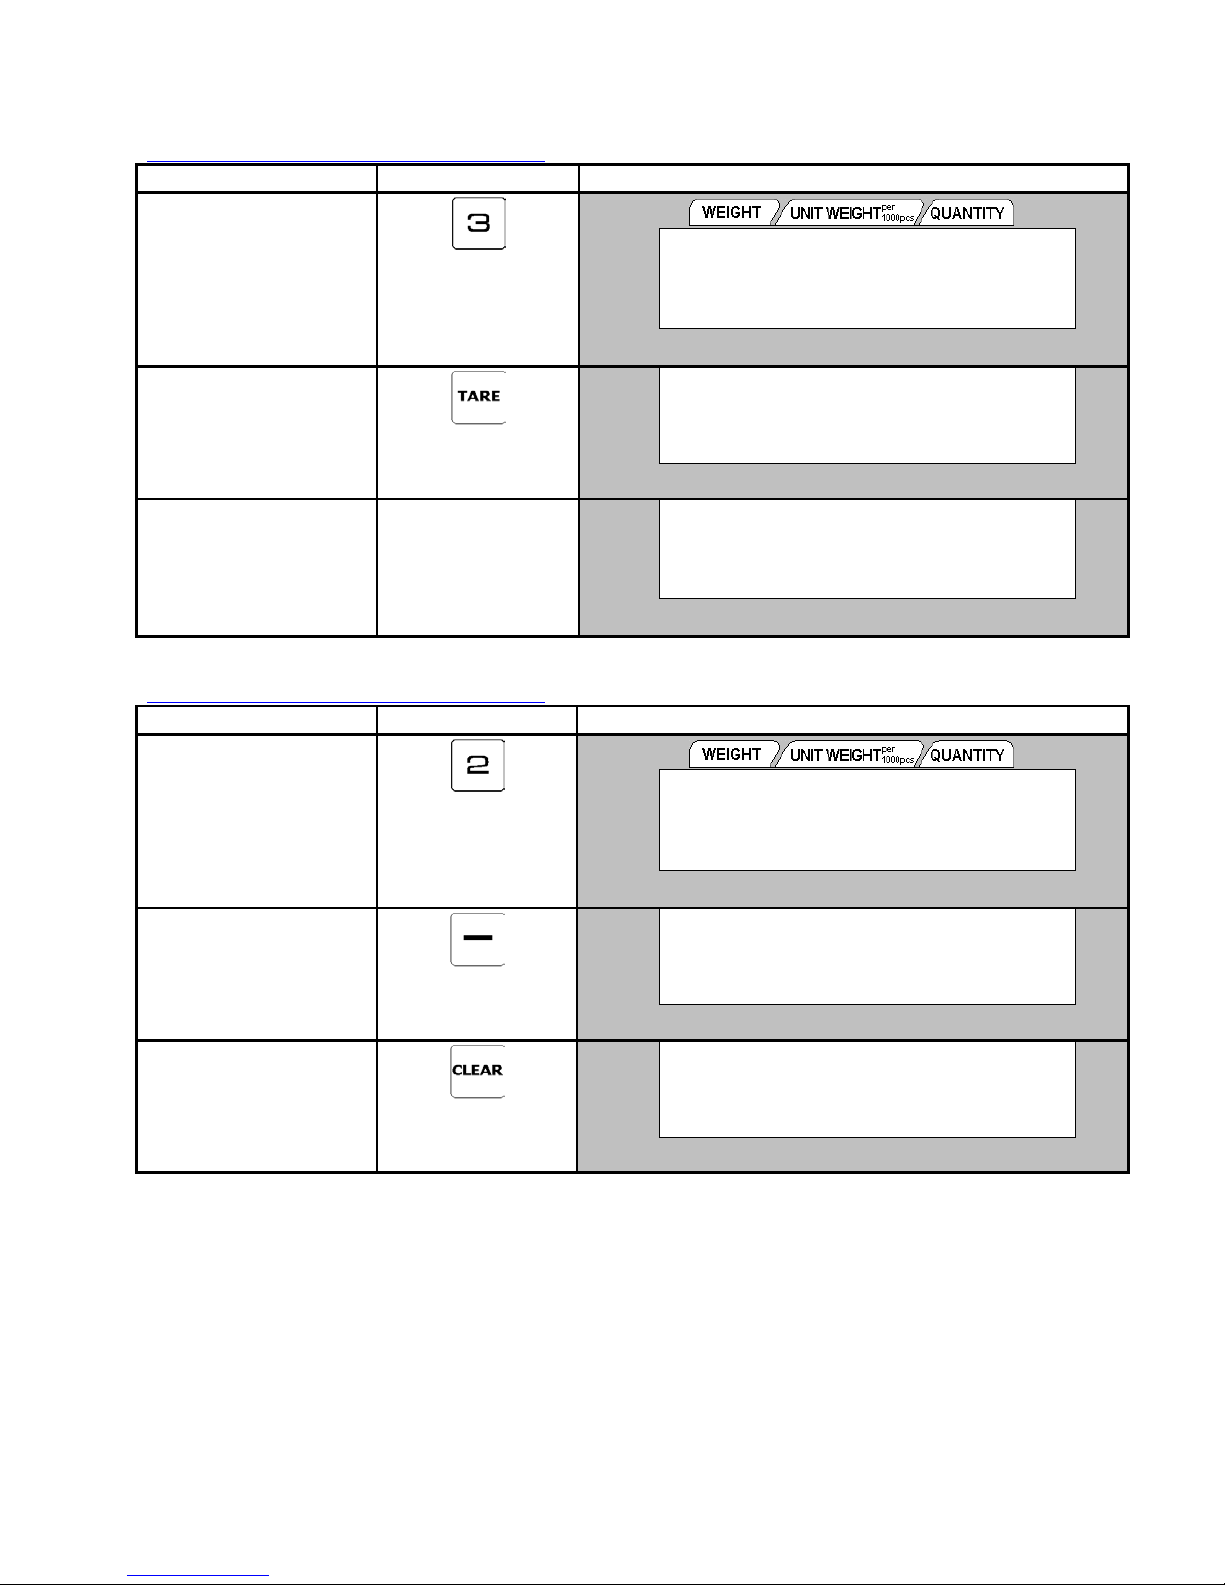
3.8.11 Print Free Format File
The following operation is used for checking Free Format Data programmed. The report is printed on receipt paper and only
available for SINGLE Report printing.
Continued from the procedure 5 on 3.8.10 Test Print
OPERATION KEYS DISPLAY
1. At Free Format
Programming mode, enter
the existing Free Format
Number (Ex. 3) for Single
Report printing.
2. Press [TARE] key to print
out the report for Free
Format Number 3.
To stop printing, press
[FEED] key.
3. After finish printing and
return back to Free
Format Programming
mode.
´0³
NET
RECOM
INSUFF
´0³
NET
RECOM
INSUFF
´0³
NET
RECOM
INSUFF
PROGRAM FREE FORMAT
ENTER FREE FORMAT # 3
W or X : display's status indicator
PROGRAM FREE FORMAT
ENTER FREE FORMAT # 0
PRINTING …
S
S
S
Σ
IN
OUT
PE
Σ
IN
OUT
PE
Σ
IN
OUT
PE
3.8.12 Delete Free Format File
Continued from the procedure 5 on 3.8.10 Test Print
OPERATION KEYS DISPLAY
1. At Free format
programming mode, enter
Free Format No. (Ex. 2)
to be deleted.
2. Press [-] key to go to Free
Format deleting display.
If The Free Format
number is link to the existing
PLU file, cannot be deleted.
3. Press [CLEAR] key to
delete the data.
Press [TARE] key to
cancel the deletion.
´0³
NET
RECOM
INSUFF
´0³
NET
RECOM
INSUFF
´0³
NET
RECOM
INSUFF
PROGRAM FREE FORMAT
ENTER FREE FORMAT # 2
DELETE?
CLEAR (YES) / TARE (NO)
PROGRAM FREE FORMAT
ENTER FREE FORMAT # 0
or X : display's status indicator
W
Σ
IN
S
OUT
PE
Σ
IN
S
OUT
PE
Σ
IN
S
OUT
PE
PROGRAM MODE
- 47 -
Page 51
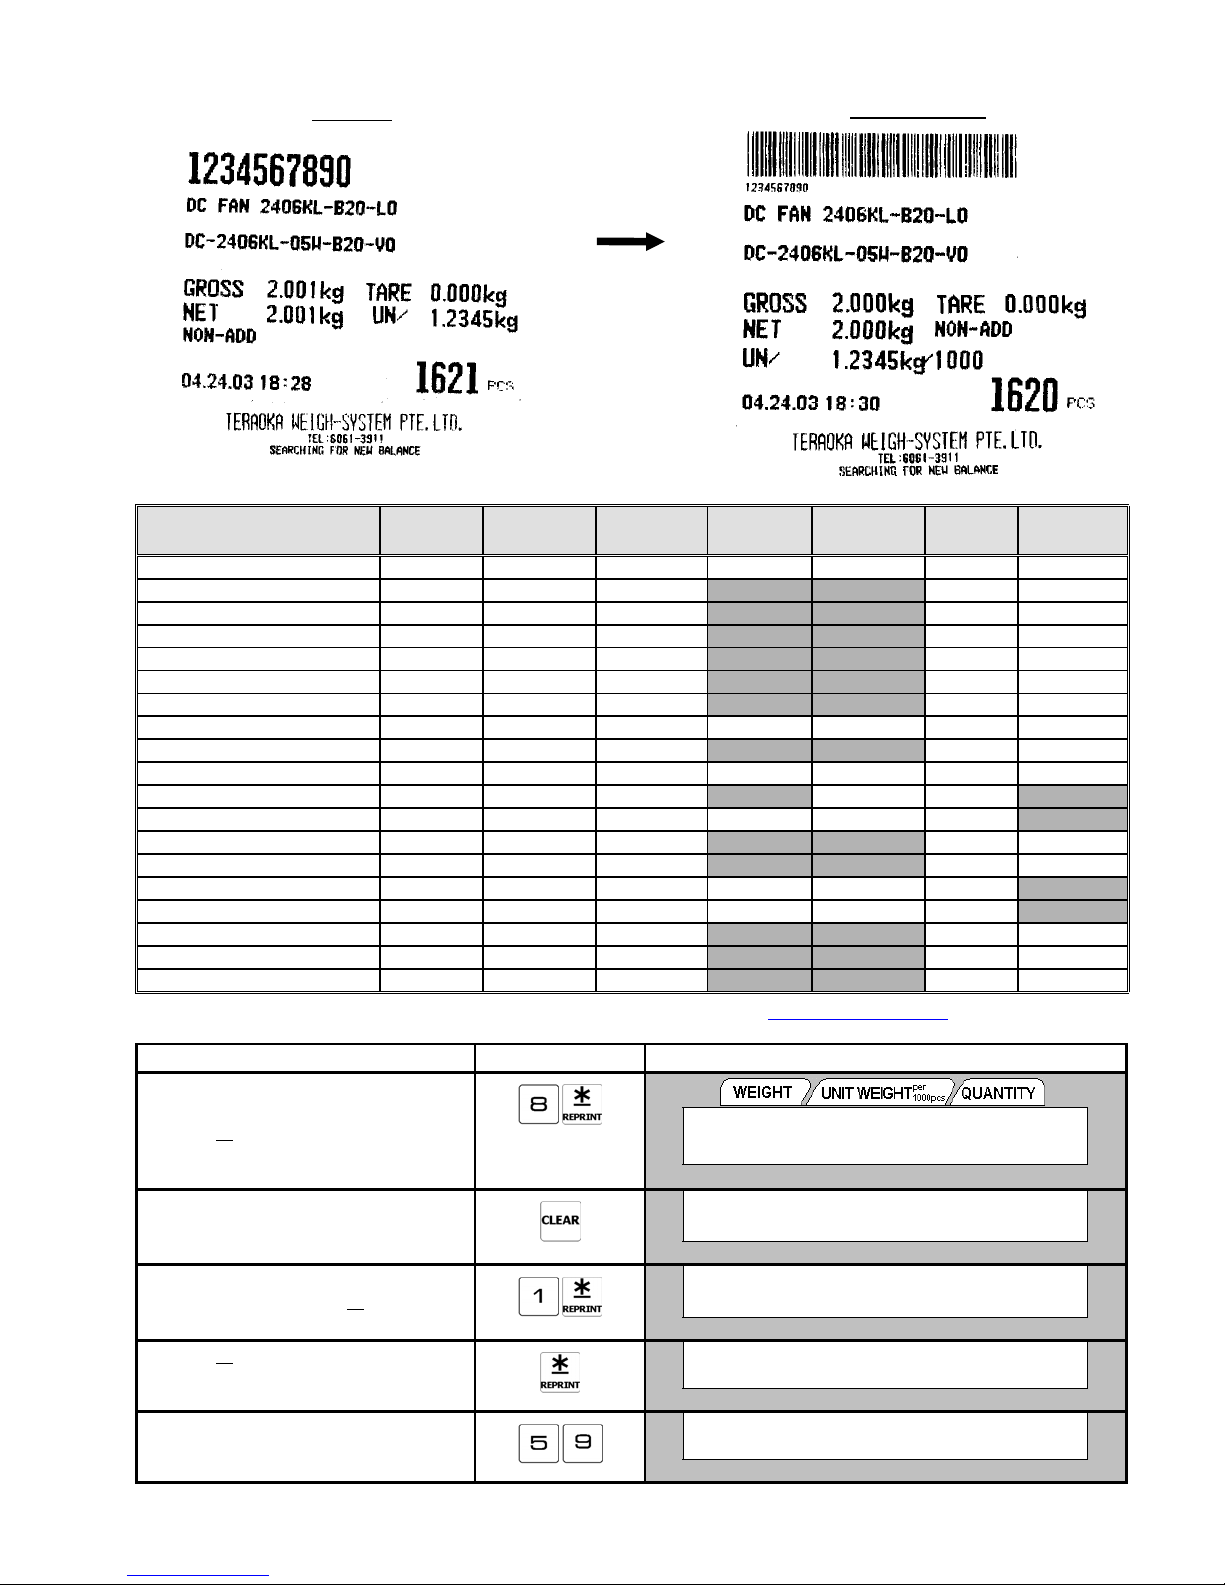
3.8.13 Sample of Program a Format by modifying the existing format.
T1 Format
After modify (F8)
Print Item
ID CODE 0 33 0 56 7=>3 2 M5=>S3
GROSS WEIGHT 14 15 0 1 M3
UNIT WEIGHT 41=>14 11=>6 0 1 M3
NET WEIGHT 14 11 0 1 M3
QUANTITY 28 0 0 2 M5
PACK DATE 0 0 0 2 M2
PACK TIME 13 0 0 2 M2
PART NO 0 21 0 56 5 2 M2
QUANTITY UNIT 51 0 0 2 M1
PART NAME 0 27 0 56 5 2 M2
BARCODE (ID) 0=>0 0=>37 0 7 0=>2
FACTORY NAME 0 46 0 56 9 2
TARE WEIGHT 41 15 0 1 M3
STATUS 0=>30 8=>12 0 2 M2
Text 2 *1 (UNIT) 32=>0 11=>6 0 6 4 1
Text 3 *1 ( PER 1000 PCS) 0=>28 0=>6 0 0=>12 0=>4 0=>1
TITLE NET 0 12 0 1 M3
TITLE GROSS 0 16 0 1 M3
TITLE TARE 30 16 0 1 M3
X position
(mm)
Note 1: After setting the Free Format, program the following data for Text 1~4 in 3.7.1 Program Text File
Y position
(mm)
Angle
(degree)
Width
(mm)
Height
(mm)
Status
Character
size
For example: Create a new Label Format by modifying the existing label format (T1).
OPERATION KEYS DISPLAY
1. At Free Format Programming mode,
enter new Free Format No. (Ex. 8) and
¾
press [
] key.
2. Press [CLEAR] key to copy Standard
Format.
3. Enter T1 Label Format by press
numeric key and press [
4. Press [
¾
] key for "NO CHANGE"
¾
] key.
label width.
5. Change Label Height to 59mm.
COPY EXISTING FORMAT?
CLEAR (YES) / TARE (NO)
FREE FORMAT # 08
COPY FROM: NON / 0
ENTER LABEL WIDTH
(32 - 56 mm) : 56
ENTER LABEL HEIGHT
(19 - 120 mm): 55
ENTER LABEL HEIGHT
(19 - 120 mm): 59
S
S
S
S
S
PROGRAM MODE
- 48 -
Page 52
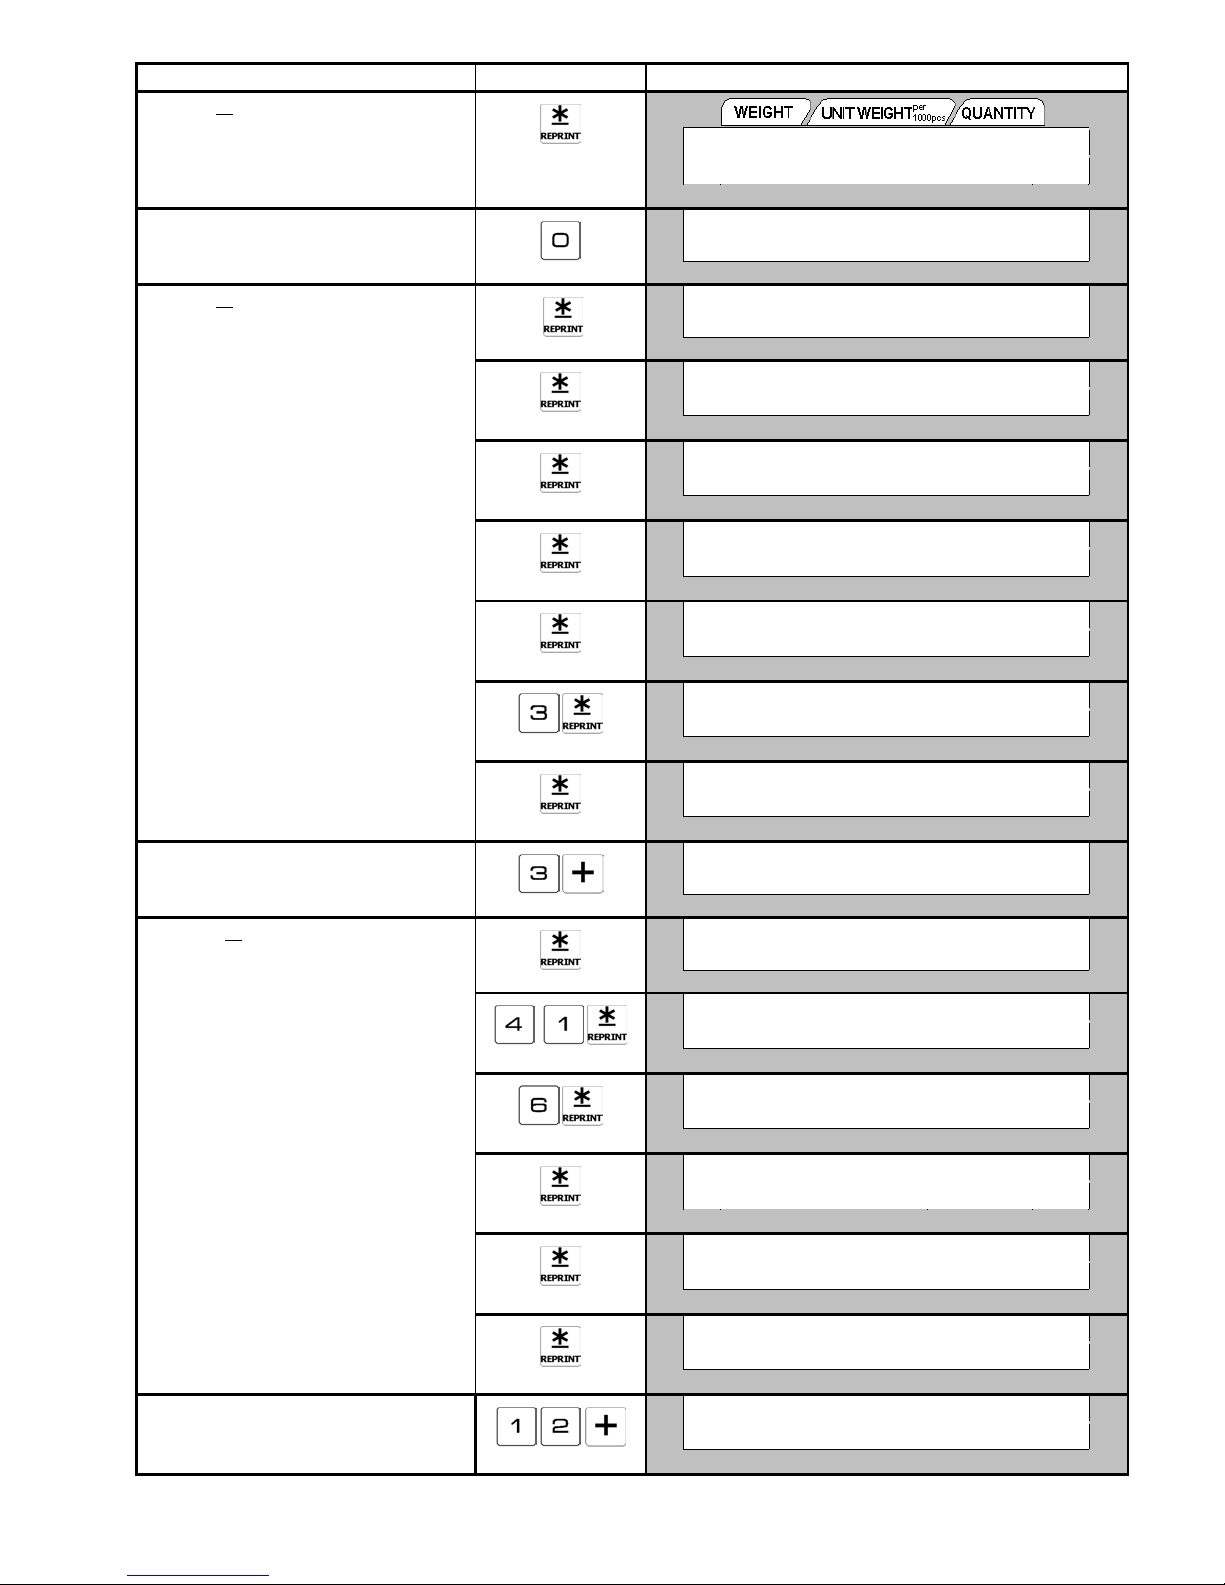
OPERATION KEYS DISPLAY
6. Press [
¾
] key.
7. Press [0] key to enter Item Label
format.
8. Press [
¾
] key to enter ID CODE
Programming mode.
Ex) X = 0 mm (NO Change)
Ex) Y = 33 mm (NO Change)
Ex) 0 degree (NO Change)
Ex) Width = 56mm (NO Change)
Ex) Height = 3mm
Ex) Status = 2 ALL PRINT (NO
Change)
9. Enter the Item Number for Unit weight
and press [+] key.
10. Press [
] key to enter Unit weight
¾
Programming mode.
Ex) X = 14 mm
Ex) Y = 6 mm
Ex) 0 degree (NO Change)
Ex) Status = 1 WEIGHT PRINT
(NO Change)
Ex) Character Size=M3 (NO Change)
11. Enter Item Number for Bar-code
SELECT LABEL TYPE
ITEM: 0 / TOTAL: 1
FREE FMT: ID CODE
1 ID CODE
FREE FMT: ID CODE
X POSITION: 0 mm
FREE FMT: ID CODE
Y POSITION:
FREE FMT: ID CODE
ANGLE: 0 DG
FREE FMT: ID CODE
TTL WIDTH: 56 mm
FREE FMT: ID CODE
TTL HEIGHT: 7 mm
FREE FMT: ID CODE
STATUS: 2 ALL PRINT
FREE FMT: ID CODE
1 ID CODE
FREE FMT: UNIT WEIGHT
3 UNIT WEIGHT
FREE FMT: UNIT WEIGHT
X POSITION: 41 mm
FREE FMT: UNIT WEIGHT
Y POSITION:
FREE FMT: UNIT WEIGHT
ANGLE: 0 DG
FREE FMT: UNIT WEIGHT
STATUS
FREE FMT: UNIT WEIGHT
CHAR SIZE
FREE FMT: UNIT WEIGHT
3 UNIT WEIGHT
FREE FMT: BAR CODE
12 BARCODE
33 mm
11 mm
1:WT PRINT
M3
S
S
S
S
S
S
S
S
S
S
S
S
S
S
S
S
S
PROGRAM MODE
- 49 -
Page 53
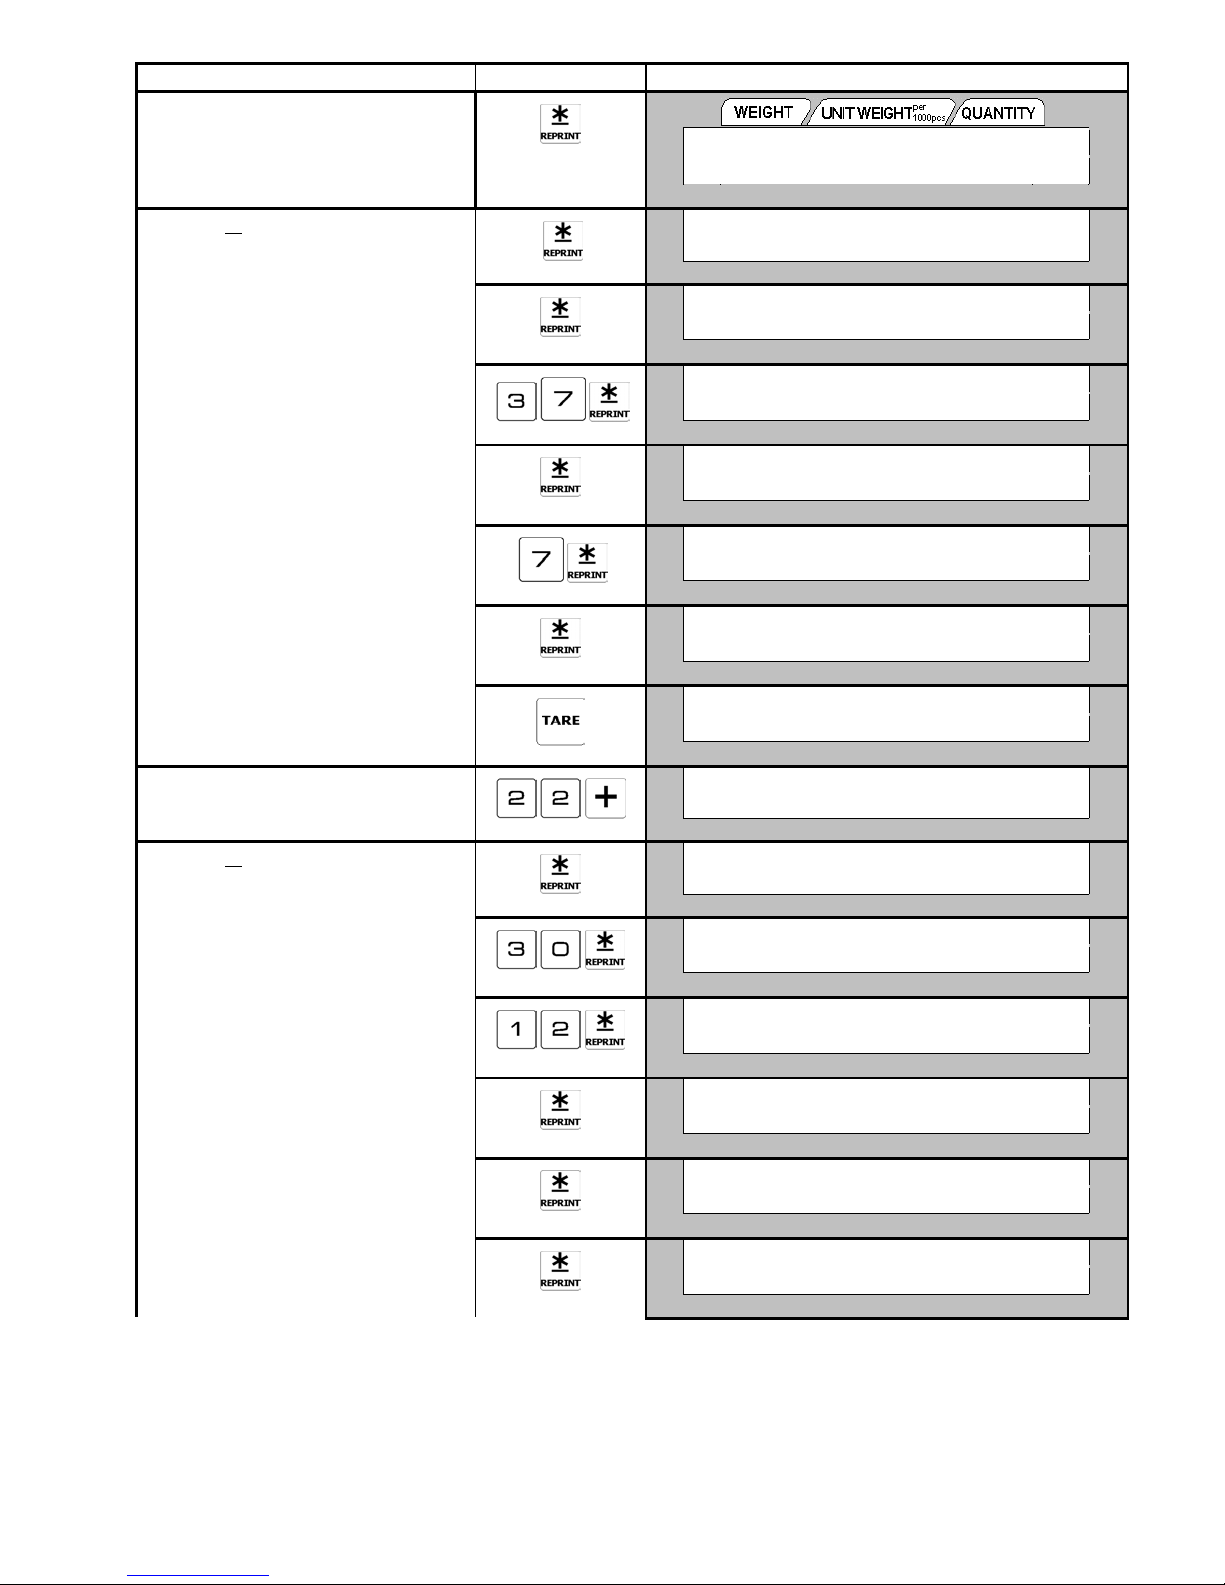
OPERATION KEYS DISPLAY
Select ID Barcode
12. Press [¾
] key to enter ID Barcode
Programming mode.
Ex) X = 0 mm (NO CHANGE)
Ex) Y = 37 mm
Ex) 0 degree (NO Change)
Ex Height = 7 mm
Ex) Status = 2 ALL PRINT (NO
Change)
PRESS [TARE] key to escape from
Barcode Mode.
13. Enter the Item Number for Status and
press [+] key.
14. Press [¾] key to enter Status
Programming mode.
Ex) X = 30 mm
Ex) Y = 12 mm
Ex) 0 degree (NO Change)
Ex) Status = 2 ALL PRINT (NO
Change)
Ex) Character Size =M2 (NO Change)
FREE FMT: BARCODE
ITEM: 1 ID CODE
FREE FMT: BARCODE
X POSITION: 0 mm
FREE FMT: BARCODE
Y POSITION:
FREE FMT: BARCODE
ANGLE: 0 DG
FREE FMT: BARCODE
TTL HIGHT: 0 mm
FREE FMT: BARCODE
STATUS 2:ALL PRINT
FREE FMT: BARCODE
ITEM: 1 ID CODE
FREE FMT: BARCODE
12 BARCODE
FREE FMT: STATUS
22 STATUS
FREE FMT: STATUS
X POSITION: 0 mm
FREE FMT: STATUS
Y POSITION:
FREE FMT: STATUS
ANGLE: 0 DG
FREE FMT: STATUS
STATUS: 2 ALL PRINT
FREE FMT: STATUS
CHAR SIZE: M2
FREE FMT: STATUS
22 STATUS
0 mm
8 mm
S
S
S
S
S
S
S
S
S
S
S
S
S
S
S
PROGRAM MODE
- 50 -
Page 54
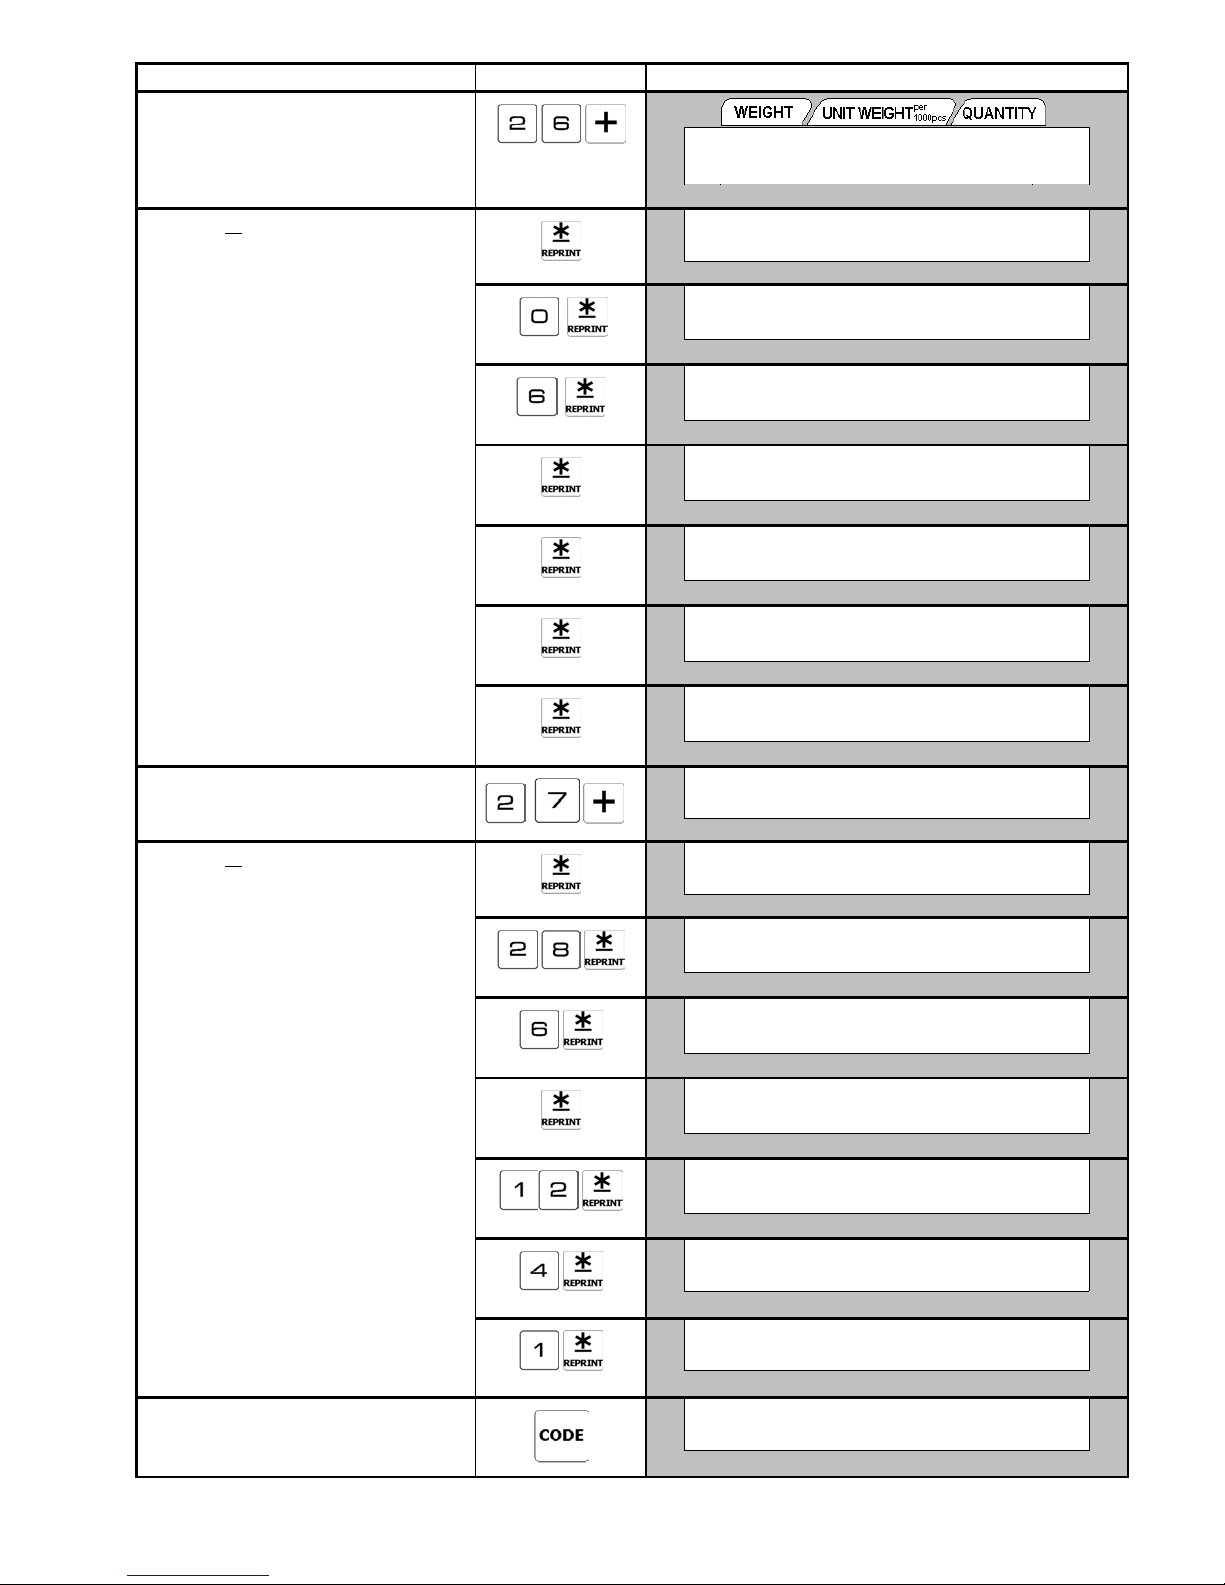
OPERATION KEYS DISPLAY
15. Enter the Item Number for Text 2 and
press [+] key.
16. Press [¾
] key to enter Text 2
Programming mode.
Ex) X = 0 mm
Ex) Y = 6 mm
Ex) 0 degree (NO Change)
Ex) Width = 6 mm (No Change)
Ex) Height = 4 mm (No Change)
Ex) Status = 1 WEIGH PRINT
(NO Change)
17. Enter the Item Number for Text 3 and
press [+] key.
18. Press [¾] key to Text 3 Programming
mode.
Ex) X = 28 mm
Ex) Y = 6 mm
Ex) 0 degree (NO Change)
Ex) Width = 12 mm
Ex) Hight = 4
Ex) Status = 1 WEIGH PRINT
19. Store the data.
FREE FMT: TEXT 2
26
TEXT 2
FREE FMT: TEXT 2
X POSITION: 32 mm
FREE FMT: TEXT 1
Y POSITION:
11 mm
FREE FMT: TEXT 1
ANGLE: 0 DG
FREE FMT: TEXT 1
TTL WIDTH: 6 mm
FREE FMT: TEXT 1
TTL HEIGHT: 4 mm
FREE FMT: TEXT 1
STATUS: 1 WEIGH PRINT
FREE FMT: TEXT 1
24
TEXT 1
FREE FMT: TEXT 3
27 TEXT 3
FREE FMT: TEXT 3
X POSITION: 0 mm
FREE FMT: TEXT 3
Y POSITION:
FREE FMT: TEXT 3
ANGLE: 0 DG
FREE FMT: TEXT 3
TTL WIDTH 0 mm
FREE FMT: TEXT 3
TTL HEIGHT 0 mm
FREE FMT TEXT 3
STATUS 0 NO PRINT
FREE FMT: TEXT 3
27 TEXT 3
PROGRAM FREE FORMAT
ENTER FREE FORMAT # 0
0 mm
S
S
S
S
S
S
S
S
S
S
S
S
S
S
S
S
PROGRAM MODE
- 51 -
Page 55
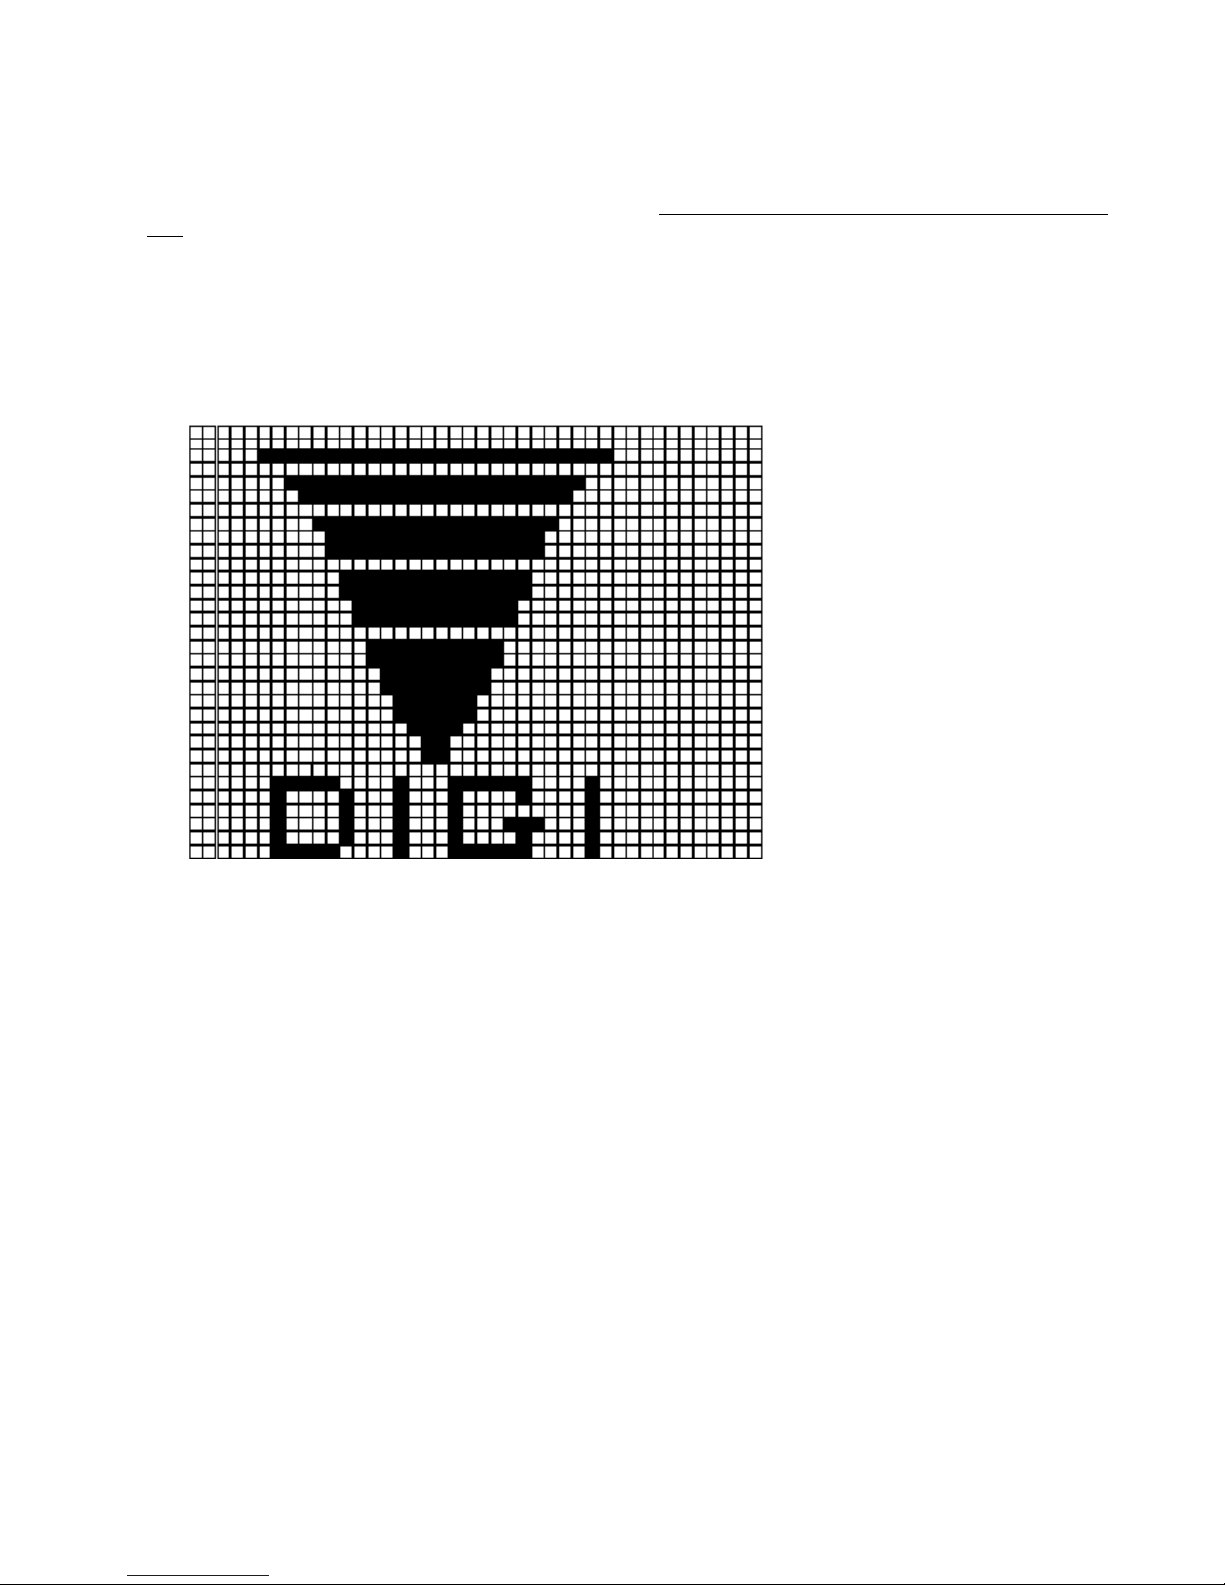
3.9 LOGO FILE
Logo is the trademark of the factory, which will be printed in Label. Logo will be printed on the left side of shop name on label.
(When printing Logo data on Free Format Label, set the print area of Logo data on the Free Format in advance.)
Logo data can be programmed up to 4 logos (Logo No. 1~4). A logo data is formed by a pattern of dots (128 horizontal dots and
64 vertical dots.) However, since the Label logo data is printed within the limits, which are programmed in label formats,
program the logo data within the limits of print area on the format. * All standard formats have 37 dots x 30 dots for logo print
area.
3.9.1 Pre-programming Logo Data
1) Prepare a section paper with 128 horizontal dots and 64 vertical dots.
2) When programming Label Logo, draw the limit of the Logo print area.
3) Draw the desired logo design in the section paper by filling the section with dot. (The dots are necessary to seize the image of
the actual logo before programming.)
Ex) 37 dots x 30dots
Example: DIGI Logo for label (37 x 30 dots)
PROGRAM MODE
- 52 -
Page 56
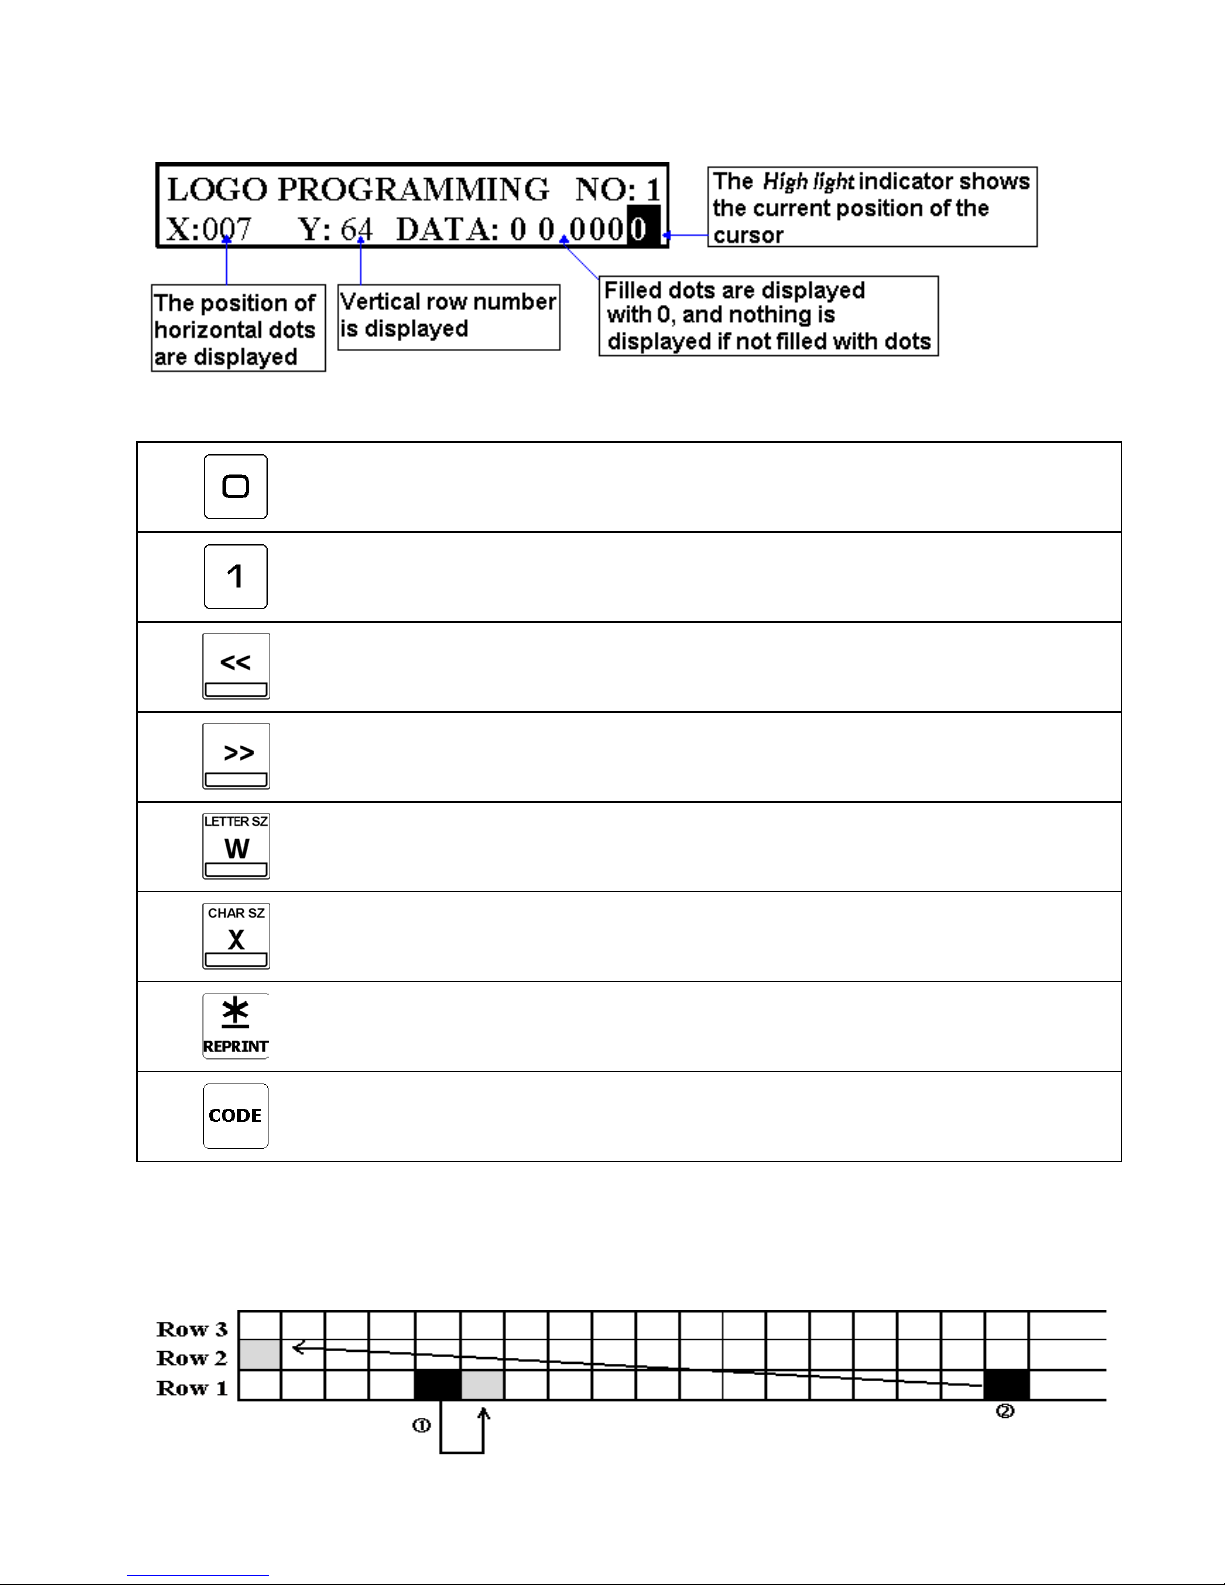
3.9.2 Program Display & Keys Function
3.9.2.1 Program Display for Logo Set Up
The following display appears when entering Logo Program Mode.
3.9.2.2 Key Function for LOGO Set Up
------- Clear a dot.
------- Fill a dot.
------- Move the cursor to left. [I]
------- Move the cursor to right. [J]
------- Move the cursor to up. [K]
------- Move the cursor to down. [L]
------- Move up to the first dot in the next line.
------- Store the Data.
3.9.3 Programming Order
After filling a section, programming status (the position of the cursor) moves to the next dot automatically.
When the programming status reached to the last dot (128 horizontal dots), or [PRINT] key is depress, the programming
status moves to the first left section on the next upper line automatically.
PROGRAM MODE
- 53 -
Page 57
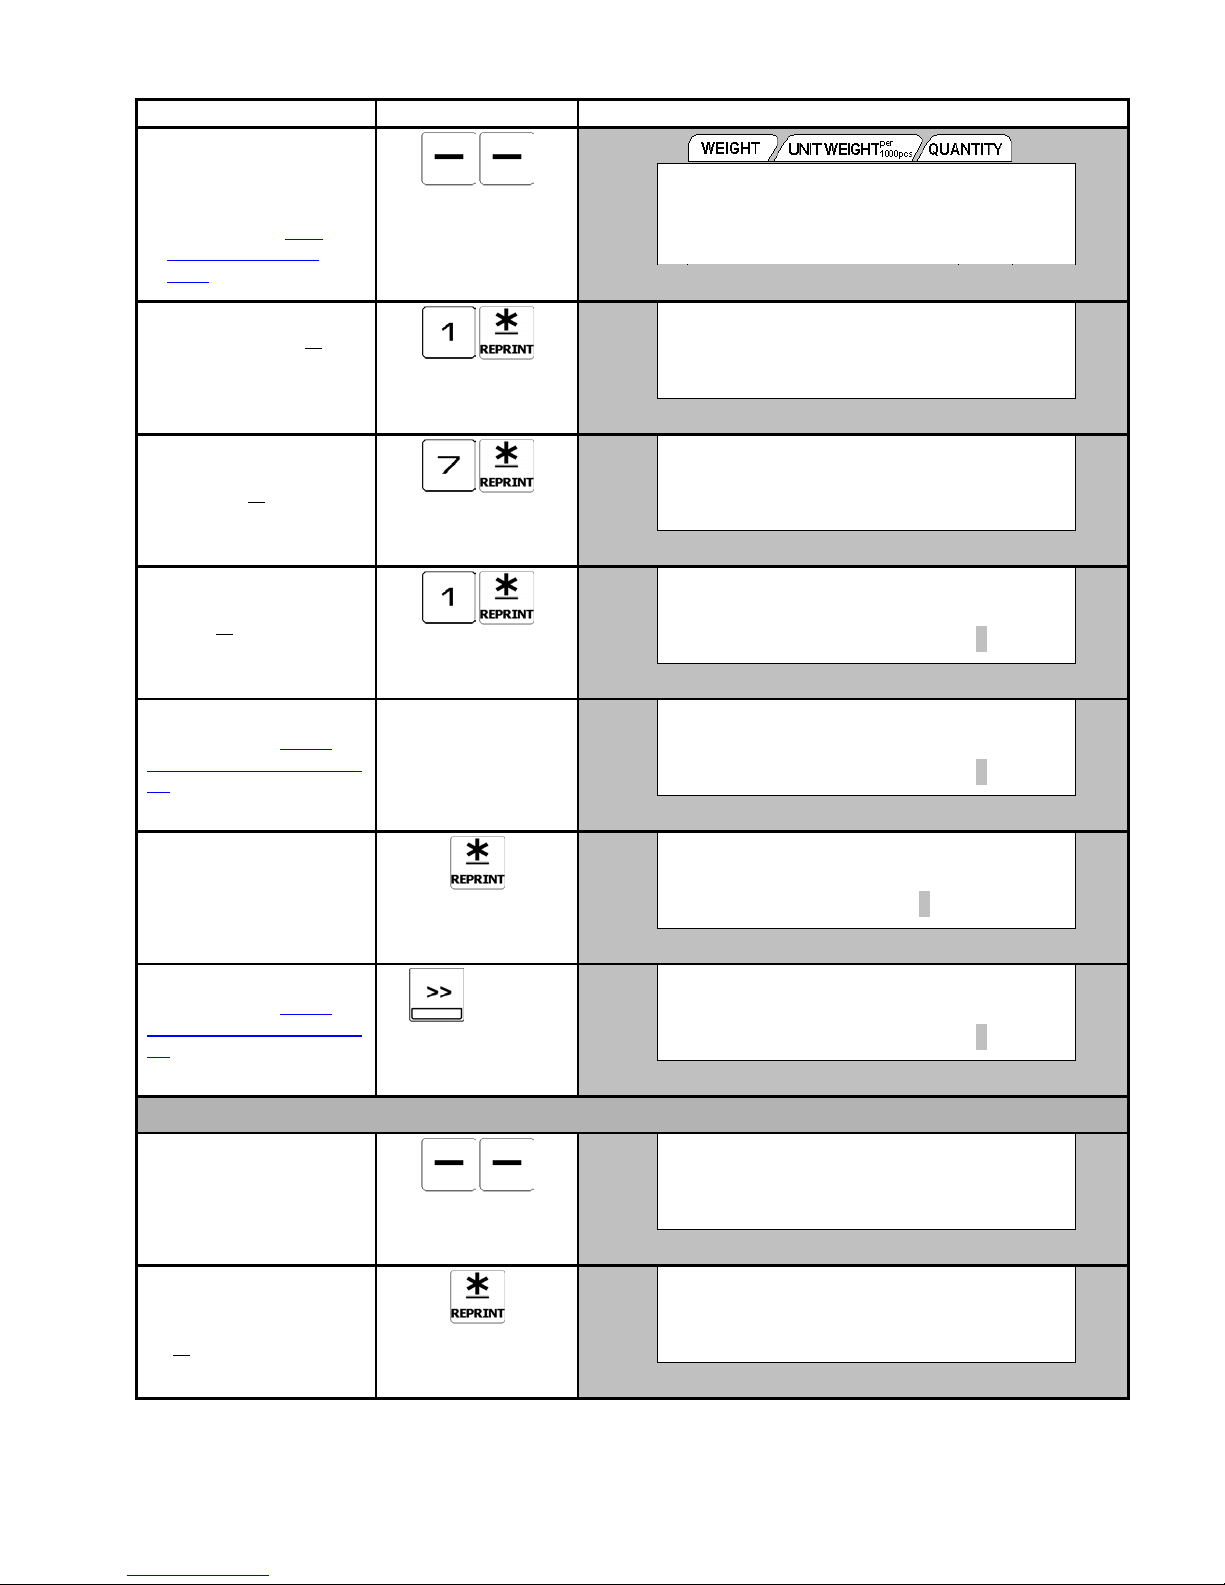
3.9.4 Program Logo File
OPERATION KEYS DISPLAY
1. At Item Code
Programming mode, press
key to select Logo
[-]
Programming mode.
(Please refer to 3.1.3
Programming Mode
Entry)
2. Enter new Logo Number
(Ex. 1) and press [¾
] key.
3. Set the horizontal position
to start (Ex. X = 7dots)
and press [¾
] key.
4. Set the vertical position to
start (Ex. Y = 1dots) and
[¾
key.
]
press
5. Enter Fill or Clear dots.
Please refer to 3.9.2.2
Key Function for LOGO Set
Up.
6. Press [¾] key to return
the cursor to the next
upper line.
7. Move the cursor.
Please refer to 3.9.2.2
Key Function for LOGO Set
Up.
X
6times
´0³
NET
RECOM
INSUFF
´0³
NET
RECOM
INSUFF
´0³
NET
RECOM
INSUFF
´0³
NET
RECOM
INSUFF
´0³
NET
RECOM
INSUFF
´0³
NET
RECOM
INSUFF
´0³
NET
RECOM
INSUFF
LOGO PROGRAMMING
ENTER LOGO # (1-4): 0
LOGO # 001 COORDINATE
ENTER X (DOT): 0
LOGO # 001 COORDINATE
ENTER Y (DOT): 0
LOGO PROGRAMMING NO:1
X: 007 Y: 01 DATA: 000000
LOGO PROGRAMMING NO:1
X: 031 Y: 01 DATA: 000010
LOGO PROGRAMMING NO:1
X: 001 Y: 02 DATA: 000000
LOGO PROGRAMMING NO:1
X: 007 Y: 02 DATA: 000000
S
W or X : display's status indicator
S
S
S
S
S
S
Σ
IN
OUT
PE
Σ
IN
OUT
PE
Σ
IN
OUT
PE
Σ
IN
OUT
PE
Σ
IN
OUT
PE
Σ
IN
OUT
PE
Σ
IN
OUT
PE
If necessary to change the position of the cursor, the following procedure is required.
8. Move back to the dot
entry screen.
9. Change the horizontal
position to start if
necessary, if not, press
] key. (Ex. No change)
[¾
PROGRAM MODE
´0³
NET
RECOM
INSUFF
´0³
NET
RECOM
INSUFF
- 54 -
LOGO # 001 COORDINATE
ENTER X (DOT): 7
LOGO # 001 COORDINATE
ENTER Y (DOT): 2
Σ
IN
S
OUT
PE
Σ
IN
S
OUT
PE
Page 58
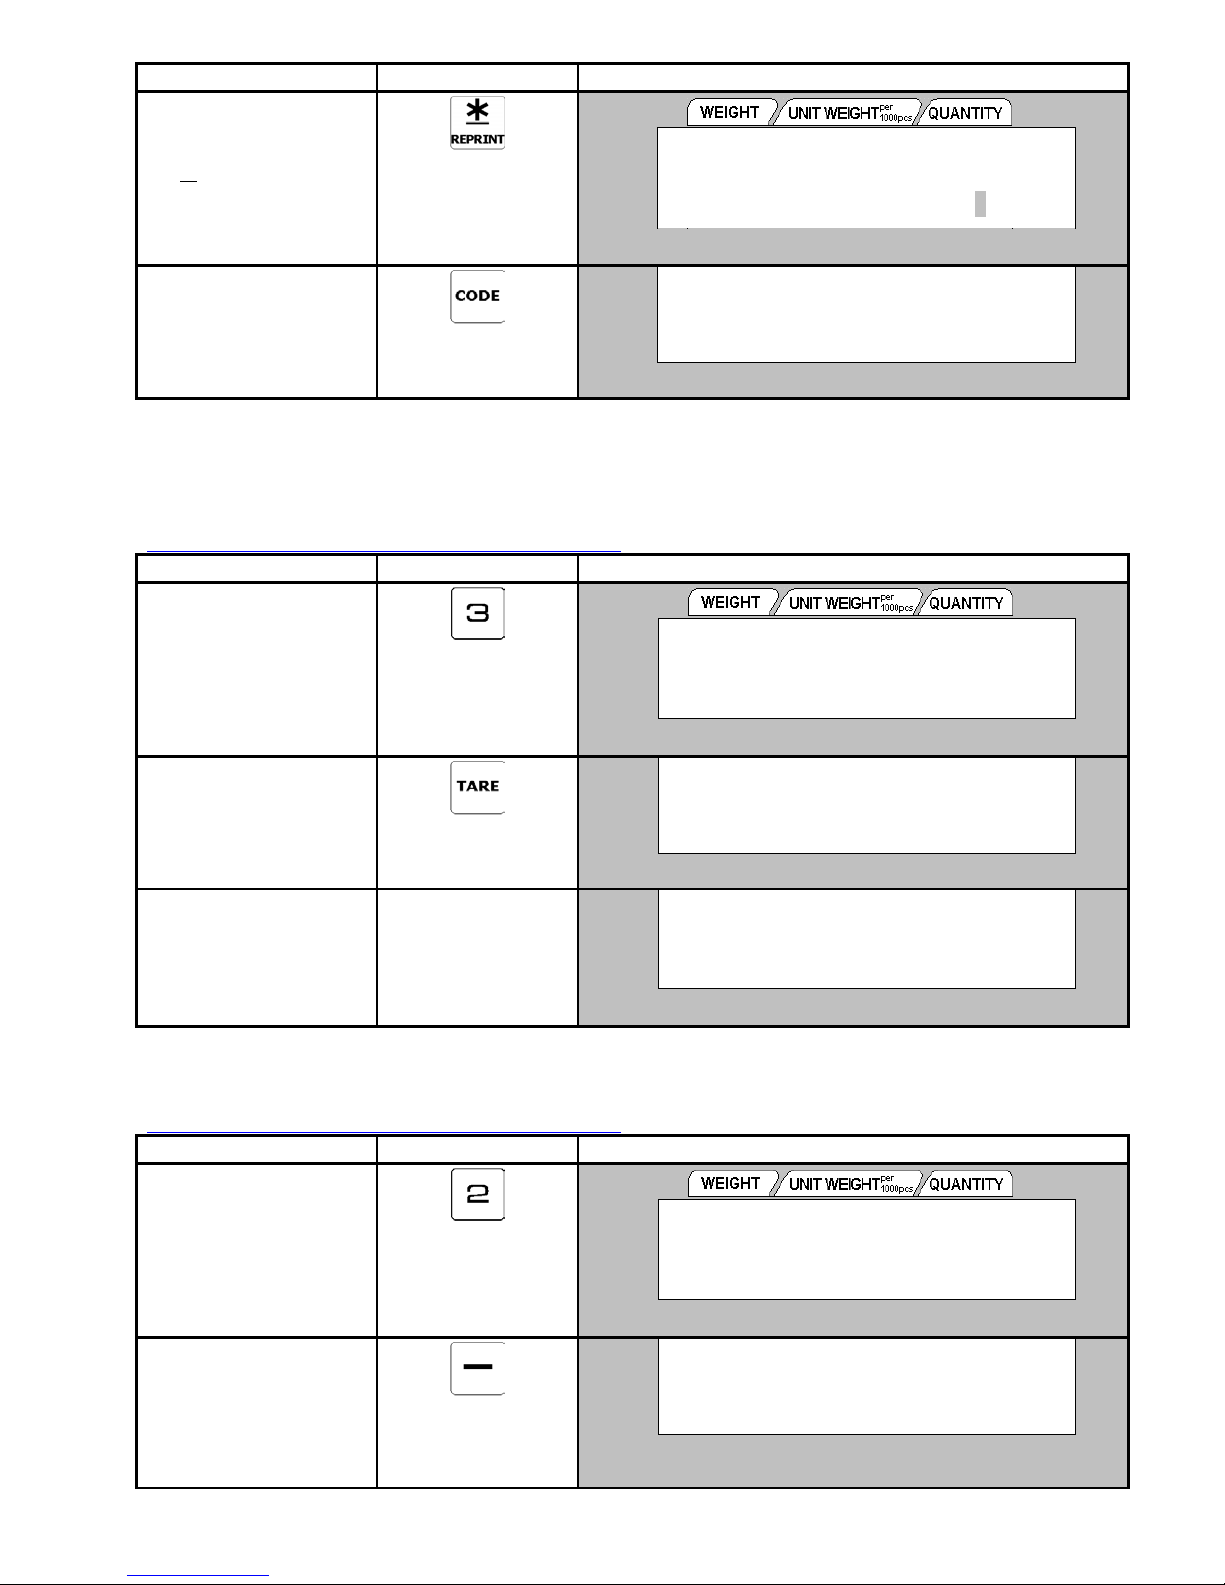
OPERATION KEYS DISPLAY
10. Change the vertical
position to start if
necessary, if not, press
] key. (Ex. No
[¾
change)
11. Press [CODE] key to
save the data.
Press [PIECES] key &
[CLEAR] key to exist
without saving the data.
´0³
NET
RECOM
INSUFF
´0³
NET
RECOM
INSUFF
LOGO PROGRAMMING NO:1
X: 007 Y: 02 DATA: 000000
W or X : display's status indicator
LOGO PROGRAMMING
ENTER LOGO # (1-4): 0
S
S
Σ
IN
OUT
PE
Σ
IN
OUT
PE
3.9.5 Print Logo File
The following operation is used for checking Logo Data programmed. The report is printed on receipt paper and only available
for Single Report printing.
Continued from the procedure 11 on 3.9.4 Program Logo File.
OPERATION KEYS DISPLAY
1. At Logo Programming
mode, enter the existing
Logo Number (Ex. 3) for
Single Report printing.
2. Press [TARE] key to print
out the report for Factory
Number 3.
To stop printing, press
[FEED] key.
3. After print out, the logo 3
will show on receipt paper
and number will auto
change to 0 for few
second.
´0³
NET
RECOM
INSUFF
´0³
NET
RECOM
INSUFF
´0³
NET
RECOM
INSUFF
LOGO PROGRAMMING
ENTER LOGO # (1-4): 3
W or X : display's status indicator
LOGO PROGRAMMING
ENTER LOGO # (1-4): 3
LOGO PROGRAMMING
ENTER LOGO # (1-4): 0
S
S
S
Σ
IN
OUT
PE
Σ
IN
OUT
PE
Σ
IN
OUT
PE
3.9.6 Delete Logo File
Continued from the procedure 11 on 3.9.4 Program Logo File.
OPERATION KEYS DISPLAY
1. At Logo Programming
mode, enter the Logo
Number (Ex. 2) to be
deleted.
2. Press [-] key to enter
deleting display.
´0³
NET
RECOM
INSUFF
´0³
NET
RECOM
INSUFF
LOGO PROGRAMMING
ENTER LOGO # (1-4): 2
W or X : display's status indicator
DELETE?
CLEAR (YES) / TARE (NO)
S
S
Σ
IN
OUT
PE
Σ
IN
OUT
PE
PROGRAM MODE
- 55 -
Page 59
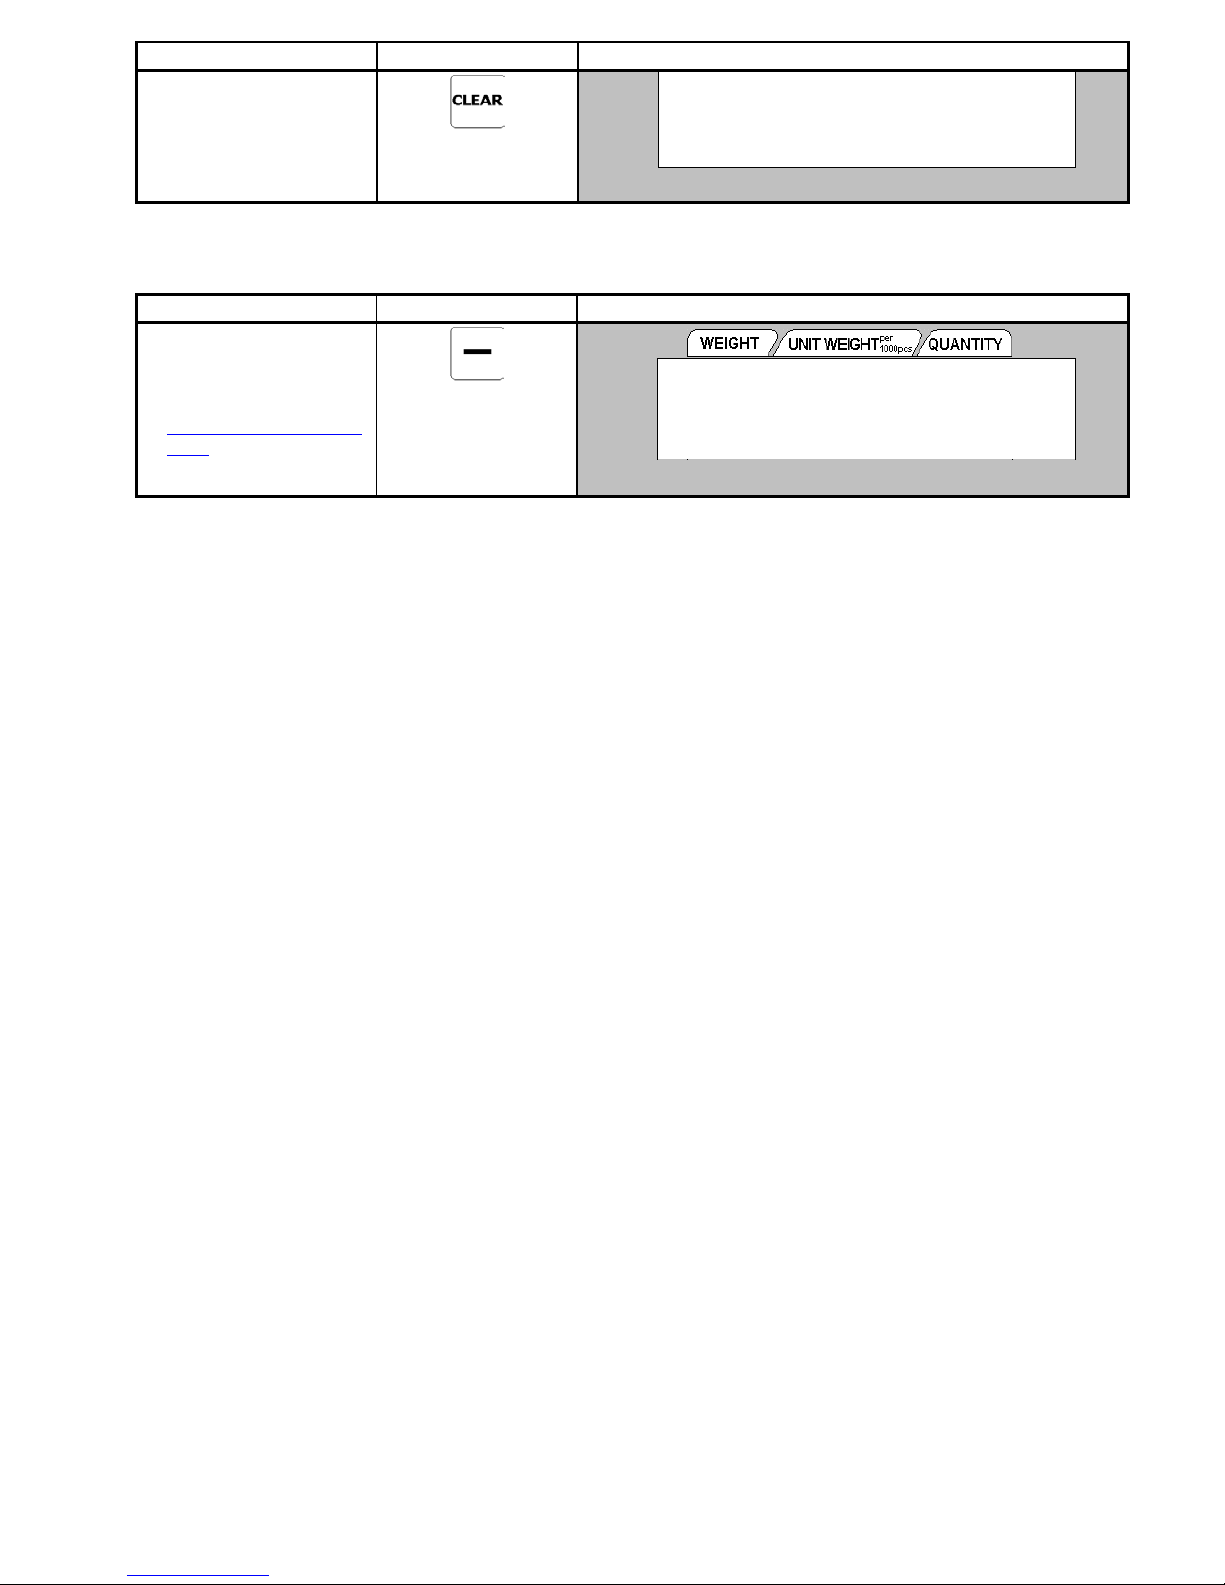
OPERATION KEYS DISPLAY
3. Press [CLEAR] key to
delete the data.
Press [TARE] key to
cancel the deletion.
´0³
NET
RECOM
INSUFF
LOGO PROGRAMMING
ENTER LOGO # (1-4): 0
3.10 MEMORY STATUS
The following operation is used for checking the number of existing Items and remaining programmable Items.
OPERATION KEYS DISPLAY
1. At Item Code
Programming mode, press
[-] key to select Memory
mode. (Please refer to
3.1.3 Programming Mode
Entry)
Note: Total of existing Items is 11 and total number of remaining programmable Items is 1989.
´0³
NET
RECOM
INSUFF
11 ITEMS PROGRAMMED
1989 ITEMS AVAILABLE
W or X : display's status indicator
Σ
IN
S
OUT
PE
S
Σ
IN
OUT
PE
PROGRAM MODE
- 56 -
Page 60
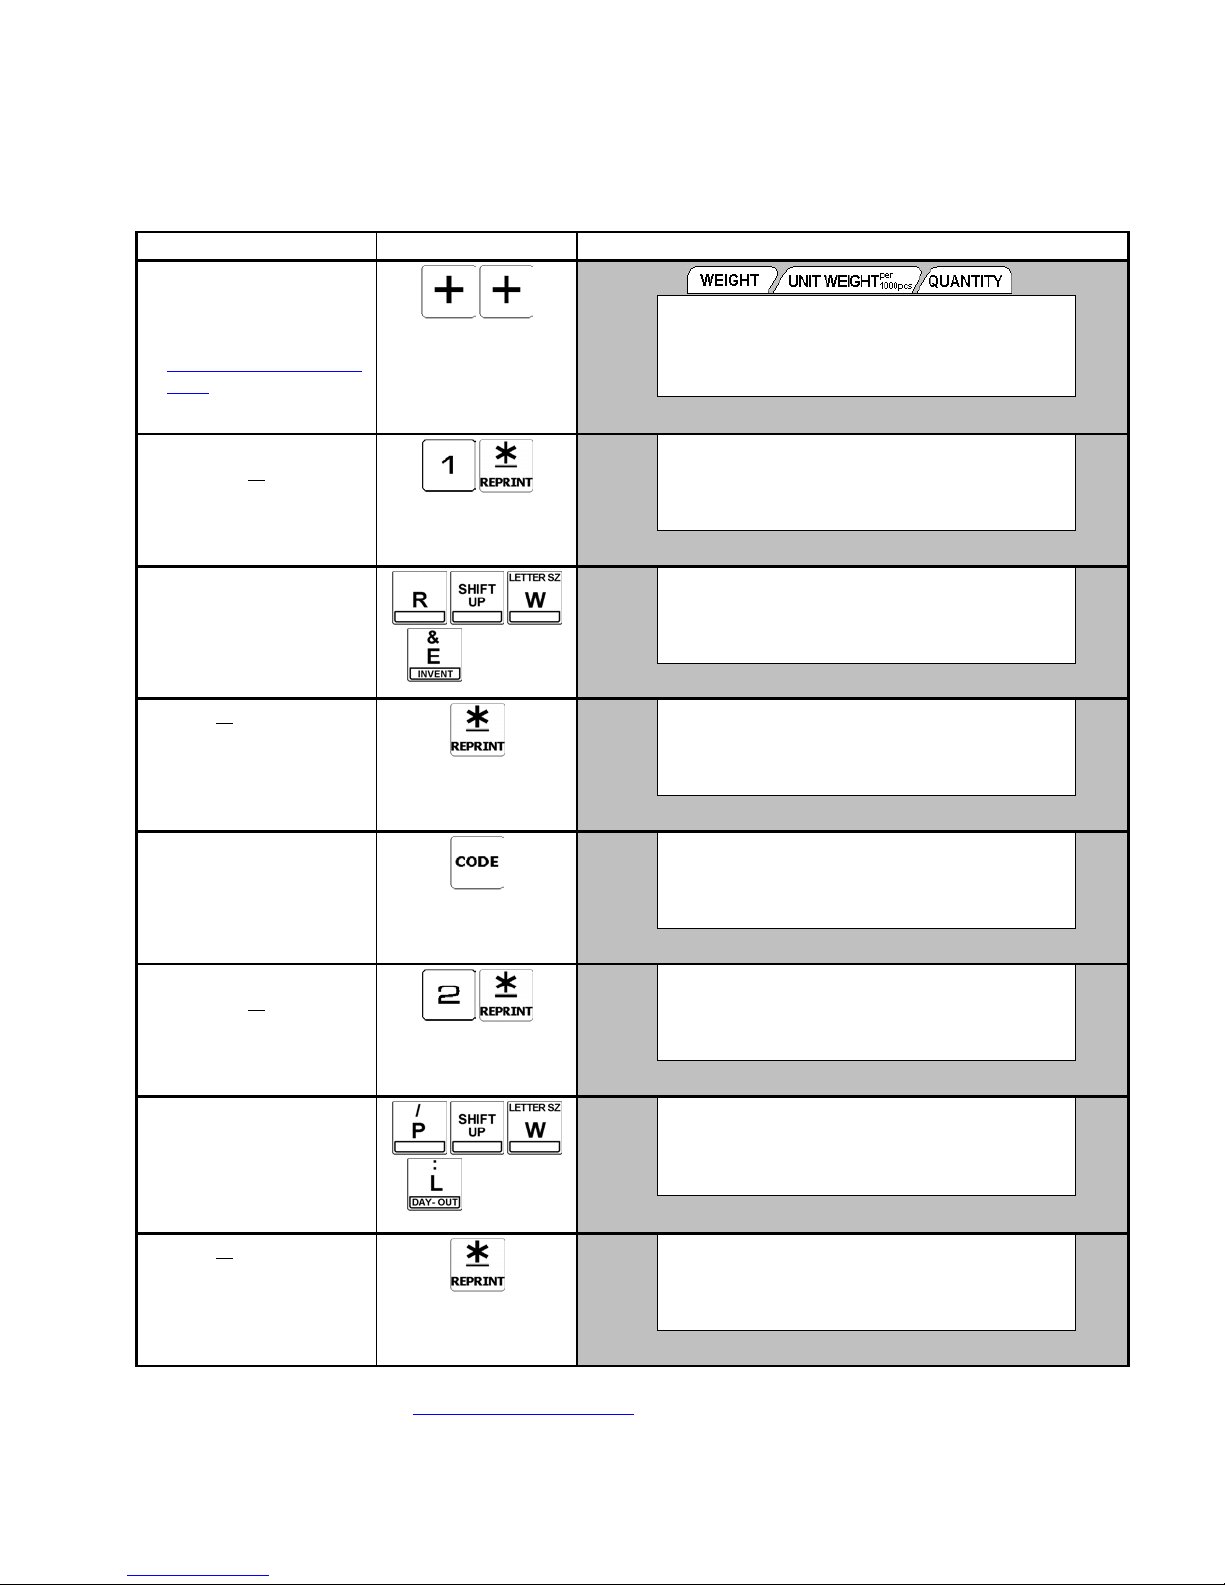
3.11 JOB SEQUENCE
Job sequence is used to program an operation instruction. The instruction will appear on the lower section of the display in Operation
Mode. A total of 10 Job Sequence can be programmed. A maximum of 22 characters can be programmed for each sequence. To
enable Job Sequence data to be shown on the display in Operation Mode, SPEC 13 must set to 1 in advance. The sequence data will
appear on the display in the order of 1 to 10.
3.11.1 Program Job Sequence Number File.
OPERATION KEYS DISPLAY
1. At Item Code
Programming mode, press
[+] key to select Job
Sequence. (Please refer to
3.1.3 Programming Mode
Entry)
2. Enter Sequence Number 1
and press [
¾
] key.
3. Enter Data for Sequence
Number 1 (Ex. Recall ID
Code)
Refer to Note1.
4. Press [¾
] key.
5. Select the keys by
pressing [<<] or [>>] key
(Ex. [CODE] and press
[CODE] to save.
Refer to Note2.
6. Enter Sequence Number 2
] key.
and press [¾
7. Enter Data for Sequence
Number 2 (Ex. Place
Product & PRINT).
8. Press [¾
] key.
and etc
and etc
´0³
NET
RECOM
INSUFF
´0³
NET
RECOM
INSUFF
´0³
NET
RECOM
INSUFF
´0³
NET
RECOM
INSUFF
´0³
NET
RECOM
INSUFF
´0³
NET
RECOM
INSUFF
´0³
NET
RECOM
INSUFF
´0³
NET
RECOM
INSUFF
PROGRAM JOB SEQUENCE
ENT JOB SEQ # (1-10): 0
JOB SEQ #0001 P: KEY
ENTER:
JOB SEQ #0001 P: KEY
ENTER: Recall ID Code
JOB SEQ #0001 P: KEY
ENTER KEY: 1 CODE (#)
PROGRAM JOB SEQUENCE
ENT JOB SEQ # (1-10): 0
JOB SEQ #0002 P: KEY
ENTER:
JOB SEQ #0002 P: KEY
ENTER: Product & PRINT
JOB SEQ #0002
ENTER KEY: 1 CODE (#)
W or X : display's status indicator
W or X : display's status indicator
Σ
IN
S
OUT
PE
Σ
IN
S
OUT
PE
Σ
IN
S
OUT
PE
Σ
IN
S
OUT
PE
Σ
IN
S
OUT
PE
Σ
IN
S
OUT
PE
Σ
IN
S
OUT
PE
Σ
IN
S
OUT
PE
Note 1: Enter the Job Sequence data the same procedure as ID CODE entry and should not exceed the maximum of 22
characters. Please refer to 1.4 Table of Characters Code
Sequence data entry.
Note 2: The following keys (12 keys) can be selected by pressing [<<] or [>>] key: 1 [PLU], 2 [PRINT], 3 [TARE], 4 [UNIT
WEIGHT], 5 [RE-ZERO], 6 [PIECES], 7 [SCALE], 8 [CLEAR], 9 [+], 10 [-], 11 [LOT NO] & 12 [MODE] keys.
PROGRAM MODE
when using ASCII Code (A) or TERAOKA Code (T) for Job
- 57 -
Page 61
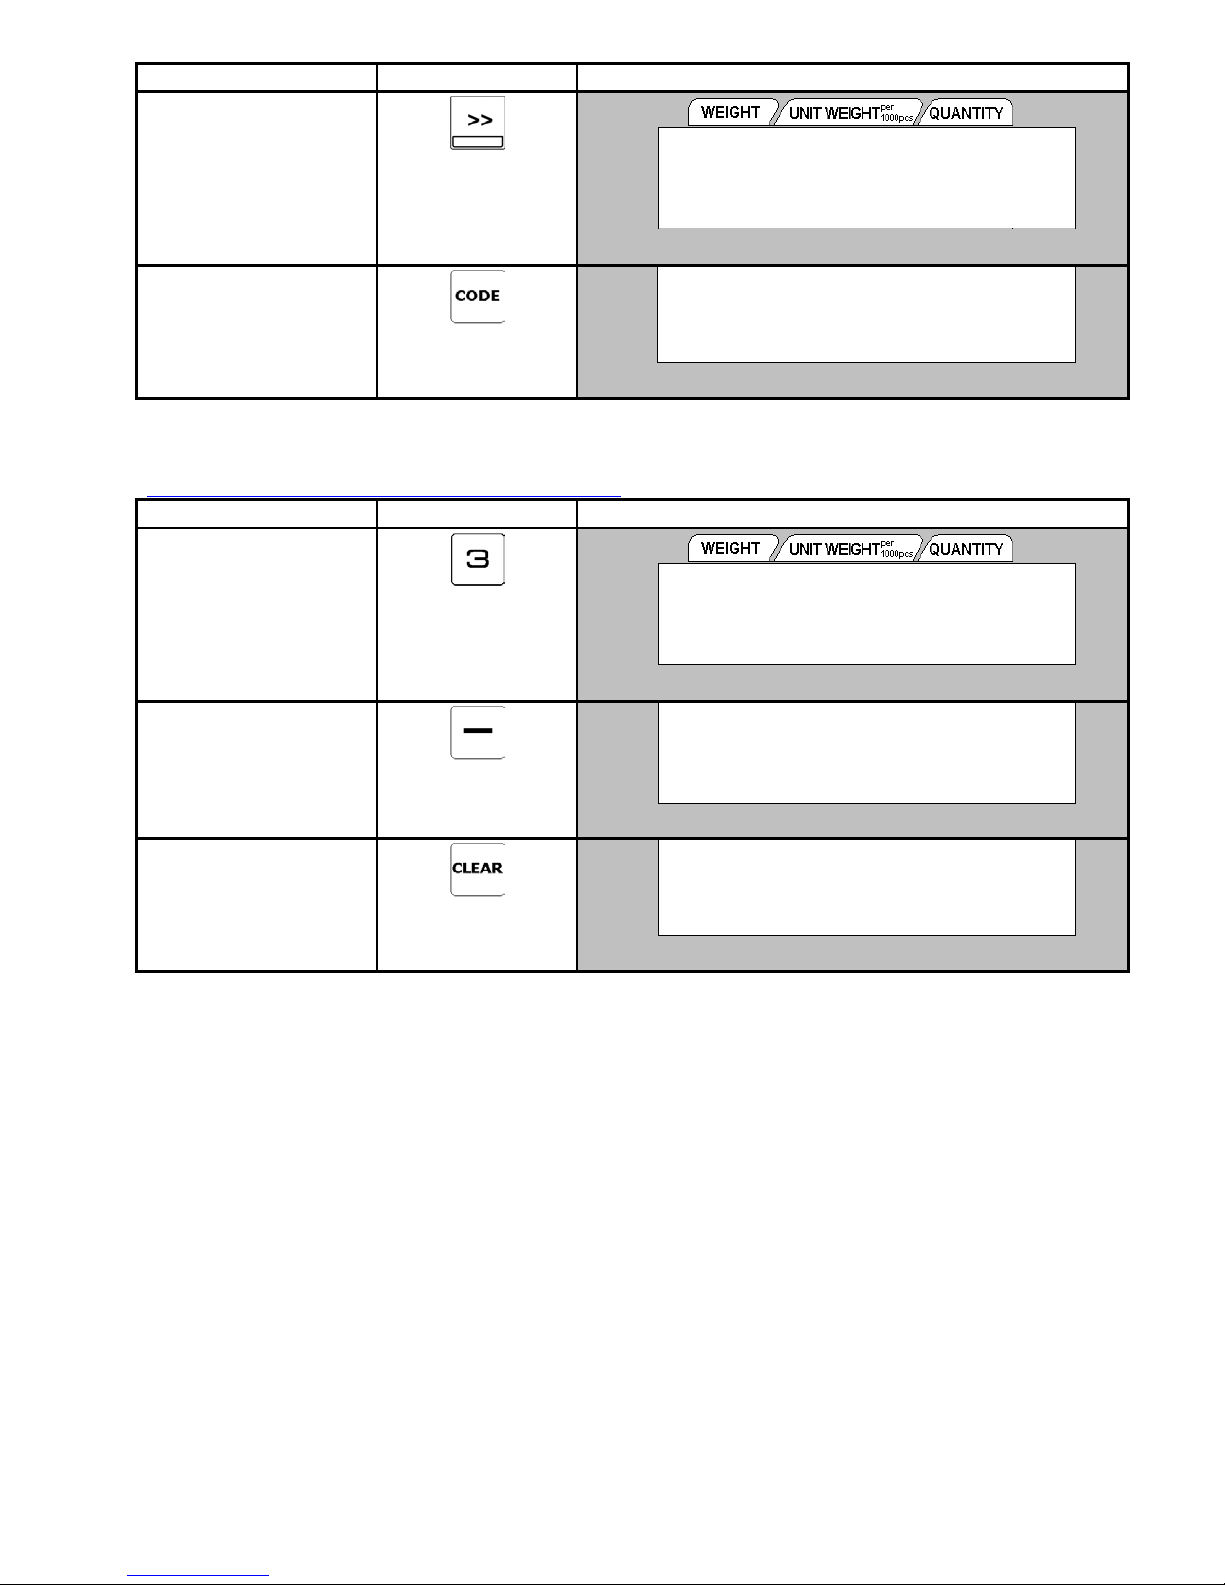
OPERATION KEYS DISPLAY
9. Select the choice of keys
by pressing [<<] or [>>]
key (Ex. [PRINT] key).
10. Press [CODE] to save.
If necessary to program
Sequence No. 3 ~ 10, repeat
procedure 6 ~ 8.
´0³
NET
RECOM
INSUFF
´0³
NET
RECOM
INSUFF
JOB SEQ #0002
ENTER KEY: 2 PRINT (¾)
PROGRAM JOB SEQUENCE
ENT JOB SEQ # (1-10): 0
3.11.2 Delete Job Sequence Number
Continued from the procedure 11 on 3.9.4 Program Logo File.
OPERATION KEYS DISPLAY
1. At Job Sequence mode,
enter the Sequence
Number (Ex. 3) to be
deleted.
2. Press [-] key to enter Job
Sequence deleting
display.
3. Press
[CLEAR]
key to
delete the data.
Press [TARE] key to
cancel the deletion.
Refer to Note 1.
´0³
NET
RECOM
INSUFF
´0³
NET
RECOM
INSUFF
´0³
NET
RECOM
INSUFF
PROGRAM JOB SEQUENCE
ENT JOB SEQ # (1-10): 3
DELETE?
CLEAR (YES) / TARE (NO)
PROGRAM JOB SEQUENCE
ENT JOB SEQ # (1-10): 0
S
W or X : display's status indicator
S
S
or X : display's status indicator
W
S
S
Σ
IN
OUT
PE
Σ
IN
OUT
PE
Σ
IN
OUT
PE
Σ
IN
OUT
PE
Σ
IN
OUT
PE
Note 1: If Sequence No. 3 is been deleted, the next Sequence number (E.g.: Seq No 4) message will appear on the display.
PROGRAM MODE
- 58 -
Page 62

4. PASSWORD MODE (‘P’ MODE)
4.1 PROGRAM PASSWORD…………………………………………58
4.2 USE PASSWORD….…………..…………………………………..60
4.3 CHANGE PASSWORD……………………………………………61
4.4 DELETE PASSWORD…………………………………………….63
PROGRAM MODE
- 59 -
Page 63
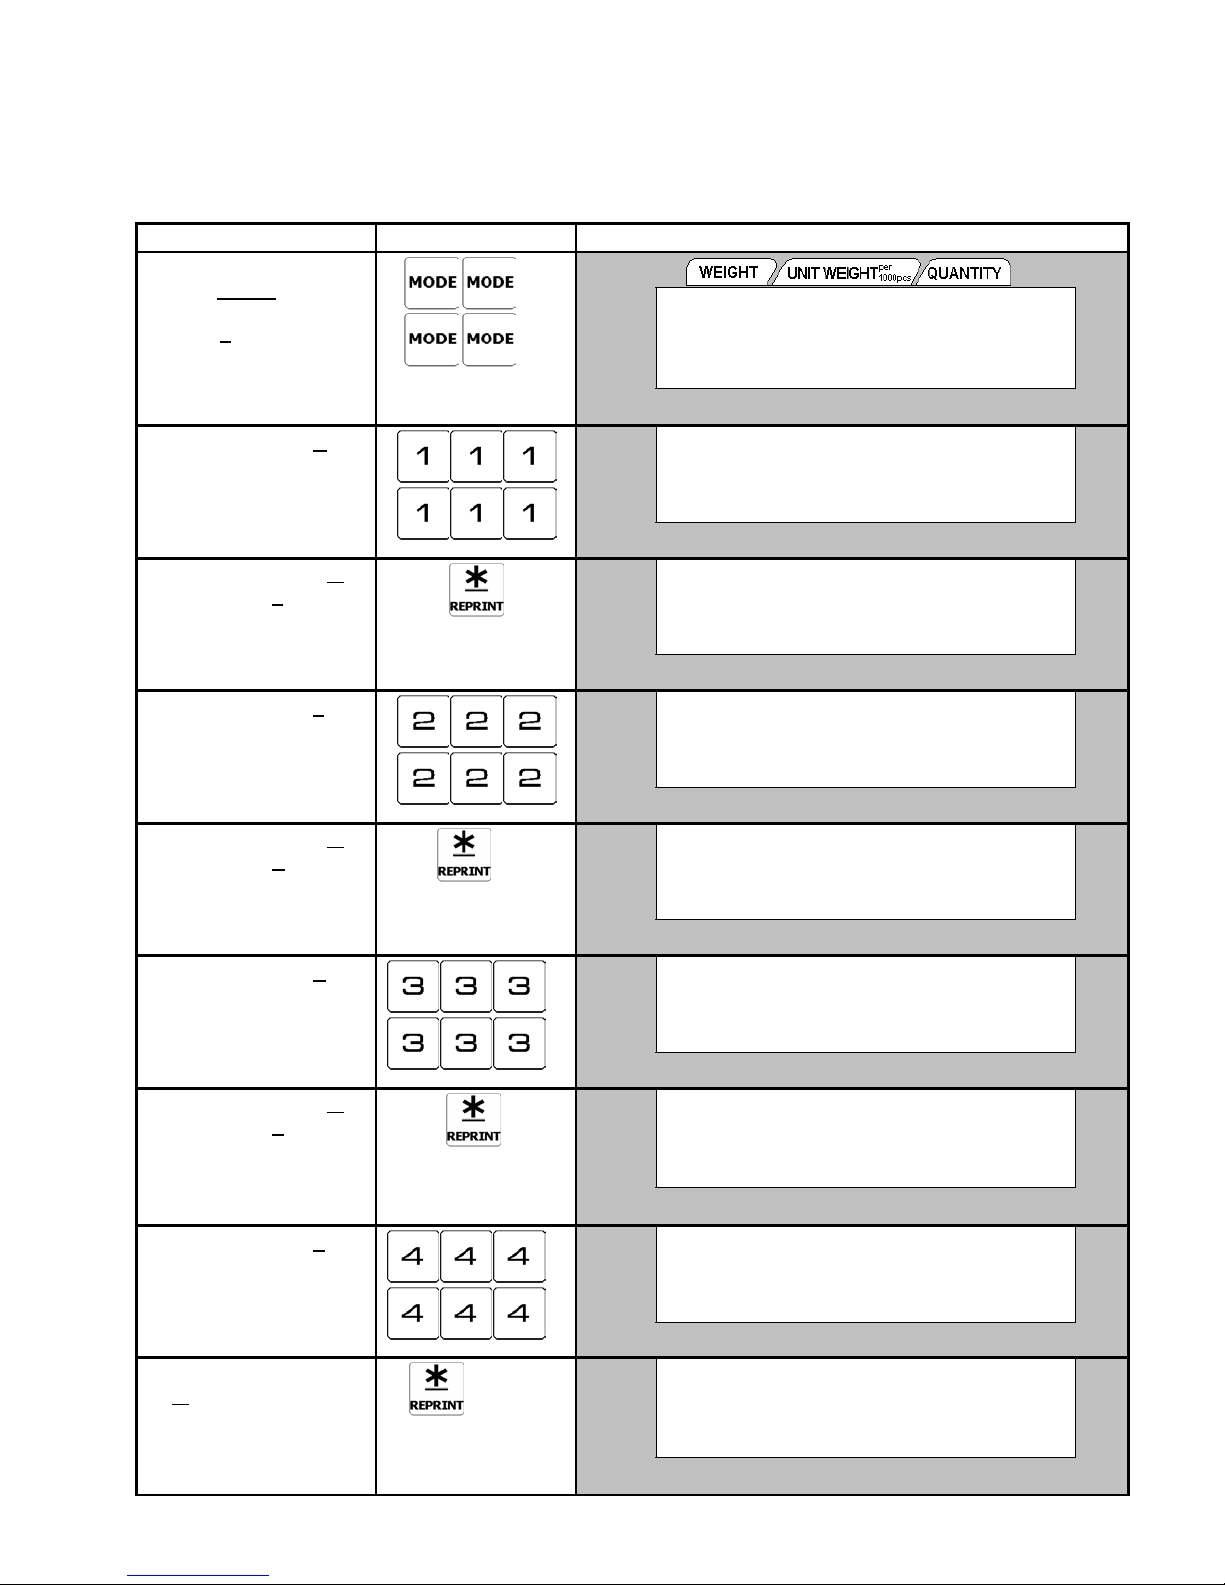
4. PASSWORD SETTING
4.1 Program Password
Password consists of maximum 6 digits. If want to protect entering in operation menu such as PROGRAM MODE from
operation, also can set the password in the menu, then the menu will be accessible only by the authorized person who knows the
password.
OPERATION KEYS DISPLAY
1. At Registration Mode,
Press [MODE
to enter Password
times
mode (P
] key X 4
mode) setting.
X indicator blink.
2. Enter password for X
mode (Report Mode).
Ex) 111111.
X indicator blink.
3. Store the Data press [¾
key and go to S
mode
]
(Programming Mode)
password setting.
S indicator blink.
4. Enter password for S
mode (Programming
Mode).
Ex) 222222.
S indicator blink.
5. Store the Data press [¾
key and go to Z
]
mode
(Service Mode) password
setting.
Z indicator blink.
6. Enter password for Z
mode (Service Mode).
Ex) 333333
Z indicator blink.
7. Store the Data press [¾
key and go to
P
]
mode
(Password Mode)
password setting.
All indicator blinks.
8. Enter password for P
mode (Password Mode).
All indicator blink.
9. Store the Data by pressing
] key and go to
[
¾
Operation mode.
´0³
NET
RECOM
INSUFF
´0³
NET
RECOM
INSUFF
´0³
NET
RECOM
INSUFF
´0³
NET
RECOM
INSUFF
´0³
NET
RECOM
INSUFF
´0³
NET
RECOM
INSUFF
´0³
NET
RECOM
INSUFF
´0³
NET
RECOM
INSUFF
´0³
NET
RECOM
INSUFF
X MODE PASSWORD: 0
NEW : 0-9 / NO PWD : ¾
W or X : display's status indicator
X MODE PASSWORD: 111111
NEW : 0-9 / NO PWD : ¾
S MODE PASSWORD: 0
NEW : 0-9 / NO PWD : ¾
S MODE PASSWORD: 222222
NEW : 0-9 / NO PWD : ¾
Z MODE PASSWORD: 0
NEW : 0-9 / NO PWD : ¾
Z MODE PASSWORD: 333333
NEW : 0-9 / NO PWD : ¾
PWD MD PASSWORD: 0
NEW : 0-9 / NO PWD : ¾
W or X : display's status indicator
PWD MD PASSWORD: 444444
NEW : 0-9 / NO PWD : ¾
W
0.000kg 0 0
W
Σ
IN
X
OUT
PE
Σ
IN
OUT
X
PE
Σ
IN
S
S
Z
Z
R
S
X
Z
R
S
X
Z
OUT
PE
Σ
IN
OUT
PE
Σ
IN
OUT
PE
Σ
IN
OUT
PE
Σ
IN
OUT
PE
Σ
IN
OUT
PE
Σ
IN
OUT
PE
A
PROGRAM MODE
- 60 -
Page 64
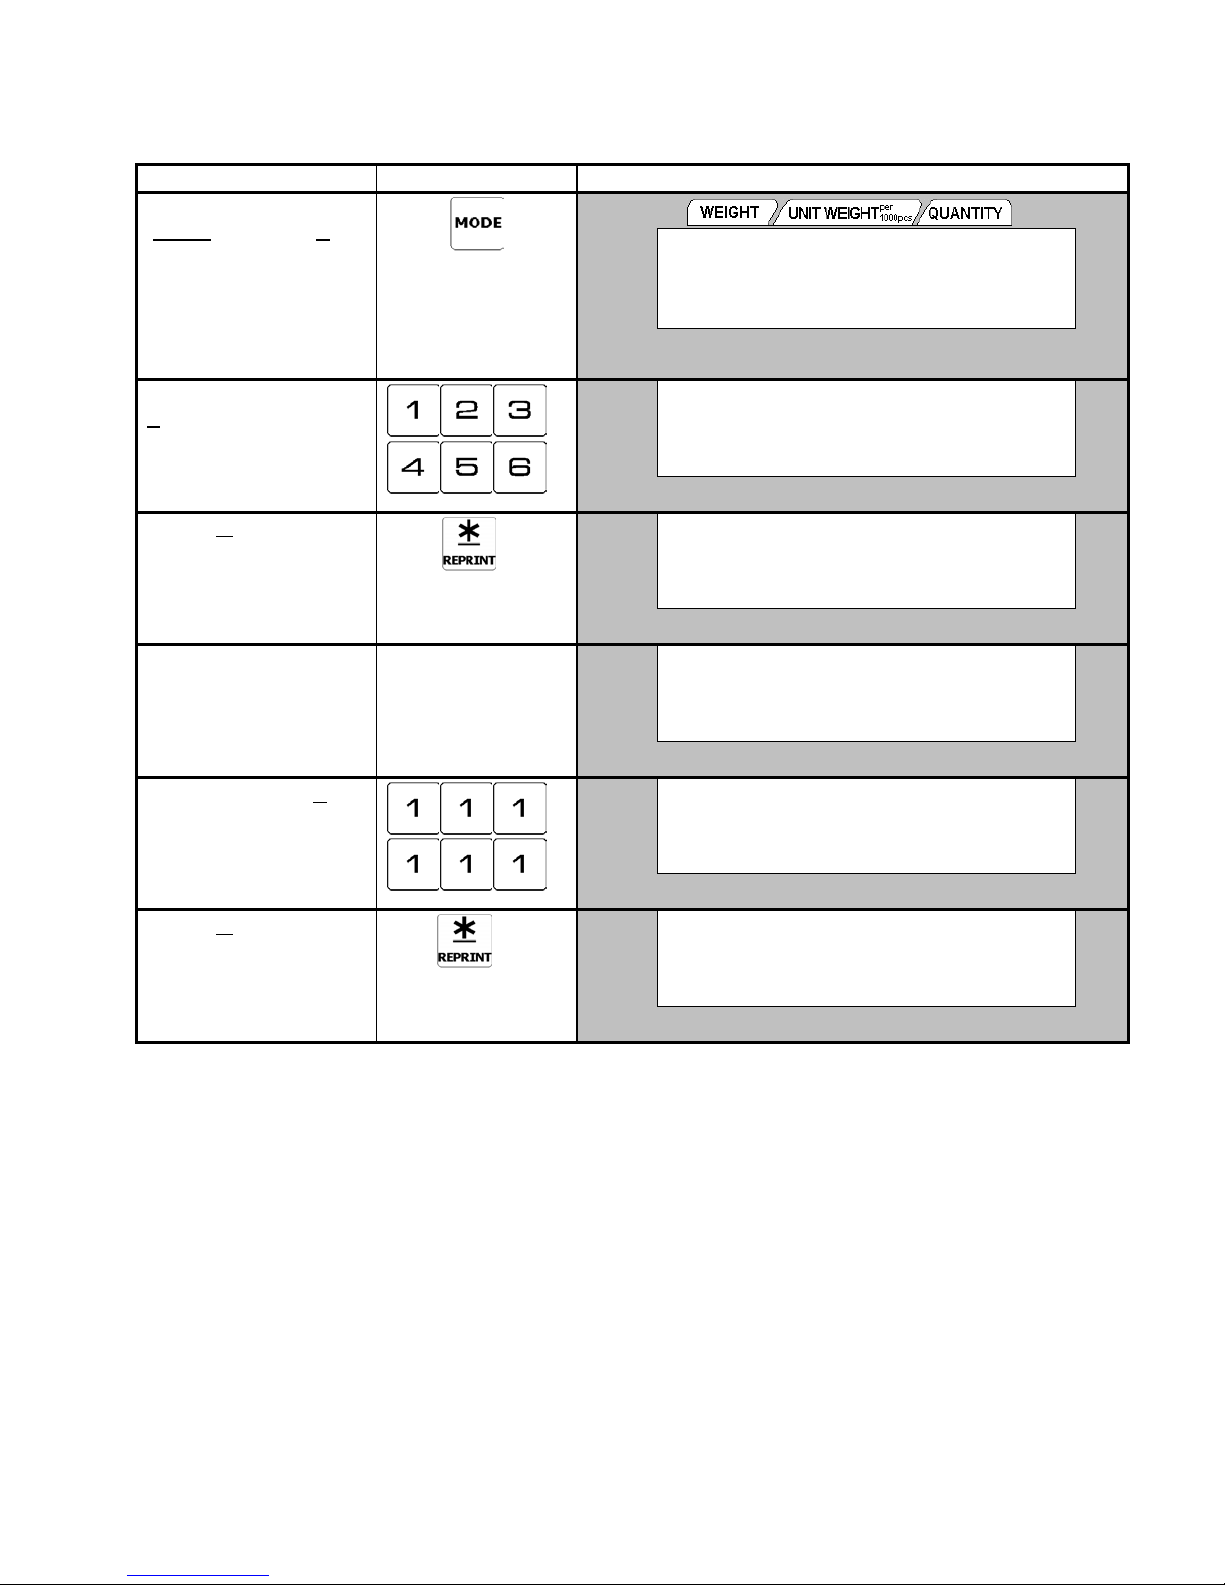
4.2 Use password
OPERATION KEYS DISPLAY
1. At operation mode Press
[MODE
mode (Report Mode). If
password is set, it will
request the user to enter
password.
X indicator light.
2. Enter wrong password for
X
Ex) 123456
X indicator light.
3. Press [¾
message “NO GO” will
appear on the display.
X indicator light.
4. After a few second, it will
return back to password
entering mode.
X indicator light
5. Enter password for X
mode.
Ex) 111111
X Indicator light.
6. Press
Select Report mode.
X Indicator light
PROGRAM MODE
] key to enter X
mode (Report Mode).
] key. An error
key for enter
]
[¾
´0³
NET
RECOM
INSUFF
´0³
NET
RECOM
INSUFF
´0³
NET
RECOM
INSUFF
´0³
NET
RECOM
INSUFF
´0³
NET
RECOM
INSUFF
´0³
NET
RECOM
INSUFF
ENTER X MODE PASSWORD
PASSWORD:
or X : display's status indicator
W
ENTER X MODE PASSWORD
PASSWORD: - - - - - -
ENTER X MODE PASSWORD
PASSWORD: NO GO
ENTER X MODE PASSWORD
PASSWORD:
ENTER X MODE PASSWORD
PASSWORD: 111111
X MODE : SELECT REPORT
1: ITEM REPORT
X
X
X
X
X
X
Σ
IN
OUT
PE
Σ
IN
OUT
PE
Σ
IN
OUT
PE
Σ
IN
OUT
PE
Σ
IN
OUT
PE
Σ
IN
OUT
PE
- 61 -
Page 65
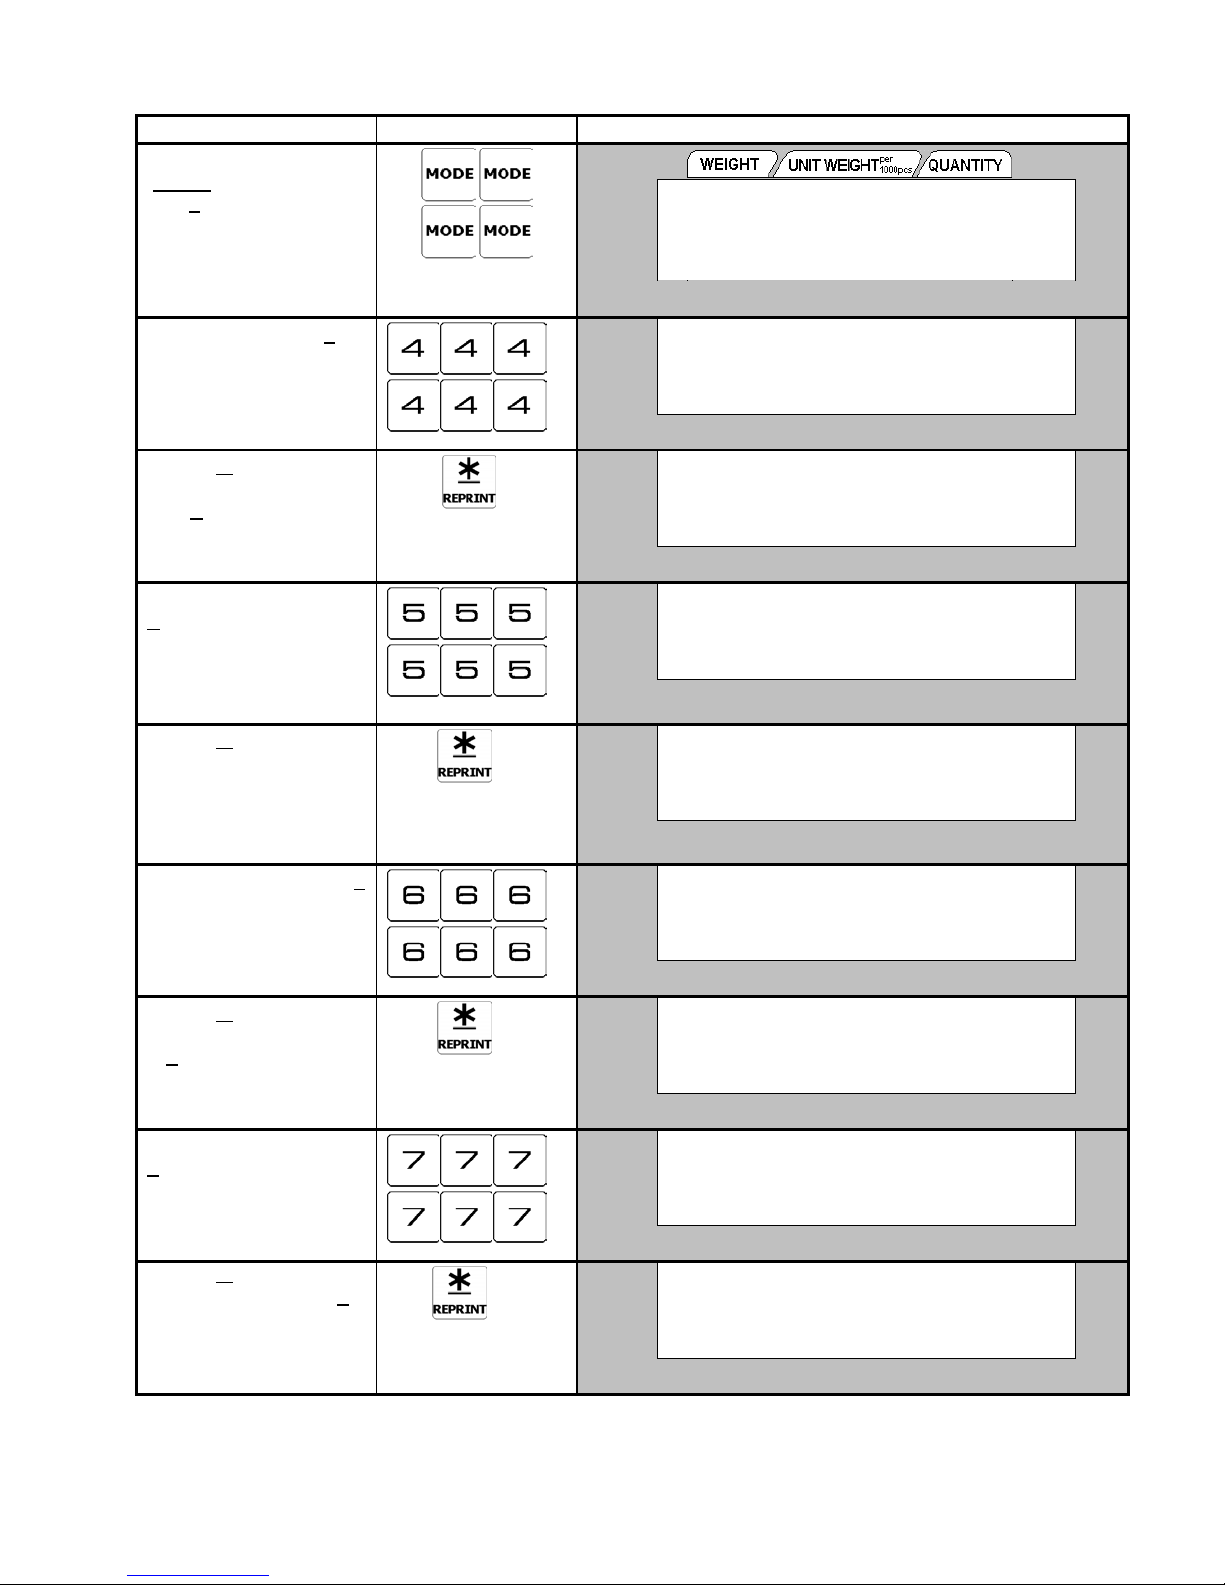
4.3 Change Password
OPERATION KEYS DISPLAY
1. At Operation mode Press
[MODE
enter P
mode (Password
key
]
X 4 times
to
mode).
All indicator lights.
2. Enter Password for P
mode.
Ex) 444444
All indicator lights.
3. Press [
] key to go to P
¾
mode (Password Mode) and
mode (Report
go to
X
Mode) setting.
X indicator blink.
4. Enter New Password for
mode (Report Mode).
X
Ex) 555555
X indicator blink.
5. Press [¾
] key to Store the
New password for X mode
(Report Mode) and go to S
mode (Program Mode)
password mode setting.
S Indicator blink.
6. Enter New Password for S
mode (Program Mode).
Ex) 666666.
S Indicator blink.
7. Press [¾
] key to Store the
New data for S mode and go
to Z
mode (Service Mode)
password setting.
Z Indicator blink.
8. Enter New Password for
mode (Service Mode).
Z
Ex) 777777.
Z Indicator blink.
9. Press [¾
New password and go to P
] key to store the
mode (Password Mode)
setting.
All Indicators blink.
´0³
NET
RECOM
INSUFF
´0³
NET
RECOM
INSUFF
´0³
NET
RECOM
INSUFF
´0³
NET
RECOM
INSUFF
´0³
NET
RECOM
INSUFF
´0³
NET
RECOM
INSUFF
´0³
NET
RECOM
INSUFF
´0³
NET
RECOM
INSUFF
´0³
NET
RECOM
INSUFF
ENTER PWD MODE PWD
PASSWORD:
ENTER PWD MODE PWD
PASSWORD: - - - - - -
X MODE PASSWORD: 0
NEW: 0-9 / NO PWD : ¾
X MODE PASSWORD: 555555
NEW : 0-9 / NO PWD : ¾
S MODE PASSWORD: 0
NEW: 0-9 / NO PWD : ¾
S MODE PASSWORD: 666666
NEW: 0-9 / NO PWD : ¾
Z MODE PASSWORD: 0
NEW: 0-9 / NO PWD : ¾
Z MODE PASSWORD: 777777
NEW: 0-9 / NO PWD : ¾
PWD MD PASSWORD:
NEW: 0-9 / NO PWD : ¾
R
S
X
Z
W or X : display's status indicator
R
S
X
Z
X
X
S
S
Z
Z
R
S
X
Z
Σ
IN
OUT
PE
Σ
IN
OUT
PE
Σ
IN
OUT
PE
Σ
IN
OUT
PE
Σ
IN
OUT
PE
Σ
IN
OUT
PE
Σ
IN
OUT
PE
Σ
IN
OUT
PE
Σ
IN
OUT
PE
PROGRAM MODE
- 62 -
Page 66
OPERATION KEYS DISPLAY
10. Enter New Password for
mode (Password Mode).
P
Ex) 888888.
All indicator blink.
11. Press
the New data for P
and return back to
key to Store
]
[¾
mode
Registration mode.
A Indicator light.
PROGRAM MODE
´0³
RECOM
INSUFF
RECOM
INSUFF
NET
´0³
NET
PWD MD PASSWORD:
NEW : 0-9 / NO PWD : ¾
or X : display's status indicator
W
W
0.000kg 0 0
W
R
S
X
Z
A
Σ
IN
OUT
PE
Σ
IN
OUT
PE
- 63 -
Page 67
4.4 Delete Password
OPERATION KEYS DISPLAY
1. At Operation mode, press
[MODE
enter P
mode Password
key
]
X 4 times
to
Mode).
All indicator lights.
2. Enter Password for P
mode (Password Mode).
Ex) 888888
All indicator lights.
3. Press [¾
] key to enter X
mode (Report Mode)
password setting.
X indicator blink.
4. Press [
password for X
] key to delete
¾
mode
(Report Mode).
S indicator blink.
5. Press [¾
password for
] key to delete
mode
S
(Program Mode).
Z indicator blink.
6. Press [¾] key to delete
password for Z
mode
(service Mode).
indicator blink.
All
7. Press [¾
password for P
] key to delete
mode
(Password Mode) and return
back to Registration mode.
´0³
NET
RECOM
INSUFF
´0³
NET
RECOM
INSUFF
´0³
NET
RECOM
INSUFF
´0³
NET
RECOM
INSUFF
´0³
NET
RECOM
INSUFF
´0³
NET
RECOM
INSUFF
´0³
NET
RECOM
INSUFF
ENTER PWD MODE PWD
PASSWORD:
ENTER PWD MODE PWD
PASSWORD: - - - - - -
X MODE PASSWORD: 0
NEW : 0-9 / NO PWD : ¾
S MODE PASSWORD: 0
NEW : 0-9 / NO PWD : ¾
Z MODE PASSWORD: 0
NEW : 0-9 / NO PWD : ¾
PWD MD PASSWORD: 0
NEW : 0-9 / NO PWD : ¾
W
0.000kg 0 0
W
R
S
X
Z
W or X : display's status indicator
R
S
X
Z
X
S
Z
R
S
X
Z
A
Σ
IN
OUT
PE
Σ
IN
OUT
PE
Σ
IN
OUT
PE
Σ
IN
OUT
PE
Σ
IN
OUT
PE
Σ
IN
OUT
PE
Σ
IN
OUT
PE
PROGRAM MODE
- 64 -
 Loading...