

Page 1
Model# PC22B
TG 1401 3016
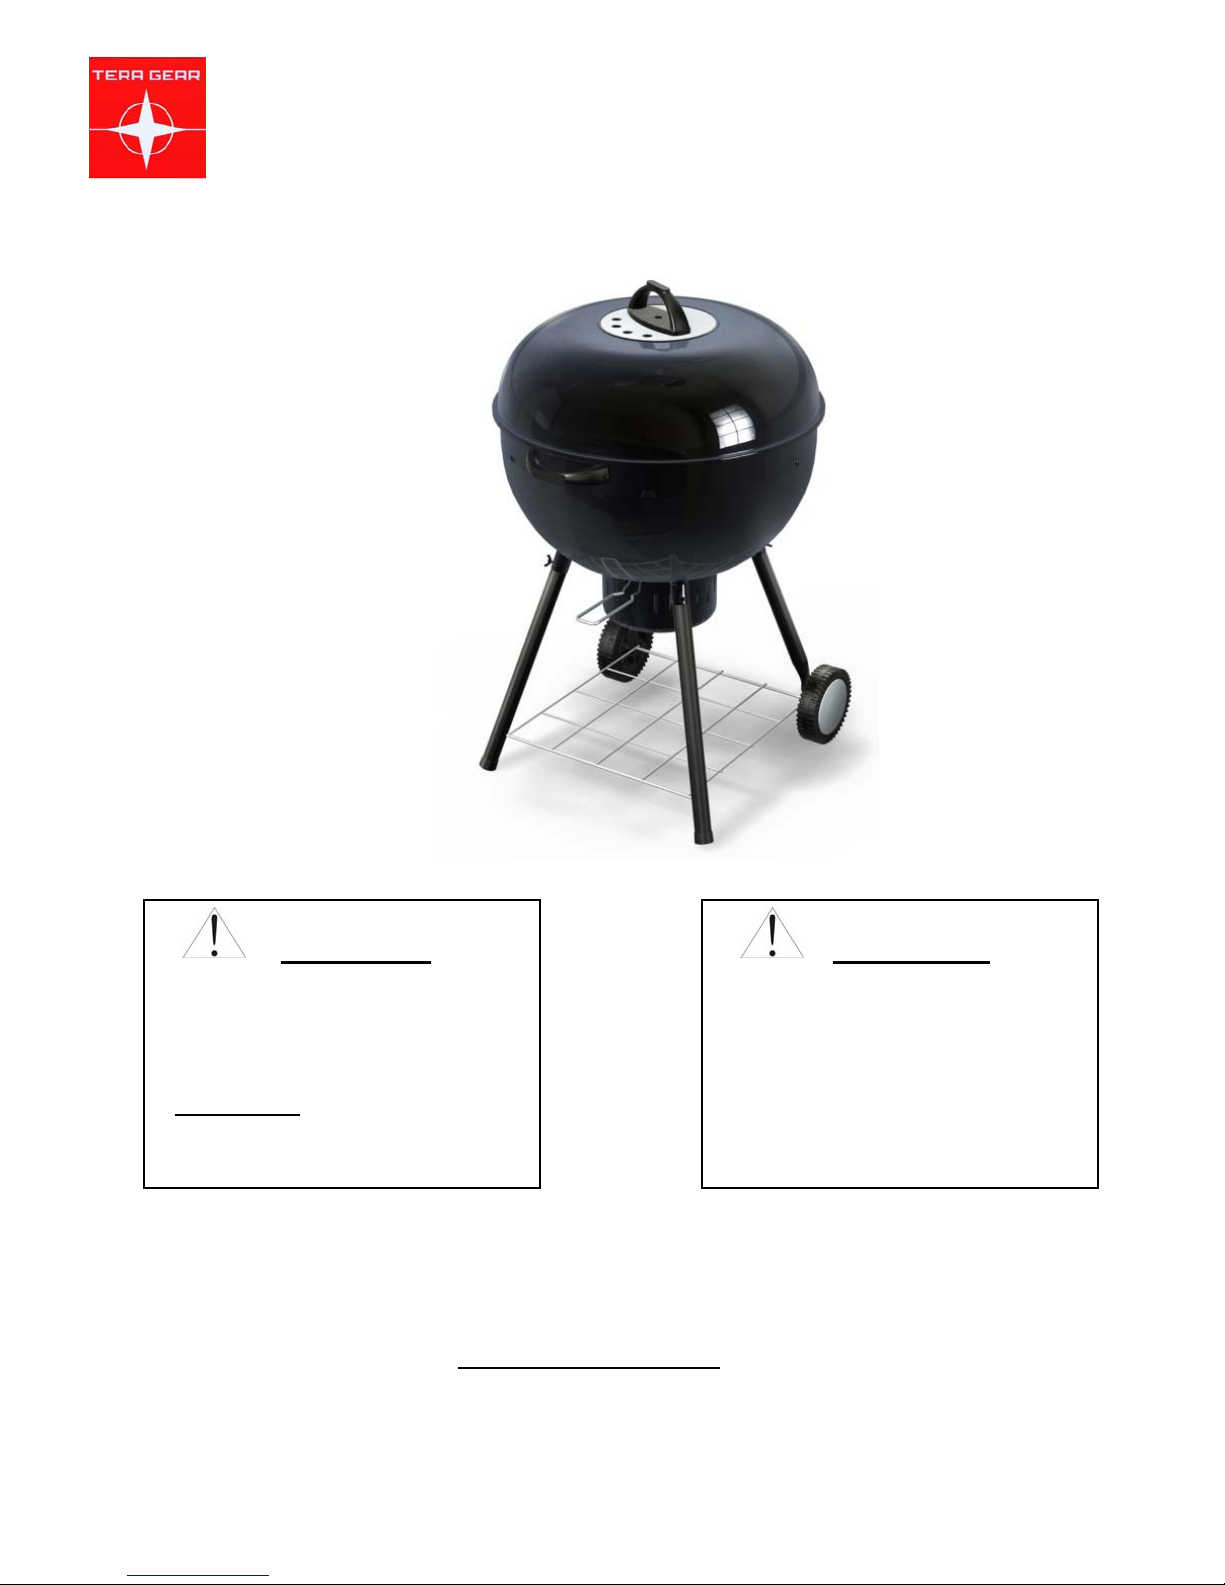
TER 23IN CLASSIC CHARCOAL GRILL
DANGER!
DO NOT use charcoal briquettes for
indoor cooking or heating. TOXIC
carbon monoxide fumes can
accumulate and cause asphyxiation.
DO NOT USE
recreational vehicles. Live hot
charcoal could create a fire hazard
SAVE THESE INSTRUCTIONS FOR FUTURE REFERENCE.
IF YOU ARE ASSEMBLING THIS UNIT FOR SOMEONE ELSE, GIVE THIS MANUAL TO HIM OR HER TO
SAVE FOR FUTURE REFERENCE.
FOR CUSTOMER SERVICE, EMAIL TO [email protected]
07:00 A.M. – 16:00 P.M. (PST), MONDAY-FRIDAY.
PC14 Owner’s Manual
on boats or
.
For Outdoor Use Only
(Outside any enclosure)
OR CALL 1-877-630-5396 (TOLL-FREE),
WARNING
Page 2

Table of Contents
g
g
A
g
g
y
For Your Safety.......................................................................................................................1
Illustrated Parts List ...............................................................................................................3
Assembly Instructions............................................................................................................5-7
Lighting Your Grill……………………………………………………………………………………8
Cooking Styles.........................................................................................................................8
Helpful Hints.............................................................................................................................8
Warranty Program....................................................................................................................8
Dear Valued Customer,
Congratulations on your new barbecue grill! You’ve made the right choice. In this manual, you
will find assembly instructions, suggestions for grilling and helpful hints, as well as guidelines
for the safe operation, proper care and use of your grill. Our expert staff has done its best to
provide you with an easy-to-assemble product. Should you have any questions, problems or
missing parts, please call our customer service department at
(PST), Monday through Friday.
1-877-630-5396, 7:00AM to 4:00PM
IMPORTANT NOTICE
WARNING
FOR YOUR SAFETY
DO NOT store or use
gasoline or other
flammable vapors
and liquids within 25
ft. (8m) of this or any
other appliance.
: READ ALL INSTRUCTIONS PRIOR TO ASSEMBLY AND USE.
For Your Safety
Safety First!
Read and understand all warnings and cautions prior to operating your grill.
WARNING
1. This grill is for outside use only, and should not be used in a building, garage or any
other enclosed area.
2. This
3. The use of alcohol, prescription or non-prescription drugs may impair the user's ability to
4. Do not use
5. Always open grill lid carefully and slowly as heat and steam trapped within the grill could
6.
7. Do not attempt to move the
8. Do not leave a lit grill unattended. Keep
9. Do not use grill in high winds.
10. Do not use the
11. Keep all combustible items and surfaces at least 12 in. (30 cm) away from the grill at all
rill is for use with charcoal only.
properly assemble or safely operate the appliance.
asoline, kerosene or alcohol for lighting.Thisgrill is not intended to be
installed in or on recreation vehicles and/or boats.
cause severe burns.
lways place your grill on a stable and level surface far away from combustible
materials. An asphalt or blacktop surface may not be acceptable for this purpose.
rill while it is lit.
children and pets away from the grill at all times.
rill until it is COMPLETELY assembled and all parts are securel
fastened and tightened.
times. DO NOT use this grill or any charcoal product under any enclosure near any
unprotected combustible constructions.
PC22B Owner’s Manual
1
Page 3

CAUTION
g
A
1. Do not touch metal parts of grill until it has completely cooled (at least 30 minutes) to avoid burns, unless you are
wearing protective gear (pot holders, gloves, BBQ mittens, etc.).
2. Do not use in an explosive atmosphere. Keep grill area clear and free from combustible materials, gasoline and other
flammable vapors and liquids.
3. Do not alter
4. Do not repair or replace any part of the grill unless specifically recommended in this manual.
rill in anymanner.
ll other service should
be referred to a qualified technician.
PC22B Owner’s Manual
2
Page 4
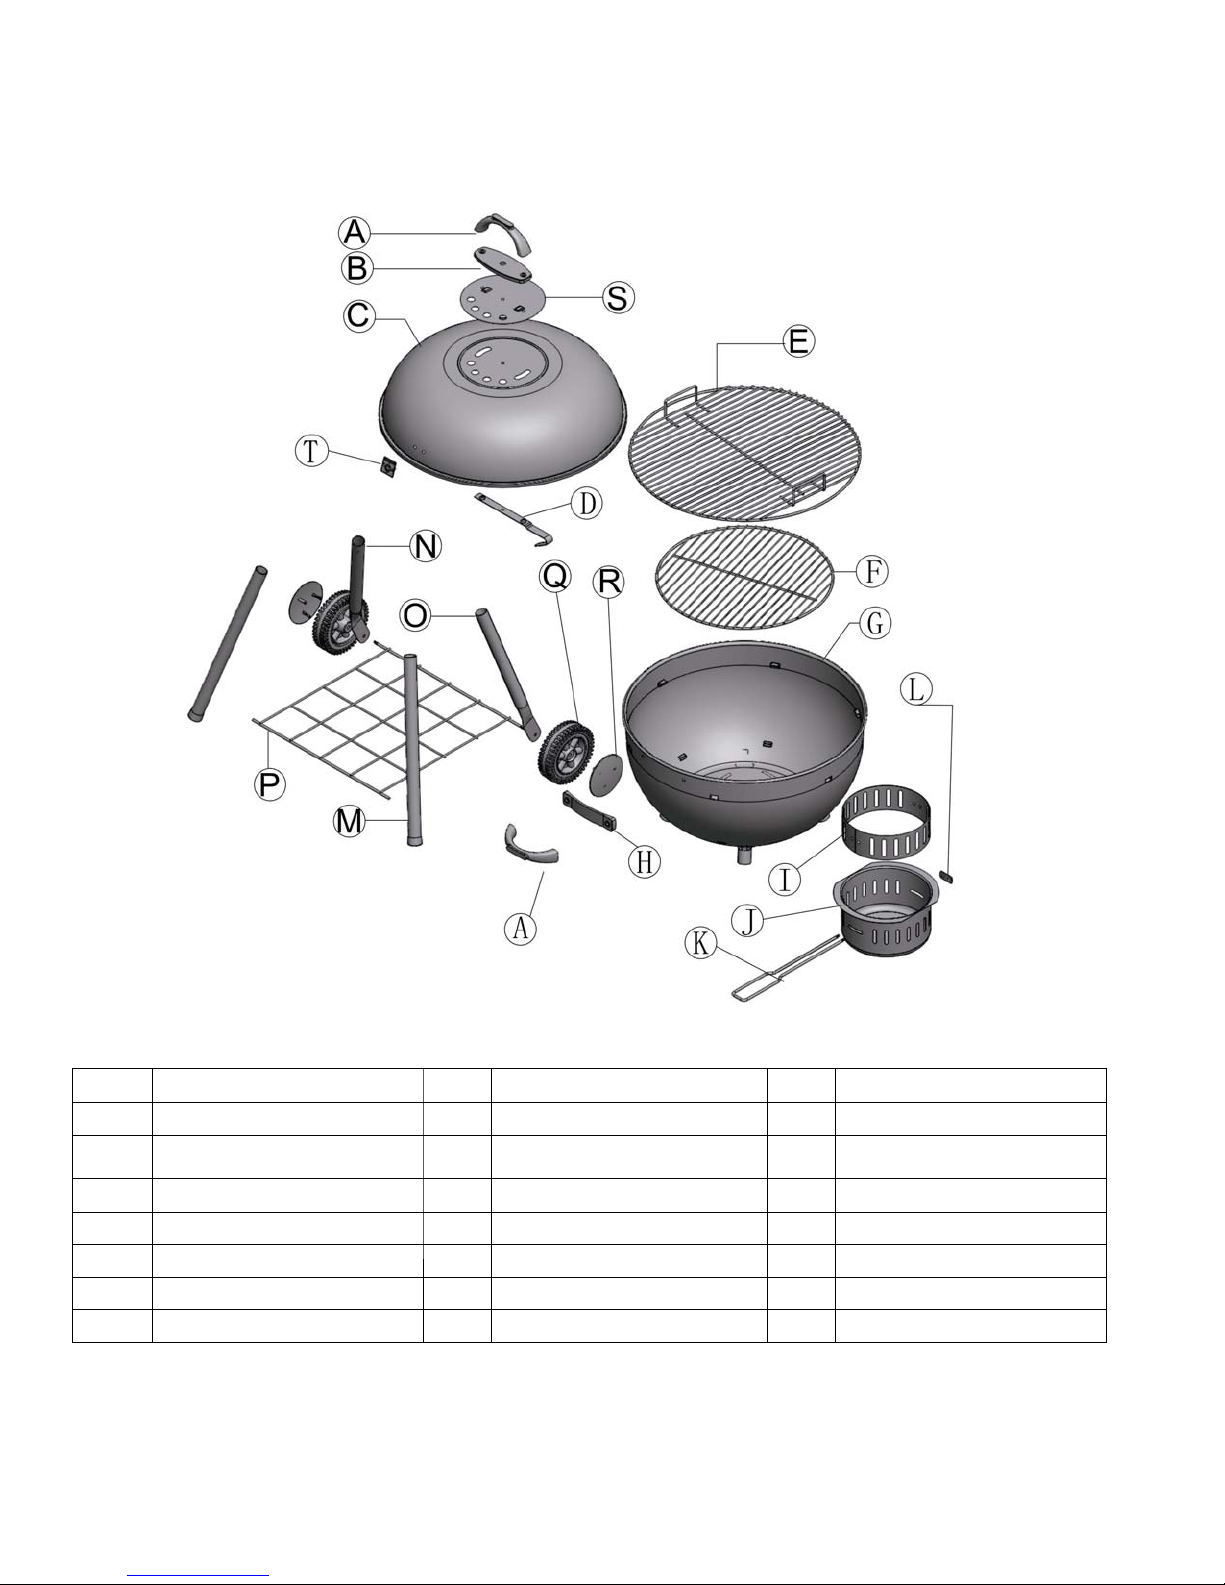
Illustrated Parts List
Part Description (QTY) Part Description (QTY) Part Description (QTY)
A Handle……………2PC G Bottom bowl…………….1PC M Front leg…………………2PCS
B Insulator cushion of lid
handle …………1PC
C Lid………………………1PC I Vent……………………….1PC O Right back leg…1PC
D Lid hook…………………1PC J Ash receiver………….1PC P Bottom grid………………1PC
E Cooking grid……………1PC K Vent handle…………….1PC Q Wheel……………………2PCS
F Charcoal gird……………1PC L Vent handle retainer…….1PC R Wheel cap………………2PCS
S Lid vent………………1PC T Name plate. …………. 1PC
PC22B Owner’s Manual
H Bowl insulator
cushion ……………….1PC
N Left back leg………1PC
3
Page 5
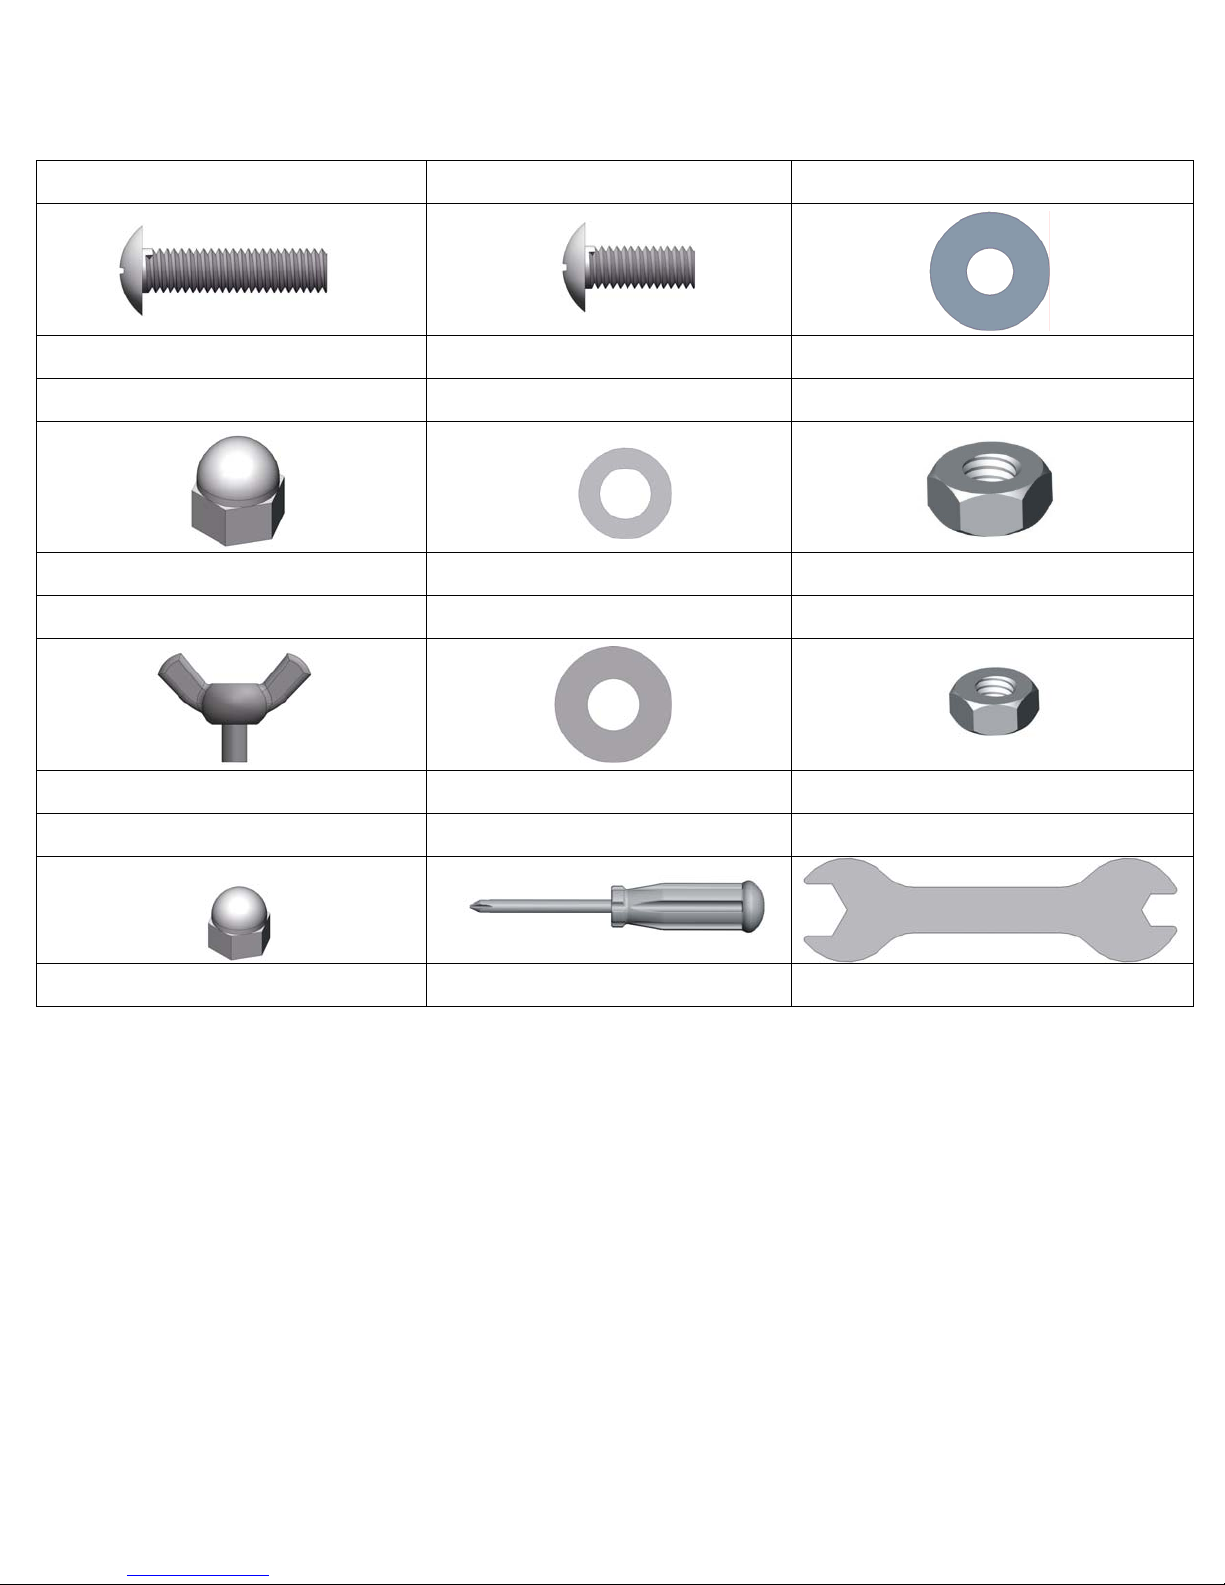
Hardware List
AAA:4PCS BBB:1PC CCC:5PCS
Bolt(M6X25) Bolt(M6X12) M6 Flat washer
DDD:1PC EEE:4PCS FFF:2PCS
Nut M6 M8 Flat washer M8 Nut
GGG:4PCS HHH:2PCS III:2PCS
Butterfly Bolt (M5X10) M5 Flat washer M5 Nut
JJJ:2PCS KKK:1PC LLL:1PC
Nut M5 Screwdriver Wrench
PC22B Owner’s Manual
4
Page 6
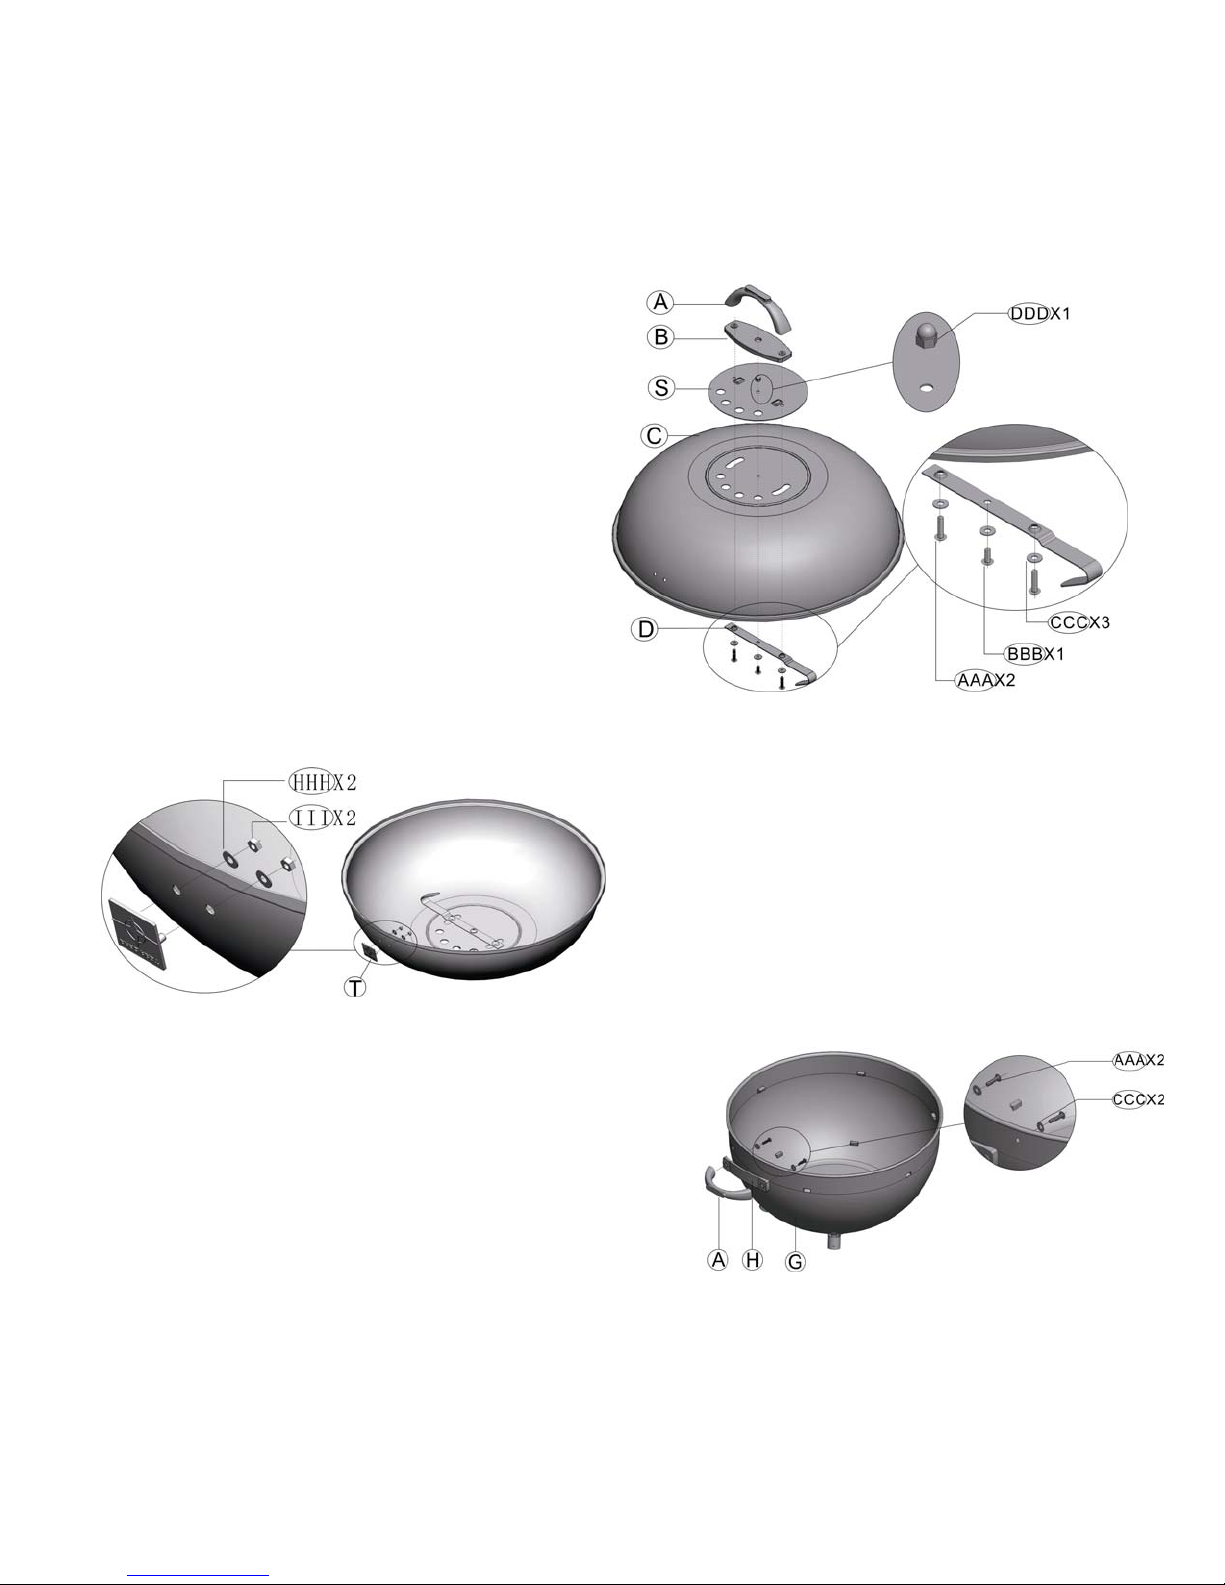
Assembly Instructions
A)
Alig
● Remove all contents from packaging, and make sure all parts are present before attempting to assemble.
● Tighten all bolt connections by hand first. Once the grill is fully assembled, go back and tighten all
connections.
● Estimated Assembly Time: 10 to 15 minutes.
Step 1
n the holes on two sides of the lid hook(D),with
the holes on the lid (C), the holes on the lid vent
(S), the holes on the insulator cushion(B) and the
holes on the lid handle (A), then insert one M6x25
bolt (AAA), one M6 flat washer (CCC) into each
pre-drilled hole, tighten the bolts by hand.
B) Align the middle hole on the lid hook, with the
middle holes on the lid, the lid vent and the
insulation cushion, then insert one M6 x12 bolt
(BBB) and one M6 nut (DDD) into pre-drilled hole.
C) Go back and tighten all bolts using the screwdriver
provided.
Step 3
Align the holes on the handle (A) with the holes
on the bowl insulator cushion (H)and the bottom
bowl(G), then insert one M6x25 bolt (AAA)
and one M6 flat washer (CCC) into each pre- drilled
hole, tighten the bolts by hand and screwdriver
provided.
Step 2
Insert the bolts extended from the name
plate (T), the M5 flat washers(HHH) and the
M5 nuts(III) into the holes on the lid, then
tighten the nuts by hand and wrench.
PC22B Owner’s Manual
5
Page 7
A)
)
)
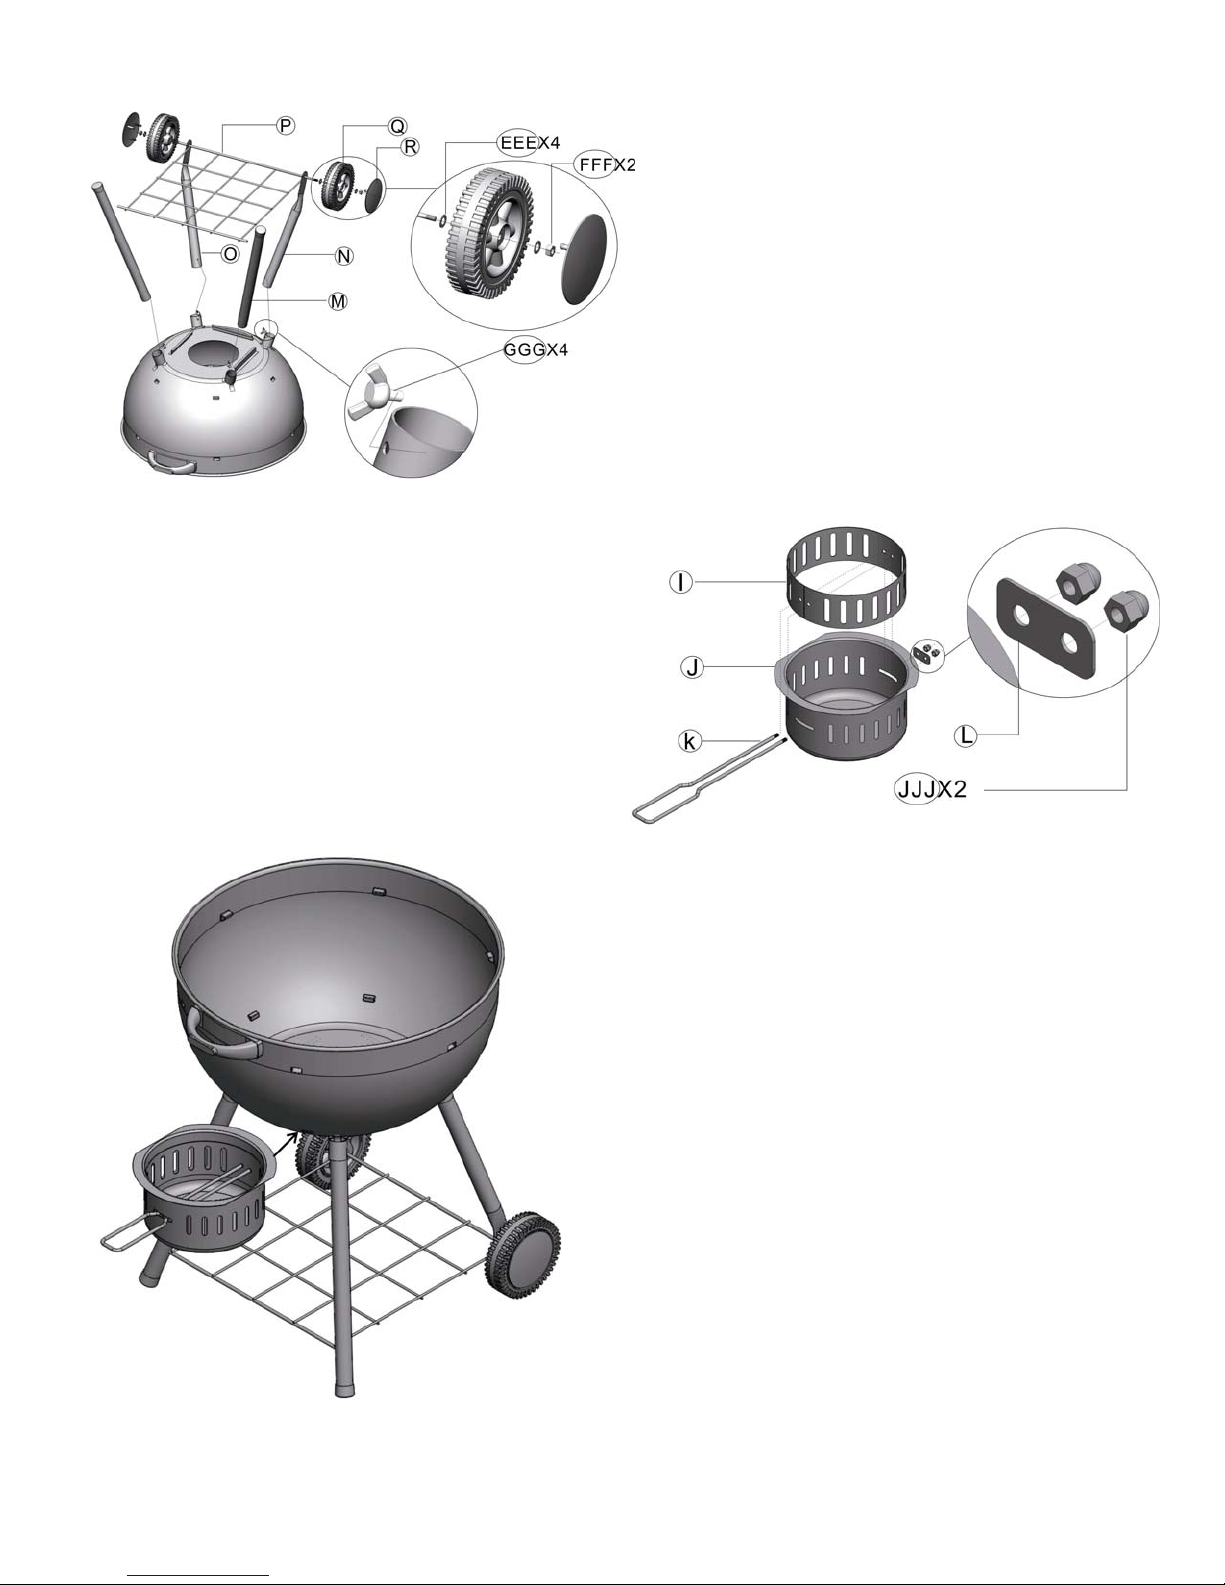
Step 5
A) Put the vent (I) in the ash receiver (J).
B) Align the holes on the vent with holes on the ash receiver
and the holes on the vent handle retainer(L), then insert the
vent handle (K) and the M 5 nut (JJJ) into the hole. Tighten
the nuts by hand.
Step 4
Use the axle extended from bottomgrid(P)to insert
the hole on the left back leg (N), one M8 flat washer
(EEE), one wheel (Q), one M8 flat washer(EEE) and
one M8 nut (FFF) by sequence, tighten the nut by the
wrench provided . Repeat the same procedure to
assemble the right back leg(O) and other wheel, insert
one wheel cap (R) on each wheel.
B
Insert the extended ends from bottomgrid into the
holes on the two front legs (M).
C
Insert the four legs into the the four seats underneath
the bottom bowl. Align the holes on the seats with the
holes on the legs, insert one M5 butterfly bolt(GGG)
into pre- drilled hole, tighten the bolts by wrench
provided.
Step 6
Slide the ash assembly into the guide underneath the bottom bowl.
PC22B Owner’s Manual
6
Page 8
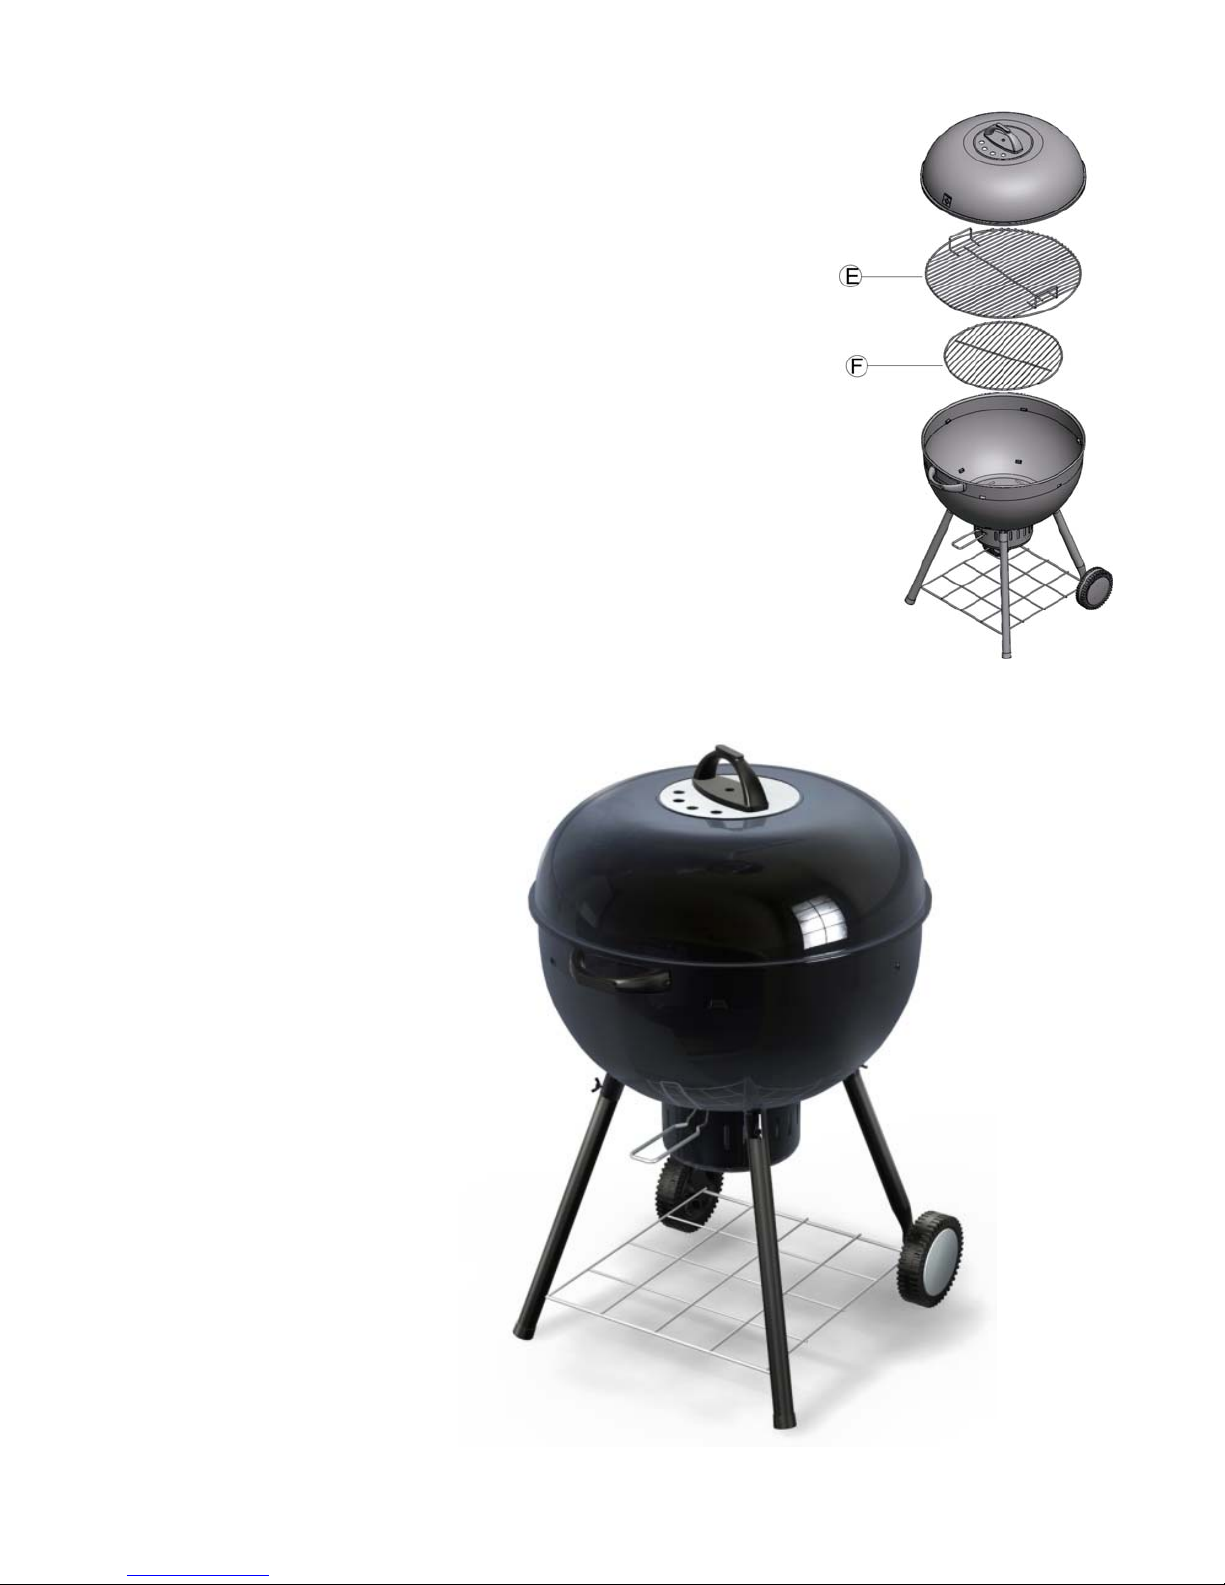
Step 7
A) Place the charcoal grid (F) in the bottom bowl.
B) Place the cooking grid (E) upon the charcoal grid,
Fully Assembled View
PC22B Owner’s Manual
7
Page 9

Lighting Your Grill
g
g
y
y
A
A
t
g
1. Make sure the lid and vents are open.
2. Remove the cookin
3. If you are using regular charcoal and intend to use lighter fluid, apply fluid according to the instruction on the
container. Allow lighter fluid to soak into the charcoal for approximately 1 minute before lighting.
4. If
5. If
6.
ou are usingan electric fire starter, do not add lighter fluid or lighter charcoal in accordance with the
manufacturer’s fire starter instructions.
ou are usinginstant-light charcoal, do not use alternate lightingmethods.
llow the charcoal to burn approximately15-20 minutes or until all the charcoal is lightlycoated withgrayash.
rid. Pile adequate amounts of charcoal in the center of the charcoalgridandshapeintoapyramid.
Cooking Styles
1. Direct Grilling: When the coals are covered with ash, use a long-handled cooking utensil and protective cooking mitts
to spread the charcoal evenly over the charcoal grid. Place the cooking grid back onto the grill and arrange the food
onto the cooking grid. Food can be cooked with the lid open or closed.
2. Indirect Grilling: When the charcoal is covered with ash, use a long-handled cooking utensil and protective cooking
mitts to arrange the charcoal in a donut shape. Leave an open space in the center. Place a small drip pan (not
included) in the center of the charcoal to catch the drippings.
3. Smoking: Soak any fragrant wood chips in water overnight so they will not burn when placed on the charcoal.
spreading the charcoal, according to direct grilling method above, place wood chips on top of the charcoal. Cook with
lid closed and the cooking grid, if adjustable, set to its highest setting.
fter
Helpful Hints
1. Store charcoal in a dryplace. If storingoutside, seal the charcoal in a waterproof container.
2. During cooking, if the lid is not hinged, lif
vacuum within the grill that could suck ash into the food.
3. When cleanin
with mild detergent. Rinse thoroughly with water. Remove and dispose of ash properly.
thegrill, DO NOT use abrasive cleaners. It could damage parts of thegrill. Clean thegrids and pans
it to one side instead of staright up. Lifting the lid straight up could create a
One-Year Limited Warranty
Top lid, chrome-plated wire cooking grid, zinc-plated charcoal grid, bottom bowl, handle and all other parts are warranted
against defects in material and workmanship for one year.
The warranty is nontransferable
● It does not cover damage due to misuse or improper installation or maintenance.
● The warranty is for replacement or repair of defective parts only. Manufacturer will not be responsible for incidental
or consequential damages or any labor costs.
● This limited warranty does not cover damage due to chipping and scratching of porcelain or painted surfaces nor
does it cover corrosion or discoloration due to misuse, lack of maintenance, harsh environment, accidents,
alterations, abuse or neglect.
● This limited warranty does not cover scratches, dents, corrosion or discoloration caused by heat, abrasive or
chemical cleaners nor chipping on porcelain enamel parts.
Customers will be subject to parts, shipping and handling fees if unable to provide proof of purchase
or if the warranty has expired.
Some provinces do not allow the limitation or exclusion of incidental or consequential damages, so
the above limitations or exclusions may not apply to you. This warranty gives you specific legal rights,
and you may also have other rights that vary from province to province.
For warranty claims or questions related to the product, please call our service center at
7:00AM to 4:00PM (PST), Monday through Friday.
1-877-630-5396,
Manufactured by:
PC22B Owner’s Manual
Lucas BBQ Co., Ltd. Printed in China
8
 Loading...