

Teradici PCoIP Zero TER1206003, PCoIP Portal, TERA1100, TERA2321, TERA2140 Administrator's Manual
...
PCoIP Zero Client and Host
Administrator Guide
TER1206003
Issue 1

PCoIP Zero Client and Host Administrator Guide
TeradiciCorporation
#101-4621 Canada Way, Burnaby, BC V5G 4X8 Canada
p +1 604 451 5800 f +1 604 451 5818
www.teradici.com
The information contained in this document r epresents the current view of Ter adici Corporation as of the date of
publication. Because Teradici must respond to changing mar ket conditions, it should not be interpreted to be a
commitment on the part of Teradici,and Teradici cannot guarantee the accuracy of any information presented after the
date of publication.
This document is for informational pur poses only.TERADICI MAKES NO WARRANTIES, EXPRESS, IMPLIED OR
STATUTORY, AS TO THE INFORMATION IN THIS DOCUMENT.
Complying with all applicable copyright laws is the r esponsibilityof the user. Without limiting the rights under copyright,
no part of this document may be reproduced, stored in or introduced into a retrieval system, or transmitted in any form or
by any means (electronic, mechanical, photocopying, recording, or otherwise), or for any purpose, without the express
written permission of TeradiciCorporation.
Teradicimay have patents, patent applications, trademarks,copyrights, or other intellectual property rights covering
subjectmatter in this document. Except as expressly provided in any written license agreement from Teradici,the
furnishing of this document does not give you any license to these patents, trademarks, copyrights, or other intellectual
property. Visit http://www.teradici.com/teradici/pat.php for more information.
© 2012 Teradici Cor poration. All r ights reserved.
Teradici, PC-over-IP, and PCoIP ar e registered tr ademarks of Teradici Corporation.
The names of actual companies and products mentioned herein may be the trademarks of their respective owners.
TER1206003 Issue 1 2

PCoIP Zero Client and Host Administrator Guide
Contents
Table of Figures 10
Table of Tables 16
1 Welcome 20
1.1 Introduction 20
2 What's New 21
2.1 What's New in Firmware 4.0.2 21
3 PCoIP Management Tools 23
3.1 About the MC 23
3.2 Logging into the MC 23
3.3 MC Home Page 24
3.4 MC Profile Management Page 25
3.5 MC Manage Profiles Page 26
3.6 About the AWI 30
3.7 Logging into the AWI 30
3.8 AWI Initial Setup Page 31
3.9 AWI Home Page 32
3.10 AWI Menus 35
3.11 About the OSD 36
3.12 Connecting to a Session 37
3.13 Disconnecting from a Session 41
3.14 Overlay Windows 43
3.14.1 Display Link Training Failed 43
3.14.2 Half Duplex Overlay 43
3.14.3 Network Connection Lost Overlay 43
3.14.4 No Support Resolutions Found 44
3.14.5 Preparing Desktop Overlay 44
3.14.6 USB Device Not Authorized Overlay 44
3.14.7 USB Over Current Notice Overlay 44
3.14.8 USB Device Not Supported Behind a High-speed Hub Overlay 45
3.14.9 Resolution Not Supported Overlay 45
3.14.10 Video Source Overlays 45
3.15 OSD Menus 46
4 PCoIP Deployment Scenarios 47
4.1 PCoIP Host Cards and Zero Clients 47
4.1.1 Displaying Processor Information 48
TER1206003 Issue 1 3

PCoIP Zero Client and Host Administrator Guide
4.2 Connecting a TERA1100 Zero Client to a TERA1202 Host Card 50
4.3 Prerequisites 51
4.3.1 Session Connection Type 52
4.3.2 Connecting Hosts and Clients Statically 52
4.3.3 Connecting Hosts and Clients Using SLP Host Discovery 52
4.3.4 Connecting Hosts and Clients Using a 3rd Party Connection Broker 53
4.3.5 Connecting Hosts and Clients Using the VMware View Connection Server Broker 54
4.3.6 Other Configuration Links 54
4.4 Connecting a TERA2321 Zero Client to a TERA1202 Host Card 56
4.5 Prerequisites 57
4.5.1 Session Connection Type 57
4.5.2 Connecting Hosts and Clients Statically 57
4.5.3 Connecting Hosts and Clients Using SLP Host Discovery 58
4.5.4 Connecting Hosts and Clients Using a 3rd Party Connection Broker 58
4.5.5 Connecting Hosts and Clients Using the VMware View Connection Server Broker 59
4.5.6 Other Configuration Links 59
4.6 Connecting a TERA2140 Zero Client to a TERA1202 Host Card 61
4.7 Prerequisites 62
4.7.1 Session Connection Type 62
4.7.2 Connecting Hosts and Clients Statically 62
4.7.3 Connecting Hosts and Clients Using SLP Host Discovery 63
4.7.4 Connecting Hosts and Clients Using a 3rd Party Connection Broker 63
4.7.5 Connecting Hosts and Clients Using the VMware View Connection Server Broker 64
4.7.6 Other Configuration Links 64
4.8 Connecting a TERA1100 Zero Client to a TERA2220 Host Card 66
4.9 Prerequisites 67
4.9.1 Session Connection Type 67
4.9.2 Connecting Hosts and Clients Statically 67
4.9.3 Connecting Hosts and Clients Using SLP Host Discovery 68
4.9.4 Connecting Hosts and Clients Using a 3rd Party Connection Broker 68
4.9.5 Connecting Hosts and Clients Using the VMware View Connection Server Broker 69
4.9.6 Other Configuration Links 69
4.10 Connecting a TERA2321 Zero Client to a TERA2220 Host Card 71
4.11 Prerequisites 72
4.11.1 Session Connection Type 72
4.11.2 Connecting Hosts and Clients Statically 72
4.11.3 Connecting Hosts and Clients Using SLP Host Discovery 73
4.11.4 Connecting Hosts and Clients Using a 3rd Party Connection Broker 73
4.11.5 Connecting Hosts and Clients Using the VMware View Connection Server Broker 74
4.11.6 Other Configuration Links 74
4.12 Connecting a TERA2140 Zero Client to a TERA2220 Host Card 76
4.13 Prerequisites 77
4.13.1 Session Connection Type 77
4.13.2 Connecting Hosts and Clients Statically 77
TER1206003 Issue 1 4

PCoIP Zero Client and Host Administrator Guide
4.13.3 Connecting Hosts and Clients Using SLP Host Discovery 78
4.13.4 Connecting Hosts and Clients Using a 3rd Party Connection Broker 78
4.13.5 Connecting Hosts and Clients Using the VMware View Connection Server Broker 79
4.13.6 Other Configuration Links 79
4.14 Connecting a TERA1100 Zero Client to a TERA2240 Host Card 81
4.15 Prerequisites 82
4.15.1 Session Connection Type 82
4.15.2 Connecting Hosts and Clients Statically 82
4.15.3 Connecting Hosts and Clients Using SLP Host Discovery 83
4.15.4 Connecting Hosts and Clients Using a 3rd Party Connection Broker 83
4.15.5 Connecting Hosts and Clients Using the VMware View Connection Server Broker 84
4.15.6 Other Configuration Links 84
4.16 Connecting a TERA2321 Zero Client to a TERA2240 Host Card 86
4.17 Prerequisites 87
4.17.1 Session Connection Type 87
4.17.2 Connecting Hosts and Clients Statically 87
4.17.3 Connecting Hosts and Clients Using SLP Host Discovery 88
4.17.4 Connecting Hosts and Clients Using a 3rd Party Connection Broker 88
4.17.5 Connecting Hosts and Clients Using the VMware View Connection Server Broker 89
4.17.6 Other Configuration Links 89
4.18 Connecting a TERA2140 Zero Client to a TERA2240 Host Card 91
4.19 Prerequisites 92
4.19.1 Session Connection Type 93
4.19.2 Connecting Hosts and Clients Statically 93
4.19.3 Connecting Hosts and Clients Using SLP Host Discovery 93
4.19.4 Connecting Hosts and Clients Using a 3rd Party Connection Broker 94
4.19.5 Connecting Hosts and Clients Using the VMware View Connection Server Broker 95
4.19.6 Other Configuration Links 95
4.20 Connecting a TERA1100 Zero Client to a VMware View Virtual Desktop 97
4.21 Prerequisites 98
4.22 Session Connection Type 98
4.22.1 View Connection Server 98
4.22.2 View Connection Server + Auto-Logon 99
4.22.3 View Connection Server + Kiosk 99
4.22.4 View Connection Server + Imprivata OneSign 99
4.22.5 Other Configuration Links 100
4.23 Connecting a TERA2321 Zero Client to a VMware View Virtual Desktop 101
4.24 Prerequisites 102
4.25 Session Connection Type 103
4.25.1 View Connection Server 103
4.25.2 View Connection Server + Auto-Logon 103
4.25.3 View Connection Server + Kiosk 104
4.25.4 View Connection Server + Imprivata OneSign 104
TER1206003 Issue 1 5

PCoIP Zero Client and Host Administrator Guide
4.25.5 Other Configuration Links 105
4.26 Connecting a TERA2140 Zero Client to a VMware View Virtual Desktop 106
4.27 Prerequisites 107
4.28 Session Connection Type 108
4.28.1 View Connection Server 108
4.28.2 View Connection Server + Auto-Logon 108
4.28.3 View Connection Server + Kiosk 109
4.28.4 View Connection Server + Imprivata OneSign 109
4.28.5 Other Configuration Links 110
4.29 Connecting a VMware View Client to a VMware View Virtual Desktop 111
5 PCoIP GUI Reference 112
5.1 Initial Setup 112
5.1.1 AWI Host: Initial Setup Page 112
5.1.2 AWI Client: Initial Setup Page 113
5.2 Configuring the Network 115
5.2.1 MC: Network Settings 115
5.2.2 AWI: Network Settings 117
5.2.3 OSD: Network Settings 120
5.3 Label Settings 122
5.3.1 AWI: Label Settings 122
5.3.2 OSD: Label Settings 123
5.4 Configuring Device Discovery 125
5.4.1 MC: Discovery Settings 125
5.4.2 AWI: Discovery Settings 126
5.4.3 OSD: Discovery Settings 128
5.5 Configuring SNMP 129
5.5.1 MC: Help for SNMP Settings 129
5.5.2 AWI: SNMP Settings 129
5.6 Configuring a Session 129
5.6.1 Configuring a Session 129
5.6.2 MC: Direct to Host Session Settings 131
5.6.3 MC: Direct to Host Session + SLP Host Discovery Settings 134
5.6.4 MC: View Connection Server Session Settings 136
5.6.5 MC: View Connection Server + Auto-Logon Session Settings 140
5.6.6 MC: View Connection Server + Kiosk Session Settings 144
5.6.7 MC: View Connection Server + Imprivata OneSign Session Settings 148
5.6.8 MC: Connection Management Interface Settings 151
5.6.9 AWI Host: Direct from Client Session Settings 154
5.6.10 AWI Client: Direct to Host Session Settings 155
5.6.11 AWI Client: Direct to Host + SLP Host Discovery Session Settings 159
5.6.12 AWI Client: View Connection Server Session Settings 163
5.6.13 AWI Client: View Connection Server + Auto-Logon Session Settings 168
5.6.14 AWI Client: View Connection Server + Kiosk Session Settings 174
TER1206003 Issue 1 6

PCoIP Zero Client and Host Administrator Guide
5.6.15 AWI Client: View Connection Server + Imprivata OneSign Session Settings 179
5.6.16 AWI Host: Connection Management Interface Session Settings 183
5.6.17 AWI Client: Connection Management Interface Session Settings 186
5.6.18 OSD: Direct to Host Session Settings 190
5.6.19 OSD: Direct to Host + SLP Host Discovery Session Settings 193
5.6.20 OSD: View Connection Server Session Settings 196
5.6.21 OSD: View Connection Server + Auto-Logon Session Settings 199
5.6.22 OSD: View Connection Server + Kiosk Session Settings 203
5.6.23 OSD: View Connection Server + Imprivata OneSign Session Settings 206
5.6.24 OSD: Connection Management Interface Session Settings 210
5.7 Configuring Session Encryption 213
5.7.1 MC: Encryption Settings 213
5.7.2 AWI: Help for Encryption Settings 214
5.8 Configuring Session Bandwidth 214
5.8.1 MC: Bandwidth Settings 214
5.8.2 AWI: Bandwidth Settings 216
5.9 Configuring the Language 218
5.9.1 MC: Language Settings 218
5.9.2 AWI Client: Language Settings 219
5.9.3 OSD: Language Settings 220
5.10 Configuring OSD Parameters 221
5.10.1 MC: OSD Settings 221
5.10.2 AWI Client: OSD Settings 222
5.10.3 OSD: OSD Settings 223
5.11 Configuring Image Quality 224
5.11.1 MC: Image Settings 224
5.11.2 AWI Host: Image Settings 226
5.11.3 AWI Client: Image Settings 229
5.11.4 OSD: Image Settings 231
5.12 Configuring Monitor Emulation 232
5.12.1 MC: Monitor Emulation 232
5.12.2 AWI Tera1 Host: Monitor Emulation 233
5.12.3 AWI Tera2 Host: Monitor Emulation 234
5.13 Configuring Time 235
5.13.1 MC: Time Settings 235
5.13.2 AWI: Time Settings 236
5.14 Configuring Security 238
5.14.1 MC: Security Settings 238
5.14.2 AWI: Help for Security Settings 239
5.15 Configuring Audio Permissions 239
5.15.1 MC: Audio Permissions 239
5.15.2 AWI Tera1 Host: Audio Permissions 240
5.15.3 AWI Client: Audio Permissions 242
5.16 Configuring Power Permissions 242
TER1206003 Issue 1 7

PCoIP Zero Client and Host Administrator Guide
5.16.1 MC: Power Permissions 242
5.16.2 AWI Tera1 Client: Power Permissions 244
5.17 Configuring the Host Driver Function 244
5.17.1 MC: Host Driver Function 244
5.17.2 AWI Host: Host Driver Function 245
5.18 Configuring the Event Log 246
5.18.1 MC: Event Log Settings 246
5.18.2 AWI: Event Log Settings 248
5.18.3 OSD: Event Log Settings 250
5.19 Configuring Peripherals 251
5.19.1 MC: Peripheral Settings 251
5.19.2 AWI Client: Help for Peripheral Settings 251
5.20 Configuring IPv6 252
5.20.1 MC: IPv6 Settings 252
5.20.2 AWI: IPv6 Settings 253
5.20.3 OSD: IPv6 Settings 255
5.21 Configuring the Display Topology 257
5.21.1 MC: Display Topology Settings 257
5.21.2 OSD Dual-display: Display Topology Settings 261
5.21.3 OSD Quad-display: Display Topology Settings 263
5.22 Uploading an OSD Logo 266
5.22.1 MC: OSD Logo Settings 266
5.22.2 AWI Client: OSD Logo Settings 267
5.23 Uploading Firmware 267
5.23.1 MC: Firmware Management 267
5.23.2 AWI: Firmware Upload Settings 269
5.24 Configuring USB Permissions 270
5.24.1 MC: USB Permissions 270
5.24.2 AWI Client: USB Permissions 273
5.24.3 AWI Host: USB Permissions 277
5.25 Configuring the Certificate Store 280
5.25.1 MC: Certificate Store Management 280
5.25.2 AWI: Certificate Upload Settings 281
5.26 Configuring an OSD Display Override 283
5.26.1 OSD Dual-display: Display Settings 283
5.26.2 OSD Quad-display: Display Settings 285
5.27 Configuring Password and Reset Parameters (AWI/OSD) 287
5.27.1 AWI: Password Settings 287
5.27.2 OSD: Password Settings 288
5.27.3 AWI Host: Parameter Reset Settings 289
5.27.4 AWI Client: Parameter Reset Settings 290
5.27.5 OSD: Parameter Reset Settings 291
5.28 Viewing Diagnostics (AWI/OSD) 292
TER1206003 Issue 1 8

PCoIP Zero Client and Host Administrator Guide
5.28.1 AWI: Help for Event Log Settings 292
5.28.2 OSD: Help for Event Log Settings 292
5.28.3 AWI Host: Session Control Settings 292
5.28.4 AWI Client: Session Control Settings 293
5.28.5 AWI Host: Session Statistics Settings 294
5.28.6 AWI Client: Session Statistics Settings 296
5.28.7 OSD:Session Statistics Settings 299
5.28.8 AWI Host: Host CPU Settings 300
5.28.9 AWI Client: Audio Settings 301
5.28.10 AWI Client: Display Settings 301
5.28.11 AWI: PCoIP Processor Settings 302
5.28.12 OSD: PCoIP Processor Settings 303
5.28.13 OSD:Ping Settings 303
5.29 Viewing Information (AWI/OSD) 304
5.29.1 AWI: Version Information 304
5.29.2 Viewing the Version Information 306
5.29.3 AWI Host: Attached Devices Information 307
5.29.4 AWI Client: Attached Devices Information 308
5.30 Configuring User Settings (OSD) 309
5.30.1 OSD: VMware View Certificate Checking Settings 309
5.30.2 MC: Help for VMware View Certificate Checking Settings 310
5.30.3 AWI Client: Help for VMware View Certificate Checking Settings 310
5.30.4 OSD: Mouse Settings 310
5.30.5 OSD: Keyboard Settings 311
5.30.6 OSD: Help for Image Settings 312
5.30.7 OSD: Help for Display Topology Settings 312
5.30.8 OSD: Touch Screen Settings 313
6 PCoIP Technology Reference 316
6.1 PCoIP Host Cards 316
6.2 PCoIP Zero Clients 316
6.3 DVI and DisplayPort Interfaces 316
6.3.1 Support for 2560x1600 Display Resolution 316
6.4 PCoIP Connection Brokers 318
6.5 APEX 2800 PCoIP Server Offload Card 318
7 Glossary of Acronyms 319
8 Index 323
TER1206003 Issue 1 9

PCoIP Zero Client and Host Administrator Guide
Table of Figures
Figure 3-1: MC Login Page 24
Figure 3-2: MC Home Page 25
Figure 3-3: MC Profile Management Page 26
Figure 3-4: MC Manage Profiles Page 27
Figure 3-5: Edit Properties Link 28
Figure 3-6: Set Properties Page for Network Configuration 28
Figure 3-7: MC Manage Profiles Page – Configured 29
Figure 3-8: AWI Log In Page 31
Figure 3-9: AWI Host: Home Page 32
Figure 3-10: AWI Client: Home Page 33
Figure 3-11: AWI Menu Overview 36
Figure 3-12: OSD Main Window 37
Figure 3-13: OSD Direct to Host Connect Window 38
Figure 3-14: OSD Connection Status 38
Figure 3-15: OSD View Connection Server Connect Window 39
Figure 3-16: Virtual Desktop Login Page 39
Figure 3-17: OSD View Connection Server Certificate Warning 40
Figure 3-18: OSD Login Screen with Insecure Warning 40
Figure 3-19: OSD VMware View Page 41
Figure 3-20: Zero Client Control Panel 42
Figure 3-21: Display Link Training Failed Overlay 43
Figure 3-22: Half Duplex Overlay 43
Figure 3-23: Network Connection Lost Overlay 43
Figure 3-24: No Support Resolutions Found Overlay 44
Figure 3-25: Preparing Desktop Overlay 44
Figure 3-26: USB Device Not Authorized Overlay 44
Figure 3-27: USB Over Current Notice Overlay 45
Figure 3-28: USB Device Not Supported Behind a High-speed Hub Overlay 45
Figure 3-29: Resolution Not Supported Overlay 45
Figure 3-30: No Source Signal Overlay 45
Figure 3-31: Source Signal on Other Port Overlay 46
Figure 3-32: OSDOptions Menu 46
TER1206003 Issue 1 10

PCoIP Zero Client and Host Administrator Guide
Figure 4-1: Processor Information on AWI Home Page 48
Figure 4-2: Processor Family Information on AWI Version Page 49
Figure 4-3: Processor Family Information on OSD Version Page 50
Figure 4-4: Connecting a TERA1100 Zero Client to a TERA1202 Host Card 51
Figure 4-5: Connecting a TERA2321 Zero Client to a TERA1202 Host Card 56
Figure 4-6: Connecting a TERA2140 Zero Client to a TERA1202 Host Card 61
Figure 4-7: Connecting a TERA1100 Zero Client to a TERA2220 Host Card 66
Figure 4-8: Connecting a TERA2321 Zero Client to a TERA2220 Host Card 71
Figure 4-9: Connecting a TERA2140 Zero Client to a TERA2220 Host Card 76
Figure 4-10: Connecting a TERA1100 Zero Client to a TERA2240 Host Card 81
Figure 4-11: Connecting a TERA2321 Zero Client to a TERA2240 Host Card 86
Figure 4-12: Connecting a TERA2140 Zero Client to a TERA2240 Host Card 92
Figure 4-13: Connecting a TERA1100 Zero Client to a VMware View Virtual Desktop 97
Figure 4-14: Connecting a TERA2321 Zero Client to a VMware View Virtual Desktop 102
Figure 4-15: Connecting a TERA2140 Zero Client to a VMware View Virtual Desktop 107
Figure 5-1: AWI Host Initial Setup Page 112
Figure 5-2: AWI Client Initial Setup Page 114
Figure 5-3: MC Network Configuration 116
Figure 5-4: AWI Network Page 118
Figure 5-5: OSD Network Page 121
Figure 5-6: AWI Label Page 123
Figure 5-7: OSD Label Page 124
Figure 5-8: MC Discovery Configuration 125
Figure 5-9: AWI Discovery Page 127
Figure 5-10: OSD Discovery Page 128
Figure 5-11: AWI SNMP Page 129
Figure 5-12: MC Session Connection Type – Direct to Host 132
Figure 5-13: MC Session Connection Type – Direct to Host + SLP Host Discovery 134
Figure 5-14: MC Session Connection Type – View Connection Server 137
Figure 5-15: MC Session Connection Type – View Connection Server + Auto-Logon 141
Figure 5-16: MC Session Connection Type – View Connection Server + Kiosk 145
Figure 5-17: MC Session Connection Type – View Connection Server + Imprivata OneSign 148
Figure 5-18: MC Session Connection Type – Connection Management Interface 152
Figure 5-19: AWI Session Connection Type – Direct from Client 154
Figure 5-20: AWI Session Connection Type – Direct to Host 156
TER1206003 Issue 1 11

PCoIP Zero Client and Host Administrator Guide
Figure 5-21: AWI Session Connection Type – Direct to Host + SLP Host Discovery 160
Figure 5-22: AWI Session Connection Type – View Connection Server 163
Figure 5-23: Enable Self Help Link Options 167
Figure 5-24: AWI Session Connection Type – View Connection Server + Auto-Logon 169
Figure 5-25: Enable Self Help Link Options 173
Figure 5-26: AWI Session Connection Type – View Connection Server + Kiosk 175
Figure 5-27: AWI Session Connection Type – View Connection Server + Imprivata OneSign 179
Figure 5-28: AWI Session Connection Type – Connection Management Interface (Host) 184
Figure 5-29: AWI Session Connection Type – Connection Management Interface (Client) 187
Figure 5-30: OSD Session Connection Type – Direct to Host 190
Figure 5-31: Advanced Settings 191
Figure 5-32: OSD Session Connection Type – Direct to Host + SLP Host Discovery 193
Figure 5-33: Advanced Settings 194
Figure 5-34: OSD Session Connection Type – View Connection Server 196
Figure 5-35: Advanced Settings 197
Figure 5-36: OSD Session Connection Type – View Connection Server + Auto-Logon 200
Figure 5-37: Advanced Settings 200
Figure 5-38: OSD Session Connection Type – View Connection Server + Kiosk 203
Figure 5-39: Advanced Settings 204
Figure 5-40: OSD Session Connection Type – View Connection Server + Imprivata OneSign 207
Figure 5-41: Advanced Settings 207
Figure 5-42: OSD Session Connection Type – Connection Management Interface 210
Figure 5-43: Advanced Settings 211
Figure 5-44: MC Encryption Configuration 213
Figure 5-45: MC Bandwidth Configuration 215
Figure 5-46: AWI Bandwidth Page 217
Figure 5-47: MC Language Configuration 219
Figure 5-48: AWI Client Language Page 220
Figure 5-49: OSD Language Page 221
Figure 5-50: MC OSD Configuration 222
Figure 5-51: AWI On Screen Display Page 223
Figure 5-52: OSD OSD Page 224
Figure 5-53: MC Image Configuration 225
Figure 5-54: AWI Host Image Page 227
Figure 5-55: AWI Host Image Page – Use Client Image Settings Disabled 227
TER1206003 Issue 1 12

PCoIP Zero Client and Host Administrator Guide
Figure 5-56: AWI Client Image Page 229
Figure 5-57: OSD Image Page 231
Figure 5-58: MC Monitor Emulation Page 232
Figure 5-59: AWI Tera1 Host Monitor Emulation Page 233
Figure 5-60: AWI Tera2 Host Monitor Emulation Page 234
Figure 5-61: MC Time Configuration 236
Figure 5-62: AWI Time Page 237
Figure 5-63: MC Security Configuration 238
Figure 5-64: MC Audio Permissions 240
Figure 5-65: AWI Tera1 Host Audio Page 241
Figure 5-66: AWI Client Audio Page 242
Figure 5-67: MC Power Permissions 243
Figure 5-68: AWI Tera1 Client Power Page 244
Figure 5-69: MC Host Driver Configuration 245
Figure 5-70: AWI Host Driver Function Page 246
Figure 5-71: MC Event Log Control 247
Figure 5-72: AWI Event Log Page 248
Figure 5-73: OSD Event Log Page 250
Figure 5-74: MC Peripheral Configuration 251
Figure 5-75: MC IPv6 Configuration 252
Figure 5-76: AWI IPv6 Page 254
Figure 5-77: OSD IPv6 Page 256
Figure 5-78: MC Display Topology Configuration 258
Figure 5-79: OSD Tera1 Display Topology Page 262
Figure 5-80: OSD Tera2 Display Topology Page 264
Figure 5-81: MC Profile OSD Logo Configuration 266
Figure 5-82: MC Add OSD Logo Configuration 266
Figure 5-83: AWI Client OSDLogo Upload Page 267
Figure 5-84: MC Profile Firmware Configuration 268
Figure 5-85: MC Link to Imported Firmware 268
Figure 5-86: MC Link to Imported Firmware – Configured 268
Figure 5-87: AWI Firmware Upload Page 269
Figure 5-88: MC Profile Zero Client USB Configuration 270
Figure 5-89: USB Authorization – Add New 272
Figure 5-90: USB Unauthorization – Add New 272
TER1206003 Issue 1 13

PCoIP Zero Client and Host Administrator Guide
Figure 5-91: USB Bridged – Add New 272
Figure 5-92: AWI Client USBPage 274
Figure 5-93: Device Class Parameters 275
Figure 5-94: Device ID Parameters 275
Figure 5-95: USB Bridged Parameters 276
Figure 5-96: AWI Host USBPage 278
Figure 5-97: Device Class Parameters 279
Figure 5-98: Device ID Parameters 279
Figure 5-99: MC Certificate Store Configuration 280
Figure 5-100: MC Add Certificate to Store 281
Figure 5-101: MC Certificate Store 281
Figure 5-102: AWI Certificate Upload Page 282
Figure 5-103: OSD Tera1Display Page 284
Figure 5-104: OSD Tera2 Display Page 286
Figure 5-105: AWI Password Page 288
Figure 5-106: OSD Change Password Page 289
Figure 5-107: AWI Host Reset Page 290
Figure 5-108: AWI Client Reset Page 290
Figure 5-109: OSD Reset Page 291
Figure 5-110: AWI Host Session Control Page 292
Figure 5-111: AWI Client Session Control Page 293
Figure 5-112: AWI Host Session Statistics Page 294
Figure 5-113: AWI Client Session Statistics Page 297
Figure 5-114: OSD Session Statistics Page 299
Figure 5-115: AWI Host CPU Page 300
Figure 5-116: AWI Client Audio Page 301
Figure 5-117: AWI Client Display Page 302
Figure 5-118: AWI PCoIP Processor Page 302
Figure 5-119: OSD PCoIP Processor Page 303
Figure 5-120: OSD Ping Page 304
Figure 5-121: AWI Version Page 305
Figure 5-122: OSD Version Page 306
Figure 5-123: AWI Host Attached Devices Page 307
Figure 5-124: AWI Client Attached Devices Page 308
Figure 5-125: OSD VMware View Page 309
TER1206003 Issue 1 14

PCoIP Zero Client and Host Administrator Guide
Figure 5-126: OSD Mouse Page 311
Figure 5-127: OSD Keyboard Page 312
Figure 5-128: OSD Touch Screen Page 313
Figure 6-1: DVI and DisplayPort Connectors for 2560x1600 Resolution 317
TER1206003 Issue 1 15

PCoIP Zero Client and Host Administrator Guide
Table of Tables
Table 3-1: AWI Home Page Statistics 33
Table 4-1: Supported Resolutions for PCoIP Host Cards and Zero Clients 47
Table 5-1: Audio Parameters 112
Table 5-2: Network Parameters 113
Table 5-3: Session Parameters 113
Table 5-4: Audio Parameters 114
Table 5-5: Network Parameters 114
Table 5-6: Session Parameters 115
Table 5-7: MC Network Configuration Parameters 116
Table 5-8: AWI Network Page Parameters 118
Table 5-9: OSD Network Page Parameters 121
Table 5-10: AWI Label Page Parameters 123
Table 5-11: OSD Label Page Parameters 124
Table 5-12: MC Discovery Configuration Parameters 125
Table 5-13: AWI Discovery Page Parameters 127
Table 5-14: OSD Discovery Page Parameter 128
Table 5-15: AWI SNMP Page Parameter 129
Table 5-16: Direct Session Connections 130
Table 5-17: Direct Session Connections 130
Table 5-18: Direct Session Connections 131
Table 5-19: MC Session Configuration Parameters 132
Table 5-20: MC Session Configuration Parameters 134
Table 5-21: MC Session Configuration Parameters 137
Table 5-22: MC Session Configuration Parameters 141
Table 5-23: MC Session Configuration Parameters 145
Table 5-24: MC Session Configuration Parameters 148
Table 5-25: MC Session Configuration Parameters 152
Table 5-26: AWI Session Page Parameters 154
Table 5-27: AWI Session Page Parameters 156
Table 5-28: AWI Session Page Parameters 160
Table 5-29: AWI Session Page Parameters 163
Table 5-30: AWI Session Page Parameters 169
TER1206003 Issue 1 16

PCoIP Zero Client and Host Administrator Guide
Table 5-31: AWI Session Page Parameters 175
Table 5-32: AWI Session Page Parameters 180
Table 5-33: AWI Session Page Parameters 184
Table 5-34: AWI Session Page Parameters 187
Table 5-35: OSD Session Page Parameters 191
Table 5-36: OSD Session Page Parameters 194
Table 5-37: OSD Session Page Parameters 197
Table 5-38: OSD Session Page Parameters 201
Table 5-39: OSD Session Page Parameters 204
Table 5-40: OSD Session Page Parameters 208
Table 5-41: AWI Session Page Parameters 211
Table 5-42: MC Encryption Configuration Parameters 213
Table 5-43: MC Bandwidth Configuration Parameters 215
Table 5-44: AWI Bandwidth Parameters 217
Table 5-45: MC Language Configuration Parameters 219
Table 5-46: AWI Client Language Parameters 220
Table 5-47: OSD Language Parameters 221
Table 5-48: MC Language Configuration Parameters 222
Table 5-49: AWI OSD Parameters 223
Table 5-50: OSD OSD Parameters 224
Table 5-51: MC Image Configuration Parameters 225
Table 5-52: AWI Host Image Page Parameters 227
Table 5-53: AWI Client Image Page Parameters 229
Table 5-54: OSD Image Page Parameters 231
Table 5-55: MC Monitor Parameters 232
Table 5-56: AWI Tera1 Host Monitor Parameters 233
Table 5-57: AWI Tera2 Host Monitor Parameters 234
Table 5-58: MC Time Configuration Parameters 236
Table 5-59: AWI Time Page Parameters 237
Table 5-60: MC Security Configuration Parameters 238
Table 5-61: MC Audio Permissions Parameters 240
Table 5-62: AWI Tera1 Host Audio Page Parameters 241
Table 5-63: AWI Client Audio Page Parameters 242
Table 5-64: MC Power Permissions Parameters 243
Table 5-65: AWI Tera1 Client Power Page Parameters 244
TER1206003 Issue 1 17

PCoIP Zero Client and Host Administrator Guide
Table 5-66: MC Host Driver Configuration Parameters 245
Table 5-67: AWI Host Driver Function Parameters 246
Table 5-68: MC Event Log Control Parameters 247
Table 5-69: AWI Event Log Page Parameters 249
Table 5-70: OSD Event Log Page Parameters 250
Table 5-71: MC Peripheral Configuration Parameters 251
Table 5-72: MC IPv6 Configuration Parameters 252
Table 5-73: AWI IPv6 Page Parameters 254
Table 5-74: OSD IPv6 Page Parameters 256
Table 5-75: MC Display Topology Configuration Parameters 258
Table 5-76: OSD Tera1 Display Topology Page Parameters 262
Table 5-77: OSD Tera2 Display Topology Page Parameters 264
Table 5-78: MC Add OSD Logo Configuration Parameters 266
Table 5-79: AWI Client OSD Logo Upload Page Parameters 267
Table 5-80: MC Link to Imported Firmware Parameters 268
Table 5-81: AWI Firmware Upload Page Parameters 269
Table 5-82: MC Profile Zero Client USB Configuration Parameters 271
Table 5-83: Add Profile USB – Add New Parameters 272
Table 5-84: AWI Client USB Page Parameters 274
Table 5-85: USB Authorized/Unauthorized Devices Parameters 276
Table 5-86: USB Bridged Devices Parameters 277
Table 5-87: AWI Host USB Page Parameters 278
Table 5-88: USB Authorized/Unauthorized Devices Parameters 279
Table 5-89: MC Certificate Store Configuration Parameters 280
Table 5-90: MC Add Certificate to Store Parameters 281
Table 5-91: AWI Certificate Upload Page Parameters 282
Table 5-92: OSD Tera1 Display Page Parameters 284
Table 5-93: OSD Tera2 Display Page Parameters 286
Table 5-94: AWI Password Page Parameters 288
Table 5-95: OSD Change Password Page Parameters 289
Table 5-96: AWI Host Reset Parameters 290
Table 5-97: AWI Client Reset Parameters 290
Table 5-98: OSD Reset Parameters 292
Table 5-99: AWI Host Session Control Page Parameters 292
Table 5-100: AWI Client Session Control Page Parameters 293
TER1206003 Issue 1 18

PCoIP Zero Client and Host Administrator Guide
Table 5-101: AWI Host Session Statistics Page Parameters 295
Table 5-102: AWI Client Session Statistics Page Parameters 297
Table 5-103: OSD Session Statistics Page Parameters 300
Table 5-104: AWI Host CPUPage Parameters 300
Table 5-105: AWI Client Display Page Parameters 302
Table 5-106: AWI PCoIP Processor Page Parameters 303
Table 5-107: Ping Page Parameters 304
Table 5-108: AWIVersion Page Parameters 305
Table 5-109: OSDVersion Page Parameters 306
Table 5-110: AWIHost: Attached Devices Page Information 307
Table 5-111: AWIClient: Attached Devices Page Information 308
Table 5-112: OSD VMware View Page Parameters 310
Table 5-113: OSD Mouse Page Parameters 311
Table 5-114: OSD Keyboard Page Parameters 312
Table 5-115: OSD Touch Screen Page Parameters 313
TER1206003 Issue 1 19

1 Welcome
1.1 Introduction
Welcome to Teradici's PCoIP Zero Client and Host Administrator WebHelp. This help
system explains how to configure PCoIP device firmware so you can access and manage the
hosts and zero clients in your PCoIP deployment. It comprises the following main sections:
l What's New: This section explains the new features for each firmware release, and
contains links to topics that provide more information about these features.
l PCoIP Management Tools: This section describes how to access and use the following
PCoIP management tools:
l Management Console (MC): The MC lets you centrally control and manage the
devices in your PCoIP deployment. This help system explains how to configure a
profile (a collection of device configuration settings), which you can then assign to a
specific PCoIP group (a set of one or more hosts or clients). The MC is the best tool
for medium to large deployments, and is often used in conjunction with a connection
broker. For further details, see About the MC.
l Administrative Web Interface (AWI): The AWI lets you use an Internet browser to
remotely access and configure a specific client or host. For further details, see About
the AWI.
l On Screen Display (OSD): The OSD is the graphical user interface (GUI) embedded
within a client. It is used to connect the client to a virtual desktop or to a host in a
remote workstation. It is also used to configure the client, and has a subset of the
configuration parameters available in the MC and AWI. For further details, see
About the OSD.
l PCoIP Deployment Scenarios: This section illustrates and describes the most common
ways to deploy the hosts and clients in your PCoIP network. Configuration steps are
included for each scenario, with links to topics in the PCoIP GUI Reference where you
can find detailed information. The scenarios are the best place to start when configuring
a new deployment.
l PCoIP GUI Reference: This section is a detailed reference that describes each
configuration parameter that appears in the MC, AWI, and OSD pages. You can use this
reference when configuring a device profile using the MC, or when configuring a single
device using the AWI or OSD. The PCoIP GUI Reference is organized by the
categories listed in the MC's Manage Profiles page, but also has special sections for
AWI and OSD menus that do not corresponding pages in the MC.
l PCoIP Technology Reference: This section contains definitions for some of the
terminology used in the help system.
PCoIP Zero Client and Host Administrator Guide
TER1206003 Issue 1 20

2 What's New
2.1 What's New in Firmware 4.0.2
The Teradici firmware 4.0.2 release provides the following features and enhancements:
l Tera2 processor family support: Firmware 4.0.2 supports the new Tera2 processor
family to deliver enhanced display capabilities, imaging performance, memory, power
management, and other important functions. For example, the TERA2140 zero client can
support up to four displays (DVI-D or DisplayPort) and can perform image encoding at
speeds of up to 300 million pixels per second (Mpps) for remote workstations and 50
Mpps for virtual desktops. For complete product details on second-generation PCoIP zero
clients and host cards containing these new Tera2 processors, see the Teradici website
at http://www.teradici.com. For a list of all the host cards and zero clients supported in
this firmware release, see PCoIP Host Cards and Zero Clients.
PCoIP Zero Client and Host Administrator Guide
l Processor family information: You can now display information about the processor
family and chipset in your device a number of ways. For details, see Displaying
Processor Information.
l Display topology configuration enhancements: To support the new Tera2 display
capabilities, the Display Topology Configuration page on the Management Console (MC)
and the Display Topology settings on the On Screen Display (OSD) now let you
configure layout, alignment, and resolution properties for dual-display and quad-display
topologies.
l Preferred resolution override enhancements: In this release, an expanded list of
default resolutions is included when you configure a zero client to advertise default
Extended Display Identification Data (EDID) information to the graphics processing unit
(GPU) in a host workstation. For Tera2 clients, you can now configure preferred
(default) resolutions for up to four displays. For details, see OSD Tera2: Display
Settings.
l Expanded list of test display resolutions: The Display page on the Administrator Web
Interface (AWI) now contains an expanded list of display resolutions for viewing a test
pattern on a zero client. For details about how to configure a test pattern, see AWI
Client: Display Settings.
l New Tera2 disconnect options: When a user is in a session with a remote workstation,
pressing the connect/disconnect button on a Tera2 zero client pops up a new dialog that
lets the user select whether to disconnect from the session or to power off the remote
workstation. Users can also use a Ctrl+Alt+F12 hotkey sequence to display this pop-up
dialog. For details about this new feature, see Disconnecting from a Session.
TER1206003 Issue 1 21

PCoIP Zero Client and Host Administrator Guide
l Enhanced OSD messaging: Messaging on the OSD has been enhanced with new
overlay windows and also new in-line messages that appear on the OSD's Connect
page. For example, if a user does not enter the correct user name or password, or if the
Caps Lock key is on, a message displays above the Connect button on this page to alert
the user. Network connection lost/down/up messages also display in this location,
replacing the network icons that used to appear in the lower right-hand corner. For
details, see Connecting to a Session and Overlay Windows.
l Management Console cached VCS address enhancement: You can now configure up
to 25 cached View Connection Server addresses from the Management Console's
Session Configuration – View Connection Server page. These servers are displayed in
a drop-down list on the OSD Connect page when users use a VMware View
Connection Server to connect to a virtual desktop. For details, see MC: View Connection
Server Session Settings.
l Imprivata OneSign configuration enhancements: New parameters on the View
Connection Server – Imprivata OneSign page allow you to configure a OneSign server
desktop name. When the desktop pool list includes a pool with this name, the zero client
will start a session with this desktop. You can configure a profile with this option from
the MC: View Connection Server + Imprivata OneSign page, or you can configure a
specific zero client from the AWI Client: view Connection Server + Imprivata Onesign
page or OSD: View Connection Server + Imprivata Onesign page.
l Online help for administrators: PCoIP zero client and host card administrator
documentation is now delivered as online help in this release, with a full GUI Reference
that includes how to configure device firmware using three PCoIP administrator tools—
the MC, the AWI, and the OSD. It also contains topics for common PCoIP device
deployment scenarios, providing illustrations, descriptions, and links to configuration
details for each one.
TER1206003 Issue 1 22

3 PCoIP Management Tools
3.1 About the MC
The PCoIP Management Console (MC) lets you centrally manage the devices in your PCoIP
deployment. It is packaged as a VMware® virtual machine (VM), running on VMware
Player. You can use the MC to view status information for devices, create groups and
profiles, configure a profile (a collection of configuration settings) that you can apply to a
group (one or more devices that require the same configuration), upload certificates and
firmware to devices, control the power settings for devices, manage the monitoring of
device event logs, and much more.
The MC topics in this help system describe how to use the MC to configure a device profile.
For complete information about how to install, set up, and use the MC, please refer to the
"PCoIP Management Console User Manual" (TER0812002).
After you type the IP address of the MC web interface into an Internet Explorer or Mozilla
Firefox browser, the browser will use HTTPS (HTTP over an SSL socket) to connect to the
MC web interface. The IP address for the MC web interface is configured (either statically
or via DHCP) from the MC virtual machine console after installation. Access to the MC is
controlled using an administrative password, which is also set from the MC virtual machine
console after installation. Full details about these setup procedures are included in the
"PCoIP Management Console User Manual" (TER0812002).
PCoIP Zero Client and Host Administrator Guide
The MC's HTTPS connection is secured using a PCoIP MC root Certificate Authority (CA)
certificate. For information on how to install this certificate, see the "PCoIP Management
Console User Manual" (TER0812002).
The following browsers have been tested with this release:
l Firefox version 3 or later
l Internet Explorer 7.0 and 8.0
If you try to log into the MC web interface using a different browser, an error message
appears that lists the supported browsers.
3.2 Logging into the MC
To log into the Management Console web interface:
1. From an Internet browser, enter the IP address of the MC web page. The IP address
may be a static or dynamic address, depending on how it is determined when the MC is
configured:
l Static IP Address: The IP address is hard-coded and must be known.
l Dynamic IP Address: The IP address is dynamically assigned by the Dynamic Host
Configuration Protocol (DHCP) server. You can get it from the DHCP server.
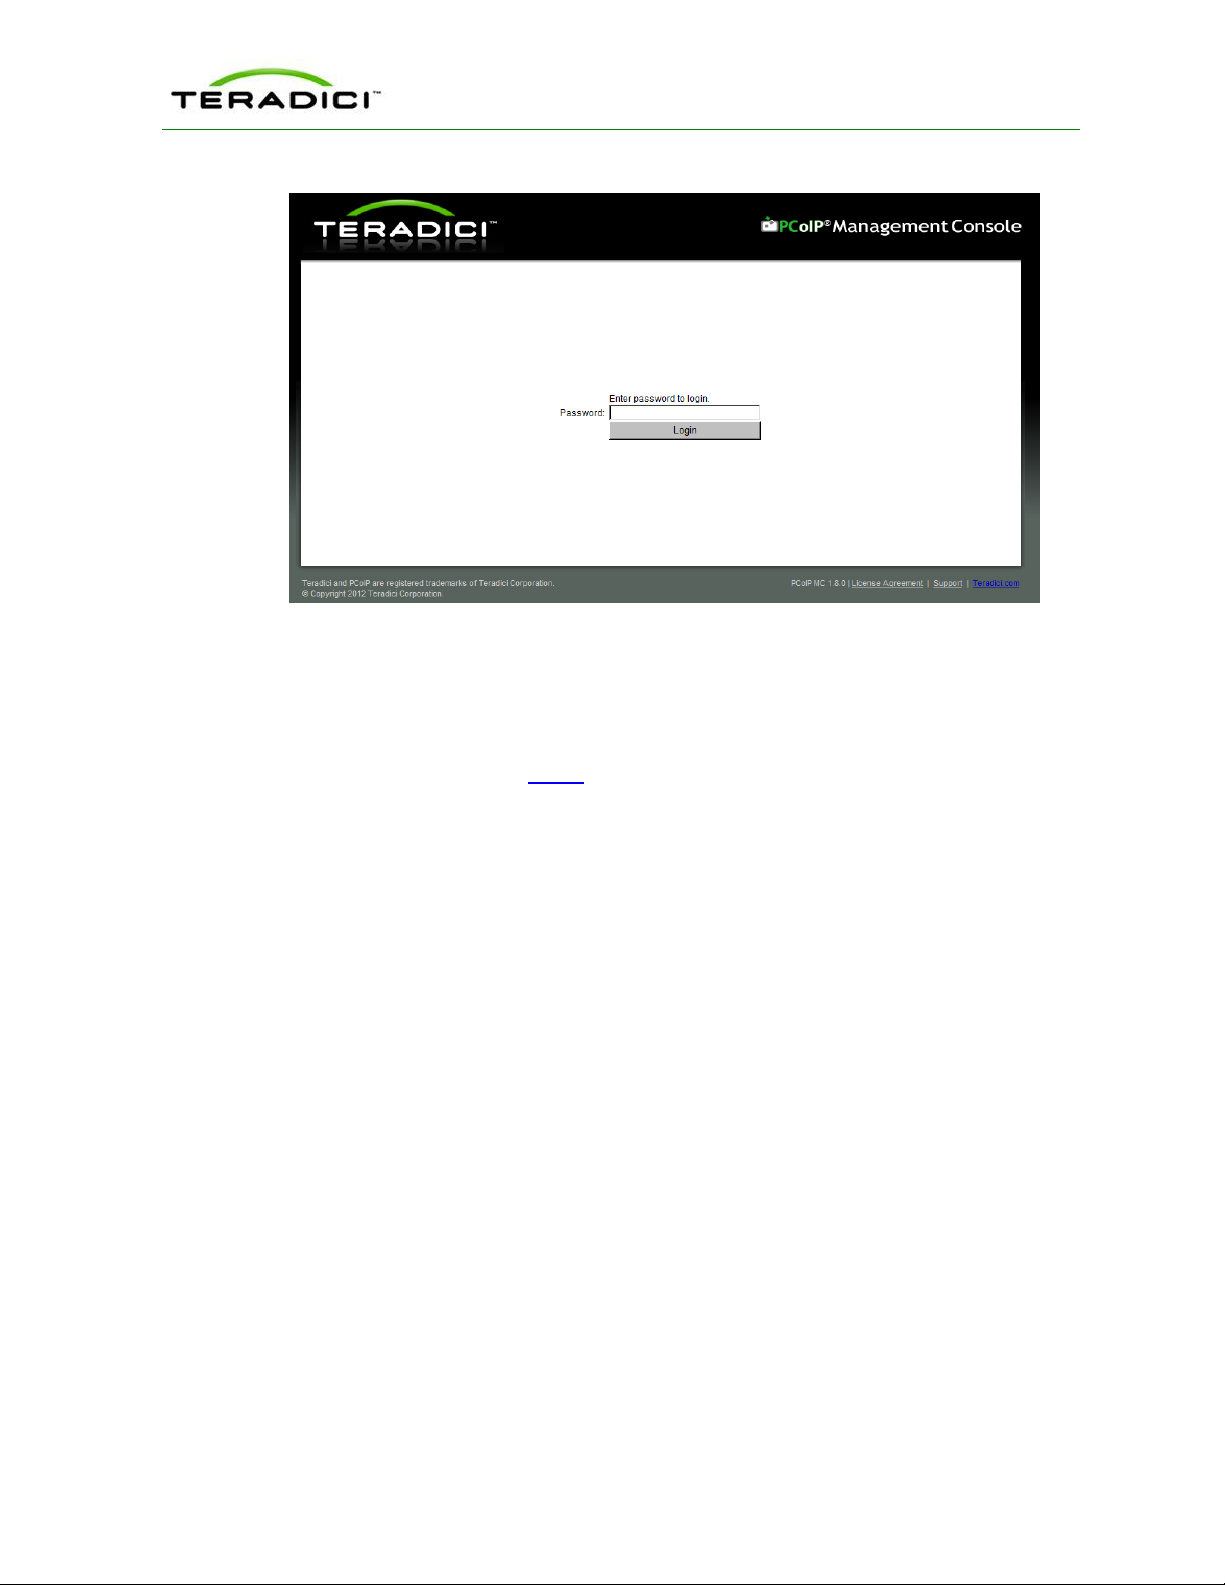
2. From the login page, enter the administrative password. The default value is blank (i.e.,
"").
TER1206003 Issue 1 23
PCoIP Zero Client and Host Administrator Guide
Figure 3-1: MC Login Page
3. When you first log into the MC, a prompt appears asking you to accept the license
agreement. After reading it, click Agree at this page. For subsequent logins, this prompt
does not appear.
After logging into the MC, the Home page appears.
3.3 MC Home Page
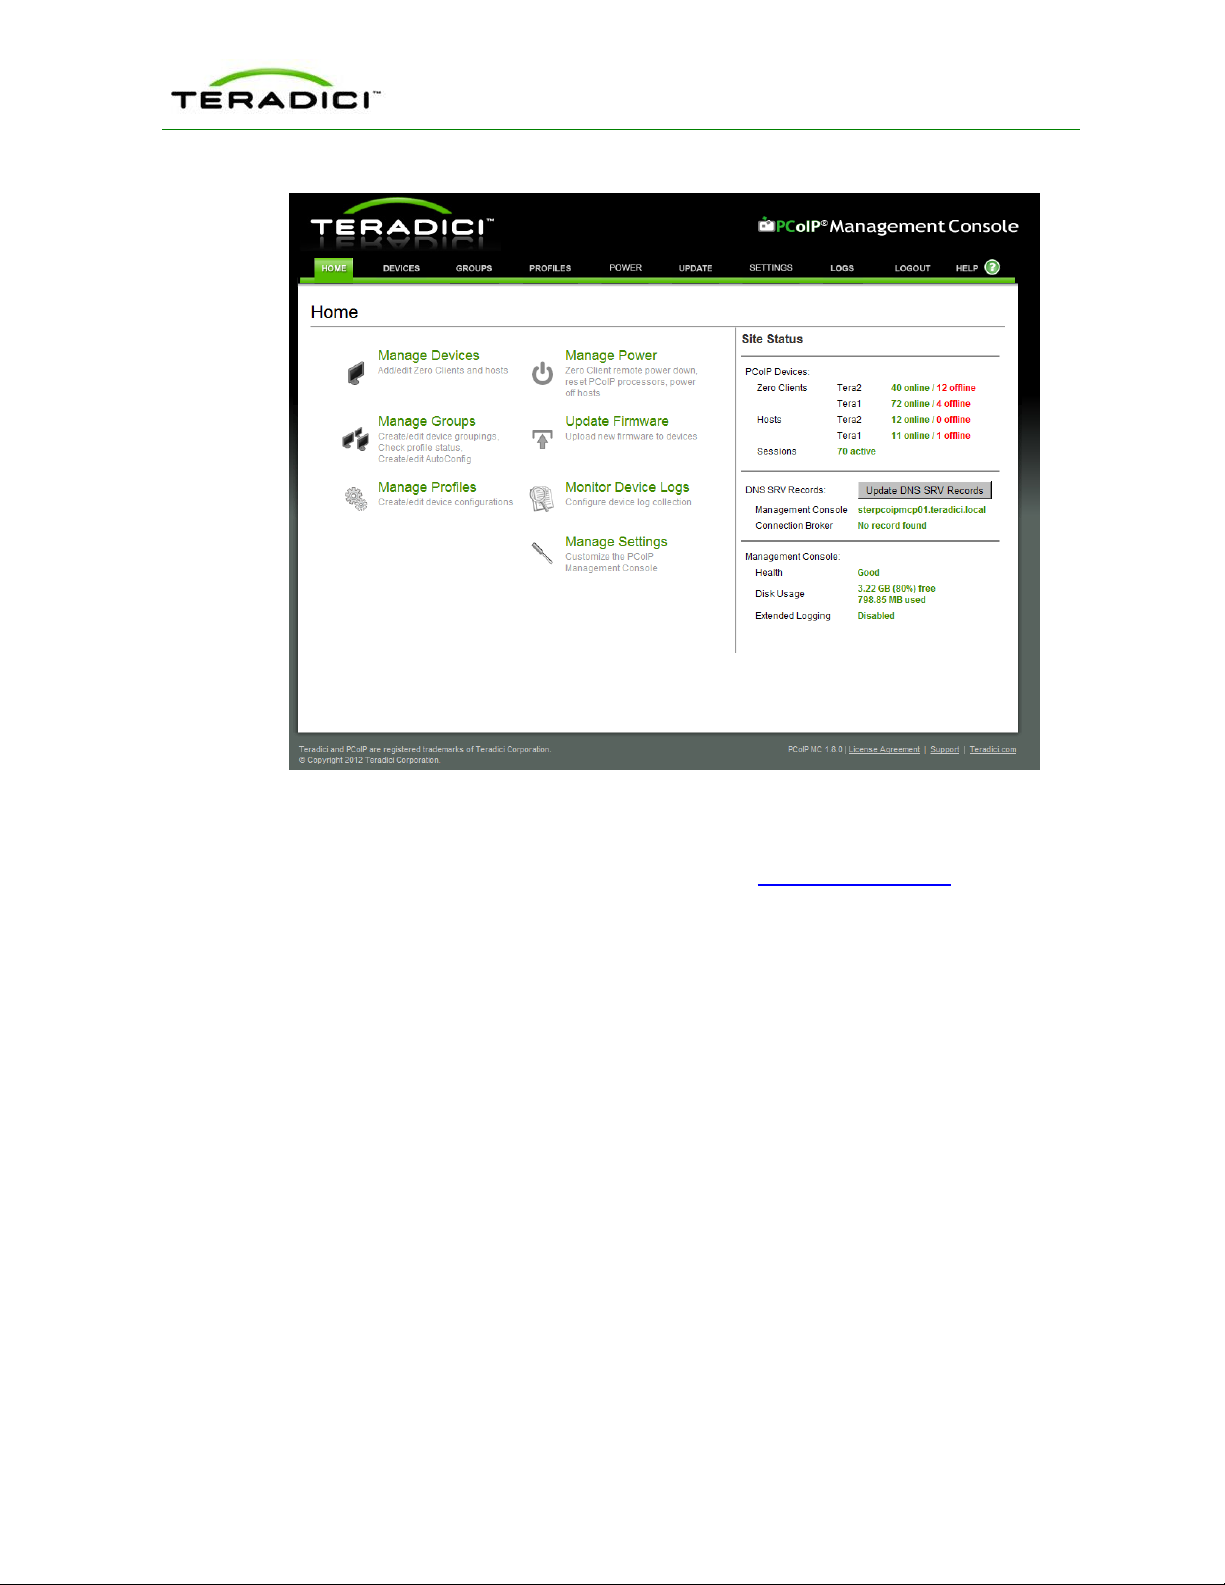
The MC Home page contains links to all the MC functions, and also contains a Site Status
section that displays summary information about the PCoIP devices discovered by the MC.
TER1206003 Issue 1 24
PCoIP Zero Client and Host Administrator Guide
Figure 3-2: MC Home Page
Device firmware is configured on the MC by defining profiles and then applying them to
groups of devices. Clicking the Profiles tab displays the Profile Management page, which
lists allows you to manage the profiles in your system.
3.4 MC Profile Management Page
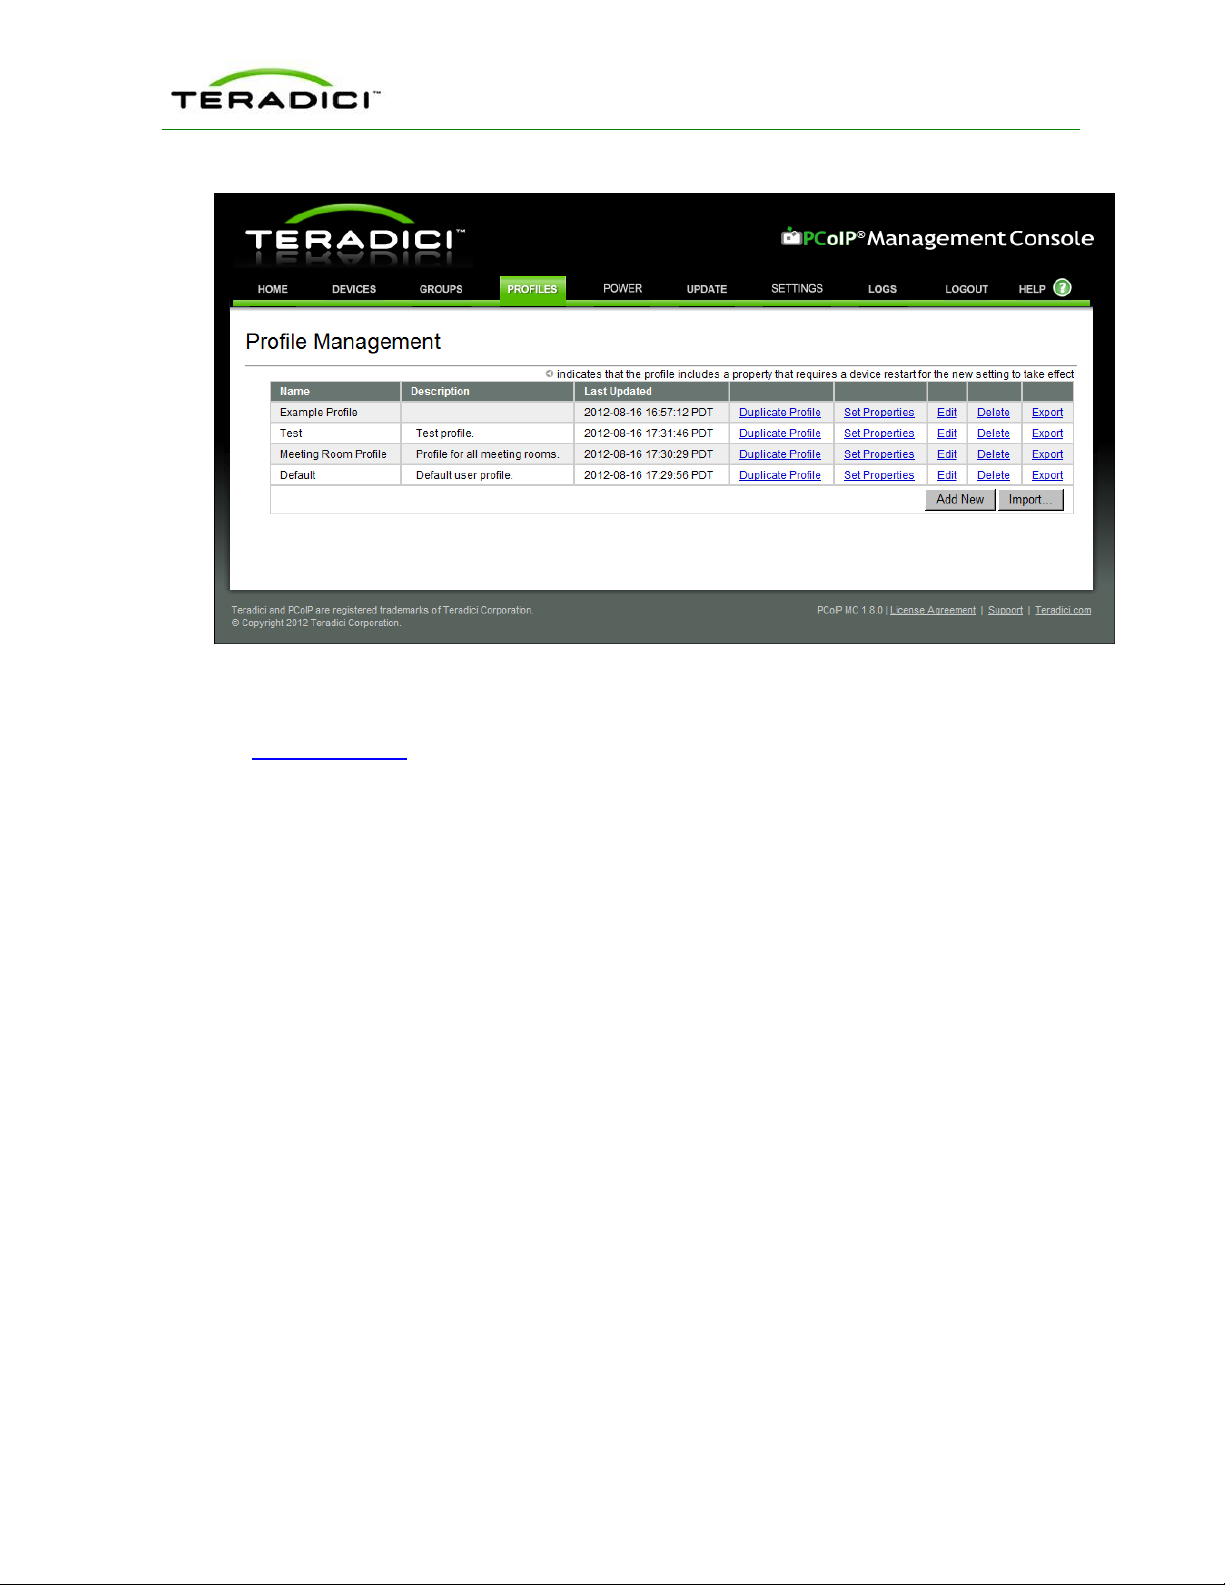
From the Profile Management page, you can view, add, duplicate, configure (i.e., set
properties for), edit, delete, and export profiles.
TER1206003 Issue 1 25
PCoIP Zero Client and Host Administrator Guide
Figure 3-3: MC Profile Management Page
Once a profile has been created, you can click its Set Properties link to display the
Manage Profiles page and begin defining a device configuration for the profile.
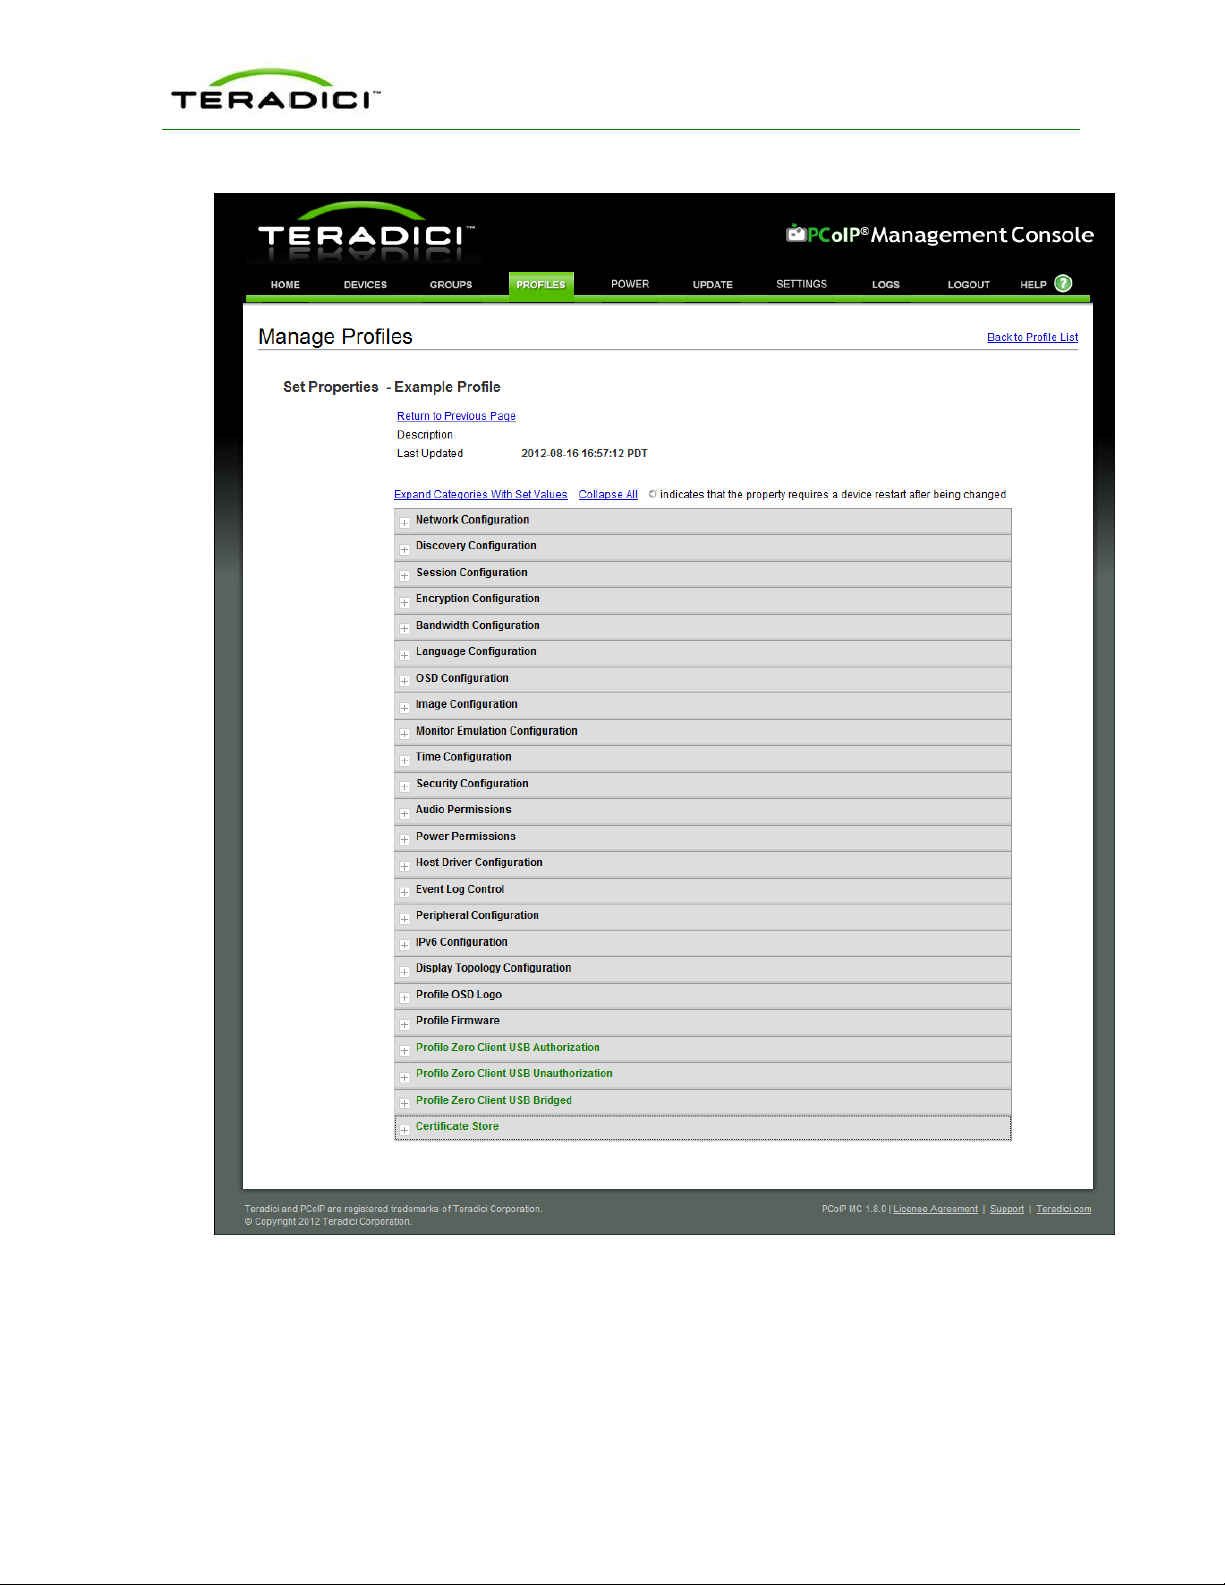
3.5 MC Manage Profiles Page
The figure below shows the Manage Profiles page for a profile. It contains a list of all the
categories used to configure the device firmware.
TER1206003 Issue 1 26
PCoIP Zero Client and Host Administrator Guide
Figure 3-4: MC Manage Profiles Page
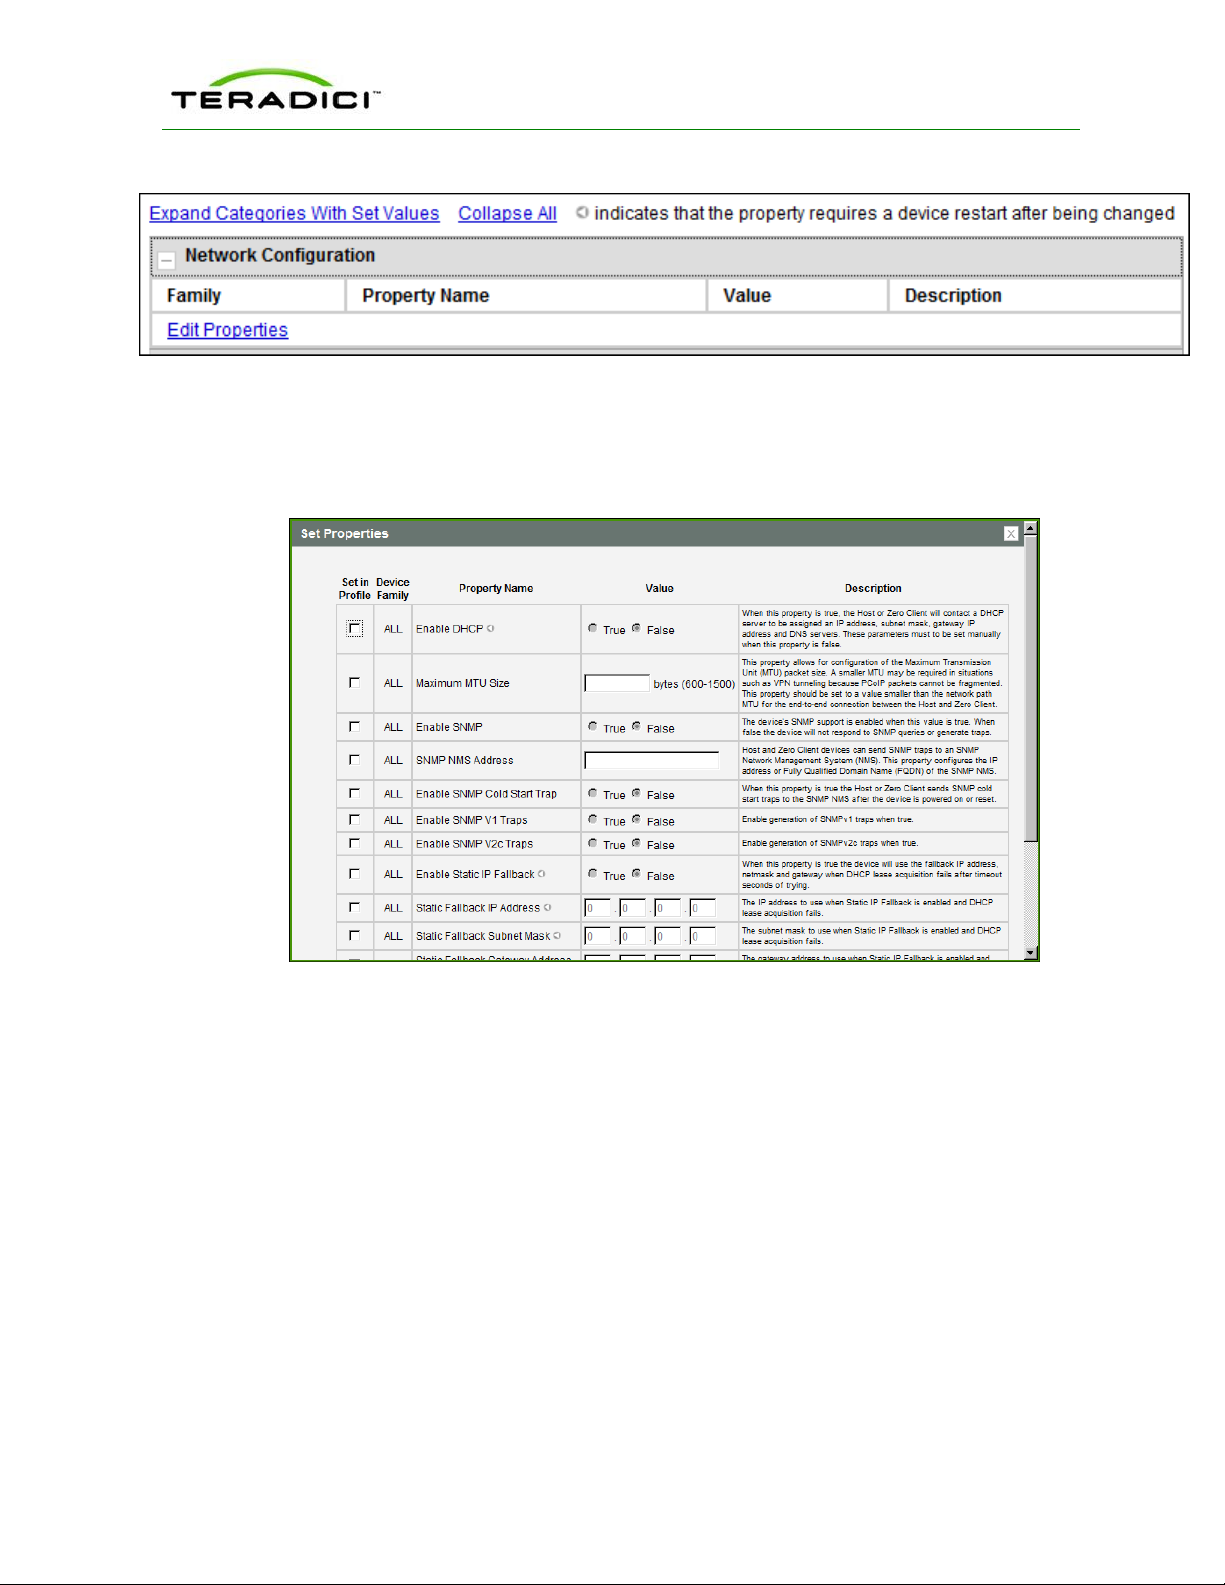
To configure a category, expand it and click the Edit Properties link, shown in the example
below.
TER1206003 Issue 1 27
PCoIP Zero Client and Host Administrator Guide
Figure 3-5: Edit Properties Link
This displays the Set Properties page for that category, from which you can configure the
category's individual parameters. The following example shows the parameters for the
Network Configuration category.
Figure 3-6: Set Properties Page for Network Configuration
Note: The parameter table for each category has a Description column to explain each
parameter. These parameters are also explained in the MC sections of the GUI Reference.
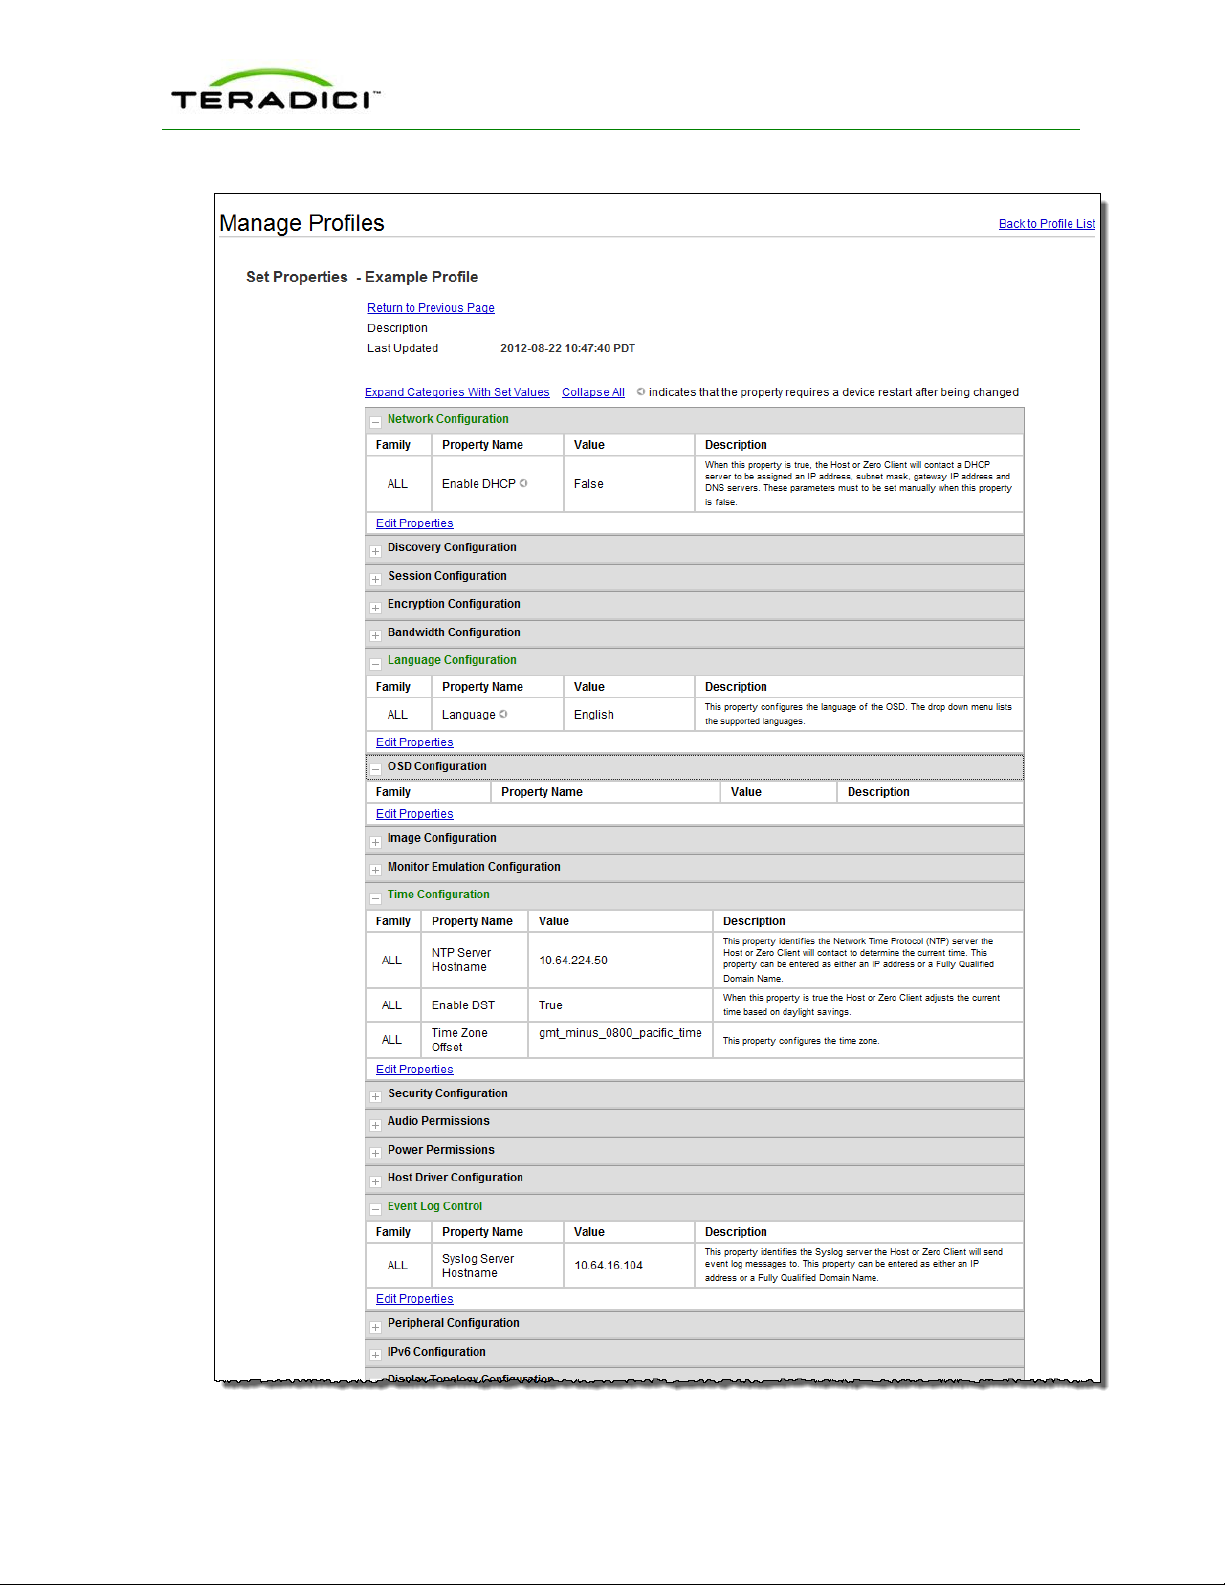
After setting the desired properties, the Manage Profiles page expands the categories to
show their configuration. You can use the expand/collapse links to control the display of this
information.
An example of a profile with some of its categories configured is shown below.
TER1206003 Issue 1 28
PCoIP Zero Client and Host Administrator Guide
Figure 3-7: MC Manage Profiles Page – Configured
TER1206003 Issue 1 29

The GUI Reference in this help system contains full details about each category. For
information about how to configure or manage a device using these MC pages, please see
the appropriate section in the GUI Reference.
For details on how to apply a profile, please refer to the "PCoIP Management Console User
Manual" (TER0812002).
3.6 About the AWI
The PCoIP Administrative Web Interface (AWI) allows you to interact remotely with a
PCoIP host or client. From the AWI, you can manage and configure a host or client, view
important information about it, and even upload firmware and certificates to it.
After you type the device's IP address into an Internet Explorer or Mozilla Firefox browser,
the browser will use HTTPS (HTTP over an SSL socket) to connect to the device's AWI
web page. Access to the AWI is controlled using an administrative password, which can be
optionally disabled.
The AWI's HTTPS connection is secured using a PCoIP root Certificate Authority (CA)
certificate. To avoid warning messages when you log into the AWI, it is recommended that
you install this certificate in your browser. The certificate file ("cacert.pem") is always
included in a firmware release, but you can also download it directly from the Teradici
support site. For detailed instructions on how to install the certificate, see Knowledge Base
support topic 15134-529 on the Teradici support site.
PCoIP Zero Client and Host Administrator Guide
The following browsers have been tested with this release:
l Firefox version 3 or later
l Internet Explorer 7.0 and 8.0
3.7 Logging into the AWI
To log into the Administrator Web Interface web page for a host or client:
1. From an Internet browser, enter the IP address of the host or client. The IP address may
be a static or dynamic address, depending on how the IP addresses are determined
within your IP network:
l Static IP Address: The IP address is hard-coded and must be known.
l Dynamic IP Address: The IP address is dynamically assigned by the Dynamic Host
Configuration Protocol (DHCP) server. You can get it from the DHCP server.
2. From the Log In page, enter the administrative password. The default value is blank
(i.e., "").
TER1206003 Issue 1 30
 Loading...