

Page 1
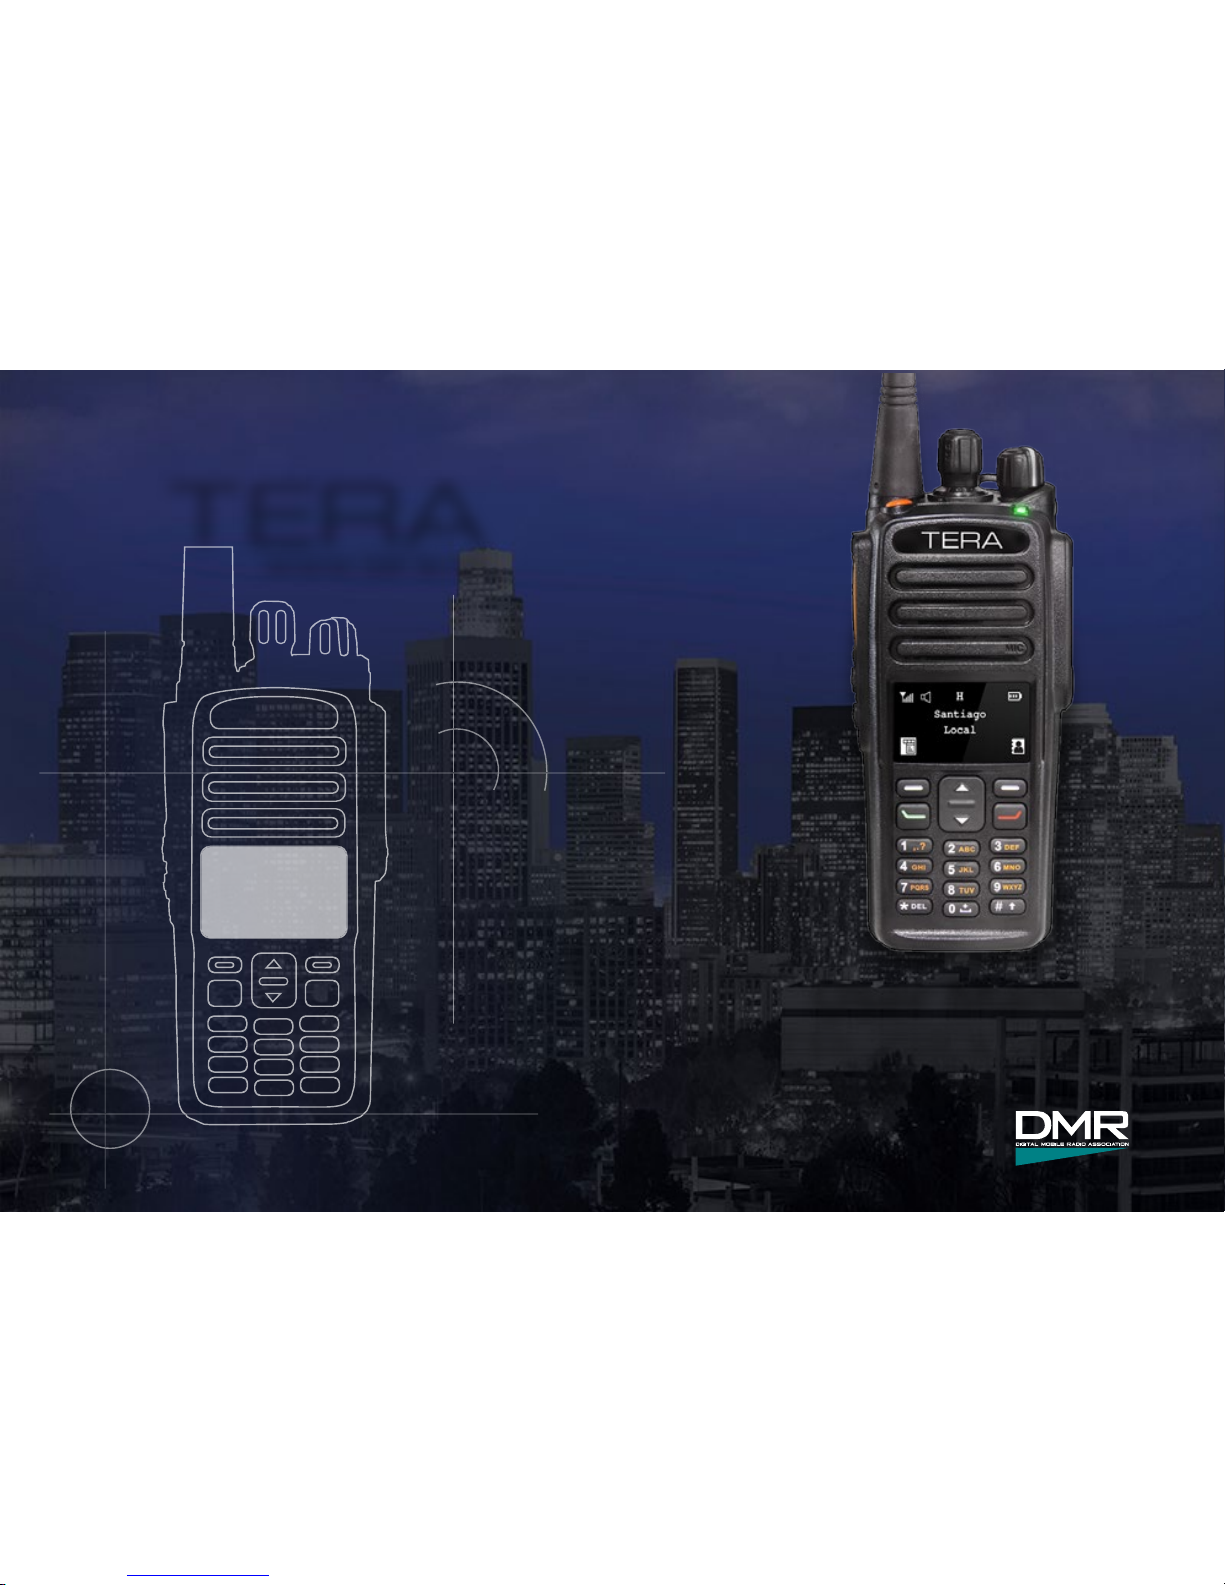
TERA
User Manual
TR-7200 VHF
TR-7400 UHF
www.tera.co
TERA
User Manual
TR-7200 VHF
TR-7400 UHF
www.tera.co
Page 2

TERA
Page 3
3
Introduction
The TERA DMR Transceiver is a high-performance digital and analog portable unit. Model
TR-7200 provides up to 5 watts of power output on the VHF band (136-174 MHz), and Model
TR-7400 provides up to 4 watts of power output on the UHF band (400-470 MHz). Operating
under the DMR (Digital Mobile Radio) protocol and using TDMA (Time Domain Multiple Access)
technology, the TERA DMR handheld provides high spectrum efficiency, along with unparallelled
flexibility in configuration for networks using the DMR TDMA protocol.
TERA DMR Hand Held Digital
Transceiver
Page 4

TERA
Thank you for purchasing TERA Model TR-7400/TR-7200 DMR radios.
These radios are built to commercial DMR standards, which ensure worldwide
operation and compatibility.
Some key features include:
• Motorola / Hytera compatibility
• IP67 waterproof
• 1,024 individual channels / 64 Zones
• 800 Talkgroups / frequent individual IDs
• FPP Front Panel Programmable
• MIL-STD810 C / D / E / F / G
• OLED display
• Digital Vocoder AMBE3000+
• Audio output 1.5 watts
• Worldwide Amateur importable receive contact database
• FCC Part 90 certification
To get the most out of your radio, please read this manual before use.
TERA
Page 5
5
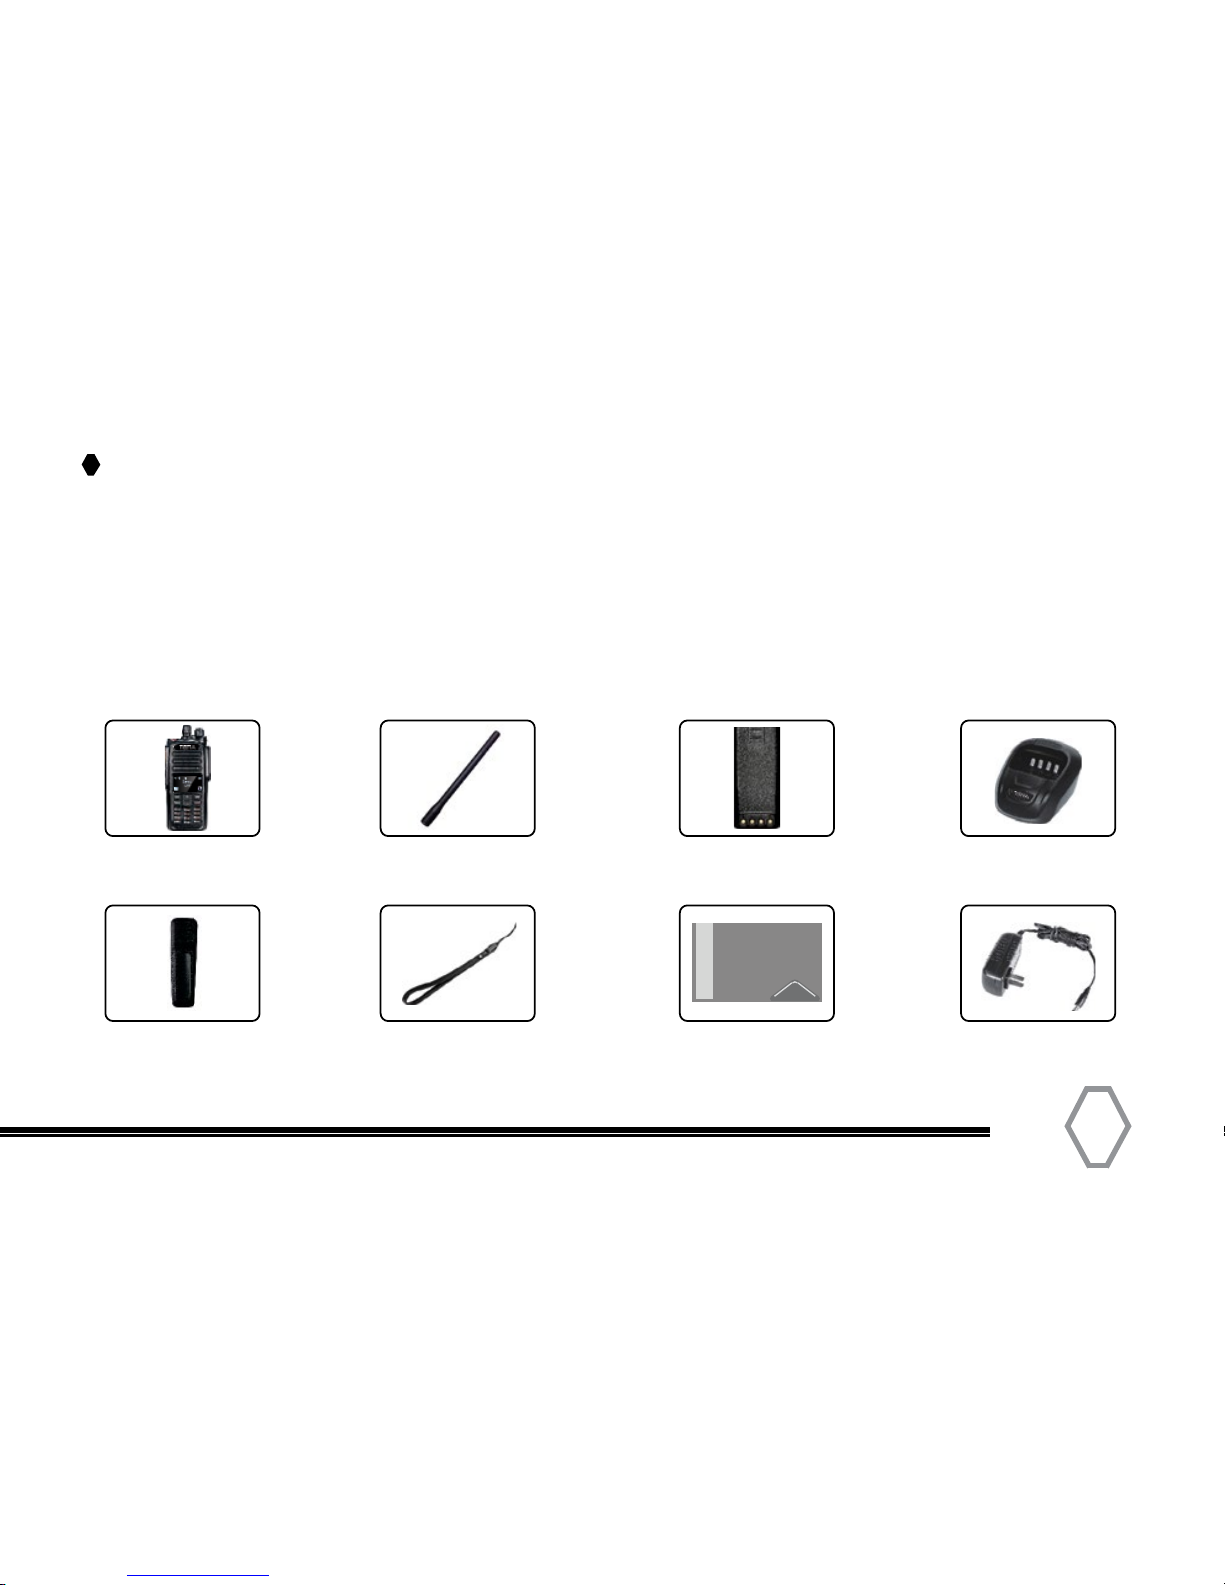
Included In Box
Radio Antenna Battery Charger
Belt Clip Hand Strap User Manual Adapter
TERA
Thank you for choosing the TERA DMR radio. Immediately upon receipt of your radio, open the
package and inspect the radio for any signs of shipping damage. Please confirm that all the items
listed below are in the box.
Should there be shipping damage, or if any items are missing, immediately contact the dealer
from whom you purchased the radio to report the issue and get instructions for resolution of the
problem.
Page 6
TERA
The following recommendations will help you understand this radio’s safety requirements.
1. Only qualified TERA technicians are allowed to service this two-way radio. Do not
disassemble the radio by yourself as it will void the warranty.
2. Use only the TERA brand battery pack and desk charger, so as to not damage the
transceiver.
3. Do not expose this radio to long periods of direct sunlight, or hot or humid areas.
4. Do not put this radio in dusty or dirty locations.
5. Do not use harsh chemicals, cleaning solvents, or strong detergent to clean this radio.
6. Never transmit on this radio without an antenna.
Caution
Safety and operability of this radio can’t be guaranteed unless TERA brand accessories or parts
are used.
Safety Matters
Page 7
Content
Introduction .. ........................................................ 3
TERA Features ........ ............................................. 4
Included In Box ..................................................... 5
Battery Information ............................................ 8
Charge Operation.. ............................................... 9
Attaching the Battery.. ....................................... 11
Attaching/Removing the Antenna ................. 12
Installing the Belt Clip & Hand Strap ............. 13
Radio Overview .................................................... 14
Radio Callouts ....................................................... 15
Status Indicators .................................................. 16
Turning the Radio ON/OFF.. .............................. 17
Volume Adjustment... ......................................... 17
Selecting a Channel ............................................. 17
Selecting a Zone ................................................... 18
Menu Navigation ................................................. 19
Messages ............................................................... 20
Contact / Talkgroup ............................................ 22
Receive Group ID ................................................. 24
Scan ......................................................................... 26
Radio Settings ...................................................... 27
Keypad Programming ......................................... 28
Editing an Existing Channel .............................. 28
Programming a New Channel ......................... 29
Initial Programming ............................................ 30
Attaching the Programming Cable ................. 31
Software Basic Settings .................................... 32
Worldwide Amateur Contact Database ........ 33
Software Overview ............................................. 34
Channel Data Entry ............................................. 34
Zone Organization ............................................... 36
Contact Sheet Database Import ...................... 37
Programmable Buttons ..................................... 41
Monitoring & Screen Saver Function ............. 43
Terms of Warranty .............................................. 46
Online Service and Support .............................. 48
General Specifications ........................................ 52
7
Page 8

TERA
Battery Information
Please use and charge only a TERA approved battery. Attempting to use a different
battery type may result in overheating or explosion of the battery, causing damage to
the radio and the potential for physical injury.
Notes:
1. Do not short-circuit the battery terminals or dispose the battery in fire. Never attempt to
disassemble the battery pack.
2. Charge the battery in 32-105
°F temperature. Otherwise the battery may not fully charge.
3. Turn off the radio before your initial charge. Use of the radio while charging may cause noise
or interfere during reception or transmission.
4. Do not pull/plug the adapter and the battery during charging, to avoid interference with the
charging procedure.
5. NEVER charge the battery or radio with battery if they are wet. Before charging, you should dry
them off with a towel or cloth to avoid danger.
Page 9
9
Warning:
Conductive metals such as jewelry, keys or decorating lace may result in short circuit
and generate a large quantity of heat when coming in contact with battery electrodes.
Treat any battery carefully especially when placing it into pocket, wallet or other metal
container as it can short out.
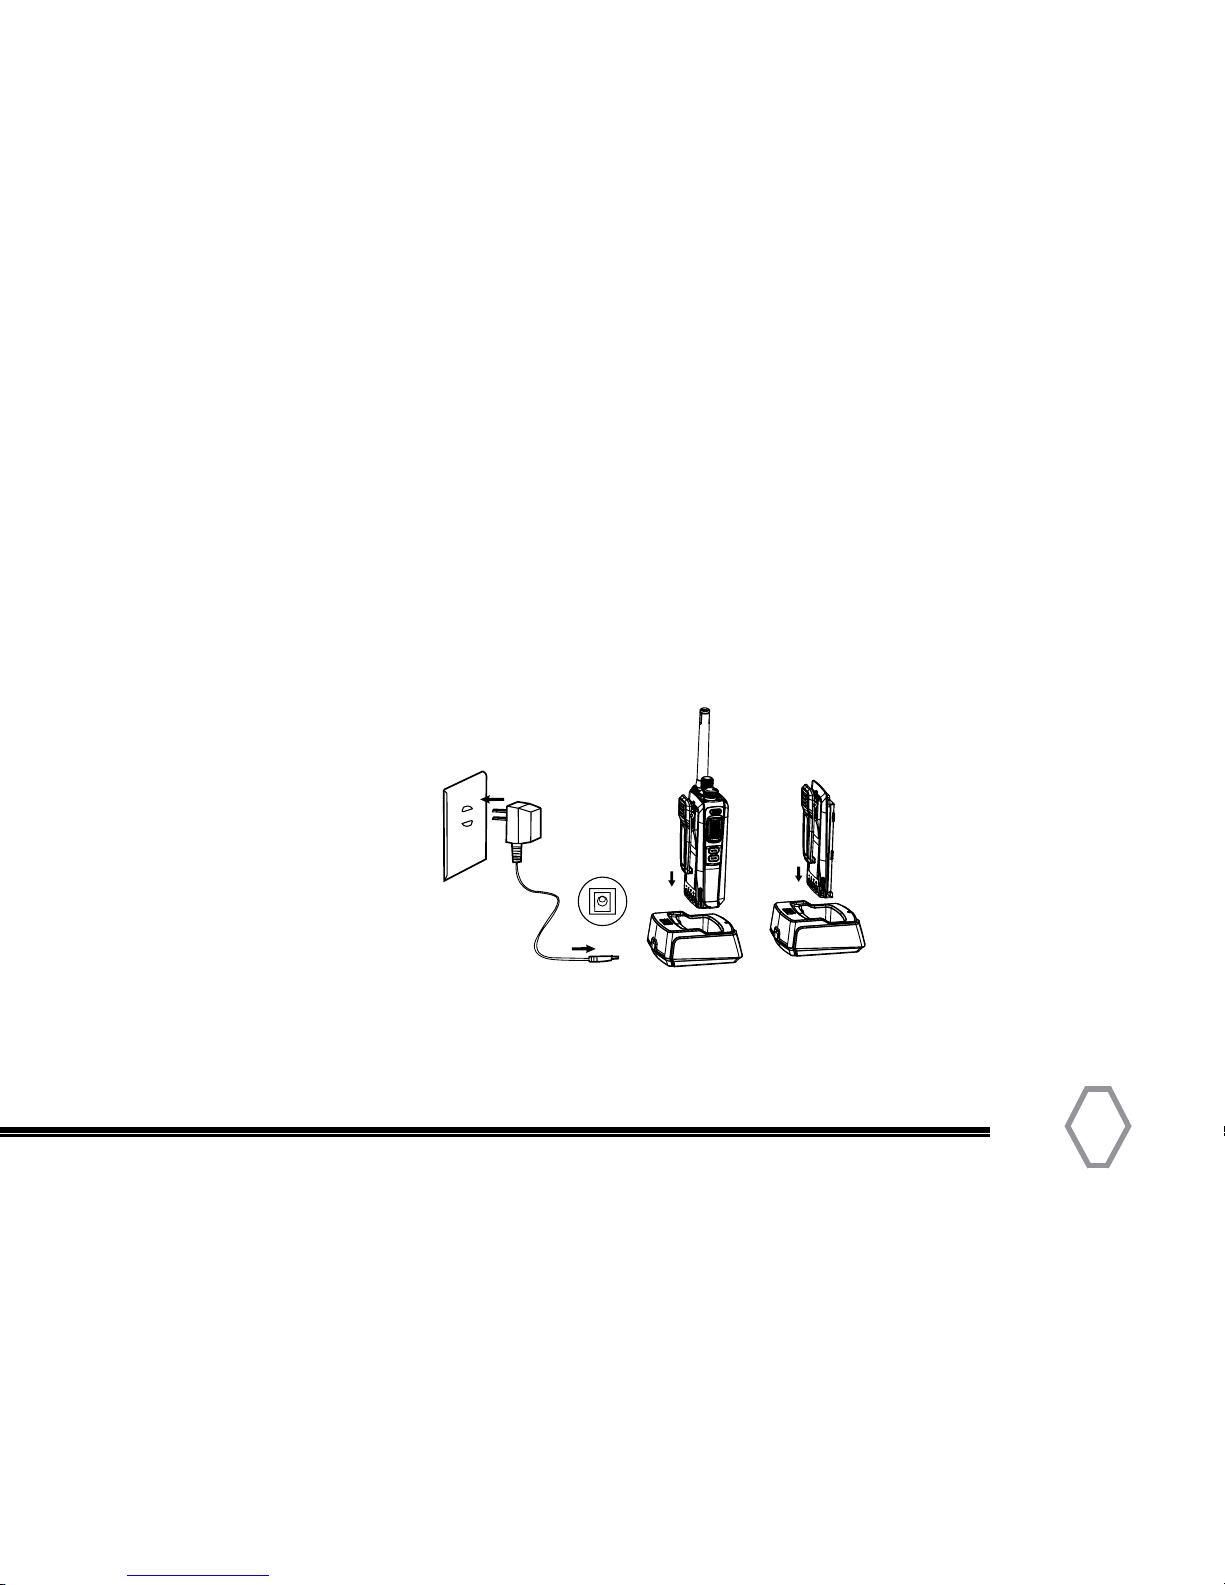
Charge Operation
Please charge as follows:
1. Turn off the radio.
2. Plug the AC connector of adapter into an AC output socket
Page 10
TERA
3. Vertically insert the battery or radio equipped with battery into the charger. Make sure the
charger and battery are well contacted.
4. After the radio and/or battery are inserted into the charger, the LED glows red and that means
the charger is ready for normal charging; if the LED flashes red, it means the remaining battery
power is too low and a trickle charge is in process. After the battery power has reached a
certain amount during trickle charge, the charger automatically turns to normal (fast) charge
mode (solid red colored LED).
5. The battery is fully charged (97%-100%) when LED glows green. The charger stops charging
automatically.
Caution when Charging the Battery
1. The battery is not fully charged from the factory. Please charge the battery before initial use or
after long-period of storage.
2. Repeat charging 2 to 3 times will make the battery reach its best capacity. Please replace or
charge the battery if battery power is low after repeated charges.
Note
Trickle charge is not allowed to exceed 30 minutes. If the LED is still flashing in red after 30
minutes, it means that the charger cannot provide power to the battery. Check if the battery or
charger is damaged.
Page 11
11
Installation of Accessories
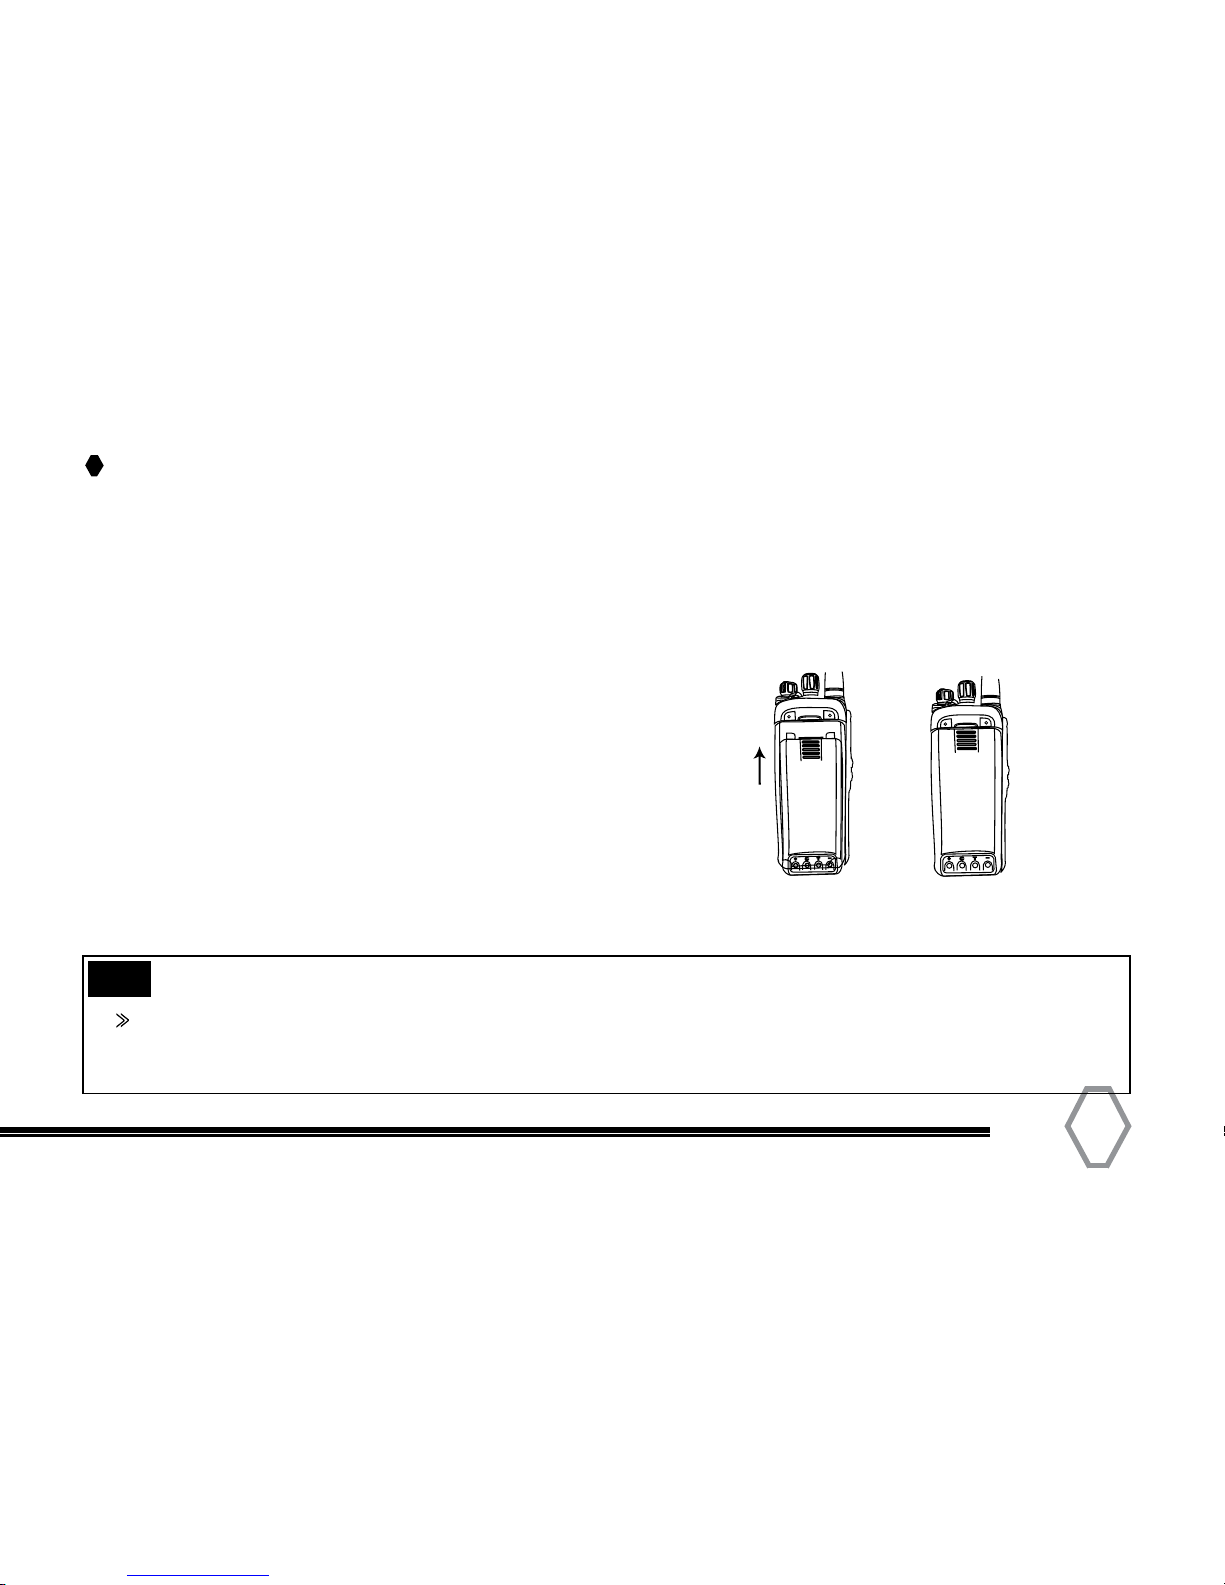
Attaching the Battery
Match the two grooves on the battery with the corresponding grooves on the body of
the radio; be sure that the battery is parallel to the radio body and in full contact with the
aluminum chassis.
Push the battery upward along the guides until it locks.
Push the battery latch toward the “Lock” mark to lock it.
TIP
When storing radio for more then 3 weeks at a time, it is best to remove the TERA battery from
radio. This will maintain a full charge in battery so it’s ready for use. Batteries will hold a charge
6-12 months when removed from radio.
Page 12
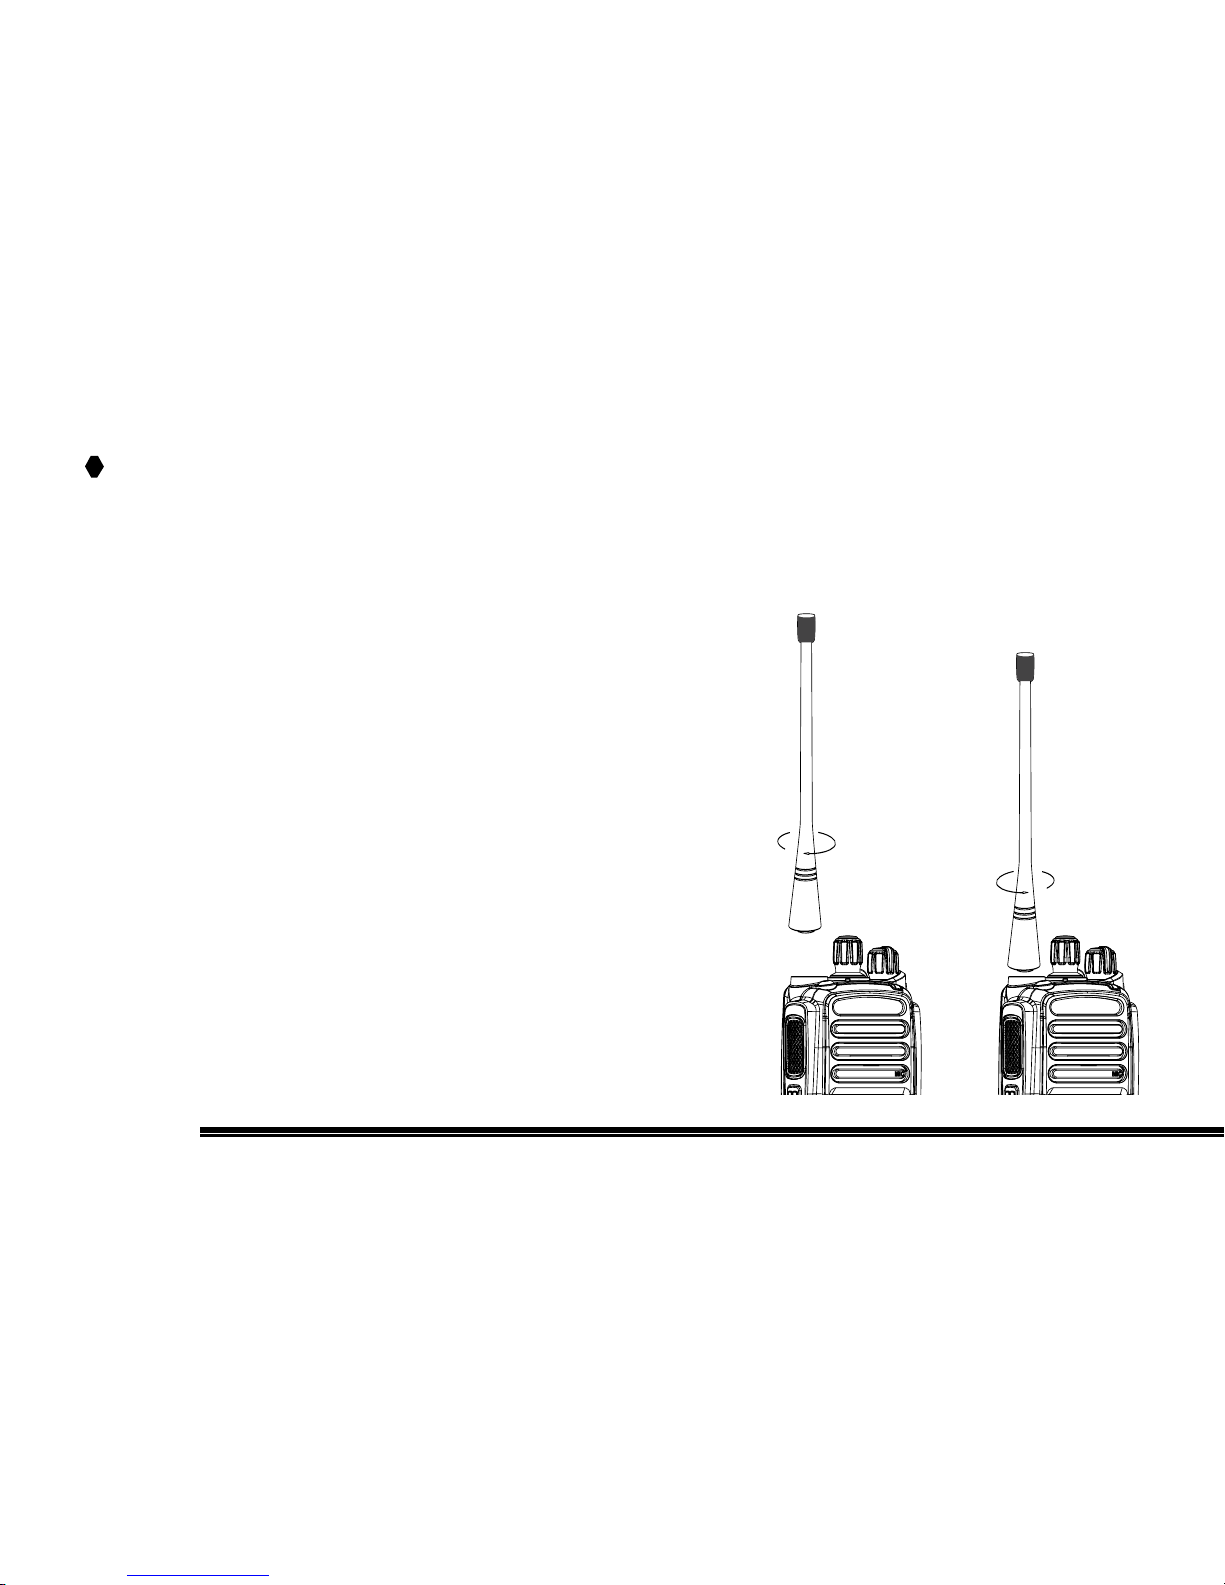
TERA
Removing the Antenna
Rotate the antenna counter-clockwise (turning it at its
base) until the antenna is free from the radio.
Attaching/Removing the Antenna
Attaching the Antenna
Insert the antenna into the connector on the radio while holding the antenna at its base.
Rotate the antenna clockwise to secure it to the radio.
TERA TERA
Page 13
13
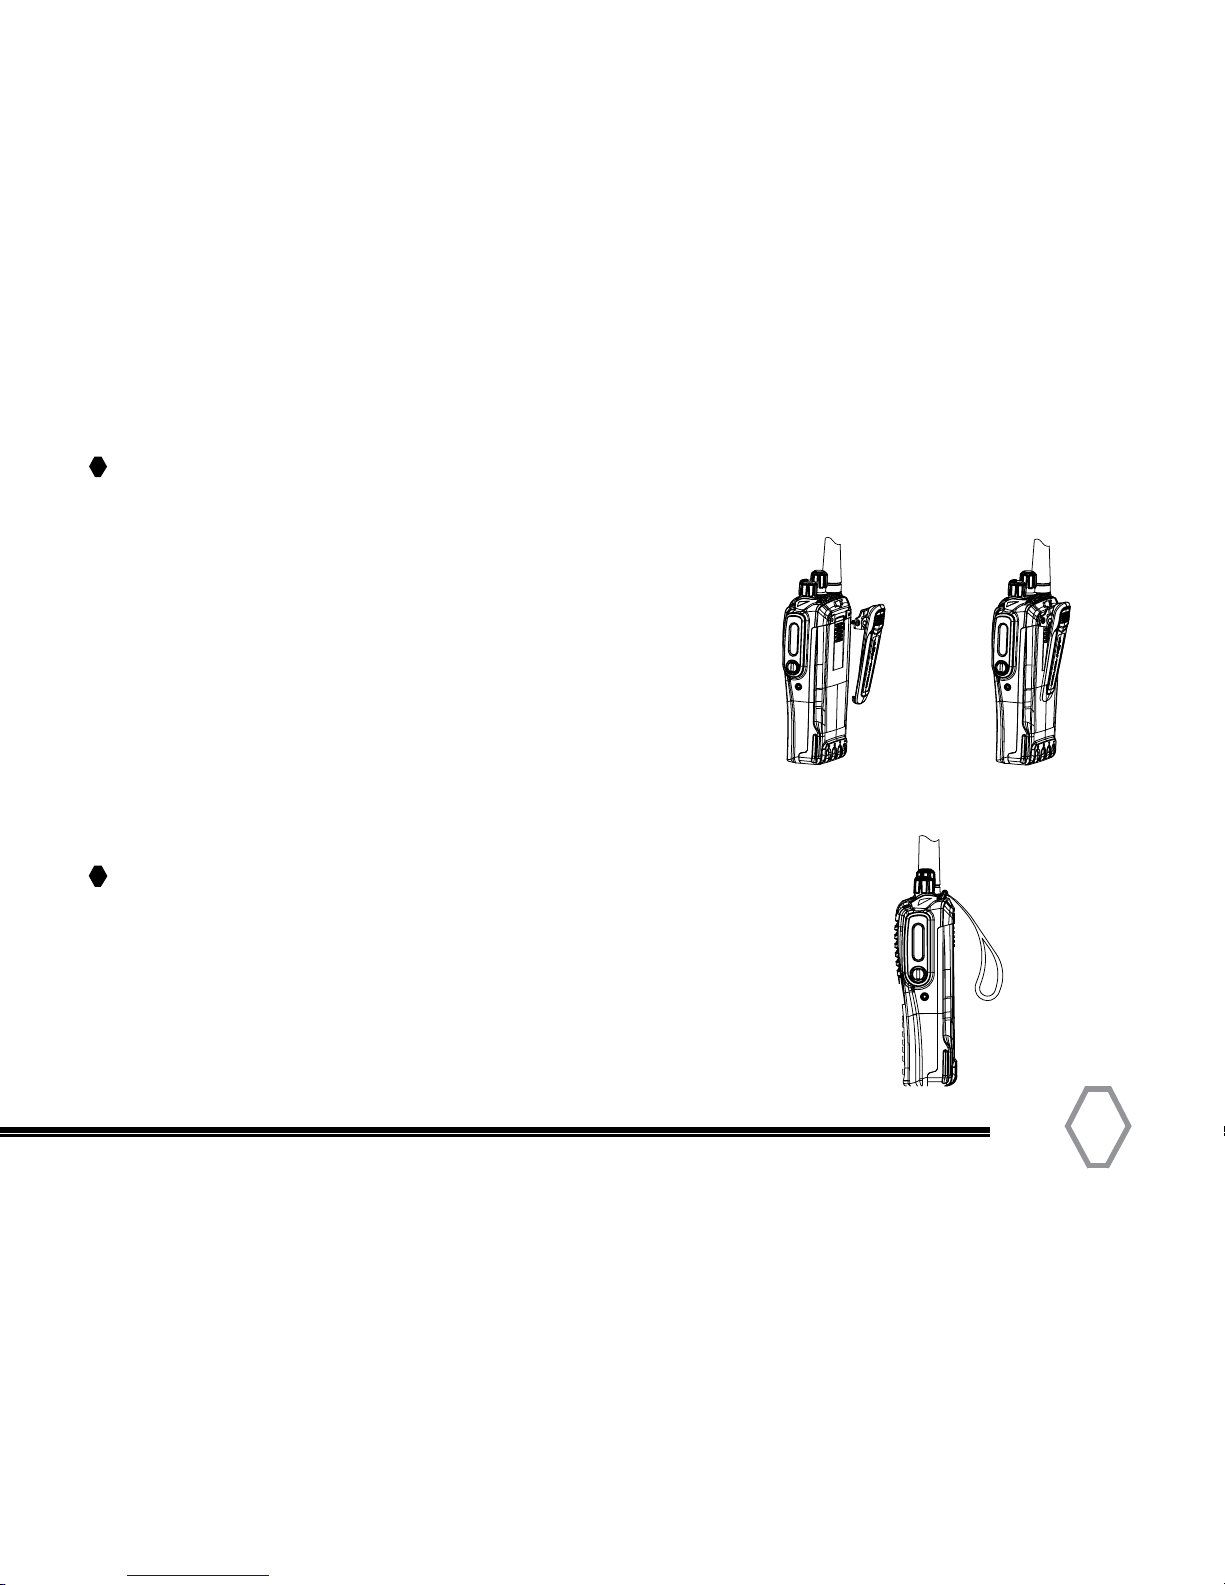
Installing the Belt Clip
Installing the Hand Strap
Installing Belt Clip
Remove screws from rear of radio and align belt clip over
rear holes in case and place belt clip over holes
and replace screws.
Notes:
1. If using a belt clip, please mount the belt clip onto
the back before installing the battery pack.
Thread the strap into the hole at the back of the radio and fasten it.
Page 14
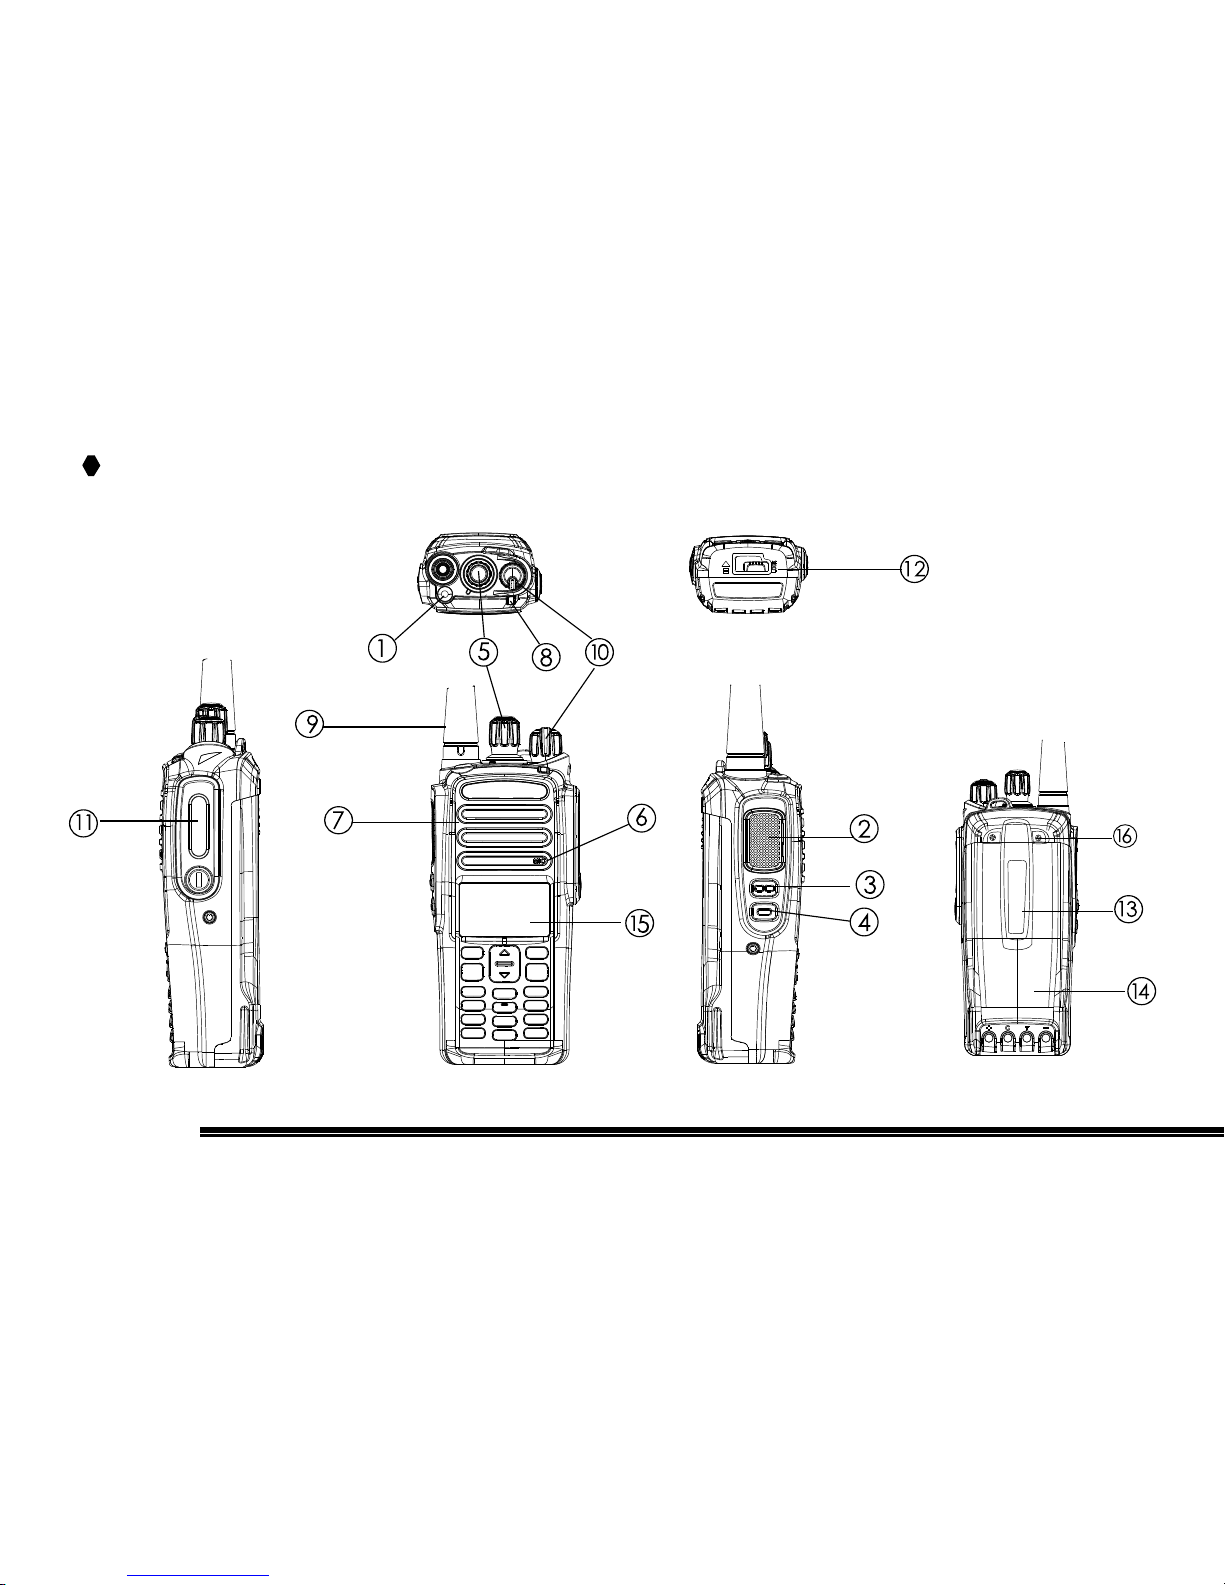
TERA
Radio Overview
TERA
Page 15
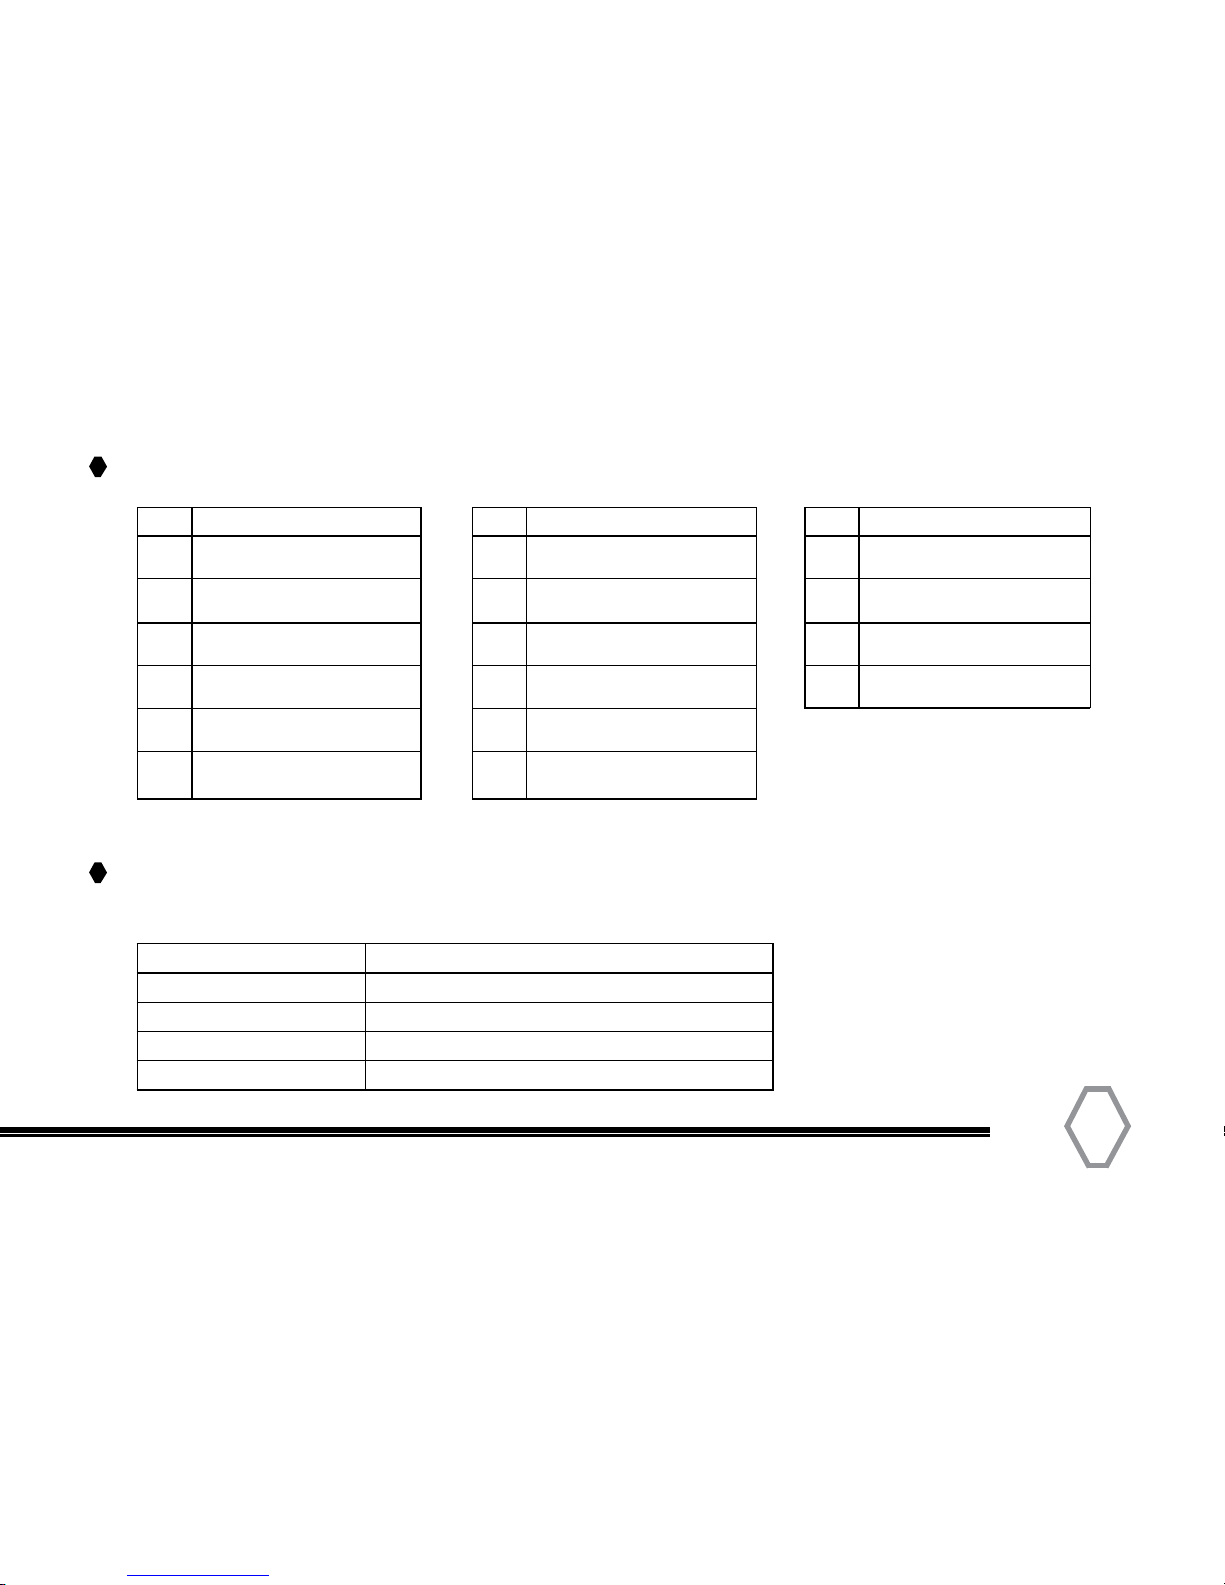
No. Part Name No. Part Name No. Part Name
1 Top Orange Programmable
Button
7 Speaker 13 Belt Clip
2 Push-To-Talk Button 8 Tricolor LED Indicator 14 Battery
3 Side Key 2 Programmable
Button
9 Antenna 15 OLED display
4 Side Key 1 Programmable
Button
10 Volume Knob 16 Belt Clip Screws
5 Channel Selector Knob 11 Accessory Jack
6 Microphone 12 Battery Latch
15
Radio Callouts
The top LED will help you to identify the current radio status.
LED Indication Status
Flashes Green Powering On
Constant Red Transmitting
Constant Green Receiving
Flashes Orange Scanning
LED Indications
Page 16
TERA
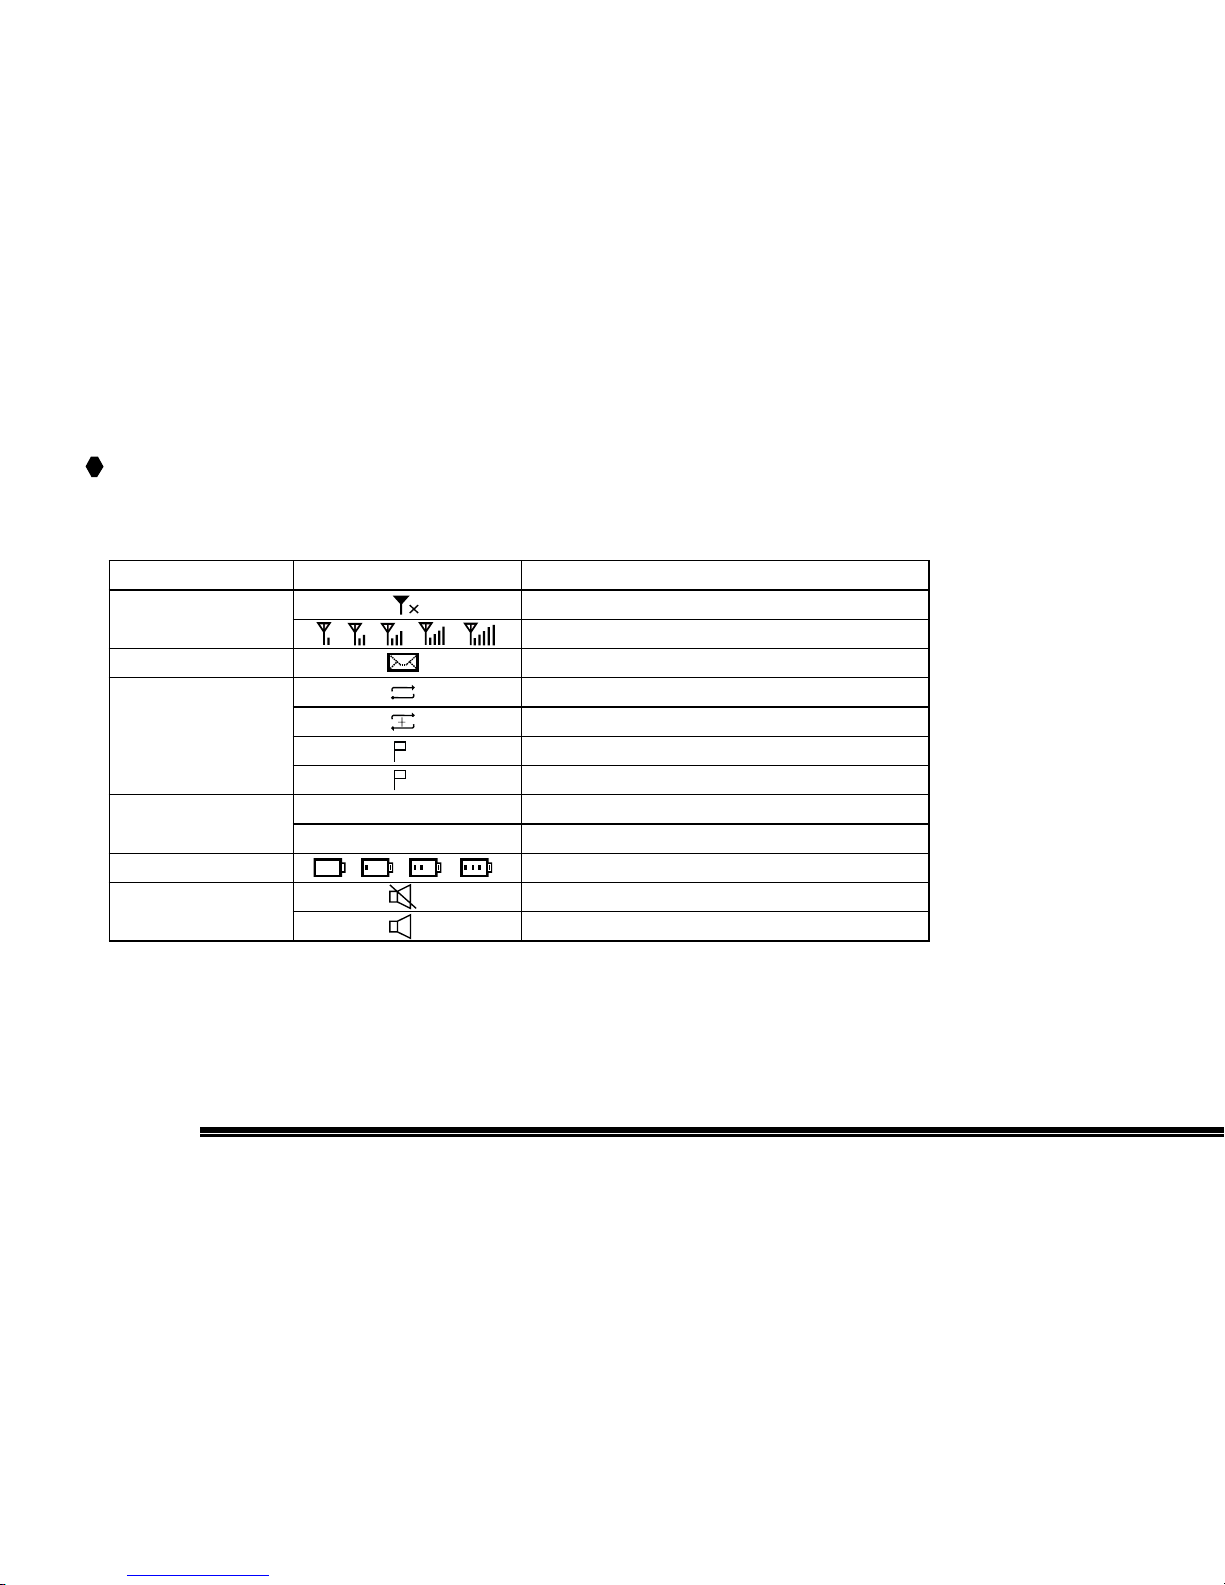
Status Indicators
Display Icons
Name Icon Status
RSSI No Signal
More bars indicate a better signal strength
Message Received New / Unread Message
Scan Status Scanning in progress
The scan has paused on a channel (non-priority channel)
The scan has paused on priority channel 1
The scan has paused on priority channel 2
Transmit Power Level Current channel is set to transmit with Low Tx Power
Current channel is set to transmit with High Tx Power
Battery Status More bars indicate more battery power left
Tones Radio Silence Mode is ON
Radio Silence Mode is OFF
1
2
L
H
Page 17
17
Basic Operations
Turning the Radio ON/OFF
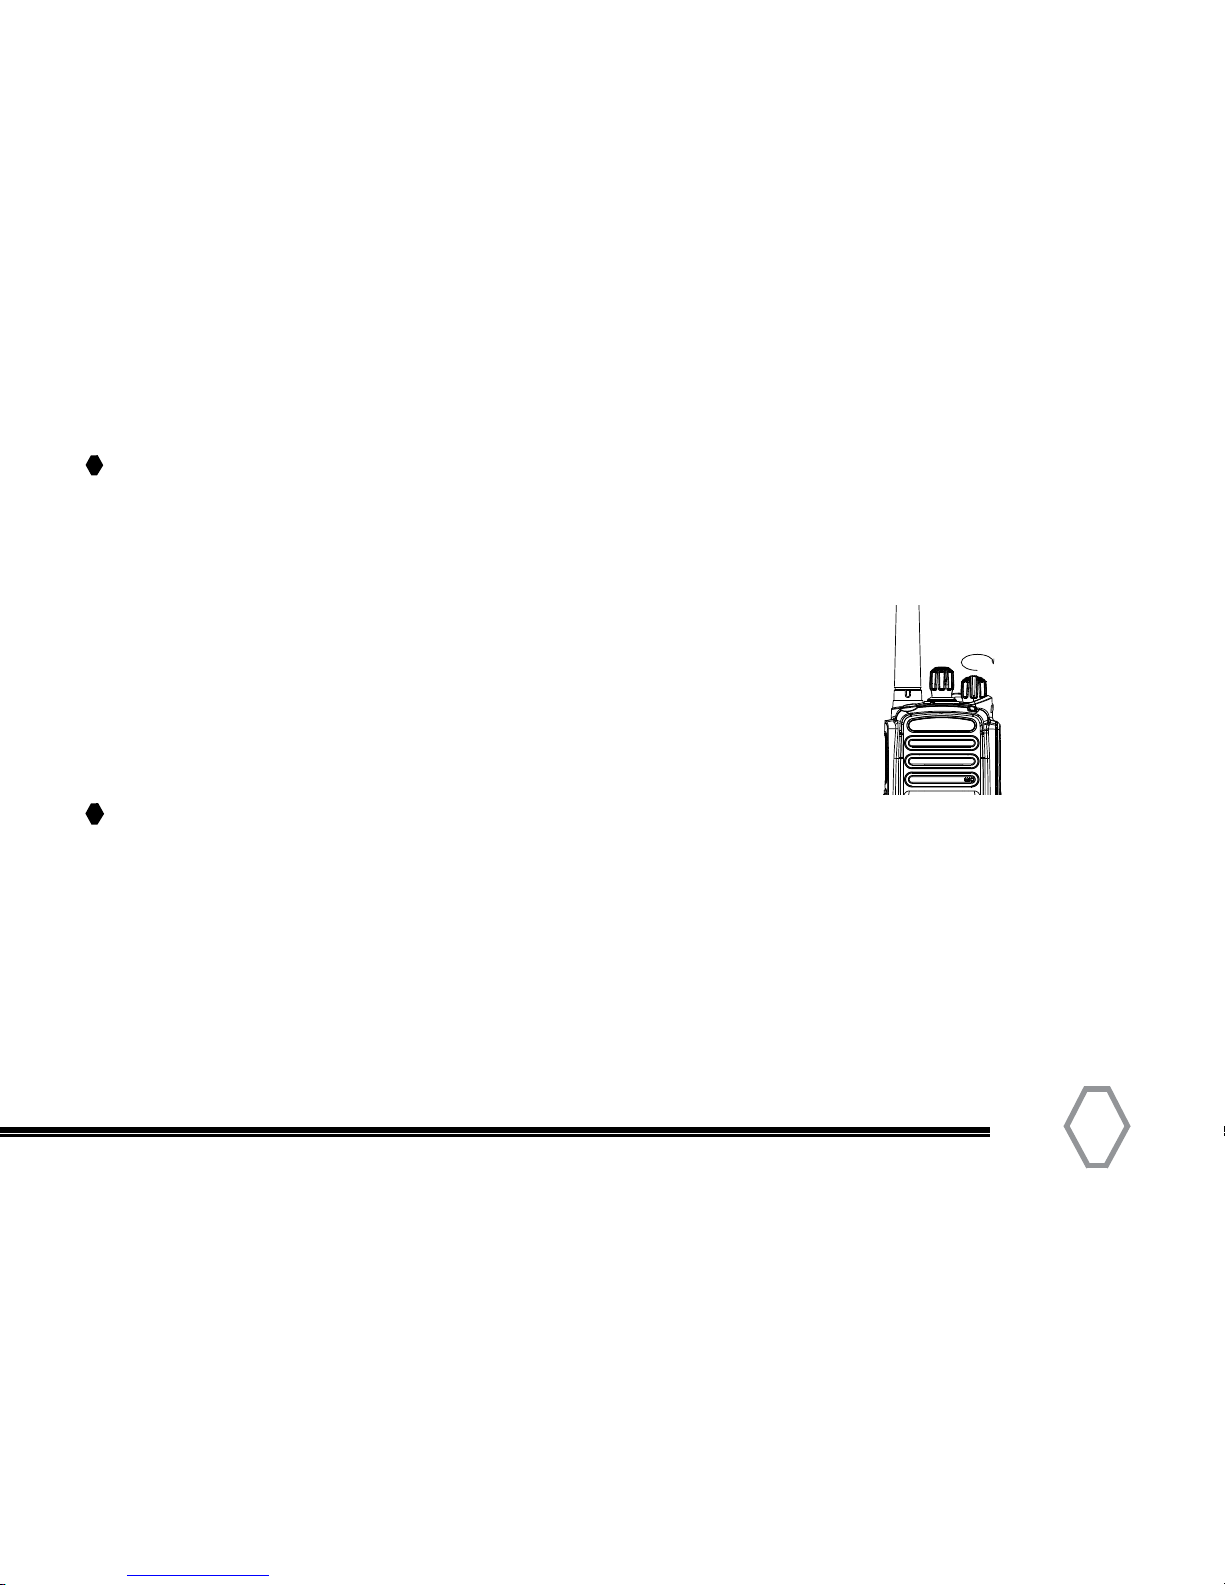
Rotate the radio On-Off/Volume Control knob clockwise to turn ON the radio,
and counter-clockwise to turn OFF.
Volume Adjustment
Rotate the volume control clockwise or counter-clockwise
to adjust the desired volume.
Selecting a Channel
Rotate the “Channel Selector” knob to a desired channel. A channel can either be Analog or Digital.
For the analog channels the Push-To-Talk button is always available, and on the Digital
Channels parameters can be set up by the users / system operators by channel to allow talk
permit. There are three possible settings:
1. Always Allow: The user can transmit all the time.
2. Channel Free: The radio can transmit only if the channel is free.
3. Color Code Free: The radio can transmit only if the channel is free and the color code matches.
TERA
Page 18
TERA
Selecting a Zone
A Zone is a group of channels grouped together. The TERA DMR radio has 64 Zones. A Zone can
have the maximum of 16 analog and/or digital channels.
Accessing a Zone:
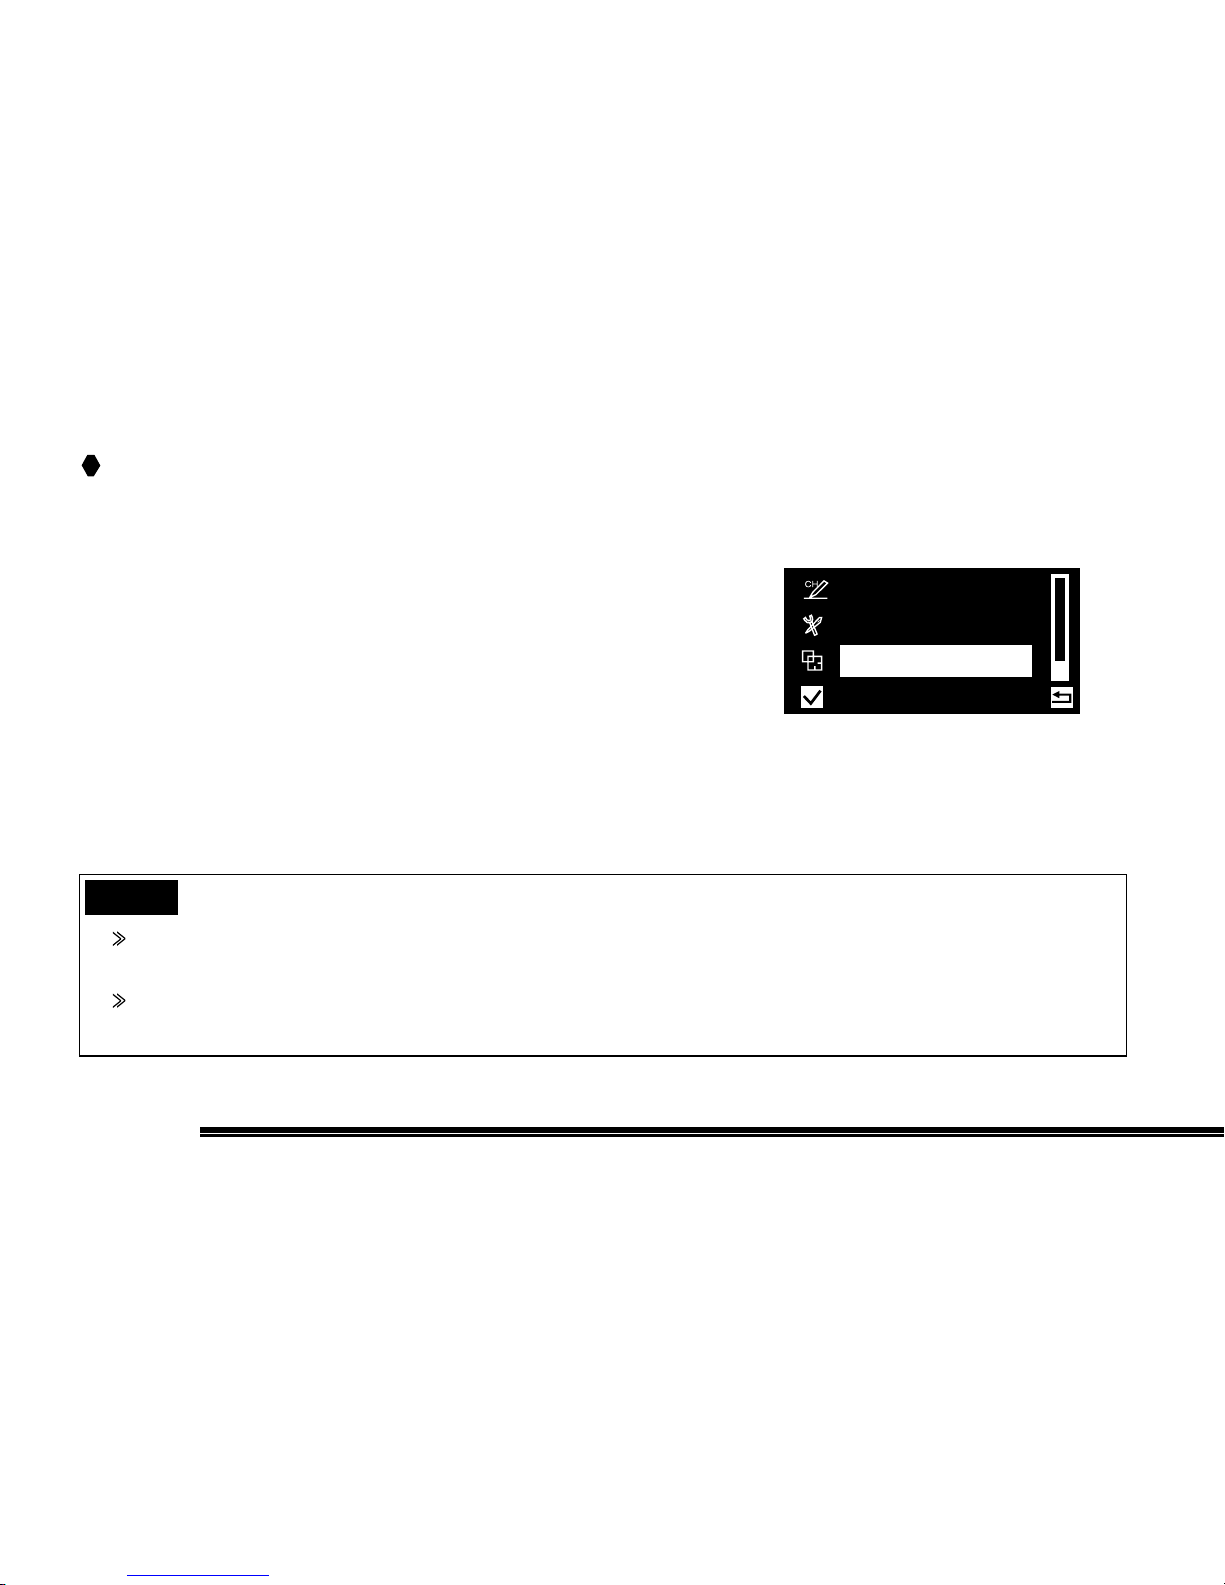
From the Main Menu Screen, scroll up to select Zone, then press OK to enter.
Use the up/down keys to select your desired Zone.
Zone
Settings
Program
Notes
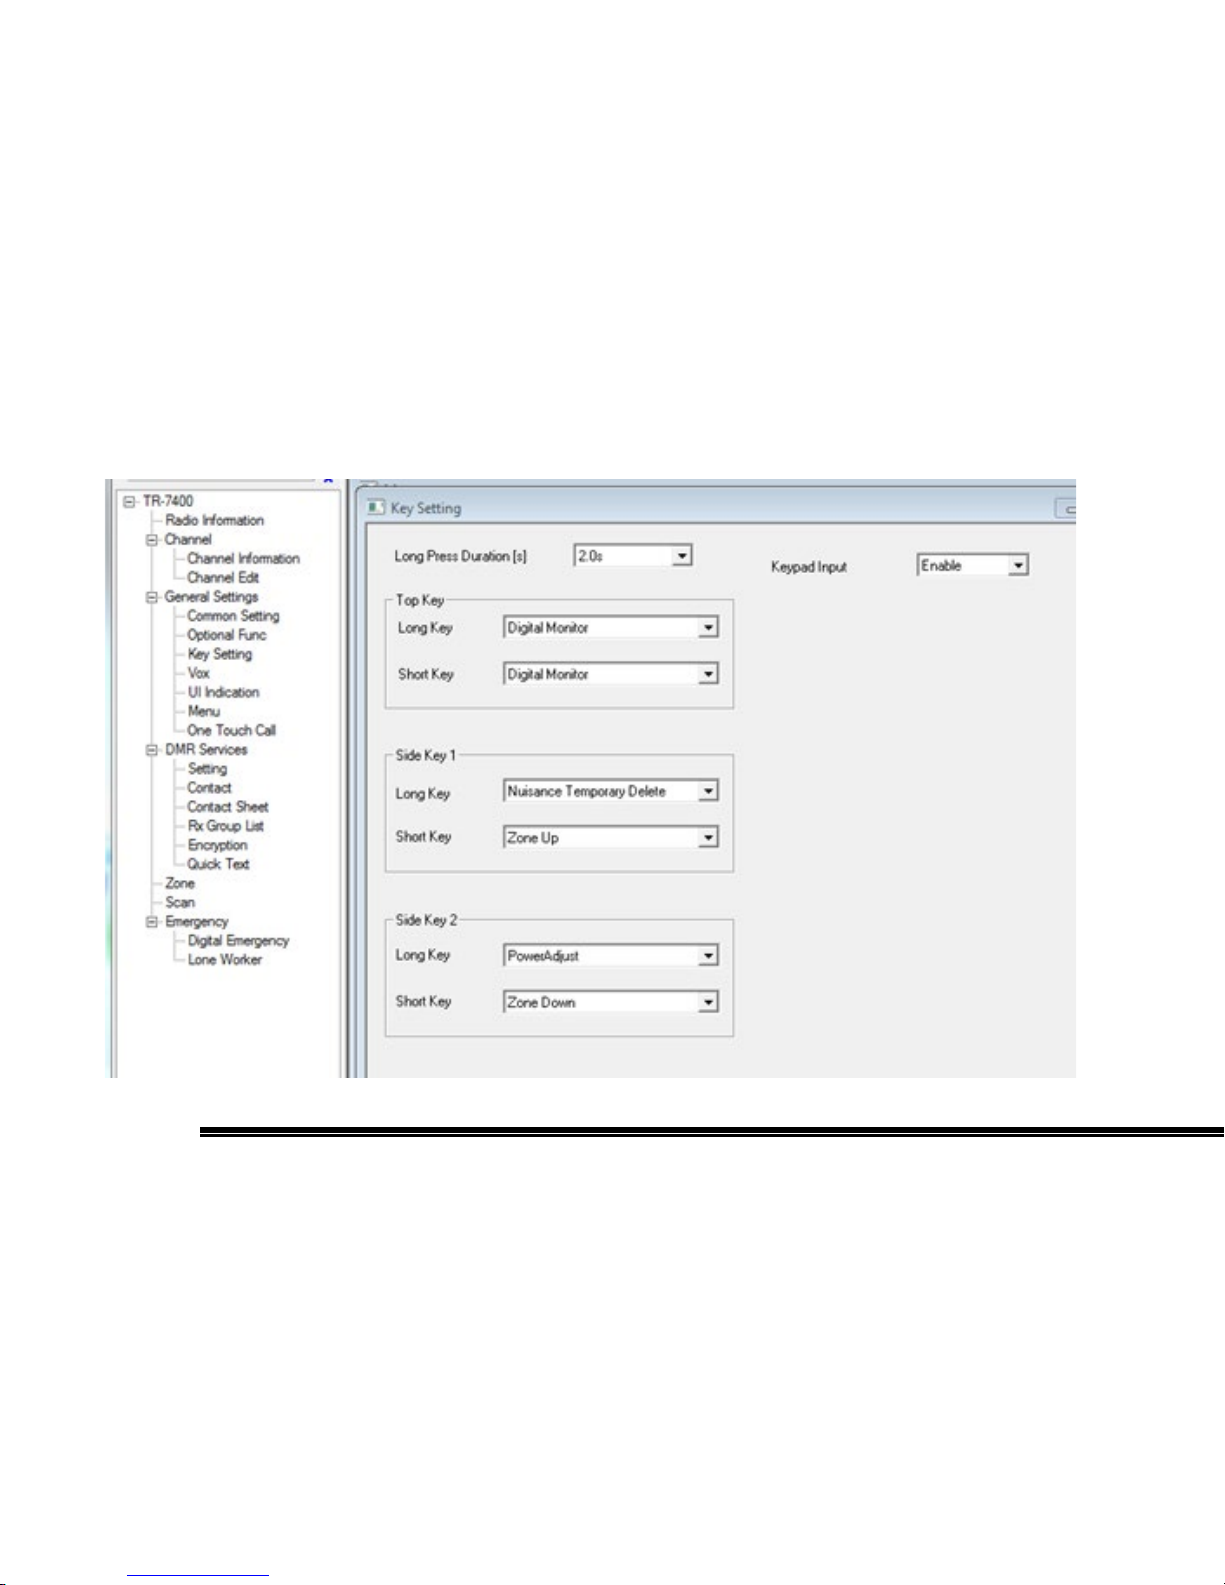
The Top and Side buttons can be programmed via software and they have long and short press
functions.
By default the Top Button is programmed to initiate the Digital Monitor function and the side
buttons are programmed with Zone Up and Zone Down.
Page 19
19
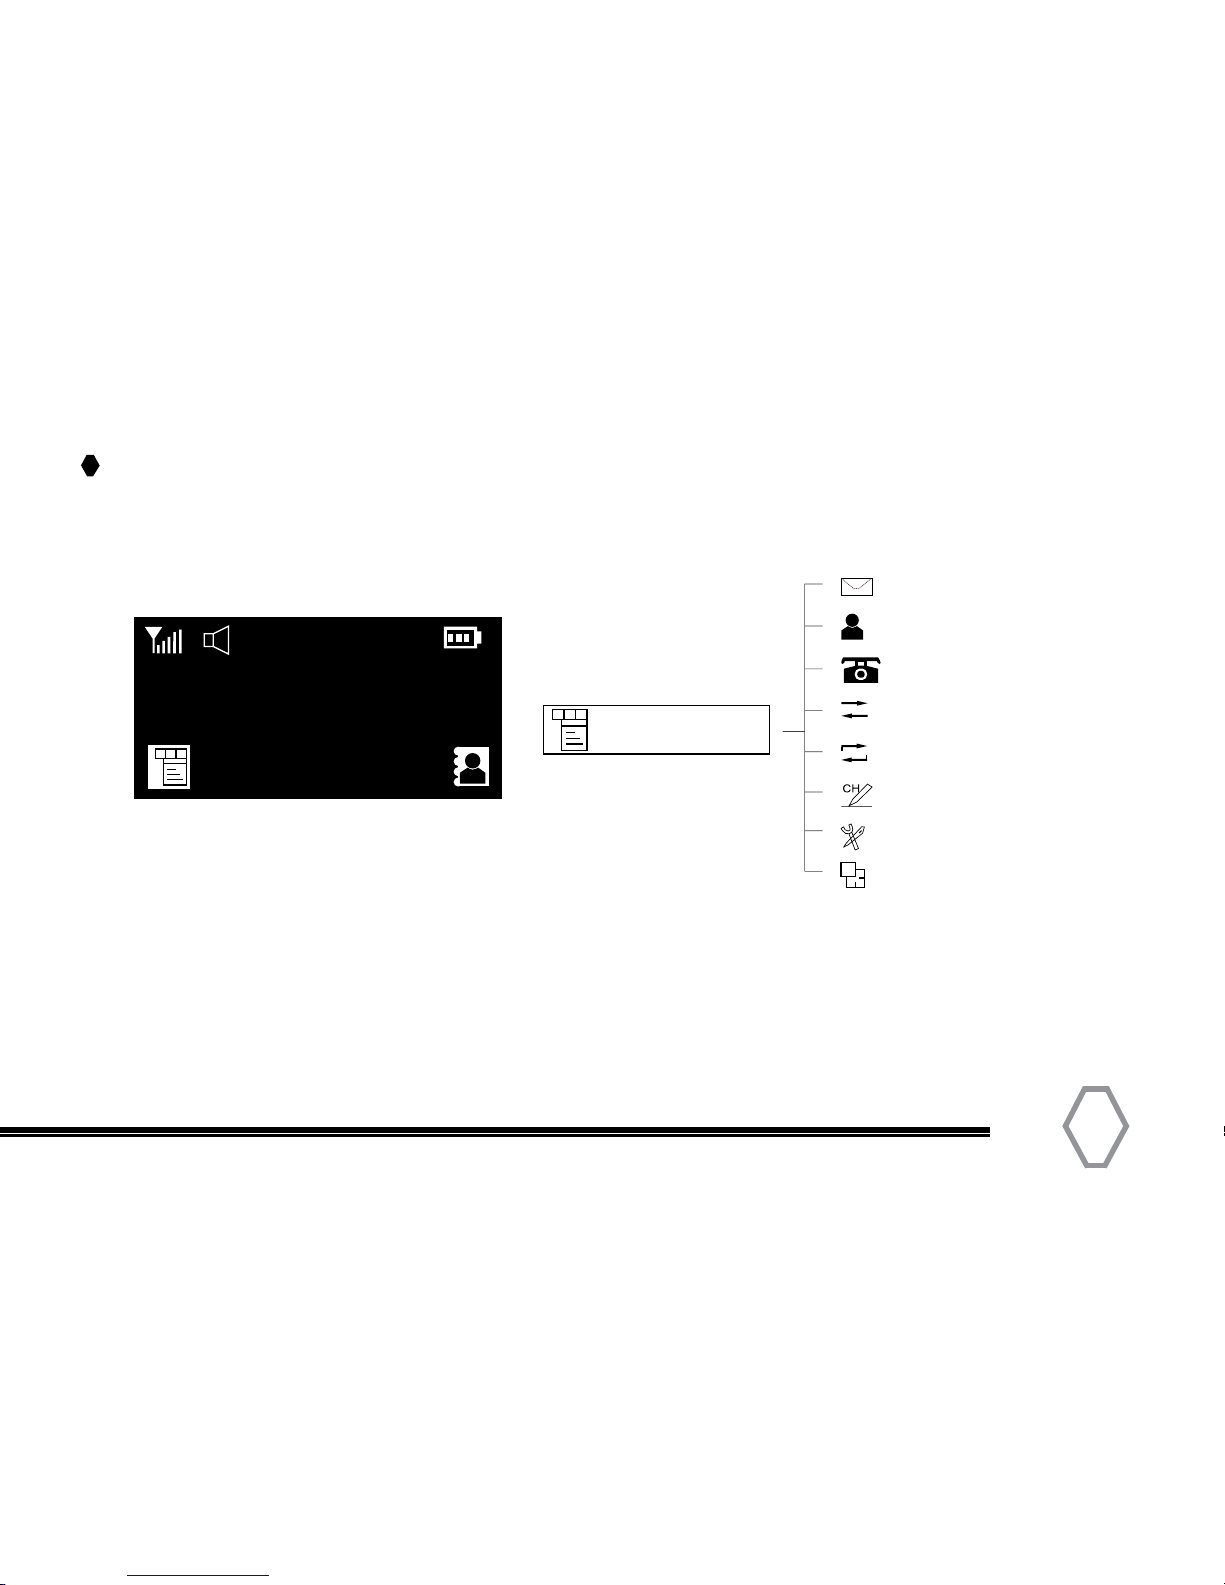
Menu Navigation
Contact
Message
ManualDial
Call
Logs
Scan
Program
Settings
Zone
MainMenu
Menu display functions can be
enabled / disabled in software.
H
Local
Santiago
Page 20
TERA
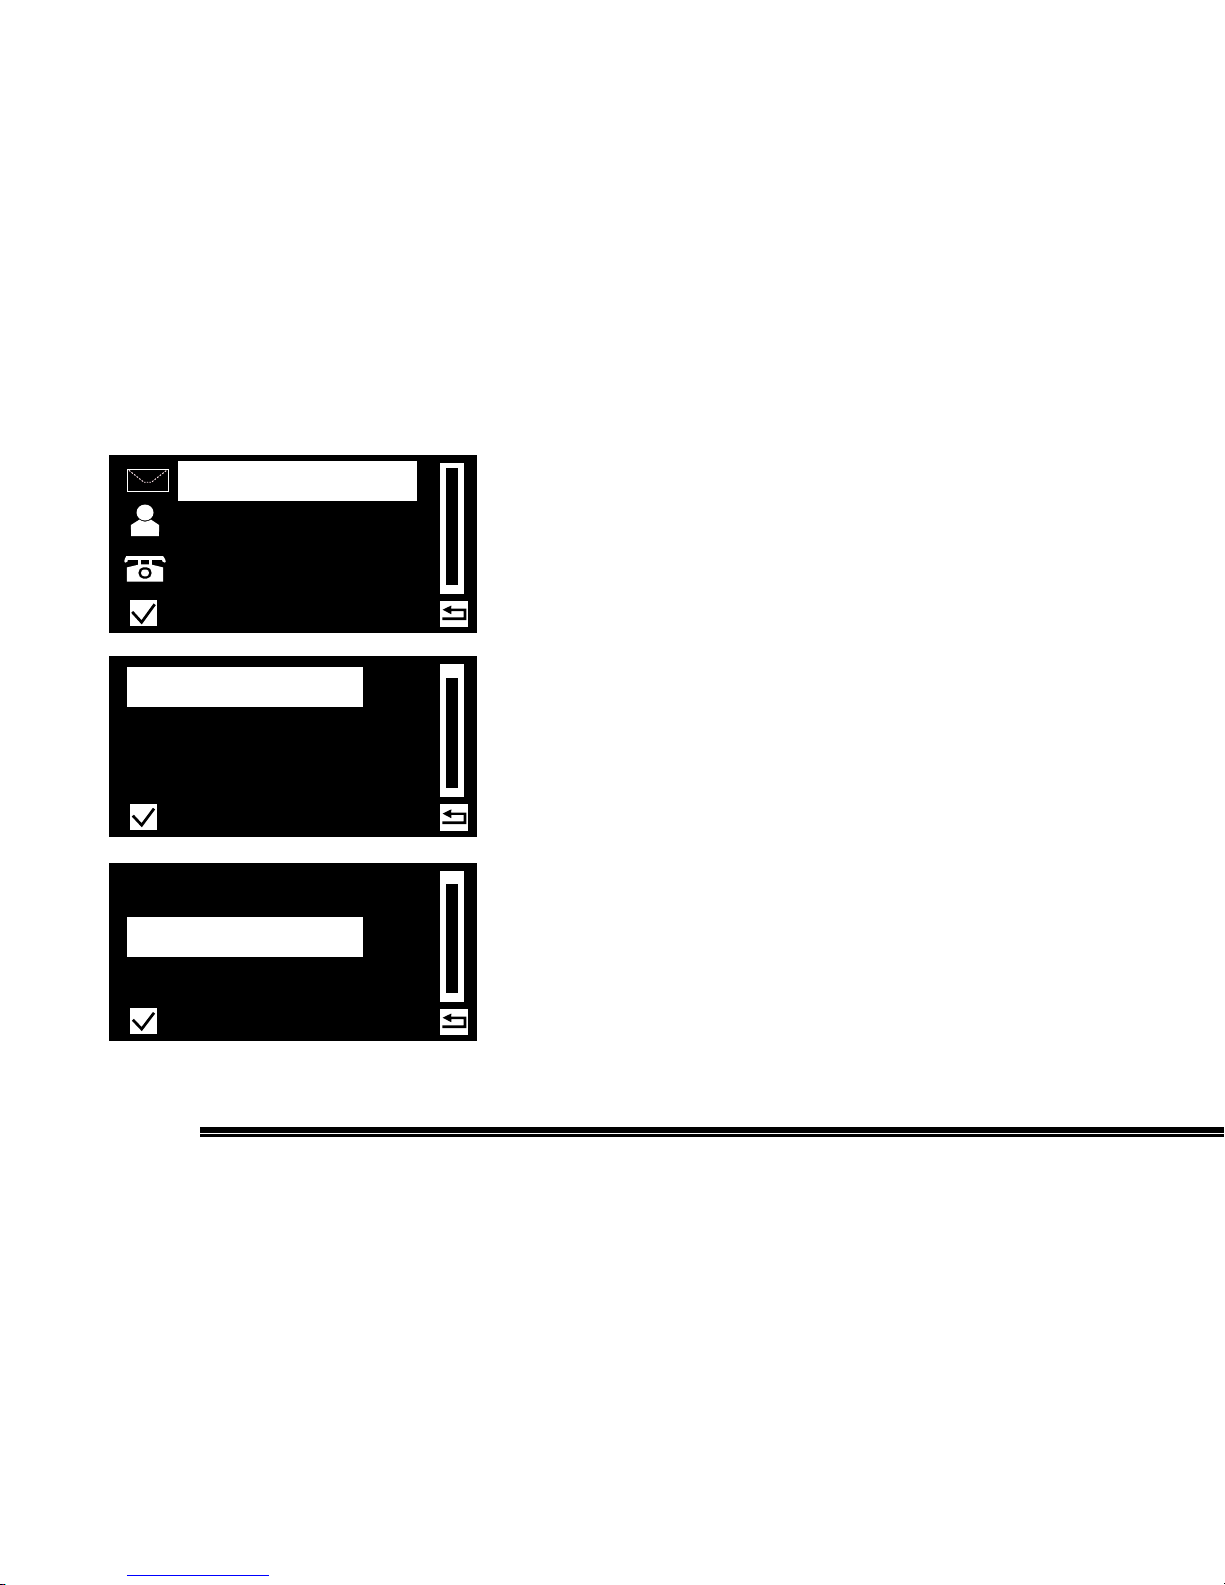
Message
To access this item, press the Menu key in idle mode
and then select “Message,” or press the shortcut key to
get to message directly.
Inbox
Each message function can perform any of these
operations: Reply/Forward/Edit/Delete.
Write
Create a text message up to 150 characters and send
it to an individual user.
Message
Contact
Manual
Dial
Inbox
Write
Outbox
Write
Inbox
Outbox
Page 21
21
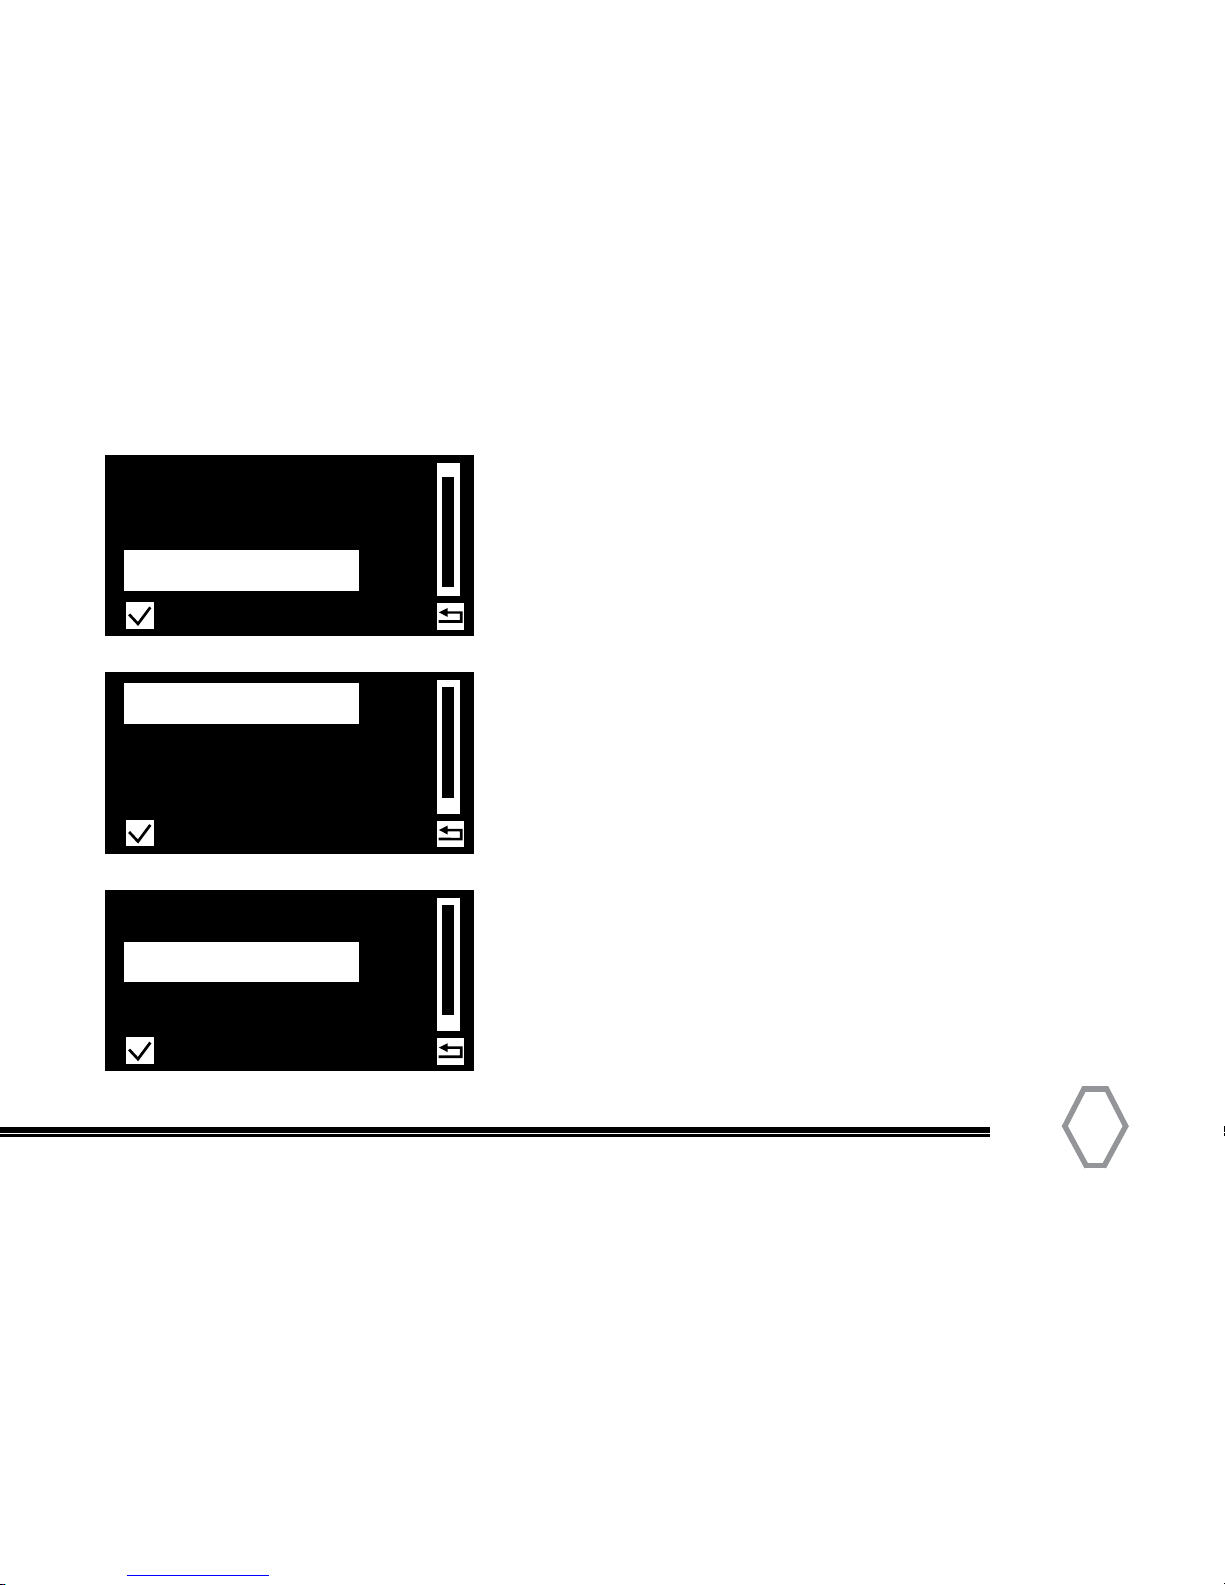
Outbox
The Outbox can save up to 15 sent messages. When
the Outbox is full, the oldest entry will be automatically
deleted. Each message can have these operations:
Resend / Forward / Edit / Delete.
Quick Text
Under this option there are 15 messages that you can
pre-define in software.
Draft Box
The Draft Box can save up to 15 messages. Users can
edit or send the message saved in the Draft Box.
Delete
Can delete messages from Inbox, Outbox, or Draft Box.
Outbox
Inbox
Write
Quick Text
Draft Box
Delete
Draft Box
Quick Text
Delete
Page 22
TERA
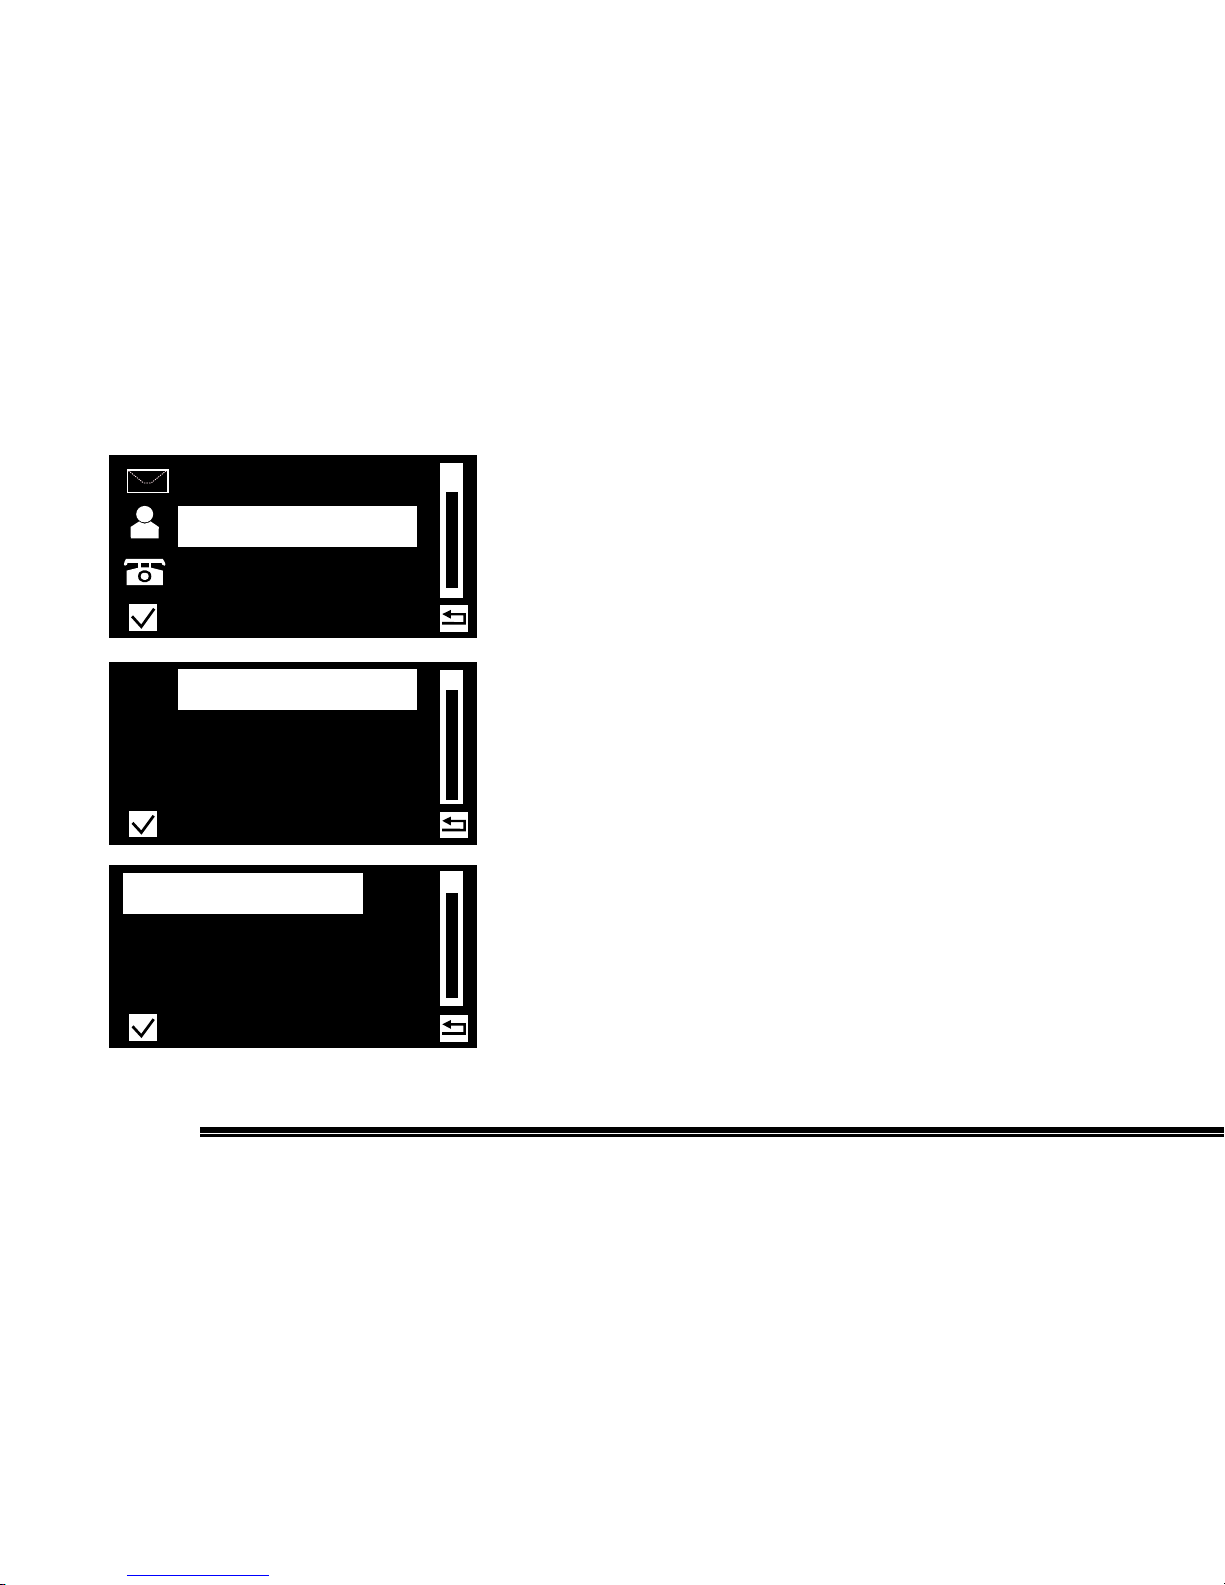
Contact / Talkgroup
By selecting the Contacts menu you will see a list of all
the Contacts / Talkgroups (Group ID) that are programmed into the radio. In Field Programming mode
you can transmit on these Talkgroups if the repeater is
programmed on the correct Frequency, Slot and Color
Code.
Please note that due to the limits of the radio you will
not hear the responding audio. To receive a specific
Talkgroup audio the TERA DMR radio provides for a
Field Programmable Receive Group ID function. See
Receive Group ID section.
Contact details
After selecting a Contact you can click on a Contact to
see the details of the Contact.
Message
Contact
Manual
Dial
Detail
Add
SendMsg
Arizona
Alaska
Alabama
Page 23
23
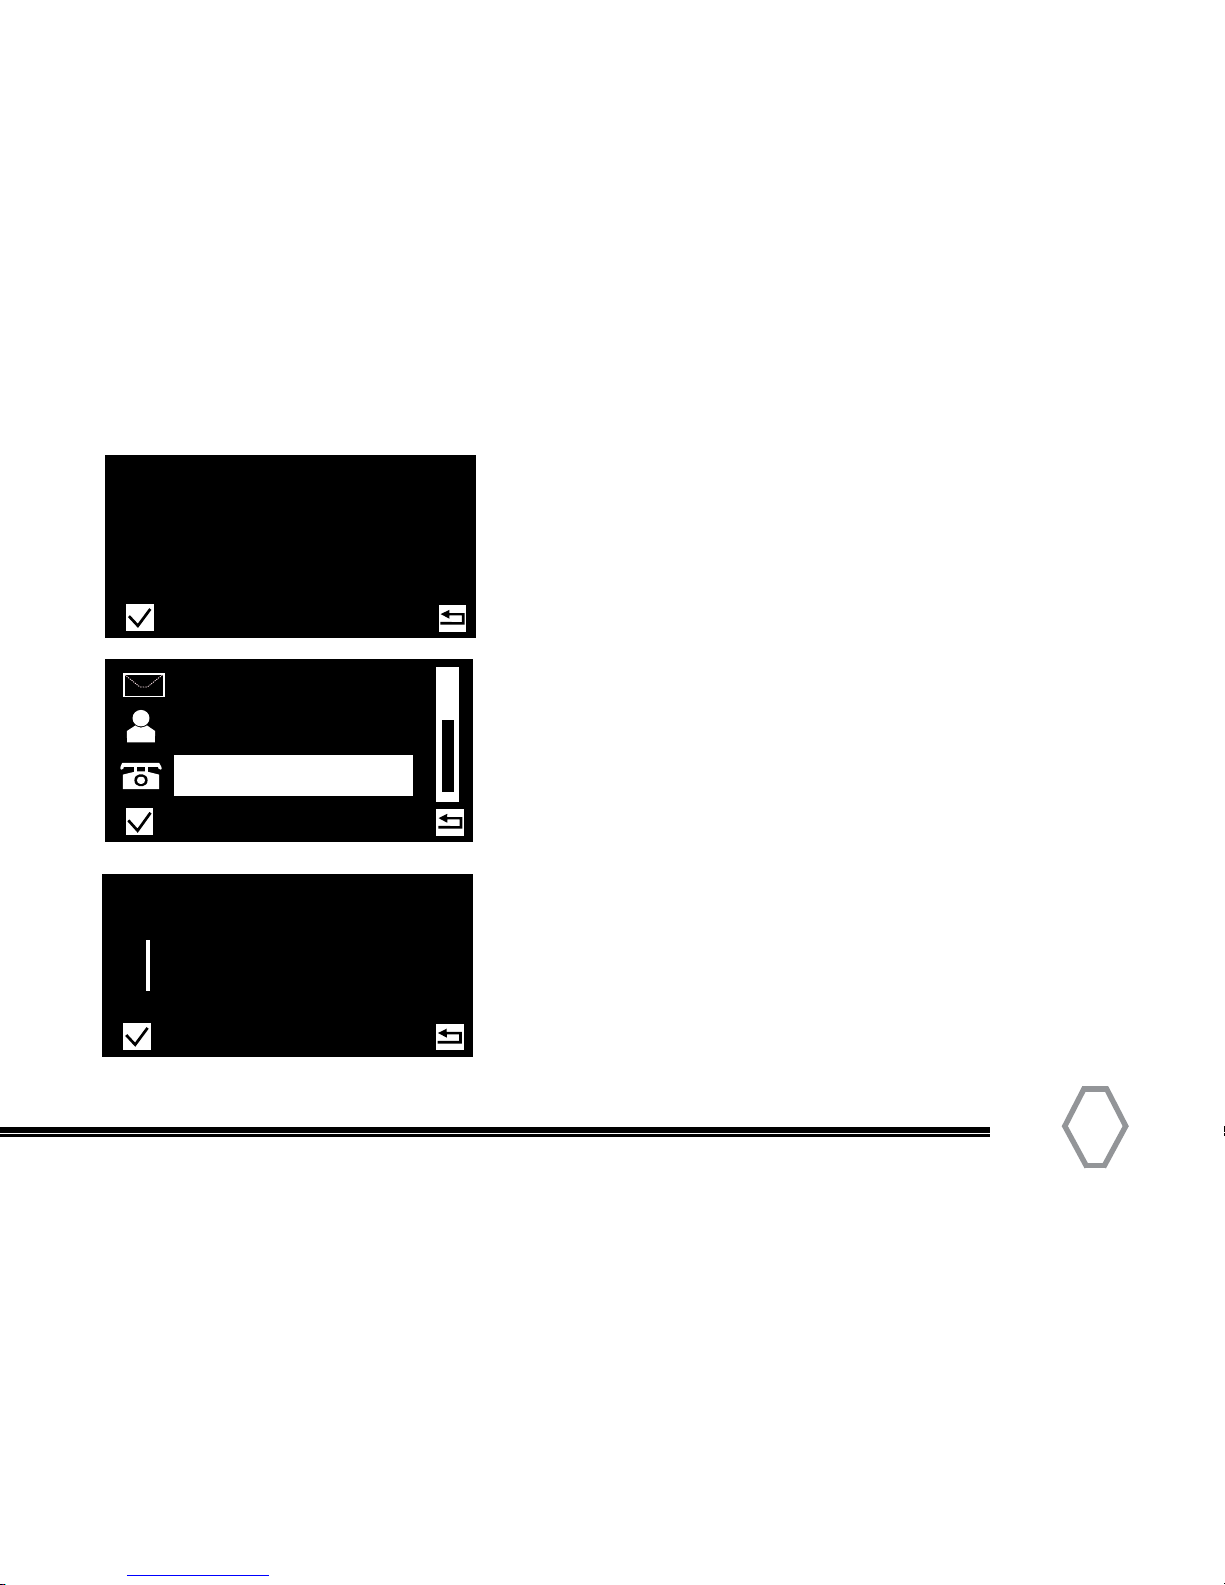
Detail information of Talkgroup (Group ID) is available
from the keypad.
You can also enter and name an Individual Contact from
the Keypad.
Manual Dial a Talkgroup (Group ID)
To temporarily enter a Talkgroup (Group ID) that is not
already programmed select Manual Dial then enter the
Group ID number. To manually dial an individual insert
a #-key before the ID number.
Note the repeater must be programmed on the correct
frequency, Slot and Color Code.
Please note that due to the limits of the radio you will
not hear the responding audio. To receive a specific
Talkgroup audio the TERA DMR radio provides for a
Field Programmable Receive Group ID function.
Message
Contact
Manual
Dial
Type: Group
Num: 3101
Alabama
Name:
Group ID
Page 24
TERA
Receive Group ID
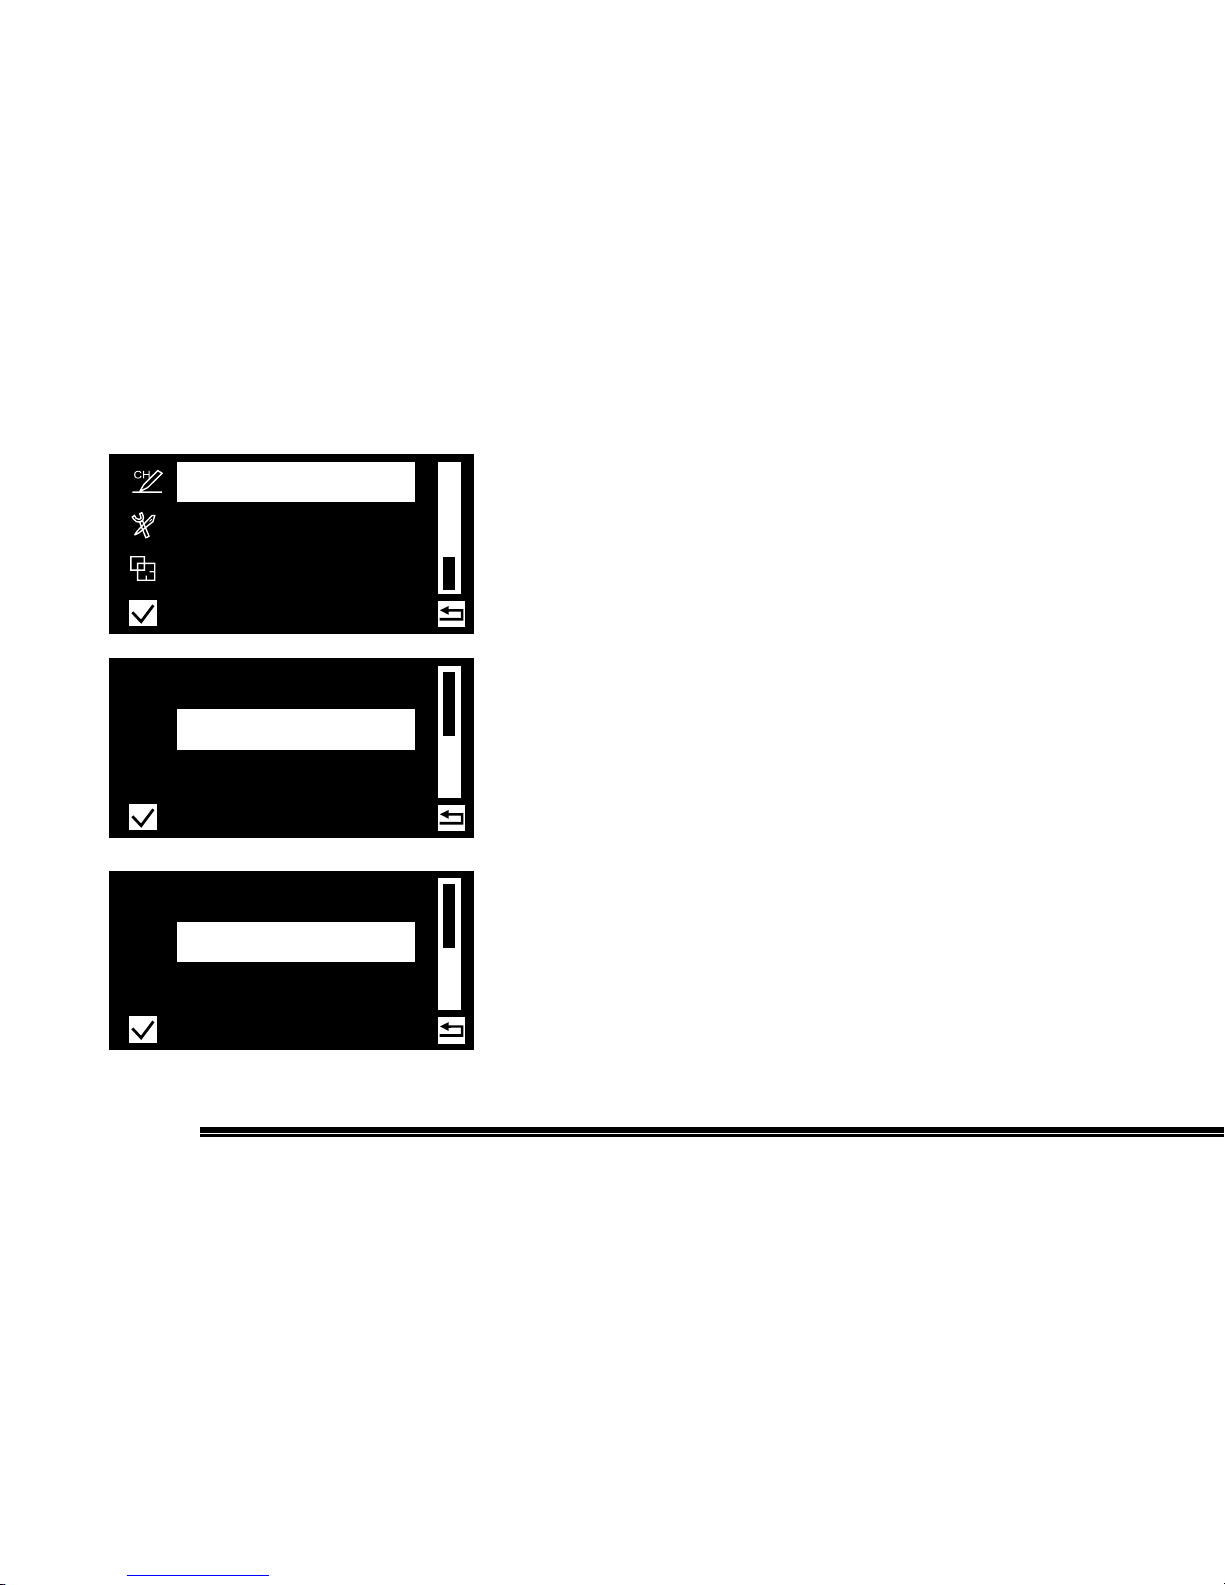
The TERA DMR radio allows one Receive Group to be
entered from the Keypad.
From the main Menu scroll up and select Program.
Next select Radio
Then select RCV Group ID.
Zone
Settings
Program
Radio
Channel
RCV Group ID
Radio ID
Page 25
25
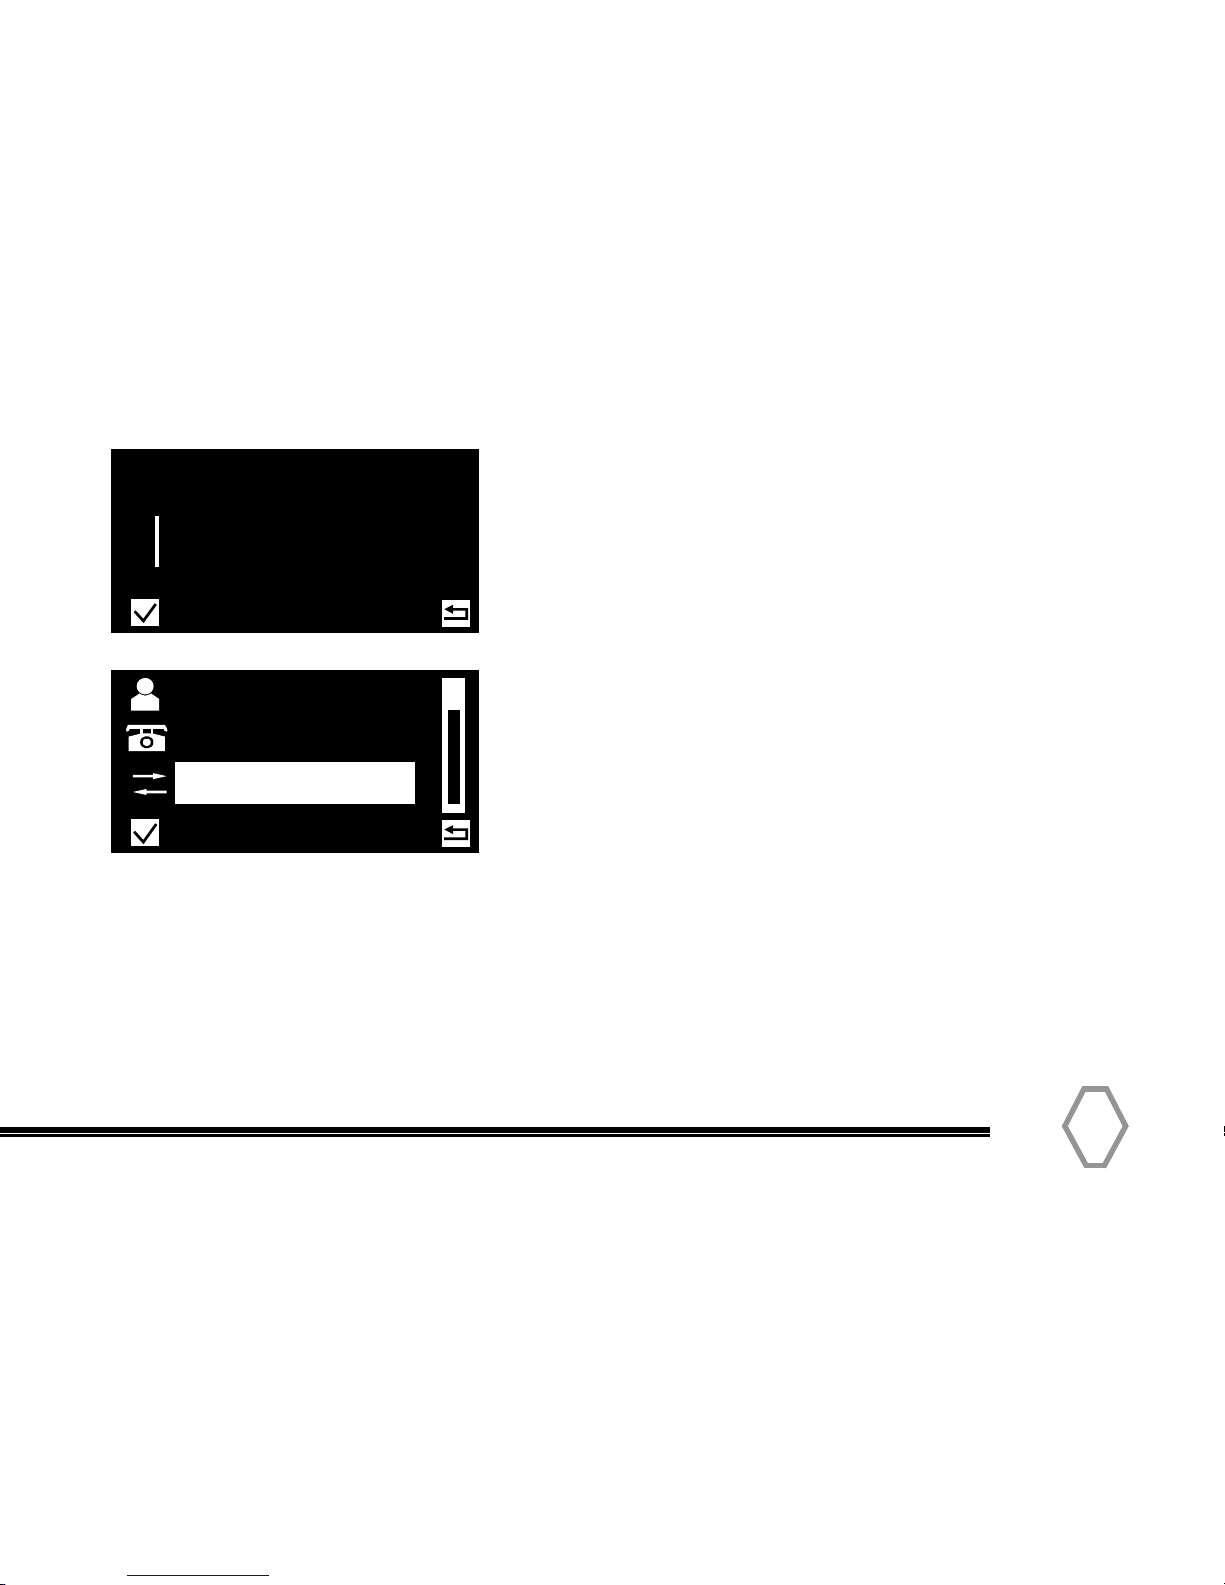
Enter the Talkgroup (Group ID) that you would like to
monitor. Make sure to cancel with a 0 after use.
Note the repeater must be programmed on the correct
frequency, Slot and Color Code.
Call Logs
To access this item, press the Menu key in idle mode
and then select “Call Logs.”
This radio can save up to 20 entries in the Outgoing
List, Incoming List and Missed List respectively (only
for private call list). When the memory for call logs is
full, the oldest entry will be overwritten by latest one
automatically. After accessing a list and selecting an
entry, you can perform any of these operations: hold
down the PTT key to initiate a call, view, send a message or delete it. To delete all entries in Outgoing List,
Incoming List and Missed List at a time, select: “Call
Logs -> Delete -> Outgoing/Incoming Missed.”
Contact
Manual
Dial
Call
Logs
RCV Group ID
Page 26
TERA
Scan
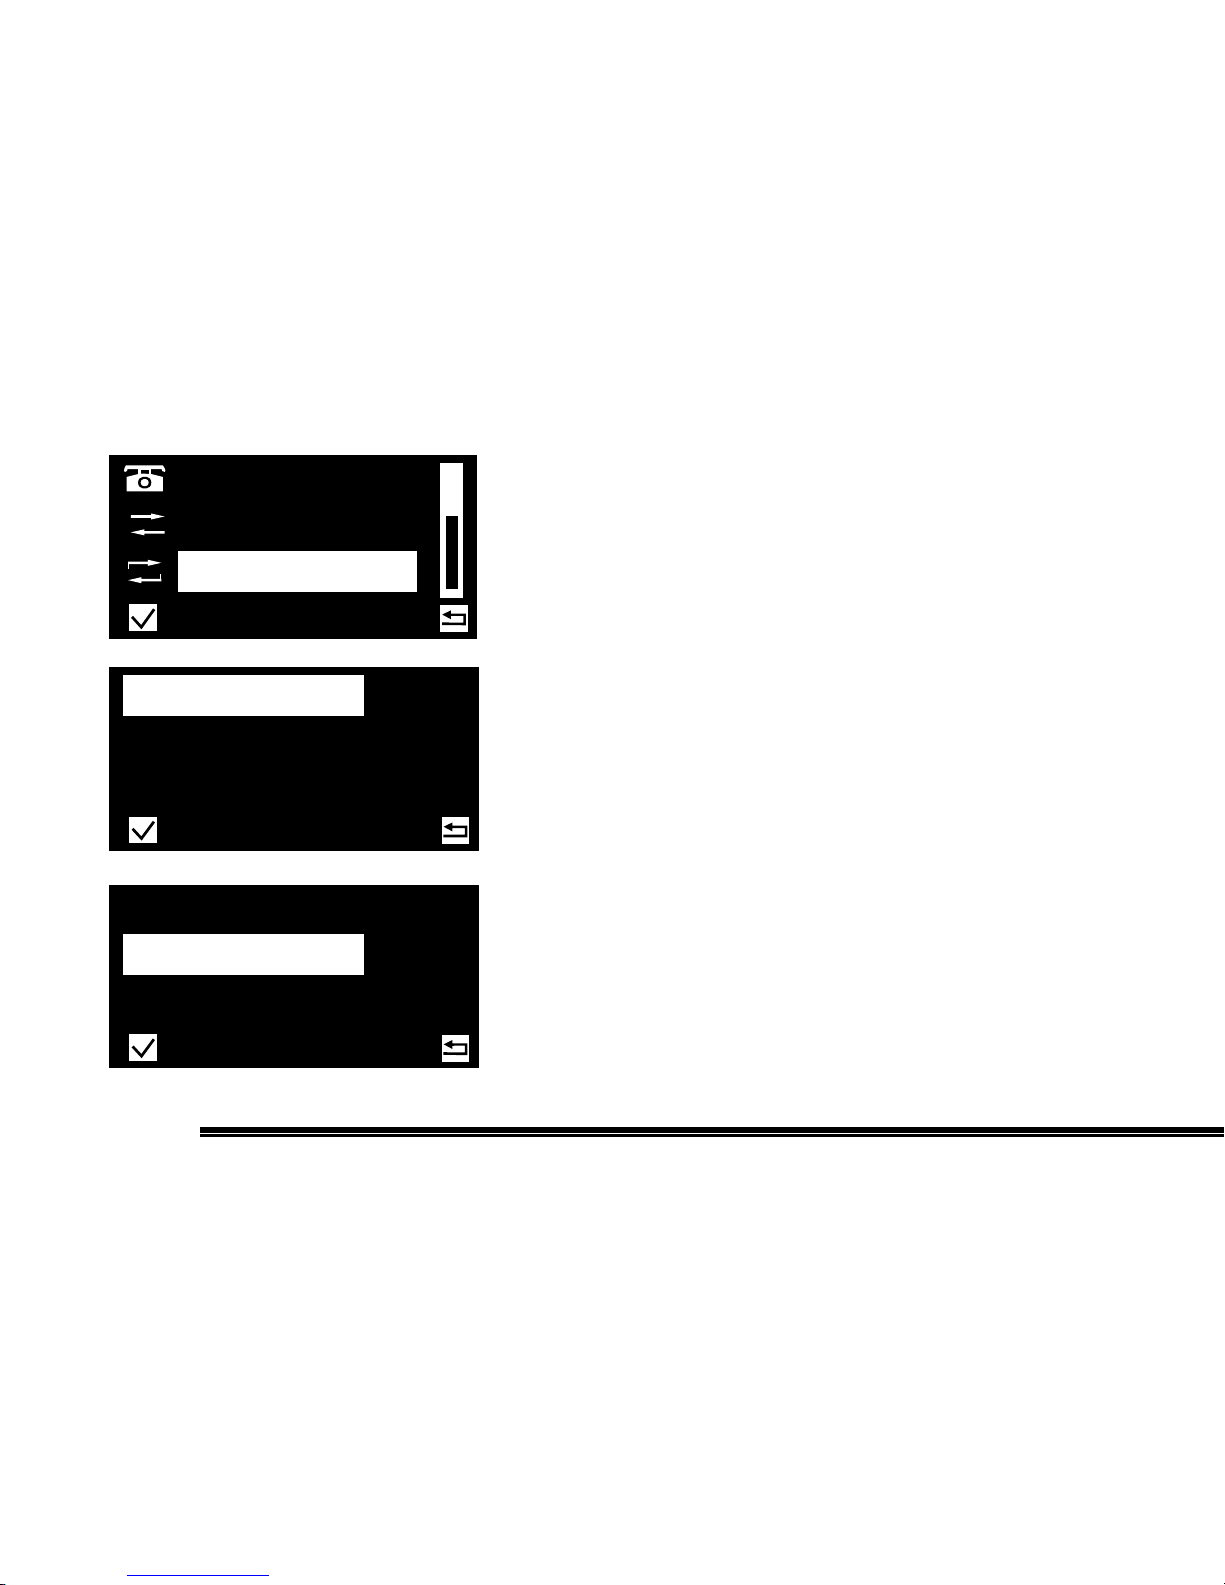
To access this item, press the Menu key and then
select “Scan.”
Scan Switch
To access this item, press the Menu key and then
select “Scan,” then click on “Scan Switch.”
Scan ON / OFF
The function “Scan” allows you to listen to communication activities on other channels. This option is used
to enable or disable the function.
Scan List
To access this item, press the Menu key and then
select “Scan,” then click on “Scan List.”
Scan List is predefined in software.
ManualDial
Call
Logs
Scan
Scan Switch
Scan List
Scan List
Scan Switch
Page 27
27
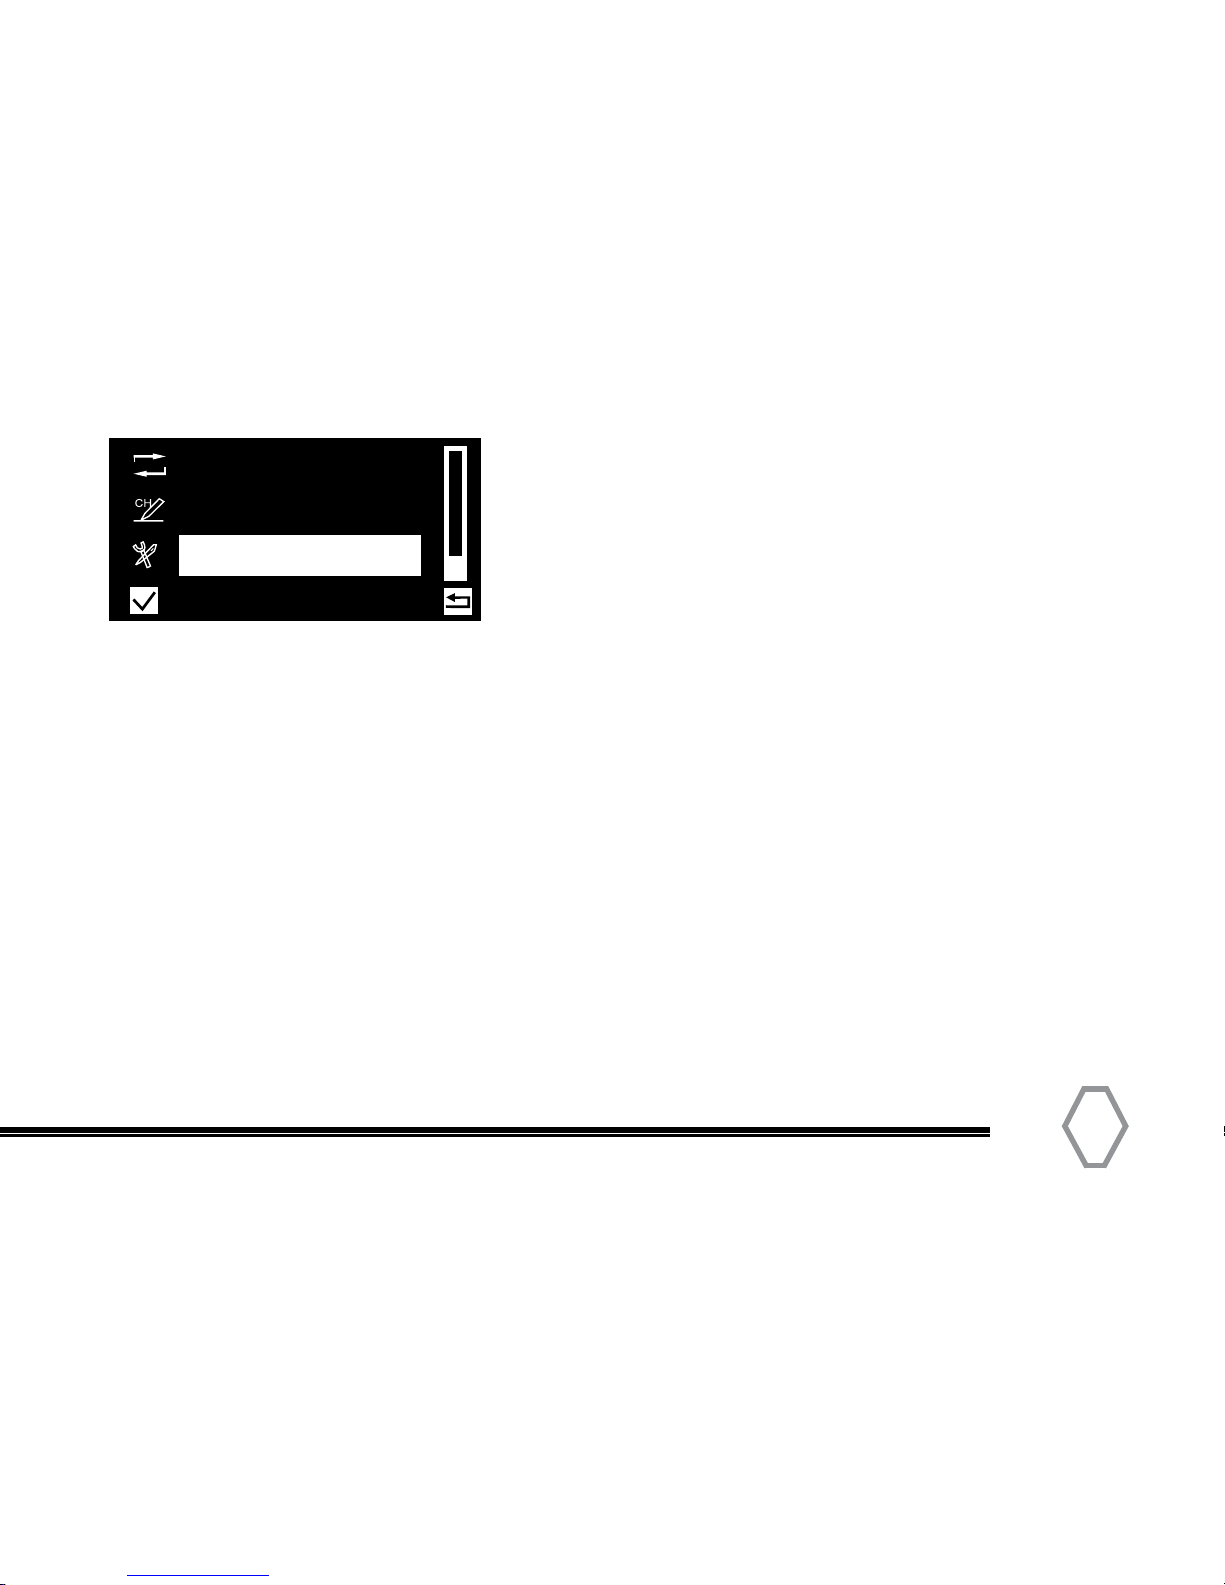
Settings menu functions can be enabled
/ disabled in software.
Settings
Radio Info
Radio ID
Software Version
Firmware Version
Model Number
Parameter
TOT Time out timer (1-180 seconds)
TX Power (High / Low)
VOX (ON / OFF)
Tone
Silence
Keypad tone
Keytone ON/OFF
Keytone UP/DOWN
Low Power Tone
Msg Tone
Private Tone
Grp Call Tone
Channel Notify
BasicSettings
Screen Set
Keypad LED
Settings
Program
Scan
Page 28
TERA
Program
To access this item, press the Menu key and then
select Program.
The programming option may be enabled / disabled in
the software menu.
CallLogs
Scan
Program
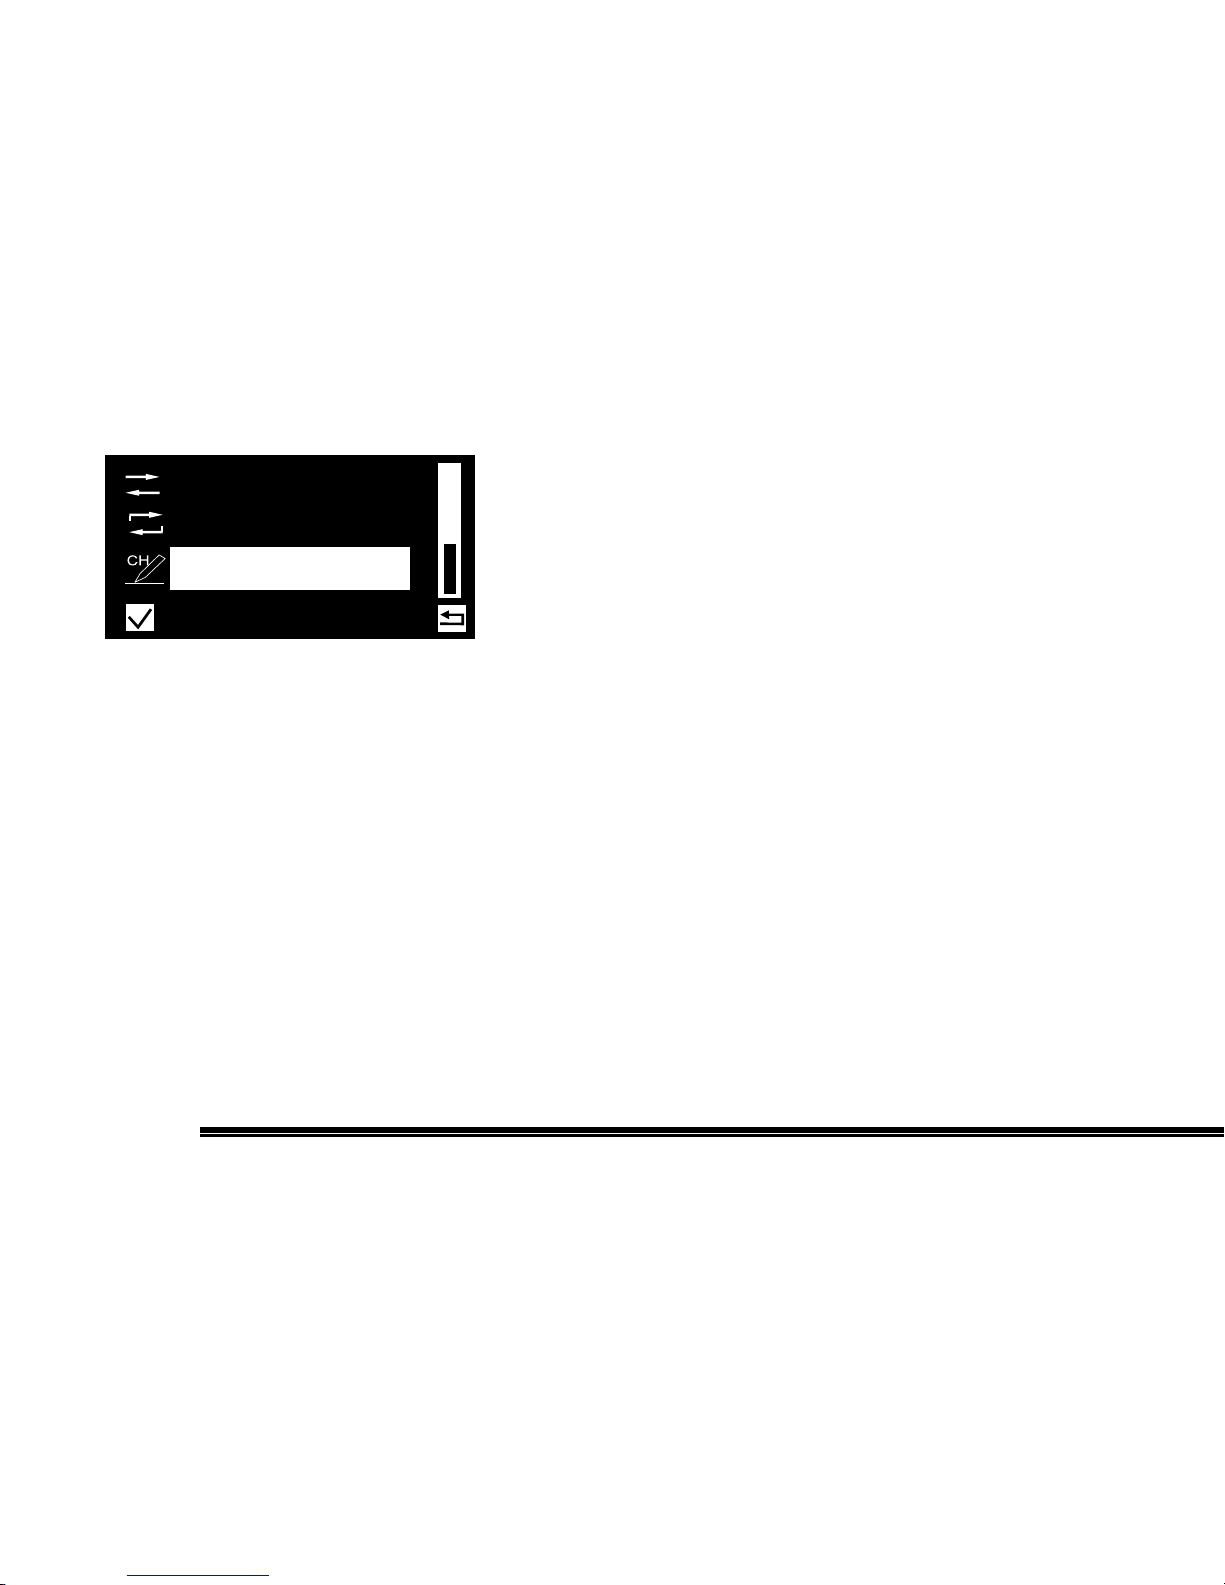
Front Panel Programming (FPP) can perform two functions:
1. Edit an existing programmed channel.
Select either an analog or digital channel to be edited.
Select PROGRAM
Channel - Digital
Frequency
RX Frequency
TX Frequency
Slot
Slot 1
Slot 2
Color Code
0 - 15
Channel - Analog
Frequency
RX Frequency
TX Frequency
CTCSS / DCS
Page 29
29
2. Add a new analog or digital channel from the keypad.
In order to add either a new Analog or Digital channel, the base channel formatting must be
predefined, as the attributes are different for digital and analog channels. Zone 64 is predefined with
5 Digital channels (Digital 1-5) and 5 Analog (Analog 1-5). Select any of the predefined Channels.
Select PROGRAM
Channel - Digital
Frequency
RX Frequency
TX Frequency
Slot
Slot 1
Slot 2
Color Code
0 - 15
For a Talkgroup, go to the Main Menu and select Contacts. Scroll through and select any predefined
Talkgroup. Please refer to the Contacts/Talkgroup (Group ID) section about transmitting and receiving
of manually entered Talkgroups on page 23.
Channel - Analog
Frequency
RX Frequency
TX Frequency
CTCSS / DCS
Page 30
TERA
Initial Programming
TERA Commercial radios ship from the manufacturer “Keypad” locked per FCC rules.
You must first use the programming software to unlock this radio for the first time of
use. To unlock the Keypad go to Menu, Basic Settings, and then uncheck Keypad Lock.
Then write the file back to the radio. You will need the programming cable to connect
your radio to your computer for programming. Please contact your dealer for a TERA
DMR programming cable and
software.
When programming this radio for the first time, it is recommended you first READ the
radio with the software and then save this file for future reference as it contains the
default programming and settings. In addition, after you READ this radio with software,
first make your programming and frequency changes, then send this edited file back to
your radio. Please contact the dealer you purchased this radio from or TERA should you
have any questions.
Page 31
31
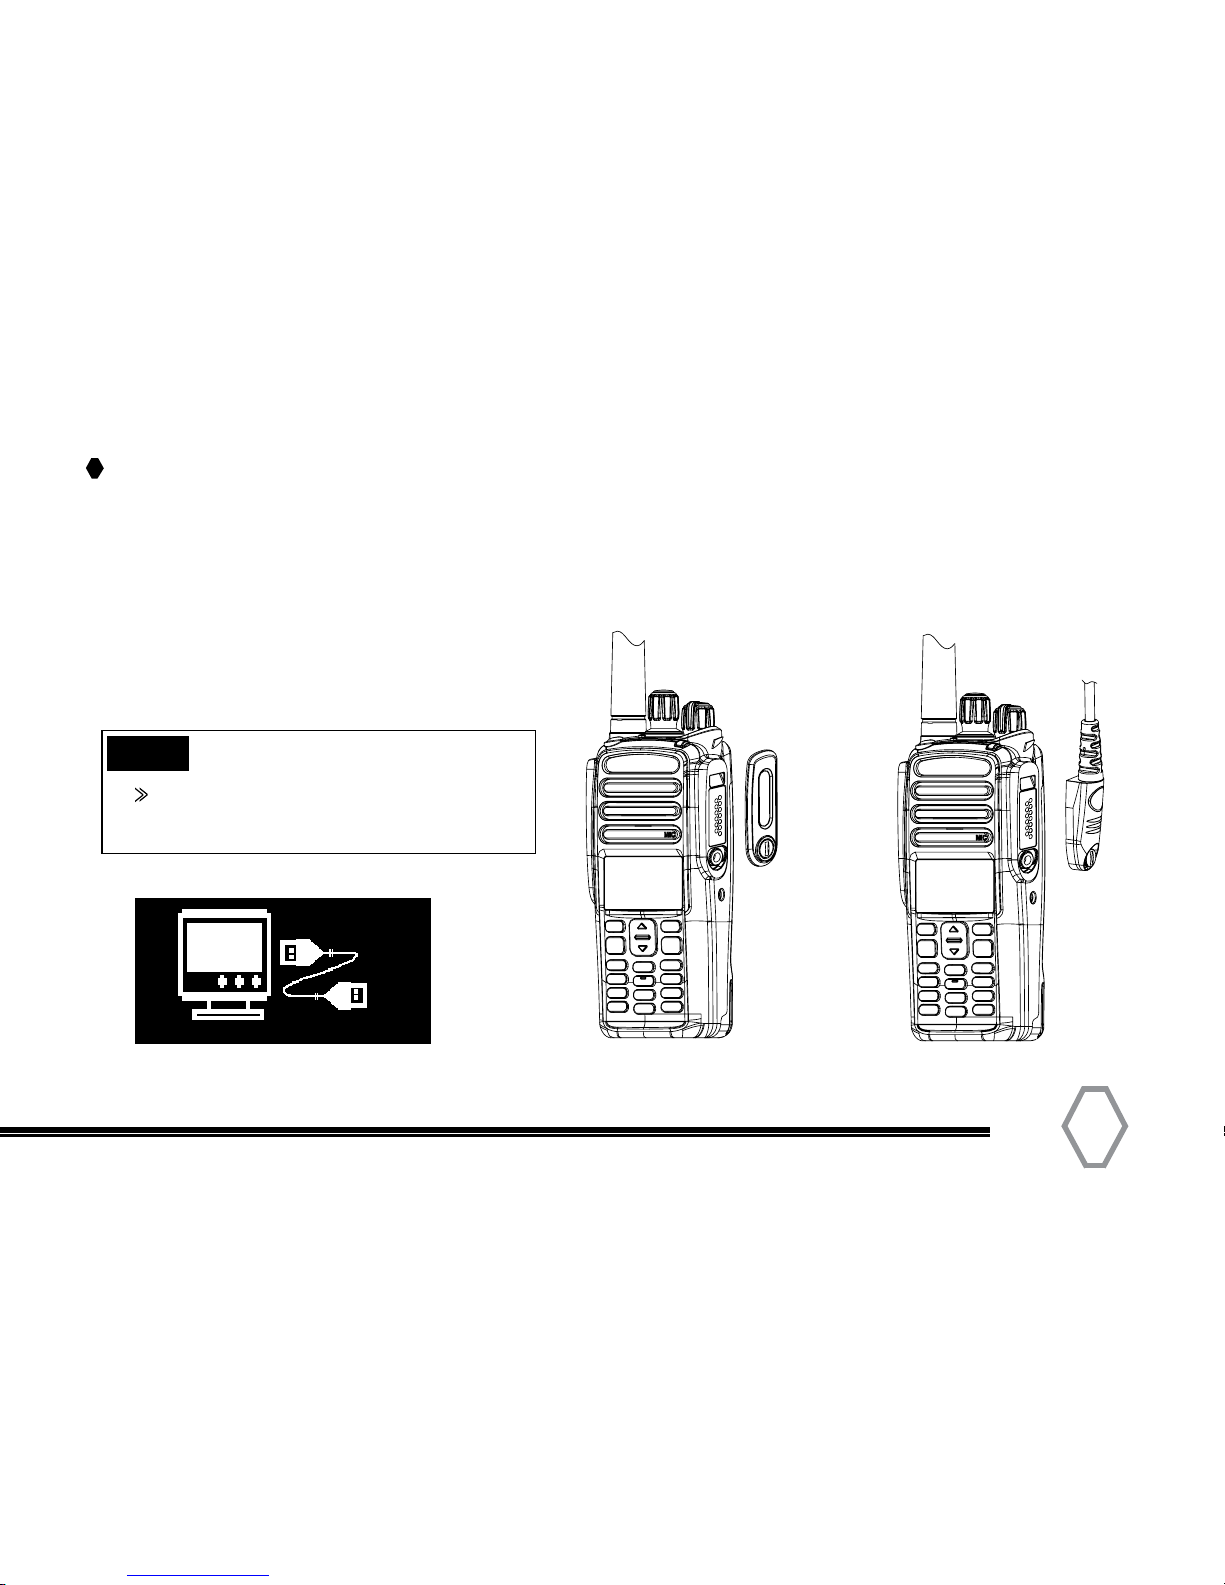
Attaching the USB Programming Cable
1. Remove the screw on the side accessory jack cover.
2. Slide the tip of the programming cable up into the slide slot.
3. Align and tighten the accessory screw.
Note
Side cover must be replaced to
maintain IP 67 rating in operation
TERA
TERA
Note: Cable is direct USB. No COM Port drivers required.
Page 32
TERA
Software Basic Settings
The TERA programming software offers many features for Commercial and Amateur
users. In General Settings / Common Settings / Radio Alias / Power-on Screen you can
enter your Department Unit Number or Amateur Radio callsign. In the menu settings
many features can be enabled / disabled from the display menu.
DMR Affiliation
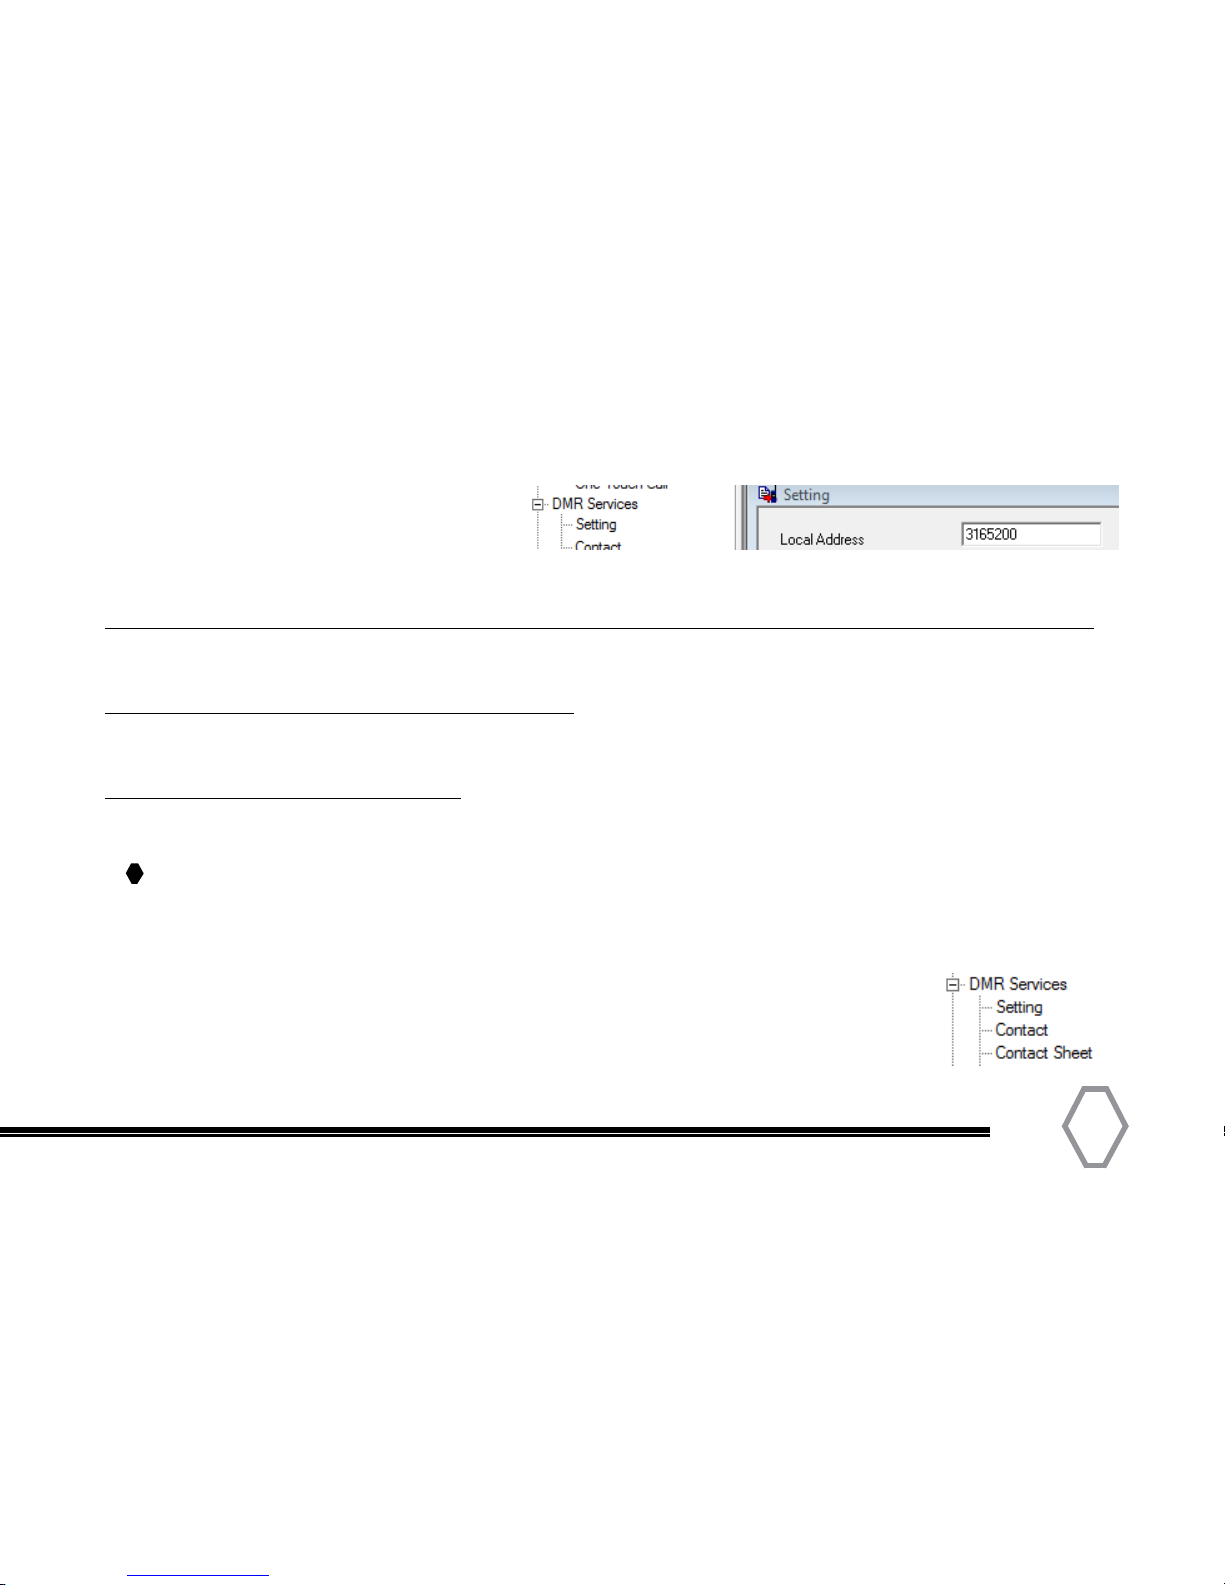
If you are a commercial user your Department will program in a “Digital Local Address” in
the DMR Services / Local Address, so your radio ID can affilate within your system.
Amateur DMR-MARC
For the best Amateur DMR experience obtain a subscriber ID from one of many available
Amateur sources. A U.S. Amateur user can obtain an ID from:
http://www.dmr-marc.net/cgi-bin/trbo-database/register.cgi
then scroll down to the user registration button.
Another place to register: http://register.ham-digital.net/
Page 33
33
Once you obtain your ID go to DMR/Settings tab and add your local address (DMR ID).
For DMR repeaters in your area please see:
https://www.google.com/maps/d/u/0/viewer?mid=zDtc036qqpwA.kMwk4xZ-Nenc&msa=0
World DMR repeater network map:
http://www.dmr-marc.net/repeaters.html
World DMR repeater network with verified Talkgroups by activity:
http://dmrx.net/dmrx-map.html
The TERA DMR radios contain a separate database memory for importing and displaying Amateur
DMR individual IDs, call sign and user name in comma-delimited format (.csv)
Please reference in the software DMR / Contact Sheet for import and export
database operations detailed on page 35.
Worldwide Amateur Contact Database
Page 34
TERA
Software Overview
The TERA programming software was developed to maximize all the functions of the TERA DMR
radio. Programming can be as simple as a few channels or developed to include all 64 Zones of
16 channels totaling 1,024 unique channels.
Channel Data Entry
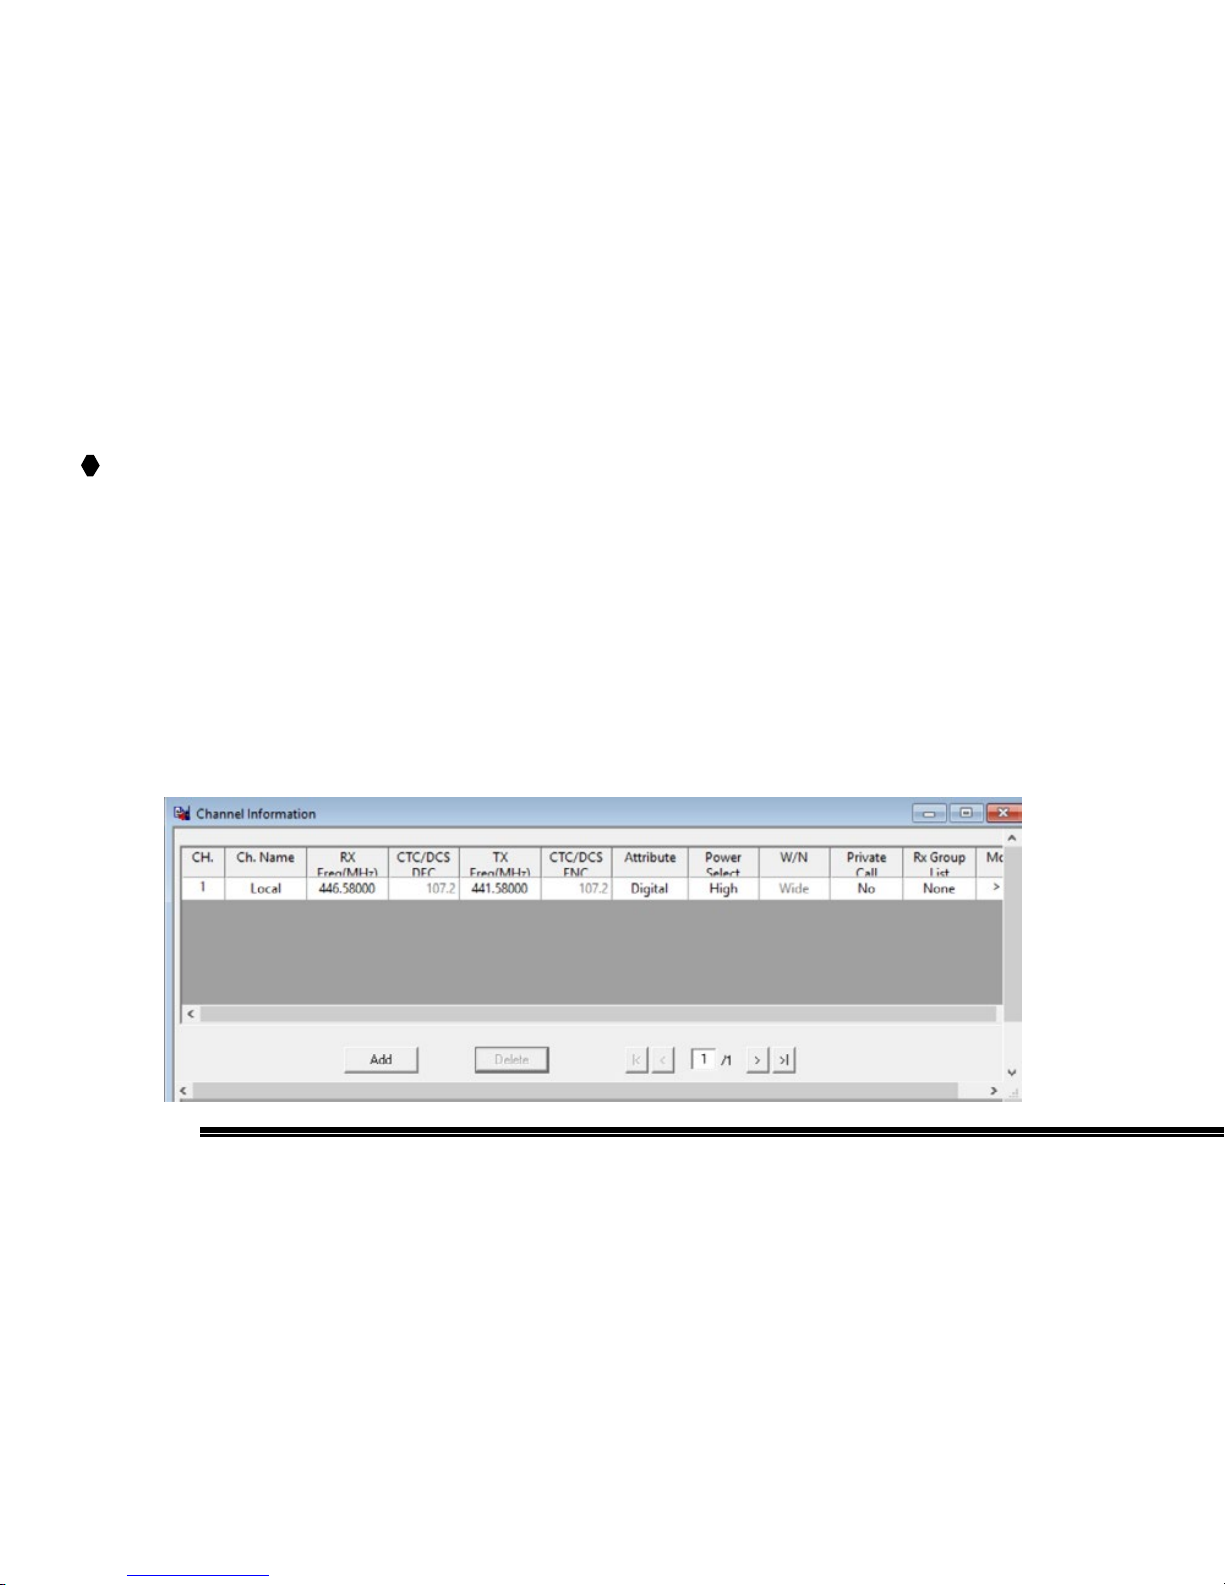
TERA software was developed with Amateur users in mind. As an example when programming a
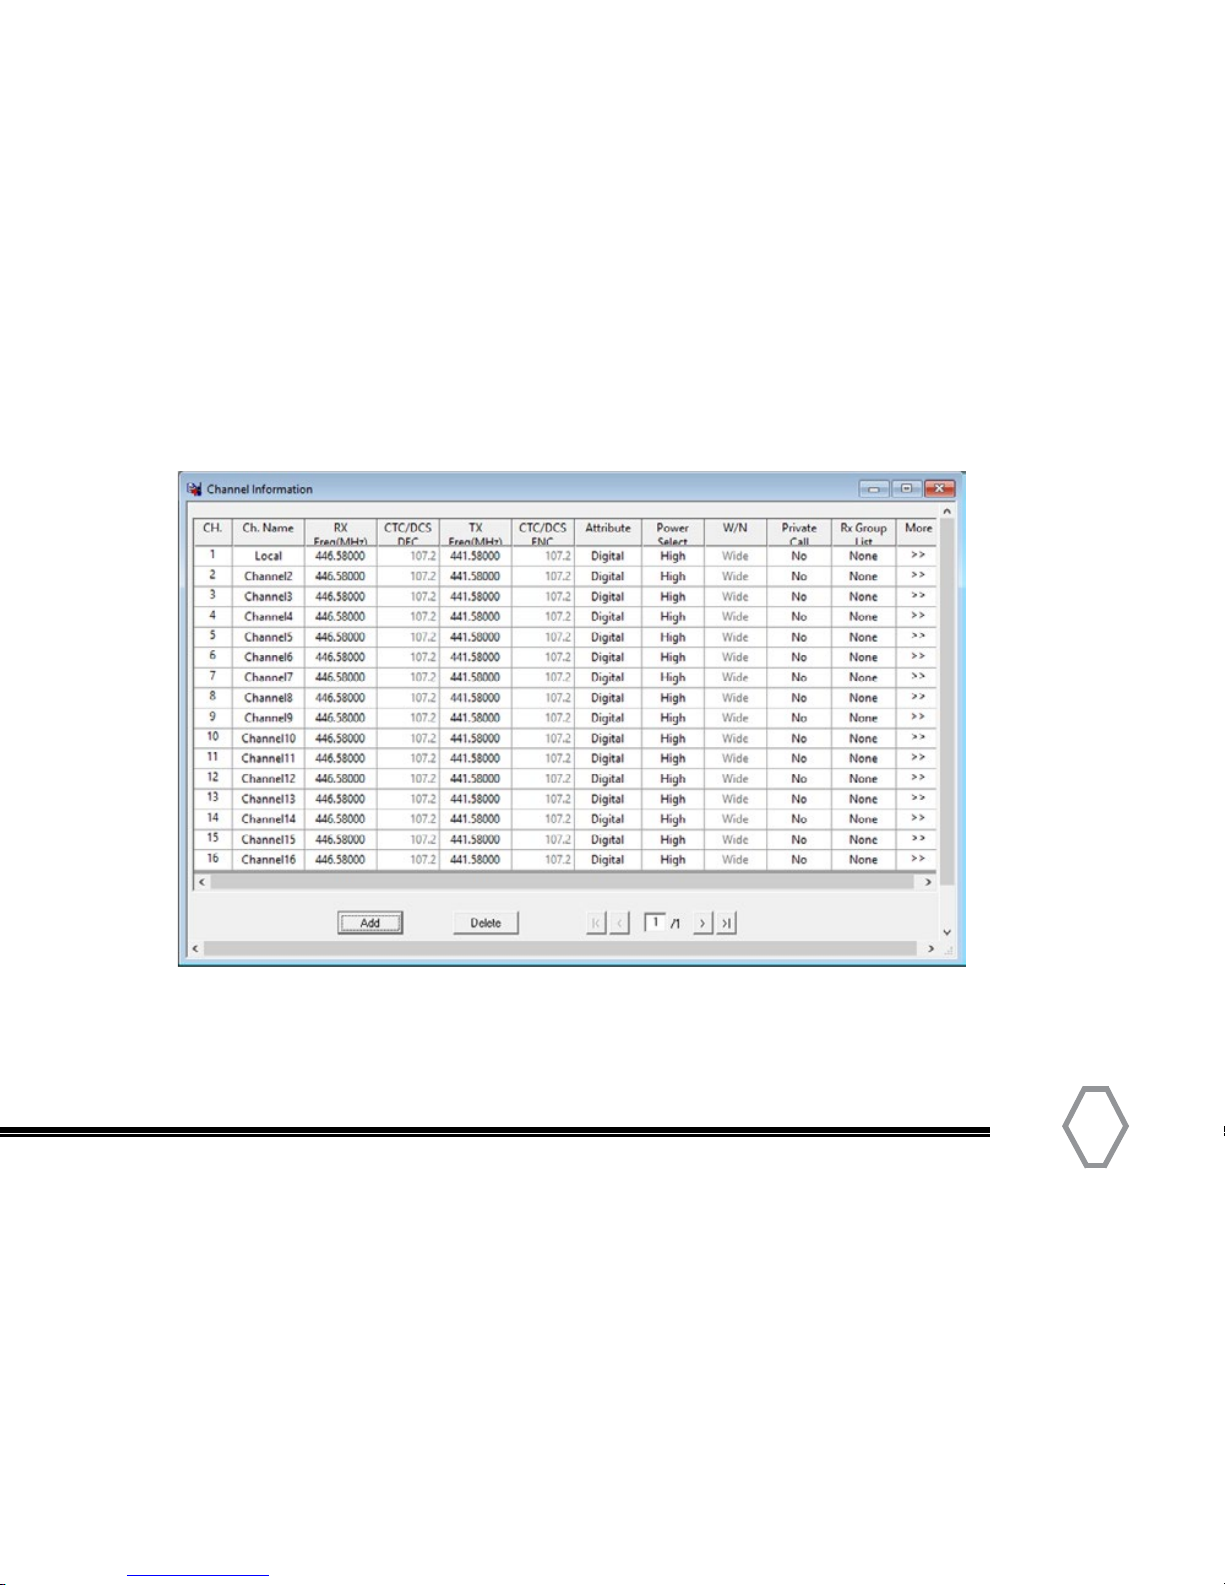
Zone of 16 channels for a repeater, enter the first channel data first. Then click “Add” for additional
channels up to 15. The main channel data will be duplicated. Then go back and change the
predefined Talkgroups and Slots, thereby saving a tremendous amount of programming time.
Page 35
35
Example of the “Add” function in duplicating row data
Next enter the Talkgroup names for each of the 16 channels. Then go back to the first channel and
expand the row by clicking on >> to select a programmed Contact that matches the Channel Name,
that was previously entered. If the Contact was not previously defined go to the Contact/Talkgroups
section and enter the new Contact information. Then select the appropriated Slot.
Page 36
TERA
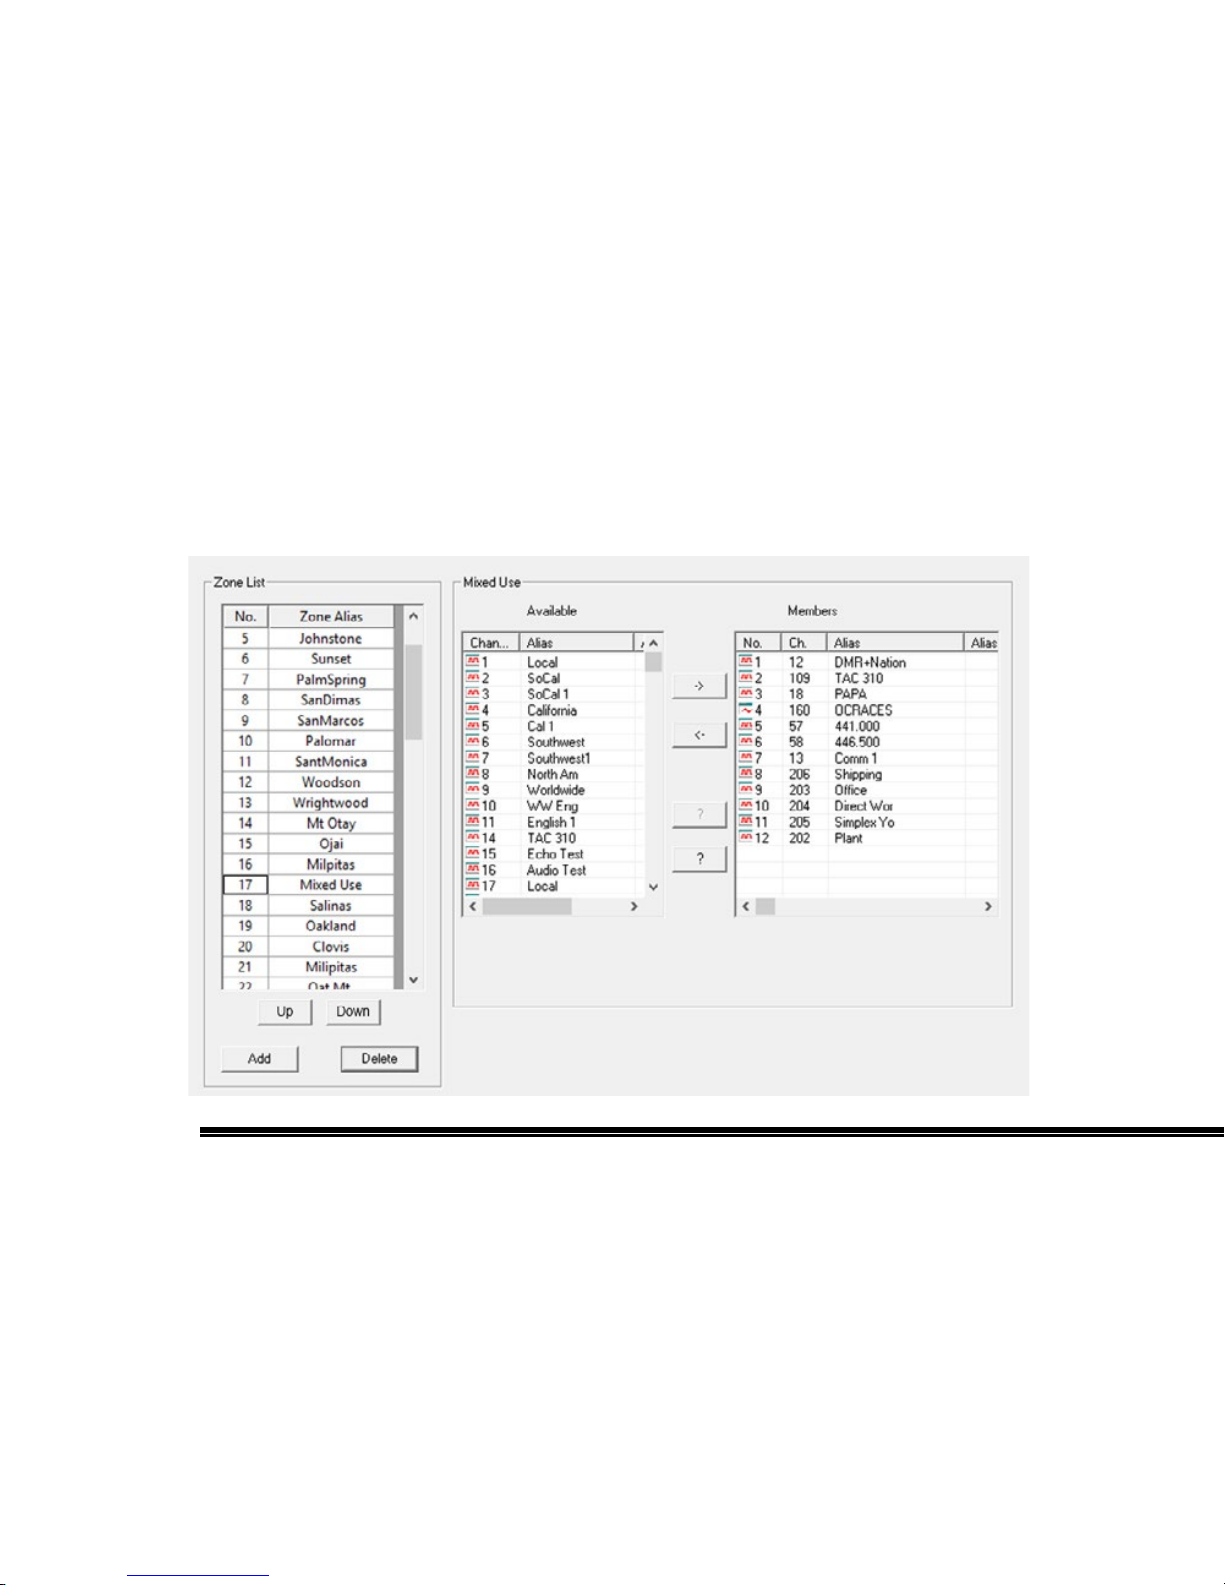
Zone Organization
A key feature is the organization of Zones in the software. Zones can be moved up and down in any
order and added or deleted. A unique feature is that channels follow the Zones when the Zones are
moved, thereby allowing the channels to be inserted and not having to be in numerical order.
Page 37
37
Contact Sheet Database Import
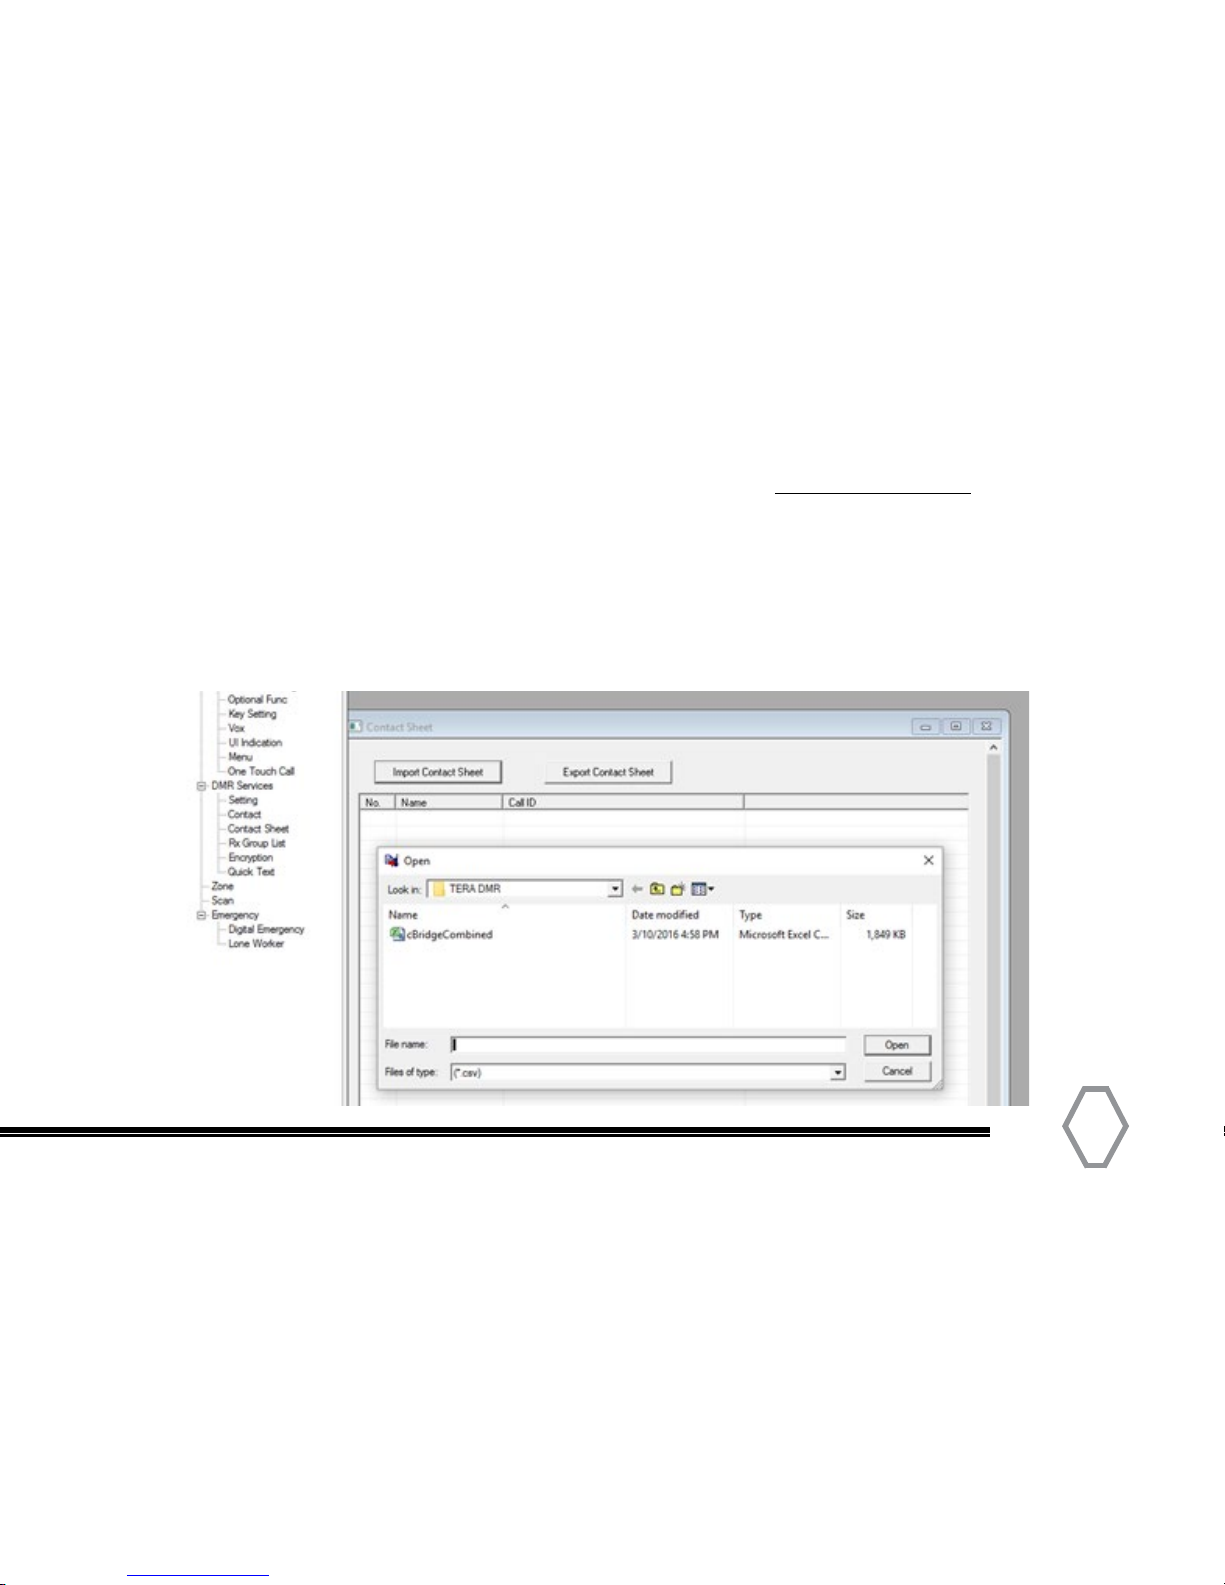
The latest Contact Database for the TERA DMR radio is located at www.tera.co/DMR This contact
database is formatted to directly import into the TERA DMR radio. No contact manager software is
needed. Talkgroup and Personal frequent IDs are located in the Talkgroup/Contact database and are
not merged into the Contact Sheet.
Download the Contact Sheet database to your desktop or a specific folder for importing. In the
following example the folder is named TERA DMR. The TERA software will look for the .csv file.
Page 38
TERA
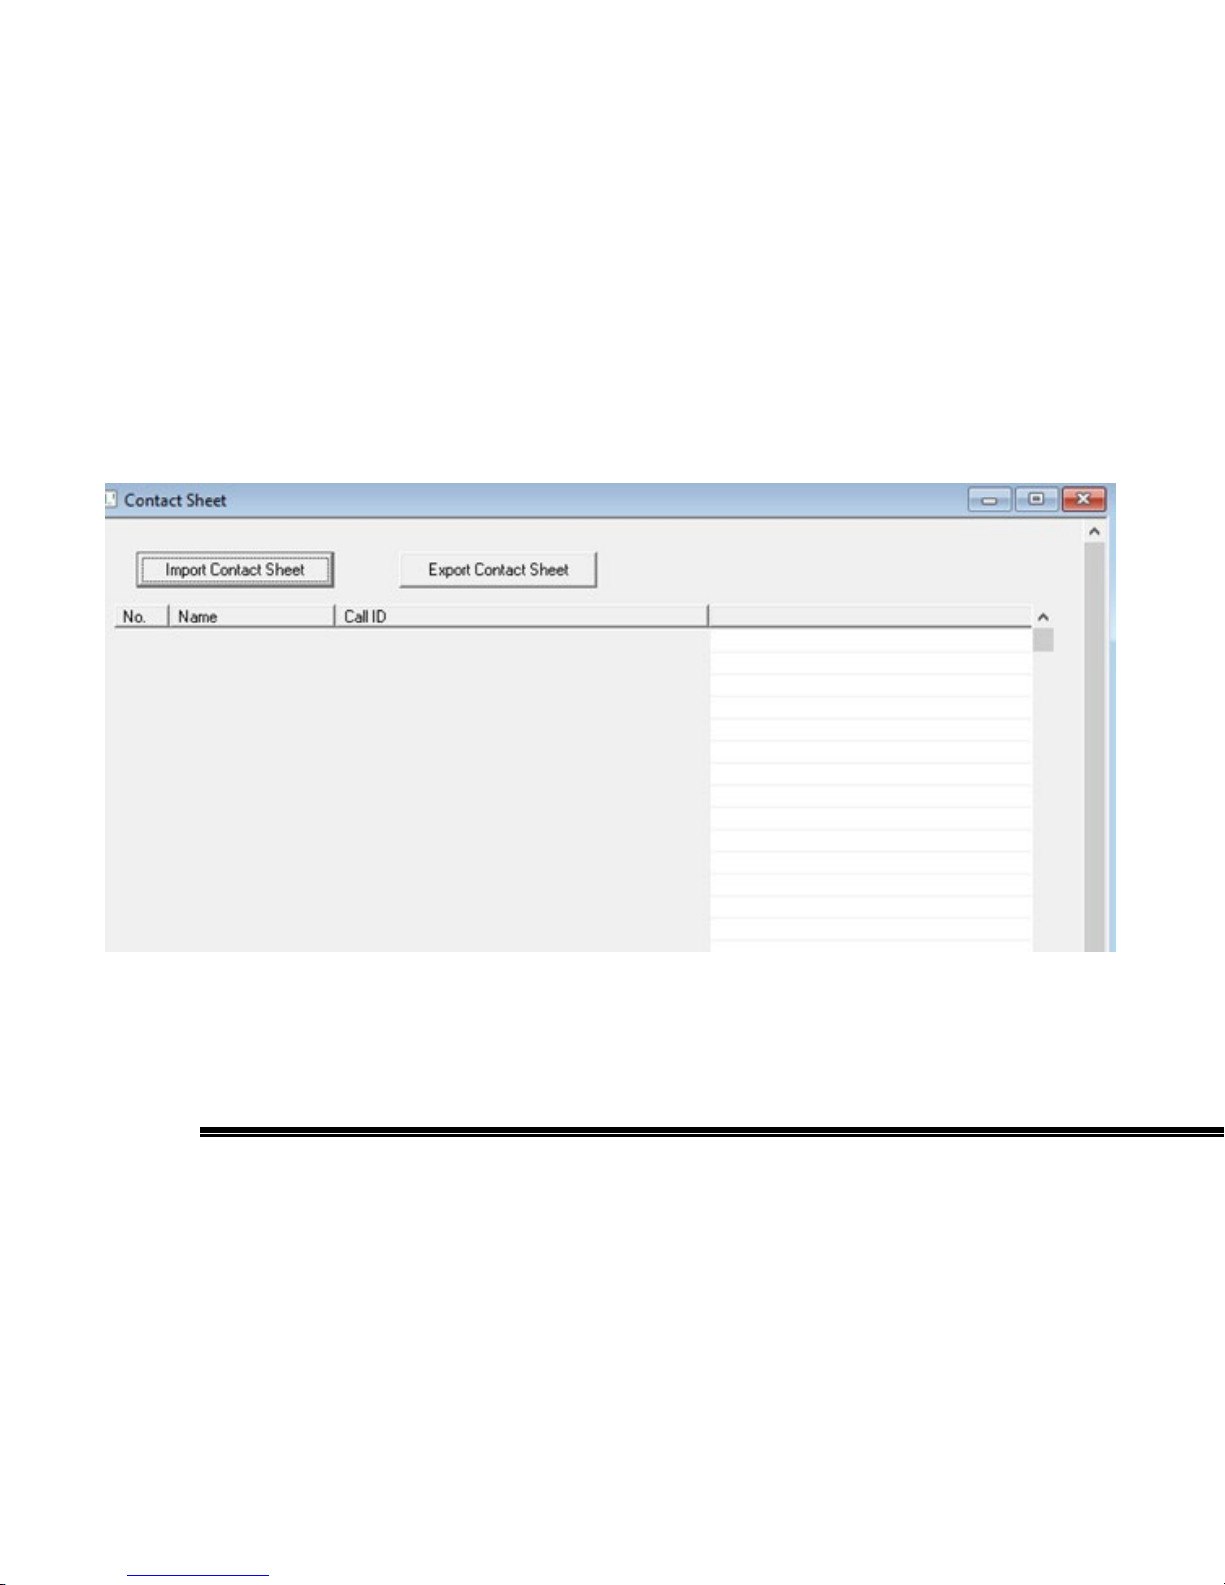
After selecting the file you will see the database starting to load.
Page 39
39
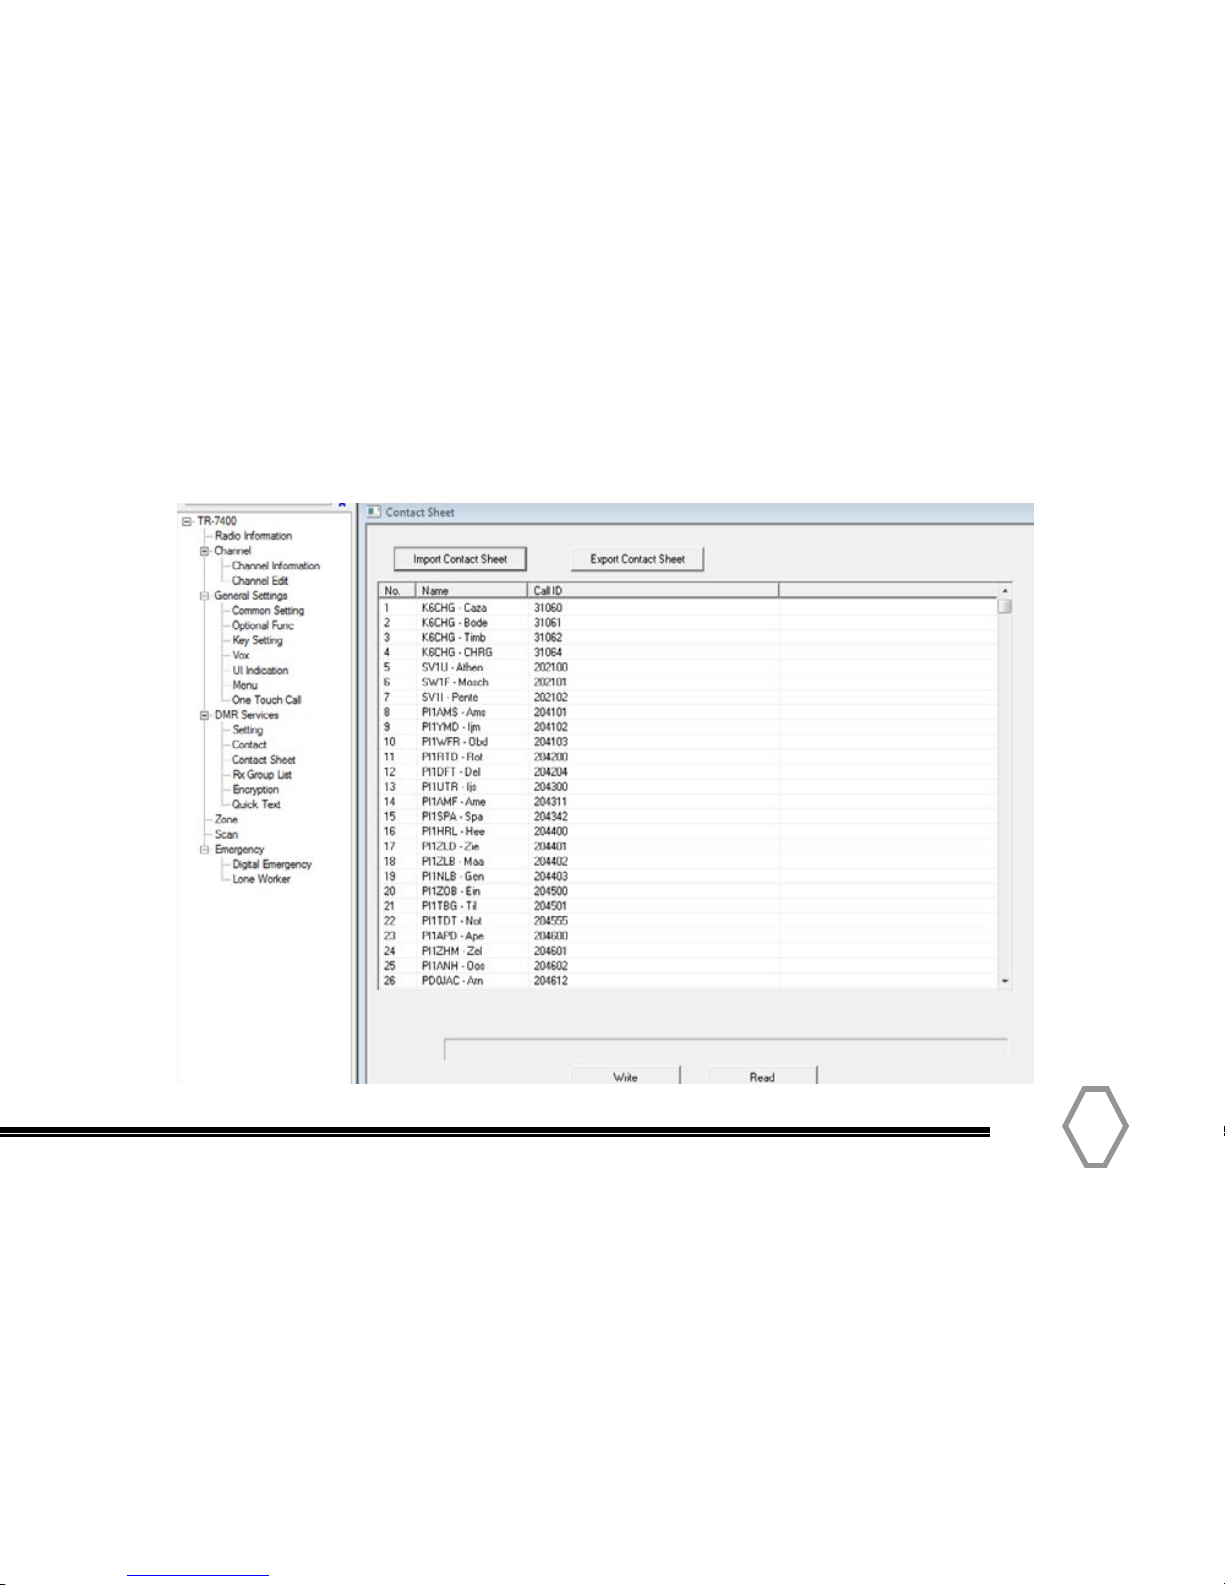
Since the Amateur database is ever growing and large, it may take a minute for the database to
appear in the display window.
Page 40
TERA
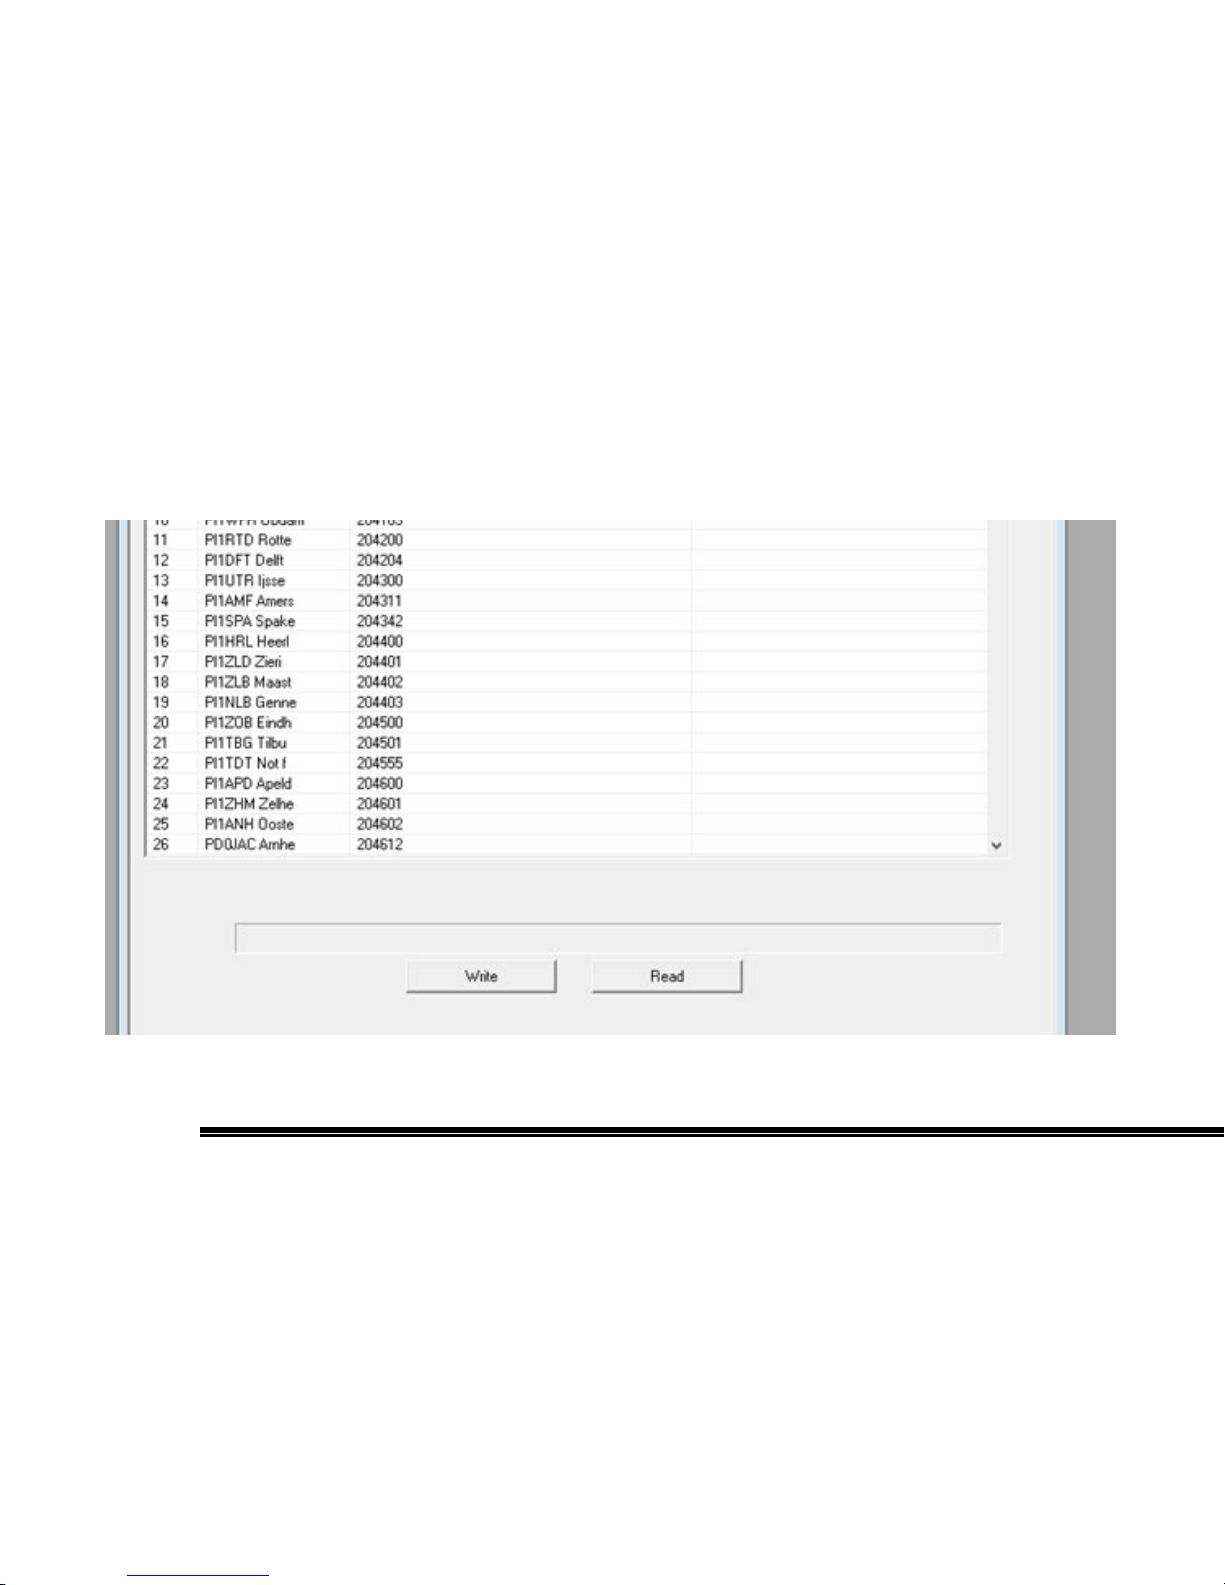
After the database appears in the Contact Sheet window, select the Write button to import the
database into the radio.
Page 41
41
Programmable Buttons
For convenience, you may program the Side Key 1, Side Key 2 and the top Orange Button to one of the
functions listed below:
No. Shortcut Name Description
1 Disable Disable a private contact
2 Enable Enable a private contact
3 Check Check a private contact
4 Alert Initiates an alert call
5 Adjust Power Level Toggles transmit power between high and low
6 Remote Monitor Monitor a contact
7 Emergency ON Initiates an emergency call
8 Emergency OFF Stops the emergency call
9 VOX Toggles VOX function ON and OFF
10 Messages Access Messages
11 Contacts Access Contact List
12 Zone Up / Down / Switch Change to a desired Zone
13 Keypad Lock Locks or Unlocks the keypad
14 Man Down Enables and Disables the Man Down function
15 Squelch OFF Turns Squelch function OFF
16 Battery Level Checks Battery Power Level
17 Nuisance Temporary Delete Nuisance Temporary Delete during scan
18 Digital Monitor Monitor all digital transmissions per slot
Page 42
TERA
The top and side keys are programmable in software by long and short press.
Page 43
43
Monitoring Function
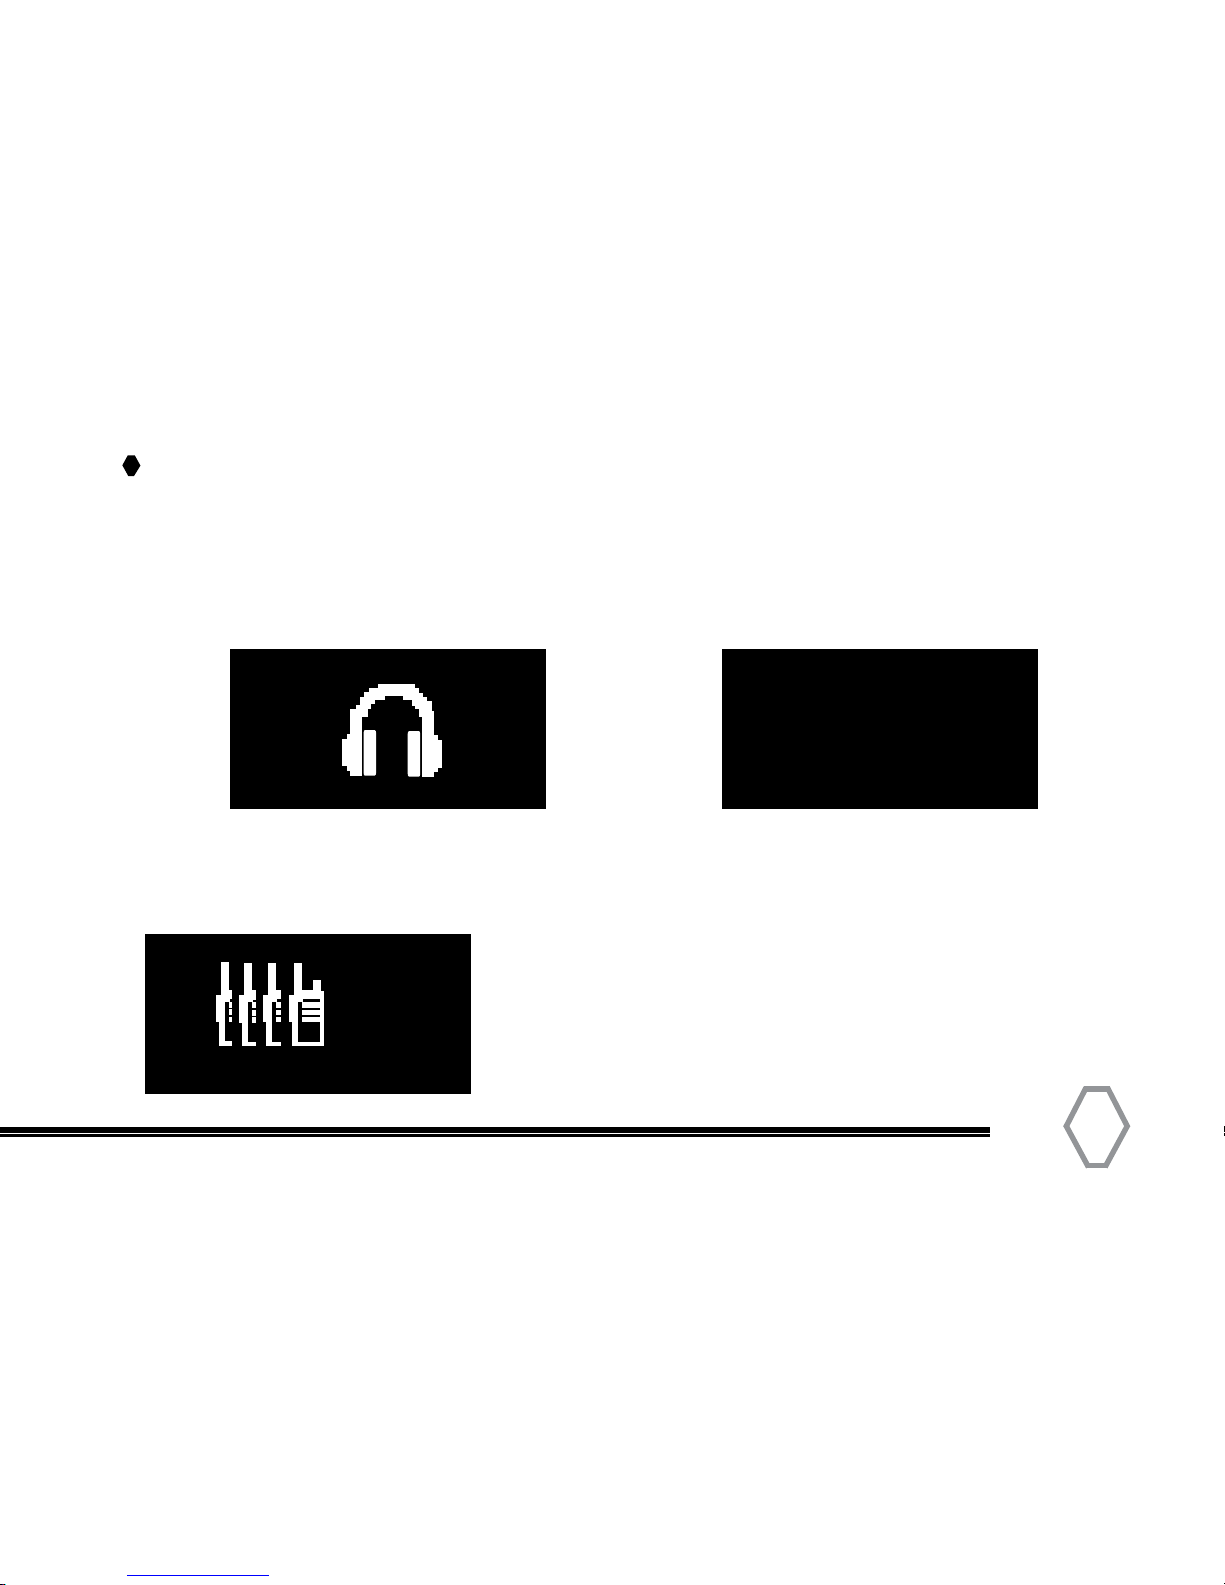
The TERA DMR radio has a monitoring function that can be enabled via software on either side
or top key button. By default the top key button is programmed to initiate the Digital Monitor.
When enabled this function will let you monitor a frequency by Slot and Color Code. All digital
transmission can be monitored by slot 1 or 2. To utilize, you must select a programmed
channel, that is either in slot 1 or 2.
For example:
KM6YH Ken
3106
The display will show the Call sign and name on the topline and the active Talkgroup (Group ID)
on the bottom line.
Screen Saver
The TERA DMR radio has a built in screen saver that can be
enabled in the Optional Functions section in the software.
To enable choose Scroll and the amount of time delay.
Screen saver is enabled by default
Page 44
TERA
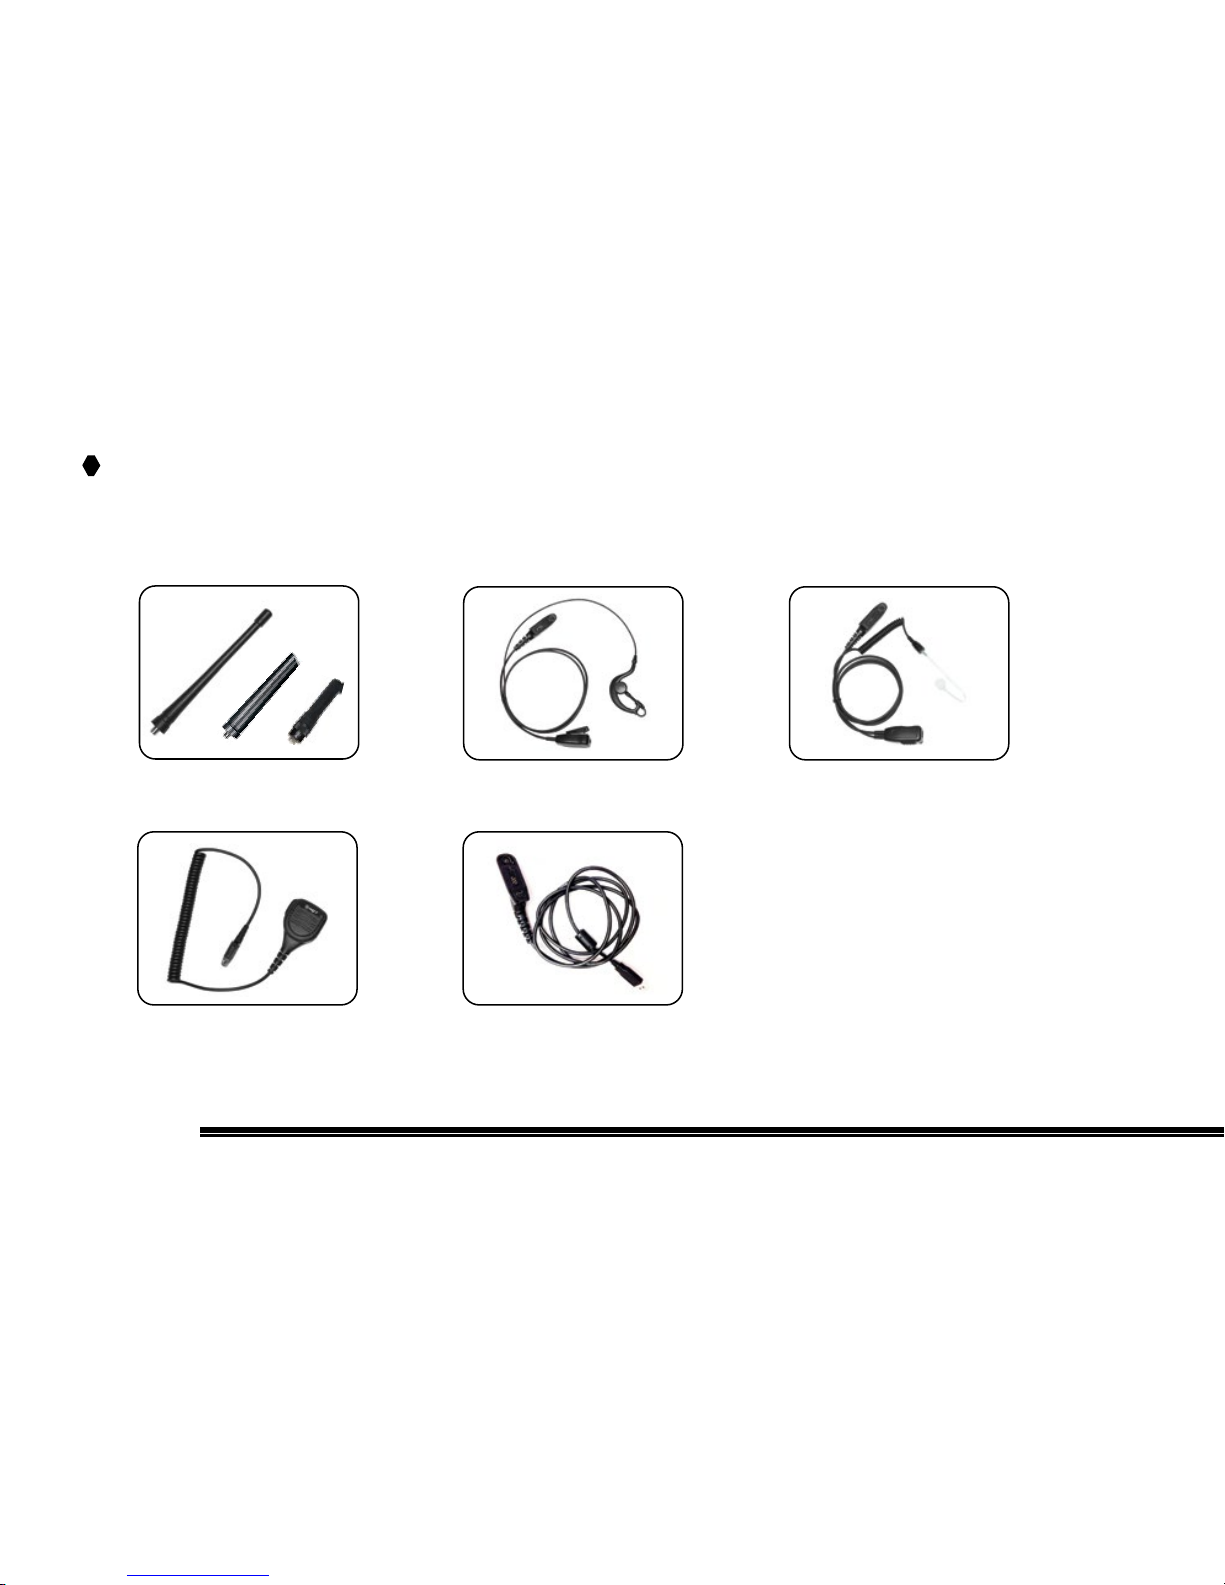
Optional Accessories
VHF / UHF Antenna G-Hook Lapel Mic Covert Clear Acoustic
Tube Earphone Mic
Heavy Duty Speaker Mic USB Programming Cable
The optional accessories listed below may enhance operation of this radio. The use of only
approved TERA quality accessories will ensure optimum communications effectiveness
Page 45
45
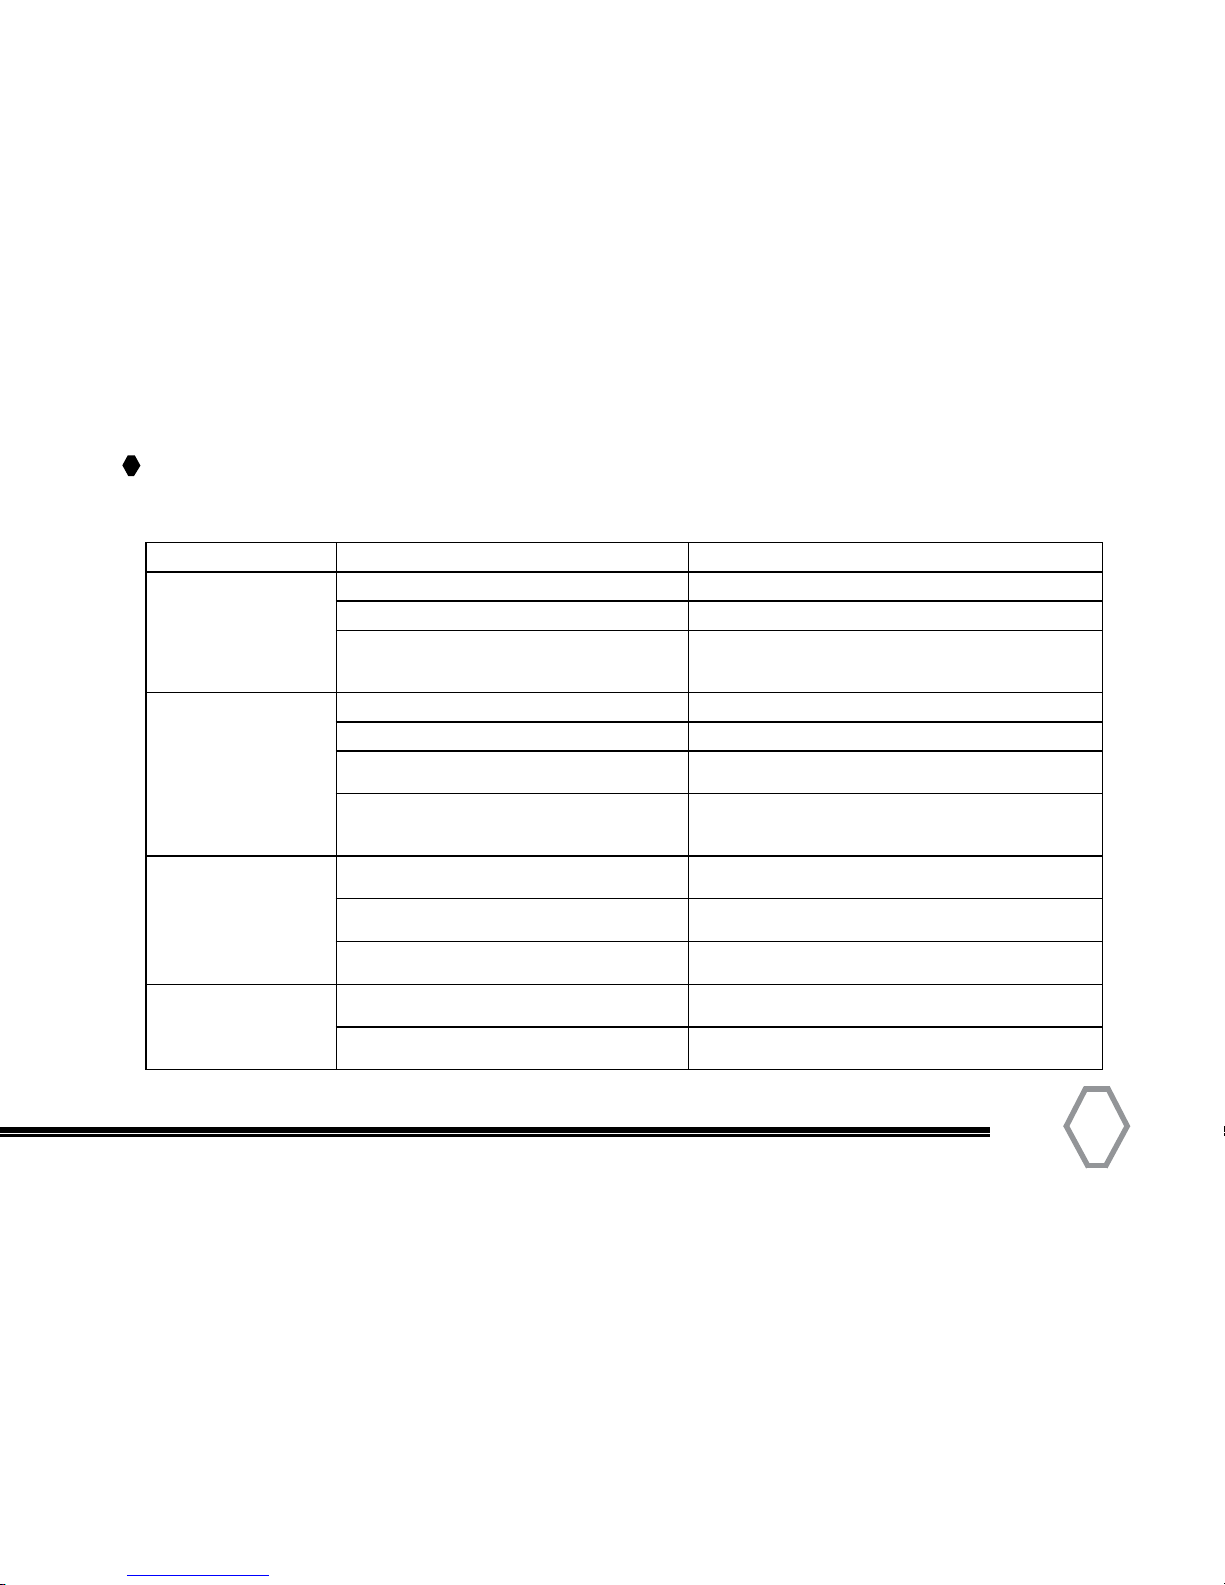
Care and Maintenance
Question and Answer
Condition Analysis Solution
The equipment can
not be powered on.
The battery may be improperly installed. Remove the battery and attach it again.
The battery may be fully discharged. Recharge or replace the battery.
The battery may suffer from poor contact
caused by dirty or damaged battery
contacts.
Clean the battery contacts. If the problem can not
be solved, contact your dealer or authorized service
center for inspection and repair.
During receive
operation,
incoming voice is
weak, intermittent,
or not present.
The battery strength may be too low. Recharge or replace the battery.
The volume may be set to a low level. Increase the volume.
The antenna may be loose, or may be
improperly installed.
Power off the radio, and re-install the antenna.
The speaker may be blocked or damaged. Clean surface of the speaker. If the problem can not
be solved, contact your dealer or authorized service
center for inspection and repair.
You can not
communicate with
other members.
The frequency or signaling may be
inconsistent with that of other members.
Set your TX/RX frequency and signaling to the same
as that of other members.
The channel type (digital/analog) may be
set inconsistently.
Make sure all members are on the same digital/
analog channel.
You may be too far away from the group
members.
Move closer towards other members.
Irrelevant
communications or
noises are heard
on the channel.
You may be interrupted by radios using the
same frequency.
Change the frequency, or adjust the squelch level.
The radio may not be set with any private tones. Set tones for all member radios to avoid
interference at the same frequency.
Page 46

TERA
Terms of Warranty
1. TERA two-way radio body has a 2-year guarantee; accessories (battery, charge
adapter, charger and antenna), earphone and speaker-mic have a 6 month waranty.
2. Only the original purchasing sales receipt or valid dealer’s invoice will be accepted.
The invoice will give clear indication of items purchased and the radio serial-number,
and purchasing date.
3. Replacement and repair is available subject to the presentation of original purchasing
invoice in case that the radio cannot work normally as the instruction says within 30
days from the purchase date. Note that there must not be visible abrasion on radio
body and accessories.
4. Repair of accessories: battery, adapter, charger and antenna is available with the
presentation of original purchasing invoice.
5. The cost of materials and labor for repair is covered in warranty.
6. Warranty is void in case that the TERA mark or the serial-number mark is torn off.
7. Warranty is void in cases below:
1) Beyond the warranty period;
2) Defects or damages under abnormal use;
3) Defects or damages because of mis-operation, accident and carelessness;
Page 47
47
4) Defects or damages because of incorrect testing, operation, repair, installation,
reconfiguration or adjustment;
5) Defects or damages to antenna because of non-material or non-processing
problems;
6) Defects or damages because of unauthorized repair and disassembling;
7) Product that the serial-number mark is torn off or unable to identify;
8) Product with unclear purchasing date on original sales receipt.
9) Battery under such conditions:
a. Any damages or unsealing to the battery pack;
b. Defects or damages to battery because of charging with improper equipment
or use beyond regulated maintain condition;
10) Abrasion under normal use.
Page 48

TERA
The TERA website provides additional information about obtaining service or support for
the TERA line of two-way radios and accessories. Visit: www.tera.co
Warning Notes
Every effort has been made to ensure that the information in this document is complete,
accurate, and up to-date. TERA Radio assumes no responsibility for the results of errors
beyond its control. The manufacturer of this equipment also cannot guarantee that
changes in the equipment made by non-authorized users will not affect the information
in it.
FCC Licensing Information
This TERA radio operates on Commercial / Land Mobile frequencies which require a
license from the Federal Communications Commission (FCC) for business, personal, education and recreational use. To obtain forms, call the FCC forms hotline at:
1-800-418-3676 or go to http://www.fcc.gov.
For questions concerning commercial licensing, contact the FCC at 1-888-CALL-FCC
(1-888-225-5322).
Online Service and Support
Page 49
49
Safety
The TERA DMR handheld transceiver has been carefully designed to provide you with
years of safe, reliable operation. As with all electrical equipment, however, there are a
few basic precautions you should take to avoid hurting yourself or damaging the radio:
• Read the instructions in this handbook carefully. Be sure to save it for future reference.
• Read and follow all warning and instruction labels on the radio and owner’s manual.
• Do not carry the transceiver by the antenna. This may damage the antenna or antenna
terminal. Grasp the handheld by its base (not the antenna) when you need to place or
remove it.
• Do not keep the radio with the antenna very close to, or touching exposed parts of the
body, while transmitting. TERA radios will perform best, if you speak 2-4 inches away
from the microphone and the radio is vertical.
• Be sure the “PTT” key is not pressed when you do not need to transmit.
• Do not operate the radio near unshielded electrical blasting caps or in an explosive
atmosphere.
• Do not transmit without the antenna fitted on the radio. Though it is provided with a
protection, it may damage the TX output final stage.
Page 50

TERA
• Respect the environment conditions. The radio is designed to be used in heavy
environments, however avoid exposing it to extremely hot or cold temperature (out of
the range between –20 to +140°F). Do not expose the transceiver to excessive
vibrations as well as dusty or rainy locations.
• Never try to disassemble or service the radio by yourself (aside from the routine
maintenance described in this handbook). It may cause damage to the radio transceiver
and void your warranty requiring extensive repair work. Always contact your local
dealer for assistance.
• Use only authorized accessories. Using non TERA radio brand accessories may
seriously damage your handheld transceiver and void your warranty.
• Do not spill liquid of any kind into your radio. If the transceiver gets wet, immediately
dry it by a soft and clean cloth.
• Switch the radio off before you clean it. Follow the directions described in the
paragraph “Care and maintenance”.
• Handle the battery properly. Never place the LI-ion battery in your pocket or purse with
loose coins. This could result in short circuiting the battery.
• Be certain that your power source matches the rating listed for the supplied battery
charger (AC adapter). If you are not sure, check with your authorized TERA dealer.
Page 51
51
• Avoid damaging the power cable of the battery charger. Do not step on or place
anything on it as this could result in a damaged charger power cord. This product
complies with the requirements of the Council Directives 89/336/EEC and
73/23/EEC on the approximation of the laws of the member states relating to
electromagnetic compatibility and low voltage.
WARNING
Your wireless hand-held portable transceiver contains a low power transmitter. When
the Push-to-Talk (PTT) button is pressed it sends out radio frequency (RF) signals. The
device is authorized to operate at a duty factor not to exceed 50% TX and 50% RX.
In August 1996, the Federal Communications Commission (FCC) adopted RF exposure
guidelines with safety levels for hand-held wireless devices. To maintain compliance
with the FCC’s RF exposure guidelines, this transmitter and its antenna must maintain
a separation distance of least 2 inches from your face. Speak in a normal voice, with the
antenna pointed up and away from the face at the required separation distance. The belt
clip is for storage purposes only. AVOID TRANSMITING ON HIGH POWER WHILE RADIO
IS ATTACHED TO YOUR BELT. To transmit, hold the device away from your body and
ensure the antenna is at least 2 inches from your body when transmitting.
Page 52

TERA
Frequency Range VHF: 136-174 MHz (Model TR-7200)
UHF: 400-470 MHz (Model TR-7400)
Channel Capacity 1024
Zone Capacity 64 (each with a maximum of 16 channels)
Channel Spacing 12.5 kHz (digital) 25/20/12.5 kHz (analog)
Operating Voltage 7.4 V
Standard Battery 2200 mAh Li-Ion Battery
Optional Battery 2500 mAh Li-Poly Battery
Battery Life Analog: above 11 h, Digital: above 16 h
Frequency Stability ±1.0 ppm
Antenna Impedance 50 Ω
Dimensions (H x W x D)
126 x 53 x 34 mm
Weight
310 g
OLED Display
1.54”
FCC ID
VHF: 2ACK8TR7200 / UHF: 2ACK8TR7400
General Specification
Page 53
53
Sensitivity (Analog) 0.22 µV (12 dB SINAD)/0.3 µV (20 dB SINAD)
Sensitivity (Digital) 0.22 µV /BER 5%
Selectivity TIA-603 ETSI 60 dB @12.5 kHz/70 dB @20/25 kHz
Intermodulation TIA-603 ETSI 70 dB @12.5/20/25 kHz/65 dB @12.5/20/25 kHz
S/N 40 dB @12.5 kHz/43 dB @20 kHz/45 dB @25 kHz
Rated Audio Power Output 1.5 W
Rated Audio Distortion <3 %
Audio Response +1 -3 dB
Conducted Spurious Emission
< -57 dBm
Receiver
RF Power Output VHF: 5 W/1 W ; UHF: 4 W/1 W;
FM Modulation 11 kФ[email protected] kHz/14 kФF3E@20 kHz/16 kФF3E@25 kHz
4FSK Digital Modulation 12.5 kHz Data Only: 7k60FXD/12.5 kHz Data & Voice: 7k60FXW
Conducted/Radiated Emission -36 dBm < 1 GHz/-30 dBm > 1 GHz
Modulation Limit ±2.5 kHz @12.5 kHz/±4.0 kHz @20 kHz/±5.0 kHz @25 kHz
FM Noise 40 dB @12.5 kHz/43 dB @20 kHz/45 dB @25 kHz
Adjacent Channel Power 60 dB @12.5 kHz 70 dB @20/25 kHz
Audio Distortion <3%
Digital Vocoder Type
AMBE3000++
Digital Protocol
ETSI-TS102 361-1.-2.-3
Transmitter
Page 54

TERA
Operating Temperature -30 °C ~ +60 °C
Storage Temperature -40 °C ~ +85 °C
ESD IEC 61000-4-2 (Level 4) / ±8 kV (Contact) / ±15 kV (Air)
American Military Standard MIL-STD-810 C/D/E/F/G
Dust & Water Intrusion IP67 standard
Humidity Per MIL-STD-810 C/D/E/F/G standard
Shock & Vibration Per MIL-STD-810 C/D/E/F/G standard
Environmental Specifications
All specifications are tested according to applicable standards, and subject to change without notice
due to continuous development.
Page 55
55
Notes
Page 56

TERA
Radio Model:
Radio Serial No:
Purchase Date:
Dealer:
Page 57

57
Page 58

www.tera.com
© 2016
ver. 4.16
 Loading...