

Page 1

1
TEQ-Z900 Projector
User’s Manual (concise)
Thank you for purchasing this product. Please read the manual to ensure proper safety and
operation.
WARNING
n
Before using this product, be sure to read the entire manual.
n
Heed all the warnings and cautions in the manual or on the product.
n
Follow all the instructions in the manual or on the product.
n
Retain the manual in a safe place for future reference.
Contents
Checking the contents. . . . . . . . . . . . . . . 2
Arrangement ...................... 3
Connecting your devices ............. 5
Connecting the power supply ......... 6
Using the security bar and slot ........ 7
Using the cable cover ............... 8
Preparing the remote control ......... 9
Starting the projector .............. 10
Adjusting the projector position ...... 11
Operation. . . . . . . . . . . . . . . . . . . . . . . . 12
Turning off the projector ............ 13
Replacing the lamp ................ 14
Maintaining the air-lter ............ 17
Caring for the mirror and lens ........ 18
Replacing the clock battery. . . . . . . . . . 19
Regulatory notices ................ 20
Troubleshooting ................... 22
Specications .................... 23
Page 2
2
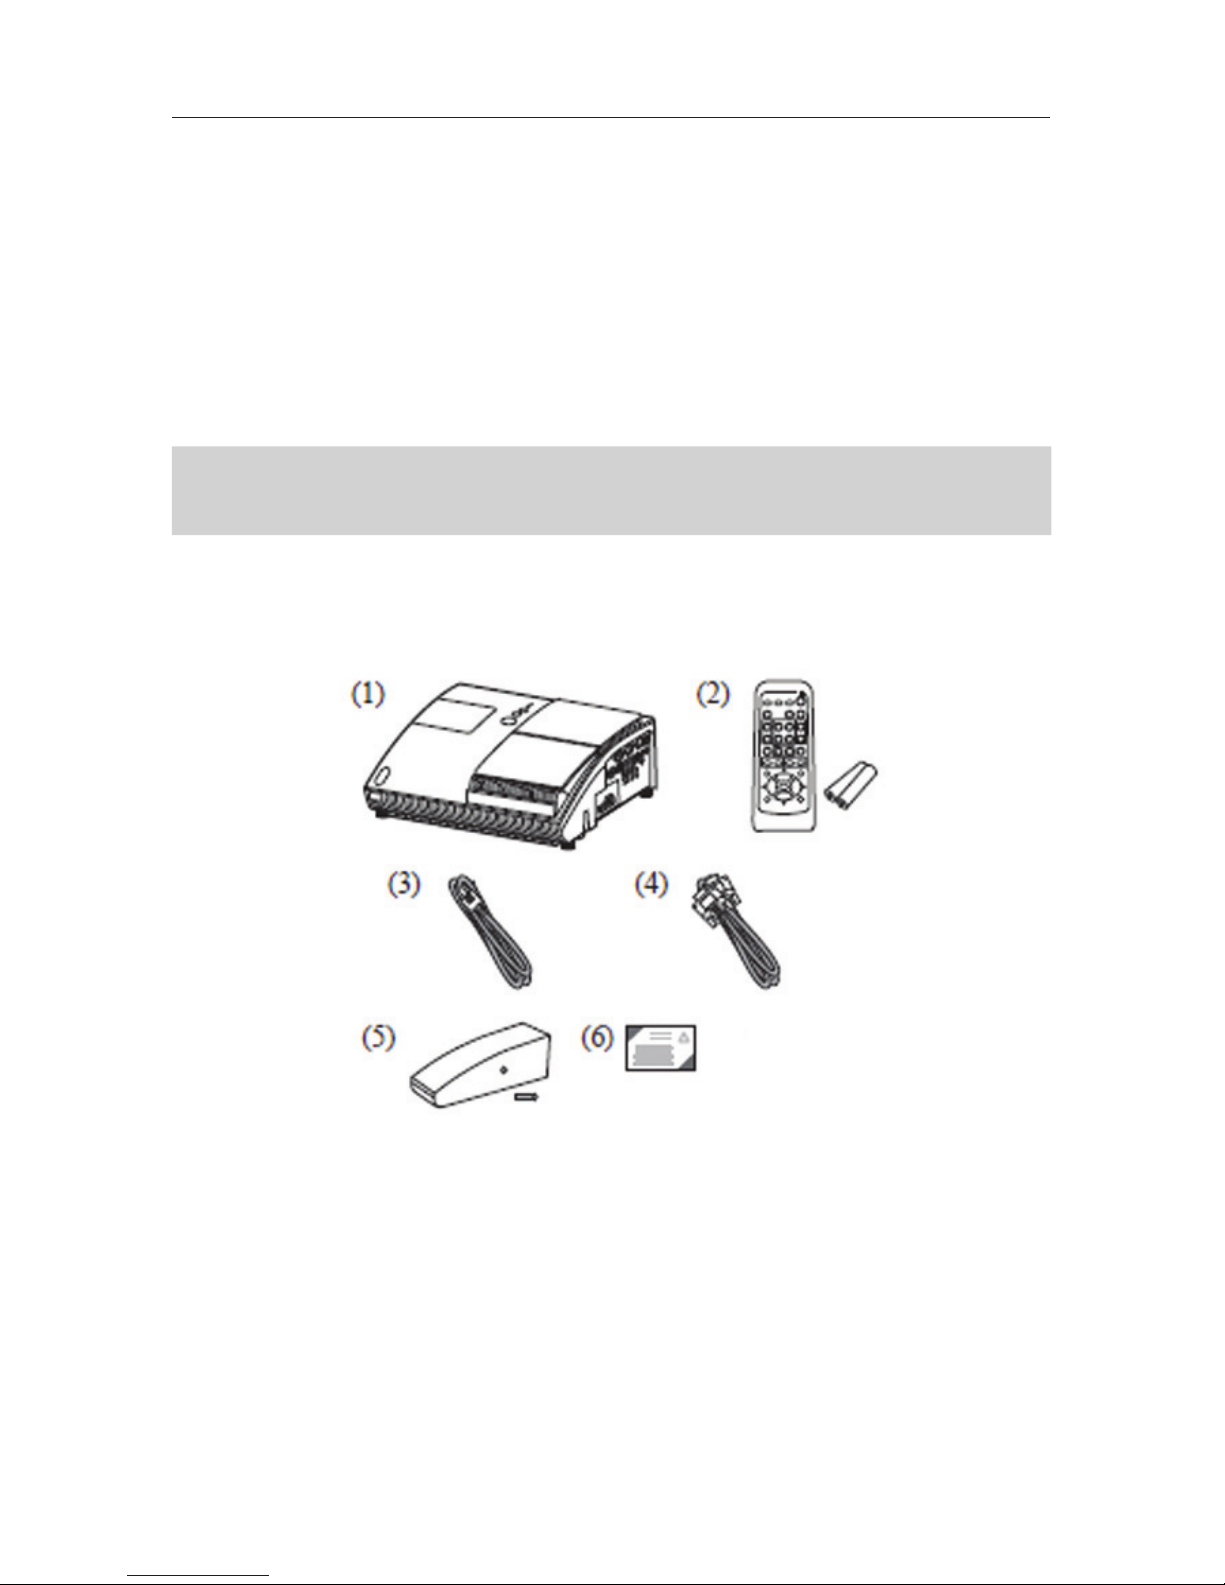
CHECKING THE CONTENTS
Make sure all the following items are included. If any items are missing, contact Teq.
(1) Projector
(2) Remote control with two batteries
(3) Power cord
(4) Computer cable
(5) Cable cover with a screw
(6) Security label
WARNING
Keep all original packing materials for future shipment purposes.
Page 3
3
ARRANGEMENT
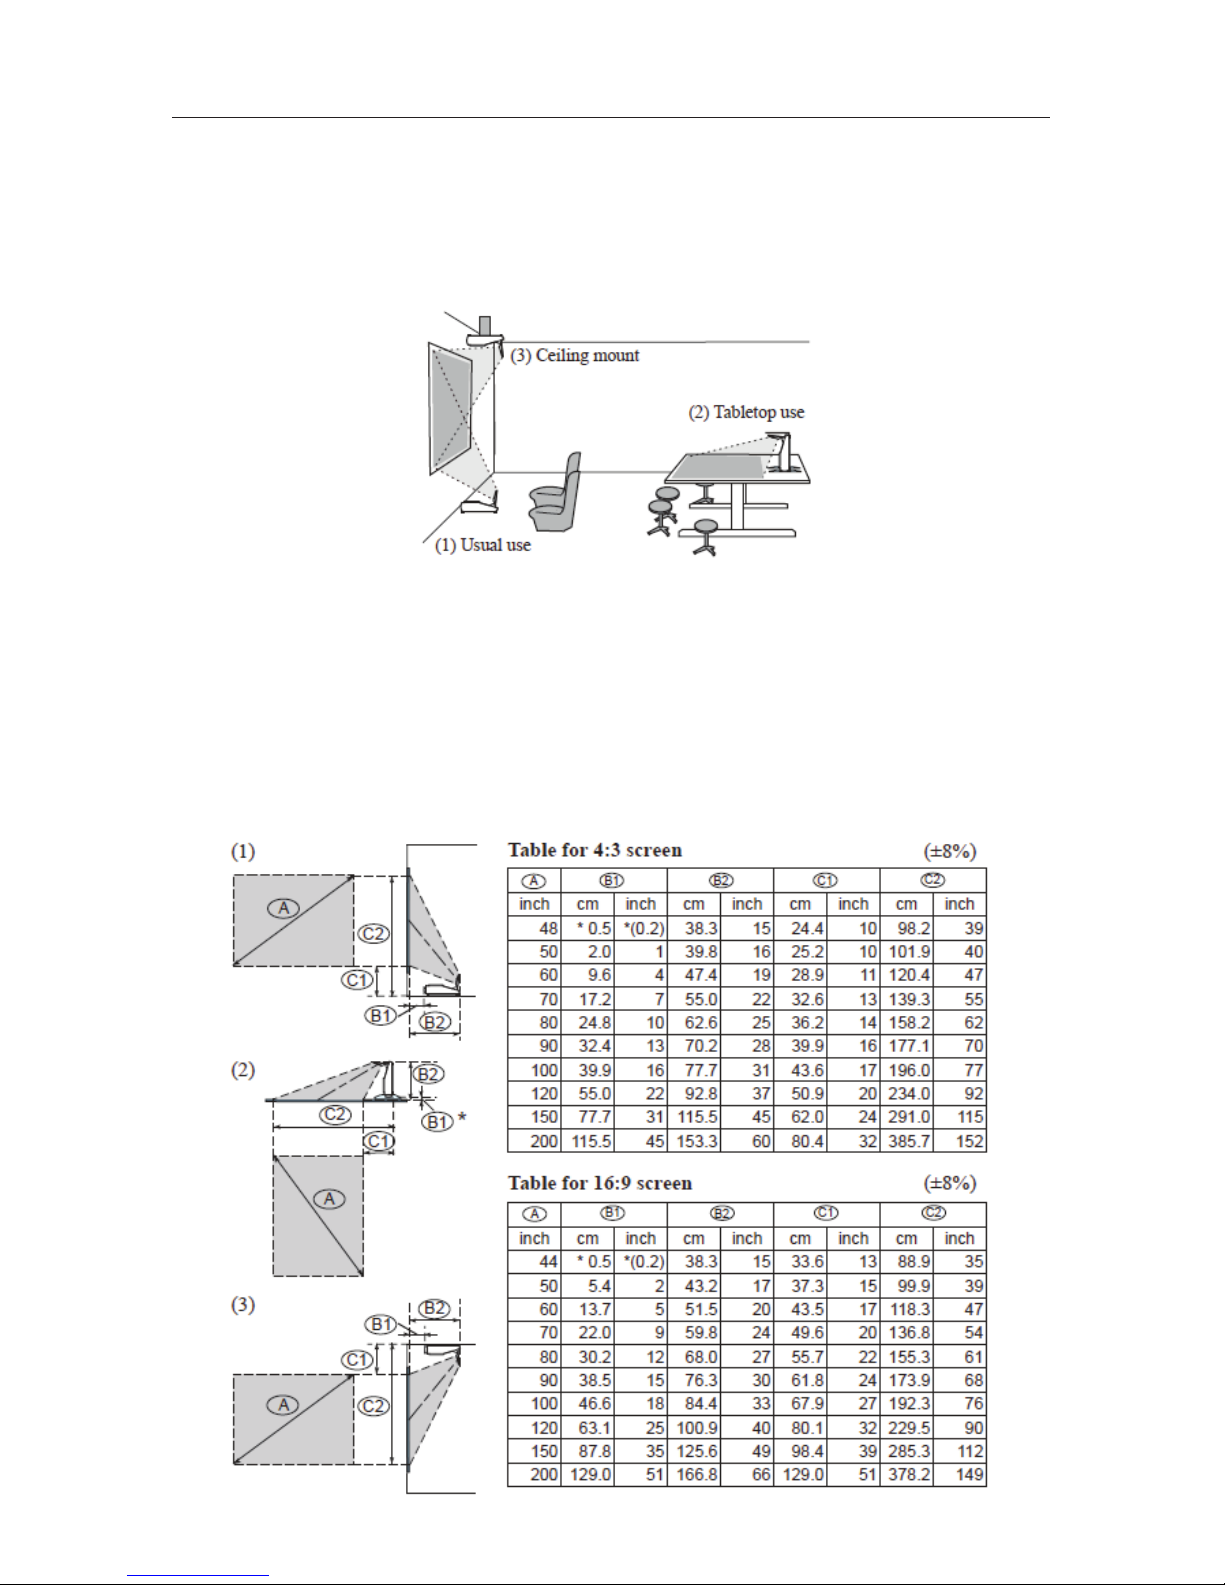
Install the projector in a stable, cool, dry and airy place, keeping a space of 30 cm or more
between the sides of the projector and other objects such as walls.
Refer to the following to decide the projection style. Ceiling mount and tabletop use must
be setup with the designated optional accessories. Ask Teq for details.
NOTE
n
When installing the projector, make sure there is nothing blocking the projection light.
n
When installing the projector, conrm that the remote sensors are not exposed to any
strong ray.
Refer to the following for the projection distance:
The values shown in the table are calculated for a full size screen: 1024x768.
Page 4

4
ARRANGEMENT (CONTINUED)
NOTE
It is recommended to adjust the screen size from 60 inch to 100 inch diagonal. A screen
image adjusted out of this range, either smaller or larger, may be deteriorated.
WARNING
n
Install the projector under the specied condition using only the specied accessory, since others
may cause hazards.
n
Do not set the up projector while it is connected to a power supply, to prevent an electric shock
and a re.
CAUTION
n
Do not block the vents on the projector. Do not place anything, such as a piece of paper that can
stick to the intake vents, around the projector.
Page 5
5
CONNECTING YOUR DEVICES
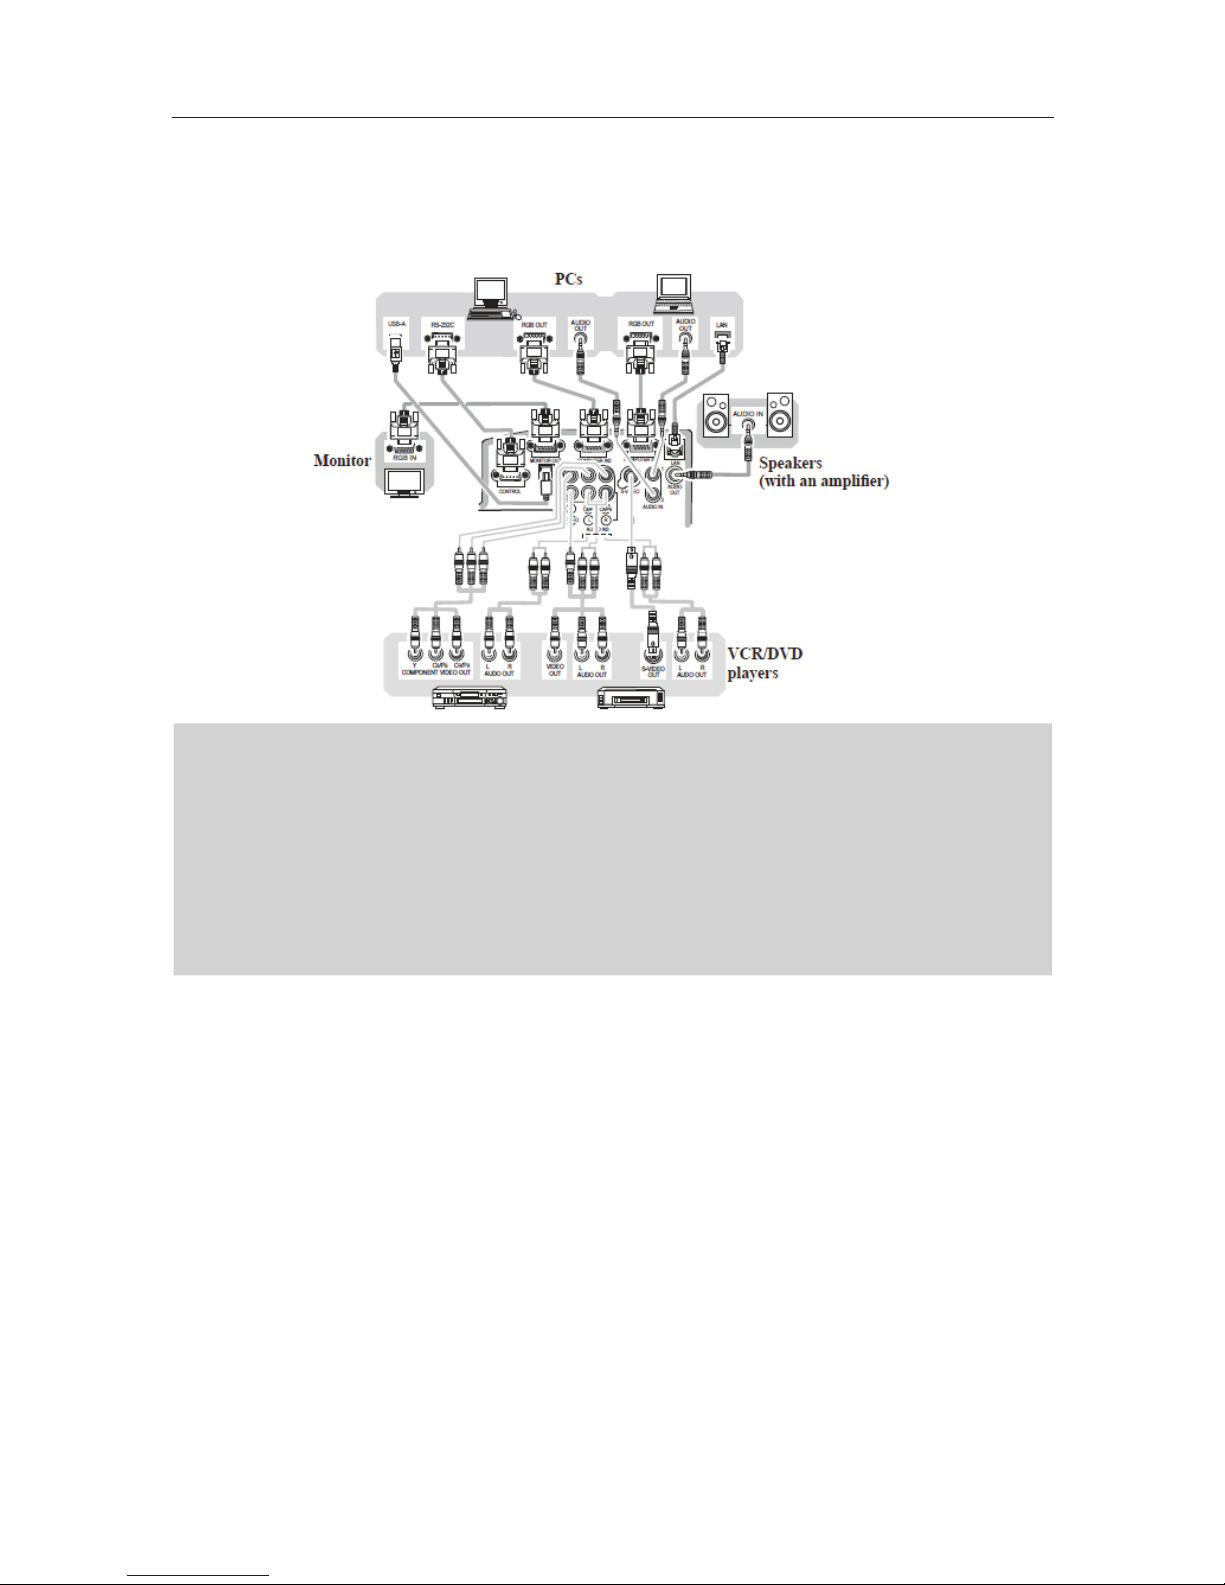
Before connecting your devices, make sure they are suitable to connect with this projector,
and prepare the required signal cables and adapters. Contact Teq if an accessory is
missing. Refer to the following for connection:
WARNING
n
Only use the accessories contained in this product or recommended by Teq. Do not modify the
projector or accessories.
n
For the cable with a ferrite core only at one end, connect the end with the core to the projector.
The cables may be required a specic length or a ferrite core by the regulations.
n
Be careful not to damage the cables. Route the cables so they are not likely to be walked on or
pinched by items placed upon or against them.
CAUTION
n
Do not connect or disconnect the projector while it is connected to a power supply, unless it is
directed by the manuals.
n
Be careful when inserting connectors.
Page 6
6
CONNECTING THE POWER SUPPLY
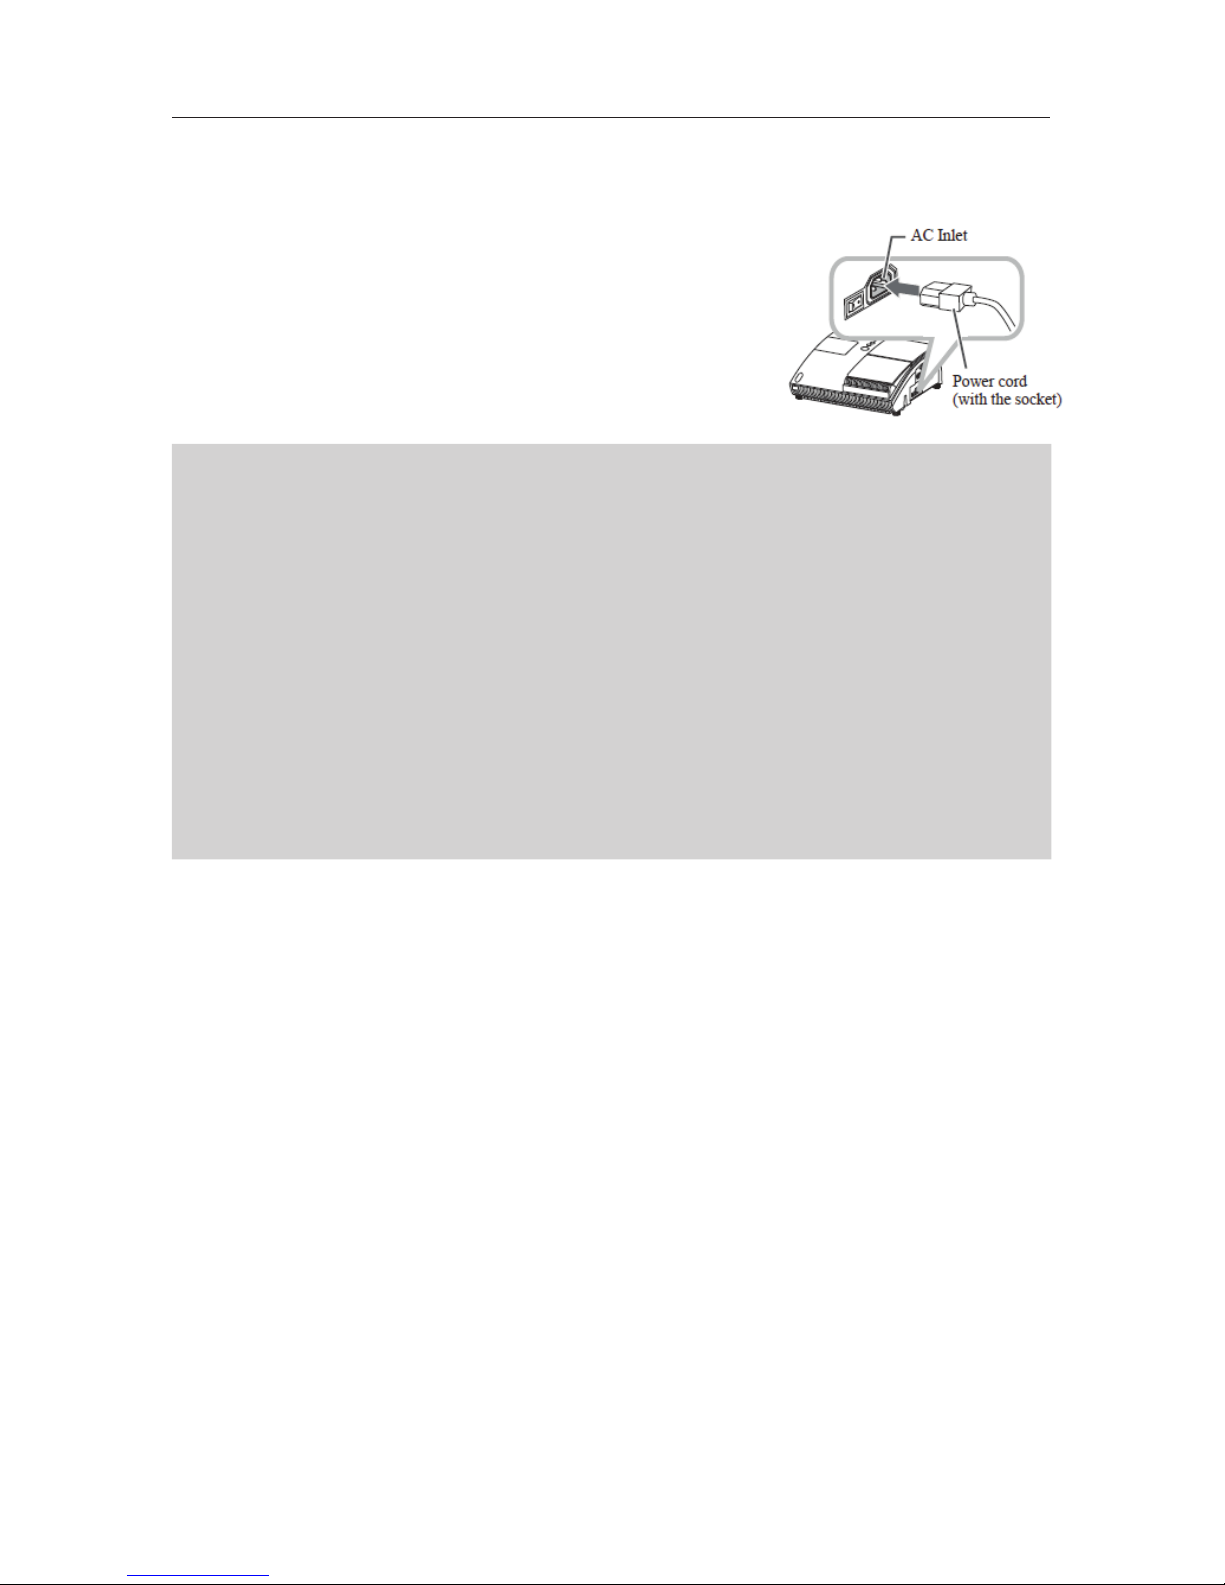
Before connection, make sure the power outlet is suitable for this projector and the power
cord. Then follow the procedure below:
1. Insert the end of the power cord with the socket into the
AC inlet of the projector.
2. Plug the other end of the power cord into a power outlet.
WARNING
n
Be careful not to cause an electric shock or a re.
n
Do not handle the power cord with the wet hand.
n
Only use this product with the type of power supply indicated on the projector.
n
Use a power outlet that is close to the projector and easily accessible.
n
Firmly connect the power cord, so it does not result in a loose connection. Do not use a loose or
unsound power outlet.
n
Do not overload the outlet, since overloading may result in a risk of re or electric shock.
n
Only use the power cord included with this product. If it is damaged, contact Teq to get new one.
Do not modify the power cord.
Page 7

7
USING THE SECURITY BAR AND SLOT
This projector has a security bar for a commercial anti-theft chain
or wire up to 10 mm in diameter, and the security slot for the
Kensington lock.
NOTE
These are not provided as comprehensive theft
preventions, but as supplemental measures.
WARNING
n
Do not place the anti-theft chain or wire near the projector’s exhaust vents, since the chain or
wire may become hot and cause a burn.
n
Do not use the security bar or slot for the purpose of fall prevention.
Page 8
8
USING THE CABLE COVER
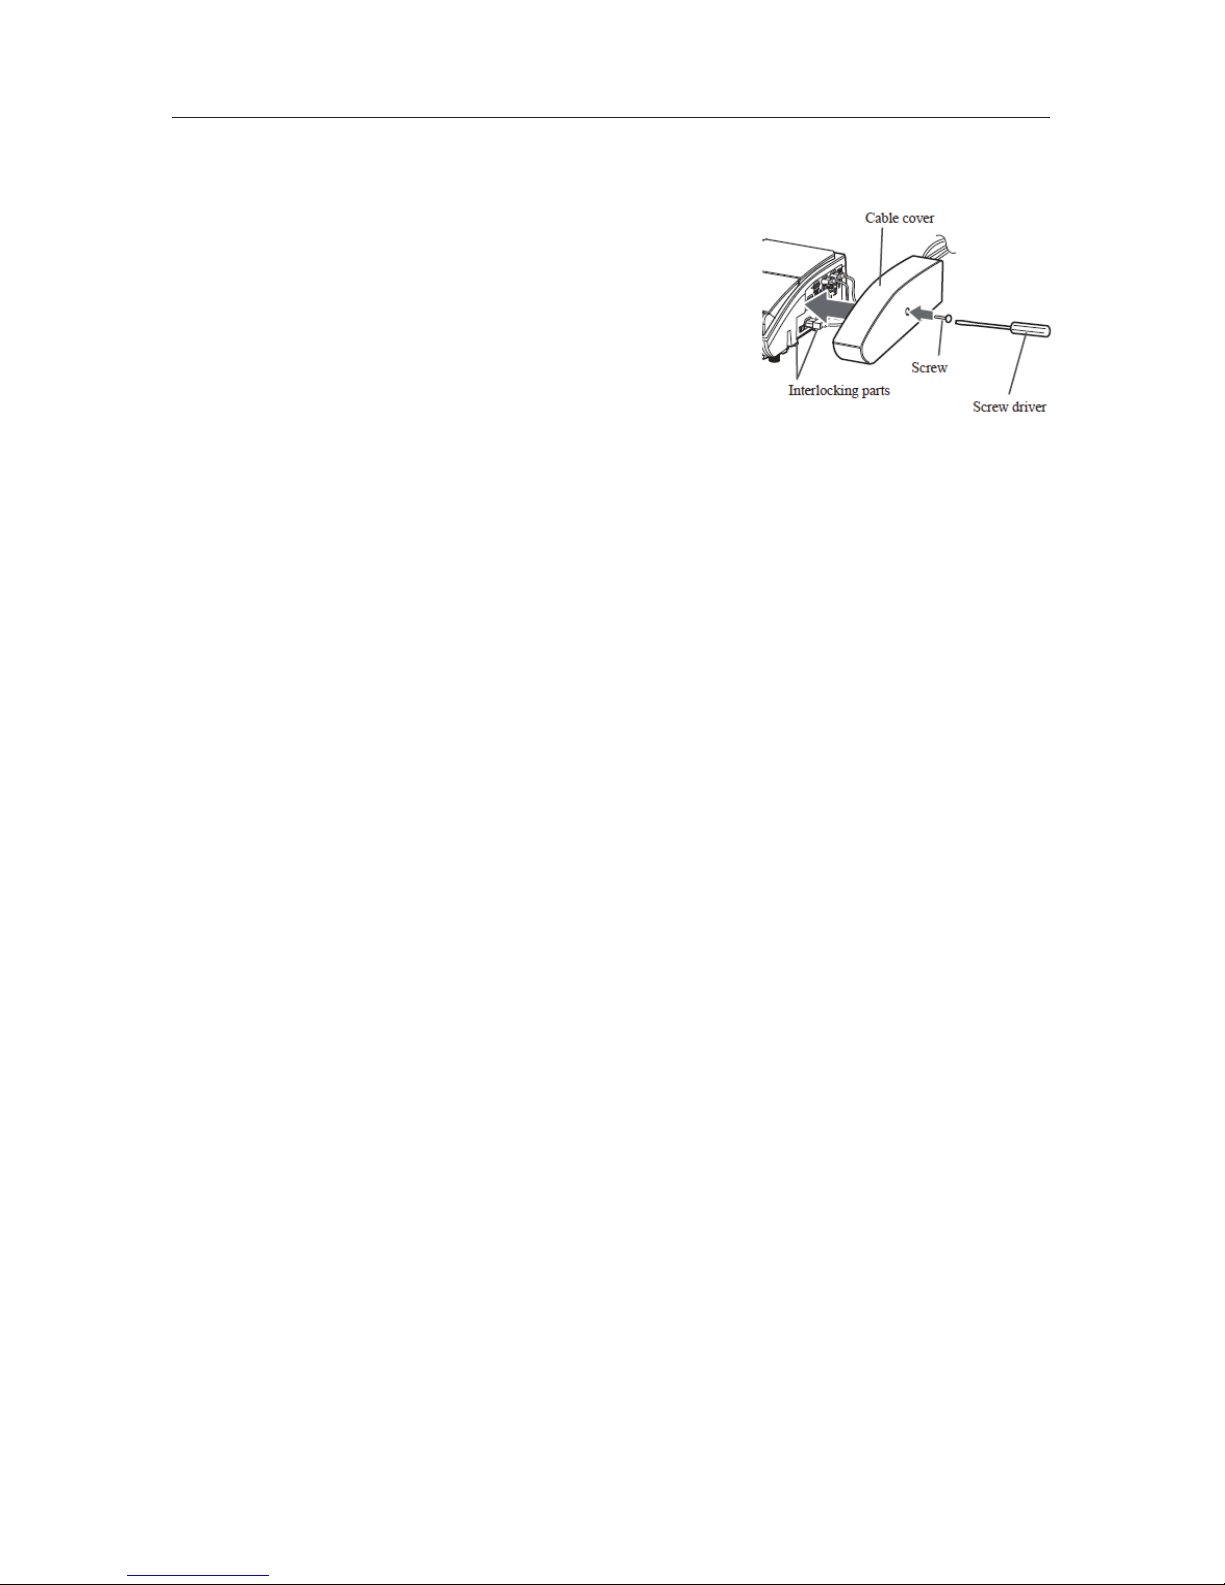
Utilize the cable cover as the guard and blind for the connecting parts.
1. Connect the signal cables and the power cord to the
projector rst.
2. Attach the cable cover to the projector, uniting the
interlocking parts.
3. Tighten the screw to x the cable cover.
4. Connect the other ends of the cables to other devices,
and plug the power cord into the power outlet.
CAUTION
Be careful not to pinch the cables in the cable cover, to prevent damage to the cables.
Page 9
9
PREPARING THE REMOTE CONTROL
The remote control runs on batteries. Use the batteries included in this product or two new
batteries.
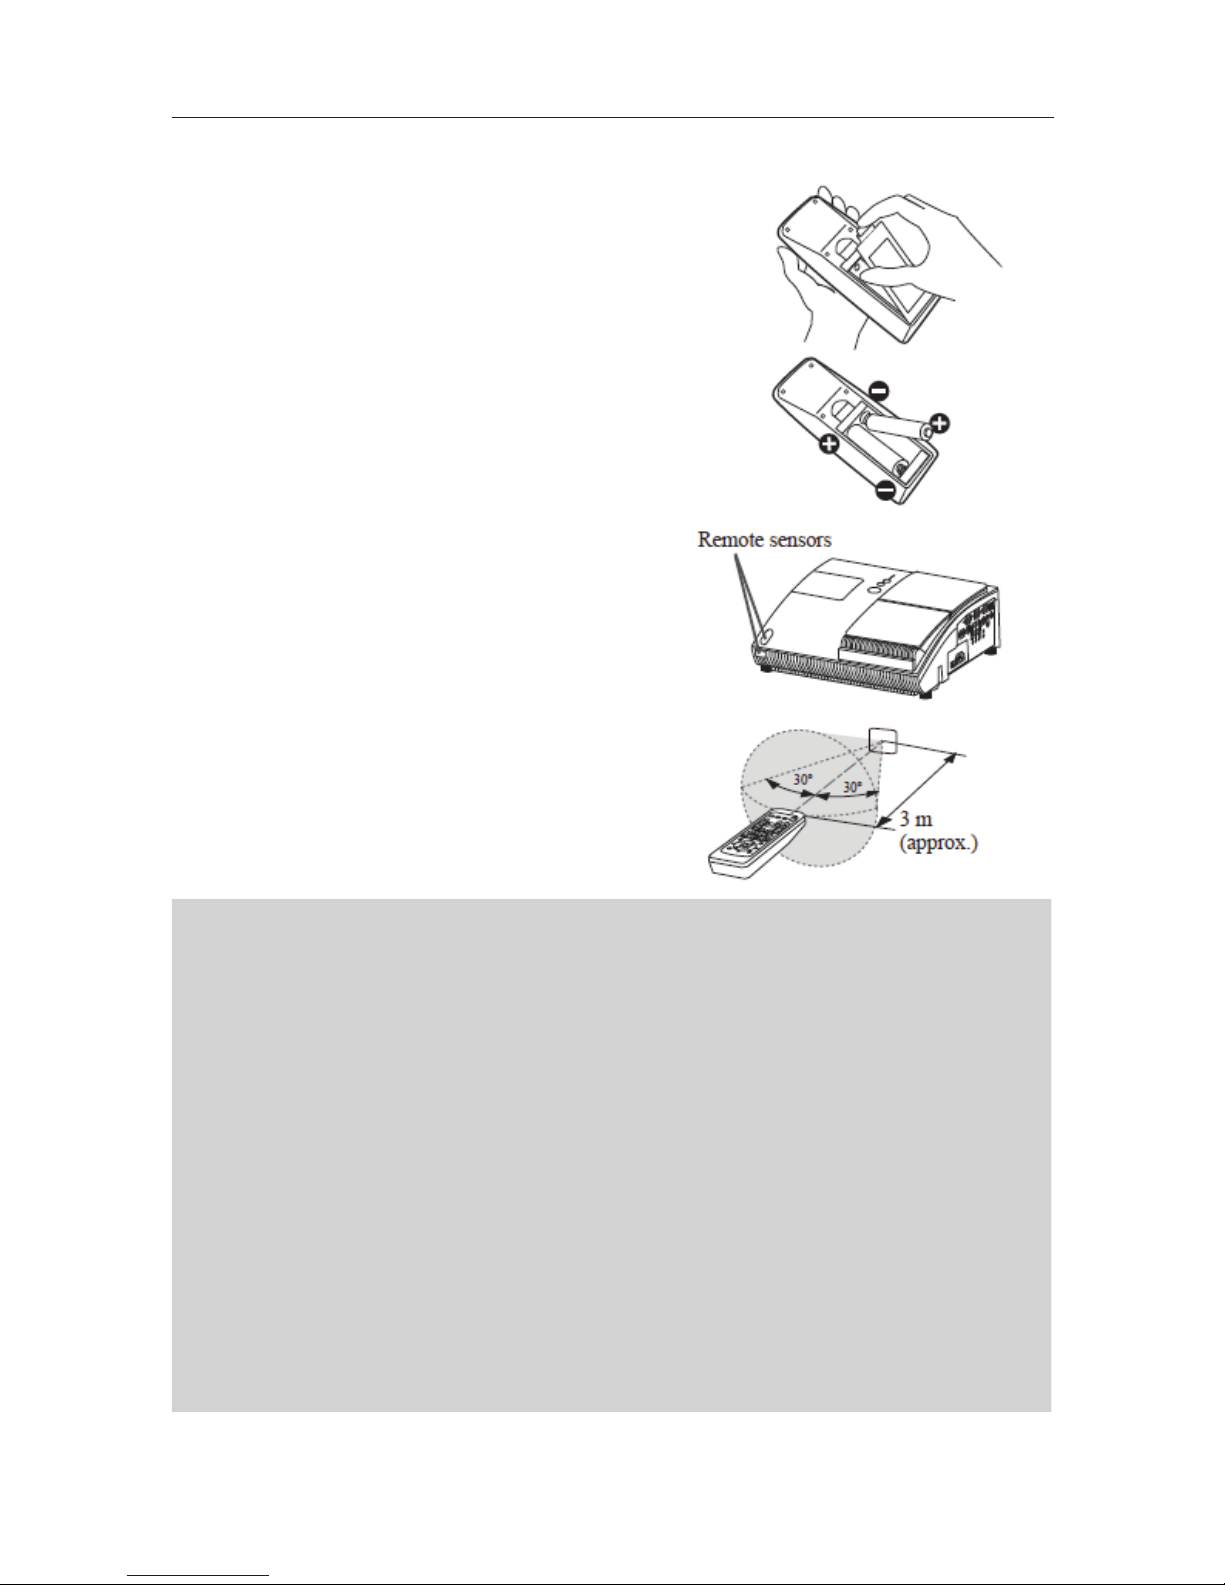
1. Remove the battery cover in the back of the
remote control.
2. Put the batteries into the battery holder,
according to the polarity markings (+) and (-)
inside the holder.
3. Put the battery cover back to the former state.
NOTE
n
Try changing the batteries when the remote
control malfunctions.
n
This remote control works with the remote
sensors on the projector using infrared light
(Class 1 LED). The active sensor will sense the
remote control signal within 60 degrees to the
right and left, and within 3 meters
n
Prevent the remote sensors from being hit by a
strong ray. This may cause a malfunction.
WARNING
n
Be careful handling batteries, as they may cause an explosion, cracking or leakage, which could
result in a re, an injury and environment pollution.
n
Only use the specied and new battery. Do not use a battery with damage, such as a scratch, a
dent, rust or leakage. Do not mix a new battery with used one.
n
If a battery leaks, wipe the leakage out well with a waste cloth. If the leakage adheres to your
body, immediately rinse it well with water. If a battery leaks in the battery holder, replace the
batteries after wiping the leakage out.
n
Make sure the plus and minus terminals are correctly aligned when loading a battery.
n
Do not work on a battery; for example recharging or soldering.
n
Do not keep the batteries put in the remote control when it is not used for a long period. Keep a
battery in a dark, cool and dry place. Never expose a battery to a re or water.
n
Obey the local laws on disposing a battery.
Page 10
10
STARTING THE PROJECTOR
Turn on the projector before the connected devices, unless mentioned in the manuals. For
this projector, follow the procedure below:
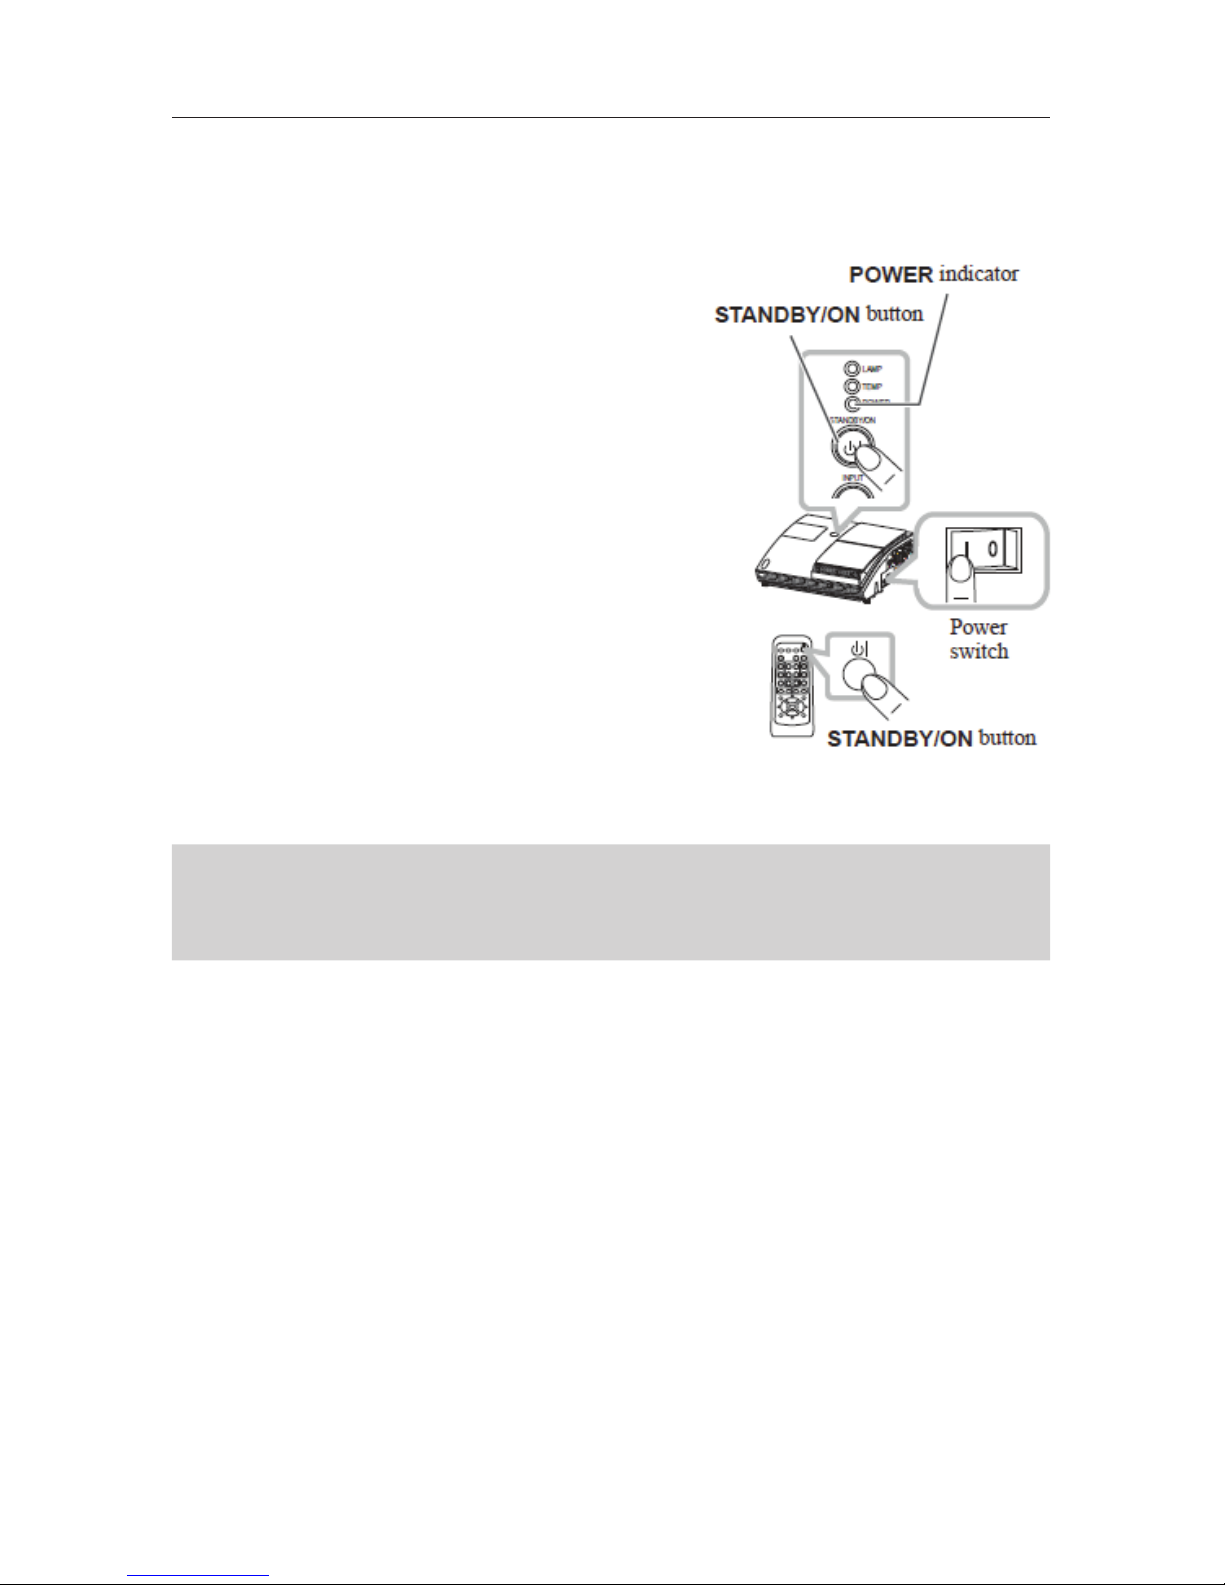
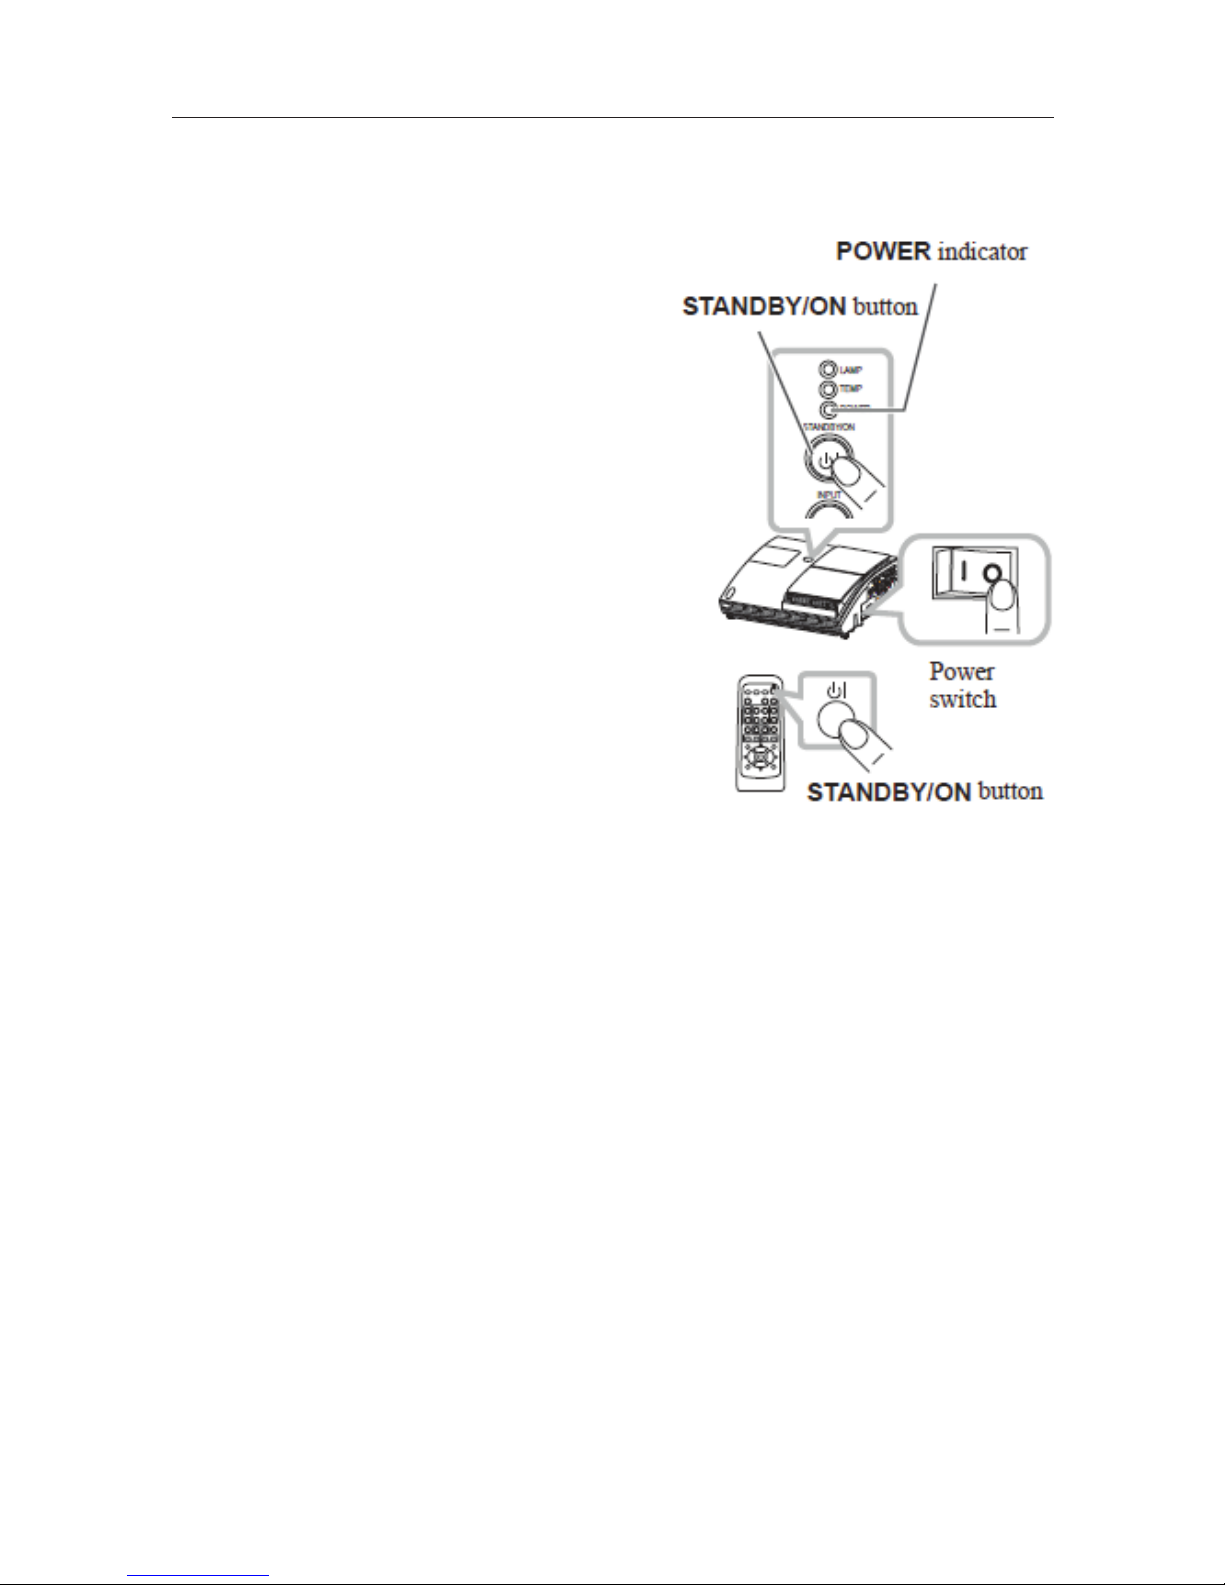
1. Press the side marked “ I “ of the power switch.
The POWER indicator will light up in orange.
NOTE
After the power indicator lights up, wait a few
seconds before using the control buttons.
2. Make sure there is nothing obstructing the
lens door while it’s opening. Then, press the
STANDBY/ON button (on the projector or remote
control). The lens door will open, the projection
lamp will light up, and the POWER indicator will
begin to blink green.
When the projector starts completely, the indicator
will turn steady green.
NOTE
This projector has the AUTO ON function.
WARNING
Never look into the projection lens or mirror while the projection lamp lights, since the projection lamp
ray may damage your eyes.
CAUTION
Be careful not to pinch your nger with the lens door, as it may cause an injury.
Page 11
11
ADJUSTING THE PROJECTION POSITION
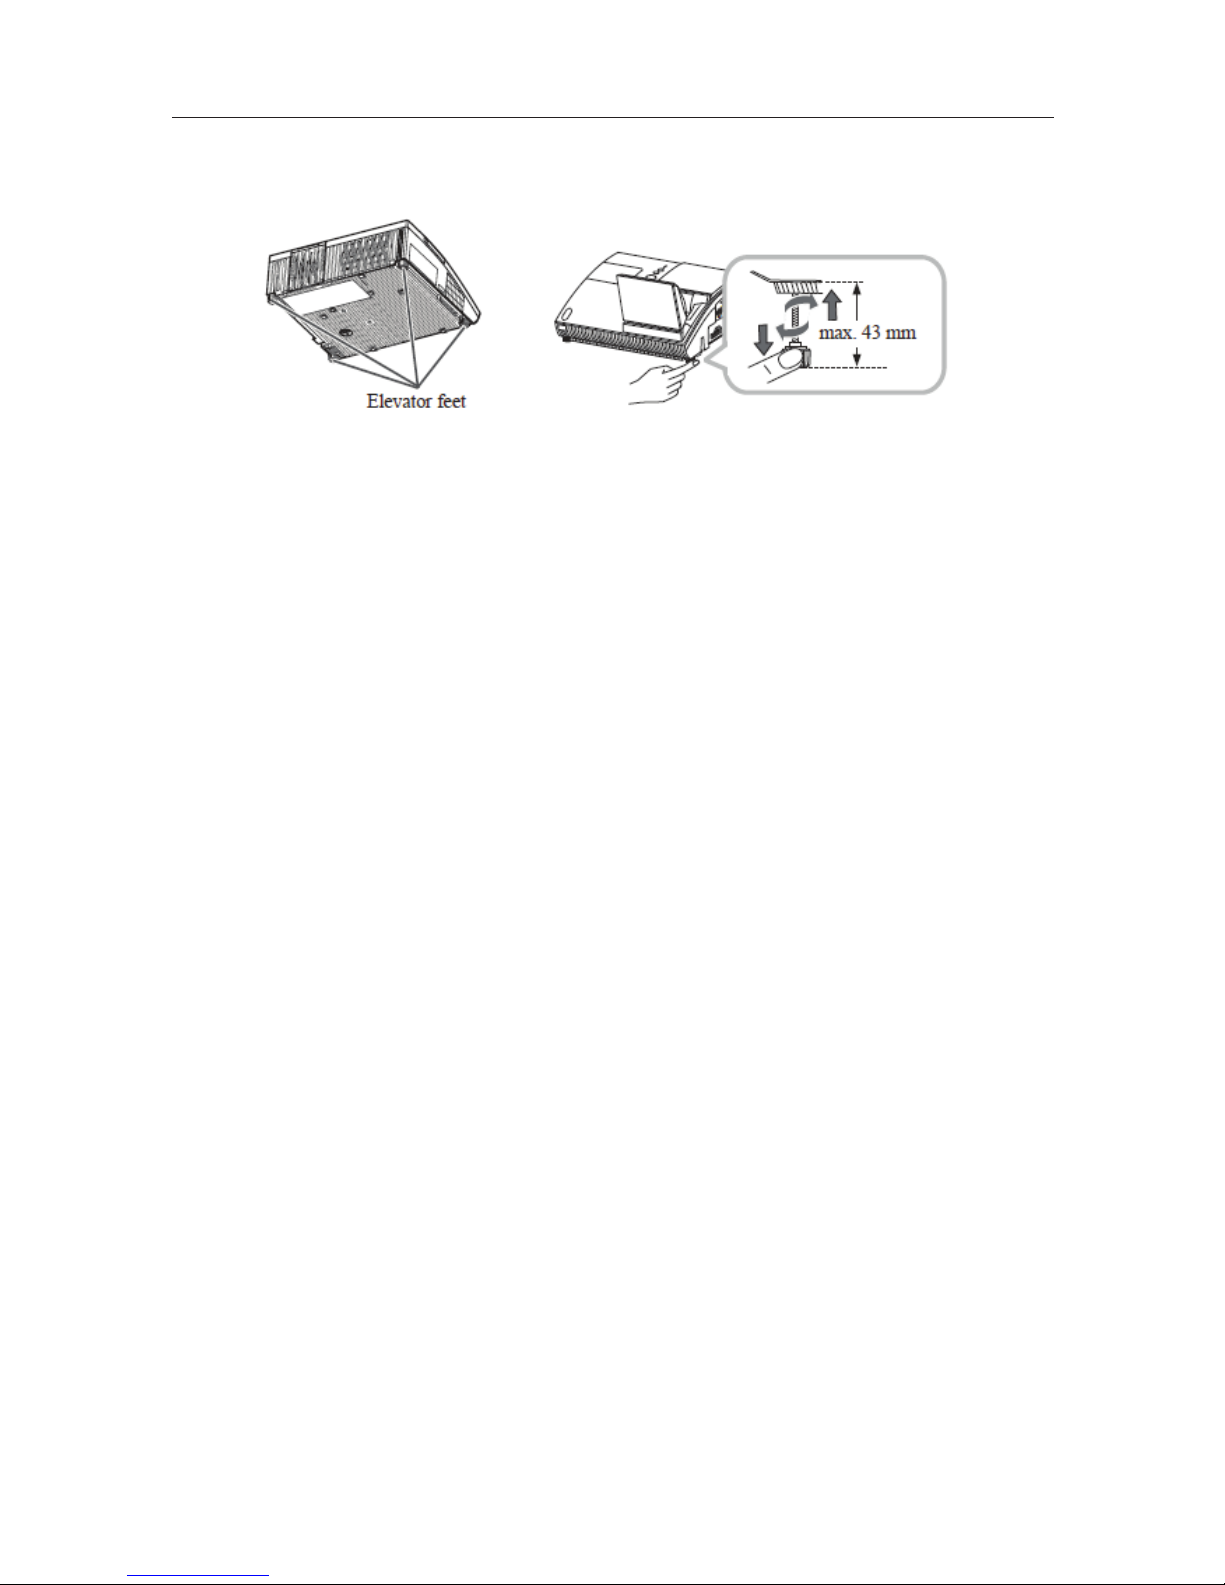
There are four elevator feet located on the bottom of the projector. Use them to adjust the
projection position.
CAUTION
Do not lengthen the elevator feet to 43 mm or more. A foot lengthened beyond the limit may detach from
the projector, and result in an injury.
Page 12
12
OPERATION
DISPLAYING AND SWITCHING THE IMAGE
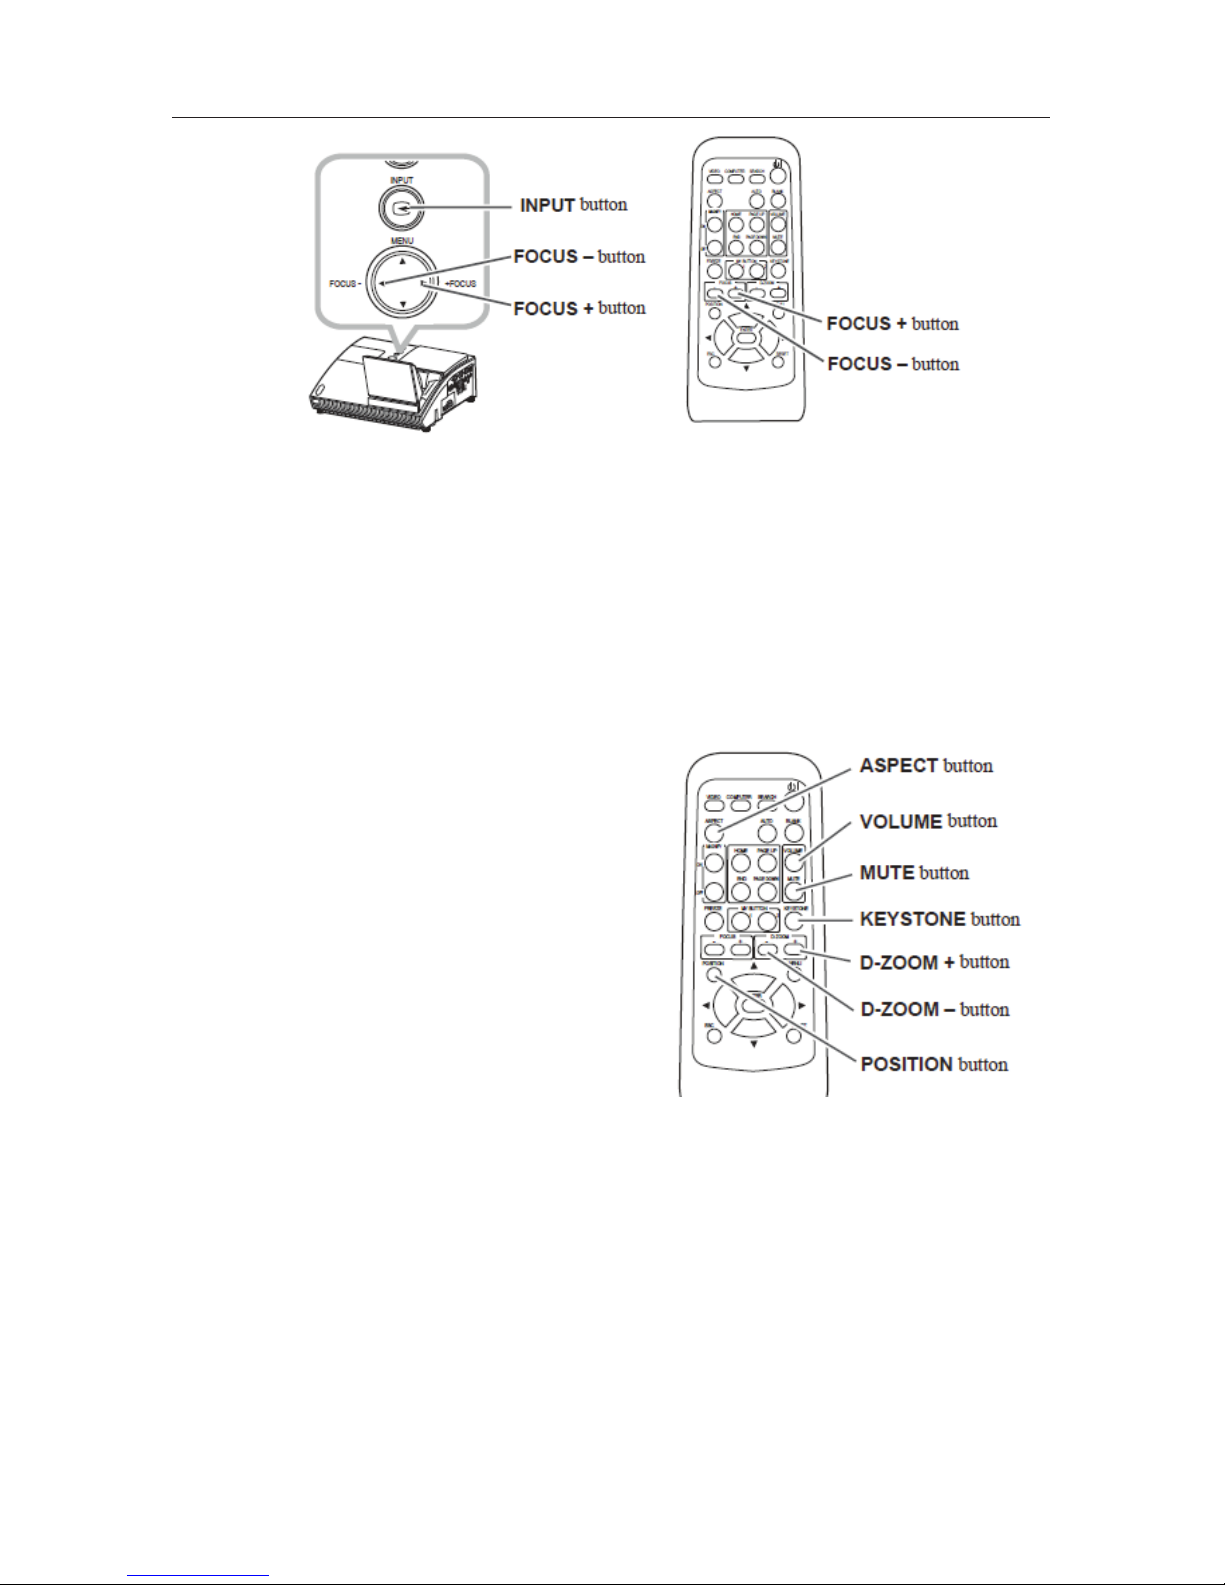
Press the INPUT button on the projector to display the image from one of the active input
ports. Each time you press the button, the port will switch, when two or more signals are
inputted.
FOCUSING
Use the FOCUS + and FOCUS – buttons on the projector or remote control to adjust the
screen focus.
SELECTING AN ASPECT RATIO
Each time you press the ASPECT button on the
remote control, it will switch the aspect ratio of
the image.
ZOOMING
Use the D-ZOOM + and D-ZOOM – buttons on
the remote control to adjust the screen size.
ADJUSTING THE PICTURE POSITION
Press the POSITION button on the remote
control, and use the , , and buttons.
Press the POSITION button again to nish this
operation.
CORRECTING THE KEYSTONE DISTORTION
Press the KEYSTONE button on the remote control, and use the and buttons. Then,
press the KEYSTONE button again to nish this operation.
ADJUSTING THE VOLUME
Press the VOLUME button on the remote control, and use the and buttons.
MUTING THE SOUND
Press the MUTE button on the remote control. To restore the sound, press the MUTE or
VOLUME button.
Page 13
13
TURNING OFF THE PROJECTOR
Turn off all connected devices before the projector, unless mentioned in the manuals. For
this projector, follow the procedure below:
1. Press the STANDBY/ON button (on the
projector or remote control). The “Power
off?” dialog will appear on the screen for
about 5 seconds.
2. Make sure there is nothing obstructing
the lens door while it’s closing. Then press
the STANDBY/ON button again when the
message appears. The projection lamp will
turn off, the lens door will close, and the
POWER indicator will blink orange.
NOTE
n
For cooling the projector down, wait for the
POWER indicator to turn steady orange.
n
The projector can be turned off without
waiting for the cool down. However, Teq
recommends cooling the projector down
sufciently.
n
Do not turn on the projector for about 10
minutes or more after turning it off, to prevent
shortening its life.
3. Press the side marked “ O “ of the power switch. The POWER indicator will go off.
If you will not use the projector for an extended period, unplug and separate the power
cord from the power outlet for safety purposes.
NOTE
This projector has the AUTO OFF function.
CAUTION
n
Be careful not to pinch your nger with the lens door, to prevent an injury.
n
Do not touch the lamp cover or approach the exhaust vents while using the projector and for a
few minutes after use, to prevent a burn.
Page 14
14
REPLACING THE LAMP
The projection lamp has nite product life that is different in each lamp. Please replace
the lamp as soon as possible when the pictures appear dark, or when the color tone is
poor. Using the lamp for long periods of time may cause the lamp to burn out or break.
Preparation of a spare lamp and early replacement are recommended. To prepare the new
lamp, contact Teq with the type number: DT00891
1. Turn off the projector and unplug the power cord
from the power outlet. Then, let the projector
cool down for about 45 minutes.
If the projector is mounted on a ceiling or somewhere
over your head, or if the lamp may have broken, be sure
to refer toTeq, since it may be dangerous.
If you plan on replacing the lamp yourself, consult the
following procedure:
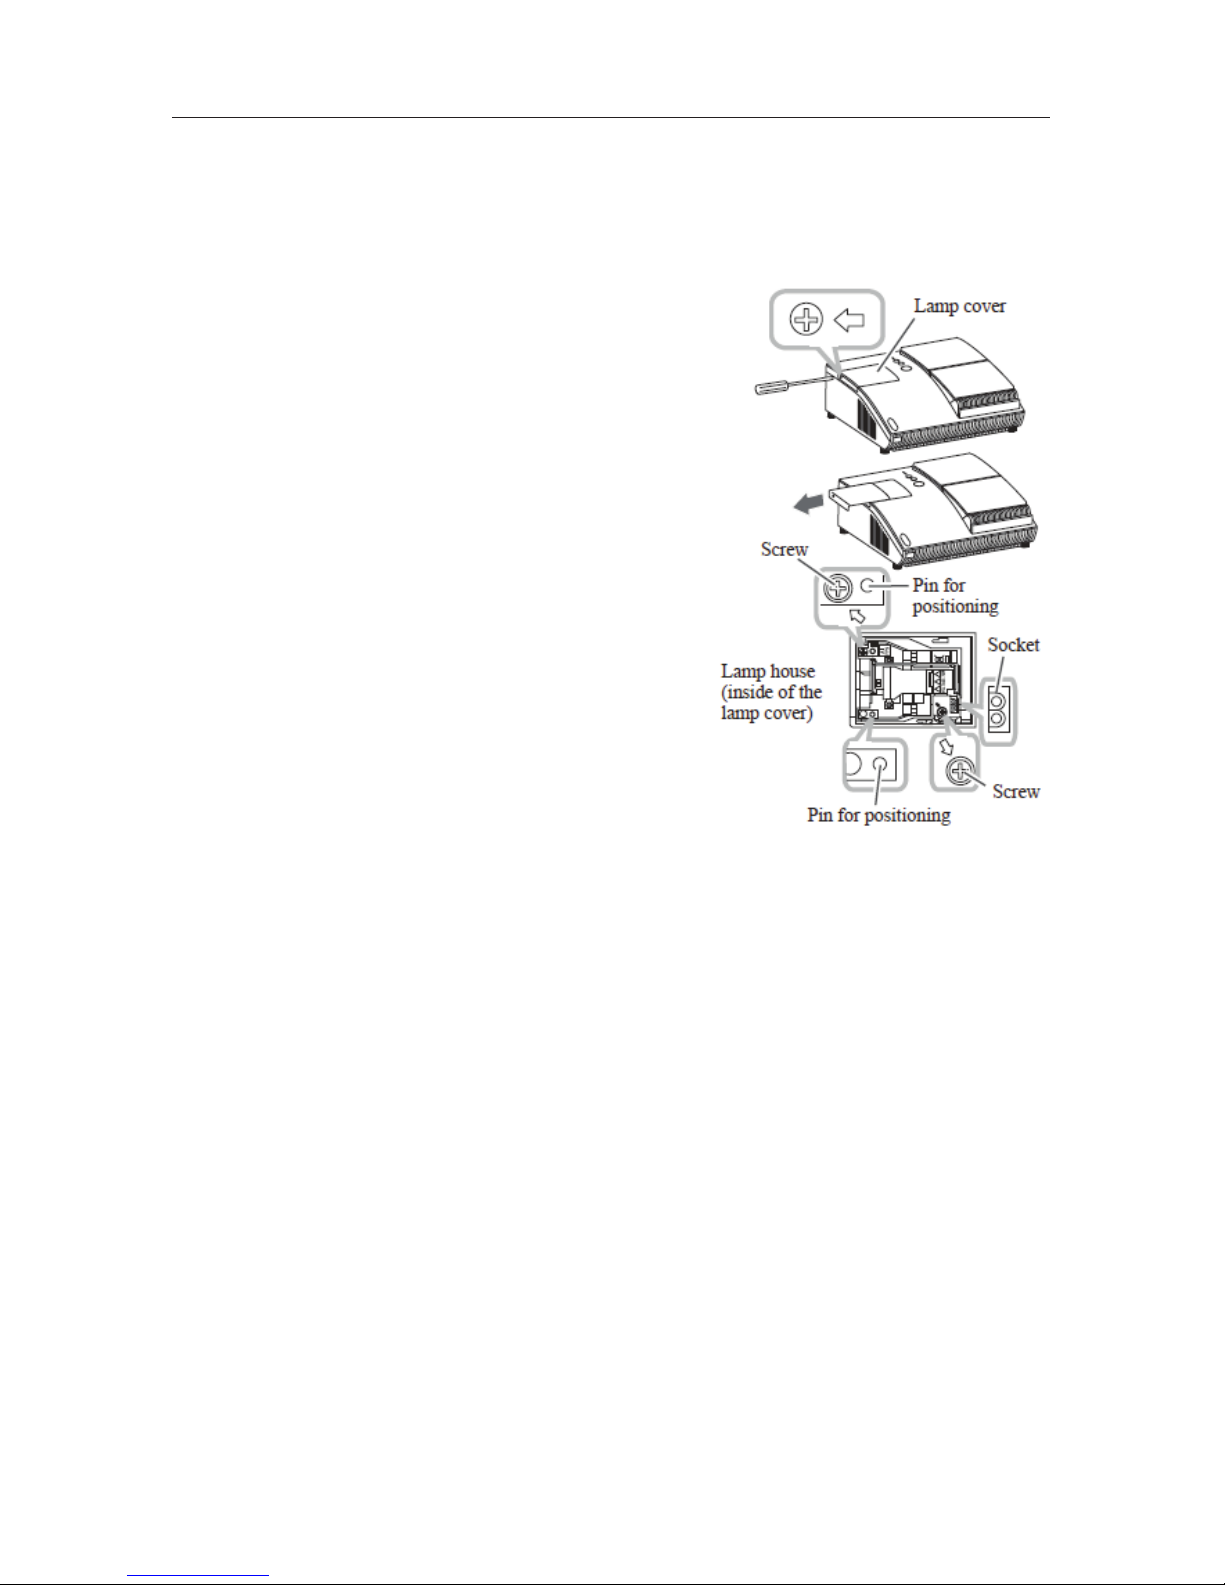
2. Loosen the screw (marked by arrow) of the lamp
cover, and then slide the lamp cover to the side
to remove it.
3. Loosen the 2 screws (marked by arrows) of the
lamp, and slowly pick up the lamp by the handles.
4. Insert the new lamp. Do not to touch the inside of
the lamp house. When inserting, pay attention to
the socket position rst, and to the pins for positioning.
5. Firmly tighten the 2 screws of the lamp that are loosened in the previous process to
lock it in place.
6. Slide the lamp cover into place and rmly tighten the screw of the lamp cover.
7. Plug in and restart the projector. Then, reset the lamp time.
Page 15

15
(1) Press the or button on the projector or the MENU button on the remote control.
The “EASY MENU” will appear.
(2) Point at the “Go to Advanced Menu …” in the menu using the or button, then
press the button. “MENU” will appear.
(3) Pointed at the “OPTION” in the left column using the or button, then press the
button. The cursor will move to the right column.
(4) Point at the “LAMP TIME” using the or button, then press the button. A
dialog will appear.
(5) Press the button to select the “RESET” on the dialog. This will reset the lamp time.
NOTE
Only reset the lamp time only when you have replaced the lamp.
Page 16
16
REPLACING THE LAMP (continued)
HIGH VOLTAGE HIGH TEMPERATURE HIGH PRESSURE
WARNING
n
The projector uses a high-pressure mercury glass lamp. The lamp can break with a loud
bang or burn out if jolted or scratched, handled while hot, or left on for an extended period.
Note that each lamp has a different lifetime, and some may burst or burn out soon after you
start using them. In addition, if the bulb bursts, it is possible for shards of glass to y into
the lamp housing, and for gas containing mercury and dust containing ne particles of glass
to escape from the projector’s vent holes.
n
About disposal of a lamp: This product contains a mercury lamp; do not put it in a trash.
Dispose of it in accordance with environmental laws.
n
For lamp recycling, go to www.lamprecycle.org (in the US).
n
For product disposal, consult your local government agency or www.eiae.org (in the US) or
www.epsc.ca (in Canada). For more information, call Teq.
n
If the lamp should break (it will make a loud bang when it does), unplug the power
cord from the outlet, and make sure to request a replacement lamp from Teq. Note that
shards of glass may damage the projector’s internals, or cause injury during handling, so
do not try to clean the projector or replace the lamp yourself.
n
If the lamp should break (it will make a loud bang when it does), ventilate the room
well, and make sure not to inhale the gas or ne particles that come out from the
projector’s vent holes. Do not get particles into your eyes or mouth.
n
Before replacing the lamp, turn off the projector and unplug the power cord, then wait
at least 45 minutes for the lamp to cool sufciently. Handling the lamp while hot may
cause burns, as well as damage the lamp.
n
Never unscrew anything except the appointed (marked by an arrow) screws.
n
Do not open the lamp cover while the projector is mounted on a wall or ceiling. This is
dangerous. If the lamp’s bulb has broken, shards of glass will fall out when the cover is
opened. In addition, working in high places is dangerous, so ask Teq to have the lamp
replaced, even if the bulb is not broken.
n
Do not use the projector with the lamp cover removed. At the lamp replacing, make sure
that the screws are screwed in rmly. Loose screws may result in damage or injury.
n
Only use the lamp of the specied type. Use of a lamp that does not meet the lamp
specications for this model may cause a re, damage or shorten the life of this product.
n
If the lamp breaks soon after the rst time it is used, it is possible that there are
electrical problems. If this happens, consult Teq.
n
Handle with care: jolting or scratching may cause the lamp bulb to burst during use.
n
Using the lamp for long periods of time, may cause it to darken, burn out or burst.
When the pictures appear dark, or when the color tone is poor, please replace the
lamp as soon as possible. Do not use old (used) lamps; this is a cause of breakage.
Disconnect
the plug
from the
power
outlet
Page 17
17
MAINTAINING THE AIR-FILTER
Please check and clean the air-lter periodically for keeping optimal ventilation. When
the indicators or a message prompts you to clean the air-lter, comply with it as soon as
possible.
When it is damaged or too soiled, replace the lter unit. To prepare the new lter unit, call
Teq with the type number: QD60122
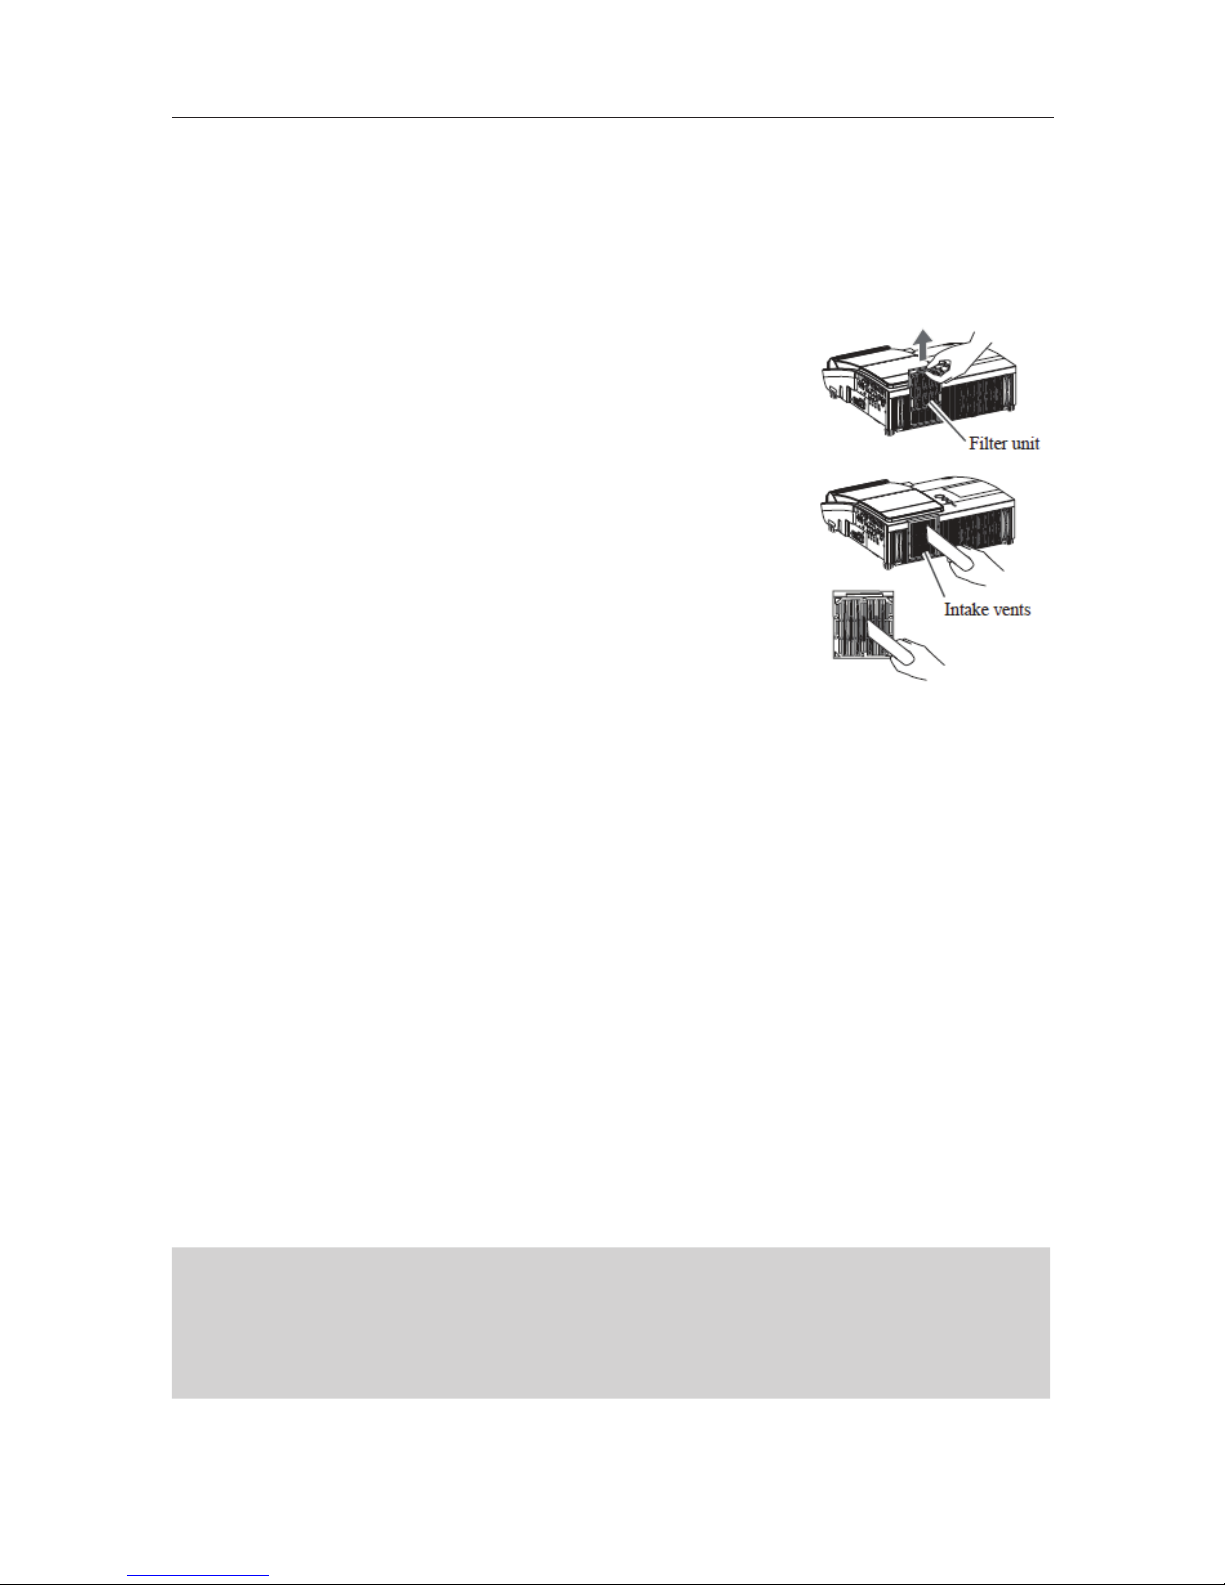
1. Turn off the projector and unplug the power cord from
the power outlet. Then, let the projector cool down
sufciently.
2. Use the vacuum cleaner on and around the lter unit.
3. Slide the lter unit upward to take it off from the projector.
4. Use the vacuum cleaner on the intake vents of the projector.
5. Use the vacuum cleaner on the cover side of the lter
unit. Do not vacuum the air-lter directly, since the
cleaner may inhale the air-lter. When the air-lter is
damaged or too soiled, prepare the new lter unit.
6. Make sure that there is an air-lter inside, then slide the
lter cover into place.
7. Plug in and restart the projector.
Then, reset the lter time (which is the time counter for the air-lter use).
( 1) Press the or button on the projector or the MENU button on the remote control.
The “EASY MENU” will appear.
(2) Point at the “FILTER TIME” in the menu using the or button, then press the
button. A dialog will appear.
(3) Press the button to select the “RESET” on the dialog. This will reset the lter time.
NOTE
n
A lter unit of specied type will come with the replacement lamp for this projector.
Replacing the lter unit at the same time as the lamp is recommended.
n
Only reset the lter time only when you have cleaned the air-lter.
WARNING
n
Before caring for the air-lter, turn off the projector and unplug the power cord, then cool the
projector sufciently.
n
Only use the specied lter unit. Do not use the projector with the air-lter removed.
Page 18
18
CARING FOR THE MIRROR AND LENS
If the projection mirror or lens is awed, soiled or fogged, it may cause deterioration of
display quality. Please take care of the mirror and lens, by following this procedure:
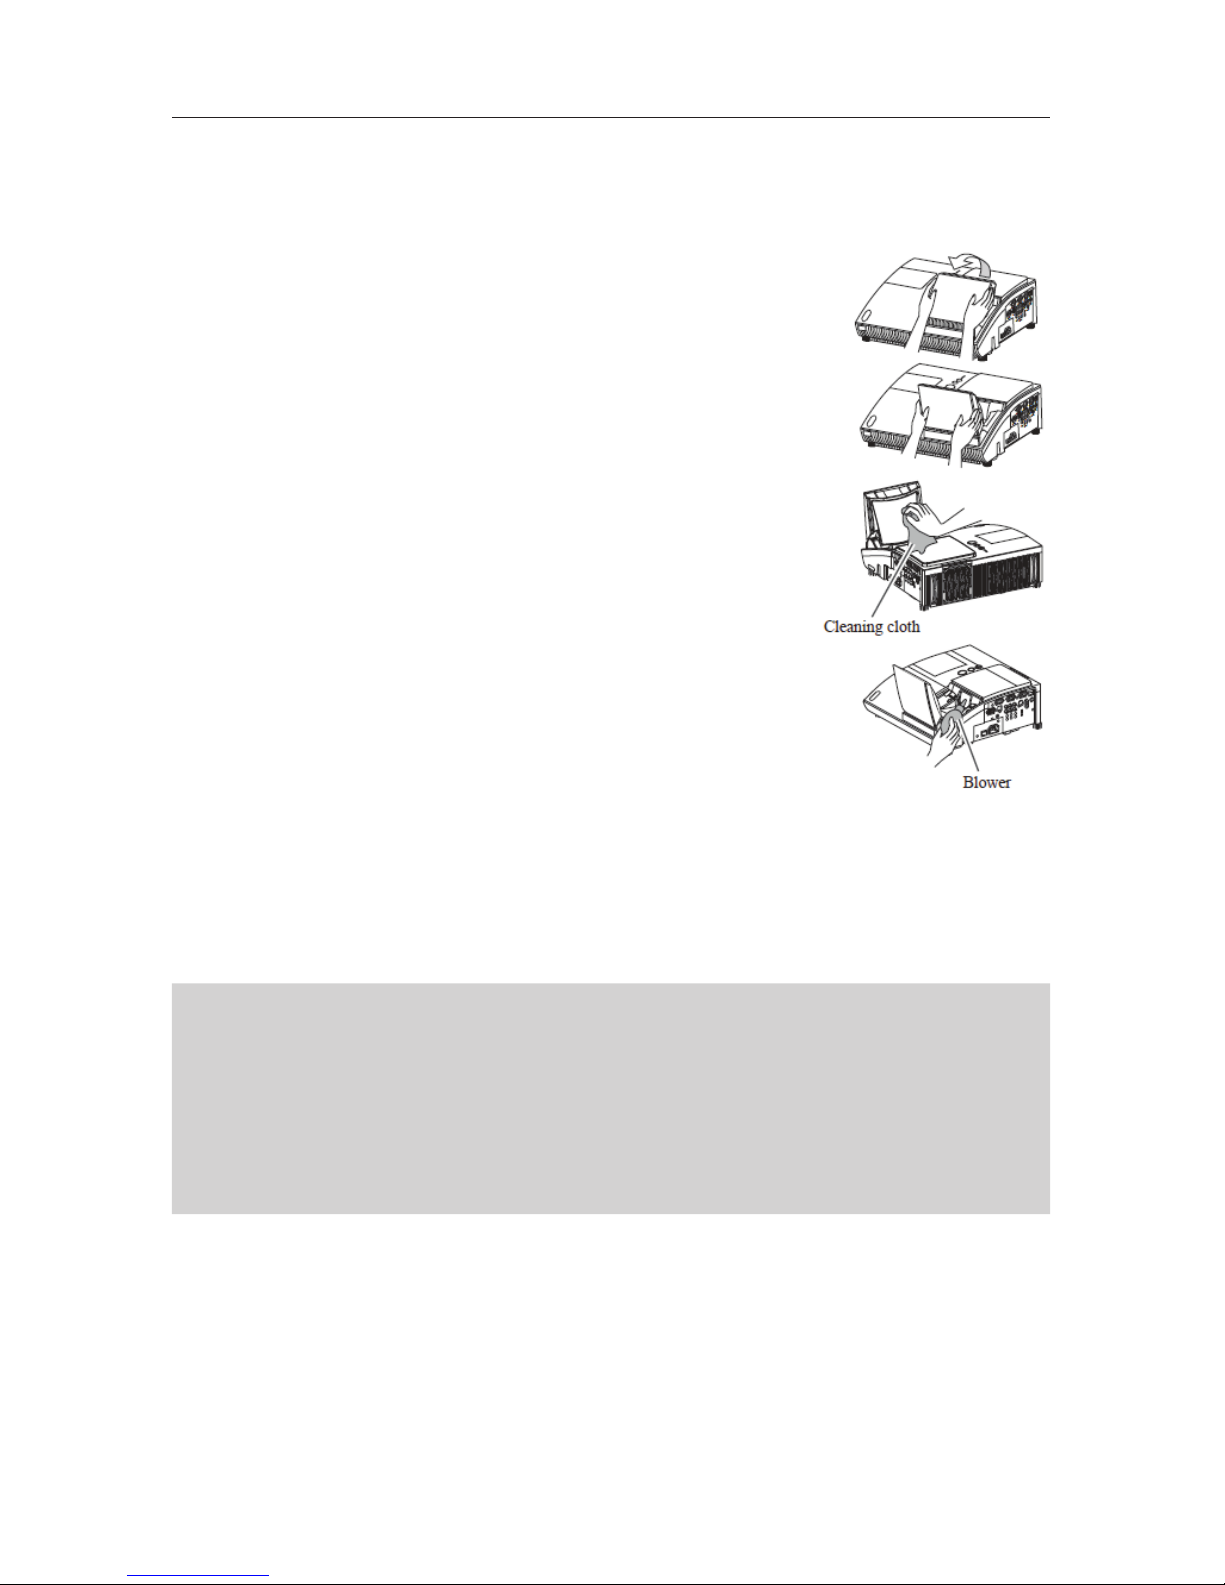
1. Turn off the projector and unplug the power cord from
the power outlet. Then, let the projector cool down
sufciently.
2. The lens door can be opened manually. Please hold
both sides of the lens door and slowly open it until it is
locked with clicking sound.
3. Softly wipe the mirror and lens with a cleaning cloth
for lens on the market. Be careful not to damage the
mirror or lens. For around edge of the mirror and lens,
where might be difcult to wipe, please use an air
blower.
4. To close the lens door, please following this procedure:
(1) Plug in the projector.
(2) Turn on the power switch. Even though the lens door
starts to close, it may not be closed properly.
(3) Press the STANDBY/ON button, so that the lamp
starts to light up.
(4) After the POWER indicator turns to steady green, press the STANDBY/ON button
twice to turn off the projector. The lens door will close properly.
NOTE
When the lens door is closed manually, it may not shut properly.
WARNING
n
Before caring for the projection mirror and lens, turn off the projector and unplug the power cord,
then cool the projector sufciently.
n
Do not use a vacuum cleaner to clean the projection mirror or lens, since it might cause damage.
n
Do not use cleaners or chemicals other than those specied in this manual. Outside chemicals
may cause serious damage to the mirror.
CAUTION
Be careful not to pinch your nger with the lens door, to prevent an injury.
Page 19
19
REPLACING THE CLOCK BATTERY
This projector has internal clock that uses a battery. When the clock of the network
function does not work correctly, please try replacing the battery:
1. Turn off the projector and unplug the power cord from
the power outlet. Then, let the projector cool down
sufciently.
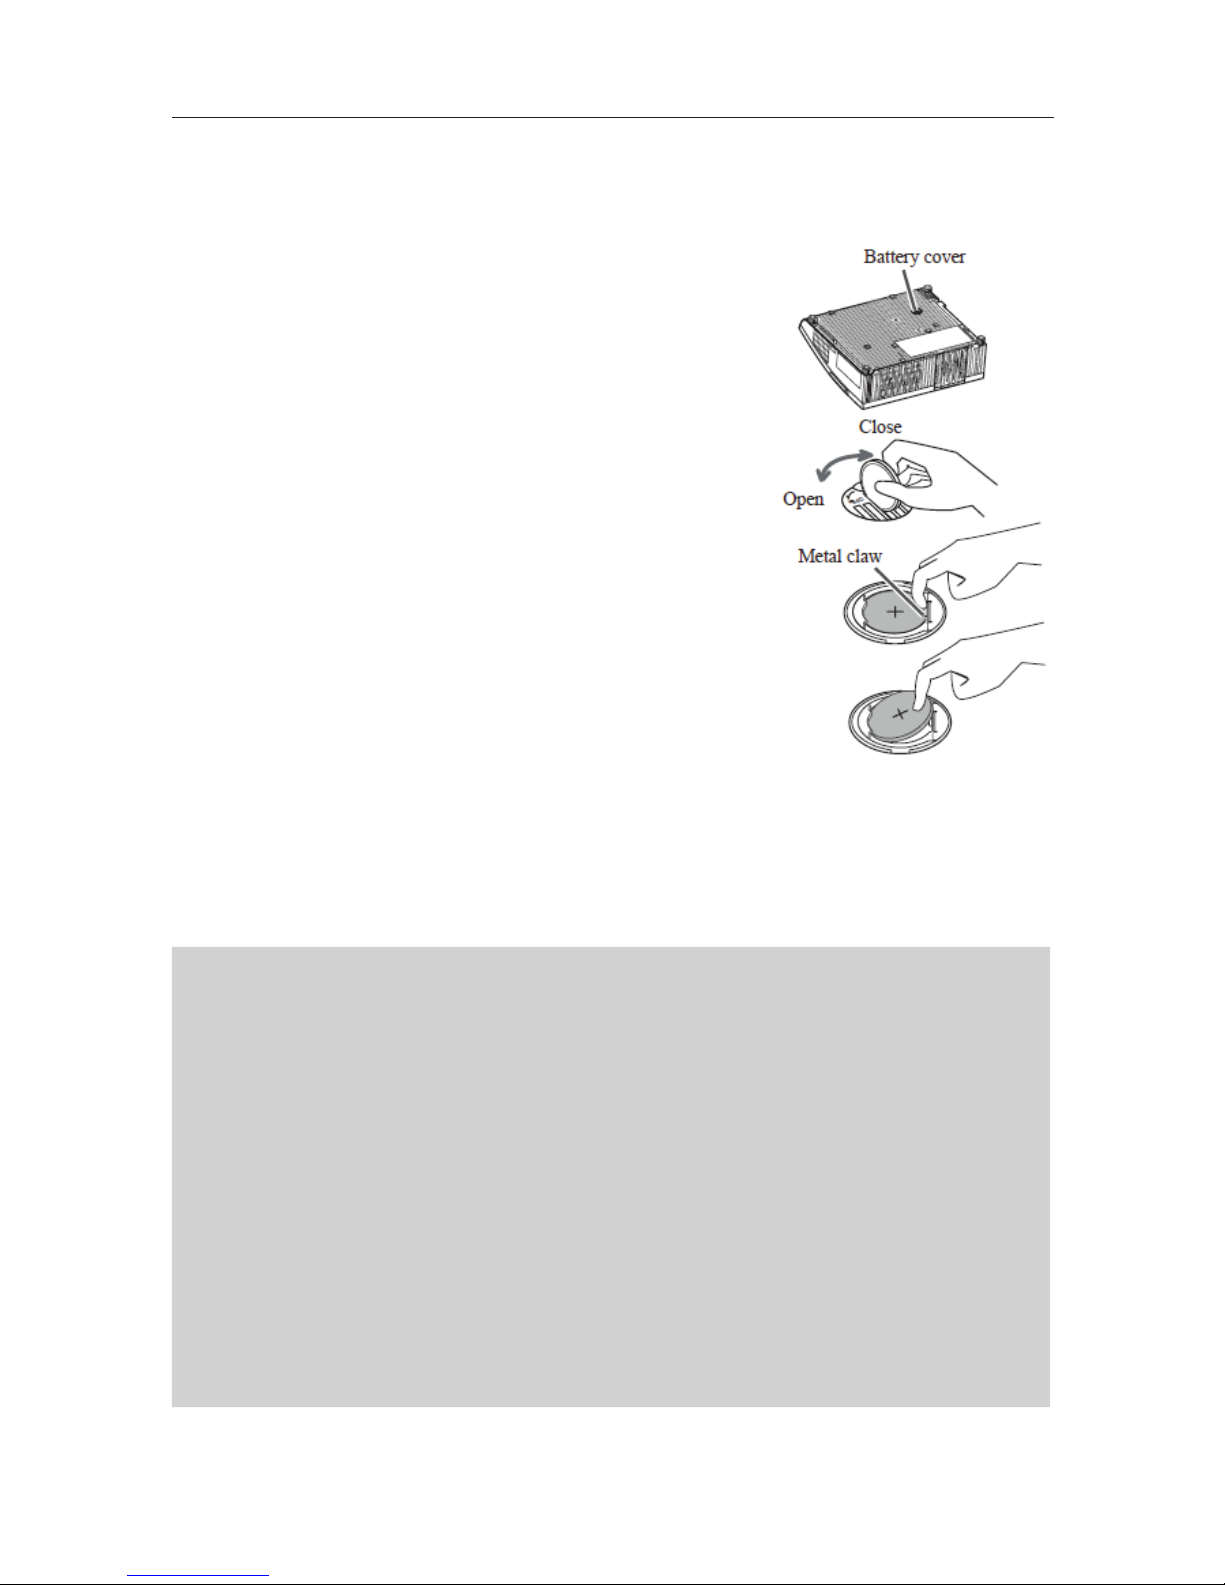
2. Gently place the projector upside down.
3. Remove the battery cover. Turn the battery cover in the
direction indicated as “ OPEN ” until it unlocks using
a coin or something similar. When nishing turning the
battery cover, pick its knob to remove it.
4. Press the metal claw of the battery holder and take out
the old battery.
5. Put the new battery into the battery holder, according
to the polarity markings (-) inside the holder, so that
the side marked (+) of the battery is facing upward.
Push the battery into the battery holder.
6. Put the battery cover into place, then turn it in the
direction indicated as “ CLOSE ” using a coin or
something similar.
NOTE
The internal clock will be initialized by removing the battery.
WARNING
n
Be careful handling a battery, as it may cause explosion, cracking or leakage, which may result in
a re, an injury and environment pollution.
n
Only use the specied and perfect battery. Do not use a battery with damage, such as a scratch,
a dent, rust or leakage.
n
If a battery leaks, wipe the leakage out well with a waste cloth. If the leakage adheres to your
body, immediately rinse it well with water. If a battery leaks in the battery holder, replace the
batteries after wiping the leakage out.
n
Make sure the plus and minus terminals are correctly aligned when loading a battery.
n
Do not work on a battery; for example recharging or soldering.
n
Keep a battery in a dark, cool and dry place. Never expose a battery to a re or water.
n
Obey the local laws on disposing a battery.
Page 20

20
REGULATORY NOTICES
WARNING:
In the US
This device complies with part 15 of the FCC Rules. Operation is subject to the following
two conditions: (1) This device may not cause harmful interference, and (2) this device
must accept any interference received, including interference that may cause undesired
operation.
This equipment has been tested and found to comply with the limits for a Class B digital
device, pursuant to Part 15 of the FCC Rules.
In Canada NOTICE:
This Class B digital apparatus complies with Canadian ICES-003.
Trade name: HITACHI
Model Number: CP-A100
Responsible Party: Hitachi America, Ltd.
Address: 900 Hitachi way, Chula Vista, CA 91914-3556 U.S.A.
Telephone Number: +1 -800-225-1741
These limits are designed to provide reasonable protection against harmful interference
in a residential installation. This equipment generates, uses and can radiate radio
frequency energy and, if not installed and used in accordance with the instructions, may
cause harmful interference to radio communications. However, there is no guarantee
that interference will not occur in a particular installation. If this equipment does cause
harmful interference to radio or television reception, which can be determined by turning
the equipment off and on. The user is encouraged to try to correct the interference by one
or more of the following measures:
- Reorient or relocate the receiving antenna.
- Increase the separation between the equipment and receiver.
- Connect the equipment into an outlet on a circuit different from the receiver.
- Consult Teq or an experienced radio/TV technician for help.
INSTRUCTIONS TO USERS:
In the US This equipment complies with the requirements of FCC (Federal Communication
Commission) equipment provided that the following conditions are met:
Some cables have to be used with the core set. Use the accessory cable or a
designatedtype cable for the connection. For cables that have a core only at one end,
connect the core to the projector.
Page 21

21
CAUTION:
Unapproved changes or modications may void the user’s authority to operate the
equipment.
INFORMATION FOR USERS APPLICABLE IN EUROPEAN UNION COUNTRIES
This symbol on the product or on its packaging means that your electrical and electronic
equipment should be disposed at the end of life separately from your household wastes.
There are separate collection systems for recycling in EU. For more
information, please contact the local authority or Teq.
Page 22

22
TROUBLESHOOTING
If an abnormal operation (such as smoke, strange odor or excessive sound) should occur,
stop using the projector immediately. Otherwise, if a problem occurs with the projector,
contact Teq.
Page 23
23
SPECIFICATIONS
item Specications
Product name Liquid crystal projector
Liquid
Crystal
Panel
Panel size 1.6 cm (0.63 type)
TFT active matrix
Drive system
786,432 pixels (1024 horizontal x 768 vertical)
Pixels
Lens F=2.1 f=5.1mm
Lamp 220 W UHB
Audio output 7 W
Power supply AC 100-120V/3.6A, AC 220-240V/1.5A
Power consumption 340W
Temperature range 5~35°C (operating)
Ports COMPUTER IN1.........D-sub 15 pin mini x1
COMPUTER IN2.........D-sub 15 pin mini x1
Y, C
B/PB
, CR/PR (Component video)...RCA x3
S-VIDEO ..................mini DIN 4 pin x1
VIDEO ...................................RCA x1
MONITOR OUT...........D-sub 15 pin mini x1
AUDIO IN1 ...........Stereo mini x1
AUDIO IN2 ...........Stereo mini x1
AUDIO IN3 (L, R) ......RCA x2
AUDIO OUT ..........Stereo mini x1
CONTROL. . . . . . . . . . . .D-sub 9 pin x1
USB ................USB-B x1
LAN ................RJ45 x1
Optional Parts Lamp: DT00891
Filter unit: QD60122
Tabletop use kit: TT100
Soft case: CA100
*
For more information, contact Teq.
Weight (mass) 5.8 kg (approx.)
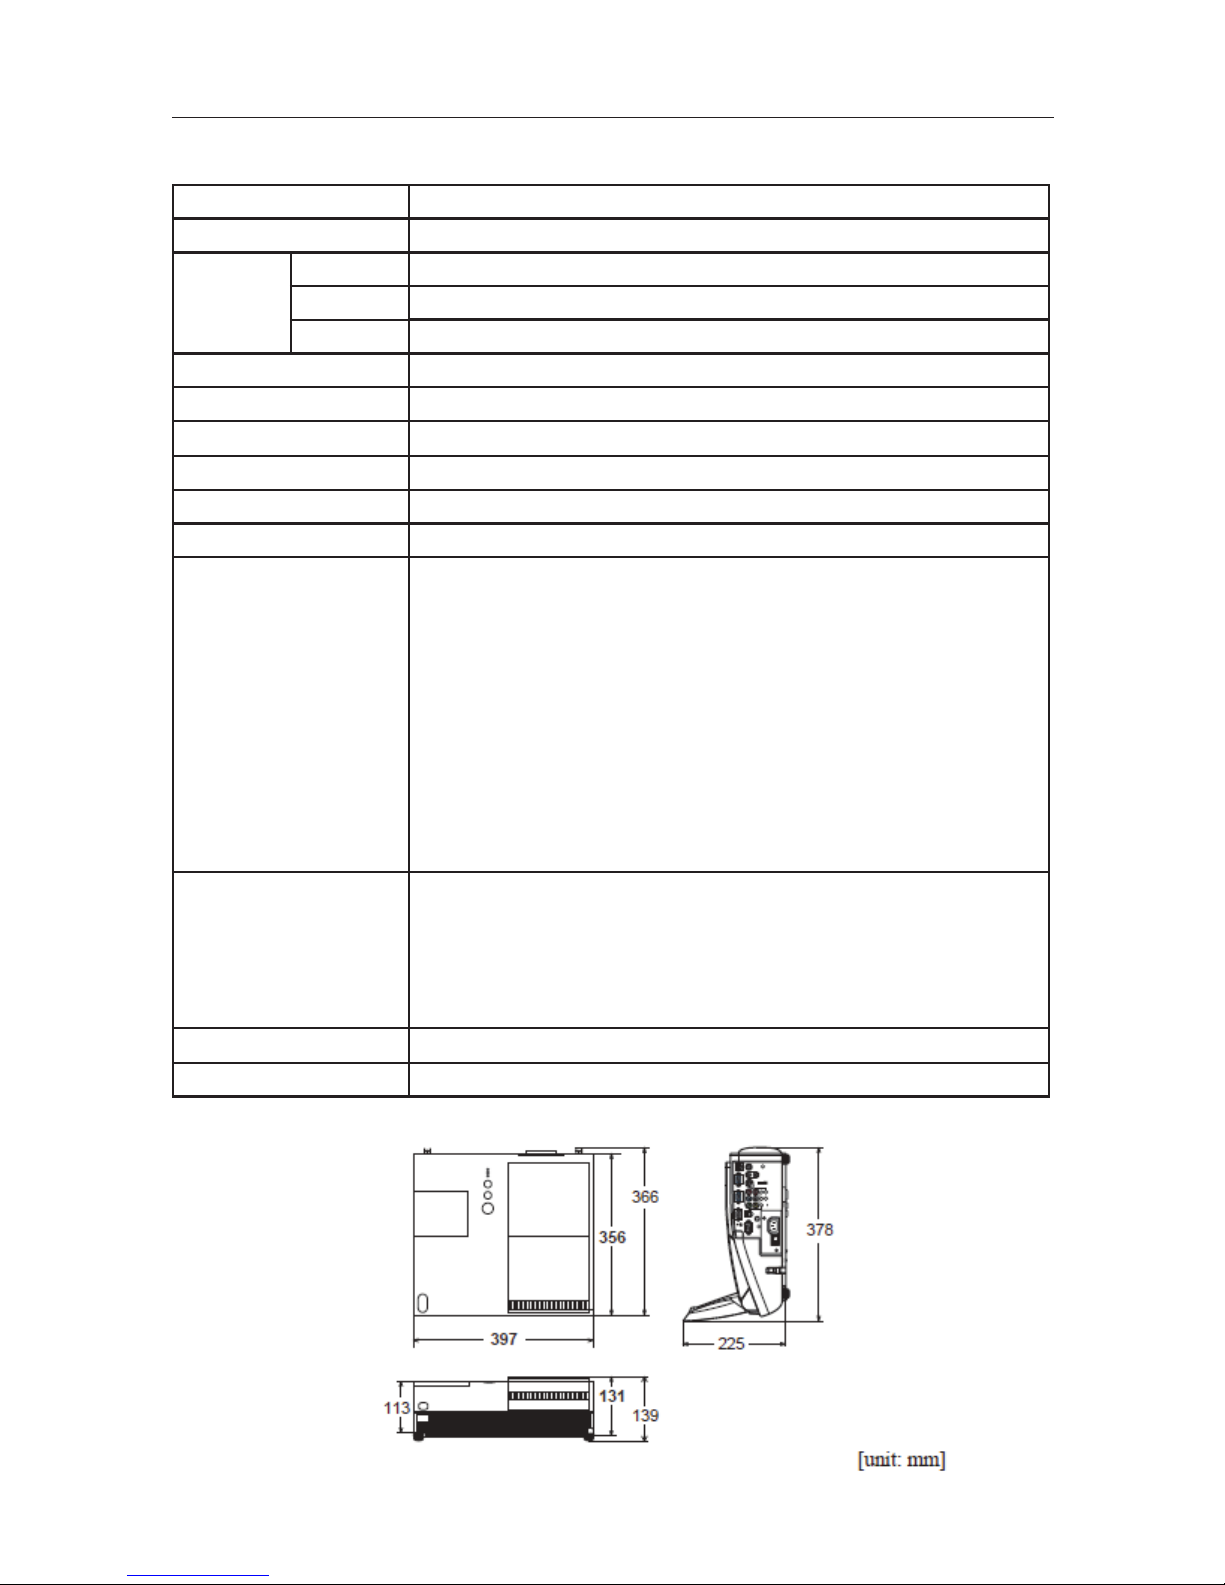
Size 397 (W) x 131 (H) x 356 (D) mm (See below.)
 Loading...