

Page 1
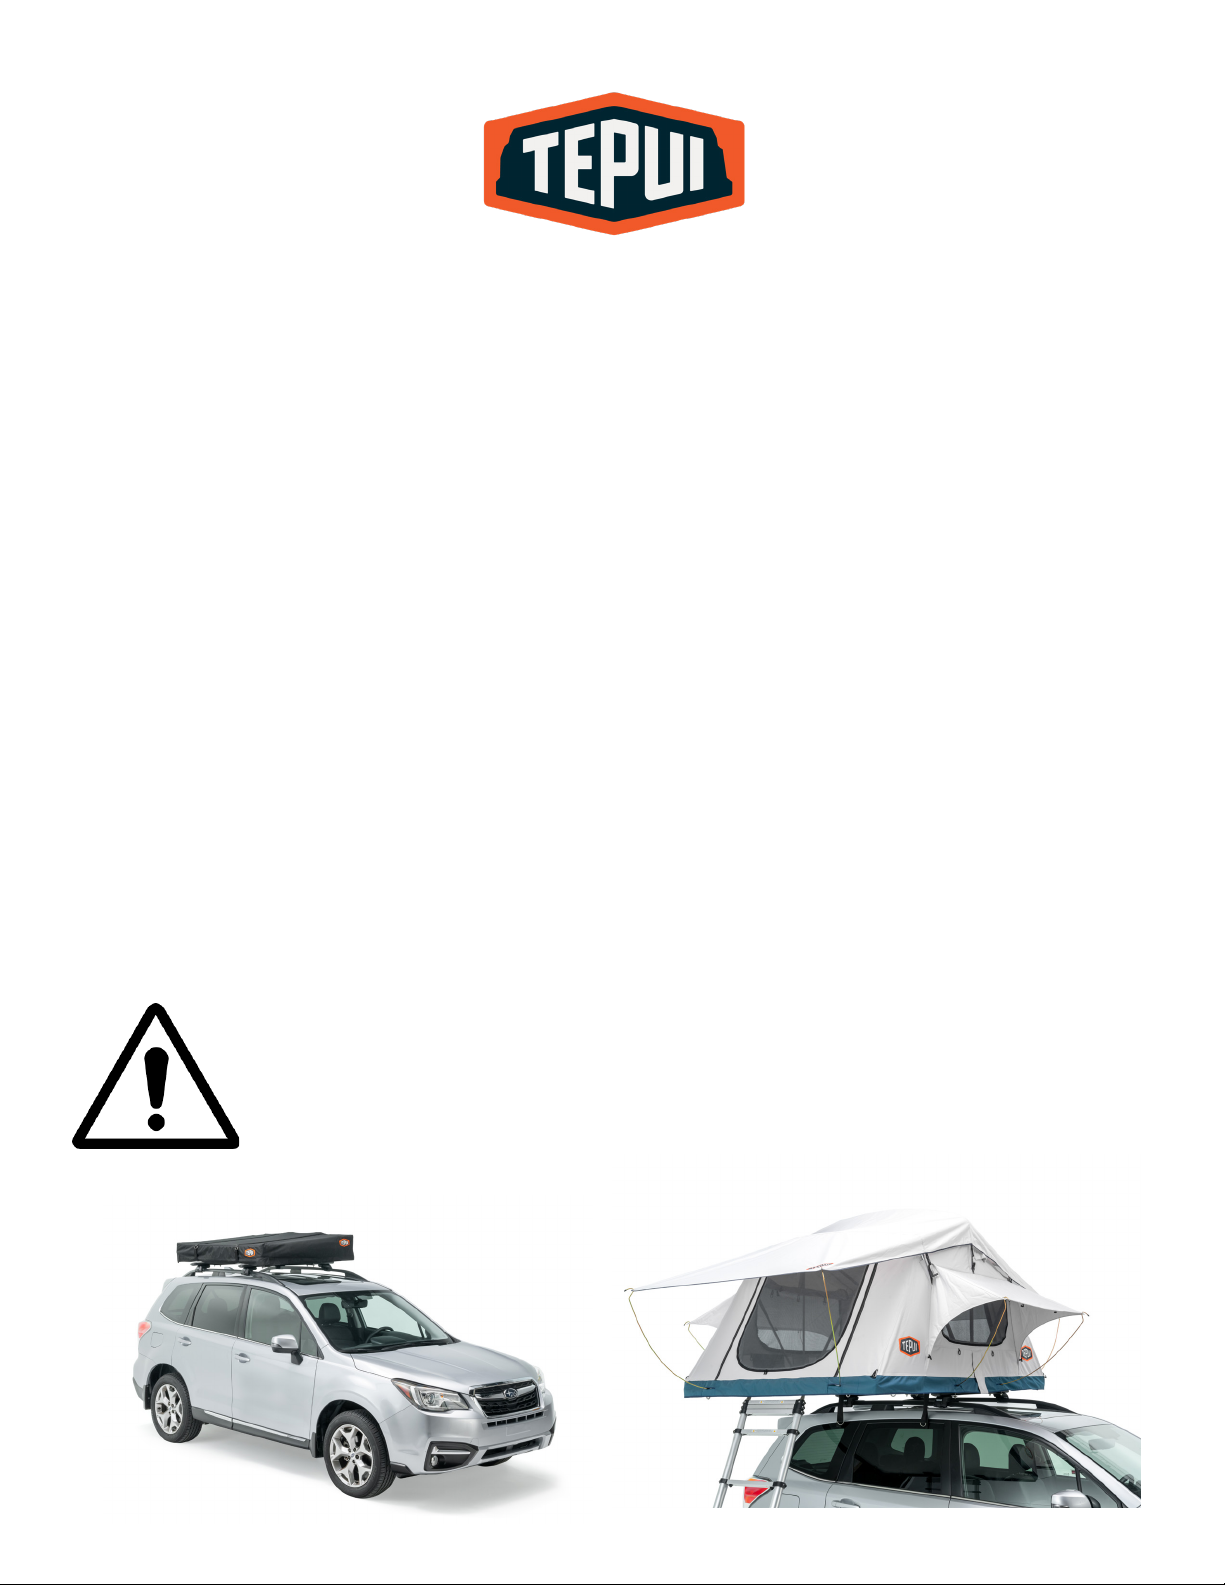
LOW-PRO OWNERS MANUAL
Updated 2.12.19
Congratulations on your purchase of a
Tepui Roof Top Tent. We strive to provide
the ultimate camping experience for every
camper. Your top quality, durable Roof Top
Tent mounts directly to your roof rack or
aftermarket roof bars and can be fully set up
in just a few minutes. It can be left on your
vehicle year ‘round.
Tepui Tents are made with the most durable
materials that stand up to the most extreme
conditions. High quality ripstop fabrics with
superior ventilate coating provide excellent
water and wind protection, yet are more
breathable than other tent brands on the
market.
Most of your Tepui Tent components have
been fully assembled at the factory with
the exception of attaching the mounting
tracks and the ladder to the base of the
tent. Installation is composed of unpacking,
attaching mounting tracks to the base of the
tent, attaching the ladder, attaching the tent
cover, and then mounting your Tepui Tent onto
your roof rack or aftermarket roof bars. All of
the tools and hardware required for installation
are included.
Should you have any questions, please email
[email protected] or call Customer Service at
1-800-301-9874.
FOR A DETAILED INSTRUCTIONAL VIDEO ON HOW TO INSTALL YOUR
ROOF TOP TENT VISIT: WWW.TEPUI.COM/INSTALLATION
WARNING
Improper installation or use of your tent may result in serious injury or death.
Follow these installation instructions carefully to ensure proper installation
on your vehicle and safe use of your tent. Please check with your vehicle
manufacturer for specified loading capacity of your roof rack. Not all factory
roof racks or aftermarket roof bars can safely accommodate tent models.
Page 2

TABLE OF CONTENTS
GETTING STARTED 3
HARDWARE IDENTIFICATION CHART 4
TENT ORIENTATION ON YOUR VEHICLE 5
TENT ASSEMBLY 6-7
COVER ATTACHMENT 8
ATTACHMENT TO ROOF RACK 9
TENT SETUP 10-11
REMOVABLE CANOPIES 12
STORAGE AND HANDLING 13
LIMITED WARRANTY 14
2
Page 3
GETTING STARTED
*This installation manual oers installation information for a Low-Pro Tepui Tent model only. The
installation process and hardware varies slightly between other models.
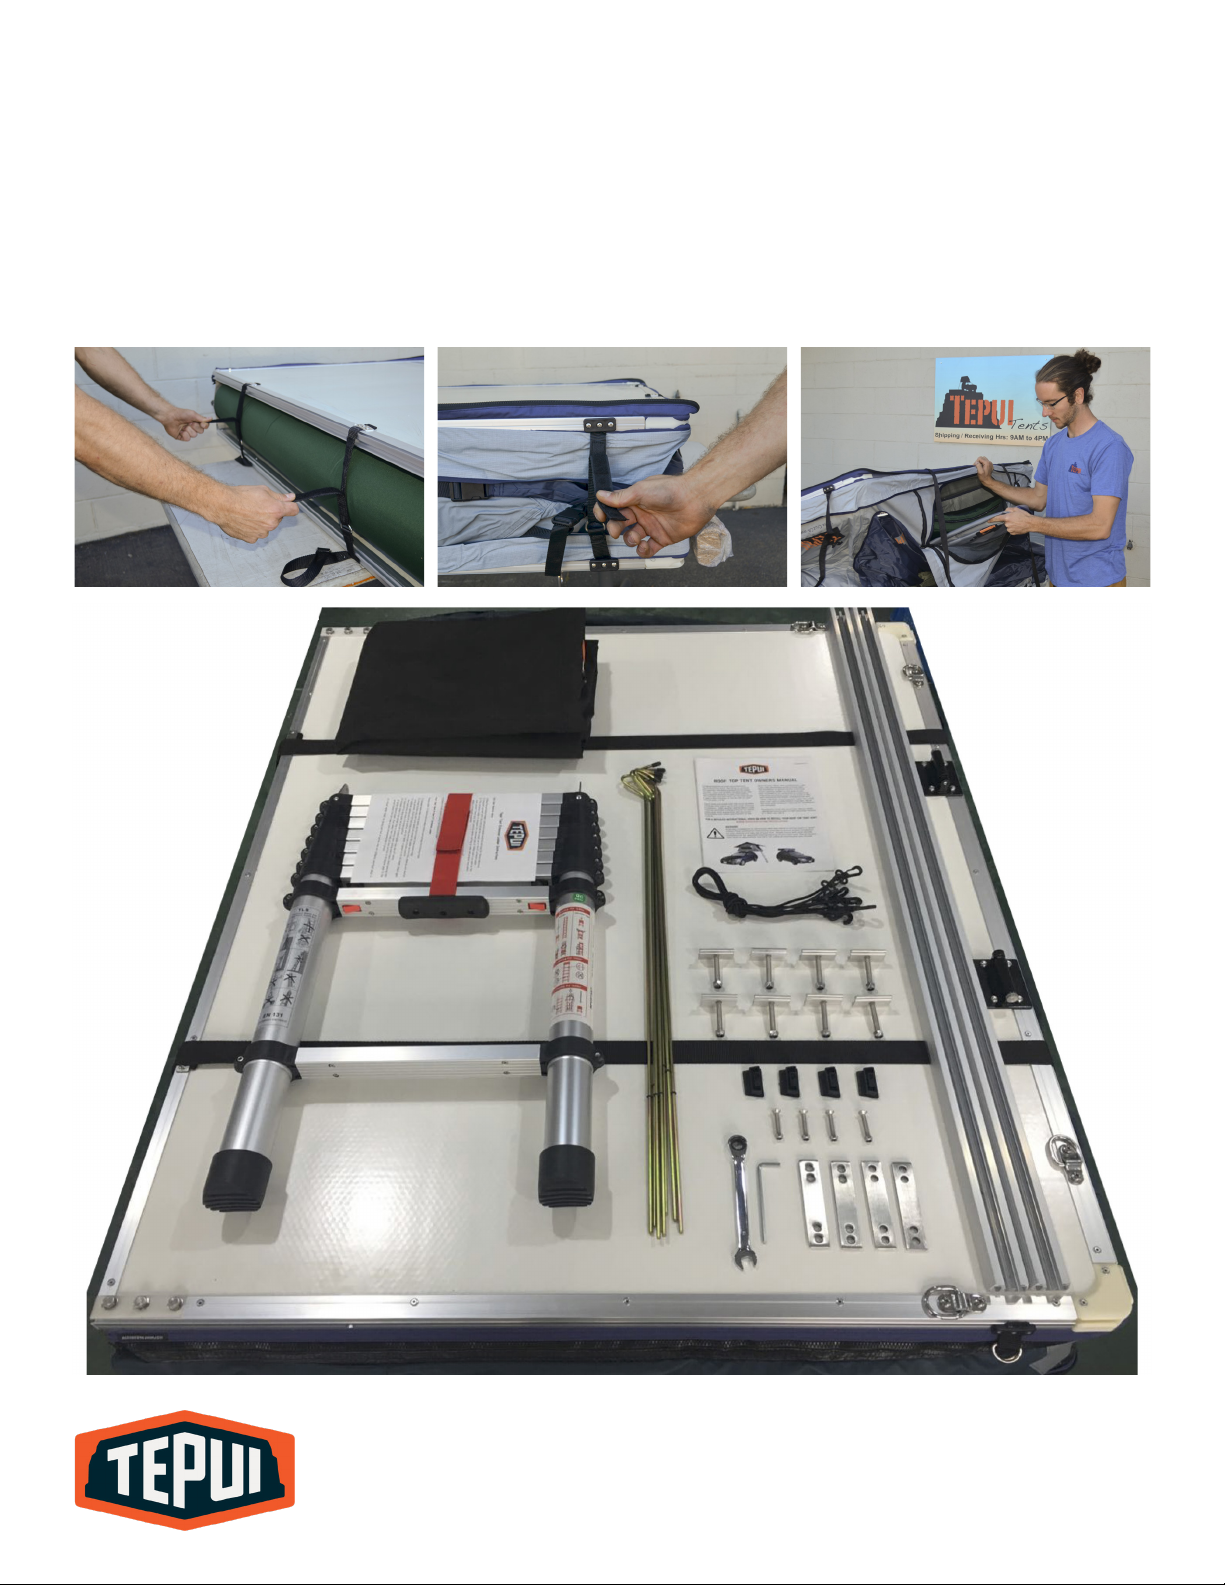
Remove tent from box and place on a clean surface with the strapped side face down. Locate
ladder bag and hardware box. Rainfly rods will be found inside of packed tent.
3
Page 4

HARDWARE IDENTIFICATION CHART
ITEM QUANTITY
13mm Steel Bolt
10mm Recessed Bolt
10mm Nylock Nut
13mm Nylock Nut
Hex Key Wrench
13mm ratchet wrench
Channel Slider
Steel Mount Plate
Mounting Tracks
8
4
4
8
1
1
8
4
2
TOOLS
All of the tools you need to install your tent are included. You may wish to use the following
optional tools during installation: box cutter, hacksaw (for cutting mounting tracks if needed, see
page 6).
4
Page 5
TENT ORIENTATION
ON YOUR VEHICLE
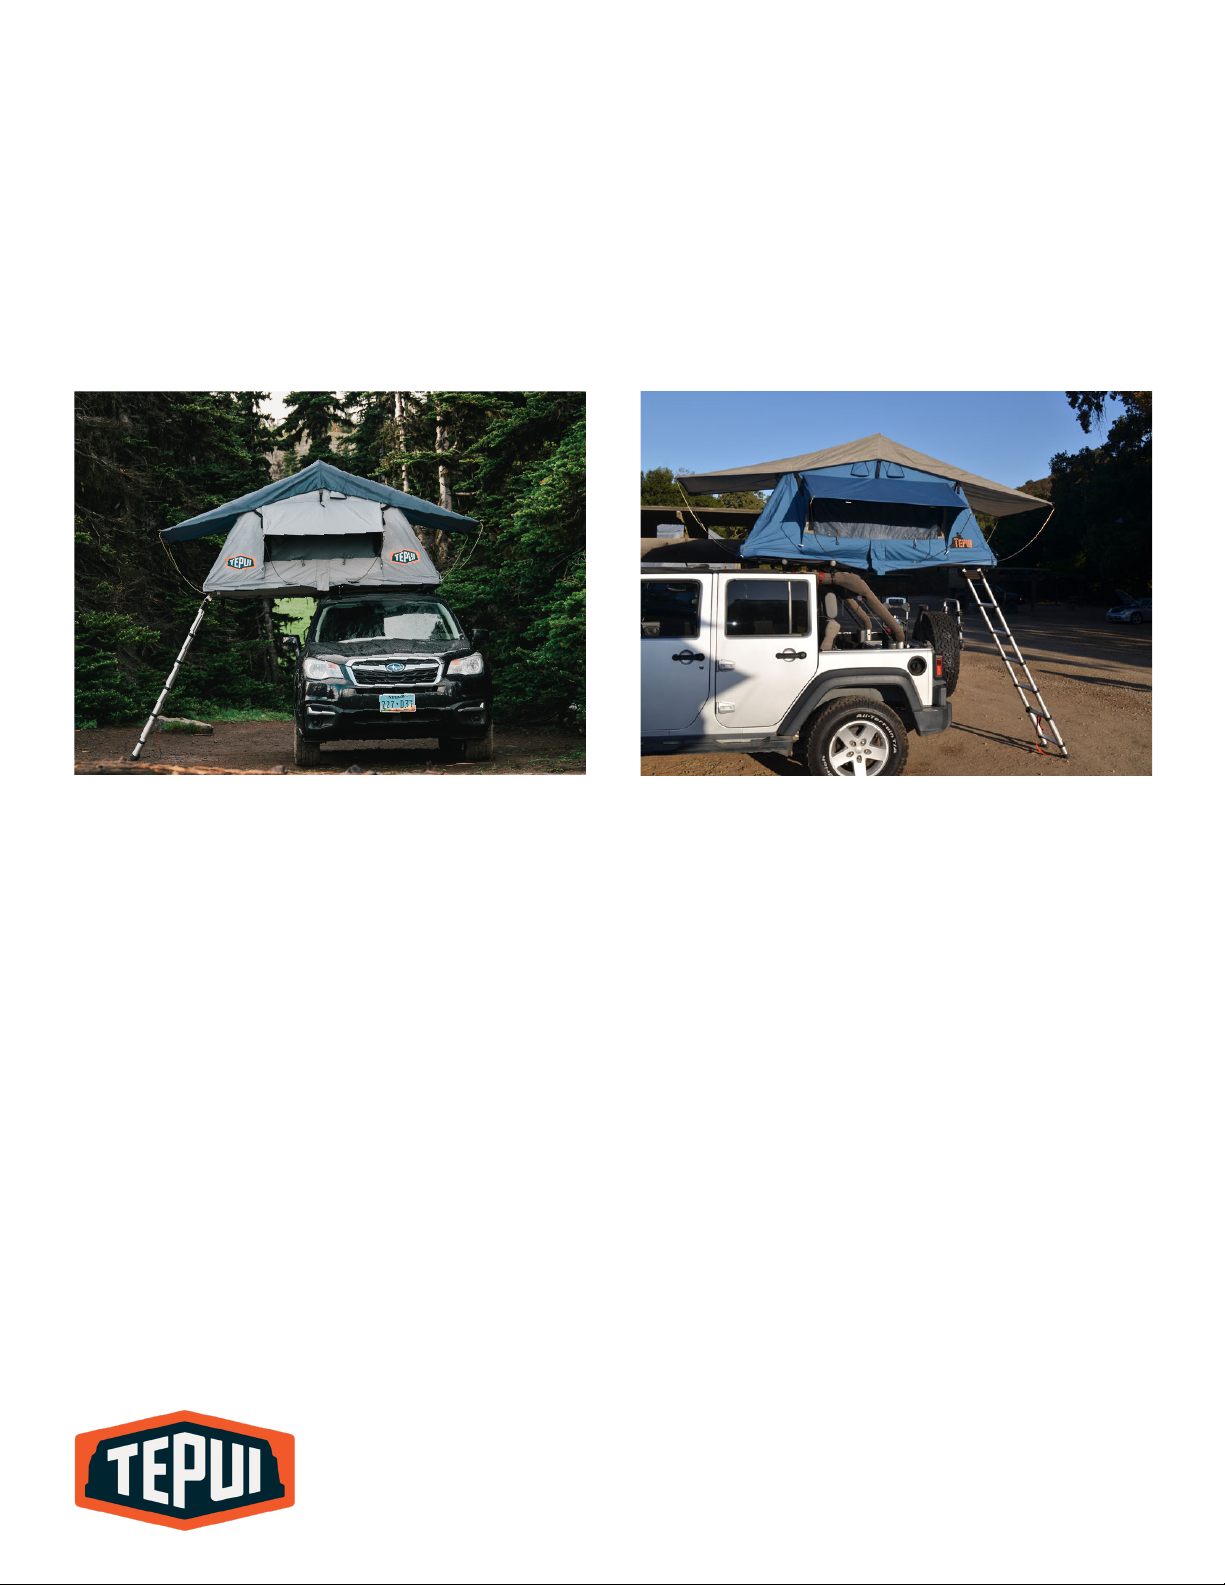
There are two mounting options for the orientation of your new Tepui Tent. Either the tent can
open so that the ladder extends o the side of you vehicle, “Side Mounted,” or the ladder extends
o the back of your vehicle, “Rear Mounted.” Most of our customers choose to mount their tents
in “Side Mounted” orientation.
SIDE MOUNTED
Either orientation works for larger vehicles, however, most sedans or smaller SUVs are better
suited for the side mounted option.
Benefits for the side mounted orientation:
1. Allows for bicycle racks and other tow
hitch/bar accessories to be installed without
interfering with your tent operation.
2. Closed tent width will fit inside the roof
dimensions of most cars and SUV’s. i.e. the
tent base will not extend beyond the roof line
of your vehicle when closed.
3. Typically does not require cutting of the
mounting tracks.
REAR MOUNTED
Benefits for the rear mounted orientation:
1. Fits into narrow camping spaces.
2. Trunk or tail gate area at the rear of your
vehicle is accessible from inside the annex
(sold separately).
5
Page 6
TENT ASSEMBLY
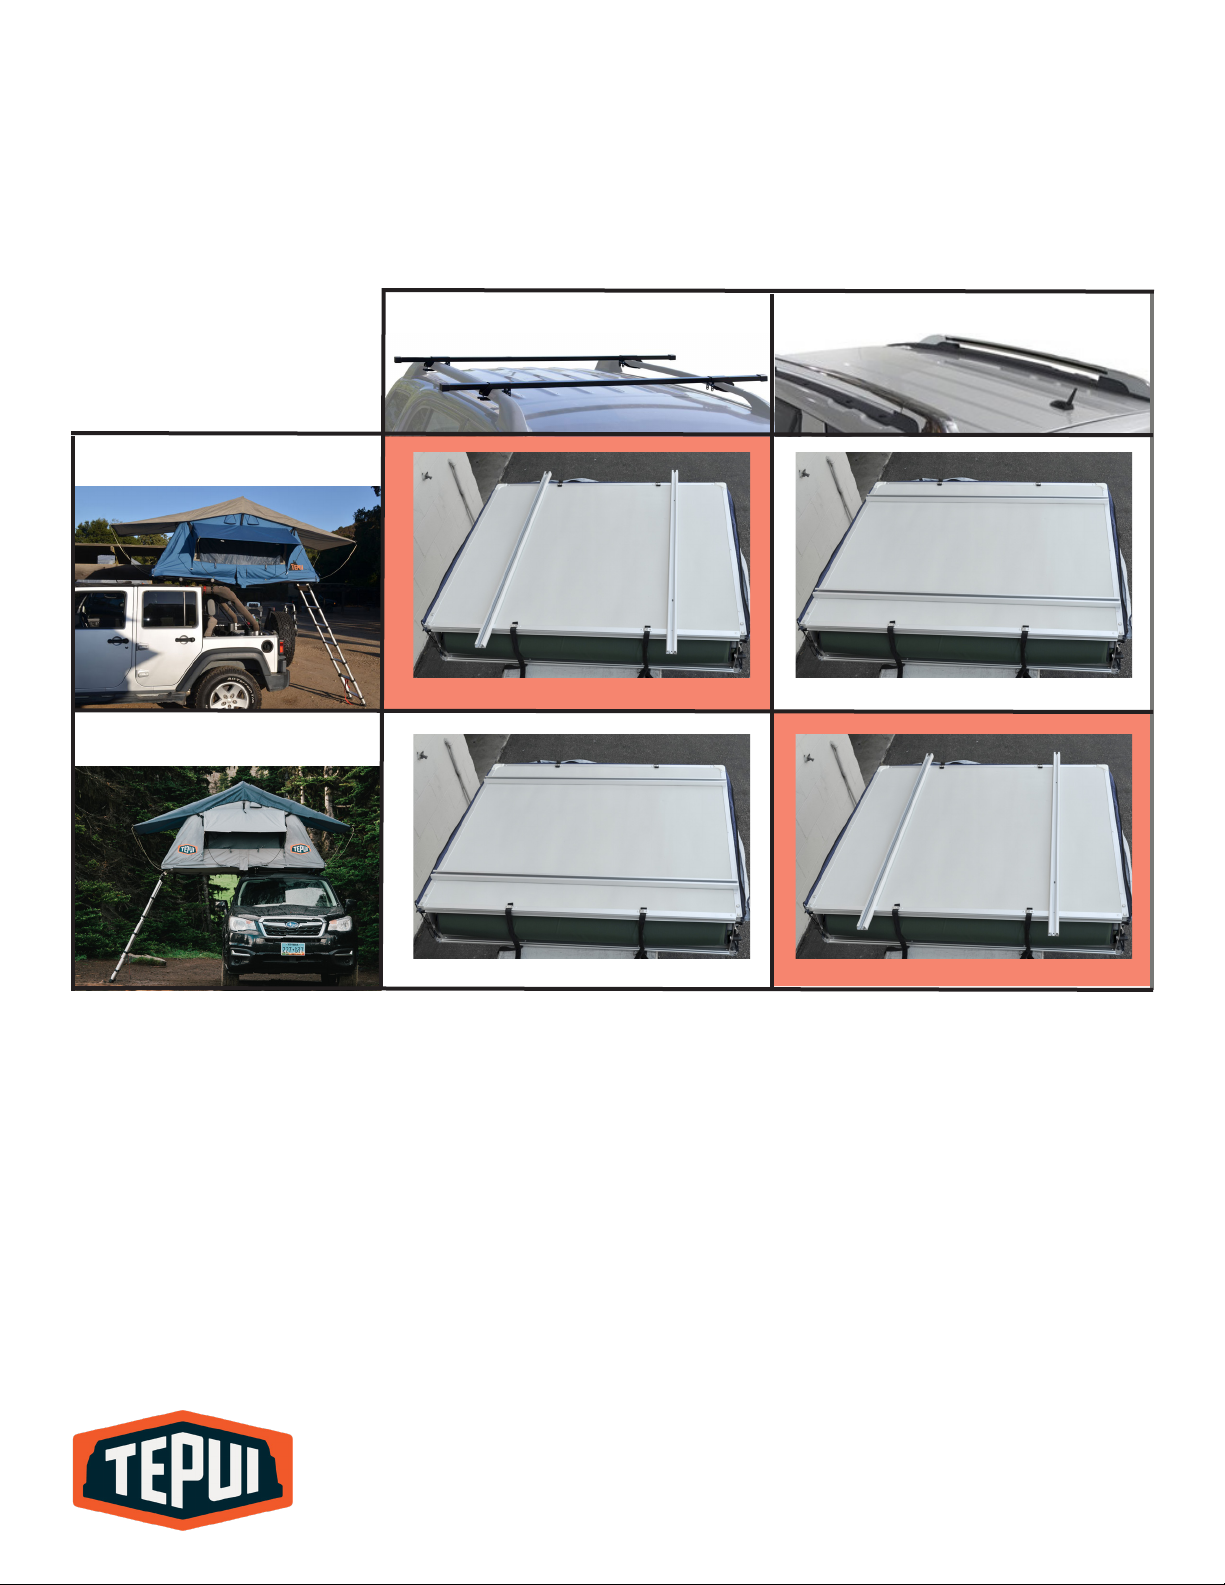
1. Four* pre-drilled holes are located in the center area of the tent base for attaching the
mounting tracks. Align the holes in the mounting tracks over the holes in the base.
REAR MOUNT
SIDE MOUNT
CROSS BARS
SIDE RAILS
Mount parallel to hinge.Mount perpendicular to hinge.*
Mount parallel to hinge.
*Mounting tracks perpendicular to the hinge side may extend beyond the edges of the base. Mark
each channel and cut using a hacksaw so that it fits within the tent base.
Mount perpendicular to hinge.*
6
Page 7
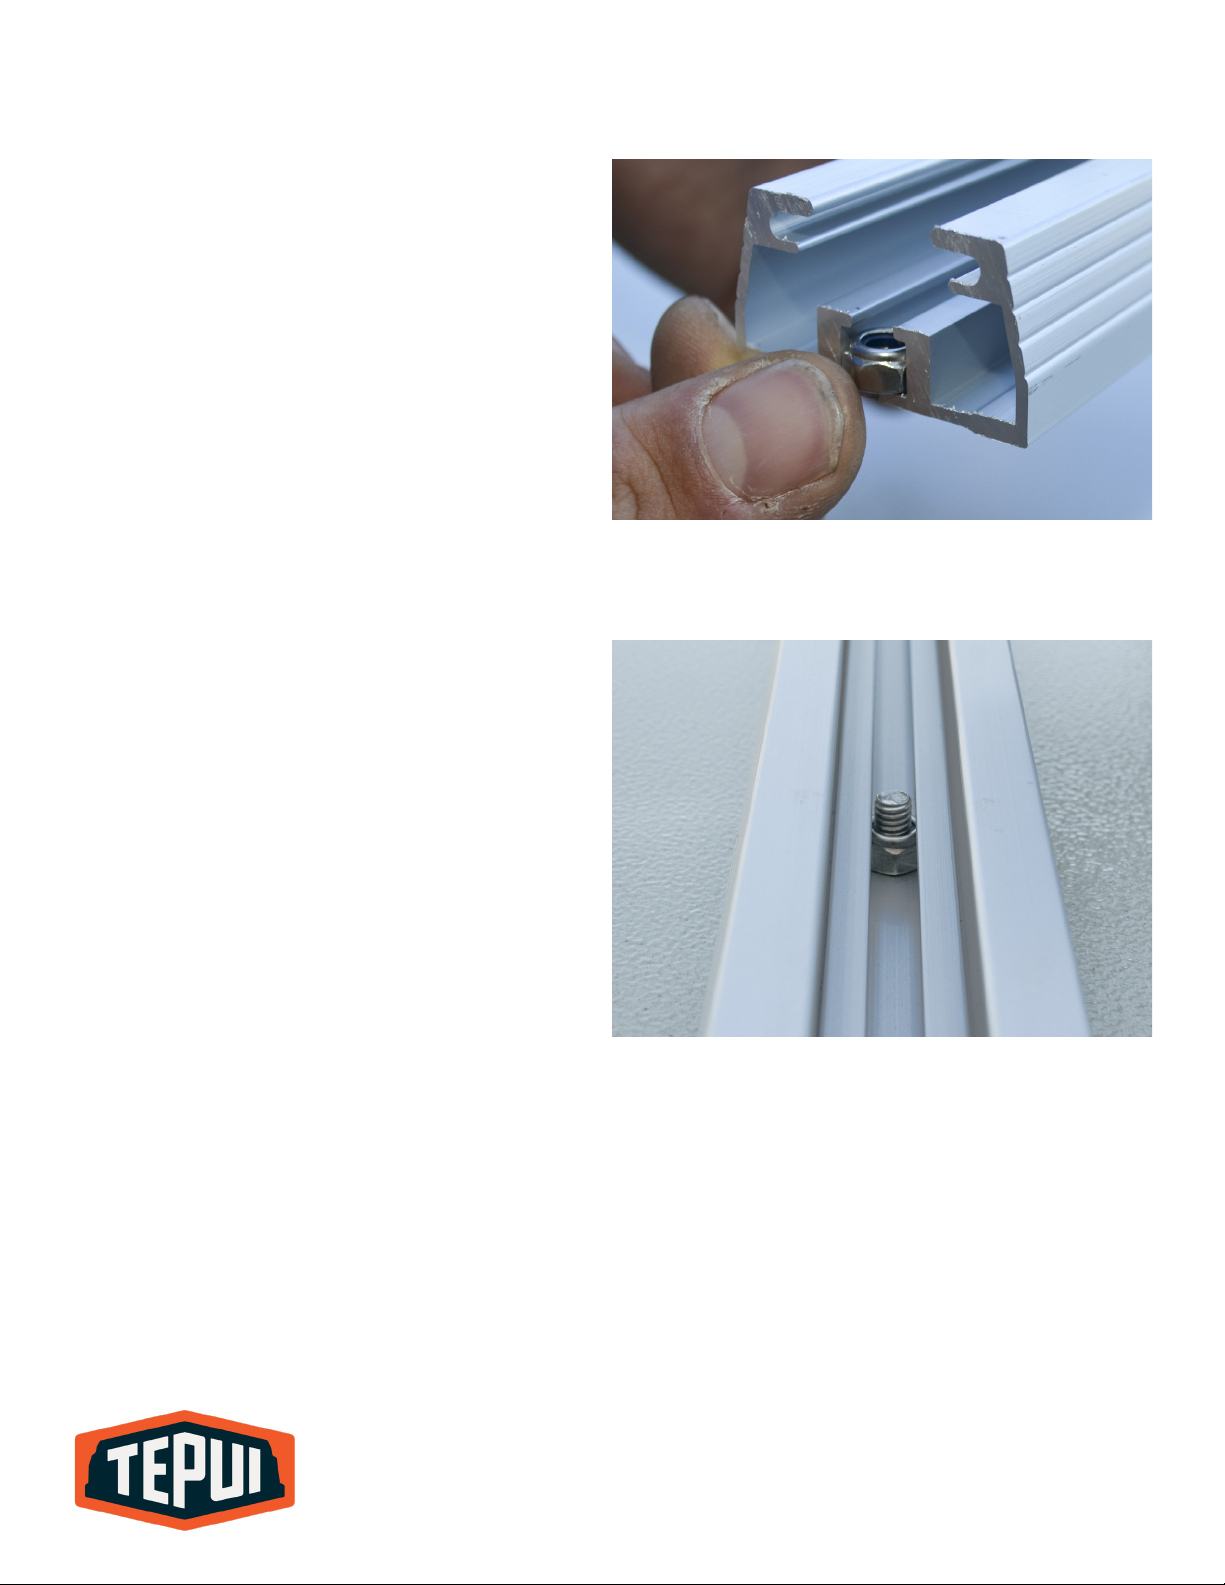
2. Slide the 10mm Nylock nuts into the inner
slot in the center of the mounting tracks
until they are aligned with the holes in the
mounting tracks and the base.
3. Slide your hand between base and
mattress and insert 10mm recessed bolts
into the pre-drilled holes. You may need to
poke holes through the tape to insert bolts.
The bolts should pass through the holes in
the tent base and the mounting tracks, into
the nuts in the inner slot of the mounting
track. Reach under the mattress and tighten
the bolts firmly using the supplied 10mm
wrench.
7
Page 8
COVER ATTACHMENT
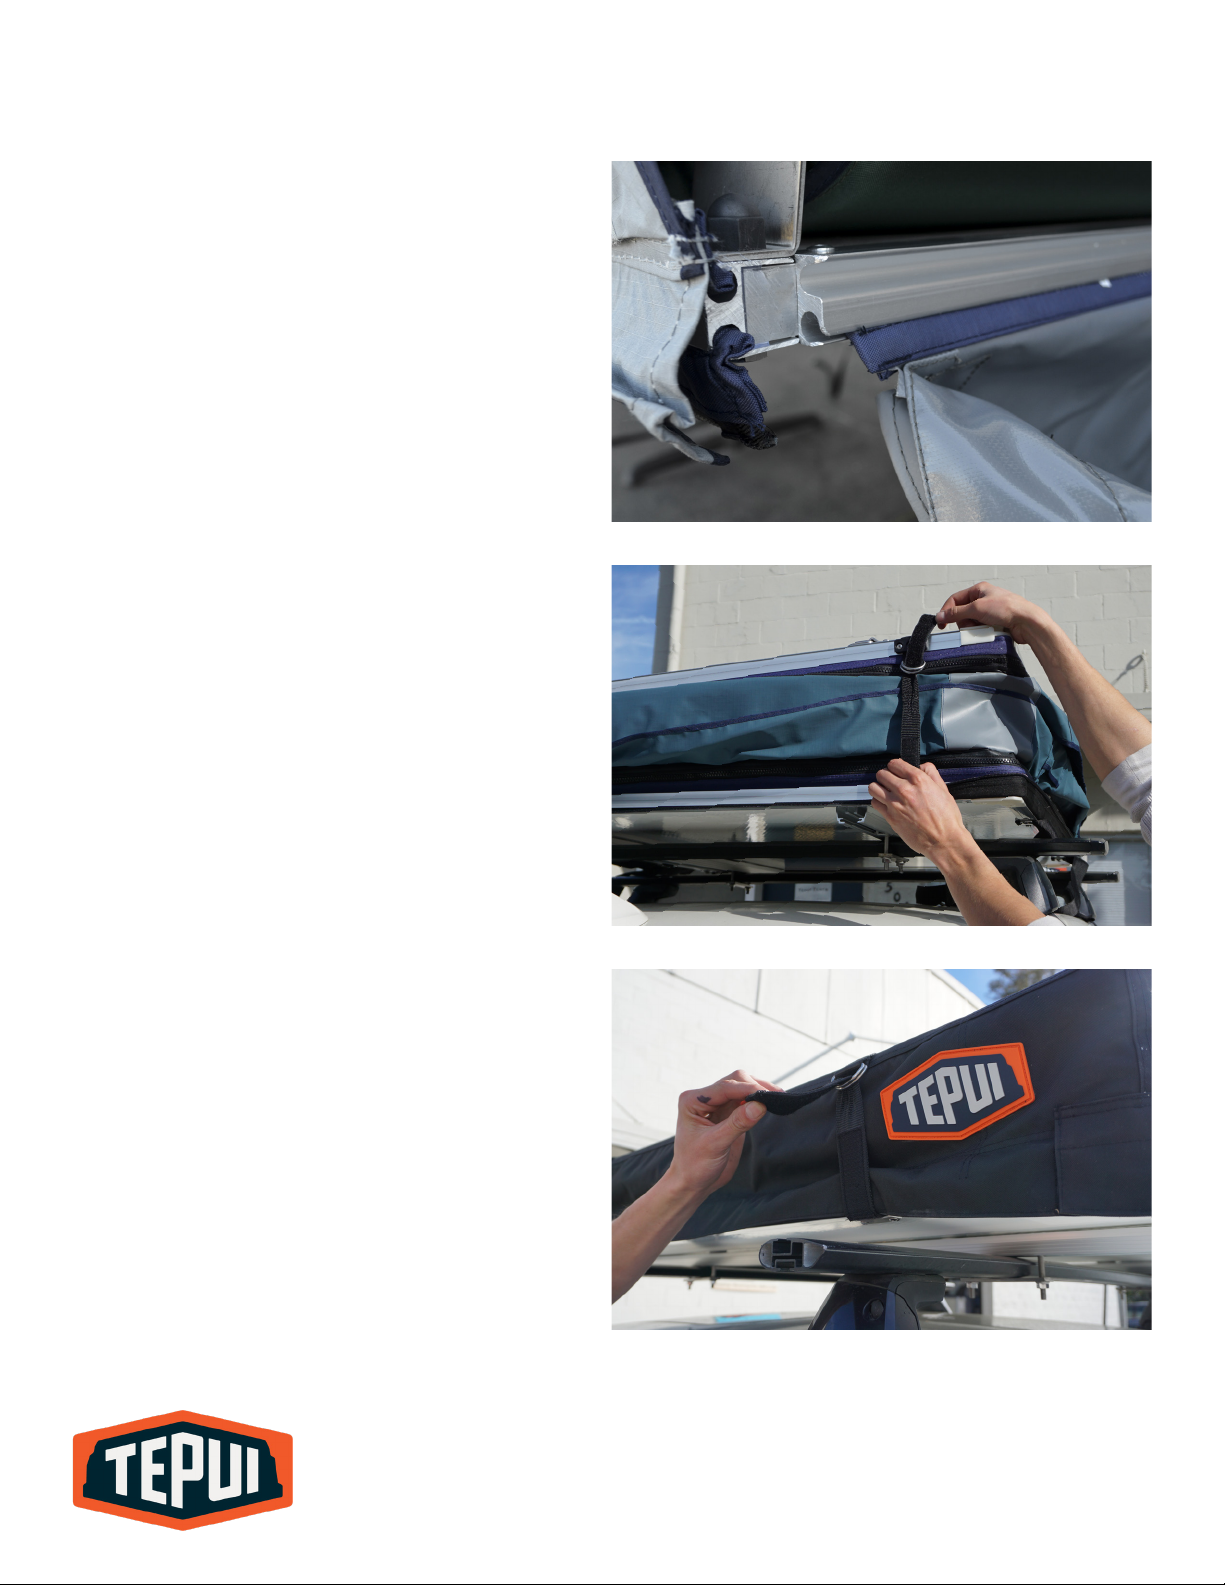
1. To attach the travel cover, slide the
rounded fabric end of the cover into the
rounded C-channel at the hinge side of the
tent base. Make sure the cover is oriented so
the exterior side of the cover faces up when
you pull the cover over the tent.
2. Fasten the velcro straps on either side of
the tent to hold the canopy in place.
3. Zip the travel cover to the base along the
other three edges, taking care that the tent
fabric does not become caught in the zipper.
4. Secure the two long velcro straps over the
top of the travel cover.
8
Page 9
ATTACHMENT TO ROOF RACK
1. Place the tent on top of your vehicle rack
system, ensuring the mounting tracks are
perpendicular to the bars they will mount
to, and the tent is centered on the roof rack.
Position the hinge so that the tent will open
to the desired side.
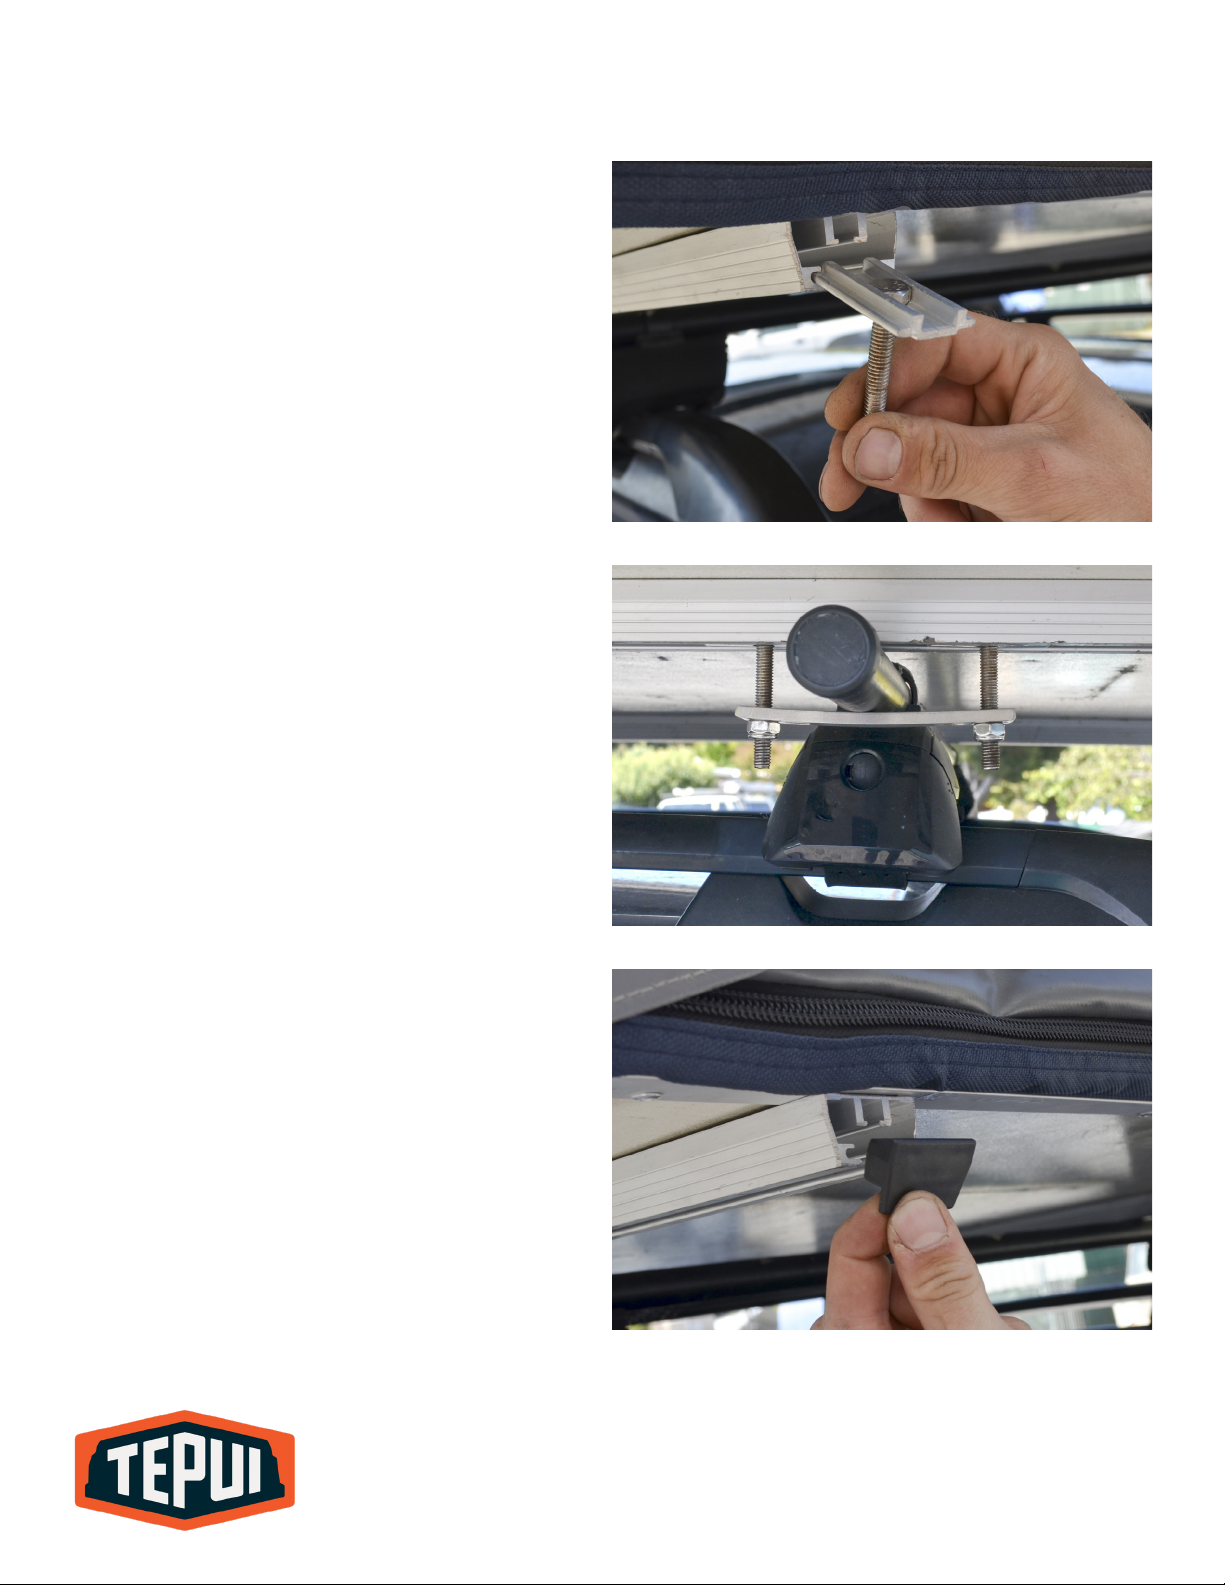
2. Slide the 13mm bolts and channel sliders
into the mounting tracks. Lift one side of the
tent to position one set of bolts and channel
sliders on the inner side of the roof rack bar
and an additional set on the opposite side.
Repeat on all four corners.
3. At each of the four corners where the rack
bars and mounting tracks cross, using a steel
mounting plate and nylock nuts to secure
the bolts on either side of the bar. Tighten
all eight bolts securely with the included
nuts and wrench. Check all the mounting
bolts and brackets periodically during use
to ensure they are securely fastened to your
rack system.
5. After ensuring the tent is positioned
correctly and all eight bolts are tightened
securely, insert rubber end caps into the ends
of the mounting tracks. This may require
light taps from a hammer.
9
Page 10
TENT SETUP
1. Release the straps over the travel cover.
Unzip the travel cover. You can remove it,
roll it up, or let it hang o the side of your
vehicle. Release velcro the straps on the
sides of the tent.
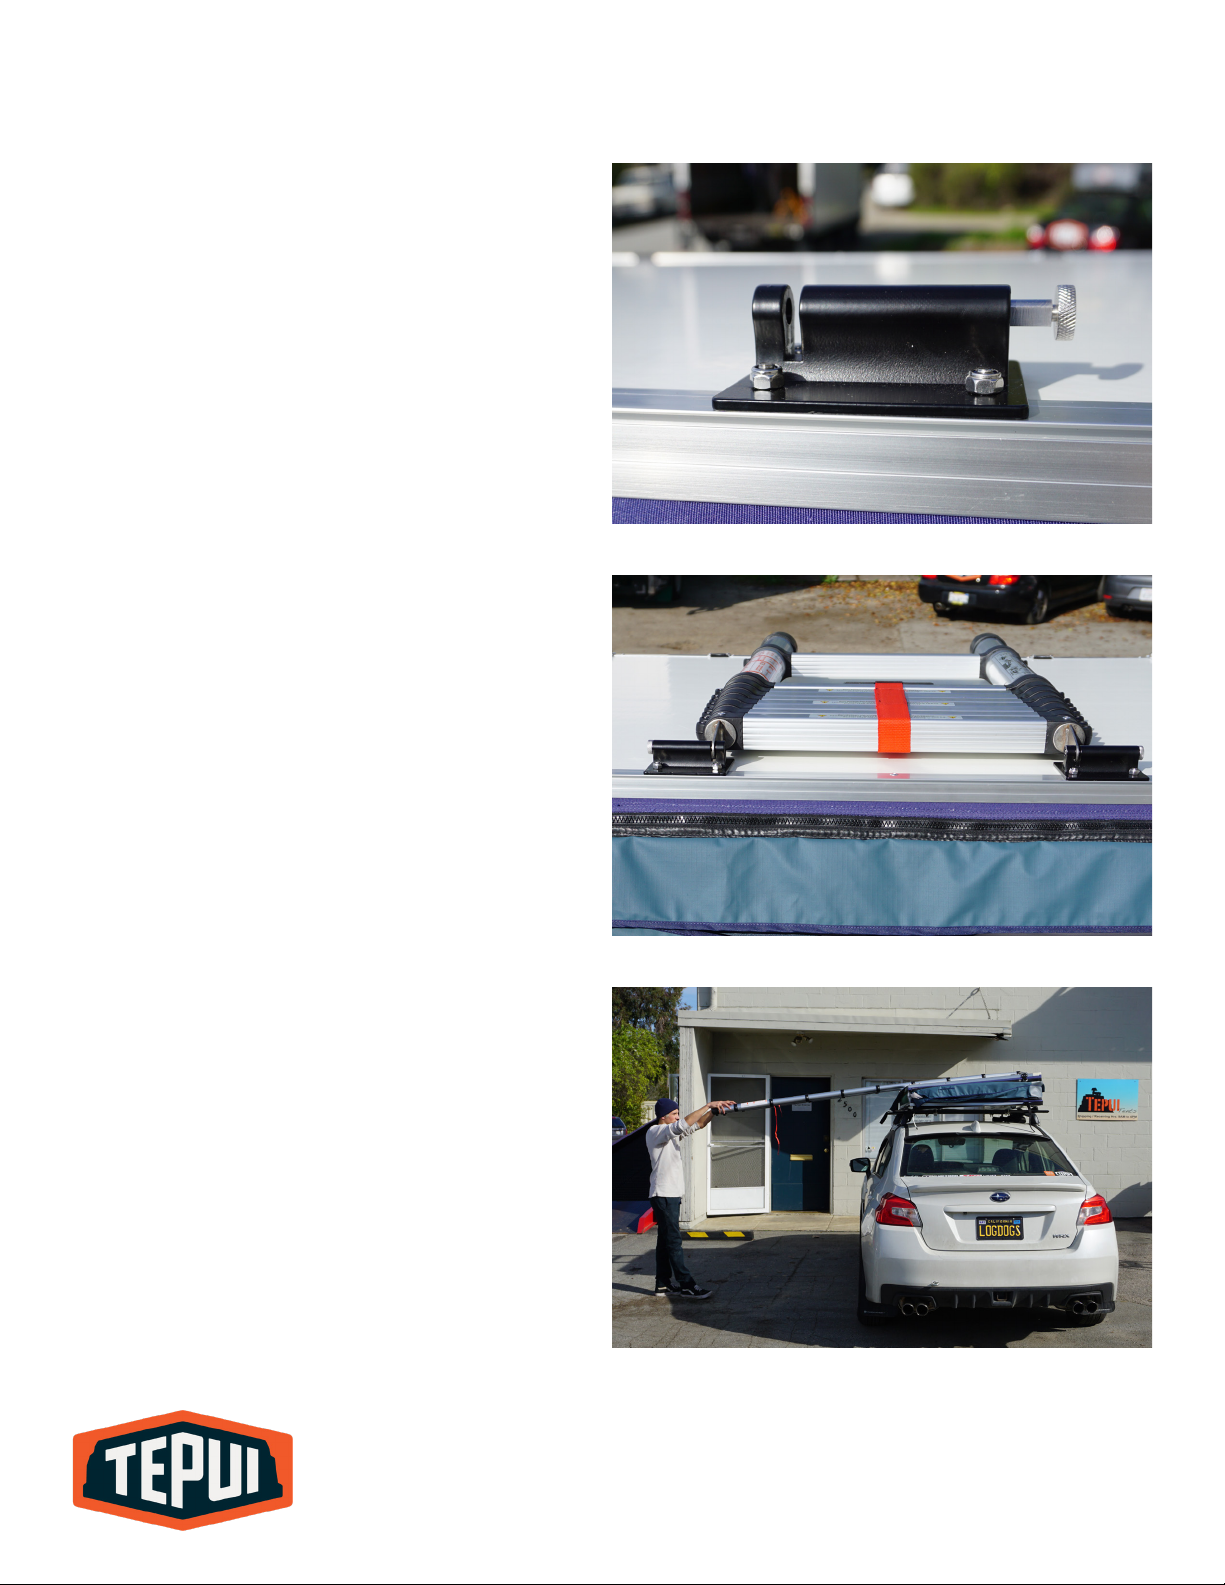
2. Quick-connect ladder receivers are
preinstalled on the tent base. Pull and twist
the ladder receiver bolt 1/4 turn to open the
channel.
3. Ladder is meant to be removed and stored
in the ladder bag when tent is closed and
travel cover is zipped shut.
Retrieve ladder from bag and insert ladder
clips into the two quick-connect ladder
receivers. Twist bolts again to engage bolt in
hinge. Undo the red strap around the ladder
and fully extend it until the locking pins in
each section engage.
4. Use the extended ladder as leverage to
open the tent by pulling straight back until
the tent hinge is fully engaged and the tent
base is level. Then position ladder firmly on
the ground.
5. To adjust the ladder height, start with the
top section, pressing the two buttons under
the ladder rung to release the locking levers.
Slide the ladder up so that it recedes into
the top rung. Repeat for each section until
the ladder is the desired height. Be sure that
the remaining sections of the ladder are fully
locked.The ladder should form a 50-60°
angle with the ground.
10
Page 11
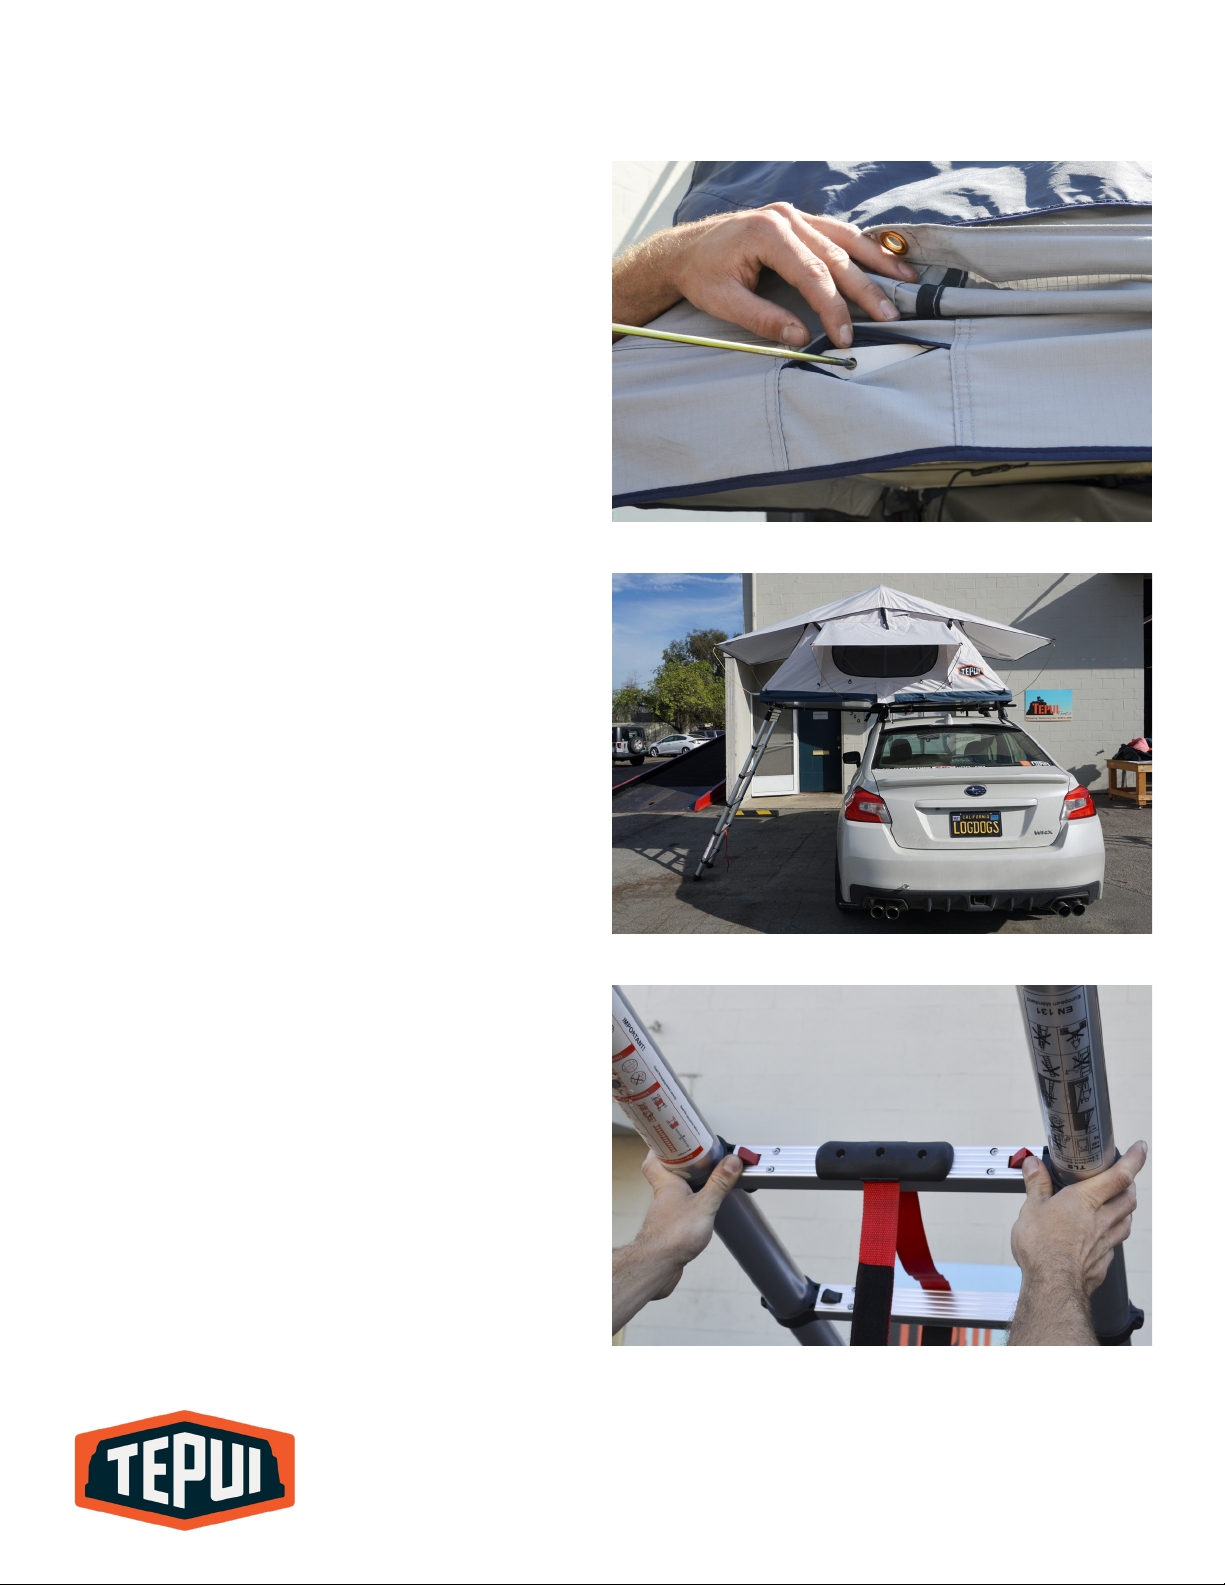
6. Unfasten the grommets on the rainfly and
awnings over windows. Locate the fabric slits
in the tent skirt. Pre-drilled holes are located
underneath each slit. Insert the rainfly rod at
a 45° angle into the hole and bend slightly to
hook the other end through the grommet.
Repeat this process for both sides of the
rainfly and both awnings.
That’s it! You’re ready to camp. Welcome to
#teamtepui. We can’t wait to see where your
Tepui takes you!
CLOSING TENT
To close the tent, remove the rainfly rods.
Extend the ladder, using it as leverage to
close the tent. To collapse the ladder, press
the red buttons at the base of the ladder.
Remove ladder from brackets, and store in
ladder bag. Fasten the straps at the sides
of the tent and across the tent base before
zipping on the cover. Zip travel cover on and
secure with the velcro straps that run across
the cover.
11
Page 12
REMOVABLE CANOPIES
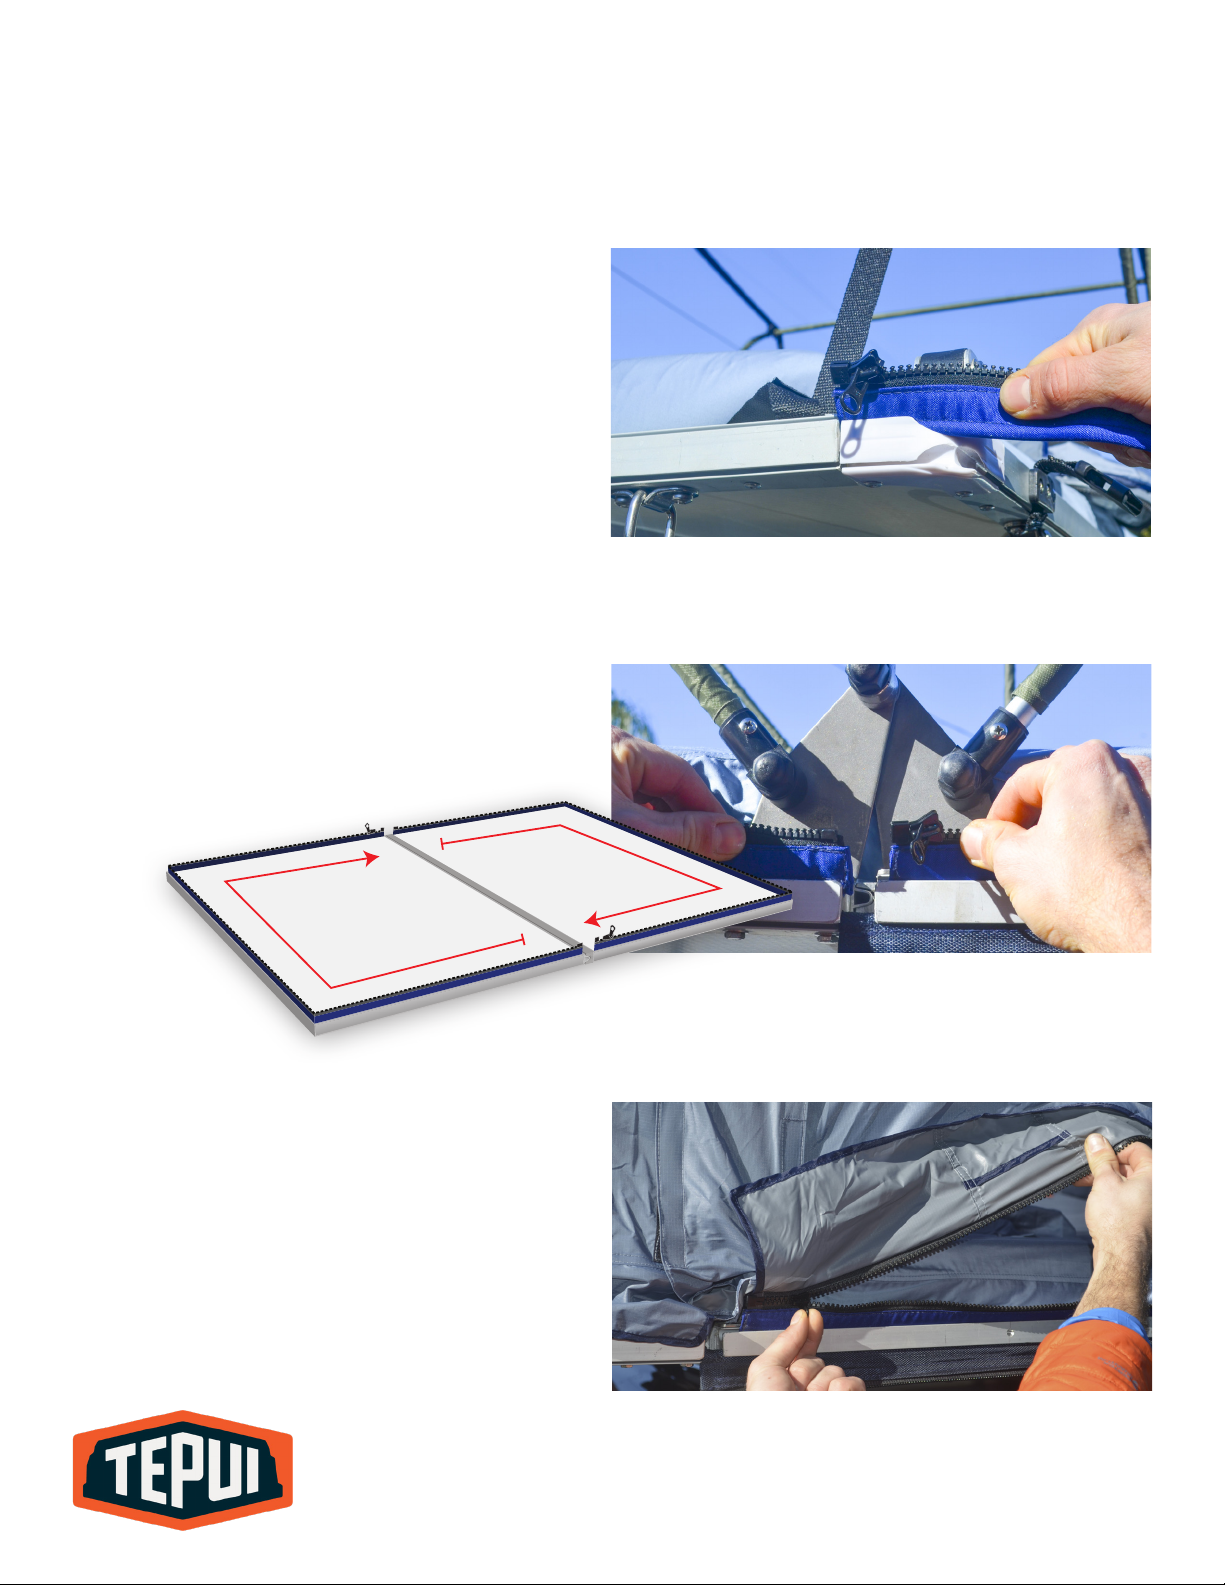
*Low-Pro utilizes a Zipper GimpTM to attach the canopy to the tent base. Should you wish to swap
canopies, follow the instructions below:
1. Move the pull tab of the Zipper GimpTM
to the start of the zipper. Beginning at the
plastic corner piece of the tent base, position
the Zipper GimpTM so that the pull tab faces
outward and upward. Feed the rounded
fabric edges of the Zipper GimpTM through
the upper C-channel on the tent base until
the ends of the zipper are positioned at
opposite sides of the tent hinge.
2. Repeat with the second half of the Zipper
GimpTM on the opposite side of the tent base.
The start and end of each zipper should meet
at the tent hinge.
3. Drape the canopy evenly over the tent
frame, positioning one of the tent doors
above the ladder. Starting at the tent hinge,
zip the canopy onto each Zipper GimpTM.
If there is any strain on the zipper, move
the ladder inward to raise the tent base and
relieve tension on the canopy.
12
Page 13
STORAGE AND HANDLING
Clean and dry your tent after each camping trip:
1. Open the tent fully and brush/vacuum inside.
2. Clean the fabric as needed using a mild detergent, warm water, and a soft to medium brush.
Rinse fabric of all detergent prior to drying.
4. Dry tent in the sun with all windows open. The tent must be completely dry before storage, or
mildew and mold may occur. This is especially necessary after camping in rain or wet conditions.
5. Using a small brush, remove dirt from zippers. Use a silicon spray to keep zippers lubricated.
6. Wash mattress cover and hang to dry.
13
Page 14

LIMITED WARRANTY
WHAT IS COVERED
Tepui Outdoors, Inc., producer of Tepui Tents, warrants to the original purchaser that its products
are free from defects in material and workmanship, for the term described, except as qualified
below. The life of the product is determined from the date of purchase until such time as the
product is no longer serviceable due to normal wear and tear.
WHAT IS NOT COVERED
Tepui Outdoors, Inc. shall not be responsible for the natural breakdown of materials that occurs
inevitably with extended use (e.g., Ultra Violet (UV) light damage on tents, exhausted zippers), or
defects caused by accident, abuse, alteration, animal attack, storm damage, misuse or improper
care.
THERE ARE NO OTHER EXPRESS WARRANTIES BEYOND THE TERMS OF THIS LIMITED
WARRANTY. IN NO EVENT SHALL Tepui Outdoors, Inc. BE LIABLE FOR INCIDENTAL OR
CONSEQUENTIAL DAMAGES.
Some states do not allow the exclusion or limitation of incidental or consequential damages, so
the above limitation or exclusion may not apply to you.
WHAT TEPUI OUTDOORS, INC. WILL DO
If after inspection we find that a product failed due to a manufacturing or material defect, we will
repair or replace the product, at our option, without charge.
HOW TO OBTAIN WARRANTY SERVICE
Return the product, freight prepaid, to the Tepui Tents Dealer from whom it was purchased; or,
contact Tepui Tent’s Customer Satisfaction Department for return authorization: toll free 1-800301-9874. Collect shipments or shipments without return authorization cannot be accepted.
REPAIRS
If your tent needs service or repair due to normal wear and tear, animal attack, accident or some
other reason that is not covered under the warranty, we will provide the necessary service for a
reasonable charge, plus shipping and handling. We require that products accepted for any repair
be properly cleaned according to our recommended care instructions. Please send your product
or component that requires repair (e.g., tent fly), postage prepaid, along with a description
of what needs attention. For service and repairs, please contact our Customer Satisfaction
Department: toll free 1-800-301-9874.
HOW STATE LAW RELATES TO THIS WARRANTY
This warranty gives you specific legal rights. You may have other rights that vary from state to
state.
WARRANTY TERM
Limited 2 year warranty applies to all tent components including base, aluminum poles, ladder,
fabric and seams.
14
Page 15

Tepui Outdoors, Inc.
2500 Rosedale Avenue
Soquel, CA 95073
1-800-301-9874
15
 Loading...