

Page 1

k Bedienungsanleitung
PAVILLON „ROWA“
t Instruction Manual
GAZEBO “ROWA”
Version 2017/
Art. Nr. 5540
Page 2
2
k
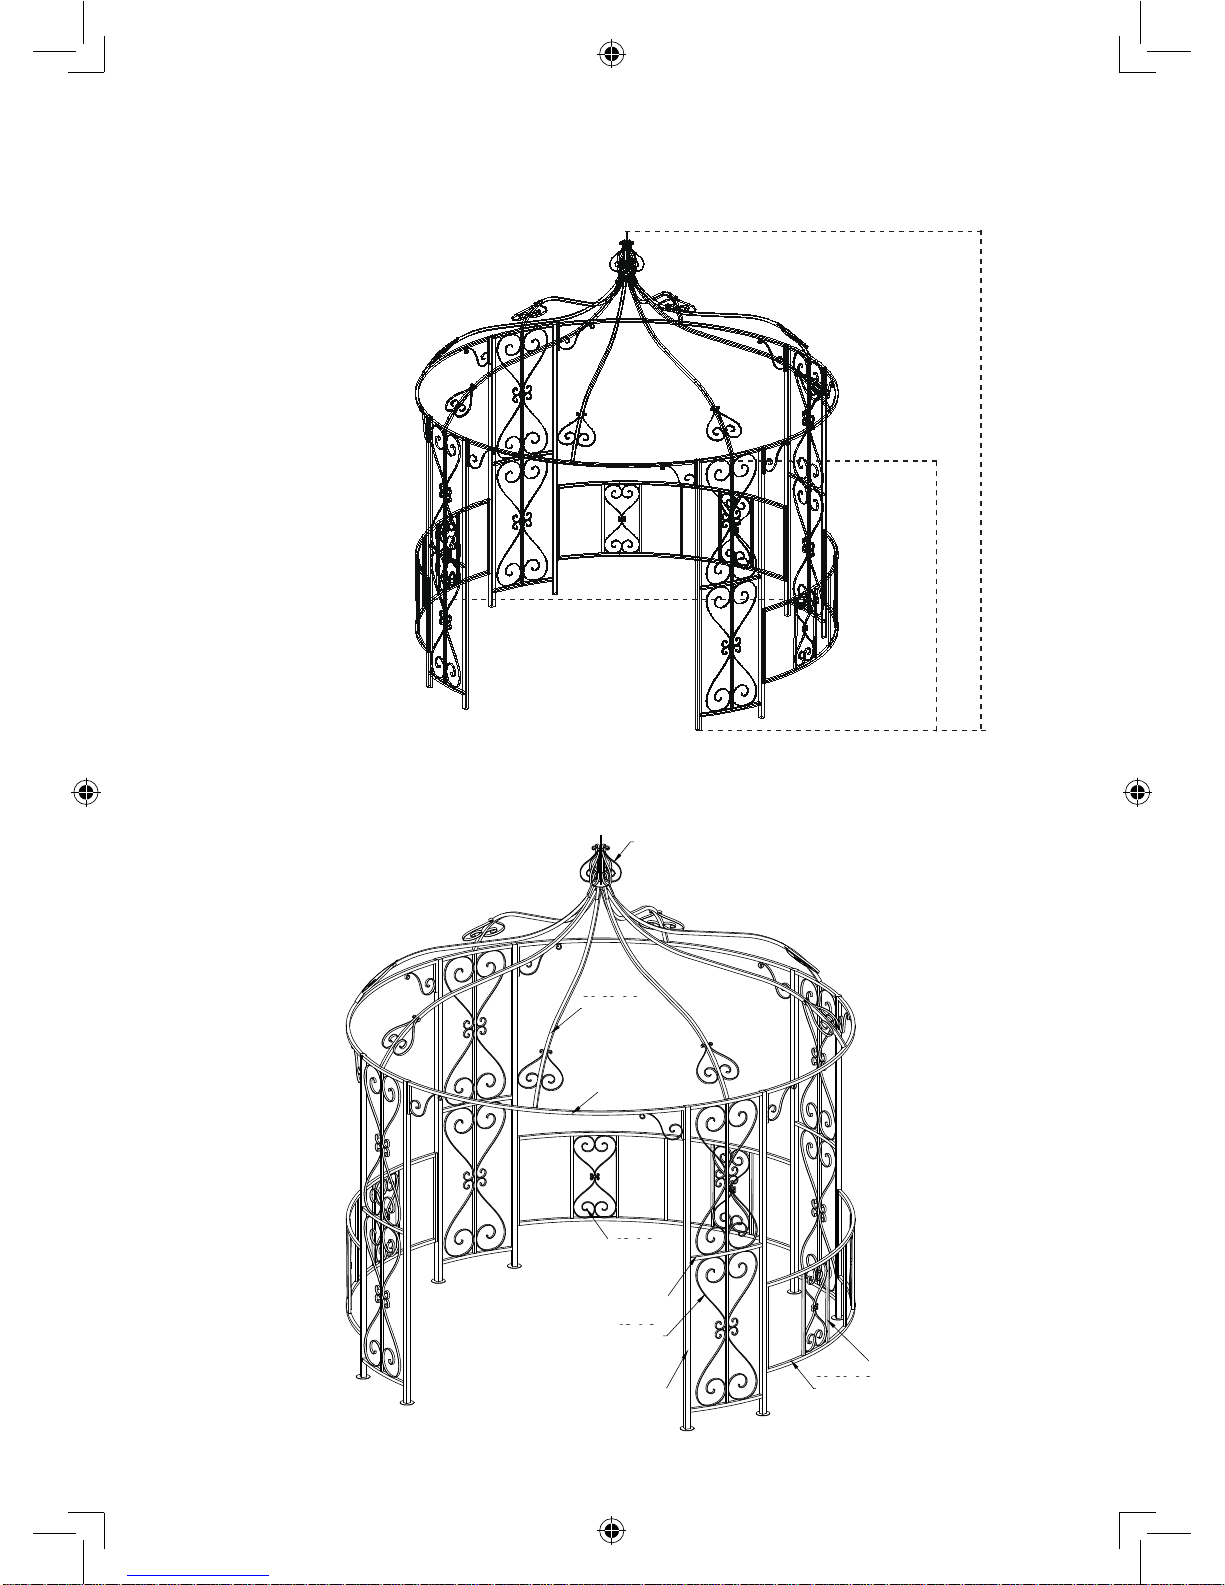
Dimensionen
30x30x0.5
12x1.6
15x15x0.5
20x20x0.6
20x20x0.6
15x15x0.4
20x20x0.6
12x1.6
12x2
Gestell
Pavillon
298 cm
298 cm
340 cm
20x20x
0,6mm
20x20x0,6mm
12x1,6mm
15x15x0,5mm
12x1,6mm
20x20x0,6mm
15x15x0,4mm
30x30x0,5mm
12x2mm
Page 3

3
k
Inhalt
Bevor Sie das Produkt benutzen ................................................................................. 4
Lieferumfang ............................................................................................................. 4 - 5
Bestimmungsgemäßer Gebrauch ................................................................................ 5
Zu Ihrer Sicherheit .................................................................................................... 5 - 6
Signalsymbole ...................................................................................................... ...... 5
Sicherheitshinweise ............................................................................................... 5 - 6
Montage ..................................................................................................................... 7 - 9
Vorbereitung ............................................................................................................... 7
Aufbau ................................................................................................................... 7 - 9
Wartung und Pflege ..................................................................................................... 10
Lagerung ....................................................................................................................... 10
Entsorgung ................................................................................................................... 10
Technische Daten ........................................................................................................ 10
Service ......................................................................................................................... 11
Inverkehrbringer .......................................................................................................... 11
Page 4
4
k
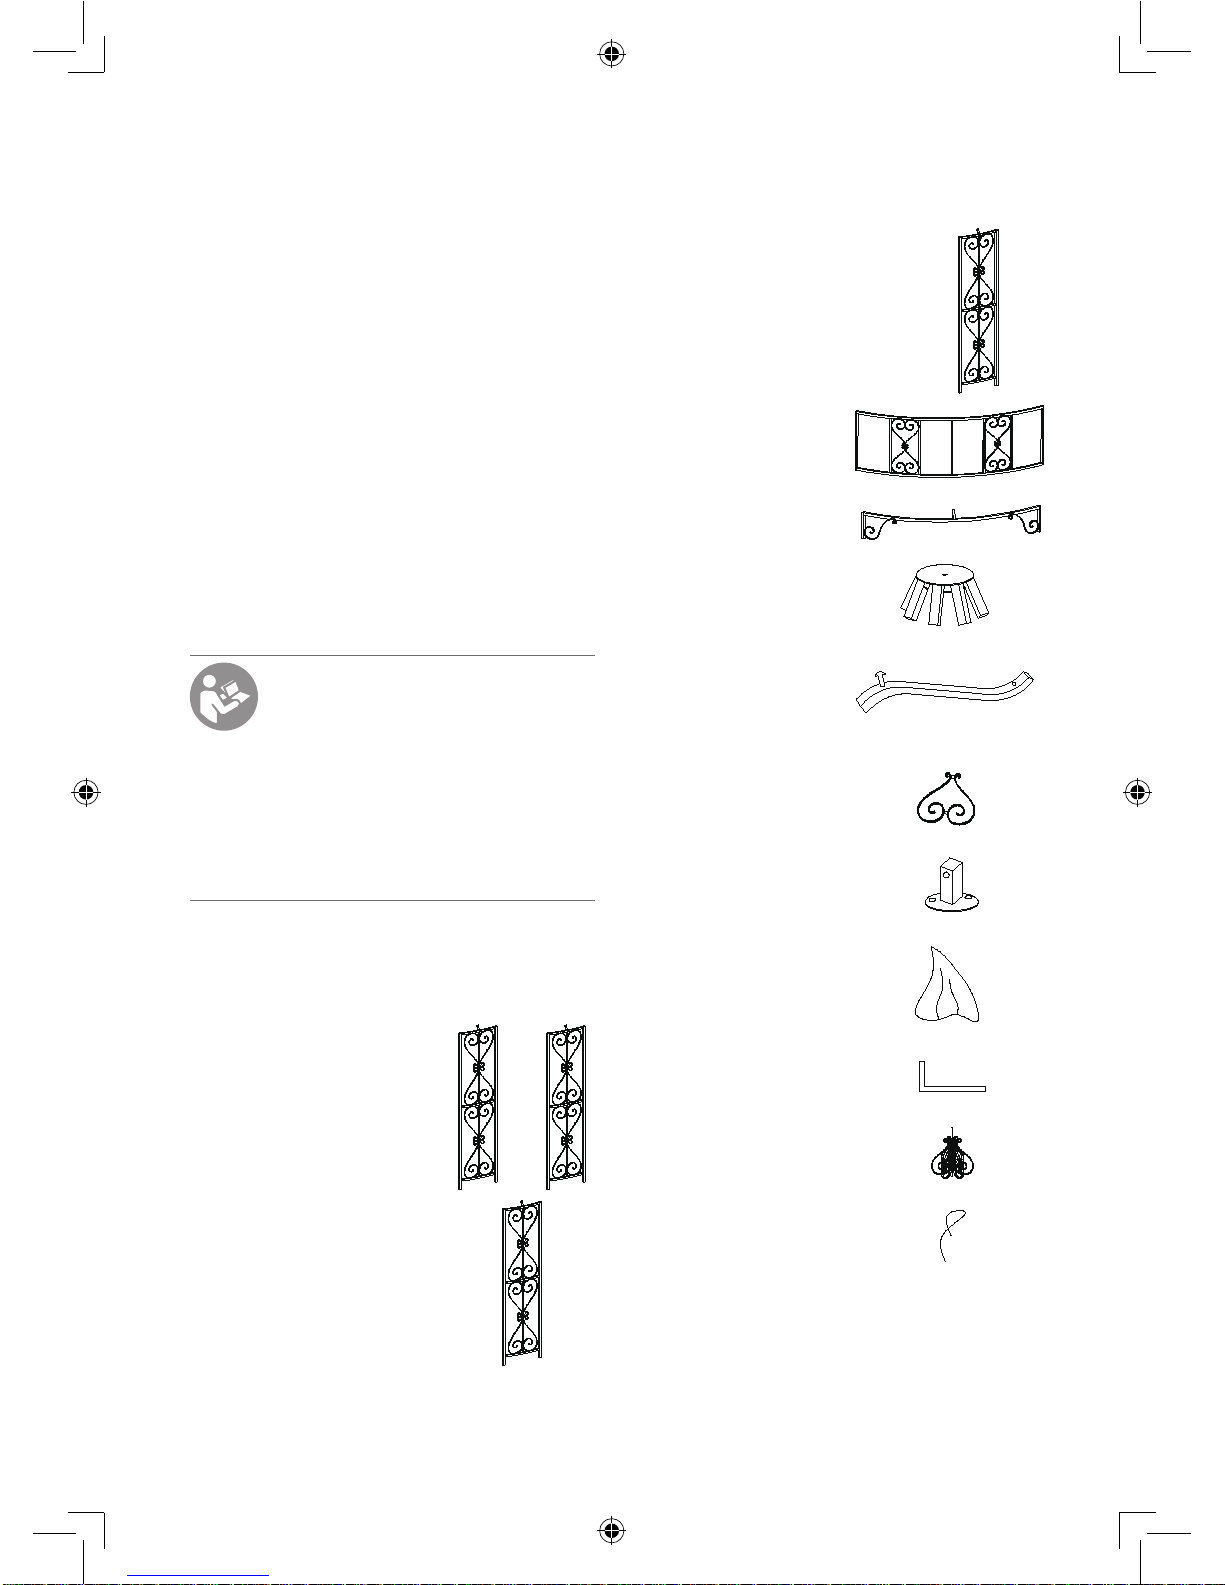
Paneel A2
vorne rechts
Seitenpaneel
B x 3
Paneelverbindung
C x 4
Dachkreuz
D x 1
Dachstrebe
E x 8
Dachverzierung
F x 8
Endkappe
G x 8
Dachtextil
K x 1
Hering
L x 15
Dachspitze
M x 1
Spannseil
N x 5
Bitte prüfen Sie, ob die Lieferung
vollständig und unbeschädigt ist. Sollte
ein Teil fehlen oder defekt sein, wenden
Sie sich bitte an Ihren Händler.
Bevor Sie das Produkt
benutzen
Prüfen Sie nach dem Auspacken sowie
vor jedem Gebrauch, ob der Artikel
Schäden aufweist.
Sollte dies der Fall sein, benutzen Sie den
Artikel nicht, sondern benachrichtigen Sie
bitte Ihren Händler.
Die Bedienungsanleitung basiert auf
den in der Europäischen Union gültigen
Normen und Regeln. Beachten Sie
im Ausland auch landesspezifische
Richtlinien und Gesetze!
Lesen Sie vor der Inbetriebnahme
zuerst die Sicherheitshinweise
und die Bedienungsanleitung
aufmerksam durch. Nur so
können Sie alle Funktionen sicher
und zuverlässig nutzen.
Heben Sie die Bedienungsanleitung gut
auf und überge ben S ie sie au ch an e ine n
möglichen Nachbesitzer.
Lieferumfang
Paneel A
hinten links/rechts
Paneel A1
vorne links
Page 5
5
k
Reklamationen nach erfolgter oder
angefangener Montage hinsichtlich
Beschädigung oder fehlender Teile
werden nicht anerkannt.
Bestimmungsgemäßer
Gebrauch
Ein Pavillon ist eine nicht ortsfeste, frei
stehende, für den nicht dauerhaften Einsatz,
überdachte Kon struktion ohne Boden.
Ein Pavillon dient im Ge gensat z zu einem
Zelt nicht dem Wohnen oder der Unterkunft
auf Reisen und Expeditionen.
Dieser Pavillon ist ausschließlich zur
Verwendung im Freien geeignet und im
privaten Bereich bestimmt. Dieser Pavillon
ist in erster Linie als Sonnenschutz und
nicht als Regen- oder Windschutz gedacht.
Verwenden Sie den Artikel nur, für seinen
vorgesehenen Verwendungszweck
und wie in dieser Bedienungsanleitung
beschrieben. Jede andere Verwendung
gilt als nicht bestimmungsgemäß und
kann zu Sachschäden oder sogar zu
Personenschäden führen.
Der Hersteller übernimmt keine
Haftung für Schäden, die durch nicht
bestimmungsgemäßen Gebrauch
entstanden sind.
Zu Ihrer Sicherheit
Signalsymbole
Gefahr Hohes Risiko!
Missachtung der Warnung
kann zu Schäden f ür Leib und
Leben führen.
Achtung Mittleres Risiko!
Missachtung der Warnung kann
Sachschäden verursachen.
Vorsicht Geringes Risiko!
Sachverhalte, die beim
Umgang mit dem Gerät
beachtet werden sollten.
Sicherheitshinweise
Gefahr Unfallgefahr!
Dieses Produkt ist nicht
dafür bestimmt, durch
Personen (einschl. Kinder) mit
eingeschränkten physischen,
sen so ri schen oder geistigen
Fähigkeiten oder mangels
Erfahrung und/oder mangels
Wissen benutzt zu werden.
– Diesen Personenkreis auf die Gefahren
des Produktes hinweisen und durch
eine für ihre Sicherheit zuständige
Person beaufsichtigen.
– Halten Sie Kinder von dem Artikel fern,
da sie versuchen könnten sich daran
hochzuziehen oder hinaufzuklettern.
– Jegliche Änderungen an dem Produkt
stellen eine große Sicherheitsgefahr
dar und sind verboten. Selbst keine
unzulässigen Eingriffe vornehmen.
Wenden Sie sich bei Beschädigungen,
Reparaturen oder anderen Problemen
am Pavillon an unsere Servicestelle
oder an einen Fachmann vor Ort.
Gefahr Gefahren für Kinder!
Kinder können sich beim
Spielen in der Verpackungsfolie
verfangen und darin ersticken.
– Lassen Sie Kinder nicht mit den
Verpackungsfolien spielen.
– Halten Sie Kinder während der
Montage fern.
– Achten Sie darauf, dass Kinder
keine kleinen Montageteile in den
Mund nehmen. Sie könnten die Teile
verschlucken und daran ersticken.
Page 6
6
k
Achtung Beschädigungsgefahr!
Verwenden sie keine starken
oder schleifenden Lösemittel
oder Scheuerpads, da diese
die Oberf lächen angreifen und
Scheuerspuren hinterlassen.
Achtung Beschädigungsgefahr!
Während des Gebrauchs
können sich die
Verschraubungen allmählich
lockern und die Stabilität des
Pavillons beeinträchtigen.
– Prüfen Sie regelmäßig die Festigkeit
der Schrauben. Ziehen Sie ggf. alle
Schrauben noch einmal nach, um
einen festen Stand zu gewährleisten.
– Sollten Sie mehrere Pavillons a ufbauen,
beachten Sie b itte, dass z wischen de n
einzelnen Pavillons ein Mindestabstand
von 3 m vorhanden ist.
– Bauen Sie Pavillons nie
aneinandergereiht auf.
Achtung Verbrennungs- und
Unfallgefahr!
Vorsicht Einsturzgefahr!
Das Dach des Pavillons darf
nicht zusätzlich belastet werden.
Personen dürfen sich zu keiner
Zeit auf dem Pavil lon befinden.
– Standsicherheit! Stellen Sie den
Pavillon immer auf einen ebenen, nicht
abschüssigen Boden auf.
– Stellen Sie den Pavillon nicht auf
weichem, schlammigem oder
sandigem Untergrund auf, da die
Erdnägel bei diesen Böden keinen
ausreichenden Halt haben.
– Überprüfen Sie den festen Sitz der
Erdnägel sowie der Schrauben
regelmäßig, um die Stabilität des
Produktes zu gewährleisten.
– Vorsicht Feuer! Brandgefahr! Im
oder in der Nähe des Pavillons darf
kein offene s Feuer z. B. Fackeln sowi e
keine Grills oder Heizpilze platziert
werden.
Der Pavillon ist nicht für den
ganzjährigen Einsatz im Freien
geeignet, da er starkem Wind, Sturm,
Hagel, Schnee u. Ä . nicht gewachsen
ist.
– Vorsicht Wi nd! Der Pavillon ist gegen
Wind zu schützen, indem Zeltheringe
bzw. Erdnägel durch die Füße in das
Erdreich zu schlagen sind. Den Pavillon
zusätzlich mit Spannseilen sichern.
– Nehmen Sie die Seitenteile ab, um den
Winddruck zu mindern.
– Vorsicht Sturm / Gewi tter! Nehmen
Sie das Dachtextil sowie die
Seitenteile ab, wenn starker Wind
oder schlechtes Wetter droht oder
wenn das Wetter während Ihrer
Abwesenheit schlecht werden
könnte.
– Bei zu erwartenden
Windgeschwindigkeiten von mehr
als 40 km/h (frischer Wind, größere
Zweige und Bäume bewegen sich
und Wind ist deutlich hörbar) ist
der Pavillon abzubauen.
– Vorsicht Regen! Sollte es zur Bi ldung
von Wassersäcken kommen, sollte das
angesammelte Wasser regelmäßig
abgeschüttet werden. Das Dach
kann vorsichtig mit einem Besen
angehoben werden, um das Wasser
zu entfernen bzw. ablaufen zu lassen.
Achten Sie vorbeugend auf eine gute
Verspannung des Dachtextils.
Page 7
7
k
Montage
Vorbereitung
Gefahr Verletzungsgefahr!
Die Nichtbeachtung der
Anweisungen kann zu
Problemen und Gefahren bei
der Verwendung des Pavillons
führen.
– Achten Sie beim Aufbau darauf, sich
nicht die Finger zu klemmen oder an
scharfen Kanten zu verletzten.
1. Beachten Sie die Abbildungen der
Montageschritte und lesen Sie sich
diese Bedienungsanleitung zunächst
vollständig durch.
2. Zur Montage sind mindestens 3
Personen notwendig. Die Montage
des Pavillons durch nur eine Person
ist nicht möglich.
3. Nehmen Sie sich ausreichend Zeit
für die Montage und schaffen Sie
eine ebene Arbeitsfläche von ca. 16
Quadratmetern.
4. Bauen Sie den Pavillon nur unter
normalen Wetterbedingungen auf.
5. Sortieren Sie die Teile möglichst
so, wie sie gemäß der folgenden
Montageschritte nacheinander
verwendet werden.
6. Bauen Sie den Pavillon an der Stelle
auf, an der er später seinen festen
Standort hat.
7. Sollten Sie sich mit der Montage
des Pavillons nicht vertraut fühlen,
so ziehen Sie unbedingt eine
Fachperson bei.
Zur Montage werden Leitern benötigt.
Aufbau
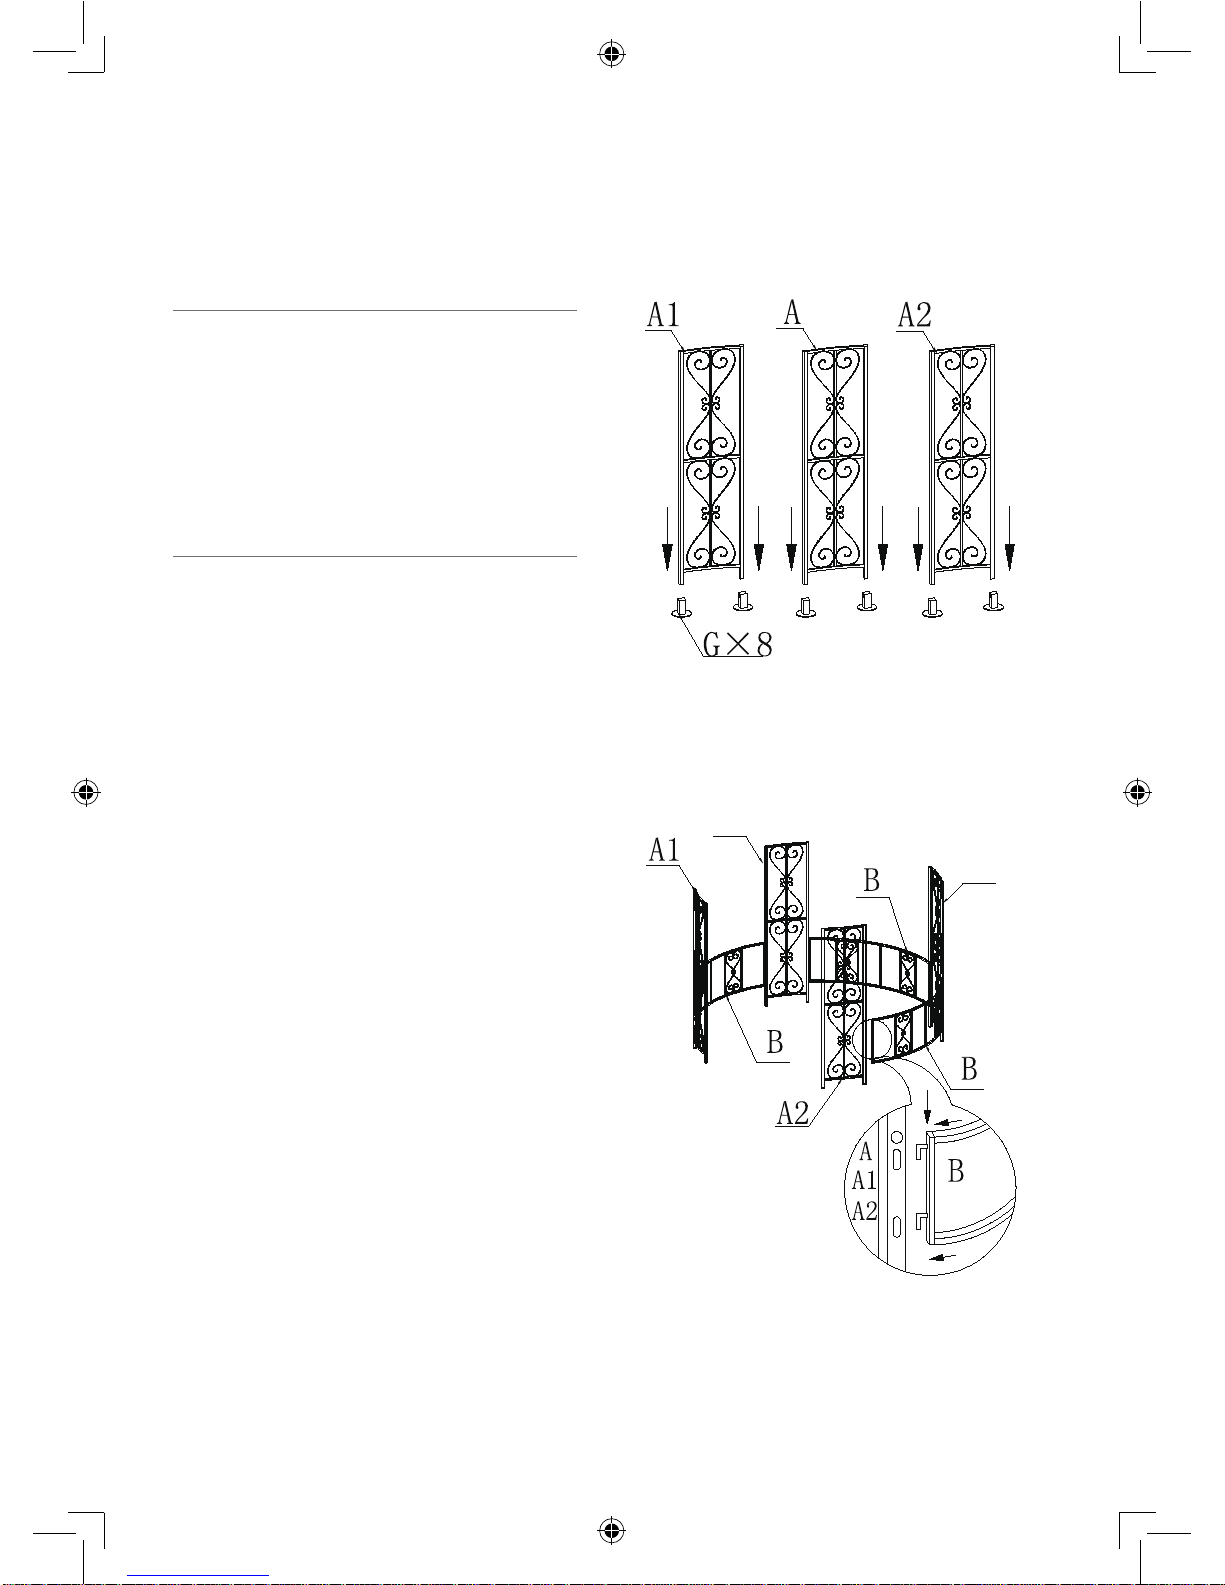
Schritt 1
Stecken Sie die Endka ppen (G) unter die
Paneele (A, A1, A2).
Schritt 2
A
A
Hängen Sie die Seitenpaneele (B)
zwischen den Paneelen (A, A1, A2) ein.
Page 8

8
k
Schritt 3
A1
C
Hängen Sie die Paneelverbindungen (C)
oben zw ische n den Paneel en (A, A1, A2)
ein.
Schritt 4
E
E
E
E
E
E
E
E
Stecken sie die Dachstreben (E) in das
Dachkreuz (D).
Schritt 5
Heben Sie die Dachkonstruktion an
und stecken Sie die Dachstreben in die
Paneelverbindungen (C) und die Paneele
(A, A1, A2).
Schritt 6
M
Befestigen sie die Dachspitze (M) auf
dem Dachkreuz (D).
Page 9

9
k
Schritt 7
F
E
Befestigen sie die Dachverzierungen (F)
an den Dachstreben (E).
Schritt 8
Haken Sie das Dachtextil unter der
Dachspitze ein und befestigen Sie es
von außen, mit den Velcrost re ifen, a n der
Dachkonstruktion.
Sichern Sie die Paneele mit Heringen (L).
Schritt 9
Knoten Sie die Spannseile (N) oben an
die Paneele.
Knoten Sie jeweils einen Hering (L) an die
Enden der Spannseile.
Ziehen Sie die Spannseile in einem
Winkel von ca. 45° stramm zum Boden.
Schlagen Sie den Hering an
entsprechender Stelle ein. Achten Sie
dabei auf eine gute Spannung.
Der Pavillon kann in umgekehrter
Reihenfolge wieder abgebaut werden.
Page 10
10
k
Wartung und Pflege
Reinigen:
• Wischen Sie das Textilmaterial mit
einem feuchten Tuch und einem milden
handelsüblichen Reinigungsmittel sauber .
• Lassen Sie es gut ausgebreitet
gründlich trocknen.
• Das T extilmaterial ist nicht zur Reinigung
in der Waschmaschine geeignet.
• Die Verwendung von Säuren, abrasiven
oder alkalischen Lösungen sollte
unterlassen werden. Auch keine harten
Bürsten oder einen Dampfstrahler
verwenden.
Metallpflege:
• Behandeln Sie die Steckverbindungen
des Pavillons regelmäßig mit einem
Pflegeöl oder Silikonspray.
• Bei Produkten aus Stahlrohr für den
Außenbereich kann eine Rostbildung
nicht völlig ausgeschlossen werden.
Sollten Sie leichte Roststellen oder
Flugrost feststellen, entfernen Sie
diese mit einem handelsüblichen
Rostlöser, um eine weitere Ausbreitung
zu verhindern. Lassen Sie sich
über Rostschutzmittel bei einem
Fachhändler beraten.
Wasserdichtigkeit:
• An den Nähten des Textilmaterials
können anfangs Wassertropfen
durchdri ngen. Mit der Zeit set zen sich
Staubpartikel in die feinen Nahtlöcher
und dichten diese ab.
• Ver wenden Si e zum Abdic hten ggf. im
Fachhandel erhältlichen Nahtdichter.
Allerdings ist eine absolute
Wasserdichtigkeit aus technischen
Gründen nicht möglich.
Hinweis: Während schlechtem Wetter
wird empfohlen den Pavillon durch eine
Plane zu schützen.
Lagerung
Um die Bildung von Stockflecken und
Schimmel zu vermeiden, stellen Sie vor
der Lagerung sicher, dass der Pavillonstoff
komplett getrocknet ist.
Bewahren Sie den Pavillon und das
Pavillontextil an einem trockenen, gut
belüfteten Ort auf.
Entsorgung
Die Verpackung besteht aus
umweltfreundlichen Materialien,
die Sie über die örtlichen
Recyclingstellen entsorgen kön nen.
Werfen Sie den Pavillon keinesfalls
in den normalen Hausmüll!
Entsorgen Sie ihn über einen
zugelassenen Entsorgungsbetrieb
oder über Ihre kommunale
Entsorgungseinrichtung. Beachten
Sie die aktuell geltenden Vorschriften.
Setzen Sie sich im Zweifelsfall mit
Ihrer Entsorgungseinrichtung in
Verbindung.
Technische Daten
Produkt: Art. Nr. 5540,
Pavillon „Rowa“ creme
Gewicht: ca. 41,5 kg
Gesamtmaße,
aufgebaut:
ca. 298 x 298 x 340 cm
(BxTxH)
Page 11

11
k
Service
Bei technis chen Fragen wenden S ie sich
bitte an den Service. Dieses Produkt
wurde sorgfältig hergestellt und verpackt.
Sollte es dennoch einmal Grund zur
Beanstandung geben, helfen Ihnen
unsere Mitarbeiter gerne weiter.
Technische Änderungen und Druckfehler
vorbehalten.
Inverkehrbringer
tepro Garten GmbH
Carl-Zeiss-Straße 8/4
D-63322 Rödermark
Email: [email protected] oder
[email protected]
Web: www.tepro-gmbh.de
Page 12
12
t
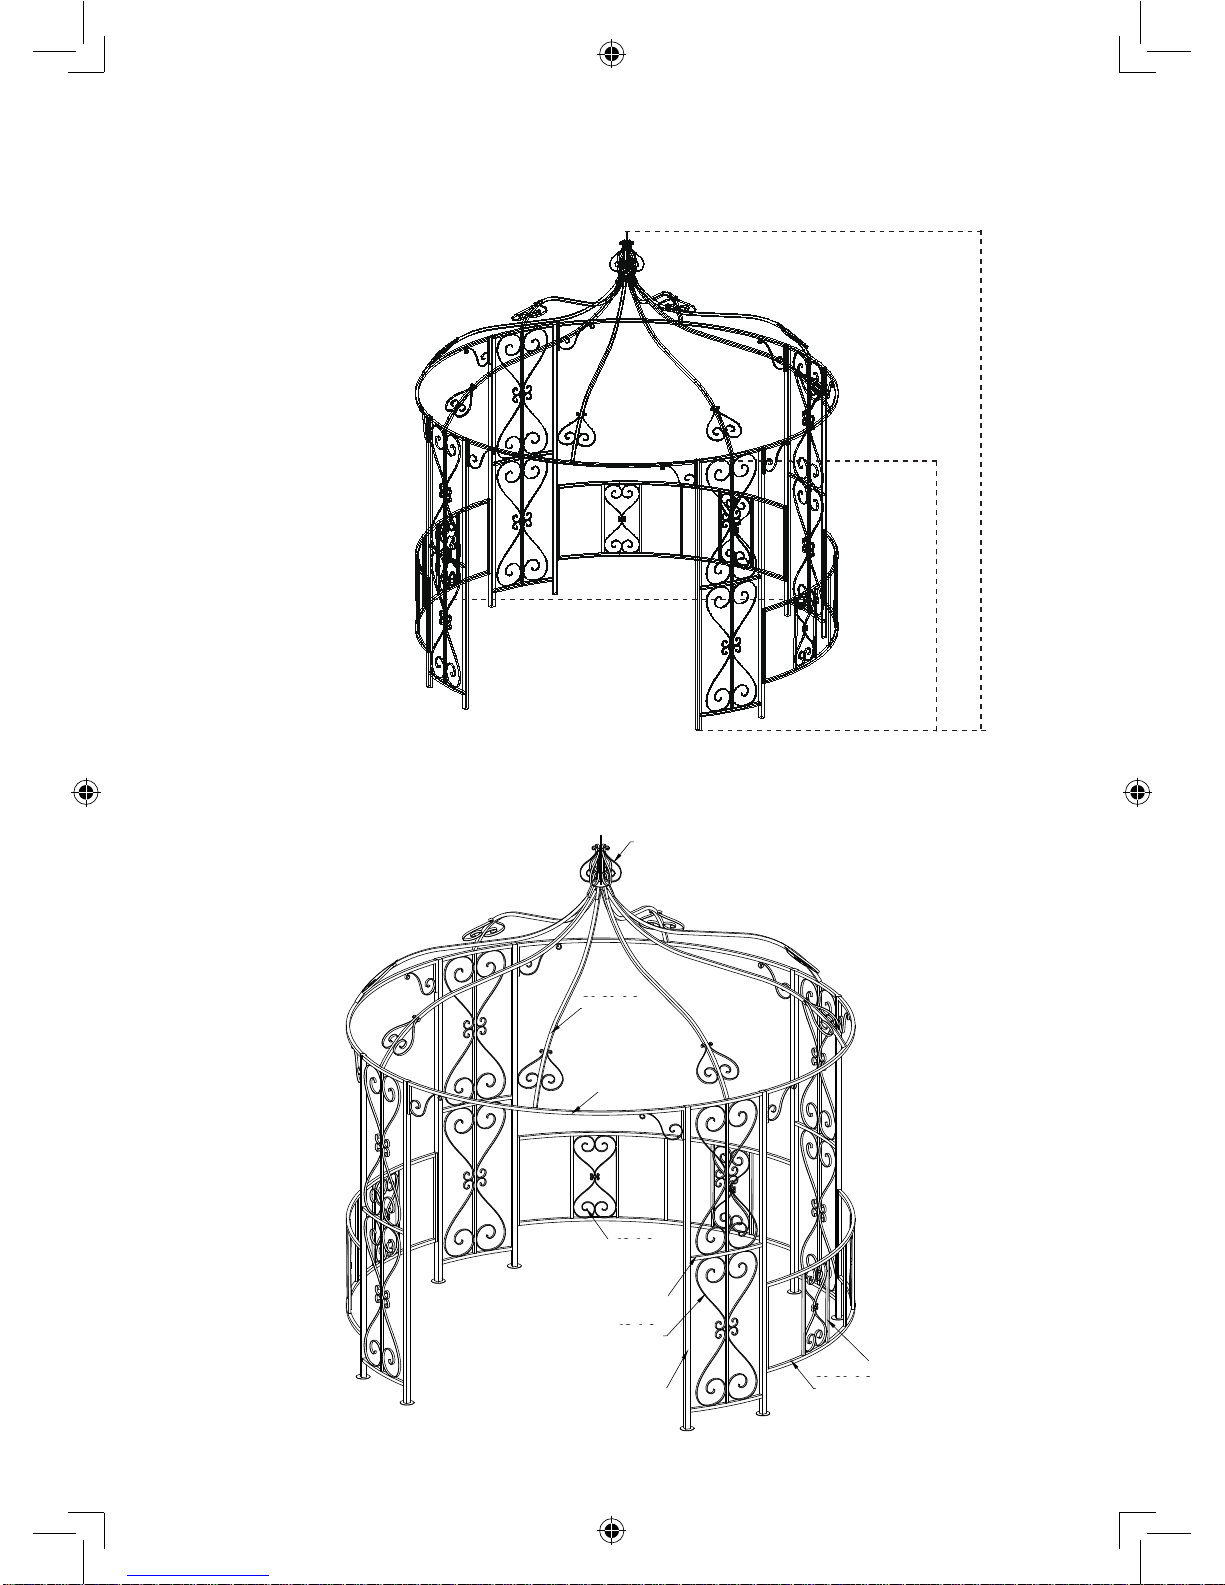
Dimensions
30x30x0.5
12x1.6
15x15x0.5
20x20x0.6
20x20x0.6
15x15x0.4
20x20x0.6
12x1.6
12x2
Frame
Gazebo
298 cm
298 cm
340 cm
20x20x
0.6mm
20x20x0.6mm
12x1.6mm
15x15x0.5mm
12x1.6mm
20x20x0.6mm
15x15x0.4mm
30x30x0.5mm
12x2mm
Page 13

13
t
Contents
Before using the product ............................................................................................. 14
Scope of delivery ................................................................................................... 14 - 15
Intended use ................................................................................................................. 15
For your safety....................................................................................................... 15 - 16
Signal symbols .......................................................................................................... 15
Safety instructions ............................................................................................. 15 - 16
Assembly................................................................................................................ 17 - 19
Preparation ............................................................................................................... 17
Setup ................................................................................................................. 17 - 19
Care and maintenance ................................................................................................. 20
Storage .......................................................................................................................... 20
Disposal......................................................................................................................... 20
Technical details ........................................................................................................... 20
Service .......................................................................................................................... 21
Distributor ..................................................................................................................... 21
Page 14
14
t
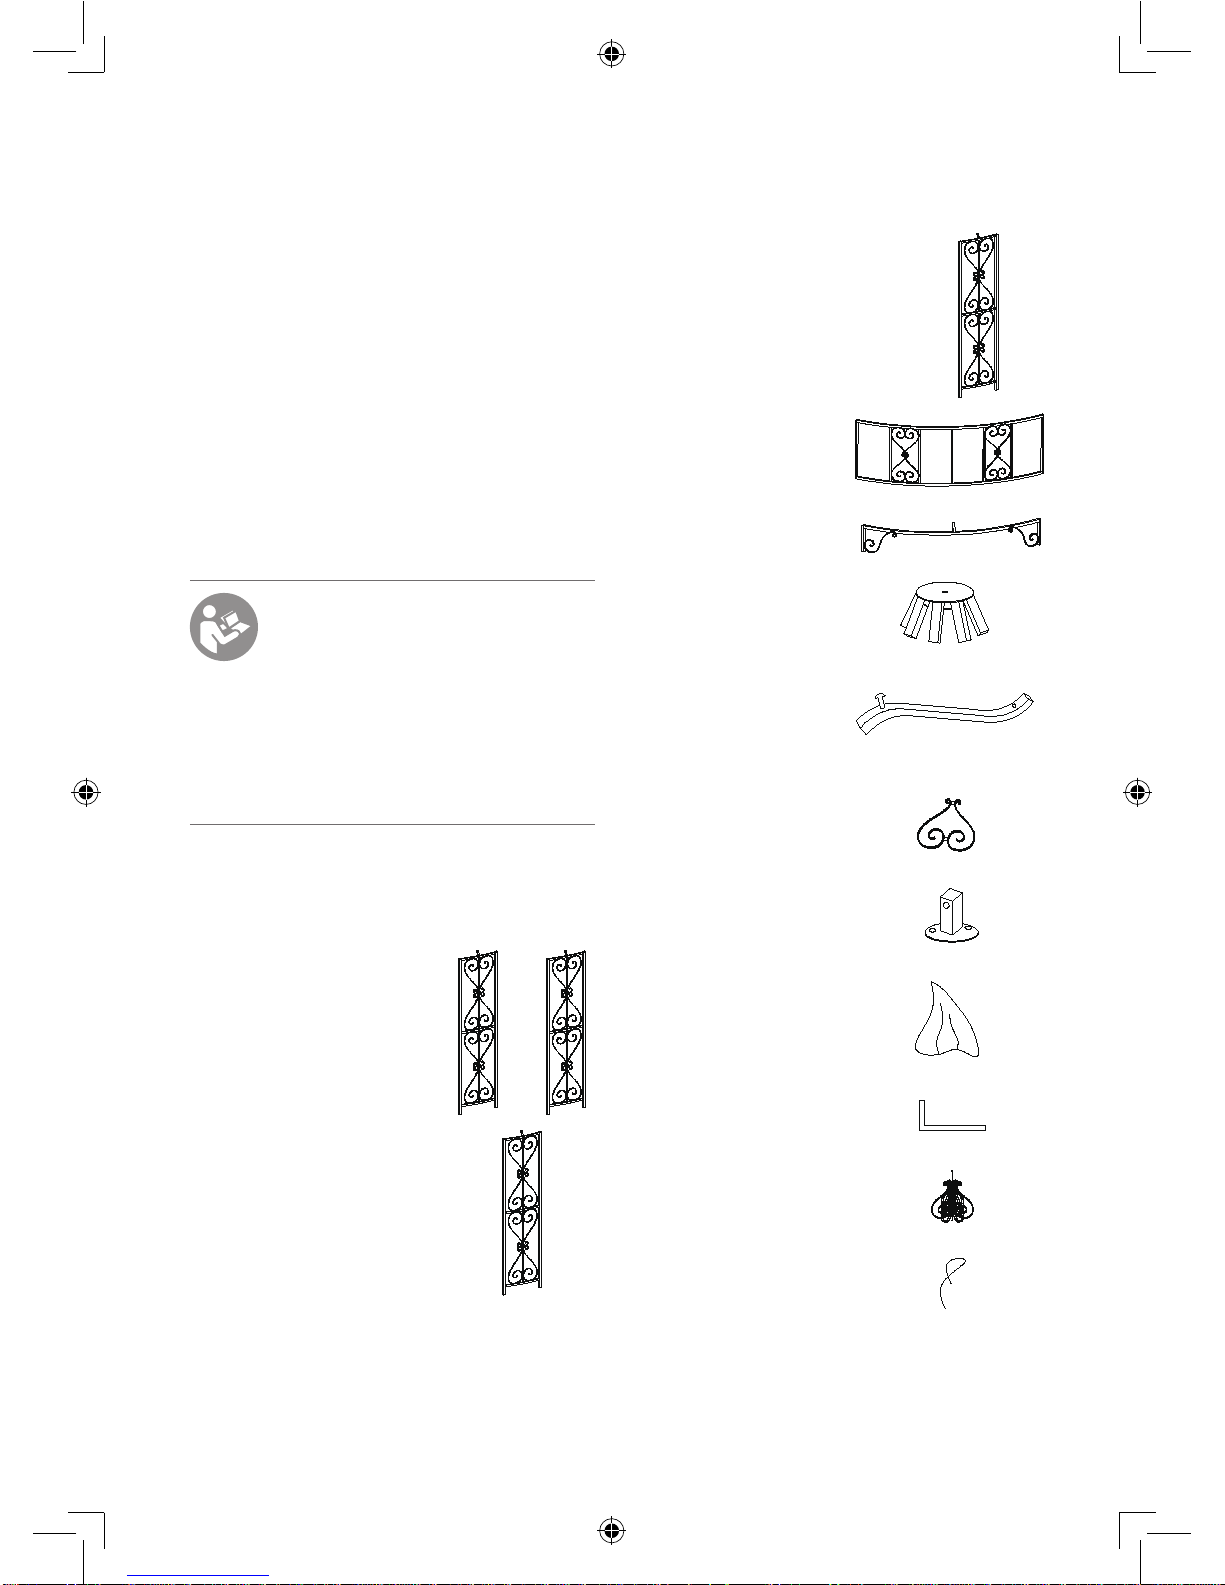
Panel A2
front right
x 1
Side panel
B x 3
Panel connection
C x 4
Roof cross piece
D x 1
Roof truss
E x 8
Roof ornament
F x 8
End cap
G x 8
Roof textile
K x 1
Tent peg
L x 15
Roof tip
M x 1
Tension rope
N x 5
Please check that the delivery is
complete and undamaged. Should a part
Before using the product
After unpacking and before every use,
check whether the item shows any signs
of damage.
Should this be the case, do not use the
item, but notify your retailer.
The operating manual is based on the
norms and regulations that are applicable
in the European Union. In non-EU
countries, observe country-specific
directives and laws!
Before start-up, first read through
the safety information and the
operating manual carefully. Only
by doing so will you be able to
use all of the functions safely and
reliably.
Keep the operating manual and pass it on
to any third party that might own the BBQ
gazebo after you.
Scope of delivery
Panel A
back left/right
x 2
Panel A1
front left
x 1
Page 15
15
t
be missing or defective, please contact
your dealer.
Claims relating to damages or missing
parts made after assembly has taken
place or commenced will not be
recognised.
Intended use
A gazebo is a non-permanent, freestanding, floorless, roofed structure for
short-term installation.
In contrast to a tent, a gazebo is not
used for habitation or accommodation on
journeys or expeditions.
This gazebo is suited exclusively for
outdoor use and is intended for private
settings. This gazebo is designed
principally as a form of sun protection and
not as protection against rain or wind.
Only use the item for its intended purpose
and as described in this instruction
manual. All other uses are considered
improper and can lead to material damage
or even to personal injuries.
The manufacturer accepts no liability for
damages caused by improper use.
For your safety
Signal symbols
Danger High risk!
Failure to observe the warning
can lead to potentially fatal
injuries.
Attention Moderate risk!
Disregarding this warning can
lead to property damage.
Caution Low risk!
Facts that should be respected
when handling the device.
Safety instructions
Danger Risk of accidents!
This product is not intended for
use by persons (incl. children)
with limited physical, sensory,
or mental capacities or lacking
experience and/or lacking
knowledge.
– Such persons must be informed
about the dangers of the product and
supervised by a person responsible for
their safety.
– Keep children away from the item, since
they might attempt to pull themselves
up or climb onto it.
– Any modifications to the product
represent a large safety risk and are
forbidden. Do not undertake any
unauthorised interventions yourself.
Contact our service department or a
local expert in the event of damage,
repairs, or other problems with the
gazebo.
Danger Risks to children!
While playing, children
can become caught in the
packaging film and choke.
– Do not let children play with the
packaging films.
– Keep children away during assembly.
– Make sure that children do not put any
small assembly parts into their mouths.
They could swallow the parts and
choke on them.
Page 16

16
t
Attention Risk of damage!
Do not use any strong or
grinding solvents or abrasive
pads, since these can attack
the surfaces and leave behind
scrape marks.
Attention Risk of damage!
During use, screw connections
may gradually loosen, thus
impairing the stability of the
gazebo.
– Check the tightness of the screws on a
regular basis. If necessary, tighten all
of the screws again to ensure the BBQ
gazebo is standing securely.
– If you intend to set up multiple gazebos,
please ensure that there is a minimum
distance of 3 m between the individual
gazebos.
– Never setup gazebos directly next to
each other.
Attention Risk of burning and
accidents!
Caution – Risk of collapse!
The roof of the gazebo must
not be subjected to additional
loads. People must not at any
time climb on top of the gazebo.
– Stability! Always place the gazebo on
flat, not sloping ground.
– Do not place the gazebo on soft, muddy ,
or sandy ground, since the pegs will not
hold properly in such ground.
– Regularly check the firm fit of the pegs
and screws to ensure the stability of the
product.
– Caution – Fire! Fire hazard! No open
fires, e.g. torches as well as BBQs or
mushroom heaters, must be placed
under or near the gazebo.
The gazebo is not suitable for yearround installation outdoors, since it
is not able to withstand strong winds,
storms, hail, snow, or the like.
– Caution – Wind! The gazebo must be
protected against wind by hammering
tent pegs through the feet into the
ground. Additionally, secure the gazebo
with tension ropes.
– Remove the side parts in order to
reduce the wind pressure.
– Caution – Storms! Remove the roof
textile and side parts if strong wind
or bad weather is imminent or if the
weather could deteriorate in your
absence.
– The gazebo must be dismantled if
the expected wind speed exceeds
40 km/h (fresh breeze, large
branches and trees are moving and
the wind is clearly audible).
– Caution – Rain! Should pools of water
form, the collected water should be
regularly tipped out. The roof can be
carefully raised using a broom in order
to remove the water or let it run off. Take
care to ensure good tension in the roof
textile.
Page 17

17
t
Assembly
Preparation
Danger Risk of injury!
Failure to follow the instructions
can lead to problems and
dangers when using the
gazebo.
– During setup take care not to jam your
fingers or injure yourself on sharp
edges.
1. Pay attention to the figures
accompanying the assembly steps
and read through this instruction
manual thoroughly first.
2. At least 3 persons are required for
assembly. Assembly of the gazebo by
only one person is not possible.
3. Take sufficient time for the assembly
and use a flat working surface of
approx. 16 square metres.
4. Setup the gazebo only under normal
weather conditions.
5. If possible, sort the parts in the order
in which they are used according to
the following assembly steps.
6. Setup the gazebo on the spot where it
will later be secured.
7. Should you feel unsure with the
assembly of the gazebo, then get in
touch with an expert.
Assembly requires the use of ladders.
Setup
Step 1
Stick the end caps (G) under the panels
(A, A1, A2).
Step 2
A
A
Hang the side panels (B) in place between
the panels (A, A1, A2).
Page 18

18
t
Step 3
A1
C
Hang the panel connections (C) in place,
above, between the panels (A, A1, A2).
Step 4
E
E
E
E
E
E
E
E
Stick the roof trusses (E) into the roof
cross piece (D).
Step 5
Raise the roof construction and stick the
trusses into the panel connections (C) and
the panels (A, A1, A2).
Step 6
M
Fasten the roof tip (M) to the roof cross
piece (D).
Page 19

19
t
Step 7
F
E
Fasten the roof ornaments (F) to the roof
trusses (E).
Step 8
Hook the roof textile in under the roof tip
and fasten it from outside, using the Velcro
strips, to the roof construction.
Secure the panels using tent pegs (L).
Step 9
Knot the tension ropes (N) above to the
panels.
Knot one tent peg (L) to the ends of each
of the tension ropes.
Pull the tension ropes at an angle of
approx. 45° tightly to the ground.
Drive the tent pegs into the ground at
those locations. In doing so, make sure to
maintain good tension.
The gazebo can be disassembled again in
the reverse order.
Page 20

20
t
Care and maintenance
Cleaning:
• Wipe the textile material clean using a
damp cloth and a mild, commercially
available detergent.
• Spread it out and let it dry thoroughly.
• The textile material is not suitable for
cleaning in the washing machine.
• The use of acids, abrasive or alkaline
solutions should be avoided. Also do
not use hard brushes or a steam jet.
Metal care:
• Treat the plug connections of the
gazebo regularly with maintenance oil
or silicone spray.
• With products made of steel piping for
outdoor use, rust formation cannot be
completely excluded. Should you find
light rust spots or rust films, remove
these using a commercially available
rust dissolver in order to prevent them
from growing. Seek advice about rust
protection agents from a specialist
dealer.
Water resistance:
• At the stitches of the textile material,
drops of water can initially get through.
With time, dust particles enter these
fine stitching holes and seal these up.
• If needed, use a commercially available
seam sealer. Nevertheless, absolute
water tightness is not possible for
technical reasons.
Please note: It is recommended to protect
the gazebo using a tarpaulin during bad
weather.
Storage
To prevent the formation of mould and
mould stains, ensure that the gazebo
material is completely dry prior to storage.
Store the gazebo and the gazebo textile in
a dry, well ventilated location.
Disposal
The packaging is made from
environmentally friendly materials,
which you can dispose of at your
local recycling points.
Do not under any circumstances
dispose of the gazebo in your
ordinary household waste!
Dispose of it at an approved
disposal business or at your
community disposal facility.
Respect the currently valid
regulations. If in doubt, get in
touch with your disposal facility.
Technical details
Product: Item No. 5540, Gazebo
“Rowa” creme
Weight: approx. 41.5 kg
Overall
dimensions,
assembled:
approx. 298 x 298 x
340 cm (WxDxH)
Page 21

21
t
Service
Please contact our service point for
assistance with technical questions. This
product was carefully manufactured and
packaged.
Should you nevertheless have a complaint,
our employees are more than happy to
assist.
Subject to technical modifications and
typographical errors.
Distributor
tepro Garten GmbH
Carl-Zeiss-Straße 8/4
D-63322 Rödermark
Email: [email protected] or
[email protected]
Web: www.tepro-gmbh.de
Page 22

22
t
 Loading...