

Page 1

Version 1.0
the w o r ld i n m y e y e s
Quick Start Guide
TH671
Page 2

Page 3
1
Just 3 Steps! Then Enjoy Your TH671
Step 1---Device Setup
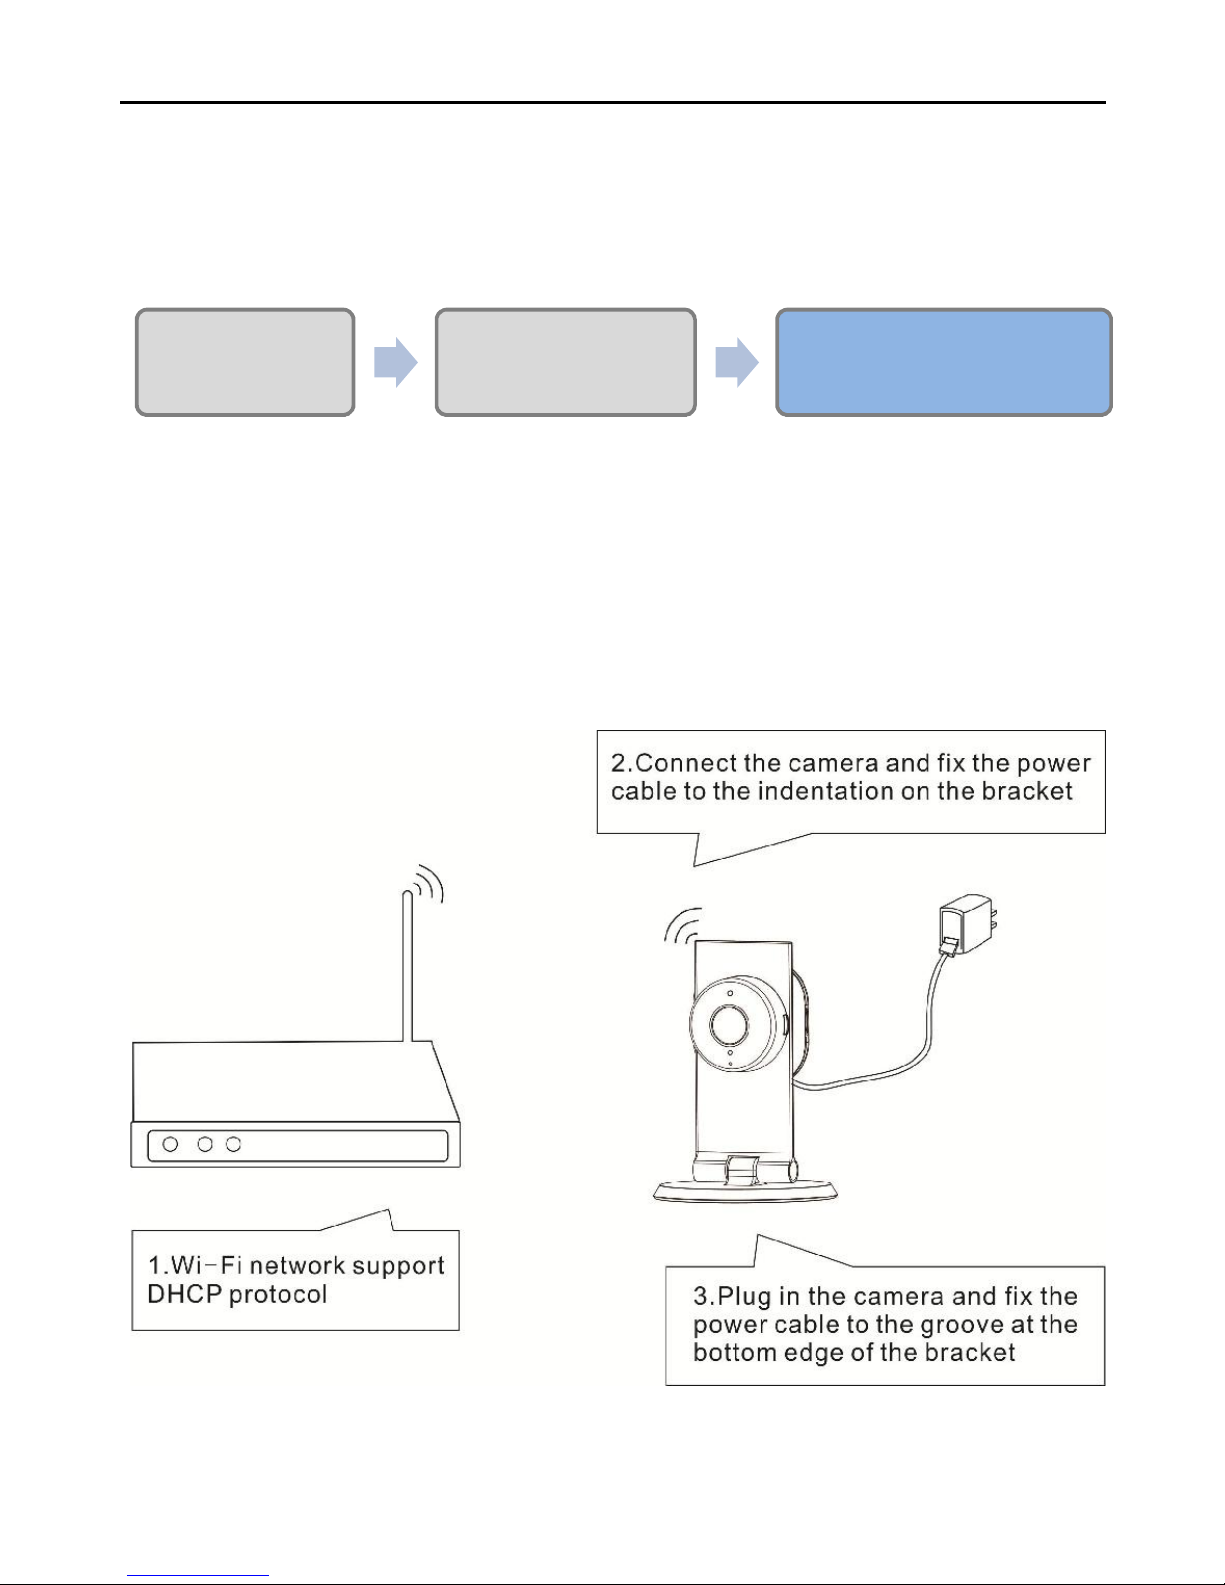
Take out camera and connect the power adapter as below;
Wait until the blue status light is blinking. Otherwise,
camera needs reset (use a pin to press and hold the reset
hole at the back of camera for 5 seconds).
1. Device Setup 2.APP Installation 3.WiFi Settings & Enjoy
Page 4
2
Step 2---Install “New TENVIS” APP
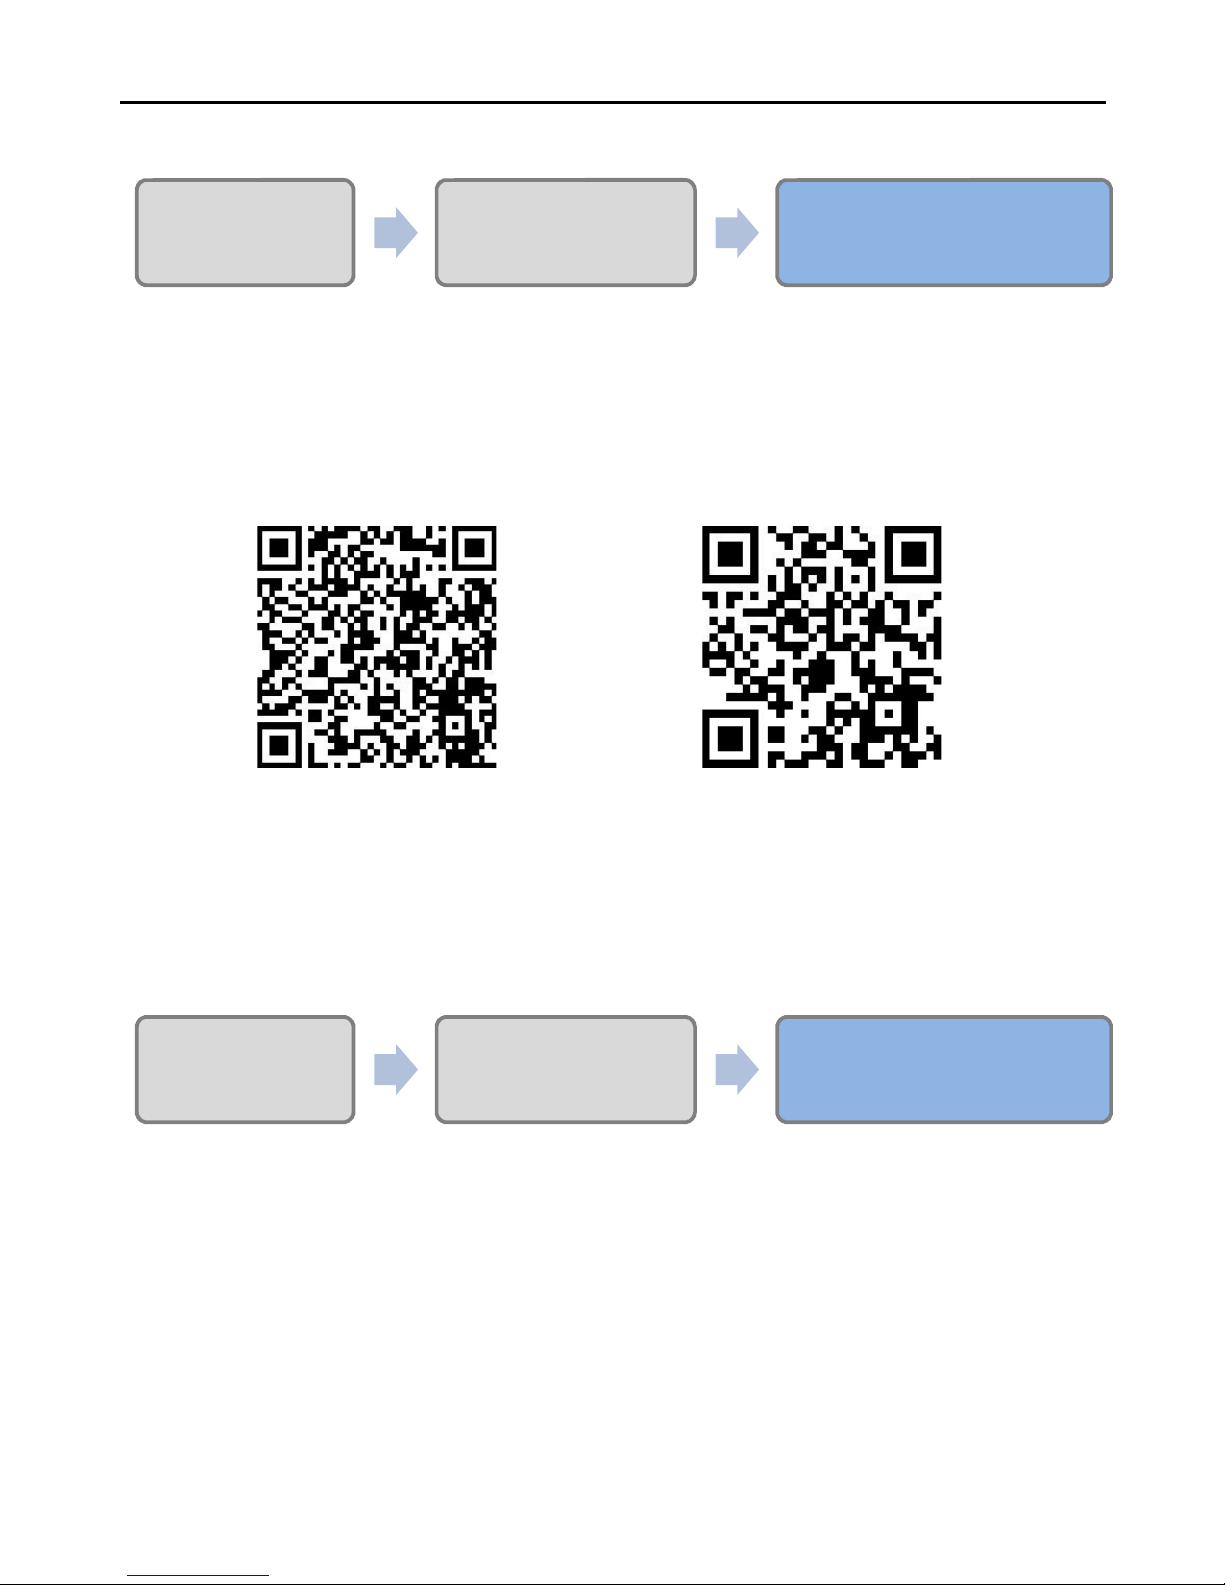
Download New TENVIS APP via following two ways:
Download NEW TENVIS from Apple’s APP Store
or Google Play Store.
Scan the following QR code to download.
Register with effective email address and then log in
NEW TENVIS.
Step 3---Wireless Network Setting
Set up camera’s network via smart phone / tablet.
** Tips:
- Please kindly choose the setting steps according to your smart
phone/tablet type (iOS / Android) from Step 3.
- The steps with (**) are for configuration via iPhone / iPad setup
only
1. Device Setup 2.APP Installation 3.WiFi Settings & Enjoy
1. Device Setup 2.APP Installation 3.WiFi Settings & Enjoy
App For Android
App For iOS
Page 5
3
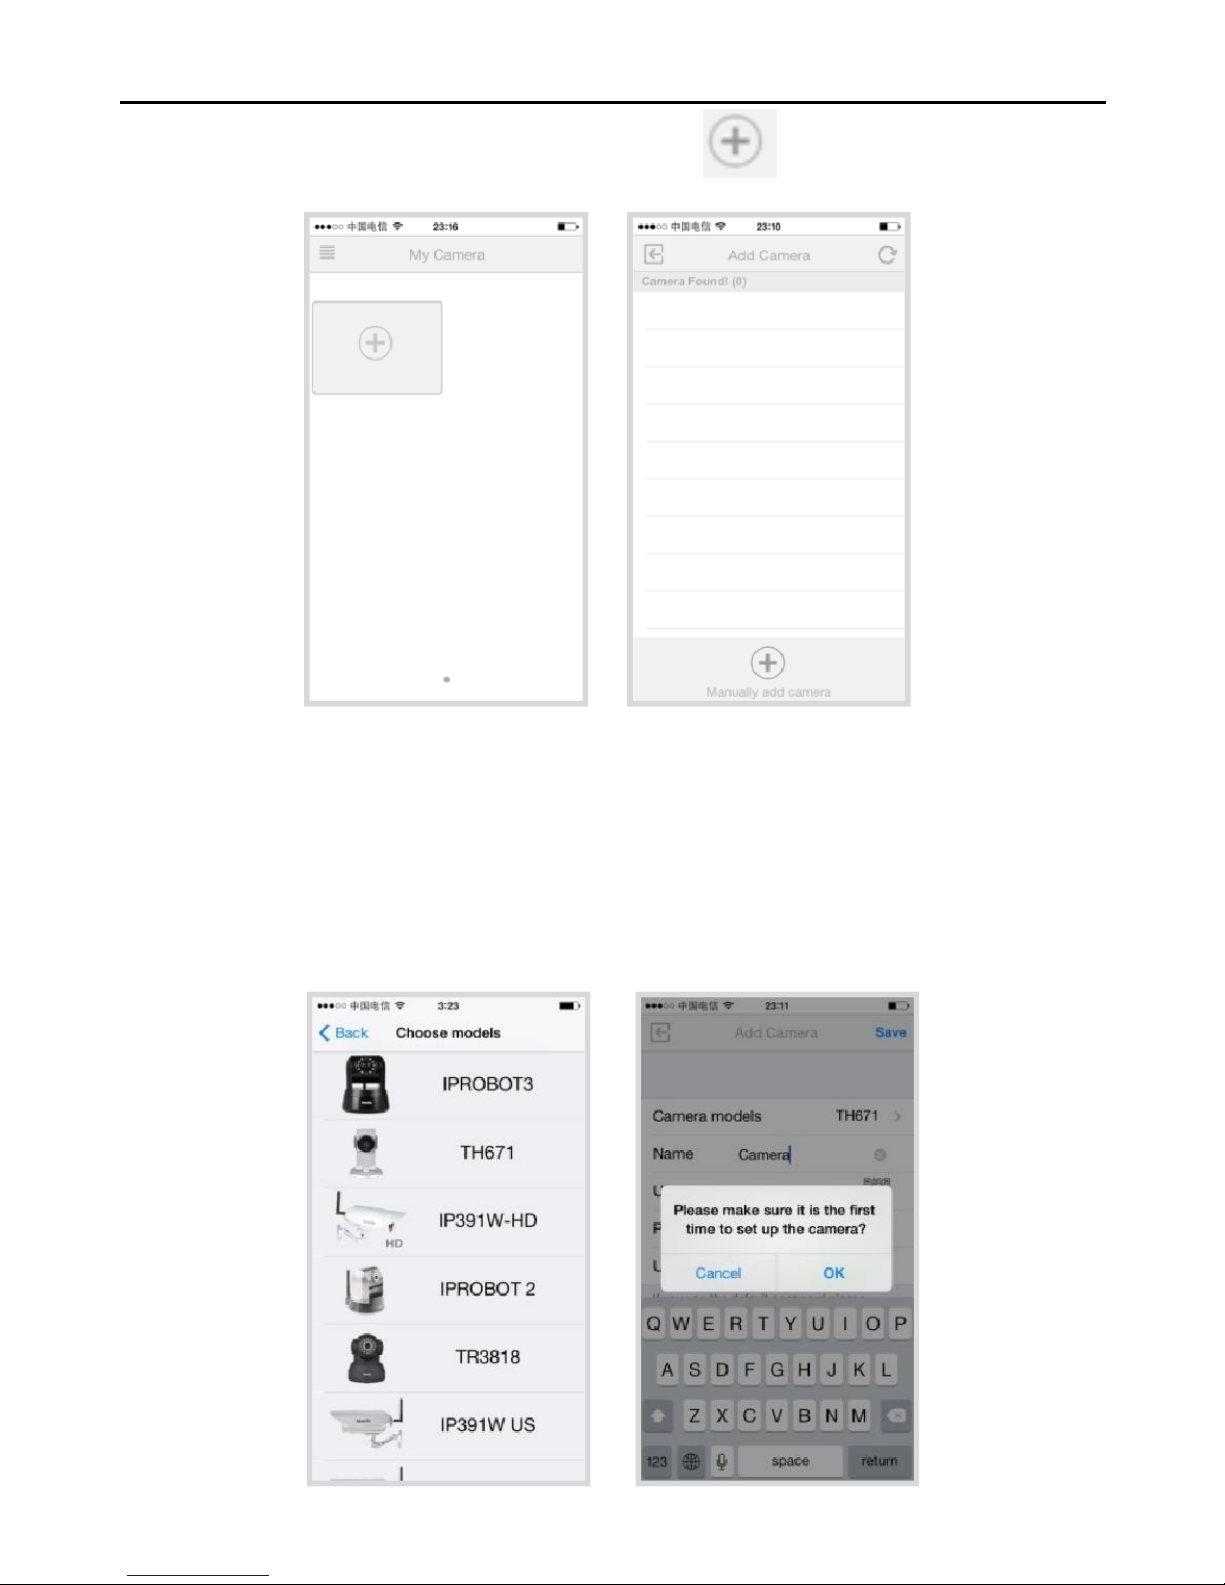
1. Login NEW TENVIS, click , and then choose
“Manually add cameras”.
2. Choose Model TH671, then click OK.
** Tips:
- The network to be connected by the camera should be the
same as mobile WiFi network.
- The camera supports 2.4GHZ WiFi only.
Page 6
4
3. For ANDROID smart phone / tablets, please kindly
follow the instructions in the Camera Setup Wizard to
complete installation, it usually takes around 1 minute.
** Tips:
- Once the network is successfully setup, it will jump to
“Manually adding the camera” interface, please revise the
camera name if you like.
- The default password is admin.
CONGRITULATIONS! ENJOY YOUR LIVE VIDEOS
NOW!
For iPhone/iPad, please follow below steps to
complete the network setup.
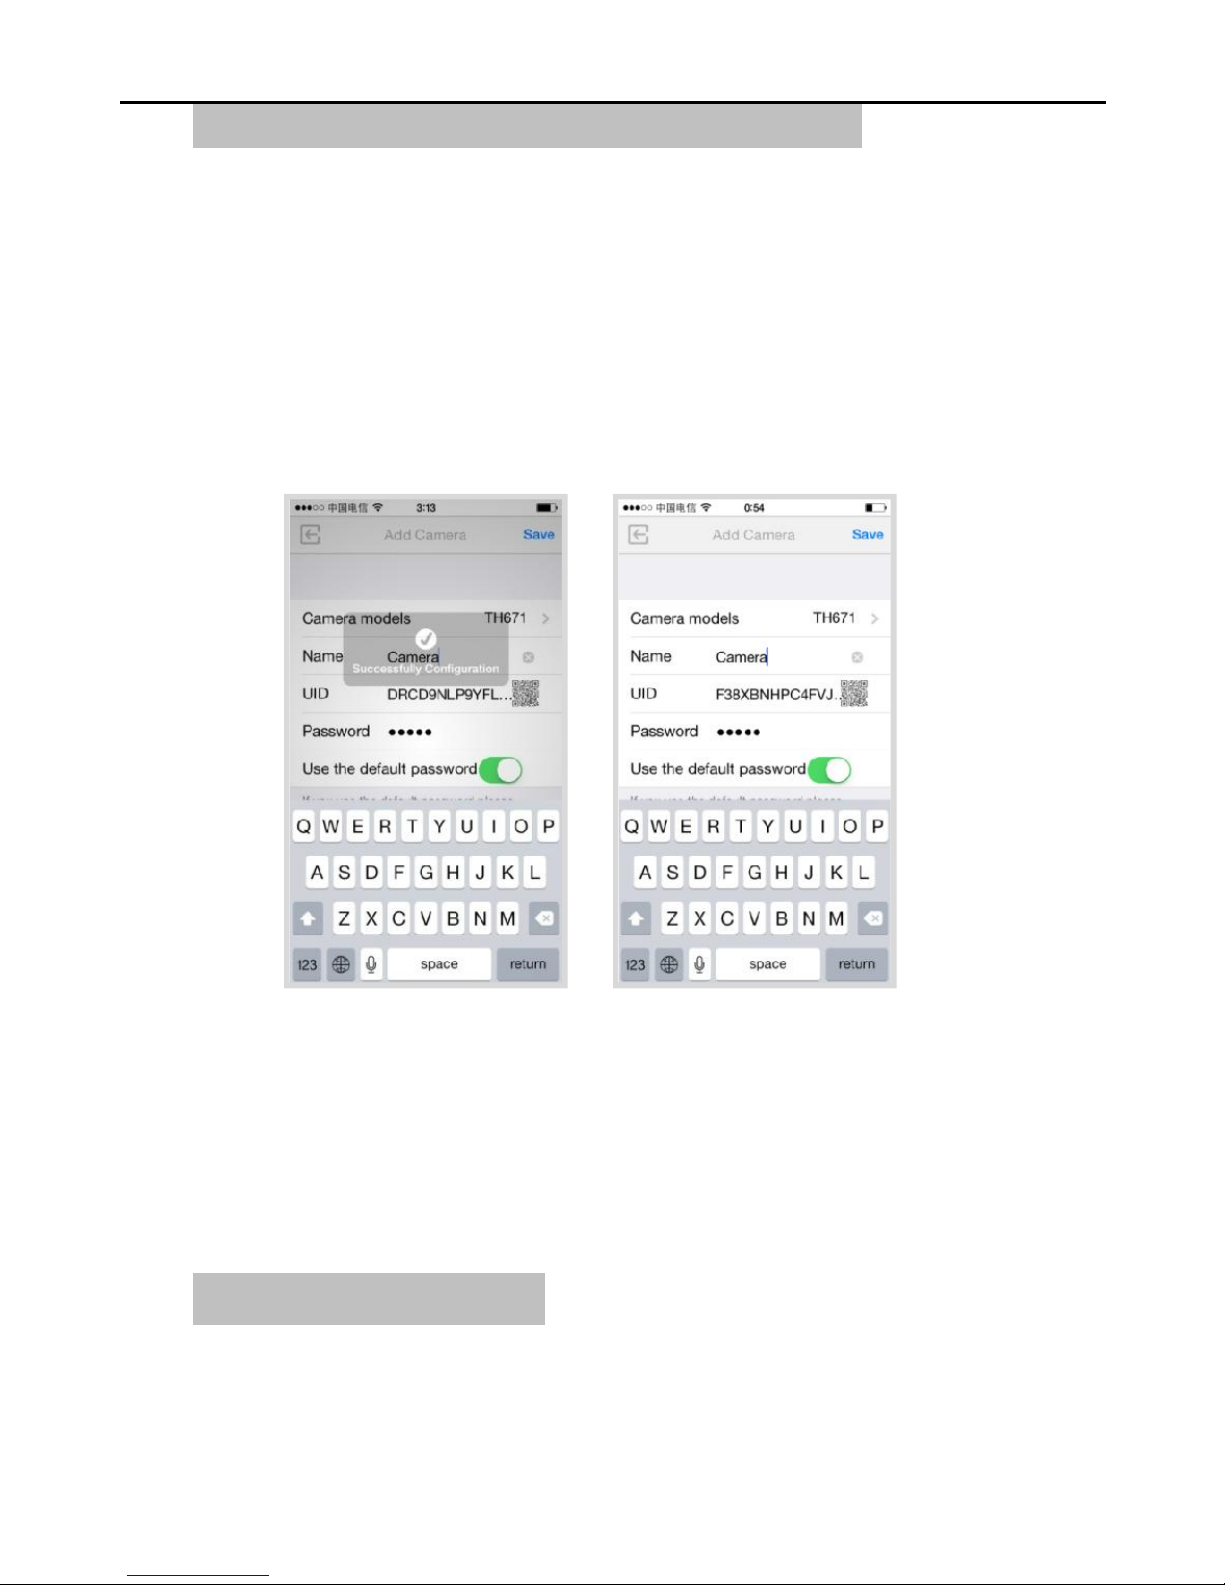
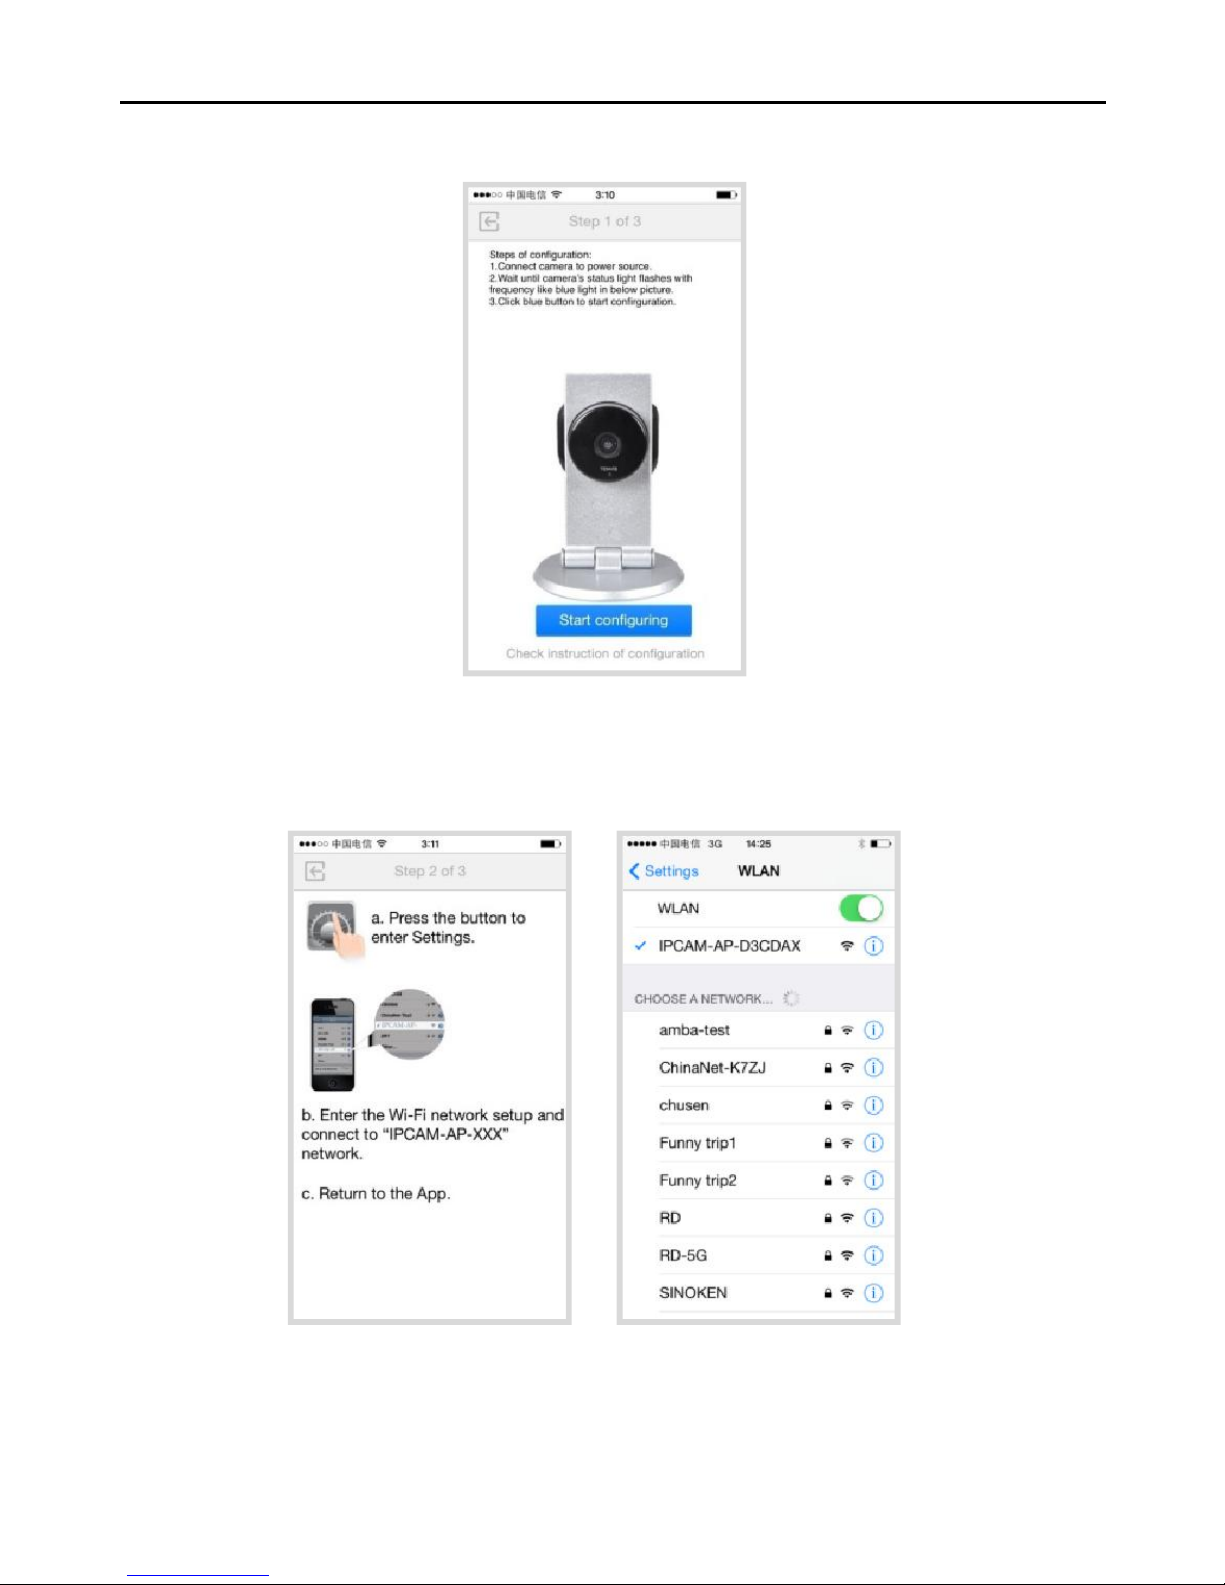
3. (**) For iPhone/iPad, please press “Start Configuring”
as below image when camera meets conditions.
Page 7
5
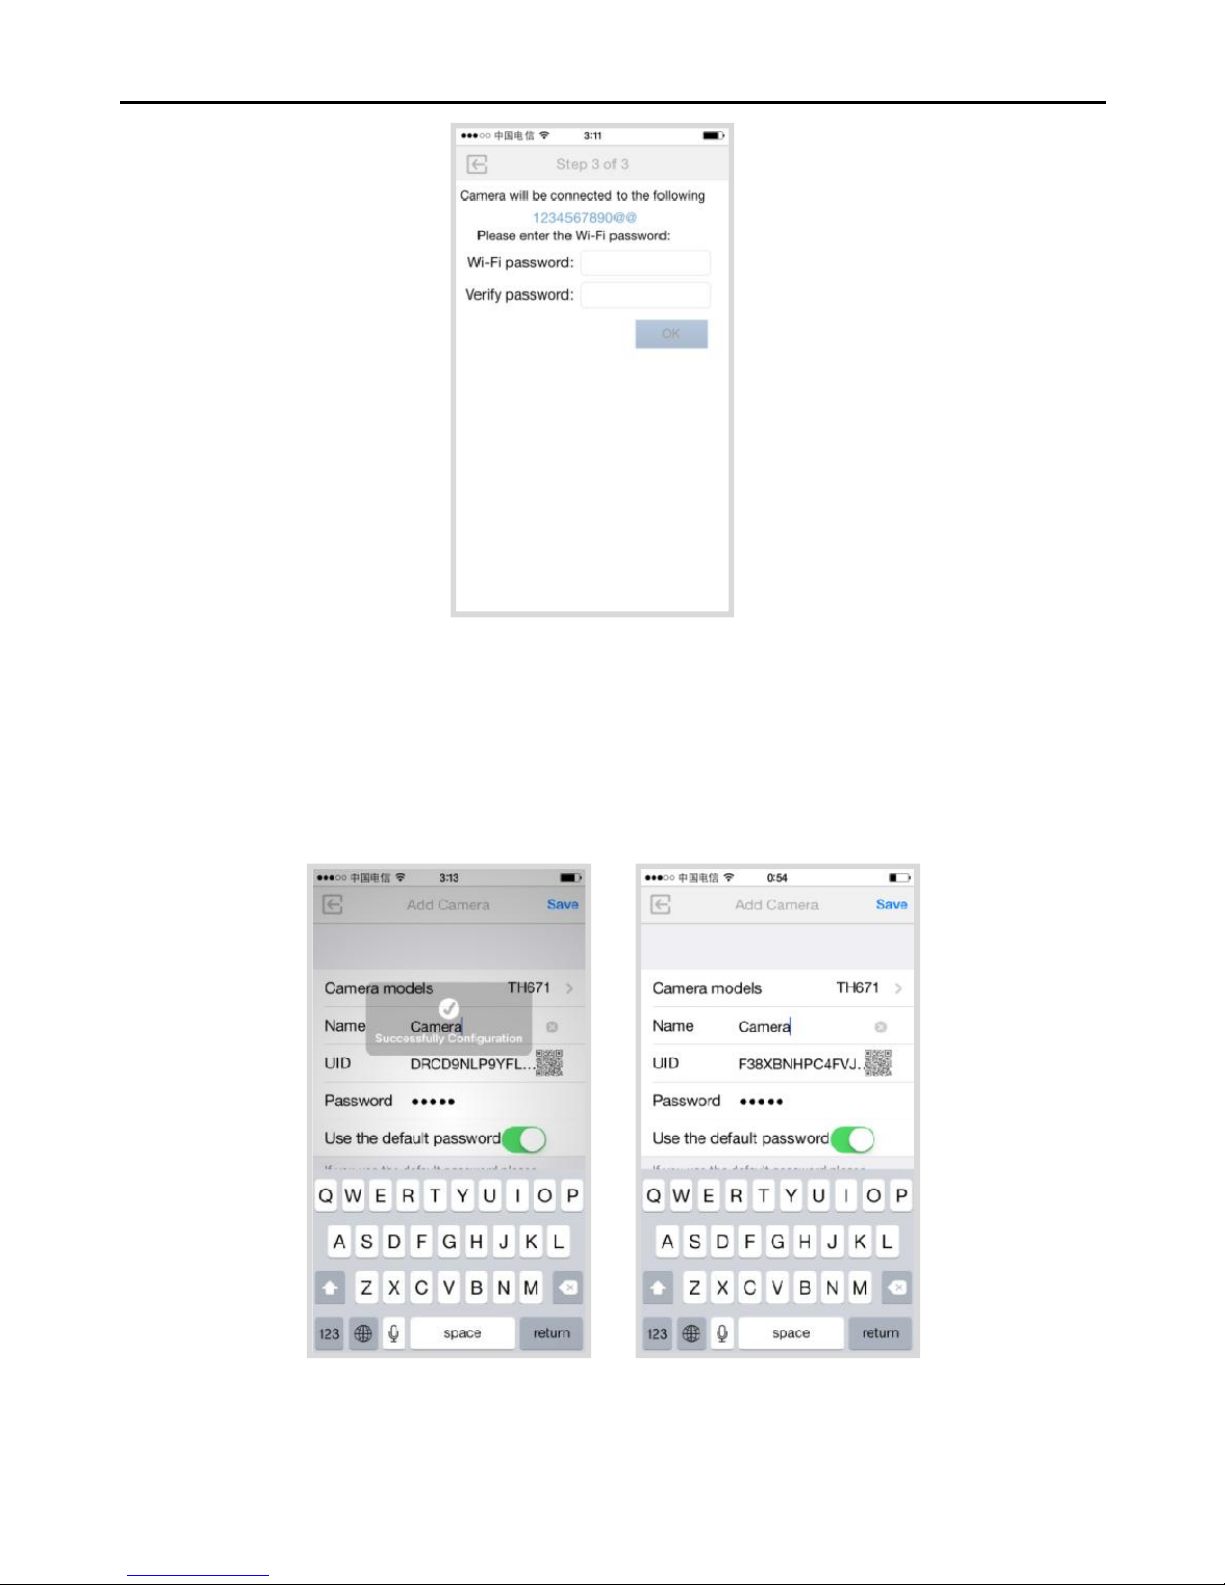
4. (**) Go to Settings ->Wi-Fi on your iPhone/iPad and
connect to TH671 wireless network “IPCAM-AP-xxxx”.
5. (**) Return to NEW TENVIS app again, and enter the
network password correctly.
Page 8
6
** Tips:
- Once the network is successfully setup, it will jump to the
“Manually adding the camera” interface, please revise the
camera name if you like.
- The default password is admin.
CONGRATULATIONS! ENJOY YOUR LIVE VIDEOS
NOW!
Page 9

7
Notes:
If it is fails to set up the camera network, please make
sure that you have entered the right password or the
camera is within the effective Wi-Fi distance (10m).
One IP camera could not be added by several
accounts. If you need to share the camera video to
your friends, please make use of the share function
rather than create a new account.
Please check the manual in CD to get further details
of instruction
FCC Statement
FCC STATEMENT This equipment has been tested and
found to comply with the limits for a Class B digital device,
pursuant to Part 15 of the FCC Rules. These limits are
designed to provide reasonable protection against harmful
interference in a residential installation. This equipment
generates uses and can radiate radio frequency energy
and, if not installed and used in accordance with the
instructions, may cause harmful interference to radio
communications. However, there is no guarantee that
interference will not occur in a particular installation. If this
equipment does cause harmful interference to radio or
Page 10

8
television reception, which can be determined by turning
the equipment off and on, the user is encouraged to try to
correct the interference by one of the following measures:
Reorient or relocate the receiving antenna.
Increase the separation between the equipment and
receiver.
Connect the equipment into an outlet on a circuit different
from that to which the receiver is connected.
Consult the dealer or an experienced radio/TV technician
for help.
FCC NOTICE This device complies with Part 15 of the
FCC Rules. Operation is subject to the following two
conditions:
1 This device may not cause harmful interference, and
2 This device must accept any interference received,
including interference that may cause undesired operation.
FCC CAUTION
• Any changes or modifications not expressly approved by
the party responsible for compliance could void the user's
authority to operate this equipment.
• This device and its antenna(s) must not be co-located or
operating in conjunction with any other antenna or
transmitter.
Page 11

9
Contact Us
USA Distributor
Address: Zettaguard Inc.
363 Cliffwood Park St, Ste A
Brea, CA 92821
Website: www.zettaguard.com
E-mail: [email protected]
Hot Line: (714)455-2958
Manufacturing center
Address:2F Building 1,TENVIS Technology Industrial Park,
NO.10 jixiang 3rd Road, Pingdi Town, Longgang
District, Shenzhen, China
Website: www.tenvis.com
E-mail: [email protected]
Hot Line: 0086-755-89732479
Page 12
10
the w o r ld i n m y e y e s
©2014 TENVIS.All rights reserved.
D140529
 Loading...