

Page 1
Page 2

TENVIS Technology Co., Ltd.
TENVIS End User Agreement
TENVIS IP Camera is designed to serve as a supplement to existing
residential and business security systems. This home monitor is intended
as an aid. It is not a substitute for home security supervision and should not
be used as such.
Application involving live radio listening and video streaming will require
WiFi usage or mobile network usage, such as 3G/LTE or Edge. If you are
on a remote Wi-Fi network or 3G connection, 10 seconds to 15 seconds
delay in video and audio streaming to your smartphone may occur. This
may incur data fee charged by your telecommunication services, please
check with your service provider for details. TENVIS does not warrant that
the functions contained in the service will be uninterrupted or error-free,
that defects will be corrected, or that this service or the server that makes it
available are free of viruses or other harmful components. TENVIS does
not warrant or make any representations regarding the use or the results of
the use of the materials in this service in terms of their correctness,
accuracy, reliability, or otherwise. You (and not TENVIS) assume the entire
cost of all necessary servicing, repair, or correction.
All trade names are registered trademarks of respective manufacturers
listed. To get the latest camera update or to learn more about TENVIS IP
Camera, please visit www.tenvis.com.
Page 3

TENVIS Technology Co., Ltd.
Table of Contents
Quick Installation Guide ................................................................................. 1
W hat’s In the Box ............................................................................................ 2
Quick Start Guide ............................................................................................ 2
Operation Guide for iPhone ........................................................................... 3
Live Video .............................................................................................. 3
Wi-Fi Setup ............................................................................................ 7
Alarm Setup ........................................................................................... 8
Other Settings ..................................................................................... 10
Operation Guide for iPad ............................................................................. 12
Live Video ............................................................................................ 12
Wi-Fi Setup .......................................................................................... 15
Alarm Setup ......................................................................................... 16
Other Settings ..................................................................................... 18
Operation Guide for Android Device ........................................................... 20
Live Video ............................................................................................ 20
Wi-Fi Setup .......................................................................................... 23
Alarm Setup ......................................................................................... 24
Other Settings ..................................................................................... 27
Operation Guide for Windows Web Browser ............................................. 28
Operationn Guide for Mac Web Browser ................................................... 33
Setup Wi-Fi using WPS ................................................................................ 36
Wh a t i s WPS? ..................................................................................... 36
Set up Wi-Fi using WPS .................................................................... 36
Camera Reset ............................................................................................... 38
FCC Statements ............................................................................................ 39
Frequently Asked Questions ........................................................................ 40
Warranty ......................................................................................................... 41
Contact us ...................................................................................................... 43
Page 4

TENVIS Technology Co., Ltd.
1
Quick Installation Guide
Hardware Installation
Software Installation
Live Video
Wireless Connection Setting
Alarm Setup
Page 5
TENVIS Technology Co., Ltd.
2
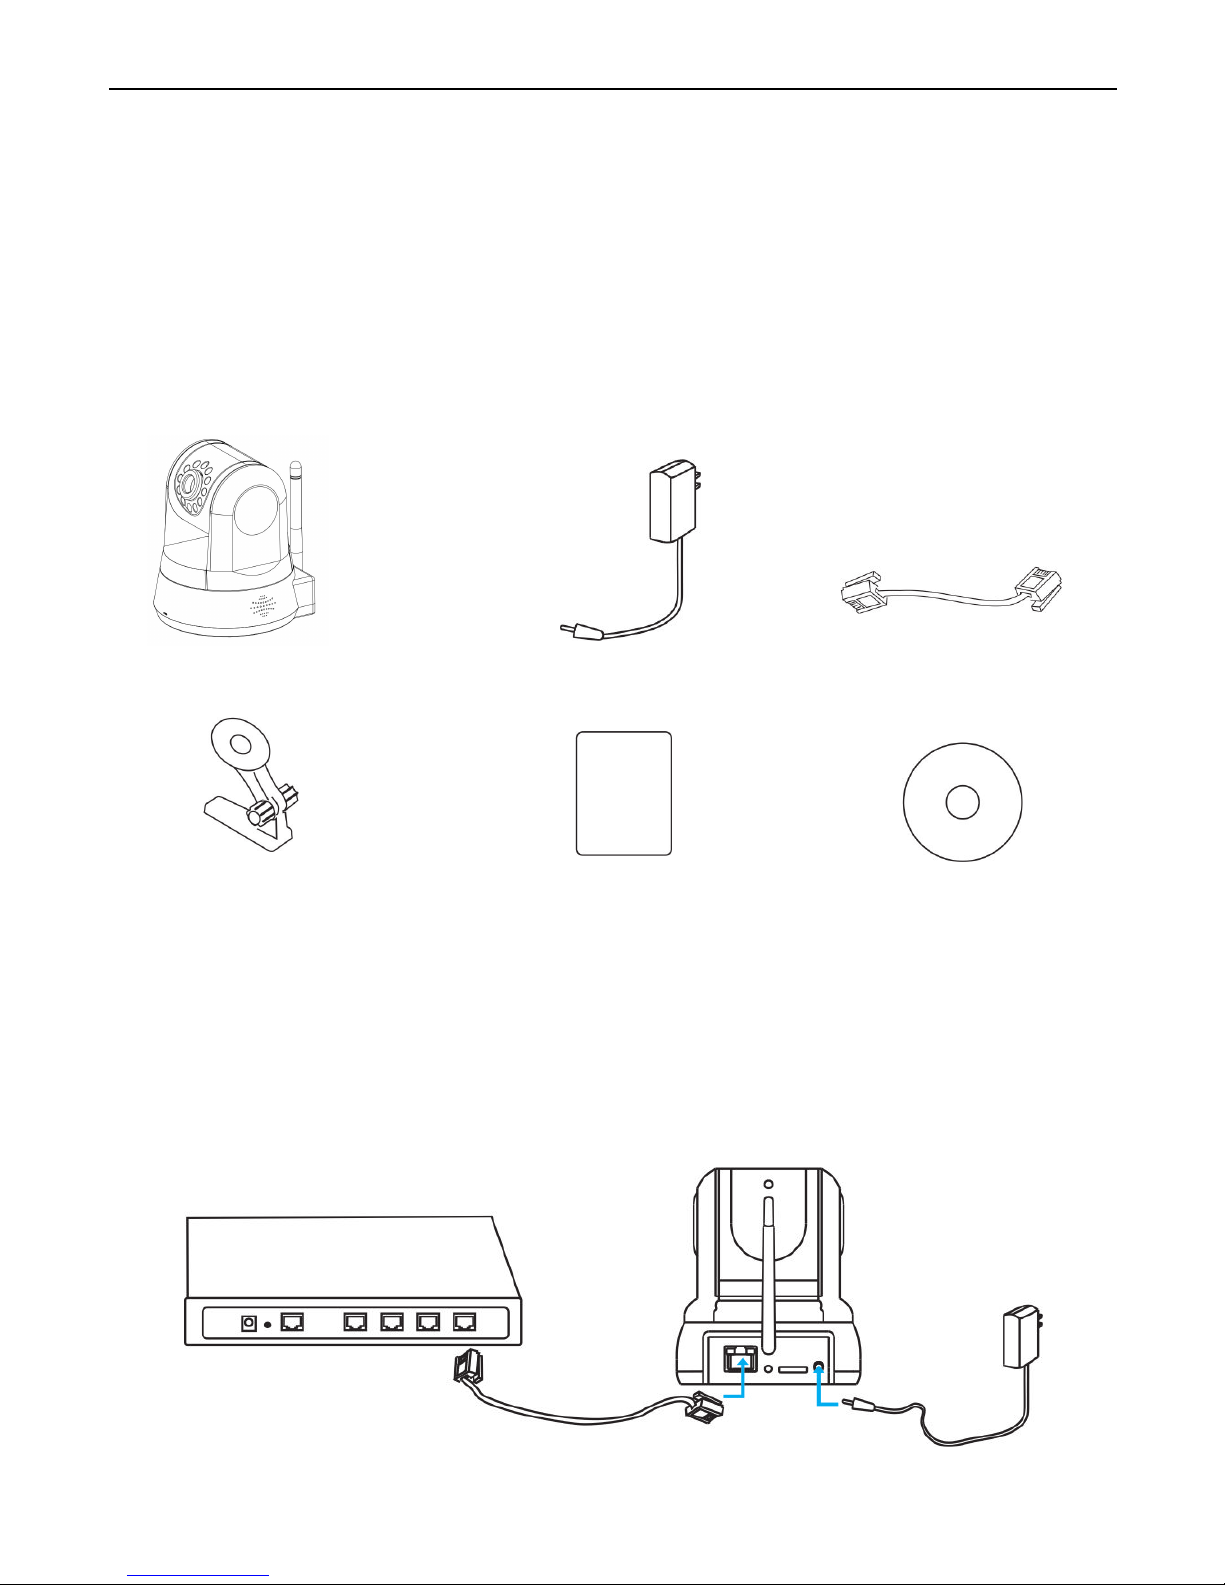
1. IP Camera IPROBOT 3 with IR-Cut x1
2. DC Power Adapter (5V-2.0A) x1
3. Network Cable x1
4. Mounting Bracket x1
5. Quick I nst al l at i on Guide x1
6. CD-ROM with Setup Software x1
Connect the power cable and wait for the camera to initialize itself.
Connect the camera to your router by using the included network c able.
2
3
5
6
1
4
LAN
Router
What’s In the Box
Quick Start Guide
Page 6
TENVIS Technology Co., Ltd.
3
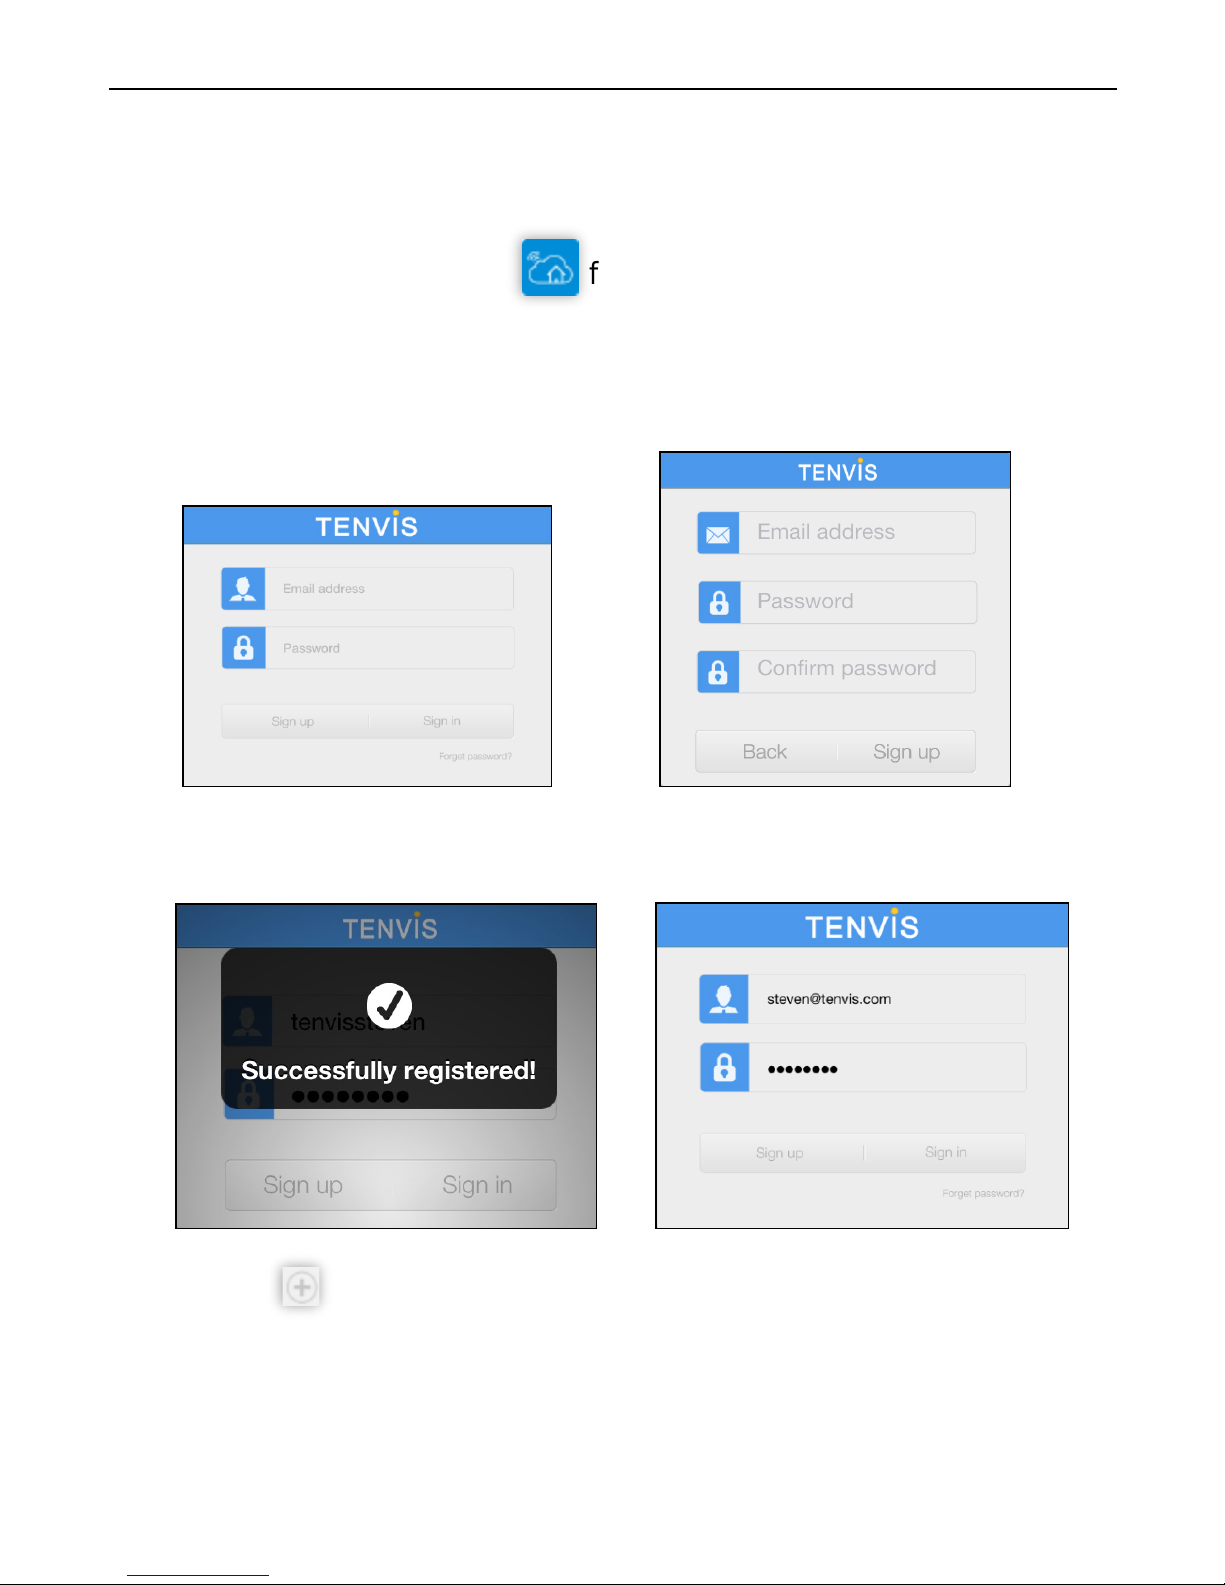
1. Download NEW TENVIS from App Store
2. Tap on Sign up if you do not already have an account with New
TENVIS. Fill in the required inf ormation to register for a New TENVIS
user account.
3. After signing up, please log on to your account.
4. Tap on to add your new cam era to your account; fi nd th e c am era
by matching UID code in the list to the UID code displayed at the
bottom of the camera. If your new camera resides in the same LAN
(Local Area Network), its UID code will show up in the list.
Operation Guide for iPhone
Live Video
Page 7
TENVIS Technology Co., Ltd.
4
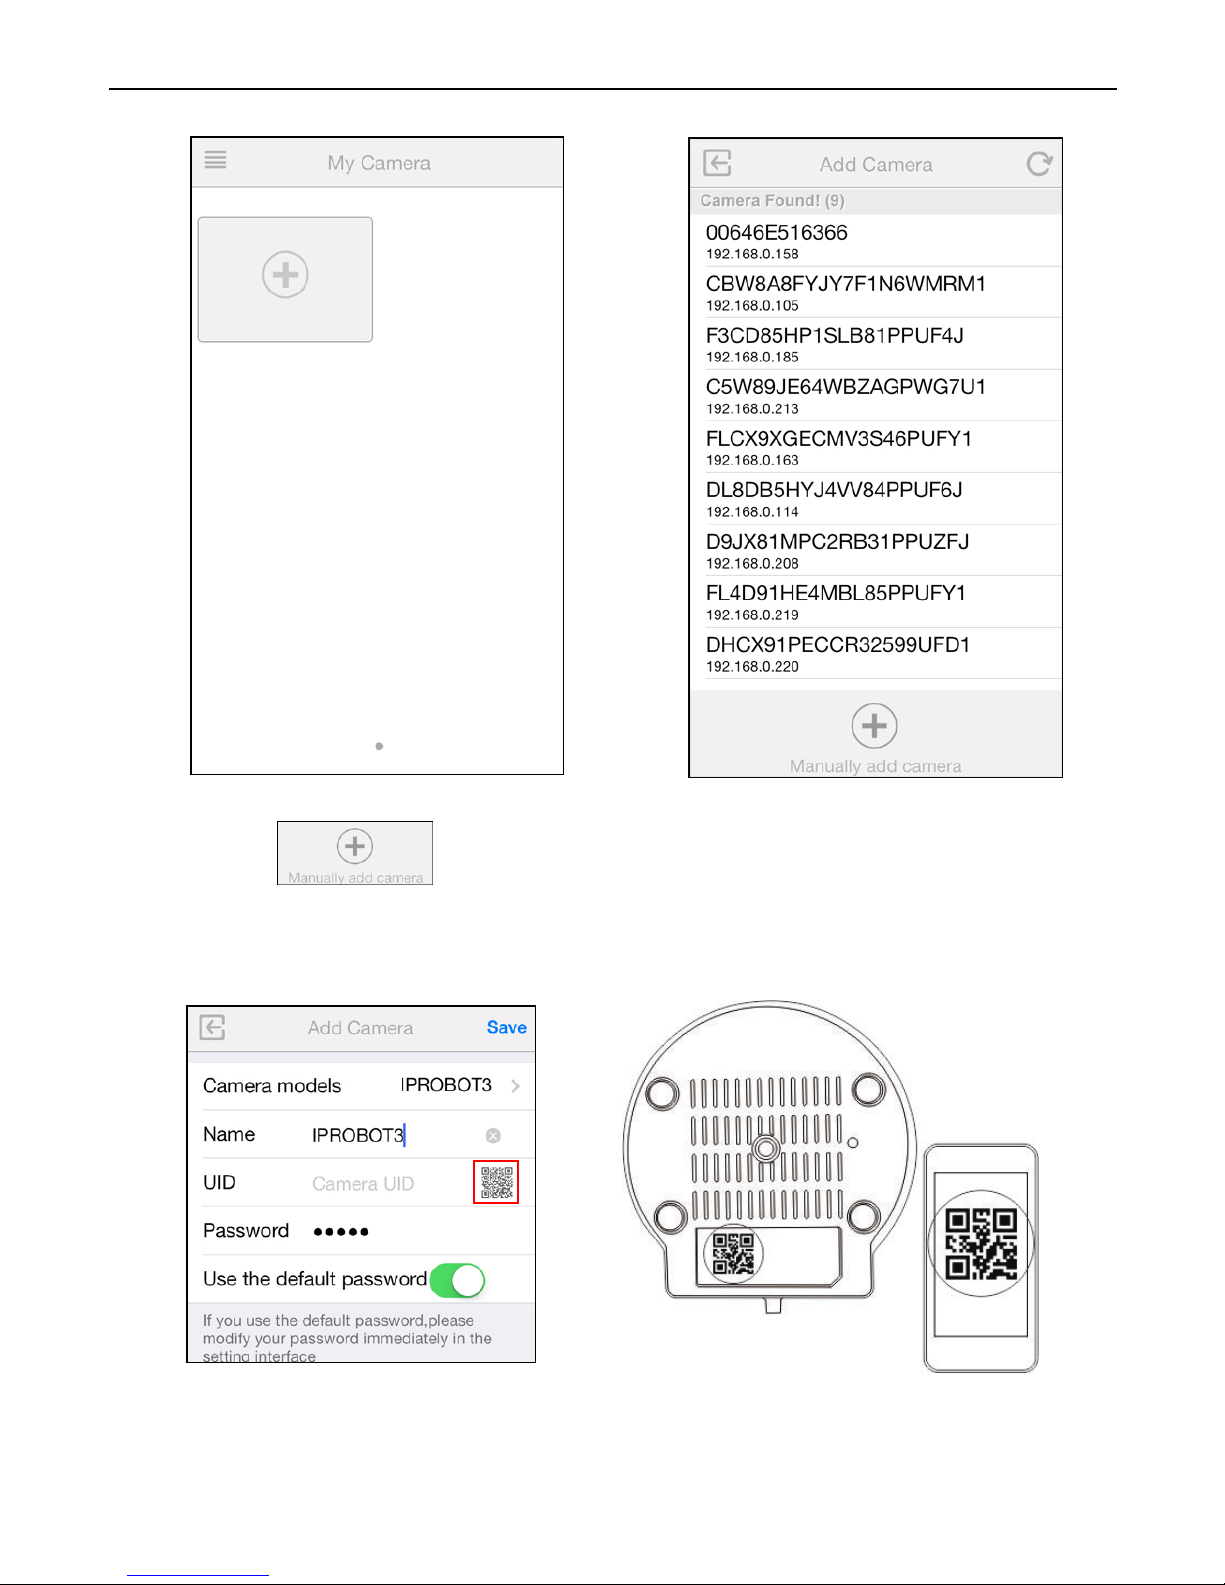
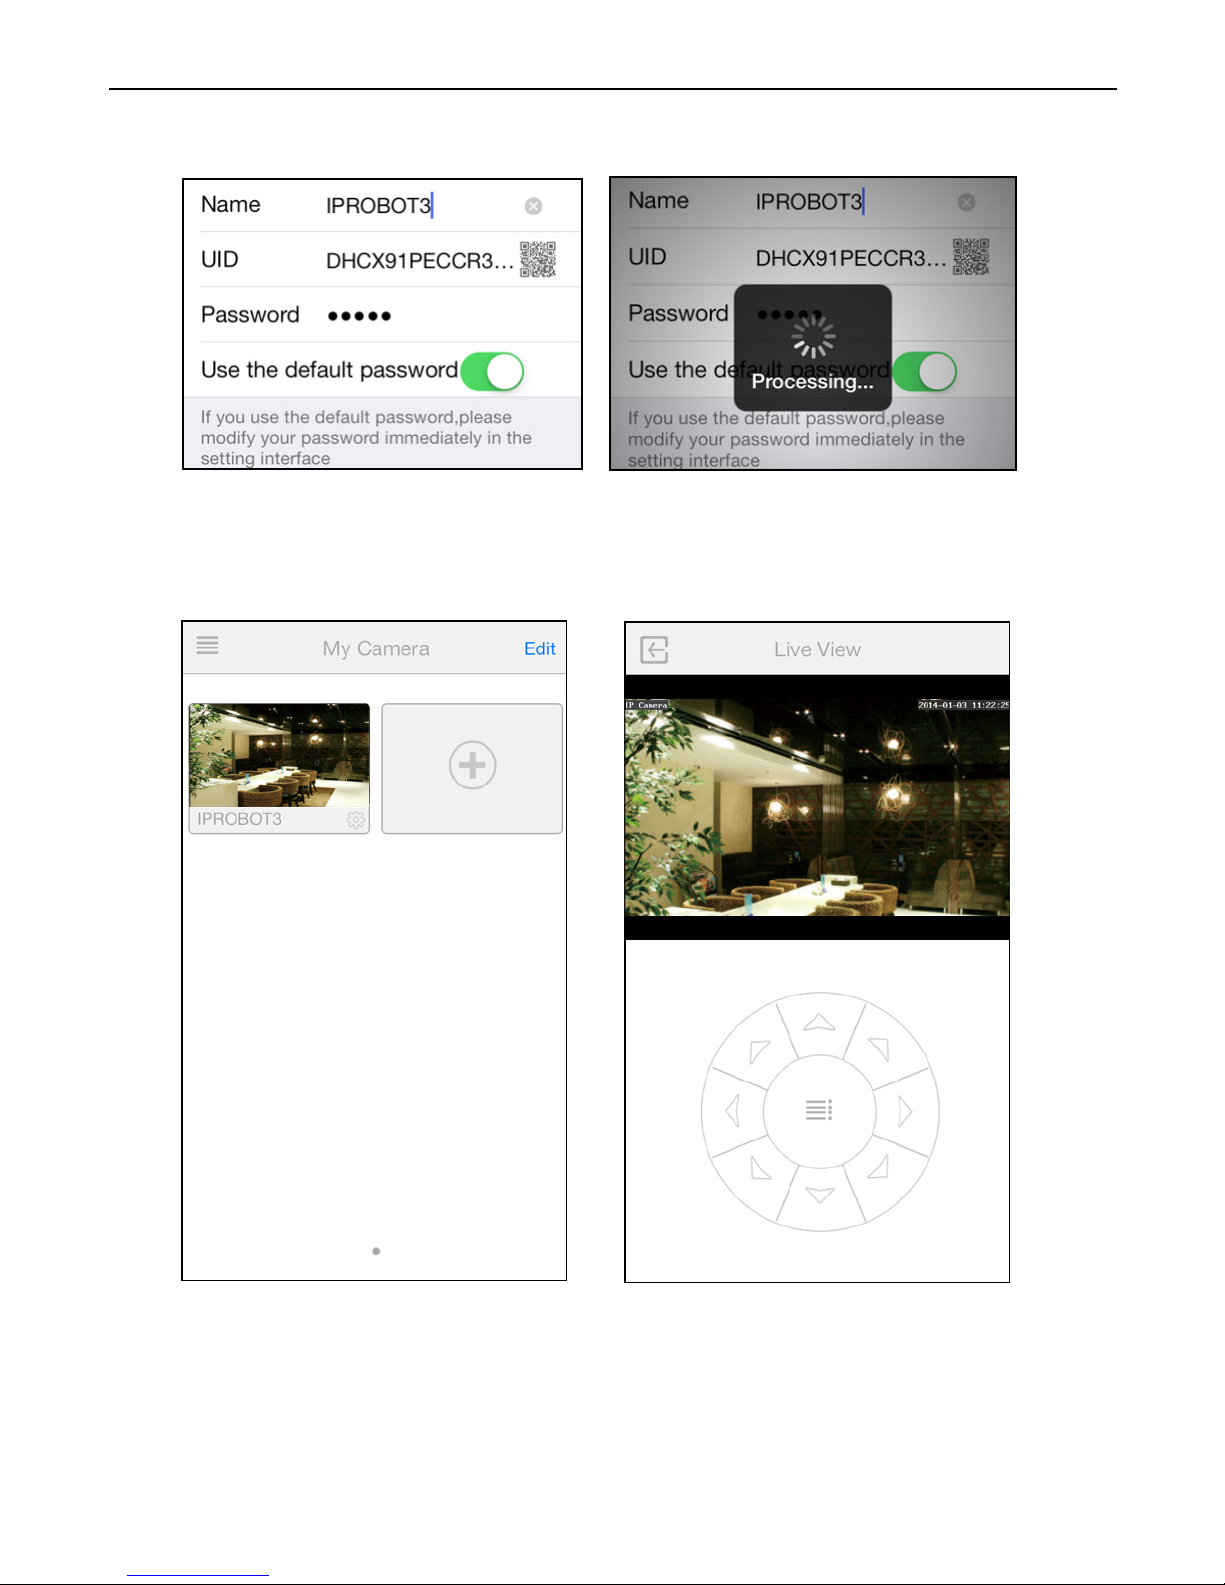
5. You can choose to add you camera manually:
Click button and select your camera model and enter
camera’s UID code (displayed at the bottom of the camera) and
password. You can scan camera’s UID from Camera's QR code by
tapping QR Code Icon to initiate the scan.
6. Enter the camera's name and password. By default the password is
admin.
Page 8
TENVIS Technology Co., Ltd.
5
7. Select the camera you've j ust added to st art viewing live video.
Page 9
TENVIS Technology Co., Ltd.
6
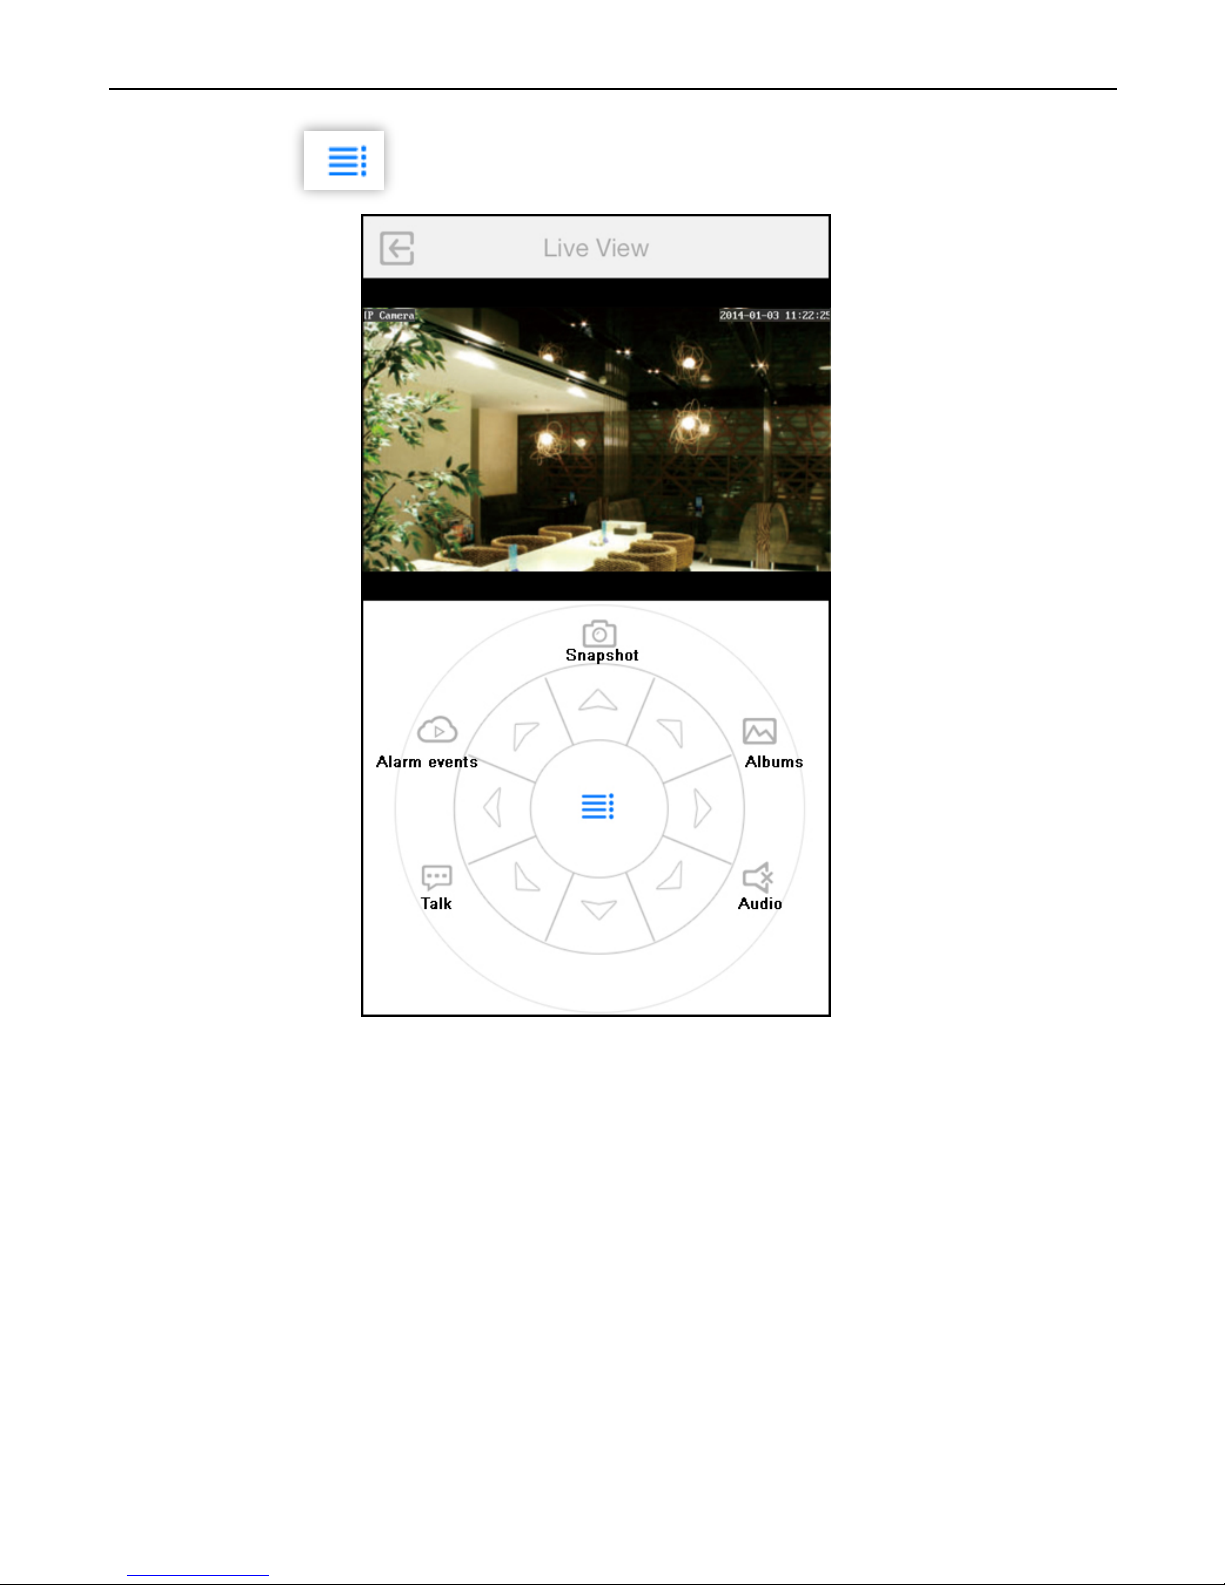
8. Tap on to display additional functions:
Pan/tilt control: 8 directions pan/ti lt cont rol.
Talk: Allows user to talk to the camera from NEW TEN VIS App .
Alarm Events: Setup alarm events
;
Snapshot: Take a snapshot picture from current camera feed;
Albums: View the snapshots taken.
Audio: Allows user to listen to the camera’s audio feed.
*Notice: To check alarm events, Insert a micro SD card and enable record
by micro SD first, then enable motion detection. TENVIS IP Camera is
designed to only supplement existing residential and business security
systems.
Page 10
TENVIS Technology Co., Ltd.
7
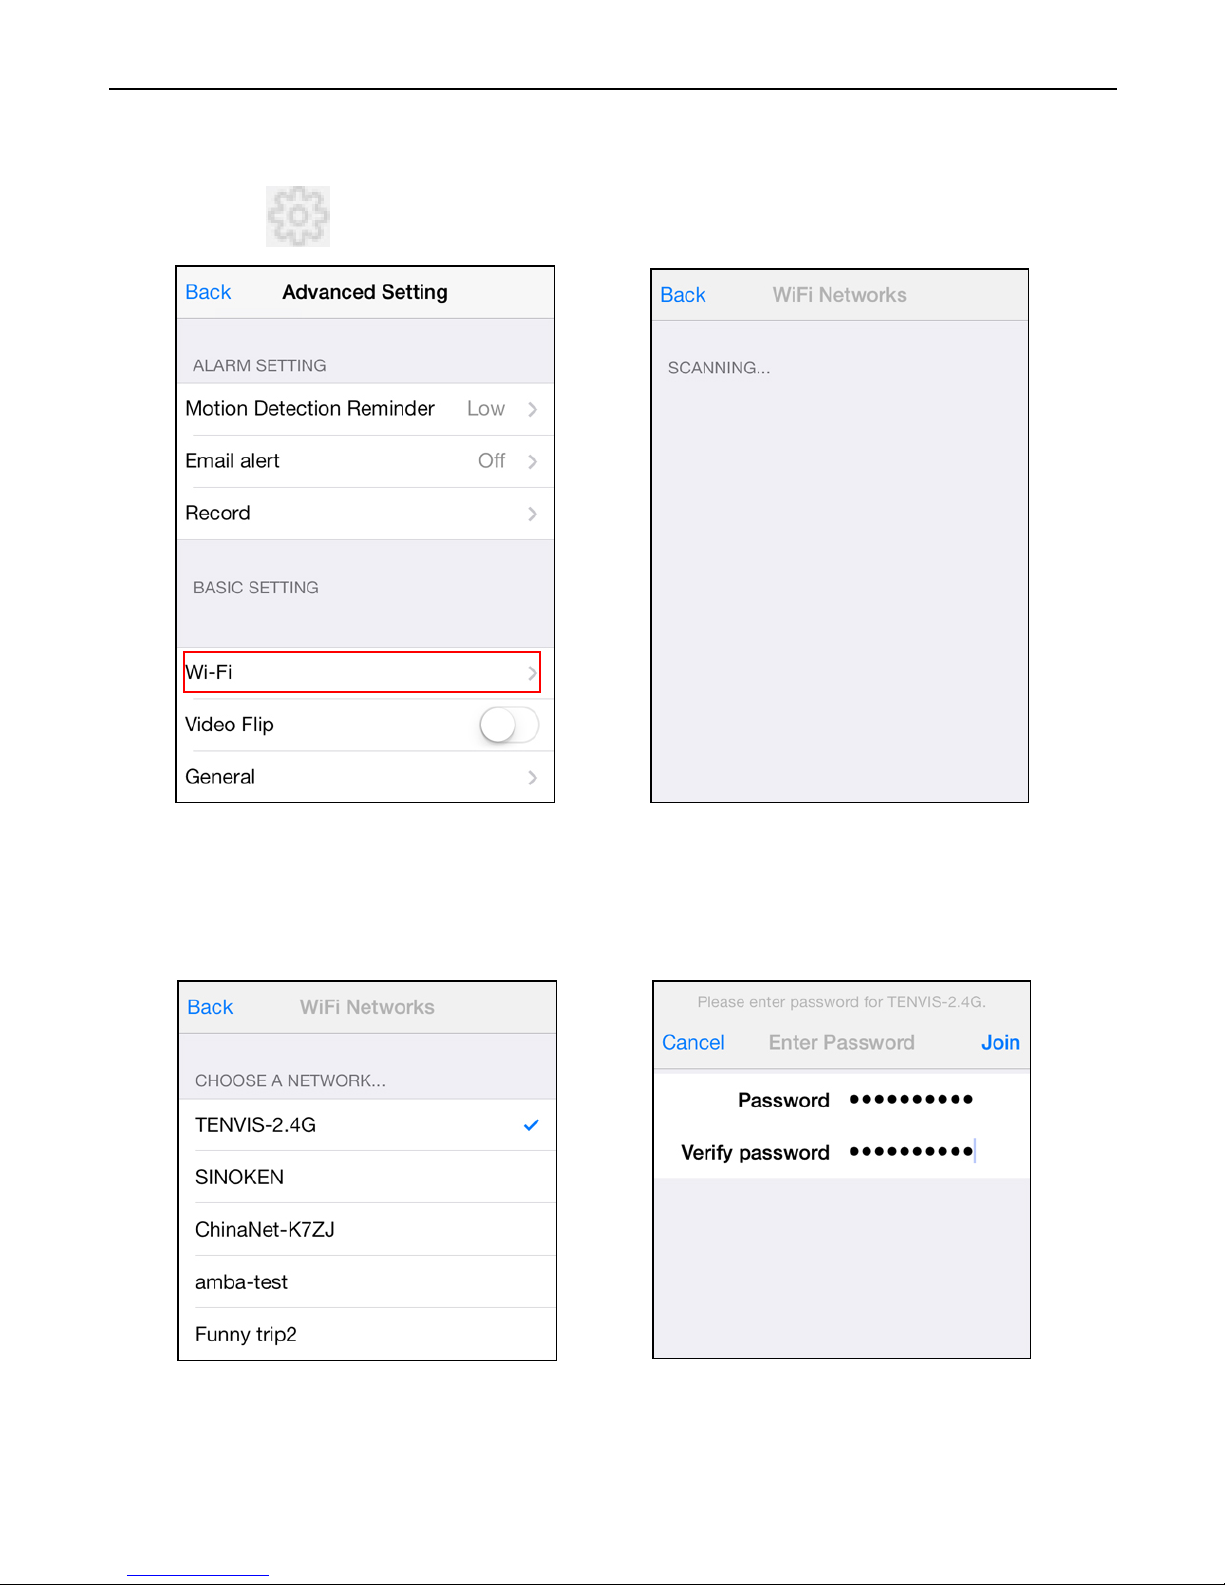
1. Click to start configuring your c am era for wireless operati on.
2.
The camera will start scanning for Wi-Fi connections. Select your
Wi-Fi connection or network ID (SSID). Enter the password for your
Wi-Fi connection.
Wi-Fi Setup
Page 11
TENVIS Technology Co., Ltd.
8
3. When the W i-Fi is successfully configured, you can now disconnect
the network cable from your camera and start using your camera as a
wireless device.
*Notice: Please wait for at least 30s (maximum to 1 minute) for Wi-Fi mode
to be completely functional.
*Tips: If your router has a WPS button, you could set up wireless LAN
easily by using the WPS button on the camera and the router by the
operation steps on Page 36.
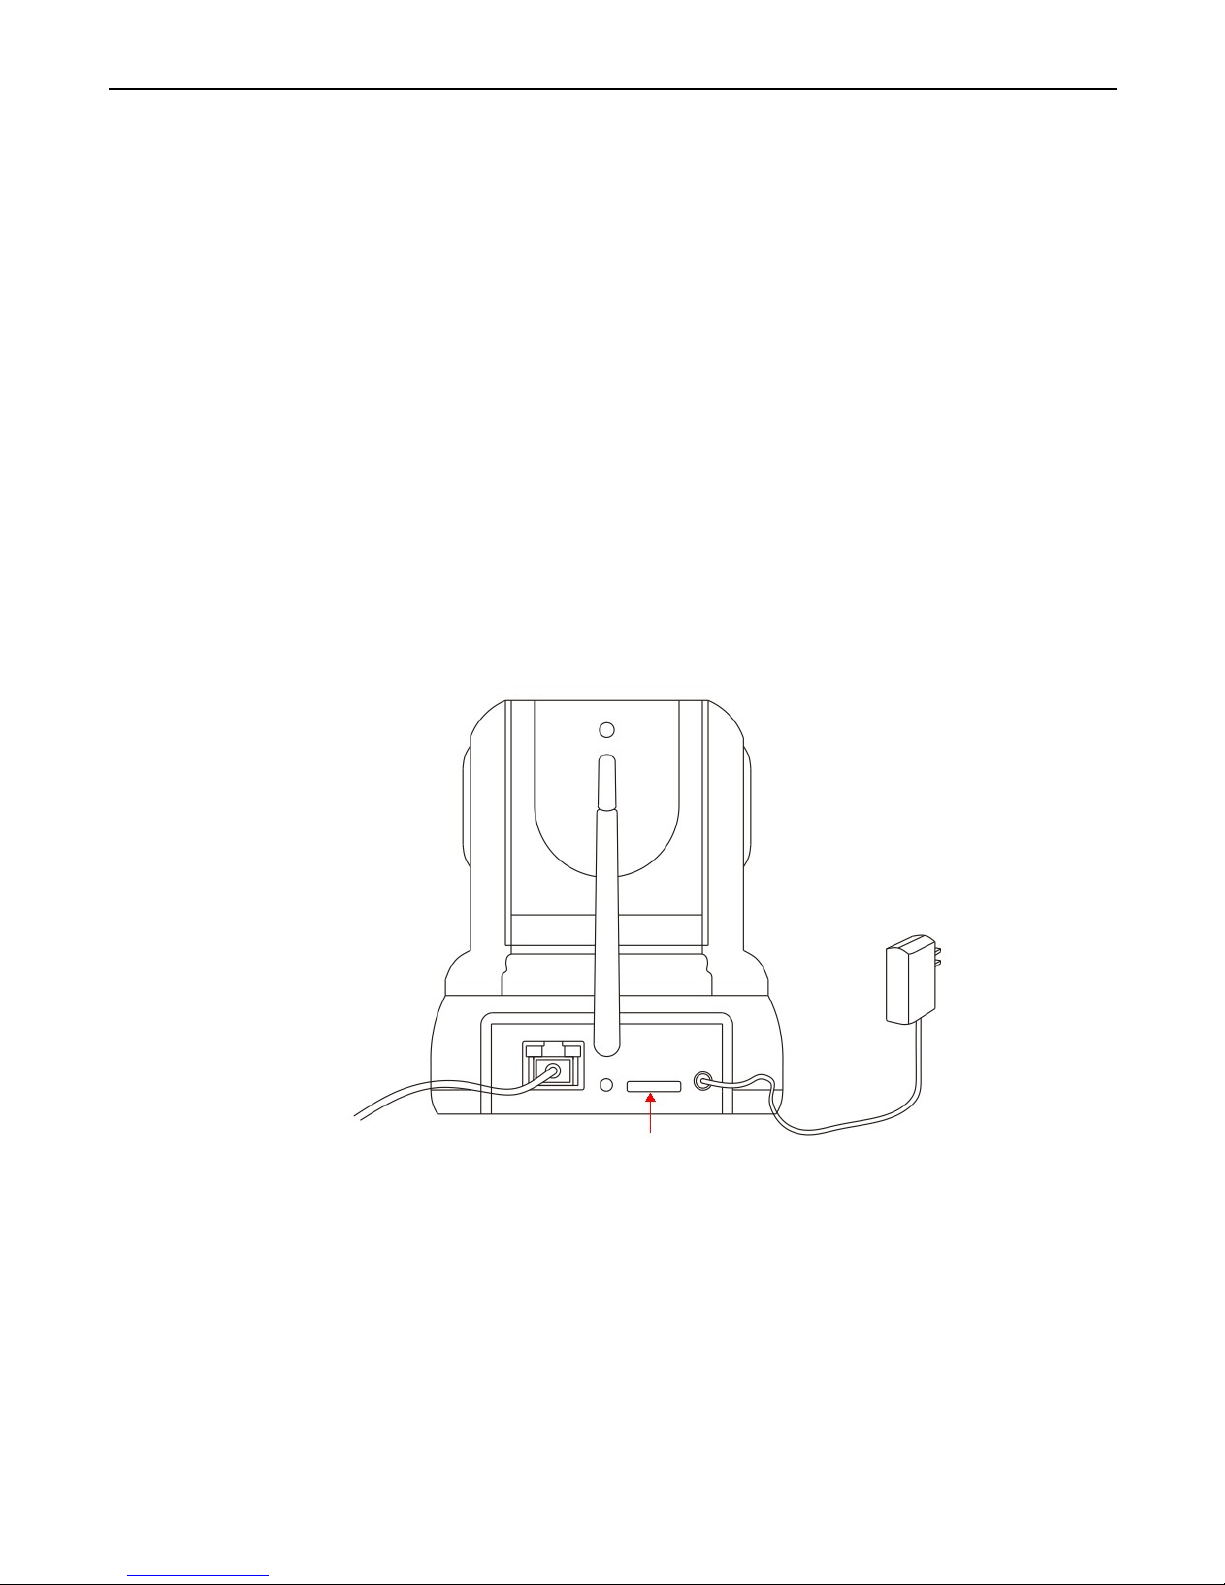
1. U
nplug the AC power adapter from the camera; insert a micro SD
card (sold separately). Plug the AC power adapter back to the camera
and wait for it to reboot.
2. T
ap on Record in settings and select the mode to record to micro SD
card. Choose between Full time for continuous recording, or Alarm
for recording while motion is detected. The camera will reboot after
saving Record settings
Alarm Setup
Page 12

TENVIS Technology Co., Ltd.
9
*
Notice: When card is full the camera will automatically overwrite history
recorded files.
3. Set up e-mail alarm if you want the camera to send snapshot pictures
to your e-mail address when alarm goes off. Enter your e-mail
address and password to receive snapshot pictures.
*Notice: Some email service provider needs SMTP server information to
enable e-mail alert function. Please cont act your email service provider for
SMTP server information.
*Important: There may be network latenc y while establishing a connecti on
depending on your network connections. It may take several minutes for
the camera to connect to SMTP server.
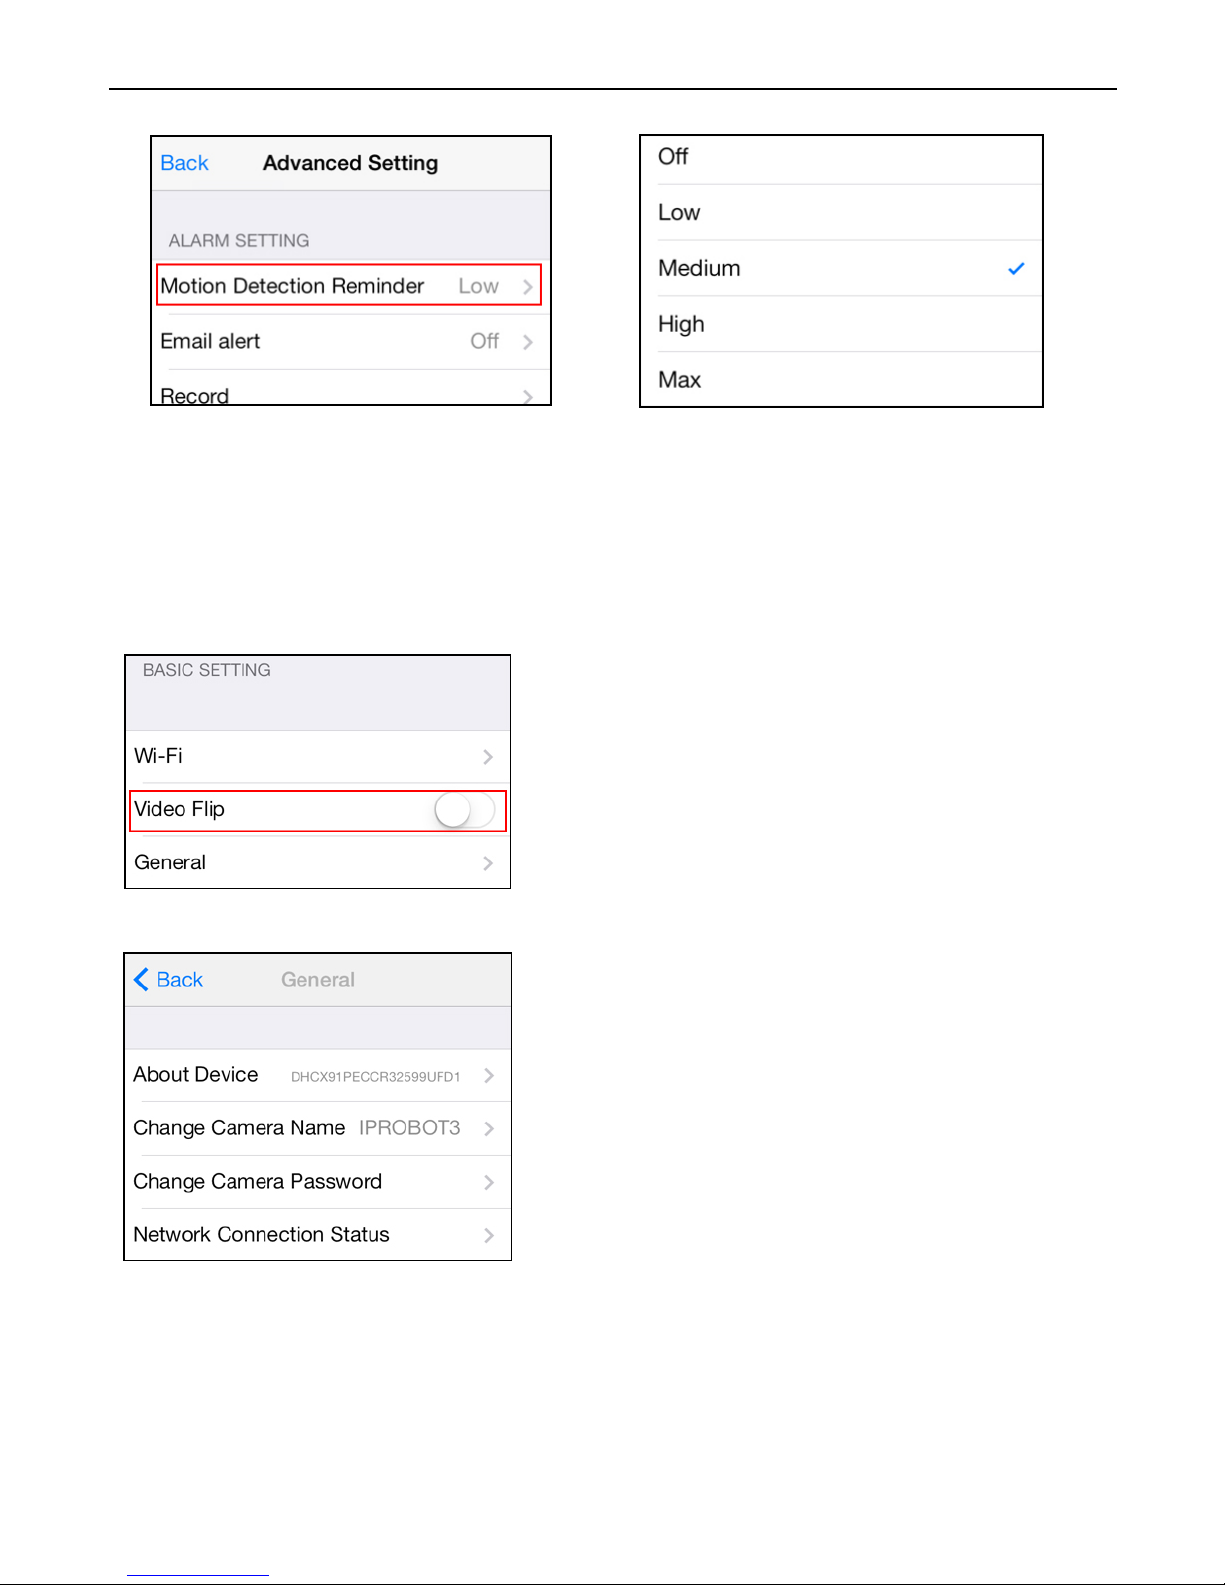
4. After setting up “Actions to take” when the alarm goes off, please
enable m otion detection. Choose the appropriate sensitivity level for
movement detection.
Page 13
TENVIS Technology Co., Ltd.
10
*Notice: We recommend this function to be deactivated in a busy
environment to avoid excessive notifications.
Other Settings
Flip Video
Mirror the displayed image horizontally
or vertically.
General
About Device: Display d evice
information and firmware version.
Change camera name: Allow user to
change camera’s alias
Change camera password: manage
camera’s user nam e/pas sword
Network Connecti on S tat us: configure
network connection status
Page 14
TENVIS Technology Co., Ltd.
11
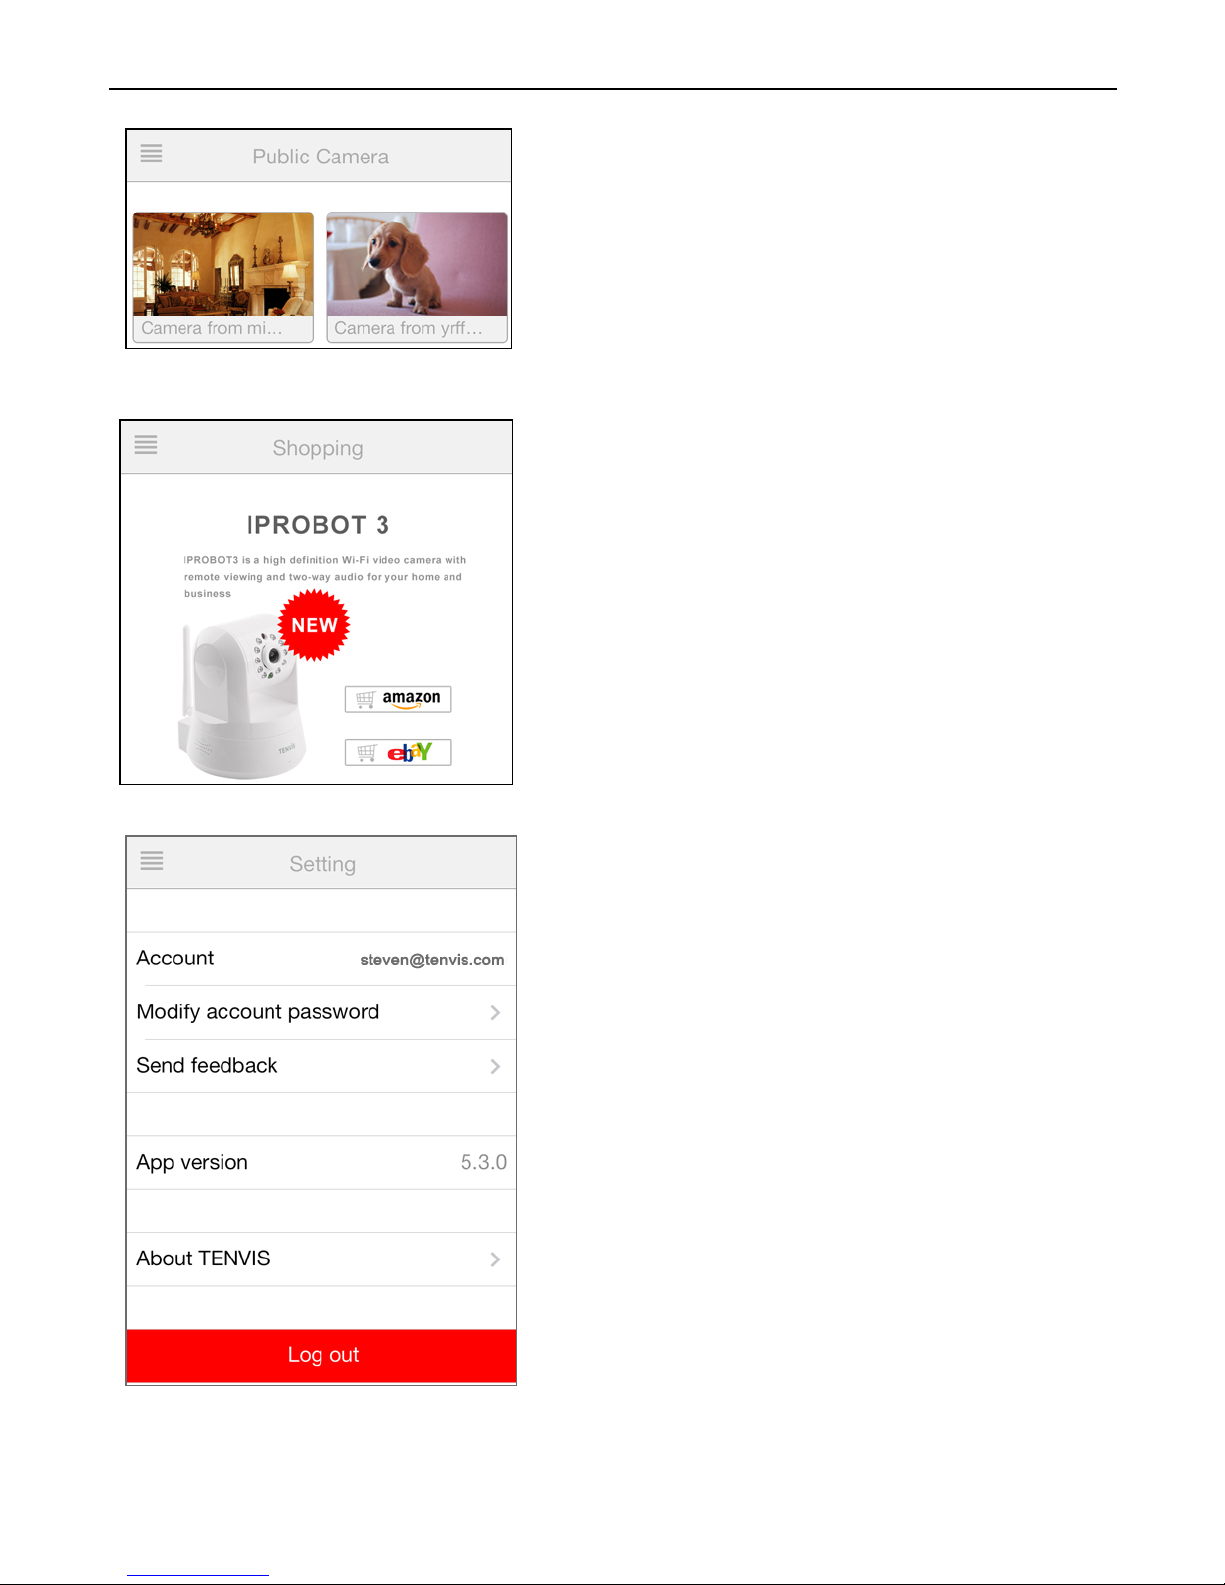
Public camera
View live video of camera shared by
others. You may also share your camera’s
to others. Follow instructions below to
share your c amera t o others in Sett ing:
Shopping
Find the latest TEN VIS product pr om otio n
Setting
Account: Your current account name.
Modify account password: Modify NEW
TENVIS accou nt password.
Send feedback: Send us feedback of the
camera.
App version: The v ersion of NEW
TENVIS.
About TENVIS: Go to TENVIS website.
Log out: Log off your NEW TENVIS
account.
Page 15
TENVIS Technology Co., Ltd.
12
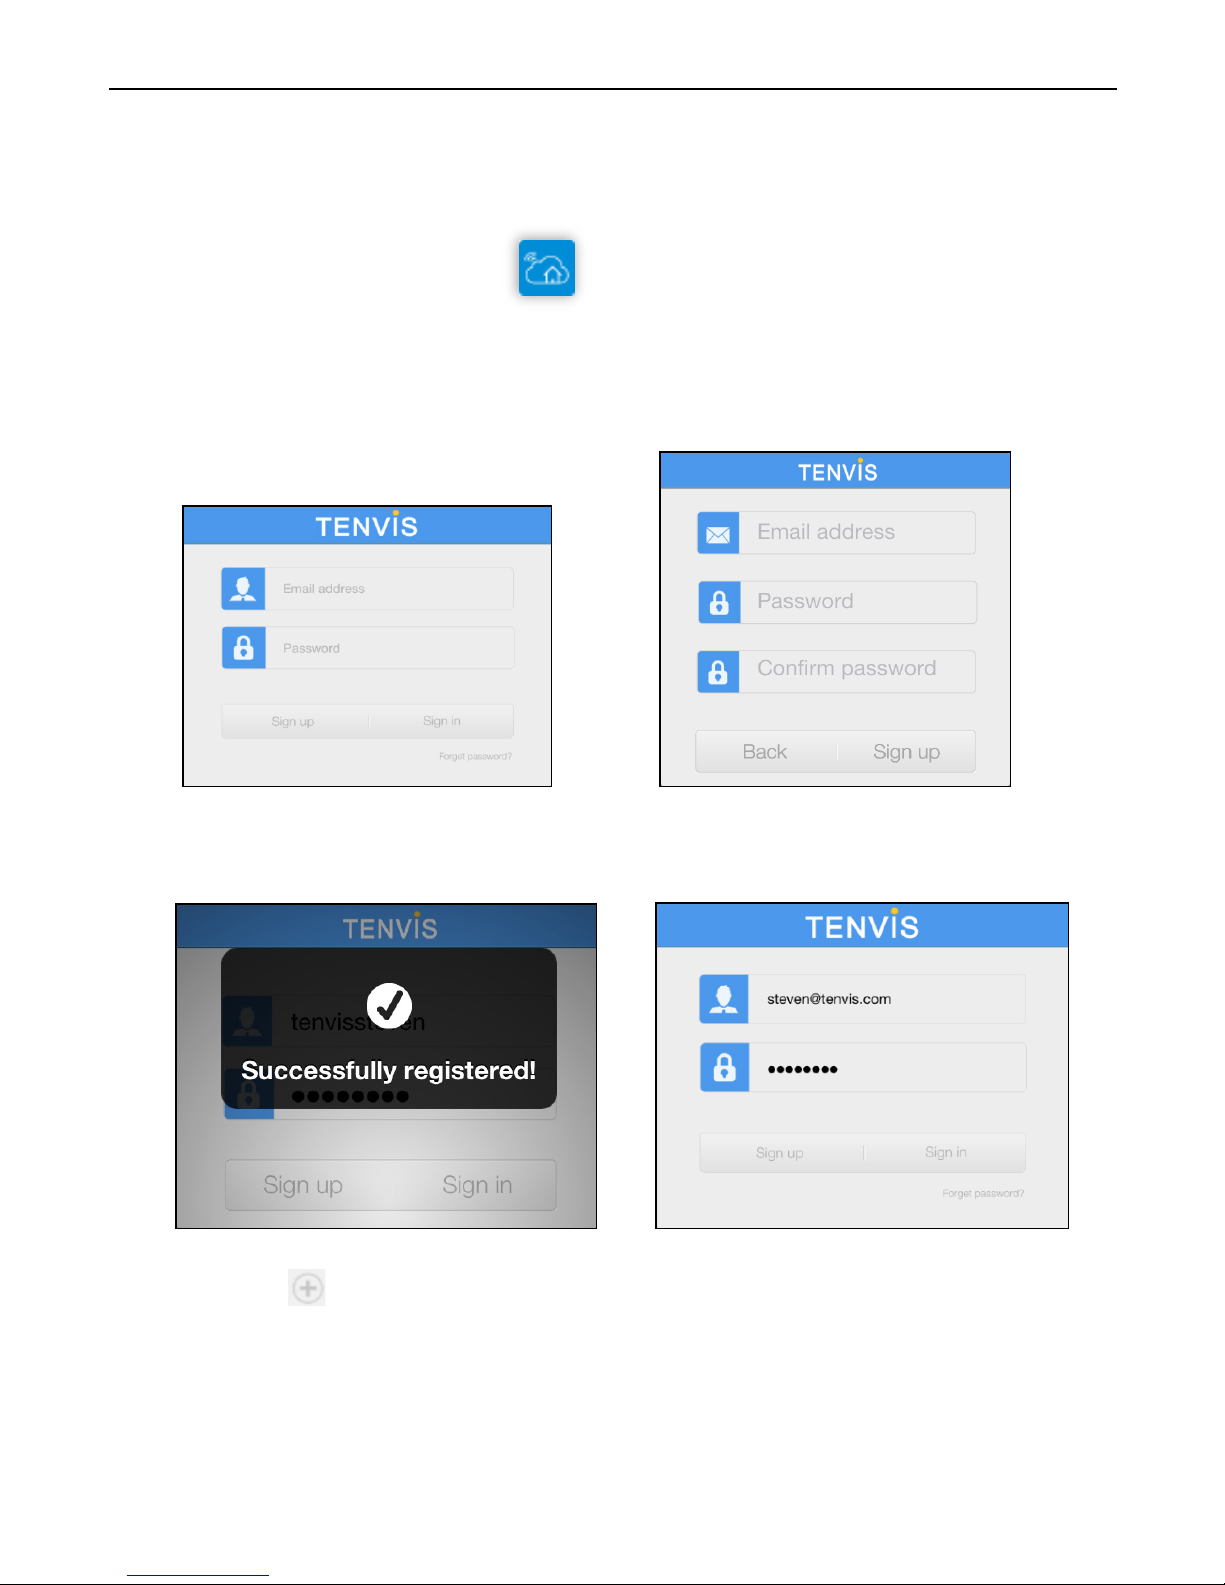
1. Download NEW TENVIS from App Store
2. Tap on Sign up if you do not already have an account with New
TENVIS. Fill in the required inf ormation to regist er for a New TENVIS
user account.
3. After signing up, please log on to your account.
4. Tap on to add your new cam era to your account; fi nd th e c am era
by matching UID code in the list to the UID code displayed at the
bottom of the camera. If your new camera is in the same LAN (Local
Area Network), its UID code will show up in the list.
Operation Guide for iPad
Live Video
Page 16
TENVIS Technology Co., Ltd.
13
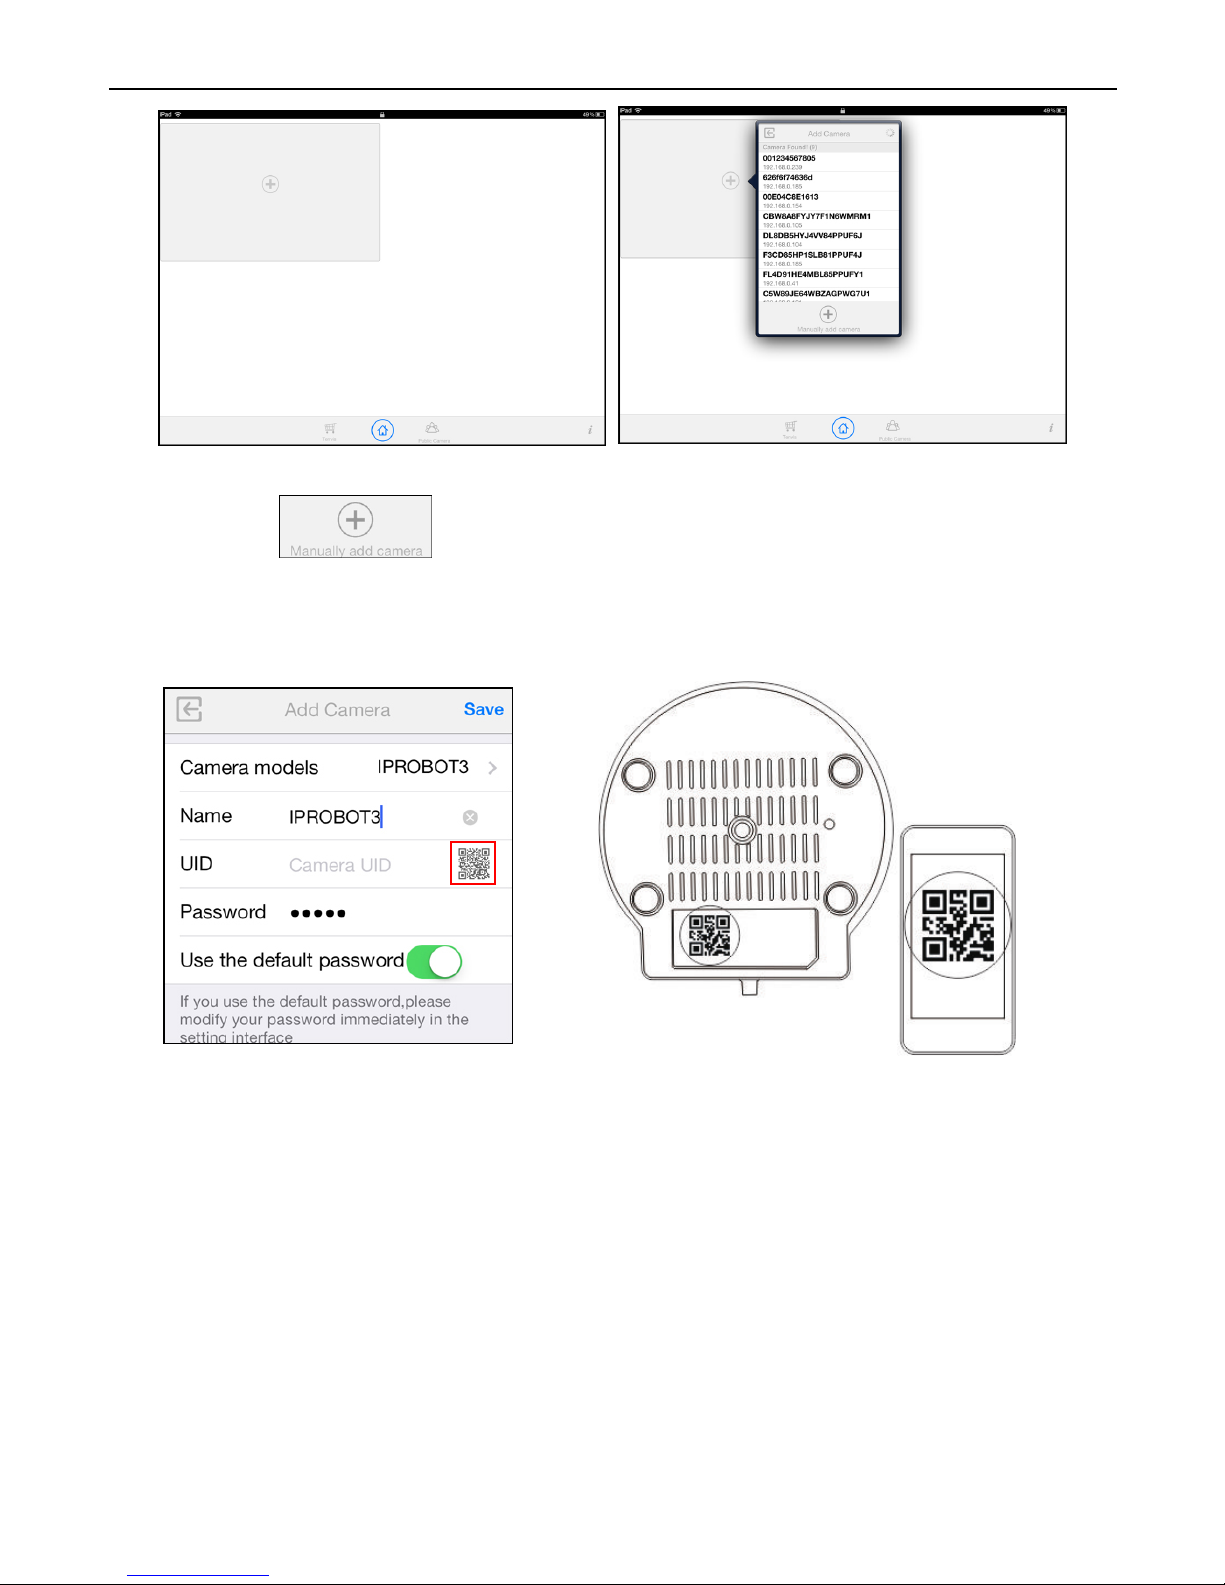
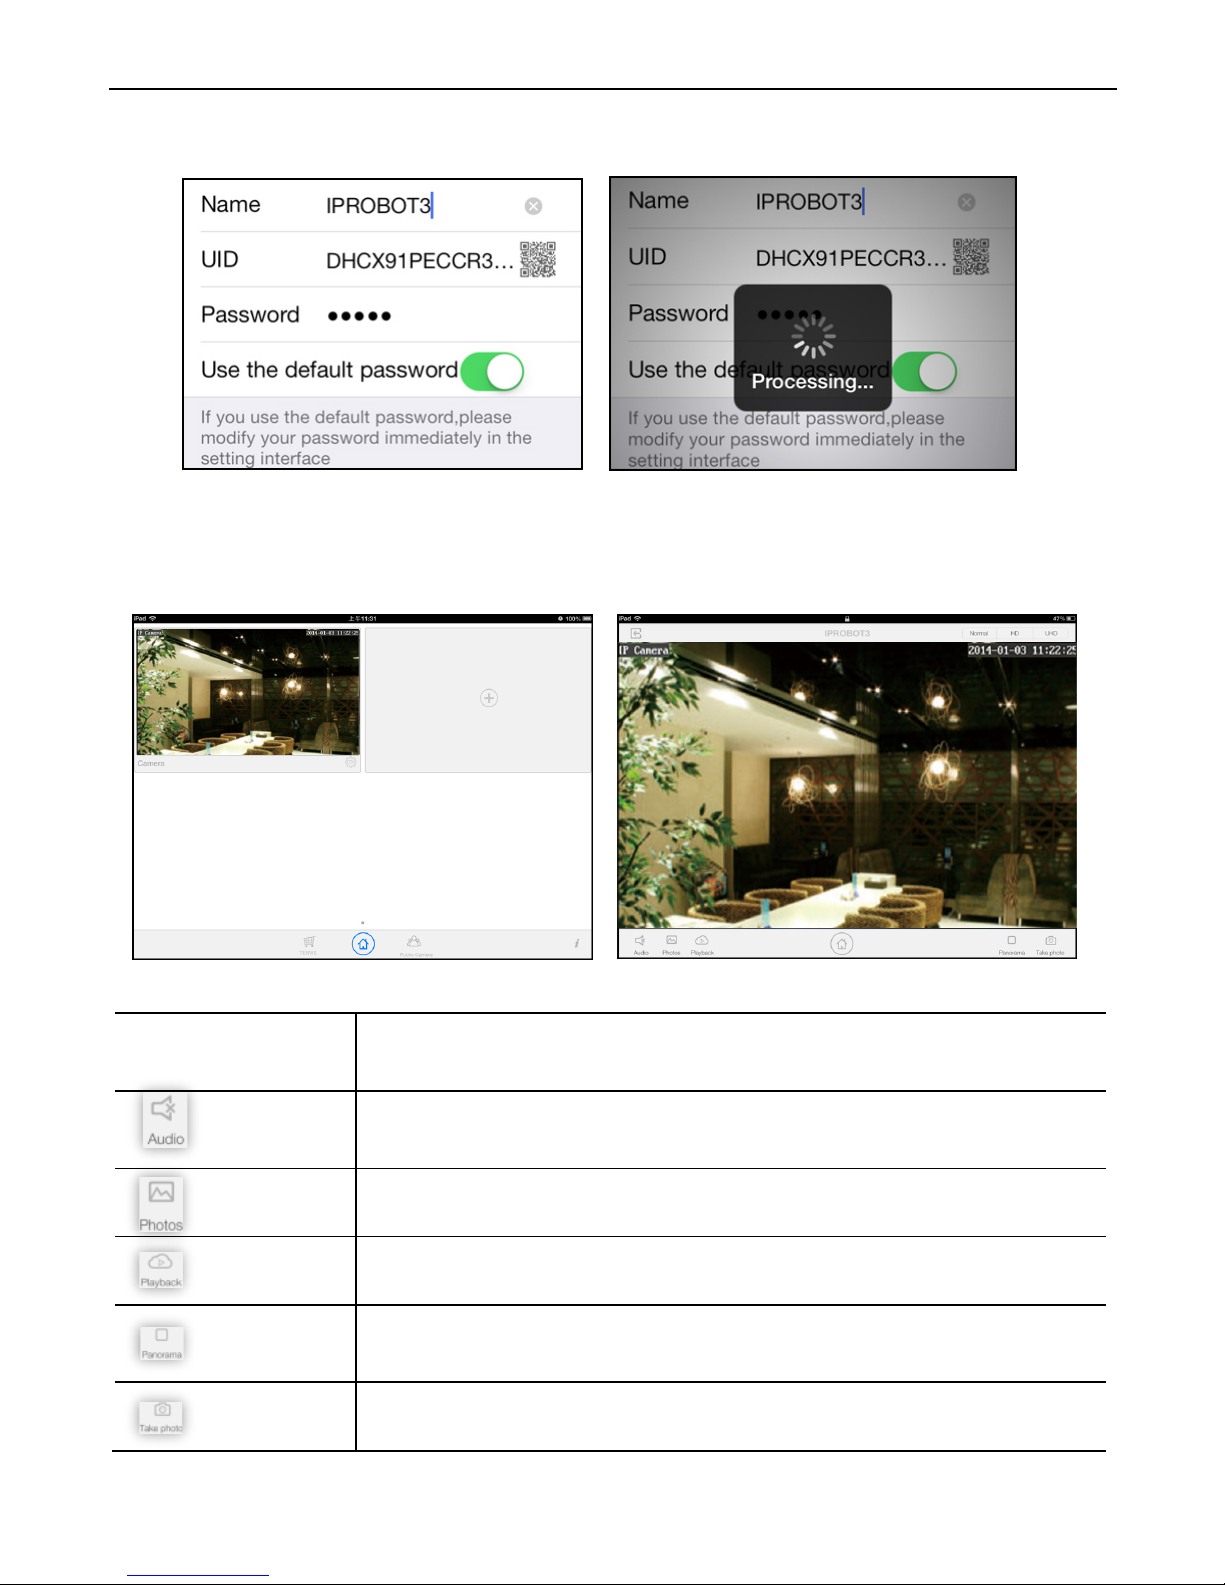
5. You can choose to add you camera manually:
Click button and select your camera model and enter
camera’s UID code (printed at the bottom of the camera) and
password. You can scan camera’s UID from Camera's QR code by
tapping QR Code Icon to initiate the scan.
6. Enter the camera's name and password. Default password is admin.
Page 17
TENVIS Technology Co., Ltd.
14
7. Select the camera you've just added to start viewing live video.
Instructions for the icons and buttons on live video page:
Pan/tilt control
Tap on the button on the video to pan or tilt the
camera
Allows User to listen to t he camera’s audio feed and
talk to the camera from NEW TENVIS App.
View the snapshots taken.
Playback recorded files in micro SD card.
Enable panorama mode. Then you could pan/tilt your
iPad to pan/tilt your camera.
Take a snapshot picture from current camera feed.
Page 18
TENVIS Technology Co., Ltd.
15
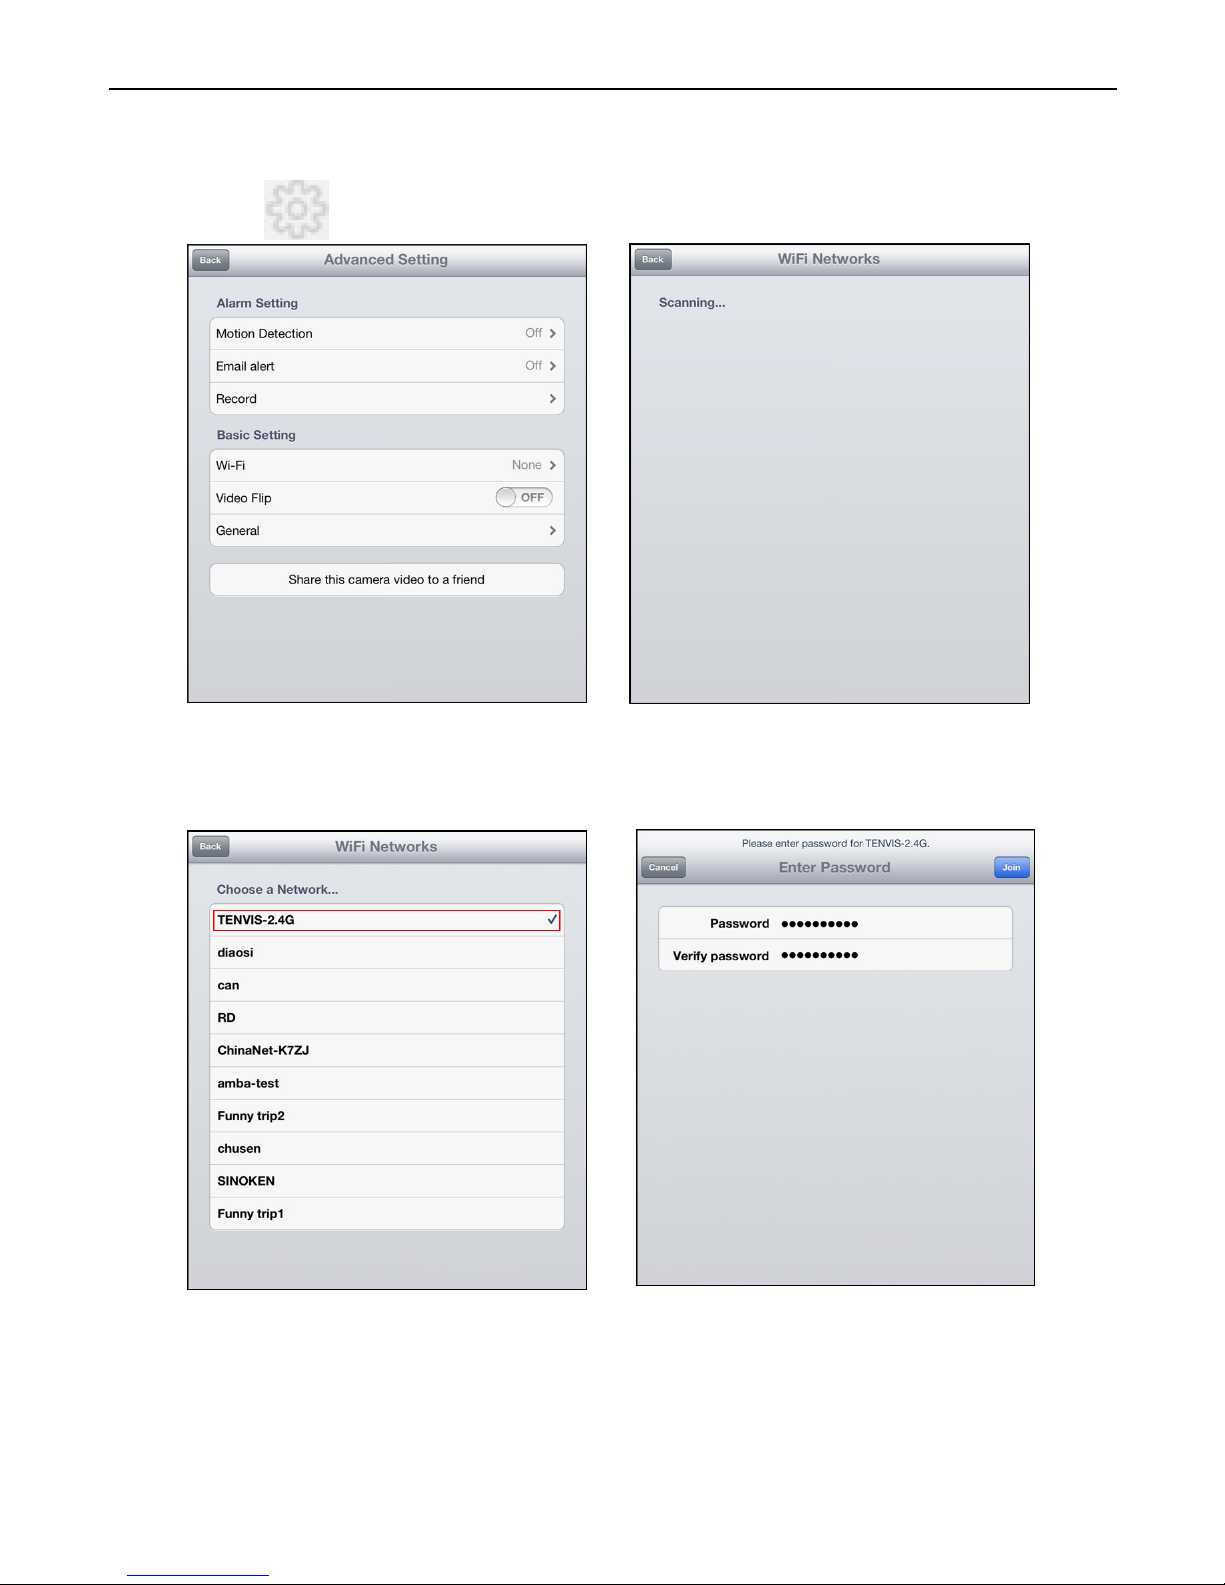
1. Click to start configuring your camera for wireless operation.
2.
The camera will start scanning for Wi-Fi connections. Select your
Wi-Fi connection or network ID (SSID). Enter the password for your
Wi-Fi connection.
3. When the W i-Fi is successfully configured, you can now disconnect
the network cable from your camera and start using your camera as a
wireless device.
*Notice: Please wait for 30 sec to 1 min for camera to switch to Wi-Fi
mode;
Wi-Fi Setup
Page 19
TENVIS Technology Co., Ltd.
16
*Tips: If your router has a WPS button, you could set up wireless LAN
easily by using the WPS button on the camera and the router by the
operation steps on Page 36.
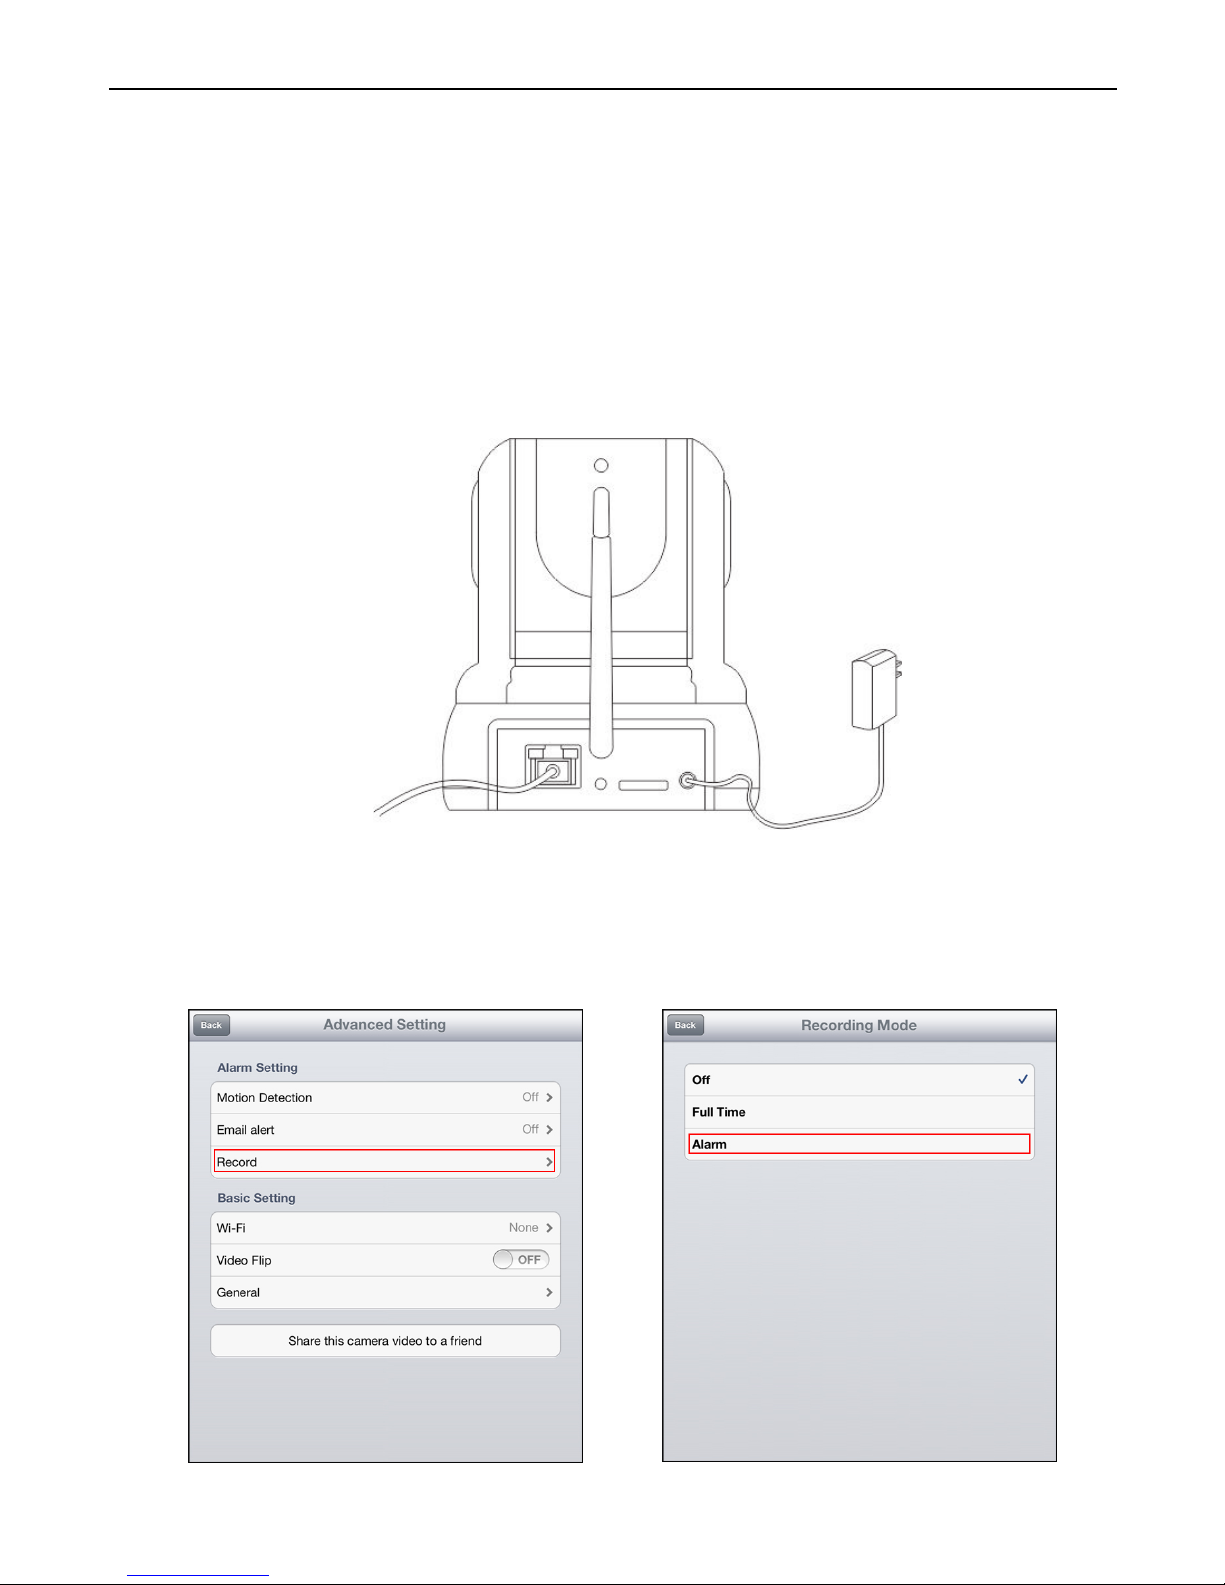
1. P
ower off the camera, insert a micro SD card if you want to record to
micro SD card (purchase separately, not sold with this product).
Power on the camera and wait for it to reboot.
2. Tap on Record in settings and select the mode to record to micro SD
card. Switch between Full time for continuous recording, or Alarm for
recording while motion is detected. The camera will reboot after
saving Record settings
Alarm Setup
Page 20
TENVIS Technology Co., Ltd.
17
* Notice: When card is full the camera will automatically overwrite history
recorded files.
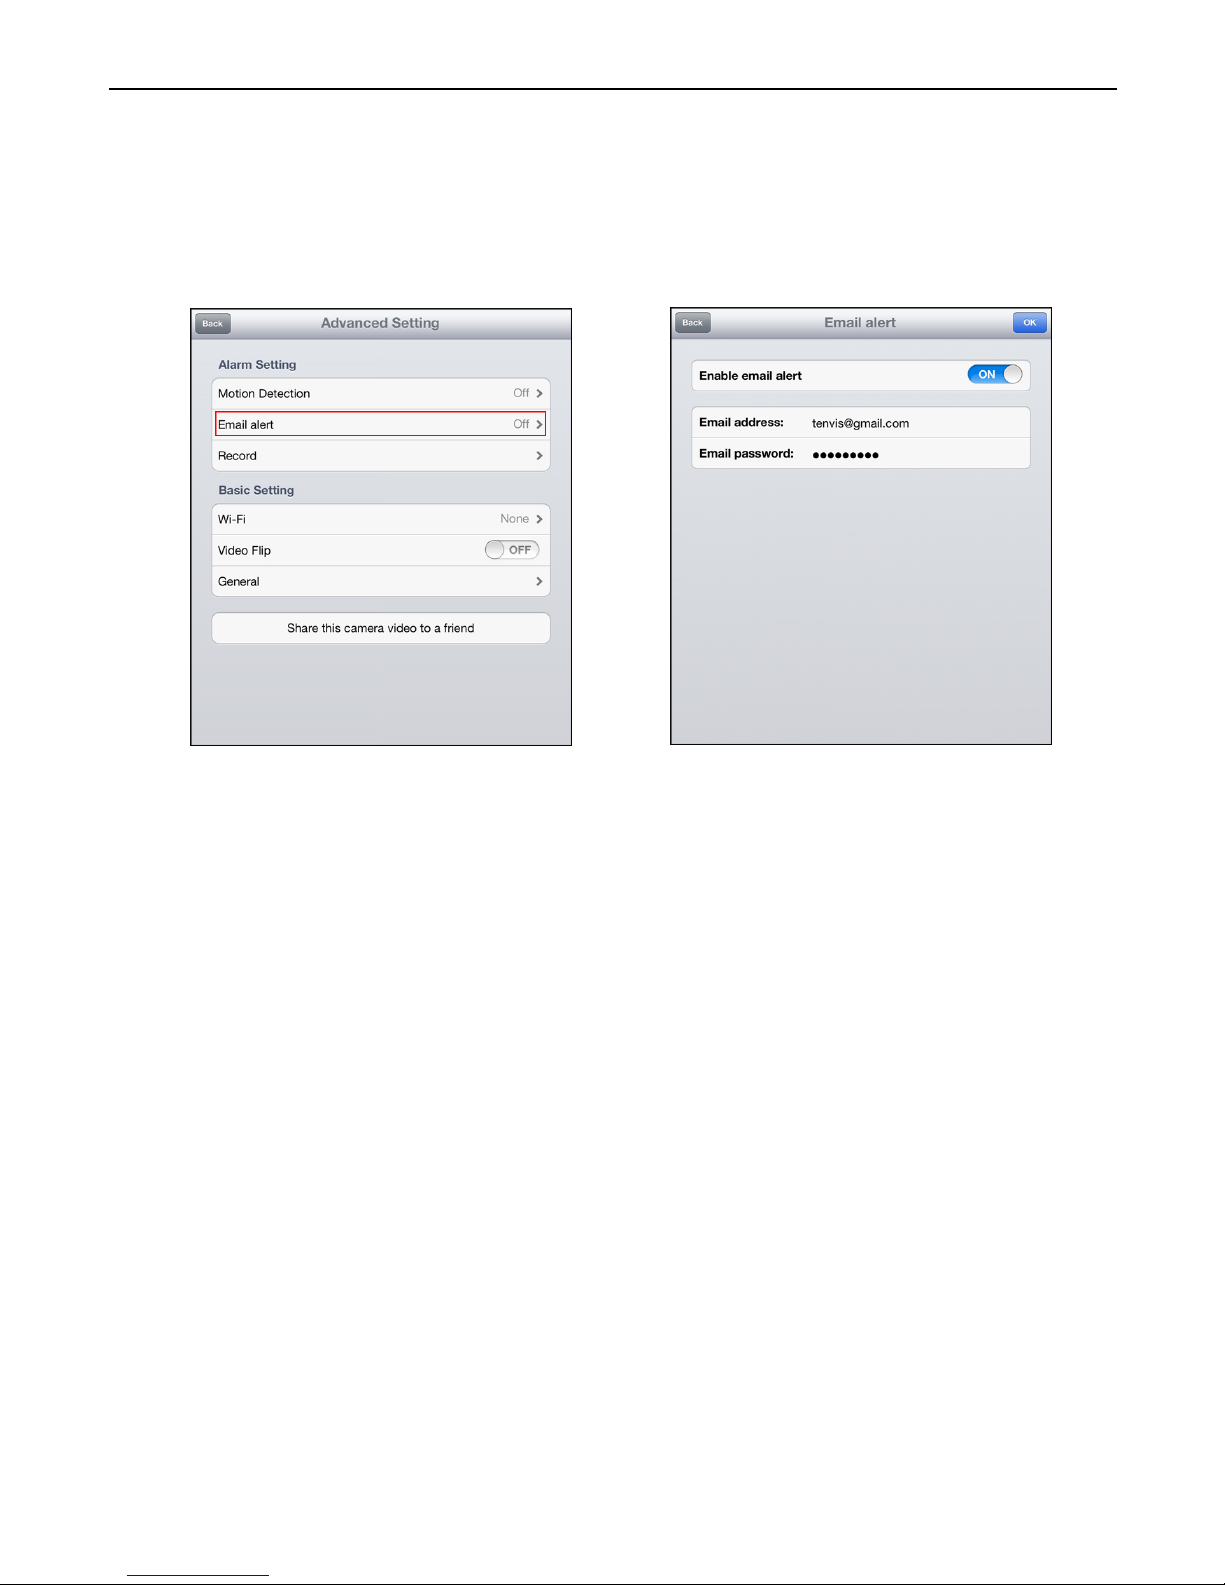
3. Set up e-mail alarm if you want the camera to send snapshots to your
e-mail address when alarm goes off. Enter your e-mail address and
password to set up email alert setting.
*Notice: Some email service provider needs SMTP server information to
enable e-mail alert function. Please cont act your email service provider for
SMTP server information.
There may be network latency while establishing
a connection depending on your network connections. It may take up to a
few minutes for the camera to connect to SMTP server.
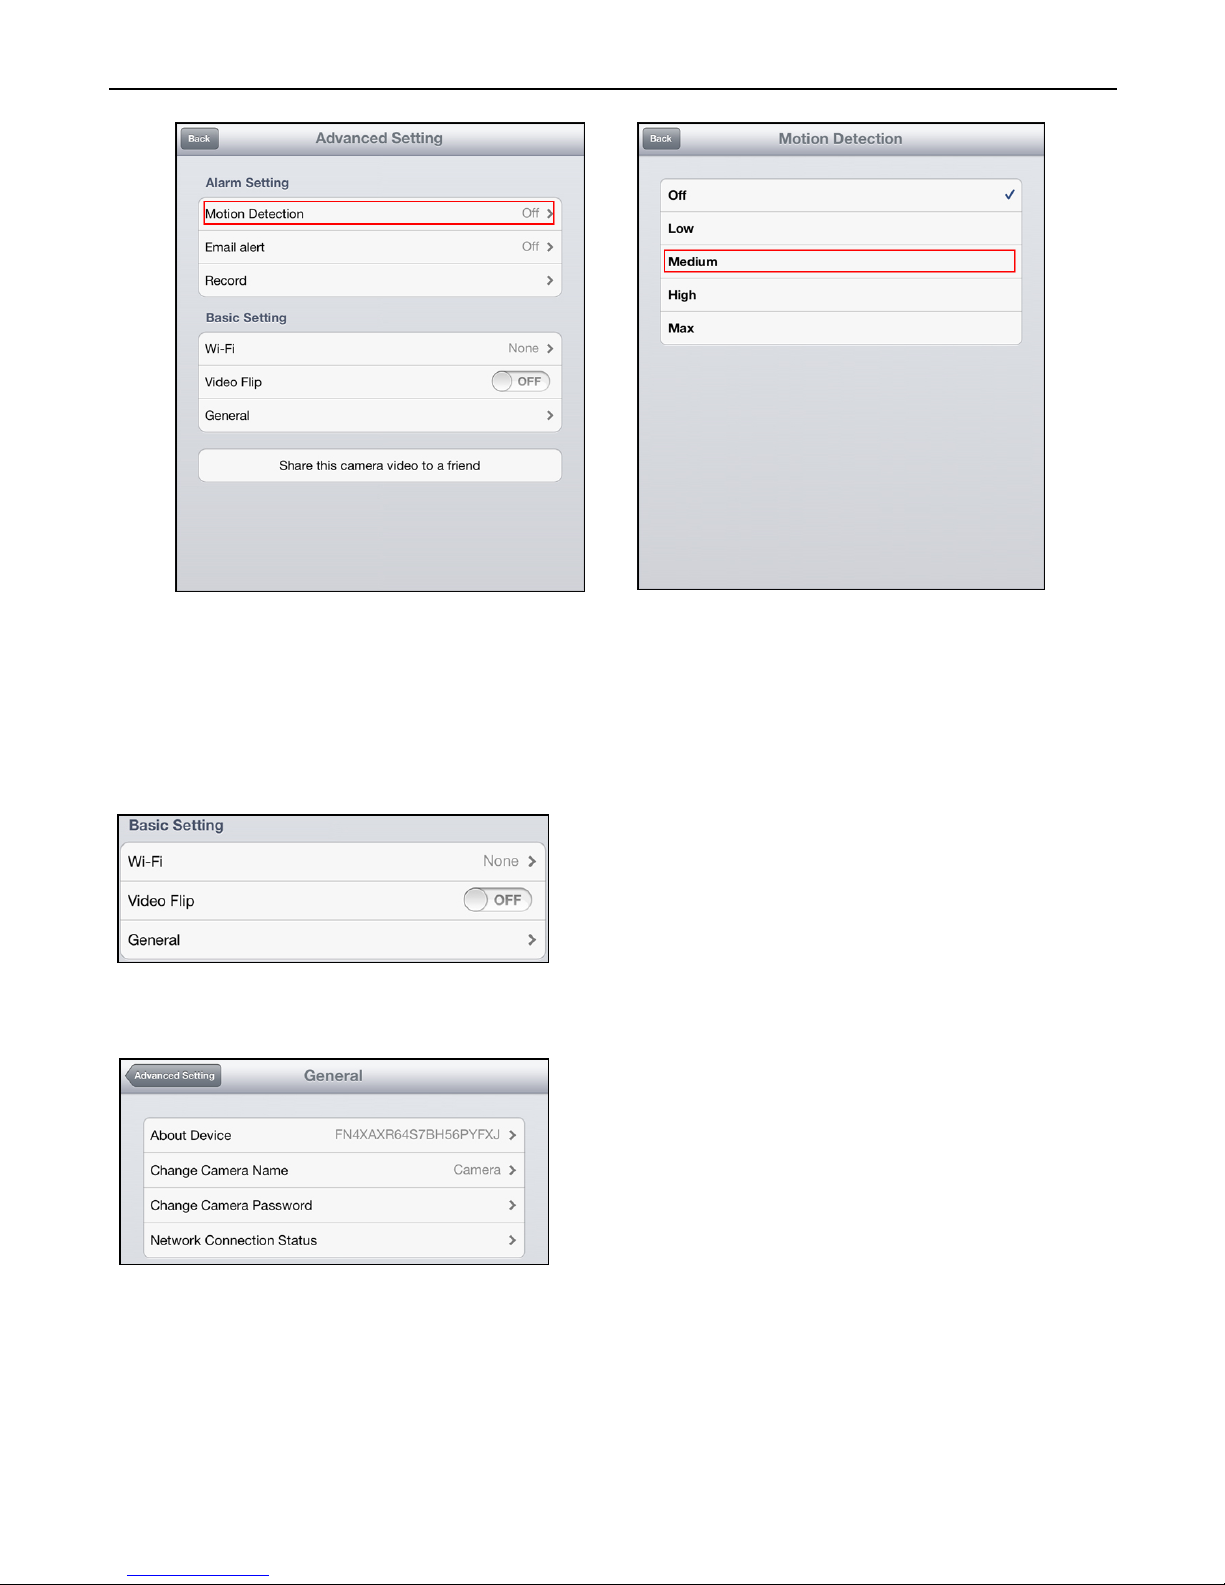
4. After setting up actions to take when the cam era is alarming, please
enable motion detection of the camera. Choose the detection
sensitivity level for movement detection.
Page 21
TENVIS Technology Co., Ltd.
18
*Notice: We recommend this function to be deactivated in a busy
environment to avoid massive notific ations.
Flip Video
Mirror the displayed image horizontall y
or vertically when the camera is
mounted.
General
About Device: Containing information of
device and its firmware version.
Change camera name: Change camera’s
display name;
Change camera password: Changing
camera’s user pas sword
Network Connecti on S tat us: Check the
camera connection status or reconnect it
manually.
Other Settings
Page 22
TENVIS Technology Co., Ltd.
19
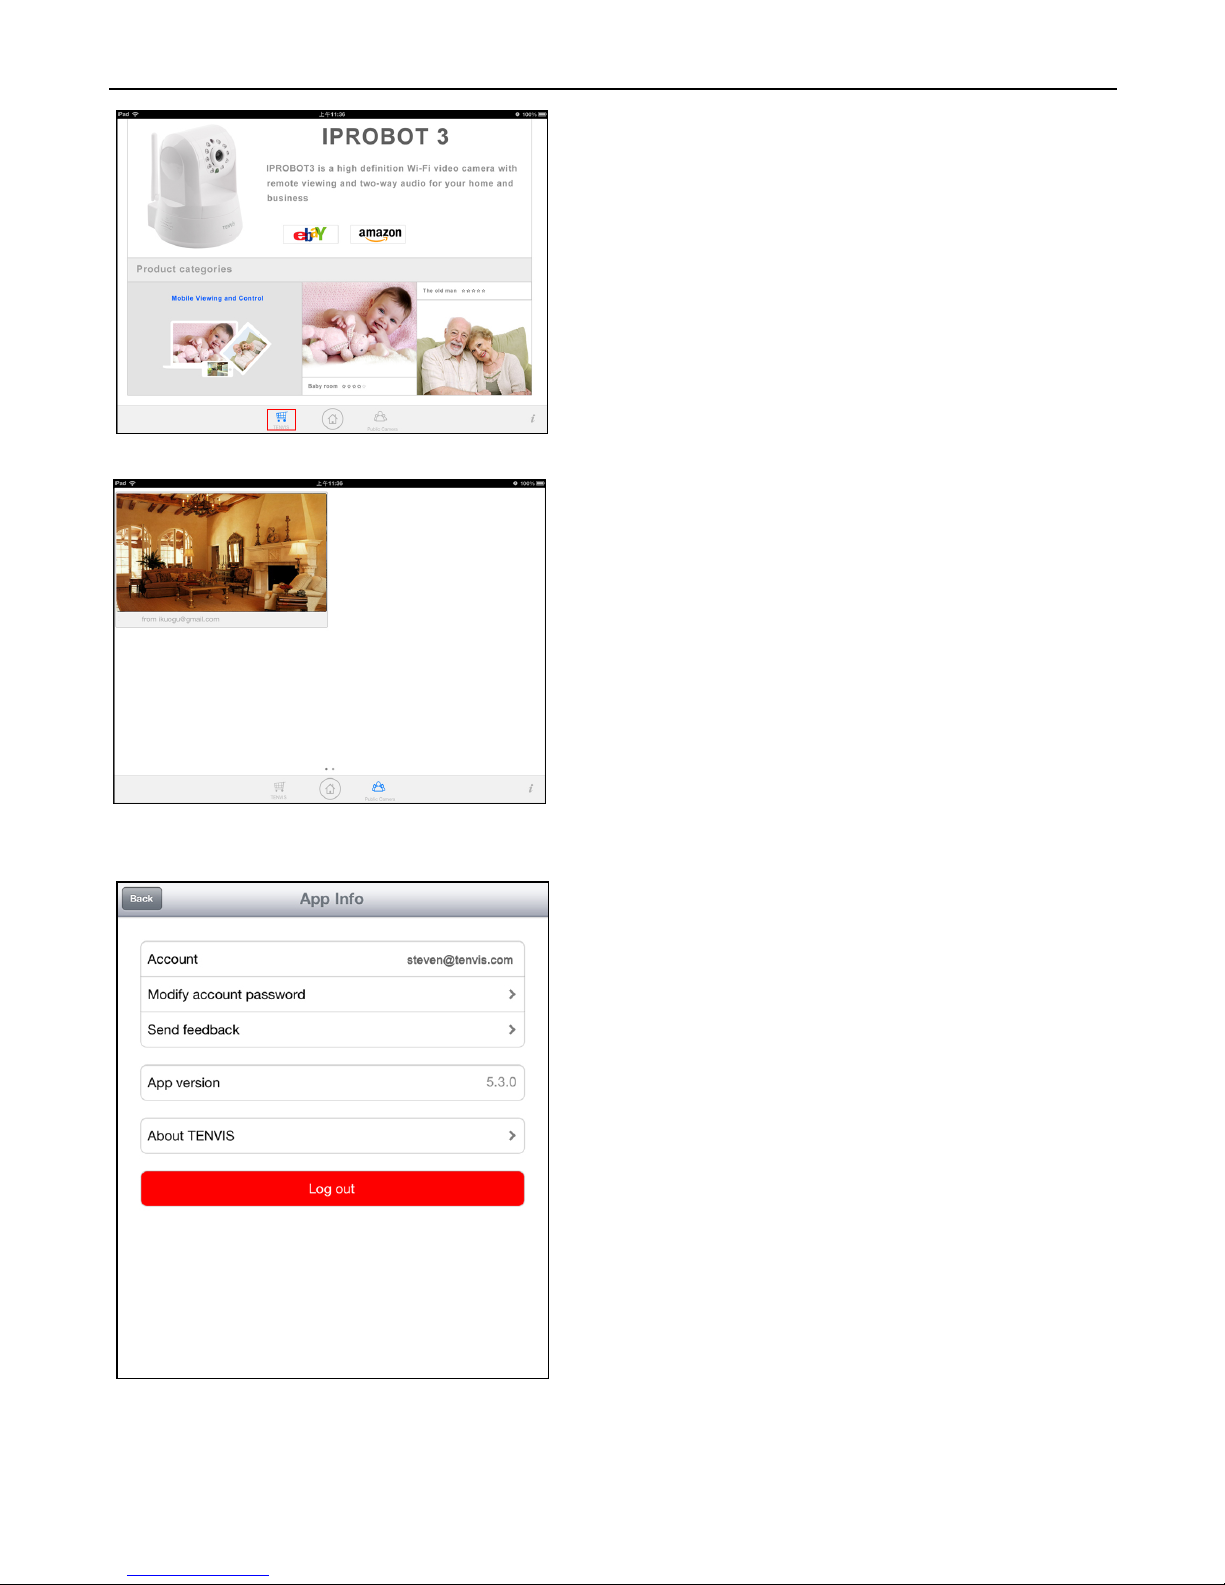
Public camera
View the live vi deo of cam era shared by
others. You may also share your camera’s
live video to other customers. Set up it in
set tings page as below.
Shopping
Find the latest TEN VIS prom otion h ere.
Setting
Account: Your current account name.
Modify account password: Modify NEW
TENVIS accou nt password.
Send feedback: Send us feedback of the
camera.
App version: The version of current NEW
TENVIS.
About TENVIS: Go to TENVIS official
website.
Log out: Log out current NEW TENVIS
account.
Page 23
TENVIS Technology Co., Ltd.
20
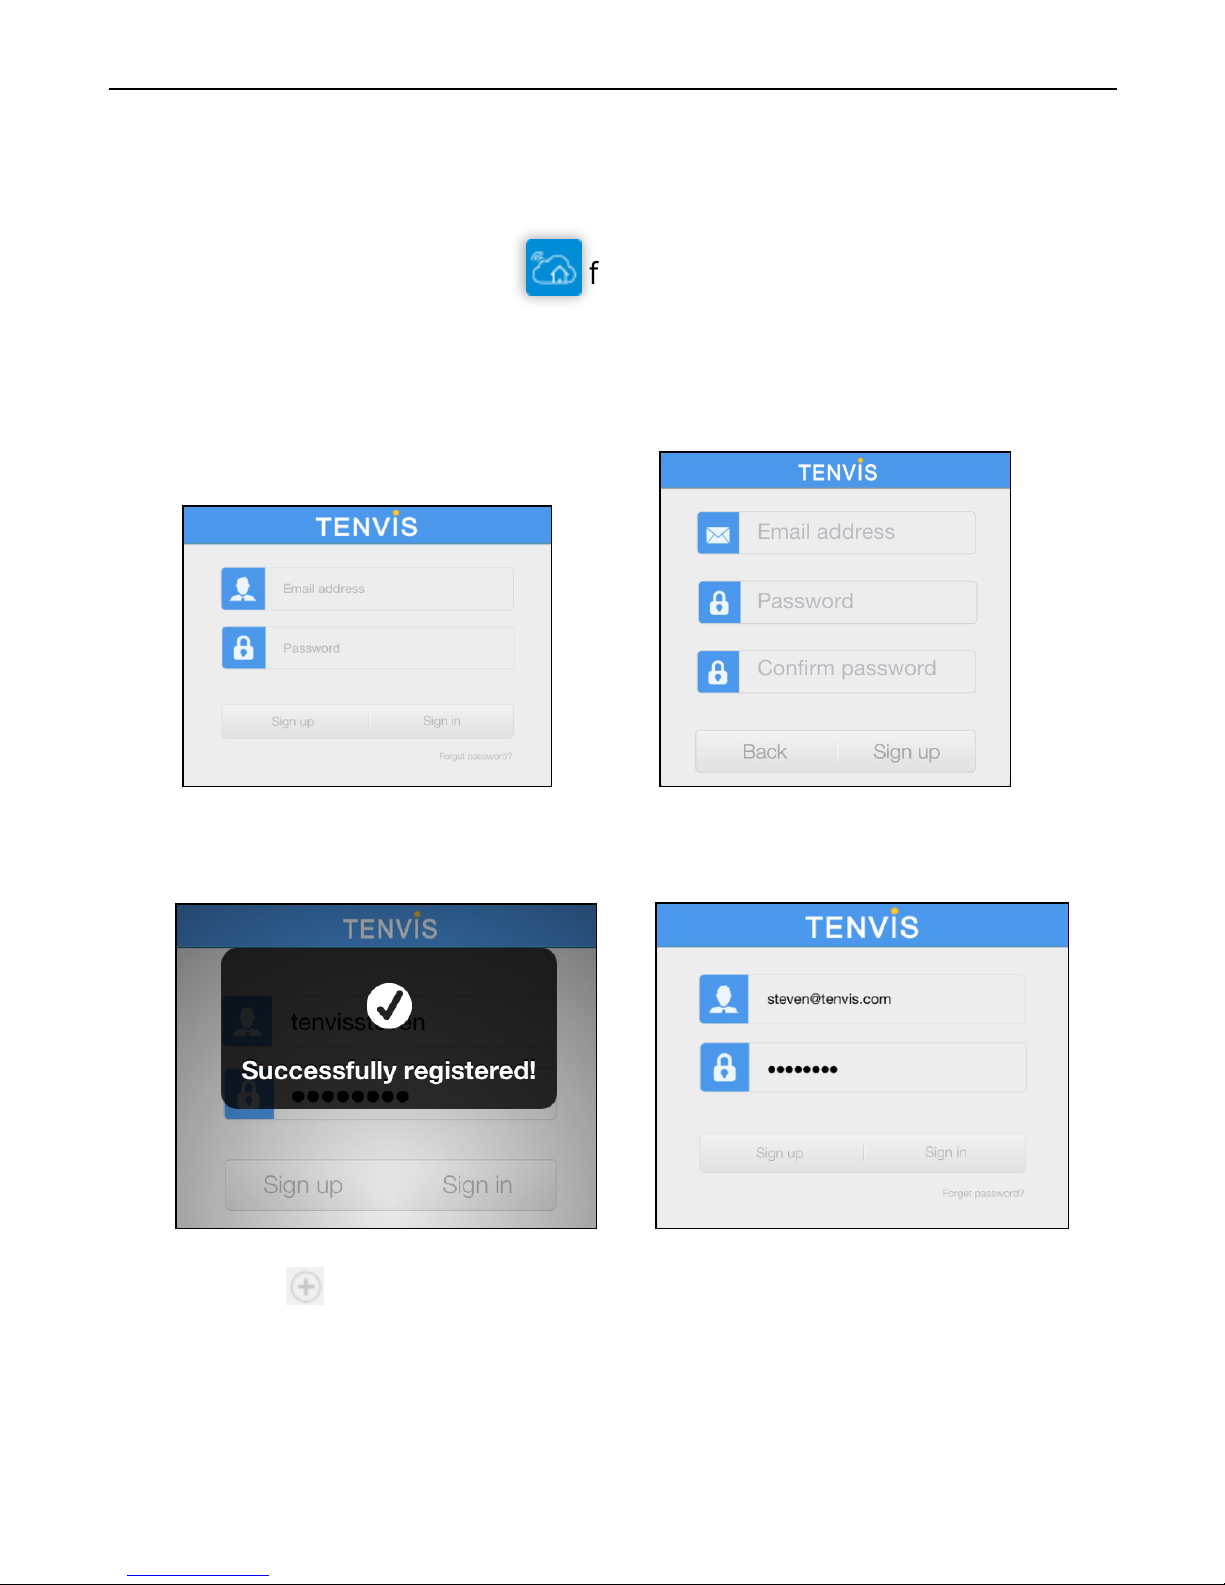
1. Download NEW TENVIS from Google’s play store
2. Tap on Sign up if you do not already have an account with New
TENVIS. Fill in the required inf ormation to regist er for a New TENVIS
user account.
3. After signing up, please log on to your account.
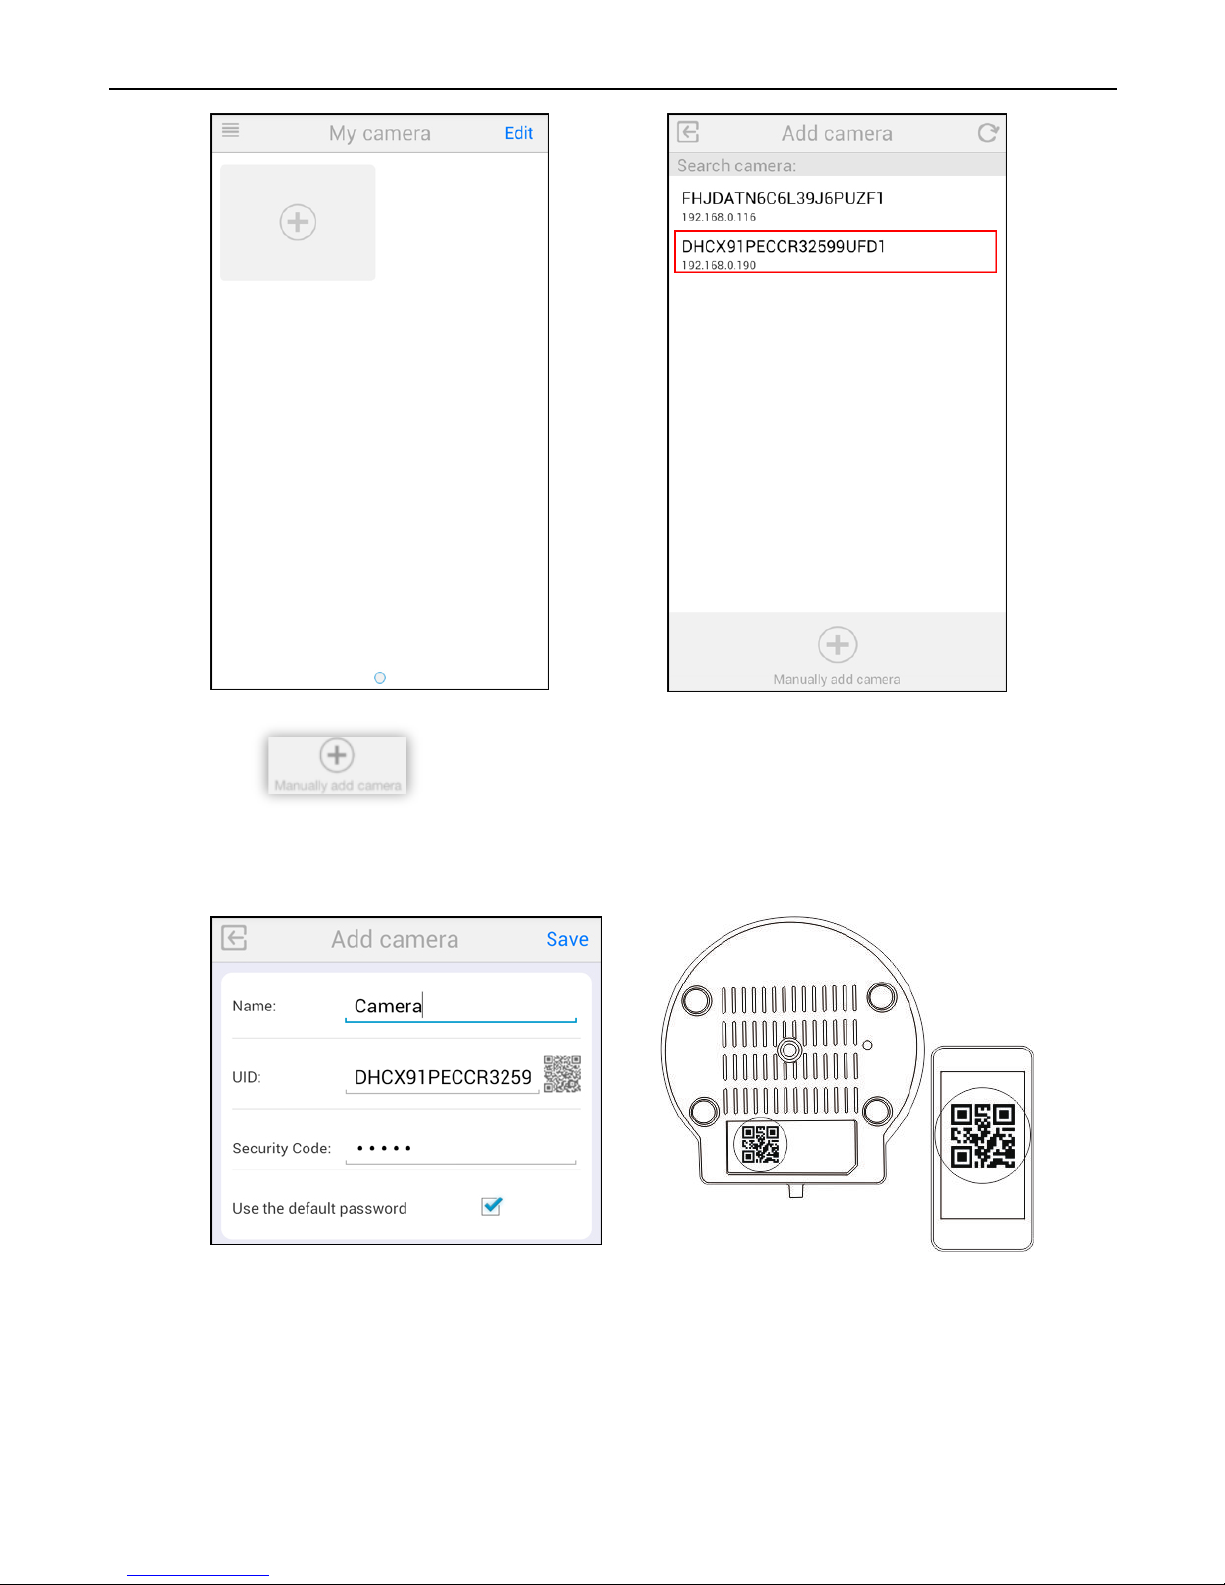
4. Tap on to add your new cam era to your account; fi nd th e c am era
by matching UID code in the list to the UID code displayed at the
bottom of the camera. If your new camera resides in the same LAN
(Local Area Network), its UID code will show up in the list.
Operation Guide for Android Device
Live Video
Page 24
TENVIS Technology Co., Ltd.
21
5. You can choose to add your camera manually:
Click button and select your camera model and enter
camera’s UID code (displayed at the bottom of the camera) and
password. You can scan camera’s UID from Camera's QR code by
tapping QR Code Icon to initiate the scan.
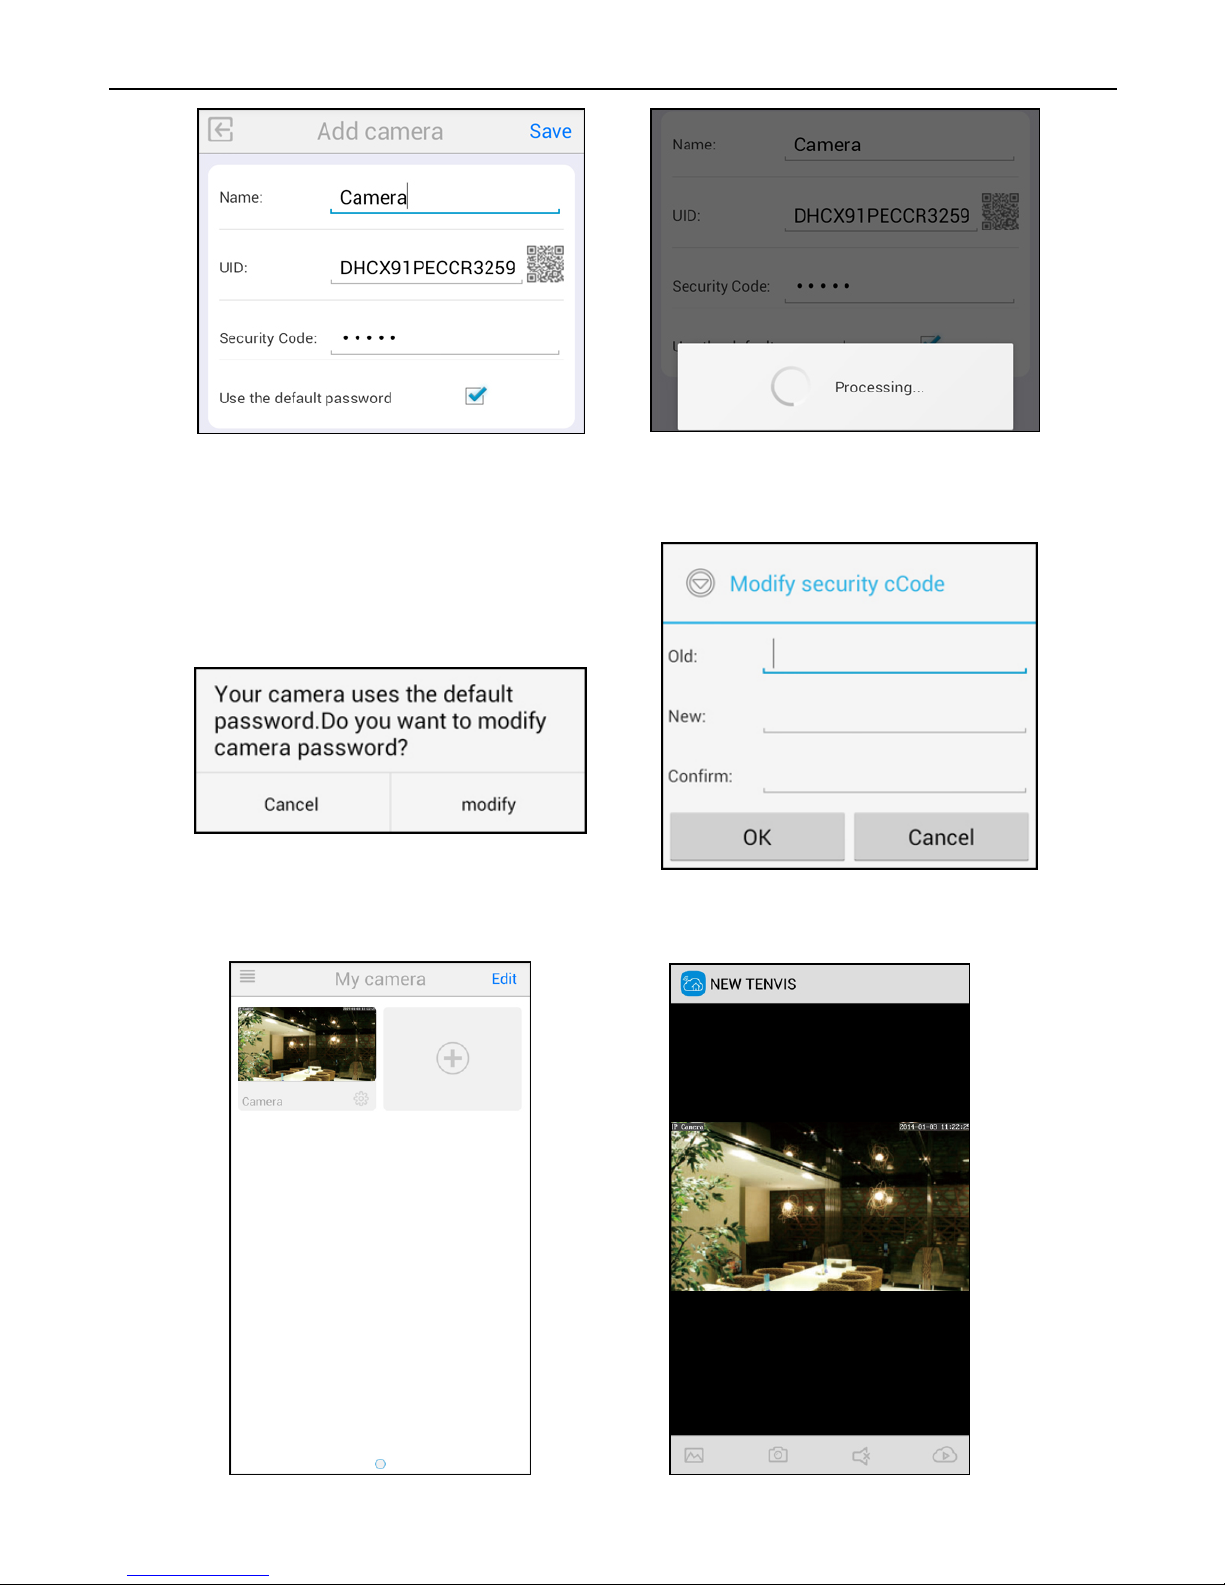
6. Enter the camera's name and password. By default the password is
admin.
Page 25
TENVIS Technology Co., Ltd.
22
7. If you use default password, NEW TENVIS will prompt you to change
the camera’s password for security reason.
8. After changing the password. Select the camera you've just added
to start viewing live video.
Page 26
TENVIS Technology Co., Ltd.
23
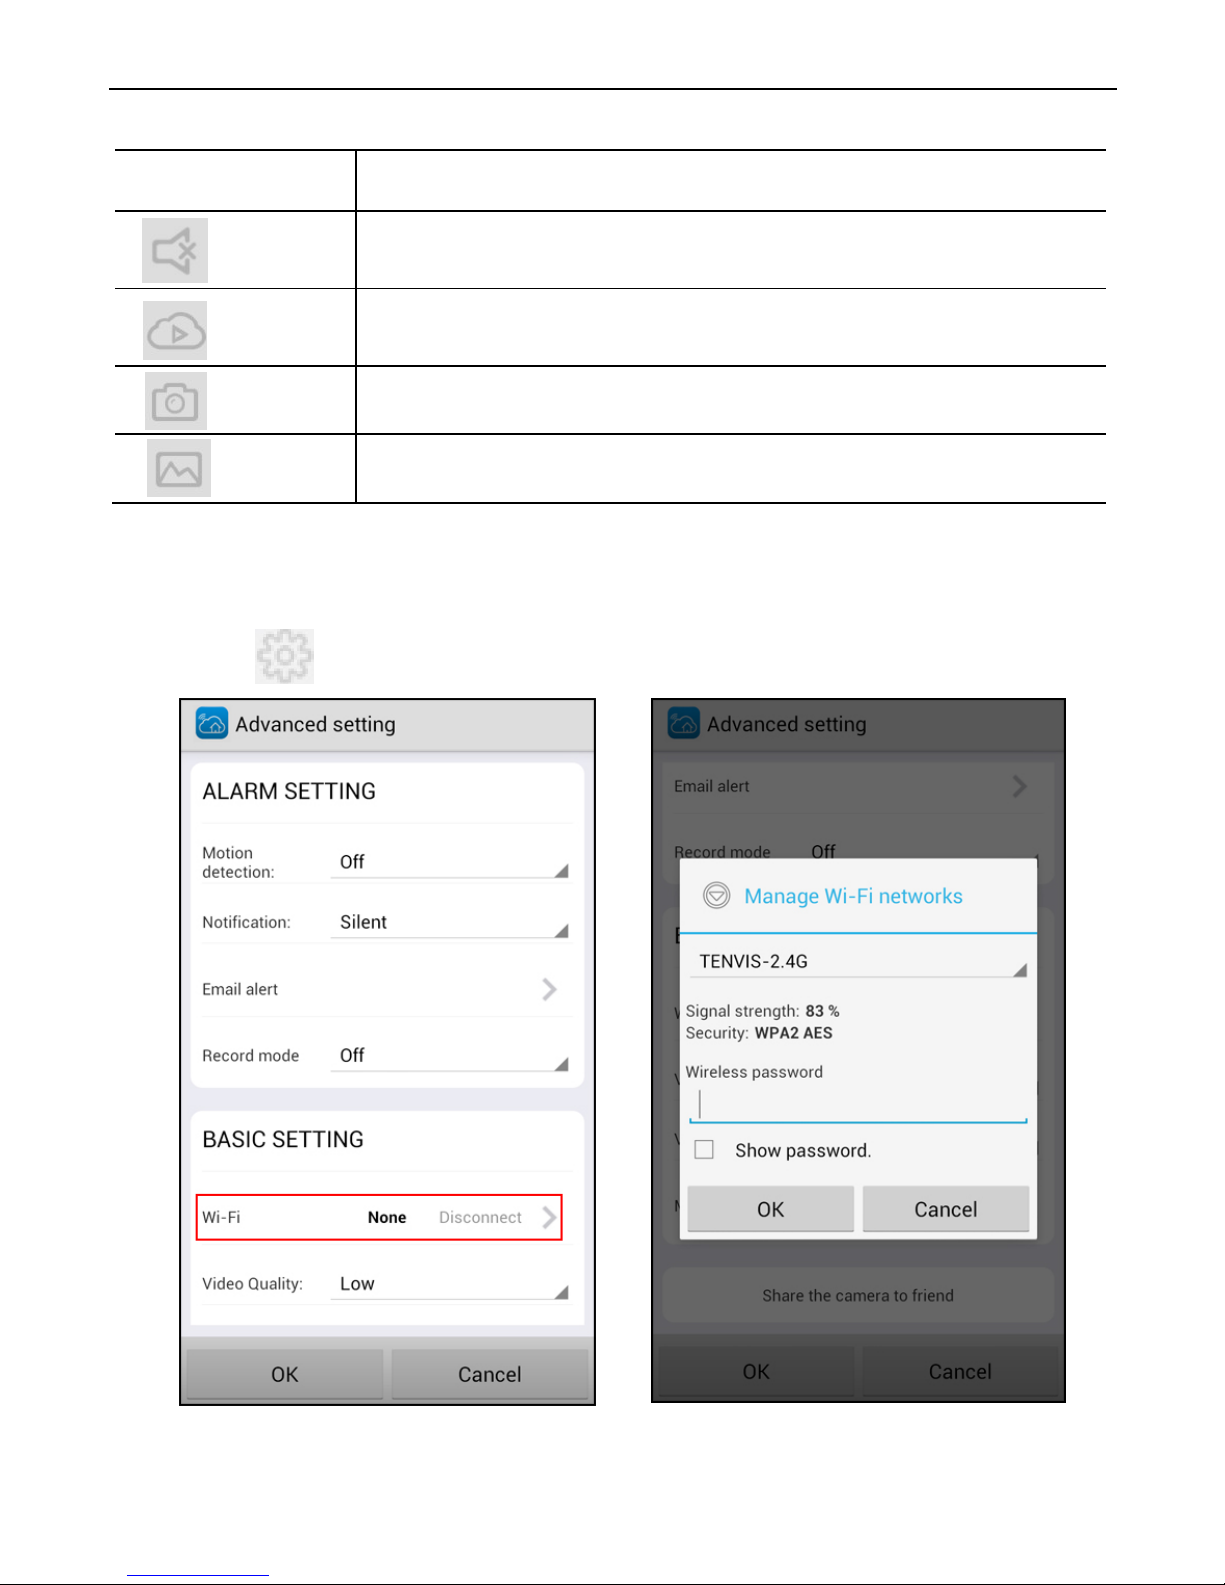
Icons and buttons on live video page:
Pan/tilt control
Tap on the button to pan or tilt the camera
Allows User to listen to t he camera’s audio feed and
talk to the camera.
Check alarm events and select the camera you wish
to view.
Take a snapshot picture
View pictures taken.
Wi-Fi Setup
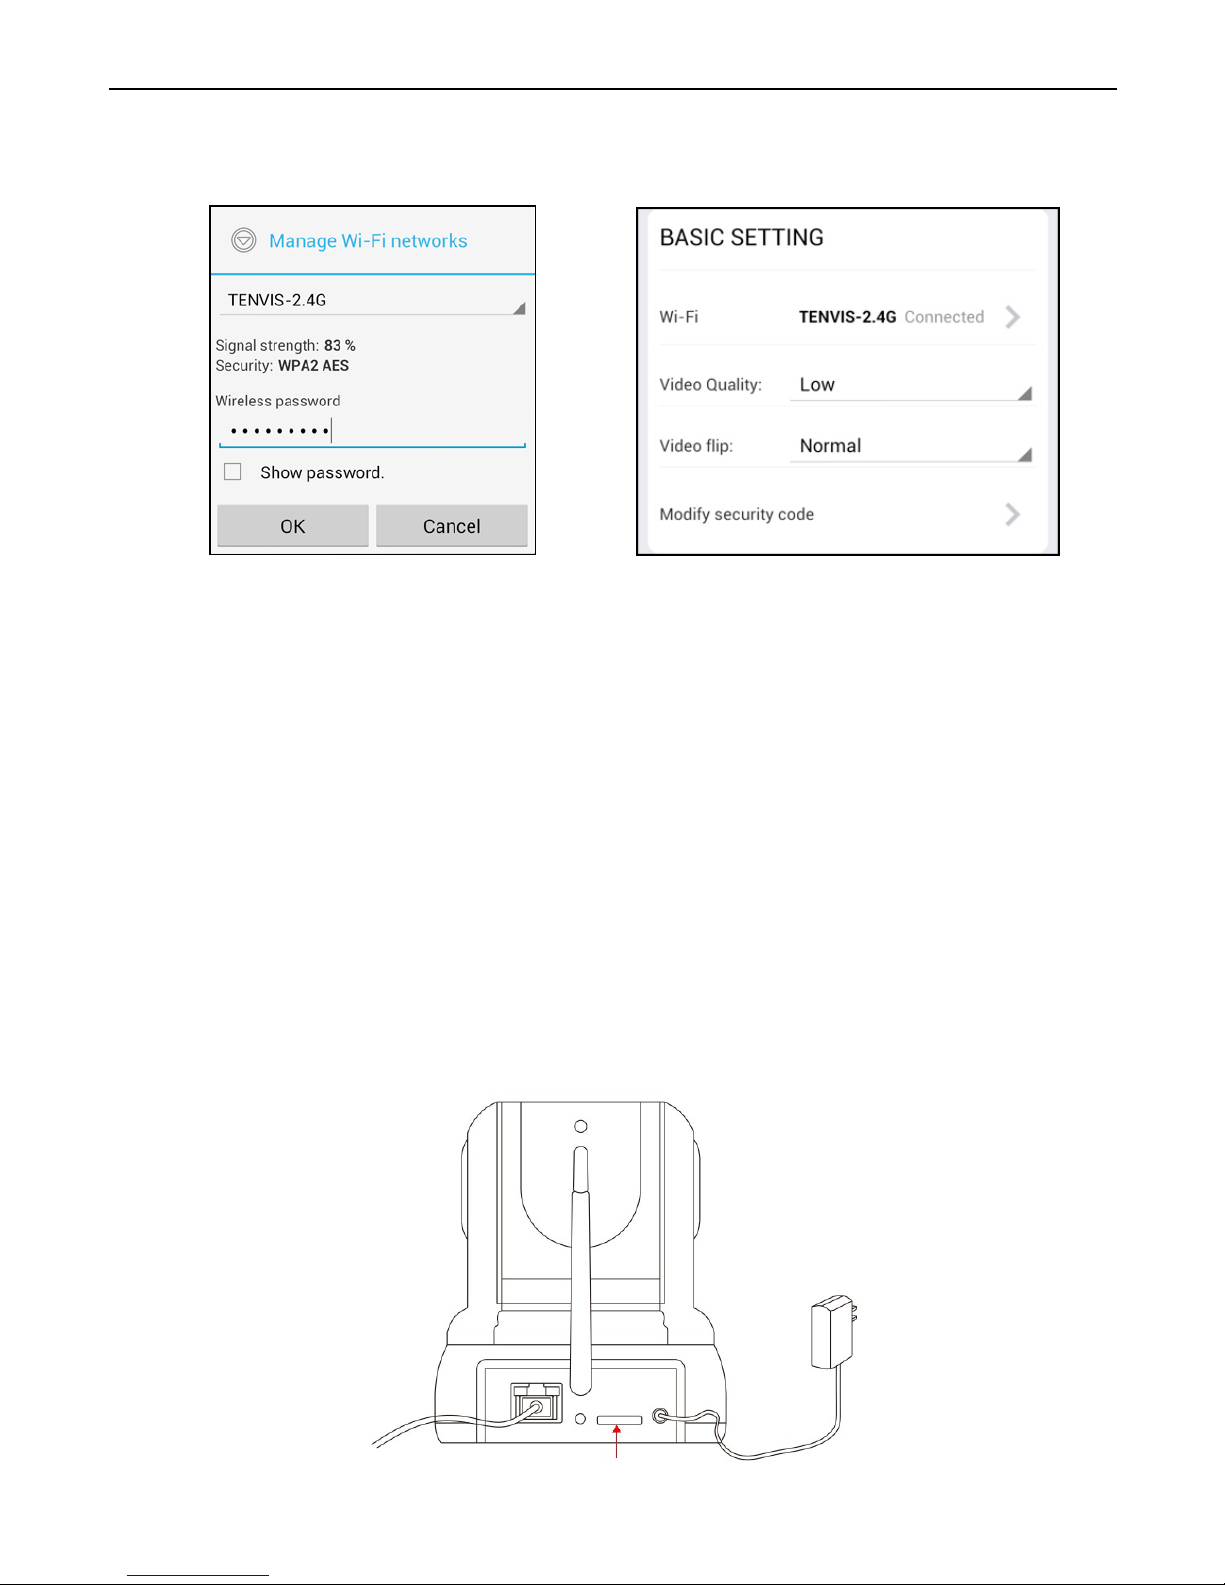
1. Click t o start configuring your c amera for wireless operation.
Page 27
TENVIS Technology Co., Ltd.
24
*N
otice: Please wait for 30 sec to 1 min for camera to switch to Wi-Fi
mode;
*Tips: If your router has a WPS button, you could set up wireless LAN
easily by using the WPS button on the camera and the router by the
operation steps on Page 36.
2. The camera will start scanning for Wi-Fi connections. Select your
Wi-Fi connection or network ID (SSID). Enter the password for your
Wi-Fi connection.
3. W
hen the W i-Fi is successfully configured, you can now disconnect
the network cable from your camera and start using your camera as a
wireless device.
Alarm Setup
1. Power off the camera, insert a micro SD card if you want to record to
micro SD card (purchase separately, not sold with this product).
Power on the camera and wait for it to reboot.
Page 28
TENVIS Technology Co., Ltd.
25
*
Notice: When card is full the camera will automatically overwrite history
recorded files.
*Notice: Please run NEW TENVIS background to receive the notification.
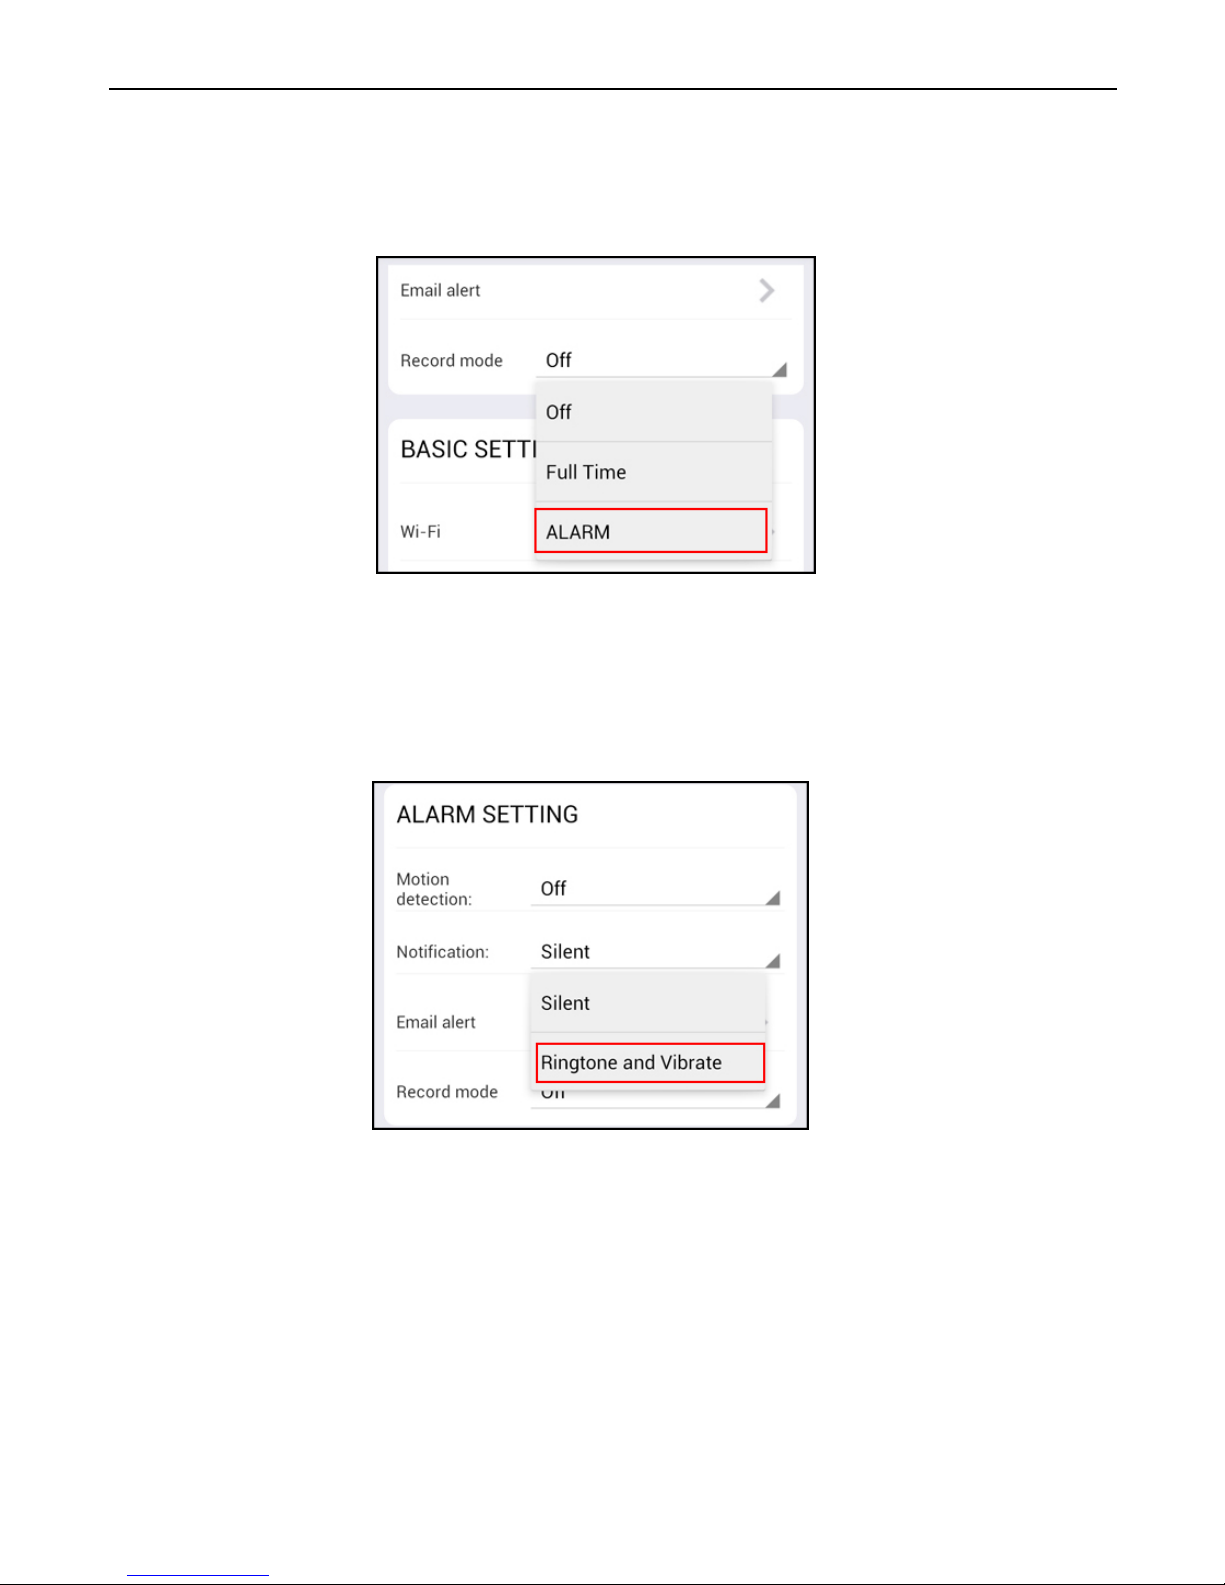
2. Tap on Record in settings and select the mode to record to micro SD
card. Switch between Full time for continuous recording, or Alarm for
recording while motion is detected. The camera will reboot after
saving Record settings
3. Enable Notification if you want to receive notification from the
camera.
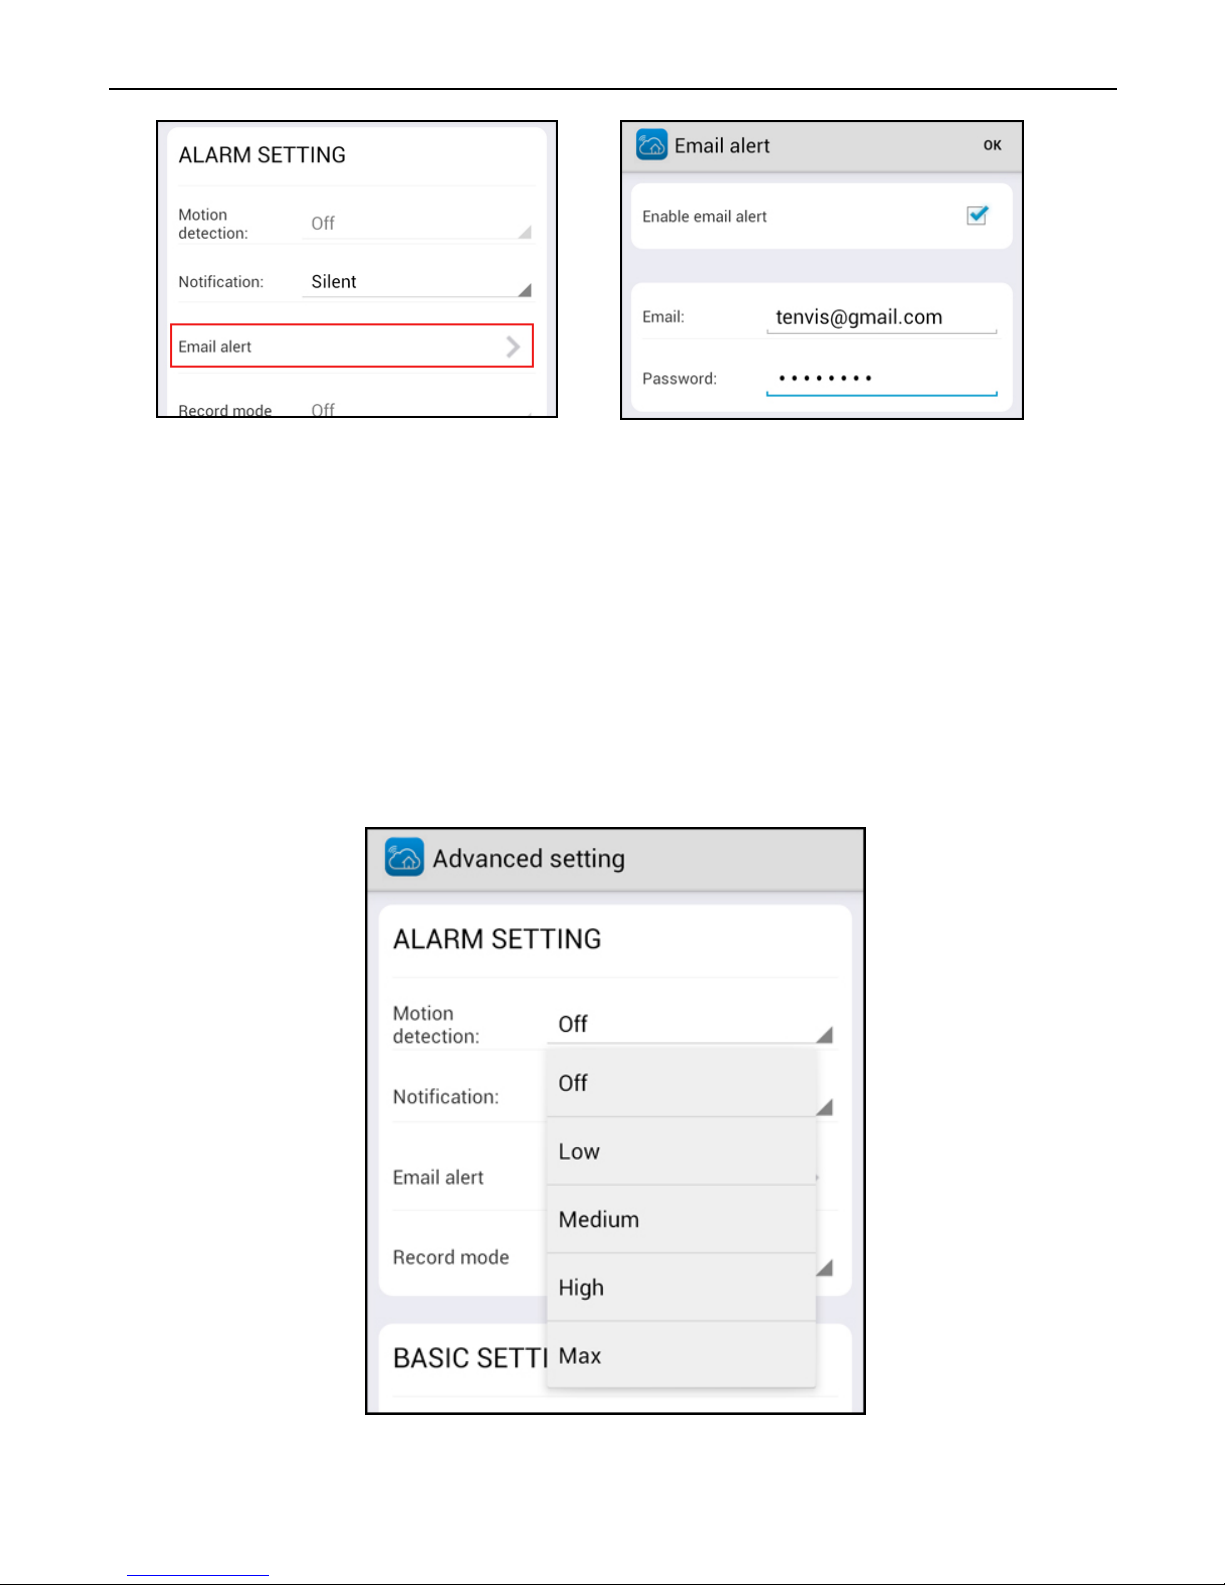
4. Set up e-mail alarm if you want the camera to send snapshots to your
e-mail address when alarm goes off. Enter your e-mail address and
password to set up email alert setting.
Page 29
TENVIS Technology Co., Ltd.
26
*Notice: Some email service provider needs SMTP server information to
enable e-mail alert function. Please cont act your email service provider for
SMTP server information.
*Important: There may be network latency while establishi ng a connection
depending on your network connections. It may take up to a few minutes
for the camera to connect to SMTP server.
*Notice: We recommend this function to be deactivated in a busy
environment to avoid massive notific ations.
5. After setting up actions to take when the camera is alarm ing, please
enable motion detection of the camera. Choose the detection
sensitivity level for movement detection.
Page 30
TENVIS Technology Co., Ltd.
27
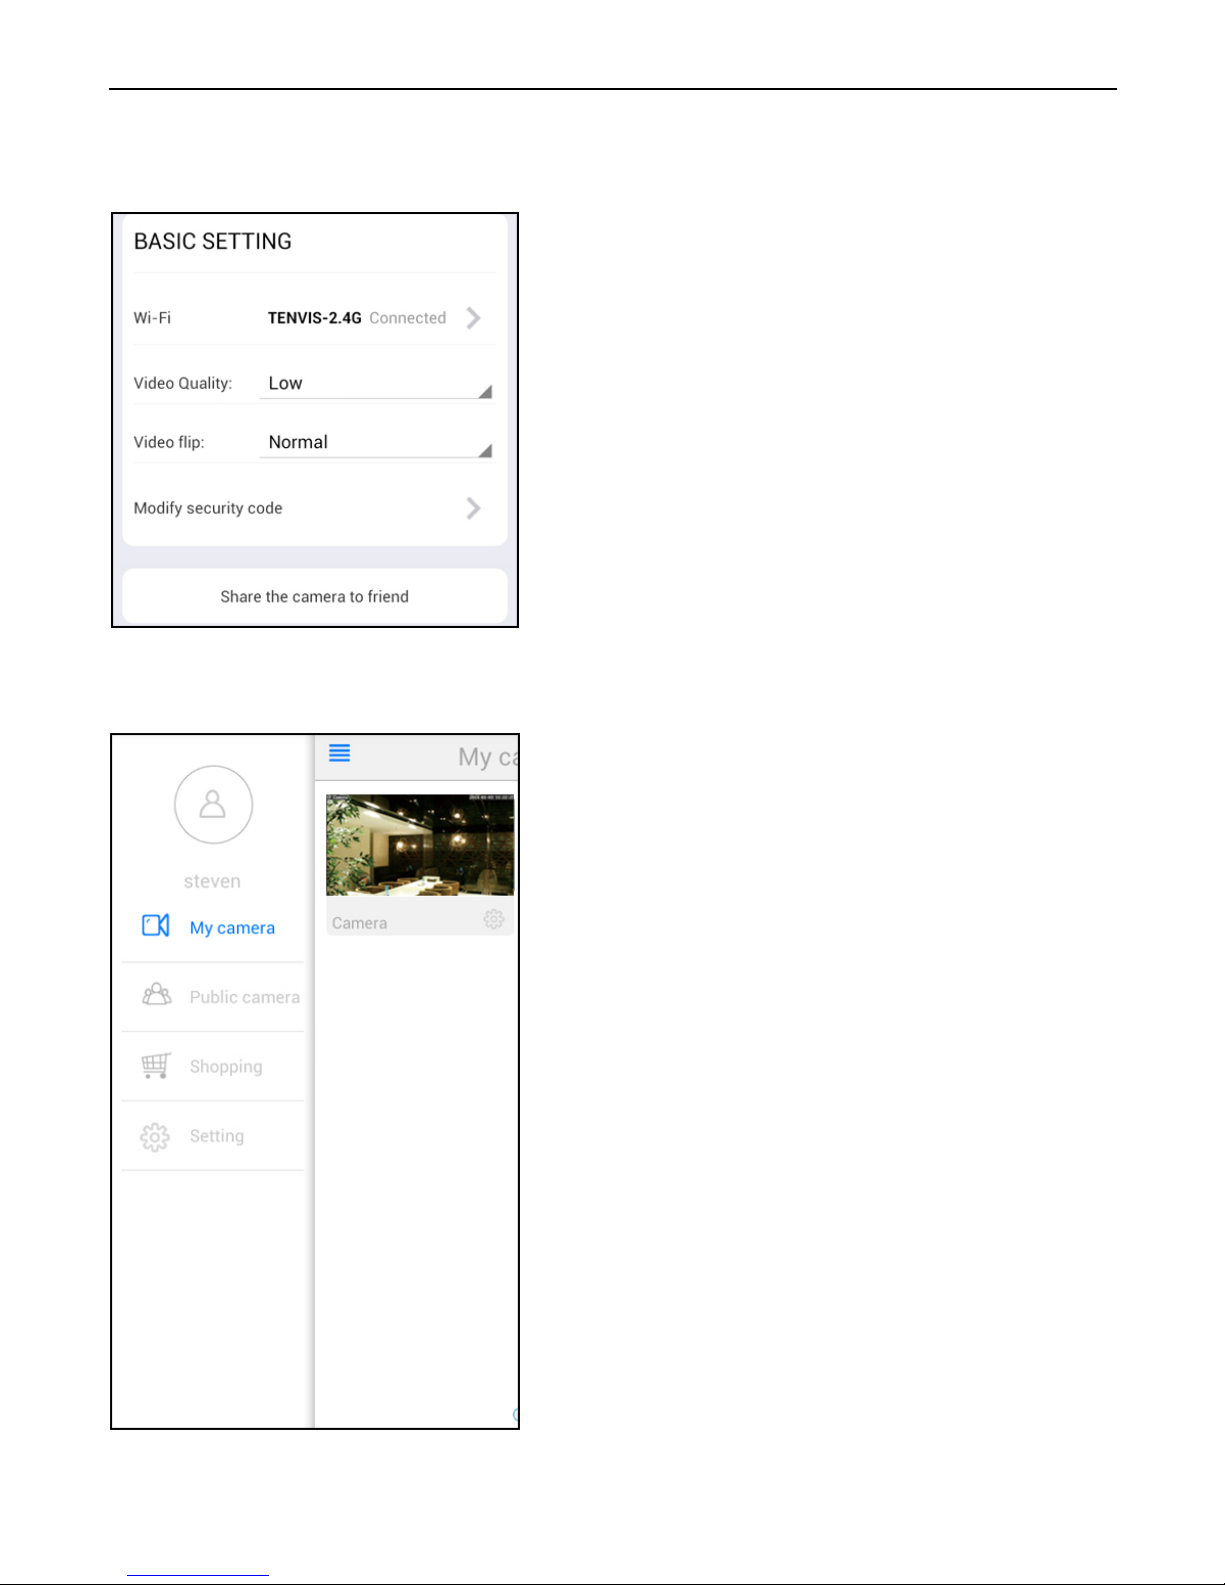
Basic setting
Video quality: Adjust the video quality.
Video flip:
Mirror the displayed image
horizontally or vertical l y when the
camera is mounted.
Modify security code: Changing
camera’s user pas sword
Public cam era: View the live video of
camera shared by others. You may also
share your camera’s live video to other
customers.
Shopping: Find the latest TENVIS
promotion here.
Setting: Log out curren t NE W TEN VIS
account.
Other Settings
Page 31
TENVIS Technology Co., Ltd.
28
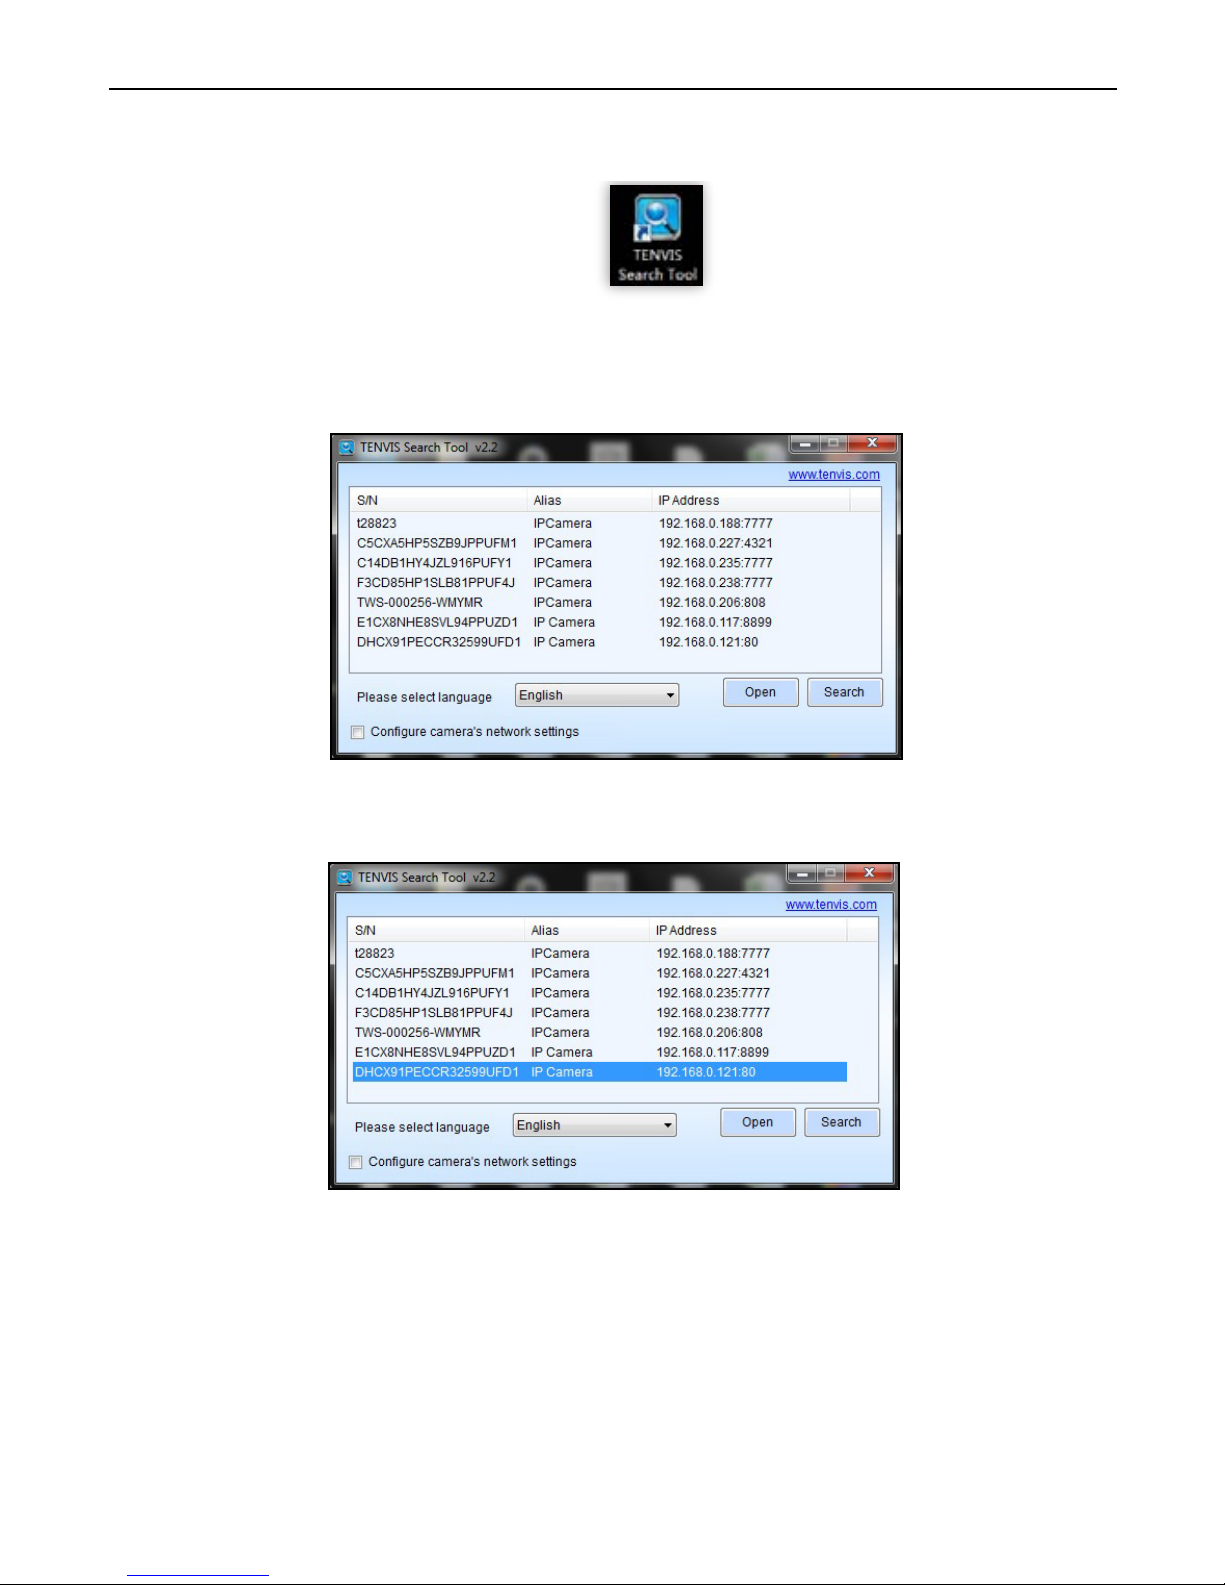
1. Install TENVIS Search Tool from CD or download and
install it from http://www.tenvis.com/download
2. Run TENVIS Search Tool on desktop, click search to search
cameras in LAN.
3. Select the camera listed in LAN by its UID code, highlight t he camera
in the list and click Open.
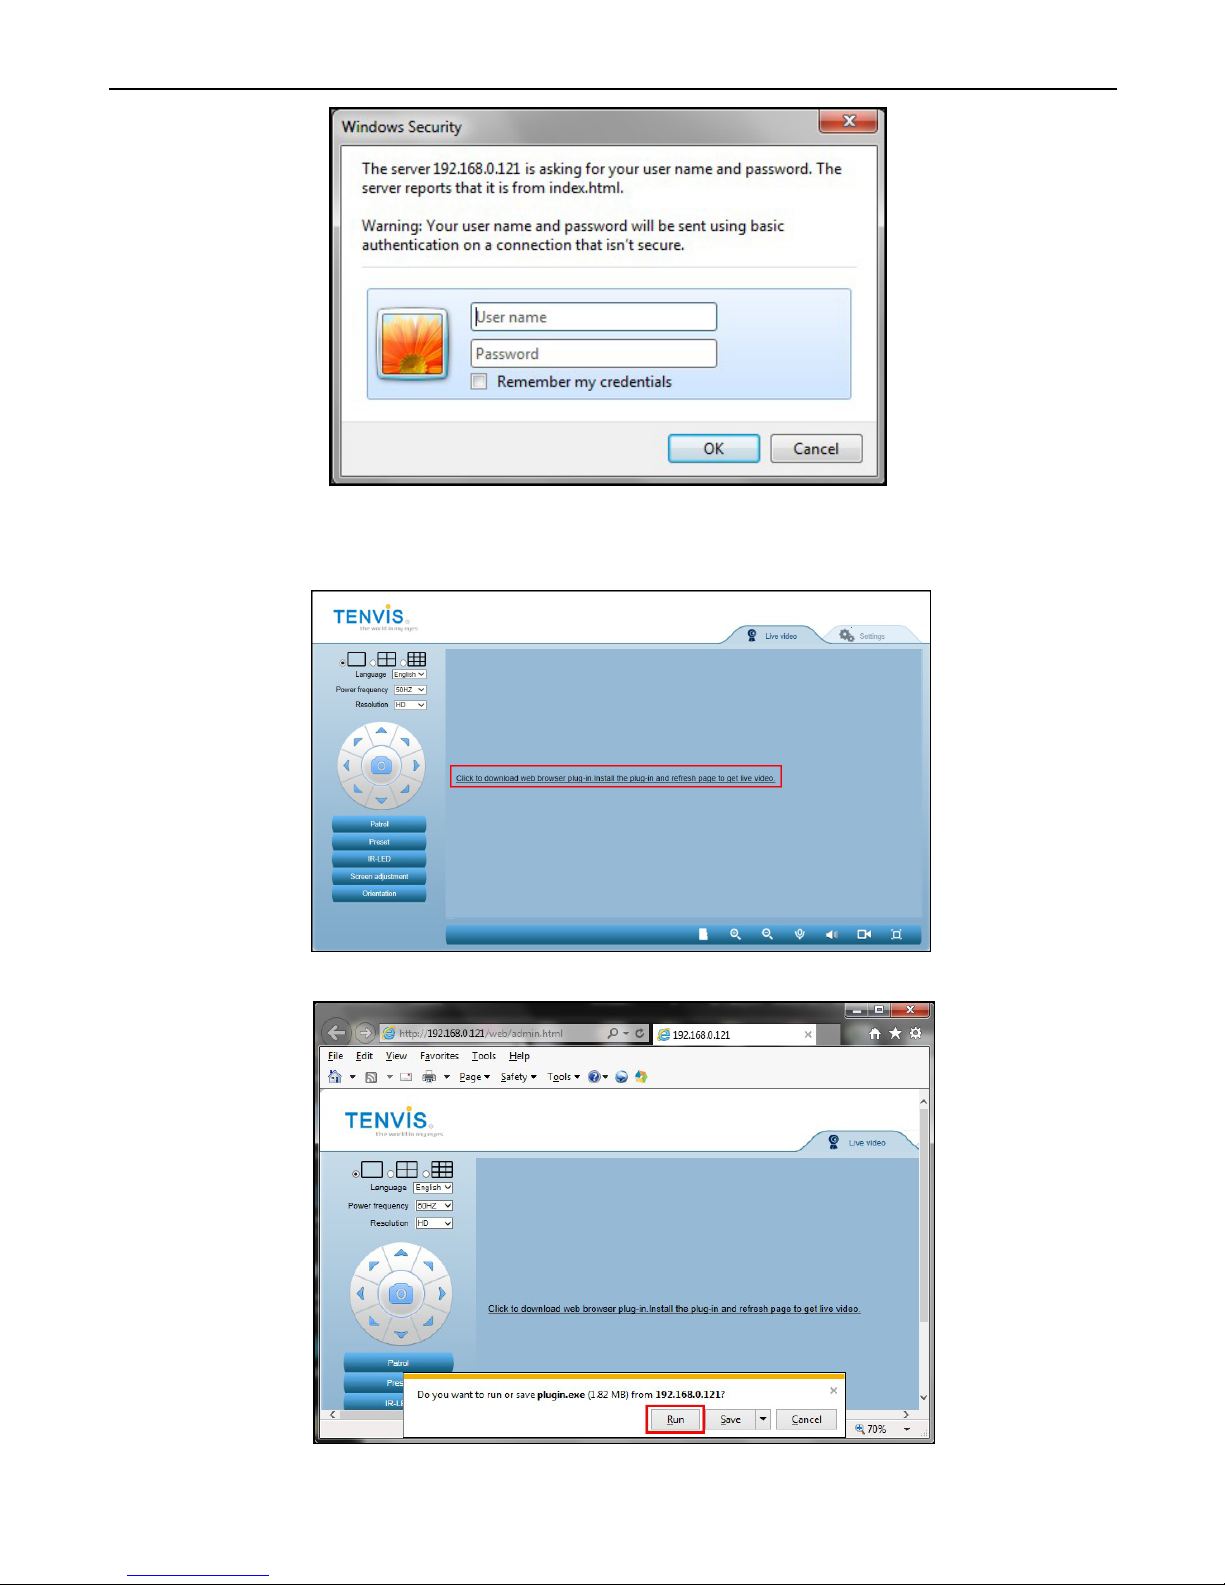
4. The default web browser will be launched to display the login window.
Log on to the camera by using camera’s username and password. By
default username is “admin” and password is “admin”.
Operation Guide for Windows Web Browser
Page 32
TENVIS Technology Co., Ltd.
29
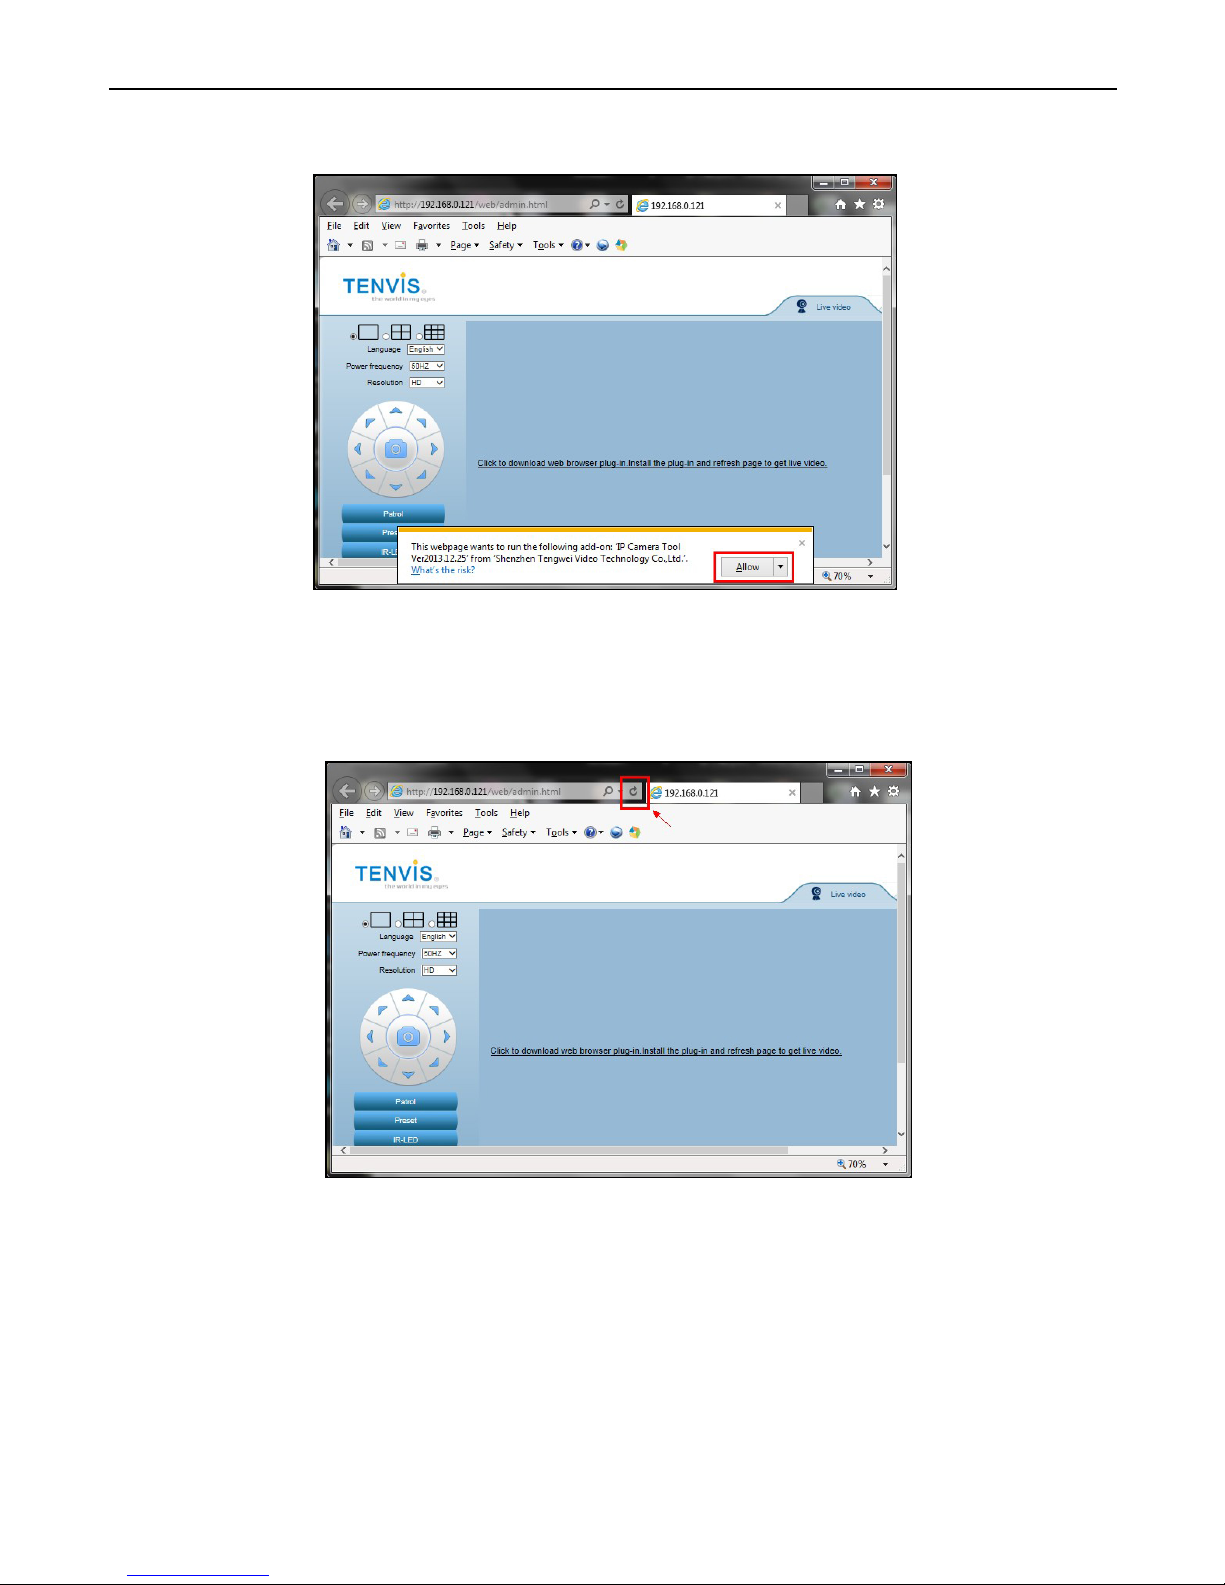
5. It will prompt you to install the web browser plug-in. Click th e li nk to
download and install the plug-in.
Page 33
TENVIS Technology Co., Ltd.
30
6. Click Allow to allow the Internet Explorer to begin the
plug-in installation;
7. After installation of the plug-in, you can now refresh the page and
watch the live video.
Page 34
TENVIS Technology Co., Ltd.
31
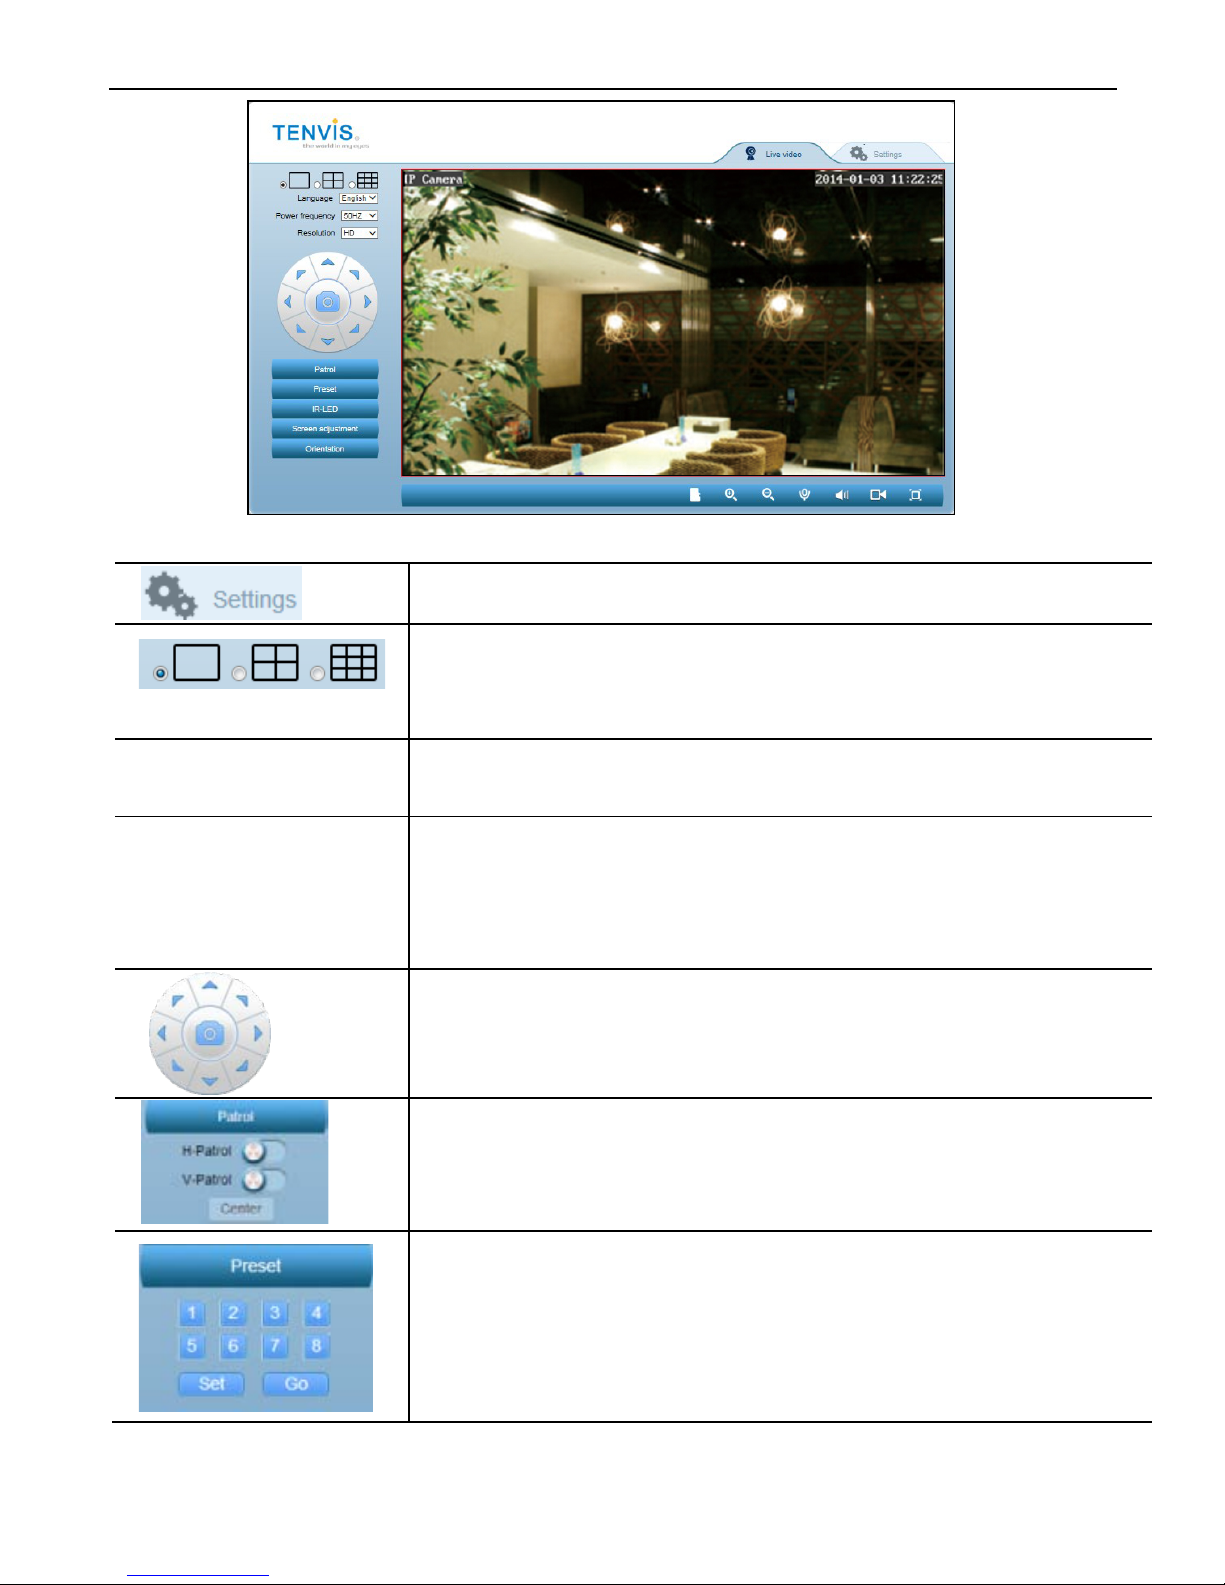
Icons and buttons on live video page:
Click this button to go to Camera Setup
1 camera frame,
4 camera frames,
9 camera frames
Power frequency
Adjust power frequency to stabilize camera video
image
Resolution
Adjust video resolution
HD: 1280*720,
VGA: 640*352,
QVGA: 320*176
8 arrows to Pan/Tilt the camera
Center button is used for taking snapshot.
Patrol horizontally or vertically
Camera will point to center position once “Center”
button clicked
Preset positions are IP camera's saved Pan/Tilt
positions, for users to quickly access 8 specific
positions by click a button. This application allows
users to store up to 8 preset positions.
Page 35
TENVIS Technology Co., Ltd.
32
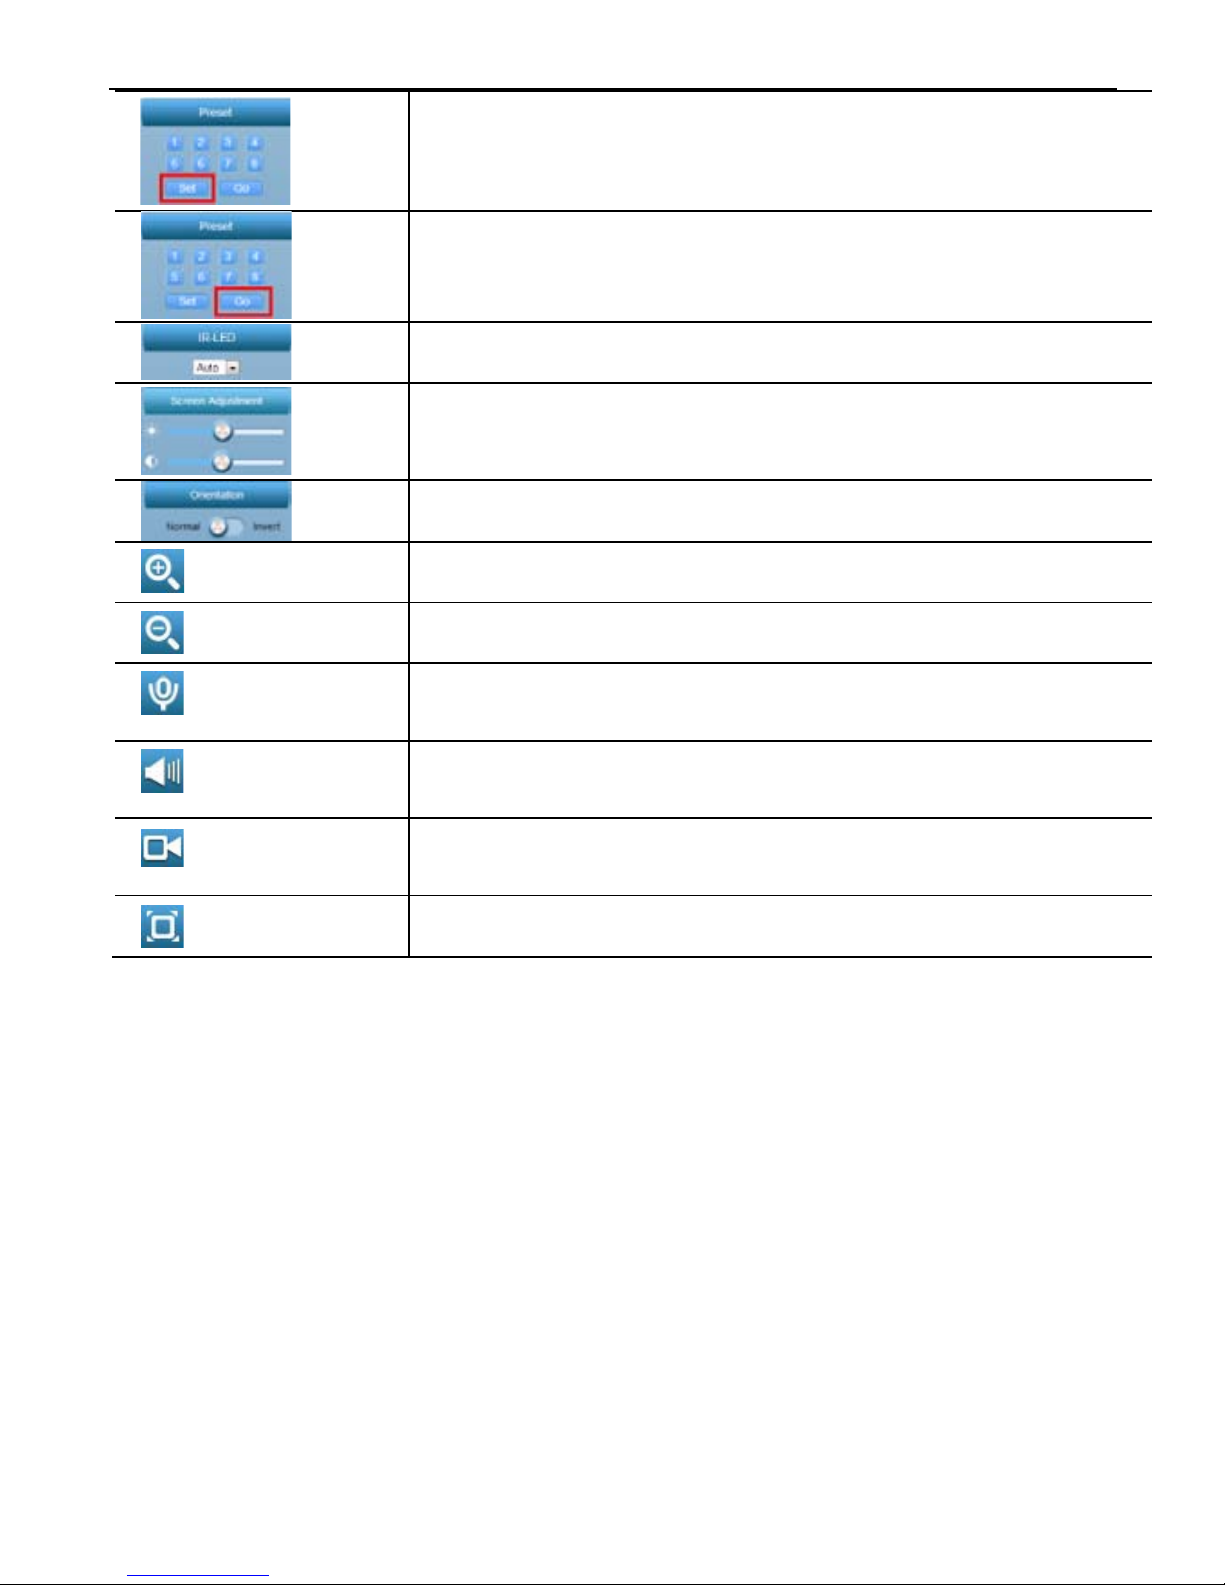
Set preset position; (only available
to Pan/Tilt
cameras)
Go to a specific preset position (only available to
Pan/Tilt cameras)
Turn on/off /IR-LED
Adjust the brightness;
Invert the video horizontally and vertical l y
Zoom in
Zoom out
Turn on audio reception (only availabl e for cameras
with 2-way audio)
Turn on camera speaker
(only available for cameras with 2-way audio)
Record video to PC, you can configure the recording
path in the setup menu
Full screen
*Noti
ce:
For
in-depth explanation on how to use this web application, please
download user manual from http://www.tenvis.com/download.
Page 36
TENVIS Technology Co., Ltd.
33
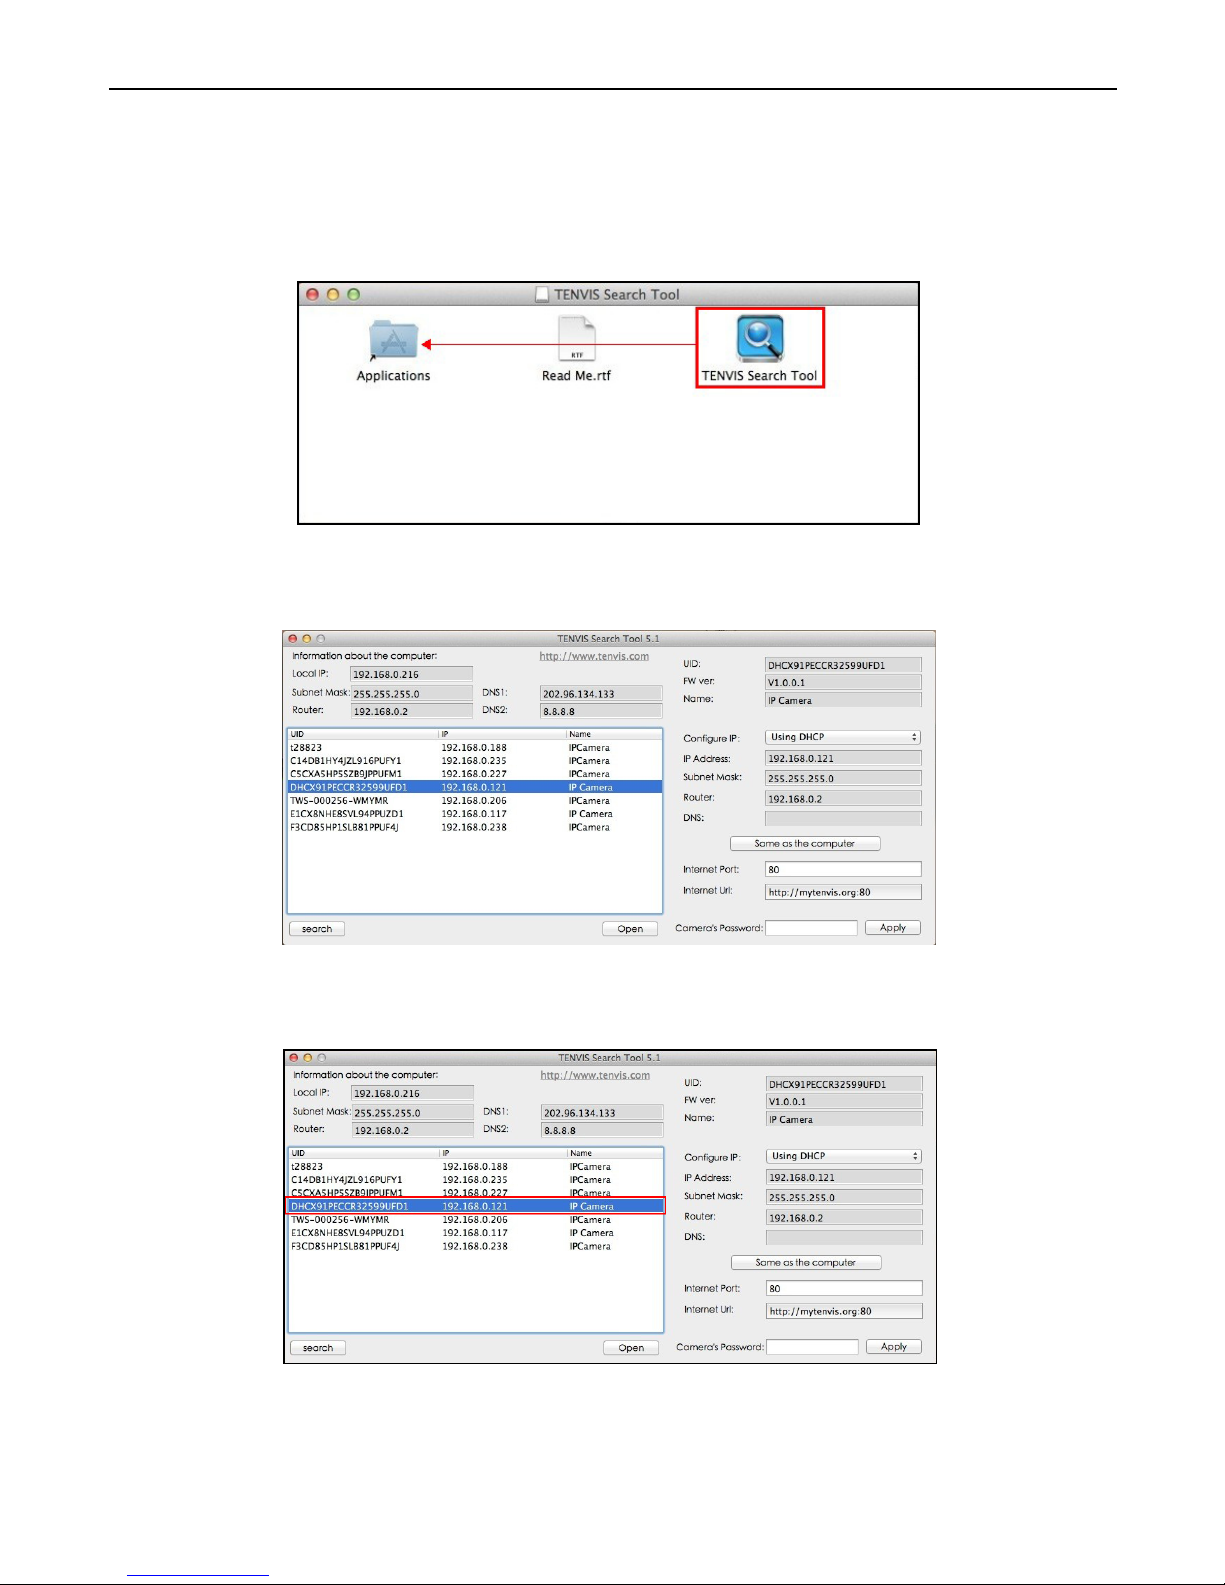
1. Open your CD and run TENVIS Search Tool.dmg. Drag TENVIS
Search Tool into Applications to install the search tool in Apple PC.
2. Run TENVIS Search Tool in Launchpad, click search to search
cameras in LAN.
3. Select the camera listed in LAN by its UID code, double click the
highlight the camera in the list.
Operationn Guide for Mac Web Browser
Page 37
TENVIS Technology Co., Ltd.
34
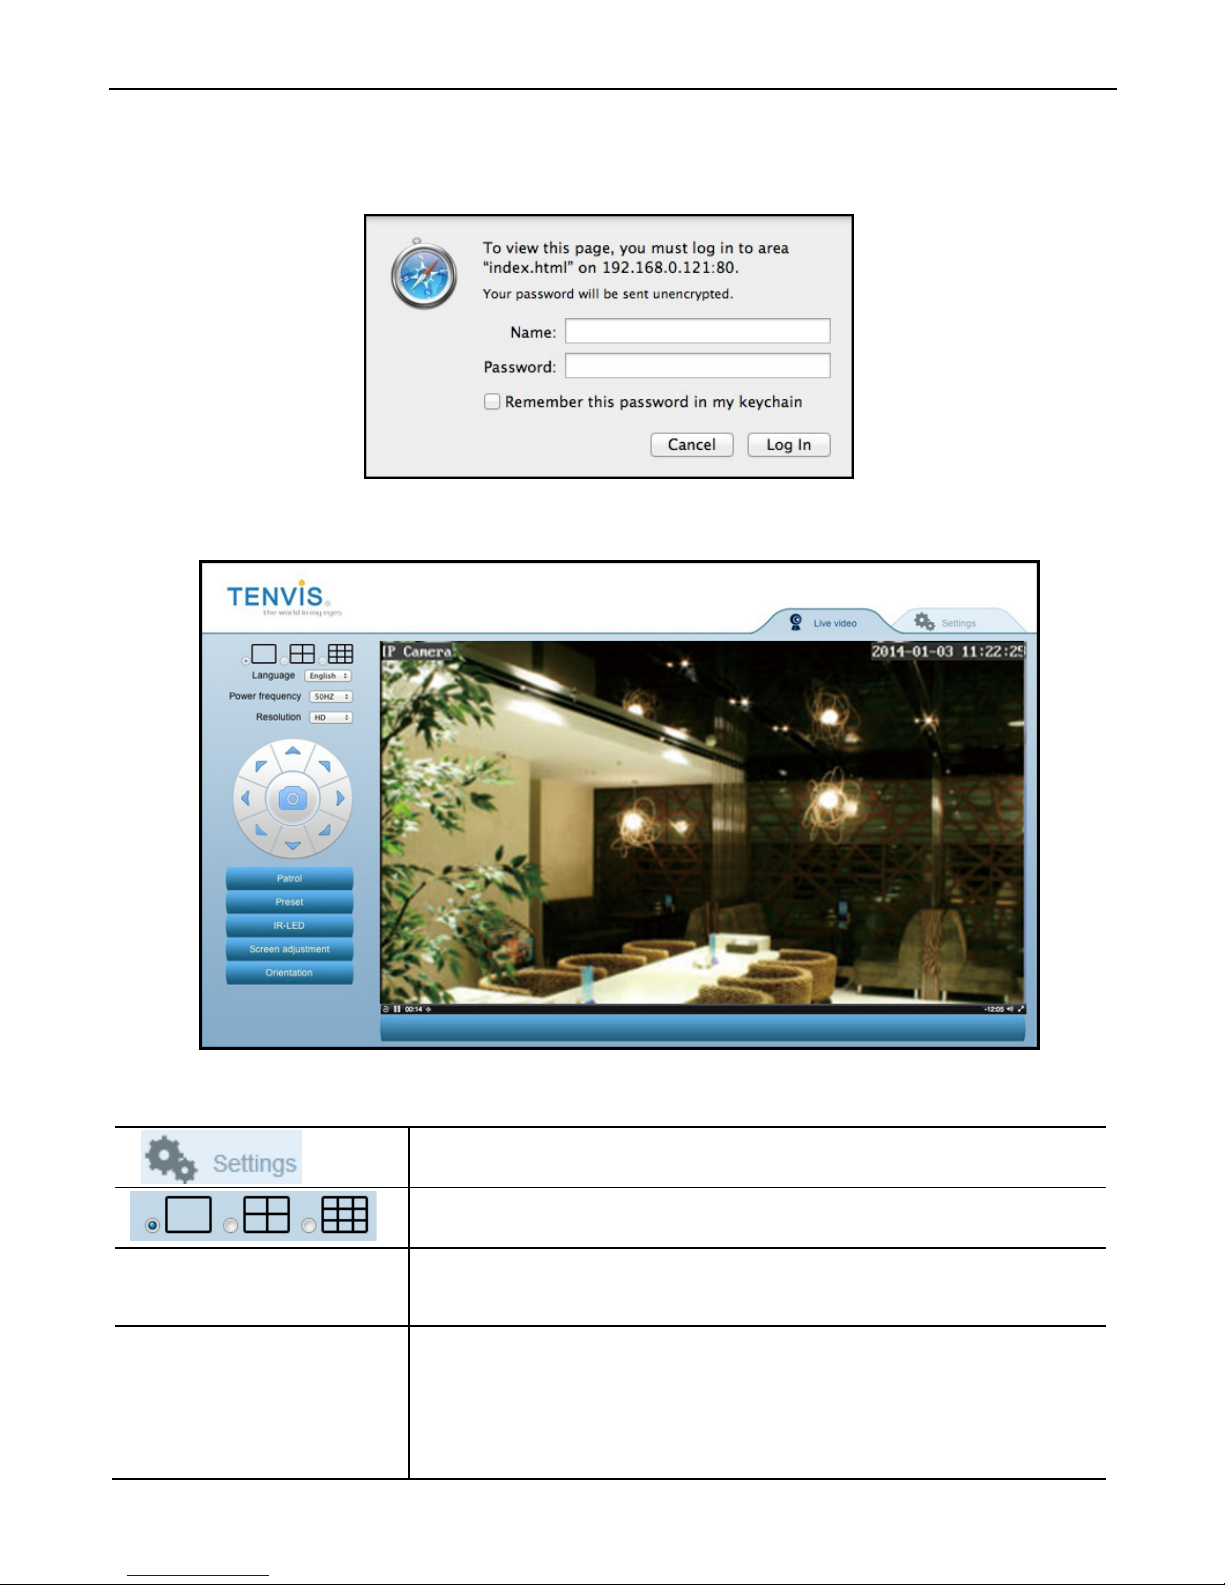
4. The default web browser will be launched to display the login window.
Log on to the camera by using camera’s username and password. By
default username is “admin” and password is “admin”.
5. After login the camera, you could get the live video.
Icons and buttons on live video page:
Click this button to go to Camera Setup
Multi-frames is not supported in Apple P C.
Power frequency
Adjust power frequency to stabilize camera video
image
Resolution
Adjust video resolution
HD: 1280*720,
VGA: 640*352,
QVGA: 320*176
Page 38
TENVIS Technology Co., Ltd.
35
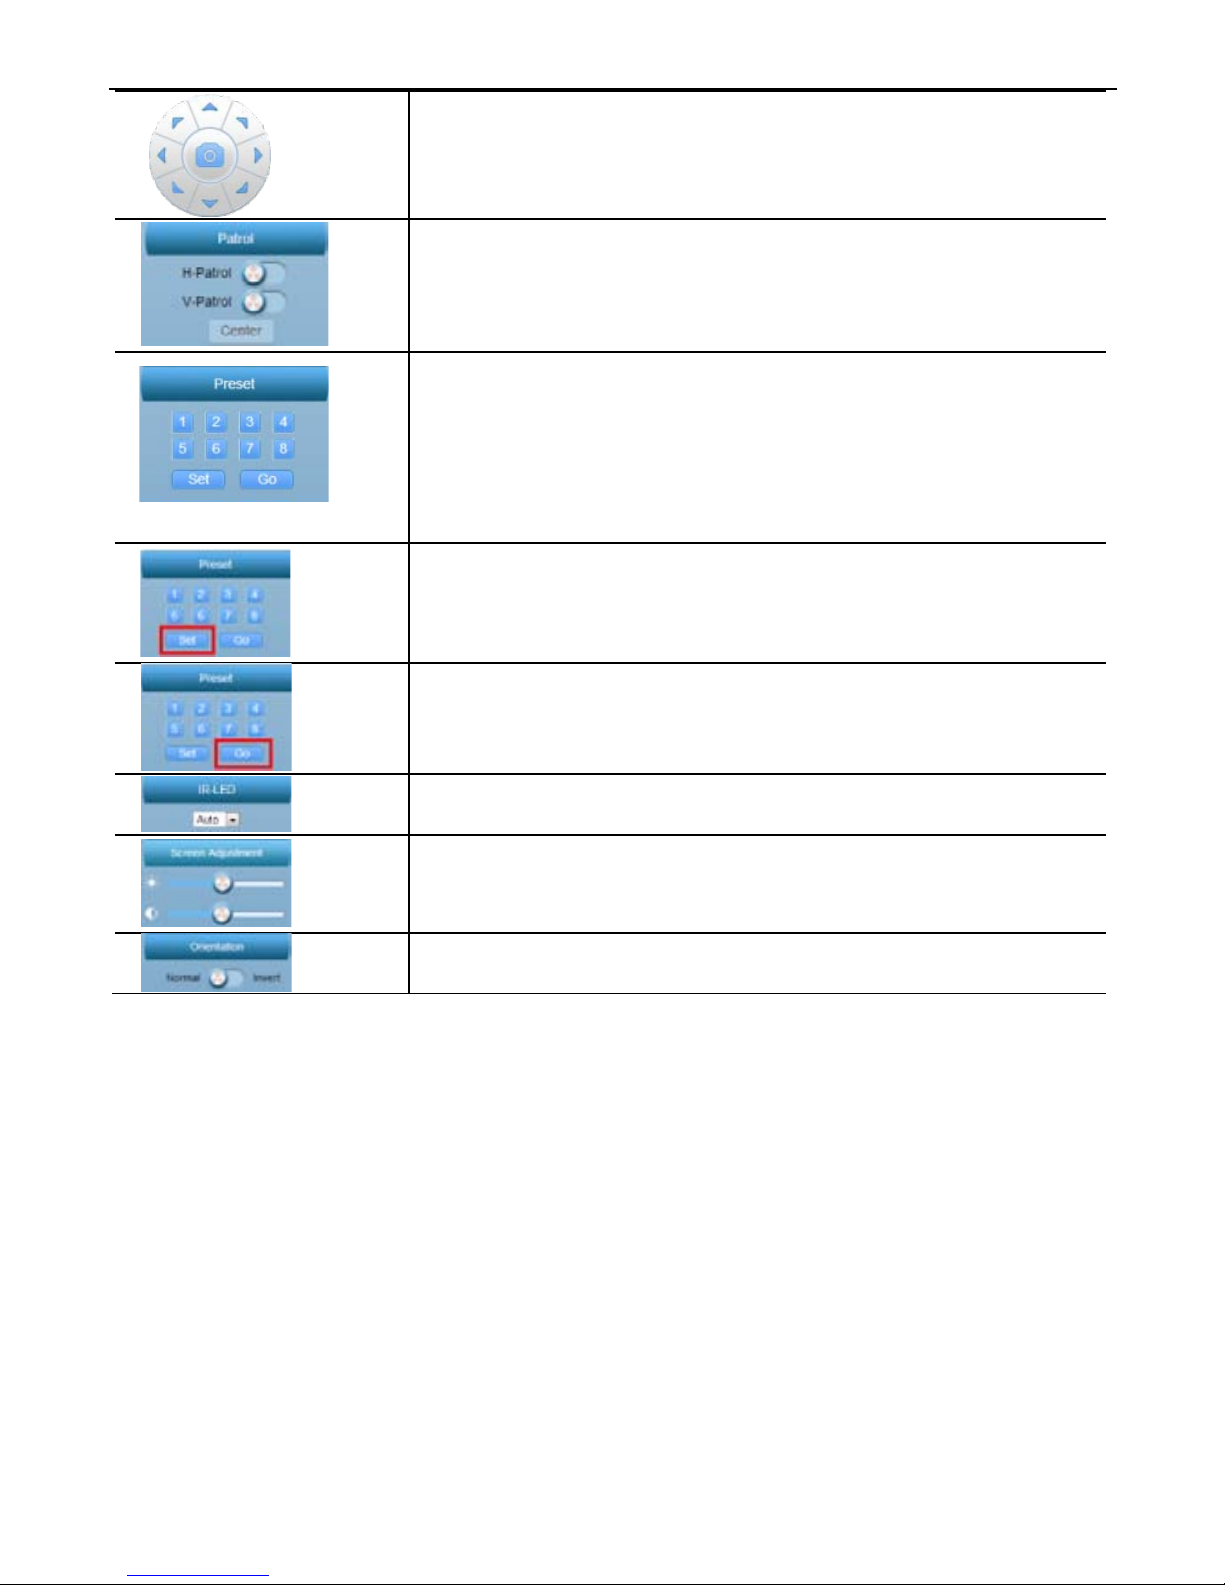
8 arrows to Pan/Tilt the camera
Center button is used for taking snapshot.
Patrol horizontally or vertically.
Go center when click “Center” button
Preset positions are IP camera's saved Pan/Tilt
positions, for users to quickly access 8 specific
positions by click a button. This application
allows users to store up to 8 preset positions.
Set preset position; (only available to Pan/Tilt
cameras)
Go to a spec ific preset position (only available to
Pan/Tilt cameras)
Turn on/off /IR-LED
Adjust the brightness;
Invert the video horizontally or vertically
*Noti
ce:
For
in-depth explanation on how to use this web application, please
download user manual from http://www.tenvis.com/download.
Page 39
TENVIS Technology Co., Ltd.
36
Wi-Fi Protected Setup (WPS) is a standard for easy and secure wireless
network set up and connections. WPS can automatically set up a random
network name (SSID) and strong WPA wireless security for wireless
routers, access points, computers, adapters, Wi-Fi phones, and other
electronic devices. If you want to set up camera’s W i-Fi by WPS, please
make sure your router support WPS function.
1. C
onnect the power cable and wait for the camera to initialize itself.
Please make sure the camera and the router are within 2 meters
when you push Wi-Fi WPS button.
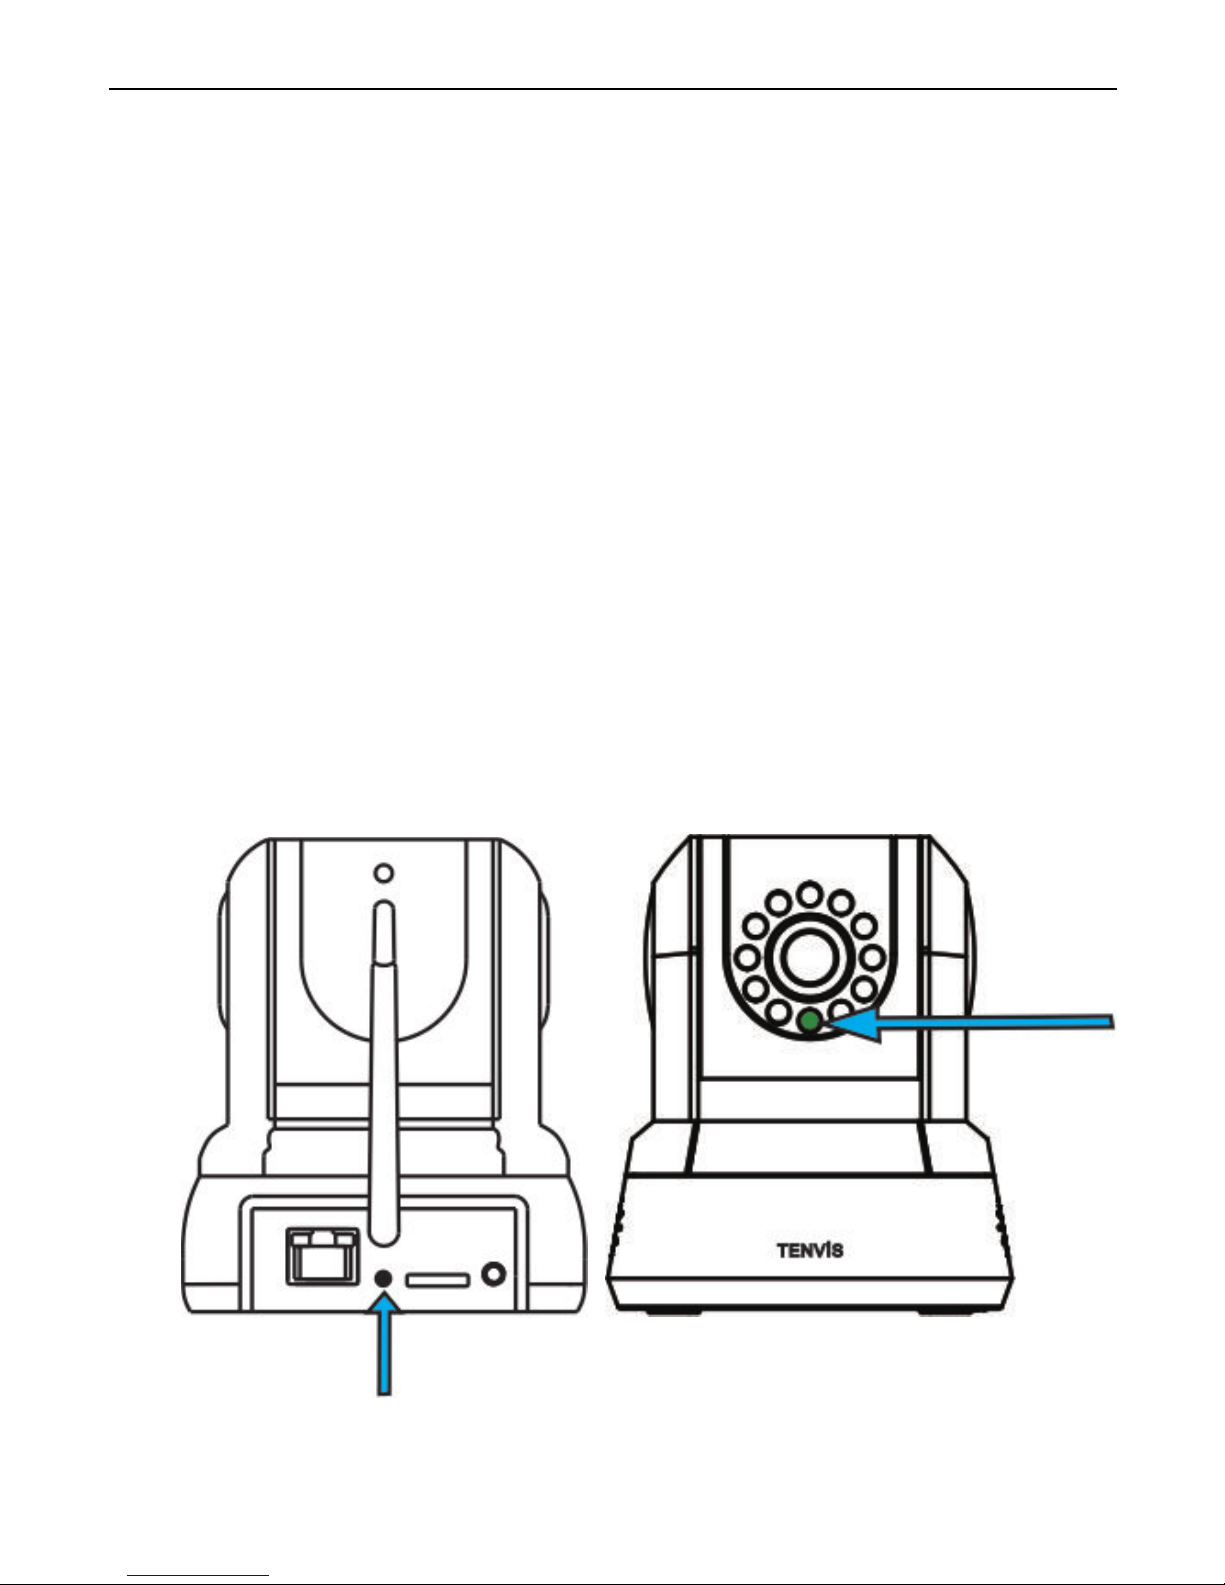
2. Press the WPS button on the back of the ca mera for about 3 seconds,
then the green light (front) will flash, the camera will be in WPS mode.
Setup Wi-Fi using WPS
What is WPS?
Set up Wi-Fi using WPS
Page 40
TENVIS Technology Co., Ltd.
37
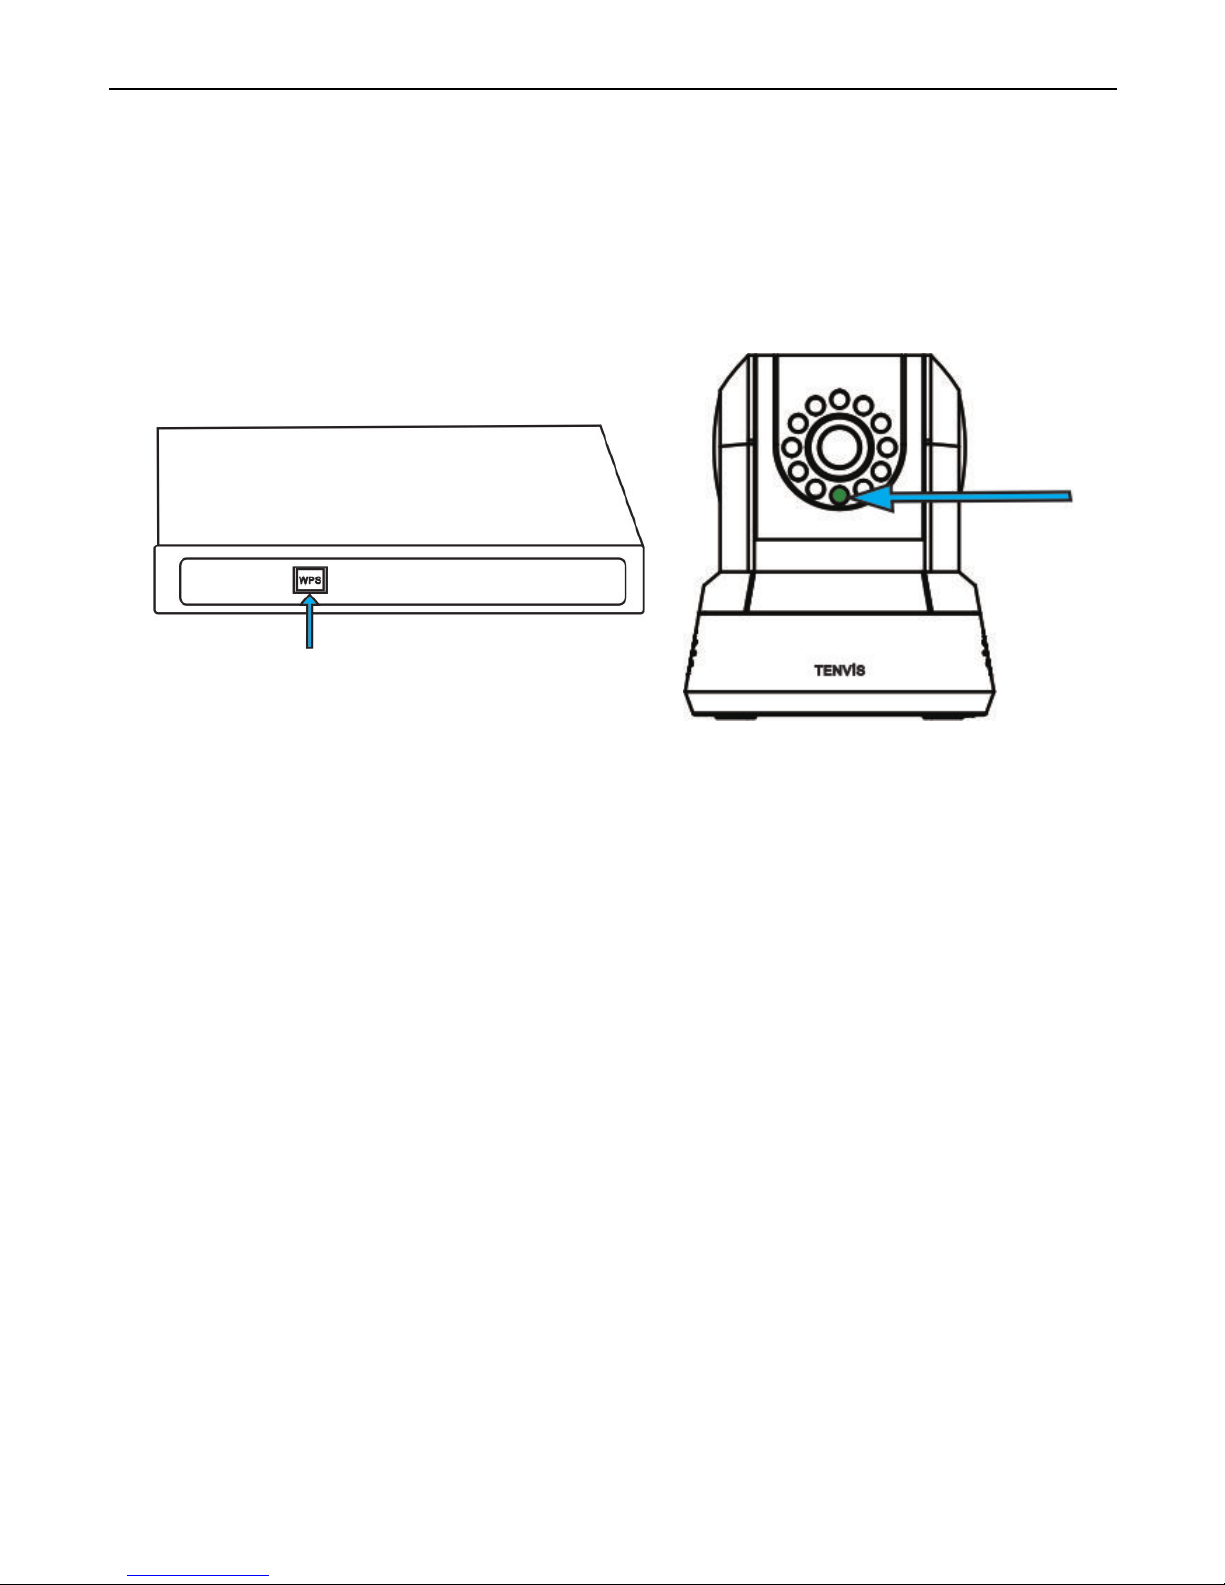
3. Press the WPS button on the router for about 3-5 seconds, the time
depends on the router. The router’s light will flash to indicate the
router i n WPS mode. W hile bot h are in W PS mode, the camera will
connect to the router via Wi-Fi. Wait about 1-2 minutes, the green light
of the camera will become static; to indicate Wi-Fi connection is
established between the two.
*Note:
1. The steps to active router’s WPS mode varies by router’s model and
brand , please refer to your router’s user manual for details.
2. Not all routers support WPS;
3. You can set up Wi-Fi in App in mobile device or web browser in your PC
if your router does not support WPS;
Page 41
TENVIS Technology Co., Ltd.
38
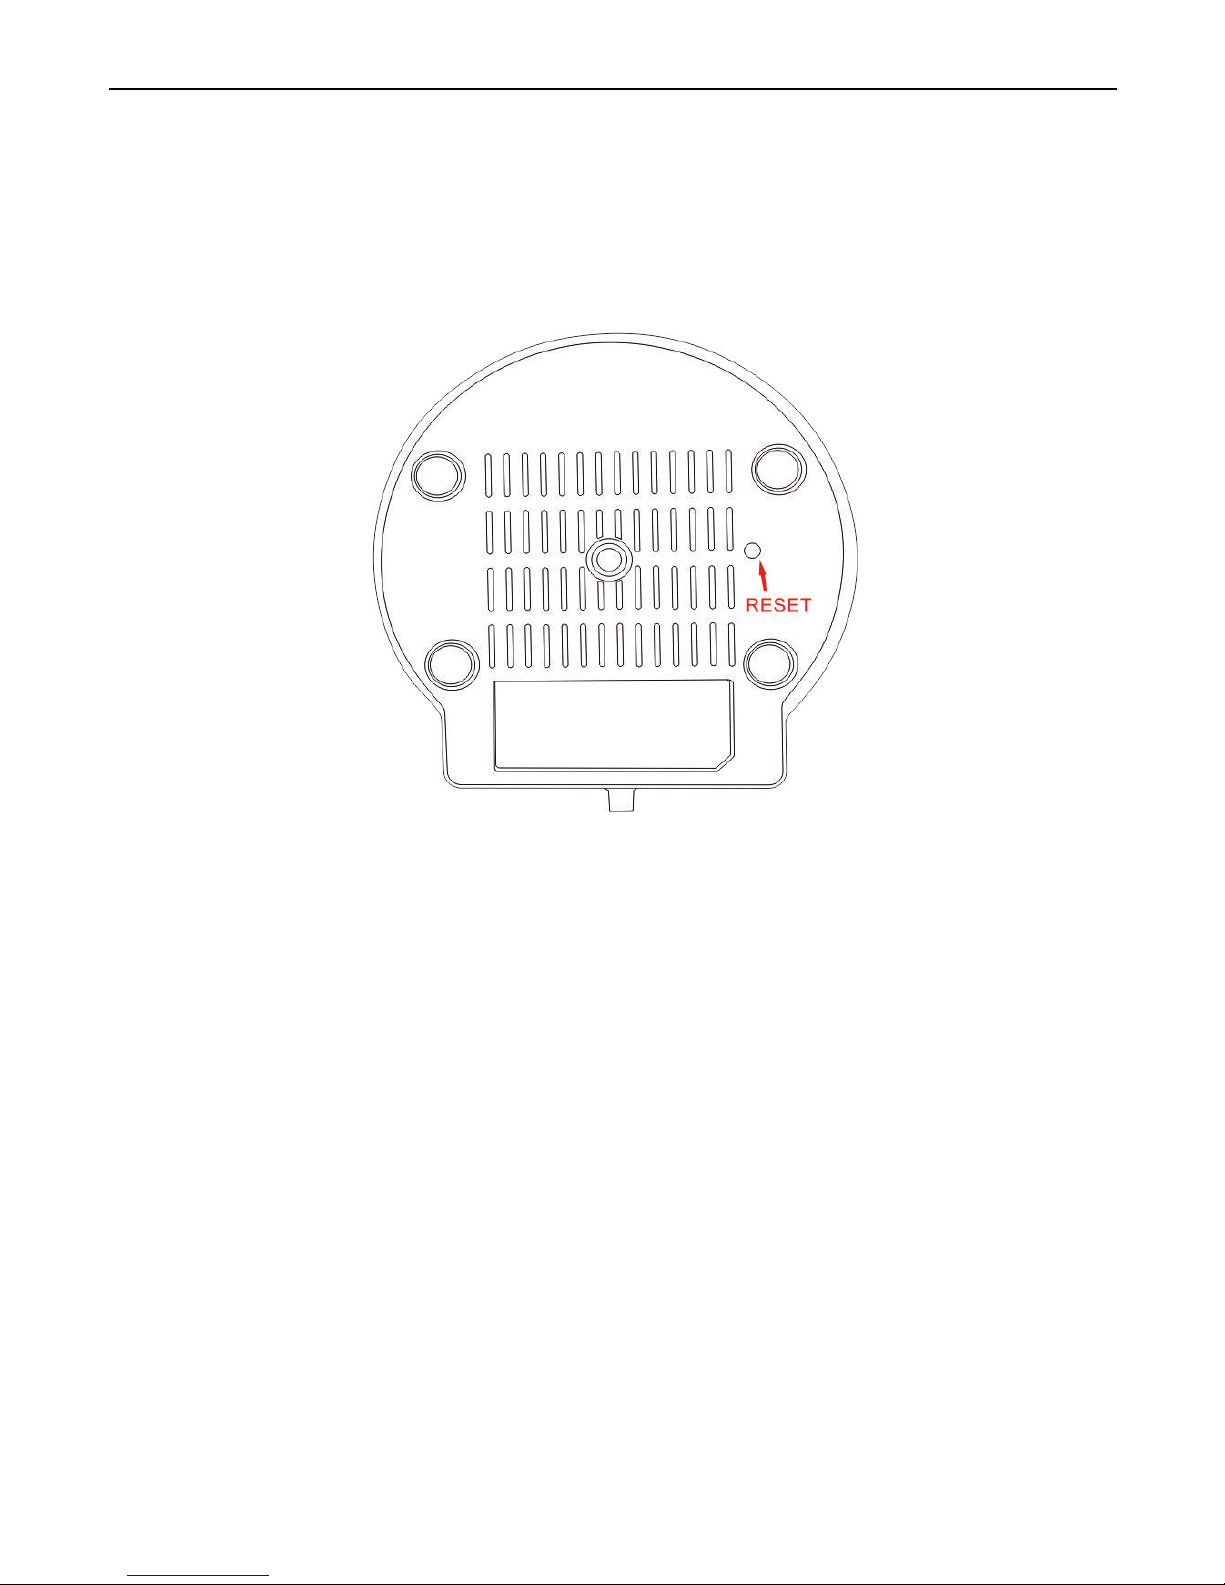
Please press the reset button under or on the camera for about 15 seconds
until the camera reboots. Please make sure the power supply is connected
to the camera when you are doing it.
*Notice: Once you reset the camera, the camera will lose all the
configuration.
Camera Reset
Page 42

TENVIS Technology Co., Ltd.
39
FCC STATEMENT This equipment has been tested and f ound to comply
with the limits for a Class B digital device, pursuant to Part 15 of the FCC
Rules. These limits are designed to provide reasonable protection against
harmful interference in a residential install ation. This equipment generates
uses and can radiate radio frequency energy and, if not installed and used
in accordance with the instructions, may cause harmful interference to
radio communications. However, there is no guarantee that interference
will not occur in a particular installation. If this equipment does cause
harmful interference to radio or television reception, which can be
determined by turning the equipment off and on, the user is encouraged to
try to correct the interference by one of the following measures:
Reorient or relocate the receiving antenna.
Increase the separation between the equipment and receiver.
Connect the equipment into an outlet on a circuit different from that to
which the receiver is connected.
Consult the dealer or an experienced radio/TV technician for help.
FCC NOTICE This device complies with Part 15 of the FCC Rules.
Operation is subject to the following two conditions:
1 This device may not cause harmful interference, and
2 This device must accept any interference received, including interference
that may cause undesired operation.
FCC CAUTION
• Any changes or modifications not expressly approved by the party
responsible for compliance could void the user's authority to operate this
equipment.
• This device and its antenna(s) must not be co-located or operating in
conjunction with any other antenna or transmitter.
FCC ID: N6QIPROBOT3
FCC Statements
Page 43

TENVIS Technology Co., Ltd.
40
How do I reset my camera?
1. Press and hold the Reset button at the bottom for over 3 seconds until
the camera confirms this action by rotating itself.
2. Please wait until the rotation is finished, unplug the power and plug in
again. The camera is fully reset and restored to factory setting.
3. You will need to setup your camera again.
Why is the image black and white?
When the environment is getting dark the camera will activate night vision
mode automatically.
When night vision is activated, the video feed will be in black and white.
Is there a limit on connection or viewing time?
TENVIS provides unlimited access to your camera for free.
Why is my camera offline?
Please check the power button of the camera and the router to ensure the
connection is valid then proceed to reboot.
I forgot my password for the camera, how can I find it?
Please go to reset password section on page 38.
What is the default password for the camera?
The default password of the camera is admin
Frequently Asked Questions
Page 44

TENVIS Technology Co., Ltd.
41
Warranty
WARRANTY COVE RAGE:
This warranty obligation is limi ted to the terms set forth below. TENVIS IP
Camera is designed to only supplement existing resi dential and business
security systems.
WHO IS COVERED:
This product is warranted to the original purchaser or the person receiving
the product as a gift against defects in materials and workmanship as
based on the date of original purchase (“Warranty Period”) from an
Authorized Dealer. The original sales receipt showing the product name
and the purchase date from an authorized retailer is considered such
proof.
WHAT IS COVERED:
This warranty covers new products if a defect in material or workmanship
occurs and a valid claim is received within the Warranty Period. At its
option, the company will either (1) repair the product at no charge, using
new or refurbished replacement parts, or (2) exchange the product with a
product that is new or which has been manufactured from new, or
serviceable used parts and is at least functionally equivalent or most
comparable to the original product in current inventory, or (3) refund the
original purchase price of the product. The Company warrants replacement
products or parts provided under this warranty against defects in m aterials
and workmanship from the date of the replacement or repair for the
remaining portion of the original product’s warranty. When a product or part
is exchanged, any replacement item becomes your property and the
replaced item becomes the company’s property. When a refund is given,
your product becomes the company’s property. Replacem ent product can
only be sent if all warranty requirements are met. Failure to follow all
requirements can result in delay.
WHAT IS NOT COVERED – EXCLUSIONS AND LIMITA TIONS:
This Limited Warranty applies only to the new products that can be
identified by the trademark, trade name, or logo affixed to it. This Limited
Warranty does not apply to any non-TENVIS hardware product or any
software, even if packaged or sold with the product. Non-TENVIS
hardware manufacturers, suppliers, or publishers may provide a separate
Page 45

TENVIS Technology Co., Ltd.
42
warranty for their own products packaged with the bundled product. The
Company is not liable for any damage to or loss of any programs, data, or
other information stored on any medi a c ontained within the product, or any
non-TENVIS product or part not covered by this warranty. Recovery or
reinstallation of programs, data or other information is not covered under
this Limited Warranty.
This warranty does not apply (a) to damage caused by accident, abuse,
misuse, neglect, misapplication, or non-TENVIS product, (b) to damage
caused by service performed by anyone other than an Authorized Service
Location, (c) to a product or a part t hat has been modified without written
permission, or (d) if any serial number has been removed or defaced, or (e)
to a product, accessories or c onsumables sold “AS IS” without warrant y of
any kind by including ref urbished TENVIS products sold “As IS” by some
retailers.
THIS LIMITED WARRANTY DOES NOT COVER:
• Shipping charges to return defective product.
• Labor charges for installation or setup of the product, adjustment of
customer controls on the product, and installation or repair of any part
outside of the product.
• Product repair and/or part replacement because of improper installation
or maintenance, connect i ons t o improper vol t age supply, power li ne surge,
lighting damage, retained images or screen markings resulting from
viewing fixed stationary content for extended periods, product cosmetic
appearance items due to normal wear and tear, unauthorized repair or
other cause not within the control of the company.
Damage or claims for products not being availabl e for use, or for lost data
or lost software.
• Damage from mishandl ed shipments or transit accidents when returning
product.
• A product that requires modific ation or adaptation to enable it to operate
in any country other than the country for which it was designed,
manufactured, approved and/or authorized, or repair of products damaged
by these modifications.
• A produc t used for commercial or institutional purposes (including but not
limited to rental purposes).
• Product lost in shipment and no signature verification receipt can be
provided.
• Failure to operate per Owner’s Manual.
Page 46

TENVIS Technology Co., Ltd.
TO OB TAIN ASSIST ANCE
Send an email to [email protected].
REPAIR OR REPLACEMENT AS PROVIDED UNDE R THIS WARRANTY
IS THE EXCLUSIVE REMEDY FOR THE CONSUMER. TENVIS SHALL
NOT BE LIABLE FOR ANY INCIDENTAL OR CONSEQUENTIAL
DAMAGES FOR BREACH OF ANY EXPRESS OR IMPLIED WARRANTY
ON THIS PRODUCT. EXCEPT TO THE EXTENT PROHIBITED BY
APPLICABLE LAW, ANY IMPLIED WARRANTY OR MERCHANTABI LITY
OR FITNESS FOR A PARTICULAR PURPOSE ON THIS PRODUCT IS
LIMITED IN DURATION TO THE DURATION OF THIS WARRANTY.
Some states do not allow the exclusions or limitations of incidental or
consequential damages, or allow limitations on how long an implied
warranty lasts, so the above limitations or exclusions may not apply to you.
This warranty gives you specific legal rights. You may have other rights
which may vary from state/province to state/province.
43
Contact us
TENVIS Technology Co., Ltd
Address: Room 505, Rujun Building
105 Zhongxing Road, Ma'antang Communit y
Bantian Street, Longgang District
USA Distributor
Address: Zettaguard Inc.
363 Cliffwood Park St, Ste A
Brea, CA 92821
Page 47

Page 48

USA 1.0 - 0313
 Loading...