

tenso-comfort BPM105, BPM205 Operating Manual

tenso-comfort
Blood pressure meter
BPM105/BPM205
Operating manual
Issued in 11/2006 REF: 590108

3
1 Introduction 6
2 General information for self-
measurement of blood pressure 9
3 How to star t up your blood pressure
meter 10
3.1 Inserting / exchanging batteries 10
3.2 Switching on 12
3.3 Configuring the device 13
3.4 Setting the date and time 14
3.5 Configuring the measured
value memory 17
3.6 Resetting the wireless connection 19
3.7 Clearing the measured value memory 21
4 Carrying out the blood pressure
measurement 23
4.1 Applying the cuff 23
4.2 Carrying out the blood pressure
measurement 24
4.3 Use by multiple persons 27
5 Measured value memory 28
5.1 Storing the measured values 28
5.2 Calling the stored measured values 28
6 Checking and taking care
of the blood pressure meter 31
6.1 Function control of the display 31
6.2 Cleaning the device 31
6.3 Maintenance and storage 31
6.4 Calibration 32
7 Error messages/causes of error and
measures to take 33
8 Technical data 38
9 Manufacturer warranty and
guarantee 41
10 Symbols and abbreviations 42
11 Blood pressure information 43
Contents Control elements
Display
MEM button
1. Switch on device
(memory mode)
2. Select user
3. Change values
SET button
1. Switch on device (setting mode)
2. Selection button (next field)
3. Switch off device after the last
field has been set
On/Off button
1. Switch on device
(measuring mode)
2. Switch off device
3. Confirm user selection
Cuff

4 5
Display elements 1 Number field for systolic blood pressure,
user no., error code
2 Number field for diastolic blood pressure
and year
3 Battery symbol
− on: weak battery
− blinking: dead battery
4 Number field for pulse
5 Heart symbol
− blinks with pulse rate during
measurement
6 Number field for time, date, year,
user activated/deactivated, wireless
connection activated/deactivated
(BPM105 only)
7 Symbol for active wireless connection
(BPM105 only)
8 Systolic blood pressure indication
9 Blood pressure unit indication
10 Error indication
11 User no. indication
12 Diastolic blood pressure indication
13 Blood pressure unit indication
14 Indication that measurement is too high
(“high”)
15 Indication that measurement is too low
(“low”)
16 Pulse
indication
17 Pulse unit indication
18 Days, e.g. 7, 14, 21, 28, from which the
average blood pressure values are to be
calculated
19 Indication of average measurements for
7, 14, 21, 28 days
20 Indication of stored measurement
(“memory function”)
1
2
3
4
5
6
7
8
12
13
14
9
10
11
15
16
17
18
19
20

6 7
Dear Customer,
We are pleased that you have decided in
favour of the Biocomfort blood pressure
meter tenso-comfort. It will be a reliable
aid for you in checking your blood pressure.
The device is easy to operate and works
reliably.
This operating manual contains important in
formation for you. Please read the operating
manual carefully before using the device for
the first time. All elements and displays are
explained in detail in the operating manual.
Keep the operating manual in a safe place for
future reference.
The Biocomfort blood pressure meter is a
compact, fully automatic wrist blood pressure meter.
It measures your blood pressure and pulse
If you have a cardiac pace maker, the device
reliably indicates your real pulse rate. This
does not have to agree with the set frequency
of the cardiac pace maker.
If you suffer from arrhythmia, you should
only use this blood pressure meter after consulting your physician.
This blood pressure meter is not suitable for
measuring the blood pressure of babies and
children. The arm circumference of the pa
tient at the measurement location should be
at least 13.5 cm and at most 22 cm.
Only use the blood pressure meter for measuring blood pressure. It is not a general meas
uring device for measuring other pressure
values.
Do not use mobile phones or other devices
which radiate an electromagnetic field in the
direct vicinity of the blood pressure meter.
This could lead to a malfunction.
Carry out the measurement in a quiet place.
Measuring in vehicles or other modes of
transportation can lead to faulty measure
ments, since vibrations can influence the
measurement.
Please also note the limitations with regard to
the ambient temperature and humidity (see
Chapter 8, “Technical data”). Temperatures
which are too high or too low can especially
lead to faulty measurements.
The cuff cannot be completely disinfected.
For this reason, if the device is used on pa
tients with contagious diseases, it should be
used exclusively for these persons.
If used by private persons, the blood pressure
meter should undergo an instrumentation
check every two years to make sure that the
measuring accuracy is kept.
In the case of commercial use or use by med
ical personnel, the instrumentation check is
required by law.
Such a check is also required if there are
signs of malfunction. These checks are car
-
ried out by Biocomfort Diagnostics.
Introduction
11 Introduction simply and quickly according to the oscillo-
metric principle.
It is suitable for making blood pressure measurements yourself and is therefore an aid for
monitoring blood pressure at home and in
the clinical area.
The Biocomfort blood pressure meter can
be used by several persons. To do this, the
measured value memory can be configured
so that the measured blood pressure measurements can be allocated to up to 8 different
users based on the user identity number
(1 to 8).
Attention:
Values you measure yourself should be only
be interpreted by your doctor. Never change
the dose of medicine your doctor prescribes
you.
Blood pressure measurements can’t be made
in cases of serious arteriosclerosis (false
results due to hardening of the arteries).

8 9
The testing laboratory meets the necessary
requirements for these checks in accordance
with Article 11 of the Medical Devices Op
-
erator Ordinance (MPBetreibV) from June 29,
1998. This testing laboratory is registered for
the checks with the responsible authority.
Scope of delivery:
Blood pressure meter
Storage bag (BPM205 only)
2 x 1.5 V alkaline batteries [type AAA / LR03]
Operating manual
Blood pressure should be measured at least
twice a day (in the morning and evening)
when in a relaxed condition. Since physical
exertion (e.g. sport), but also eating, smoking
and drinking (especially alcohol and caffeinated drinks), influence blood pressure values,
this should be avoided before measurement.
But other extraneous factors, such as stress or
a full bladder, can also falsify the measure
ments.
Since blood pressure fluctuates throughout the
day and a series of other factors also have a
strong influence, more or less, even if meas
urements are taken soon after each other, the
results may deviate. One-time or irregular
measurements therefore do not form a reliable basis for an assessment. This is only pos
sible when the blood pressure is measured
regularly under similar conditions and over
a long period of time. It is important to docu-
ment the measured values. If you measure el
evated blood pressure values over a relatively
long period of time, you should consult a
physician and present him with the measured
blood pressure values (table).
If your physician determines that you have
high blood pressure, please comply with the
prescribed dose of medication exactly, and
do not change this, even if you temporarily
notice lower values in your measurements.
For the best possible measurement in meas
uring blood pressure yourself on your wrist,
it is decisive that you follow all instructions
in this operating manual. It has been shown
from experience that most measuring errors
are due to the incorrect position of the wrist
and the incorrect measuring time.
General information
2
2 General information for self-
measurement of blood pressure

3 How to start up your
blood pressure meter
10 11
Preliminary note:
This operating manual refers to the blood pressure meter BPM105 with a wireless interface
and BPM205 without a wireless interface.
The measured value memory for the BPM105
device with a wireless interface is directly
configured via the Health Manager software.
Chapter 3.5 does not apply to this device.
3.1 Inserting / exchanging batteries
The Biocomfort blood pressure meter is
delivered with two 1.5 V alkaline batteries
(type AAA/ LR03) which must be inserted
before the first measurement.
If the battery symbol appears on the display, the batteries are weak and must be
exchanged as soon as possible, but measure
ments can still be made. When the battery
symbol on the display starts to blink, the bat
-
teries are already so weak, that measurement
is no longer possible.
Weak batteries are to be exchanged so that
error-free measuring results can be guaran
teed.
When batteries are exchanged, all
settings
which have been made on the device are
retained, as well as the stored measurements.
Please follow the following steps for insert
-
ing/exchanging batteries:
Step 1
Please always switch off the device before
exchanging the batteries.
Step 2
Pull the battery compartment cover on the
back side of the device in the direction of the
arrow and remove.
Step 3
Remove any used batteries. To make it easier
to remove the used batteries, you can pull on
the plastic band looped around the batteries
in the direction of the arrow.
Insert both batteries according to the symbols
in the battery compartment. Please make sure
that the plastic band is looped around the
batteries as shown in the figure.
Step 4
Push the battery compartment cover back on
until you feel it click into place.
Step 5
Afterwards, check whether the batteries have
been correctly inserted by briefly pressing the
On/Off button. If this is the case, all display
elements appear for about 2 seconds as a
function test.
Getting started
3

12 13
Note:
Please make sure that you have replacement batteries on hand. New batteries
(1.5 V alkaline batteries) have a lifetime of
circa 300 measurements.
When batteries are removed, the internal
clock of the measuring device doesn’t continue to run, so when the device is used again
after exchanging the batteries or after storing
the device without batteries, the date and
time may have to be reset (see Section 3.4).
Attention:
Used batteries are hazardous waste and
should not be thrown in the household
garbage can. Please dispose of batteries
in accordance with the local regulations.
3.2 Switching on
Switch on your blood pressure meter by
pressing the On/Off button. Every time you
turn it on, all display elements appear for
about 2 seconds as a function test. Please
make sure that the display elements can real
ly be seen completely, as shown in the figure
on page 4. If a segment is missing, this could
lead to a false display of later measurements.
Note:
If no measurement is started or no button is
pushed within 2 minutes, the blood pressure
meter switches off
automatically.
Attention:
Only switch the device on once the cuff has
already been applied and the measuring
process can begin.
3.3 Configuring the device
Before using the blood pressure meter for the
first time, or if you would like to adapt the
device to your needs, you must make a few
settings in the settings menu, whereby the
SET, MEM and On/Off buttons are pressed
as described in the following sections.
Pressing the SET button:
The SET button can be found underneath the
On/Off and MEM buttons and is covered by
these two buttons to avoid pressing it by mis
take. It’s easiest to press the SET button with
a small, flat object (e.g. paperclip).
While you are in the settings menu, the but
-
tons have the following tasks:
SET button:
When you press the SET button with the
device switched off, you enter the settings
menu, whereby the first setting which can be
made is the year of the present date. You can
tell which parameter can be set at any given
time by its blinking. If you press SET again,
you proceed to the next settable parameter.
MEM button:
By pressing the MEM button, you can change
the currently blinking parameter until it takes
on a value you desire.
Once this is the case, you can go to the next
Getting started
3
14 15
parameter by pressing the SET button, or you
can exit the settings menu by pressing the
On/Off button.
Note:
If you keep the MEM button pressed, you can
change the currently active parameter faster.
On/Off button:
By pressing the On/Off button, you exit the
settings menu and the set parameters are
saved.
3.4 Setting the date and time
Note:
The measured blood pressure and pulse
values are stored with the date and time.
The correct setting of the date and time
makes it easier for you to make a correct
time allocation of your measurements.
In order to set the correct date and time in
your measuring device, please proceed as
follows:
Step 1:
With the device switched off, first press
the SET button with a small, flat object
(e.g. paper clip).
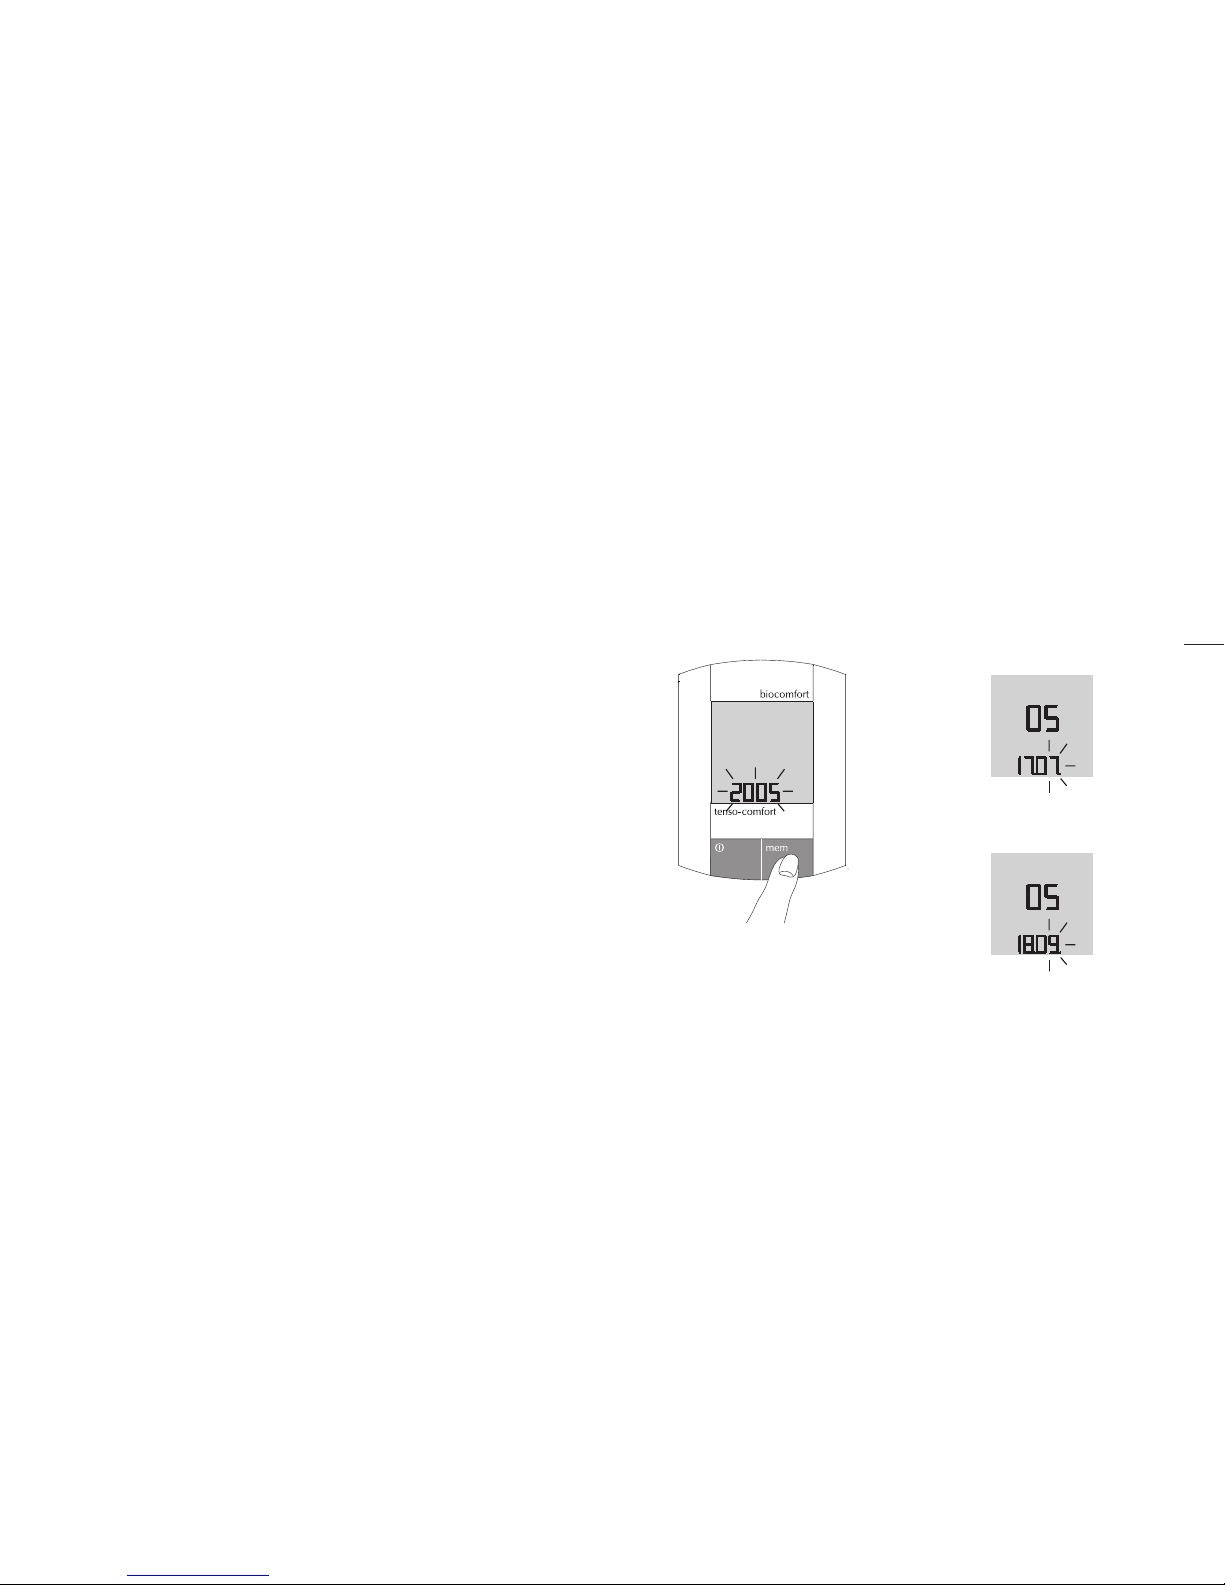
Step 2:
As soon as the year starts blinking on the
display, press the MEM button until the
correct year appears.
Step 3:
Press the SET button again: Now the display
for the month starts blinking.
Step 4:
Press the MEM button until the correct month
is displayed.
Getting started
3
 Loading...