

Page 1
TX-1 Series Instrument www.tensitron.com pg. 1
Operating Instructions
TX-1 Series Digital
Wire / Filament Tension Meter
Page 2

TX-1 Series Instrument www.tensitron.com pg. 2
TABLE OF CONTENTS
1. WARRANTY POLICY ..................................................................................................... 3
2. SPECIFICATIONS .......................................................................................................... 4
3. SAFETY ......................................................................................................................... 5
4. INSTRUMENT DESCRIPTION ........................................................................................ 5
• Add-On Options ...................................................................................................... 6
• Features of all Instruments .................................................................................... 6
5. BASIC OPERATION ....................................................................................................... 7
• Charging Instrument Batteries ............................................................................... 7
• Quick Start Instructions .......................................................................................... 8
• Engaging Instrument onto material ....................................................................... 9
6. DISPLAY SCREEN ........................................................................................................ 10
• SETUP Screen ....................................................................................................... 10
o LCD Refresh Rate ............................................................................................. 10
o Data Averaging ................................................................................................ 10
o Cal Analog (Optional feature) ......................................................................... 10
o Cal Length (Optional feature) ......................................................................... 10
o Custom Names ................................................................................................ 10
o Resolution ....................................................................................................... 11
o Length Units (Optional feature) ...................................................................... 11
o Re-Cal Tension: See description at the end of this booklet. ............................ 11
o Audio ............................................................................................................... 11
o Backlight .......................................................................................................... 11
o Set-Point Menu ............................................................................................... 11
o Version ............................................................................................................ 12
• DATA LOGGING Screen ......................................................................................... 12
• TENSION UNITS Screen ......................................................................................... 13
• SELECT MATERIAL Screen ..................................................................................... 13
• LENGTH Screen ..................................................................................................... 13
• SPEED Screen........................................................................................................ 13
Page 3

TX-1 Series Instrument www.tensitron.com pg. 3
7. ADVANCED OPERATION ............................................................................................ 14
• General Calibration Precautions .......................................................................... 14
• Check Accuracy .................................................................................................... 14
• Calibrate Instrument ............................................................................................ 15
Proprietary Notice
This document contains proprietary information which may not be
reproduced in whole or in part without the written permission of
Tensitron, 733 South Bowen Street, Longmont, CO 80501.
Tensitron reserves the right to make instrument changes and
improvements which may not be reflected in this document. Portions
of this document may have been updated to include the latest
hardware or firmware version, if applicable. We recommend that this
document be read in its entirety before any attempt is made to
operate the instrument.
Thank You . . .
For purchasing another fine product from Tensitron
If you have any questions or need assistance, please call us at
303-702-1980 or find us online at www.tensitron.com
1. WARRANTY POLICY
STANDARD EQUIPMENT WARRANTY
Tensitron warrants that all Tensitron-manufactured equipment will be free of any defect in materials or
workmanship for the period of (1) year. Warranty begins from the date of shipment from a Tensitron facility.
The warranty is extended to customers and applies to all Tensitron-manufactured equipment purchased,
installed, and used for the purpose for which such equipment was originally designed. The above warranties
cover only defects arising under normal use and do not include malfunctions or failures resulting from misuse,
abuse, neglect, alteration, problems with electrical power, usage not in accordance with product instructions,
acts of nature, or improper installation or repairs made by anyone other than Tensitron or a Tensitronauthorized, third-party service provider. Shipping costs to and from Tensitron are not included in the warranty
coverage.
Page 4
TX-1 Series Instrument www.tensitron.com pg. 4
2. SPECIFICATIONS
o Full Scale Accuracy
For all models up through 5000 grams: 1%
Accuracy for custom calibrations is material specific
o Power Requirements
For Instrument Input: 9 VDC…2.2A
For AC Adapter: 100-240V~50-60Hz 0.48A
Power Supply operates with input voltages from 100 –240V and includes
several interchangeable adapters allowing use with European, U.S.,
Australian, British, and other plug configurations.
Battery: Rechargeable NiMH, custom proprietary design
o Battery Life
Approximately 12 hours depending on backlighting intensity
o Operating Temperature
32º F to 120 º F
If these values are exceeded, battery charge/discharge rates will decline.
However, this could be offset by using the power supply. Charging in direct
sunlight or near a heat source will not produce a full charge and may
permanently damage battery pack.
o Storage Temperature
20º F to 158º F (instrument and charger)
o Ambient Humidity
10% to 90% non-condensing
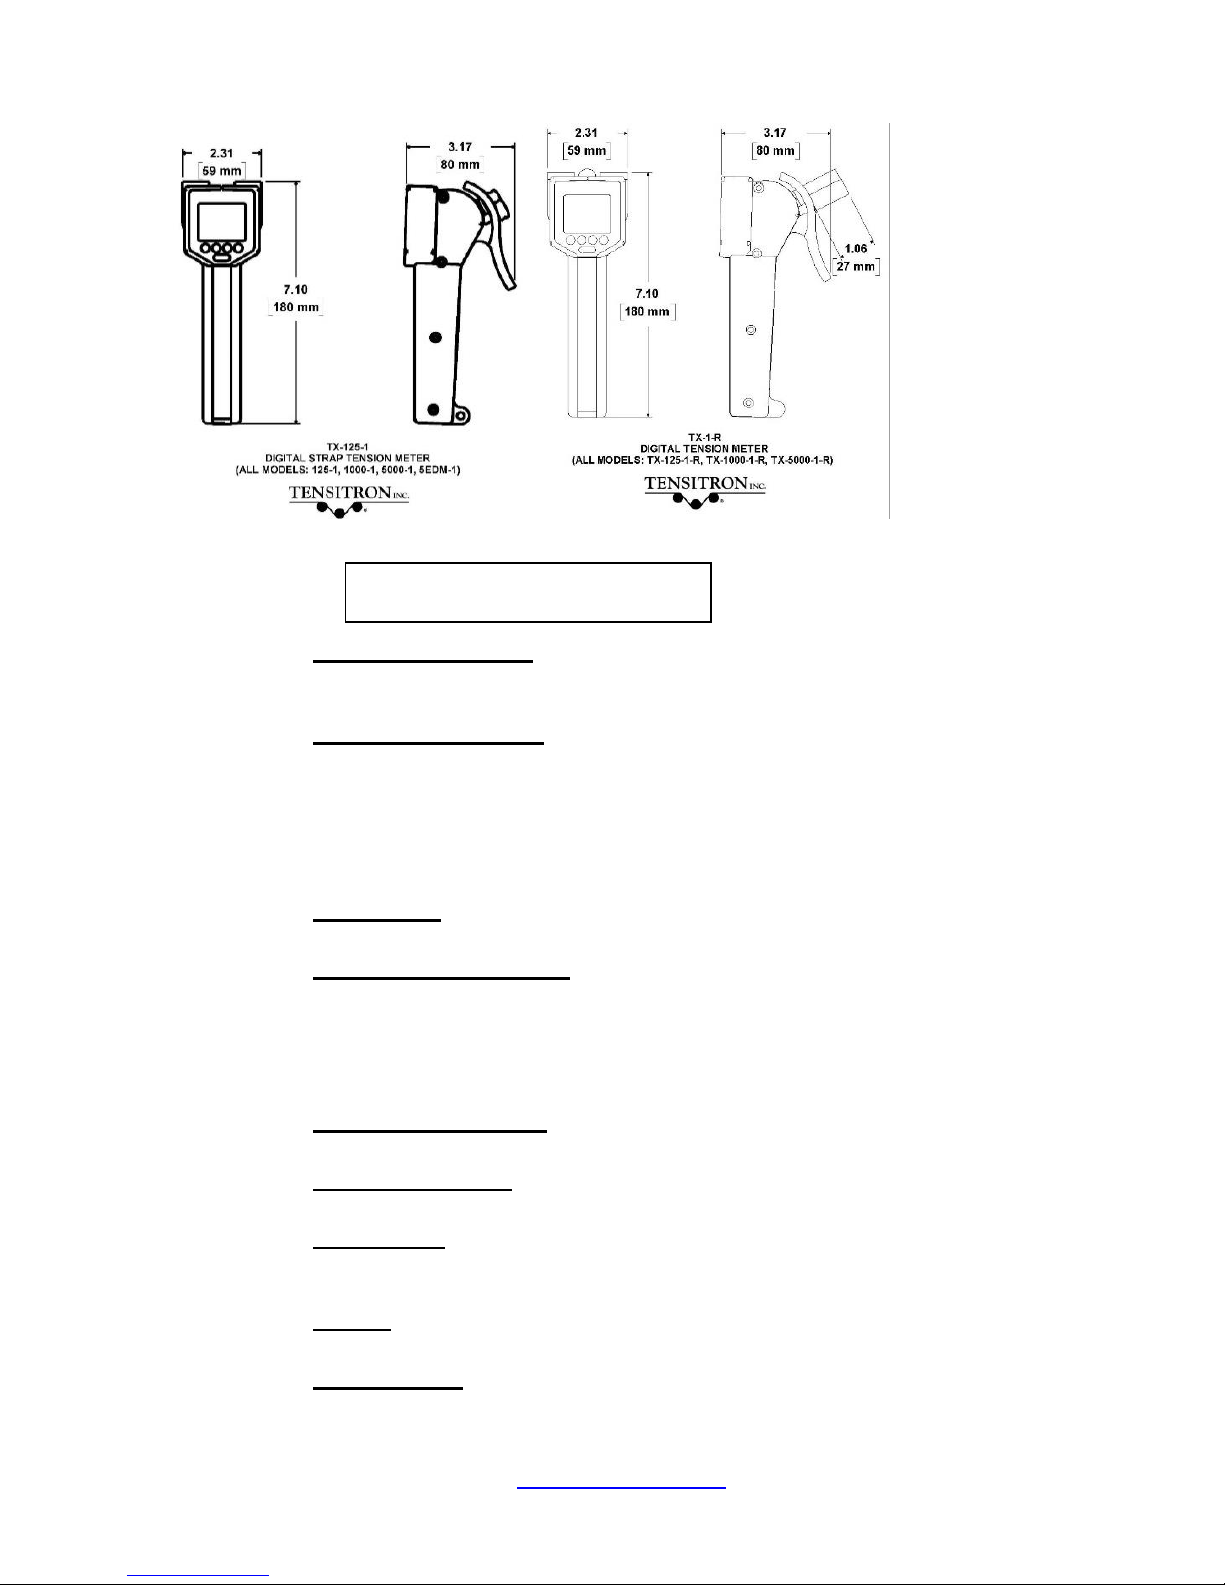
o Dimensions
All models without cylindrical rollers: 2.31” x 3.17” x 7.10”
All models with cylindrical rollers: 2.31” x 3.70” x 7.10” (See Figure 1.)
o Weight
.75 lb. (depending on instrument configuration)
o Environment:
Indoor or outdoor use, dust-free environment
Figure 1: TX-1 Dimensions
Page 5

TX-1 Series Instrument www.tensitron.com pg. 5
3. SAFETY
WARNING: When using cordless, electronic instruments, always follow basic safety
precautions to reduce the risk of fire, electric shock, or personal injury
READ AND SAVE ALL INSTRUCTIONS FOR FUTURE USE. Before using this meter,
make sure all users read and understand this manual, as well as any labels packaged
with or attached to the instrument.
o Know your instrument. Read this manual carefully to learn your tension
meter’s applications and limitations, as well as potential hazards associated
with this type of instrument.
o Avoid dangerous environments. Do not use your instrument in the presence
of explosive atmospheres (gaseous fumes, dust or flammable materials). Do
not submerge your instrument in liquids.
o Use the right tool or instrument. Do not use this instrument to do a job for
which it is not recommended.
o Check for damaged parts. Inspect instrument before use. Check for any
binding of moving parts, improper mountings, broken parts, and any other
condition that may affect operation. Do not use a damaged instrument. Tag
damaged instrument “DO NOT USE” until repaired. For repair, send
instruments directly to Tensitron, Inc.
o Guard against electric shock.
o Maintain instrument carefully. Keep handles dry, clean, and free from oil and
grease. Do not lubricate. All roller bearings are sealed.
o Do not use instrument if it has received a sharp blow or been dropped or
damaged in any way. Do not disassemble. Incorrect reassembly may result
in damage to the instrument and risk of electric shock and fire. If instrument is
damaged return it to Tensitron, Inc. for repair.
o Unplug charger when not in use.
o WARNING: Only use battery pack assemblies provided by Tensitron, Inc.
with your meter (P/N: TX-BATT). Other types of batteries might explode,
causing personal injury and damage.
4. INSTRUMENT DESCRIPTION
• Standard Instruments
Model
Material Selection
(Wire / Filaments)
Resolution
(grams)
Range
(grams)
TX-125-1
37 to 54 AWG or finer /
.0002” to .0044” Filaments
0.1 or 1
0-125
TX-1000-1
32 – 40 AWG or finer /
.002” to .008” Filaments
1 or 5
10-1000
TX-5000-1
28 – 40 AWG or finer /
.02” to .120” Filaments
5 or 10
50-5000
TX-5EDM-1
EDM Wires (.10, .15, .20, .25, &
.30mm)
5 or 10
50-5000
Page 6

TX-1 Series Instrument www.tensitron.com pg. 6
• Add-On Options
Instruments can be configured with any of the options below. Meters can be
equipped with either –A or –E, but not both.
o - R Custom Roller option
Choose from numerous sizes of cylindrical, flanged or U-shaped rollers.
o - S Speed and Length option
Indicate real-time speed in FPM or MPM. Maximum measurable speed is 9,999
FPM or 9,999 meters per minute. (Note: Line speeds exceeding 2,000 FPM are
generally unsafe for hand-held applications.) Read length measured up to
9,999 meters.
o - A Analog Output option
For both speed and tension values.
0-5 VDC of 4-20mA with software definable ending sequences.
Data output at 40 Hz.
Provided with 10’ cable to interface with your receiving device.
o - E RS-232 Serial Output option
Select data sampling rate from 1, 2 or 5 Hz.
Provided with 10’ cable to interface with your receiving device.
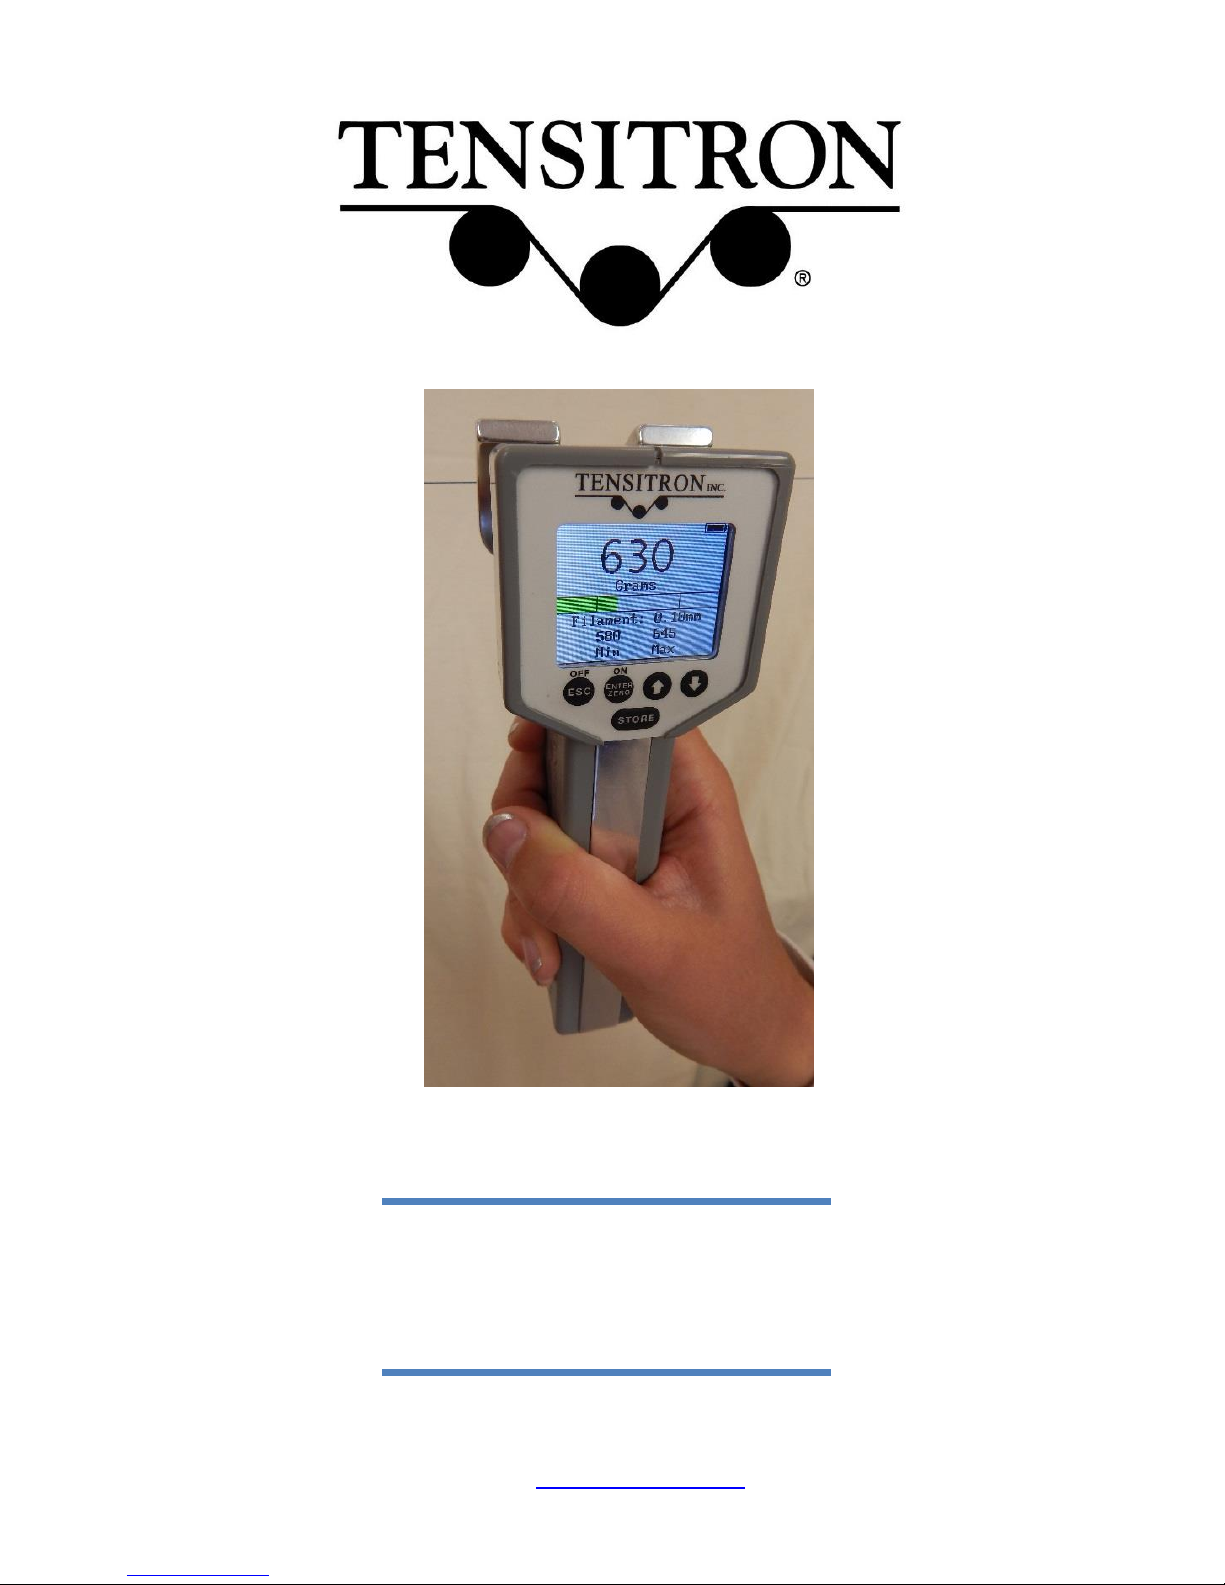
• Features of all Instruments
o Large, easy-to-read, color display with adjustable backlighting.
o Display shows tension, material selected, minimum and maximum tension
values, and a dynamic color bar graph that indicates changing tensions and
battery charge levels.
o Select tension values to display in grams, lbs, Newtons or cN (cN only
available on TX-125-1-series instruments).
o Instrument includes calibrations for numerous wires and filaments.
o Extremely accurate custom calibration using up to a 10-point linear
calibration procedure.
o All calibrations are password protected.
o Choose your calibration by first highlighting and selecting the material (Wire,
Filaments or Custom). Next define material size using choices such as
AWG, inches or mm and push “Enter”. The instrument automatically adjusts
to the calibration you’ve selected with a full-scale accuracy of +/- 1%. Note:
Full-scale accuracy for custom calibrations is material-specific.
o Adjustable LCD refresh rates allowing for stable, digital readouts.
o Automatic shutoff after several minutes of non-use.
o Instruments may be operated continuously while connected to power
supply.
o Data Logging: Select either Continuous or Single Point data logging mode
and record tension or (optional) speed values to the instrument memory.
o Data Averaging: Stabilizes your displayed tension readings. This feature
calculates and displays a rolling average of the readings taken over a userdefined time period. Options are: 1, 2, 5, or 10 seconds. (Only the readings
taken in the most recent period will be averaged and displayed.)
o Data Statistics: Monitor your process by viewing count, average,
minimum/maximum, and standard deviation values of your logged data.
Page 7

TX-1 Series Instrument www.tensitron.com pg. 7
o Set-Point feature: allows user to specify high and low tension points which
are then shown on the main display as an active, color-changing bar graph.
o Rechargeable NiMH batteries with power supply provided. Approximately 12
hours of continuous use depending on backlighting intensity.
o Power supply operates with input voltages from 100 – 240V and includes
several interchangeable adapters allowing use with European, Australian,
US, British, and other plug configurations.
o Optional features, including: Custom Rollers, Speed and Length monitoring,
Analog Output or Serial Output.
o Optional magnetic or rigid Mounting Bracket.
o All models typically available from stock.
o Numerous application-specific models available.
o Durable, lightweight carrying case with protective foam inserts. (See Figure
2.)
o All instruments are factory-calibrated and ready to use. Calibration
certificate is included. All calibration values are traceable to National
Standards.
5. BASIC OPERATION
• Charging Instrument Batteries
1. Connect power supply cable to the instrument.
2. Plug the power supply into a power source with input voltages between 100 –
240 VAC.
3. A full charge of the battery assembly requires several hours of charging.
4. The battery pack assembly cannot be overcharged.
5. The instrument will remain on while connected to its power supply.
6. The battery charge level is indicated in the upper, right-hand corner of the
display.
Figure 2: Carrying case with instrument, calibration certification,
power supply (charger), adapters and operating instructions.
Page 8

TX-1 Series Instrument www.tensitron.com pg. 8
• Quick Start Instructions
1. Power the unit on by pressing ON button. Main display will indicate: Tension,
Material, Min and Max tension readings. (See Figure 3.)
2. Select a screen:
a. Move between screens by using the up (↑) and down (↓) buttons.
b. Make or enter a selection by pressing the Enter/Zero button.
c. Exit a setting by pressing the Escape (ESC) button.
3. Log Data:
a. Press the STORE button to store tension readings along with the
Minimum and Maximum of these values.
b. Clear the data displayed on the Main Screen by pressing and
holding the STORE button, or power the instrument off.
c. For additional information on logging and viewing data, refer to Sec
6 - Display Screens - Data Logging.
4. Read Tension: Variations in materials affect tension readings. It is essential
to select the correct material and size before use, or tension values may be
incorrect.
5. Select Tension Units:
a. Using the up or down arrows, scroll to TENSION UNITS, then press
ENTER.
Instrument Operation Panel
Main Display
Operation Buttons:
Off / Escape
On / Enter / Zero
Arrow Up
Arrow Down
Store
Main Display
Battery Charge Level
Selectable Units in grams, lbs, Newtons or
cN (TX-125 only).
Set Point Display
Select material Size – Instrument
automatically adjusts calibration
Store and Display up to 5 separate
tension measurements and their Average.
Figure 3: Instrument Operation
Panel and Display
Page 9

TX-1 Series Instrument www.tensitron.com pg. 9
b. Next, select from: Grams, Newtons, or LBS, and then press ENTER.
6. Select material:
a. Using the up or down arrows, scroll to SELECT MATERIAL, then
press ENTER.
b. Next select your material from: Wire, Filaments or Custom and
press ENTER. Next select your material size (diameter) in AWG
(for wires), Inches, mm or description for Custom entries and then
ENTER your selection. (See Figure 4.)
c. If your specific material is not listed, add it to the menu by following
the calibration instructions included at the end of these instructions.
Or, send a 15’ sample of your material and the instrument to
Tensitron and ask to have it added to the menu.
7. Zero Instrument: Hold the instrument in the attitude your reading will be taken
before you engage it to the tensioned material. Then, press ZERO.
• Engaging Instrument onto material
WARNING: DO NOT EXCEED THE MAXIMUM TENSION RANGE
OF THE INSTRUMENT OR DAMAGE WILL OCCUR.
▪ Engage the Instrument onto the tensioned material by separating the
rollers (squeeze the trigger assembly) and inserting your material
between the fixed roller and the two rollers on the trigger assembly.
(See Figure 5.)
▪ Once the material is in line with the three rollers, slowly release the
trigger until it makes a full stop. Note tension reading (See Figure 6.)
Select material and then
Size – Instrument
automatically adjusts
calibration
Figure 4:
Select Material Screen
Note the routing of the Cable.
Once material is properly routed, gently
release the Trigger until it stops into the
engaged position.
Figure 5: Instrument ready to engage
Figure 6: Instrument engaged onto material
Trigger and Guide Plate
Note the routing of the material.
Pull Trigger and engage instrument
onto material
Page 10

TX-1 Series Instrument www.tensitron.com pg. 10
6. DISPLAY SCREEN
• SETUP Screen
o LCD Refresh Rate
To either speed up or slow down the instrument’s LCD refresh rates:
▪ Scroll to SETUP and press ENTER.
▪ Scroll to LCD REFRESH RATE and press ENTER.
▪ Enter your preference: 1, 2 or 5 Hz and press ENTER.
Note: This feature is unrelated to Data Averaging.
o Data Averaging
Use this feature to adjust the stability of your displayed tension readings. It
allows users to select the duration the meter takes tension readings over before
averaging all of the readings and posting that average to the display. The
meter takes ~300 readings per second, so if a 1 second duration is selected,
the meter will average all 300 readings before posting the average of those
readings to the display. Likewise, if a 10-second duration is selected, the meter
will average all 3000 readings before posting the average of those 3000
readings to the display. Options are: 1, 2, 5 and 10 seconds. This is a rolling
average, meaning that only the readings taken in the last 1, 2, 5 or 10 seconds
(your choice) will be averaged and displayed.
Note: This feature is primarily used in processes where the material to be
checked is constantly moving, such as coil winding and textiles.
o Cal Analog (Optional feature)
Use this feature to calibrate the Analog Out option by hanging the weight
specified on the screen then entering that numeric value on your Signal
Conditioner (follow the instructions with your signal conditioner)
▪ Scroll to SETUP and press ENTER.
▪ Scroll to CAL ANALOG and press ENTER.
▪ Using the up and down arrows adjust the display to indicate the value
at which the instrument should output maximum Voltage or current.
▪ Then press ENTER.
o Cal Length (Optional feature)
Use this feature to calibrate the Length measurement option of your instrument.
▪ Scroll to SETUP and press ENTER.
▪ Scroll to CAL LENGTH and press ENTER.
▪ Next, using a precise 20-foot length of your material (20.0’), thread
one end through the instrument’s three rollers and slowly pull exactly
20.0’ through the instrument.
NOTE: The material must be under tension to make good contact
with the rollers on the instrument.
▪ Then press ENTER.
o Custom Names
Custom calibrations, listed as Custom 0 – 9, can be renamed so your material
appears as a selection on the Main Display. To rename a Custom Calibration:
▪ Scroll to SETUP and press ENTER.
▪ Scroll to CUSTOM NAMES and press ENTER.
Page 11

TX-1 Series Instrument www.tensitron.com pg. 11
▪ Scroll to the description to rename and press ENTER.
▪ Input your custom name by using the up and down arrows to select
each number, letter, or character, followed each time by ENTER.
▪ Continue pressing ENTER until all spaces in the description have
values, including blank spaces.
▪ Once your new name has been entered you will automatically be
returned to the SETUP screen.
o Resolution
To either increase or decrease the Resolution of the tension readings:
▪ Scroll to SETUP and press ENTER.
▪ Scroll to RESOLUTION and press ENTER.
▪ Select your preference: 5 or 10 Grams for the Model TX-5000 series,
1 or 5 Grams for the TX-1000 series, or 0.1 to 1 Grams for the TX125 series. Then press ENTER.
o Length Units (Optional feature)
Use this feature to select the unit for measuring length.
▪ Scroll to SETUP and press ENTER.
▪ Scroll to Length Units and press ENTER.
▪ Select your preference: Meters or Feet, and press ENTER.
o Re-Cal Tension: See description at the end of this booklet.
ONLY PERFORM THIS IF YOU ARE A QUALIFIED CALIBRATION HOUSE USING NIST-CERTIFIED
CALIBRATION WEIGHTS. NOT USED FOR CHECKING ACCURACY. TO CHECK ACCURACY, REFER TO
SEC. 7: CHECK ACCURACY.
o Audio
To turn the Beep ON or OFF:
▪ Scroll to SETUP and press ENTER.
▪ Scroll to AUDIO and press ENTER.
▪ Select ON or OFF and press ENTER.
o Backlight
To adjust the visual intensity of the LCD screen:
▪ Scroll to SETUP and press ENTER.
▪ Scroll to BACKLIGHT and press ENTER
▪ Select Low, Medium or Full intensity and press ENTER.
o Set-Point Menu
This feature displays tension as a colored bar on the main display. The colored
bar advances as tension increases, and retracts as tension decreases. You can
define a safe operating tension range. For tension measurements within this
range, the bar is green. Below the range, the bar is amber. Above the range,
the bar is red. To adjust the Set Point Menu:
▪ Scroll to SETUP and press ENTER.
▪ Scroll to SETPOINT MENU and press ENTER.
Page 12

TX-1 Series Instrument www.tensitron.com pg. 12
▪ Follow and enter the prompts to turn this feature on or off, or to edit
your high and low values. (See Figure 7.)
o Version
Press this button to determine the instrument’s model and what level of
firmware is downloaded to the instrument.
• DATA LOGGING Screen
Each time the instrument’s STORE button is pressed, a log of that material
tension will be stored in memory for later review.
o Logging Rate (when logging Continuous Data)
To adjust the rate at which the tension readings are logged:
▪ Scroll to DATA LOGGING and press ENTER.
▪ Scroll to LOGGING RATE and press ENTER
▪ Select 1, 2, or 5 Hz and press ENTER.
o Duration (when logging Continuous Data)
To adjust the duration that tension readings are logged:
▪ Scroll to DATA LOGGING and press ENTER.
▪ Scroll to DURATION and press ENTER
▪ Use the Up and Down arrows to change the Duration that you want
data stored and press ENTER. (Minimum: 10 seconds; Maximum:
100 seconds)
o Select Mode
To change the mode that tension readings are logged:
▪ Scroll to DATA LOGGING and press ENTER.
▪ Scroll to SELECT MODE and press ENTER
▪ Use the Up and Down arrows to select either CONTINUOUS or
SINGLE POINT data collection.
o View Data Stats
This feature allows the operator to view the basic statistics of the logged
data (Count, Average, Min/Max, and Standard Deviation). (See Figure 8.)
Set Point Setup Screen
See High and Low threshold values
Settings:
On / Off
Edit High Point Threshold
Edit High Point Threshold
Figure 7: Setpoint Setup
Data Statistics Screen
See the Count, Average,
Minimum/Maximum, and Standard
Deviation of the logged data.
Figure 8: Data Statistics Screen
Page 13

TX-1 Series Instrument www.tensitron.com pg. 13
o View Data Log
When data is logged to the instrument memory, that data and the
statistics of that data log (Count, Average, Minimum/Maximum, and
Standard Deviation) can be seen under the Data Logging / View Data
Stats screen. To view this logged data:
▪ Scroll to DATA LOGGING and press ENTER.
▪ Scroll to VIEW DATA LOG and press ENTER.
o Clear Single Point Log
To clear stored data, scroll to CLEAR SINGLE PT LOG, press ENTER,
and follow the prompts.
• TENSION UNITS Screen
To change the unit of measure in which tension readings are logged:
o Scroll to Tension Units and press ENTER.
o Use the Up and Down arrows to Grams, Newtons and Pounds
(CentiNewtons on TX-125 only) and press ENTER.
• SELECT MATERIAL Screen
Press ENTER while this display is shown to show the available options for
material types. The options are Wires, Filaments and Custom. Use the up or
down arrow to scroll to the option you want and press ENTER to select it.
o Select Material Wire Units
This feature allows the operator to select the unit for describing diameter
of wire to be measured for tension: AWG, Inches or mm.
o Select Material Filaments Units
This feature allows the operator to select the unit for describing diameter
of filaments to be measured for tension: Inches or mm.
o Select Material Custom Units
This feature allows the operator to select the unit for describing diameter
of the custom material to be measured for tension. For Custom, the
operator inputs the options for units. Use the up and down arrows to
scroll through all the available alpha-numeric symbols and press ENTER
to choose that symbol.
• LENGTH Screen
Scroll down to this screen to view the length that has traveled through the meter
since enabled (or reset), measuring up to 9,999 meters. The units of measure
will be shown in meters or feet. (These units are designated in the Setup screen
under Length Units).
• SPEED Screen
Scroll down to this screen to view the speed at which the material is passing
through the meter at that instant. The meter will also store the Minimum and
Maximum speeds logged. The units of measure will be shown in Meters/Minute
or Feet/Minute. (These units are designated in the Setup screen under Length
Units). Maximum measurable speed is 9,999 FPM or 9,999 meters per minute.
Note: line speeds exceeding 2,000 FPM are generally unsafe for hand-held
applications.
Page 14

TX-1 Series Instrument www.tensitron.com pg. 14
7. ADVANCED OPERATION
• General Calibration Precautions
1. To verify accuracy or to calibrate your instrument, hang a sample length of
material vertically, and suspend known weight(s) from the opposite end. (See
Figure 9.)
2. When performing this test, use a micrometer to measure your material
diameter and verify it is dimensionally within tolerance and not out of round.
3. Only use free-hanging weights which are traceable to National Standards.
4. Never use any tensioning device that attempts to convert rotational torque
values into tension loads, as these types of systems are highly inaccurate.
Also, any load cell system must be routinely checked for accuracy using
traceable weights, as these types of systems are also highly inaccurate and
generally do not meet minimum repeatable accuracy standards.
• Check Accuracy
1. To check the accuracy of your meter, first hang the test material and suspend
weights from it as described in “General Calibration Precautions” above.
2. Select from your meter’s menu the material type and material diameter
corresponding to your test material.
3. Before engaging the instrument onto the material, zero the instrument by
holding it in the same attitude you’ll be taking the readings, and pressing the
“Enter” or “Zero” button. This will eliminate any small tare effects.
4. Take readings along the material.
FOR BEST RESULTS ALWAYS TAKE SEVERAL READINGS OF
THE MATERIAL TENSION BY DISENGAGING AND THEN REENGAGING THE INSTRUMENT ON THE MATERIAL.
5. If the meter is accurately calibrated, readings will fall within 1% of the full-
scale capability of the instrument:
▪ TX-125-1: +/- 1.3 grams
▪ TX-1000-1: +/- 10 grams
▪ TX-5000-1: +/- 50 grams
If you have additional questions, please contact Tensitron for assistance.
Figure 9: Free Hanging Weight
simulating cable tension.
Page 15

TX-1 Series Instrument www.tensitron.com pg. 15
• Calibrate Instrument
*IMPORTANT: THIS FEATURE SHOULD ONLY BE USED BY A CALIBRATION FACILITY USING CERTIFIED AND
TRACEABLE DEAD WEIGHTS. DO NOT USE THIS FEATURE FOR A SIMPLE ACCURACY CHECK.
NOTE 1: TX-1 instruments are calibrated for Wire and Filaments through a
factory process not available to users. Use the calibration procedure below
to add or change a calibration in the CUSTOM menu.
NOTE 2: When calibrating your TX-1 instrument, tension values must be
entered in grams.
1. To add or change a calibration in the CUSTOM menu of your TX-1 meter,
first hang the material for the calibration as described in “General Calibration
Precautions” above. (You will suspend the weights later in the process.)
2. Access the setup menu: Turn on your meter and press the DOWN ARROW
until SETUP is highlighted, then press ENTER.
3. If there isn’t yet a CUSTOM NAME in the menu for the material, then add one
as follows:
o Scroll down until CUSTOM NAMES is highlighted, and press ENTER.
o Scroll down to CUSTOM1 (or to the next available CUSTOM entry),
and press ENTER.
o Using a combination of the UP, DOWN and ENTER buttons, key in a
name for your custom material.
4. Add or change the calibration for your CUSTOM material:
o Press the ESCAPE button until only SETUP is showing, and press
ENTER.
o Scroll down to RE-CAL TENSION, and press ENTER
o Press the ENTER, UP, ENTER buttons. (This is the password.)
o Scroll up or down to select the CUSTOM NAME for the material want
to calibrate, and press ENTER.
o Enter the number of calibration points you will be using (at least five,
and no more than ten). Zero counts as the first point.
o ENTER WEIGHT for each data point:
▪ Zero is the first value and is already programmed.
▪ Each successive data point should be a higher weight than
the previous one.
▪ Data points are typically distributed evenly along the tension
range. (Example: With 5 data points for 1000 grams, use 0,
200, 400, 600 and 800.)
o When the display reads Zero Unit, hold the instrument (NOT engaged
on the material) in the attitude that you plan to do the calibration (likely
horizontal). Then, press ZERO.
o As the display prompts you, suspend the correct weight from your
material. Then clamp the instrument on the material and press
ENTER.
o Repeat for each weight as prompted.
Page 16

733 S. Bowen Street
Longmont, CO 80501
USA
Phone: (303) 702-1980
Fax: (303) 702-1982
E-mail: sales@tensitron.com
 Loading...