

Page 1

ACM Series Instrument www.tensitron.com pg. 1
Operating Instructions
ACM and CWT Series Mechanical
Aircraft Cable Tension Meters
Page 2

ACM Series Instrument www.tensitron.com pg. 2
TABLE OF CONTENTS
1. WARRANTY POLICY ..................................................................................................... 3
2. SPECIFICATIONS .......................................................................................................... 4
3. SAFETY ......................................................................................................................... 5
4. INSTRUMENT DETAILS ................................................................................................. 5
Standard Instruments, cable diameters, accuracy ................................................. 5
Features of all Instruments .................................................................................... 6
5. BASIC OPERATION ....................................................................................................... 6
Before Use .............................................................................................................. 6
Selecting the Riser .................................................................................................. 6
Engaging Instrument onto Cable ............................................................................ 7
Saving a Reading Using Memory Lock Feature ....................................................... 8
Converting Readings to Tension Values with Calibration Chart ............................. 9
Maintaining Your Meter ....................................................................................... 10
6. ADVANCED OPERATION ............................................................................................ 10
Checking Accuracy ................................................................................................ 10
Recalibrating ........................................................................................................ 11
7. APPENDICES .............................................................................................................. 12
Appendix 1: RISER USAGE CHARTS ....................................................................... 12
Appendix 2: BLANK CALIBRATION CHARTS........................................................... 12
o ACM-100 .......................................................................................................... 12
o ACM-200 .......................................................................................................... 13
o ACM-300 .......................................................................................................... 13
o ACM-600 .......................................................................................................... 14
o CWT-150 .......................................................................................................... 14
o CWT-300 .......................................................................................................... 15
Appendix 3: TROUBLESHOOTING ......................................................................... 15
Page 3

ACM Series Instrument www.tensitron.com pg. 3
Proprietary Notice
This document contains proprietary information which may not be
reproduced in whole or in part without the written permission of
Tensitron, 733 South Bowen Street, Longmont, CO 80501.
Tensitron reserves the right to make instrument changes and
improvements which may not be reflected in this document. Portions
of this document may have been updated to include the latest
hardware or firmware version, if applicable. We recommend that this
document be read in its entirety before any attempt is made to
operate the instrument.
Thank You . . .
For purchasing another fine product from Tensitron.
If you have any questions or need assistance, please call us at
303-702-1980 or find us online at www.tensitron.com
1. WARRANTY POLICY
STANDARD EQUIPMENT WARRANTY
Tensitron warrants that all Tensitron-manufactured equipment will be free of any defect in materials or
workmanship for the period of (1) year. Warranty begins from the date of shipment from a Tensitron facility.
The warranty is extended to customers and applies to all Tensitron-manufactured equipment purchased,
installed, and used for the purpose for which such equipment was originally designed. The above warranties
cover only defects arising under normal use and do not include malfunctions or failures resulting from misuse,
abuse, neglect, alteration, problems with electrical power, usage not in accordance with product instructions,
acts of nature, or improper installation or repairs made by anyone other than Tensitron or a Tensitronauthorized, third-party service provider. Shipping costs to and from Tensitron are not included in the warranty
coverage.
Page 4
ACM Series Instrument www.tensitron.com pg. 4
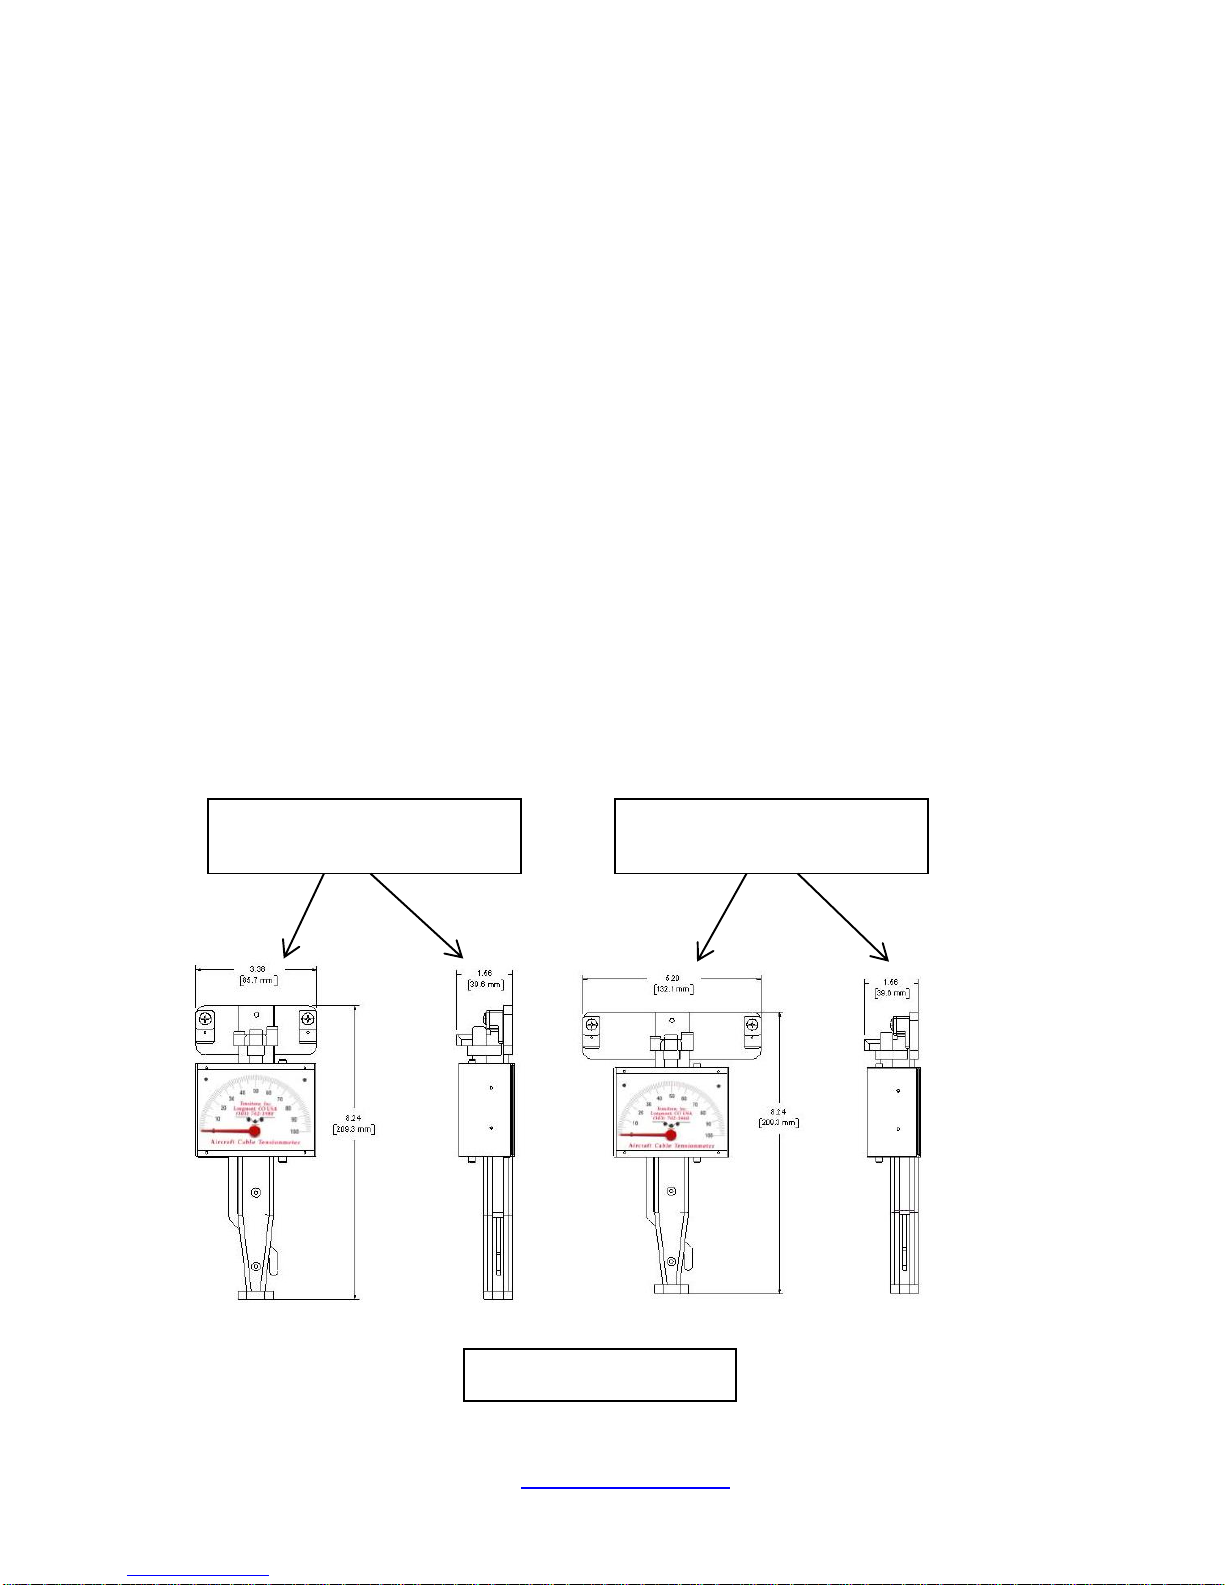
2. SPECIFICATIONS
Dimensions (L x W x D)
All ACM models except ACM-600: 8.24” x 3.38” x 1.56”
ACM-600 only: 8.24” x 5.20” x 1.56” (See Figure 1)
Full Scale Accuracy
ACM-100, ACM-200 and ACM-150-CWT: 4%
ACM-300, ACM-400 and ACM-300-CWT: 6%
ACM-600: 8%
Accuracy for custom calibrations is material specific
Operating Temperature
32º F to 120 º F.
Storage Temperature
20º F to 158º F.
Ambient Humidity
10% to 90% non-condensing
Weight
1.5 lb
Environment:
Indoor or outdoor use, dust-free environment.
Figure 1: ACM Dimensions
All ACM and Models
except ACM-600
ACM-600 only
Page 5

ACM Series Instrument www.tensitron.com pg. 5
3. SAFETY
READ AND SAVE ALL INSTRUCTIONS FOR FUTURE USE. Before use,
ensure all users read and understand this manual, as well as any labels
packaged with or attached to the instrument.
Know your instrument. Read this manual carefully to learn your tension
meter’s applications and limitations, as well as the potential hazards
associated with this type of instrument.
Use the right tool or instrument. Do not use this instrument to do a job for
which it is not recommended.
Check for damaged parts. Inspect instrument before use. Check for any
binding of moving parts, improper mountings, broken parts and any other
condition that may affect operation. Do not use a damaged instrument.
Tag damaged instrument “DO NOT USE” until repaired.
Maintain instrument carefully. Keep handles dry, clean and free from oil
and grease. Do not lubricate. All roller bearings are sealed.
Do not use instrument if it has received a sharp blow, been dropped or
damaged in any way. Do not disassemble. Incorrect reassembly may
damage the instrument.
If instrument is damaged return it to Tensitron for repair.
4. INSTRUMENT DETAILS
Standard Instruments, cable diameters, accuracy
Model #
Cable Selection
Full Scale
Accuracy
(+/-)
Total error
allowed (+/-)
ACM-100
1/16”, 3/32”, 1/8”, 5/32”
4%
4 lbs.
ACM-200
1/16”, 3/32”, 1/8”, 5/32”, 3/16”, 1/4”
4%
8 lbs.
ACM-300
3/32”, 1/8”, 3/16”, 1/4”
6%
18 lbs.
ACM-400
3/32”, 1/8”, 5/32”, 3/16”
6%
24 lbs.
ACM-600
1/8”, 5/32”, 3/16”, 1/4”
8%
48 lbs.
ACM-150-CWT
(formerly CWT-150)
5, 10, 15, 20 & 25 CWT cables
4%
6 lbs.
ACM-300-CWT
(formerly CWT-300)
10, 15, 20 & 25 CWT cables
6%
18 lbs.
Page 6

ACM Series Instrument www.tensitron.com pg. 6
Features of all Instruments
Memory Lock feature on all models.
All models are typically available from stock.
All models are factory calibrated and ready for use.
All calibration values are traceable to National Standards.
Calibration certificate is included.
Durable, lightweight carrying case with protective foam inserts included.
(See Figure 2)
5. BASIC OPERATION
Before Use
1. Verify that the serial number on the instrument and the calibration chart are
the same, since readings may vary among instruments.
2. Check that the calibration and certification are current.
3. The Memory Lock feature should be OFF (pushed down). (See “Memory Lock
Feature” below.)
4. The pointer must be resting at 0 on the dial. If it is not, the calibration should
be checked. (See “Checking Accuracy” in Section 6 below.)
Selecting the Riser
1. Determine the diameter of the cable to be checked. (See Figure 3)
1/16" = .0625" 5-CWT = .076"
3/32" = .0938" 10-CWT = .106"
1/8" = .1250" 15-CWT = .141"
5/32" = .1562" 20-CWT = .155"
3/16" = .1875" 25-CWT = .170"
7/32" = .2188"
1/4" = .2500"
Standard
Aircraft Cables
CWT
Aircraft Cables
Cable Dimensions
Figure 2:
Carrying case
with
instrument and
calibration
certification
Figure 3:
Cable
Dimensions
Page 7

ACM Series Instrument www.tensitron.com pg. 7
2. Determine the correct riser for your cable by referring to the Calibration Chart
on the back of the meter. (See also Riser Usage Chart in Appendix 1)
3. Rotate the riser so the correct setting faces the front (dial side) of the meter
and clicks into place.
Example: Selecting Riser
Assuming your cable diameter is 1/8”:
If the meter is an ACM-100, rotate the riser so the number 1/8 faces front
If the meter is an ACM-200, rotate the riser so the number 2 faces front
If the meter is an ACM-300, rotate the riser so the number 2 faces front
If the meter is an ACM-400, rotate the riser so the number 2 faces front
If the meter is an ACM-600, rotate the riser so the letter A faces front
Engaging Instrument onto Cable
Warning:
Do not force the engagement lever or
exceed the maximum tension range of the instrument
or you will damage your meter!
1. To engage the instrument on the cable, first rotate the engagement lever away
from the instrument, raising the outer cable contacts. Next position your cable
so it rests on top of the (center) riser and beneath the outer cable contacts.
(See Figure 4)
2. Once the cable is in place, squeeze the engagement lever shut until it locks
into position parallel with the instrument handle. (See Figure 5) Note: Do NOT
try to force the lever closed, or damage may occur. If the lever does not close
Ready the instrument to
accept cable by rotating
engagement lever away
from handle.
Figure 4: Instrument ready to engage cable
Position cable below the
outer cable contacts.
Position cable above the riser.
Page 8

ACM Series Instrument www.tensitron.com pg. 8
easily, STOP, and refer to the Troubleshooting Guide at the end of these
instructions
3. Note the reading on the display.
Saving a Reading Using Memory Lock Feature
Each ACM instrument has a Memory Lock feature. This feature can be used to
save readings taken in areas (such as confined spaces or behind obstructions)
where the operator cannot see the dial face while engaging the instrument on the
cable. To use this feature:
1. Begin by making sure the Memory Lock feature is OFF. Do this by pushing the
memory lock shaft all the way DOWN, so the red line is no longer visible. (See
Figure 6)
2. Engage the instrument onto the cable as described in “Engaging Instrument
onto Cable,” above.
Turn OFF the Memory Lock feature
by pushing the memory lock shaft
DOWN until the red line is no
longer visible.
Figure 6: Memory Lock feature
OFF / disengaged
Note the routing of the Cable.
Once cable is properly routed,
gently squeeze the
engagement lever back toward
the handle until it locks into the
engaged position, parallel to
the instrument handle.
Don’t over torque!
Figure 5: Instrument engaged
onto cable
Page 9

ACM Series Instrument www.tensitron.com pg. 9
3. Save your reading by turning the Memory Lock feature ON. Do this by pushing
the memory lock shaft UP as far as possible, so the red stripe on the shaft is
visible. (See Figure 7)
4. Disengage and remove the meter from the cable. The pointer will remain
locked in position so you can note the reading.
5. To clear the reading and return the pointer to zero, turn the Memory Lock
feature OFF (see step #1 above).
6. If you engage the Memory Lock with no tension load, you may see the needle
move slightly off zero. However, this small amount of travel will not materially
affect the accuracy of tension readings taken when the Memory Lock feature
is correctly used.
7. Do not try to measure tension with the Memory Lock feature already ON. Only
turn the Memory Lock feature on AFTER engaging the meter on the cable.
Converting Readings to Tension Values with Calibration Chart
The number on the dial is NOT the tension. You must convert the reading on
the dial to a tension value by using the chart on the back of the meter.
1. Once the meter is engaged onto the cable, note the reading (where the pointer
is on the dial).
2. Refer to the calibration chart on the back of the instrument and locate the
column for the cable diameter you are testing.
3. Find the number in this column that most closely corresponds to the pointer’s
reading.
4. Follow this number’s row all the way to the left until you reach a number in the
“TENSION IN LBS” column. This number is the true tension of the cable.
5. Tensions may differ along the length of an aircraft cable because cable shape
and thickness may vary. For greater accuracy, it is best to take multiple
readings along the cable and average these readings.
Turn ON the Memory Lock feature
by pushing the memory lock shaft
UP until the red line is visible.
Figure 7: Memory Lock
ON / engaged
Page 10

ACM Series Instrument www.tensitron.com pg. 10
Maintaining Your Meter
Return your meter to Tensitron for service when:
Pointer does not reset at 0 with memory lock "off."
Instrument has been dropped or otherwise damaged.
When using on aircraft, the instrument should be calibrated at intervals
not to exceed 12 months.
6. ADVANCED OPERATION
Checking Accuracy
1. To verify the accuracy of your instrument, hang a 5’ length of your cable
vertically. Suspend a known weight from the end. (Make sure the weight does
not exceed the maximum tension range of your instrument.) Engage the
instrument on the cable. See if the tension value matches the suspended
weight. (See Figure 8)
2. NOTE: Tension on a cable can be defined as the exact value of a suspended
weight from the cable. For example, a 100 lb. weight hanging freely from a
cable will tension the cable to exactly 100 lbs.
3. When performing this test, use a micrometer to measure your cable diameter
and ensure it is dimensionally within tolerance, +/- .003” of size, and not out of
round.
4. Only use free-hanging weights which are traceable to National Standards on
correctly-sized cables.
5. Never use any tensioning device that attempts to convert rotational torque
values into tension loads, as these types of systems are highly inaccurate.
Also, any load cell system must be routinely checked for accuracy using
traceable weights as these types of systems are also highly inaccurate and
generally do not meet the minimum repeatable accuracy standards required
by ISO-17025.
6. NEVER SIMULATE TENSION LOADS ON THESE INSTRUMENTS BY
USING A CALIBRATION BAR!
Figure 8:
Simulating
cable tension
using freehanging weight
Page 11

ACM Series Instrument www.tensitron.com pg. 11
Recalibrating
Tensitron provides prompt turnaround service for its instruments needing
repair and/or re-certification. All values tested are traceable to national
standards, and serviced instruments meet or exceed all civilian and military
specifications. A calibration certification listing all calibration data and
values is included with each instrument.
If you would like to calibrate your instrument yourself, follow the procedure below.
*IMPORTANT: This procedure should only be performed by a qualified
calibration facility using certified and traceable dead weights.
Do not use this procedure for a simple accuracy check.
1. Prepare blank charts: Photocopy the blank calibration chart to use for the
new values you will be collecting. (See Appendix 2 for blank calibration charts
that are correctly sized to fit on the back of your instrument.)
2. Adjust zero: If the pointer is not resting at the 0 position on the dial, unscrew
the socket plug located on the bottom left of the instrument body. Using a
small screwdriver, gently adjust the zero adjust screw until the pointer
indicates 0. After adjustment apply torque-seal or paint to lock the screw
head.
3. Perform a Dead Weight Calibration:
a. For each cable to be tested:
i. Set the correct riser for the cable diameter as described in
“Selecting the Riser” above.
ii. Simulate a tension load on the cable with a dead weight by
following the procedure in step #1 under “Checking
Accuracy” above.
iii. On the calibration chart, in the column for that cable, record
the pointer reading so it lines up with the corresponding
weight in the CABLE TENSION LBS column.
iv. Repeat this process with different weights.
b. Do not attempt to measure cable diameters larger than those for
which the meter was designed. See Appendix 1, Riser Usage Charts,
for the appropriate cables for each instrument.
c. If a tension value for a particular cable is considered “critical”, remove
the cable from the aircraft and perform this dead weight calibration
procedure on that cable, rather than relying on a comparable sample.
d. Repeat this process for each cable.
4. Complete Chart: Make sure to sign and date your new calibration chart, and
attach it to the back of the instrument.
Page 12

ACM Series Instrument www.tensitron.com pg. 12
7. APPENDICES
Appendix 1: RISER USAGE CHARTS
Note: ACM-150-CWT was formerly known as CWT-150, and ACM-300-CWT was
formerly known as CWT-300.
Appendix 2: BLANK CALIBRATION CHARTS
o ACM-100
DIAMETER 1/16" 3/32" 1/8" 5/32" 3/16" 1/4"
ACM-100 1/16 3/32 1/8 5/32
ACM-200 1 2 2 3 3 4
ACM-300 1 2 3 4
ACM-400 1 2 3 3
ACM-600
A B C D
DIAMETER 5 10 15 20 25
ACM-150-CWT
5 10 15 20 20
ACM-300-CWT
10 15 20 20
MODEL #
MODEL #
RISER USAGE & CABLE DIAMETER - Inch
RISER USAGE & CABLE DIAMETER - Carat Weight (CWT)
Use Riser #:
Use Riser #:
ACM-100
Serial No.
If Cable Size is:
1/16" 3/32" 1/8" 5/32"
USE
RISER 1/16 RISER 3/32 RISER 1/8 RISER 5/32
CABLE TENSION
LBS =
5
10
15
20
25
30
35
40
45
50
55
60
65
70
75
80
85
90
95
100
TENSITRON, INC.
CAL. BY: _________________________
733 S. Bowen S t., Lo ngmon t, CO 80501
Date: See Cal Sticker
Page 13

ACM Series Instrument www.tensitron.com pg. 13
o ACM-200
o ACM-300
Model ACM-300
Serial No.
If Cable Size is:
3/32" 1/8" 3/16" 1/4"
USE RISER 1 RISER 2 RISER 3 RISER 4
CABLE TENSION
LBS =
40
50
60
70
80
90
100
120
140
160
180
200
220
240
260
280
300
TENSITRON, INC.
CAL. BY: _______________
733 S. Bowen St., Longmont, CO 80501
Date: See Cal Sticker
Page 14

ACM Series Instrument www.tensitron.com pg. 14
o ACM-600
o ACM-150-CWT (formerly CWT-150)
ACM-600
Serial No.
If Cable Size is:
1/8" 5/32" 3/16" 1/4"
USE RISER A RISER B RISER C RISER D
Actual Tension on
Cable in LBS =
406080
100
120
140
160
180
200
220
240
260
280
300
320
340
360
380
400
420
440
460
480
500
520
540
560
580
600
TENSITRON, INC.
CAL. BY: _________________________
733 S. Bowen St., Longmont, CO 80501
Date: See Cal Sticker
Model CWT-150 Ser. No.:
IF CABLE SIZE IS:
5 CWT 10 CWT 15 CWT ACTUAL 20 CWT 25 CWT
USE USE USE TENSION USE USE
RISER 5 RISER 10 RISER 15 LBS. RISER 20 RISER 20
10
20
30
40
50
60
70
80
90
100
N/A N/A 110
N/A N/A 120
N/A N/A 130
N/A N/A 140
N/A N/A 150
DATE: SEE CAL. STICKER
CAL. BY: __________________
TENSITRON, INC.
733 S. Bowen St., Longmont, CO 80501
TEL: (303) 702-1980 FAX: (303) 702-1982
Page 15

ACM Series Instrument www.tensitron.com pg. 15
o ACM-300-CWT (formerly CWT-300)
Appendix 3: TROUBLESHOOTING
TROUBLESHOOTING
PROBLEM
POSIBLE CAUSE
POSIBLE SOLUTION
The engagement
lever is difficult to
rotate closed.
1. Using the incorrect riser for
the cable diameter.
1. See Appendix 1, and
use correct riser.
2. Trying to measure
excessive tension.
2. Do not exceed meter’s
maximum tension
The tension
readings are not as
expected
1. Reading chart incorrectly.
See “Converting Readings
to Tension Values with
Calibration Chart” above
2. The meter has been
dropped and is damaged
3. Return to Tensitron for
service
The instrument
needle will not
return to zero
The Memory Lock is engaged
Disengage the memory
Lock. See “Saving a
Reading Using Memory
Lock Feature “ above
The instrument
needle will not
hold a stable
reading.
The meter has been dropped
and is damaged
Return to Tensitron for
service
Model CWT-300
Serial No.
224
If Cable Size is:
1/16" 10 15 5/32" 20 25
USE RISER RISER 1 10 15 RISER 3 20 20
LBS =
40
50
60
70
80
90
100
120
140
160
180
200
220
240
260
280
300
300
TENSITRON, INC.
CAL. BY: _______________
- Bould er, CO 80301
Date: See Cal Sticker TEL: (303) 702-1980 FAX: (303) 702-1982
Page 16

733 S. Bowen Street
Longmont, CO 80501
USA
Phone: (303) 702-1980
Fax: (303) 702-1982
E-mail: sales@tensitron.com
Web Site: www.tensitron.com
 Loading...