

Page 1

Instructions For Use
Flexistim IF
READ INSTRUCTIONS CAREFULLY BEFORE USE
flexistimIF instructions final.indd 1 24/11/2014 10:51
Page 2

FOREWORD
Read this User Manual carefully before you start using your Flexistim IF unit.
The manufacturer strongly recommends carefully reading of the “Warnings and Cautions” and
Chapters of this User Manual.
1 INTRODUCTION 1
2 WARNINGS AND CAUTIONS 2
3 HOW DOES IFT WORK 5
4 KEYPAD AND DISPLAY 7
5 CONTENTS OF THE PACK 12
6 HOW TO ASSEMBLE YOUR UNIT 12
7 OPERATION 15
8 PROGRAMMES 19
9 FURTHER CLINICAL INFORMATION AND TREATMENT PROTOCOLS 20
10 ELECTRODE PAD PLACEMENT 20
11 CARE OF ELECTRODES 22
12 CHARGING THE BATTERY 23
13 TROUBLESHOOTING 24
14 CLEANING 25
15 CONSUMABLES AND SERVICING 25
16 WARRANTY 26
17 DISPOSAL OF WASTE ELECTRICAL AND ELECTRONIC PRODUCTS (WEEE) 26
18 SPECIFICATIONS 27
19 STANDARD SYMBOLS 28
20 EMC PRECAUTIONS 28
flexistimIF instructions final.indd 2-3 24/11/2014 10:51
Page 3

1. INTRODUCTION
INTENDED USE
IF stands for Interferential Stimulation. IF is indicated for symptomatic relief of chronic
intractable pain.
The Flexistim IF is intended for use in both the Hospital and Home
Healthcare Environments.
Flexistim IF provides interferential therapy to treat conditions where inammation is a
problem such as Back Pain, Osteoarthritis, Rheumatoid Arthritis, Muscular Pain / Strain,
and Sports injuries, or where deep penetration of low frequency stimulation is required.
Flexistim IF produces a low frequency current treatment that uses two medium frequency
currents, which “interfere” with each other to produce a beat frequency that the body
recognizes as a low frequency energy source.
The aim is to overcome the problems caused by low-frequency currents, while maintaining
their claimed therapeutic effect. Unlike TENS, which delivers intermittent pulses to
stimulate surface nerves and block the pain signal, Interferential Current Therapy delivers
continuous stimulation deep into the affected tissue.
The actual stimulation is produced by crossing two alternating currents with medium
frequencies simultaneously to a targeted body region. As a result, these two currents will
superimpose to form a new low frequency current deep within the tissue.
FLEXISTIM IF FEATURES
Flexistim IF includes many of the features of a professional desk-top unit in a compact,
portable, battery operated device.
1. Power Supply
Removeable, rechargeable Li-ion battery, with option of operation through external mains
power adaptor.
2. Output
60mA Peak to Peak pure sinusoidal carrier wave with constant energy (modied constant
current) control and 40mA safety override for home use.
1 2
3. Flexible programmes
3 preset and 3 adjustable programmes give a wide selection of treatment options.
4. Memory
Flexistim IF allows you to save and recall a particular programme setting and has a
Usage Timer to record the time it has been used.
2. WARNING AND CAUTIONS
Contraindications:
1. Do not use this device on patients who have a cardiac pacemaker, implanted
debrillator, or other implanted electronic devices, because this may cause electric
shock, burns, electrical interference, or death.
2. Do not use this device on patients whose pain syndromes are undiagnosed.
Warnings:
1. Do not apply stimulation over the neck or mouth because this could cause severe
muscle spasms resulting in closure of the airway, difculty in breathing, or adverse
effects on heart rhythm or blood pressure.
2. Do not apply stimulation across the chest, because IFT currents penetrate deep into
the tissue and the introduction of electrical current into the chest may cause rhythm
disturbances to the patient’s heart, which could be lethal.
3. Do not apply stimulation over the pregnant uterus.
4. Do not apply stimulation over open wounds or rashes, or over swollen, red, infected,
or inamed areas or skin eruptions (e.g. phlebitis, thrombophlebitis, varicose veins).
5. Do not apply stimulation over, or in proximity to, cancerous lesions.
6. Do not apply stimulation in the presence of electronic monitoring equipment (e.g.
cardiac monitors, ECG alarms), which may not operate properly when the electrical
stimulation device is in use.
7. Do not apply stimulation when in the bath or shower.
flexistimIF instructions final.indd 4-5 24/11/2014 10:51
Page 4

Adverse Reactions:
• Patients may experience skin irritation and burns beneath the stimulation electrodes
applied to the skin.
• Patients may experience headache and other painful sensations during or following the
application of electrical stimulation near the eyes and to the head and face.
• Patients should stop using the device and should consult with their physicians if they
experience adverse reactions from the device.
General Warnings:
1. Do not immerse any part of the unit in water
2. Do not place the unit close to excessive heat.
3. Do not use any electrodes which are less than 50mm X 50mm.
4. Use only the specied battery: 1x 3.7volt rechargeable lithium battery. The use of any
other battery could damage the unit.
5. Remove battery if unit is not used for a long period of time.
6. Do not use the unit while asleep.
7. Do not put the lead wire on, or wrapped around, the neck.
8. Use this device only with the leads, electrodes and accessories recommended by the
manufacturer. Use of other parts can degrade minimum safety.
9. After inserting plugs into both CH1 and CH2 sockets, please do not remove the
plugs when the unit is working. Ensure that the unit is switched OFF before removing
the plugs.
10. Keep the unit away from sources of high magnetic elds such as TV’S, microwave
ovens and hi- speakers, as these may affect the LCD screen.
11. Keep the device away from a replace or radiant heater, as the heat may affect
the device.
3
4
8. Do not apply stimulation while driving, operating machinery, or during any activity in
which electrical stimulation can put the patient at risk of injury.
9. Consult with your physician before using this device, because the device may cause
lethal rhythm disturbances to the heart in susceptible individuals.
10. Apply stimulation only to normal, intact, clean, healthy skin.
11. Using the device directly over metallic implants could cause the currents to focus
over a small area, causing tissue burns. If you have metal implants, do not place the
pads near, or across the implant, and adjust the intensity with care.
Precautions:
1. Since the effects of stimulation of the brain are unknown, stimulation should not be
applied across the head and electrodes should not be placed on opposite sides of the
head.
2. The safety of electrical stimulation during pregnancy has not been established.
3. Some patients may experience skin irritation or hypersensitivity due to the electrical
stimulation or electrical conductive medium (gel).
4. Patients with suspected or diagnosed heart disease should follow precautions
recommended by their physicians.
5. Patients with suspected or diagnosed epilepsy should follow precautions recommended
by their physicians.
6. Use caution when the patient has a tendency to bleed internally, such as following an
injury or fracture.
7. Use caution following recent surgical procedures when stimulation may disrupt the
patient’s healing process.
8. Use caution if stimulation is applied over areas of skin with less than normal sensitivity.
9. Keep this device out of the reach of children.
flexistimIF instructions final.indd 6-7 24/11/2014 10:51
Page 5
5 6
12. Keep the device away from nebulizer or steam kettle, as the moisture may affect
the device.
13. Keep the device away from sunlight, as long-term exposure to sunlight may affect the
rubber causing it to become less elastic and crack.
14. Keep the device away from lint and dust, as long-term exposure to lint or dust may
affect the sockets or cause the battery connector to develop a bad contact.
15. Temperature & Relative Humidity of storage: -20°C–+40°C, 8%--70% R.H.
16. Temperature & Relative Humidity of transportation: -20°C–+40°C, 8%--70% R.H.
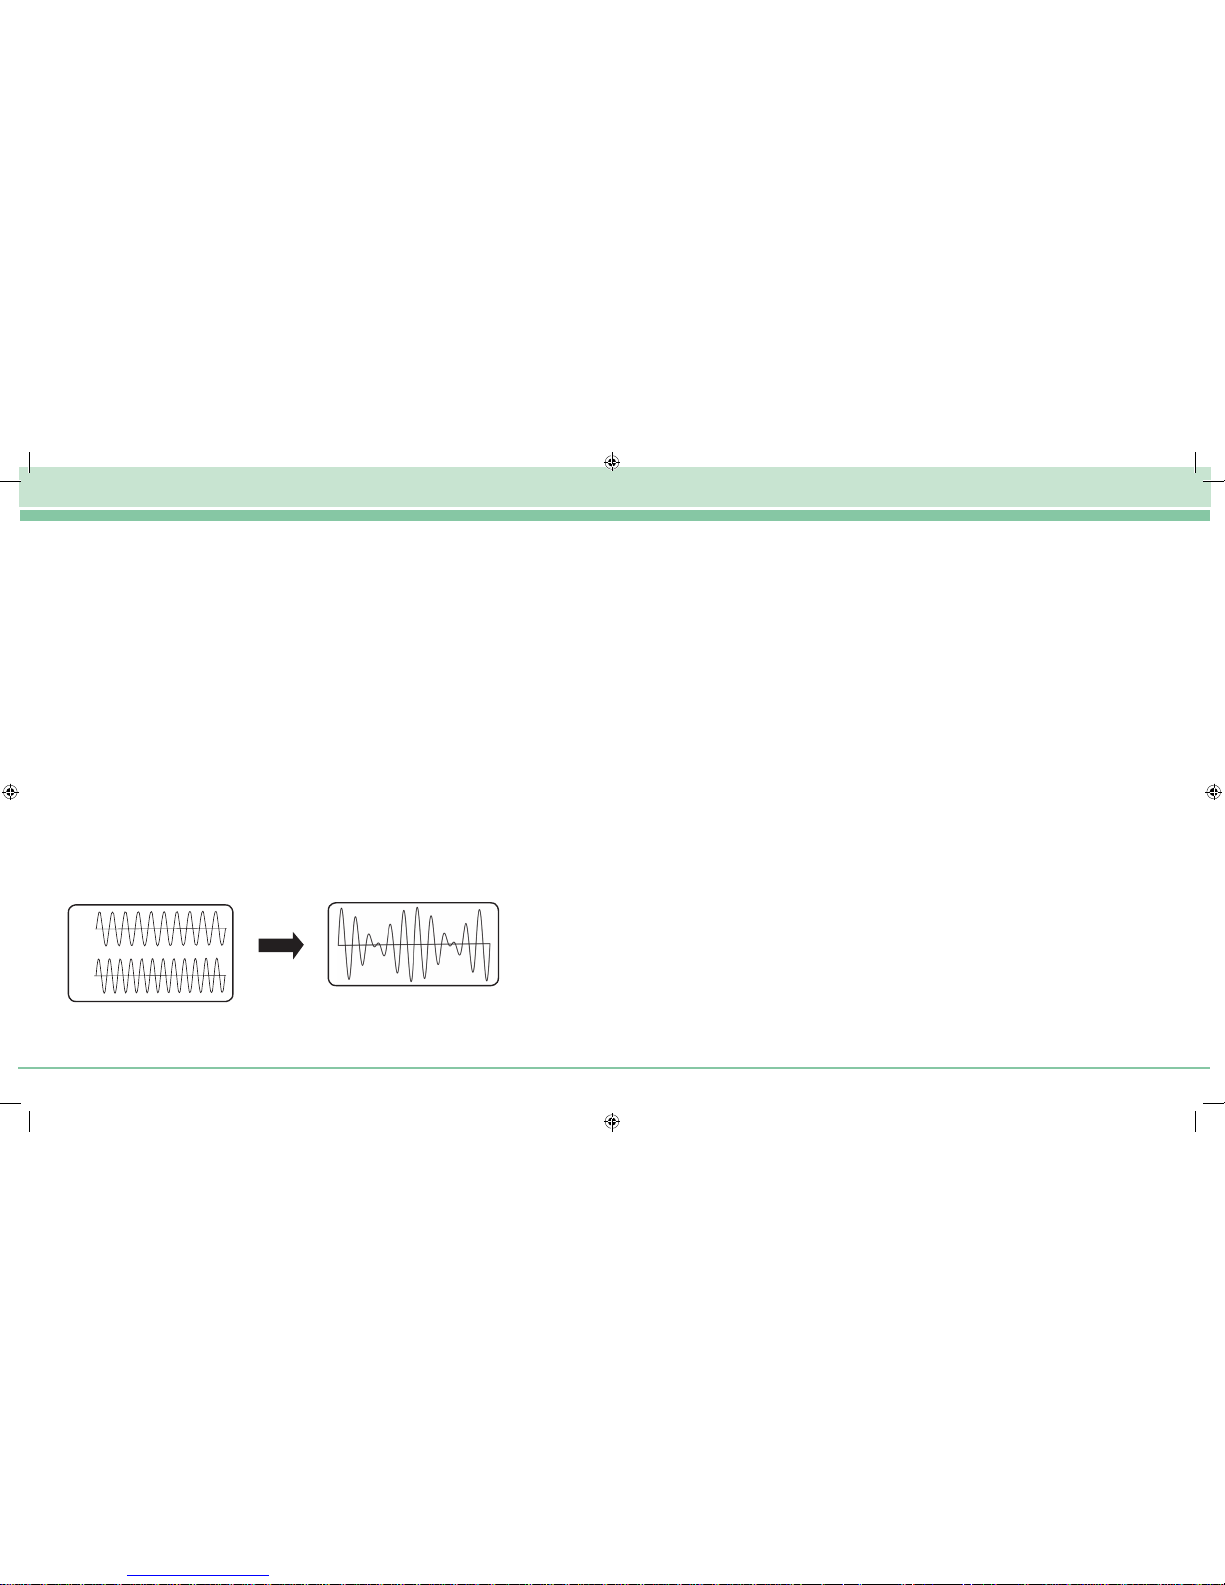
3. HOW DOES IFT WORK
Many users will be familiar with TENS, which delivers intermittent pulses to stimulate
surface nerves and block the pain signal. Unlike TENS, Interferential Therapy delivers a
continuous stimulation deep into the affected tissue.
IFT achieves this deep penetration by using a 4000Hz carrier wave to overcome the
skin impedance. TENS signals travel around the top 1cm of the skin surface. IFT signals
travel almost directly between the electrodes.
Interferential Therapy uses two medium frequency 4000Hz currents that ‘interfere’ with
each other to produce a beat frequency that the body recognises as a low frequency
energy source.
Unlike TENS, which delivers intermittent pulses to stimulate surface nerves and block the
pain signal, IFT delivers continuous stimulation deep into the affected tissue.
In addition to providing pain relief by the same mechanism that TENS uses, most
physiotherapists consider that IFT’s major role is to accelerate the inammatory or
healing rate.
IFT is believed to work by stimulating parasympathetic nerve bres to give increased
blood ow and oedema reduction and by passing currents across cell membranes; these
currents vary depending upon the tissue involved. By using particular frequencies in the
range, different systems within the body can be stimulated or used to increase the blood
supply, which in turn hastens the healing rate. IFT is used to treat almost any condition
where inammation is a problem. For example, sports injuries; arthritic conditions;
bruising and swellings, back pain, osteo-arthritis, rheumatoid arthritis, muscular pain.
Many practitioners use a “Sweep” treatment which uses constantly changing interference
pulse frequency. Practical clinical experience suggests therapeutic benets for these
sweeps in addition to those of conventional nerve stimulation.
The range of this beat frequency in the
Flexistim F is 1 to 160Hz
10Hz
12Hz
flexistimIF instructions final.indd 8-9 24/11/2014 10:51
Page 6
7 8
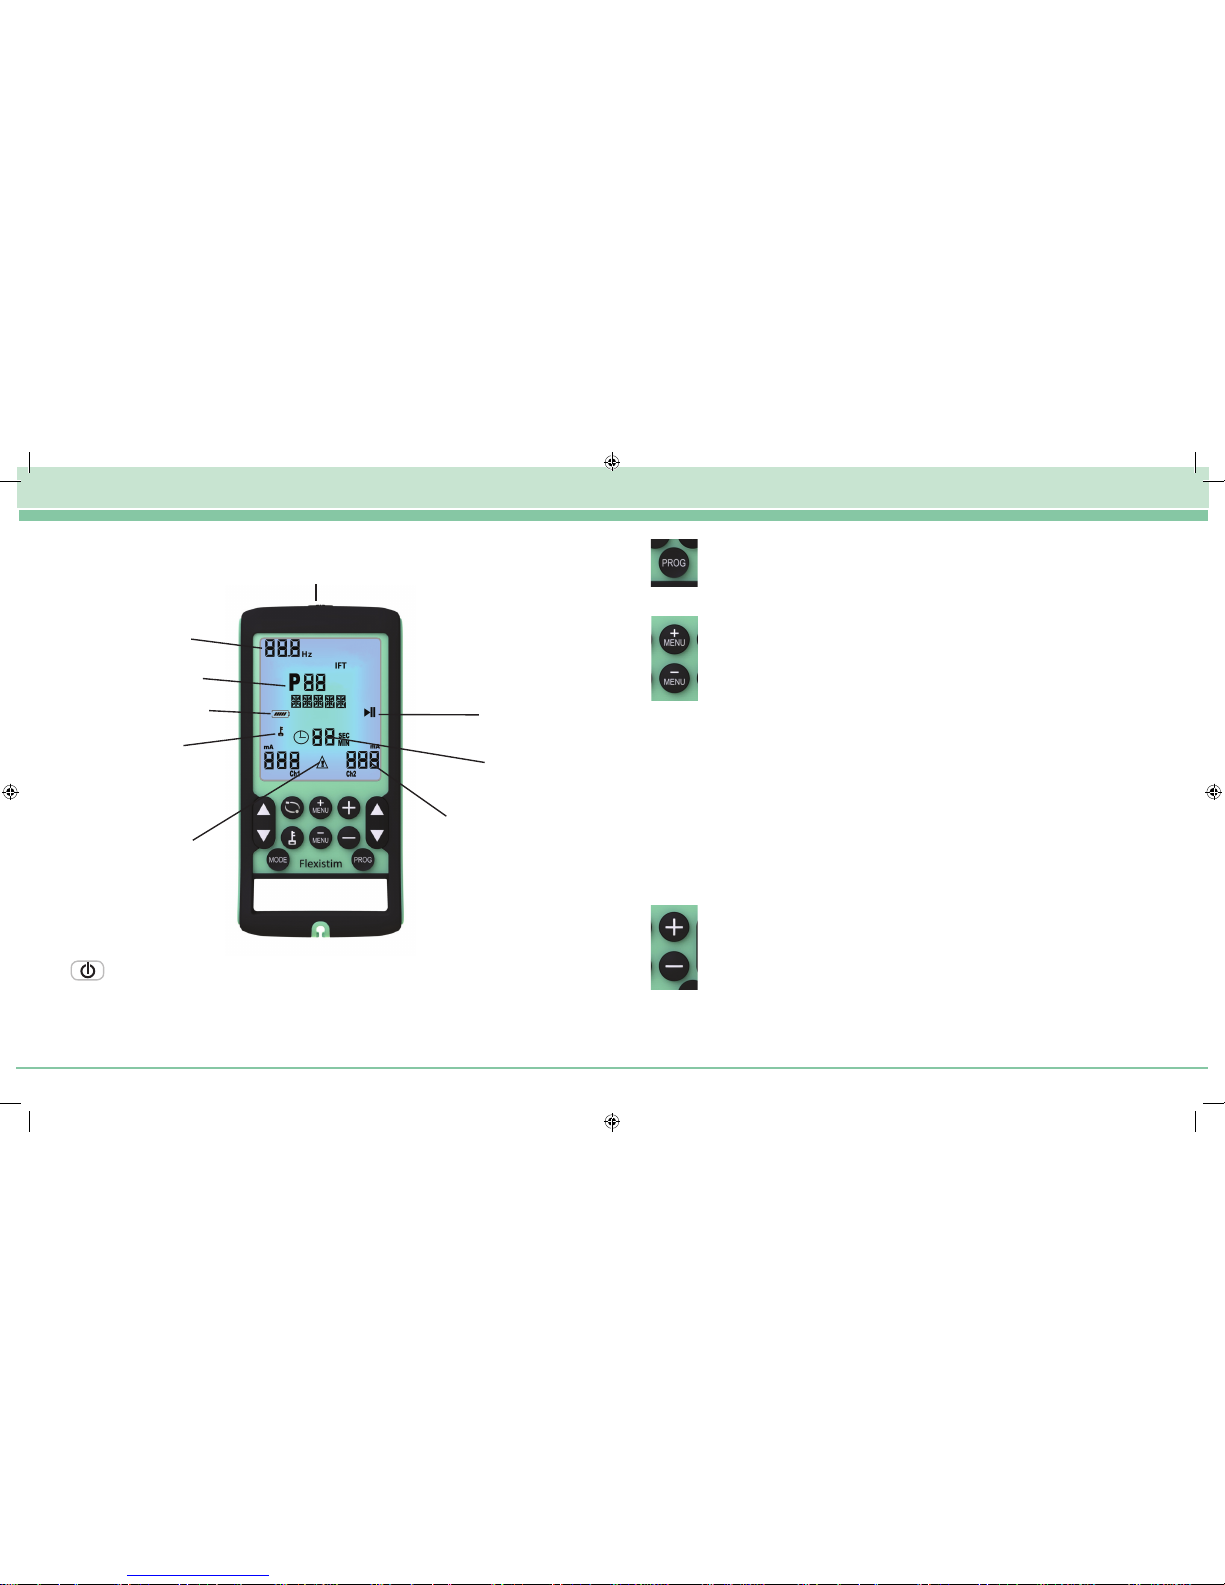
4. KEYPAD AND DISPLAY
Programme Selection
Press the “Prog” key to select the programme you require (see section 8)
Parameter Menu Selection
Press these keys to select the following parameters one by one:
In Programme P1:
FREQUENCY (Hz)
Treatment Timer (min)
In Programmes P2-P4:
Treatment Timer (min)
In Programmes P5-P6:
Sweep is between High Frequency and Low Frequency over the set Cycle
Time in seconds:
HIGH FREQUENCY (Hz)
LOW FREQUENCY (Hz)
CYCLE TIME (Sec)
Treatment Timer (min)
Parameter Adjustment Controls
Press these keys to increase or decrease the value of the parameter which you
have selected with the MENU keys.
ON/OFF
Lock
Intensity mA
Pause
Beat
Frequency
Programme
Battery State
Warning
Timer
Keys:
ON/OFF Key (On top of unit)
This key switches the unit on or off.
Press once for 2 sec and the unit is on, the LCD display located at the front of
the unit will light up.
There will be no feeling from either lead at this point as the intensity always
starts at zero. Press this key again and the unit will switch off.
flexistimIF instructions final.indd 10-11 24/11/2014 10:51
Page 7

9
10
Check electrode pad position. If you are certain that the pads are positioned
safely, press the SKIP key to override. The triangle will stop ashing and
intensity can be increased to 60mA.
Manual Programme Lock
When “Manual” is showing, you can protect the manual settings
by pressing and holding for 3 seconds.
If you try to adjust the parameters, the key symbol will ash.
Press and hold for 3 seconds to unlock the programme.
To unlock the buttons, simply press and hold button for 3 seconds again.
Treatment Timer
When the Treatment Timer has been set, it begins to count down in minutes
and the time remaining is displayed on the LCD. When it reaches zero, the
device automatically shuts off.
Memory
Pressing the MODE button enters Memory.
The Usage time will be accumulatively recorded when the output level is above
zero, The accumulative treatment time in minutes and no of uses are displayed.
Press the same key again to return back to the previous normal display
Pressing “CH2▼” key and “MODE“ key together for 3 seconds will clear the
treatment time to zero.
Intensity Controls
Press either left or right hand keys to adjust the intensity
I.F. signals penetrate deep into the tissue. Positioning pads across the chest or
head could be dangerous - see section 9
For your safety, when intensity reaches 40mA, the warning triangle ashes and
intensity cannot be increased.
Check electrode pad position. If you are certain that the pads are positioned
safely, press the SKIP key to override. The triangle will stop ashing and
intensity can be increased to 60mA.
Note that the two channels ADD intensity, so that max effective IF intensity
is 120mA
Memory Mode
Pressing the MODE button enters Memory Mode
The Usage time will be accumulatively recorded when the output level is above
zero, The accumulative treatment time in minutes is displayed.
Press Mode key again to return back to the previous normal display
Pressing “CH2▼” key and “Mode“ key together for 3 seconds will clear the
treatment time to zero.
When a programme is running, this key also acts a PAUSE button. The PAUSE
symbol II will be displayed and the programme timer will stop. Pressing again
resumes the programme and the intensity gradually returns to the set value.
SKIP Key
High intensity I.F. can be harmful if electrodes are placed so that the current
goes directly through the chest or across the head. For your safety, when
intensity reaches 40mA, the warning triangle ashes and intensity cannot
be increased.
Automatic keypad lock
There is an automatic keypad lock if no button is used for 10 seconds.
Key symbol appears.
Press the Intensity Down button for either channel to unlock.
flexistimIF instructions final.indd 12-13 24/11/2014 10:51
Page 8

Power Supply
The Flexistim IF may be operated from the re-chargeable battery, or
directly from the power adaptor. When the adaptor is plugged in to
the Flexistim IF, the internal battery is automatically disconnected.
The battery cannot be charged while in the unit, only in the charging
cradle supplied.
The rechargeable battery will give about 1 hours use at 50% intensity.
If you need to make more than one treatment you may either:
a) Purchase and recharge additional batteries
b) Connect to mains power using the mains adaptor
11 12
OTHER FEATURES
1. The LCD is backlit. To save energy the back light will switch off if the keypad
is not used for 30 secs. Pressing any key will re-activate it.
2. When the unit is turned on, if you do not press any of the keys, or intensity
is set to zero, for > 5 mins it will automatically shut off.
3. When you turn the unit on, it will automatically enter the mode that the you
used last.
4. When you change Programme, the output level will reset to zero immediately.
5. When the battery is low, the battery icon will ash indicating that the battery
should be recharged.
WARNING: The power adaptor supplied has special medical grade isolation.
Use of any mains adaptor other than the one supplied with the device could
compromise electrical safety.
5. CONTENTS OF THE PACK
Your Flexistim IF pack should contain the following:
1 × Flexistim IF Unit
2 × Leads
4 × Self-Adhesive Electrodes with Connectors (Size: 50mm×50mm)
1 × 3.7V Rechargeable Lithium Battery (BL-6F)
1 × AC Power Cord
1 × Battery Charging Cradle
6. HOW TO ASSEMBLE YOUR UNIT
Your Flexistim IF has been designed to be simple and easy to use. Assembly of the
Flexistim IF unit is very simple and requires only ve steps.
STEP 1: BATTERY
Slide belt clip down to access battery cover.
Remove the battery cover and insert the
battery (as shown on the diagram) inside
the battery compartment. Replace the
battery cover.
NOTE: Fully charge battery before initial use.
See “Charging the Battery” section 12.
CAUTION:
There is a risk of explosion if the battery is tted incorrectly. Replace only with the
correct 3.7 volt lithium battery. Do not dispose of the battery in a re and keep it out of
reach of children. The battery must be removed from the unit if unit is not used for a
long period of time.
Insert the battery Replace the
battery cover
flexistimIF instructions final.indd 14-15 24/11/2014 10:51
Page 9

13 14
STEP 2: LEADS
If only using one lead, insert into one socket.
If using two leads, insert into both sockets.
A: Insert the lead wires
B: Turn the plug on the lead wire 90° to lock it
between the main body and handle of the unit.
This prevents accidental disconnection
during treatment.
STEP 3: ELECTRODES
Remove electrodes from the bag and connect to the leads.
STEP 4: PLACEMENT OF ELECTRODES
Ensure wherever you intend to place the electrodes, the skin is clean and thoroughly
dry. Remove the electrodes from the clear plastic shield and position on your body
as required.
Life of the Electrodes:
The electrodes are water based and can dry out if left outside of the PVC storage bag.
If the electrodes lose their adhesive quality in this way, it is possible to reactivate their
adhesiveness by applying a ne spray of water.
Replace the electrodes when they stop sticking well. This can affect the efciency of the
unit and may lead to skin irritation.
STEP 5: READING
Read sections 11 to 16 and decide how to use the unit for the treatment.
NOTE: AFTER USE
Always ensure that the unit is switched OFF before removing the electrodes. After use,
return the electrodes to the clear plastic shields and seal them in the PVC bag. There is
no need to separate the lead wires from the electrodes.
flexistimIF instructions final.indd 16-17 24/11/2014 10:51
Page 10

15
7. OPERATION
After assembling and connecting the device:
1 Turn on the device
Press ON/OFF KEY.
LCD displays when the device is on. The LCD is backlit. To save energy the back light
will switch off if the keypad is not used for 30 seconds. Pressing any key will re-activate it.
Always switch the device off before removing electrodes from the skin.
2 Select a programme
Use Programme Selection Key to choose a desirable programme from Programme 1 to
Programme 6.
The output intensity resets to zero when you change a treatment programme.
3 Set Treatment Timer
The Treatment Timer defaults to 20 minutes.
To set a Treatment Time, press either of the Parameter Selection keys.
The Timer symbol will ash
Use the Parameter Adjustment Controls to select your desired treatment period
ranging from 1 to 90 minutes. You can also select C Continuous operation, but
should use this setting with caution.
Press any intensity key or wait 10 seconds to return to the main screen
16
The Treatment Timer starts counting as soon as you increase the intensity above zero.
At this point, the display begins to count down from its preset value.
When the preset treatment period is elapsed, the device switches off its output.
4 Attach the Electrode Pads
Attach the leads as shown in section 6 and position the electrode pads as shown in
section 9.
5 Adjust the Intensity
The output from both leads is linked.
You can adjust a desired intensity by pressing either of the intensity controls.
For your safety, when intensity reaches 40mA, the warning triangle ashes and
intensity cannot be increased.
Check electrode pad position. If you are certain that the pads are positioned safely, press
the Skip key to override. The triangle will stop ashing and intensity can be increased
to 60mA.
Automatic keypad lock
There is an automatic keypad lock if no button is used for 10 seconds.
Key symbol appears.
Press the Intensity Down button for either channel to unlock.
flexistimIF instructions final.indd 18-19 24/11/2014 10:51
Page 11

17
7 Lock and Unlock your own programme
To lock programme settings in Programmes 1,5 & 6, rst adjust the intensity to zero, then
press & hold the LOCK KEY for 3 seconds. You cannot adjust settings while the
key symbol is displayed. 3 seconds is a long time, but you will want to avoid accidental
activation of this key.
To unlock the programme, take the same step. i.e. Press INTENSITY ▼ till it reaches zero,
then press & hold the LOCK key for 3 seconds.
8 Memory Mode
Once you set intensity >0 the Usage Timer automatically and accumulatively counts your
total usage up to 999 hours 59 minutes.
To enter MEMORY MODE and view the Usage Timer, set intensity to zero, then press &
hold the MODE key for 3 seconds.
The number at bottom left shows the number HOURS, and at bottom right the number of
MINUTES
The number at the top left shows the numbers of uses
Press Mode key again to return back to the previous normal display
To reset the Usage Timer to zero, press the Press “CH2▼” key and “Mode“ key together
for 3 seconds.
18
6 Adjusting other parameters
In programmes 1, 5 & 6 you can adjust other parameters
Press MENU + key
In Prog 1, there are only two parameters - Hz and Timer – to adjust.
Hz display at top left will start ashing
In Progs 5 & 6 there are 4 parameters to adjust:
HIGH, LOW, CYCLE, and Timer.
When you rst presss MENU+ key, HIGH will be shown in the centre, and the Hz display
at the top left will start ashing.
Use the Parameter Adjustment controls to select the required value, then press MENU+ or
MENU- to move to the next parameter.
The interference beat frequency moves between the set HIGH and LOW frequencies over
the CYCLE time set.
Default is 80-130Hz in 6 seconds.
Hz
Time Secs
LOW
HIGH
CYCLE TIME
Uses
Hours
Minutes
flexistimIF instructions final.indd 20-21 24/11/2014 10:51
Page 12

9. FURTHER CLINICAL INFORMATION AND
TREATMENT PROTOCOLS
For further information and clinical references go to www.tenscare.co.uk, and look on
the Flexistim IF product page.
10. ELECTRODE PAD PLACEMENT
Ensure that intensity is zero before connecting electrodes.
Insert connection lead(s) into the sockets below the handle.
Rotate the body of the plug to lock the lead in place. Plug the lead pins into the
sockets in the pad pigtails.
To avoid damage, remember to rotate the plug to unlock it before removing
the lead.
Only pull the lead by holding the body of the plug.
The interferential electrical signal is created by the interaction of the signals from all four
pads (i.e. between the pairs of pads of each channel). So the pads need to be applied in
positions so that the signals from each channel cross over the point to be treated.
8.1 Choosing settings
IFT works in the same way a TENS, but penetrates much deeper into the body. So you
can use IFT with the same settings as the TENS programmes.
Many therapists believe, however, that IFT has additional effects and can be used to
reduce swelling and muscle tension. One of the leading textbooks says:
2Hz Around this frequency the metencephalins are stimulated which will result in
short term pain relief.
10Hz This frequency has a benecial effect on the immune system and tends to
make patients wakeful yet relaxed.
130Hz This frequency stimulates the production of endorphins and results in longer
term pain relief and some local anaesthesia.
1-100Hz This frequency sweep will increase the inammatory rate.
45-90Hz This frequency sweep will depress the sympathetic nervous system so
allowing increased activity of the parasympathetic system and increase the
blood supply.
8. PROGRAMMES
19 20
Programme table:
P1 Constant. The pulse frequency is selectable. 2-16-Hz
P2 2-10 Hz Sweep over cycle time
P3 2-100 Hz sweep over cycle time
P4 80-150 Hz sweep over cycle time
P5 The pulse frequency varies set LOW frequency to set HIGH frequency over
Cycle Time and back. The transition is ramping (triangular wave function).
P6 The pulse frequency varies from set LOW frequency to set HIGH frequency
over Cycle Time and back. The transition is abrupt (square wave function).
The two channels add and subtract
to create an interference pattern. In
theory this pattern looks like the cross
shaped diagram below. In real tissue
the pattern is difcult to predict and you
may need to adjust the pad positions
until you can sense the stimulation in
the correct area.
The diagrams on the following pages
show how pads can be placed in
various body areas.
They all follow the same principles.
flexistimIF instructions final.indd 22-23 24/11/2014 10:51
Page 13

11. CARE OF ELECTRODES
The electrodes that are supplied with your Flexistim IF are self-adhesive and can be used
several times. Skin must be allowed to breathe, so the electrodes should be removed
periodically. When not in use, the electrodes should be placed onto the clear plastic shield.
The condition of the electrodes has a direct effect on conductivity and therefore the
effectiveness of the treatment. When the electrodes start to lose their adhesive quality,
it is possible to reactivate their adhesiveness by applying a ne spray of water to the gel
side of the electrode. In time, this technique will not work, the gel will not reactivate and
new electrodes should be used.
GENERAL PAD ADVICE
• The electrode pads supplied are reusable but are for single patient use.
• In order to obtain the best conductivity through the pads always ensure that they are in
good condition and tacky.
• Before use make sure your skin is clean and dry.
• Peel the electrode pads from their protective plastic shield by holding and lifting one
corner of the pad and pulling. Do not pull on the pigtail wire of the pad.
• After use always replace the pads on the plastic liner and replace in the re-sealable plastic bag.
• If the pads dry out then it is best to buy a replacement pack of electrodes. In an emergency
it may be possible to restore some of the tackiness of the pad by adding a tiny drop
of water on each pad and spreading around. If too much water is added the pads will
become too soft then it is suggested in order to try to re-establish some adhesiveness to
place them sticky side up in a refrigerator for a few hours.
• In very hot weather the gel on the pads may become soft. In such cases place the
pads, still on their plastic liners and in their bag, into a fridge until they return to their
normal condition.
WARNINGS
Do not use any electrodes less than 50mm X 50mm.
Allergic reactions to the self-adhesive electrodes can occur even though they
are hypoallergenic.
• Do not apply to broken skin.
• Do not apply electrodes to areas with less than normal sensitivity. This could lead to
setting intensities at higher levels than intended.
21 22
L1
L1L2
L2
L1
L1
L2
L2
L1
L1
L2
L2
L1
L1
L2
L2
L1
L1
L2
L2
L1
L1
L2
L2
L1
L1
L2
L2
Elbow
Knee
Neck
Shoulder
Lower Back
Constipation in Children
Alternative knee
setting
flexistimIF instructions final.indd 24-25 24/11/2014 10:51
Page 14

13. TROUBLESHOOTING
If your Flexistim IF is not working properly please check the following:
12. CHARGING THE BATTERY
The Flexistim IF is powered by a type BL-6F rechargeable
Li-ion battery.
The battery cannot be charged while it is in the unit. A separate
charging cradle and power adaptor are included in the kit.
The battery will only last about one hour’s use at 30mA.
When the battery is running low, a low battery indicator
will show on the screen (battery symbol).
NB: Remove the battery from your Flexistim IF if the unit is unlikely to be used for a
long period.
When the battery is charged, the indicator light on the cradle will change from red to
green.
For a replacement battery, contact Tenscare or your local distributor.
Use only the power adaptor and charging cradle supplied.
The
Flexistim IF
can also be operated directly from the power supply. Just plug it directly
into the socket in the side of the unit. This automatically disconnects the battery.
USE OF OTHER CHARGERS COULD BE HAZARDOUS AND WILL NEGATE
THE GUARANTEE
Warning
There is a risk of smoke, re, or rupture if the battery is not used according to the following
guidelines:
• Do not disassemble the battery
• Do not short-circuit the battery
• Do not incinerate or heat the battery
• Do not use or leave battery near a re, stove or heated place (more than 80°C)
• Do not immerse the battery in water or sea water, or get it wet
• Do not charge battery nearby the re or in strong sunlight
• Only use the charger provided and observe charging instructions
Disposal
Always dispose of batteries responsibly according to local government guidelines.
23 24
Problem:
No display/won’t turn on: BATTERY:
i) Is it tted?
ii) Is it charged?
Controls don’t work i) If is shown on display, press button to unlock
the keypad
ii) No showing. Ensure battery is charged.
No impulse output from electrodes A circuit is not being made.
i) Have you applied both electrode pads (per
lead wire) to ensure a complete circuit?
ii) Are the lead wires properly connected at
both ends?
iii) Is the lead damaged? (Try using the other
lead - if this works, then the original lead is faulty)
Warning triangle ashing, When intensity reaches 40mA, the warning triangle
cannot increase intensity. ashes and intensity cannot be increased.
Check electrode pad position. If you are certain that
the pads are positioned safely, press the SKIP key to
override. The triangle will stop ashing and intensity
can be increased to 60mA.
If the above review has failed to resolve your problem, call TensCare or your local dealer
for advice.
flexistimIF instructions final.indd 26-27 24/11/2014 10:51
Page 15

14. CLEANING
• Clean your device before use.
• Remove the battery from the device every time when you clean the device.
• The case and lead wires can be cleaned by wiping with a damp cloth and a solution of
mild soap and water. Wipe dry.
• Do not immerse your Flexistim IF in water.
• Do not use any other cleaning solution than soap and water.
15. CONSUMABLES AND SERVICING
Original Accessory
The unit must be used only with the original accessories, supplied by the manufacturer.
Replacement electrode pads, new batteries and lead wires are available from your
supplier or distributor (see back cover for contact details), by mail order from TensCare,
by telephone using a credit or debit card, or through our website.
PART NUMBER:
L-ST2 Replacement lead 1.25m
E-CM5050 Electrode pads 50x50mm for external use. Pack of 4
B-BL6F Li-Ion battery type BL-6F 3.7V 1100mAh
X-ST2CR Charging Cradle
X-FLEXIPA Power adaptor
Apart from these items, there are no user-serviceable parts or calibration.
• Maintenance and all repairs should only be carried out by an authorised agency. The
manufacturer will not be held responsible for the results of maintenance or repairs by
unauthorised persons.
• The user must not attempt any repairs to the device or accessories. Please contact the
retailer for repair.
• Opening of the equipment by unauthorised agencies is not allowed and will terminate
any claim to warranty.
• Check the unit before each use for signs of wear and/or damage. Replace worn items
as required.
16. WARRANTY
In addition to your statutory rights, the manufacturer agrees that if any defect in materials
or workmanship appears in this product within two years after the original date of
consumer purchase, it will repair or at its option, replace the product in question free of
charge. This applies only if the product has been used for domestic purposes and has
not been damaged through misuse, accident or neglect and has not been modied or
repaired by anyone other than the manufacturer or its authorised agents.
If a defect appears, please make sure that the unit is being used in accordance with the
instructions, if so, return it with this warranty and the proof of purchase to your nearest
Flexistim IF dealer. Note: only our authorised service agents should carry out repairs of
the Flexistim IF units.
Exclusions: The batteries, lead wires and electrode pads are not considered covered by
this warranty.
The supplier will make available on request circuit diagrams, component part lists,
descriptions, calibration instructions, or other information which will assist the user’s
appropriately qualied technical personnel to repair those parts of equipment which are
designated by the manufacturer as repairable.
17. DISPOSAL OF WASTE ELECTRICAL AND ELECTRONIC
PRODUCTS (WEEE)
One of the provisions of the European Directive 2002 / 96 / CE is that anything electrical
or electronic should not be treated as domestic waste and simply thrown away. New
products are now being marked with the symbol to remind you. Your local council or
retailer will be able to tell you where your nearest facility is. The collection facilities will
send items for treatment, recovery and recycling, so by using them you’ll help to save
resources and minimise the effects on the environment.
25 26
flexistimIF instructions final.indd 28-29 24/11/2014 10:51
Page 16

27
19. STANDARD SYMBOLS
Type BF Applied part
Attention, consult accompanying document
Complies with WEEE regulations
CE marking
Manufacturer
The rst number 2: Protected against access to hazardous parts with a nger, and
the jointed test nger of 12 mm Ф, 80 mm length, shall have adequate clearance from
hazardous parts, and protected against solid foreign objects of 12.5 mm Ф and greater.
The second number: Protected against vertically falling water drops when enclosure is
tilted up to 15º. Vertically falling drops shall have no harmful effects when the enclosure
is tilted at any angle up to 15’’ on either side of the vertical.
20. EMC PRECAUTIONS
Wireless communications equipment such as wireless home network devices, mobile phones,
cordless telephones and their base stations, walkie-talkies can affect this equipment and
should be kept at least a distance d = 3,3 m away from the equipment.
(Note: As indicated in Table 6 of IEC 60601-1-2:2007 for ME EQUIPMENT, a typical cell phone
with a maximum output power of 2 W yields d = 3,3 m at an IMMUNITY LEVEL of 3 V/m).
EC Declaration of Conformity
28
18. SPECIFICATIONS
IFT:
Intensity Up/down 60 steps, 0-60mA zero to peak at 500ohm load
Carrier 4000Hz xed(CH1)
Frequency
Modulating 4004-4160Hz, in steps of 4Hz(CH2)
Frequency
Pulse Width 125μs
Waveform Symmetrical balanced sine wave
Treatment Timer Continuous, 10, 20, 30, 45, 60, 90min
Dimensions 61×123×22mm (exclude belt clip)
Weight 160g (with battery)
Power Supply BL-6F Li-Ion battery 3.7V 1100mAh
Mains adaptor (Class II, IEC60601-1) with charging cradle
Input 100-240V
Output DC 5V 1000mA
Safety Classication Type BF Designed for continuous use
IP22
Environmental
Operating Specications Humidity: 20 to 93% RH
Temperature range: 0 to 40C
Atmospheric Pressure: 700hPa to 1060hPa
Storage and Humidity: 10 to 93% RH
Transport Specications Temperature range: -20 to 70C
Atmospheric Pressure: 700hPa to 1060hPa
Typical Operation Time No less than 1 hour (@50%AMP
Expected Service Life No less than 5 years
IP22
TensCare Ltd hereby declare that an examination of the production quality assurance
system has been carried out following the requirements of the UK national legislation
according to Annex V of the Directive 93/42/EEC on medical devices. We certify
that the production quality system conforms with the relevant provisions of the
aforementioned legislation, and the result entitles the organisation to use the CE 0473
marking on this product.
flexistimIF instructions final.indd 30-31 24/11/2014 10:51
Page 17

TensCare Ltd, 9 Blenheim Road,
Epsom, Surrey KT19 9BE, UK
Tel: +44(0) 1372 723434
www.tenscare.co.uk
Distributed by:
Pub No.: I-FLEXIF-UK Version 1.0 09/14
Manufactured by:
flexistimIF instructions final.indd 32 24/11/2014 10:51
 Loading...