

Page 1
Integral D3 mobile
connected to Integral 1/ 3 / 5
and Integral 33 /CS I55
Kurz-Bedienungsanleitung
Manual abreviado
Quick Guide
Guide utilisateur
Brevi istruzioni
Korte inleiding
Page 2
Integral 33 / CS I55 – Integral 1/3/5
D3 mobile
2
8
7
6
5
4
3
1
15
10
11
12
13
14
16
9
R
OK
12
ABC
4
GHI
7
PQRS
9
WXYZ
5
JKL
8
0
TUV
6
MNO
3
DFG
Page 3

Integral 33 / CS I55 – Integral 1/3/5
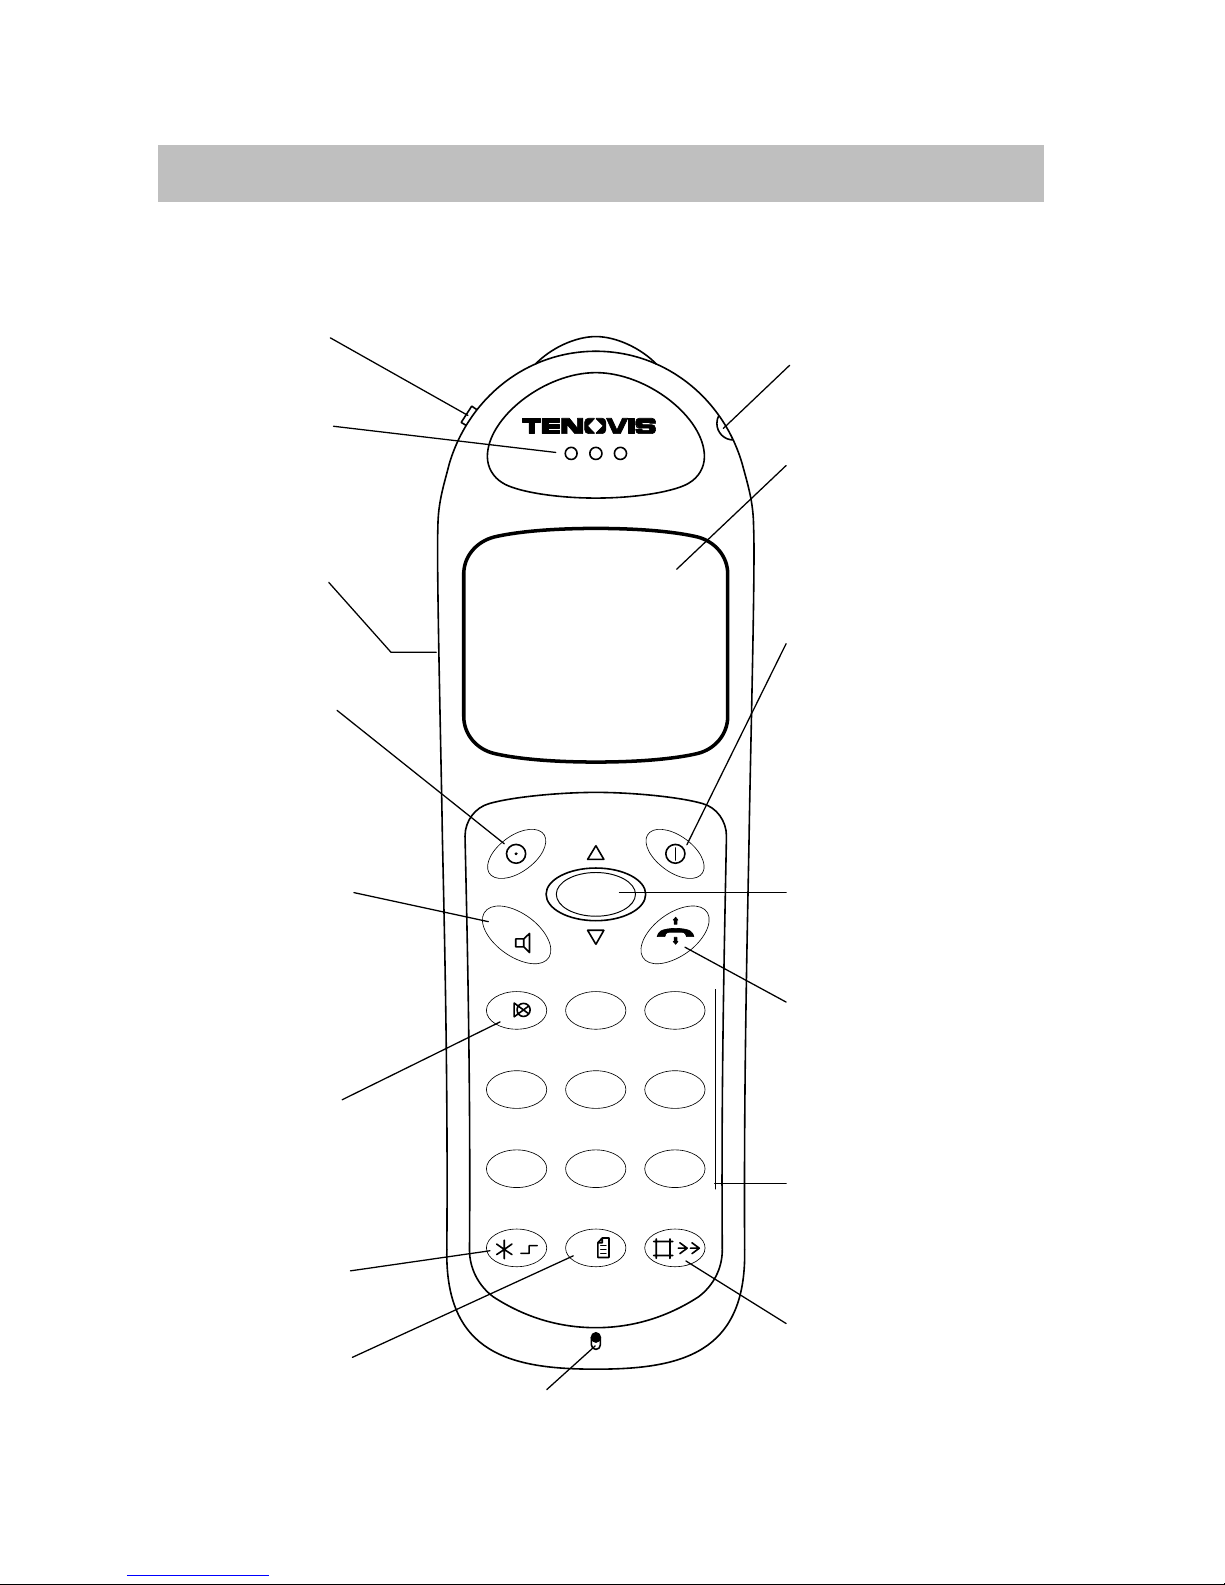
Telefonieren wie gewohnt
DGBE F INL
1 Buchse für
Headset
Socket for
headset
Conector
hembra para
auriculares
Prise pour
le combiné
écouteurmicrophone
Presa per
headset
Bus voor
headset
2 Display Display Display Afficheur Display Display
3 Softkey
rechts
Right softkey Softkey
derecha
Touche programmable
de droite
Softkey
destra
Softkey
rechts
4 Selector
2.: Pfeiltasten
zum Blättern
im Menü
Selector
2nd: Arrow
keys for paging through
the menu
Selector
2.: Teclas de
flecha para
hojear en el
menú
Touche OK
2.: Touche
fléchée pour
feuilleter dans
le menu
Selettore
2ª: tasti freccia per sfogliare il menu
Selector:
toetsen om in
het menu te
bladeren
5 Taste Hörer “Handset”
key
Tecla
microteléfono
Touche
« Combiné »
Tasto
“Ricevitore„
Toets „Hoorn”
6 Zifferntasten Number keys Teclas
numéricas
Touches
numériques
Tasti numerici Cijfertoetsen
7 Taste Raute
2.: Wahlwiederholung
“Hash” key
2nd. Redial
Tecla
Almohadilla
2.: Rep. marc.
Touche
« Dièse »
Tasto
“Cancelletto„
2ª: ripetizione
selezione
Toets „Hekje”:
nummerherhaling
8 Mikrofon Microphone Micrófono Microphone Microfono Microfoon
9 Taste 0
2.: Telefonbuch oder Anruf-/Nachrichtenliste
“0” key
2nd: Telephone book or
call/message
list
Tecla 0
2.: Guía
telefónica
o Lista de
llamadas/
mensajes
Touche « 0 »
2. : Annuaire
ou liste
d’appels /
de messages
Tasto “0„
2ª: rubrica o
lista chiamate/
messaggi
Toets „0”:
telefoonboek
of aparte of
berichtenlijst
10 Taste Stern
2.: Sonderfunktionen
“Star” key
2nd: Special
functions
Tecla
Asterisco
2.: Funciones
especiales
Touche
« Etoile »
Tasto
“Asterisco„
2ª: funzioni
speciali
Toets „Ster”:
speciale
functies
11 Taste 1
2.: Stummschaltung
“1” key
2nd: Mute
Tecla 1
2.: Conmutación a mute
Touche « 1 »
2. : Secret
Tasto “1„
2ª: commutazione su mute
Toets „1”:
mute-functie
12 Taste R
2.: Freisprechen
“R” key
2. Handsfree
operation
Tecla R
2.: Manos
libres
Touche « R »
2. Mainslibres
Tasto “R„
2ª: vivavoce
Toets „R”:
handenvrij
13 Softkey links Left softkey Softkey
izquierda
Touche programmable
de gauche
Softkey
sinistra
Softkey links
14 Lautsprecher
für Freisprechen
Loudspeaker
for handsfree
operation
Altavoz para
Manos libres
Haut-parleur
mains-libres
Altoparlante
per vivavoce
Luidspreker
voor
handenvrij
15 Hörer Handset Tecla llamada
emergencia
Combiné Ricevitore Hoorn
16 Notruftaste Emergency
call key
Microteléfono Touche
d’appel
d’urgence
Tasto
chiamata di
emergenza
Noodoproeptoets
Page 4

Integral 33 / CS I55 – Integral 1/3/5
D
Wichtige Hinweise 1. . . . . . . . . . . . . .
Inbetriebnahme 3. . . . . . . . . . . . . . . .
Display 6. . . . . . . . . . . . . . . . . . . . . . .
Grundregeln für die Bedienung 7. . .
Telefonieren wie gewohnt 10. . . . . . . .
Rückfrage und Weiterverbinden 11. .
Gespräche laut hören, Mikrofon aus-
schalten 12. . . . . . . . . . . . . . . . . . . . . . .
Handset einstellen 13. . . . . . . . . . . . . .
Notruf 14. . . . . . . . . . . . . . . . . . . . . . . . .
Sprache 15. . . . . . . . . . . . . . . . . . . . . . .
Technische Daten 16. . . . . . . . . . . . . .
GB
Important information 1. . . . . . . . . . .
Commissioning 3. . . . . . . . . . . . . . . .
Display 6. . . . . . . . . . . . . . . . . . . . . . .
Basic rules of operation 7. . . . . . . . .
Telephoning as usual 10. . . . . . . . . . .
Refer-back call and call forwarding 11
Hearing conversations via
loudspeaker, switching off
the microphone 12. . . . . . . . . . . . . . . .
Setting the handset 13. . . . . . . . . . . . .
Emergency call 14. . . . . . . . . . . . . . . .
Language 15. . . . . . . . . . . . . . . . . . . . .
Technical specifications 16. . . . . . . . .
E
Información importante 1. . . . . . . . . .
Puesta en servicio 3. . . . . . . . . . . . . .
Display 6. . . . . . . . . . . . . . . . . . . . . . .
Reglas básicas para el manejo 7. . .
Telefonear como de costumbre 10. . .
Consulta y transferencia 11. . . . . . . . .
Activar Manos libres,
silenciar el micrófono 12. . . . . . . . . . .
Ajustar el móvil DECT 13. . . . . . . . . . .
Llamada de emergencia 14. . . . . . . . .
Idioma 15. . . . . . . . . . . . . . . . . . . . . . . .
Datos técnicos 16. . . . . . . . . . . . . . . . .
Page 5

Integral 33 / CS I55 – Integral 1/3/5
F
Remarques importantes 1. . . . . . . . .
Mise en service 3. . . . . . . . . . . . . . . .
Afficheur 6. . . . . . . . . . . . . . . . . . . . . .
Règles élémentaires d’utilisation 7.
Téléphoner comme vous en avez
l’habitude 10. . . . . . . . . . . . . . . . . . . . .
Rétro-appel et transfert 11. . . . . . . . . .
Ecoute amplifiée des
communications,
désactiver le microphone 12. . . . . . . .
Configurer votre combiné 13. . . . . . . .
Appel d’urgence 14. . . . . . . . . . . . . . . .
Langue 15. . . . . . . . . . . . . . . . . . . . . . .
Caractéristiques techniques 16. . . . .
I
Avvertenze importanti 1. . . . . . . . . . .
Messa in funzione 3. . . . . . . . . . . . . .
Display 6. . . . . . . . . . . . . . . . . . . . . . .
Istruzioni d’uso fondamentali 7. . . . .
Esecuzione di una telefonata 10. . . .
Richiamata e inoltro 11. . . . . . . . . . . .
Ascolto amplificato della conversazione, disattivazione del microfono 12
Impostazione del portatile 13. . . . . . .
Chiamata di emergenza 14. . . . . . . . .
Lingua 15. . . . . . . . . . . . . . . . . . . . . . . .
Dati tecnici 16. . . . . . . . . . . . . . . . . . . .
NL
Belangrijke aanwijzingen 1. . . . . . . .
Inbedrijfstelling 3. . . . . . . . . . . . . . . . .
Display 6. . . . . . . . . . . . . . . . . . . . . . .
Basisregels voor de bediening 7. . .
Normaal telefoneren 10. . . . . . . . . . . .
Ruggespraak en doorverbinden 11. .
Gesprekken met ingeschakelde luidspreker, microfoon uitschakelen 12. .
Handset instellen 13. . . . . . . . . . . . . . .
Noodoproep 14. . . . . . . . . . . . . . . . . . .
Taal 15. . . . . . . . . . . . . . . . . . . . . . . . . .
Technische gegevens 16. . . . . . . . . . .
Page 6

Integral 33 / CS I55 – Integral 1/3/5
Page 7

Integral 33 / CS I55 – Integral 1/3/5
1
Wichtige Hinweise
Inhalt dieser Kurzbedienungsanleitung
In dieser Bedienungsanleitung finden Sie erklärt, wie Sie Ihr Handset in
Betrieb nehmen. Es werden alle Grundregeln zur Bedienung und die am
häufigsten genutzten Funktionen und Einstellungen beschrieben.
Eine vollständige Beschreibung aller anlagenspezifischen Funktionen finden Sie auf der mitgelieferten CD-ROM. Sie können die Bedienungsanleitungen ansehen und ausdrucken.
Hinweis: Eine gedruckte Anleitung können Sie kostenpflichtig über Tenovis
Direct bestellen: Tel. +49 (0) 800-3473 287, Fax: +49 (0) 800-3473 283.
Bestellnummern: Integral D3 mobile an Integral 1/3/5: 4.999.059.185
Integral D3 mobile an Integral 33 / CS I55: 4.999.059.184
Lieferumfang
Bitte kontrollieren Sie sofort den Lieferumfang, wenn Sie Ihr Integral D3
mobile erhalten:
– Handset D3 mobile mit Kurz-Installationsanleitung
– Wechselakku – MEM-Card
– Ladegerät classic – Steckernetzteil
– Kurz-Bedienungsanleitung
– CD-Rom mit ausführlichen Bedienungsanleitungen
Wo Sie Ihr Handset benutzen können
Das Handset Integral D3 mobile ist für den Einsatz im Büro, im Freien oder
in staubiger Umgebung geeignet. Es entspricht der Schutzklasse IP 65,
strahlwassergeschützt und staubdicht.
Vor Störungen schützen
In der Regel sind andere elektronische Geräte vor Hochfrequenz-Einstrahlung geschützt. Falls aber ein solches Gerät unzureichend abgeschirmt ist,
kann es zu Fehlfunktionen kommen.
Gehäuse des Handsets niemals aufschrauben!
Das Gehäuse kann sonst beschädigt werden. Es enthält keine Teile, die
Sie reparieren können.
Akku in Betrieb nehmen
Akkus nur sachgemäß einsetzen. Tenovis übernimmt keine Haftung für
Schäden, die durch unsachgemäßen Umgang mit dem Akku entstehen.
D
Page 8

Integral 33 / CS I55 – Integral 1/3/5
2
Wichtige Hinweise
Wenn die Akkus aufgebraucht sind – Endverbraucherinformation
Werfen Sie aufgebrauchte Akkus nicht in die Mülltonne! Bringen Sie sie zu
einer Sammelstelle Ihrer Gemeinde oder Ihrem Händler, damit sie einer
umweltgerechten Entsorgung zugeführt werden können.
Tipps zum Aufstellort
Verwenden Sie für Ihr Ladegerät eine rutschfeste Unterlage, besonders bei
neuen oder mit Pflegemitteln behandelten Möbeln. Lacke oder Pflegemittel
können Stoffe enthalten, die die Füße Ihres Ladegeräts aufweichen, und
die aufgeweichten Gerätefüße könnten auf der Oberfläche der Möbel unerwünschte Spuren hinterlassen. Tenovis kann für derartige Schäden nicht
haften.
Bitte entsorgen Sie nur entladene Akkus.
Zulassung und Konformität
Wir Tenovis GmbH & Co. KG erklären, dass das Produkt Integral D3 mobile
mit den grundlegenden Anforderungen und anderen relevanten Bestimmungen der Richtlinie 1999/5/EU (R&TTE) übereinstimmt.
Dieses Gerät ist zum Anschluss an Funk-Schnittstellen (DECT
t
) von
Tenovis-TK-Anlagen bestimmt und erfüllt die grundlegenden Anforderungen
gemäß der EG-Richtlinie 1999/5/EG (Radio und Telekommunikation Terminal Equipment, R&TTE).
Dieses Gerät ist bauartbedingt nicht zum direkten Betrieb an Schnittstellen
öffentlicher Telekommunikationsnetze vorgesehen.
Falls beim Betrieb dennoch Probleme auftreten sollten so wenden Sie sich
bitte zunächst an Ihren Fachhändler oder an den Tenovis Service.
Die Konformitätserklärung kann auf folgender Internetadresse angefordert
werden: www.tenovis.com/deutsch/verzeichnis/conformance.htm
oder su-
chen Sie unter Index das Stichwort: Konformität.
Diese Einrichtung arbeitet nach dem System DECTt im Frequenzbereich
1880 bis 1900 MHz. Die Ausweisung dieses Frequenzbereichs im Frequenznutzungsplan gilt zunächst bis 2008 und wird in Abhängigkeit von der
europäischen Harmonisierung fortgeschrieben.
DECT ist eingetragenes Warenzeichen der ETSI
D
Page 9

Integral 33 / CS I55 – Integral 1/3/5
3
Inbetriebnahme
Wenn Ihr Handset noch nicht montiert ist
Wenn Sie das Handset nicht komplett montiert erhalten, müssen Sie
D die MEM-Card einsetzen (→ Seite 3),
D den Akku einbauen (→ Seite 4) und
D gegebenenfalls noch die Schutzfolie vom Display abziehen.
D Ihr Service muss das Handset an Ihrer Telefonanlage anmelden.
Ihr Handset ist dann betriebsbereit.
D Schließen Sie jetzt noch das Ladegerät an (→ Seite 5).
Wenn Ihr Handset schon komplett montiert ist
Wenn Sie Ihr Handset schon komplett montiert erhalten und es an Ihrer
Telefonanlage angemeldet ist, dann brauchen Sie nur das Ladegerät anschließen (→ Seite 5).
MEM-Card
Sie können mit Ihrem Handset nur telefonieren, wenn eine MEM-Card eingelegt ist. Wichtige Daten Ihres Handsets, wie persönliche Einstellungen
und Ihr persönliches Telefonbuch, sind darauf gespeichert. Wechseln Sie
einmal Ihr Handset, können Sie mit dieser MEM-Card sofort telefonieren.
D
Page 10
Integral 33 / CS I55 – Integral 1/3/5
4
Inbetriebnahme
MEM-Card einlegen
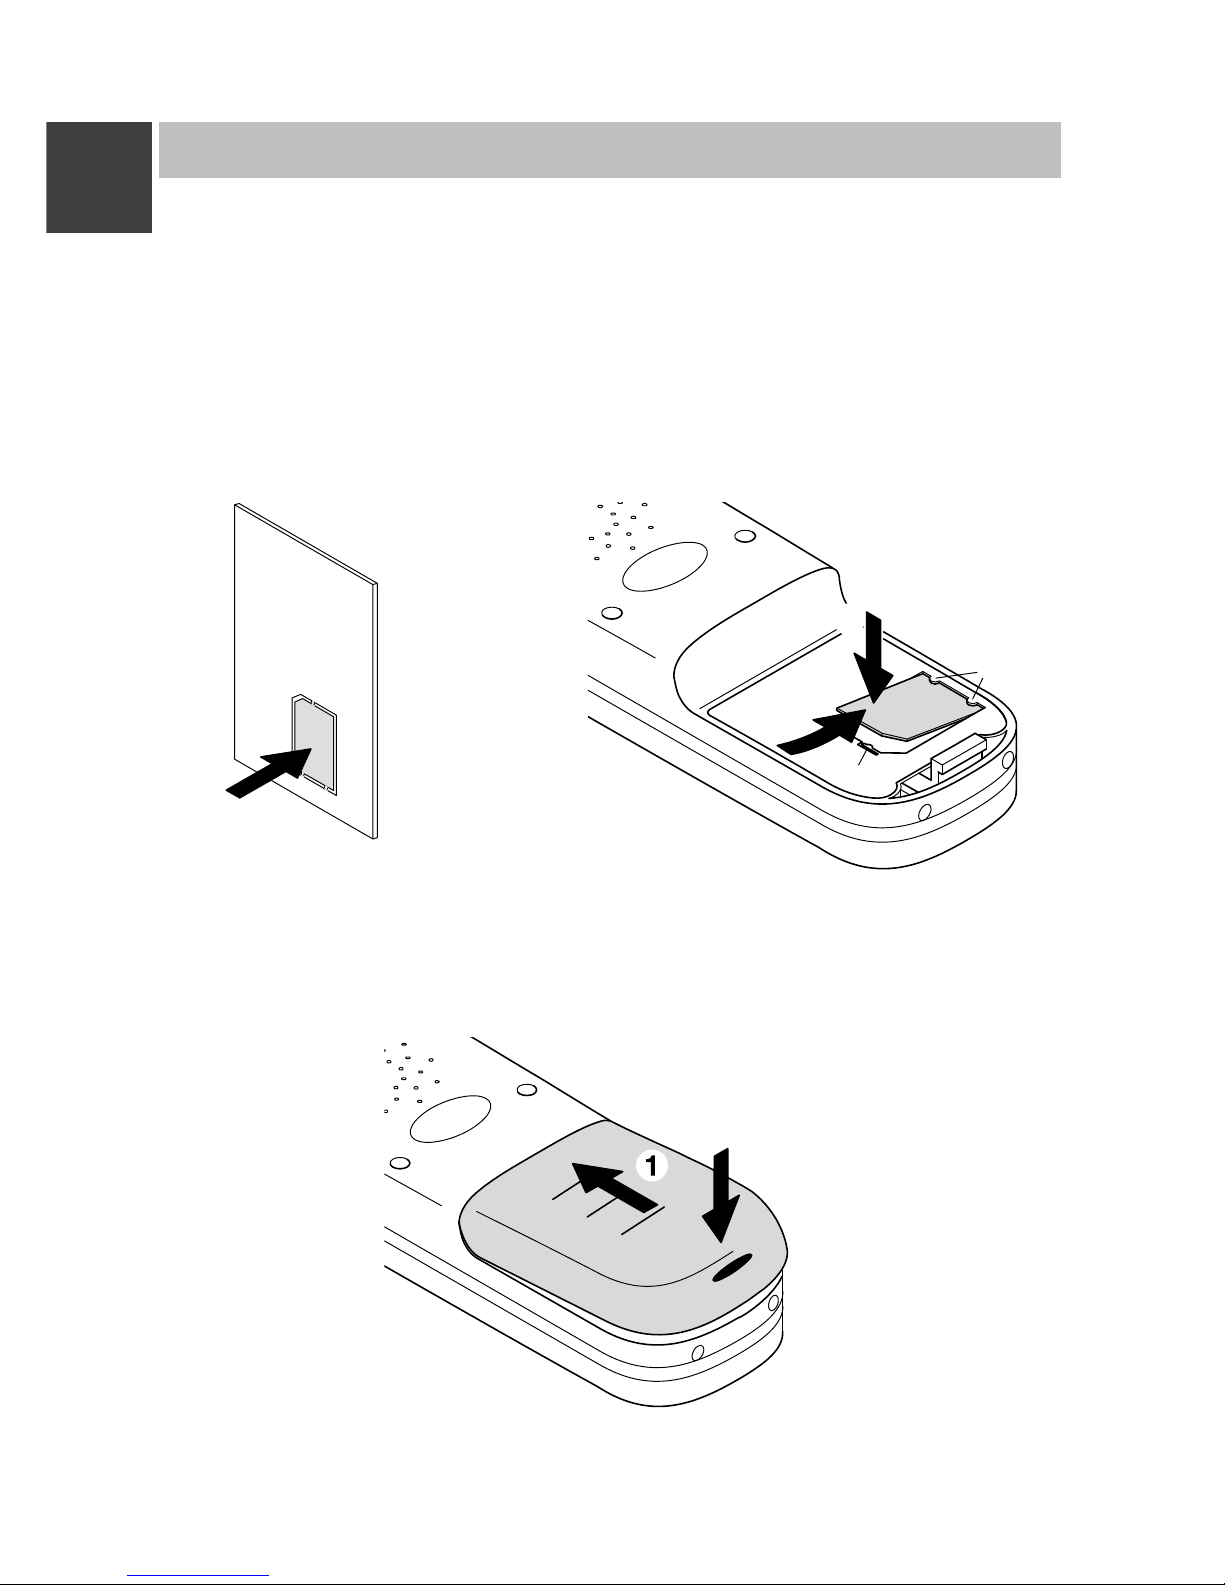
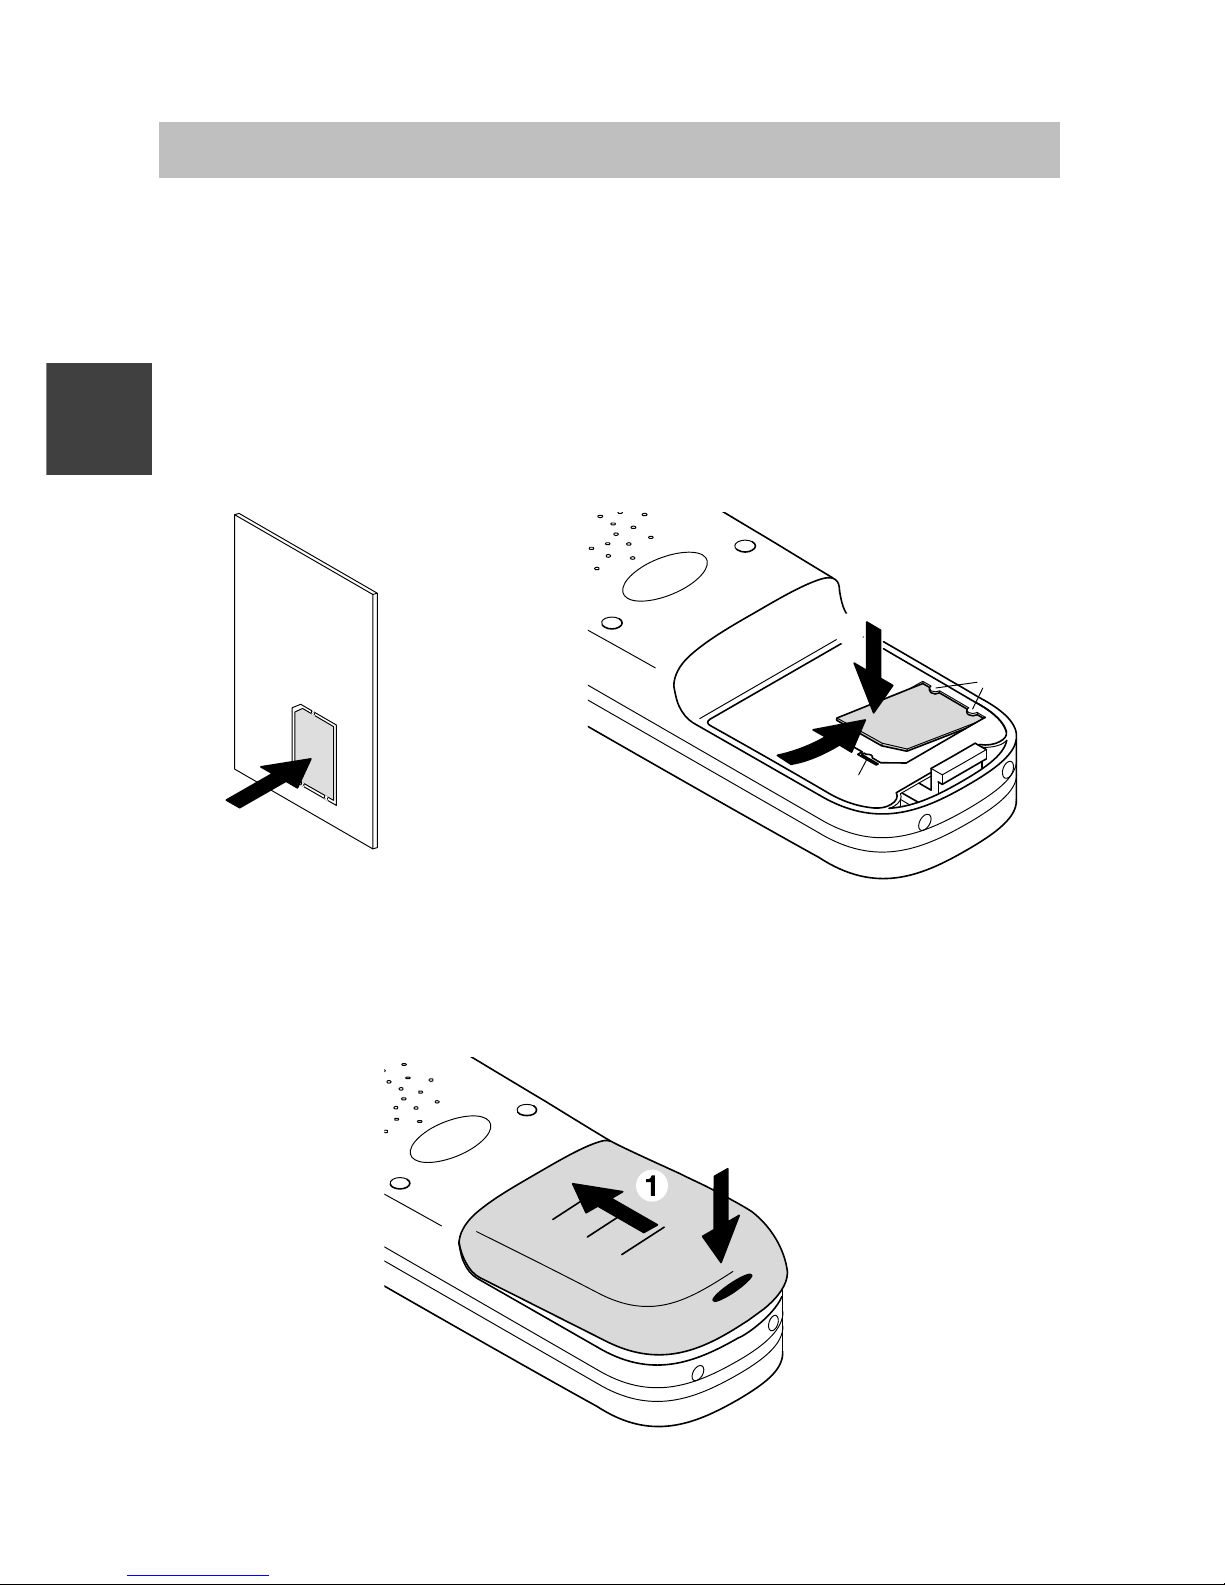
D Drücken Sie zunächst die kleine MEM-Card mit dem Finger aus dem
größeren Rahmen heraus (nachstehende Abbildung links).
D Schieben Sie die MEM-Card mit der kurzen Kante schräg unter die
Halte-Halbmonde a im MEM-Card-Fach (nachstehende Abbildung
rechts) (1). Die goldglänzenden Kontaktflächen der MEM-Card müssen
nach unten weisen!
D Drücken Sie die MEM-Card nach unten, bis die kleine Rastnase b fasst (2).
Akku einsetzen
D Akku in das Gehäuse schieben (1)
D Akku an der Riegelseite nach unten drücken bis er hörbar einrastet (2).
D
1
2
a
b
2
Page 11
Integral 33 / CS I55 – Integral 1/3/5
5
Inbetriebnahme
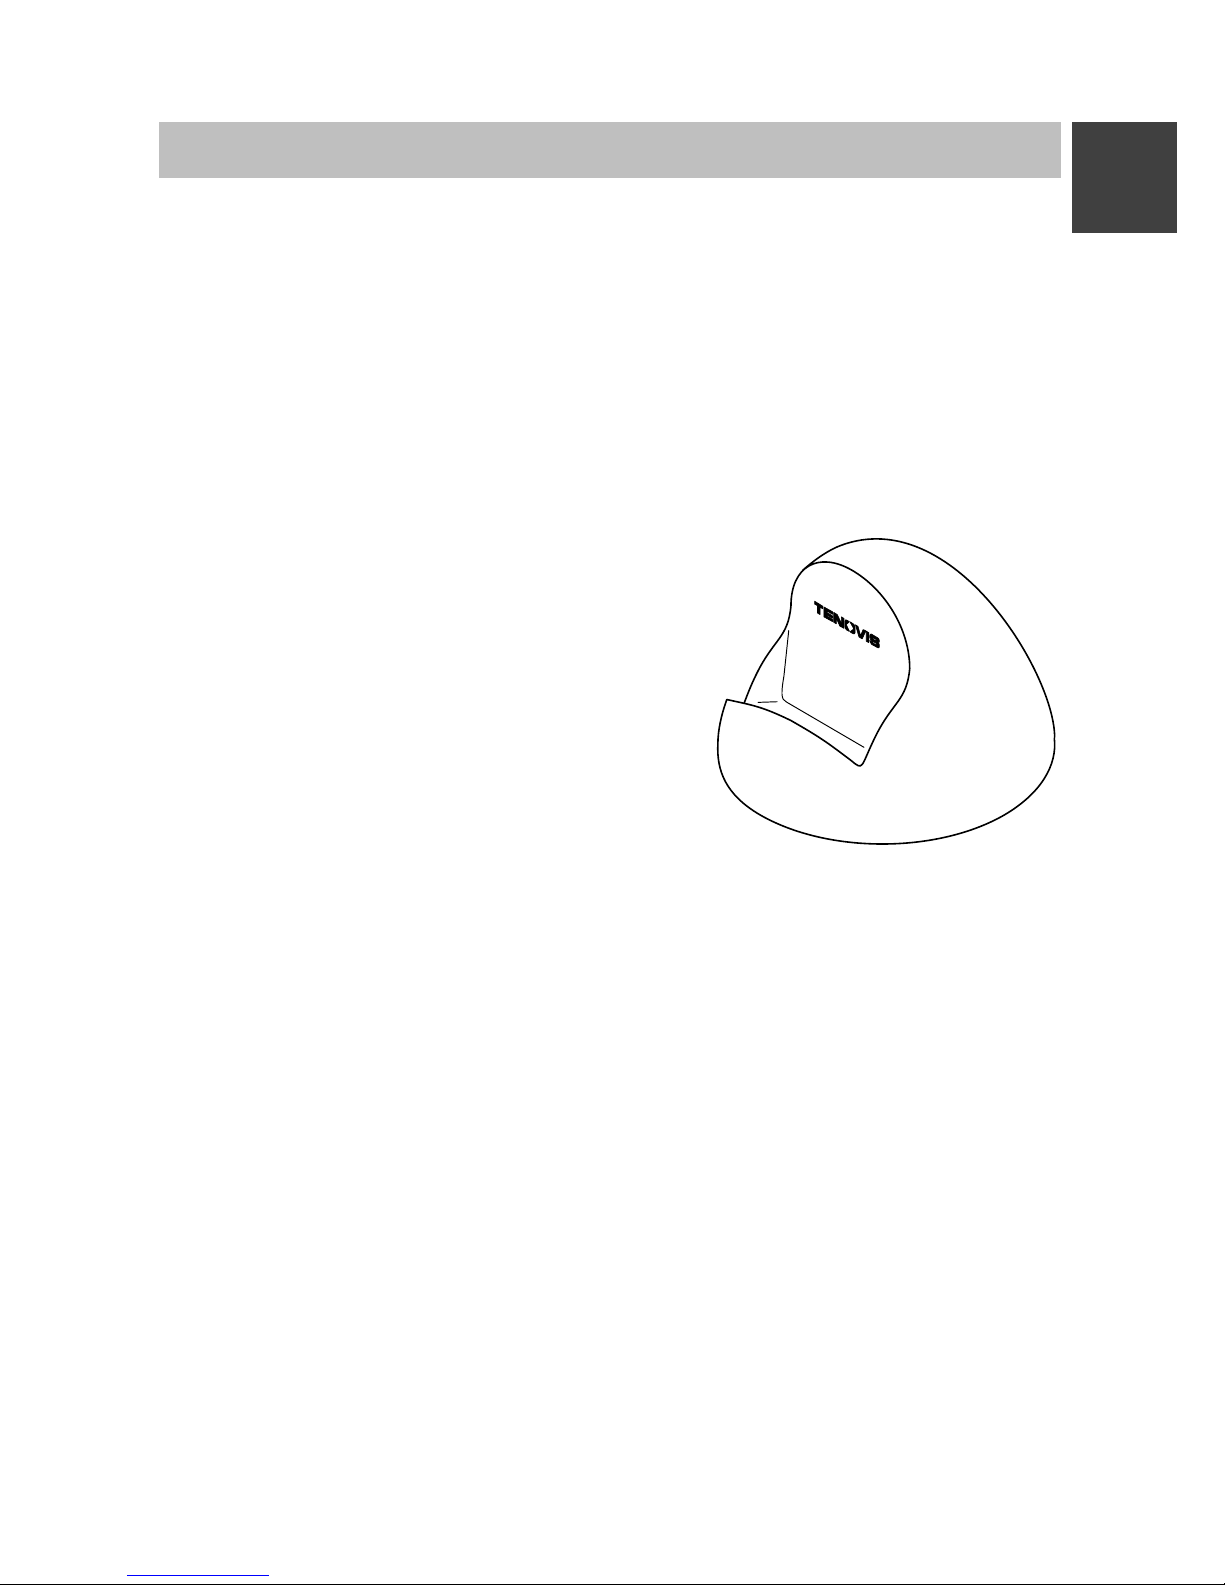
Ladegerät aufstellen
Stellen Sie das Ladegerät auf eine feste, ebene Unterlage, z. B. auf einen
Tisch. Wählen Sie einen Standplatz, der vor direkter Sonneneinstrahlung
und Feuchtigkeit geschützt ist.
D Stecken Sie das Steckernetzteil in eine Steckdose.
D Stecken Sie den kleinen Stecker der Anschlussschnur hinten in das La-
degerät.
Das Ladegerät ist nun betriebsbereit.
Handset aufladen
Stellen Sie das Handset einfach in das Ladegerät. Sie hören einen Bestätigungston.
Die Display-Beleuchtung geht kurz an. Das
Handset bleibt ein- oder ausgeschaltet.
Das Akku-Symbol in der Symbolzeile bewegt sich bis der Akku voll geladen ist.
Während des Aufladens werden die Akkus
leicht warm. Das ist normal.
Hinweise zum Akkugebrauch
Laden Sie den Akku am Anfang zunächst vollständig auf, und stellen Sie
das Handset in der ersten Betriebswoche immer wieder in das Ladegerät.
Neue Akkus erreichen ihre volle Kapazität in der Regel erst nach einigen
Lade-/Entladevorgängen.
Sie können Ihr Handset dauerhaft im Ladegerät stehen lassen. Der Akku
kann nicht überladen werden.
Lassen Sie den Akku nicht in der prallen Sonne liegen. Er dankt es Ihnen
mit einer langen Lebensdauer.
Achtung!
D Werfen Sie den Akku nicht ins Feuer, er könnte explodieren.
D Um Verletzungen oder Brandschäden vorzubeugen, achten Sie darauf,
dass die Kontakte des Akkus nicht mit leitenden Gegenständen in Berührung kommen oder kurzgeschlossen werden.
D
Ladegerät classic
Page 12
Integral 33 / CS I55 – Integral 1/3/5
6
Display
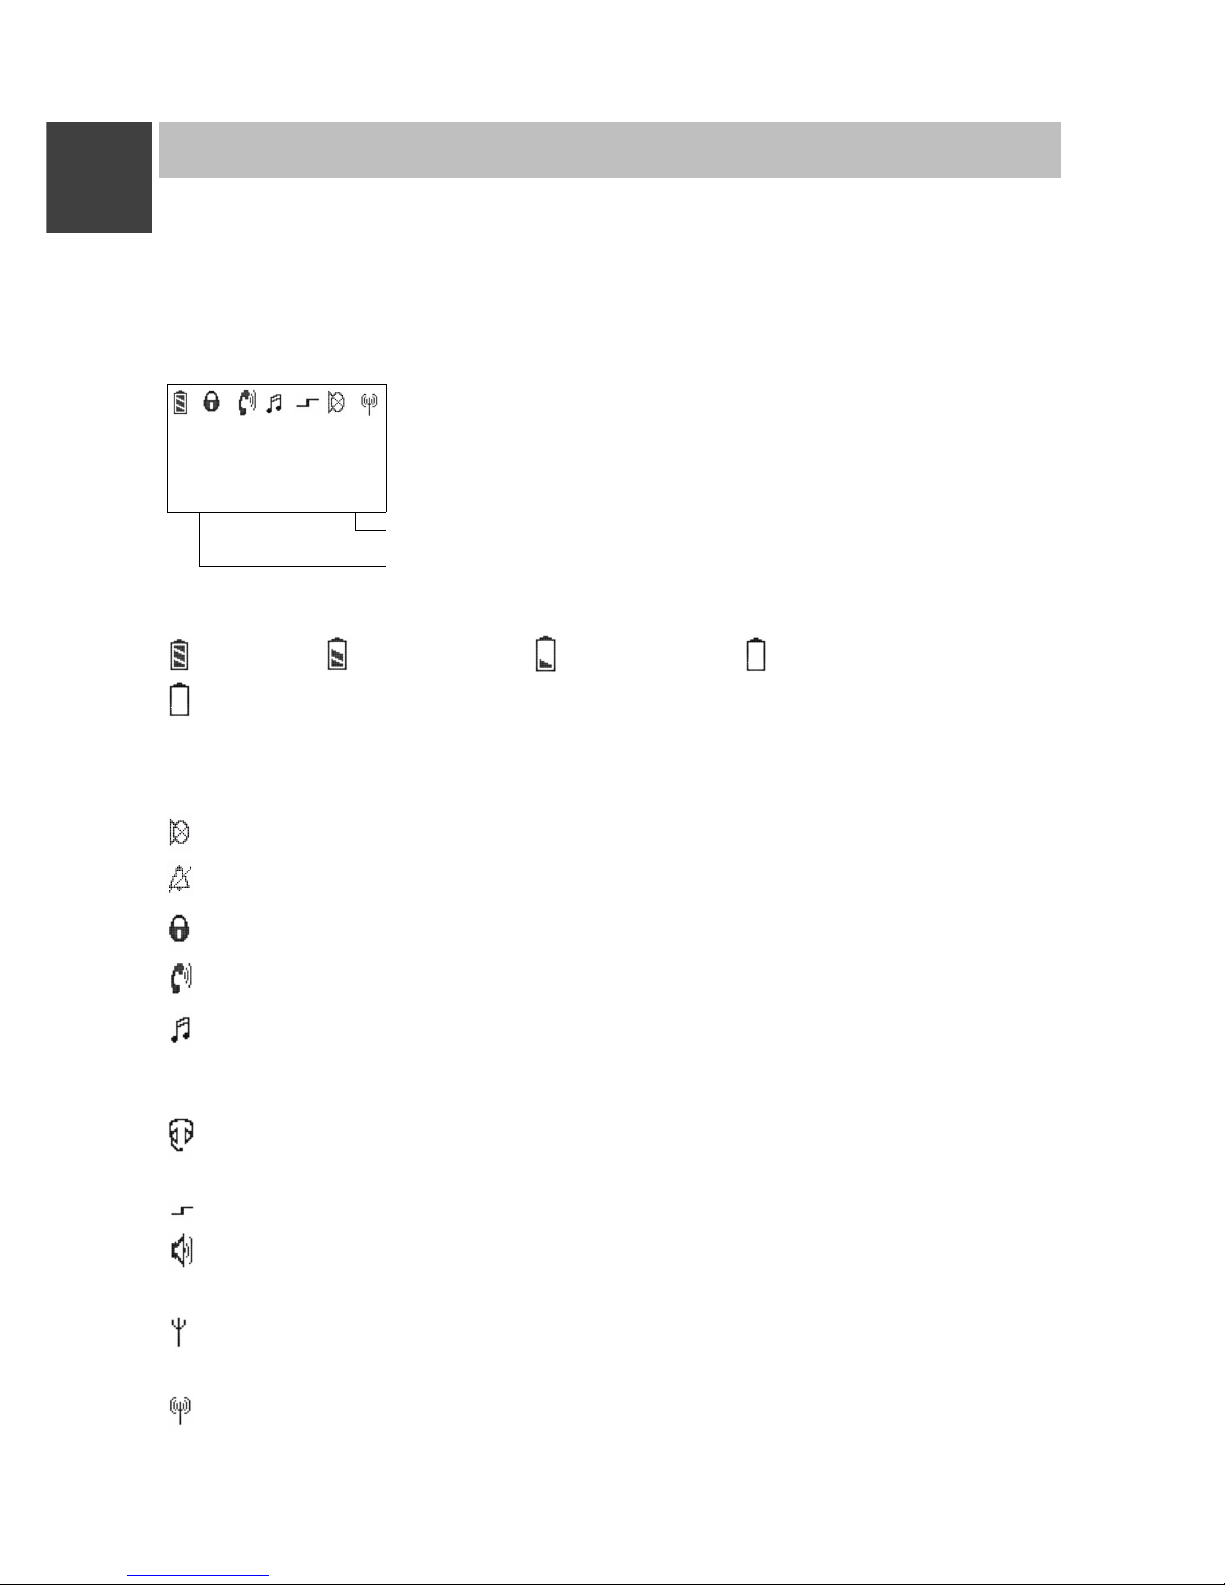
Texte und Symbole im Display helfen Ihnen bei der Bedienung. Sie werden
durch die Menüs geführt und über den Zustand Ihres Handsets informiert.
Die Funktionen der Softkeys links und rechts ändern sich je nach Zustand.
Sie werden im Display direkt über den Tasten angezeigt.
Die Zeilen im Display
Symbolzeile zeigt den Zustand des Telefons an.
Mauer
7442
Zwei Textzeilen z.B. für Name und Rufnummer
Trennen Menü
Funktion des rechten Softkey z. B. Menü
Funktion des linken Softkey, z. B. Trennen.
Bedeutung der Symbole
Akku voll, Akku fast voll, Akku fast leer, Akku leer,
(Akkusymbol blinkt) Kapazität für weniger als fünf Minuten! Wenn Sie
einen Akku neu einlegen, ist dem Handset sein Ladezustand unbekannt.
Deshalb wird kein Akkusymbol angezeigt. Die Anzeige erscheint erst, wenn
er im Handset einmal geladen wurde.
Stumm: Das Mikro ist aus. Ihr Gesprächspartner hört nicht mit.
Kein Anrufsignal: Anrufsignal wurde auf stumm gestellt.
Schloss: Das Handset ist abgeschlossen.
Hörer: Das Handset hat eine Telefonverbindung.
Mehrfrequenzwahlverfahren: jeder Tastendruck wird als DTMF-Ton
(hörbar) an den Verbindungsteilnehmer übertragen (MFV-Nachwahl). (Sym-
bol wird nur bei Integral 1/3/5 angezeigt)
Headset: Sie telefonieren über das Headset. Gehäusemikrofon und
-lautsprecher sind automatisch abgeschaltet.
Sonderfunktion eingeleitet: Taste Stern wurde lange gedrückt.
Lautsprecher: Der Lautsprecher für Freisprechen auf der Gehäuse-
rückseite ist eingeschaltet.
In Reichweite der Anlage: Ihr Handset ist in Reichweite einer Basis-
station. Sie können telefonieren.
Verbindung zur Anlage: Ihr Handset hat eine Funkverbindung.
D
Page 13
Integral 33 / CS I55 – Integral 1/3/5
7
Grundregeln für die Bedienung
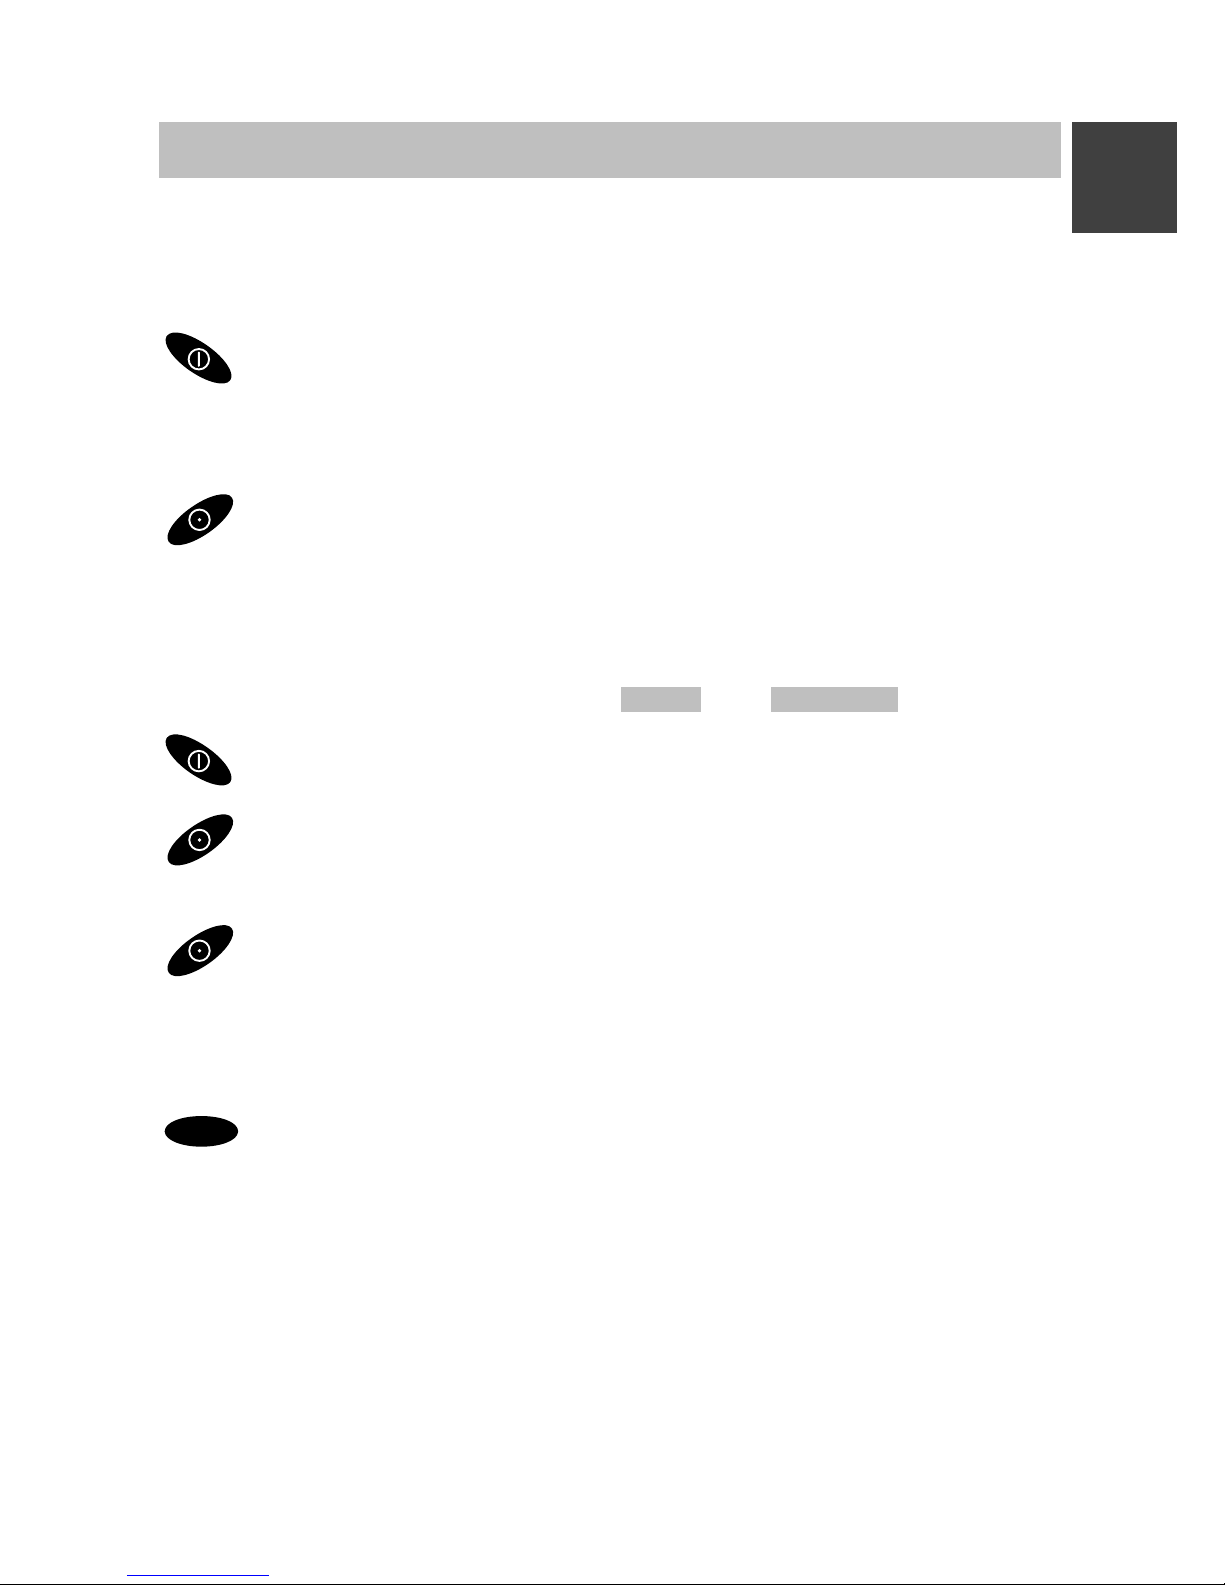
Für die Bedienung Ihres Telefons gibt es einige Schritte, die häufig vorkommen. Machen Sie sich mit diesen Bedienschritten vertraut.
Telefon einschalten
Das Telefon ist aus. Softkey rechts lange drücken.
Telefon ausschalten
Das Telefon ist im Grundzustand. Softkey links lange drücken.
Linker und rechter Softkey
Die Funktion der Softkeys wechselt je nach Situation. Die Funktion steht
immer im Display über der Taste, z. B. Menü oder Trennen .
Der Softkey rechts dient zum Einschalten oder zum Menüaufruf.
Der Softkey links dient zum Beenden eines Menüpunkts oder zum
Abbrechen.
Wenn Sie den Softkey links in irgendeinem Menü lange drücken,
geht das Handset in den Grundzustand.
Selector
OK
Damit schließen Sie Einstellvorgänge ab (erfordert etwas kräftigeren
Tastendruck, um eine unbeabsichtigte Betätigung zu verhindern).
Doppelt belegte Tasten
Einige Tasten Ihres Handsets sind mit zwei Funktionen belegt. Diese erkennen Sie an den zusätzlichen orangen Aufdrucken. Wenn Sie die zweite
orange Funktion auslösen wollen, müssen Sie die Taste länger drücken.
Sie hören einen Bestätigungston.
D
Page 14
Integral 33 / CS I55 – Integral 1/3/5
8
Grundregeln für die Bedienung
Menü auswählen
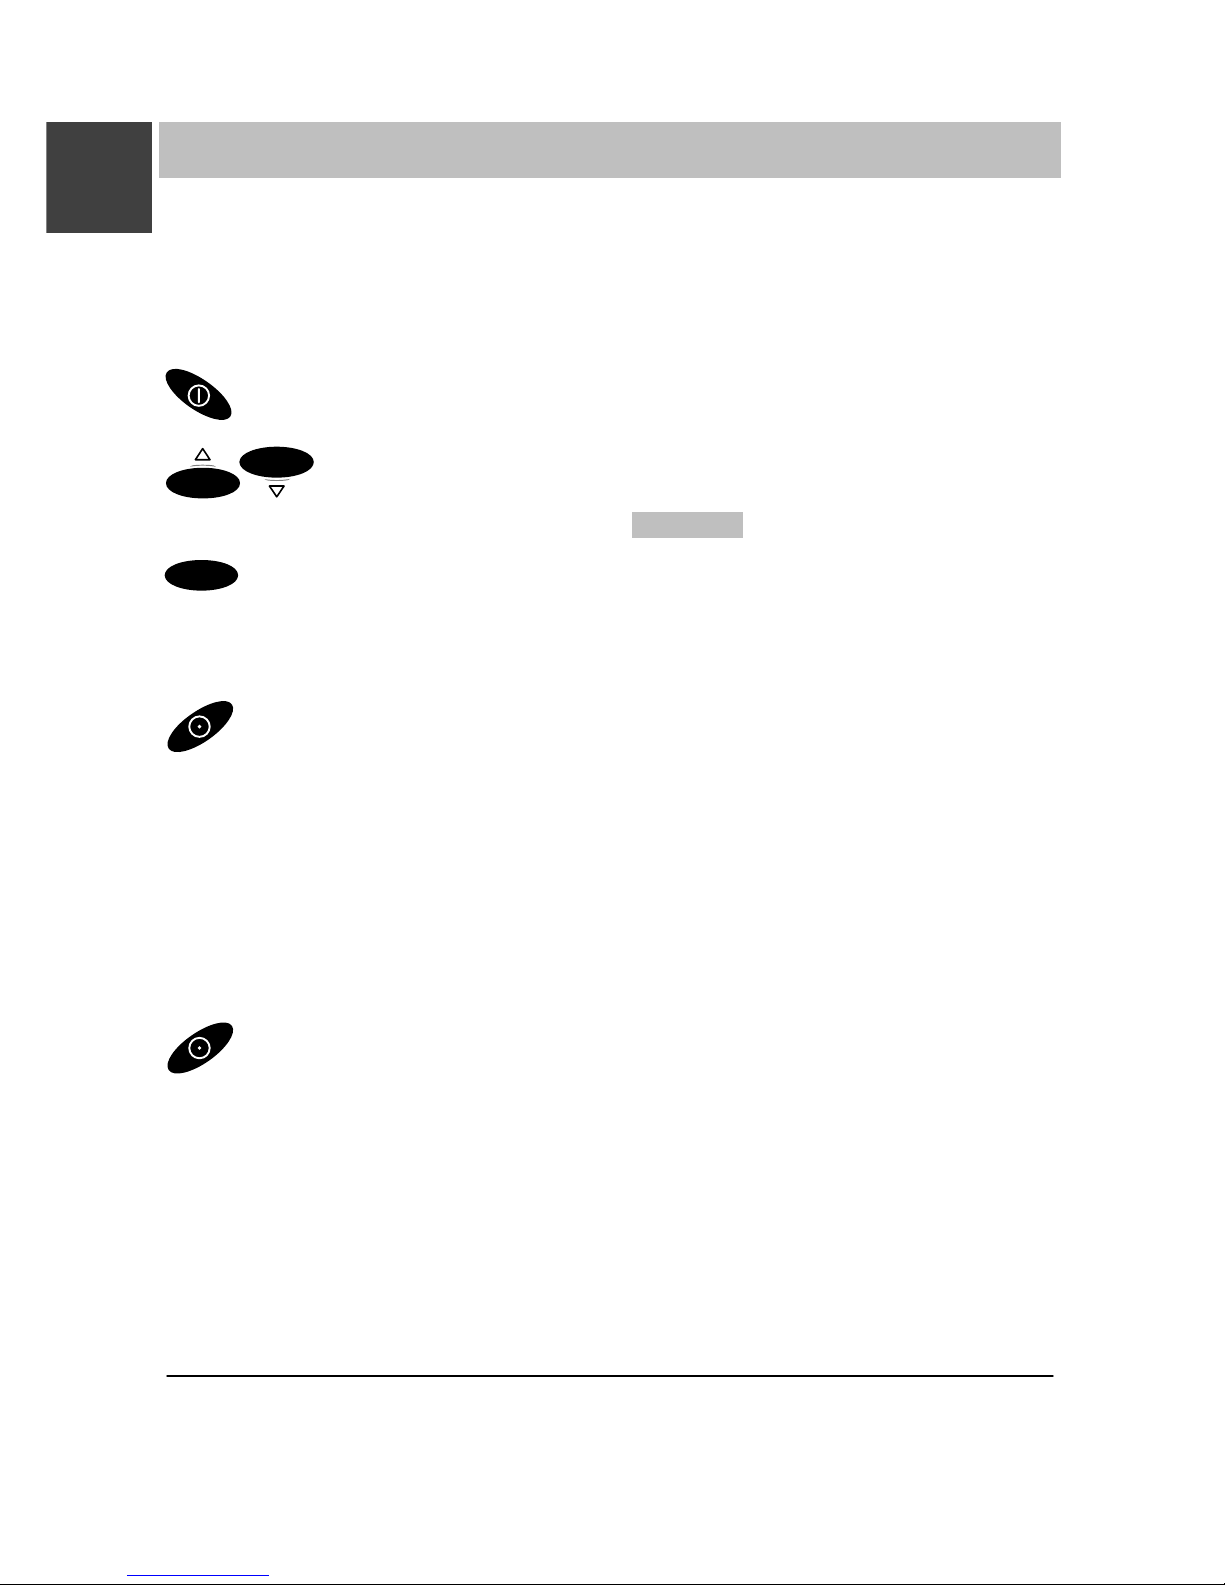
Einige Funktionen und Einstellungen Ihres Telefons können Sie über die
Anzeige (Menü) im Display erreichen. Das Menü ist so strukturiert, daß sich
hinter den meisten Menüpunkten weitere Untermenüs befinden.
Menü aufrufen mit Softkey rechts.
OK
OK
Selector nach oben oder unten drücken und so den ge-
wünschten Menüpunkt markieren, z. B. System .
OK
Menüpunkt auswählen mit dem Selector.
Menü-Ebene zurück
Mit dem Softkey links gelangen Sie eine Menüebene höher oder
verlassen das Menü.
Untermenüs
Untermenüs werden genauso bedient wie das Hauptmenü.
Abbrechen
Drücken Sie den Softkey links lange, um in den Grundzustand zu
gelangen.
Sie können im Grundzustand auch gleich den Selector nach unten drükken, um das Menü aufzurufen.
D
Page 15
Integral 33 / CS I55 – Integral 1/3/5
9
Grundregeln für die Bedienung
Zeichen eingeben bei Telefonbuch-Einträgen
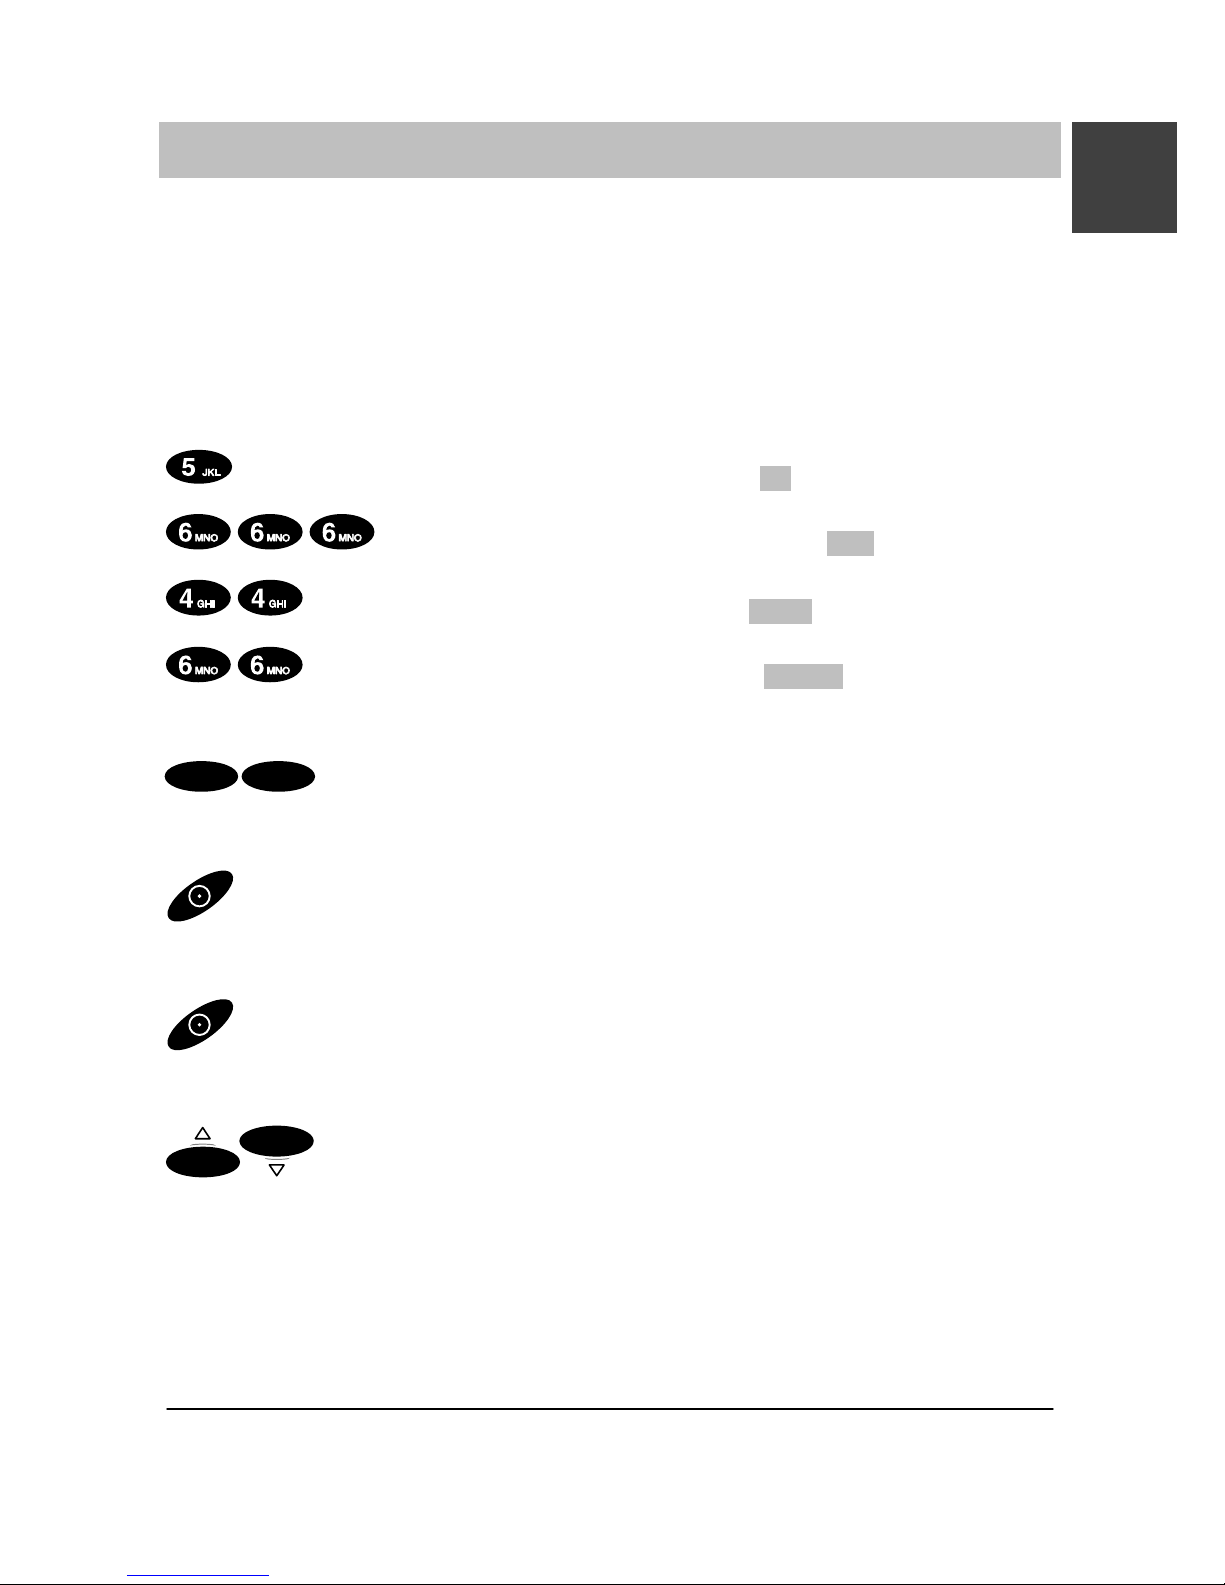
Sie können mit den Zifferntasten auch Buchstaben und Zeichen eingeben,
z.B. für Namen im persönlichen Telefonbuch. Die Buchstaben stehen auf
den Zifferntasten. Ihr Telefon schaltet automatisch auf die Eingabe von
Buchstaben und Zeichen um, wenn dies nötig ist.
Beispiel: Name „JOHN“ eingeben:
Taste JKL einmal drücken. Im Display steht J . Kurz warten.
Taste MNO dreimal. Im Display steht JO . Kurz warten.
Taste GHI zweimal. Im Display steht JOH . Kurz warten.
Taste MNO zweimal. Im Display steht JOHN . Kurz warten.
Eingabe beenden
OK OK
Selector zweimal drücken. Die Zeichen werden übernommen.
Zeichen korrigieren
Softkey links drücken.
Zeile löschen
Softkey links lange drücken.
Zeichen einfügen
OK
OK
Einfügemarke nach rechts oder links bewegen. Neue Zeichen,
die Sie eingeben, werden vor die Einfügemarke eingefügt.
Wechsel zwischen Groß- und Kleinbuchstaben: Taste Stern lange drücken.
D
Page 16
Integral 33 / CS I55 – Integral 1/3/5
10
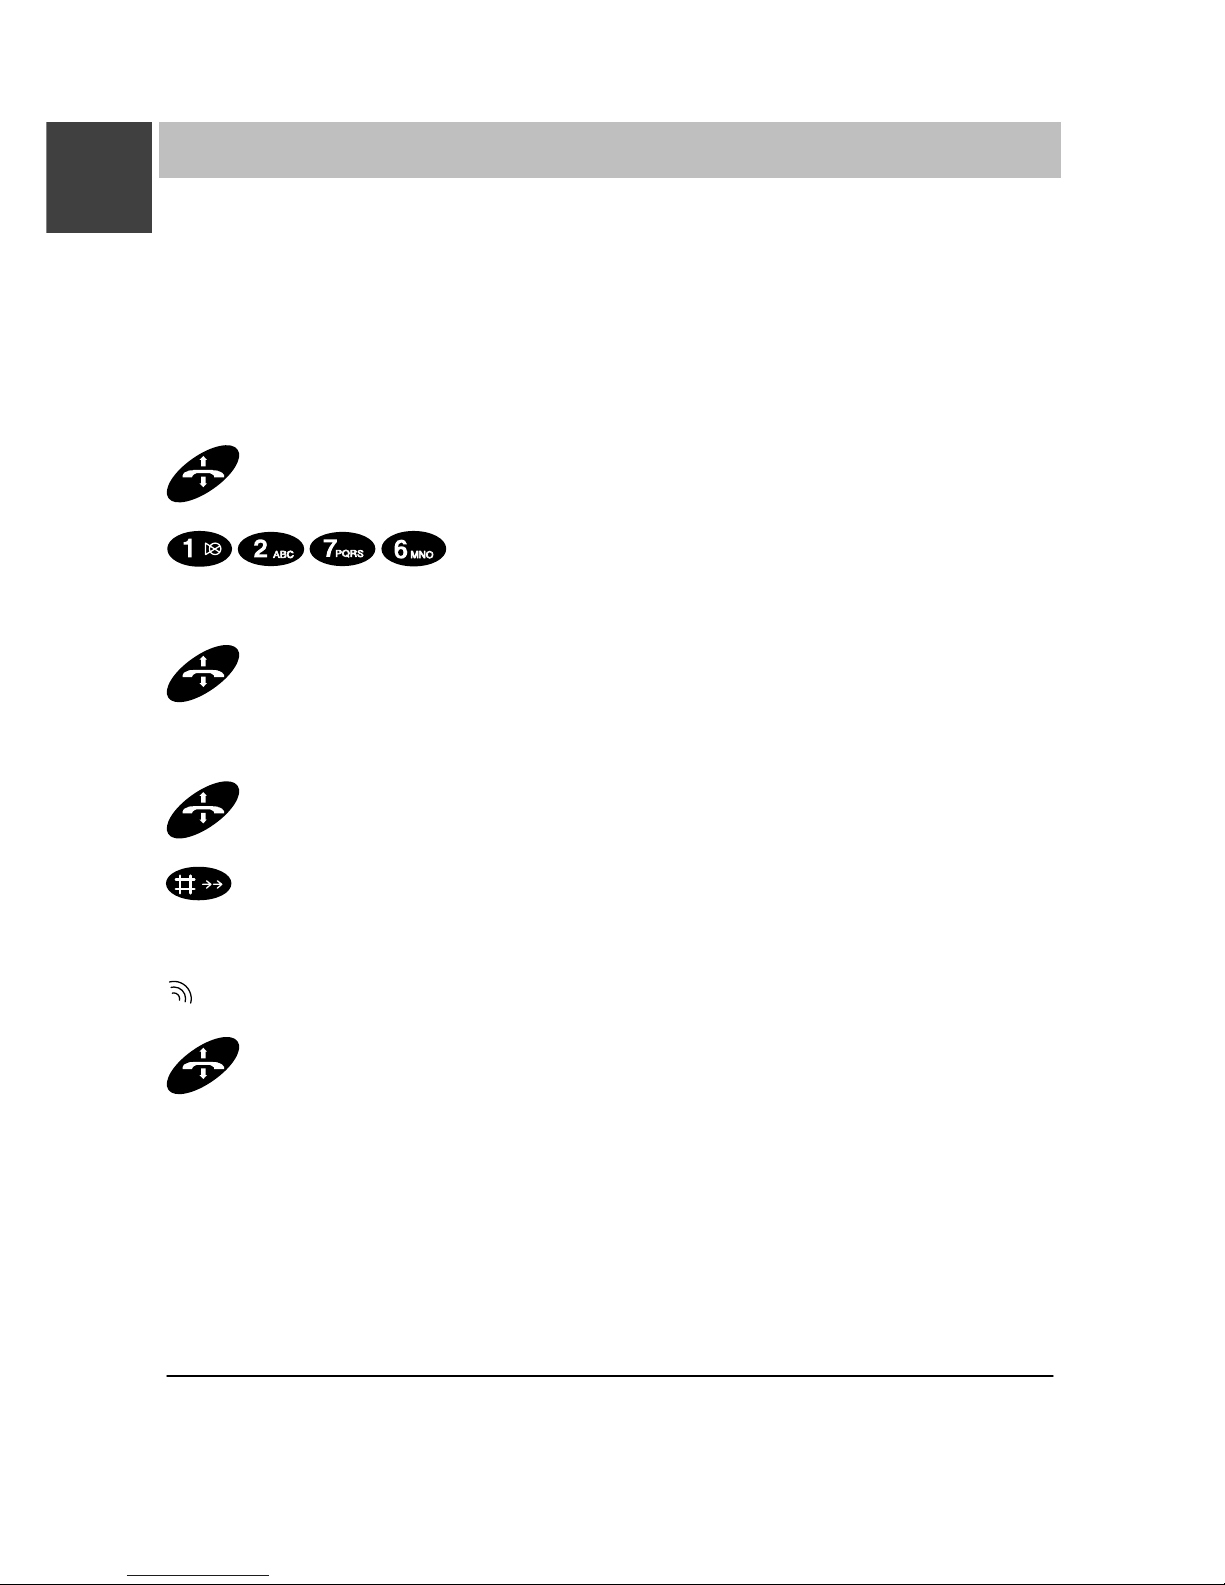
Telefonieren wie gewohnt
Sie können mit Ihrem Handset ganz normal telefonieren.
Innerhalb Ihrer Telefonanlage (intern): Wählen Sie gleich die Durchwahl-
nummer.
Außerhalb Ihrer Telefonanlage (extern): Wählen Sie erst die Amtskennziffer
(meist die Null) und dann die Rufnummer Ihres Gesprächspartners.
Anrufen
Abheben.
Rufnummer wählen, z. B. 1276
Gespräch beenden
Auflegen.
Wahlwiederholung
Abheben.
Taste Raute lange drücken.
Einen Anruf annehmen
Ihr Handset klingelt.
Abheben.
An der Integral 1/3/5 können Sie die Wahlwiederholung nur bei externen
Anrufen nutzen.
D
Page 17
Integral 33 / CS I55 – Integral 1/3/5
11
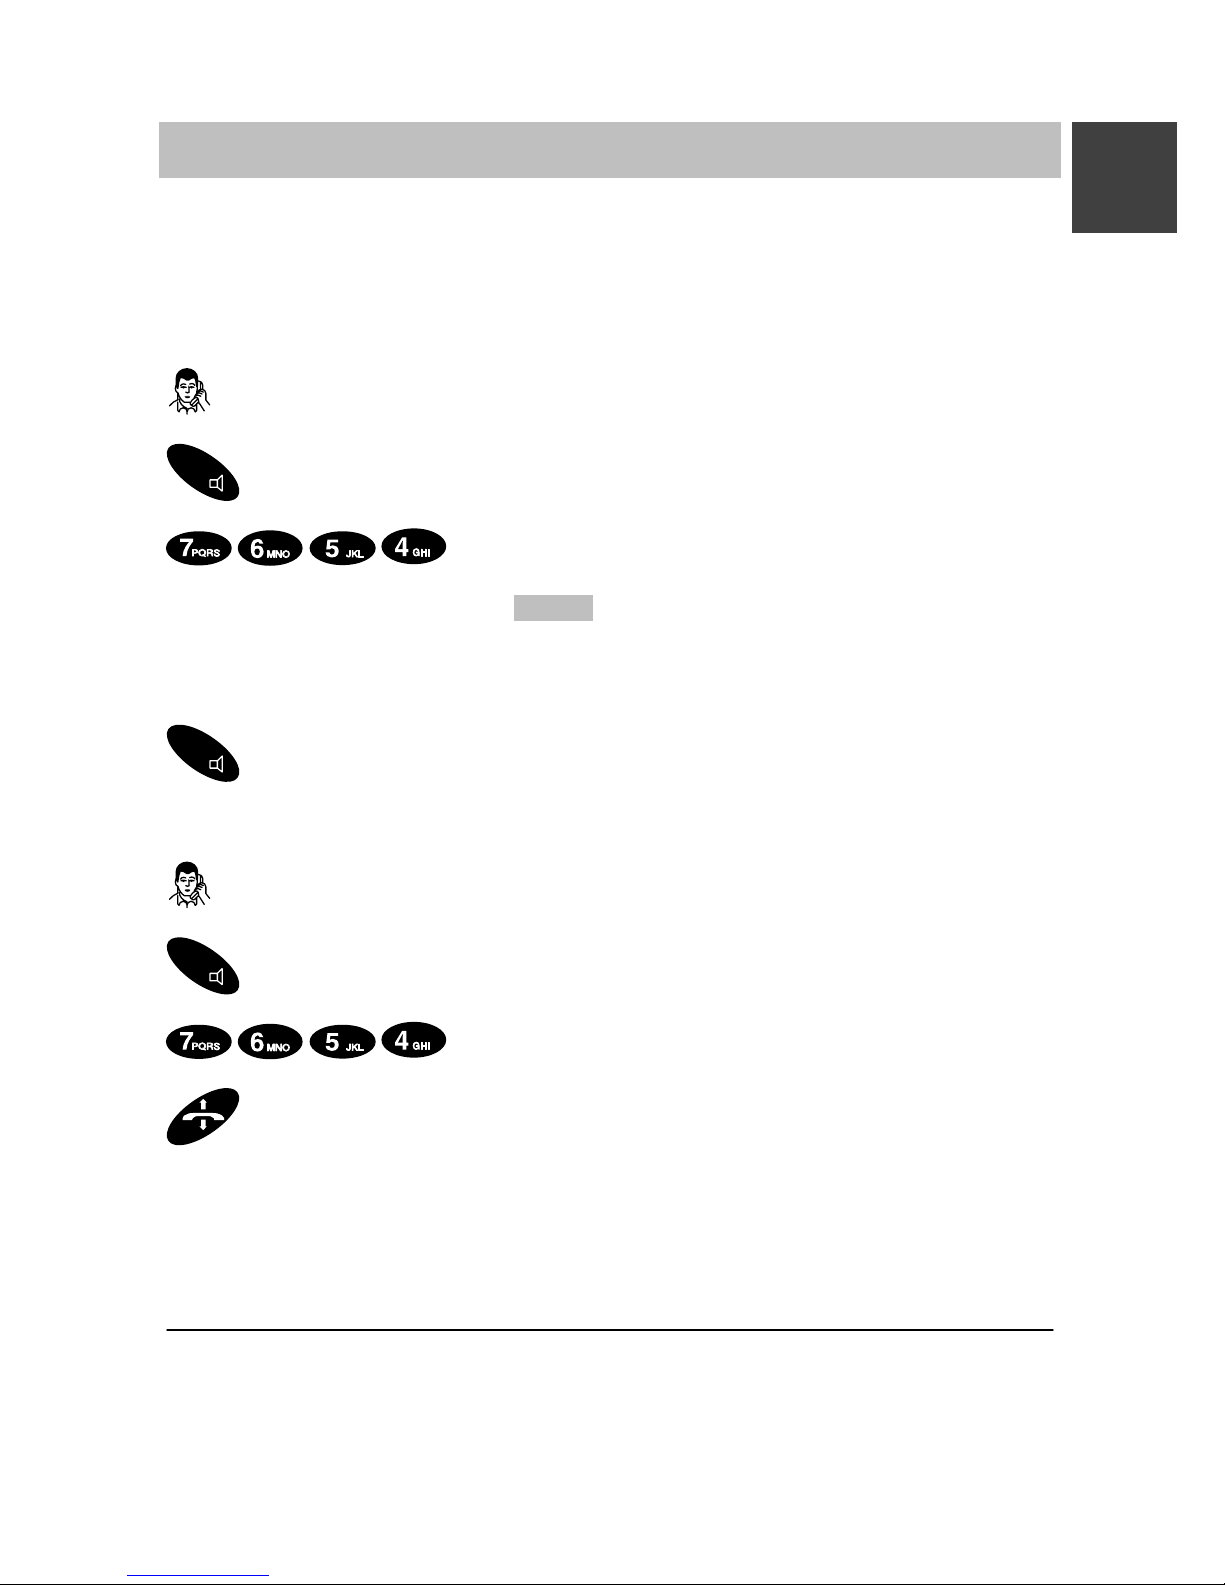
Rückfrage und Weiterverbinden
Beim Telefonieren können Sie in Rückfrage gehen und mit einem anderen
telefonieren. Ihr Gesprächspartner wartet dann. – Außerdem können Sie
den Anrufer weiterverbinden.
Rückfrage einleiten
Sie telefonieren.
R
Rückfrage einleiten. Ihr Gesprächspartner hört Sie nicht.
Gewünschte Nummer eingeben, z. B. 7654.
Im Display steht die Nummer 7654 . Die Verbindung wird aufgebaut. Ihr
erster Gesprächspartner wartet.
Rückfrage beenden
R
Zum ersten Gesprächspartner zurück mit Taste R.
Einen Anrufer weiterverbinden
Sie telefonieren.
R
Rückfrage einleiten.
Gewünschte Nummer eingeben, z. B. 7654.
Auflegen.
An der Integral 1/3/5 wird die Verbindung zum Rückfrageteilnehmer getrennt, wenn Sie die Rückfrage beenden.
Sie können weiterverbinden, ohne abzuwarten, bis der dritte abhebt.
D
Page 18
Integral 33 / CS I55 – Integral 1/3/5
12
Gespräche laut hören, Mikrofon ausschalten
Sie können den eingebauten Lautsprecher für Freisprechen einschalten.
Ihren Gesprächspartner hören Sie dann laut im Raum und Sie können frei
sprechen.
Beim Telefonieren können Sie das Mikrofon an Ihrem Handset ausschalten.
Der Hörer bleibt dabei eingeschaltet. Ihr Gesprächspartner hört Sie nicht,
aber Sie ihn.
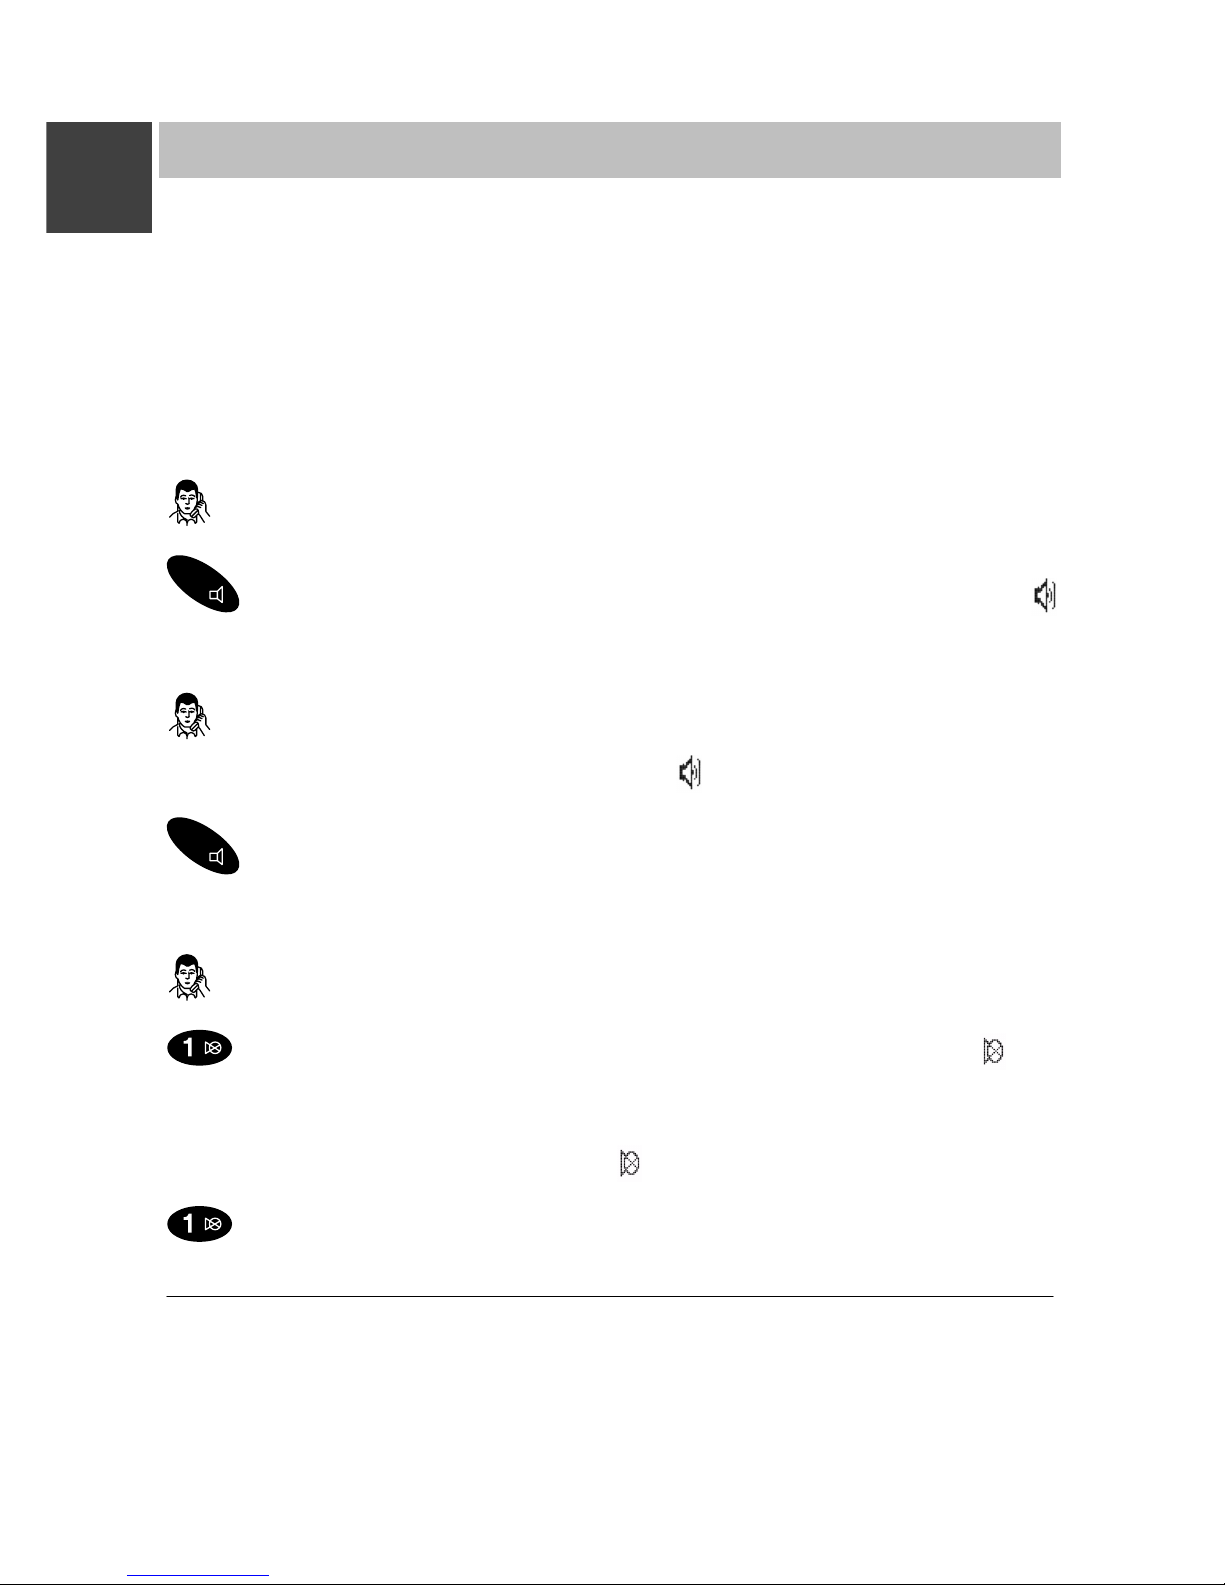
Lautsprecher für Freisprechen einschalten
Sie telefonieren.
R
Lautsprecher einschalten: Taste R lange drücken. Im Display steht .
Lautsprecher für Freisprechen wieder ausschalten
Sie telefonieren. Das Gespräch wird über den Lautsprecher für Frei-
sprechen wiedergegeben. Im Display steht .
R
Lautsprecher ausschalten: Taste R lange drücken.
Mikrofon ausschalten (stumm schalten)
Sie telefonieren.
Mikrofon ausschalten: Taste 1 lange drücken. Im Display steht
Mikrofon wieder einschalten
Das Mikrofon ist aus. Im Display steht
Mikrofon einschalten: Taste 1 lange drücken. Sie können weiter tele-
fonieren.
Bei Gesprächsende wird der Lautsprecher für Freisprechen automatisch
ausgeschaltet und das Mikrofon automatisch wieder eingeschaltet.
Wenn Sie während eines Gesprächs Ihr Handset in das Ladegerät stellen,
wird automatisch Freisprechen eingeschaltet.
D
Page 19
Integral 33 / CS I55 – Integral 1/3/5
13
Handset einstellen
Im Grundzustand können Sie Einstellungen am Handset vornehmen.
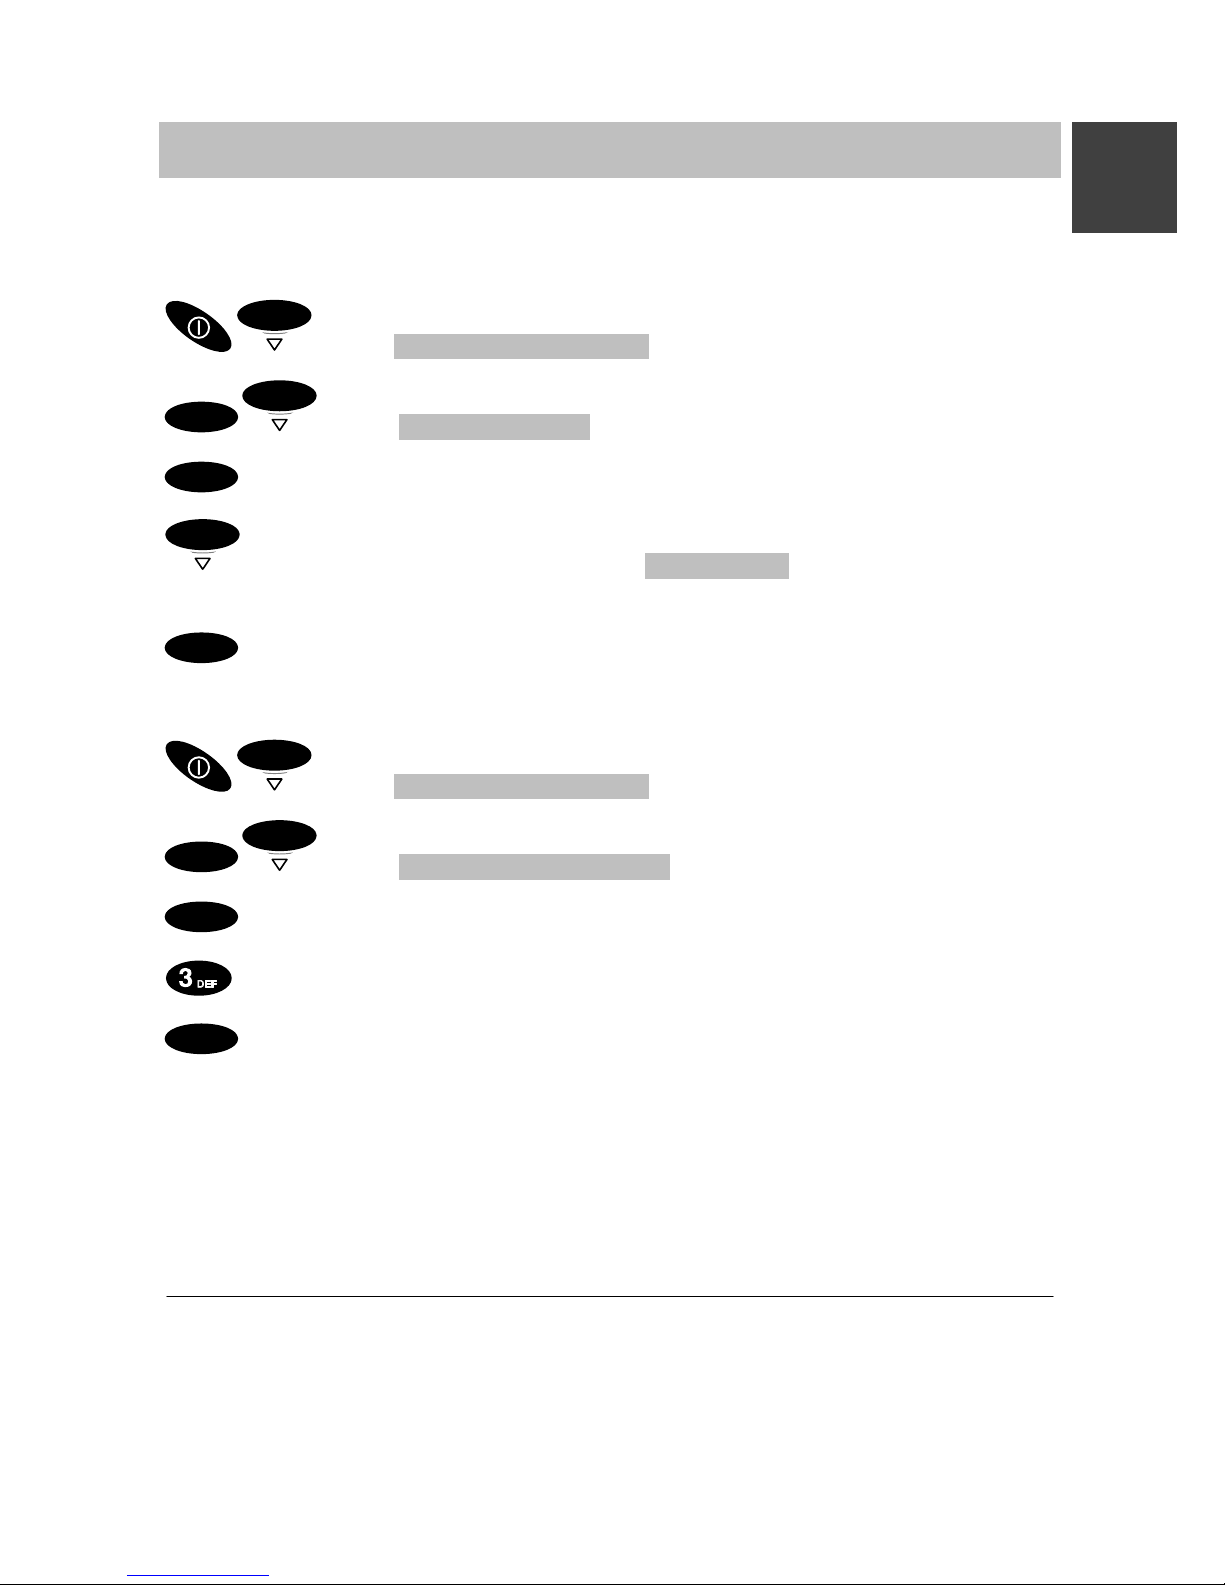
Anrufsignal
OK
Menü Tel. einstellen
OK
OK
Menü Anrufsignal
OK
Bestätigen
OK
Gewünschte Rufeinstellung, z. B. Anrufton . Sie haben die Wahl
zwischen Anrufton, Vibrieren, beides, Anrufton kurz oder stumm.
OK
Bestätigen
Hörerlautstärke
OK
Menü Tel. einstellen
OK
OK
Menü Lautstärke Hörer
OK
Bestätigen.
Hörerlautstärke eingeben (von 1 bis 6), z. B. 3.
OK
Bestätigen.
Im Ladegerät vibriert Ihr Handset nicht. Wenn Sie als Anrufsignal Vibrieren
gewählt haben, ertönt bei einem Anruf der Anrufton kurz.
Wenn Sie als Anrufsignal stumm gewählt haben, erscheint ein entsprechendes Symbol im Display (→ S. 6).
D
Page 20
Integral 33 / CS I55 – Integral 1/3/5
14
Notruf
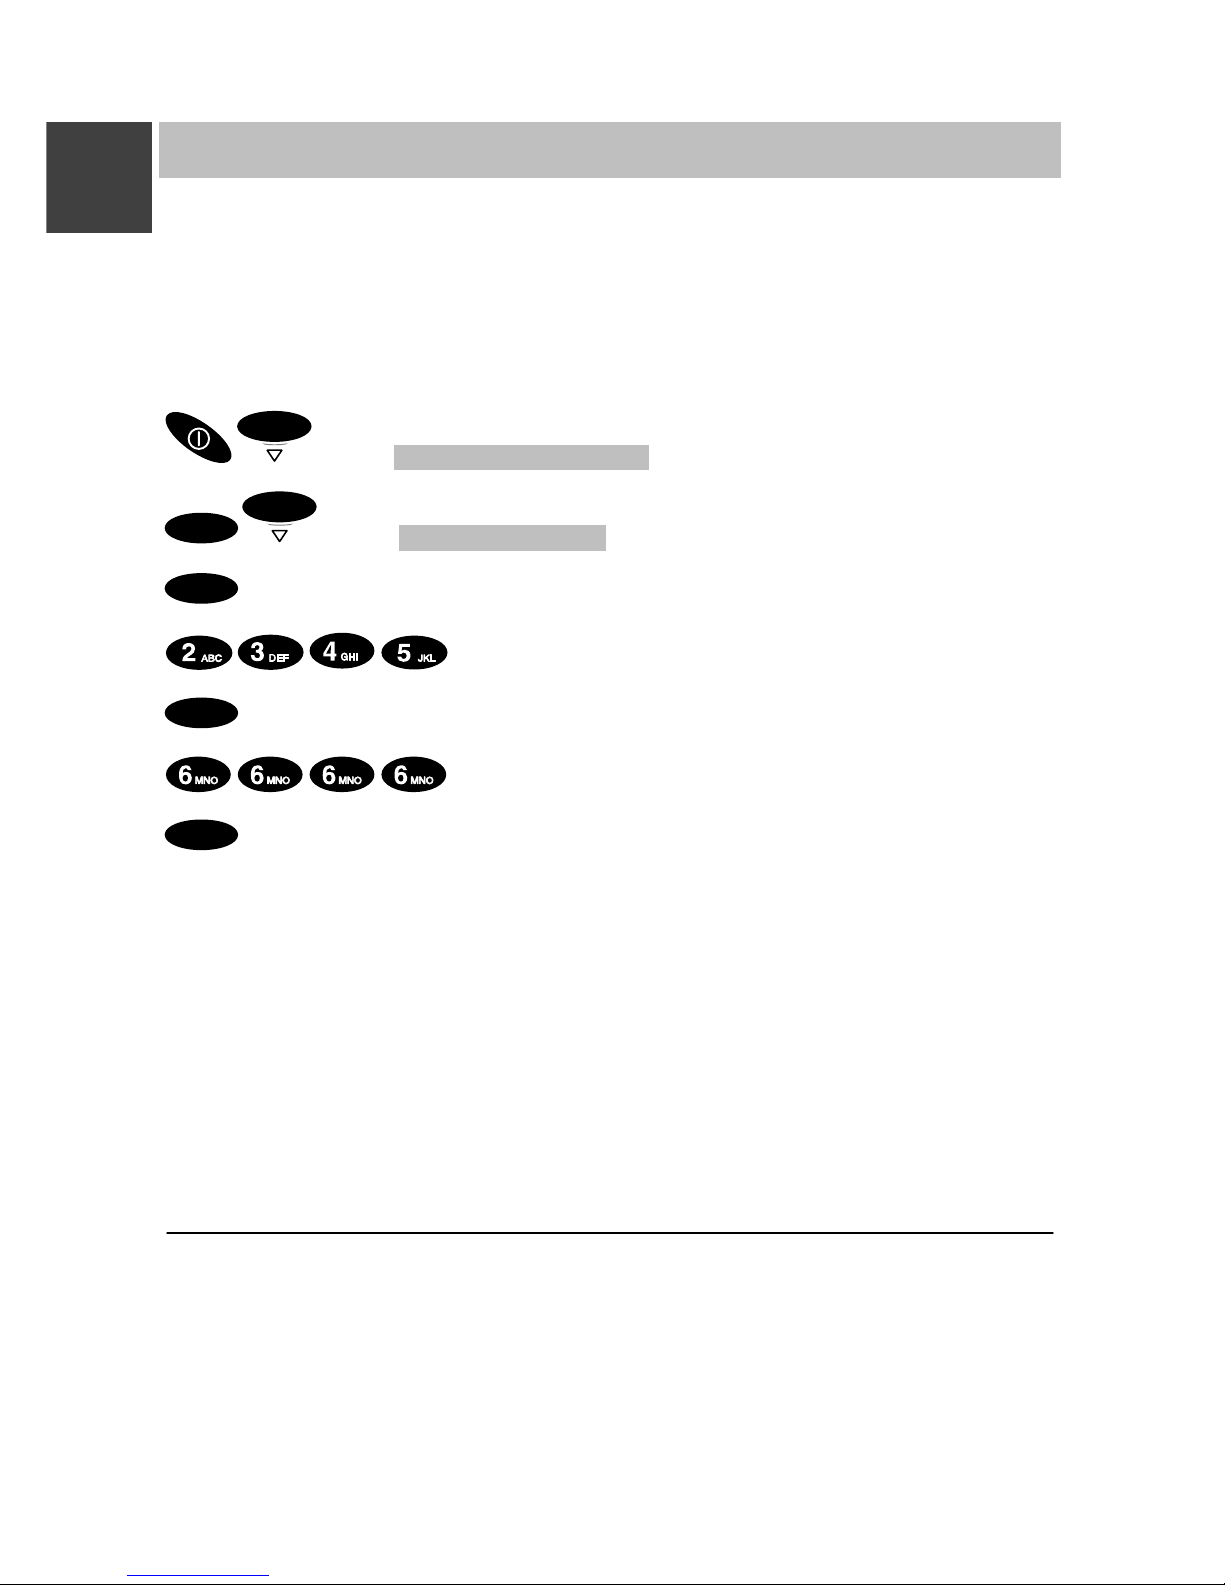
Wenn Ihr Handset abgeschlossen ist, funktioniert nur noch die Notrufnummer. Im Display steht über dem rechten Softkey: SOS.
Der Notruf ist mit der roten Notruftaste links auf der Oberseite immer verfügbar – auch bei nicht abgeschlossenem Handset.
Notrufnummer einrichten und ändern
OK
Menü Tel. einstellen
OK
OK
Menü Notrufnummer
OK
Bestätigen.
PIN eingeben, z. B. 2345.
OK
Bestätigen.
Notrufnummer eingeben oder ändern, z. B. 6666.
OK
Bestätigen.
Notruf absetzen mit Notruftaste
Notruftaste auf der Oberseite lange drücken. Die Notrufnummer wird ge-
wählt.
Der Notruf SOS ist nicht verfügbar, wenn keine Notrufnummer eingegeben
ist, während ein Gespräch geführt wird, wenn ein Anruf oder eine Message
ankommt, oder wenn das Handset außer Reichweite der Telefonanlage ist.
Um eine Notrufnummer zu löschen, ändern Sie sie; als Telefonnummer
geben Sie nichts ein (Softkey links lange drücken) und bestätigen mit dem
Selector.
D
Page 21
Integral 33 / CS I55 – Integral 1/3/5
15
Sprache
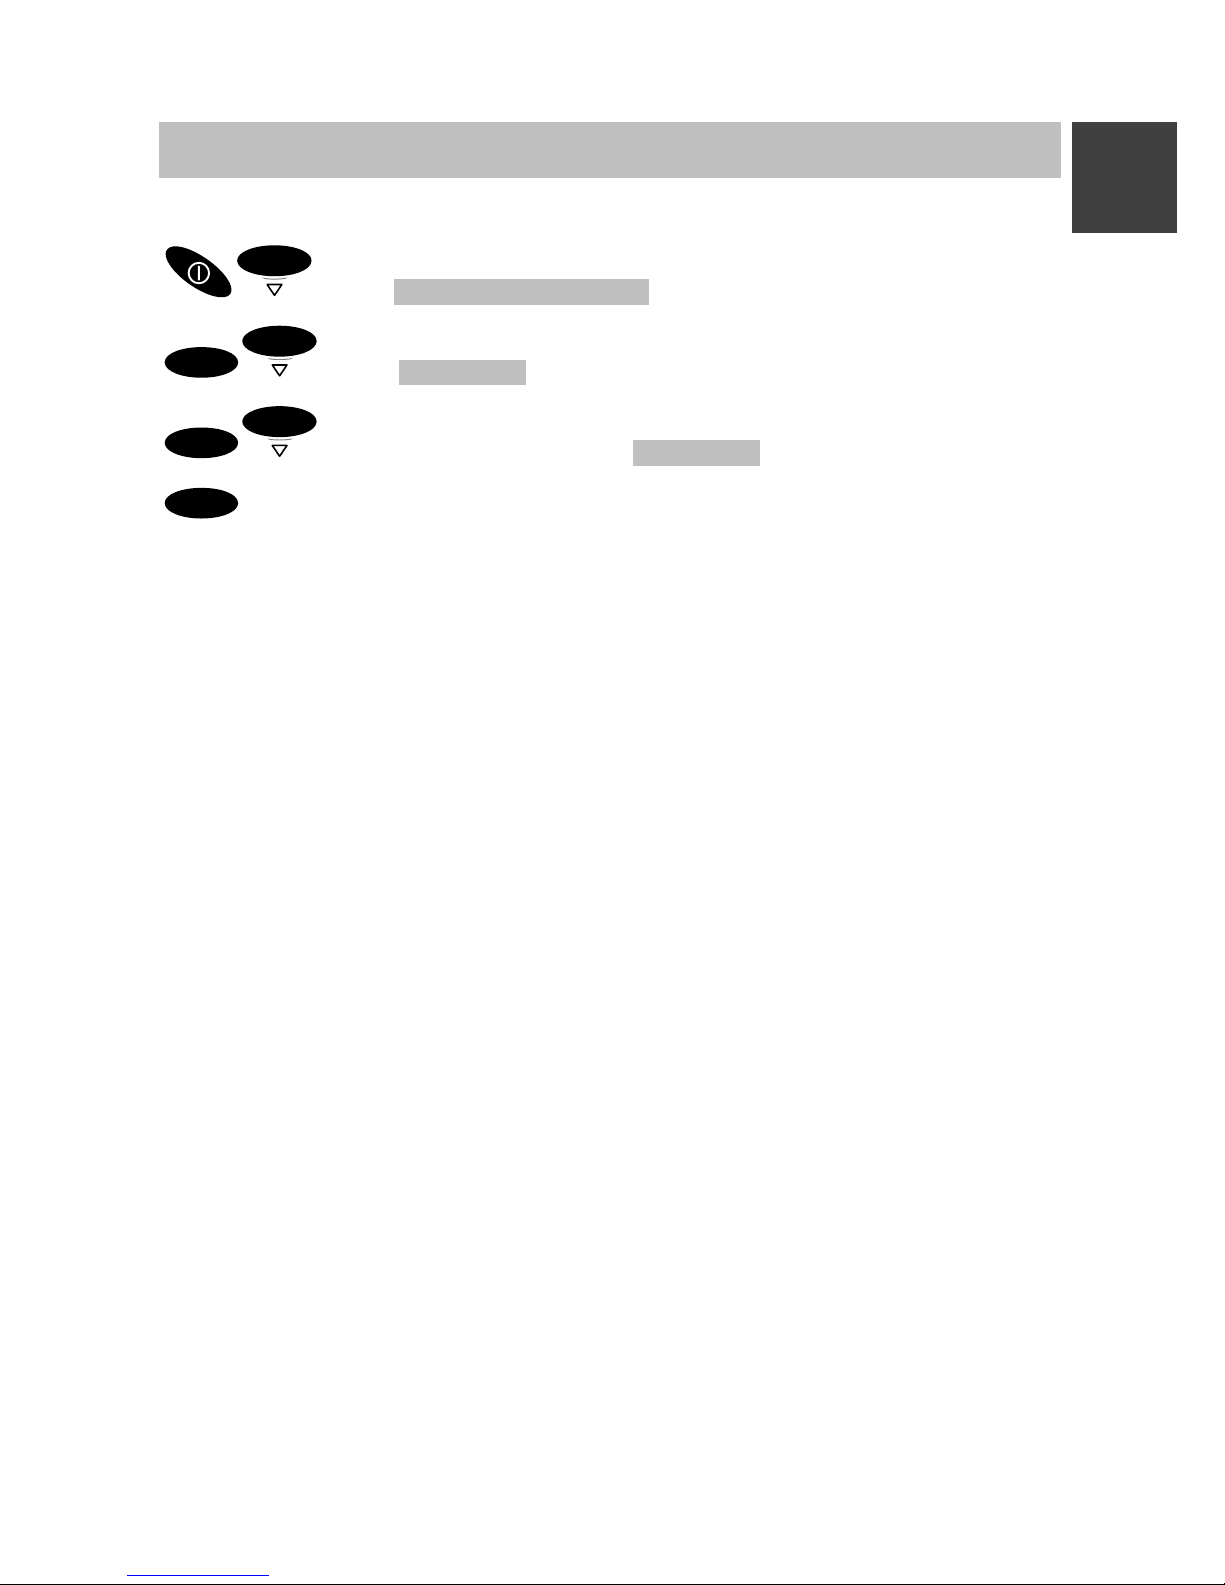
Sprache des Lokalmenüs festlegen
OK
Menü Tel. einstellen
OK
OK
Menü Sprache
OK
OK
Sprache auswählen, z. B. Deutsch .
OK
Bestätigen.
D
Page 22

Integral 33 / CS I55 – Integral 1/3/5
16
Technische Daten
Handset Integral D3 mobile
Nicht für Betrieb in explosionsgefährdeten Bereichen außer Zonen 2 und
22 nach Vorgaben in der Herstellererklärung!
Standard:
DECTt (Digital Enhanced Cordless
Telecommunications).
Maße: 137 x 46 x 21 mm plus Antenne
Gewicht, Handset: ca. 100 g (mit Akku)
Akkutyp: NiMH; 650 mAh
Betriebsdauer Handset
(mit vollem Akku):
Sprechen: min. 8 Stunden
Stand-by: min. 80 Stunden
Ladezeit: leer: ca. 5 Stunden
unbekannter Ladezustand: ca. 14 Stunden
Frequenzbereich: 1,88 - 1,9 GHz
Sendeleistung: Mitte: 10 mW, Spitze: 250 mW
Zulässige
Betriebstemperatur:
Handset: -10 ° C bis +45 ° C
Ladeschale: +5 ° C bis +40 ° C
Lagertemperatur: -25 ° C bis +55 ° C
Transporttemperatur: ohne Akku -25 ° C bis +70 ° C
mit Akku -25 ° C bis +60 ° C
Schutzart: IP 65, strahlwassergeschützt und staubdicht
Zubehör Ladegerät classic, Ladegerät comfort,
Steckernetzteil Europa, Steckernetzteil UK,
Wechselakku, Headset HSG D3,
Tragetasche, D3 Case,
MEM-Card,
MEM-Card-Manager
Einige Teile des Zubehörs müssen gesondert bestellt werden!
D
Page 23

Integral 33 / CS I55 – Integral 1/3/5
1
Important information
Contents of the operating instructions
These operating instructions explain how to start using your handset. They
describe all the basic operating rules and the most frequently used functions and settings.
A comprehensive description of all the system-specific functions can be
found on the CD-ROM supplied. You can view and print out the operating
instructions.
Note: A printed version of the instructions can be ordered at a charge from
Tenovis Direct: Tel. +49 (0) 800–3473 287, Fax: +49 (0) 800–3473 283.
Catalog numbers: Integral D3 mobile on Integral 1/3/5: 4.999.059.185
Integral D3 mobile on Integral 33 / CS I55: 4.999.059.184
Product package
Please check the contents of your Integral D3 mobile product package
immediately:
– D3 mobile handset with operating instructions
– Changeable battery pack – MEM-Card
– Charger classic – Plug-in mains unit
– Short operating instructions
– CD–Rom with detailed operating instructions
Where you can use your handset
The Integral D3 mobile handset is suitable for use in the office, outdoors
or in a dusty environment. It complies with protection class IP 65 and is
hose- and dust-proof.
Protecting against interference
Other electronic units are generally protected from high-frequency irradiation. However, if a device of this kind is insufficiently protected, malfunctions may occur.
Never unscrew the handset housing!
The housing could be damaged as a result. It does not contain any components that can be repaired by yourself.
Operating the battery
Batteries must be used in the appropriate manner. Tenovis is not liable for
damage which occurs due to inappropriate handling of the battery.
GB
Page 24

Integral 33 / CS I55 – Integral 1/3/5
2
Important information
When the batteries are exhausted – Consumer information
Do not throw exhausted batteries into the dustbin! Take them to a municipal
collection centre or to your dealer where they can be disposed of in an environmentally friendly manner.
Tips for location
You are advised to use an antiskid surface for your charger, in particular
with new furniture or furniture that has been treated with preservation
agents. Varnishes or varnish preservation agents may contain substances
that soften the feet of the device, thus leaving unsightly stains on the surface of your furniture. Tenovis cannot be made liable for such damage.
Please dispose of discharged batteries only.
Authorisation and conformity
We Tenovis GmbH & Co. KG declare that the product Integral D3 mobile
concurs with the basic requirements and other relevant provisions of EU
guideline 1999/5/EU (R&TTE).
This device is suitable for connection to the radio interfaces (DECT
t
) of
Tenovis telecommunications systems and fulfils the basic requirements laid
out in EU Guideline 1999/5/EU (Radio and Telecommunication Terminal
Equipment, R&TTE).
Due to its construction, this device is not suitable for direct operation on
interfaces to public telecommunications networks.
In the unlikely event of any problems during operation, please contact your
dealer or Tenovis Service.
The conformity declaration can be accessed under the following Internet
address: www.tenovis.com/tenovis_international/Themenseiten/Confor
mity.htm or search the index under the key term “Conformity”.
This device operates in accordance with the DECT
t
system with a frequency range of 1880 to 1900 MHz. The allocation of this frequency range
in the frequency utilisation plan is initially valid until 2008 and will be extended in accordance with European harmonisation.
DECT is a registered trademark of ETSI
GB
Page 25

Integral 33 / CS I55 – Integral 1/3/5
3
Commissioning
If your handset is not yet mounted
If the handset is not completely assembled when you receive it, you must
D Insert the MEM-Card (→ Page 3)
D Install the battery (→ Page 4) and
D Remove the protective film from the display, if necessary.
D Your service team must register the handset with your telephone system.
Your handset is then ready for operation.
D Now connect the charger (→ Page 5).
If your handset is alredy fully mounted
If the handset is already completely assembled and registered with your
telephone system when you recieve it, you need only connect the charger
(→ Page 5).
MEM-Card
You can only use your handset to make and receive telephone calls if a
MEM-Card is inserted. It performs the memory function for your important
handset data, such as personal settings and telephone books. If you switch
handsets you can use the MEM-Card to make and receive telephone calls
immediately.
GB
Page 26
Integral 33 / CS I55 – Integral 1/3/5
4
Commissioning
Inserting the MEM-Card
D First use your fingers to press the small MEM-Card out of the larger
frame (next illustration on the left).
D With the short edge at an angle under the holding crescents a, push
the MEM-Card into the MEM-Card compartment (next illustration on
the right) (1). The golden contact surface of the MEM-Card must face
downwards!
D Press the MEM-Card downwards until the small tag b locks (2).
Inserting the battery
D Push the battery into the casing (1).
D Press the battery downwards on the lever side until you hear it lock (2).
GB
1
2
a
b
2
Page 27
Integral 33 / CS I55 – Integral 1/3/5
5
Commissioning
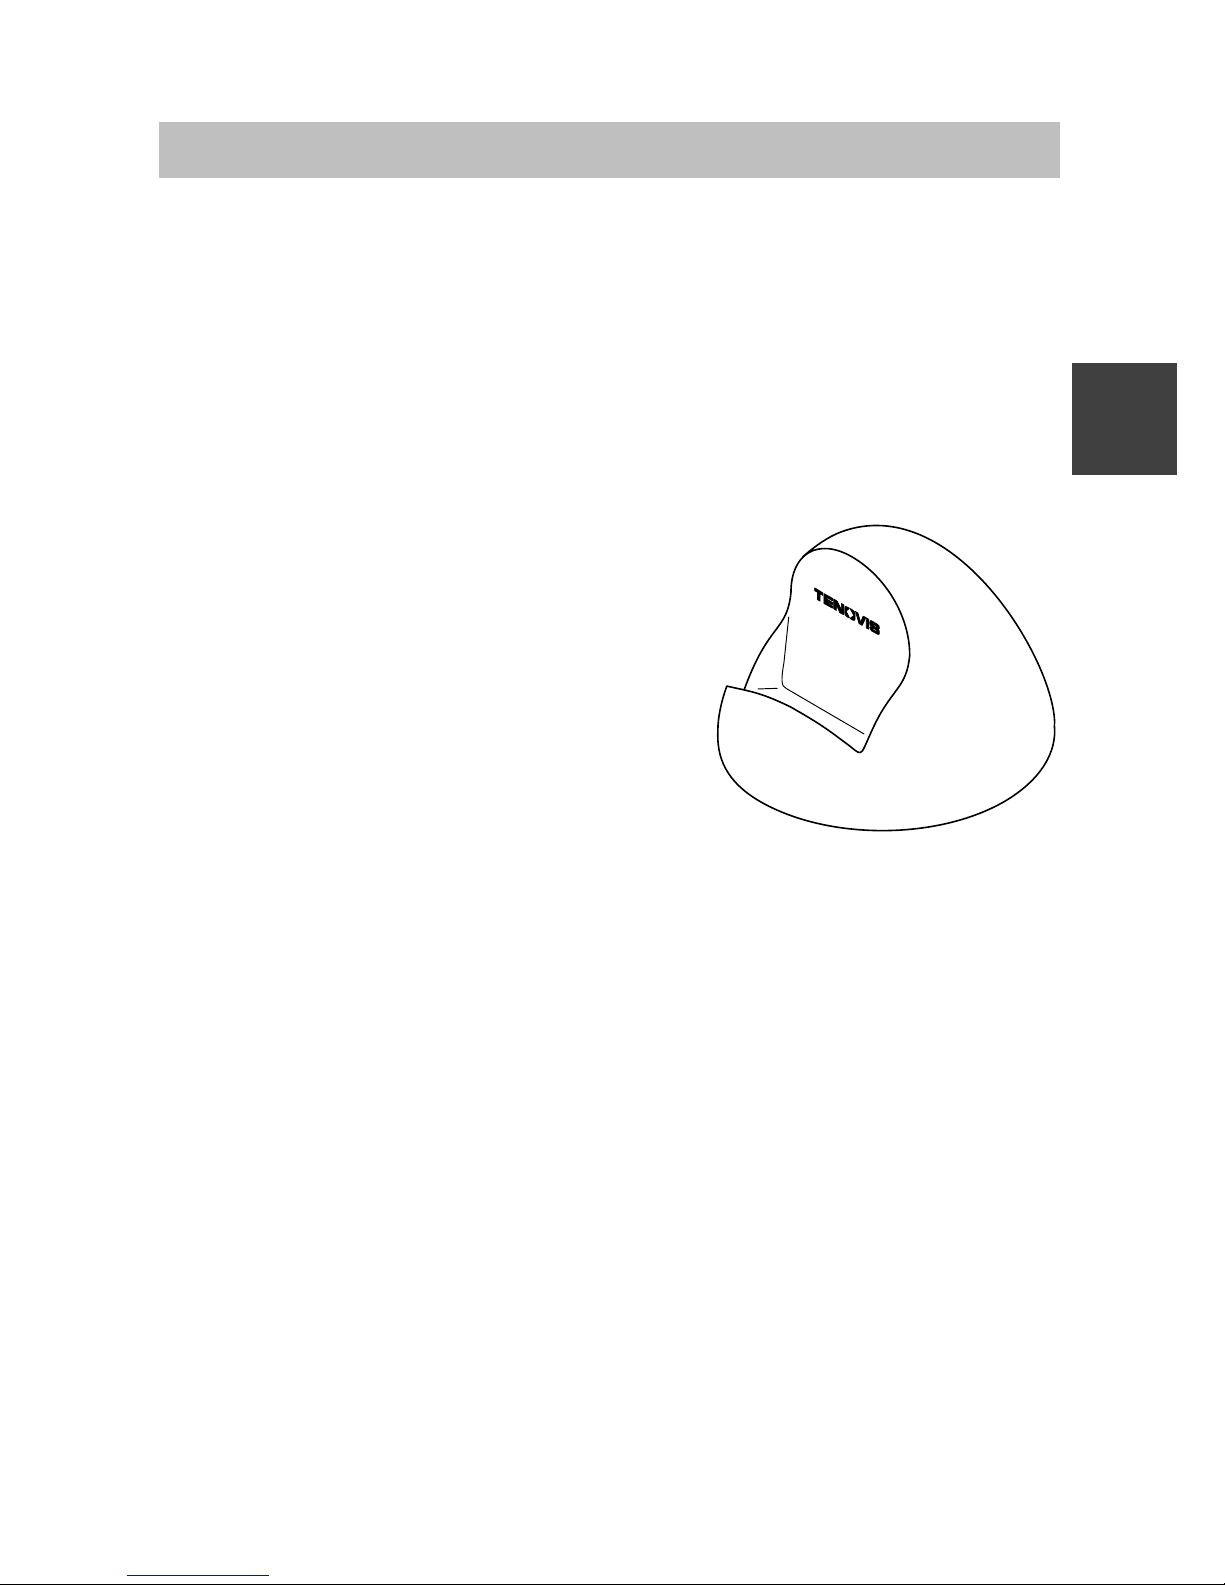
Placement of the charger
Place the charger on a solid, even surface, e.g. a table. Choose a location
that is protected from direct sunlight and dampness.
D Plug the plug-in mains unit into a socket.
D Insert the small connecting cord plug into the back of the charging
device.
The charger is ready for operation.
Charging the handset
Simply place the handset into the charger.
You will hear an acknowledgement tone.
The display light will switch on briefly.
The handset remains switched on or off.
The battery symbol in the symbol row moves
until the battery is completely charged.
When the batteries are being charged, they
will become slightly warm. This is perfectly
normal.
Notes on the battery
First charge the battery to full capacity. Then during the first week of operation, always return the handset to the charger cradle. New batteries will in
general reach full capacity only after several days of normal use.
You can leave your handset in the charger cradle for extended periods. The
battery cannot be over-charged.
Do not leave the battery in direct sunlight. Proper care of the battery is
rewarded with a long service life.
Caution!
D Do not through the battery into a fire, it might explode.
D To avoid injury and fire damage, do not allow the contacts of the battery
to come into contact with conductive objects or to be short-circuited.
GB
Charger classic
Page 28
Integral 33 / CS I55 – Integral 1/3/5
6
Display
Texts and symbols in the display assist you in operating the handset. They
will guide you through the menus and give you information on the status of
your handset.
The functions of the right and left softkeys change according to the current
status. The respective functions are shown in the display directly above the
softkeys.
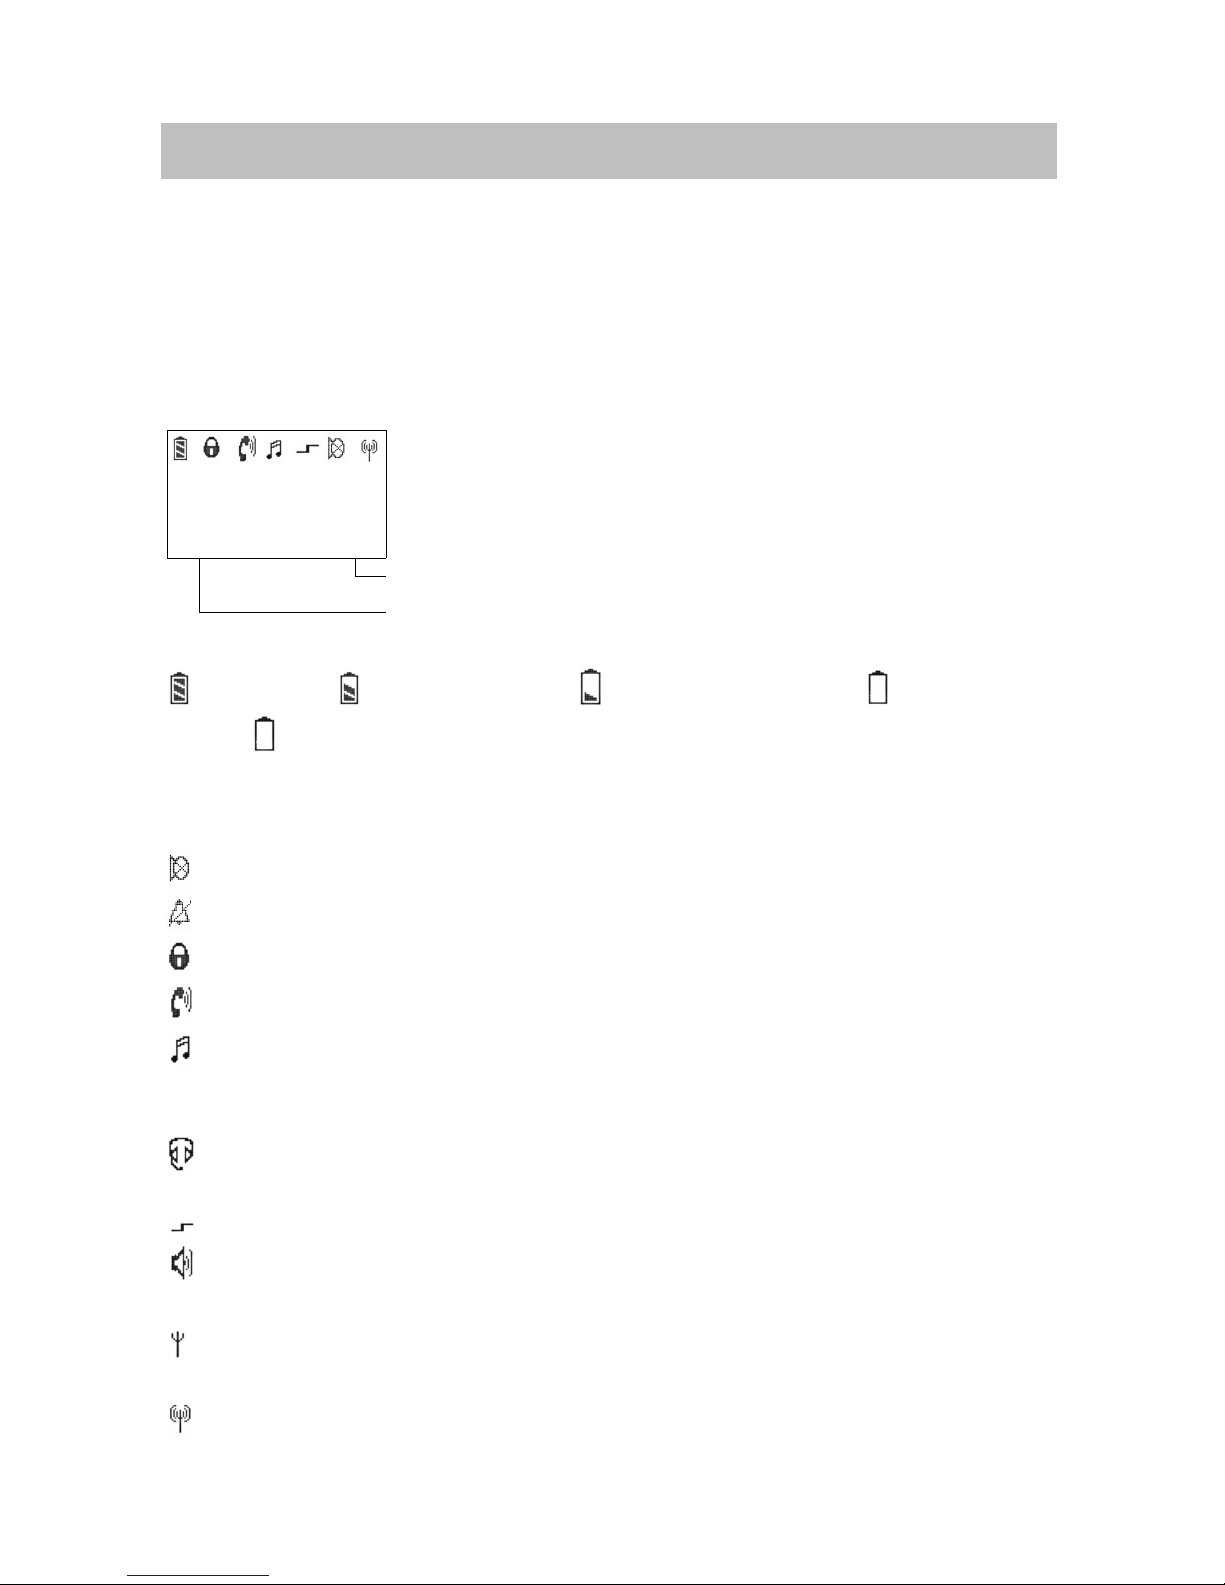
The lines in the display
Symbol line indicating the status of the telephone.
Mauer
7442
Two text lines e.g. for the name and call number.
Clrdown Menu
Function of the right softkey e.g. Menu.
Function of the left softkey, e.g. Cleardown.
Symbol denotations
Battery full Battery nearly full Battery nearly empty Battery
empty, (Battery symbol flashing) Capacity for less than five minutes!
When you first load a new battery, the handset does not “know” its
charging status. So no battery signal is shown. The display will only appear
when it is charged in the handset.
Mute: The microphone is off. Your call partner cannot hear you.
No calling signal: Calling signal is set to mute.
Lock: The handset is locked.
Handset: The handset has a telephone connection.
Dual-tone multifrequency dialling: Each push of the button is trans-
mitted to the connection subscriber as a DTMF tone, with audible output
(DTMF post dialling).(The symbol is only visible on Integral 1/3/5 systems)
Headset: You are telephoning using the headset. The housing micro-
phone and loudspeaker are switched off automatically.
Special function activated: Star key was pressed for a long time.
Loudspeaker: The loudspeaker for handsfree operation on the rear
side of the housing is switched on.
Within range of the system: Your handset is within range of a base
station. You can make and receive telephone calls.
Connection to system: Your handset has a radio link.
Page 29
Integral 33 / CS I55 – Integral 1/3/5
7
Basic rules of operation
The operation of your telephone includes several frequently-recurring operating steps. Please familiarize yourself with these operating steps.
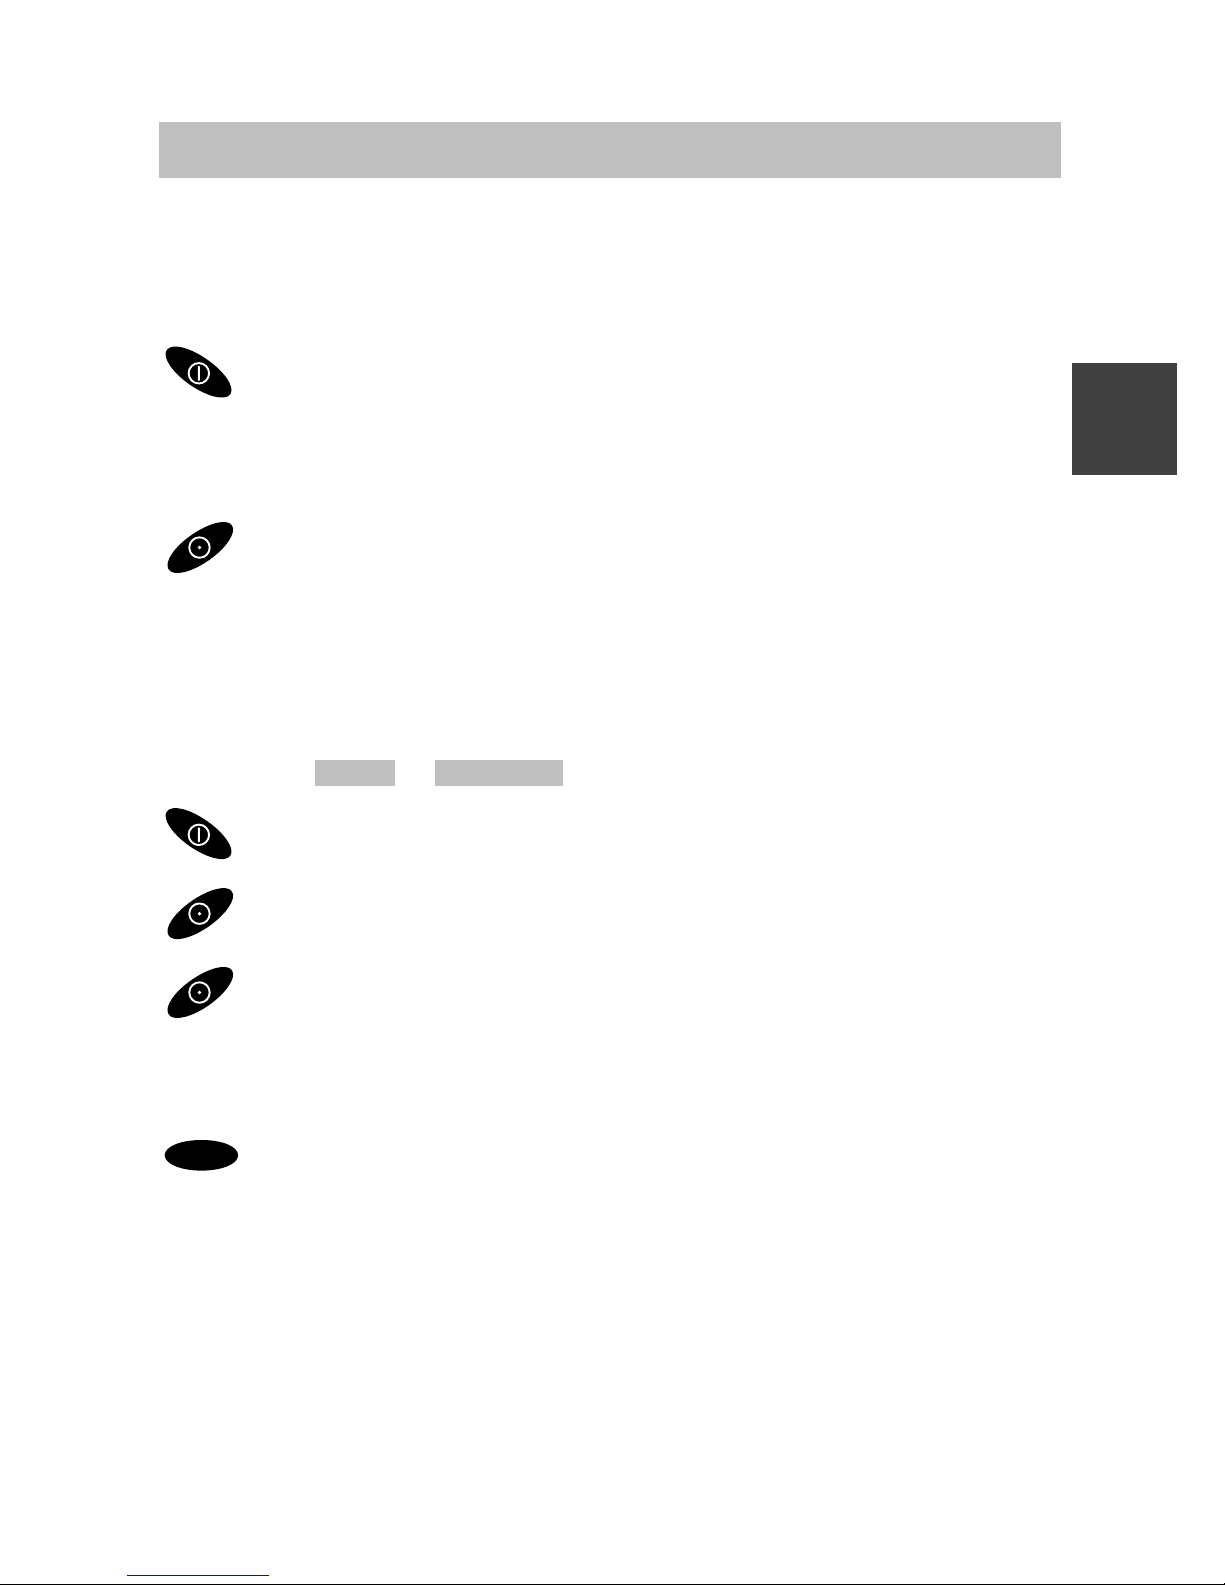
Switching on the telephone
The telephone is switched off. Press the right softkey for
a long period.
Switching off the telephone
The telephone is in basic status. Press the left softkey for
a long period.
Left and right softkeys
The function of the softkeys changes according to the situation.
The respective function always appears in the display above the
softkey, e.g. Menu or Clrdown .
The right softkey is used for switching on or to call up menus.
The left softkey is used for ending a menu option or cancelling.
If you press the left key for a long period when in any of the
menus, the handset will be returned to its basic status.
Selector
OK
This concludes the setting procedure. (Press the button slighly
stronger than ususal. This prevents to trigger an unintentional action.)
Doubly occupied keys
Some keys on your handset are occupied by two functions. The additional
orange labels denote these keys. You must hold the key for longer if you
want to trigger the second orange function. You will hear an acknowledgement tone.
GB
Page 30
Integral 33 / CS I55 – Integral 1/3/5
8
Basic rules of operation
Selecting a menu
Some functions and settings of your telephone can be obtained via the
display contents (menu). The menu is set out in such a way that most of
the menu options lead to submenus.
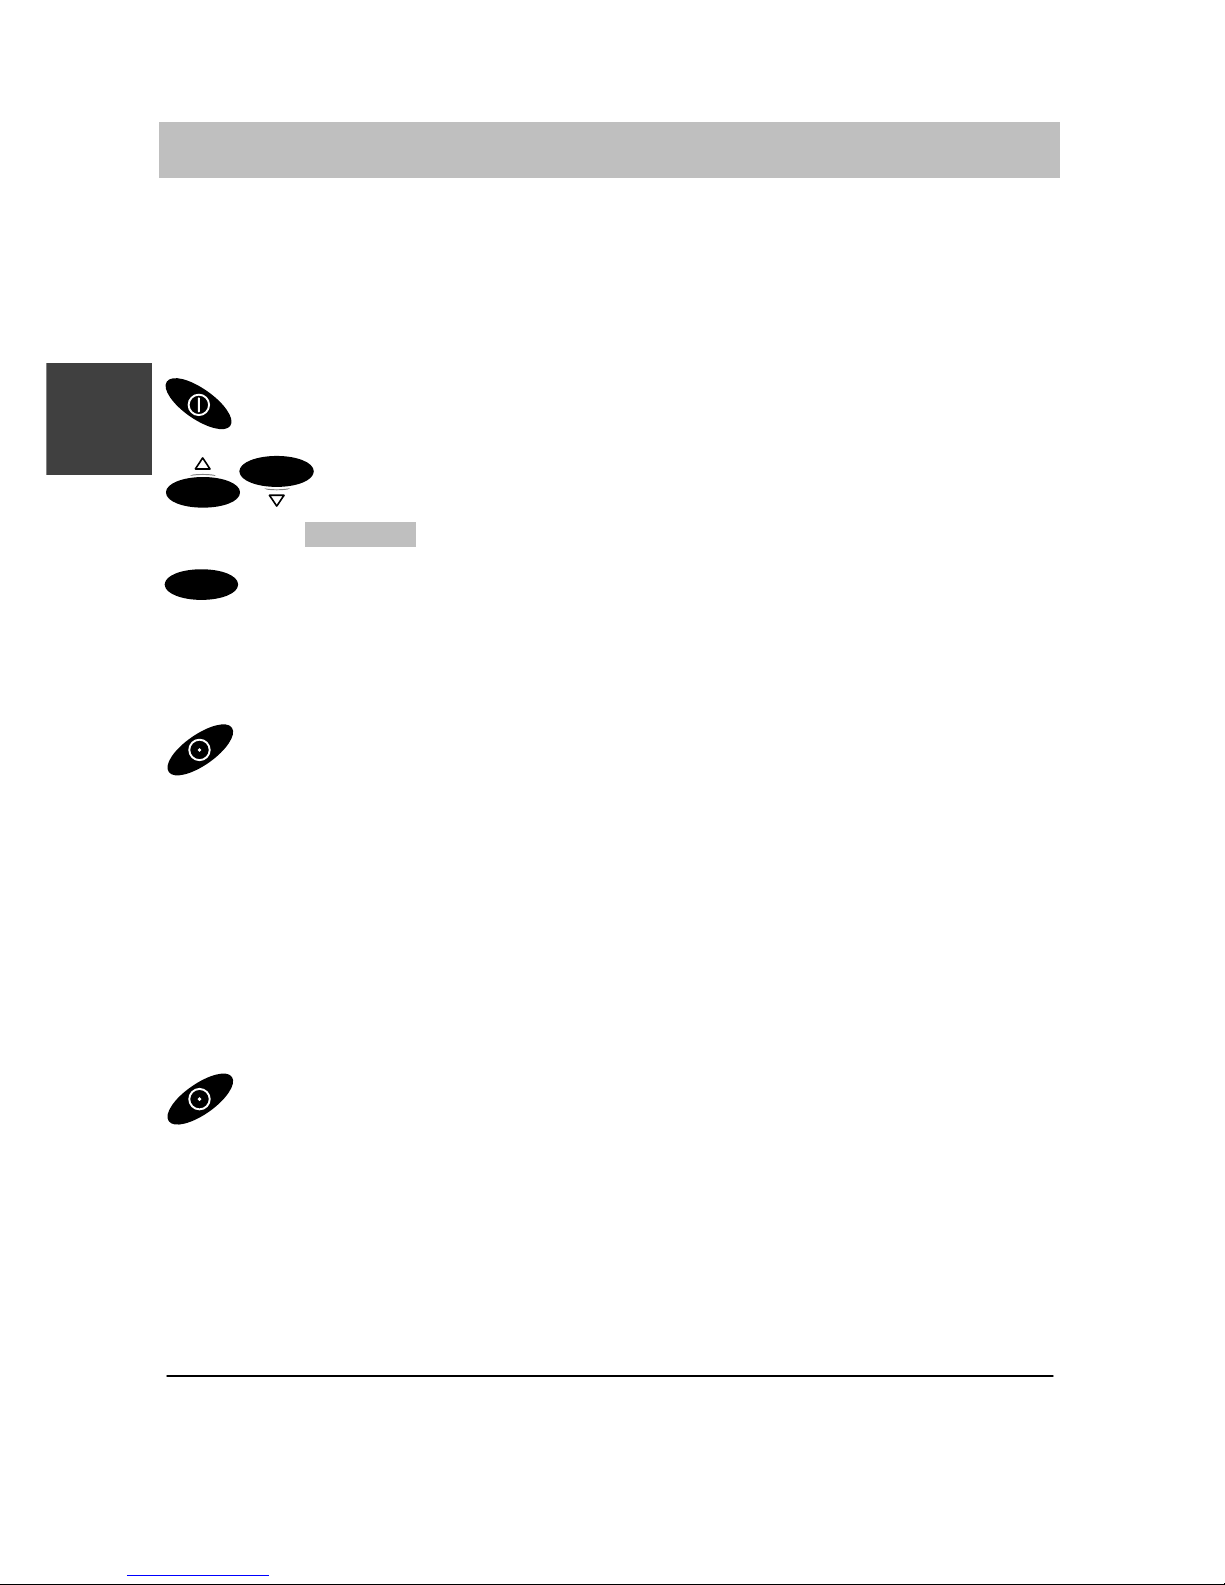
Call up the menu using the right softkey.
OK
OK
Press the selector up or down to mark the desired menu
option, e.g. System .
OK
Select a menu point with the selector.
Returning to another menu level
The left softkey enables you to move to the next menu level up or
leave the menu.
Submenus
Submenus are operated in exactly the same way as the main menu.
Cancel
Press the left softkey for a long period in order to reach basic
status.
In the basic status, you can also call up the menu by pressing down the
selector.
GB
Page 31
Integral 33 / CS I55 – Integral 1/3/5
9
Basic rules of operation
Entering characters for telephone directory entries
The digit keys may also be used to enter letters and characters, e.g. for
names in your personal telephone directory. The letters are printed on the
digit keys. Your telephone will automatically switch to the input of letters
and characters when this is required.
Example: Entering the name “JOHN”:
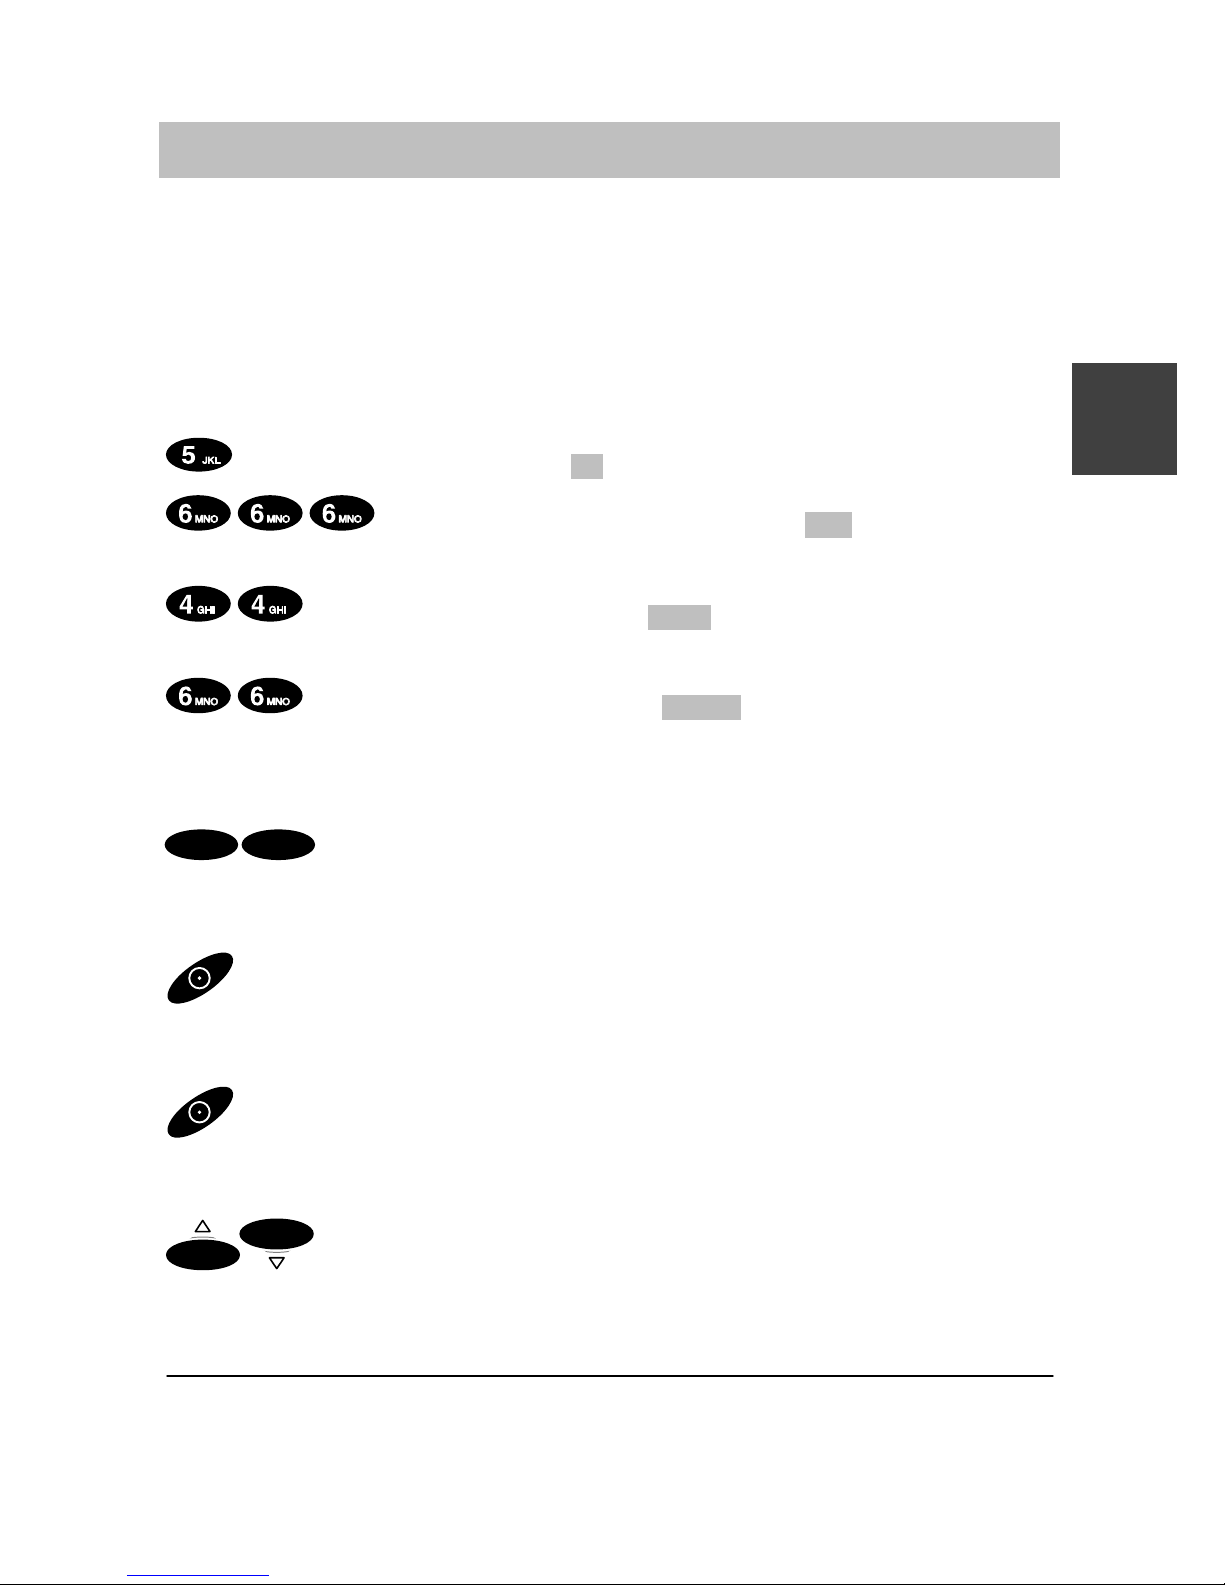
Press the JKL button once. J appears in the display. Wait briefly.
Press the MNO button three times. JO appears in the
display. Wait briefly.
Press the GHI button twice. JOH appears in the display.
Wait briefly.
Press the MNO button twice. JOHN appears in the display .
Wait briefly.
Ending input
OK OK
Press the selector twice. The characters will be accepted.
Correcting characters
Press the left softkey.
Deleting a line
Press the left softkey for a long period.
Inserting characters
OK
OK
Move the cursor position to the left or right. New characters
which you enter will be inserted in front of the cursor.
To switch between upper and lower case letters: Press the star key for a
long period.
GB
Page 32
Integral 33 / CS I55 – Integral 1/3/5
10
Telephoning as usual
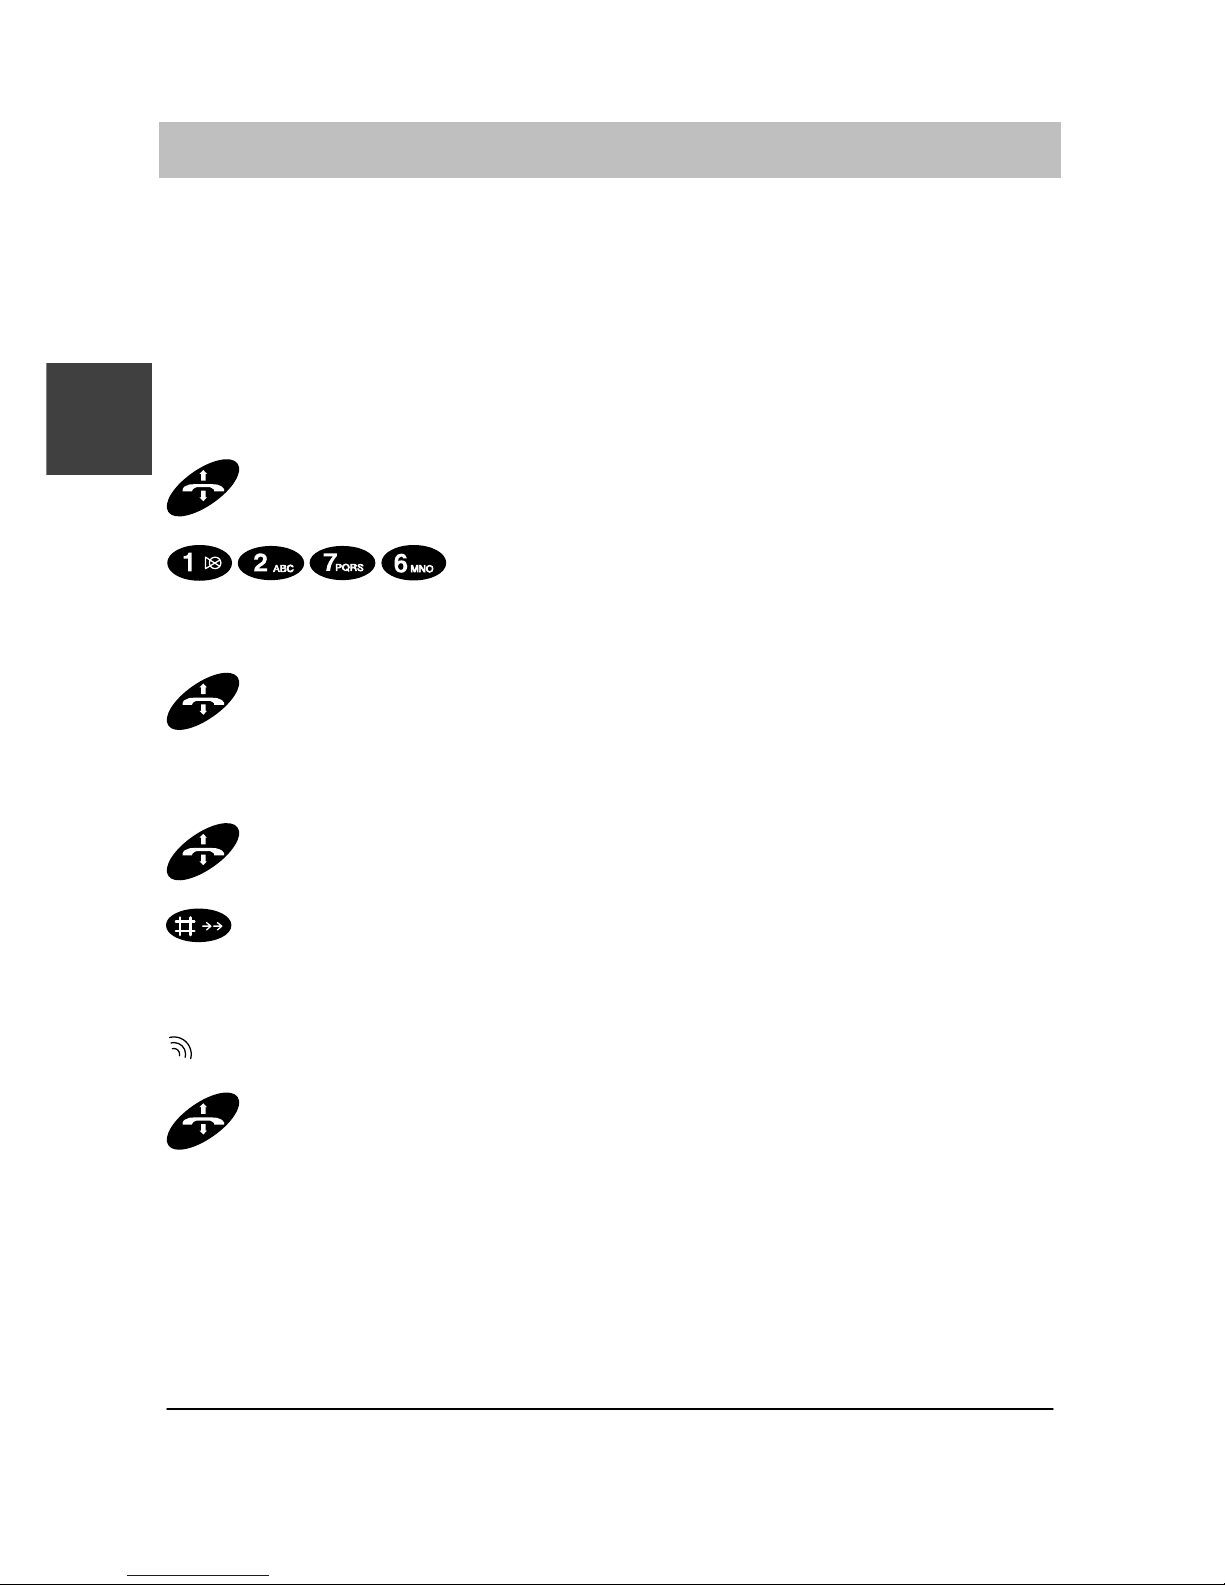
You may use your handset to telephone in the usual manner .
Telephoning within the telephone system (internally): Dial the internal call
number required.
External Calls: Dial the external line code (usually zero), followed by the
call number of your call partner.
Making a call
Lift the handset.
Dial the call number, e.g. 1276.
Ending a call
Replace the handset.
Redialling
Lift the handset.
Press the hash key for a long period.
Accepting a call
Your handset rings.
Lift the handset.
You can only use the Integral 1/3/5 redial function for external calls.
GB
Page 33
Integral 33 / CS I55 – Integral 1/3/5
11
Refer-back call and call forwarding
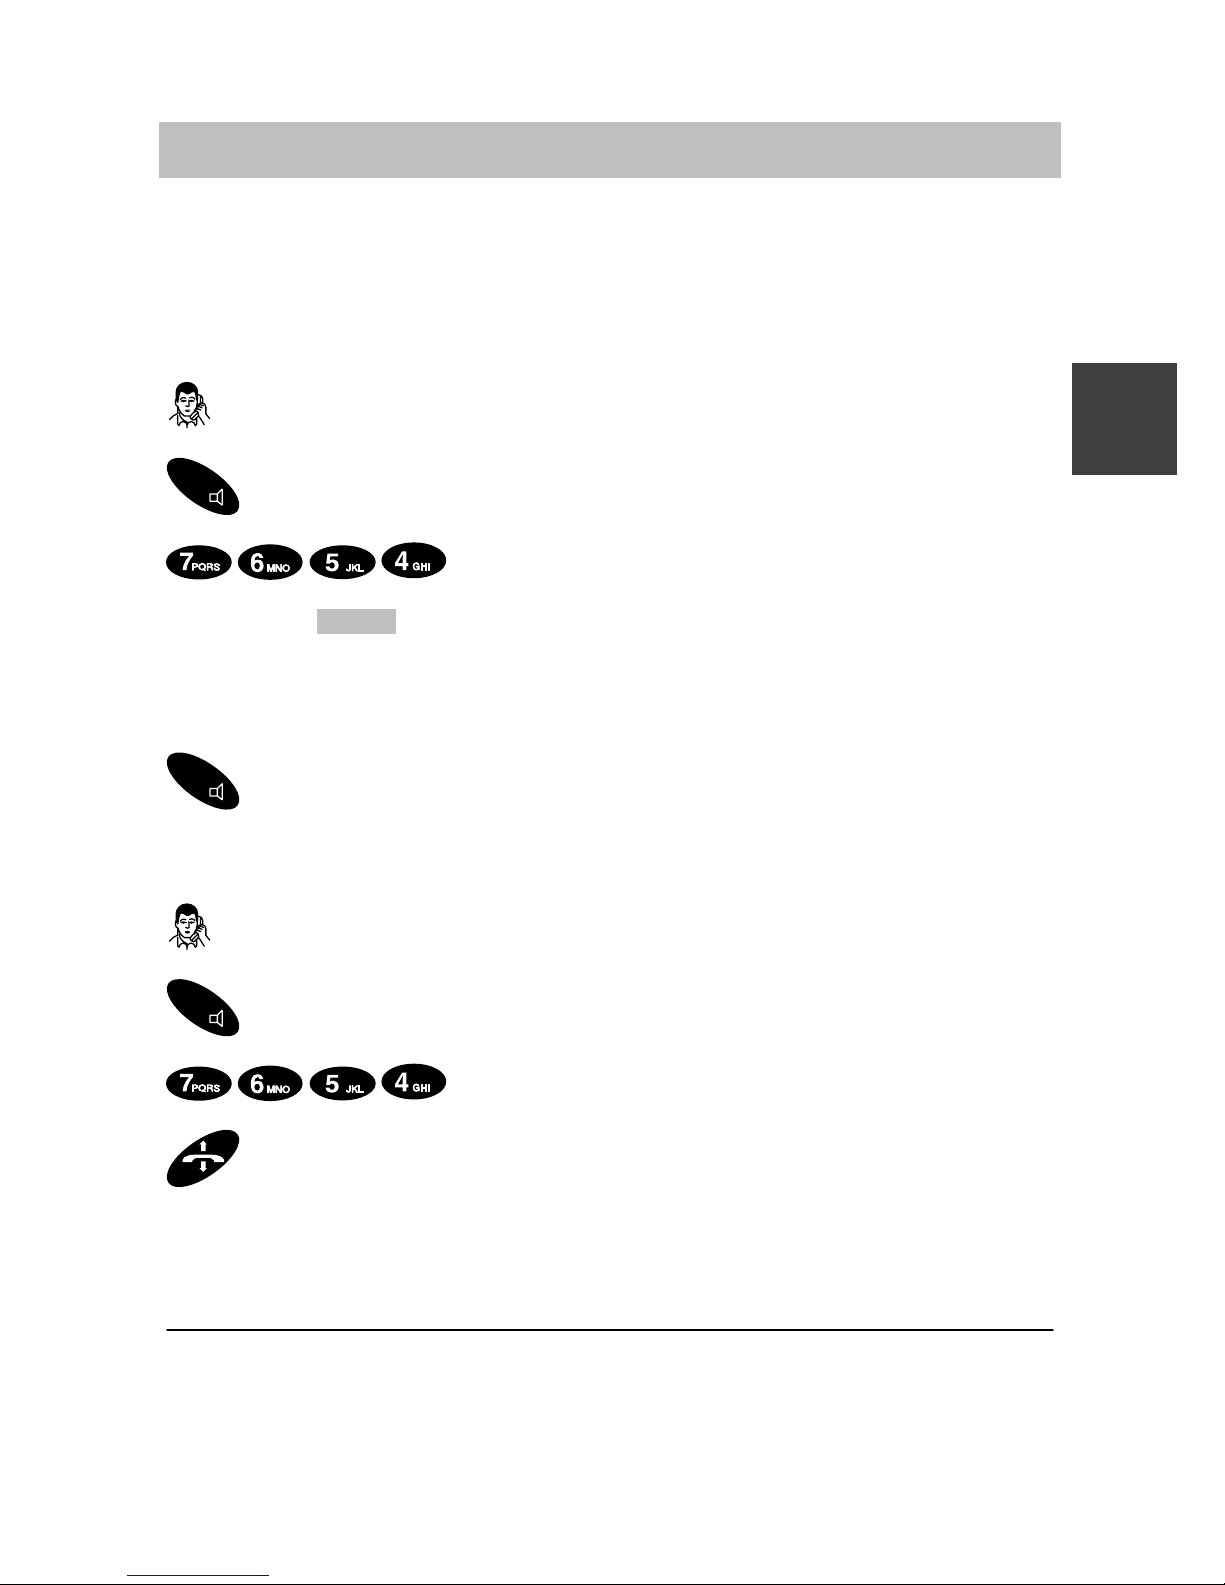
During a telephone conversation, you may go into consultation and speak
to another call partner. Your initial call partner is left waiting. – It is also
possible to transfer the caller.
Activating a refer-back call
You are speaking on the telephone.
R
Activate a refer-back call. Your call partner cannot hear you.
Enter the desired number, e.g. 7654.
The number 7654 appears in the display. The connection is made.
Your initial call partner is left waiting.
Ending a refer-back call
R
Return to your initial call partner by pressing the R key.
Forwarding a caller
You are speaking on the telephone.
R
Activate a refer-back call.
Enter the desired number, e.g. 7654.
Replace the handset.
On the Integral 1/3/5, the connection to the refer-back extension will be
broken when you end the refer-back call.
You may still forward the caller if the third party’s number is engaged.
GB
Page 34
Integral 33 / CS I55 – Integral 1/3/5
12
Hearing conversations via loudspeaker, switching off the microphone
You can switch on the loudspeaker installed for handsfree operation. You can
then hear your caller’s amplified voice and you c an s peak wi th hi m o r her.
You may switch off the microphone on your handset whilst telephoning.
The handset remains switched on. Your call partner cannot hear you,
but you can hear him.
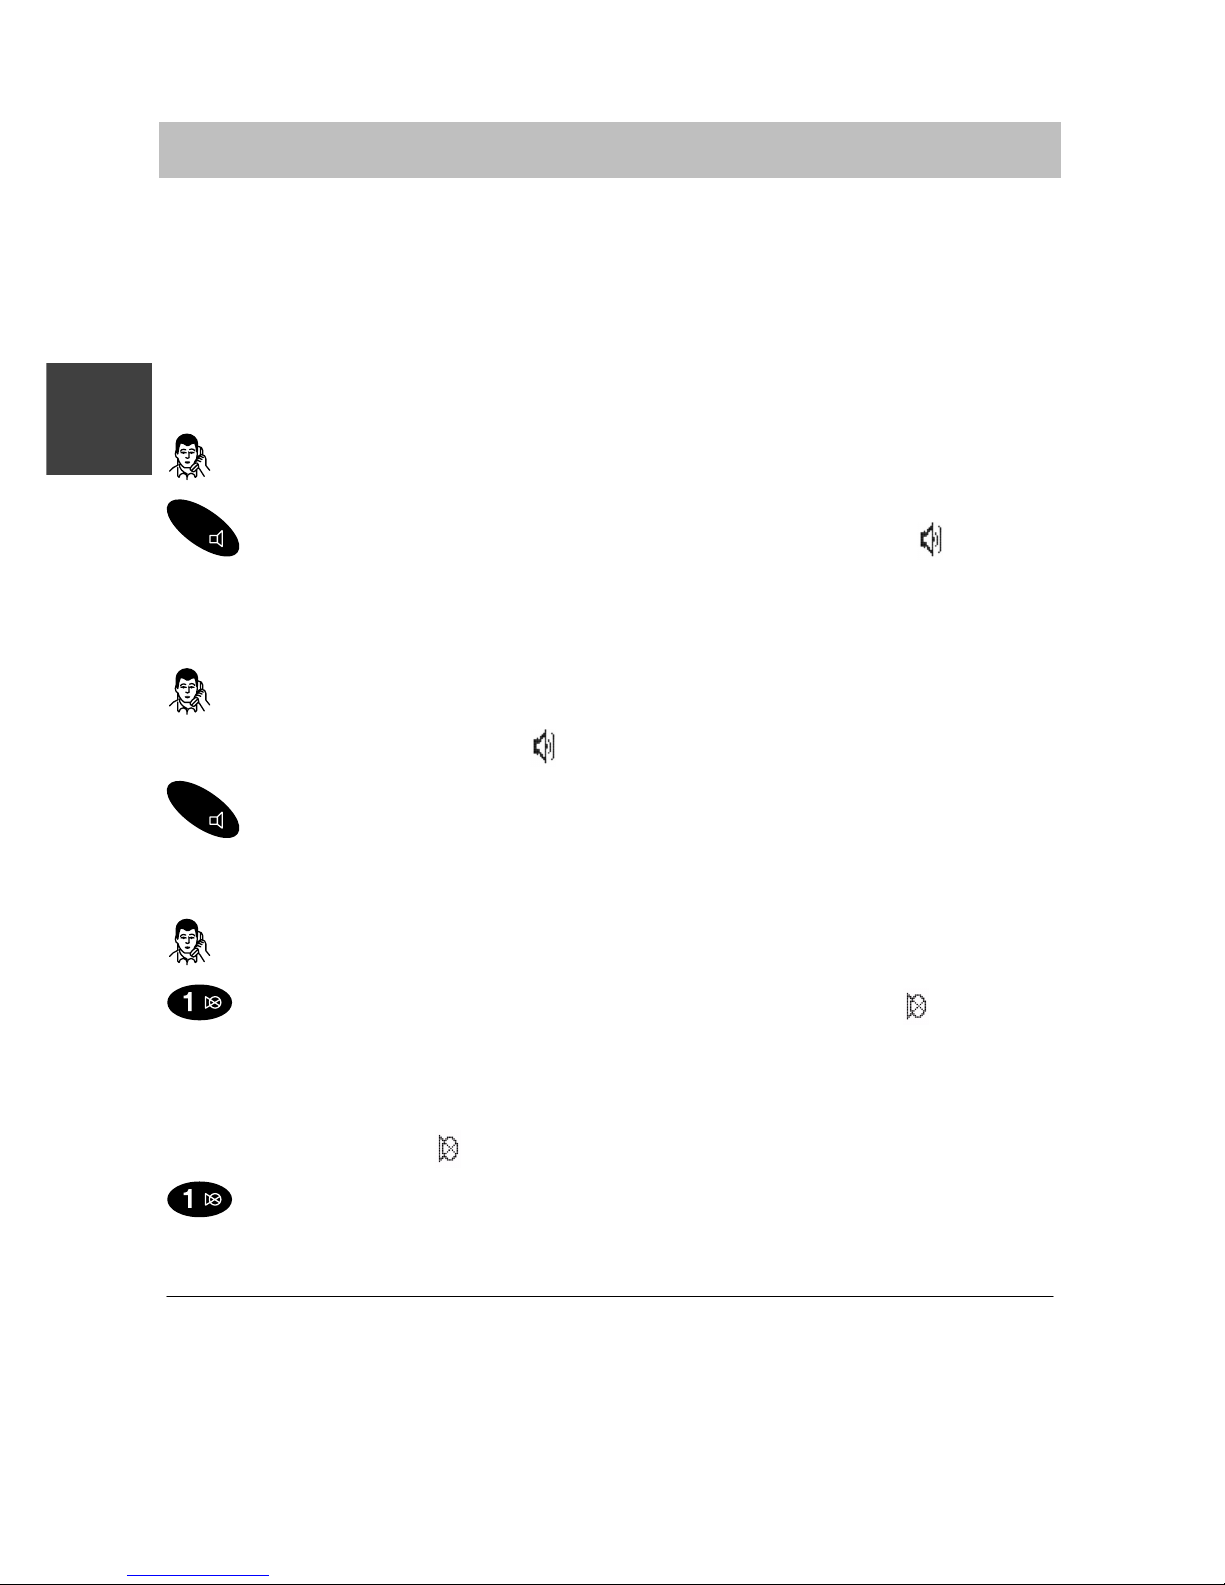
Switching on the loudspeaker for handsfree operation
You are speaking on the telephone.
R
To switch on microphone: Press R key for a long period. appears
in the display.
Switching off the handsfree loudspeaker again
You are speaking on the telephone. The conversation will be amplified
by the handsfree loudspeaker. appears in the display.
R
To switch off the loudspeaker: Press R key for a long period.
Switching off the microphone (mute)
You are speaking on the telephone.
To switch off microphone: Press key 1 for a long period. appears
in the display.
Reactivating the microphone
The microphone is off. appears in the display.
To switch on microphone: Press key 1 for a long period. You may
continue telephoning.
At the end of the call, the handsfree loudspeaker will be switched off automatically and the microphone will be switched on again automatically.
If you place your handset in the charger during a call, handsfree operation
will be switched on automatically.
GB
Page 35
Integral 33 / CS I55 – Integral 1/3/5
13
Setting the handset
You may make the handset settings when in basic status.
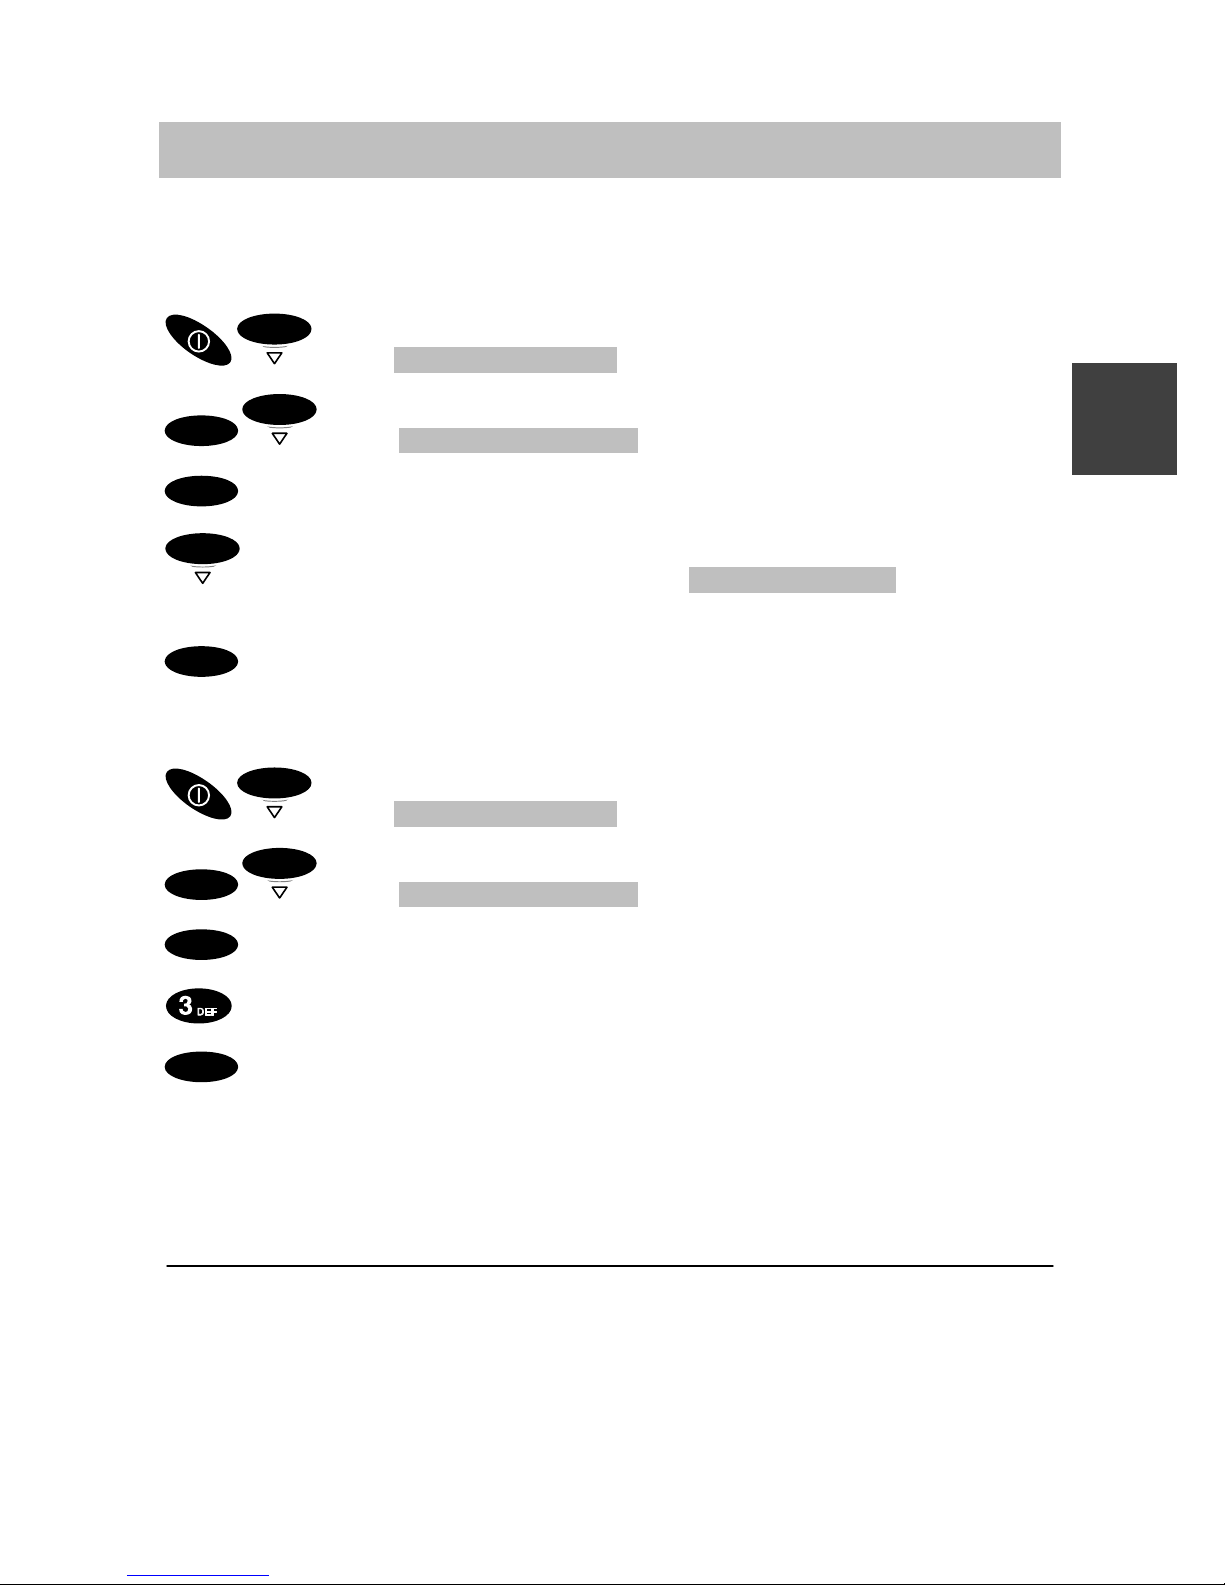
Ringing signal
OK
Menu Set telephone
OK
OK
Menu Ringing signal
OK
Confirm.
OK
Make the desired ringing setting, e.g. Ringing tone . You may
choose between ringing tone, vibrating, both, short ringing tone and mute.
OK
Confirm
Handset volume
OK
Menu Set telephone
OK
OK
Menu Handset volume
OK
Confirm.
Enter the handset volume (from 1 to 6), e.g. 3.
OK
Confirm.
The handset will not vibrate in the charger. When you have selected vibration as the calling signal, the ringing tone will sound for a short period when
a call is registered.
If you have selected mute as the call signal, the corresponding symbol
appears in the display (→ p. 6).
GB
Page 36
Integral 33 / CS I55 – Integral 1/3/5
14
Emergency call
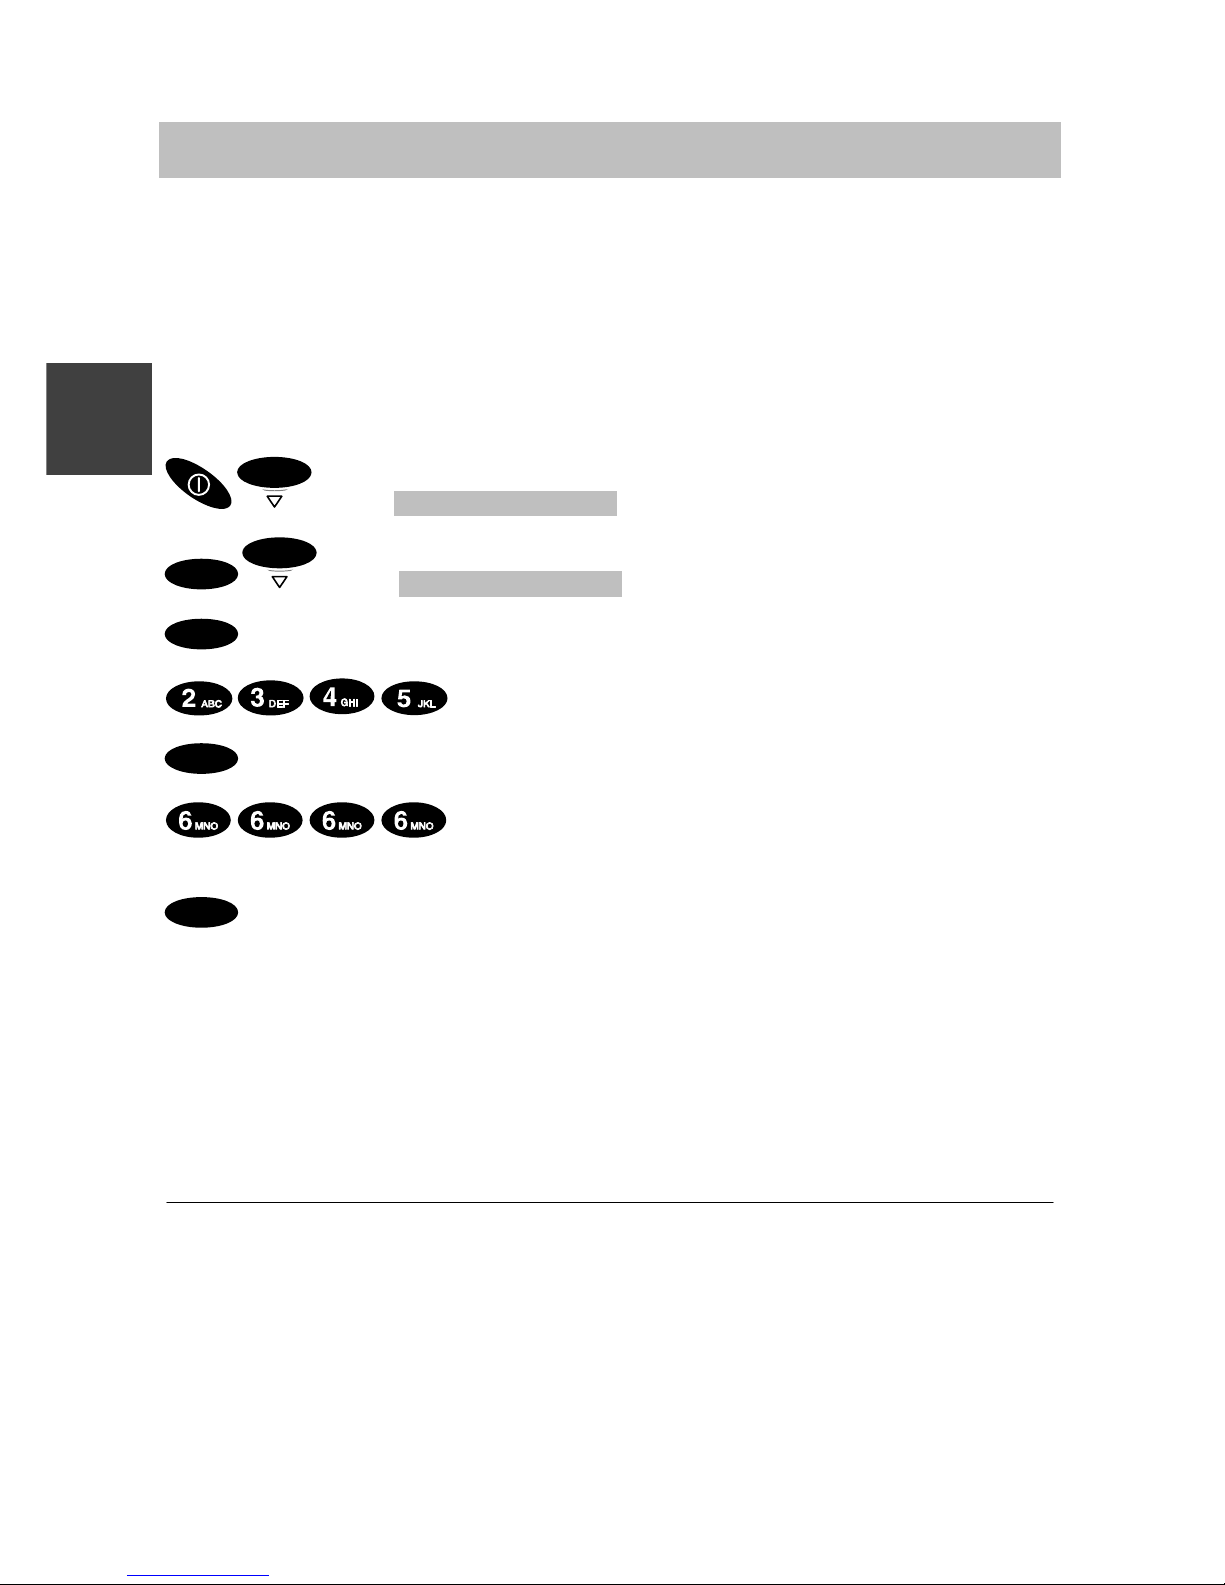
When your handset is locked, the only function that can be used is that of
the emergency call number. The following appears in the display above the
right softkey: SOS.
Emergency calls are always available using the red emergency call button
at the top – even if the handset is not locked.
Setting up and changing emergency call numbers
OK
Menu Set telephone
OK
OK
Menu Emergency No.
OK
Confirm.
Enter the PIN, e.g. 2345.
OK
Confirm.
Enter or change the emergency call number,
e.g. 6666.
OK
Confirm.
Making an emergency call with the emergency call key
Press the emergency call button at the top for a long period.
The emergency call number is dialled.
The SOS emergency call is not available in the following cases: if an emergency call number has not been entered; during a call; while a call or a
message is being received; or if the handset is not within the range of the
telephone system.
In order to delete an emergency call number, you must change the number.
Enter nothing as the telephone number (press the left softkey for a long
period) and confirm using the selector.
GB
Page 37
Integral 33 / CS I55 – Integral 1/3/5
15
Language
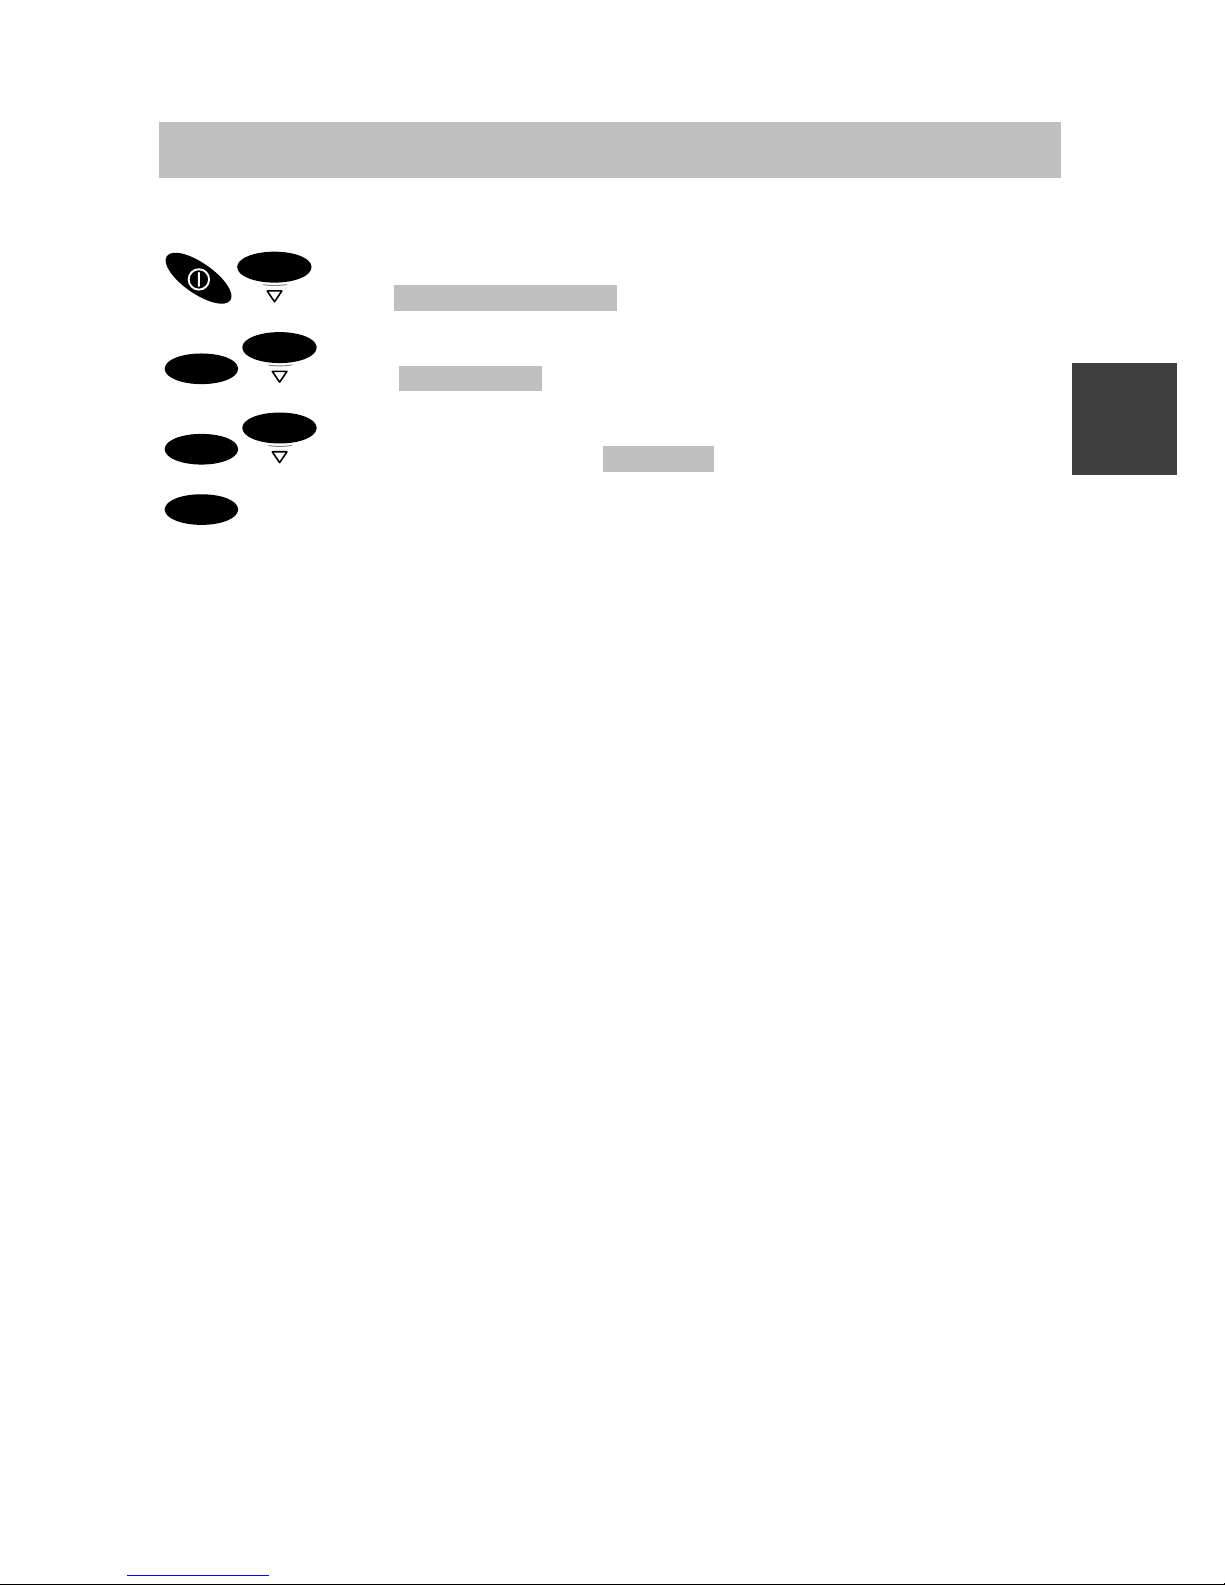
Determining the language of the local menu
OK
Menu Set telephone
OK
OK
Menu Language
OK
OK
Select a language, e.g. German .
OK
Confirm.
GB
Page 38

Integral 33 / CS I55 – Integral 1/3/5
16
Technical specifications
Handset Integral D3 mobile
Not for use in hazardous areas except zones 2 and 22 in accordance with
specifications in the manufacturer’s declaration!
Standard: DECTt (Digital Enhanced Cordless
Telecommunications).
Dimensions: 137 x 46 x 21 mm plus antenna
Weight, handset: Approx. 100 g (with battery)
Battery type: NiMH; 650 mAh
Operating time
for handset
(with full battery):
Conversation: min. 8 hours
Stand–by: min. 80 hours
Charging time: discharged: approx. 5 hours
charging condition unknown: approx. 14 hours
Frequency range: 1.88 – 1.9 GHz
Transmitting power: Mean: 10 mW, Peak: 250 mW
Permissible operating
temperature:
Handset: –10 °C to +45 °C
Charging cradle: +5 °C to +40 °C
Storage temperature: –25 °C to +55 °C
Transport temperature: without battery: –25 °C to +70 °C
with battery: –25 °C to +60 °C
Protection category: IP 65 , dust– and hose–proof
Accessories Charger classic, Charger comfort,
Plug-in mains unit Plug-in mains unit
for continental Europe, for the UK,
Changeable battery Headset HSG D3,
pack, Holster,
Carrying bag,
MEM-Card
MEM-Card manager,
Some of the listed accessories must be ordered separately!
GB
Page 39

Integral 33 / CS I55 – Integral 1/3/5
1
Información importante
Contenido de este manual de manejo abreviado
En este manual de manejo se explica cómo se pone en servicio el móvil
DECT. Se describen todas las reglas básicas para el manejo así como las
funciones y los ajustes usados con mayor frecuencia. Ud. encontrará una
descripción completa de todas las funciones específicas de la central en el
CD-ROM suministrado. Ud. puede ver e imprimir los manuales de manejo.
Advertencia: Un manual impreso lo puede pedir (con coste) a través de
Tenovis Direct: Tel. +49 (0) 800-3473 287, Fax: +49 (0) 800-3473 283.
Códigos de pedido:
Integral D3 mobile para conexión a Integral 1/3/5: 4.999.059.185
Integral D3 mobile para conexión a Integral 33 / CS I55: 4.999.059.184
Material suministrado
Al recibir su Integral D3 mobile, por favor, compruebe inmediatamente si la
entrega es completa:
– Móvil DECT D3 mobile con manual de instalación abreviado
– Batería de repuesto – MEM-Card
– Cargador classic – Fuente de alimentación
– Manual de manejo abreviado
– CD con manuales de manejo en versión no abreviada
Dónde puede usar su móvil DECT
El móvil DECT Integral D3 mobile es adecuado para su uso en la oficina, a
la intemperie o en ambientes en los que se genera mucho polvo. Corresponde a la clase de protección IP65, con protección contra lanzamiento de
agua y polvo.
Protegerlo de interferencias
Generalmente los otros aparatos electrónicos están protegidos contra interferencias de alta frecuencia. Sin embargo, si hubiera uno de estos aparatos con protección insuficiente, pueden producirse malfuncionamientos.
¡Nunca abra la carcasa de su móvil DECT!
La carcasa puede dañarse. El teléfono no contiene piezas que Ud. pueda
reparar.
Poner la batería en servicio
Utilice las baterías sólo correctamente. Tenovis no se hace responsable de
daños que se puedan ocasionar por el uso inadecuado de la batería.
E
Page 40

Integral 33 / CS I55 – Integral 1/3/5
2
Información importante
Cuando las baterías están agotadas – Información para el
usuario final
¡Las baterías agotadas no deben eliminarse con los residuos domiciliarios!
Llévelas al centro de recolección de su municipio o a su comerciante para
que puedan ser recicladas preservando el medio ambiente.
Consejos para la colocación
Utilice un apoyo antideslizante para su cargador, en especial si se trata de
muebles nuevos o tratados con agentes de conservación de las lacas. Las
lacas o productos para la conservación de los muebles pueden contener
sustancias que ablandan las patas del cargador, y las patas reblandecidas
a su vez pueden dejar huellas no deseadas en la superficie de los muebles. Tenovis no se hace responsable de los daños así ocasionados.
Por favor, deseche sólo baterías agotadas.
Homologación y conformidad
Nosotros, Tenovis GmbH & Co. KG, declaramos que el producto Integral
D3 mobile cumple con los requisitos básicos y otras estipulaciones relevantes de la directiva1999/5/EU (R&TTE).
Este equipo está diseñado para conectarlo a interfaces de radio (DECT
t
)
de los sistemas de telecomunicación de la marca Tenovis y cumple con los
requisitos básicos de la directiva EG 1999/5/EG (Radio und Telecommuni-
cation Terminal Equipment, R&TTE).
Por motivos constructivos, este equipo no se debe conectar directamente a
los interfaces de una red telefónica pública.
En caso de que surgieran problemas durante el funcionamiento, por favor,
diríjase en primer lugar a su comercio especializado o al servicio técnico de
Tenovis.
La declaración de conformidad se puede obtener en la siguiente dirección
de internet: www.tenovis.com/deutsch/verzeichnis/conformance.htm
o bus-
que por la clave ”Konformität” en el índice.
Este equipo funciona según el sistema DECTt en la banda de frecuencias
comprendida entre 1880 y 1900 MHz. La adjudicación de esta banda de
frecuencias en el plan de ordenamiento de las frecuencias inicialmente tiene una vigencia hasta el año 2008, y se prorrogará luego, en función de la
armonización europea.
DECT es una marca registrada de ETSI
E
Page 41

Integral 33 / CS I55 – Integral 1/3/5
3
Puesta en servicio
Si su móvil DECT aún no está montado
Si Ud. recibe el móvil DECT sin que éste montado por completo Ud. tiene
que
D insertar la MEM-Card (→ página 3) ,
D montar la batería (→ página 4) y
D en un caso dado, todavía hay que retirar el plástico protector del display.
D El servicio técnico tiene que dar de alta el móvil DECT en su central te-
lefónica.
A continuación, su móvil DECT estará listo para funcionar.
D Conecte ahora el cargador (→ página 5).
Si su móvil DECT ya está completamente montado
Si su móvil DECT ya está completamente montado y si está dado de
alta en su central telefónica, tan sólo tiene que conectar el cargador
(→ página 5).
MEM-Card
Ud. sólo puede telefonear con su móvil DECT si hay una MEM-Card insertada en el mismo. En esta tarjeta se memorizan datos importantes de su
móvil DECT, como p. ej. ajustes personales y listines telefónicos. Si Ud.
alguna vez cambia de móvil DECT Ud. puede telefonear inmediatamente
con esta MEM-Card.
E
Page 42
Integral 33 / CS I55 – Integral 1/3/5
4
Puesta en servicio
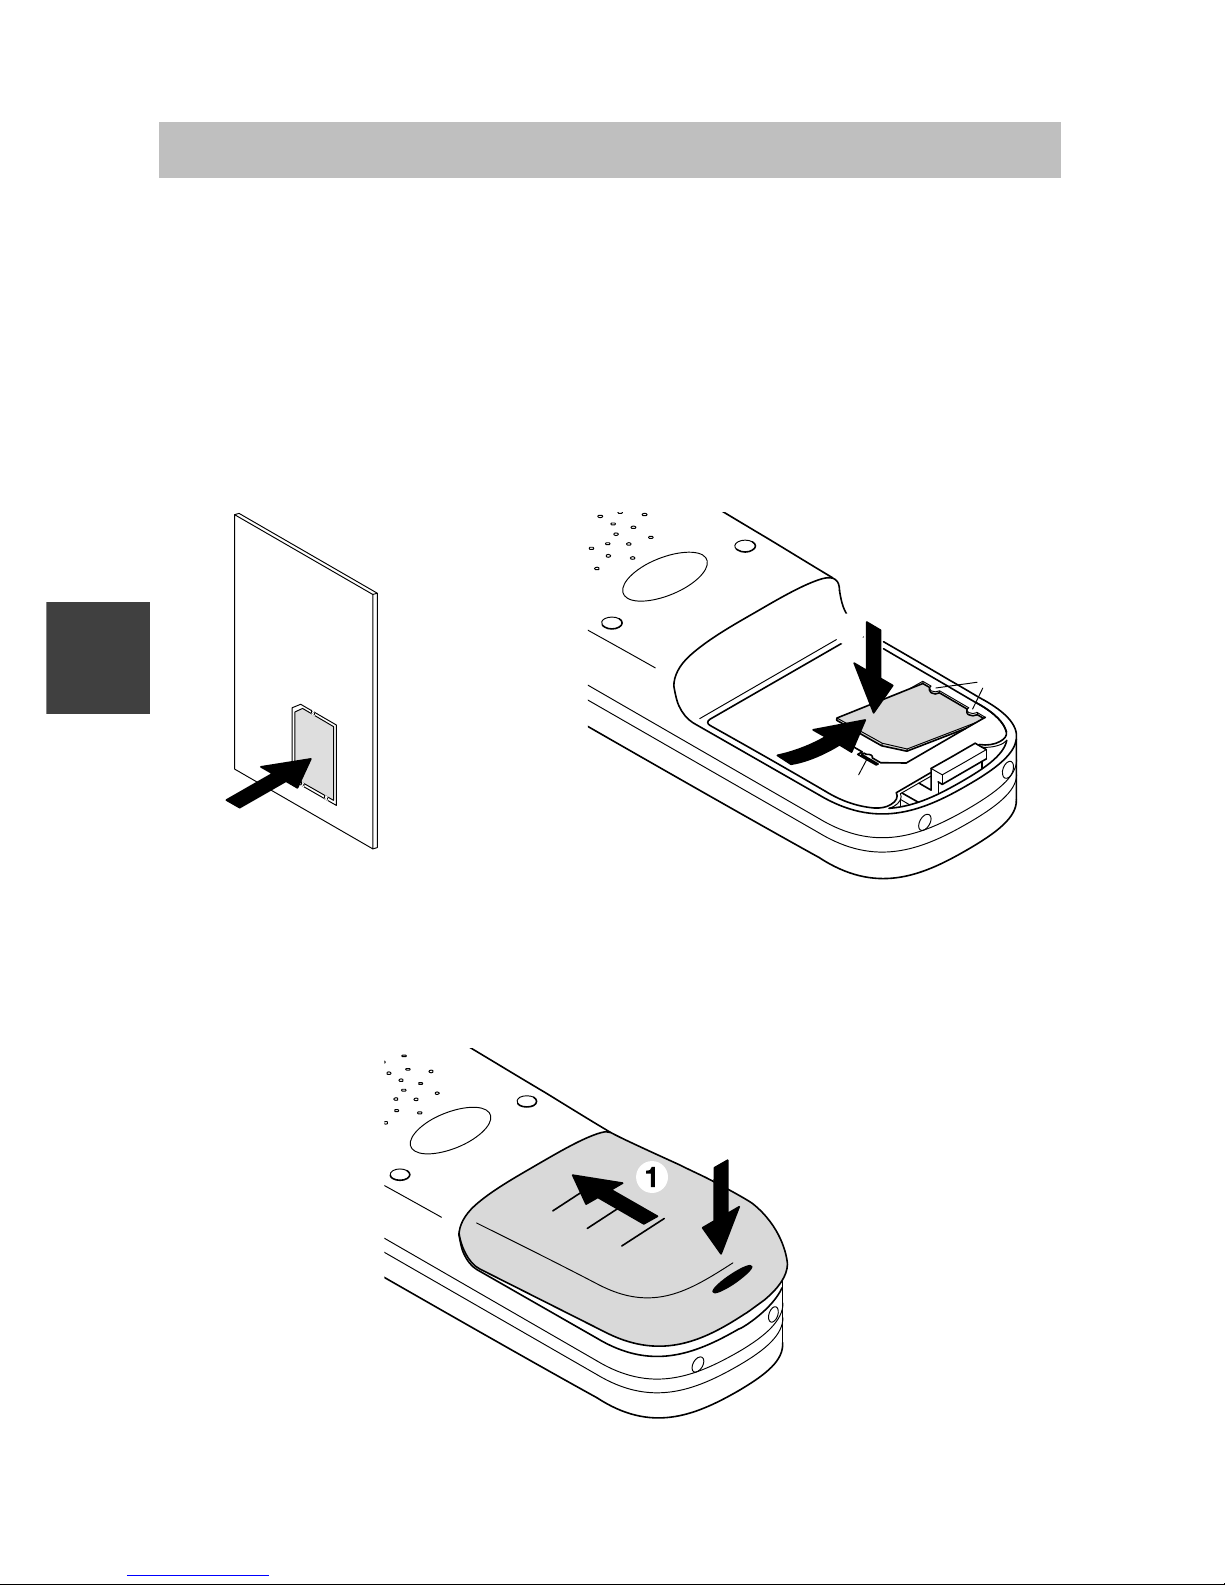
Insertar MEM-Card
D Primero saque la pequeña MEM-Card del marco mayor alrededor de ella
apretando con el dedo (ver figura a la izquierda).
D Inserte la MEM-Card de manera que quede con el lado corto por debajo
de las protuberancias a en el alojamiento previsto para ella (ver figura
a la derecha) (1). ¡Las superficies de contacto de color dorado de la
MEM-Card tienen que estar boca abajo!
D Oprima la MEM-Card hacia abajo hasta que quede aprisionada por b (2).
Insertar la batería
D Insertar la batería en la carcasa (1)
D Apretar la batería hacia abajo en el extremo inferior del móvil DECT
hasta oir que engaste (2).
E
1
2
a
b
2
Page 43
Integral 33 / CS I55 – Integral 1/3/5
5
Puesta en servicio
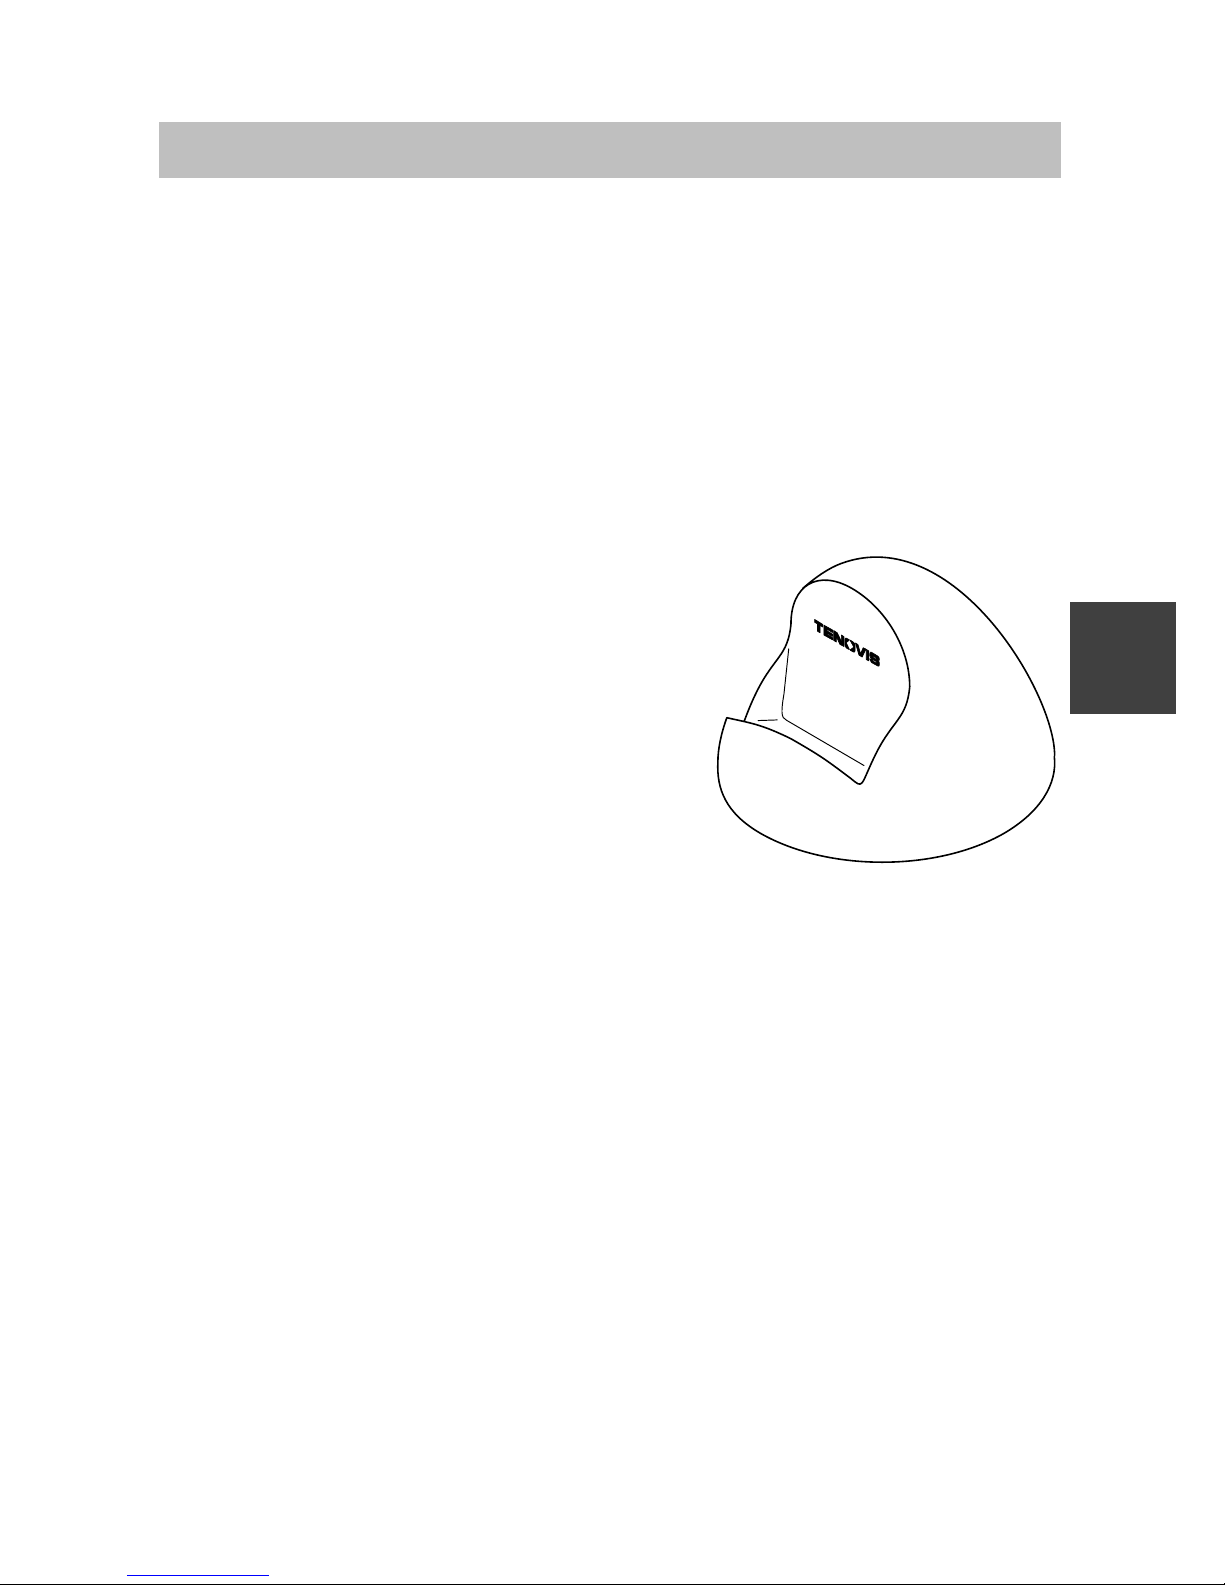
Colocar el cargador
Coloque la base de carga sobre una superficie firme y plana, p. ej. una
mesa. Seleccione un lugar de emplazamiento protegido de la incidencia
directa de luz solar y de la humedad.
D Conecte el enchufe de alimentación en una base de enchufe.
D Enchufe el conector pequeño del cable en la parte posterior del
cargador.
El cargador está ahora listo para funcionar.
Cargar el móvil DECT
Coloque el móvil DECT simplemente en el
cargador. Escuchará un tono de confirma-
ción. El display se ilumina brevemente. El
móvil DECT continuúa estando encendido
o apagado. El símbolo de la batería en la
línea de símbolos se mueve hasta que la
batería se haya cargado por completo.
Durante la carga, las baterías se calientan
levemente. Esto es completamente normal.
Advertencias acerca del uso de la batería
Cargue completamente la batería al comienzo y vuelva a colocar el móvil
DECT en el cargador repetidas veces durante la primera semana de funcionamiento. Generalmente, las baterías nuevas alcanzan su capacidad de
carga plena tras algunos procesos de carga/descarga.
Ud. puede dejar que el móvil DECT permanezca durante un tiempo prolongado en el cargador. La batería no corre el riesgo de sufrir sobrecarga.
No exponga la batería al pleno sol. Se lo agradecerá con una larga vida.
¡Atención!
D No arroje la batería al fuego; podría explotar.
D Para evitar lesiones y daños por incendios, evite que los bornes de las
baterías entren en contacto con objetos conductores o se produzcan
cortocircuitos.
E
Cargador classic
Page 44
Integral 33 / CS I55 – Integral 1/3/5
6
Display
Diversos textos y símbolos en el display le ayudarán a manejar el móvil DECT. Se
le conduce a través de los menús y se le informa sobre el estado del móvil DECT.
Las funciones de las softkeys izquierda y derecha cambian según el estado. Se
visualizan en el display justo encima de las teclas.
Las líneas en el display
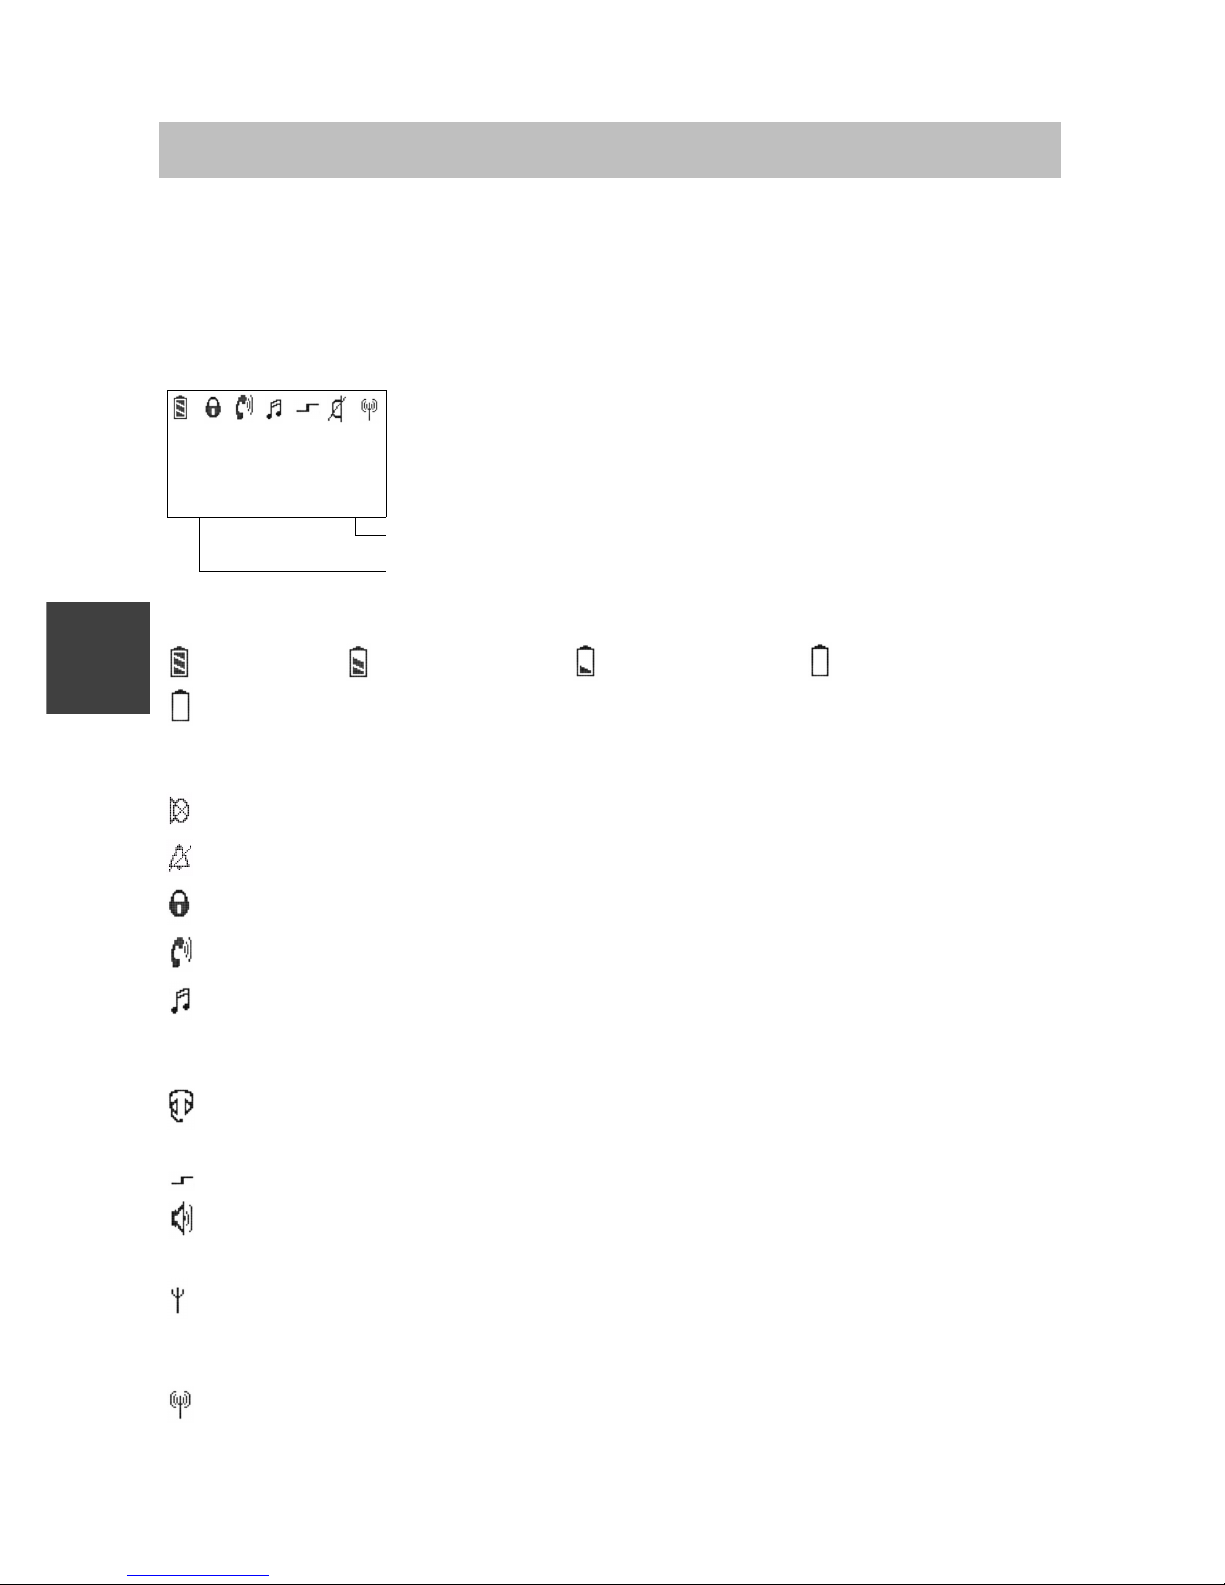
Línea de símbolos indica el estado del teléfono.
Malo
7442
Dos líneas de texto p. ej. para nombre y nº de llamada
Cortar Menú
Función de la softkey derecha p. ej. Menú
Función de la softkey izquierda p. ej. Cortar.
Significado de los símbolos
Batería llena, Batería casi llena, Batería casi vacía, Batería vacía,
(parpadea el símbolo de batería) ¡capacidad para menos de cinco minutos!
Al insertar una batería por primeravez, no se indica ningún símbolo de batería.
La indicación no aparece hasta que la batería se cargue una vez en el móvil DECT.
Mute: El micrófono está inactivo. Su interlocutor no le oye.
Ninguna señal de llamada: La señal de llamada fue conmutada a mute.
Candado: El móvil DECT está bloqueado.
Microteléfono: El móvil DECT tiene una conexión telefónica.
Método de marcación por multifrecuencia: Cada pulsación de tecla se trans-
mite al colateral como tono MF (audible) (postmarcación MF). (Este símbolo sólo
aparece en la Integral 1/3/5)
Auriculares: Ud. realiza una llamada con el microplastón. El micrófono y el
altavoz del móvil DECT se desconectan automáticamente.
Función especial iniciada: La tecla asterisco fue pulsada prolongadamente.
Altavoz: El altavoz para Manos libres situado en la parte trasera de la carcasa
está encendido.
En cobertura de la central: Su móvil DECT está dentro de la cobertura de una
base de radio. Ud. puede telefonear (símbolo grande: alta intensidad de campo;
símbolo pequeño: suficiente intensidad de campo).
Comunicación con la central: Su móvil DECT tiene una comunicación in-
alámbrica.
E
Page 45
Integral 33 / CS I55 – Integral 1/3/5
7
Reglas básicas para el manejo
Para el manejo de su teléfono hay algunos pasos que se repiten frecuente-
mente. Familiarícese con estos pasos de manejo.
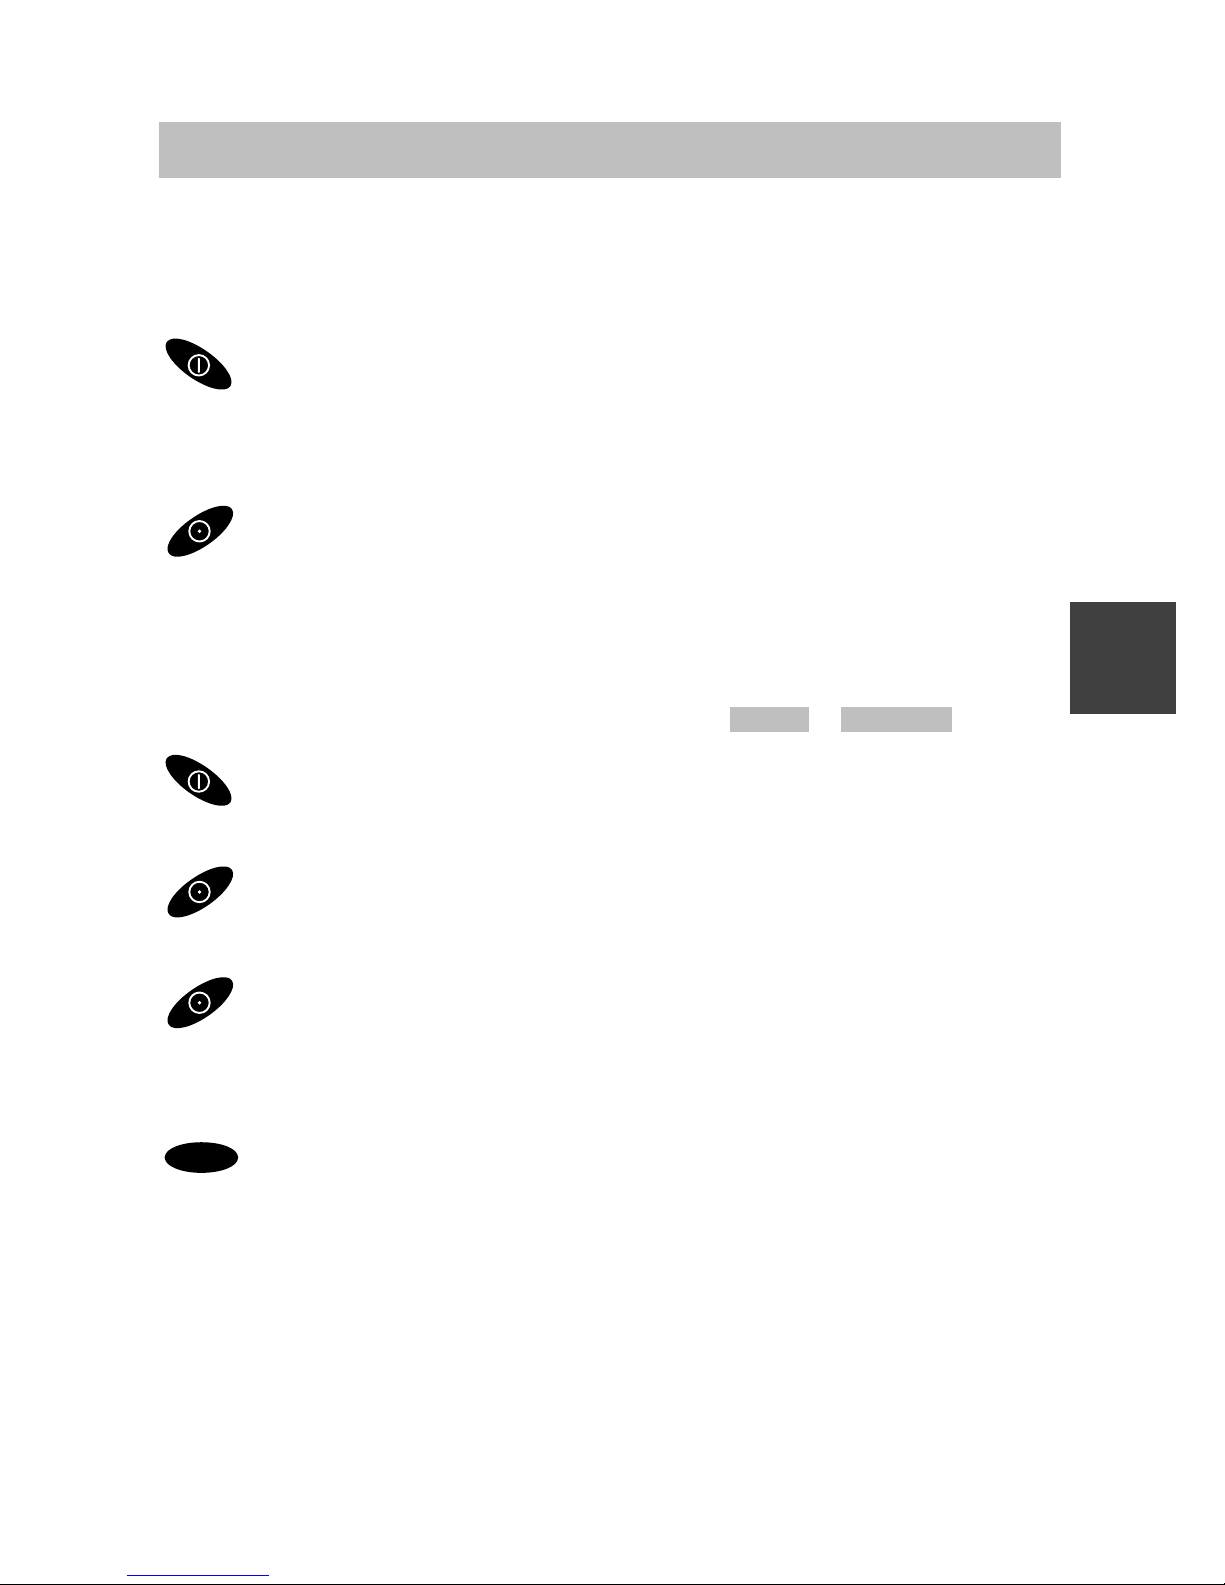
Encender el teléfono
El teléfono está apagado. Pulsar la softkey derecha
prolongadamente.
Apagar el teléfono
El teléfono está en estado básico. Pulsar la softkey izquierda
prolongadamente.
Softkey izquierda y derecha
La función de las softkeys cambia según la situación. La función siempre
se indica en el display, encima de la tecla, p. ej. Menú o Cortar .
La softkey derecha sirve para conectar el equipo o para iniciar un
menú.
La softkey izquierda sirve para concluir un punto de menú o para
cancelar.
Si Ud. mantiene pulsada la tecla durante un tiempo prolongado
en cualquier menú, el móvil DECT pasa al estado básico.
Selector
OK
Con esta tecla se finalizan los procesos de ajuste (requiere que la
tecla se pulse con cierta fuerza; de lo contrario, los ajustes realizados no
se guardan).
Teclas programadas con dos funciones
Algunas teclas de su móvil DECT están programadas con dos funciones.
Estas teclas se reconocen por el texto adicional impreso en color naranja.
Si Ud. quiere usar la segunda función impresa en color naran ja tiene que
pulsar la tecla prolongadamente. Escuchará un tono de confirmación.
E
Page 46
Integral 33 / CS I55 – Integral 1/3/5
8
Reglas básicas para el manejo
Seleccionar el menú
Ud. puede acceder a algunas funciones y ajustes de su teléfono a través
de la indicación (menú) en el display. El menú está estructurado de manera
que detrás de la mayoría de los puntos hay submenús.
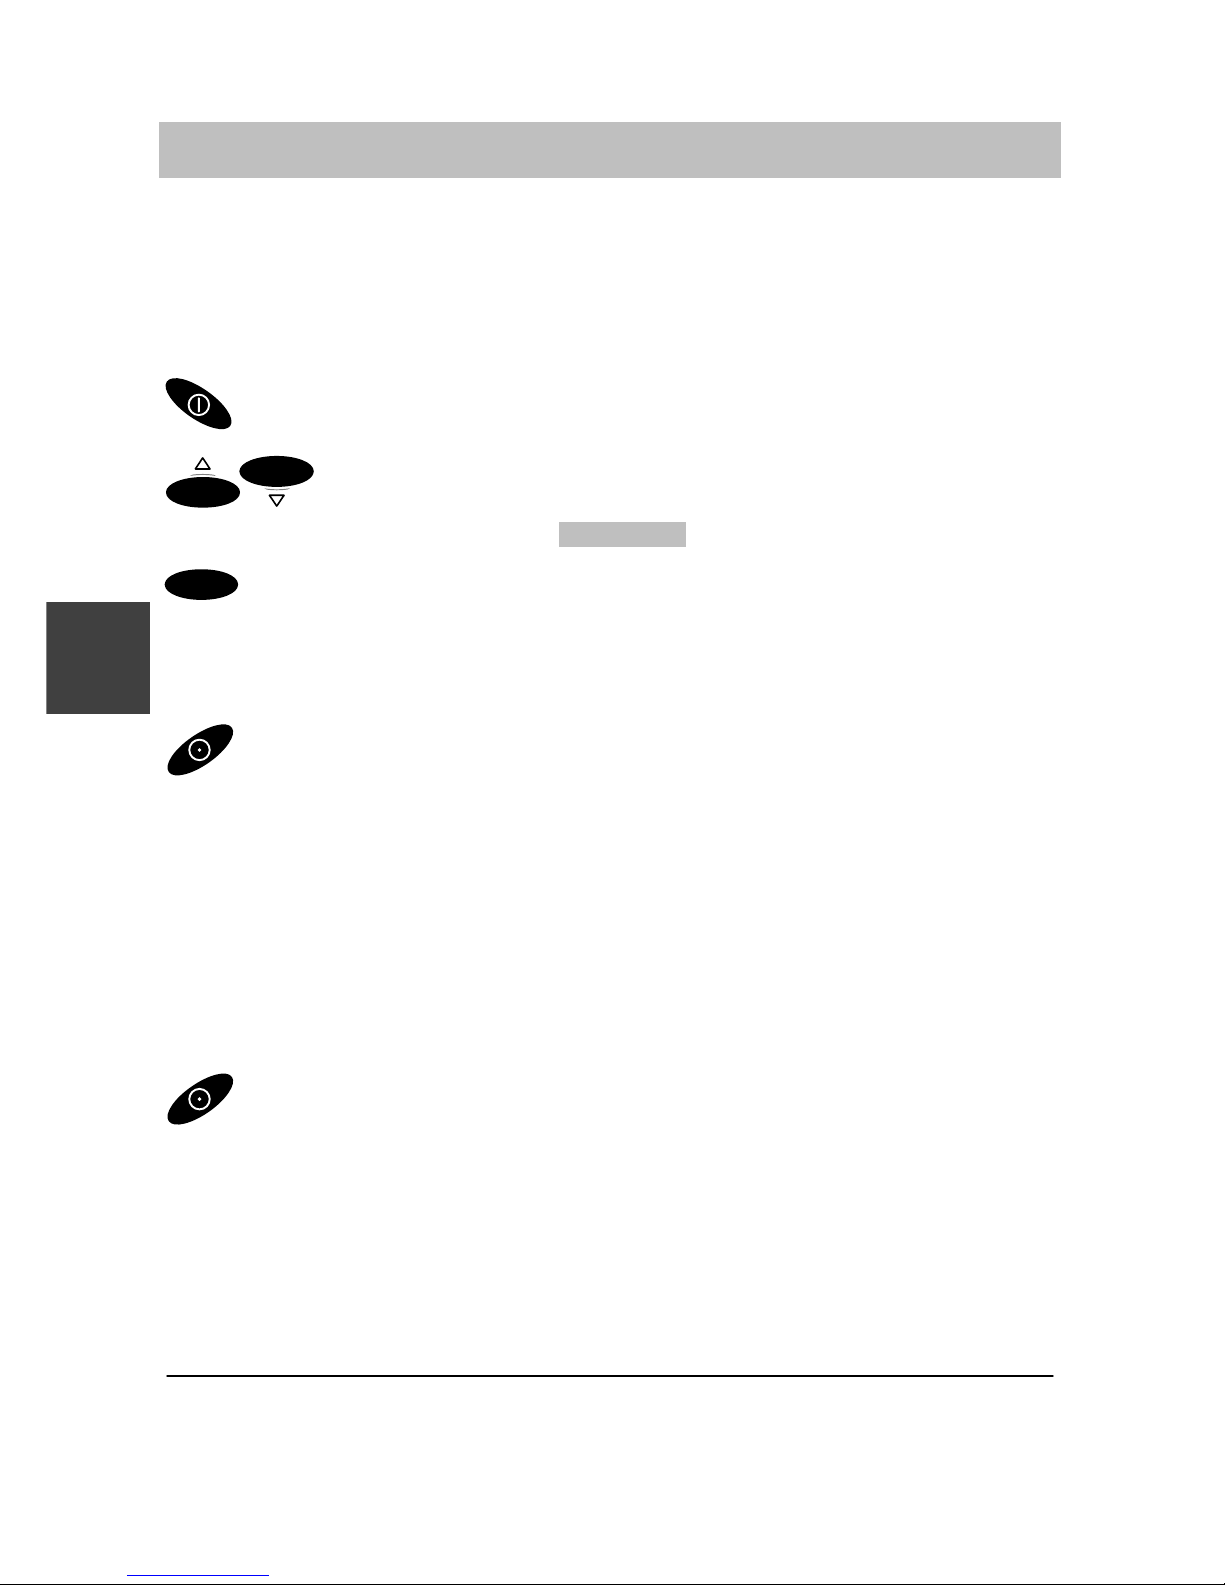
Abrir el menú mediante la softkey derecha.
OK
OK
Pulsar selector hacia arriba o hacia abajo seleccionando así
el punto de menú deseado, p. ej. Sistema .
OK
Seleccionar punto de menú mediante el selector.
Regreso de nivel de menú
Mediante la softkey izquierda Ud. asciende un nivel de menú
o abandona el menú.
Submenús
Los submenús se manejan de la misma manera que el menú principal.
Cancelar
Accione la softkey izquierda prolongadamente para regresar al
estado básico.
En el estado básico, Ud. también puede pulsar directamente el selector
hacia arriba o hacia abajo para abrir el menú.
E
Page 47
Integral 33 / CS I55 – Integral 1/3/5
9
Reglas básicas para el manejo
Introducir caracteres en registros de la guía telefónica
Ud. puede introducir también letras y símbolos mediante las teclas de cifras, p. ej. para introducir nombres en la guía telefónica personal. Las letras
están impresas encima de las teclas numéricas. Su teléfono conmuta automáticamente al modo de introducción de letras y símbolos cuando hace
falta.
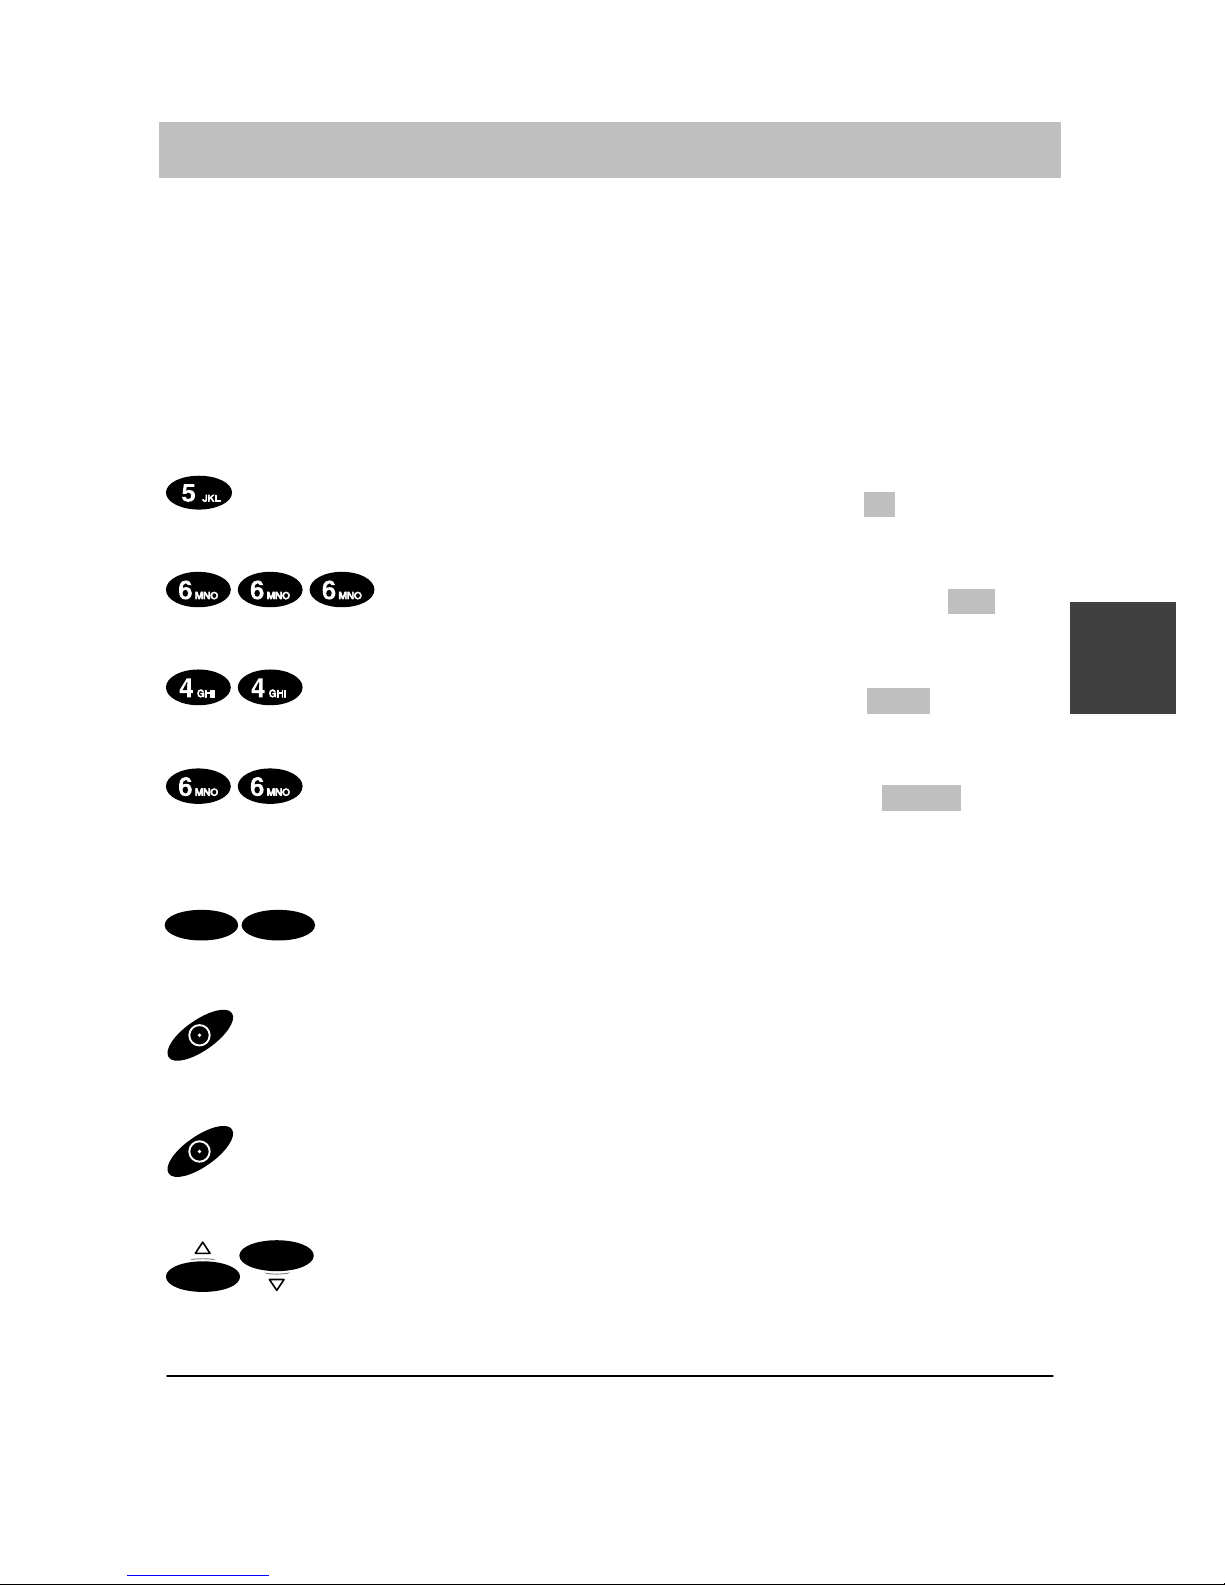
Ejemplo: Introducir el nombre “JOHN“
Pulsar la tecla JKL una vez. En el display aparecerá J .
Esperar brevemente.
Tecla MNO tres veces. En el display aparecerá JO .
Esperar brevemente.
Tecla GHI dos veces. En el display aparecerá JOH .
Esperar brevemente.
Tecla MNO dos veces. En el display aparecerá JOHN .
Esperar brevemente.
Concluir introducción
OK OK
Pulsar selector dos veces. Los caracteres se almacenan.
Corregir caracter
Pulsar softkey izquierda.
Borrar línea
Pulsar la softkey izquierda prolongadamente.
Insertar caracteres
OK
OK
Mover la marca de inserción hacia la derecha o hacia la
izquierda. Los nuevos caracteres que Ud. introduce se insertan delante
de la marca de inserción.
Para conmutar entre mayúsculas y minúsculas: Pulsar la tecla asterisco
prolongadamente.
E
Page 48
Integral 33 / CS I55 – Integral 1/3/5
10
Telefonear como de costumbre
Ud. puede hablar por teléfono desde su móvil DECT normalmente.
Dentro de su central telefónica (interno): Marque el número de extensión.
Fuera de su central telefónica (externo): Marque primero el indicativo
urbano (generalmente el cero) y luego el número de llamada.
Llamar
Descolgar.
Marcar el número de llamada, p. ej. 1276.
Concluir la llamada
Colgar.
Repetición de marcación
Descolgar.
Pulsar la tecla almohadilla prolongadamente.
Recibir una llamada
Su móvil DECT suena.
Descolgar.
En la Integral 1/3/5 Ud. puede usar la repetición de marcación sólo en
caso de llamadas externas.
E
Page 49
Integral 33 / CS I55 – Integral 1/3/5
11
Consulta y transferencia
Ud. puede efectuar una consulta durante una llamada para telefonear con
otra persona. Su interlocutor esperará entre tanto. Además puede transferir
la llamada.
Iniciar consulta
Ud. está hablando por teléfono.
R
Iniciar una consulta. Su interlocutor no le oye.
Marcar el número deseado, p. ej. 7654.
En el display aparece el número 7654 . Se establece la comunicación.
Su primer interlocutor espera.
Finalizar consulta
R
Volver al primer interlocutor mediante la tecla R.
Transferir una llamada
Ud. está hablando por teléfono.
R
Iniciar una consulta.
Marcar el número deseado, p. ej. 7654.
Colgar.
An der Integral 1/3/5 la comunicación con el abonado consultado se corta
cuando Ud. finalice la consulta.
Ud. puede transferir la llamada aún cuando el tercero está ocupado.
E
Page 50
Integral 33 / CS I55 – Integral 1/3/5
12
Activar Manos libres, silenciar el micrófono
Ud. puede activar el altavoz incorporado para Manos libres. A continuación, Ud. oirá a su interlocutor a través del altavoz y puede hablar con él
libremente.
Ud. puede desactivar el micrófono de su móvil DECT mientras habla. El
microteléfono permanece en funcionamiento. Su interlocutor no le escucha,
pero Ud. a él sí.
Activar el altavoz para Manos libres:
Ud. está hablando por teléfono.
R
Activar el altavoz: Pulsar la tecla R prolongadamente. En el display
aparecerá .
Volver a desactivar el altavoz para Manos libres
Ud. está hablando por teléfono. La conversación se reproduce por el
altavoz incorporado para Manos libres. En el display aparecerá .
R
Desactivar el altavoz: Pulsar la tecla R prolongadamente.
Silenciar el micrófono (conmutar a mute)
Ud. está hablando por teléfono.
Desactivar el micrófono. Pulsar la tecla 1 prolongadamente.
En el display aparecerá .
Volver a activar el micrófono
El micrófono está apagado. En el display aparecerá .
Activar el micrófono: Pulsar la tecla 1 prolongadamente. Ud. puede
continuar telefoneando.
Al finalizar la conversación, el altavoz para Manos libres se desconecta
automáticamente y el micrófono se vuelve a activar automáticamente.
Si Ud. inserta su móvil DECT en el cargador durante una conversación
se activa automáticamente Manos libres.
E
Page 51
Integral 33 / CS I55 – Integral 1/3/5
13
Ajustar el móvil DECT
En el estado básico Ud. puede efectuar ajustes en el móvil DECT.
Señal de llamada
OK
Menú ajustar teléfono
OK
OK
Menú Señal de llamada
OK
Confirmar.
OK
Ajuste de la señal de llamada deseada, p. ej tono llamada .
Ud. puede elegir entre tono de llamada, vibrar, ambas cosas, tono corto
o mudo.
OK
Confirmar.
Volumen del microteléfono
OK
Menú ajustar teléfono
OK
OK
Menú volum. microtel.
OK
Confirmar.
Introducir el volumen del microteléfono (del 1 al 6), p. ej. 3.
OK
Confirmar.
Dentro del cargador su móvil DECT no vibra. Si Ud. ha elegido “vibrar”
como señal de llamada sonará un tono corto cuando entra una llamada.
Si Ud. ha seleccionado “mudo” como señal de llamada aparecerá un
símbolo correspondiente en el display (→ página 6).
E
Page 52
Integral 33 / CS I55 – Integral 1/3/5
14
Llamada de emergencia
Si su móvil DECT está cerrado solamente funciona la llamada de emergen-
cia. En el display aparece sobre la softkey derecha: SOS.
La llamada de emergencia siempre está disponible a través de la tecla roja
en la parte superior a la izquierda, aún cuando el móvil DECT está cerrado.
Instalar y modificar el número de emergencia
OK
Menú ajustar teléfono
OK
OK
Menú nº emergencia
OK
Confirmar.
Introducir PIN, p. ej. 2345.
OK
Confirmar.
Introducir o modificar el número de emergencia,
p. ej. 6666.
OK
Confirmar.
Efectuar una llamada de emergencia pulsando la tecla de llamada
de emergencia
Pulsar la tecla de llamada de emergencia en el lado superior prolongadamente. Se marca el número de emergencia.
La llamada de emergencia SOS no está disponible si no se ha introducido
ningún número de emergencia, mientras hay una conversación en curso,
cuando está llegando una llamada u un mensaje, o cuando el móvil DECT
se encuentra fuera de la cobertura de radio de la central telefónica.
Para borrar un número de emergencia, modifíquelo introduciendo nada
como número de teléfono (pulsar la softkey izquierda prolongadamente)
y confirmando mediante el selector.
E
Page 53
Integral 33 / CS I55 – Integral 1/3/5
15
Idiomas
Seleccionar el idioma del menú local
OK
Menú ajustar teléfono
OK
OK
Menú idioma
OK
OK
Seleccionar idioma, p. ej. Español .
OK
Confirmar.
E
Page 54

Integral 33 / CS I55 – Integral 1/3/5
16
Datos técnicos
Móvil DECT Integral D3 mobile
¡No apto para el funcionamiento en áreas con peligro de explosión excepto
zonas 2 y 22 según especificaciones en la declaración del fabricante!
Estándar: DECTt (Digital Enhanced Cordless
Telecommunications).
Dimensiones: 137 x 46 x 21 mm más la antena
Peso del móvil DECT: aprox. 100 g (con batería)
Tipo de batería: NiMH; mAh
Tiempo funcionamiento
del móvil DECT
(bat. con plena carga)
Hablando: mín. 8 horas
En espera: mín. 80 horas
Tiempo de carga: vacío: aprox. 5 horas
estado de carga desconocido: aprox. 14 horas
Banda de frecuencias: 1,88 - 1,9 G 650Hz
Potencia de transmisión: valor medio: 10 mW , valor máximo: 250 mW
Temper. funcionamiento
admisible:
Móvil DECT: –10 °C hasta +45 °C
Base de carga: +5 °C hasta +40 °C
Temp. almacenamiento: –25 °C hasta +55 °C
Temperatura de
transporte:
sin batería –25 °C hasta +70 °C
con batería –25 °C hasta +60 °C
Tipo de protección: IP 54, protegido contra polvo y lanzamiento
de agua
Accesorios Cargador classic, Cargador comfort,
Fuente alim. Europa, Fuente alim. UK,
Batería de repuesto, Auriculares HSG D3,
Funda, D3 Case,
MEM-Card,
MEM-Card-Manager
¡Algunas piezas de los accesorios deben encargarse por separado!
E
Page 55

Integral 33 / CS I55 – Integral 1/3/5
1
Remarques importantes
Contenu de ce mode d’emploi condensé
Ce mode d’emploi vous explique comment mettre votre combiné en service. Toutes les règles élémentaires nécessaires à l’utilisation ainsi que
les fonctions les plus fréquemment utilisées et les réglages les plus fré-
quemment choisis y sont décrits.
Vous trouverez une description exhaustive de toutes les fonctions relatives
à l’installation dans le CD-ROM livré avec l’installation. Il vous est possible
de visualiser et d’imprimer le mode d’emploi.
Remarque : Vous pouvez commander à Tenovis Direct une version impri-
mée du mode d’emploi. Cette version est payante :
Tél. +49 (0) 800-3473 287, Fax : +49 (0) 800-3473 283.
Références : Integral D3 mobile pour Integral 1/3/5 : 4.999.059.185
Integral D3 mobile pour Integral 33 / CS I55 : 4.999.059.184
Contenu de la livraison
Veuillez contrôler immédiatement le contenu de la livraison lorsque vous
recevez votre Integral D3 mobile :
– combiné D3 mobile avec notice d’installation abrégée
– batterie de rechange – MEM-Card
– chargeur classic – bloc d’alimentation
– notice d’utilisation abrégée
– CD-Rom avec notice d’utilisation détaillée
Lieux d’utilisation du combiné
Le combiné Integral D3 mobile peut être utilisé au bureau, en plein air ou
dans un environnement poussiéreux. Il appartient à la classe IP 65, (protection contre la poussière et le ruissellement).
Protéger des parasites
En général, les autres appareils électroniques sont protégés contre les perturbations électromagnétiques. Un blindage insuffisant de ces appareils
peut toutefois perturber le fonctionnement de votre combiné.
N’ouvrez jamais le boîtier du combiné téléphonique !
Vous risqueriez de l’endommager. Il ne contient aucune pièce que vous
puissiez réparer vous-même.
Mettre la batterie en service
Utilisez les batteries de façon conforme. Tenovis décline toute responsabilité
en cas de dommages dus à une manipulation non conforme de la batterie.
F
Page 56

Integral 33 / CS I55 – Integral 1/3/5
2
Remarques importantes
Lorsque les batteries sont usagées – information pour les
consommateurs
Ne jetez pas les batteries usagées avec les déchets domestiques. Rapportez-les à un centre de collecte de votre commune ou à votre revendeur afin
que les batteries entrent dans un circuit de recyclage respectueux de l’environnement.
Conseils relatifs au lieu d’installation
Utilisez un support antidérapant pour poser votre chargeur, surtout si votre
meuble est neuf ou entretenu avec des produits d’entretien. Les vernis ou
produits d’entretien peuvent contenir des substances qui peuvent attaquer
le revêtement des pieds de votre chargeur. Ceux-ci peuvent ensuite laisser
des traces indésirables sur la surface de vos meubles. Tenovis décline
toute responsabilité en cas de dégradations de ce genre.
Ne mettez au rebut que les batteries déchargées.
Agrément et conformité
Au nom de la société Tenovis GmbH & Co.KG, nous certifions que le produit Integral D3 mobile est conforme aux exigences fondamentales et
autres prescriptions correspondantes de la directive 1999/5/UE (R&TTE).
Cet appareil est destiné à être connecté aux interfaces radios (DECTt )
d’installations de télécommunication Tenovis et satisfont aux exigences fondamentales de la directive CE1999/5/CE (Equipement de terminaux radio
et télécommunication, R&TTE).
De par sa construction, cet appareil ne saurait être utilisé directement sur
les interfaces de réseaux de télécommunications publics.
En cas de problèmes lors de l’utilisation, veuillez vous adresser à votre
revendeur ou au service après-vente Tenovis.
Vous pouvez obtenir la déclaration de conformité sur l’adresse Internet
suivante : www.tenovis.com/deutsch/verzeichnis/conformance.htm ou
chercher dans l’index le mot-clé : conformité.
Cet équipement fonctionne selon le système DECTt dans une plage de
fréquences comprise entre 1 880 et 1 900 MHz. Cette plage dans le plan
d’utilisation des fréquences est en premier lieu valable jusqu’en 2008 et
sera reconduite en fonction de l’harmonisation européenne.
DECT est une marque déposé de ETSI
F
Page 57

Integral 33 / CS I55 – Integral 1/3/5
3
Mise en service
Si votre combiné n’est pas encore monté
Si le combiné n’est pas complètement monté lorsque vous le recevez, vous
devez :
D insérer la MEM-Card (→ page 3),
D monter la batterie (→ page 4) et
D le cas échéant, retirer le film protecteur de l’afficheur.
D Votre revendeur doit assigner le combiné à votre installation téléphonique.
Votre combiné est ensuite prêt à fonctionner.
D Raccordez le chargeur (→ page 5).
Si votre combiné est déjà complètement monté
Si vous recevez votre combiné complètement monté et qu’il est déjà
assigné à votre installation téléphonique, il ne vous reste qu’à brancher
le chargeur (→ page 5).
MEM-Card
Vous pouvez téléphoner avec votre combiné uniquement lorsqu’une MEMCard y est insérée. Les données importantes de votre combiné telles que
réglages personnels et annuaires s’y trouvent enregistrés. Même si vous
changez de combiné, vous pouvez immédiatement téléphoner grâce à
cette MEM-Card.
F
Page 58
Integral 33 / CS I55 – Integral 1/3/5
4
Mise en service
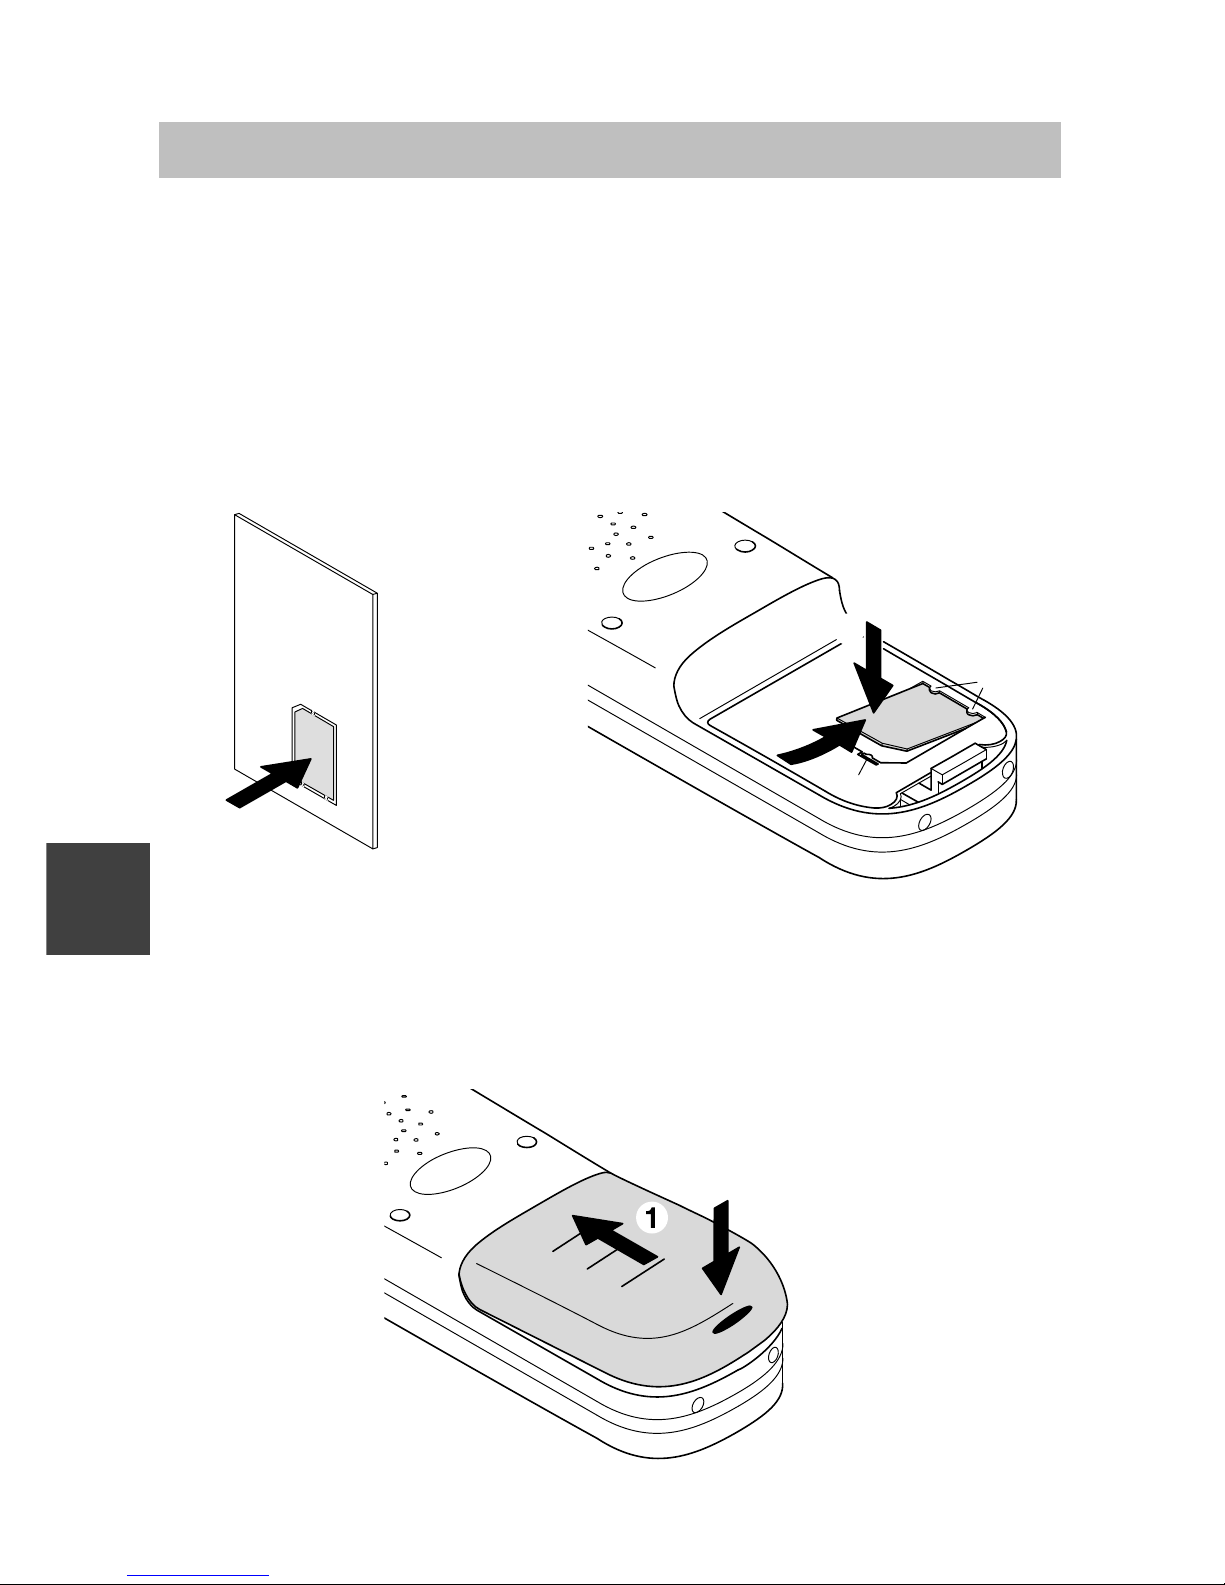
Insérer la MEM-Card
D Poussez tout d’abord avec le doigt la petite MEM-Card pour l’extraire de
son support (figure ci-contre à gauche).
D Maintenez la MEM-Card inclinée, côté bord moins large et insérez-la en
la faisant glisser sous les onglets de maintien a du compartiment de la
MEM-Card (figure ci-contre à droite) (1). Les surfaces de contact dorées
de la MEM-card doivent être orientées vers le bas.
D Enfoncez la MEM-Card jusqu’à ce que la languette d’arrêt b la bloque (2).
Placer la batterie
D Faites glisser la batterie dans le boîtier (1)
D Du côté des saillies de bridage, enfoncez la batterie jusqu’à ce que vous
l’entendiez s’enclencher (2).
F
1
2
a
b
2
Page 59
Integral 33 / CS I55 – Integral 1/3/5
5
Mise en service
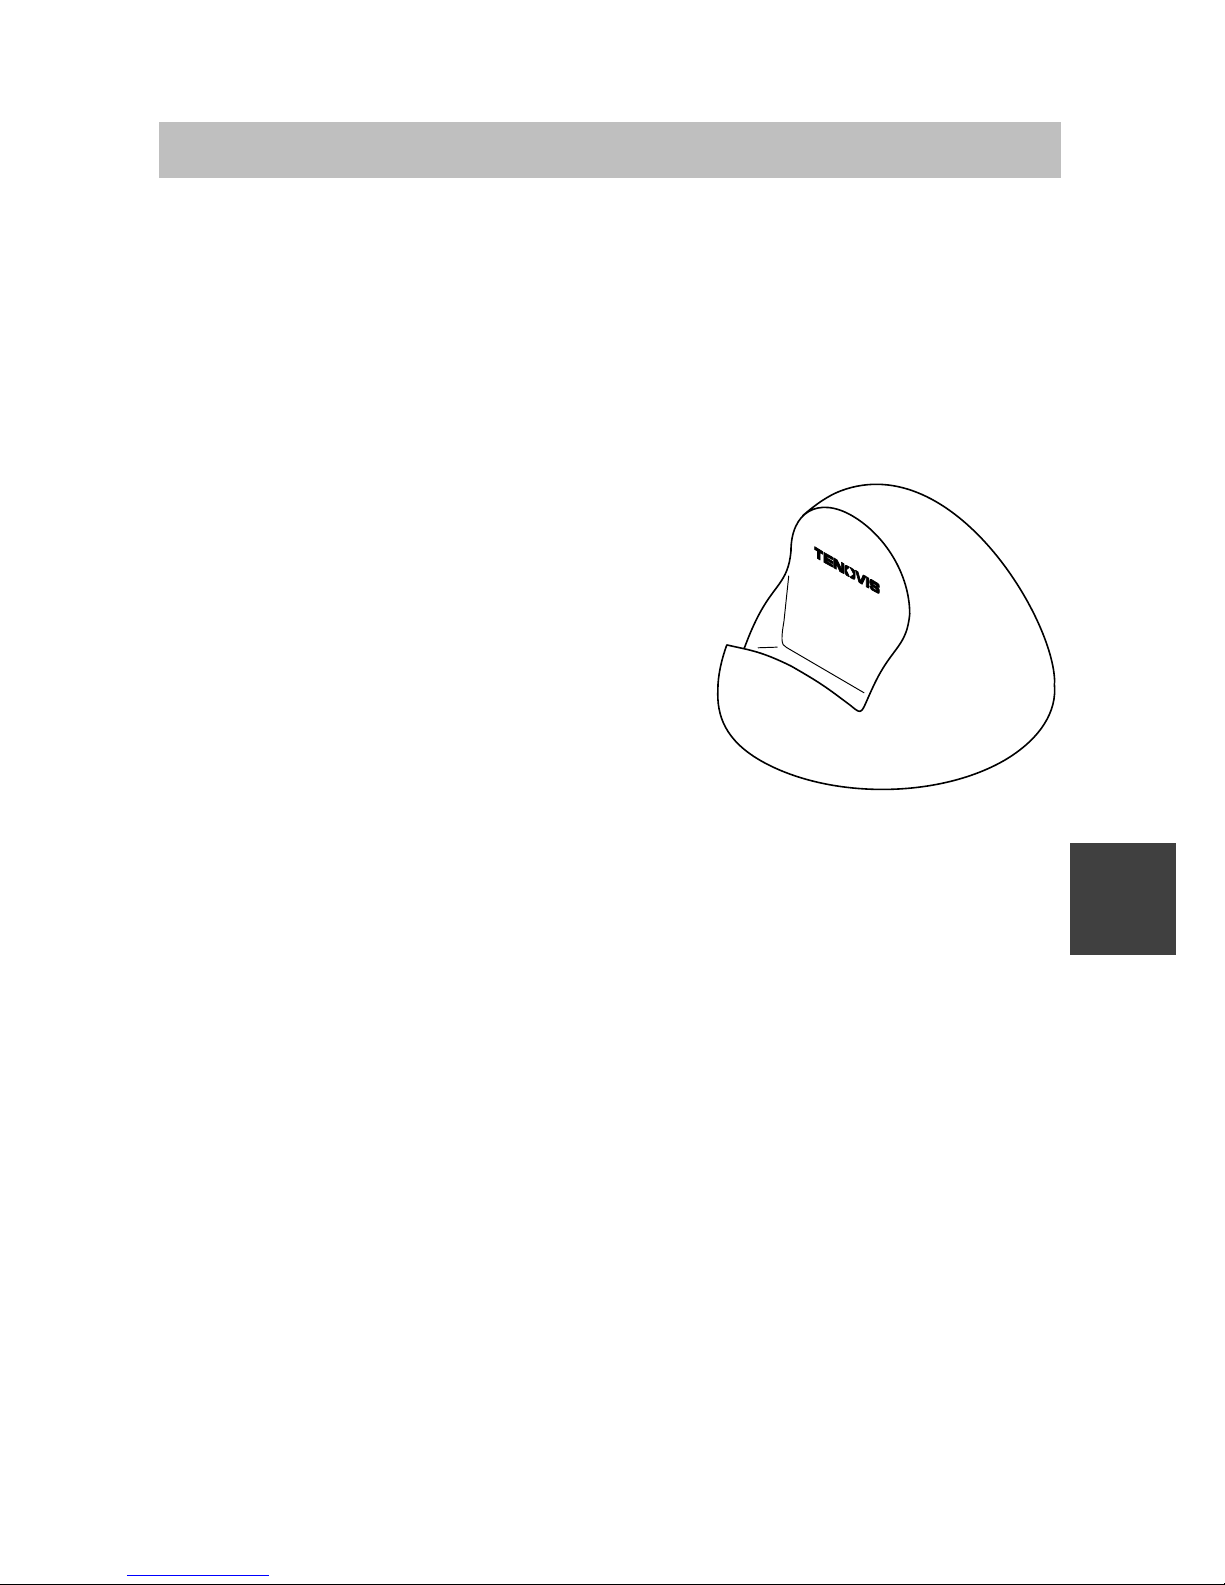
Installer le chargeur
Posez le chargeur sur une surface dure et plane, p. ex. sur une table. Choisissez un emplacement à l’abri de l’ensoleillement direct et de l’humidité.
D Raccordez le bloc d’alimentation à une prise de courant.
D Insérez la petite fiche du câble de raccordement dans le chargeur.
Le chargeur est prêt à fonctionner.
Charger le combiné
Posez simplement le combiné sur le chargeur. Une tonalité de confirmation se fait
entendre. L’afficheur s’illumine brièvement.
Le combiné reste activé ou ne se met pas
en marche. Le symbole de la batterie situé
sur la ligne des symboles se déplace jusqu’à ce que la batterie soit complètement
chargée.
Pendant la recharge, les batteries chauffent légèrement. C’est normal.
Remarques relatives à la batterie
Effectuez tout d’abord un chargement complet de la batterie. Pendant la
première semaine d’utilisation, veillez à replacer régulièrement le combiné
dans le chargeur. Les cellules de batterie neuves n’atteignent générale-
ment leur pleine capacité qu’après quelques procédures de décharges et
recharges.
Vous pouvez laisser votre combiné pour une durée indéterminée dans le
chargeur. La batterie ne risque pas d’être trop chargée.
Ne laissez jamais la batterie en plein soleil. Elle vous en remerciera par
une longue durée de vie.
Attention !
D Ne jetez pas la batterie au feu car elle risquerait d’exploser.
D Afin de prévenir toute blessure ou tout dégât consécutif à un incendie,
veillez à ce que les contacts de la batterie ne puissent pas entrer en
contact avec des objets électroconducteurs et ne soient pas courtcircuités.
F
Chargeur classic
Page 60
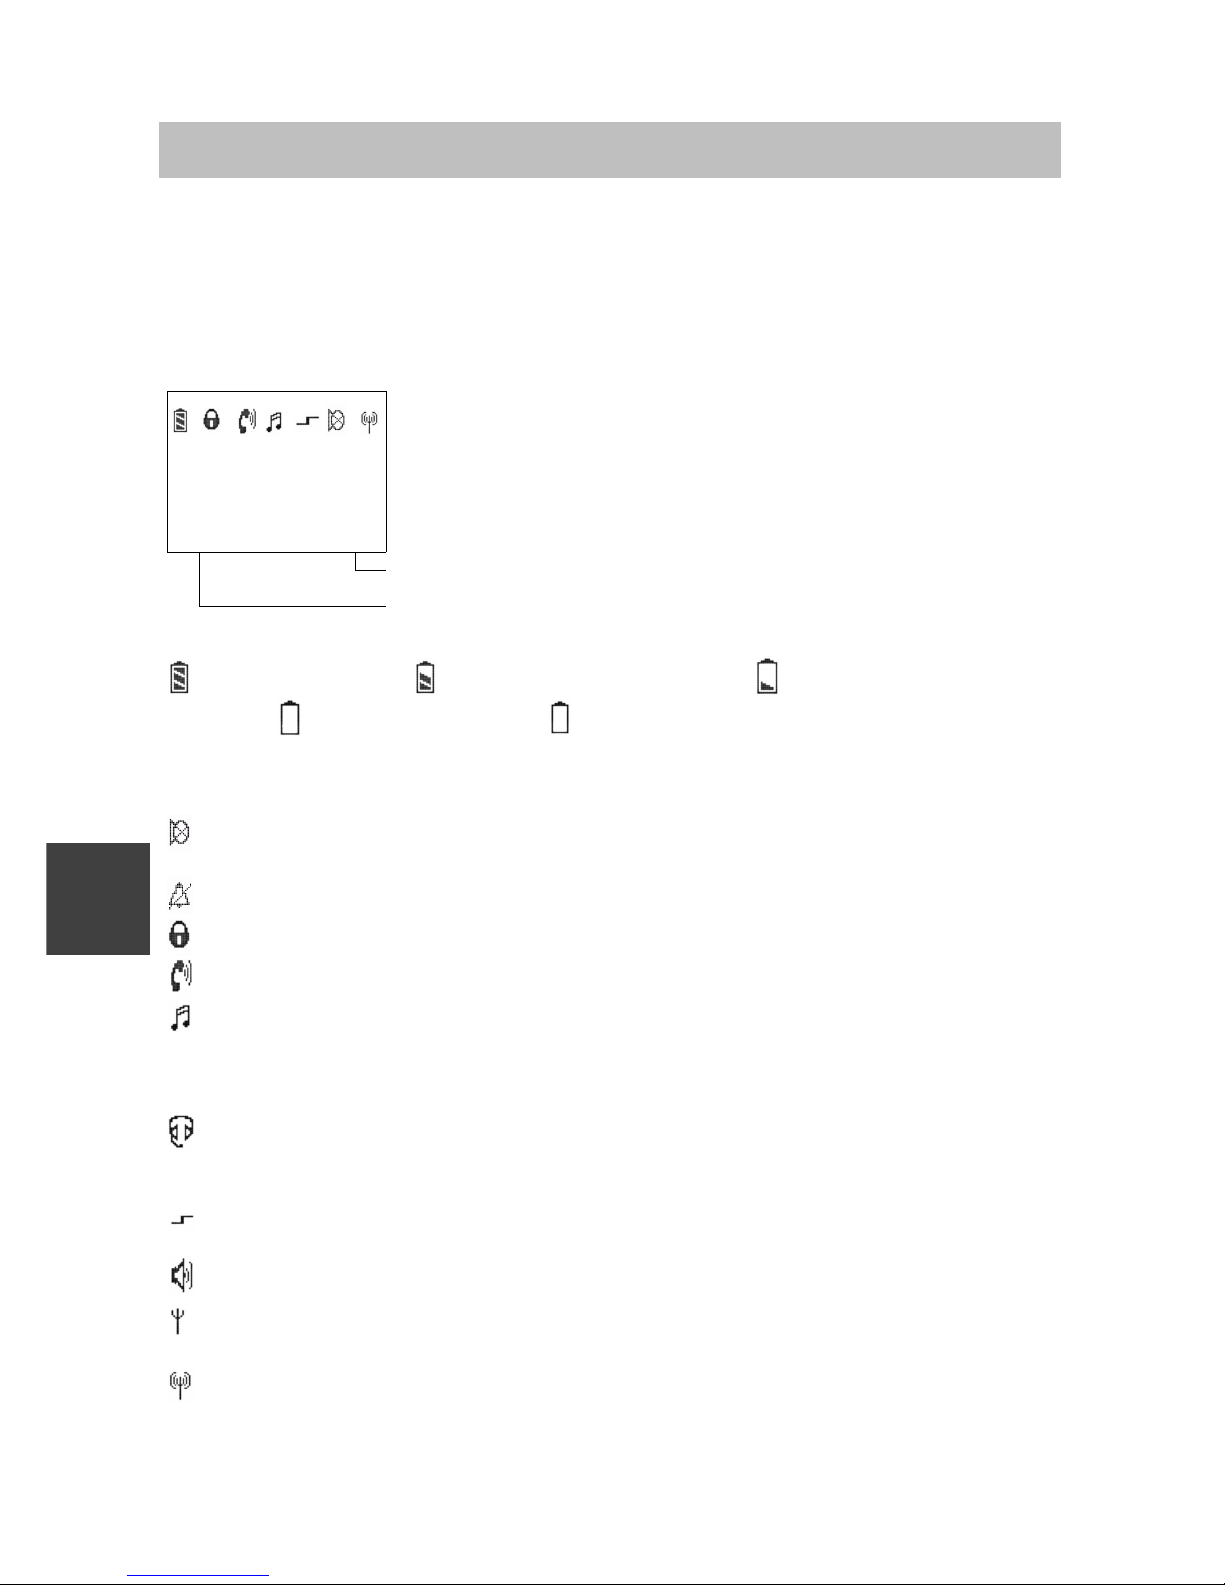
Integral 33 / CS I55 – Integral 1/3/5
6
Afficheur
Les différents textes et symboles qui apparaissent sur l’afficheur vous aident
à utiliser le combiné. Les textes et les symboles vous guident à travers les
menus et vous renseignent sur l’état de votre combiné.
Les fonctions des touches de gauche et de droite changent suivant l’état
actuel du combiné. Elles s’affichent directement au-dessus des touches.
Lignes sur l’afficheur
La ligne des symboles indique l’état actuel du
téléphone.
Durand
7442
Deux lignes de texte p. ex. pour le nom et le numéro
d’appel.
Couper Menu
Fonction de la touche de droite p. ex. Menu.
Fonction de la touche de gauche p. ex. Couper.
Légende des symboles
Batterie chargée, Batterie presque chargée, Batterie presque dé-
chargée, Batterie déchargée, (le symbole de la batterie clignote) l’autonomie n’est plus que de cinq minutes ! Lorsque vous réinstallez une bat-
terie, le symbole de la batterie ne s’affiche pas. Il apparaît seulement une
fois que la batterie a été chargée dans le combiné.
Secret : le microphone est désactivé. Votre correspondant ne peut pas
vous entendre.
Pas de signal d’appel : Le signal d’appel a été désactivé.
Serrure : le combiné est verrouillé.
Combiné : le combiné est en communication téléphonique.
Numérotation multifréquences : chaque pression sur la touche est
transmise sous forme de fréquences audibles à l’usager de cette communication (surnumérotation multifréquences). (Le symbole est affiché seulement avec l’intégral 1/3/5)
Combiné écouteur-microphone : vous téléphonez par le biais du com-
biné écouteur-microphone. Le microphone et le haut-parleur du boîtier sont
automatiquement déconnectés.
Fonction spéciale activée : la touche Etoile a été maintenue pressée
trop longtemps.
Haut-parleur:Le haut-parleur mains-libres situé au dos du boîtier est activé.
Dans la zone de couverture radio de l’installation : votre combiné se
trouve dans la zone de couverture radio d’une base. Vous pouvez téléphoner.
Liaison avec l’installation: votre combiné est en communication téléphonique.
F
Page 61
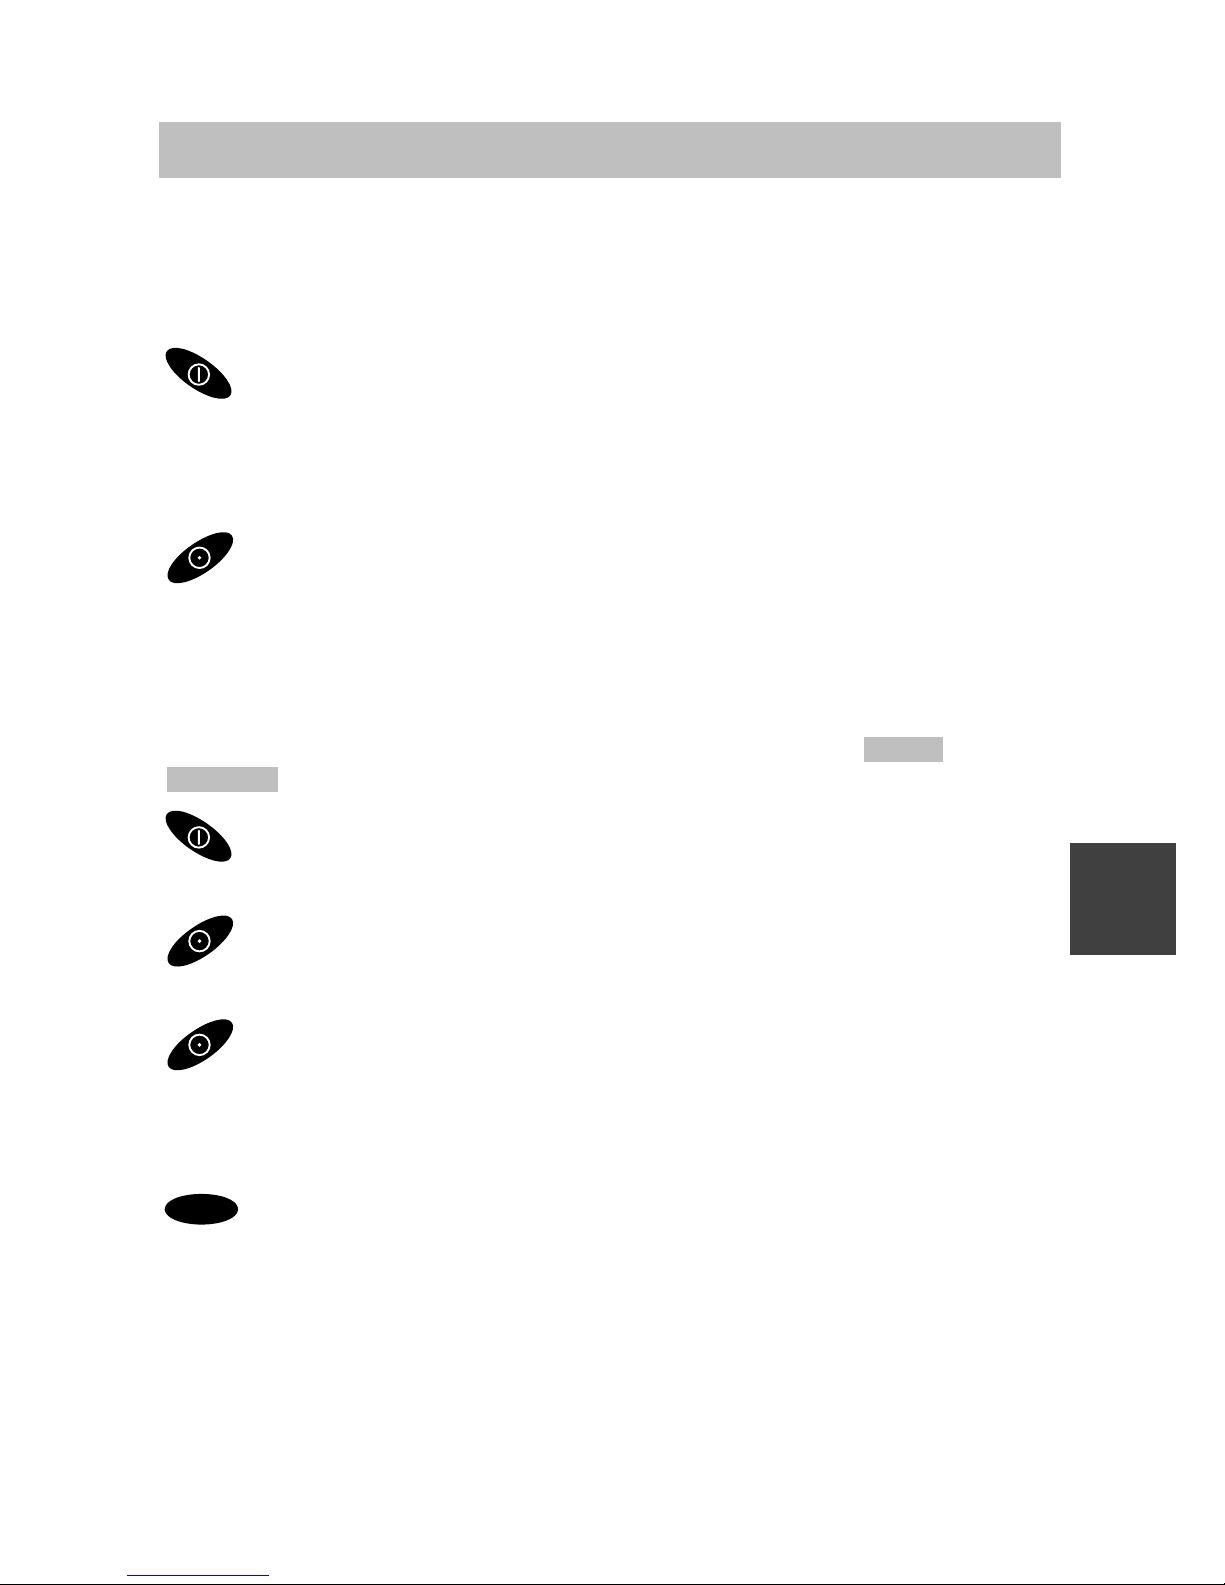
Integral 33 / CS I55 – Integral 1/3/5
7
Règles élémentaires d’utilisation
L’utilisation de votre téléphone comporte par un certain nombre d’opéra-
tions qui reviennent fréquemment. Familiarisez-vous avec ces manipulations.
Activer le téléphone
Le téléphone est désactivé. Pressez longuement la touche
de droite.
Désactiver le téléphone
Le téléphone se trouve à l’état initial. Pressez longuement
la touche de gauche.
Touches de gauche et de droite
Les fonctions de ces touches varient selon la situation. La fonction est toujours indiquée sur l’afficheur au-dessus de la touche, p. ex. Menu ou
Couper .
La touche de droite sert à mettre en marche le combiné ou à appeler
le menu.
La touche de gauche sert à quitter une rubrique de menu ou à annu-
ler une fonction.
Si dans un menu quelconque vous pressez longuement la
touche de gauche, le combiné revient à son état initial.
Touche OK
OK
Cette touche permet de valider les réglages (nécessite un appui sur
touche un peu plus énergique afin d’éviter une action non prévue).
Touches à double fonction
Certaines touches de votre combiné disposent d’une seconde fonction.
Vous pouvez les reconnaître à leur surimpression de couleur orange. Si
vous souhaitez activer la seconde fonction indiquée en orange, vous devez
pressez longuement la touche. Une tonalité de confirmation se fait entendre.
F
Page 62
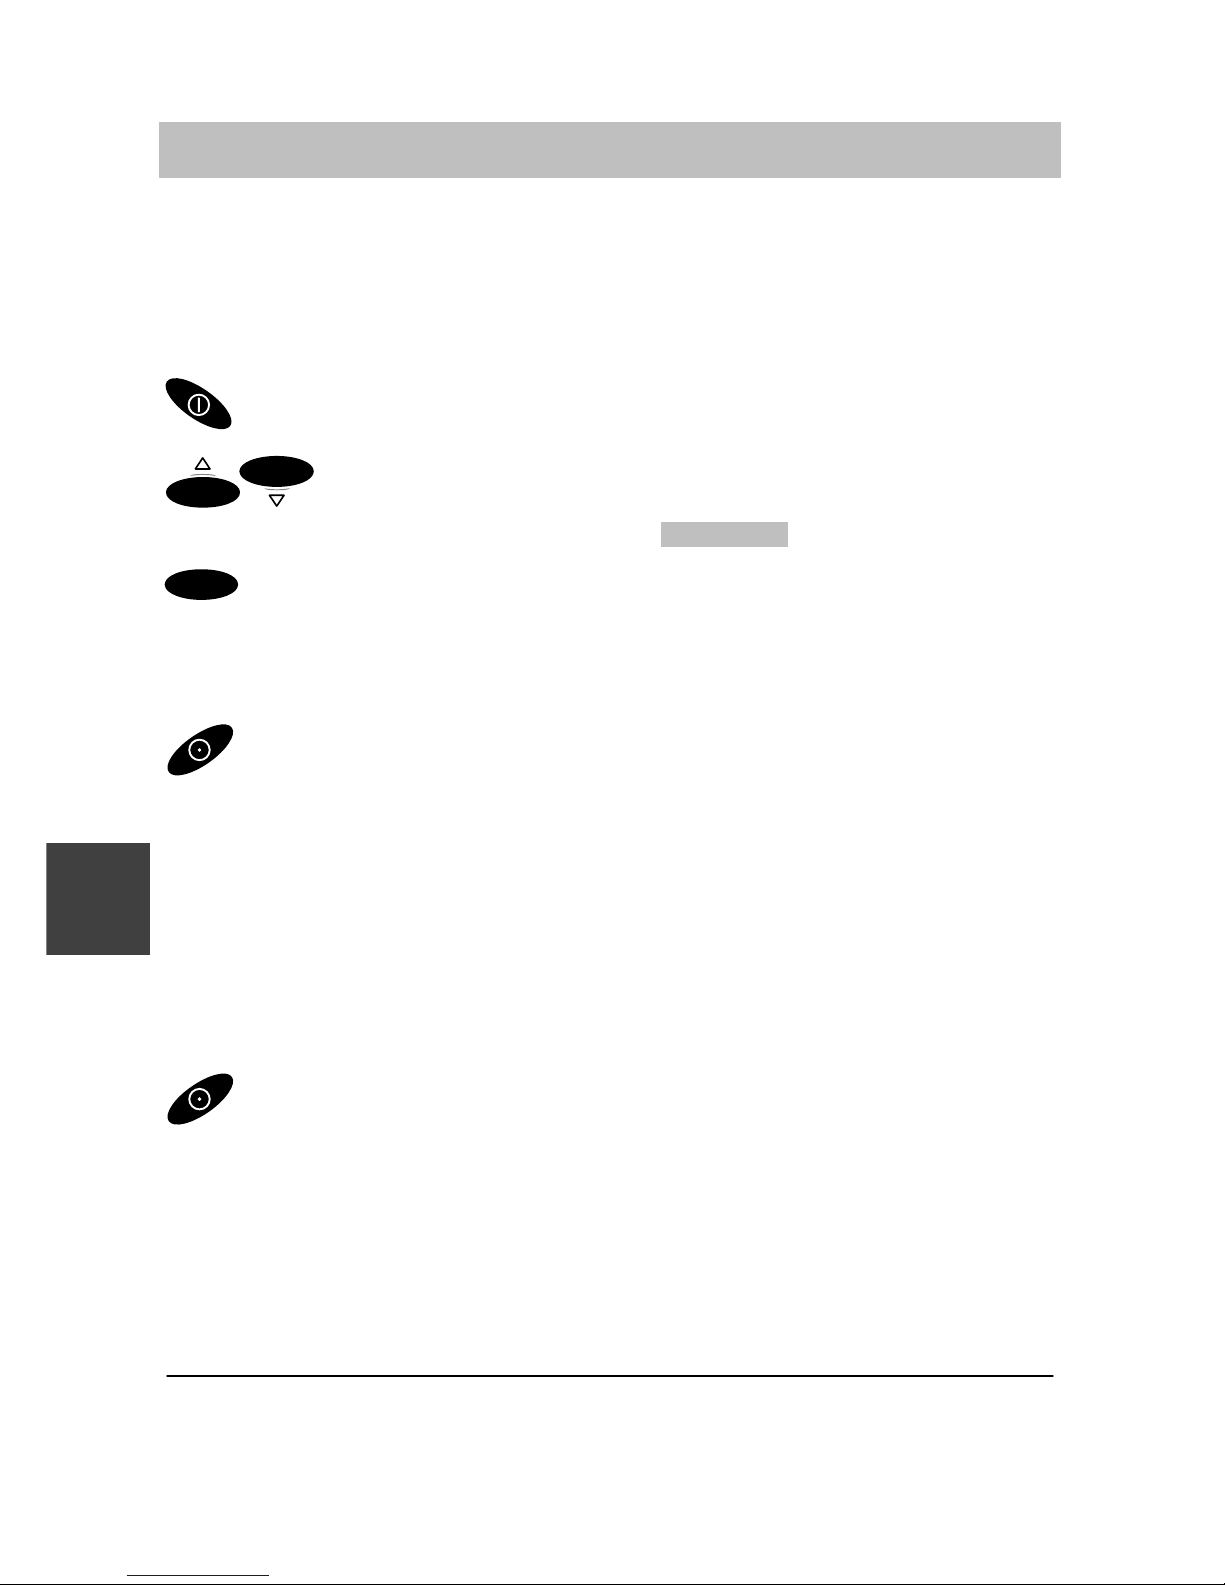
Integral 33 / CS I55 – Integral 1/3/5
8
Règles élémentaires d’utilisation
Sélectionner un menu
Les fonctions et les réglages de votre téléphone sont accessibles par le
menu indiqué sur l’afficheur. Le menu est structuré de telle sorte que la
plupart des rubriques du menu se subdivisent en sous-menus.
Appelez le menu à l’aide de la touche de droite.
OK
OK
Pressez la touche OK vers le haut ou vers le bas et sélection-
nez la rubrique du menu souhaitée, p. ex. Système .
OK
Sélectionnez la rubrique du menu à l’aide de la touche OK.
Remonter dans le menu
La touche de gauche vous permet d’accéder à un niveau supérieur
du menu ou de quitter celui-ci.
Sous-menus
Les sous–menus fonctionnent de la même manière que le menu principal.
Annuler
Pressez longuement la touche de gauche pour revenir à l’état
initial.
Lorsque le combiné se trouve en état initial, vous pouvez directement presser la touche OK vers le bas pour appeler le menu.
F
Page 63
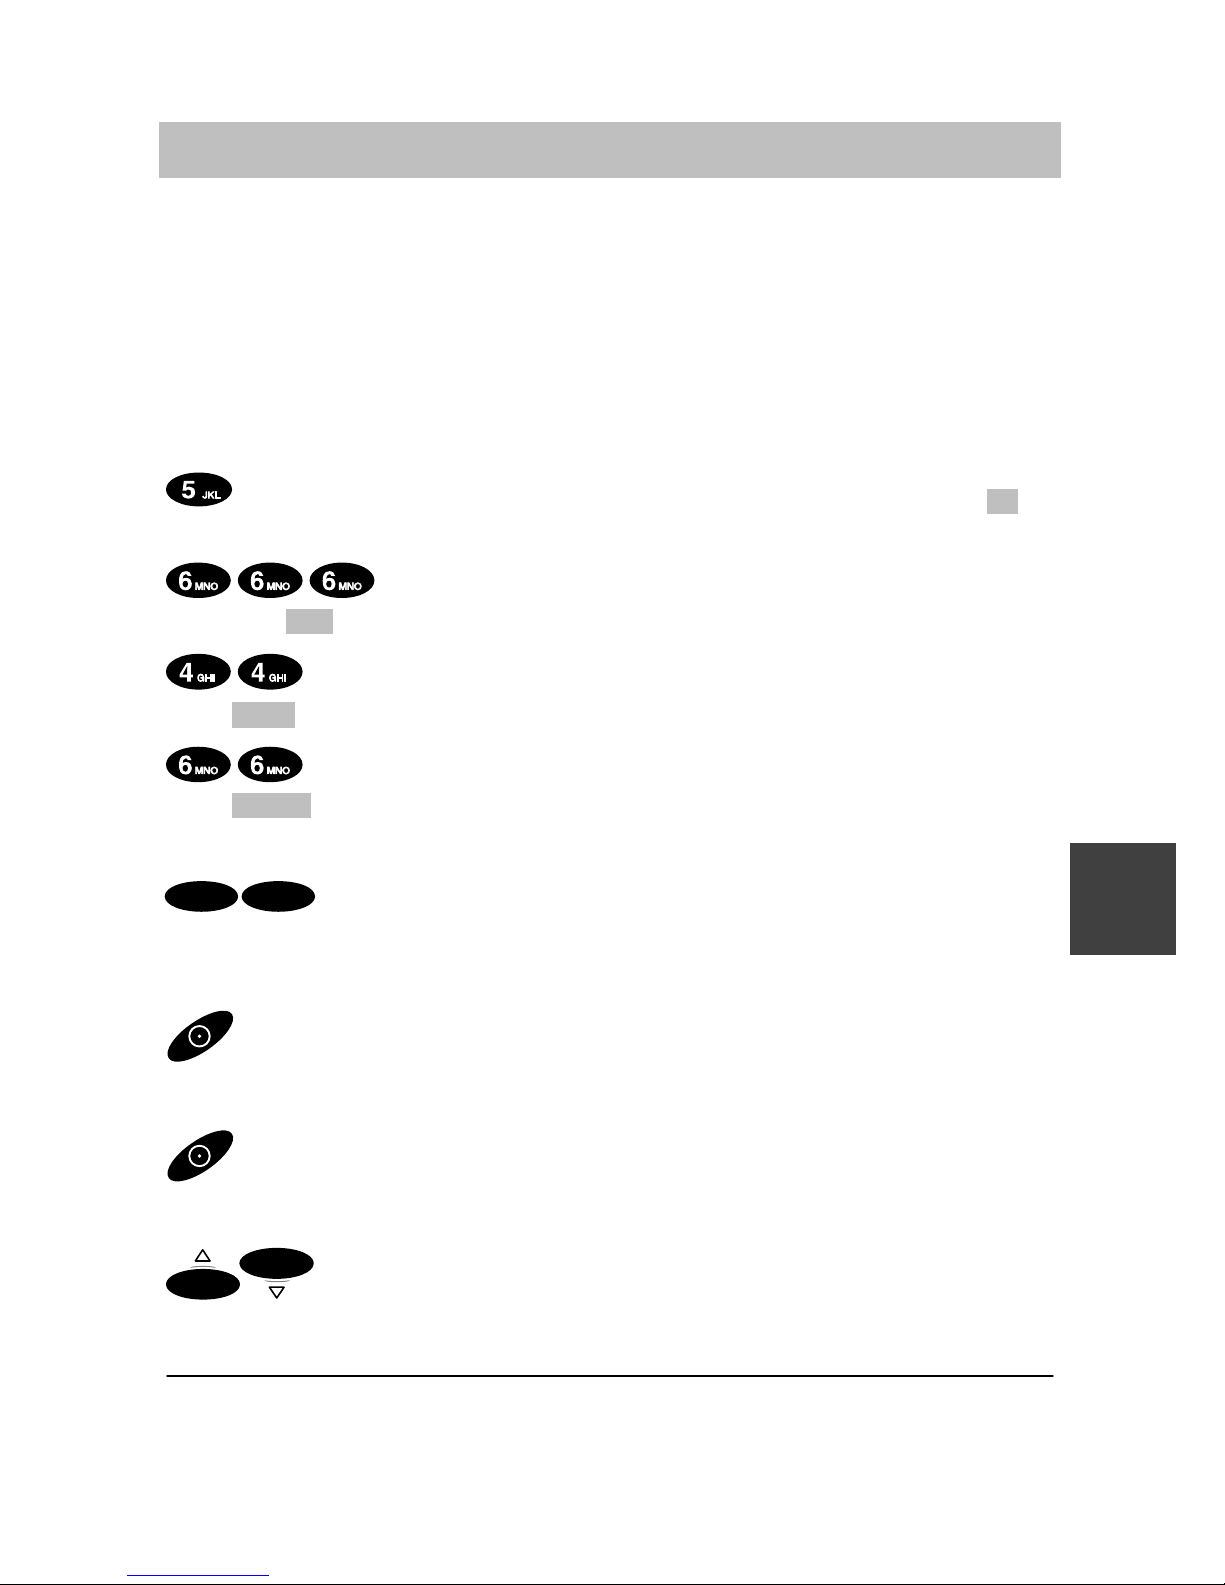
Integral 33 / CS I55 – Integral 1/3/5
9
Règles élémentaires d’utilisation
Entrée des caractères pour les inscriptions dans l’annuaire
Les touches numériques vous permettent également de saisir des lettres et
des caractères spéciaux, p. ex. pour inscrire des noms dans votre annuaire
personnel. Les lettres figurent sur les touches numériques. Lorsque c’est
nécessaire, votre téléphone bascule automatiquement sur la saisie de lettres et de caractères spéciaux.
Exemple : saisie du nom « JOHN » :
Pressez une fois la touche JKL. La mention suivante s’affiche : J .
Attendez un peu.
Pressez trois fois la touche MNO. La mention suivante
s’affiche : JO . Attendez un peu.
Pressez deux fois la touche GHI. La mention suivante s’affi-
che : JOH . Attendez un peu.
Pressez deux fois la touche MNO. La mention suivante s’affi-
che : JOHN . Attendez un peu.
Terminer l’entrée
OK OK
Pressez deux fois la touche OK. Les caractères entrés sont
enregistrés.
Corriger un caractère
Pressez la touche de gauche.
Effacer une ligne
Pressez longuement la touche de gauche.
Insérer un caractère
OK
OK
Déplacez le curseur vers la droite ou vers la gauche. Les nou-
veaux caractères que vous entrez sont insérés devant le curseur.
Passage des lettres majuscules aux lettres minuscules : pressez longue-
ment la touche Etoile.
F
Page 64
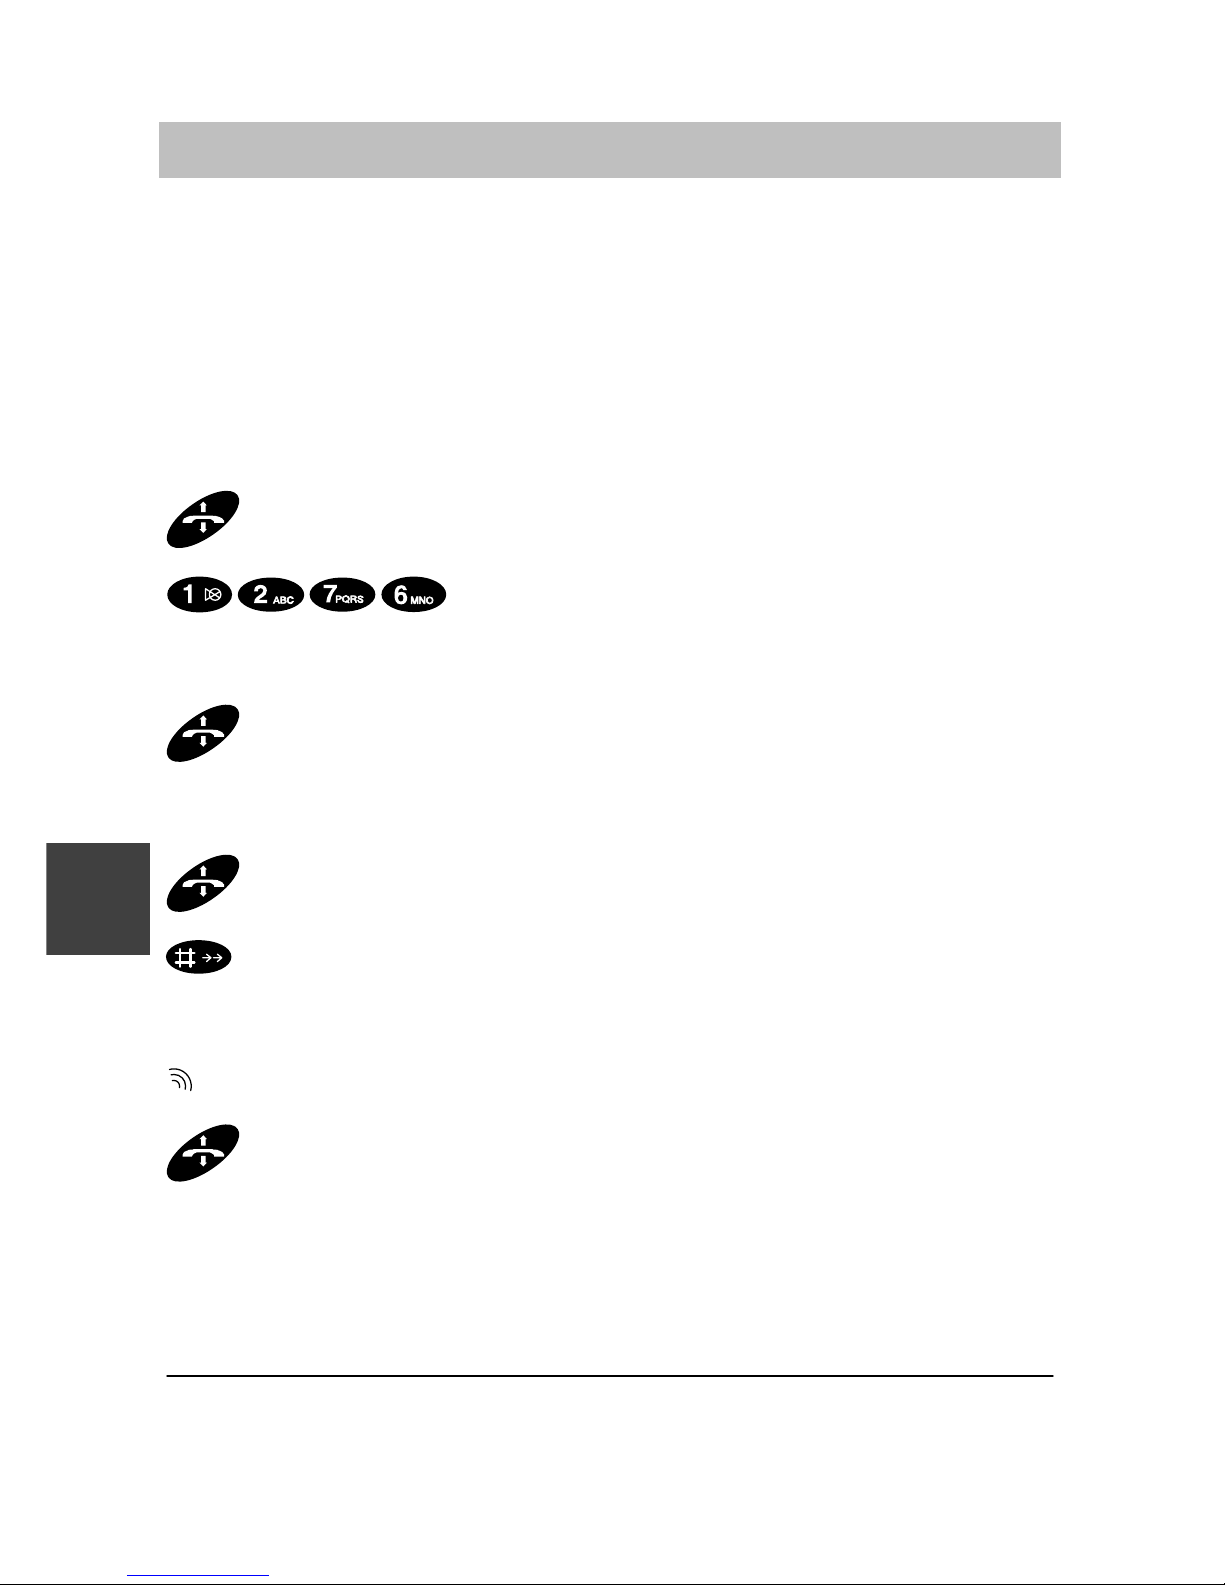
Integral 33 / CS I55 – Integral 1/3/5
10
Téléphoner comme vous en avez l’habitude
Votre combiné vous permet de téléphoner tout à fait normalement.
Au sein de votre installation téléphonique (communication interne) :
composez directement le numéro de sélection directe à l’arrivée.
En dehors de votre installation téléphonique (communication externe) :
composez le préfixe d’accès au réseau public (zéro le plus souvent) et
le numéro d’appel de votre correspondant.
Appeler
Décrochez.
Composez le numéro d’appel désiré, p. ex. 1276.
Mettre fin à la communication
Raccrochez.
Répétition automatique
Décrochez.
Pressez longuement la touche Dièse.
Recevoir un appel
Votre combiné sonne.
Décrochez.
Pour Integral 1/3/5, vous pouvez utiliser la fonction de répétition uniquement pour les appels extérieurs.
F
Page 65
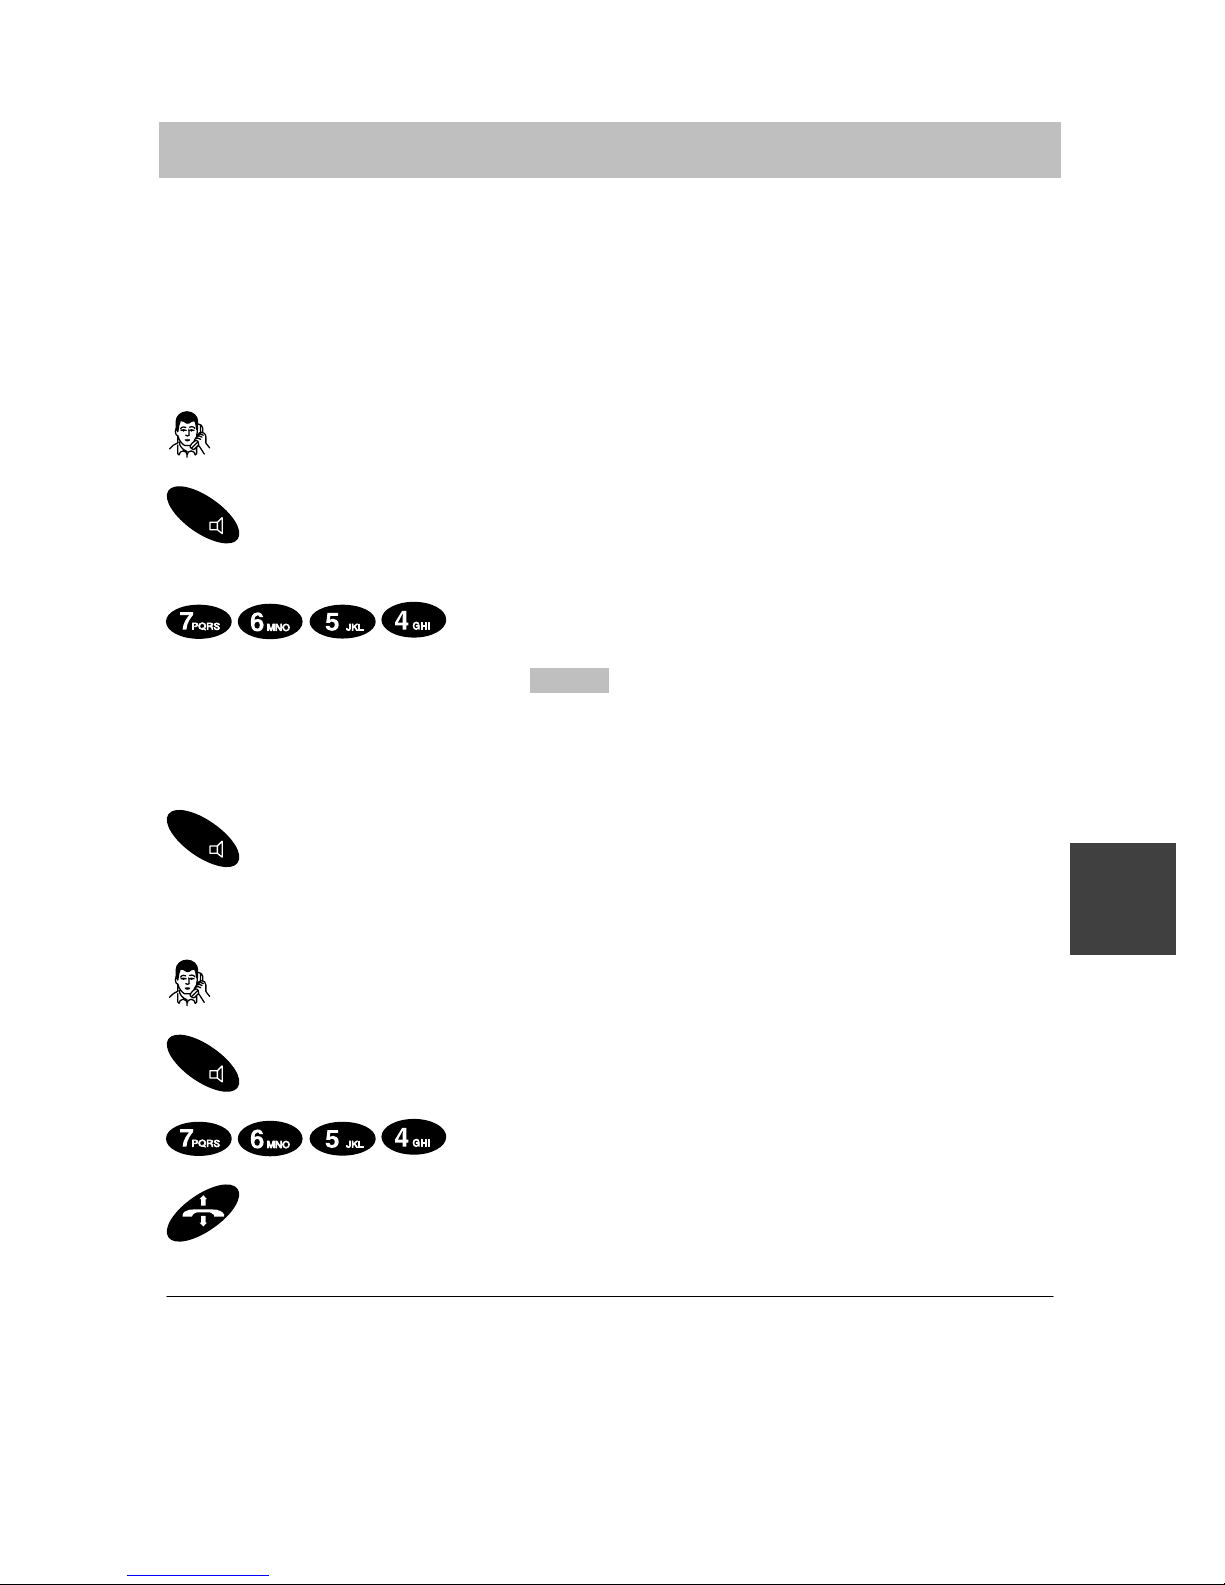
Integral 33 / CS I55 – Integral 1/3/5
11
Double appel et transfert
Pendant que vous êtes en communication externe, vous pouvez basculer
votre combiné en rétro-appel et converser avec une autre personne. Votre
premier correspondant est alors en attente. – En outre, vous pouvez transférer l’appelant en interne ou en externe.
Activer un double appel
Vous êtes en communication.
R
Pressez la touche R pour mettre votre correspondant en attente.
Votre correspondant ne peut pas vous entendre.
Composez le numéro d’appel désiré, p. ex. 7654.
La mention suivante s’affiche : 7654 . La communication est en cours
d’établissement. Votre premier correspondant attend.
Revenir en communication avec votre premier correspondant
R
Retournez au premier correspondant à l’aide de la touche R.
Transférer un correspondant
Vous êtes en communication.
R
Pressez la touche R pour mettre votre correspondant en attente.
Composez le numéro d’appel désiré, p. ex. 7654.
Raccrochez.
Pour l’Integral 1/3/5, la communication avec l’usager du rétro-appel est
coupée lorsque vous désactivez le rétro-appel.
Vous pouvez effectuer un transfert même si le troisième usager est oc-
cupé.
F
Page 66
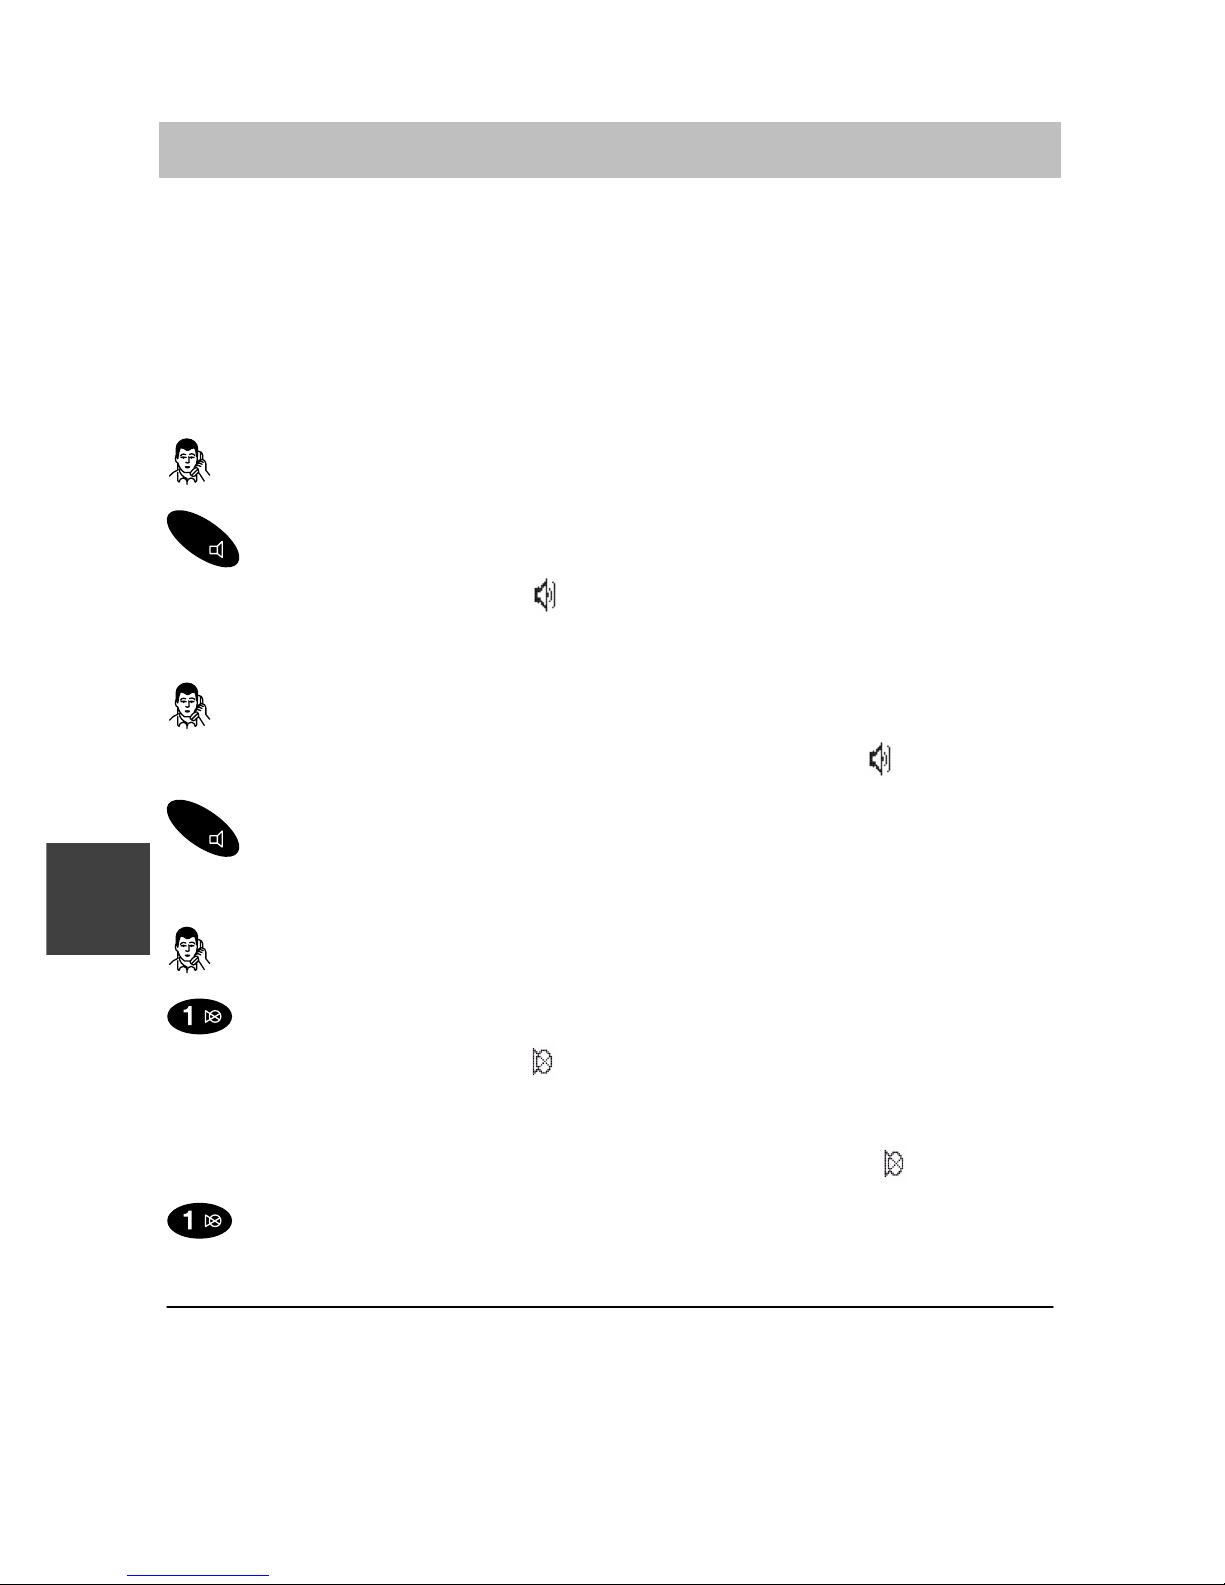
Integral 33 / CS I55 – Integral 1/3/5
12
Ecoute amplifiée des communications, désactiver le microphone
Vous pouvez activer le haut-parleur mains-libres pour être à l’écoute.
La voix de votre correspondant est amplifiée dans la pièce et vous pouvez
parler les mains-libres.
Vous pouvez désactiver le microphone de votre combiné alors que vous
êtes en communication. L’écouteur demeure activé. Votre correspondant
ne vous entend plus, mais vous continuez de l’entendre.
Activer le haut-parleur mains-libres
Vous êtes en communication.
R
Activer le haut-parleur : pressez longuement la touche R.
La mention suivante s’affiche : .
Désactiver à nouveau le haut-parleur mains-libres
Vous êtes en communication. La communication est retransmise par
le haut-parleur mains-libres. La mention suivante s’affiche : .
R
Pour désactiver le haut-parleur, pressez longuement la touche R.
Désactiver le microphone de votre combiné
Vous êtes en communication.
Pour désactiver le microphone, pressez longuement la touche 1.
La mention suivante s’affiche :
Réactiver le microphone de votre combiné
Le microphone est désactivé. La mention suivante s’affiche :
Pour activer le microphone de votre combiné, pressez longuement la
touche 1. Vous pouvez poursuivre la conversation.
Une fois la communication terminée, le haut-parleur mains-libres est automatiquement désactivé et le microphone réactivé.
Si vous placez votre combiné sur le chargeur pendant la communication,
la fonction mains-libres s’active automatiquement.
F
Page 67
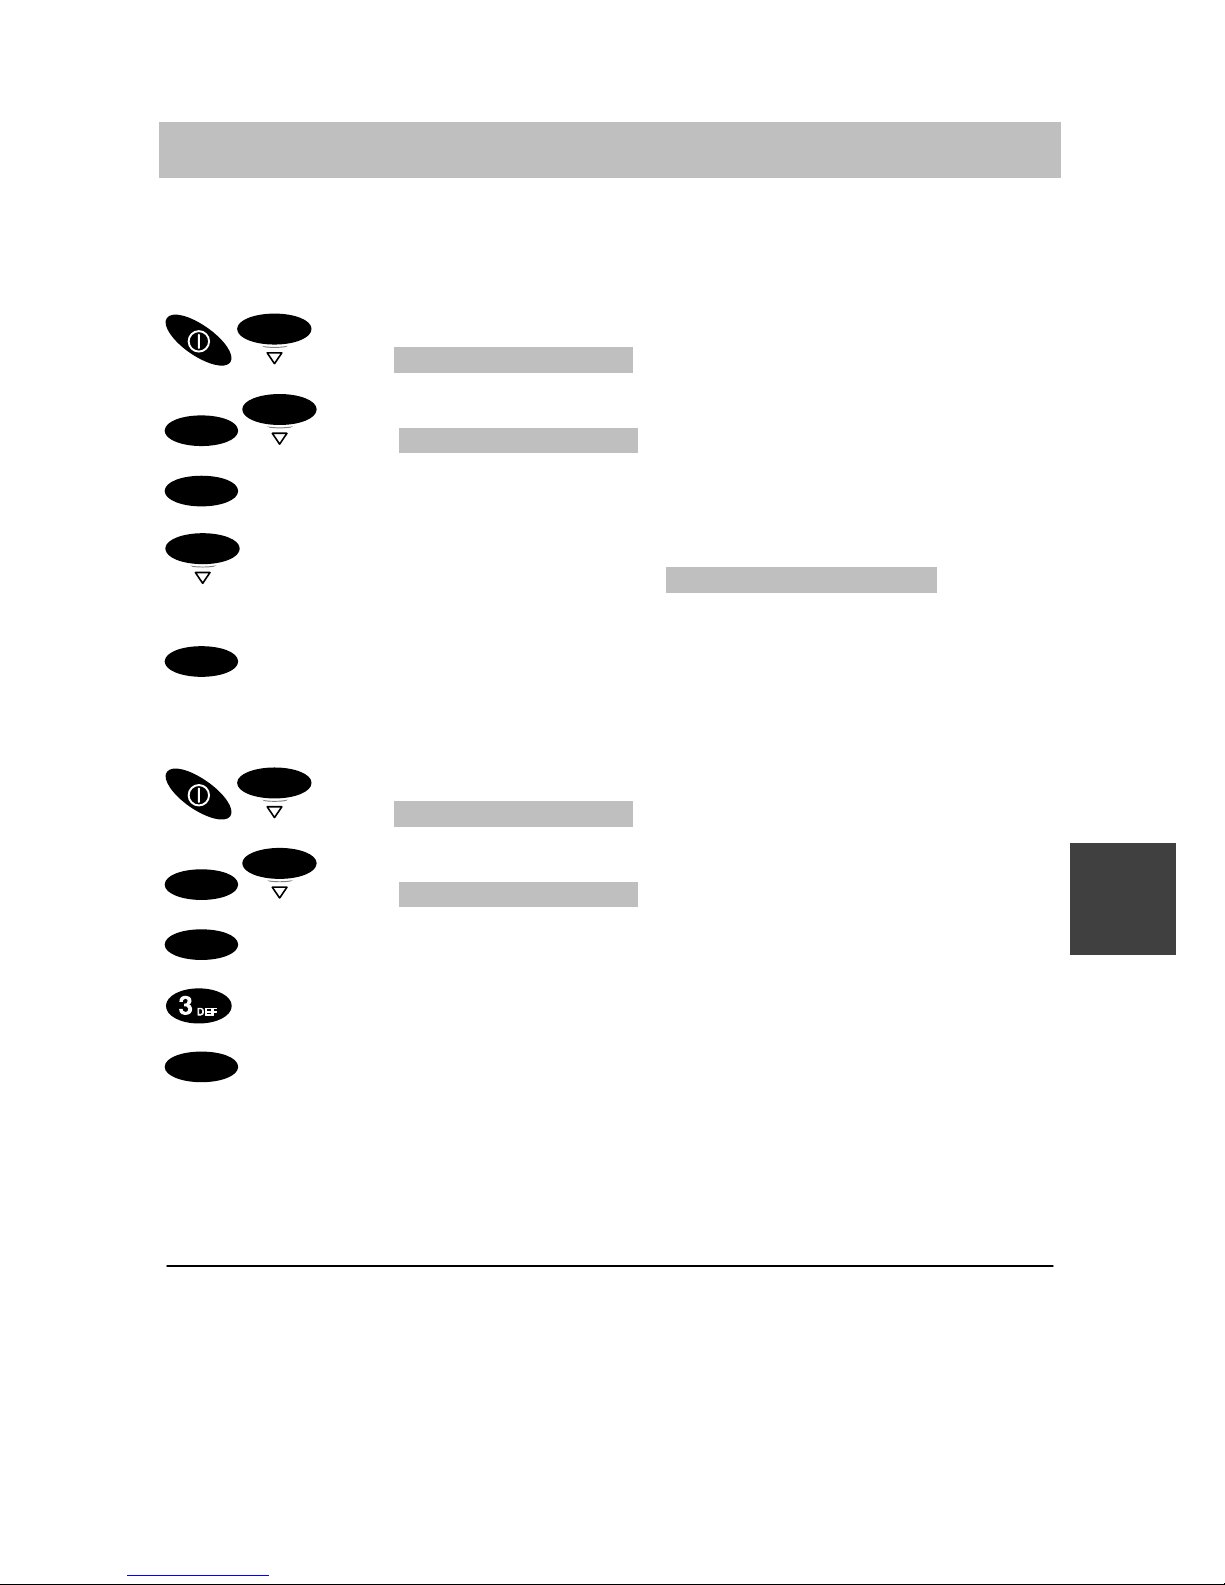
Integral 33 / CS I55 – Integral 1/3/5
13
Configurer votre combiné
Lorsque votre combiné est à l’état initial, vous pouvez le configurer.
Signal d’appel
OK
Menu Prg. Téléphone
OK
OK
Menu Signal d’appel
OK
Validez
OK
Configuration de la sonnerie, p. ex. Tonalité d’appel .
Vous avez le choix entre sonnerie, vibration ou les deux, bip ou silence.
OK
Validez
Volume du combiné
OK
Menu Prg. Téléphone
OK
OK
Menu Volume combiné
OK
Validez.
Programmez le volume du combiné (de 1 à 6), p. ex. sur 3.
OK
Validez.
Le combiné ne vibre pas lorsqu’il se trouve sur le chargeur. Si vous avez
choisi le mode vibration comme signal d’appel, une brève tonalité d’appel
retentit lors de tout appel.
Si vous avez choisi silence comme signal d’appel, le symbole correspondant apparaît sur l’afficheur (→ p. 6).
F
Page 68
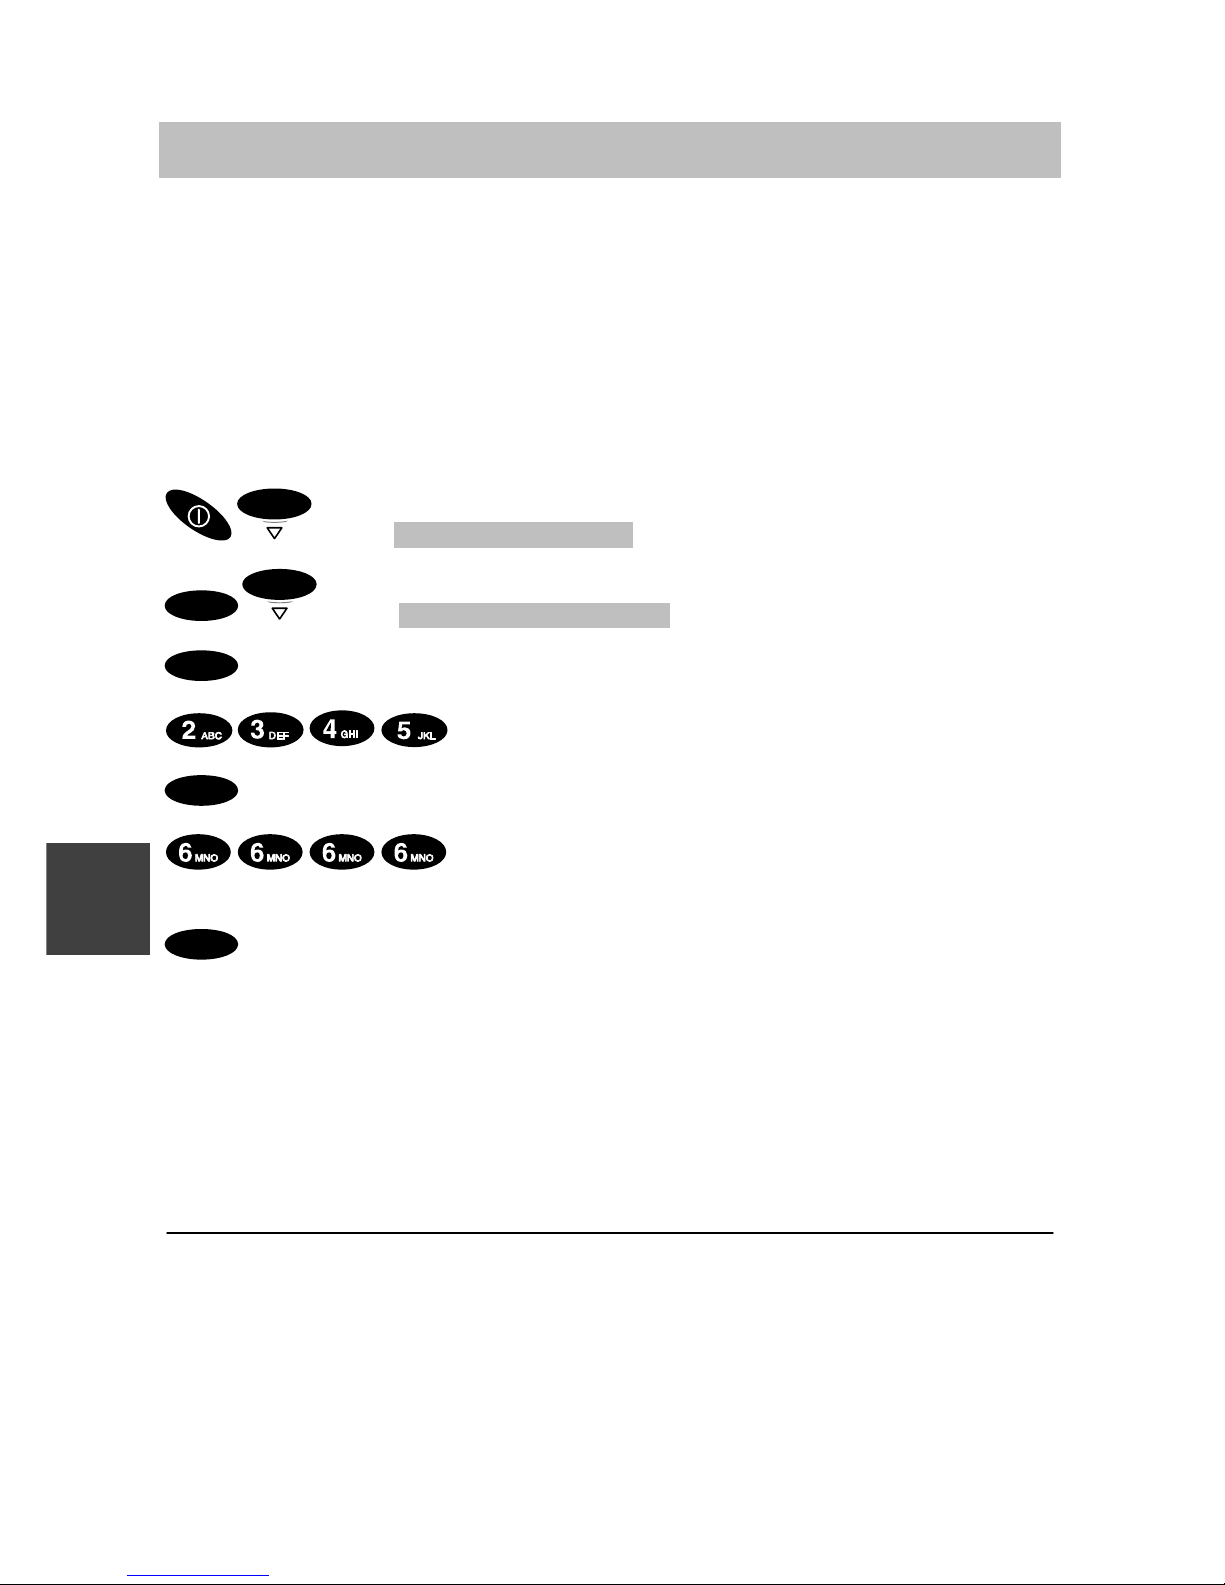
Integral 33 / CS I55 – Integral 1/3/5
14
Appel d’urgence
Lorsque votre combiné est verrouillé, seul fonctionne encore le numéro
d’appel d’urgence. Sur l’afficheur apparaît au-dessus de la touche de droite
la mention : SOS.
L’appel d’urgence est toujours disponible grâce à la touche d’appel d’ur-
gence rouge située en haut du côté gauche du combiné que celui-ci soit
verrouillé ou non.
Programmer et modifier le numéro d’urgence
OK
Menu Prg. Téléphone
OK
OK
Menu Numéro d’urgence
OK
Validez.
Entrez le code secret, p. ex. 2345.
OK
Validez.
Entrez ou modifiez le numéro d’urgence,
p. ex. 6666.
OK
Validez.
Lancer un appel d’urgence à l’aide de la touche d’urgence
Appuyez longuement sur la touche d’appel d’urgence située au sommet
de l’appareil. Le combiné compose le numéro d’urgence.
L’appel d’urgence (SOS) n’est pas disponible lorsqu’aucun numéro d’appel
d’urgence n’a été programmé, lorsqu’un appel ou un message arrive, ou
lorsque le combiné se trouve hors de portée radio de l’installation.
Pour effacer un numéro d’appel d’urgence, modifiez-le ; n’introduisez pas
de numéro de téléphone (pressez longuement la touche de gauche) puis
validez avec la touche OK.
F
Page 69
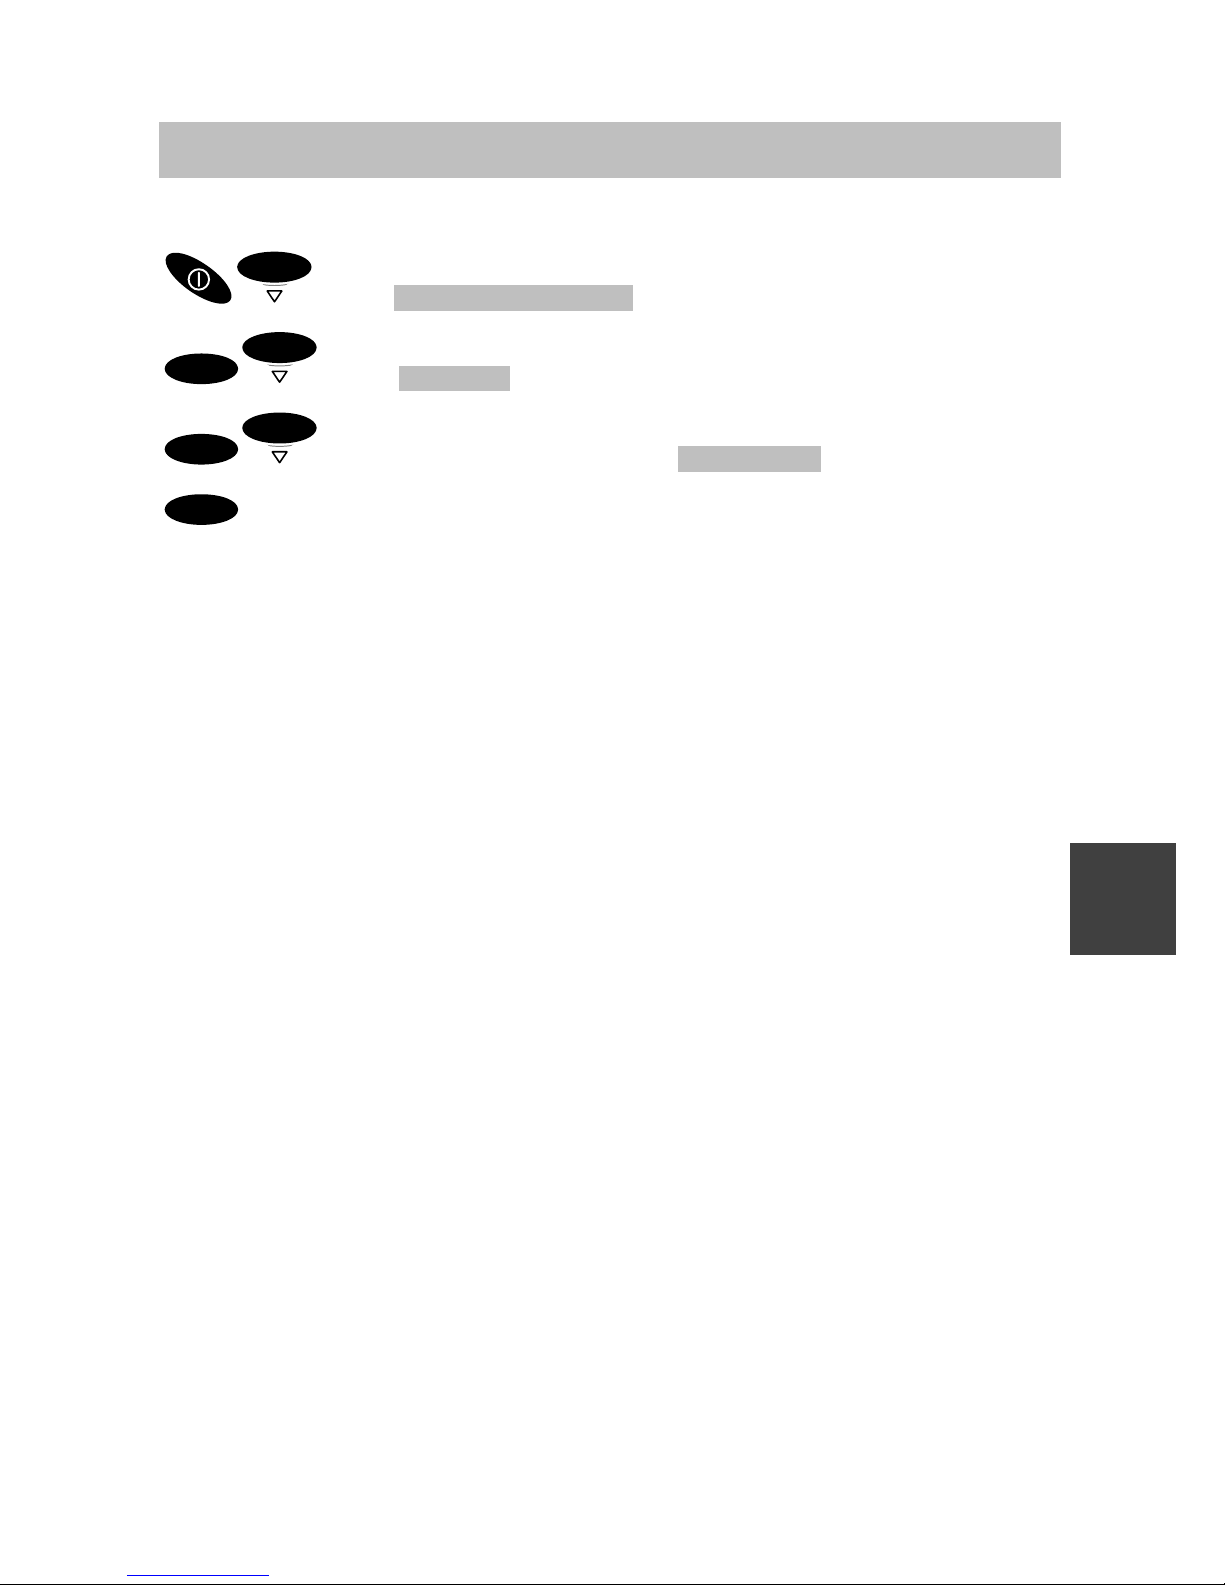
Integral 33 / CS I55 – Integral 1/3/5
15
Langue
Configurer la langue du menu local
OK
Menu Prg. Téléphone
OK
OK
Menu Langue
OK
OK
Sélectionnez la langue, p. ex. Français .
OK
Validez.
F
Page 70

Integral 33 / CS I55 – Integral 1/3/5
16
Caractéristiques techniques
Combiné Integral D3 mobile
Emploi interdit dans les secteurs à risque d’explosion, sauf dans les zones 2
et 22 conformément aux critères spécifiés dans la déclaration du fabricant.
Standard : DECTt (Digital Enhanced Cordless
Telecommunications).
Dimensions : 137 x 46 x 21 mm plus l’antenne
Poids, combiné : 100 g env. (avec batterie)
Type de batterie : NiMH ; 650 mAh
Autonomie du combiné
(batterie pleine) :
En communication : 8 heures min.
En stand-by : 80 heures min.
Durée de charge : à vide : environ 5 heures
Etat de charge inconnu : environ 14 heures
Plage de fréquences : de 1,88 à 1,9 GHz
Puissance d’émission : Moyenne : 10 mW, pointe : 250 mW
Températures de service
admises :
Combiné : – 10 °C à + 45 °C
Support-chargeur : +5 °C à + 40 °C
Température de
stockage :
– 25 °C à + 55 °C
Température de
transport :
Sans batterie de – 25 °C à + 70 °C
Avec batterie de – 25 °C à + 60 °C
Protection : IP 65 (protection contre la poussière et le
ruissellement.)
Accessoires Chargeur classic Chargeur comfort
Bloc alimentati on Europe Bloc alimentation RU
Batterie de rechange Casque écouteur-
Etui microphone D3
MEM-Card D3 Case
MEM-Card-Manager
Certains accessoires doivent être commandés à part.
F
Page 71

Integral 33 / CS I55 – Integral 1/3/5
1
Avvertenze importanti
Contenuto del presente manuale di istruzioni
Nel presente manuale viene spiegato come si mette in funzione il proprio
portatile. Vengono fornite le regole fondamentali per l’impiego e le funzioni
e le impostazioni utilizzate con maggiore frequenza.
Una descrizione esaustiva di tutte le funzioni specifiche dell’impianto si
trova sul CD-ROM in dotazione. L’utente ha quindi la possibilità di leggere
e stampare il manuale di istruzioni.
Note: È possibile inoltre ordinare un esemplare stampato del manuale
(a pagamento) presso la Tenovis Direct: tel. +49 (0) 800–3473 287,
fax: +49 (0) 800–3473 283.
Codici di ordinazione: Integral D3 mobile su Integral 1/3/5: 4.999.059.185
Integral D3 mobile su Integral 33 / CS I55: 4.999.059.184
Dotazione di fornitura
Controllare immediatamente la dotazione di fornitura non appena si riceve
l’Integral D3 mobile:
– portatile D3 mobile con le istruzioni per l’installazione in forma concisa
– batteria di riserva – MEM-Card
– base classic – alimentatore a spina
– manuale di istruzioni conciso
– CD-Rom con manuale di istruzioni dettagliato
Dove si può usare il portatile
Il portatile Integral D3 mobile è adatto per l’impiego in ufficio, all’aperto
o in ambienti polverosi. Esso corrisponde alla classe di protezione IP65 ed
è quindi protetto da polvere e jetti d’acqua.
Protezione dai disturbi
In genere, gli altri apparecchi elettronici sono protetti dalle radiazioni ad alta
frequenza. Se una di queste apparecchiature dovesse tuttavia essere insufficientemente protetta, si potrebbero avere errori di funzionamento.
Non aprire mai il portatile!
Altrimenti l’involucro potrebbe danneggiarsi. Non contiene parti che può
riparare l’utente.
Messa in funzione della batteria
È indispensabile inserire correttamente le batterie. La Tenovis non si assume
alcuna responsabilità per danni causati da un uso improprio della batteria.
I
Page 72

Integral 33 / CS I55 – Integral 1/3/5
2
Avvertenze importanti
Batterie esaurite – informazioni per i consumatori finali
Non gettare le batterie esaurite nel bidone delle immondizie! Portarle in
un centro di raccolta del proprio comune o presso il commerciante locale
in modo tale che sia possibile procedere ad uno smaltimento ecologico.
Suggerimenti sul luogo di installazione
Soprattutto su mobili nuovi o appena trattati con prodotti per la cura,
utilizzare una base d’appoggio antisdrucciolevole per la stazione base.
Le vernici e i prodotti per la cura dei mobili contengono sostanze che rendono molli i piedini della base, i quali potrebbero lasciare tracce indesiderabili sulla superficie dei mobili. La Tenovis non può rispondere di danni di
questo tipo.
Smaltire solo le batterie scariche.
Omologazione e conformità
La Tenovis GmbH & Co. KG dichiara che il prodotto Integral D3 mobile
soddisfa i requisiti fondamentali ed è conforme alle altre disposizioni rilevanti della direttiva 1999/5/CE (R&TTE).
Questo apparecchio è progettato per il collegamento alle interfacce radio
(DECTt ) di impianti di telecomunicazione Tenovis e soddisfa i requisiti fondamentali previsti dalla direttiva CEE1999/5/CEE (Radio and Telecommunication Terminal Equipment, R&TTE).
Questo apparecchio, in virtù del suo principio costruttivo, non è progettato
per essere collegato direttamente alle interfacce di reti di telecomunicazione pubbliche.
Per eventuali problemi insorti durante il funzionamento, rivolgetevi al Vostro
rivenditore specializzato o al Servizio Assistenza Tenovis.
Si può richiedere la dichiarazione di conformità al seguente sito Internet:
www.tenovis.com/deutsch/verzeichnis/conformance.htm
oppure cercare
nell’indice analitico il lemma: conformità.
Questo dispositivo opera secondo il sistema DECT
t
nella gamma di frequenze da 1880 a 1900 MHz. L’assegnazione di questa gamma di fre-
quenze nel piano di utilizzazione delle frequenze è inizialmente valida fino
al 2008 e verrà prolungata in funzione dell’armonizzazione alle norme
europee.
DECT è un marchio registrato di ETSI
I
Page 73

Integral 33 / CS I55 – Integral 1/3/5
3
Messa in funzione
Se il portatile non è ancora montato
Se non si riceve il portatile già completamente montato occorre
D Inserire la MEM-Card (→ pagina 3),
D Introdurre la batteria (→ pagina 4) ed
D eventualmente staccare la pellicola protettiva dal display.
D Il Servizio Assistenza deve registrare il portatile sull’impianto telefonico.
Il portatile è ora pronto per il funzionamento.
D Allacciare la base (→ pagina 5).
Se il portatile è già completamente montato
Se si riceve il portatile già completamente montato e registrato sul
proprio impianto telefonico, è sufficiente allacciare solamente la base
(→ pagina 5).
MEM-Card
Il Vostro portatile Vi consente di effettuare le telefonate, solamente se
è inserita la MEM-Card. Su di essa sono memorizzati dati importanti
del portatile, quali ad es. le impostazioni personali e la rubrica telefonica.
Se si cambia portatile, la MEM-Card permette all’utente di continuare
a usare il telefono con le stesse funzioni.
I
Page 74
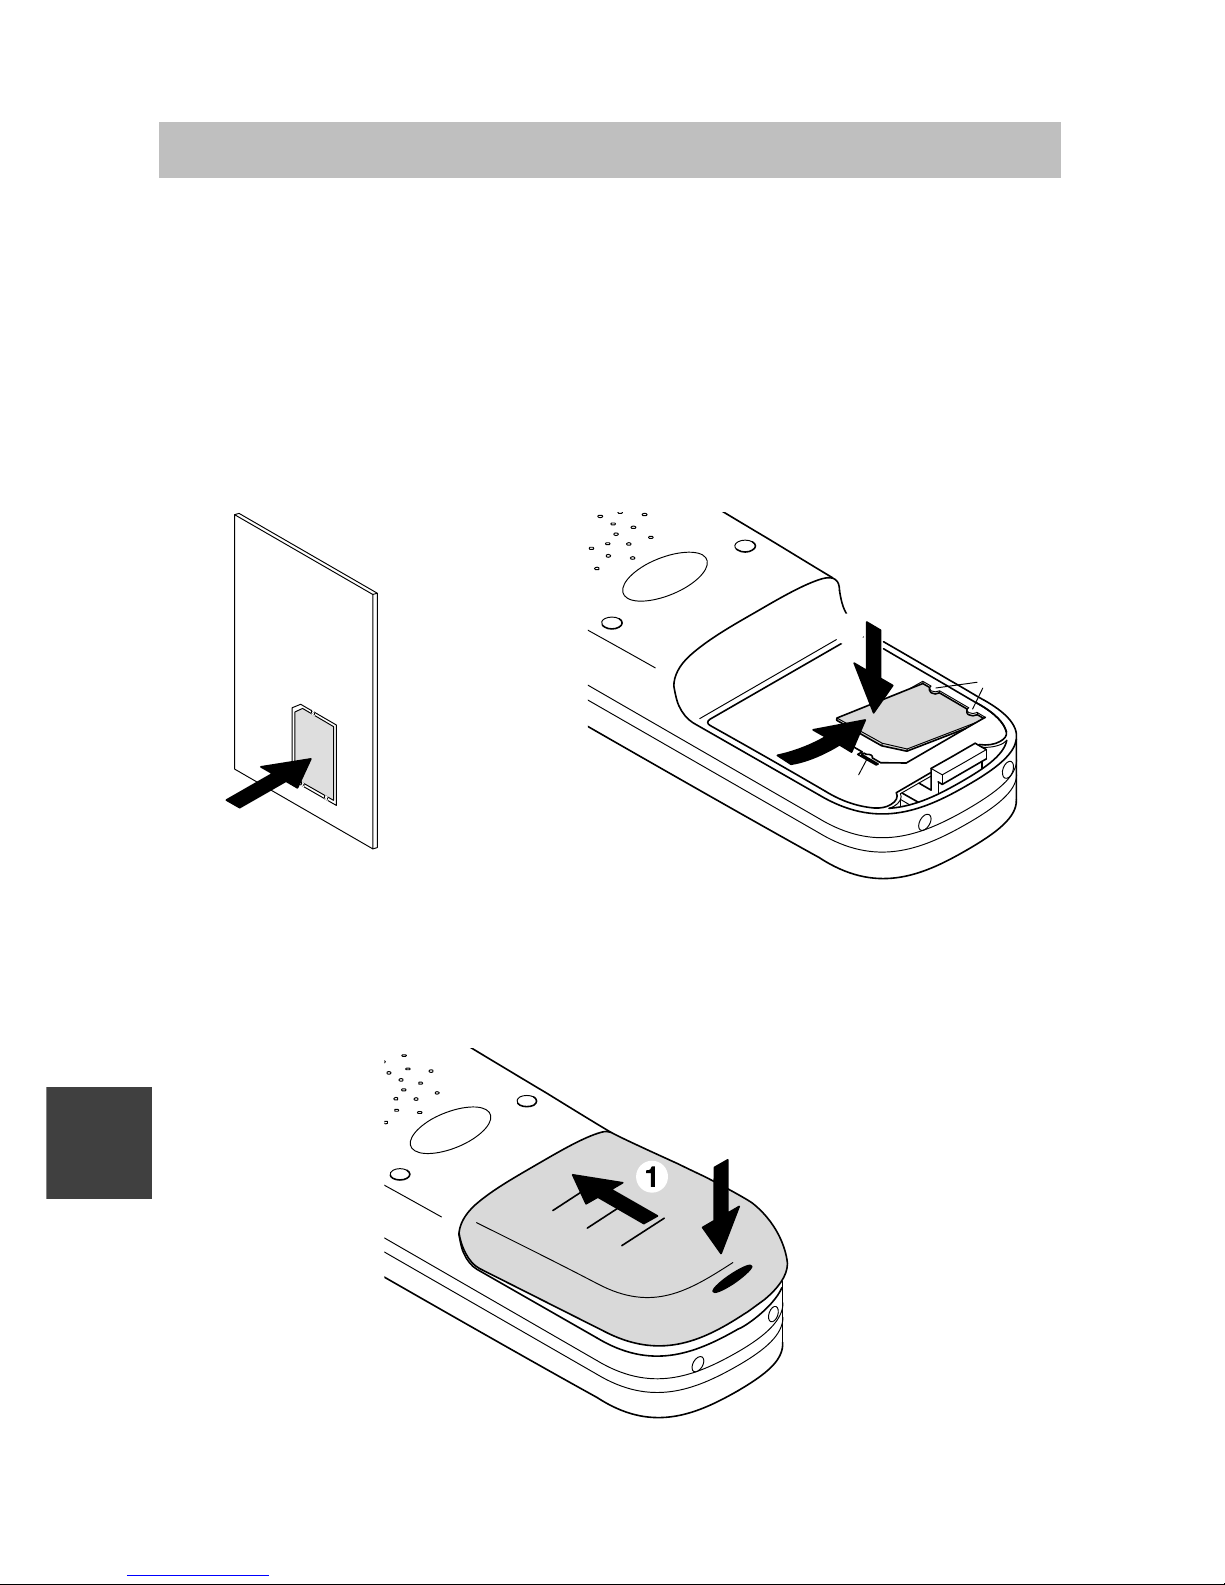
Integral 33 / CS I55 – Integral 1/3/5
4
Messa in funzione
Introduzione della MEM-Card
D Estrarre la piccola MEM-Card dalla cornice con il dito (figura sottostante
a sinistra).
D Spingere la MEM-Card sotto le due mezzelune di fissaggio a nell’appo-
sito vano (1) infilandola di traverso per il lato corto. Le superfici di contatto dorate lucide della MEM-Card devono essere rivolte verso il basso!
D Spingere la MEM-Card verso il basso finché il piccolo nasello di incastro b
fa presa (2).
Introduzione della batteria
D Spingere la batteria nell’involucro (1)
D Spingere la batteria verso il basso dal lato della chiusura finché non si
incastra in modo udibile (2).
I
1
2
a
b
2
Page 75
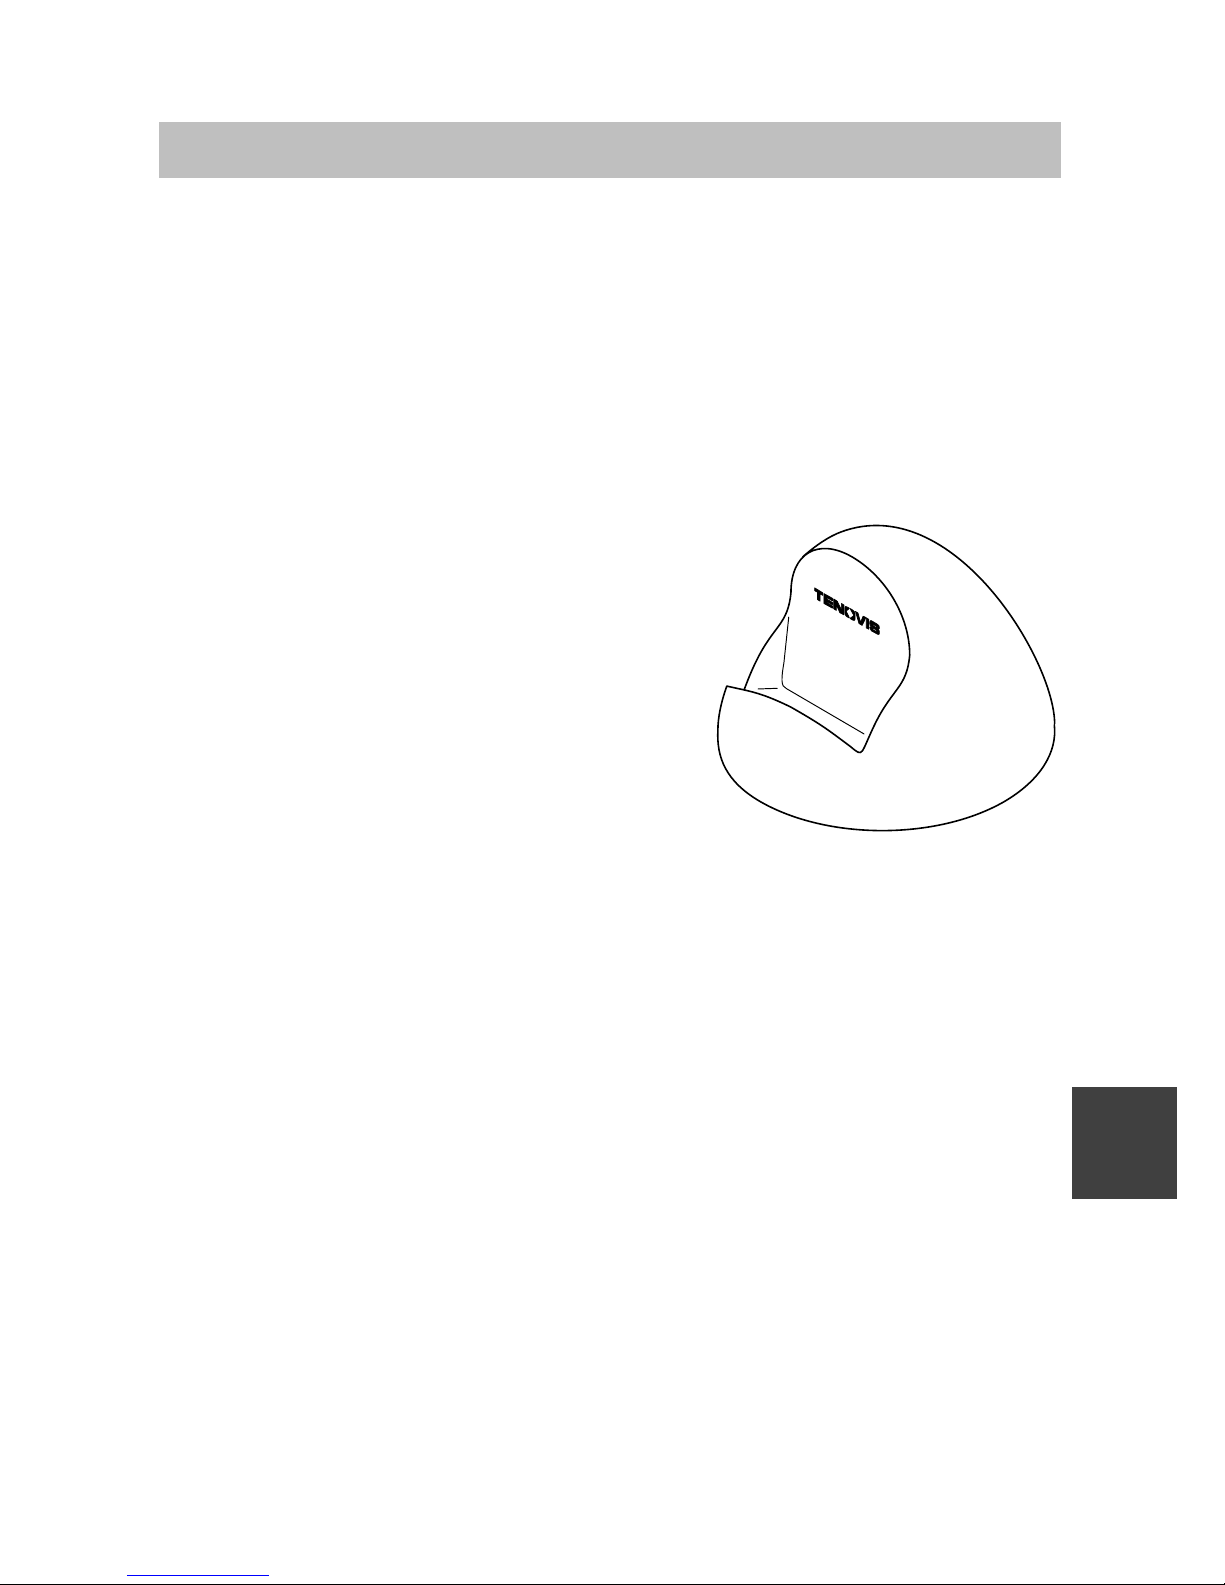
Integral 33 / CS I55 – Integral 1/3/5
5
Messa in funzione
Installazione della base
Collocare la base su una superficie solida e piana, ad es. su un tavolo.
Scegliere una sistemazione al riparo dalle radiazioni solari dirette e
dall’umidità.
D Inserire l’alimentatore a spina in una presa di corrente.
D Inserire la spina piccola del filo di collegamento sul retro della base.
La base è pronta per il funzionamento.
Carica del portatile
Inserire semplicemente il portatile nella
base. Si ode un segnale di conferma. L’illu-
minazione del display si accende brevemente. Il portatile rimane acceso o spento.
Il simbolo della batteria sulla riga dei simboli si muove fino a quando la batteria non
è completamente carica.
Durante la carica le batterie si scaldano
leggermente. È normale.
Note sulla batteria
All’inizio occorre caricare completamente la batteria e riporre sempre il portatile nella base durante la prima settimana di esercizio. I nuovi elementi
della batteria raggiungono di solito la loro piena capacità soltanto dopo alcune volte che la batteria é stata caricata e scaricata.
Il portatile può rimanere sempre sulla base. La batteria non viene sovraccaricata.
Non lasciare la batteria sotto il sole cocente. In tal modo, la batteria durerà
a lungo.
Attenzione!
D Non bruciare la batteria, potrebbe esplodere.
D Per evitare lesioni o danni da incendio, non cortocircuitare o far toccare
i contatti della batteria con oggetti conduttori.
I
Base classic
Page 76
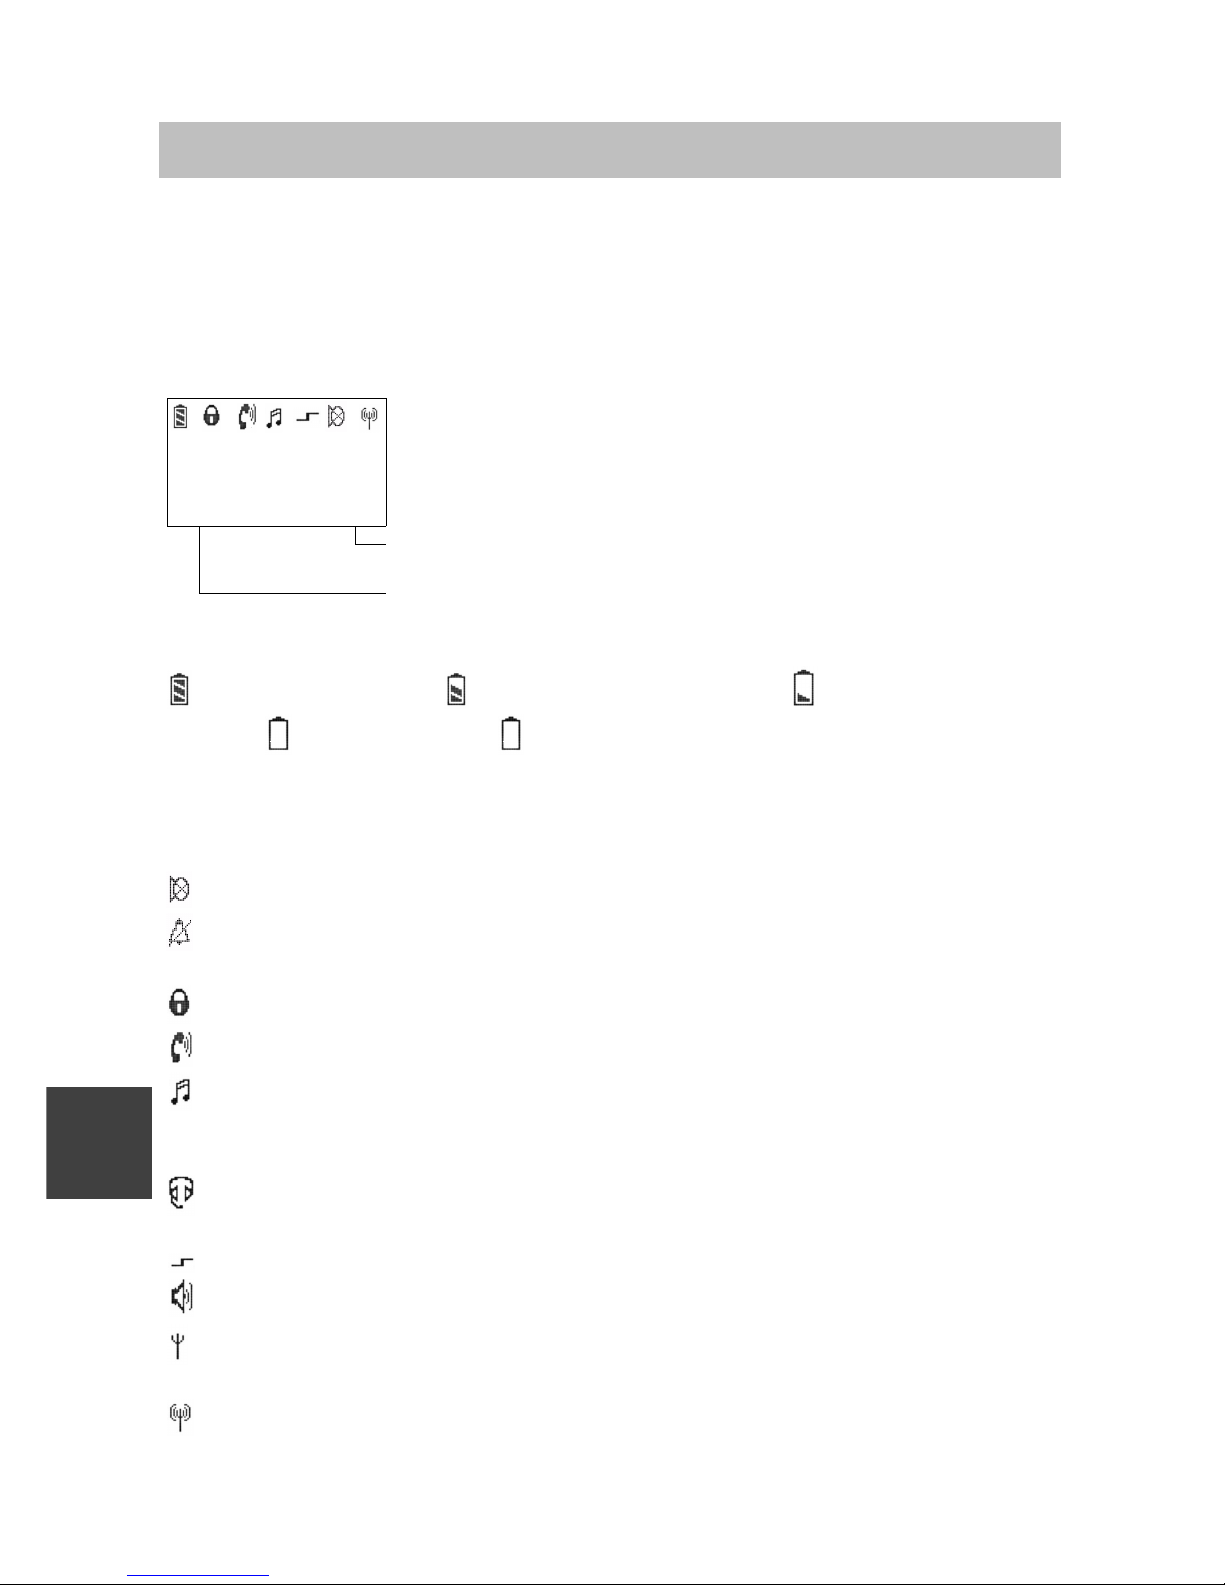
Integral 33 / CS I55 – Integral 1/3/5
6
Display
I testi e i simboli che appaiono sul display sono uno strumento ausiliare per
l’uso. Essi guidano l’utente attraverso i menu e lo informano sullo stato del
portatile.
Le funzioni delle softkey di sinistra e di destra variano a seconda dello stato.
Tali funzioni vengono visualizzate sul display direttamente sopra i tasti.
Le righe sul display
Riga dei simboli indica lo stato del telefono.
Rossi
7442
Due righe di testo ad es. per nome e numero telef.
Interrompi Menu
Funzione della softkey di destra ad es. Menu.
Funzione della softkey di sinistra, Funzione della softkey di sinistra,
ad es. Interrompi.
Significato dei simboli
batteria tutta carica, batteria quasi tutta carica, batteria quasi
scarica, batteria scarica, (simbolo della batteria lampeggiante) autonomia inferiore a cinque minuti! Quando si inserisce nuovamente una
batteria, il portatile non ne riconosce lo stato di carica. Non viene dunque
visualizzato il simbolo della batteria. Il simbolo appare, soltanto dopo che
la batteria nel portatile è stata caricata.
Mute: il microfono è disinserito. Il Vostro interlocutore non può ascoltare.
Nessun segnale di chiamata: è stato disattivato l’audio del segnale
di chiamata.
Lucchetto: il portatile è bloccato.
Ricevitore: il portatile è in collegamento telefonico.
Selezione a multifrequenza: ogni volta che si preme un tasto viene
trasmesso un segnale DTMF (udibile) all’utente connesso (selezione aggiuntiva DTMF). (Il simbolo viene indicato solo nei sistemi 1/3/5 )
Headset: l’utente telefona attraverso l’headset. Il microfono e l’altopar-
lante del portatile vengono automaticamente disattivati.
Funzione speciale avviata: il tasto asterisco è stato premuto a lungo.
Altoparlante: è inserito l’altoparlante per Vivavoce sul retro del telefono.
Nel raggio d’azione dell’impianto: il portatile si trova nel raggio
d’azione di una stazione base. È possibile effettuare una telefonata.
Collegamento con l’impianto: il portatile è in collegamento telefonico.
I
Page 77
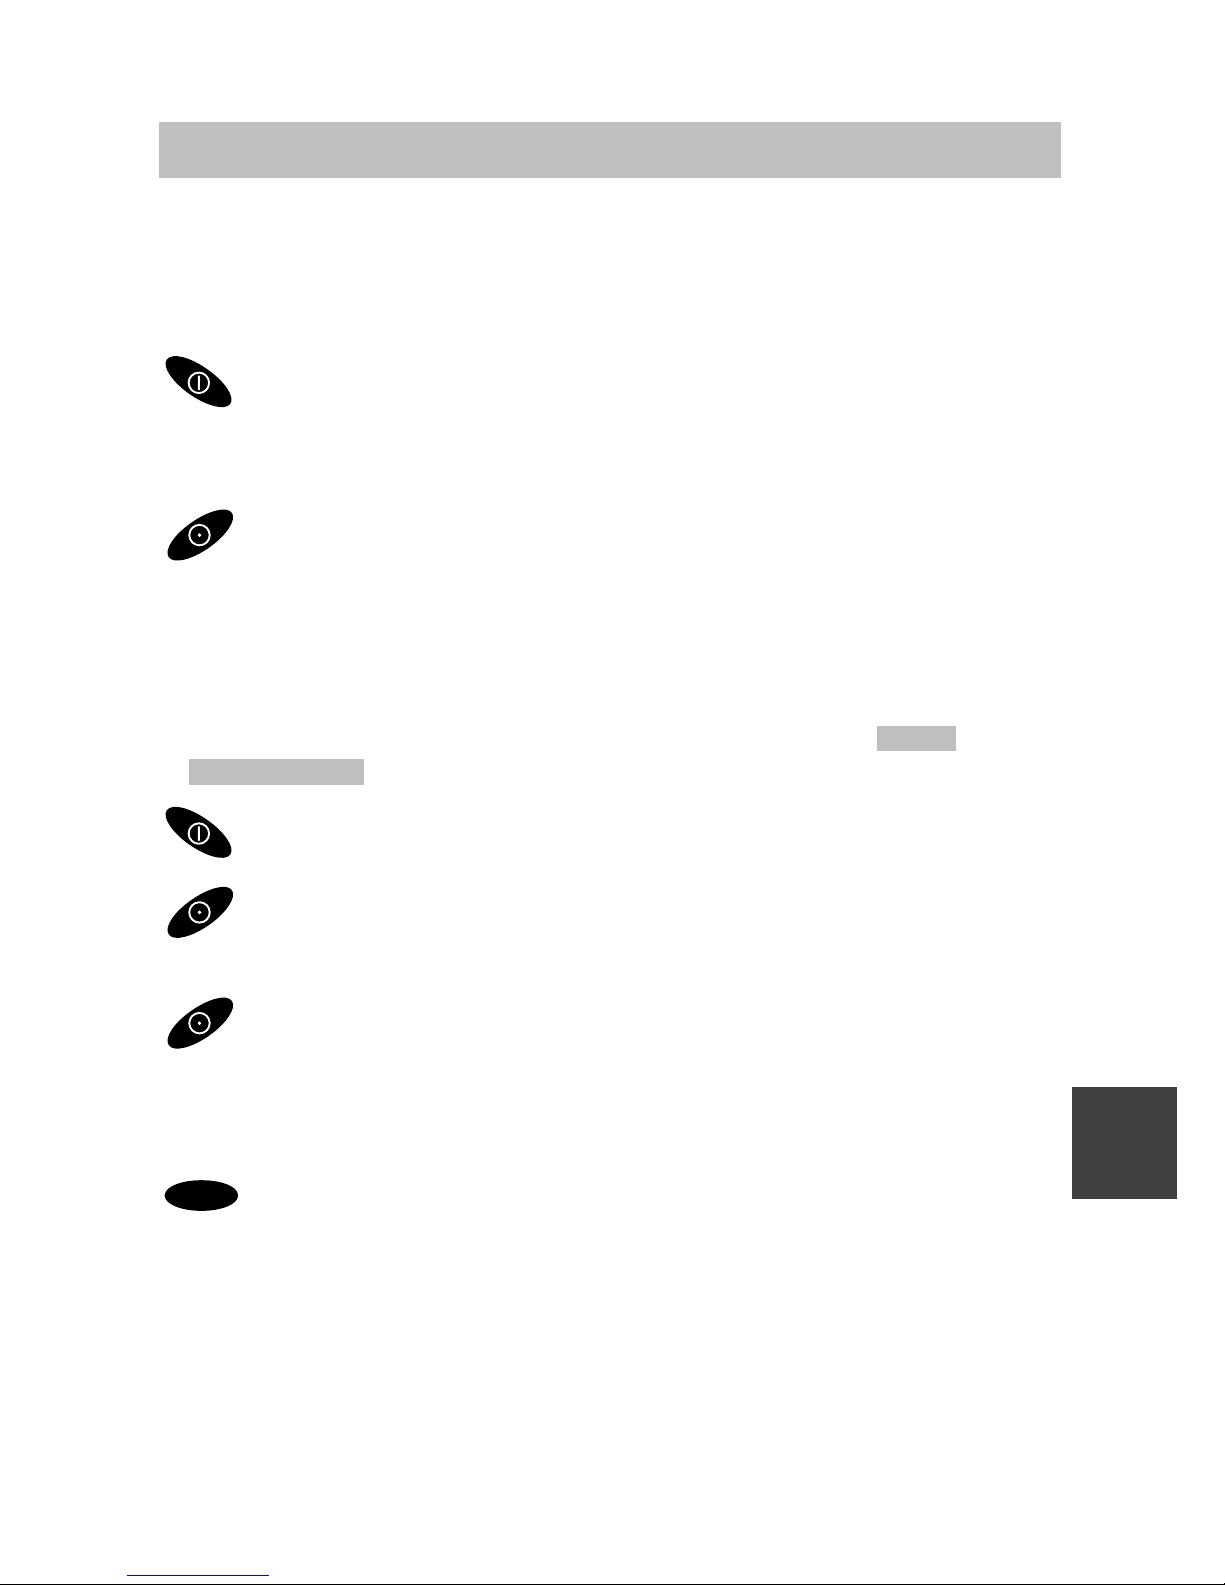
Integral 33 / CS I55 – Integral 1/3/5
7
Istruzioni d’uso fondamentali
Per l’utilizzo del telefono vi sono alcune procedure ricorrenti. Prendete con-
fidenza con questi punti.
Attivazione del telefono
Il telefono è disattivato. Premere a lungo la softkey di destra.
Disattivazione del telefono
Il telefono si trova nella configurazione iniziale. Premere
a lungo la softkey di sinistra.
Softkey di sinistra e di destra
La funzione delle softkey varia a seconda della situazione. La funzione viene sempre indicata sul display sopra il tasto, ad es. Menu
o Interrompi .
La softkey di destra serve per l’attivazione o per il richiamo di menu.
La softkey di sinistra serve per uscire da una voce di menu o per
annullare l’operazione.
Premendo la softkey di sinistra in un menu qualsiasi a lungo,
si riporta il portatile nella configurazione iniziale.
Selettore
OK
Con questo tasto si concludono le impostazioni. E’ necessario pre-
mere il tasto con decisione per impedire una prestazione non desiderata.
Tasti multifunzione
Ad alcuni tasti del portatile sono state assegnate due funzioni. Essi si riconoscono dalle indicazioni supplementari in arancione. Per attivare la seconda funzione contraddistinta dall’insegna arancione si deve premere il
tasto più a lungo. Si ode un segnale di conferma.
I
Page 78
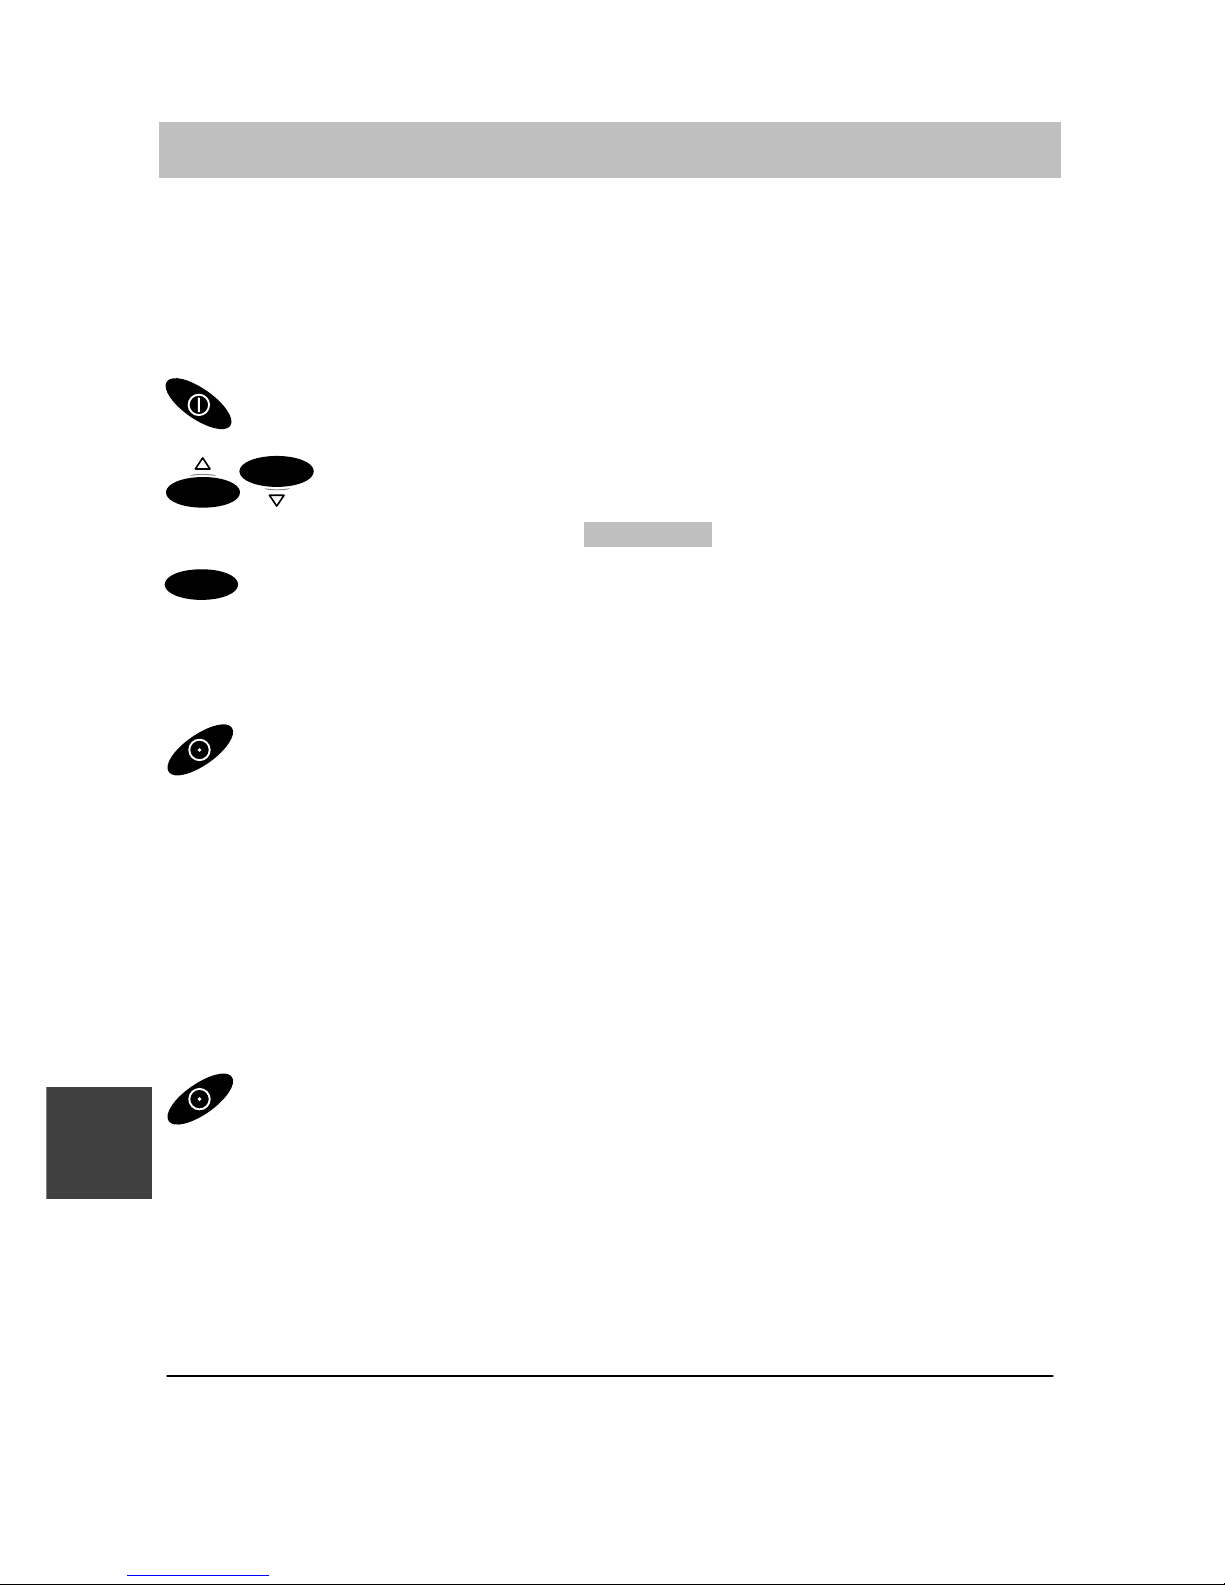
Integral 33 / CS I55 – Integral 1/3/5
8
Istruzioni d’uso fondamentali
Selezione del menu
Alcune funzioni e impostazioni del telefono possono essere richiamate
tramite visualizzazione (menu) su display. Il menu è strutturato in modo
da suddividere la maggior parte delle sue voci in ulteriori sottomenu.
Richiamare il menu con la softkey di destra.
OK
OK
Spingere il selettore verso l’alto o verso il basso selezionando
la voce di menu desiderata, ad es. Sistema .
OK
Selezionare la voce di menu con il selettore.
Passaggio al livello di menu superiore
Premere la softkey di sinistra per tornare al livello di menu superiore
o per uscire dal menu.
Sottomenu
La procedura è identica a quella impiegata per il menu principale.
Interruzione
Premere a lungo la softkey di sinistra per portarsi nella configura-
zione iniziale.
Nella configurazione iniziale è possibile premere già in partenza il selettore
verso il basso per richiamare il menu.
I
Page 79
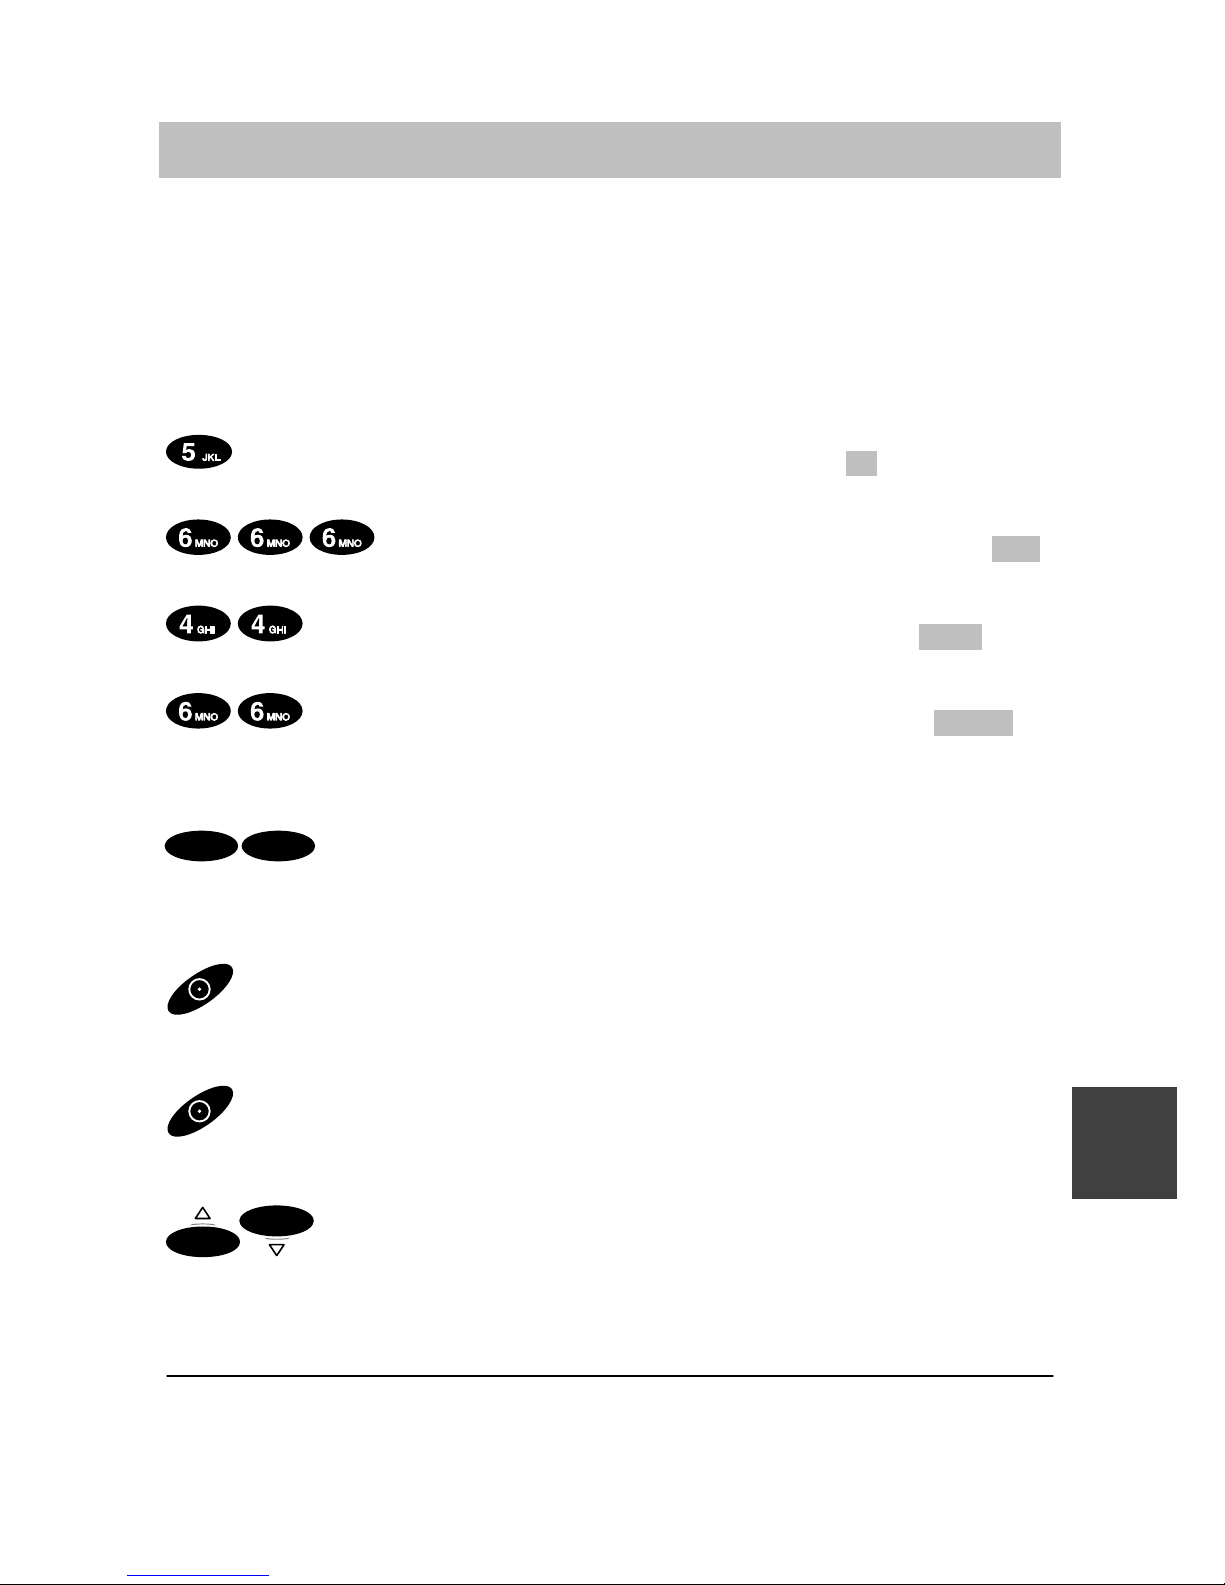
Integral 33 / CS I55 – Integral 1/3/5
9
Istruzioni d’uso fondamentali
Immissione di caratteri per la rubrica
Con i tasti numerici è anche possibile l’immissione di lettere e caratteri, ad
es. per i nomi della rubrica personale. Le lettere si trovano sui tasti numerici. Il telefono si porta automaticamente in modalità di immissione di lettere
e caratteri quando è necessario.
Esempio: immissione del nome “JOHN„:
Premere una volta il tasto JKL. Sul display appare: J Attendere
brevemente.
Premere tre volte il tasto MNO. Sul display appare: JO
Attendere brevemente.
Premere due volte il tasto GHI. Sul display appare: JOH .
Attendere brevemente.
Premere due volte il tasto MNO. Sul display appare: JOHN .
Attendere brevemente.
Termine dell’immissione
OK OK
Premere due volte il selettore. I caratteri vengono memoriz-
zati.
Correzione dei caratteri
Premere la softkey di sinistra.
Cancellazione della riga
Premere a lungo la softkey di sinistra.
Aggiunta di caratteri
OK
OK
Muovere il cursore di inserzione verso destra o verso sinistra.
I caratteri che l’utente immette vengono inseriti davanti al cursore di inserzione.
Per commutare tra lettere maiuscole e minuscole: Premere il tasto asterisco a lungo.
I
Page 80
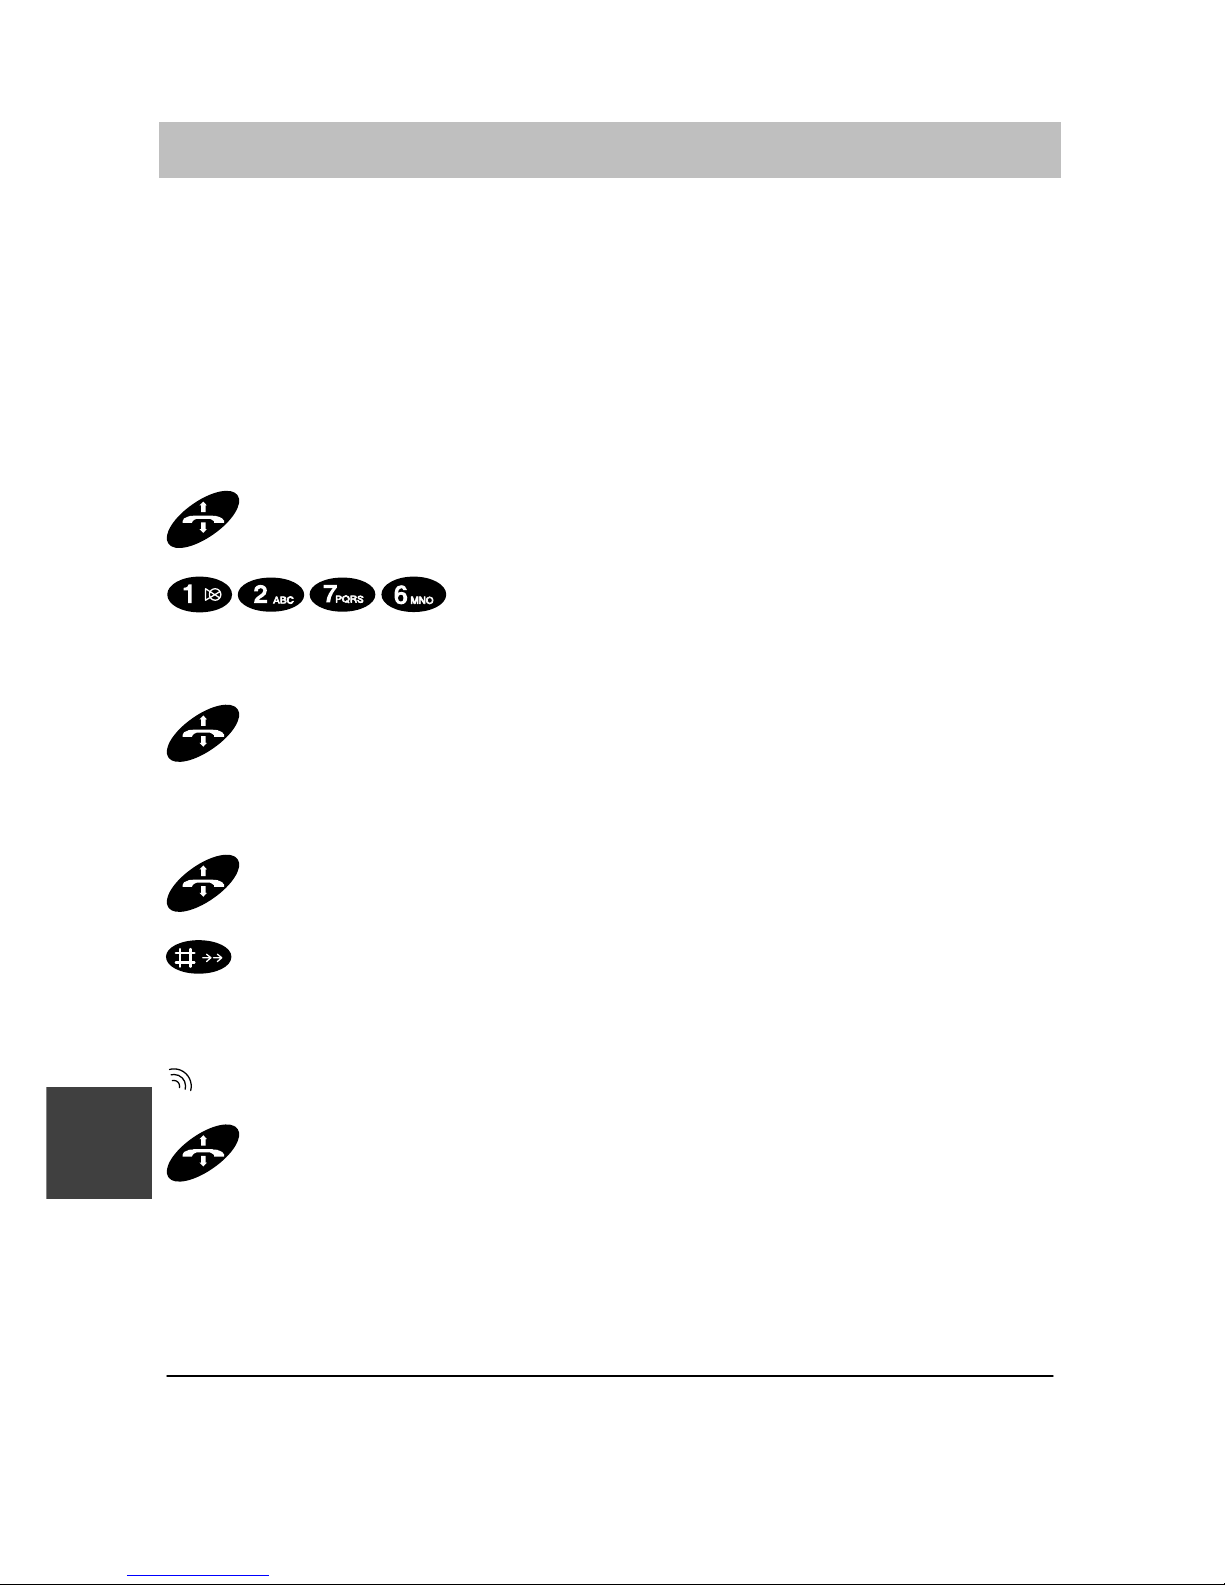
Integral 33 / CS I55 – Integral 1/3/5
10
Esecuzione di una telefonata
Il portatile consente di effettuare normalissime telefonate.
Per effettuare una chiamata all’interno dell’impianto telefonico (chiamata
interna): selezionare direttamente il numero di selezione passante.
Per una chiamata esterna: selezionare dapprima il prefisso per l’impegno
della linea urbana (nella maggior parte dei casi zero) e il numero telefonico
esterno.
Chiamata
Sollevare il ricevitore.
Comporre il numero telefonico, ad es. 1276.
Termine della conversazione
Agganciare il ricevitore.
Ripetizione della selezione
Sollevare il ricevitore.
Premere il tasto cancelletto a lungo.
Risposta a una chiamata
Il portatile squilla.
Sollevare il ricevitore.
Su Integral 1/3/5 si può fare uso della ripetizione della selezione soltanto
per le chiamate esterne.
I
Page 81
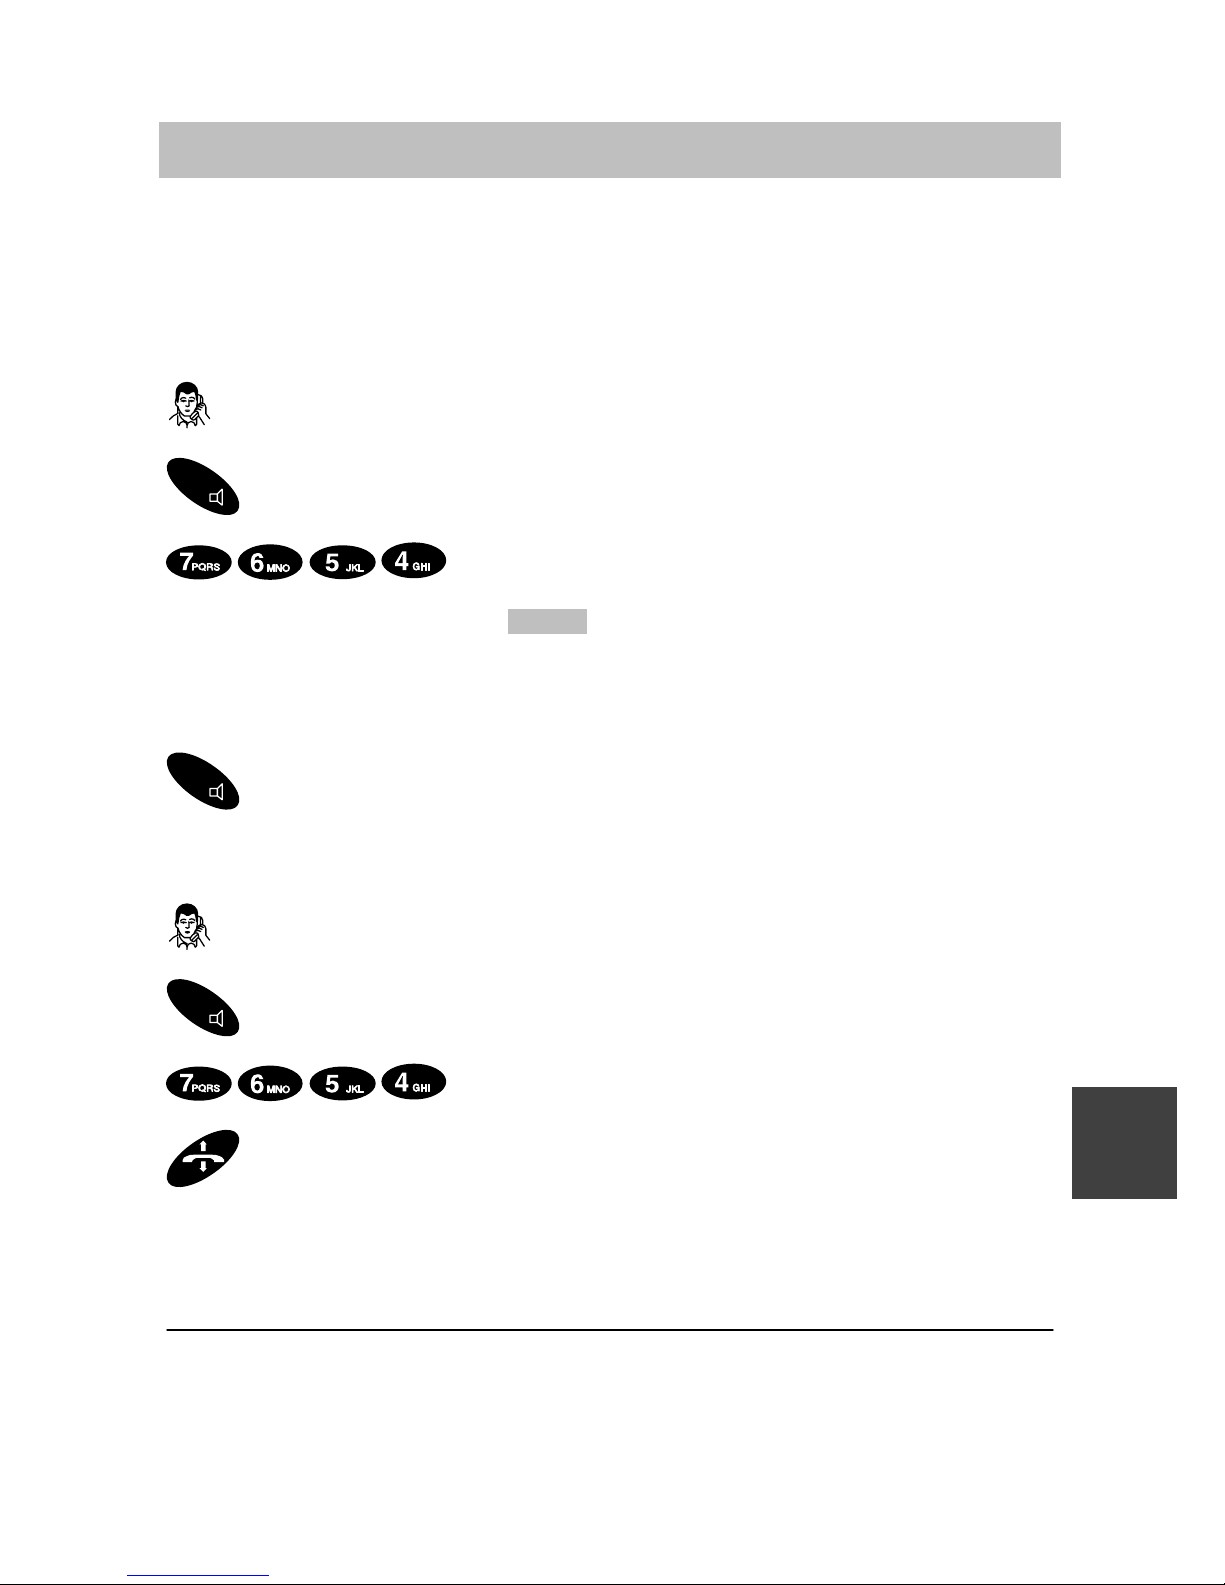
Integral 33 / CS I55 – Integral 1/3/5
11
Richiamata e inoltro
Durante la telefonata è possibile impostare una richiamata e telefonare a
un’altra persona. Il Vostro interlocutore rimane in attesa. – È inoltre possibile inoltrare la chiamata del chiamante.
Impostazione della richiamata
Si sta telefonando.
R
Impostare la richiamata. L’interlocutore non può ascoltare.
Selezionare il numero desiderato, ad es. 7654.
Sul display appare il numero 7654 . Viene effettuato il collegamento. Il
primo interlocutore rimane in attesa.
Conclusione della richiamata.
R
Per tornare al primo interlocutore premere il tasto R.
Inoltro della chiamata
Si sta telefonando.
R
Impostare la richiamata.
Selezionare il numero desiderato, ad es. 7654.
Agganciare il ricevitore.
Su Integral 1/3/5 viene interrotto il collegamento con l’utente della richiamata quando si conclude la richiamata.
È possibile effettuare l’inoltro anche se il terzo utente è occupato.
I
Page 82
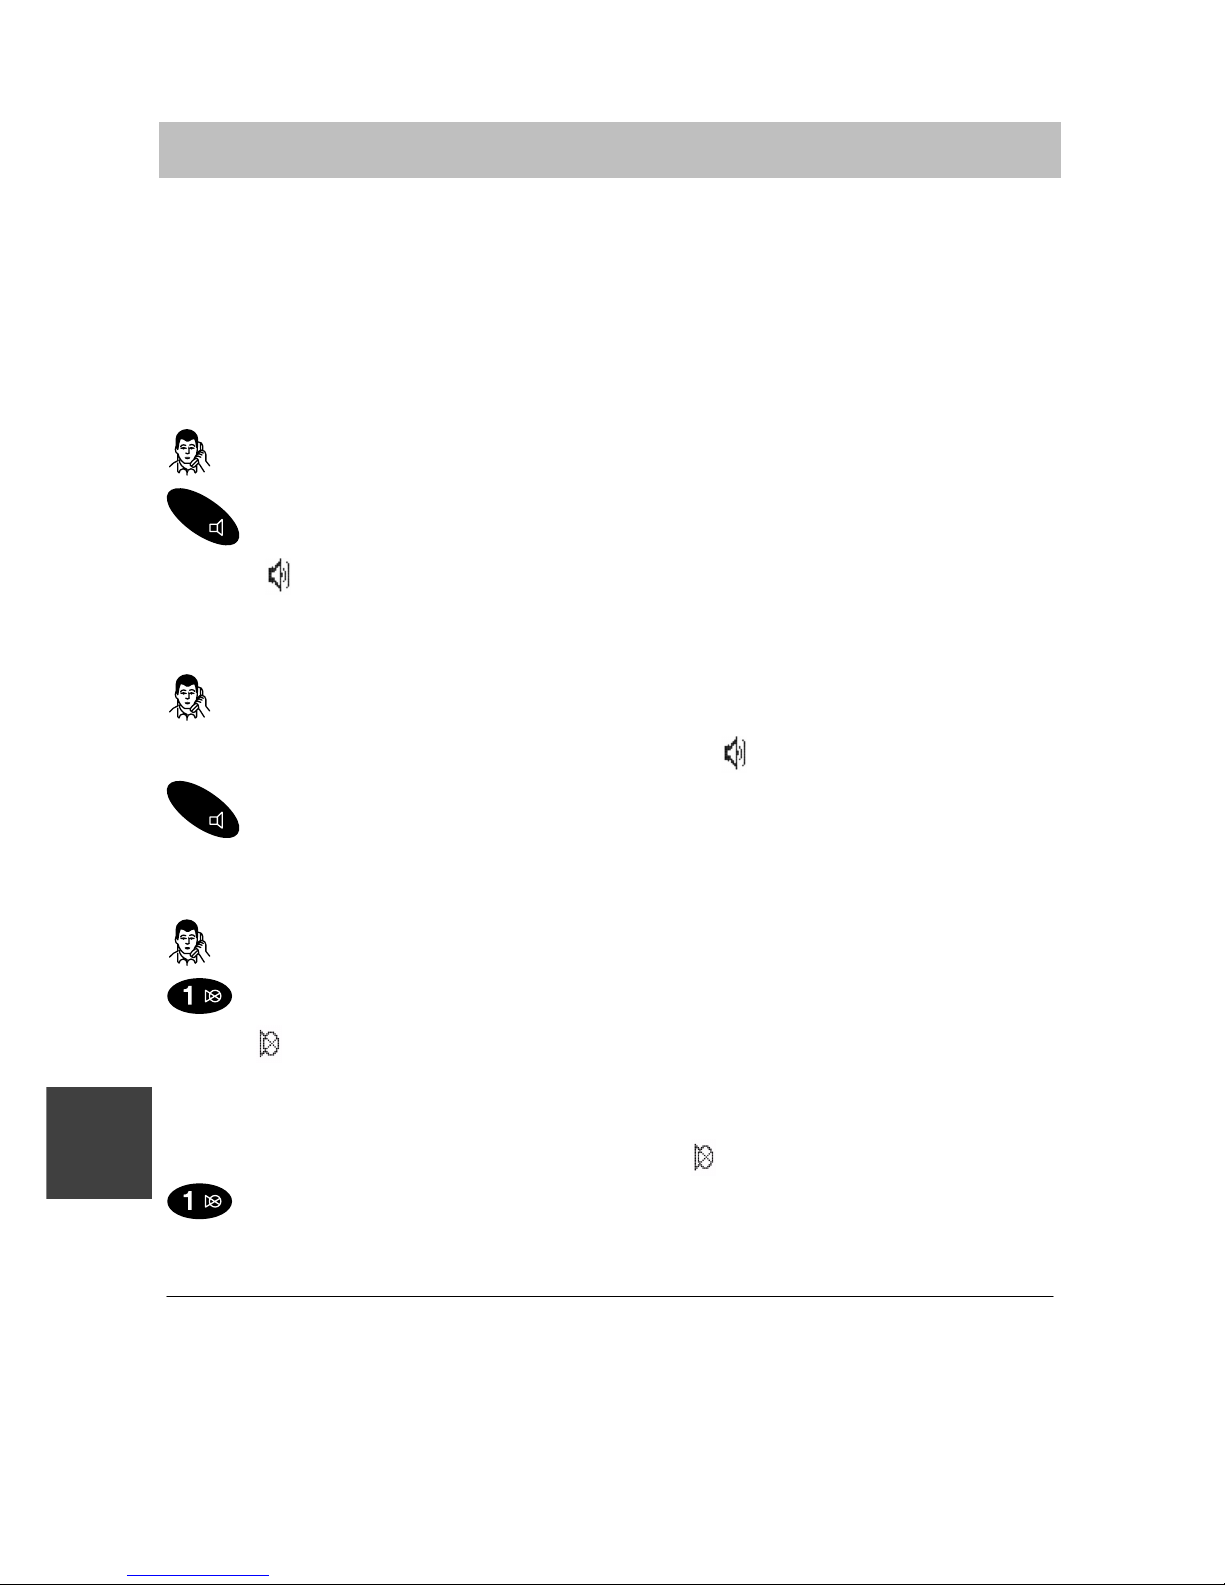
Integral 33 / CS I55 – Integral 1/3/5
12
Ascolto amplificato della conversazione, disattivazione del microfono
Per l’ascolto amplificato si può inserire l’altoparlante per vivavoce incorporato. La voce dell’interlocutore viene amplificata nella stanza e si può parlare liberamente.
Durante la telefonata è possibile disattivare il microfono del portatile. Il ricevitore rimane attivato. L’interlocutore non Vi sente, ma Voi lo sentite.
Attivazione dell’altoparlante per vivavoce
Si sta telefonando.
R
Attivazione dell’altoparlante: premere il tasto R a lungo. Sul display
appare .
Disattivazione dell’altoparlante per vivavoce
Si sta telefonando. La conversazione viene effettuata attraverso
l’altoparlante per vivavoce. Sul display appare .
R
Disattivazione dell’altoparlante: premere il tasto R a lungo.
Commutazione del microfono su mute (disattivazione audio)
Si sta telefonando.
Disattivare del microfono: premere il tasto 1 a lungo. Sul display
appare .
Riattivazione del microfono
Il microfono è disinserito. Sul display appare .
Attivazione del microfono: premere il tasto 1 a lungo. È possibile
proseguire la telefonata.
Al termine della conversazione viene automaticamente disattivato l’altoparlante per vivavoce e riattivato il microfono.
Se durante una conversazione si deposita il portatile nella base viene automaticamente attivata la funzione di vivavoce.
I
Page 83
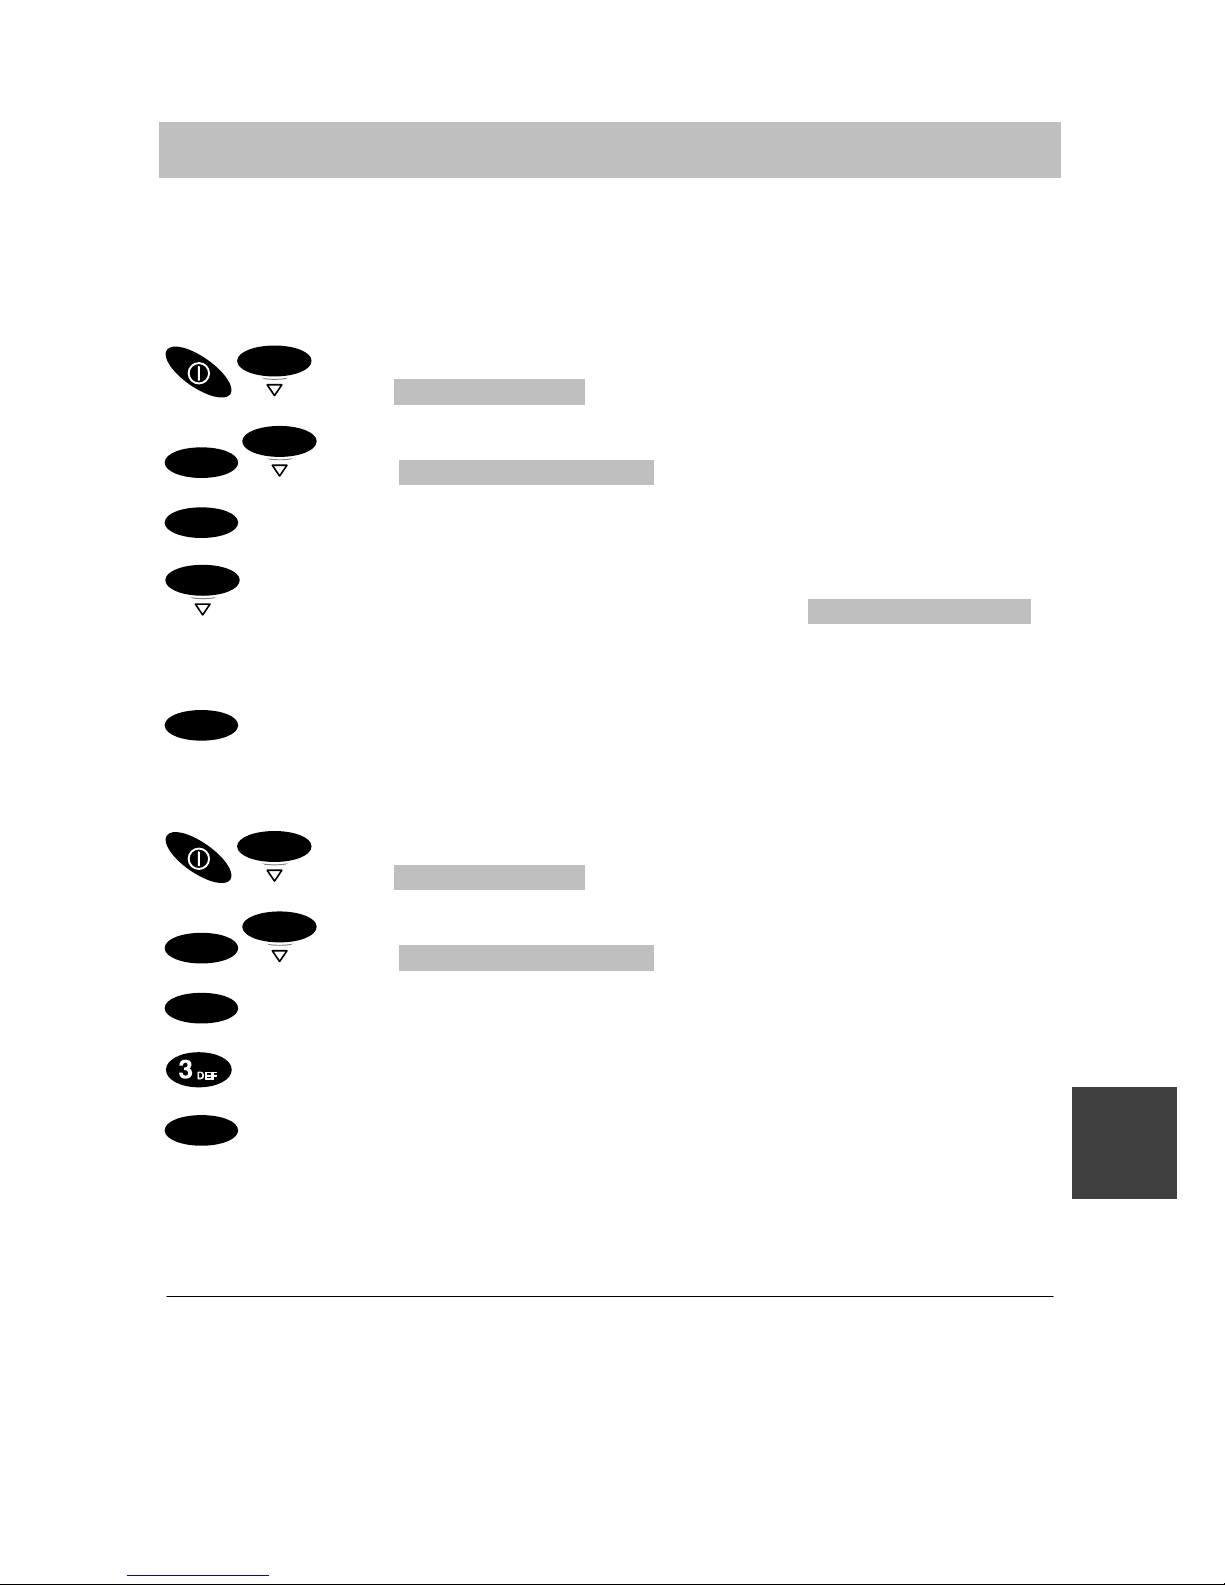
Integral 33 / CS I55 – Integral 1/3/5
13
Impostazione del portatile
Nella configurazione iniziale è possibile effettuare le impostazioni sul portatile.
Segnale di chiamata
OK
Menu Regola tel.
OK
OK
Menu Regola acustica
OK
Confermare
OK
Impostazione desiderata della chiamata, ad es. Tono chiamata .
E’ possibile selezionare tra suoneria, vibrazione, entrambe, suoneria breve
o muto.
OK
Confermare
Volume del ricevitore
OK
Menu Regola tel.
OK
OK
Menu Vol. ricevitore
OK
Confermare.
Immettere il volume del ricevitore (da 1 a 6), ad es. 3.
OK
Confermare.
Il portatile nella base non vibra. Se è stata selezionata la vibrazione come
segnale di chiamata, ad ogni chiamata si ode un breve segnale acustico.
Se come segnale di chiamata è stato selezionato muto, sul display viene
visualizzato il simbolo corrispondente (→ Pag. 6).
I
Page 84
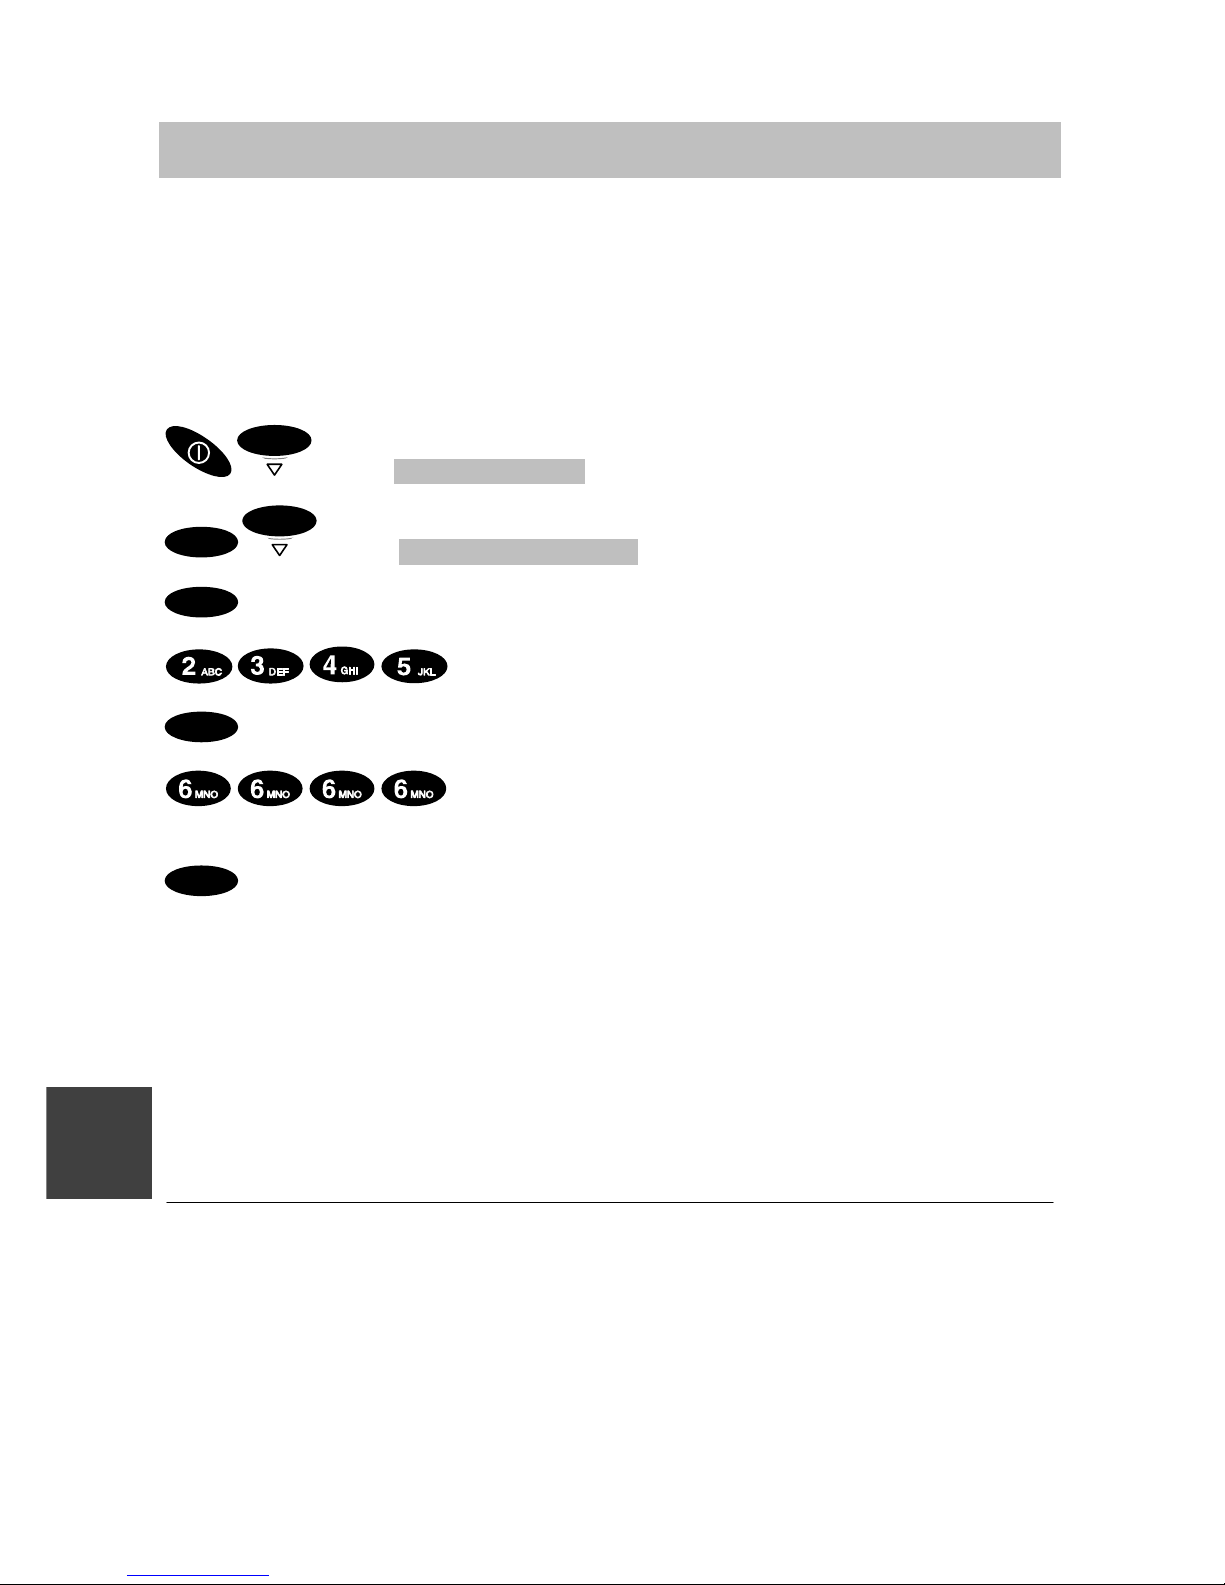
Integral 33 / CS I55 – Integral 1/3/5
14
Chiamata di emergenza
Se il portatile è bloccato, funziona soltanto il numero di emergenza.
Sul display, sopra la softkey di destra appare: SOS.
La chiamata di emergenza è sempre possibile con il relativo tasto rosso
situato sul lato superiore, anche nel caso in cui il portatile non sia bloccato.
Impostazione e modifica del numero d’emergenza
OK
Menu Regola tel.
OK
OK
Menu n.chiam.emerg.
OK
Confermare.
Immettere il PIN, ad es. 2345.
OK
Confermare.
Immettere o modificare il numero d’emergenza,
ad es. 6666.
OK
Confermare.
Interruzione della chiamata d’emergenza con il relativo tasto
Premere a lungo il tasto per la chiamata di emergenza sulla sommità.
Il numero di emergenza viene selezionato.
La chiamata di emergenza SOS non è disponibile qualora non sia stato
immesso alcun numero di chiamata di emergenza durante una conversazione, se è in arrivo una chiamata o un messaggio o se il portatile si trova
al di fuori del raggio d’azione dell’impianto telefonico.
Per cancellare un numero d’emergenza è necessario modificarlo, non
immettendo nessun numero di telefono (premere a lungo la softkey di
sinistra) e confermando con il selettore.
I
Page 85
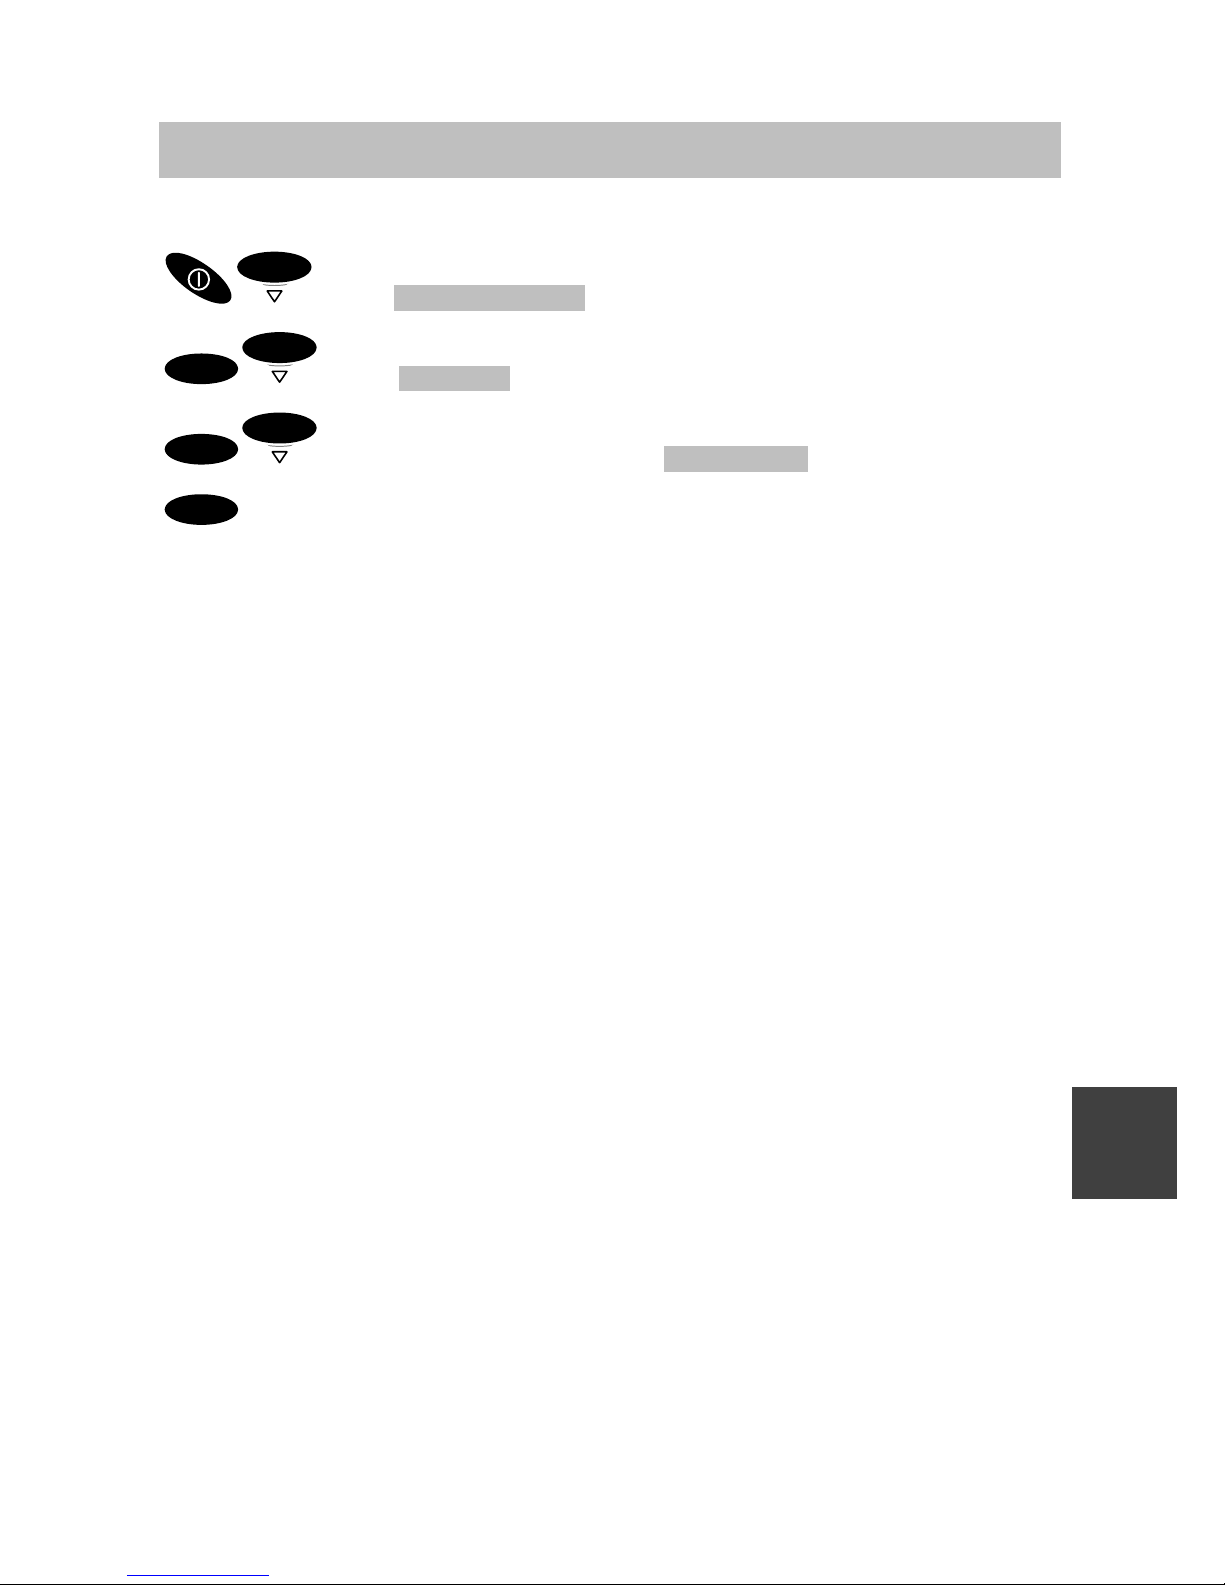
Integral 33 / CS I55 – Integral 1/3/5
15
Lingua
Impostazione della lingua del menu locale
OK
Menu Regola tel.
OK
OK
Menu Lingua
OK
OK
Selezionare la lingua, ad es. Italiano .
OK
Confermare.
I
Page 86

Integral 33 / CS I55 – Integral 1/3/5
16
Dati tecnici
Portatile Integral D3 mobile
Non utilizzare in aree a rischio di esplosioni al di fuori delle zone 2 e 22 in
conformità ai valori indicati nella dichiarazione del produttore!
Standard:
DECTt (Digital Enhanced Cordless
Telecommunication).
Dimensioni: 137 x 46 x 21 mm più antenna
Peso, portatile: ca. 100 g (con batteria)
Tipo di batteria: NiMH; 650 mAh
Autonomia portatile
(a piena carica):
Conversazione: min. 8 ore
Stand–by: min. 80 ore
Tempo di carica: scarica: ca. 5 ore
stato di carica sconosciuto: ca. 14 ore
Gamma di frequenze: 1,88 – 1,9 GHz
Potenza di trasmissione: valore medio: 10 mW, valore di punta: 250 mW
Temperatura di esercizio
consentita:
Portatile: –10 da °C a +45 °C
Base: +5 da °C a +40 °C
Temperatura
di stoccaggio:
–25 da °C a +55 °C
Temperatura durante il
trasporto:
senza batteria, da –25 °C a +70 °C
con batteria, da –25 °C a +60 °C
Tipo di protezione: IP 65, protezione da polvere e jetti d’acqua
Accessori base classic, base comfort
alimentatore a spina alimentatore a spina
Europa, GB,
batteria di riserva, headset HSG D3,
borsa, D3 Case,
MEM-Card,
gestione MEM-Card
Alcuni accessori devono essere ordinati separatamente!
I
Page 87

Integral 33 / CS I55 – Integral 1/3/5
1
Belangrijke aanwijzingen
Inhoud van deze beknopte bedieningshandleiding
In deze bedieningshandleiding wordt uitgelegd hoe u uw handset in gebruik
kan nemen. Alle basisregels voor de bediening en de meest gebruikte functies en instellingen worden beschreven.
Een volledige beschrijving van alle installatiespecifieke functies vindt u op
de meegeleverde cd-rom. U kunt de bedieningshandleidingen bekijken en
afdrukken.
Aanwijzing: een afgedrukte handleiding kunt u tegen betaling bestellen via
Tenovis Direct: Tel. +49 (0) 800–3473 287, Fax: +49 (0) 800–3473 283.
Bestelnummers: Integral D3 mobile op Integral 1/3/5: 4.999.059.185
Integral D3 mobile op Integral 33 / CS I55: 4.999.059.184
Inbegrepen bij de levering
Zodra u uw Integral D3 mobile ontvangt, dient u te controleren of de levering compleet is:
– Handset D3 mobile met beknopte installatie-instructies
– Verwisselbare accu – MEM-Card
– Laadtoestel classic – Netstekker
– Beknopte bedieningshandleiding
– Cd-rom met uitvoerige bedieningshandleidingen
Waar kunt u uw handset gebruiken
De handset Integral D3 mobile is geschikt voor gebruik op kantoor, in de
buitenlucht of in een stoffige omgeving. De handset voldoet aan de eisen
van beschermingsklasse IP65, stofdicht en beschermd tegen waterstralen.
Tegen storingen beschermen
Normaal gesproken is andere elektronische apparatuur tegen straling met
hoge frequentie beschermd. Mocht echter een dergelijk toestel onvoldoende beschermd zijn, kan dit tot storingen leiden.
Behuizing van de handset nooit losschroeven!
De behuizing kan hierdoor beschadigd raken. Het bevat geen onderdelen
die u kunt repareren.
Accu in gebruik nemen
Accu’s uitsluitend correct gebruiken. Tenovis kan niet aansprakelijk worden
gesteld voor schade die ontstaat door incorrect gebruik van de accu.
NL
Page 88

Integral 33 / CS I55 – Integral 1/3/5
2
Belangrijke aanwijzingen
Als de accu’s versleten zijn – informatie voor de eindgebruiker
Gooi versleten accu’s nooit in de prullenbak! Breng versleten accu’s naar
het inzamelpunt voor chemisch afval van uw gemeente of naar uw dealer,
zodat zij op een milieuvriendelijke wijze kunnen worden afgevoerd.
Tips voor de plaats van opstelling
Gebruik voor het laadtoestel een slipvaste onderlaag, met name bij nieuwe
meubels of meubels die met een onderhoudsmiddel behandeld zijn. Lak of
onderhoudsmiddelen kunnen stoffen bevatten die de voetjes van uw laadtoestel aantasten en de aangetaste toestelvoetjes zouden aan de bovenkant van de meubels ongewenste sporen kunnen achterlaten. Tenovis kan
voor dergelijke schade niet aansprakelijk worden gesteld.
Gelieve uitsluitend lege accu’s af te voeren.
Erkenning en conformiteit
Wij, Tenovis GmbH & Co. KG, verklaren hiermee, dat het product Integral
D3 mobile voldoet aan de fundamentele eisen en andere relevante bepalingen van de richtlijn 1999/5/EU (R&TTE).
Dit toestel is voor de aansluiting op radio-interfaces (DECT
t
) van
Tenovis telecommunicatie-installaties bedoeld en voldoet aan de fundamentele eisen conform EG-richtlijn1999/5/EG (radio en telecommunicatie
terminal equipment, R&TTE).
Dit toestel is op basis van de constructie niet voor direct gebruik op interfaces van openbare telecommunicatienetwerken bedoeld.
Wanneer bij het gebruik toch problemen optreden, dient u zich in de eerste
plaats tot uw vakhandel of de servicedienst van Tenovis te wenden.
De conformiteitsverklaring kan op het onderstaande internetadres worden
aangevraagd: www.tenovis.com/deutsch/verzeichnis/conformance.htm
of
zoek onder Index het trefwoord: Conformiteit.
Deze installatie functioneert conform systeem DECT
t
in het frequentiebereik 1880 tot 1900 MHz. De legitimatie van dit frequentiebereik in het frequentieschema geldt in eerste instantie tot 2008 en wordt afhankelijk van
de Europese harmonisering voortgezet.
DECT is een geregisteerd handelsmerk van ETSI
NL
Page 89

Integral 33 / CS I55 – Integral 1/3/5
3
Inbedrijfstelling
Als uw handset nog niet gemonteerd is
Indien u de handset niet afgemonteerd ontvangen heeft, dient u
D de MEM-Card te plaatsen (→ pagina 3),
D de accu te plaatsen (→ pagina 4) en
D indien nodig de beschermfolie van het display te verwijderen.
D uw servicedienst dient de handset voor uw telefoonsysteem aan te
melden.
Uw handset is dan gereed voor gebruik.
D Het laadtoestel nu aansluiten (→ pagina 5).
Als uw handset reeds volledig gemonteerd is
Indien u uw handset afgemonteerd ontvangen heeft en het voor uw telefoonsysteem aangemeld is, hoeft u alleen het laadtoestel aan te sluiten
(→ pagina 5).
MEM-Card
U kunt alleen met uw handset telefoneren als er een MEM-Card geplaatst
is. Belangrijke gegevens omtrent uw handset, zoals persoonlijke instellingen en telefoonboeken, zijn hierop opgeslagen. Met deze MEM-Card kunt
u meteen telefoneren als u uw handset een keer omruilt.
NL
Page 90
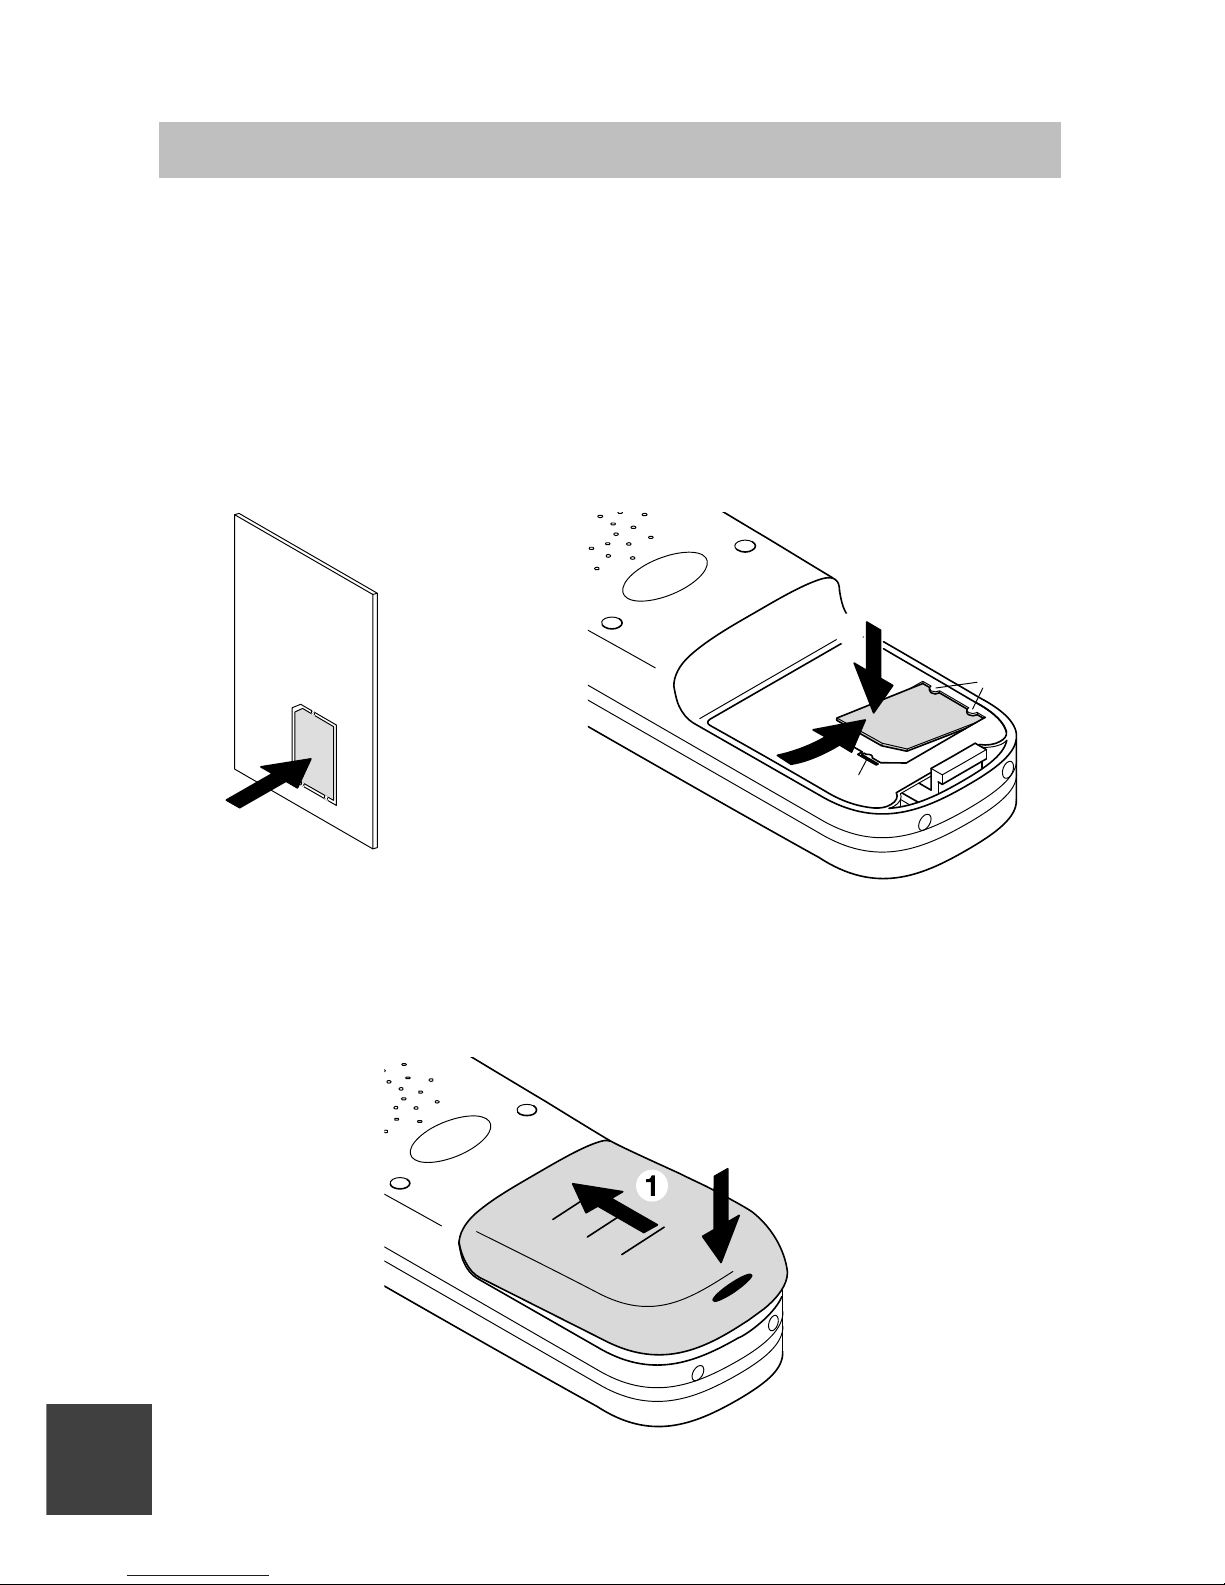
Integral 33 / CS I55 – Integral 1/3/5
4
Inbedrijfstelling
MEM-Card plaatsen
D Allereerst de kleine MEM-Card uit de grote kaart drukken (onderstaande
afbeelding links).
D Schuif de MEM-Card met de korte kant schuin onder de halve-maanvor-
mige houders a in de MEM-Cardhouder (onderstaande afbeelding
rechts) (1). De goudkleurige contactvlakken van de MEM-Card moeten
naar beneden wijzen!
D MEM-Card naar beneden drukken tot het kleine lipje b vastklikt (2).
Accu plaatsen
D Accu in de behuizing schuiven (1)
D Accu aan de vergrendelingskant naar beneden drukken tot deze hoor-
baar vastklikt (2).
NL
1
2
a
b
2
Page 91
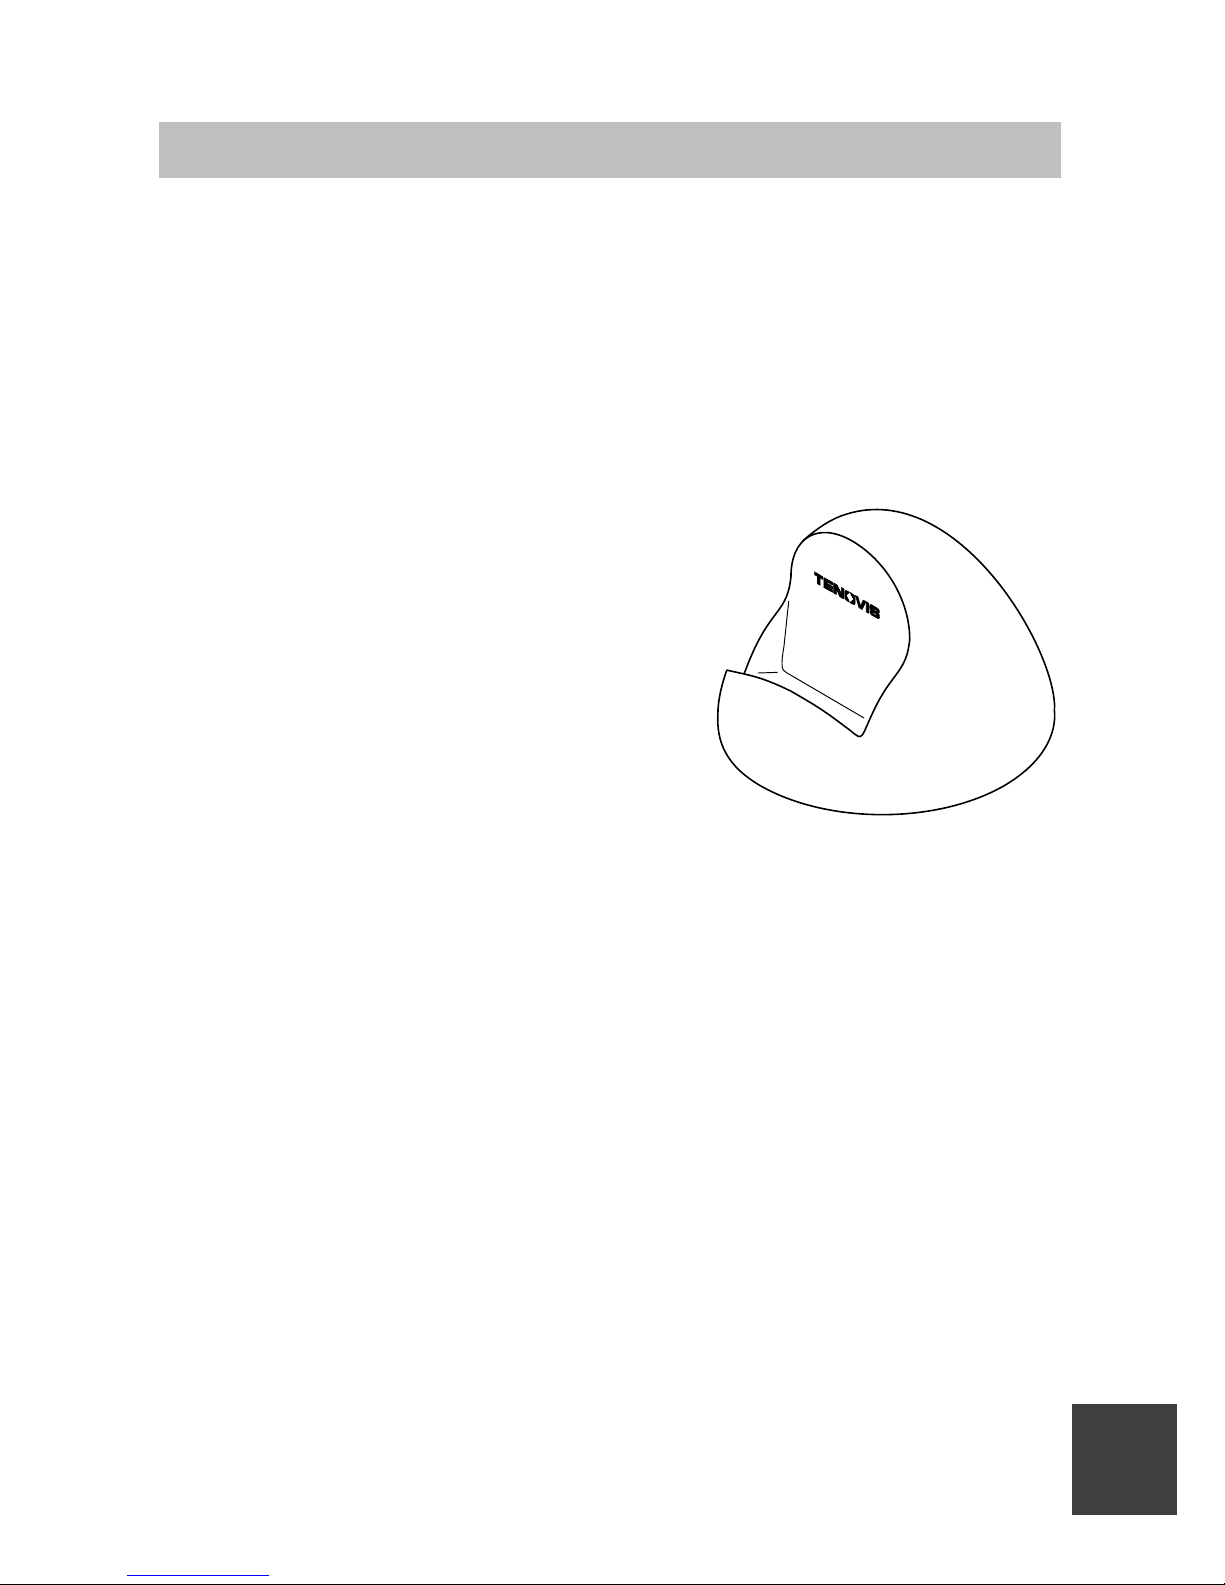
Integral 33 / CS I55 – Integral 1/3/5
5
Inbedrijfstelling
Laadtoestel neerzetten
Het laadtoestel op een vaste en vlakke ondergrond neerzetten, bijv. op een
tafel. Kies een standplaats die beschermd is tegen direct zonlicht en vochtigheid.
D Netstekker in een contactdoos steken.
D De kleine stekker van het aansluitsnoer achter in het laadtoestel steken.
Het laadtoestel is nu gereed voor gebruik.
Handset opladen
De handset in het laadtoestel zetten. U
hoort een bevestigingssignaal. De verlichting van het display gaat kort branden.
De handset blijft in- of uitgeschakeld.
Het accu-pictogram in de pictogrambalk
beweegt tot de accu volledig opgeladen is.
Tijdens het opladen wordt de accu warm.
Dit is normaal.
Aanwijzingen bij de accu
Laad de accu aan het begin volledig op en plaats de handset in de eerste
week van gebruik telkens terug in het laadtoestel. Nieuwe accucellen bereiken hun volledige capaciteit eerst na enkele oplaad/ontlaadbeurten.
U kunt uw handset permanent in het laadtoestel laten staan. De accu kan
niet overladen worden.
De accu niet aan direct zonlicht blootstellen. Dit kan ten koste gaan van de
lange levensduur van uw accu.
Let op!
D De accu niet in vuur gooien, explosiegevaar.
D Om letsel of brandschade te voorkomen er op letten, dat het contact van
de accu niet met geleidende voorwerpen in aanraking komt of kortgeslo-
ten wordt.
NL
Laadtoestel classic
Page 92
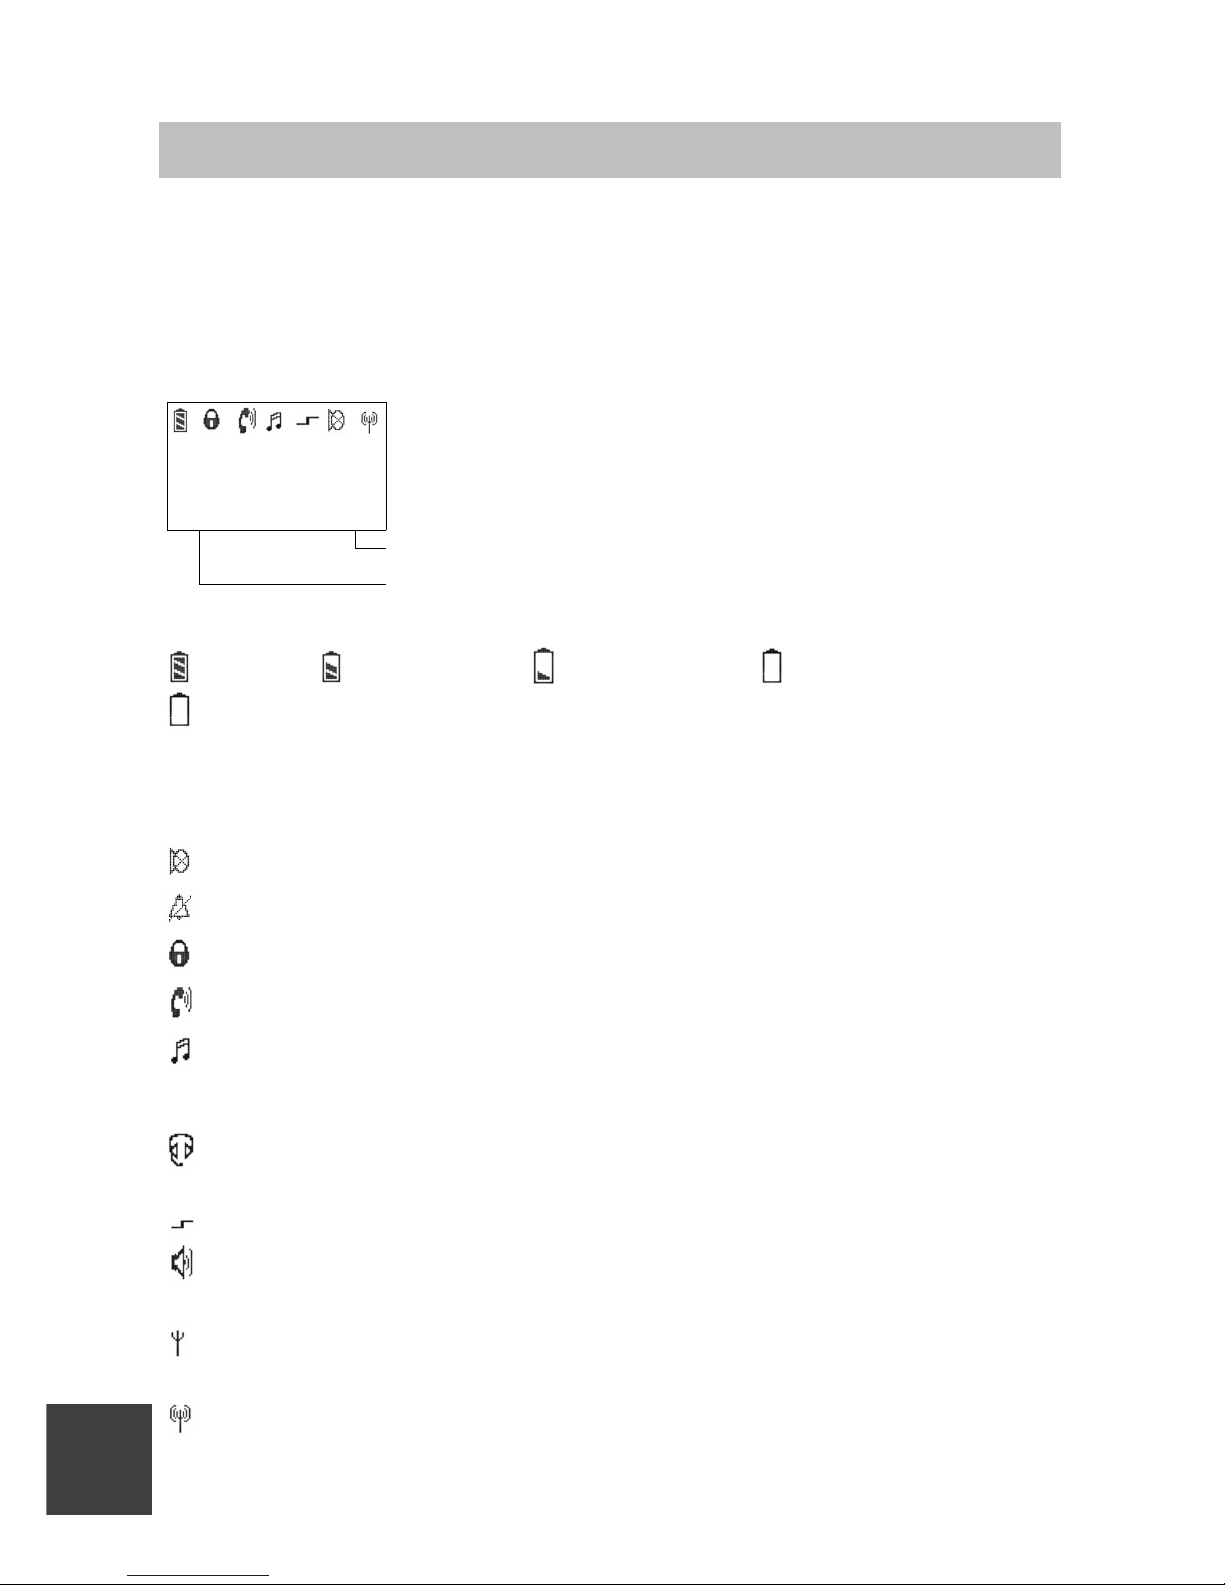
Integral 33 / CS I55 – Integral 1/3/5
6
Display
Teksten en symbolen op het display helpen u bij de bediening. U wordt door
het menu geleid en over de status van uw handset geïnformeerd.
De functies van de softkeys links en rechts veranderen, afhankelijk van de
status. Deze functies worden op het display weergegeven, direct boven de
toetsen.
De regels op het display
Pictogrambalk geeft de status van de telefoon weer.
Muur
7442
Twee tekstregels, bijv. voor naam en oproepnummer
Scheid Menu
Functie van de rechter softkey, bijv. Menu
Functie van de linker softkey, bijv. Scheid
Betekenis van de pictogrammen
Accu vol, accu bijna vol, accu bijna leeg, accu leeg,
(accu-pictogram knippert) capaciteit minder dan vijf minuten!
Als u een accu opnieuw plaatst, is zijn oplaadtoestand onbekend voor
de handset. Daarom verschijnt er geen accu-pictogram op het display. Dit
pictogram wordt pas weergegeven als de accu voor het eerst in de handset
opgeladen is.
Mute: de microfoon is uit. Uw gesprekspartner luistert niet mee.
Geen oproepsignaal: oproepsignaal werd op mute gezet.
Slot: de handset is afgesloten.
Hoorn: de handset heeft een telefoonverbinding.
Multitoon-belmodus: iedere druk op een toets wordt als hoorbare
DTMF-toon naar de gesprekspartner verzonden (DTMF-doorkiezen).
(Symbool wordt enkel bij Integral 1/3/5 getoond)
Headset: u belt met behulp van de headset. Microfoon en luidspreker in
de behuizing zijn automatisch uitgeschakeld.
Speciale functie ingesteld: sterretjestoets werd lang ingedrukt.
Luidspreker: de luidspreker voor handsfree op de achterkant van de
behuizing is ingeschakeld.
Binnen reikwijdte van de installatie: uw handset bevindt zich binnen
reikwijdte van het basisstation. U kunt telefoneren.
Verbinding naar de installatie: de handset heeft een radioverbinding.
NL
Page 93
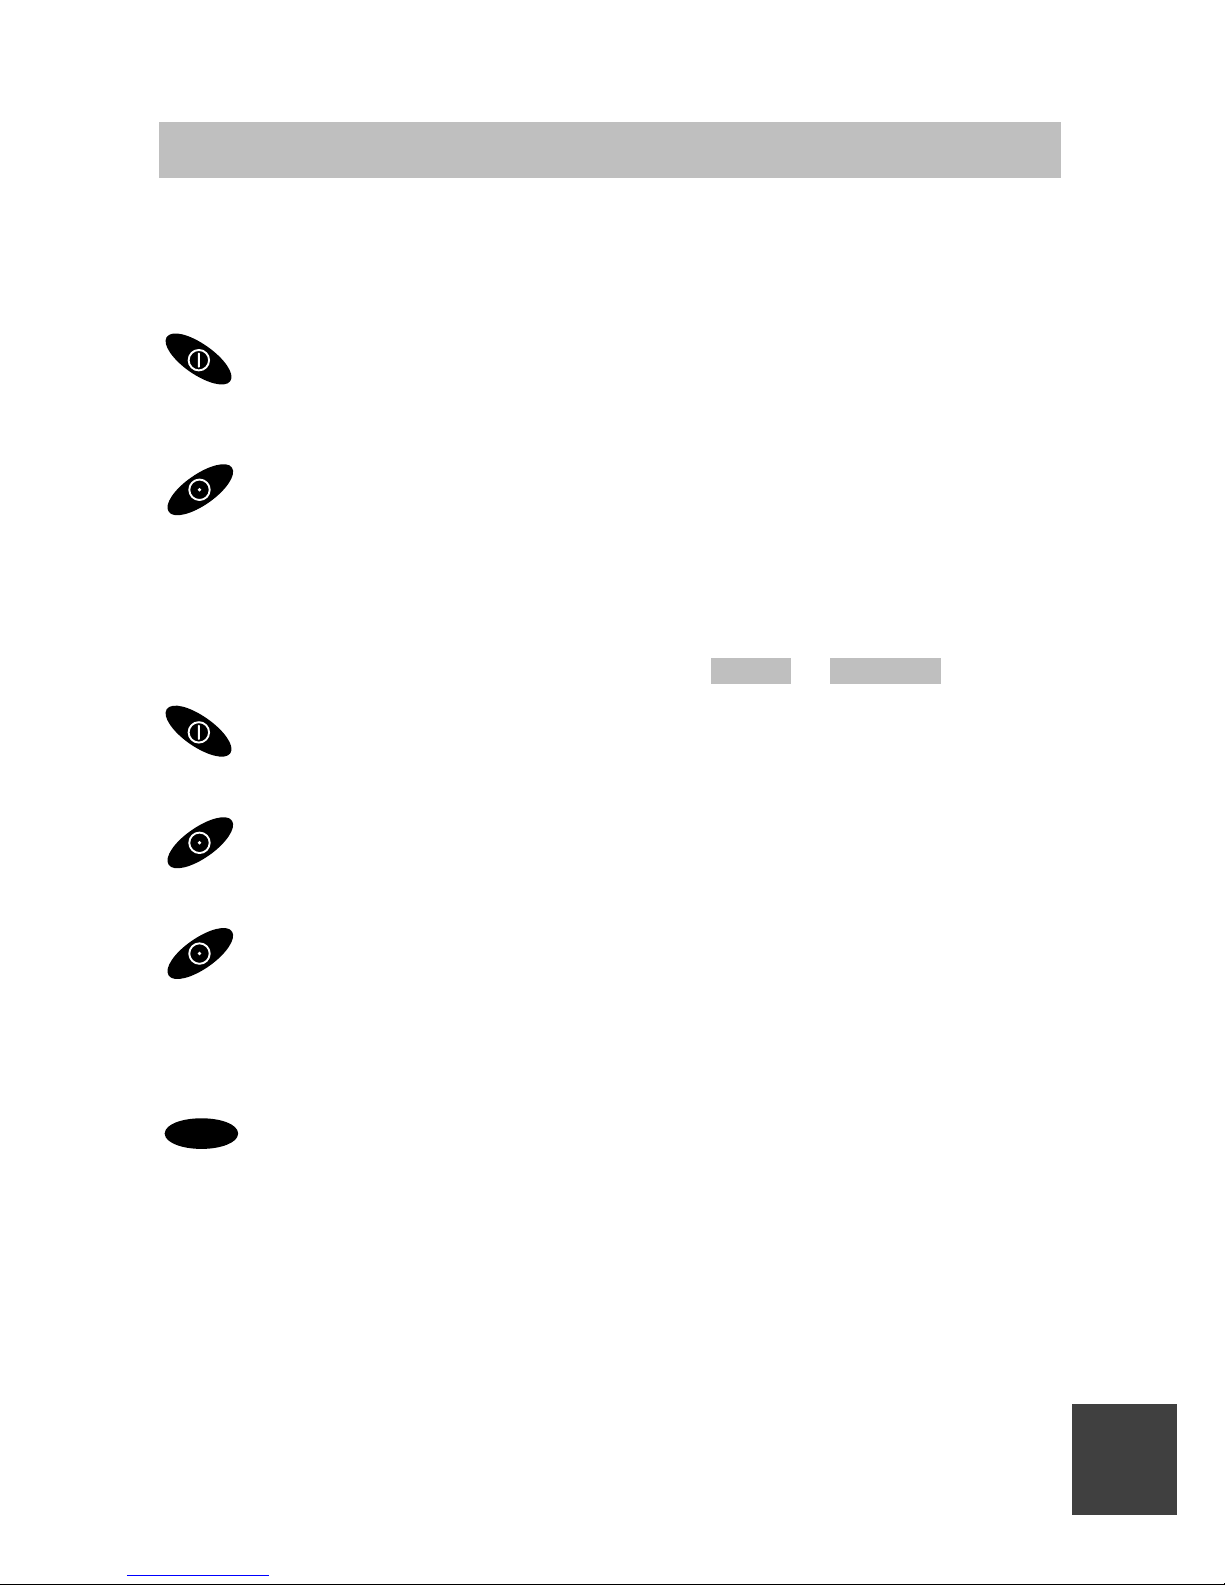
Integral 33 / CS I55 – Integral 1/3/5
7
Basisregels voor de bediening
Voor de bediening van uw telefoon bestaan er enkele stappen, die veelvuldig voorkomen. Maakt u zich met deze bedieningsstappen vertrouwd.
Telefoon inschakelen
De telefoon is uit. Softkey rechts lang indrukken.
Telefoon uitschakelen
De telefoon staat in de basistoestand. Softkey links lang
indrukken.
Linker- en rechter softkey
De functie van de softkeys verandert afhankelijk van de situatie. De functie
staat altijd op het display boven de toets, bijv. Menu of Scheid .
De softkey rechts is voor het inschakelen bedoeld of om het menu
op te roepen.
De softkey links is bedoeld om een menupunt te beëindigen of om
af te breken.
Als u de softkey links in een willekeurig menu lang ingedrukt
houdt, wordt de handset in de basistoestand geplaatst.
Selector
OK
Hiermee worden instellingsprocedures afgesloten. (vergt een krachtige druk op de toets, om een onopzettelijke inwerkingstelling te verhinderen).
Toesten met dubbele functie
Enkele toetsen van uw handset hebben twee functies. Deze zijn te herkennen aan de extra oranje opschriften. Als u de tweede oranje functie wilt
activeren, moet u de toets langer ingedrukt houden. U hoort een bevestigingssignaal.
NL
Page 94
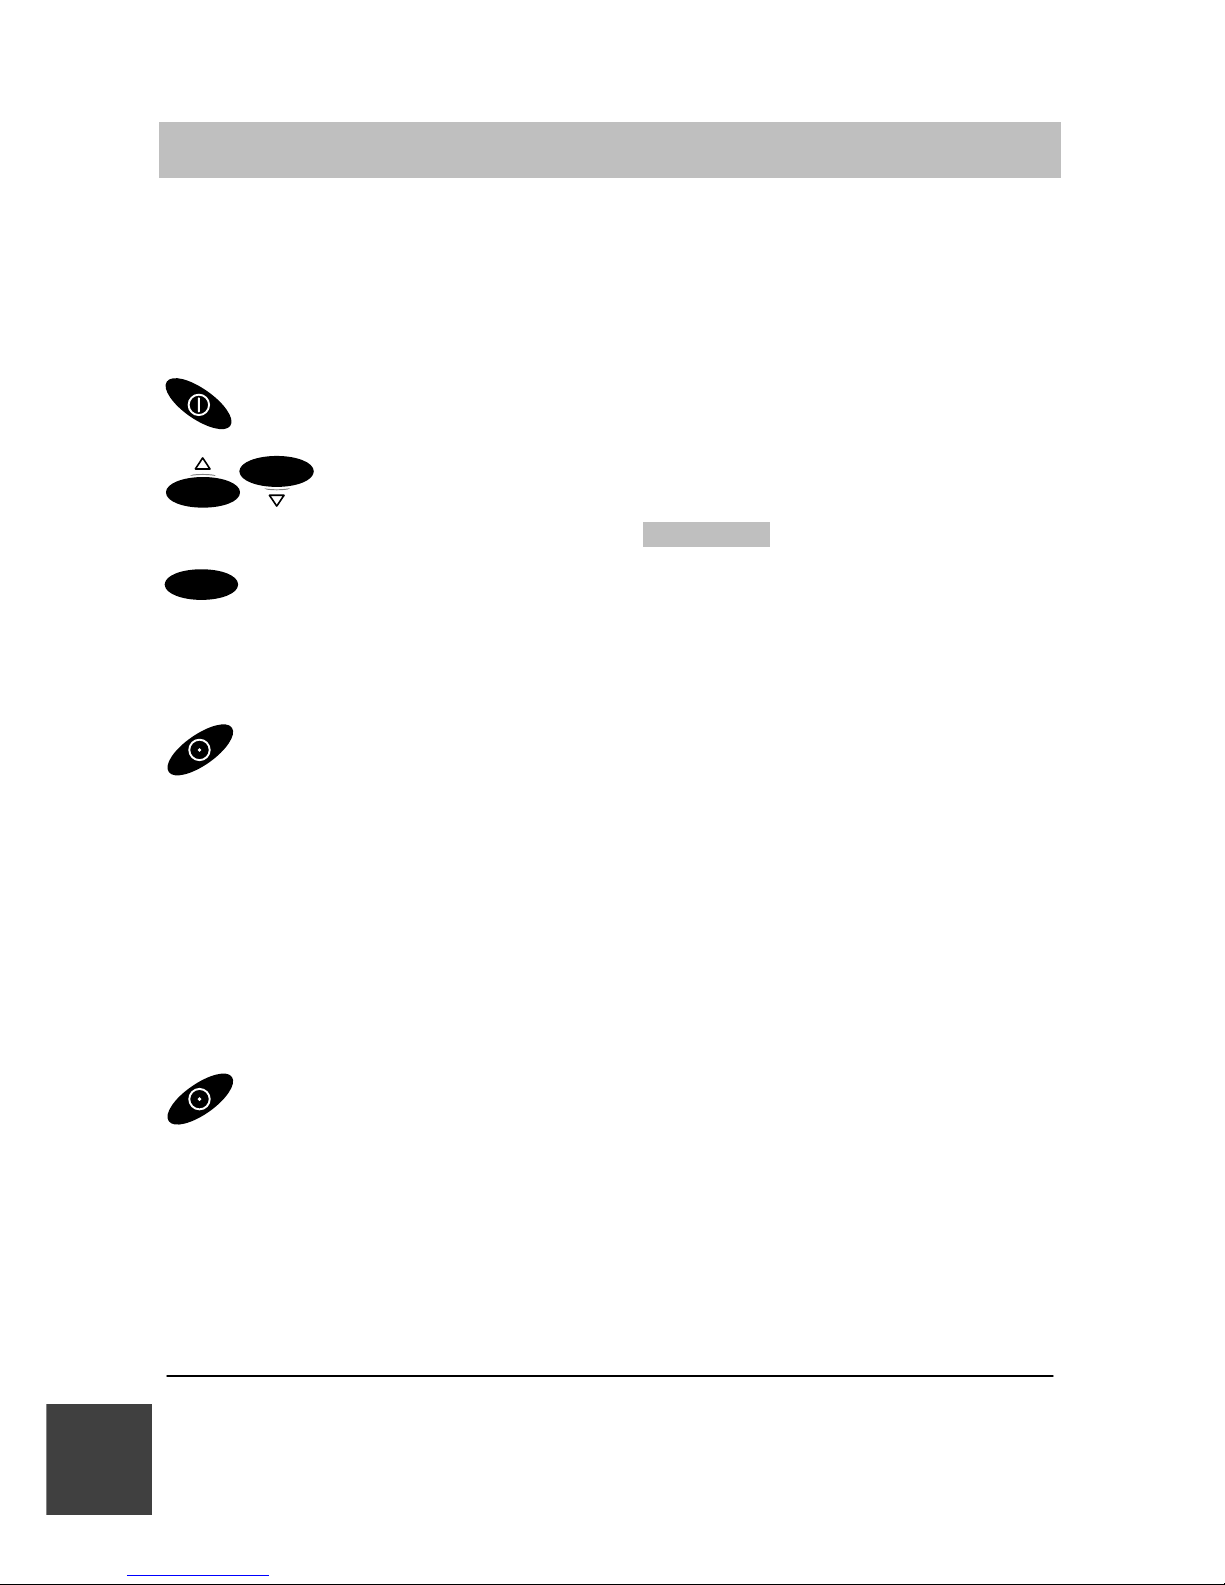
Integral 33 / CS I55 – Integral 1/3/5
8
Basisregels voor de bediening
Menu selecteren
Enkel functies en instellingen van uw telefoon kunt u via de indicatie (menu)
op het display laten verschijnen. Het menu is zodanig gestructureerd dat er
zich achter de meeste menupunten nog meer submenu’s bevinden.
Menu oproepen met softkey rechts.
OK
OK
Selector naar boven of beneden drukken en op deze manier
het gewenste menupunt markeren, bijv. Systeem .
OK
Menupunt selecteren met de selector.
Menu-niveau terug
Met de softkey links bereikt u een bovengeschikt menu of verlaat u
het menu.
Submenu’s
Submenu’s worden precies zo bediend als het hoofdmenu.
Afbreken
Houd de softkey links lang ingedrukt om de basistoestand
te bereiken.
U kunt in de basistoestand ook meteen de selector naar beneden drukken
om het menu op te roepen.
NL
Page 95
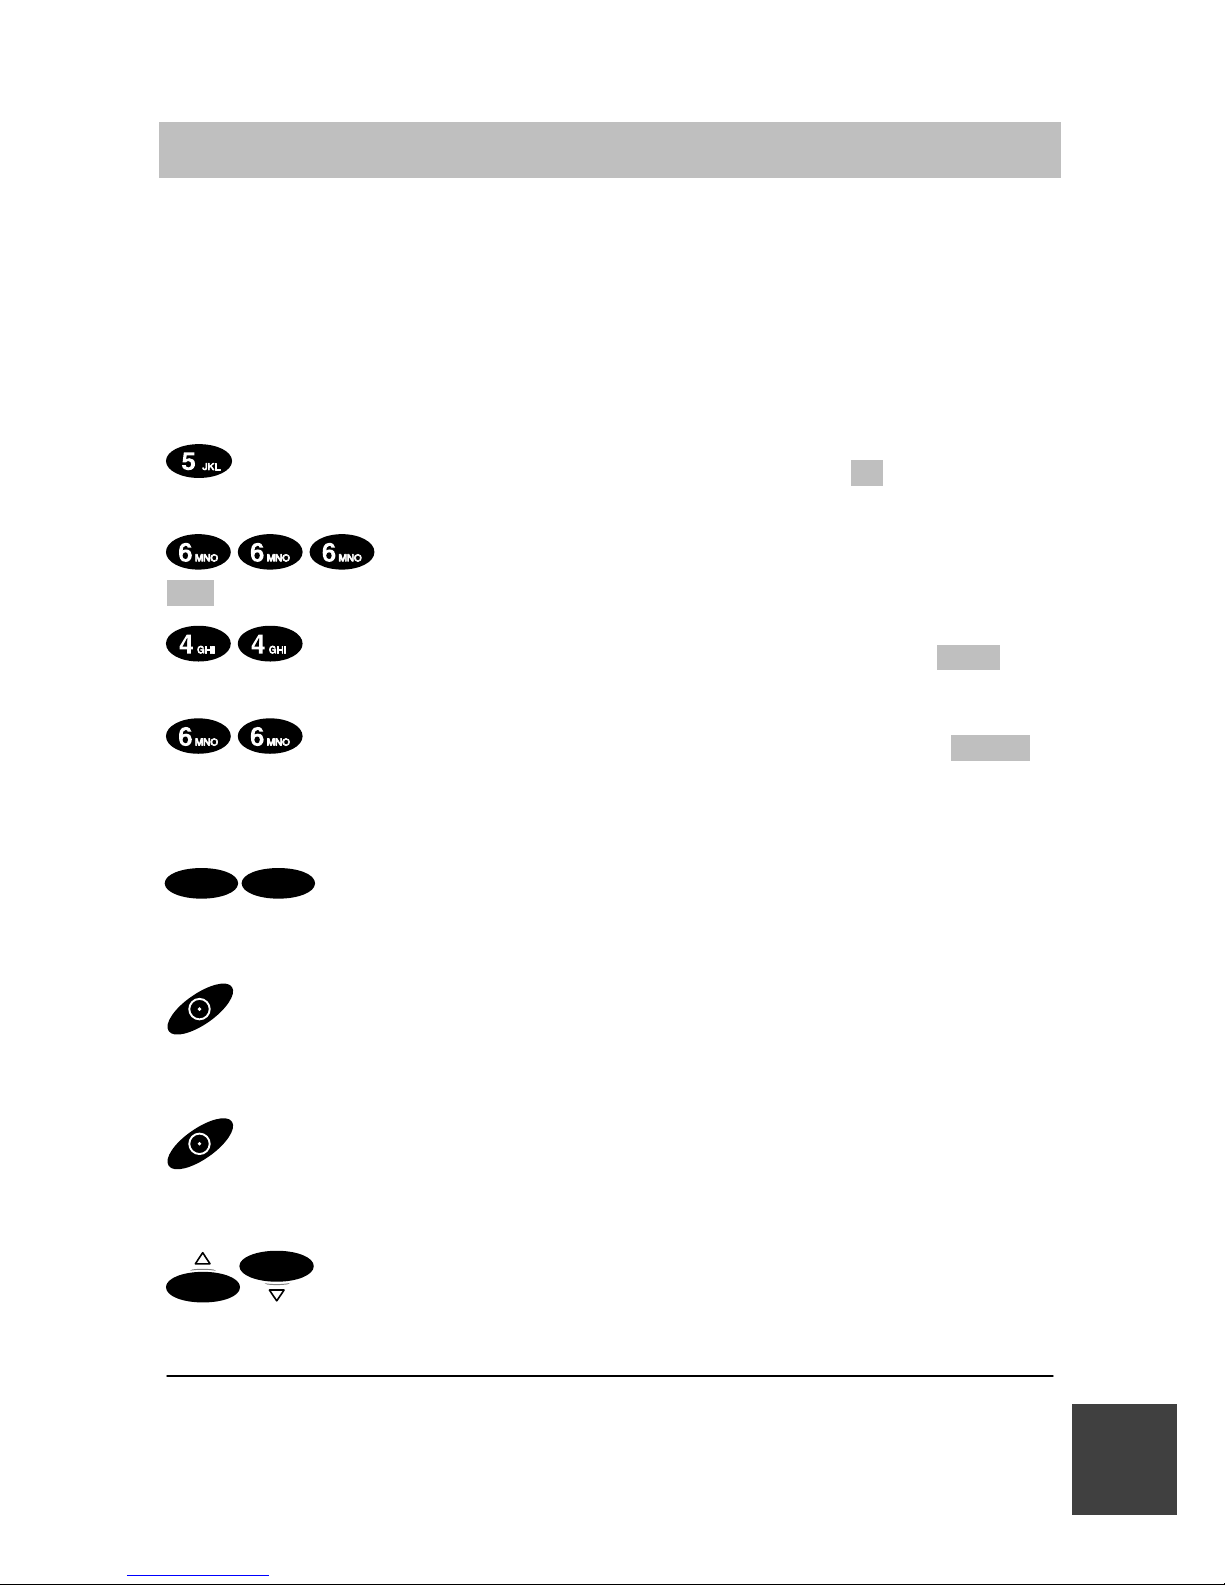
Integral 33 / CS I55 – Integral 1/3/5
9
Basisregels voor de bediening
Tekens invoeren bij telefoonboek-records
U kunt met de cijfertoetsen ook letters en tekens invoeren, bijv. voor namen
in het persoonlijke telefoonboek. De letters staan ook op de cijfertoetsen.
Uw telefoon schakelt automatisch om op letters en tekens als dit voor de
invoer nodig is.
Voorbeeld: naam „JOHN” invoeren:
Toets JKL één keer indrukken. Op het display staat J .
Even wachten.
Toets MNO drie keer indrukken. Op het display staat
JO . Even wachten.
Toets GHI twee keer indrukken. Op het display staat JOH .
Even wachten.
Toets MNO twee keer indrukken. Op het display staat JOHN .
Even wachten.
Invoer beëindigen
OK OK
Selector twee keer indrukken. De tekens worden opgeslagen.
Tekens corrigeren
Softkey links indrukken.
Regel wissen
Softkey links lang ingedrukt houden.
Tekens invoegen
OK
OK
Cursor naar rechts of links bewegen. Nieuwe tekens die u
invoert worden voor de cursor ingevoegd.
Wisselen tussen hoofdletters en kleine letters: sterretjestoets lang ingedrukt houden.
NL
Page 96
Integral 33 / CS I55 – Integral 1/3/5
10
Normaal telefoneren
U kunt met uw handset heel normaal telefoneren.
Binnen uw telefooninstallatie (intern): kies meteen het doorkiesnummer.
Buiten uw telefooninstallatie (extern): kies eerst de kiescode (meestal de
nul) en vervolgens het oproepnumer van uw gesprekspartner.
Oproepen
Opnemen.
Oproepnummer selecteren, bijv. 1276
Gesprek beëindigen
Opleggen.
Nummerherhaling
Opnemen.
Hekjestoets lang ingedrukt houden.
Een telefoonoproep aannemen
Uw handset gaat over.
Opnemen.
Op de Integral 1/3/5 kunt u de nummerherhaling enkel bij externe telefoonoproepen gebruiken.
NL
Page 97
Integral 33 / CS I55 – Integral 1/3/5
11
Ruggespraak en doorverbinden
Tijdens het telefoneren kunt u ruggespraak houden en met een ander telefoneren. Uw gesprekspartner wordt dan in de wacht gezet. – Bovendien
kunt u de beller doorverbinden.
Ruggespraak activeren
U telefoneert.
R
Ruggespraak activeren. Uw gesprekspartner luistert niet mee.
Gewenste nummer invoeren, bijv. 7654.
Op het display staat het nummer 7654 . De verbinding wordt opgebouwd.
Uw eerste gesprekspartner staat in de wacht.
Ruggespraak beëindigen
R
Terug naar de eerste gesprekspartner met R-toets.
Een beller doorverbinden
U telefoneert.
R
Ruggespraak activeren.
Gewenste nummer invoeren, bijv. 7654.
Opleggen.
Op de Integral 1/3/5 wordt de verbinding naar de ruggespraakdeelnemer
verbroken als u de ruggespraak beëindigt.
U kunt doorverbinden, ook als de derde in gesprek is.
NL
Page 98
Integral 33 / CS I55 – Integral 1/3/5
12
Gesprekken met ingeschakelde luidspreker, microfoon uitschakelen
U kunt de ingebouwde luidspreker voor handsfree inschakelen. U hoort uw
gesprekspartner dan via de luidspreker en u kunt vrij spreken.
Tijdens het telefoneren kunt u de microfoon van uw handset uitschakelen.
De hoorn blijft echter wel ingeschakeld. Uw gesprekspartner hoort u niet,
maar u hoort uw gesprekspartner wel.
Luidspreker voor handsfree inschakelen
U telefoneert.
R
Luidspreker inschakelen: toets R lang indrukken. Op het display
staat .
Luidspreker voor handsfree weer uitschakelen
U telefoneert. Het gesprek wordt via de luidspreker voor handsfree
weergegeven. Op het display staat .
R
Luidspreker uitschakelen: toets R lang indrukken.
Microfoon uitschakelen (mute-functie inschakelen)
U telefoneert.
Microfoon uitschakelen: toets 1 lang indrukken. Op het display
staat .
Microfoon weer inschakelen
De microfoon is uit. Op het display staat .
Microfoon inschakelen: toets 1 lang indrukken. U kunt weer verder
telefoneren.
Bij beëindiging van het gesprek wordt de luidspreker voor handsfree automatisch uitgeschakeld en de microfoon automatisch weer ingeschakeld.
Indien u tijdens een gesprek uw handset in het laadtoestel plaatst, wordt
handsfree automatisch ingeschakeld.
NL
Page 99
Integral 33 / CS I55 – Integral 1/3/5
13
Handset instellen
In de basistoestand kunt u instellingen aan de handset uitvoeren.
Geluid instellen
OK
Menu Tel. instellen
OK
OK
Menu Geluid instellen
OK
Bevestigen
OK
Gewenste oproepinstelling kiezen, bijv. Oproepsignaal . U kunt
kiezen tussen oproepsignaal, vibreren, beide, oproepsignaal kort of mute.
OK
Bevestigen
Geluidsvolume hoorn
OK
Menu Tel. instellen
OK
OK
Menu Geluidsvolume hoorn
OK
Bevestigen.
Geluidsvolume hoorn invoeren (van 1 tot 6), bijv. 3.
OK
Bevestigen.
In het laadtoestel vibreert uw handset niet. Wanneer u vibreren als geluidsinstelling gekozen heeft gaat de telefoon bij een oproep kort over.
Als u mute als oproepsignaal gekozen heeft, verschijnt er een overeenkomstig pictogram op het display (→ S. 6).
NL
Page 100
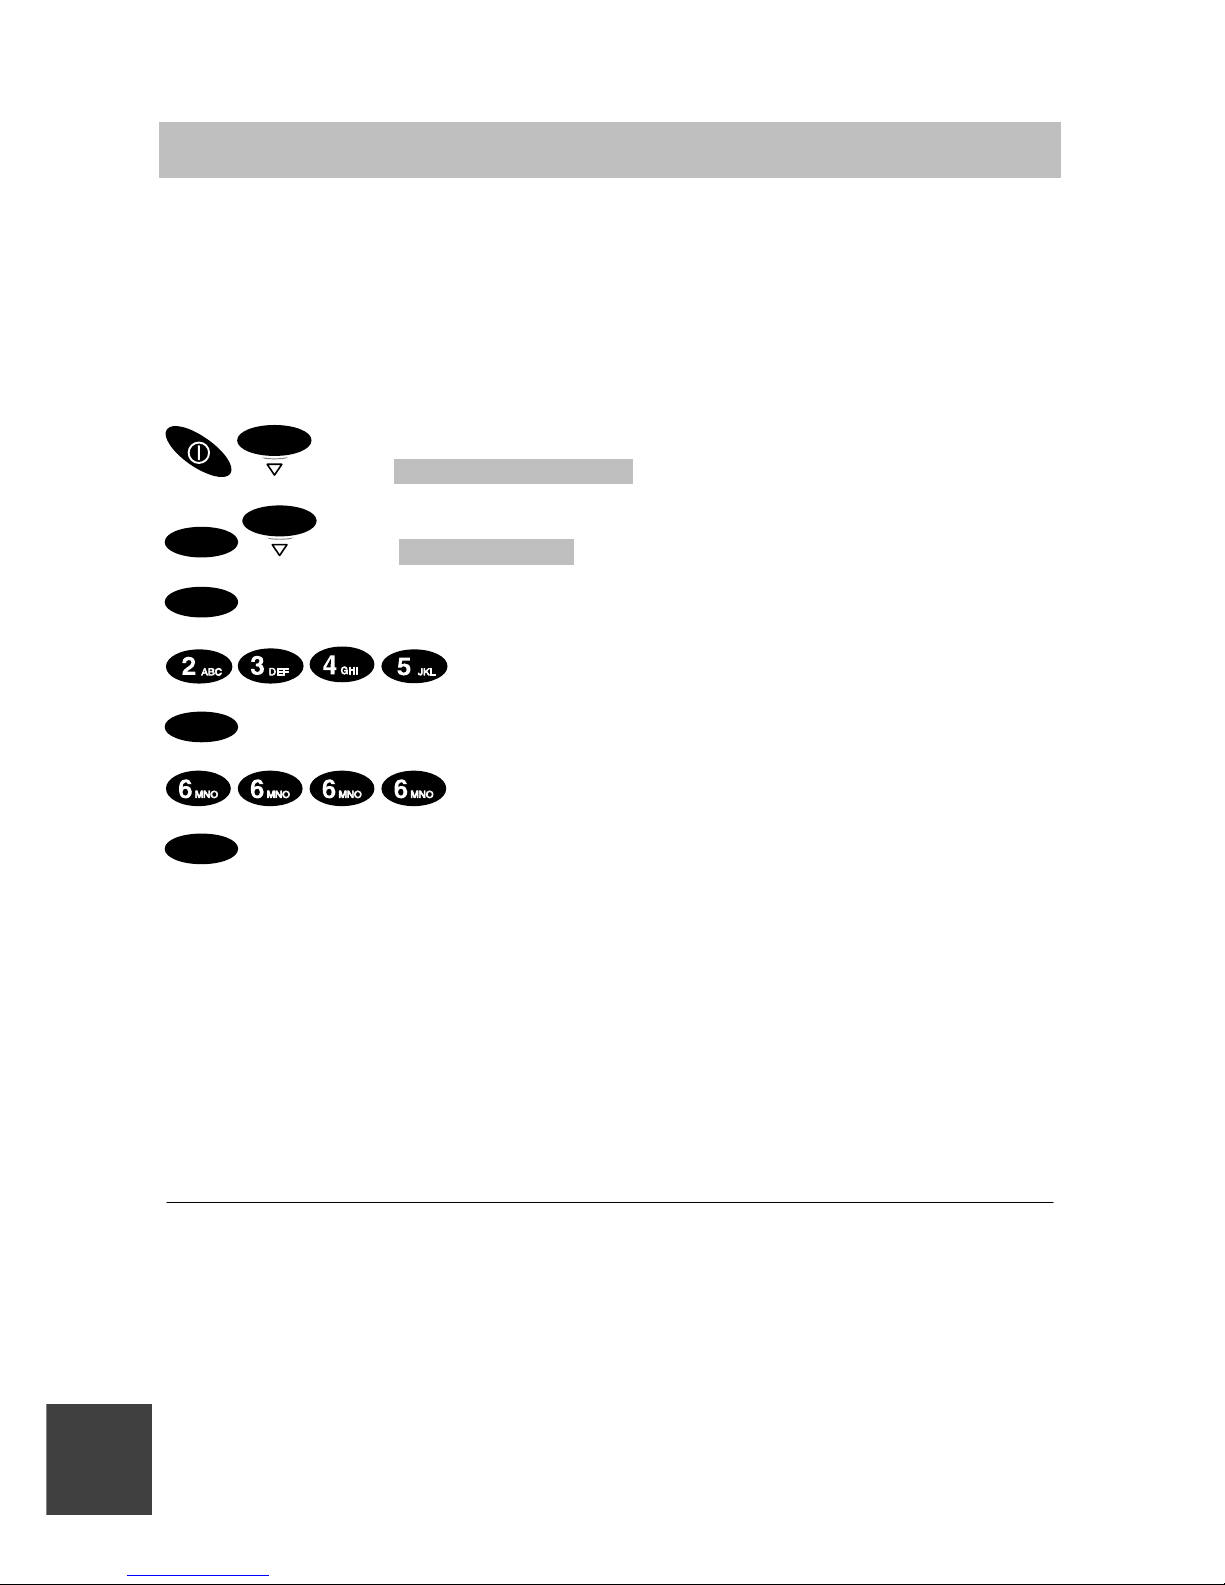
Integral 33 / CS I55 – Integral 1/3/5
14
Noodoproep
Wanneer uw handset afgesloten is, kan alleen het noodnummer opgeroepen worden. Op het display staat boven de rechter softkey: SOS.
De noodoproep is met de rode toets, links boven, altijd te bereiken – ook
wanneer de handset niet afgesloten is.
Noodnummer invoeren en veranderen
OK
Menu Tel. instellen
OK
OK
Menu Noodnummer
OK
Bevestigen.
PIN invoeren, bijv. 2345.
OK
Bevestigen.
Noodnummer invoeren of wijzigen, bijv. 6666.
OK
Bevestigen.
Noodoproep afzetten met noodoproeptoets
Noodoproeptoets boven lang indrukken. Het noodnummer wordt gekozen.
De noodoproep SOS is niet beschikbaar als het noodnummer niet ingevoerd is, tijdens een gesprek, tijdens een oproep of wanneer een message
binnenkomt, of als de handset buiten reikwijdte van het telefoonsysteem
ligt.
Om een noodnummer te wissen dient u dit te veranderen, als telefoonnummer voert u niets in (softkey links lang drukken) en bevestigen met
de selector.
NL
 Loading...