


ASSEMBLY INSTRUCTIONS & PARTS MANUAL #1090703
HOME SHELVING SYSTEM,
Model No. LSS-482484
STUR-D-STOR, Dickson, TN 37056-1888 * (615) 446-8000
Be Sure To Save This Instruction Sheet For Future Reference!
CONGRATULATIONS on your
selectio n of Tennsco’s STU R -D-STOR
home shelving system. The
STUR-D-ST OR system is des igned for
use in the home, the offic e, and the
industrial workplace. STUR-D-STOR
shelving systems pro vi d e stur dy
shelving whic h m ay be us ed as eit her a
single upright unit or s plit in half to
provide shelving with a handy work
surface. Our unique shelf support
design provid es sup port f or loads of up
to 850 pounds per she lf !
LIMITED WARRANTY
Tennsco warrants goods purchased hereunder to be free of defects
in materials and workmanship for a period of one (1) year from the
date of shipment, hereunder. Thi s warranty shall not apply in the
event goods are damaged as a result of misuse, abuse, neglect,
accident, improper application, modification or repair by persons not
authorized by Seller, where goods are damaged during shipment, or
where the date stamps on the goods have been defaced, modified or
removed. UNLESS CONSIDERED UNENFORCEABLE OR
UNLAWFUL UNDER APPLICABLE LAW:
a. ALL IMPLIED WARRANTIES, INCLUDING BUT NOT LIMITED TO
WARRANTIES OR MERCHANT ABILITY AND FITNESS FOR A
PARTICULAR PURPOSE ARE HEREBY EXCLUDED.
b. BUYERS REMEDY, IF ANY, FOR ANY DEFECTIVE GOODS
SHALL BE LIMITED TO A REFUND BY SELLER OR
REPLACEMENT OF T HE GOODS AT SELL ER’S OPTION, AND
SHALL IN NO EVENT INCLUDE DAMAGES OF ANY KIND,
WHETHER INCIDENTAL, CONSEQUENTIAL OR OTHERWISE.
NO GOODS ACCEPTED FOR RETURN WITHOUT PRIOR
APPROVAL. Seller s hall have the righ t t o ins pect any g oods clai med
to be defective at Buyers place of business or require Buyer to return
the goods to Seller for inspection on Seller’s premises. Transportation
charge s cover ing retu rned go ods will b e borne by Sel ler only if such
goods are pro ven to be defe cti ve, ar e cov ered by thi s warr anty and ar e
returned within the warranty period stated above.
GENERAL SAFETY INFORMATION
Some parts may have sharp edges. CARE must be taken when
handling various pieces to avoid injury. For safety, wear a pair of
work gloves when assembling or performing any maintenance on
shelving uni t. Shel ving uni t is de signed to be placed up right o n a flat
surface. Distr ibut e t he w eight of items stored on the shelves evenl y
across the s helves. Do not place heavier items on the upper shelves.
If the shelvi ng unit is to be locat ed in an uneven manner or posit ioned
on an unlevel surface, the unit should be secured to a wall or floor
with appropriat e f ast eners. Do not use as a ladder!
Step By Step Installation Instructions
1. Remove all parts from carton and
check against the parts list on back
cover for any missing parts.
3. Place a second
24" wide upright
halfway up the
upright assembly
as shown.
Tool required: Rubber Mallet or Hammer
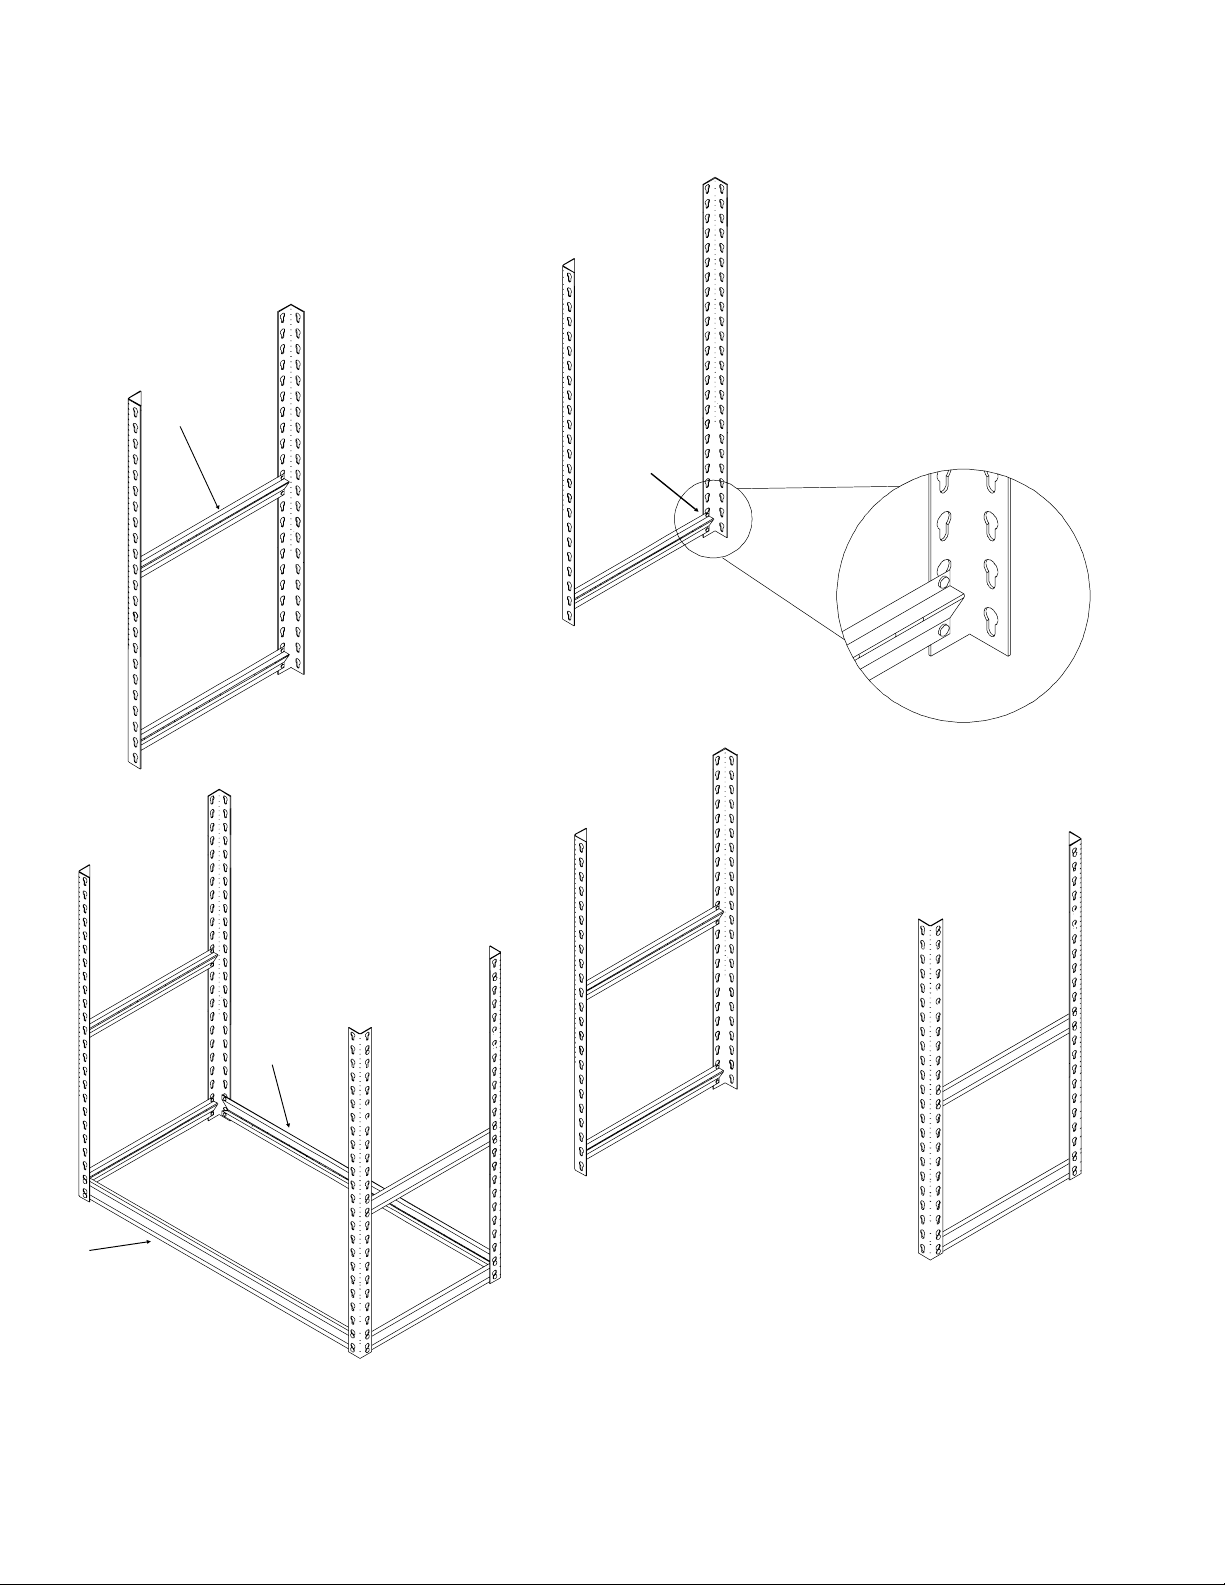
2. Connect two upright posts (Ref. A) with a
A
A
24" wide shelf support (Ref. B) by
inserting shelf support rivets into the
bottom two keyhole slots of each upright.
Use a rubber mallet to seat the upright
securely in the keyhole slots.
NOTE: Make sure that the narrow
end of the keyhole slots are pointing
downward, and that the flat e dge of
the shelf support is facing up, as
shown in exploded view below.
B
C
C
5. Place the two end
assemblies about 48"
apart, with the angled corners
facing outward. Connect two 48"
shelf supports (Ref. C) between the
two assemblies, one on each side,
as shown. Be sure to use the two
keyhole slots nearest the floor, as
before.
4. Repeat steps 2 and 3 to
prepare a second set of
uprights, as shown. You should
now have two upright end
assemblies.
NOTE: As in step two, make sure the flat edge of the
shelf su pports are facing upward. If you have done this
correctly, there should now be a flat surface around all
four edges on which to la y the bottom particleboard
shelf. If any edge has an upward-facing angled edge, the
upright has been inserted upside-down.

6. Repeat step 5 halfway
up the post as shown
below.
8. Place another upright post
on the opposite side of
the one you just mounted.
Using the other side of the
same shelf support,
attach in the same way
described in step 7.
7. Mount another upright post (Ref. A) to the top
of one of the other uprights and attach with
an
24" shelf support, mounting the bottom
rivet of the shelf support in the bottom upright
post, and the top rivet in the new upright post
as shown in the exploded view above.
NOTE: Be sure that the narrow end of
the keyhole slots of the new post are
pointing dow nw ard, and that the flat
side of the shelf support is facing
upward, as m entioned in previous steps.
9. Repeat steps 7 and 8 on the
opposite end of the unit. Then,
attach the two ends by placing
two
48" shelf supports across the
width of the unit. Be sure to
mount as previously described.
,
10. Continue placing
shelf levels, one
level halfway
between the
center shelf and
the top, and one
level using the
top two keyhole
slots. Make sure
all shelf supports
are mounted with
flat side facing up.
11. Place one particleboard
shelf (Ref. D) in each of
the five levels you have
created, slanting each
shelf slightly as you are
placing it to allow it to
fit between the uprights
and shelf supports. Make sure
each shelf is seated between the
edges on all four shelf supports, and
that the shelf is laying flat. Your Stur-D-Stor
Shelving System is now ready for use.
D
D
D
D
D

Assembly as a Workbench/Shelf Unit
A. Follow steps one through
six on the inside of this
assembly sheet.
C. Now, build the second unit in the same
manner as you did the first unit, except this
one with only two levels. Place the top
level in the top two keyhole slots, and the
second level at whatever
height you prefer (see
illustration).
Tool required: Rubber Mallet or Hammer
B. Instead of stacking the
uprights on top of each other,
as shown in step seven inside
this sheet, place four shelf
supports in the top two
keyhole slots, being sure that
the flat edge of each shelf
support is facing up as
described in earlier steps.
D. Insert one
particleboard
shelf at each of
the five shelf levels, as
described in step 11 inside
this sheet. Then, place the two
units together, or use seperately as desired. Your
Stur-D-Stor Shelving System is now ready for use.
Parts List
AB C D
REF. NUMBER DESCRIPTION PARTS NO. QTY.
A Upright Post EUR-42 8
B Shelf Support (24" wide) VDRS-2416 10
C Shelf Support (48" wide) VDRS-4816 10
D Particleboard Shelf PBV-4824 5
ORDER REPLACEMENT PARTS DIRECT FROM FACTORY
Please Provide the following information: Contact: STUR-D-STOR, P.O. Box 1888
• Model Number
• Part Description and Number as Shown Above
Dickson, TN 37056-1888
(615) 446-8000 (800) 251-8184
 Loading...