


Tennant OS3 User Manual
ON−SITE GENERATOR
GENERADOR IN SITU
GÉNÉRATEUR SUR SITE
English Operator Manual EN
Español Manual del operario ES
Français Manuel de l’Opérateur FR
North America / International
To view, print or download
the latest manual, visit:
www.tennantco.com/manuals
DM20036
Rev. 00 (3-2014)
*DM20036*
INTRODUCTION
This manual is furnished with each new model. It provides necessary operation and maintenance instructions.
Read this manual completely and understand
the machine before operating or servicing it.
This machine will provide excellent service. However, the best results will be obtained at minimum costs if:
The machine is operated with reasonable care.
The machine is maintained regularly - per the machine maintenance instructions provided.
The machine is maintained with manufacturer supplied or equivalent parts.
PROTECT THE ENVIRONMENT
Please dispose of packaging materials,
used machine components such as
batteries and fluids in an
environmentally safe way according to
local waste disposal regulations.
Always remember to recycle.
Please fill out at time of installation for future reference.
Model No. −
Serial No. −
Installation Date −
MACHINE DATA
INTENDED USE
This machine is designed solely for creating, storing and dispensing Orbio MultiSurface and MultiMicro solution for
internal professional use only. Not for resale. Buyer is responsible for ensuring that the solutions are labeled and
used in accordance with local health and safety regulations. Not intended for human consumption.
Orbio Technologies
701 North Lilac Drive
Minneapolis, MN 55440
Phone: (800) 553−8033 or (763) 513−2850
www.orbio.com
MultiMicro is a trademark of Tennant Company.
Specifications and parts are subject to change without notice.
Original Instructions, copyright 2014 Orbio Technologies from TENNANT COMPANY, Printed in U.S.A.

CONTENTS
OPERATION EN
Important Safety Instructions − Save These
Instructions 2...........................
Grounding Instructions 3....................
Operation 5...............................
Machine Components 5..................
Display Panel Indicators 6................
How The Machine Works 7...............
While Operating The Machine 7...........
Cleaning Solution
(Top Positions Indicated In Blue) 7......
Antimicrobial Solution
(Bottom Positions Indicated In Yellow) 8.
Operating The Orbio Dispenser 8..........
Filling Bottles 8......................
Filling Buckets And Equipment 9.......
Indicators 10.............................
Service Required Indicator 10...........
Ready To Dispense Indicator
(Home Screen) 10..................
Machine Initializing Indicator 10.........
Tanks Filling Indicator 10...............
Wait To Dispense Indicator 10...........
Water Temperature Too Hot Indicator 11..
Add Salt Indicator 11...................
Quantity Dispensed Indicator 11.........
Information Touch Button 12............
Service Information Touch Button 12.....
Troubleshooting 13.......................
Page
Page
Maintenance 14.............................
Filling The Salt Reservoir 14...............
Replacing Wear Components 15...........
Replacing The Ph Probe 15.............
Replacing The E−Cell 17...............
Replacing The Manifold 19.............
Testing The Antimicrobial Solution 21.......
Testing The Cleaning Solution 22...........
Satellite Systems 23......................
Connecting And Disconnecting
Transport Containers 24.............
Connecting 24........................
Disconnecting 24......................
Using The Transport Container
Wall Hook 24......................
Specifications 25............................
Os3 Generator 25........................
Os3 Water Softener 25....................
Power 25................................
Dispensing System 25....................
Generation System 25....................
Wear Components 26.....................
Satellite System − Transport Containers 26..
Satellite System − Dispensing System 26....
Satellite System − Water Softener 26.......
Machine Dimensions 27...................
Os3 DM20036 (3−2014)
1
EN OPERATION
IMPORTANT SAFETY INSTRUCTIONS − SAVE THESE INSTRUCTIONS
The following precautions are used throughout
this manual as indicated in their description:
WARNING: To warn of hazards or
unsafe practices that could result in
severe personal injury or death.
FOR SAFETY: To identify actions that must be
followed for safe operation of equipment.
This machine is designed solely for creating,
storing, and dispensing Orbio
cleaner and MultiMicro 200 Solution.
The following information signals potentially
dangerous conditions to the operator or
equipment. Read this manual carefully. Know
when these conditions can exist. Locate all safety
devices on the machine. Then, take necessary
steps to train machine operators. Report machine
damage or faulty operation immediately. Do not
use the machine if it is not in proper operating
condition.
WARNING: Electrical Hazard
− Do not operate with damaged power
cord.
− Unplug power cord before servicing
machine.
− Do not modify plug. If the power cord
is damaged or broken, it must be
replaced by the manufacturer or its
service agent or a similarly qualified
person in order to avoid a hazard.
WARNING: Electrical Shock Hazard.
Do not use outdoors. Do not expose to
rain / moisture. Store indoors.
MultiSurface
FOR SAFETY:
1. Do not operate machine:
− Unless trained and authorized.
− Unless operator manual is read and
understood.
− Under the influence of alcohol or
drugs
− Unless mentally and physically
capable of following machine
instructions.
− If it is not in proper operating
condition.
− In outdoor areas. This machine is for
indoor use only.
2. When using machine:
− Use only as described in this manual.
− Do not use water softener as a step.
− Keep children and unauthorized
persons away from machine.
− Do not allow to be used as a toy.
− Follow site safety guidelines
concerning wet floors.
3. When servicing machine:
− Unplug cord from wall outlet.
− All work must be done with sufficient
lighting and visibility.
− All repairs must be done by trained
personnel.
− Do not modify the machine from its
original design.
− Use Tennant supplied parts or
approved replacement parts.
− Do not remove e−module unless
operator manual is read and
understood.
This machine may be equipped with
technology that automatically communicates
over the cellular network. If this machine will
be operated where cell phone use is restricted
because of concerns related to equipment
interference, please contact a Tennant
representative for information on how to
disable the cellular communication
functionality.
2
OS3 DM20036 (3−2014)
4. When using MultiSurface Cleaner:
− Do not mix with other cleaning
products.
− Do not drink.
− Refer to SDS (Safety Data Sheet) for
additional safety information and
precautions.
− Wear personal protection safety
equipment as needed.
5. When using MultiMicro 200 Solution:
− Do not mix this product with ammonia
or acid, which will product chlorine
gas.
− Do not mix with other cleaning
products.
− Do not drink.
− Refer to SDS (Safety Data Sheet) for
additional safety information and
precautions.
− Wear personal protection safety
equipment as needed.
For Safety: wear protective gloves.
OPERATION EN
For Safety: wear eye protection.
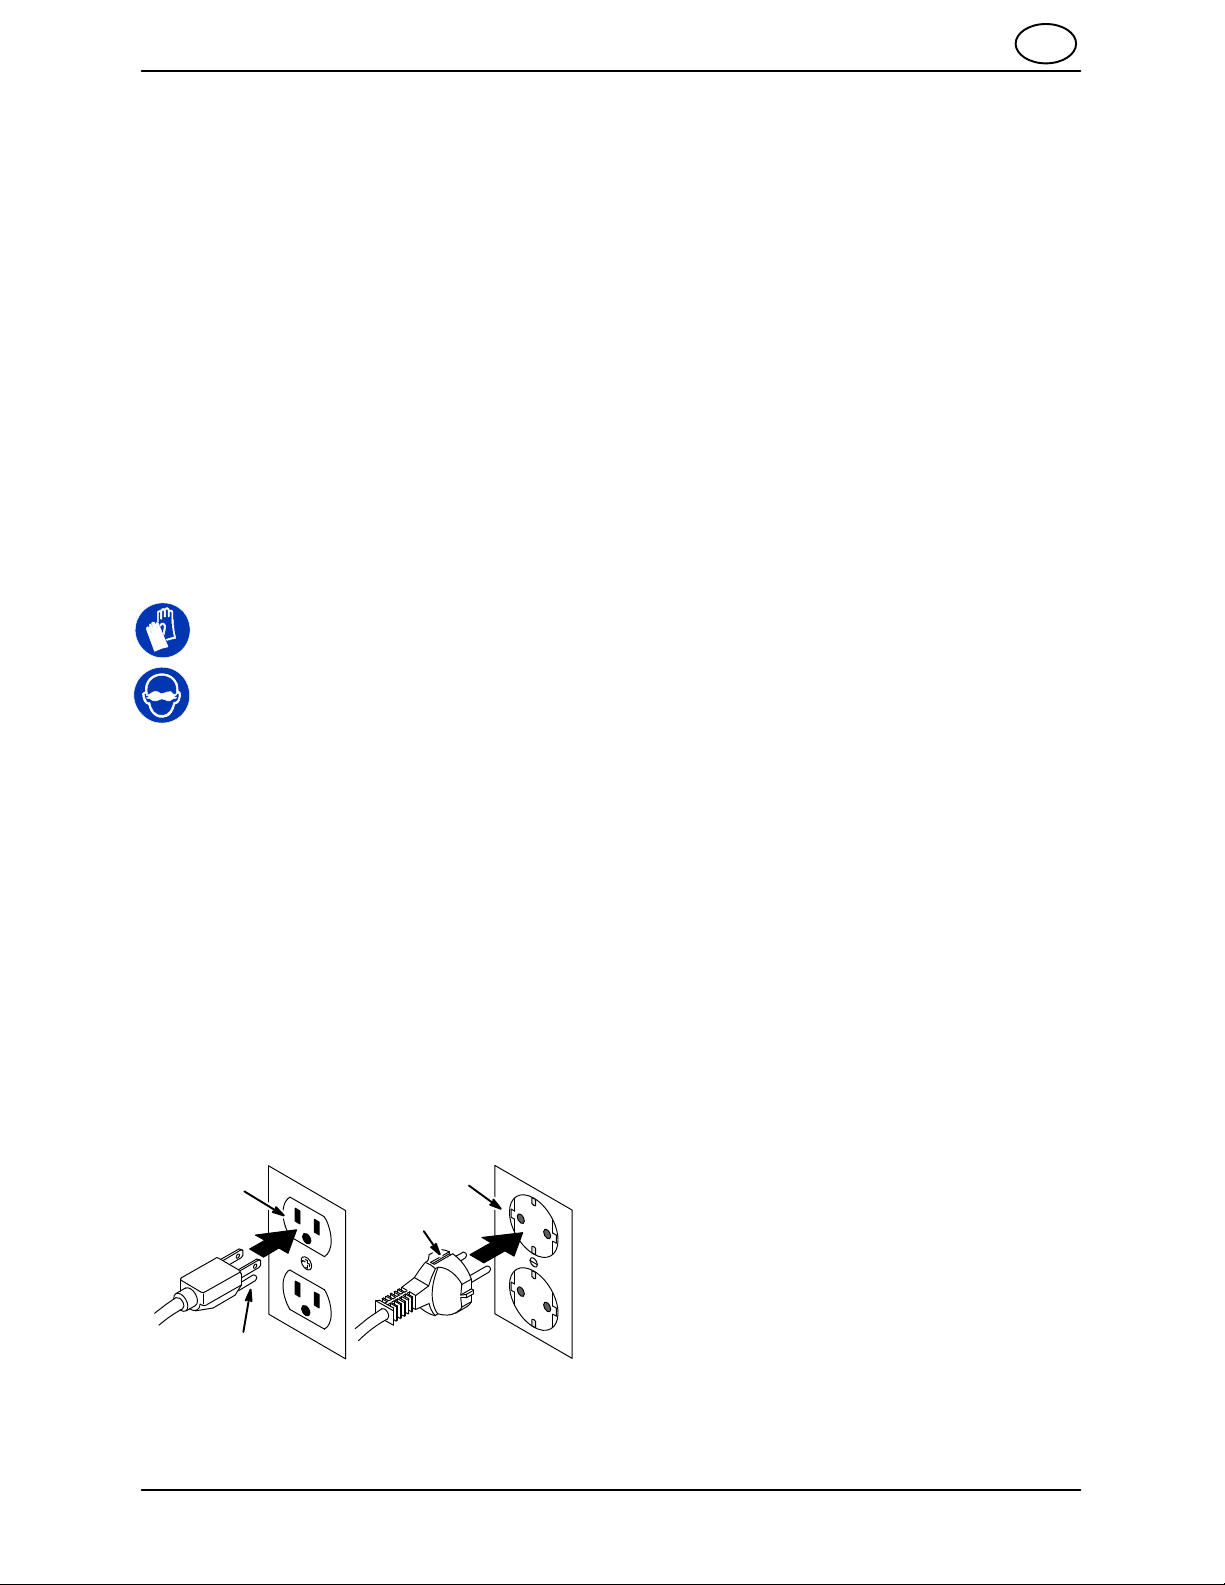
GROUNDING INSTRUCTIONS
Equipment must be grounded. If it should
malfunction or break down, grounding
provides a path of least resistance for
electrical current to reduce the risk of
electrical shock. This equipment is equipped
with a cord having an equipment−grounding
conductor and grounding plug. The plug
must be plugged into a Ground Fault Circuit
Interrupter (GFCI)−protected outlet or adapter
that is properly installed in accordance with
all local codes and ordinances. Do not remove
ground pin; if missing, replace plug before
use.
Grounded 3
Hole Outlet
Grounded Outlet
Grounding
Edge/hole
Ground Pin
120V
OS3 DM20036 (3−2014)
220V/230V/240V
3
EN OPERATION
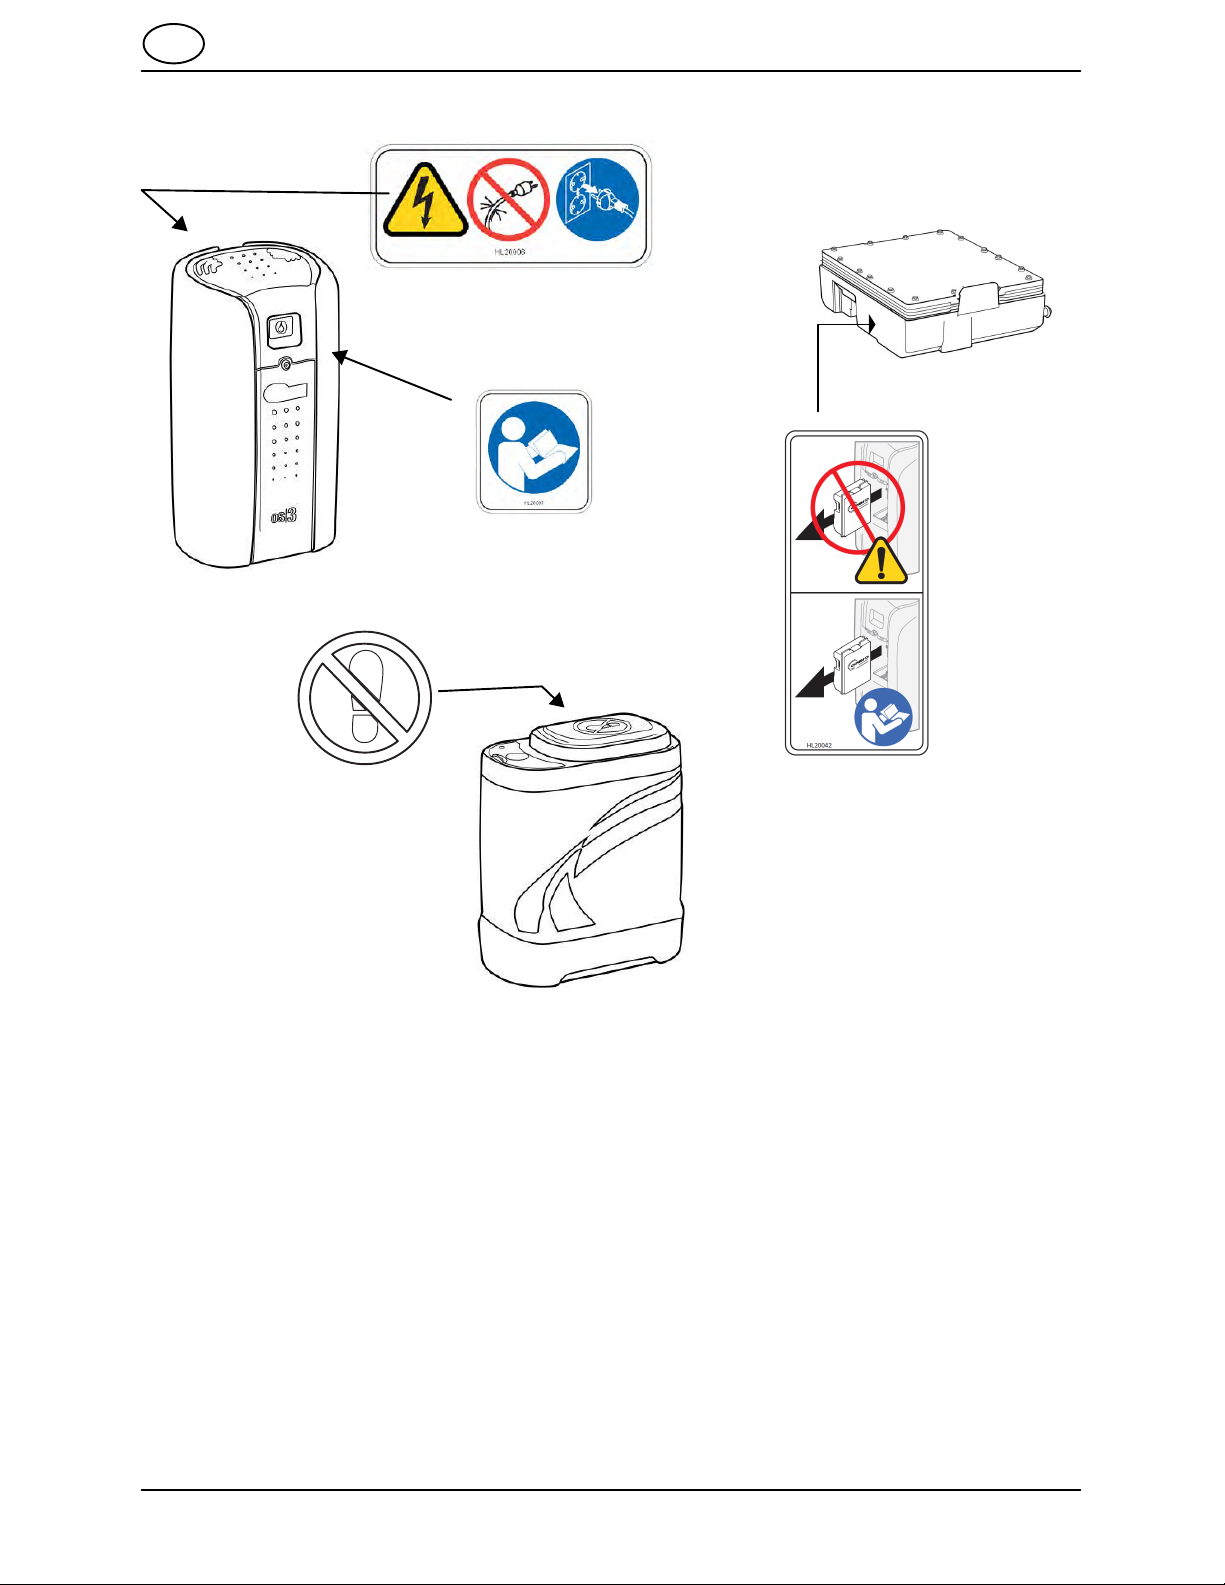
The safety labels appear on the equipment in the
locations indicated. Replace damaged labels.
WARNING: Electrical hazard.
Do not use with damaged cord.
Unplug cord before servicing.
FOR SAFETY: Do not
operate machine unless
operator manual is read
and understood.
FOR SAFETY: When
using machine, do not
use water softener as
a step.
FOR SAFETY: When
servicing machine, do not
remove e−module unless
operator manual is
read and understood.
4
OS3 DM20036 (3−2014)
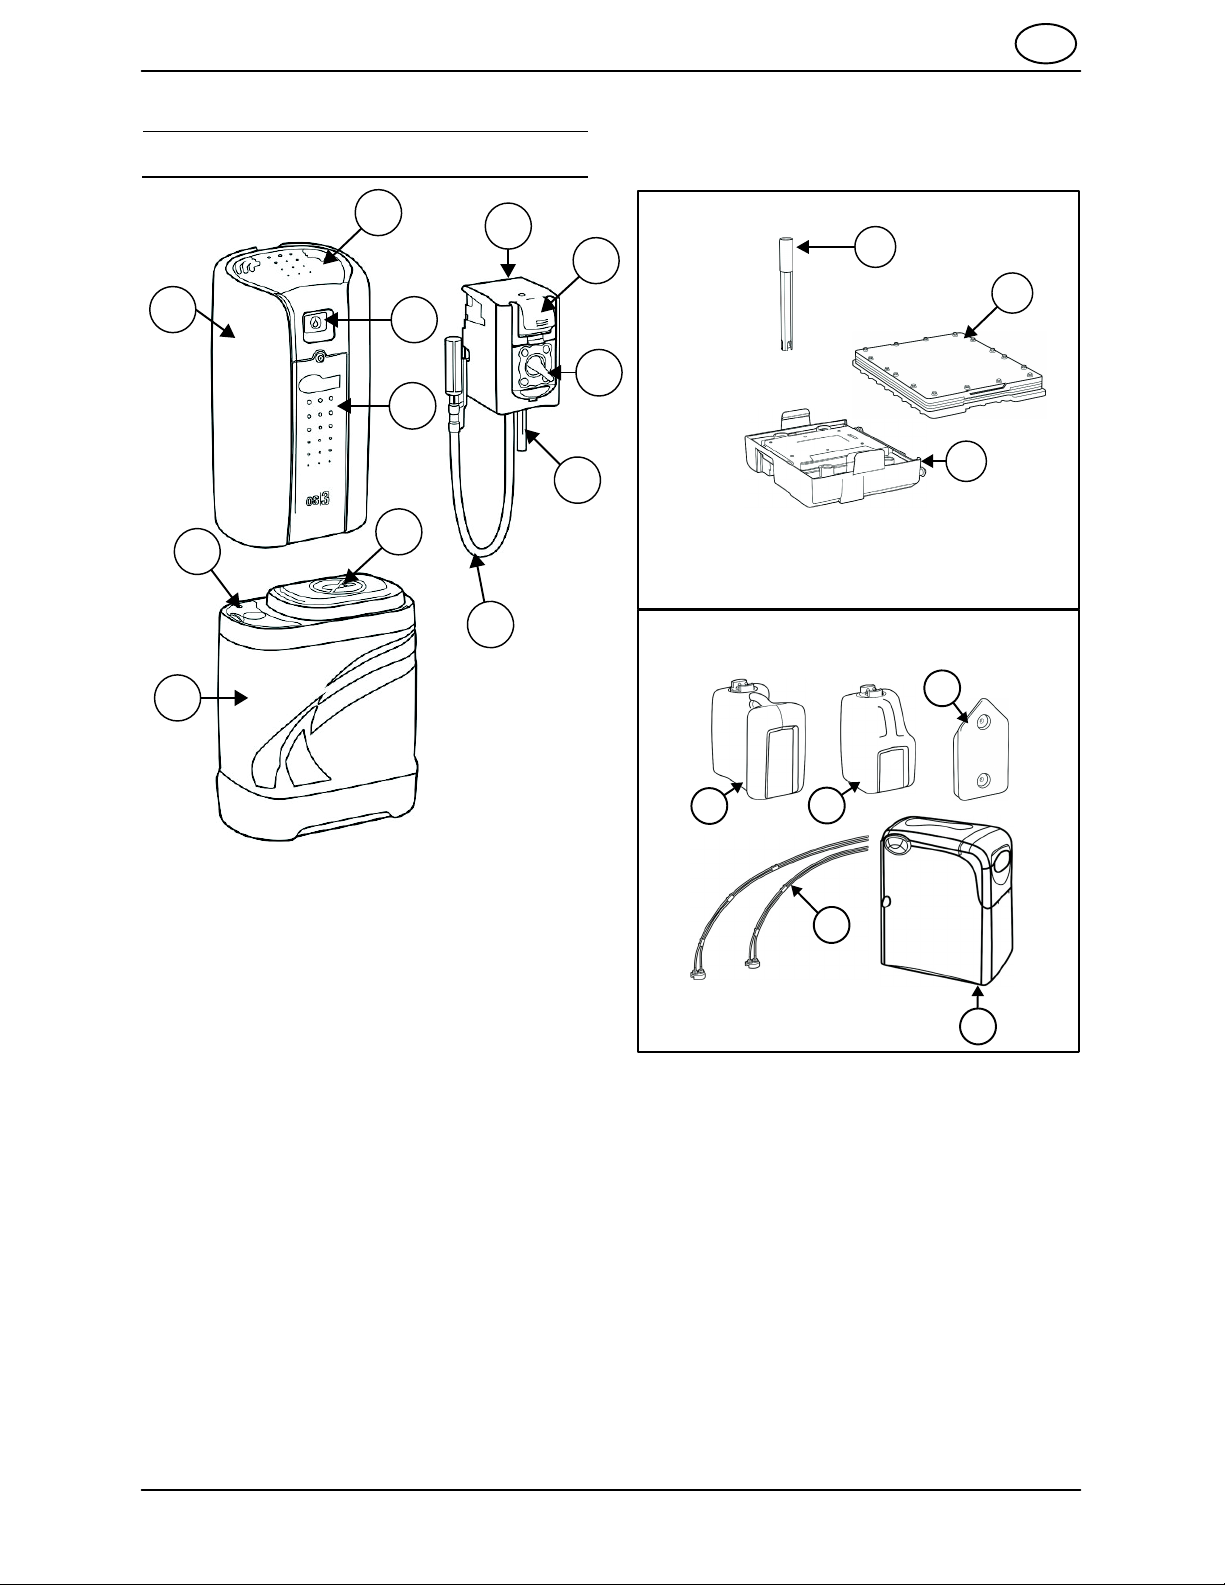
MACHINE COMPONENTS
OPERATION EN
OPERATION
F
A
H
D
E
I
C
L
G
J
Located behind front access panel
The e−cell and manifold are assembled
WEAR COMPONENTS
M
Located under
top cover
O
N
together as the “e−module.”
K
SATELLITE COMPONENTS
(OPTIONAL)
B
R
A. os3 generator
B. os3 water softener
C. Dispenser
D. Touch screen display
E. Front access panel with panel lock
F. Top cover
G. Selector knob and selector panel
H. Salt reservoir cover
I. Water softener cover
J. Bottle fill tube
K. Bucket and equipment fill tube
L. Dispenser button
PQ
S
T
M. PH probe
N. e−cell
O. Manifold
P. Transport container (large)
Q. Transport container (small)
R. Wall hook
S. Satellite tubing kit
T. Satellite system water softener
OS3 DM20036 (3−2014)
5
EN OPERATION
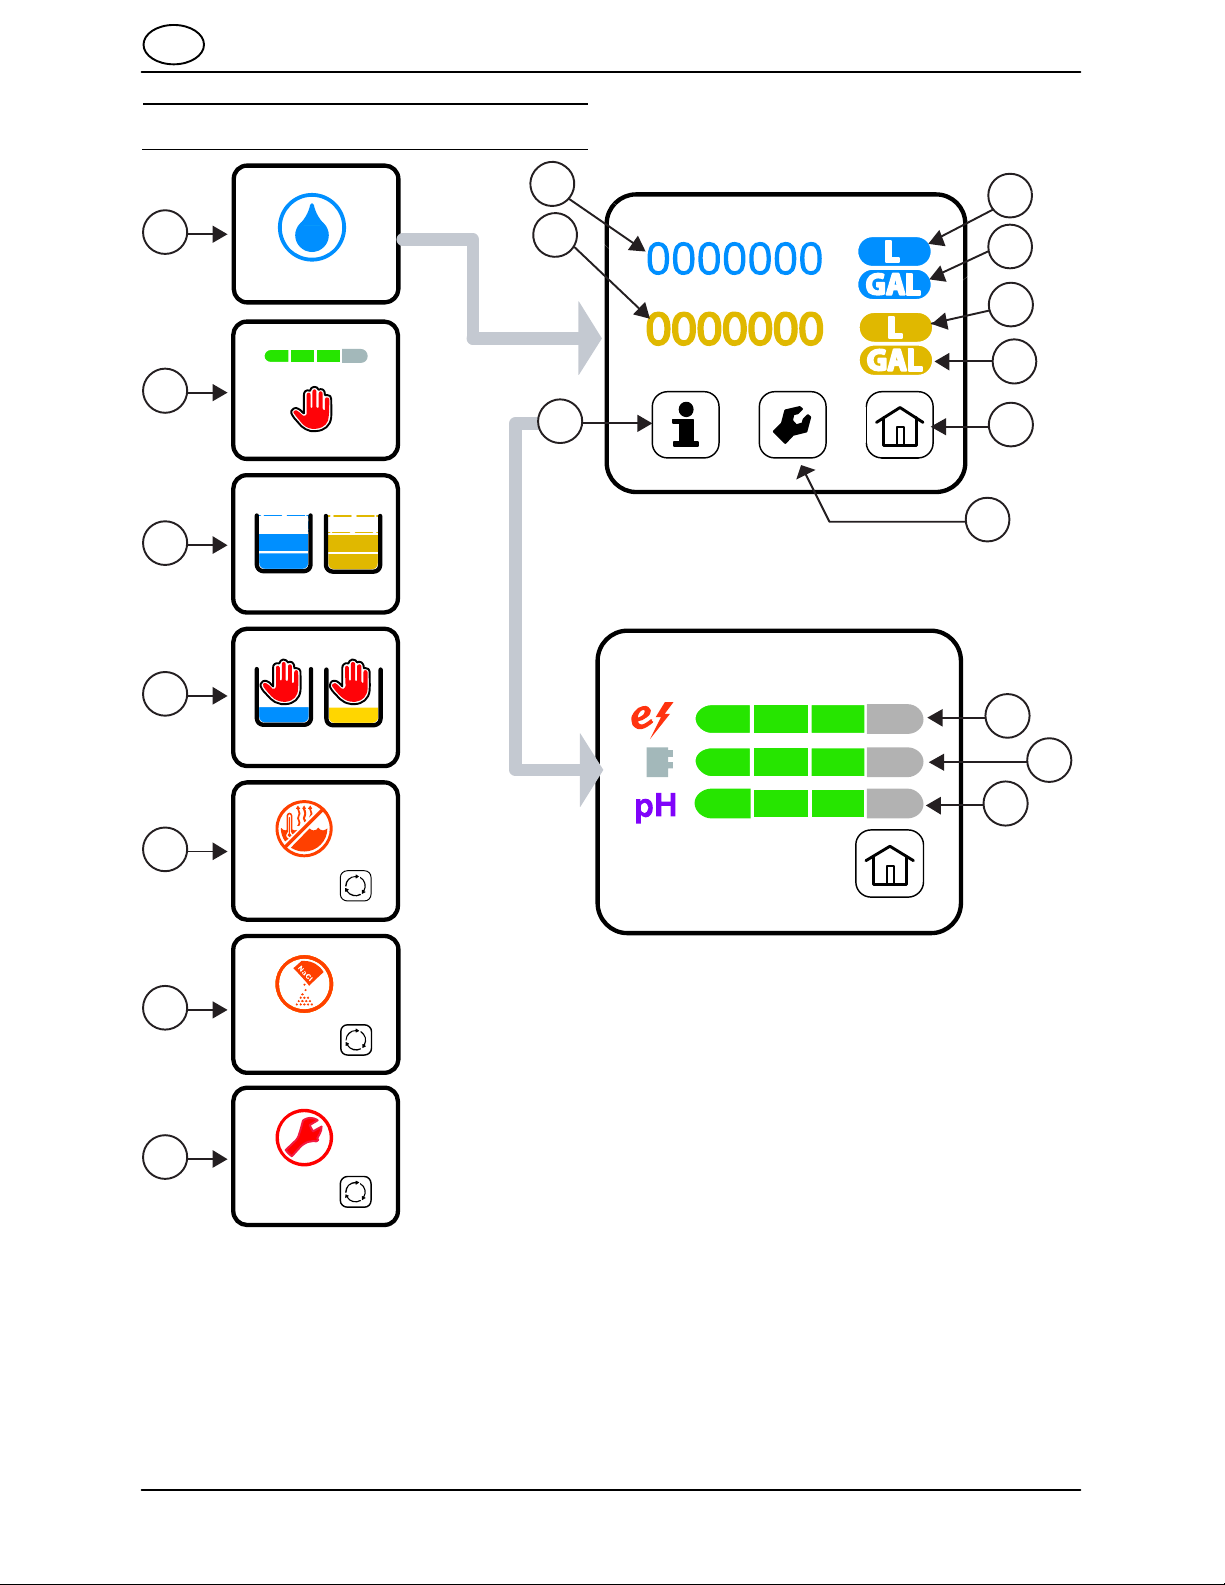
DISPLAY PANEL INDICATORS
H
A
B
C
D
I
N
Quantity dispensed indicators:
J
K
J
K
L
M
Wear component indicators:
O
E
F
G
A. Ready to Dispense indicator (Home)
B. Machine initializing indicator
C. Tanks filling indicator
D. Wait to dispense indicator
E. Water temperature too hot indicator
F. Add Salt indicator
G. Service required indicator
H. MultiSurface Cleaner solution generated
(diluted)
I. Multimicro 200 Solution generated (diluted)
P
Q
J. Liter indicator
K. Gallon indicator
L. Home touch button
M. Service information touch button
N. Information touch button
O. e−cell status indicator
P. Manifold Status indicator
Q. PH probe status indicator
6
OS3 DM20036 (3−2014)

OPERATION EN
HOW THE MACHINE WORKS
The Orbio os3 is an on−site generator that
produces cleaning and antimicrobial solutions for
institutional and commercial use. The os3 uses
electrolysis to convert water and salt into low
concentrations of sodium hydroxide (NaOH) for
cleaning and hypochlorous acid (HOCL) for
antimicrobial applications. These solutions are
diluted through the os3 dispenser as ready to use
products. No additional dilution is required.
NOTE: Store MultiSurface Cleaner and MultiMicro
200 Solution in a room/location where the
temperature is between 50−110° F (10−43° C).
WHILE OPERATING THE MACHINE
Periodically check the display panel indicators to
ensure there are no service alerts that need to be
cleared. Conditions must be cleared before the
os3 can be used again. Avoid running the system
completely out of salt. Add water softener salt to
the reservoir on a routine basis as the salt supply
is consumed. When the add salt indicator is
displayed the machine will stop until salt is added.
Refer to the Filling the Salt Reservoir section of
this manual.
The operator is responsible for ensuring that the
solutions are at the proper pH and concentration
levels. Refer to TESTING THE ANITMICROBIAL
SOLUTION and TESTING THE CLEANING
SOLUTION in the Maintenance section of this
manual for proper testing procedures.
CLEANING SOLUTION
(top positions indicated in blue)
Multi
CLEANER
Multi
Micro
200
MultiSurface Cleaner is the cleaning solution
produced by the os3. MultiSurface Cleaner will
clean most soiled or dirty surfaces (wool, nylon
and polyester carpeting, glass, stainless steel,
other metal, ceramic, laminate, painted surfaces,
and other non−porous surfaces), but is not
recommended for cleaning heavy petroleum
based oils and greases.
NOTE: Always check carpet manufacturer
specifications for color stability and shrinkage
properties before using a water−based solution on
carpeting.
Do not dilute MultiSurface cleaning solution with
water. Water will diminish the cleaning
effectiveness. MultiSurface cleaner is ready to
use after dispensing.
FOR SAFETY: Do not mix MultiSurface
cleaning solution with conventional cleaning
chemicals. Do not drink. Refer the SDS (Safety
Data Sheet) for additional safety information
and precautions.
OS3 DM20036 (3−2014)
MultiSurface cleaner will remain effective for 30
days or more when stored in a clean, sealed
container. Test the cleaning solution to verify the
pH level is at the correct level if the solution has
been stored for longer than 30 days. Refer to the
Testing the Cleaning Solution in MAINTENANCE
for additional testing information.
7
EN OPERATION
ANTIMICROBIAL SOLUTION
(bottom positions indicated in yellow)
Multi
CLEANER
Multi
Micro
200
MultiMicro is the antimicrobial solution generated
by the os3. The os3 dilutes this solution and
dispenses MultiMicro 200, the ready to use form
containing 200 ppmavailable chlorine. MultiMicro
200 is an effective disinfecting and sanitizing
solution. Do not dilute MultiMicro 200 with water.
The solution is ready to use after being dispensed
from the Orbio dispenser.
MultiMicro 200 stored in a spray bottle or sealed
container is effective for up to 7 days. Discard
expired solution.
MultiMicro Concentrate has a stability of 30 days.
To ensure proper concentration levels, the
MultiMicro tank must be evacuated at least every
30 days. Evacuate the MultiMicro Concentrate
using the MultiMicro 200 bucket fill position. Drain
until the Wait to Dispense indicator displays.
Dispose the solution according to local waste and
disposal regulations.
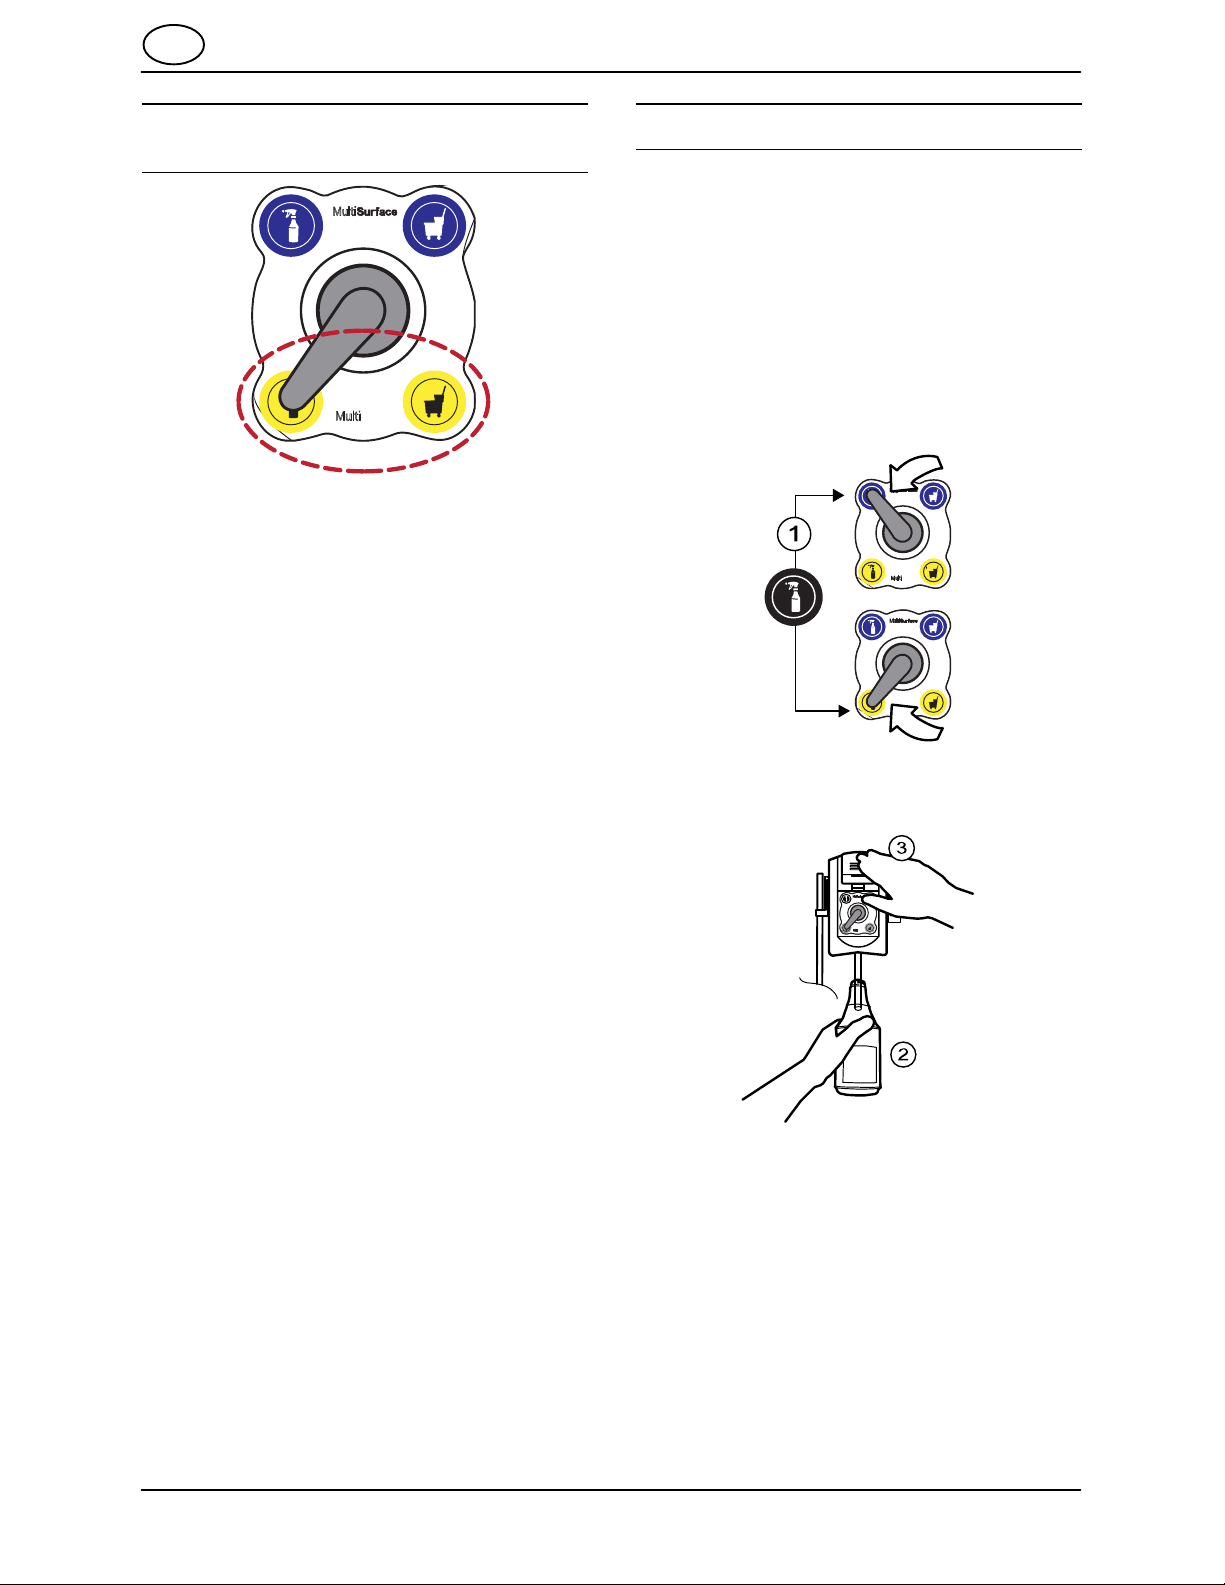
OPERATING THE ORBIO DISPENSER
The Orbio os3 and satellite systems are equipped
with a four position dispenser.
FOR SAFETY: Do not operate machine unless
operator’s manual is read and understood. Do
not drink. Refer to SDS (Safety Data Sheet) for
additional safety information and precautions.
FILLING BOTTLES
1. Turn selector knob to the bottle fill position for
MultiMicro 200 or MultiSurface Cleaner.
Multi
CLEANER
Multi
Micro
200
Multi
CLEANER
Multi
Micro
200
2. Insert bottle fill nozzle into the spray bottle.
3. Push the dispenser button to fill the bottle.
Multi
CLEANER
Micro
Multi
200
FOR SAFETY: Do not mix MultiMicro 200 with
ammonia or acid which will produce chlorine
gas. Do not mix with other cleaning products.
Refer to the SDS (Safety Data Sheet) for
additional safety information and precautions.
NOTE: For application information and
antimicrobial claims, refer to the use directions
detailed on the os3 generator label.
8
NOTE: Only use clean bottles properly labeled
with labels provided with this machine. Do not use
non−labeled or mis−labeled bottles.
Refer to the MultiMicro 200 and MultiSurface
Cleaner bottle labels for instructions for use.
OS3 DM20036 (3−2014)
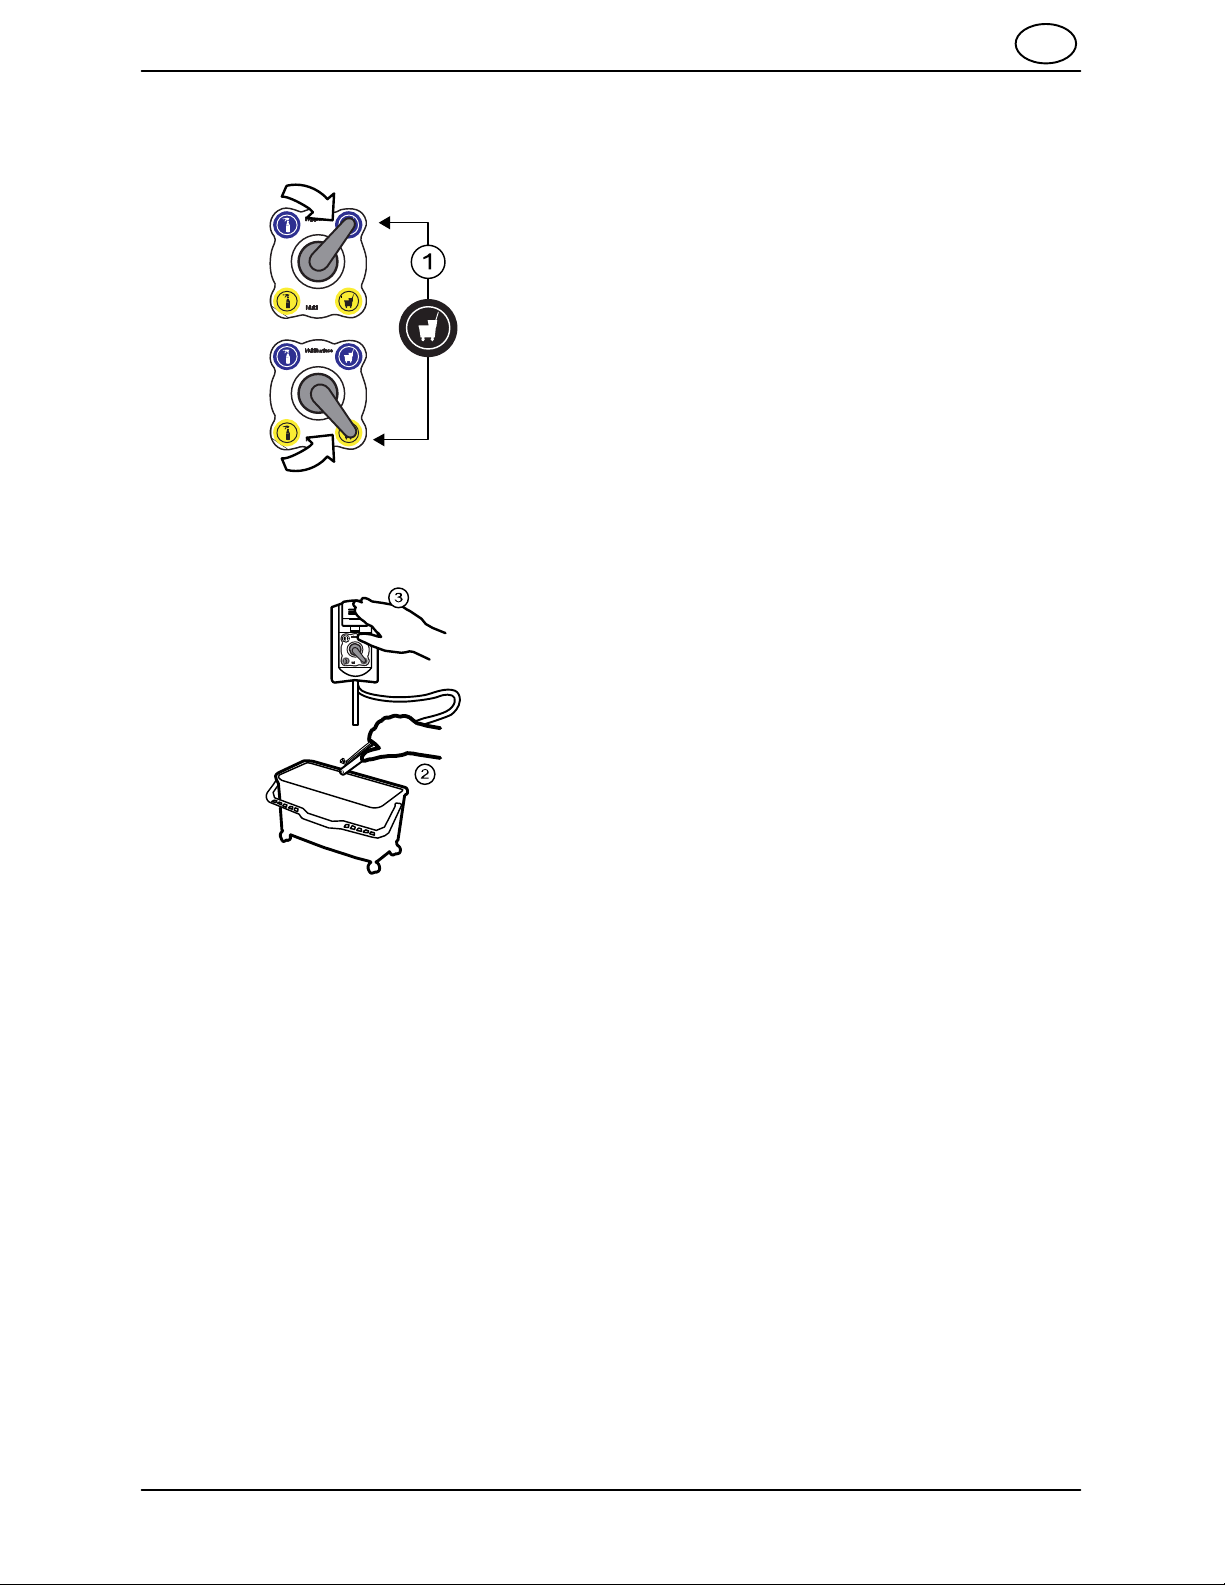
FILLING BUCKETS AND EQUIPMENT
1. Turn selector knob to the bucket fill position
for MultiMicro 200 or MultiSurface Cleaner.
Multi
CLEANER
Micro
Multi
200
Multi
CLEANER
Multi
Micro
200
2. Unhook bucket/equipment fill hose from
dispenser and insert into container to be filled.
3. Push the dispenser button to fill the container.
OPERATION EN
Multi
CLEANER
Multi
Micro
200
The dispenser button can be locked into position
for filling large containers. Tap the dispenser
button to unlock.
Refer to the MultiMicro 200 and MultiSurface
Cleaner bottle labels for instructions for use.
OS3 DM20036 (3−2014)
9
EN OPERATION
INDICATORS
This machine is equipped with visual indicators on
the touch screen to alert the operator that there is
a condition that may need to be cleared.
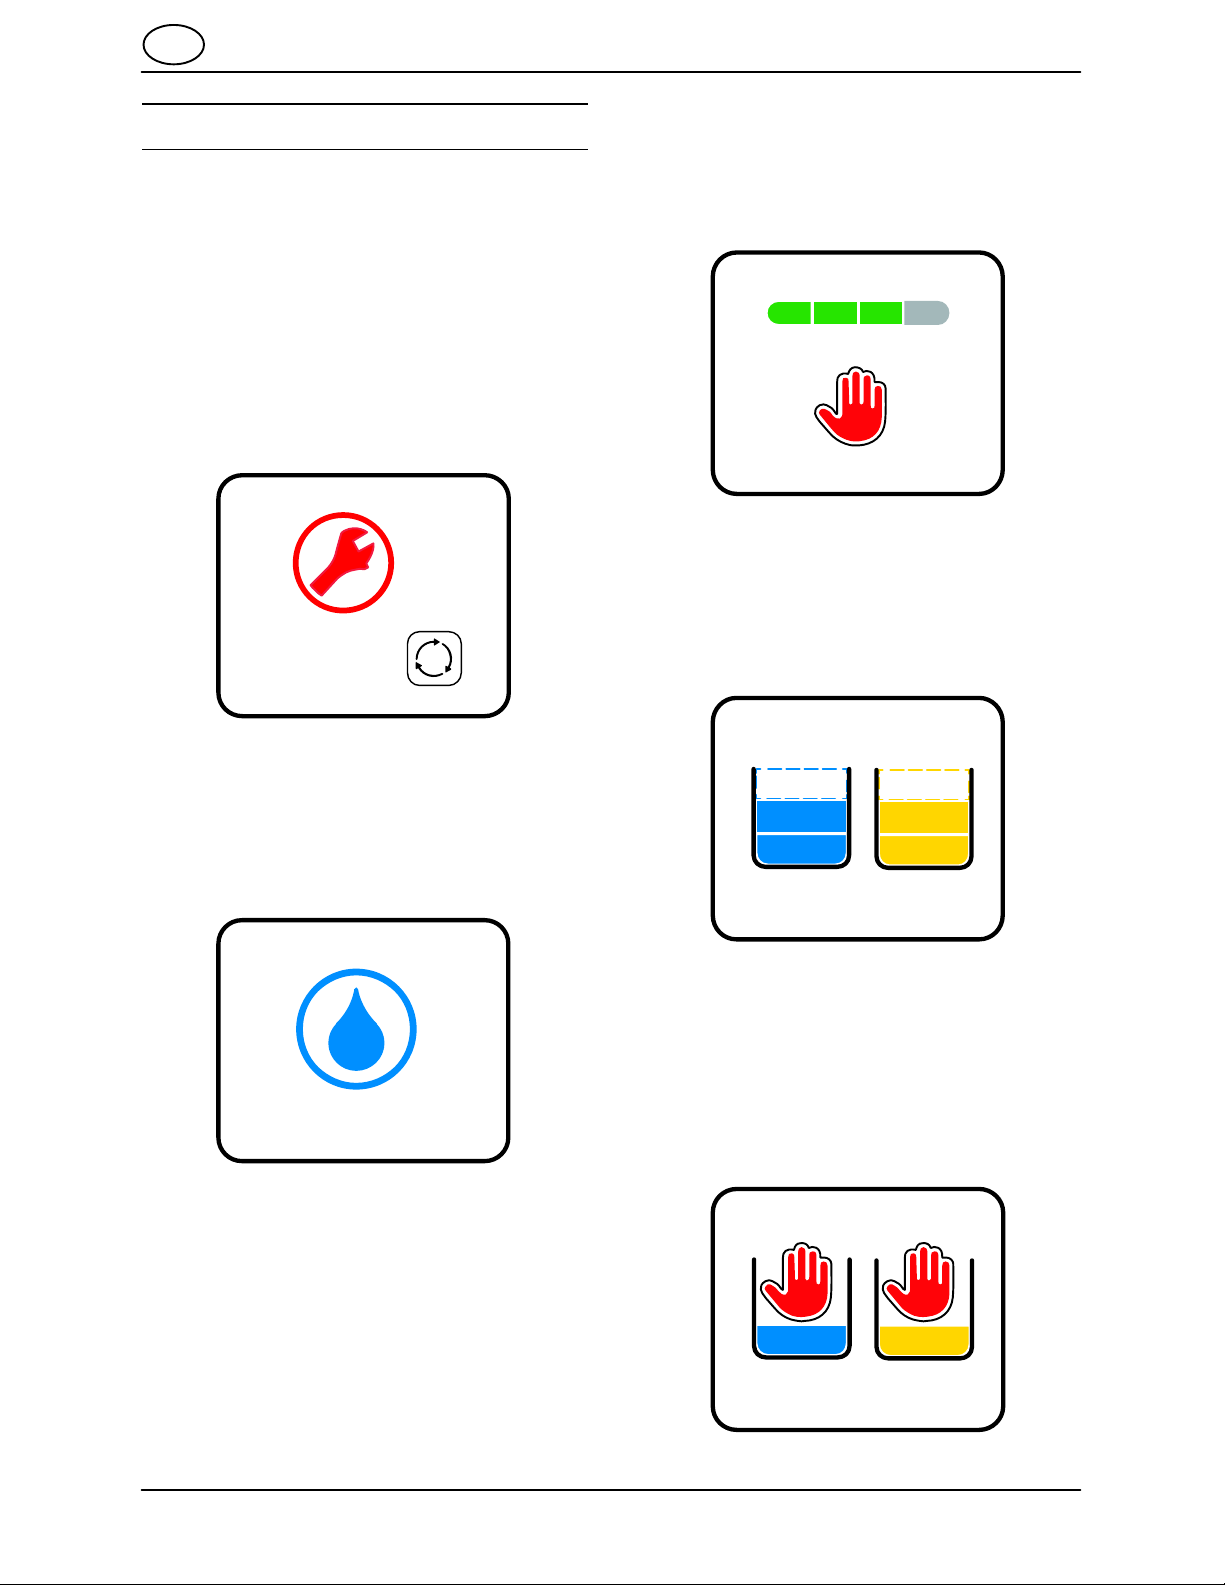
SERVICE REQUIRED INDICATOR
The service required indicator illuminates when
The os3 needs to be serviced. In some instances
an error code will be displayed under the indicator.
Stop using the machine. Refer to the TROUBLE
SHOOTING section of this manual to determine
the cause of the condition.
MACHINE INITIALIZING INDICATOR
The machine initializing indicator displays during
start−up and system reset. Progress bar indicates
the machine is processing information. Wait while
the machine completes the initialization process.
TANKS FILLING INDICATOR
The tanks filling indicator displays when one or
both tanks are filling with solution. This indicator is
for informational purposes only. The system may
be used while this indicator is displayed.
READY TO DISPENSE INDICATOR (Home
Screen)
The ready to dispense indicator is displayed when
both of the tanks are full of concentrate solution
and the machine is powered.
WAIT TO DISPENSE INDICATOR
The wait to dispense indicator is displayed when
one or both tanks are empty. Do not dispense
MultiSurface Cleaner (blue bars) or MultiMicro
200 (yellow bars) if the associated indicator is
displayed. One solution may be ready to dispense
while the other is not.
10
OS3 DM20036 (3−2014)
OPERATION EN
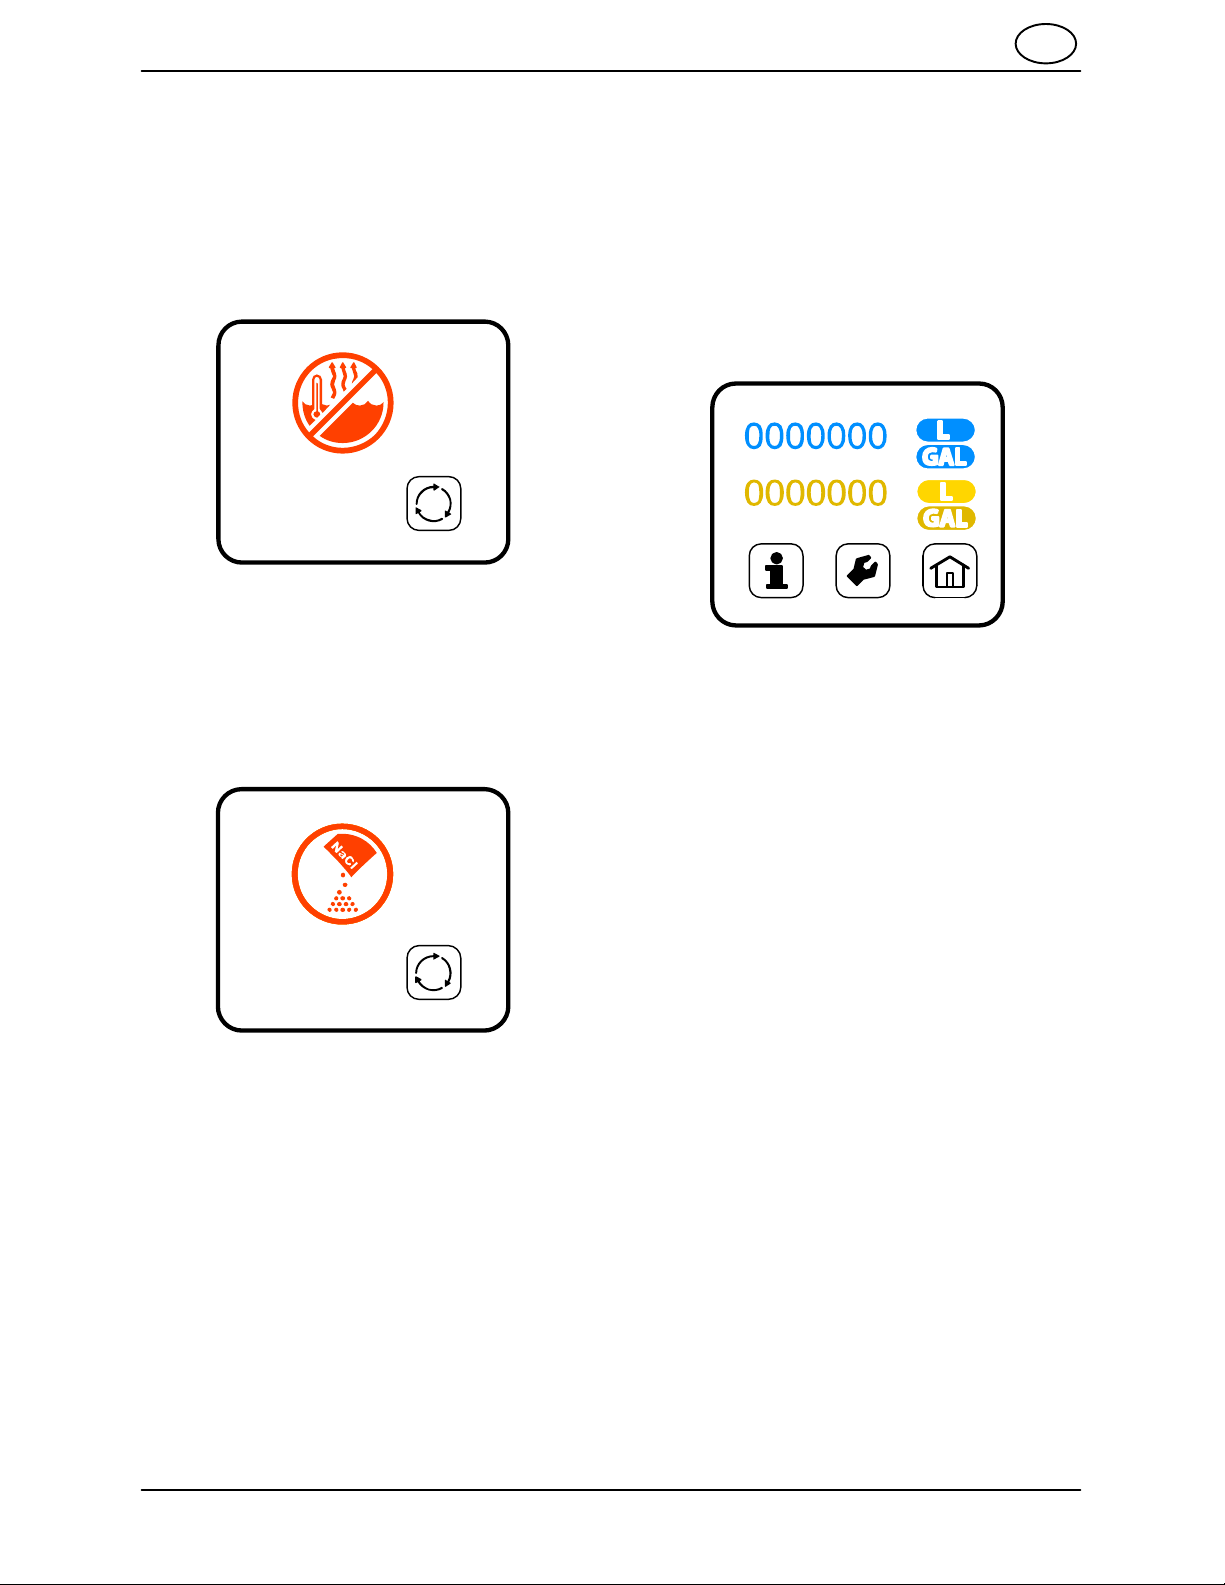
WATER TEMPERATURE TOO HOT INDICATOR
The water temperature too hot indicator is
displayed when the water supply to the machine
is too hot. Turn off the hot water and ensure there
is a dedicated cold water supply. Press the reset
button after changing the water supply to cold
water. System will not function until condition is
cleared.
ADD SALT INDICATOR
The add salt indicator is displayed when the salt
supply in the salt reservoir is low. Add salt to the
reservoir when the indicator is displayed. Refer to
Filling the Salt Reservoir in MAINTENANCE.
System will not function until condition is cleared.
QUANTITY DISPENSED INDICATOR
The quantity dispensed indicator displays the
amount of diluted solution generated in both liters
and gallons. The display will automatically
alternate between the liter and gallon equivalent
amounts. MultiSurface Cleaner is indicated in
blue, and MultiMicro 200 is indicated in yellow.
Touch the ready to dispense (home) screen to
access the quantity dispensed indicator.
OS3 DM20036 (3−2014)
11
EN OPERATION
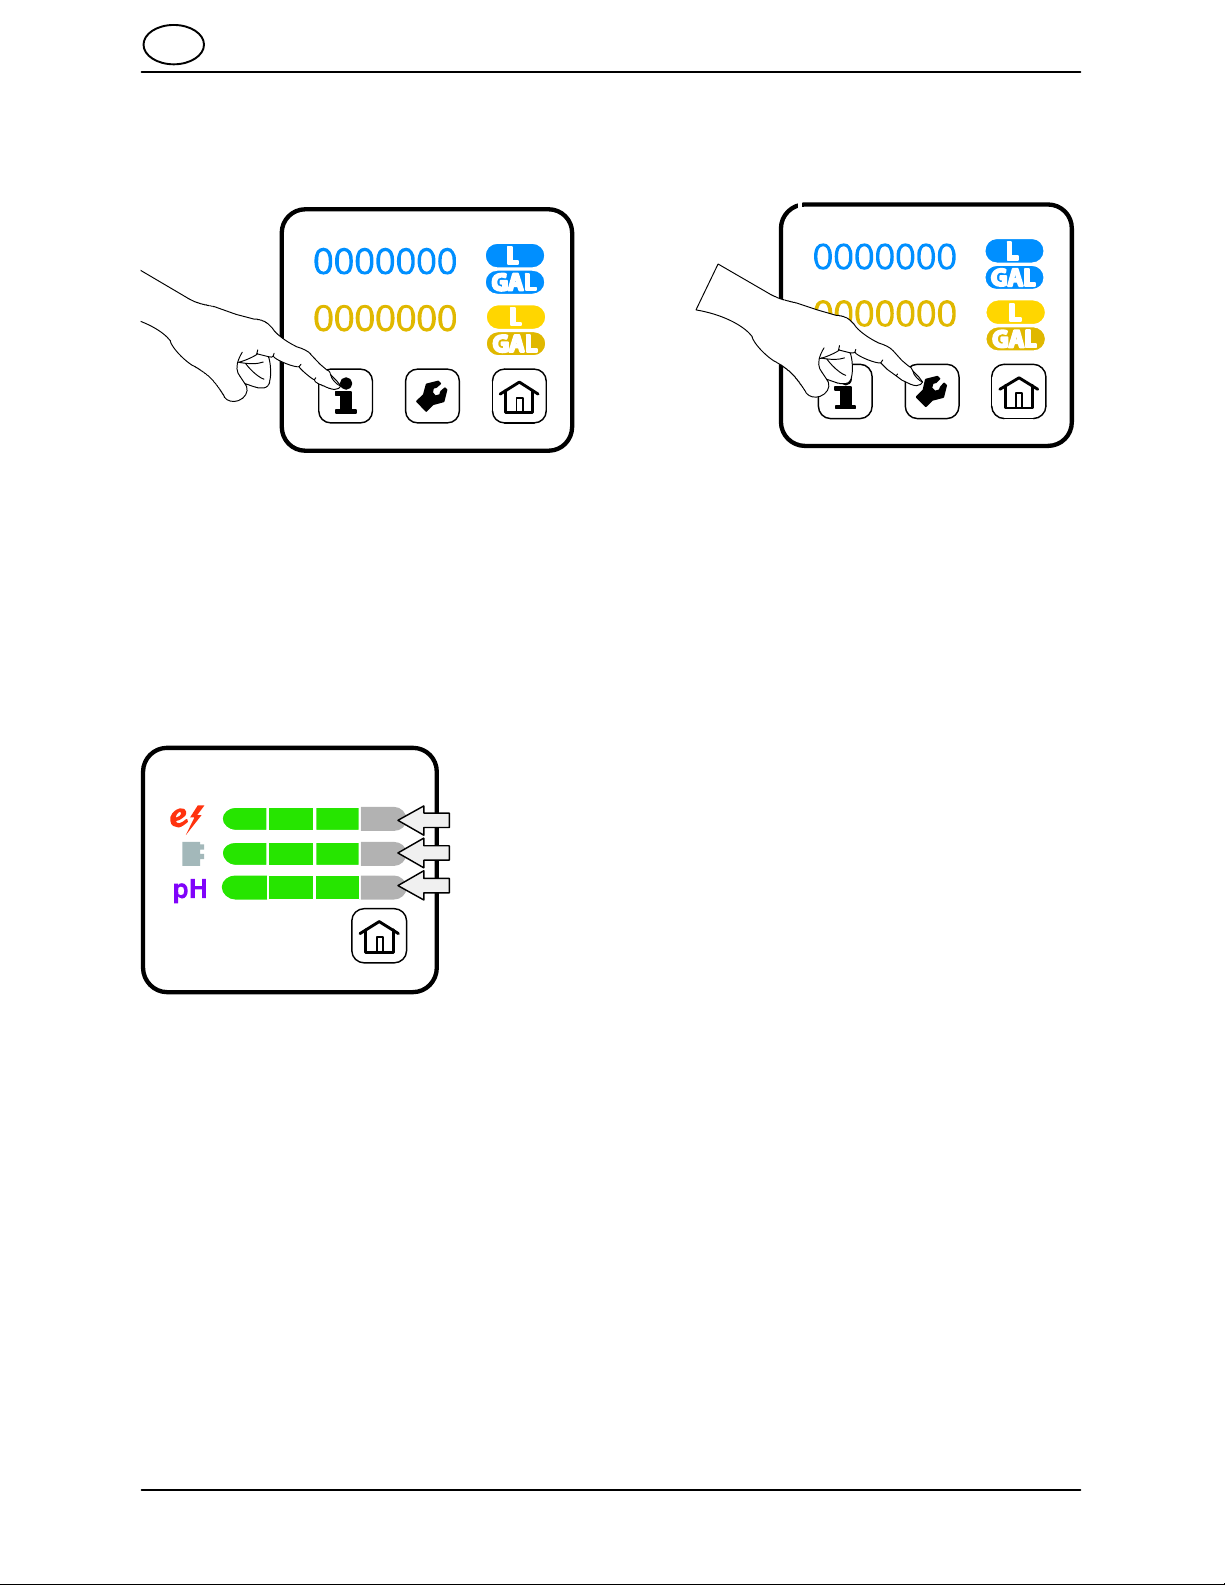
INFORMATION TOUCH BUTTON
Touch the information touch button to navigate to
the wear component indicators panel.
The wear component indicators panel displays the
status of the e−cell, manifold, and pH probe. The
progress bars indicate wear life. Order a new
component when the final segment of a progress
bar is yellow. Replace the component when the
segment is red.
Refer to Replacing Wear Components in
MAINTENANCE for instructions on replacing
these system components.
SERVICE INFORMATION TOUCH BUTTON
This button is used for trained service personnel
to access data for system troubleshooting.
e−cell status
manifold status
pH probe status
12
OS3 DM20036 (3−2014)

OPERATION EN
TROUBLESHOOTING
Problem Cause Remedy
No solution flow from dispenser. No water supply.
Screen is blank. No power.
Low salt indicator will not clear
after multiple resets.
SYS120 error No water to system.
EC110 Water too cold. Ensure all system components
COM110 Communication error between
COM100 Circuit board (power board) not
WS100 Possible lack of water to system. Ensure water is turned on.
PCB120 Expired pH probe. Replace pH probe.
PM100 Ambient temperature too hot. Machine must be in an
Chlorine test paper strips show
low
ppm of MultiMicro 200.
pH test paper strips show pH of
MultiSurface Cleaner less than
10.
Solution leaking from os3 Loose or damaged fitting.
Water softener overflows Obstruction or malfunction Turn off water, unplug machine,
No salt.
System requires flush. Dispense 19 Liters (5 Gallons) of
water softener and generator.
connected.
Call technical support.
Call technical support.
Damaged salt reservoir or
storage tanks.
Turn on water
Check for kinked or bent water
lines.
Check power cord connections at
both ends. Confirm cord is
connected to outlet and power
supply.
Power supply switch is turned off
(in rear of machine).
GFCI outlet tripped. Reset outlet.
Add salt to reservoir.
Check for salt bridge in reservoir.
Break loose to provide salt to
system.
Turn on water.
Check for kinked or pinched
hoses.
solution through the dispenser
and cycle power.
and water supply is above 5 C
(41 F). Warm system and press
reset.
Check DB9 cable that connects
water softener and generator.
Check connections on both
softener and generator.
Unplug machine. Press power
board and firmly seat into slot
(next to e−module).
environment less than 100 C
(230 F) to operate. Resolve
temperature and reset.
Turn off water, unplug machine,
and call technical support.
and call technical support.
See Indicators in the OPERATION section of this manual for instruction on machine indicators.
If a problem cannot be resolved with the associated remedy, or an error code is displayed that is not
listed in this troubleshooting guide, contact Tennant Company Technical Support at 1−800−553−8033.
OS3 DM20036 (3−2014)
13
EN OPERATION
MAINTENANCE
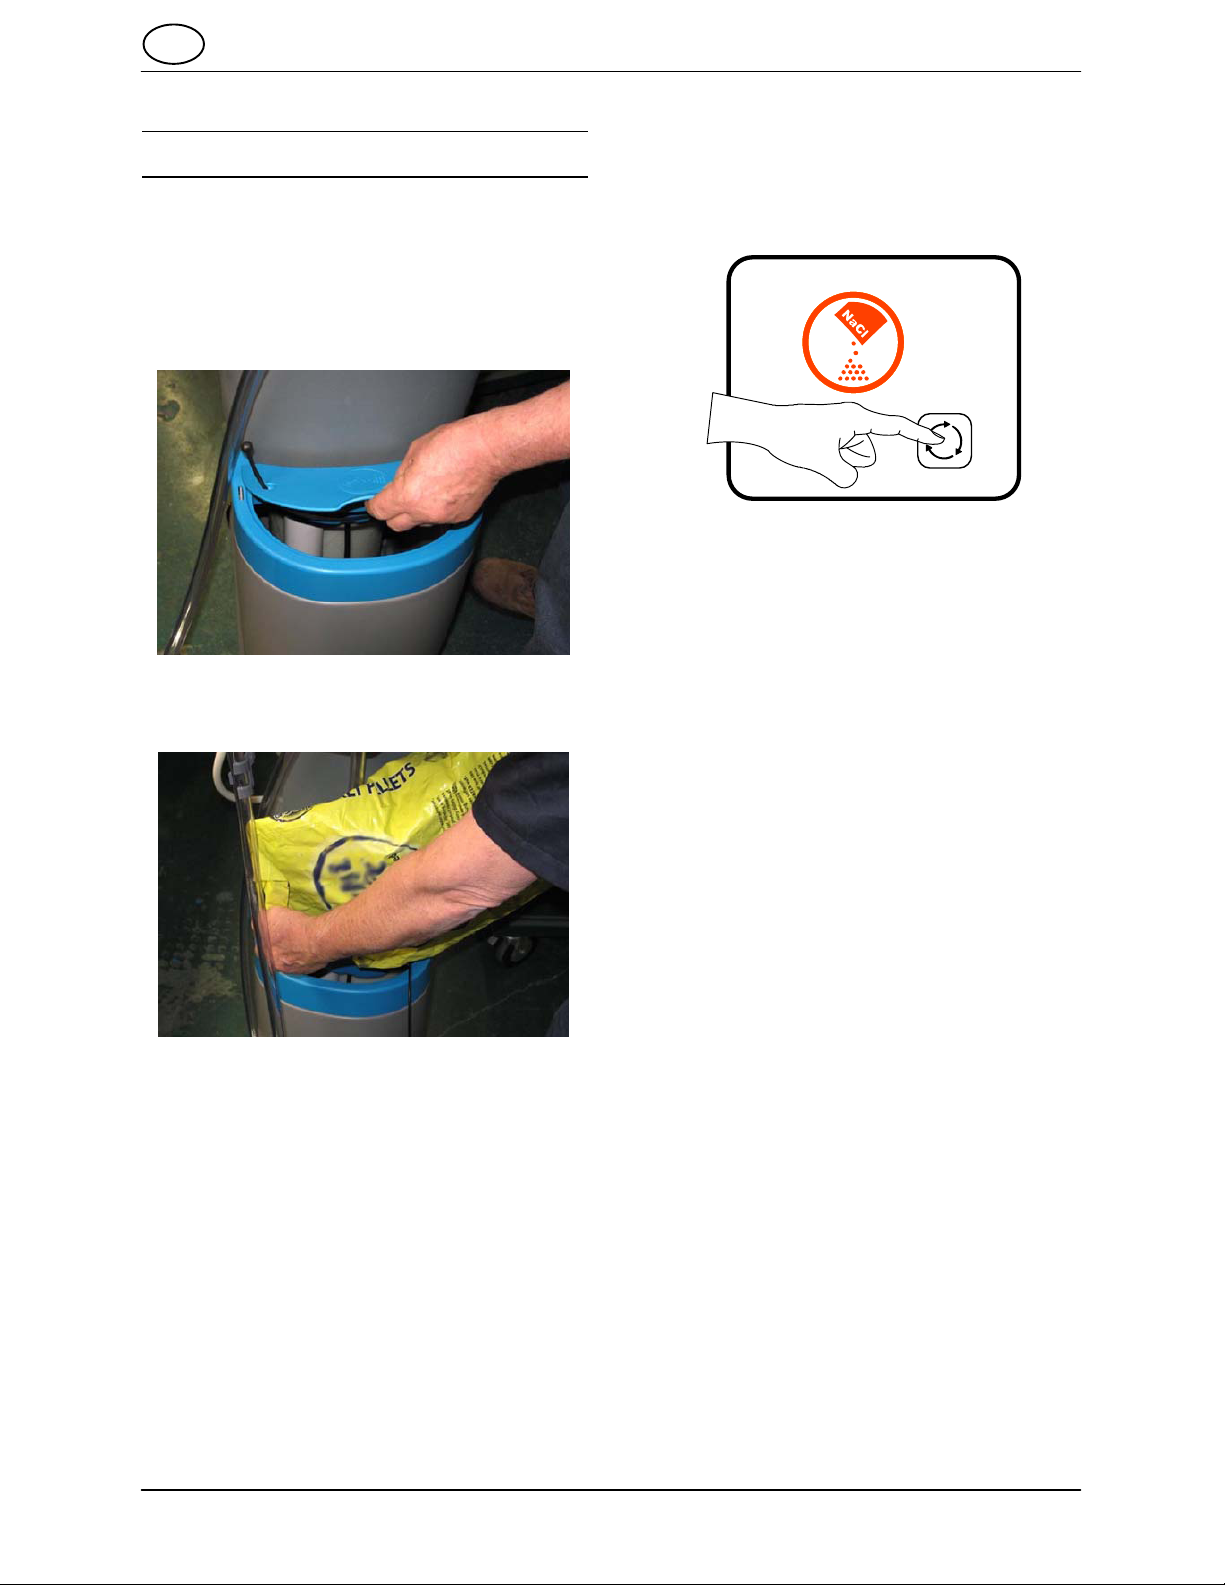
FILLING THE SALT RESERVOIR
Fill the salt reservoir with salt whenever the add
salt indicator is displayed. Use standard water
softener salt pellets (solar or evaporated).
Do not use rock salt to fill the salt reservoir.
1. Remove the cover from the salt reservoir.
4. Press the reset touch button and allow the
system to generate solution. The pump will
operate at a high rate while generating
solution. Multiple resets may be required
before the condition is cleared.
2. Pour the bag of salt into the salt reservoir. Fill
the salt reservoir to approximately 50mm
(2inches) below the salt reservoir opening.
3. Reinstall the cover onto the salt reservoir.
14
OS3 DM20036 (3−2014)
REPLACING WEAR COMPONENTS
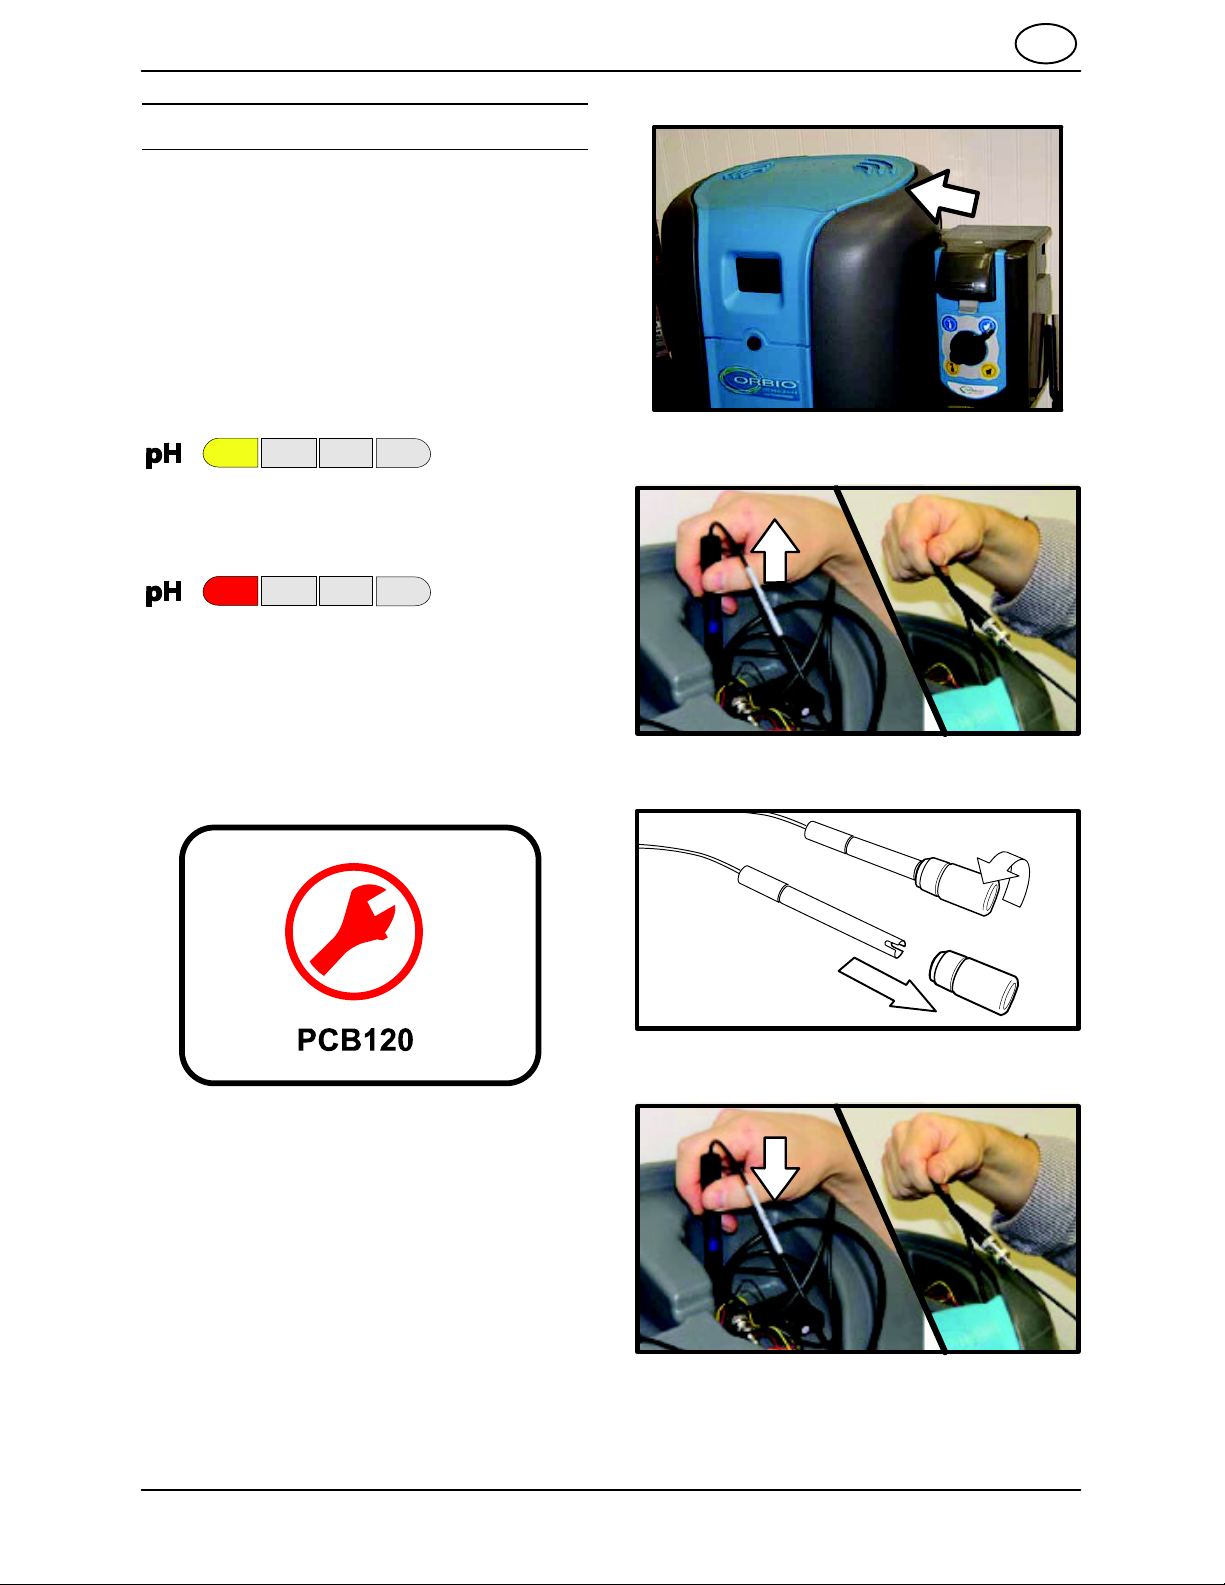
REPLACING THE pH PROBE
Requires service kit AS20052 PH PROBE
REPLACEMENT
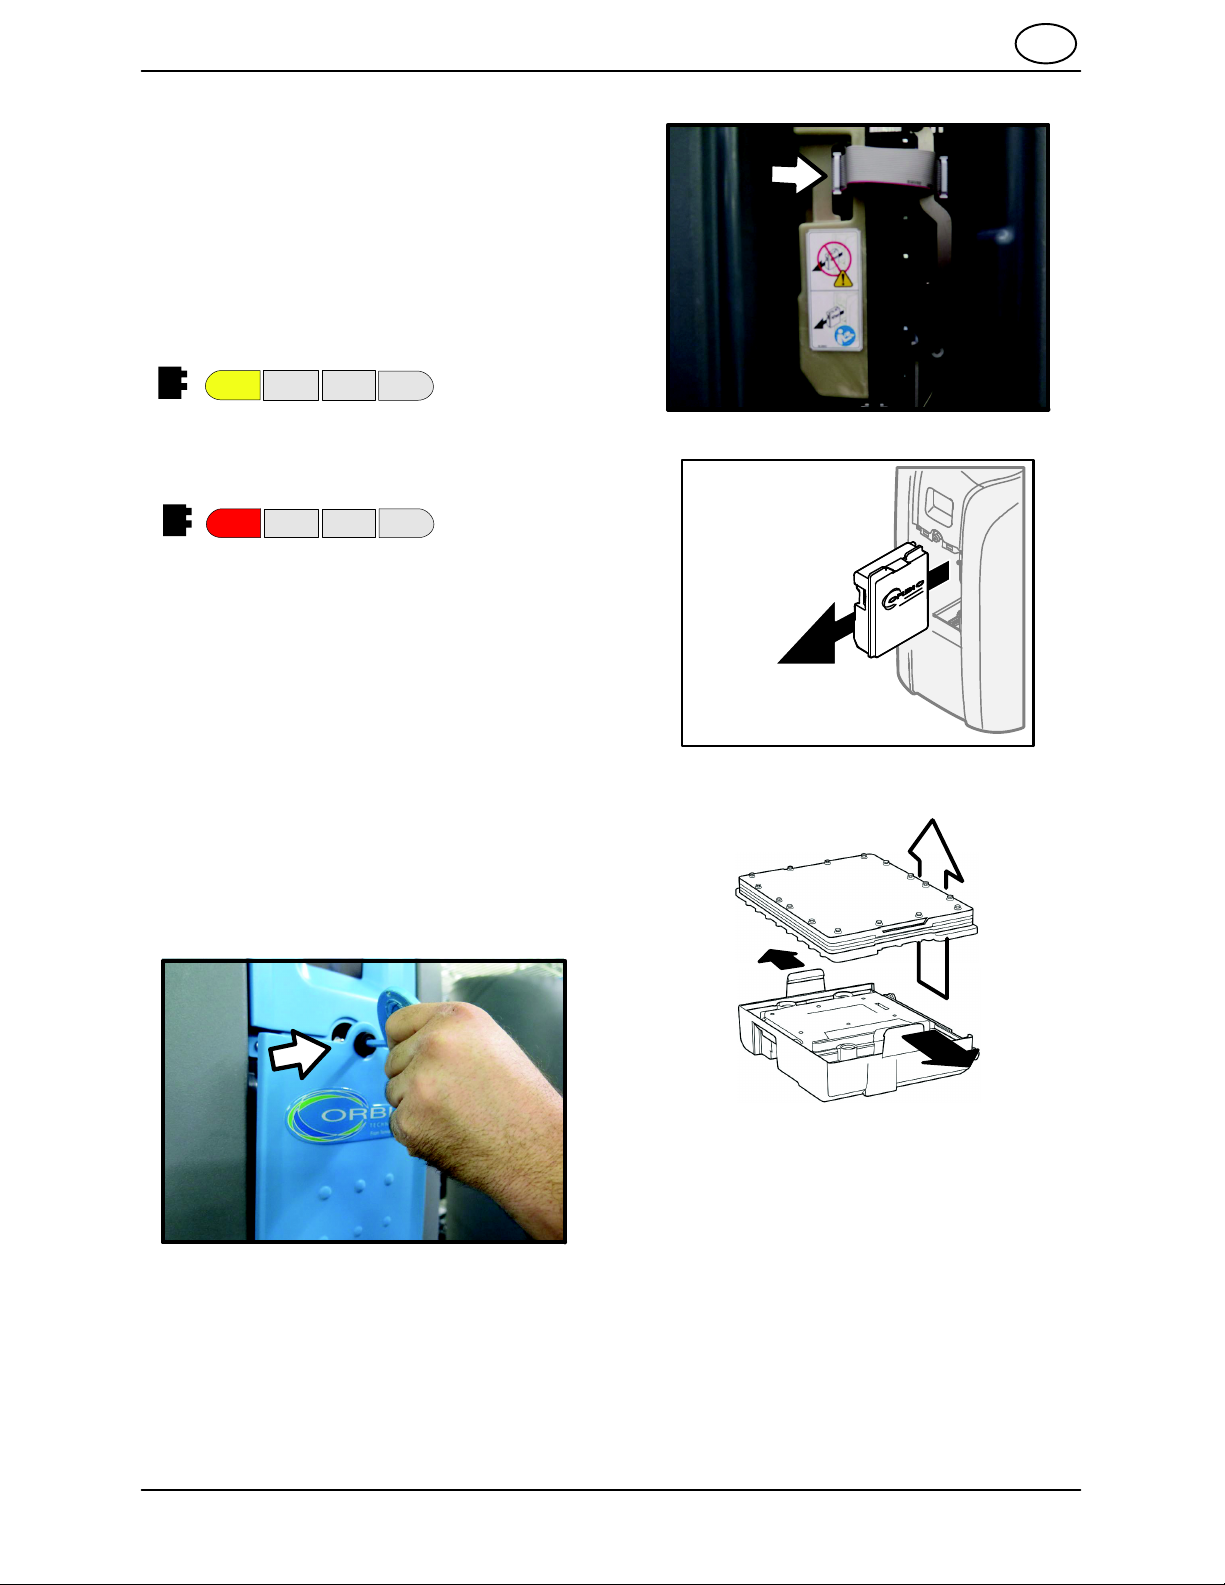
Replace the pH probe annually. The machine will
not function with an expired pH probe. When the
remaining progress bar is displayed in yellow,
order the replacement kit. Install new pH probe
when segment turns red after one year of
operation.
Order new pH probe
(yellow)
OPERATION EN
1. Remove top cover.
2. Disconnect existing pH probe, remove and
discard.
Replace pH probe
(red)
When the pH probe expires, the machine will not
operate and the PCB120 error code will be
displayed:
Installing a new pH probe will clear this condition.
To prevent machine down time replace the pH
probe immediately when the last wear indicator
segment turns red. This error code can be
preempted by replacing the probe during yellow
status.
3. Remove and discard saline vial from
replacement pH probe.
4. Install new pH probe in pocket on top of
machine and connect to wire harness:
OS3 DM20036 (3−2014)
15
EN OPERATION
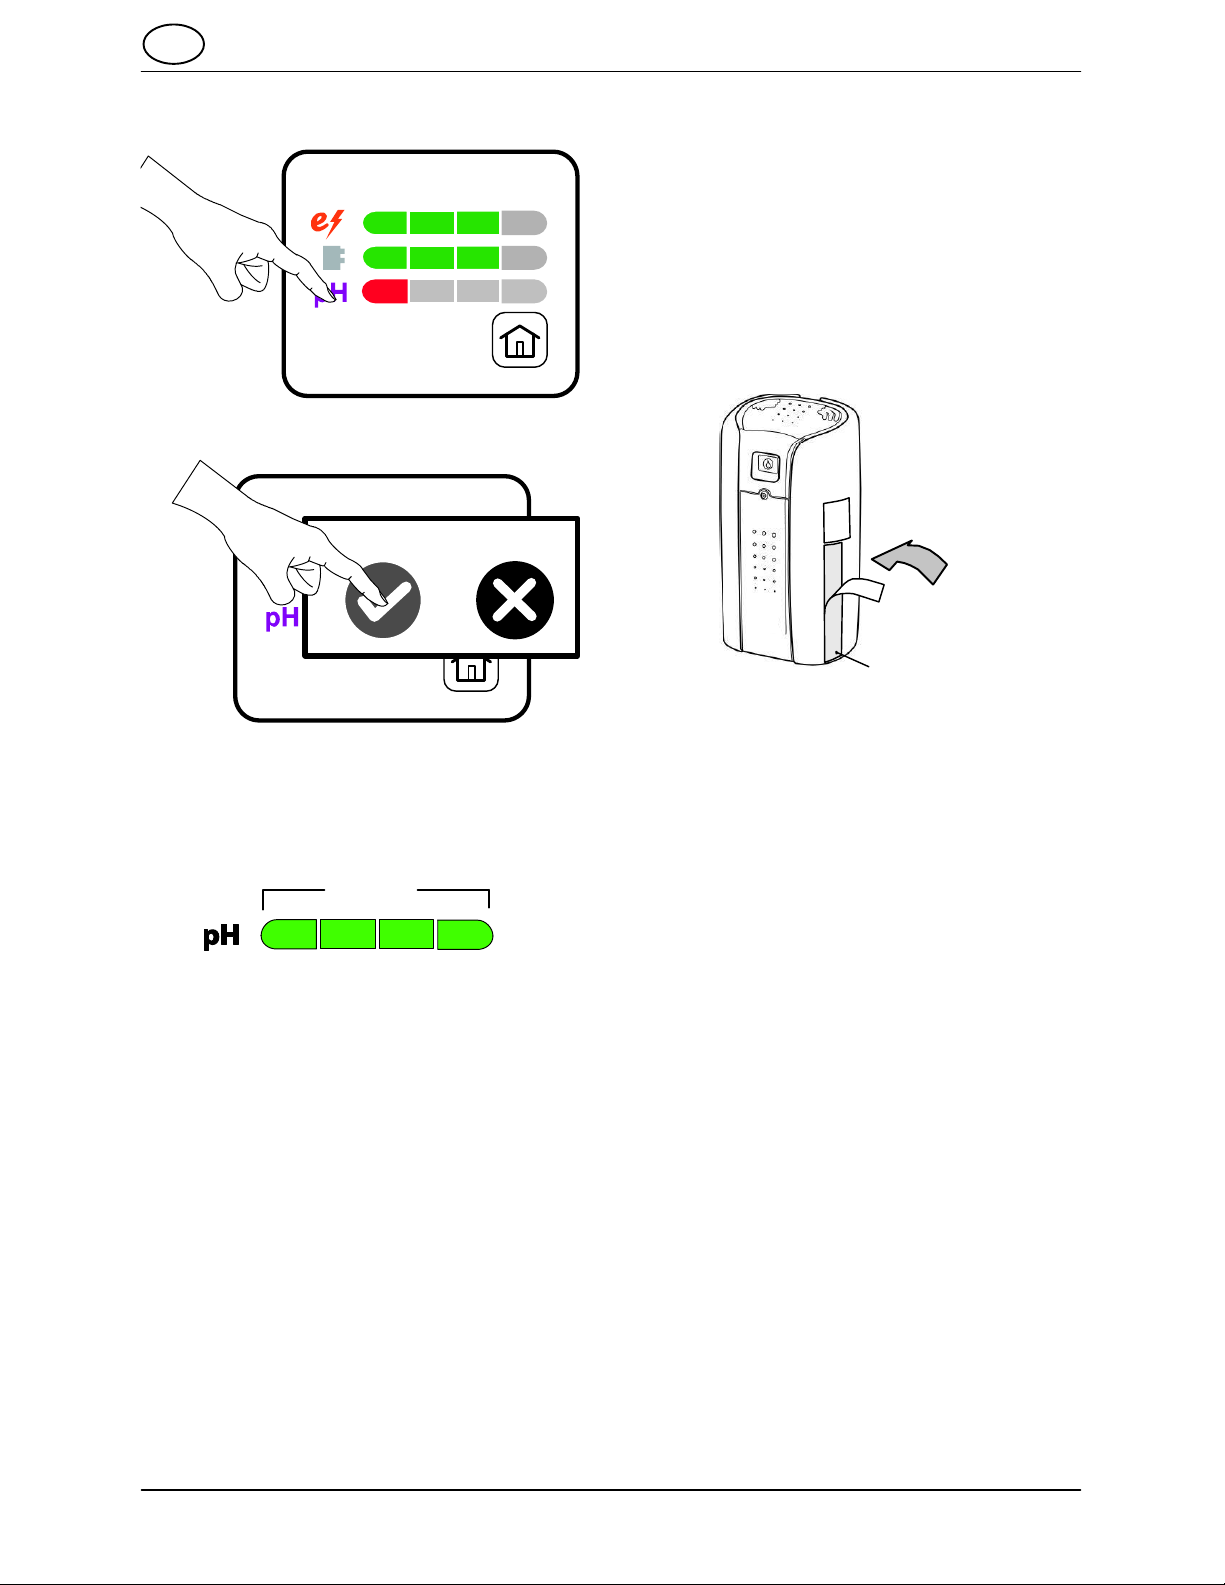
5. Press pH icon on touchscreen.
6. Confirm new pH probe installation.
pH
8. Reinstall the top cover.
9. Update product label.
Place the MultiMicro Directions for Use label
included in the pH probe service kit over the
existing label if the revision level number on the
replacement label is greater. The label is located
on the lower right hand side of the os3 generator.
Note: The pH probe service kit may contain more
than one MultiMicro
Select the appropriate label by country.
Directions for Use label.
Revision #
7. Verify correct installation on the Wear
Component Status Indicator Panel. All
segments on the progress bar will display as
green indicating a new pH probe.
GREEN
16
OS3 DM20036 (3−2014)
OPERATION EN
REPLACING THE e−CELL
Requires service kit AS20041 E−CELL
REPLACEMENT
Refer to the Wear Component Indicators panel on
the touch screen display for status of system wear
components. Order a replacement e−cell when
the remaining segment on the progress bar turns
yellow. Replace the e−cell when the the segment
turns red.
Order new e−cell
(yellow)
Replace e−cell
(red)
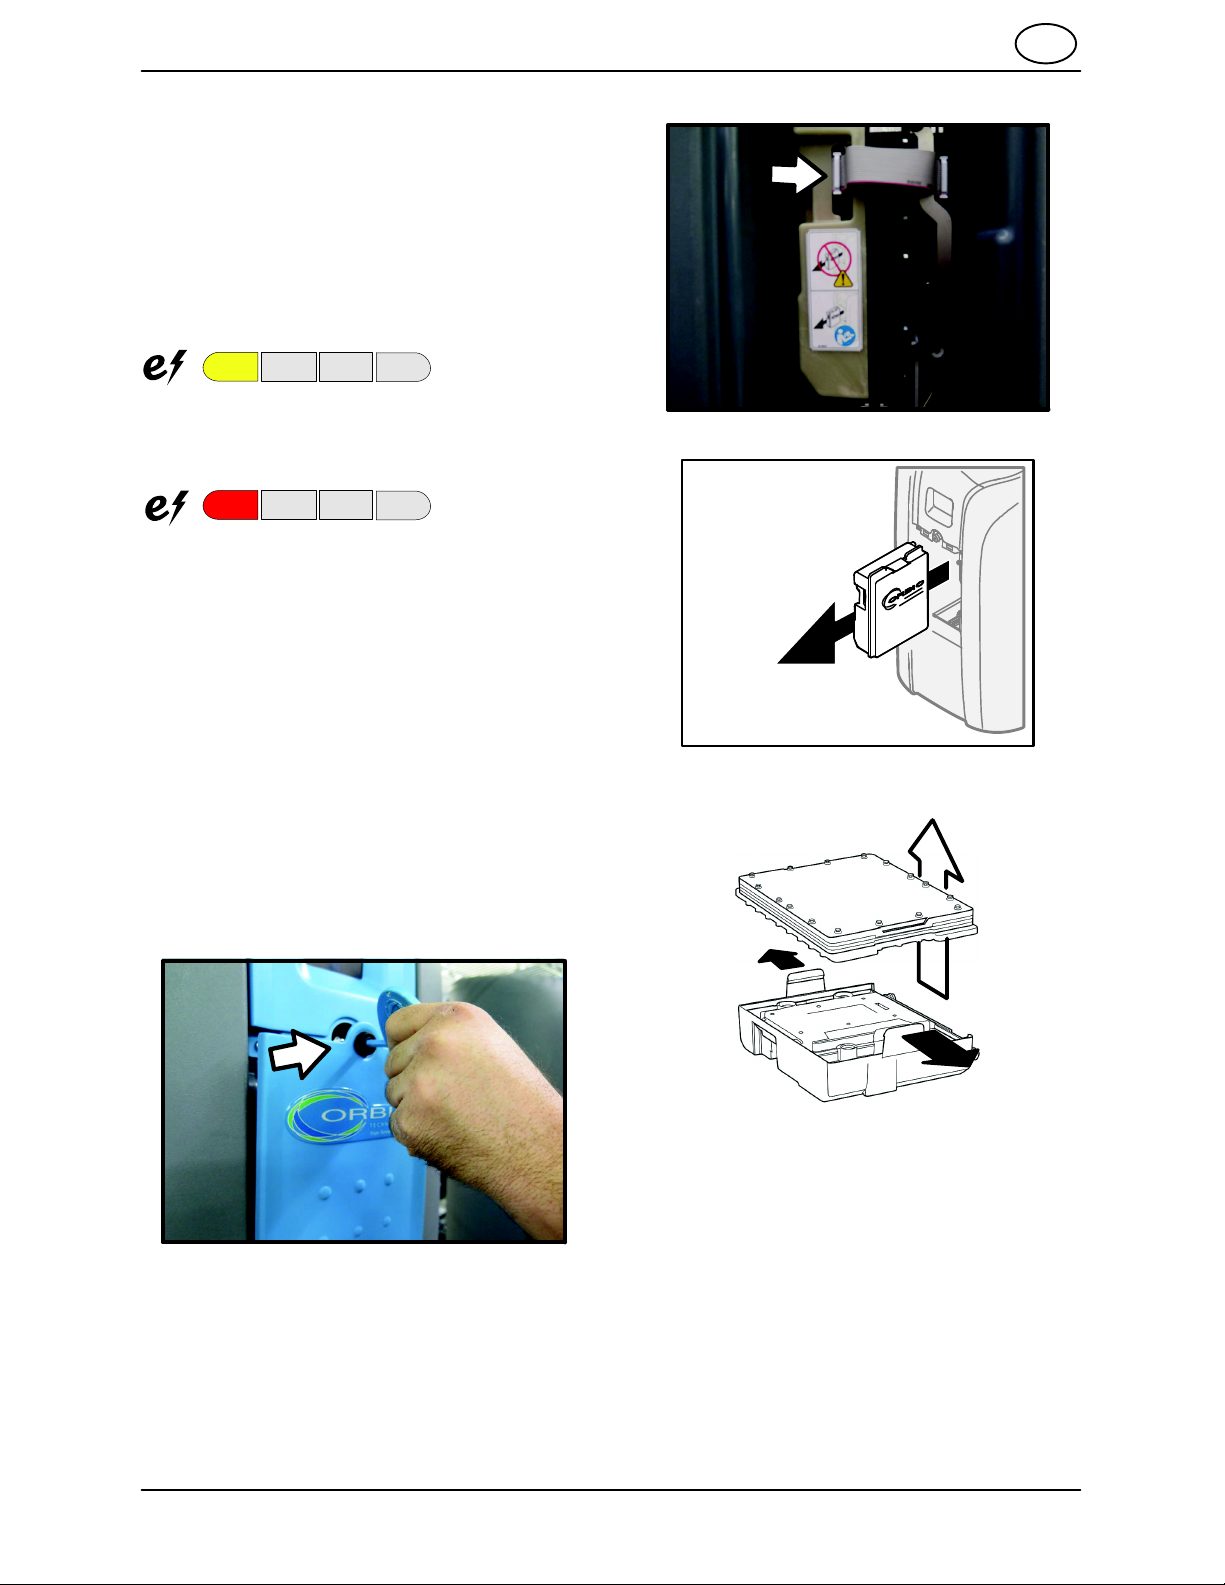
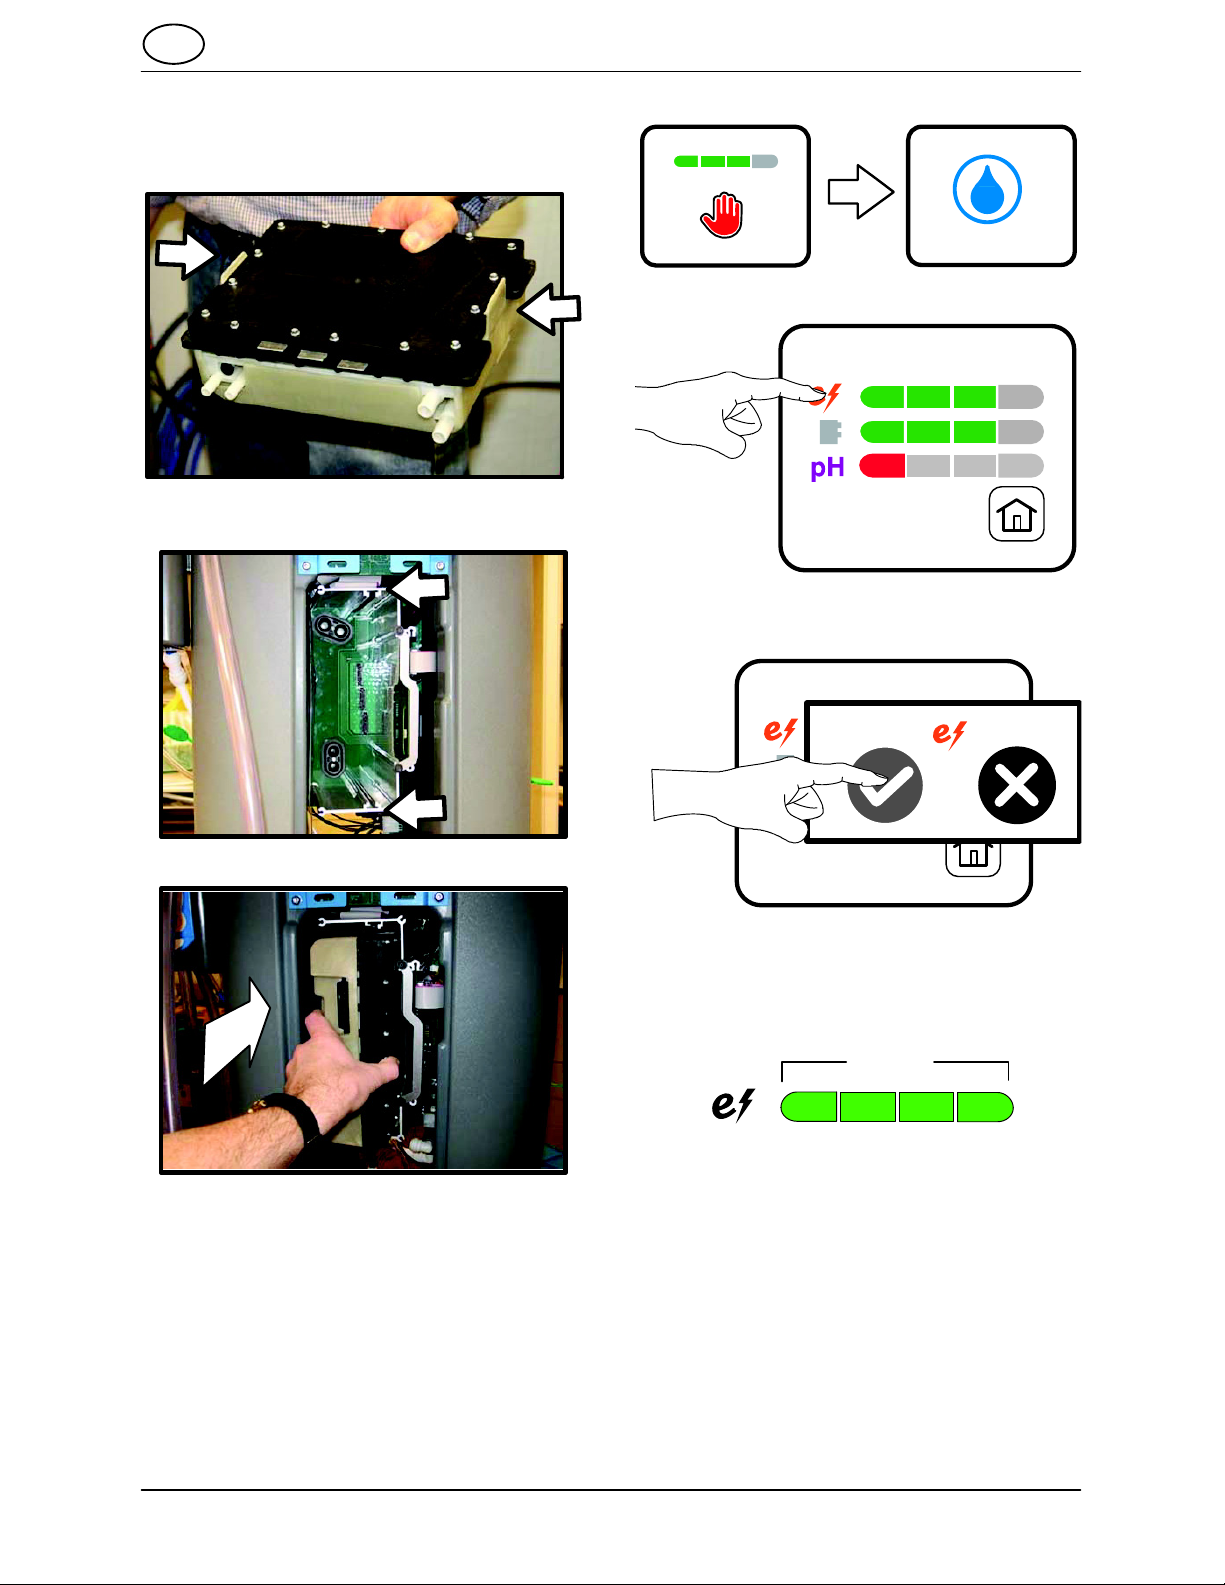
1. Disconnect power cord from outlet.
5. Disconnect ribbon cable.
6. With a firm grip pull out e−module from os3.
FOR SAFETY: When servicing machine
unplug cord from wall outlet.
2. Turn off water.
3. Dispense either the MultiSurface or
MultiMicro solution into a bucket or a drain
to depressurize the system.
4. Remove front access panel using the access
key.
7. Flex tabs on manifold and separate from
e−cell. Dispose of old e−cell properly.
OS3 DM20036 (3−2014)
17
EN OPERATION
8. Install new e−cell onto manifold. Note port
and connector locations. Be sure the snaps
hold the e−cell and manifold securely
together.
9. Engage e−module into rails on chassis. Press
firmly until fully seated.
14.Wait to complete initialization.
15.Press e−cell icon on touchscreen.
16.Confirm new e−cell installation.
10.Reconnect ribbon cable.
11.Turn on water.
12.Power machine by plugging into outlet.
13.Check for leaks.
18
17.Verify correct installation on the Wear
Component Status Indicators panel. All
segments on the progress bar will display as
green indicating a new e−cell.
GREEN
18.Reinstall front access panel and secure with
key.
OS3 DM20036 (3−2014)
OPERATION EN
REPLACING THE MANIFOLD
Requires service kit AS20044 MANIFOLD
REPLACEMENT
Refer to the Wear Components Indicators panel
on the touch screen display for status of system
wear components. Order a replacement manifold
when the remaining segment of the progress bar
turns yellow. Replace the manifold when the
segment turns red.
Order new manifold
(yellow)
Replace manifold
(red)
1. Disconnect cord from outlet.
5. Disconnect ribbon cable.
6. With a firm grip pull out e−module from os3.
FOR SAFETY: When servicing machine
unplug cord from wall outlet.
2. Turn off water.
3. Dispense either the MultiSurface or
MultiMicro solution into a bucket or a drain
to depressurize the system.
4. Remove front access panel using the access
key.
7. Flex tabs on manifold and separate from
e−cell. Dispose of old e−cell properly.
OS3 DM20036 (3−2014)
19

EN OPERATION
8. Install e−cell onto new manifold. Note port
and connector locations. Be sure the snaps
hold the e−cell and manifold securely
together.
9. Engage e−module into rails on chassis. Press
firmly until fully seated.
14.Wait to complete initialization.
15.Press manifold icon on touchscreen.
16.Confirm new manifold installation.
10.Reconnect ribbon cable.
11.Turn on water.
12.Power machine by plugging into outlet.
13.Check for leaks.
20
17.Verify correct installation on the Wear
Component Status Indicators panel. All
segments on the progress bar will display as
green indicating a new manifold.
GREEN
18.Reinstall front access panel and secure with
key.
OS3 DM20036 (3−2014)

TESTING THE ANTIMICROBIAL
SOLUTION
Test MultiMicro 200 solution to verify proper
dilution through the Orbio dispenser. This
procedure will test both the bottle and bucket fill
metering tips.
Tools required: Orbio Chlorine Test Paper and 2
clean 240 cc (8 oz.) containers.
OPERATION EN
3. Using a chlorine test strip for each container,
dip and remove quickly.
3
4. Blot immediately.
4
Orbio Chlorine Test Paper
If the solution test paper does not indicate 200
ppm contact technical support. Discard solution
that does not pass this test procedure.
1. Fill one container with solution from the bottle
fill tube.
Multi
1
2. Fill the second container with solution from
the bucket fill tube.
CLEANER
Multi
Micro
200
5. Compare to color chart on test paper
container. “200” indicates correct
concentration.
5
OK
10 50 100 200
2
OS3 DM20036 (3−2014)
Multi
CLEANER
Multi
Micro
200
21

EN OPERATION
TESTING THE CLEANING SOLUTION
3. Using a pH test strip for each container, dip
and remove quickly.
Test MultiSurface Cleaner to verify proper dilution
through the Orbio dispenser. This procedure will
test both the bottle and bucket fill metering tips.
Tools required: Orbio pH Test Paper and 2 clean
240 cc (8 oz.) containers.
Orbio pH Test Paper
If the solution has a pH less than 10, discard the
solution. This test method can also be used to
test solution that has been stored for more than
60 days.
1. Fill one container with solution from the bottle
fill tube.
1
Multi
CLEANER
Multi
Micro
200
3
4. Blot immediately.
4
5. Compare to color chart on test paper
container. “10” or greater indicates adequate
pH level.
254
1
pH0
5
36
2. Fill the second container with solution from
the bucket fill tube.
2 Multi
CLEANER
Multi
Micro
200
22
pH7
891011
12 13
OK
OS3 DM20036 (3−2014)
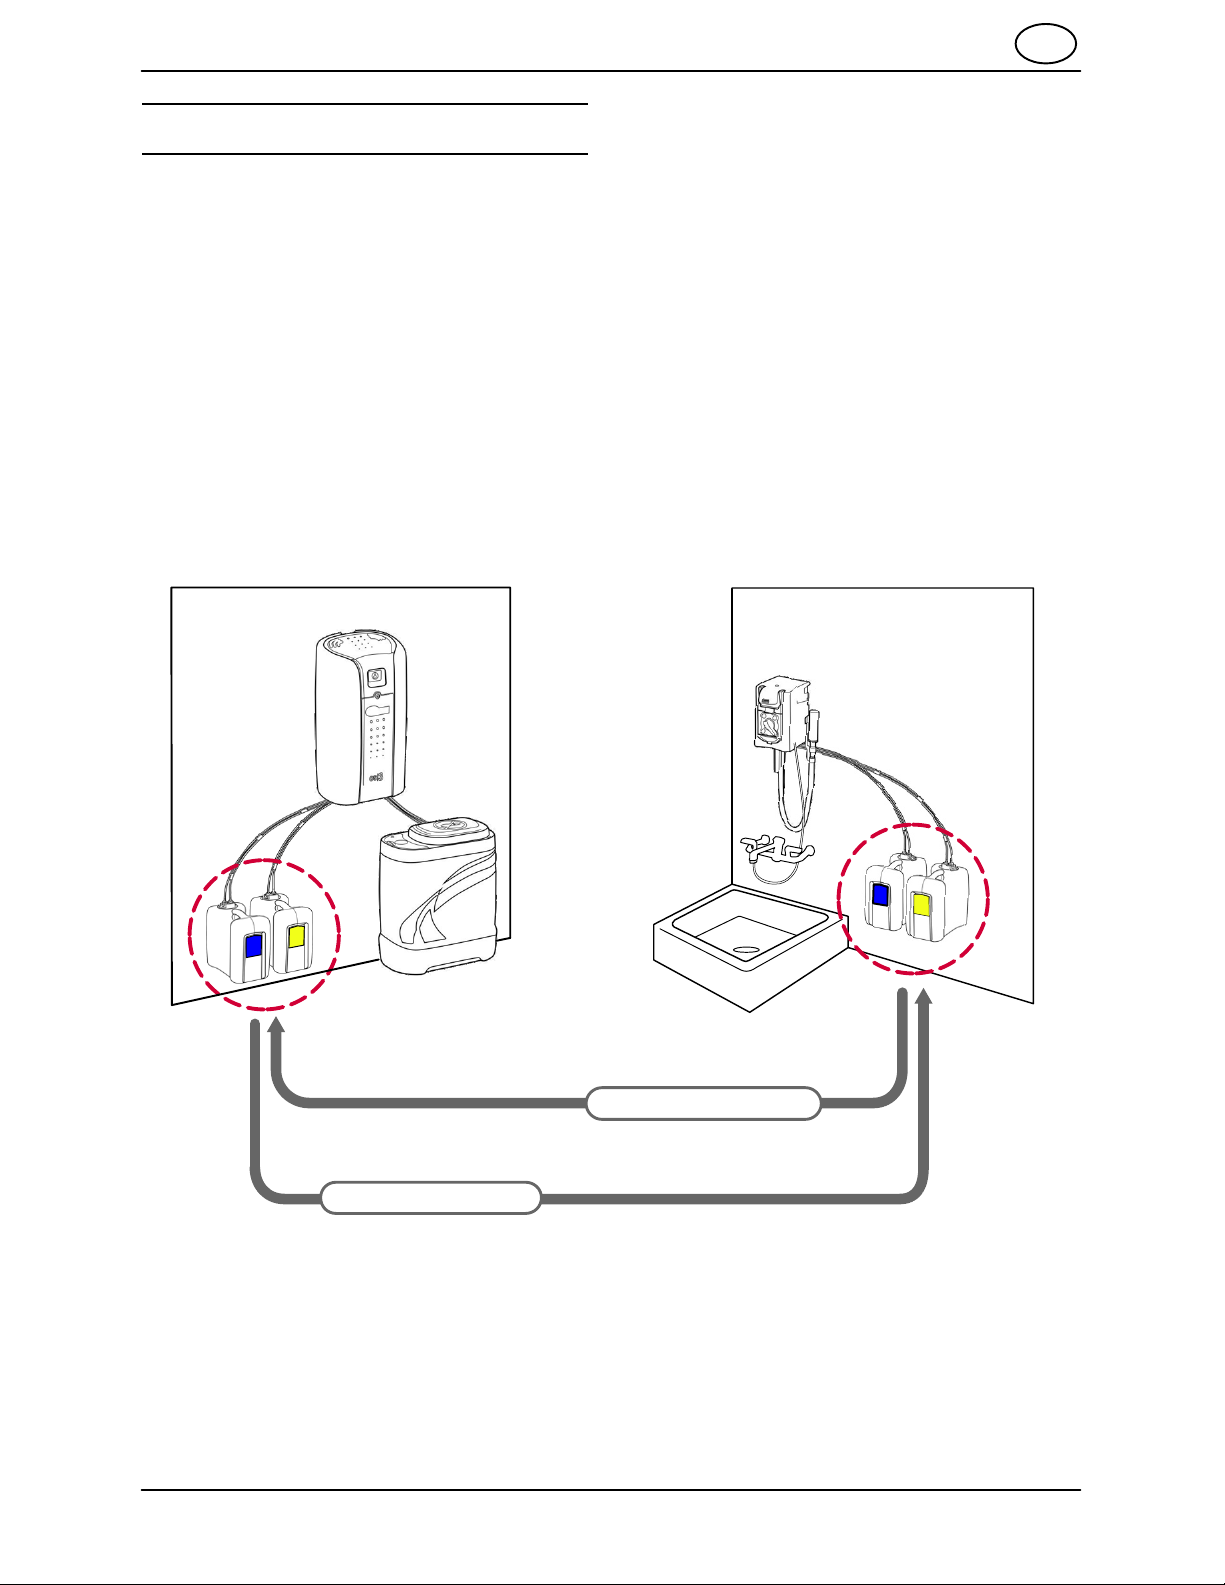
SATELLITE SYSTEMS
The os3 system may be equipped with one or
more satellite systems. The satellite systems
allow dilution of MultiMicro Concentrate and
MultiSurface Concentrate in remote locations
through an Orbio Technologies dispenser.
Orbio transport containers are filled at the os3
generator and moved to the satellite station
location where the concentrate is diluted into a
RTU (ready−to−use) solution. When empty,
transport containers are returned to the os3
generator to be filled. The empty container is
replaced with a full container at the satellite
station.
OPERATION EN
Only completely emptied transport containers
should filled at the os3 generator. Any remaining
amount of either MultiMicro Concentrate or
MultiSurface Concentrate can be evacuated by
diluting the concentrate with water through the
satellite system dispenser. Dispose of according
to local waste disposal regulations.
Note: Do not refill partially empty containers. The
residual solution in the transport container will
compromise the shelf life and effectiveness of the
concentrate.
MultiSurface Concentrate can be stored in a
transport container for 90 days.
MultiMicro Concentrate can be stored in a
transport container for 30 days.
os3 Generator (filling station)
transport
containers
os3 Satellite (dispensing station)
transport
containers
empty containers
OS3 DM20036 (3−2014)
full containers
23
EN OPERATION
CONNECTING AND DISCONNECTING
TRANSPORT CONTAINERS
Quick−connect caps attach the transport
containers to the os3 generator and satellite
systems. The caps are color coded to ensure
correct installation. MultiMicro 200 connecting
caps are yellow, and MultiSurface connecting
caps are blue.
NOTE: Caps are designed to prevent access to
the concentrate solution. Do not attempt to
remove the caps from the container.
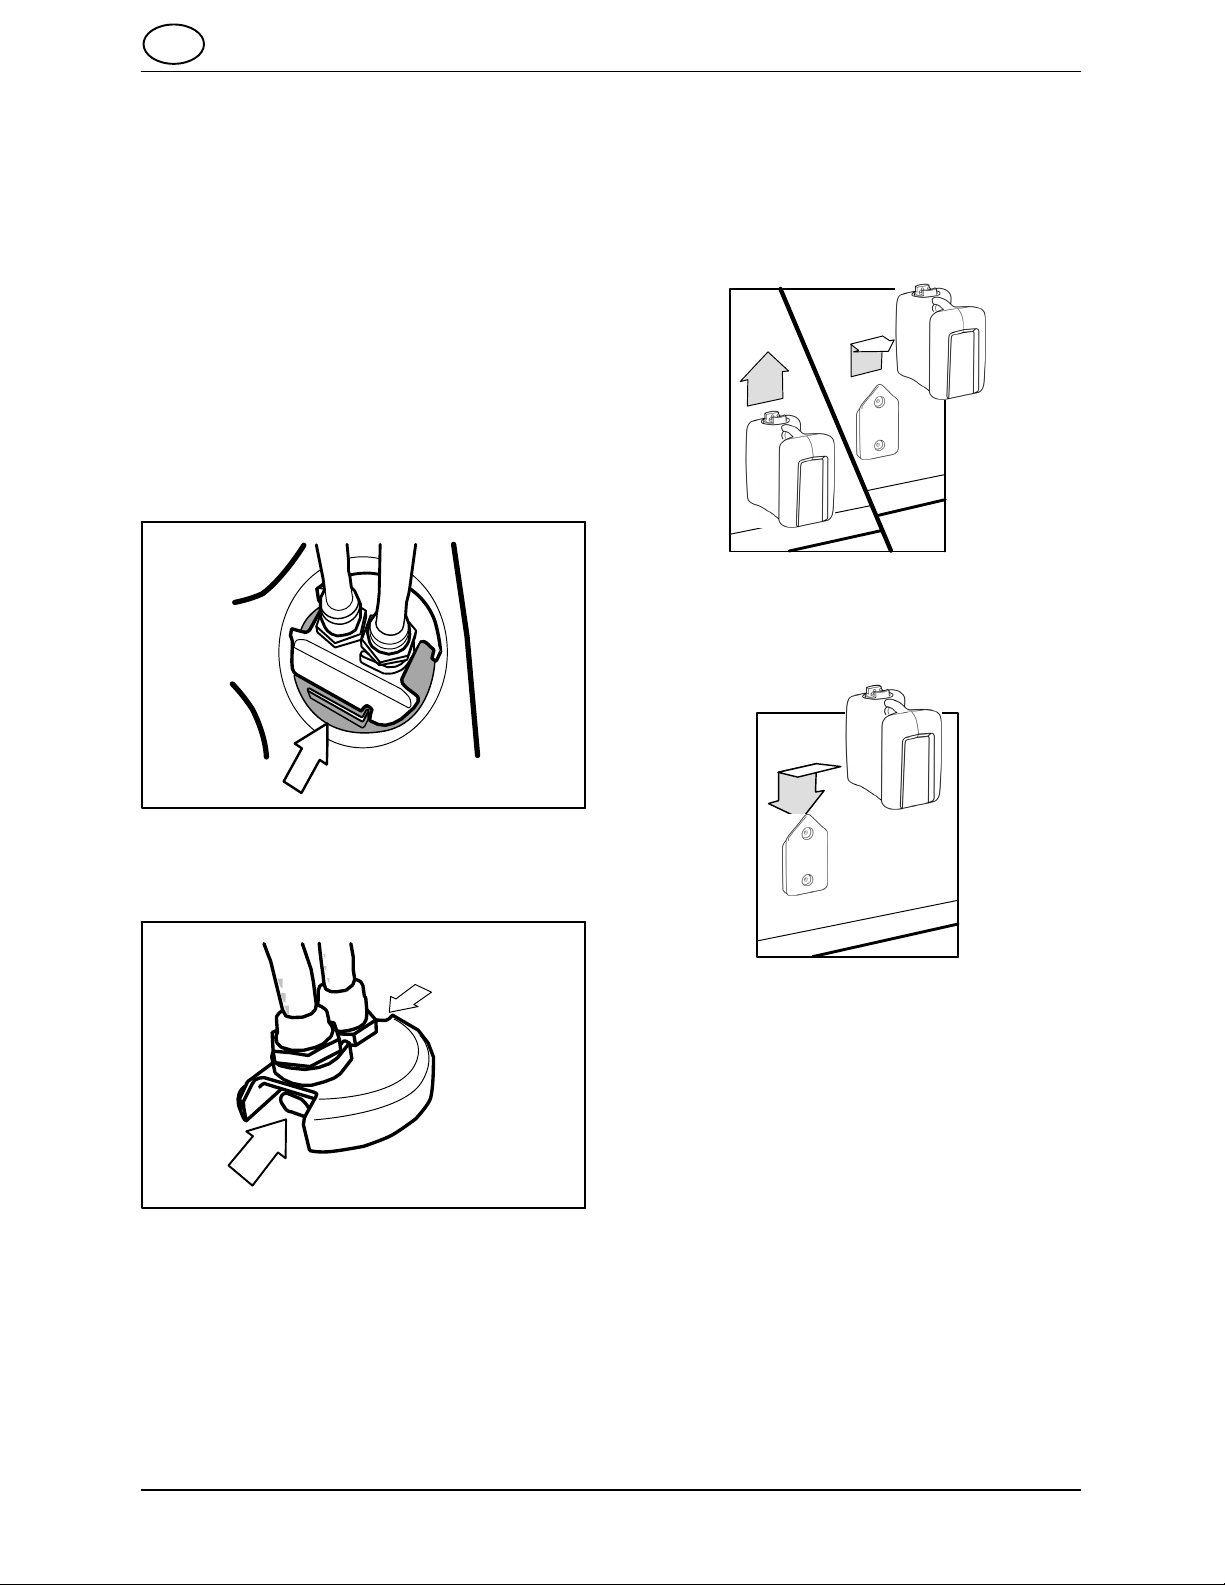
CONNECTING
Align section of cap with “L” shaped key on the
transport container. Push firmly until the cap locks
to the receptacle on the container.
USING THE TRANSPORT CONTAINER WALL
HOOK
Transport containers may be secured to the wall
with an os3 wall hook.
To remove a container from the wall hook, lift the
container up slightly and then away
To install the container on an os3 wall hook,
position the transport container immediately
above the wall hook and slowly lower the
transport container until the hook engages.
ALIGNMENT KEY
DISCONNECTING
With thumb and forefinger, squeeze release tabs
on cap and lift cap away from transport container.
RELEASE TABS
Note: Do not stack transport containers when on
wall hook.
For additional accessories and information
about Orbio satellite systems for the os3, see a
sales representative or go to www.orbio.com.
24
OS3 DM20036 (3−2014)
OPERATION EN
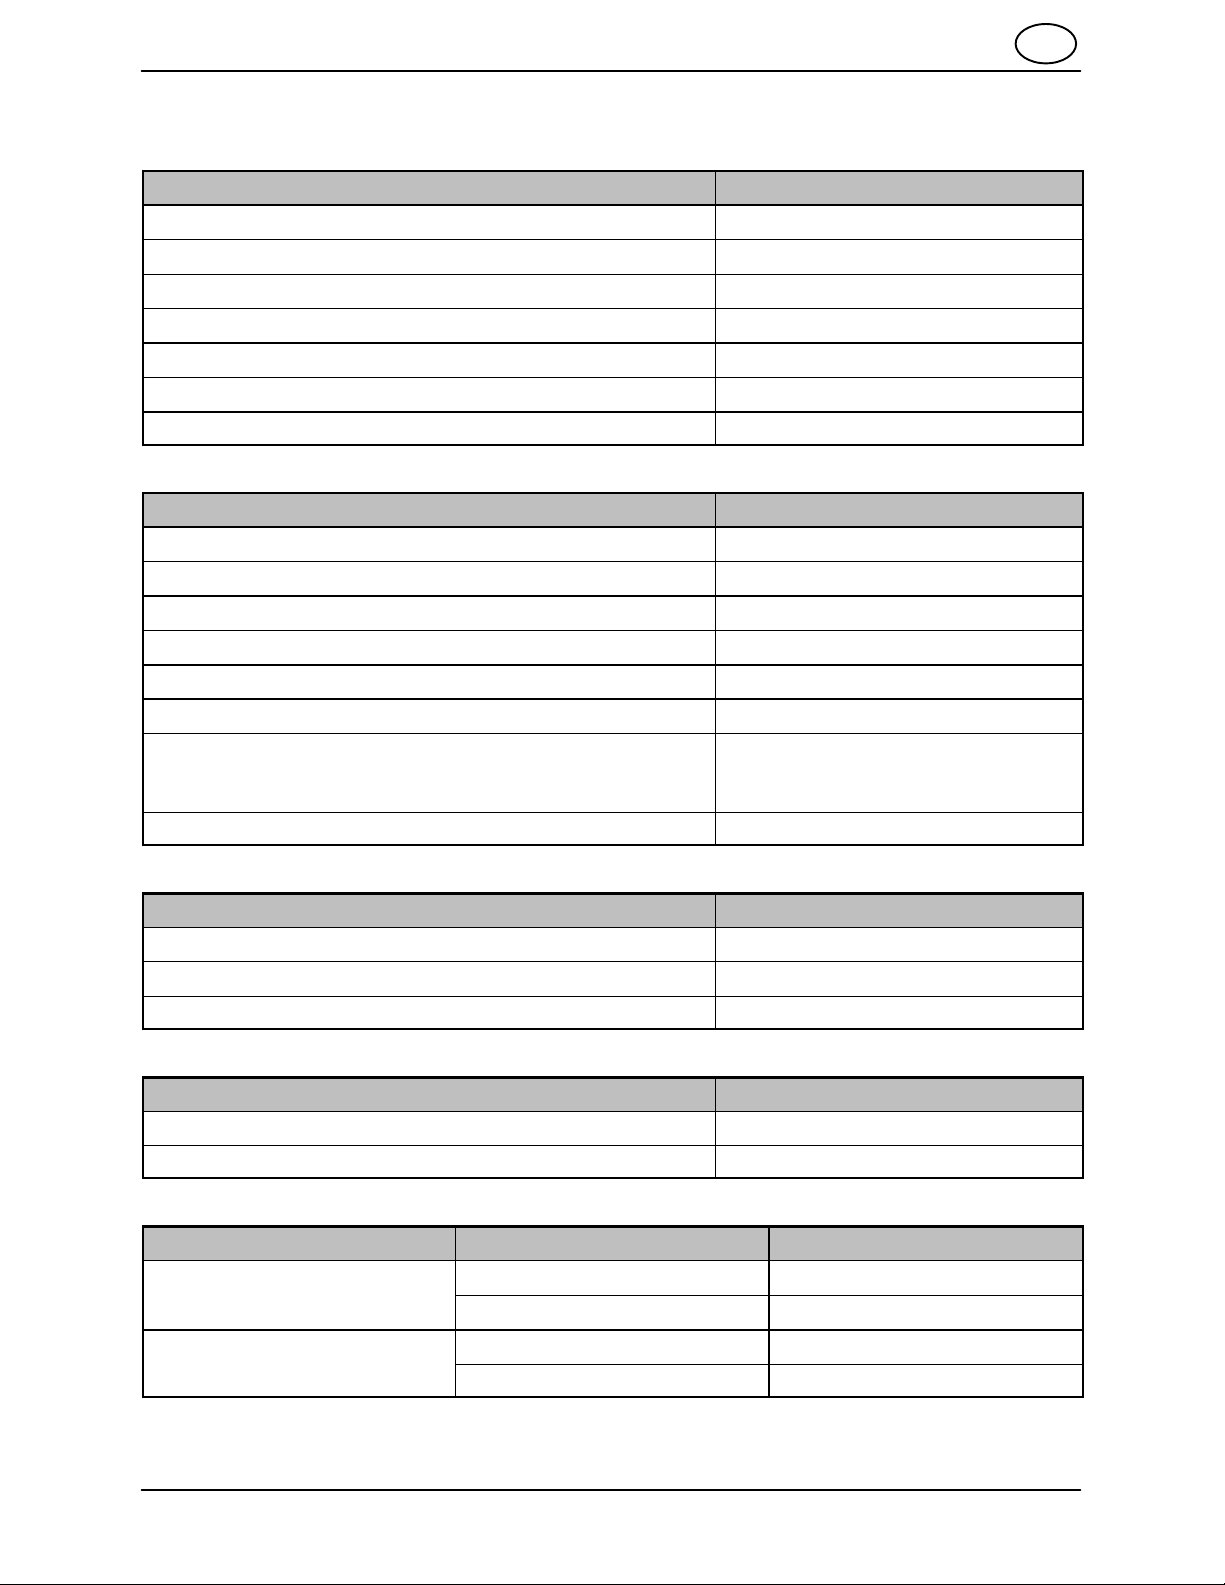
SPECIFICATIONS
os3 GENERATOR
Item Measure
Depth 356 mm (14 in)
Width (with dispenser attached) 610 mm (24 in)
Width (without dispenser attached) 457 mm (18 in)
Height 813 mm (32 in)
Weight (empty) 18 kg (40 lbs)
Weight (filled with solution) 47 kg (103 lbs)
Operating ambient temperature 10°−43° C (50°−110° F)
os3 Water Softener
Item Measure
Depth 356 mm (14 in)
Width (with dispenser attached) 610 mm (24 in)
Height 686 mm (27 in)
Weight (empty) 20 kg (44 lbs)
Weight (filled with solution) 112 kg (247 lbs)
Operating ambient temperature 10°−43° C (50°−110° F)
Salt type Standard water softener pellets (solar
or evaporated) −
Not rock salt or crystals
Salt reservoir capacity 68 kg (150 lbs)
POWER
Item Measure
Circuit Required (min) 15A
Input AC voltage 120V/60Hz
Input AC voltage (International) 230V/50Hz
DISPENSING SYSTEM
Item Measure
MultiSurface Cleaner pH (RTU) 10−11.5
MultiMicro 200 pH (RTU) 6−8
GENERATION SYSTEM
Solution Type Item Measure
MultiSurface Concentrate
MultiMicro 200 Concentrate
Generator tank capacity 19 L (5 gal)
MultiSurface Concentrate pH 12.2−12.49
Generator tank capacity 13 L (3.5 gal)
MultiMicro 200 Concentrate pH 5−6
25OS3 DM20036 (4−2014)