

Page 1

TCNMARS
Thermometer
TM.8ON
TM.82N
TM.83N
TM.84N
Users
Manual
(€
HB2TMSONOOOO
Page 2
Table
of Contents
1 lntroduction
Tenmars TM-BX series
thermometer is a digital
thermometer use for thermocouple
type.
Build in
microprocessor and
high resolution analog
to digital
converter
chip. The thermocouple
probe
has fast
response, measure
wide
ranges, easy change shape
and
popular prices.
This
popular
used to industry
and
homes.
Page 3
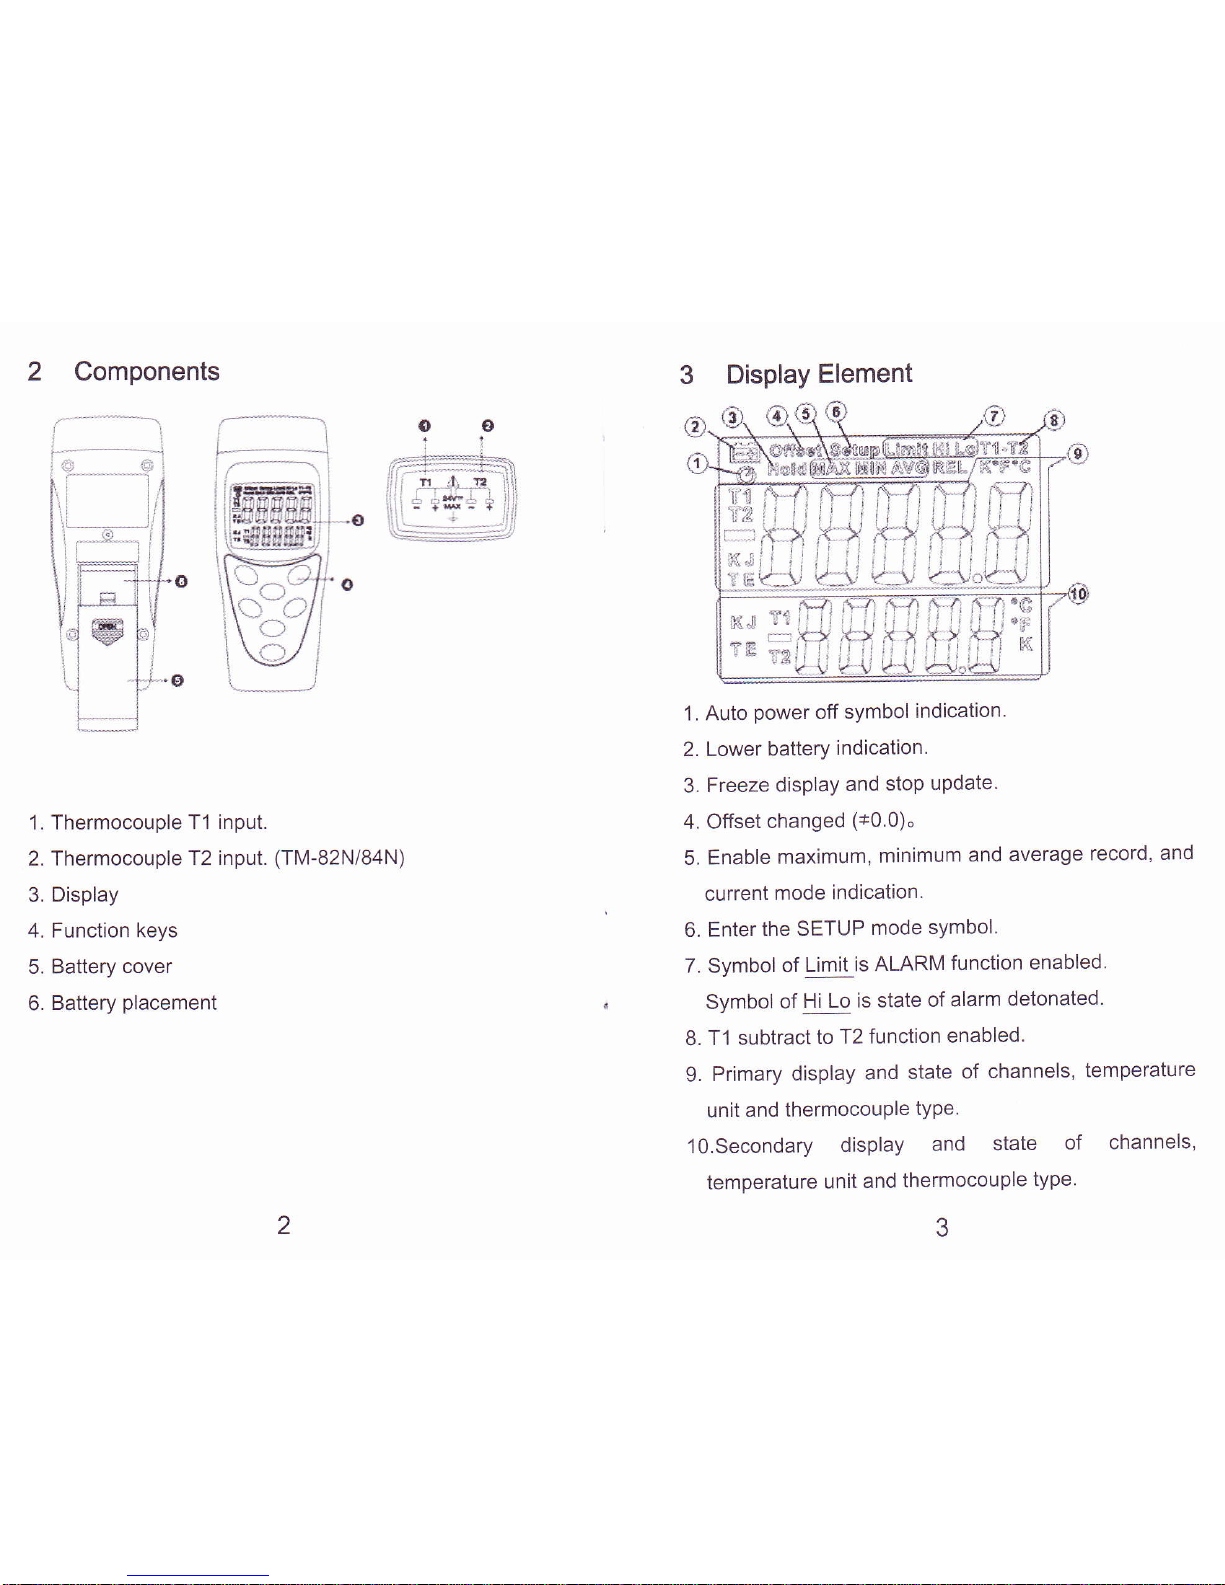
2 Components
1. Thermocouple Tl
input.
2. Thermocouple T2
input.
(TM-82N/84N)
3.
Display
4. Function keys
5. Battery
cover
6.
Battery
placement
Display
Element
1. Auto
power
ofi symbol
indication.
2. Lower
battery
indication.
3.
Freeze
display
and
stoP uPdate.
4. Offset
changed
(+0.0)"
5. Enable
maximum,
minimum
and average
record,
and
current
mode
indication.
6. Enter
the SETUP
mode
sYmbol.
7. Symbol
of
Limit
is ALARM
function
enabled.
Symbol
of
Hi Lo
is state
of alarm
detonated
B.
Tl subtract
to T2
function
enabled.
9.
Primary
display
and
state
of
channels,
temperature
unit
and
thermocouPle
tYPe.
1O.Secondary
display
and
state
of channels'
temperaiure
unit
and thermocouple
type
Page 4

Buttons
lntroduction
Temperature
Unit Select.
Press
and hold, Alarm
function enable
or
disable.(TM-83N/84N)
Freeze
display
and update function enable
or
disable.
Press
and hold,
auto
power
off function
enable
or disable.
ln
the setup mode,
"|eft"
select function.
(TM-83N/84N)
Thermocouple
Type
Select.
ln the
setup mode,
"up"
select function.
MAX, MIN
and AVG record.
Press
and hold,
enter setup
mode.
ln the
setup mode,
"ENTER'function.
(TM-83N/B4N)
Deducting relative
reading function enable or
disable.
Press
and hold,
enter offset setup mode
ln
the
setup mode,
"right"
select function.
(TM-83N/84N)
Power
turn the on
or off
ln the setup
mode,
"down"
select function.
T1
minus T2 Temperature
function enable
or
disable.
Press
and hold, T1 with T2
display location
swap.
(TM-B2N/84N)
5 lnstruction
for Use
.
Temperature
Unit Select
('C/'F/K):
User can
change temp
unit to between
Celsius('C),
Fahrenheit('F), and
Kelvin(K).Press\t9key
to change,
follow the figure circles.
"C+@+"F*S+K+G
(K
only TM-83N/B4N)
The device
will auto save
unit before shutdown,
being
as default
for next
power
on.
.
MAX, MIN and
AVG record
:
This function
record
maximum, minimum,
and average.
User can select
viewing.
,r"..@n",
to start
record MAX,
MlN, and AVG.
Show
the max reading
to display.
Press@key
to
switch viewing between
MAX, MlN, and AVG.
Follow the
figure circles.
MAX*@*MlN+dP*AVG+6P
I
Press and hotO@1"U
to disable
this function
The
primary
display
showed current
channel
reading of
5
@
@
Page 5

MAX . MIN and AVG.
The
secondary
display
showed
current
channel reading of real temperature.
lf want
to
show another
channel reading of
MAX, MlN,
and
AVG. Please
press
un6
6o16@tey to swap
Tl
with T2.
(TM-82N/B4N)
lf device
auto
power
off and this
function
is
enable,
device
will auto save record value, and showed
for next
power
on.
. Thermocouple Type Select
:
User
must choice correctness
ihermocouple
type. lf
choice the
wrong type will caused
inaccuracy
temperature
reading.
Press@key to switch type
between K, J,
T, and E.
Follow the
figure
circles.
K+@+,{",+@oL+@
+
H,a@
(T,
E only
TM-83N/84N)
lf want
to
setting
f2 type, Please
press
and hold
qt9
key to swap T2
being
primary
display.(TM-82N/84N)
The device
will
auto save
type before shutdown,
being
as default
for next
power
on-
.
Freeze Display and
Stop Update
(HOLD):
User can
or".rGkey
to freeze display
and stop
update
temperature
read.
pr"""
G
key again
to
unfreeze.
When the HOLD
function is enable, all
function keys
was useless except
for
power
key.
.
Deducting Relative
Reading Function
(REL):
User can
Or"r,
@
key to show deducting
relative
reading.
This function
provides
display becomes"0".
Save the
previous
reading as the standard
relative
reading.
For example:
lf the reading
display is 25'C,
press(9key
to
have
a reading of
"0"
'C. Save the
reading of 25'C as the
standard
relative reading,
if the temperature
up to
30'C, the display
will be 30.0-25.0=5'C,
if the
temperature
down to 20' C
the display will be
25.0-30.0=
-5'C.
Press@1", again to disable
function.
The
primary
display showed current
channel
reading
of
REL. The secondary
display showed current
channel
reading of real temperature.
lf want to show
another channel
reading of REL.
Please
press
and
hold@key to swap
T1 with T2.
(TM-82N/84N)
I
Page 6

.
T1 minus T2 Temperature
(T1-T2):(TM-82N/84N
only)
This function
provides
display
Tl minus T2 temperature
value.
,<.4
User
pressEPkey
to display T1 mrnus T2 temperature
value.
/fiF\
plsss\:9key
again to disable this function.
The
primary
display showed T1-T2 temperature.
The
secondary display showed current channel reading of
real temperature.
lf secondary display want to show another channel
reading of real
temperature.
Please
press
and
,ri];-\
holda:?key
to swap T1 with T2.
(TM-82N/84N)
.
T1 with T2 Display Location Swap :
(TM-82N/84N
only)
User can swap display location of T1 with T2.
/€,>'
Press and holdql9key
to swap
display location.
.
Auto Power Off Function :
The
device
will
auto
power
off
if
there
is no
action
for 15
minutes.
lf
want to disable or enable the auto
power
off
function,
Please
press
"nO
no,OQlouto-off) key.
.
Power
On/Off
:
tr"".@k"y
to turn on or turn off the
power.
.ln
the SETUP mode, can't turn
off
the
power,
Please
leave the SETUP mode.
*lf
can't turn
on the
power,
please
check battery connect
normal
and
power
enough.
.
Changing the Offset
:
User
can adjust
the offset to compensate for the
error of specific
thermocouple.
1. Press
und
,Io,O@IOFFSET) key to setting offset.
ffi .=,
2. Presslf
and
L9-'key
to increase or decrease
offset
value.
The allowable adjustment
range is
ls'C,
tsK, and
+9'F.
once 0.1"CfFlK.
a. Rress@1SET)
key to save
and
leave setup
mode.
lf
want to adjust another channel the
offset,
please
/f-A'\
press
q5lt/
key to setting,
and repeat step 2,3.
(TM-B2N/B4N)
The device will auto save offset
value before
shutdown, being
as
default
for next
power
on.
.When
you
change the thermocouple
probe
or don't
need
offset compensate,
please
adjust value to be
0.0'c.
Page 7

.
Alarm
Function :(TM-83N/84N only)
User
can setting a Hi and
Lo limit, when
temperature
read over
limit range, the buzzer will be
sounded until
the reading come back
in the limit range or disable
this
function.
Press and
1o16t9
1R|-RRM)
key to
turn the alarm
enable
or disable.
.
Setting Limit Range
for Alarm:
(TM-83N/84N
only)
User can enter setup
mode to set
limit hi and lo for alarm
function.
1.
Press und no,O@lrimit)
key to set T1
Hi
rC) i=r
2. Press upYand down@)key
to
increase or
decrease
temperature.
Press
leftS{ano right}@tey
to select digit
and negative symbol.
s.
eress@1sET) Key to
save setting
value.
lnto set T1 Lo.
4.
Repeat step 2 to set T1 Lo temperature.
u. ,r"".@1rET)
Key to save setting
value and
leave setup mode.
(TM-82N/B4N
into the
set T2 Hi)
6.
Repeat step 2 to set
T2 Hi temperature.
, ,r".r@1rET) Key to
save setting
value
lnto set T2 Lo.
8.
Repeat
step
2 to set
T2 Lo temperature.
n. ,r"..@1aET)
Key to save setting value and
leave
setup
mode.
6 Specification
.
Display: dual
5 digit LCD
.
Temp Unit
'C,
"F.
K(TM-83N//84N)
. Resolution:0.1
.
Measurement
Range:
K-TYPE :-200'C- 1 370'C(-328'F
-2498'F)
J-TYPE
:-200'C- 1 050"C(-328'F
-
1
922"F)
(TM-83N/84N
only)
T-TYPE:-250'C-400'C(-4
1 8'F
-7
52"F)
E-TYPE:-2 1 0"C-
1
000'c(-346"F-1
832'F)
10
11
Page 8

.
Accuracy:
(at
2315'C Relative
humidity<80%RH)
t(0.05%
reading+0.7'C)
t(0.05%
reading+1.4'F)
0.01o/o of
reading
+
0.03'C
per
'C
(0.01%
of
reading+
0.06"F
per
'F)
outside the specified
+18'C
to+28"C(+64'F
to+82'
F)range
.
Overload
index:
"OL"
stands
for
positive
temperature
"-OL"
stands
for negative temperature
.
lnput
protection:
Maximum
24V DC or AC
.
Battery:
9v
(NEDA
1604.
IEC
6F22 fr,
JIS 006P)
.
Battery Life:
Approx. 200 hours"
.
Shutdown Rated Power:
9uW
.
Operate
Rated Power:
26mW
.
Operating
temperature & humidity:
S'Cto 40'C,below 80%
RH.
.
Storage temperature &
humidity:
-10"C
to 60'C, below
70ol0.
.
Weighl About 170g.
.
Dimensions:
130(L).56(W)-38(H)mm.
Accessories:
User's
manual, 9V battery, K Type
thermocouple.
7 Battery Replacement
.
Turn
off the
instrument.
.
Remove the battery cover
.
Replace the battery.
.
lnstall the battery
cover.
8
Safety
Precaution
.
For cleaning the instrument
use a soft dry cloth.
Never
use a wet cloth,
solvents or
water,
etc..
.
Operation Altitude: Up
to 2000M.
9 End of Life
Caution:
this symbol indicates
that
equipment and
its accessories shall be
subject
to a separate collection
and
correct
disposal
X
I
12
13
 Loading...