

Page 1
TM-93
Radiation/RF Strength Meter
User’s Manual
HB2TM930000
Page 2

Contents
1 Introduction ...................................................... 1
2 Accessories ..................................................... 1
3 Safety Precaution ............................................. 1
4 Instrument Description ..................................... 2
5 Operation ......................................................... 3
5.1 Menu setting: ............................................... 3
5.2 Bright: ................................ .......................... 3
5.3 Langrage Select: ....................................... 4
5.4 Unit Select: .................................................. 4
5.5 Alarm Setting: .............................................. 5
5.5.1 Dose Rate Alarm Setting: ...................... 6
5.5.2 RF Strength Alarm Setting: .................... 7
5.6 Calibration: ................................................... 8
5.7 Power off: ..................................................... 8
5.8 Sound: ......................................................... 9
5.9 Time Record Clear: ...................................... 9
5.10 Information: ................................................ 12
5.11 Reset to factory settings: ............................ 12
6 General Specifications ................................... 13
7 Electrical Specifications .................................. 15
7.1 Radiation Dose Rate and Dose .................. 15
7.2 RF Strength ................................................ 15
8 Maintenance or Repair ................................... 16
9 Battery Replacement ..................................... 17
10 Product Disposal ............................................ 17
Page 3

TM-93
Caution! Please refer to this manual.
Improper use may damage the meter and its
components.
If the case needs to be opened, please avoid
touching the board in order to prevent
accidently touching the DC500V high voltage.
Complies with European Directive.
1 Introduction
Radiation dose rate measurement.。
CPS/CPM : Geiger Counter count per second (CPS)
or count per minute(CPM).
RF strength measurement。
Languages : English; Traditional Chinese; Simplified
Chinese; Japanese; Español.
Radiation dose rate alarm setting。
RF strength warning range settings.
Radiation dose rate audible alert measurement。
Calibration factor。
2 Accessories
1 Meter
1 Manual
1 9V alkaline battery
1 Carrying case
3 Safety Precaution
Do not operate in environments with flammable gas or humid
environments.
Operating altitude: up to 2000M.
Operating environment: Indoor use; Pollution degree 2.
Clean with soft cloth when dirty, such as glasses cloth. Do not
clean with chemicals and other solvents.
EMC: EN61326-1:CISPR 11:Group 1, Class B
1
Page 4
TM-93
Class B – Equipment for use in all establishments other
Group 1 – RF energy generated is needed for internal
Group 1 –RF energy generated is needed for internal
than domestic.
functioning.
functioning.
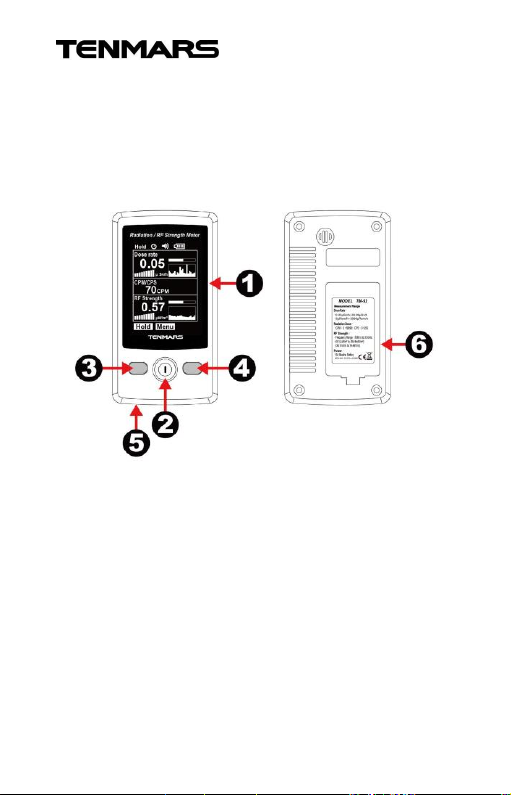
4 Instrument Description
Fig. 2.
1. Color TFT display
2. Power button/setting button
3. Setting button
4. Setting button
5. Mini USB power supply
6. Battery Cover
2
Page 5
TM-93
5 Operation
1. Press and hold the button for over 1 second to turn on
the power; the power on screen will be displayed.
2. The power on screen will be displayed for approximately 3
seconds, and then enter the measurement screen.
3. Press the “Hold” button to turn on or turn off the data hold
function. When “Hold” is displayed on the top-left of the
screen, the read value is locked.
4. Press and hold the button for over 3 seconds and the
screen will be highlighted and then it will power off.
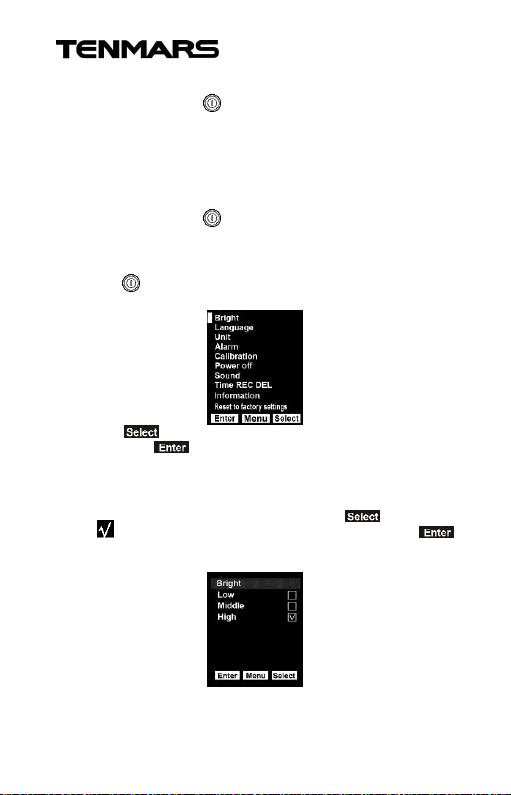
5.1 Menu setting:
Press the button to enter or exit menu setting.
10 options are displayed on the screen:
Press the button to move to the function to change and
then press the button to enter the next stratum settings;
please refer to 5.2 ~5.11.
5.2 Bright setup:
Continuing the operations from 5.1, press the button and
move to the function to change, and then press the
button to save the settings and return to the measurement
screen.
Default:”High”
3
Page 6

TM-93
5.3 Langrage Select:
Continuing the operations from 5.1, press the button and
move to the function to change, and then press the
button to save the settings and return to the measurement
screen.
Default: ”English”
5.4 Unit Select:
1. Continuing the operations from 5.1, press the
button and move to the function to change and enter
the next stratum settings.
2. Press the button and move to the function to
change, and then press the button to save the
settings and return to the measurement screen.
*When Radiation dose is selected, press the button into
3 radiation dose measurement screen.
4
Page 7

TM-93
Play
Stop
Default:
0.5μsv/h (start alarm)
0.3μsv/h (green area)
2.0 V/m (start alarm)
0.1 V/m (green area)
3. Start The Radiation dose:
Press the button to start the dose function; when
measurement is complete, press the button to stop
the dose.
***Execution of the record function requires the unit to be
turned on for an extended period of time, so the USB power
must be used to execute this function; this function will be
invalid of no external USB power function is connected!
5.5 Alarm setting:
Continuing the operations from 5.1, press the button and
move to the function to change; once selected, press the
button to enter the next stratum settings:
Select the radiation dose rate option; please prefer to 5.5.1
Select the RF strength option; please refer to 5.5.2
Radiation dose alarm adjustable range: 0.30 ~ 40.00μsv/h
RF strength adjustable range: 0.1 ~ 14.0 V/m。
5
Page 8

TM-93
5.5.1 Dose Rate Alarm Setting:
1. Continuing the operations from 5.5, press the
button to enter the next stratum enable alarm setting;
select the high value or low value and then press the
button to enter the next stratum setting.
2. Press the button: Number cursor will move towards
the right.
Press the button: Numbers 0~9; the number will
increase.
Press the “ ” button to save the settings and return to
the measurement screen.
3. Enable alarm setting (using high value); using the
measurement range as the datum, it will automatically
determine whether the yellow limit has been exceeded;
when the red area is reached, the alarm will go off!
If the low value set exceeded the high value, press the
button and the high and low values will
automatically be switched around and saved.
6
Page 9

TM-93
5.5.2 RF Strength Alarm Setting:
1. Continuing the operations from 5.5, press the
button to enter the next stratum enable alarm setting.
2. Press the “ ” button: Number cursor will move towards
the right.
Press the “ ” button: Numbers 0~9; the number will
increase.
Press the “ ” button to save the settings and return to
the measurement screen.
3. Enable alarm high limit setting; using the measurement
range as the data, it will automatically determine whether
the yellow limit has been exceeded and reached the red
area.
If the low value set exceeded the high value, press the
“ ” button and the high and low values will
automatically be switched around and saved.
7
Page 10

TM-93
5.6 Calibration:
Continuing the operations from 5.1, press the button and
move to the function to change, and then press the
button to enter the next stratum settings.
Calibration factor adjustable range: 0.01~5.00.
Press the “ ” button:Cursor below the number will move
towards the right.
Press the “ ” button: Numbers 0~9; the number will
increase.
Press the “ ” button to save the settings and return to the
measurement screen.
Default:1.00
5.7 Power off:
Continuing the operations from 5.1, press the button and
move to the function to change, and then press the
button to save the settings and return to the measurement
screen. Uses minutes as the unit.
Default:15 minute
8
Page 11

TM-93
5.8 Sound:
Continuing the operations from 5.1, press the button and
move to the function to change, and then press the
button to save the settings and return to the measurement
screen. When is displayed on the measurement screen it
means that sound is enabled, means disabled.
Default:High
5.9 Time Record Clear:
Continuing the operations from 5.1, press the button and
move button to move to A or B or C or D, and then press the
button to enter settings.
9
Page 12

TM-93
A.Time Settings
Press the button and when moves to the time format
to set, press the button to enter time settings.
Press the button; every time it is pressed, the ▃ cursor
will move from left to right. When it reaches the position to set,
press the button to increase the number until it reaches
the number you need. (Holding will allow the number to
automatically increase and cycle).
Press the button to save the settings and return to the
measurement screen.
B.REC Interval Time
Press the button; every time it is pressed, the ▃ cursor
will move from left to right. When it reaches the position to set,
press the button to increase the number until it reaches
the number you need. (Holding will allow the number to
automatically increase and cycle).
Press the button to save the settings and return to the
measurement screen.
10
Page 13

TM-93
C. Read Accumulated Record Data
Read recorded data 1~8; press the button to return to
measurement mode.
D.Memory Clear
Press and then press
Press the button to clear the records and return to
measurement mode.
Note!! Cleared records cannot be restored!!
11
Page 14

TM-93
5.10 Information:
Continuing the operations from 5.1, item nine of the menu is
software version: 1.2.3
Press and the button at the middle to return to
the measurement screen.
Note!! Cleared records cannot be restored!!
5.11 Reset to factory settings:
Continuing the operations from 5.1, press the button and
move to the function to change and then press the
button to save the settings and return to the measurement
screen.
Note!! Cleared records cannot be restored!!
12
Page 15

TM-93
6 General Specifications
2.4” 240*320 resolution color TFT,4 digital maximum display
3999.
Data hold function。
Low battery indication:full empty 。
Over load indication :OL。
USB external power supply indicator: ; automatic shutdown
is cancelled and the symbol disappears when external
power is inserted.
Radiation dose rate unit: µSv/h or µRem/h。
Radiation dose unit:µsv or µRem。
RF Strength unit: Wave power density (uW/m² / mW/m²),
wave power density (μW/cm²), electric field strength (mV/m
/ V/m), magnetic field strength (mA/m),power strength (dBm)
five options.
5 language selections: English /Traditional Chinese
/Simplified Chinese /Japanese/ Español five options.
Automatic shutdown time setting: Factory default is set to 15
minutes; users can adjust it manually to NO/1/3/5/10/15/3
minutes; NO means to cancel automatic shutdown and
when “ ” is displayed it means that automatic shutdown
has been set.
Sound volume and mute options.
Alarm value setting.
Radiation dose and RF strength bar graph display.
Radiation dose and RF strength historical figure display:
20-set display
13
Page 16

TM-93
Dose rate Rang e RF strength
The Green zone
≦0. 19μ sv/ h 0~0 .03 mW/m ²; 0~0. 1V/m
The Yellow zone
0. 2~0. 5μ sv /h 0. 1~2. 0 V/ m
The Red zone
>0. 51μs v/h ≧2. 1V/ m
DC4.8~5.2V current≧500mA.
will be displayed on the screen when external
USB power is supplied.
The inserted USB cable is also viewed as an
antenna; do not let the USB cable exceed the top of
the button when performing tests. If RF strength
test is performed when it exceeds the top of the
button, the value read is invalid.
Environmental status display:
Safe zone green average zone yellow danger zone red
The preset color zones are for reference only: Users can adjust
the yellow high and low zones.
Battery Life : Approximately 10 hours.
Power : 9V Alkaline battery ( NEDA 1604、IEC 6F22 or JIS
006P).。
Operation temperature and humidity: 5 to 40
under 80%RH.
Storage temperature and humidity: -10 to 60
under 70% RH.
Dimensions:115x60x31mm(length x width x height).
Weight: Approximately 170 grams.
External power supply:
14
o
C(41 to 104oF);
o
C (14 to 140oF);
Page 17

TM-93
Sample rate
1 time/10 seconds or 1
time/40 seconds
Radiation sensor
geiger-mueller tube
Measurement Range
0.05µSv/h~39.99µSv/h
5.00µRem/h~3999µRem
Resolution
0.01µSv/h
0.01µRem/h
Accuracy
±15% Cesium-137
Gamma energy range
10KeV to 1.25 MeV
X-rays energy range
3KeV to 3.0 MeV
β-beta energy range
25KeV to 3.5 MeV
CPM
0~1999
CPS
0~212
Dose logger interval
1 to 999 days
Sample rate
1 times/10 seconds
RF sensor
Single axis sensor
Measurement Range
0.1 ~ 14.0 V/m
Accuracy
±2dB at 2.45GHz
Frequency Range
50MHz to 3.5GHz
Range
(0.02uW/m² to 484.6uW/m²)
(0.01uW/cm² to 45.3uW/cm²)
(36.1mV/m to13.90V/m)
(0.01mA/m to 30.01mA/m)
(-46dBm to 16dBm)
Resolution
0.01µW/m²,0.01µW/cm²,0.2mV/
m,0.02mA/m, 2dB
7 Electrical Specifications
Accuracy is indicated at 23°C ± 5°C with RH < 80%.
7.1 Radiation Dose Rate and Dose
7.2 RF Strength
15
Page 18

TM-93
8 Maintenance or Repair
1. When the When symbol is displayed on the LCD, it
means that there is insufficient power; please change the
battery immediately in order to ensure its accuracy.
2. Do not place the meter in locations that have high
temperature, humidity or that are exposed to direct
sunlight.
3. Remember to turn off the power after usage; remove the
battery if not used for a long period of time in order to
prevent battery leakage and causing damages to internal
components.
When the instrument failure, only by the authorized service
provider or return the original repair.
16
Page 19

TM-93
Note: This symbol indicates that the
meter and its accessories must be
separated and processed properly.
9 Battery Replacement
1. Turn off the power.
2. Open the battery cover at the back of the meter, remove the
battery.
3. Please insert a new 9V battery according to the polarities.
4. Put the battery cover back in place.
10 Product Disposal
17
Page 20

TENMARS ELECTRONICS CO., LTD.
6F, NO.586 Ruiguang Rd, Neihu Dist.
Taipei City, Taiwan
E-mail: service@tenmars.com
http://www.tenmars.com
Professional Electrical and
Environment Test & Measurement
Instruments:
Battery Capacity ,Impedance Tester,
TACHO Meter ,LED light meter ,Temperature &
Humidity meter ,Infrared Thermometer ,Sound
level meter ,Light meter ,EMF meter ,UV Light
meter ,RF mete r ,Hot wire Anemometer ,CO
meter ,Anemometer ,Lan cable tester ,CO2
meter ,Solar power meter ,Radiation meter,
Clamp meter ,Multimeter ,Phase Rotation test,
Digital Insulation tester.
Our products of high quality are selling
well all over the world
 Loading...