

Page 1
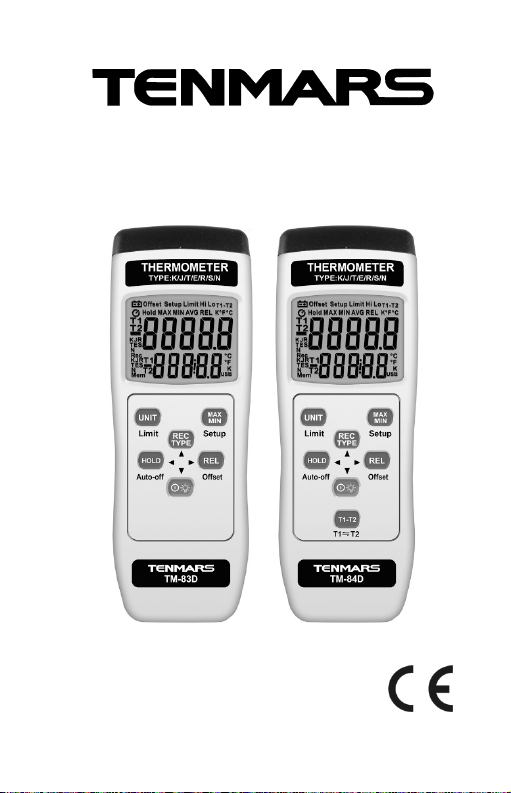
THERMOMETER
TM-83TM-84TM-83D
TM-84D
HB2TM830000
2
User’s Manual
Page 2

Page 3

Contents
1 Introduction..............................................................1
2 Accessories..............................................................1
3 Safety Precaution....................................................1
4 Meter Description....................................................2
5 Operation..................................................................3
5.1 Backlight...........................................................3
5.2 Alarm Function: ...............................................3
5.3 Thermocouple Type Selection (TYPE).........4
5.4 Manual Record (Rec) .....................................4
5.5 Data Hold .........................................................5
5.6 Auto Power Off ................................................5
5.7 Relative Value Measurement ........................6
5.8 Offset Setting (OFFSET):...............................7
5.9 T1-T2 Display: (TM-84/TM-84D)...................8
5.10 Maximum/Minimum/ Average Value:...........9
5.11 FunctionSettings:Step1~Step5....................10
6 Software Installation (TM-83D/84D) ...................14
7 General Specifications..........................................16
8 Electrical Specifications........................................17
9 Maintenance and Repair......................................18
10 Battery Replacement............................................18
11 Product disposal....................................................18
Page 4
TM-83/83D TM-84
/84D
1
19Valkaline battery
1
Carrying
case
19VAC
to DC
adaptor
(TM-83D/84D)
1
USB cable
(TM-83D/84D)
1
Installation
disk
(TM-83D/84D)
components.
1 Introduction
The TM-8X series thermometers are K /J/ T / E/ R /
S/ N type thermocouple thermometers.
2 Accessories
1 Meter
User manual
3 Safety Precaution
Do not operate in environments with flammable gas or
Operating altitude:up to 2000M.
Operating environment: Indoor use; Pollution degree 2.
Clean with soft cloth when dirty, such as glasses cloth. Do
EMC: EN61326-1:CISPR 11:Group 1, Class B
Class B – Equipment for use in all establishments other
Group 1 – RF energy generated is needed for internal
Note! Please refer to this manual.
Improper use may damage the meter and its
Complies with European Directive.
humid environments.
not clean with chemicals and other solvents.
than domestic.
functioning.
1
Page 5
TM-83/83D TM-84
/84D
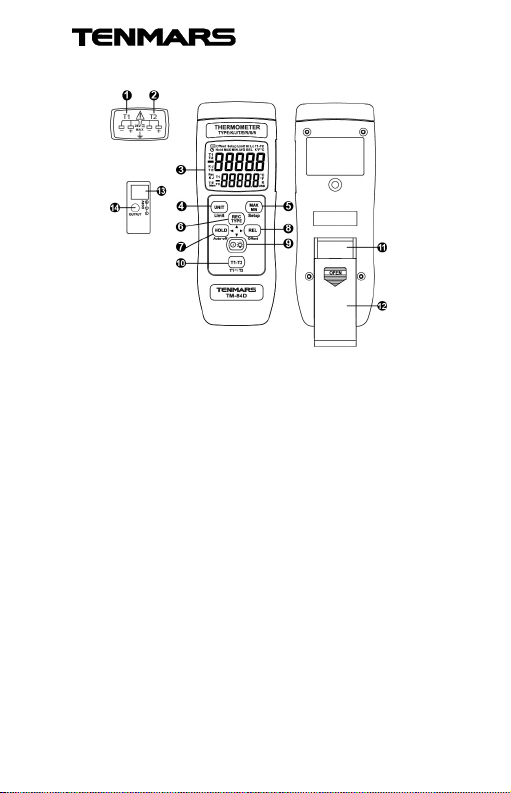
4 Meter Description
1.Thermocouple input terminal T1
2.Thermocouple input terminal T2 (TM-84/84D)
3.LCD display: The top row is the main display and
the bottom row is the secondary display
4.Unit °C/°F/ K alarm switch button
5.Maximum value, Minimum value, Average value,
elapsed time / Setup button
6.K /J/ T / E/ R / S/ N type switching/record single data
button
7.Hold/auto power off button
8.Relative value / offset value button
9.Power / backlight button
10. T1 - T2 / T1 and T2 top and bottom switch button
(TM-84/84D)
11. Battery installation
12. Battery cover
13. DC 9V input
14. Data output socket(TM-83D/84D)
2
Page 6

TM-83/83D TM-84
/84D
5 Operation
1.Quickly press the button for less than a
second and release to turn the thermometer
ON or OFF.
*The power cannot be turned off under SETUP
mode; please exit SETUP mode first.
2.Select Celsius °C, Fahrenheit °F or Kelvin °K; the
temperature unit will be switched once every
time the button is pressed.
3.Move the front of the thermocouple towards the
test subject to measure its temperature.
4.Read the measured value on the LCD.
5.1 Backlight
While under ON status:
Press and hold the button for over 2 seconds to
turn on the backlight; press and hold the button
for over 2 seconds again to turn off the backlight
function.
*The backlight will automatically turn off after being lit for
15 seconds.
5.2 Alarm Function:
Press and hold the button for 2 seconds and the
LCD will display whether the alarm function is ON or
OFF. A maximum and minimum value for the
temperature can be set manually; when the
temperature reading exceeds this range, the buzzer
will give an alarm until the temperature returns to
within the range or the alarm function is turned OFF.
3
Page 7
TM-83/83D TM-84
/84D
5.3 Thermocouple Type Selection (TYPE)
Every time the button is pressed for less than a
second, the termocouple type will switch in the
order of K/J/E/T/R/S/N.
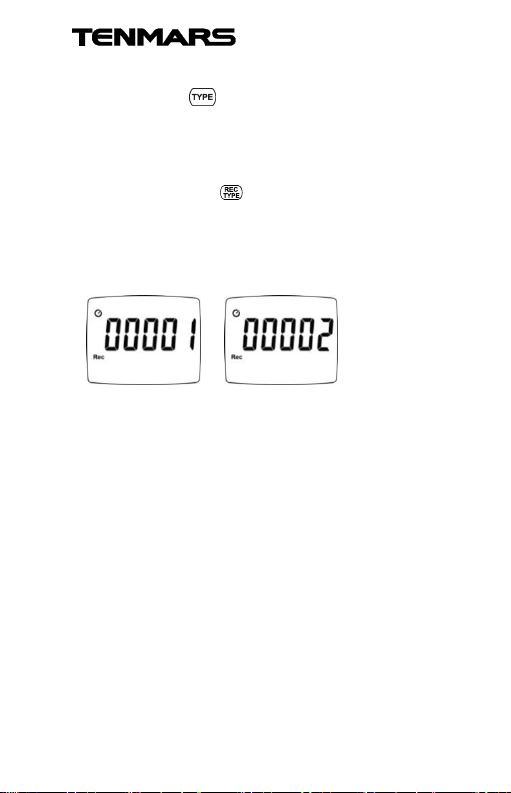
5.4 Manual Record (Rec) (TM-83D / TM-84D)
Press and hold the button for over 2 seconds to
save 1 temperature data; 00001 will be displayed on
the LCD and will increase by 1 every time it is
pressed.
Repeat this process, the manual record will
continue to add 1,0002 will be displayed.
4
Page 8
TM-83/83D TM-84
/84D
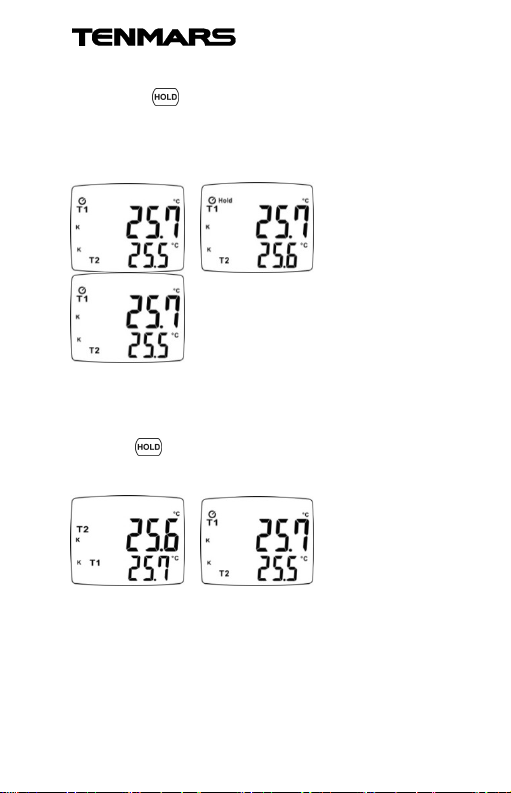
5.5 Data Hold
Press the button to turn on or turn off hold the
data and stop updating.
When HOLD is enabled, all buttons will stop working
except for the power button.
5.6 Auto Power Off
The device is preset to automatically shut down
after 15 minutes of inactivity.
Press button more than 1 second to turn on or
turn off auto power off.
5
Page 9
TM-83/83D TM-84
/84D
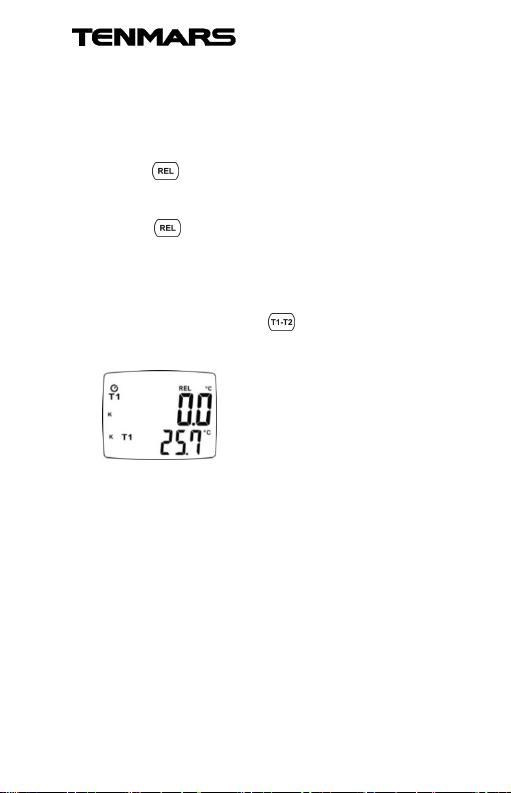
5.7 Relative Value Measurement
Function(REL):
Use only one thermocouple to compare the
difference between 2 temperatures. For example if
the first temperature was measured to be 25°C,
press the button now and the LCD will display
0°C; then a second temperature was measured to
be 30°C, and the LCD will display 5°C (30-25=5°C).
Press the button again to turn off this function.
The main display shows the REL value and the
secondary display shows the temperature value
currently being measured.
To display the relative value of another channel,
please press and hold the button to switch
between T1 and T2 displays. (TM-84/84D)
6
Page 10
TM-83/83D TM-84
/84D
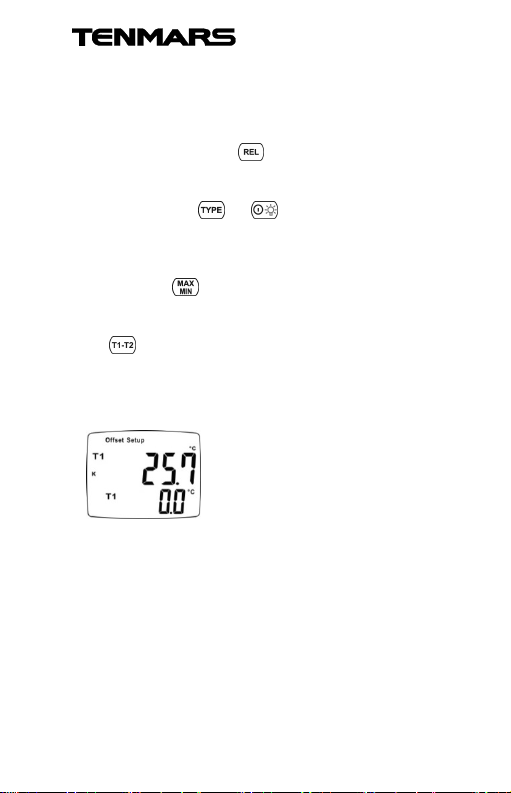
5.8 Offset Setting (OFFSET):
Users can manually set the offset value to use as
compensation for the error of the thermocouple
cable that you are currently using.
1. Press and hold the (OFFSET) button for 1
second to enter settings for the offset value.
2. Press the top and bottom buttons to
increase or decrease the offset value; the unit for
every time it is pressed is 0.1°C/°F/°K. The setting
range is between±5°C, ±5°K and ±9°F.
3. Press the (Setup) button to save the setting
and exit the setting mode.
To set the offset for another channel, please press
the button to switch. (TM-84/84D)
The device will automatically save the offset value
set as the default value for the next power ON.
7
Page 11
TM-83/83D TM-84
/84D
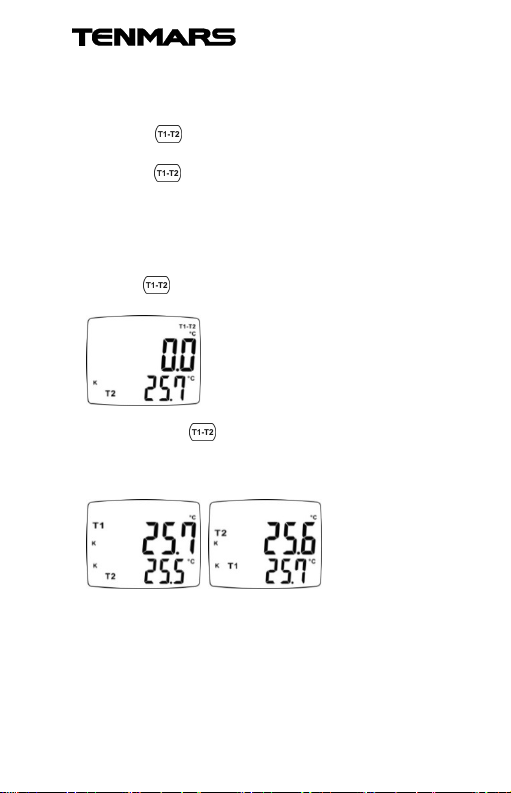
5.9 T1-T2 Display: (TM-84/TM-84D)
This meter provides the display for the difference
between the T1 temperature and T2 temperature.
When the button is pressed, it will display the
value of T2 subtracted from T1.
Press the button again to turn off this function.
The main display will display the T1-T2 value and
the secondary display will display the temperature
value currently measured.
To display the temperature measured on another
channel on the secondary display, please press and
hold the button to switch.
Every time the button is pressed and held, the
main/secondary display position of T1 and T2 will
be switched. (TM-84/84D)
8
Page 12
TM-83/83D TM-84
/84D
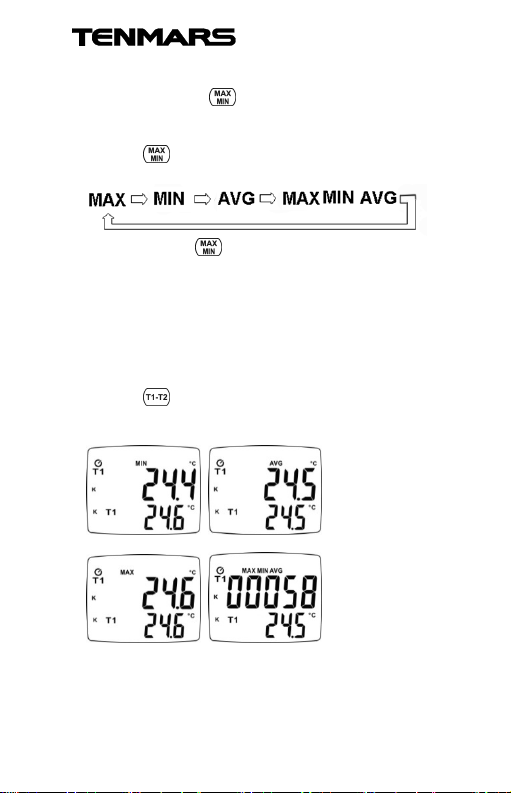
5.10 Maximum /Minimum/ Average Value:
Quickly press the button for less than one
second and then MAX/MIN/AVG and measurement
elapsed time will be activated simultaneously. Every
time the button is pressed, the display will cycle
as shown in the figure below.
ss and hold the button for over 1 second to turn
off this function.
The main display will display the MAX, MIN or AVG
value of the current channel and elapsed time for
the measurement; the secondary display will display
the current temperature value.
To display the maximum value, minimum value and
mean value of another channel, please press and
hold the button to switch displays between T1
and T2. (TM-84/84D)
Pre
9
Page 13
TM-83/83D TM-84
/84D
10
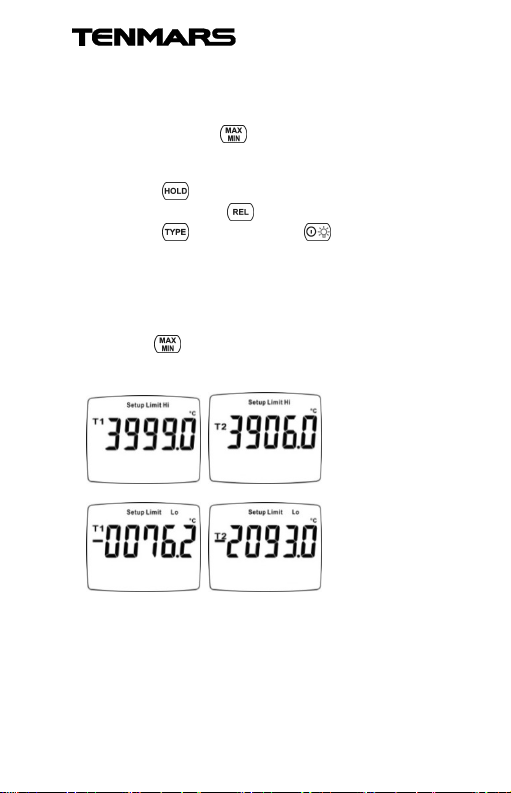
5.11 FunctionSettings:Step1~Step5High/L
ow limit Value setting for alarm function
(Limit):
1.Press and hold the Setup button for 1 second to
enter the High/Low limit value setting
for T1 and T2 (Setup Limit Hi, Lo).
2.Press the button to select T1 or T2 and Hi or Lo
symbol, and the button to select the digit.
3.Press the button or bottom button to set the
temperature and positive/negative symbol.
4.The setting of the High and Low bottom limit is
based on the measurement range, and it will
automatically determine whether the temperature
exceeded the limits.
5.Press the Setup button to save the settings and
go to Step 2.
Page 14
TM-83/83D TM-84
/84D
11
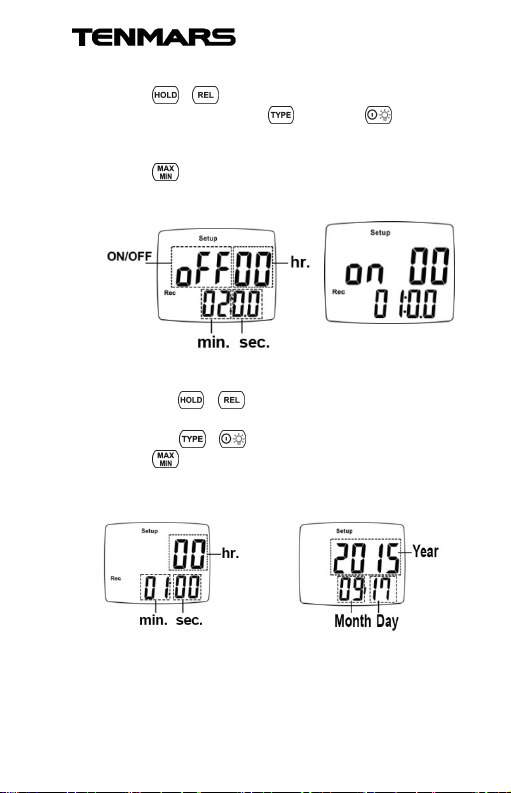
STEP 2. Set Record Intervals and ON/OFF:
1.Press the or buttons to select ON/OFF, hour,
minute, second; press the button or button to
select ON/OFF or adjust the hour, minute and
second.
2.Press the Setup button to save the settings and
go to Step 3.
STEP 3. Time Setting:
1.Press the left or buttons to select hour, minute,
second, year, month and day.
2.Press the top or button to adjust the time.
3.Press the Setup button to save the settings and
go to Step 4.
Page 15

TM-83/83D TM-84
/84D
12
STEP 4. USB ON/OFF Setting:
1.Press the or buttons to select USB
ON/OFF.
2.Press the (Setup) button to save the settings
and go to Step 5.
PS: Please turn off the USB when not in use in
order to save battery consumption.
Page 16
TM-83/83D TM-84
/84D
13
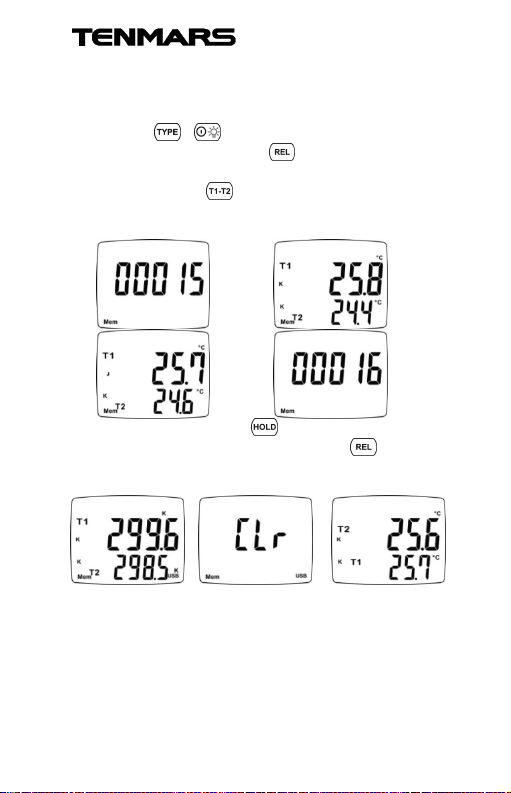
STEP 5. Read and Clear Records:
(This step will not appear if there are no records)
Press the or buttons to read the previous or
next record. Press the button to view the time
and temperature for this record .
Please press the button to switch the display of
T1 and T2 between the main and secondary
displays. (TM-84D)
Clear record: Press the button and CLR will start
flashing on the screen; press the button to
confirm clearing all records.
Page 17
TM-83/83D TM-84
/84D
14
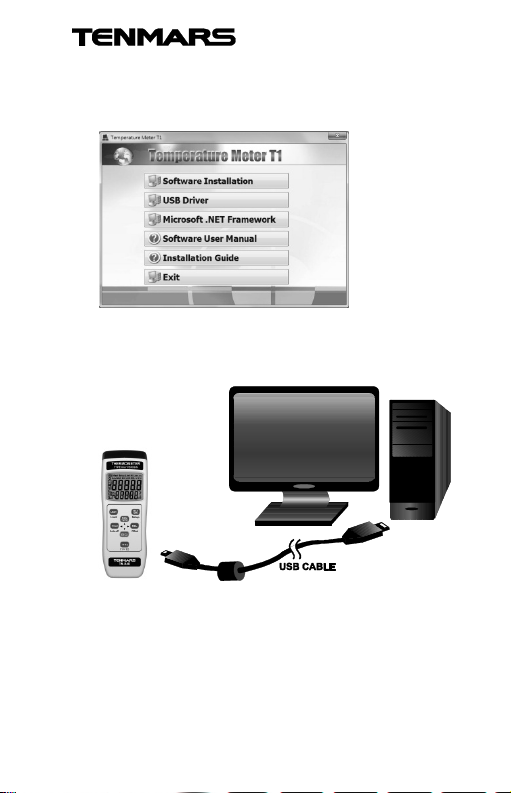
6 Software Installation (TM-83D/84D)
OS: Windows XP/ 7 / 8 / 10 operating systems
Install the CD into the PC to install the software first.
Connect the USB cable to connect the meter and the
computer according to the drawing.
Page 18
TM-83/83D TM-84
/84D
15
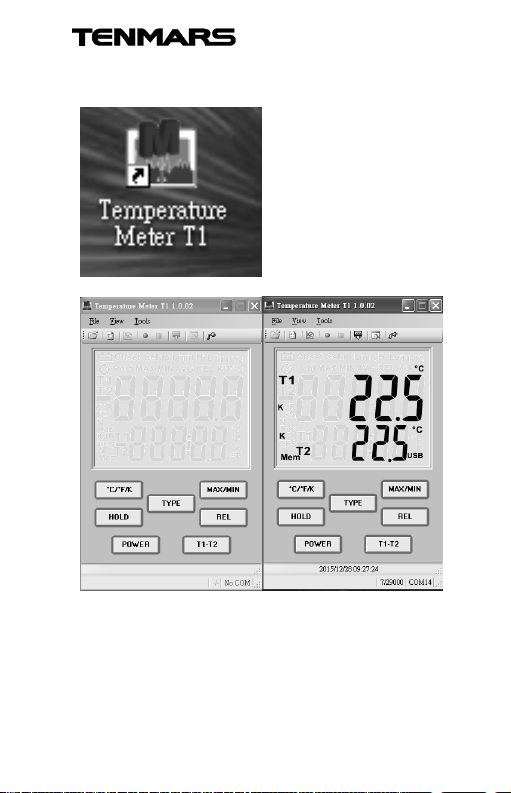
Select the desktop icon and click twice on left key of the
mouse to run the procedure.
Page 19
TM-83/83D TM-84
/84D
16
7 General Specifications
Display: Dual-display 5-digit LCD monitor with a
maximum display of 99999.
Unit: °C / °F / ° K
Data hold.
Auto ranging.
Back light.
Auto power (default 15 min)and disable auto power off.
Maximum/minimum/mean value/measurement elapsed
time.
Alarm function
Overload display: “OL” or “-OL”
Input limit: Maximum input 24V DC or AC.
Manual 300 records. (TM-83D/TM-84D)
Datalogging capacity 14,000 records. (TM-83D/84D)
Save interval: 1 second~24 hours.
Low battery display
Battery: 9V alkaline battery (NEDA 1604, IEC 6F22 or
JIS 006P)
AC to DC Adaptor
External AC 100~240V to DC 9V/0.5A power supply.
Plug: The pin in the center connects to the positive
electrode and the outer case is negative electrode.
Diameter: 5.5mm; internal diameter: 2.1mm.
Battery life: Approximately 100 hours.
Operation temperature and humidity: 0°C to 50°C (32°F
to 122°F), < 80%RH
Storage temperature and humidity: 0°C to 50°C (32°F to
122°F), < 80%RH
Weight: Approximately 170 grams
Dimensions: 155 x 56 x 38 mm (length x width x height)
Page 20
TM-83/83D TM-84
/84D
17
Temperature
,
scale
TM-83TM-
83DTM-84TM-84D
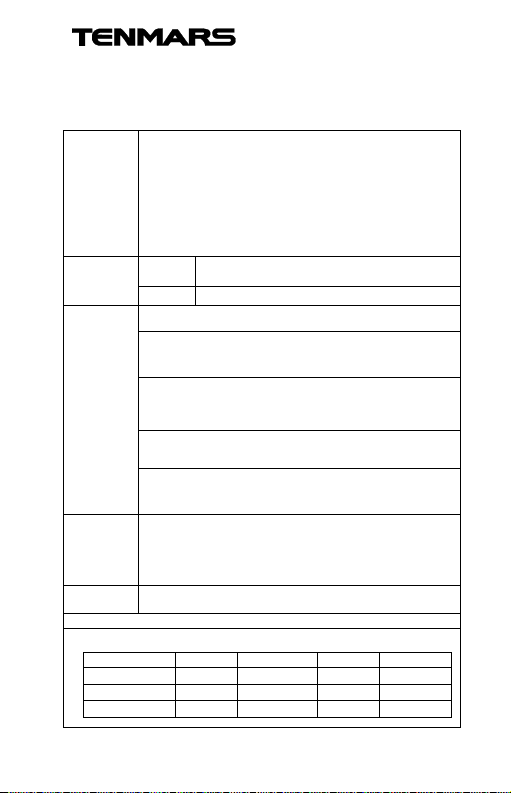
8 Electrical Specifications
Accuracy is specified for ambient temperatures between 18 to
28°C (64 to 82°F).
TYPE-K:-200°C to +1372°C (-328°F to +2501°F)
TYPE-J:-210°C to +1200°C (-346°F to +2192°F)
Range
TYPE-T:-250°C to +400°C (-418°F to +752°F)
TYPE-E:-210°C to +1000°C (-346°F to +1832°F)
TYPE-R / S:0°C to +1767°C (+32°F to +3212°F)
TYPE-N:-150°C to +1300°C (-238°F to +2372°F)
Resolution
Accuracy
coefficient
Temperature
The above specifications do not include error of thermocouple.
Functions:
Single input
Dual input
Data logger
0.1 K / J / T / E / N
1 R / S
K/J/E/T/N Type:
±(0.05% rdg + 0.7°C / 1.4°F)
-250°C to -100°C (-418°F to -148°F)
±(0.05% rdg + 0.7°C / 1°F)
-100 to +1372°C (-148 to 2501°F)
R/S Type:
±(0.05% rdg + 2°C / 4°F)
0°C to 1767°C (32°F to 3212°F)
0.01%+0.03°C of read value/ °C (0.06°F/ °F) outside
+18°C to 28°C (+64°F to +82°F) specified range
(Under -100°C (-148°F): 0.04% of read value added to K, J
T,E, and 0.08% read value added to N).
ITS-90
ˇ ˇ
ˇ ˇ
ˇ ˇ
Page 21
TM-83/83D TM-84
/84D
18
9 Maintenance and Repair
1.When the symbol is displayed on the LCD, it means
that there is insufficient power; please change the battery
immediately in order to ensure its accuracy.
2.Do not place the meter in locations that have high
temperature, humidity or that are exposed to direct
sunlight.
3.Remember to turn off the power after usage; remove the
battery if not used for a long period of time in order to
prevent battery leakage and causing damages to internal
components.
4.When the instrument failure, only by the authorized
service provider or return the original repair.
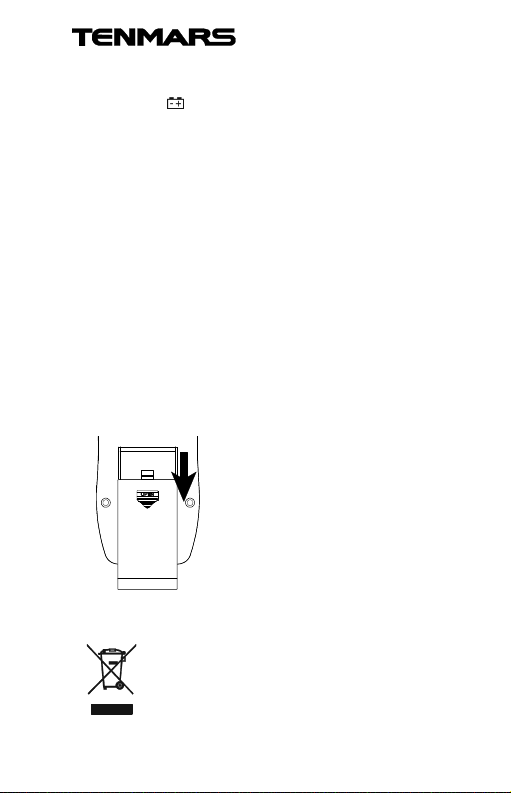
10 Battery Replacement
1.Turn off the power.
2. Open the battery cover at the back of the meter, remove
the battery.
3.Please insert a new 9V battery according to the
polarities.
4. Put the battery cover back in place.
11 Product disposal
Note: This symbol indicates that the meter and
its accessories must be separated and
processed properly.
Page 22

Page 23

Page 24

TENMARS ELECTRONICS CO., LTD.
6F, NO.586 Ruiguang Rd, Neihu Dist.
Taipei City, Taiwan
E-mail: [email protected]
http://www.tenmars.com
 Loading...