

Page 1
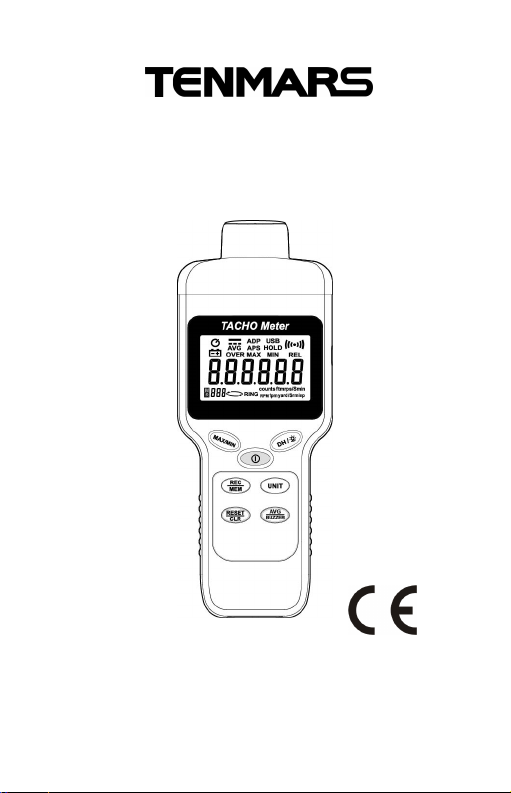
TACHO Meter
TM- 4100N/TM- 4100DN
User’s Manual
HB2TM4100N01
Page 2

1 Introduction ........................................................2
Contents
2 Accessories........................................................2
3 Safety.................................................................2
4 Instrument Description.......................................3
4.1 Meter Descriotion............................................3
4.2 LCD Decription................................................4
5 General Specifications.......................................5
6 Electrical Specification.......................................7
7 Operation ...........................................................8
7.1 Power on/off....................................................8
7.2 Auto power off.................................................8
7.3 Data Hold........................................................8
7.4 Backlight .........................................................8
7.5 Average (AVG)................................................8
7.6 Buzzer on/off...................................................9
7.7 Unit .................................................................9
7.8 MAX/MIN.........................................................9
7.9 Reset (RESET/CLR)......................................10
7.10 Save single record manually (REC key) ........10
7.11 Reading memory........................................... 11
7.12 Clear memory................................................ 11
7.13 Precautions on tachometer measurement .....11
8 Setup Mode.....................................................14
8.1 St1 (Auto Power On/Off)................................14
8.2 St2 (Auto Power Off Timer)............................14
8.3 St3 (Data Logger Interval) .............................15
8.4 St4 (Backlight Timer).....................................15
8.5 St5 (Units).....................................................16
9 Maintenance or Repair....................................16
10 Battery replacement
11 Software installation.........................................18
12 Product disposal..............................................18
.........................................17
Page 3
TM-4100N/TM4100DN
and its components.
1 Introduction
This is a handheld tachometer for both contact and
non-contact measurement.
It is ideal for measuring rotational speeds of machines,
motors and conveyor belts and for counting the moving
objects.
2 Accessories
1
Meter
1
Contact set (optional)
1
User’s Manual
1
9V alkaline Battery
1
Carrying case
1
USB cable (TM-4100DN)
2
Reflection tape
3 Safety
Caution! Please refer to this manual.
Improper use may damage the meter
Complies with European Directive.
Do not operate in environments with flammable gas
or humid environments.
Operating altitude: up to 2000M.
Operating environment: Indoor use,
Pollution degree 2.
Clean with soft cloth when dirty, such as glasses cloth.
Do not clean with chemicals and other solvents.
EMC: EN61326-1: CISPR 11: Group 1, Class B
Class B – Equipment for use in all establishments
other than domestic.
Group 1 – RF energy generated is needed for
internal functioning.
2
Page 4
TM-4100N/TM4100DN
4 Instrument Description
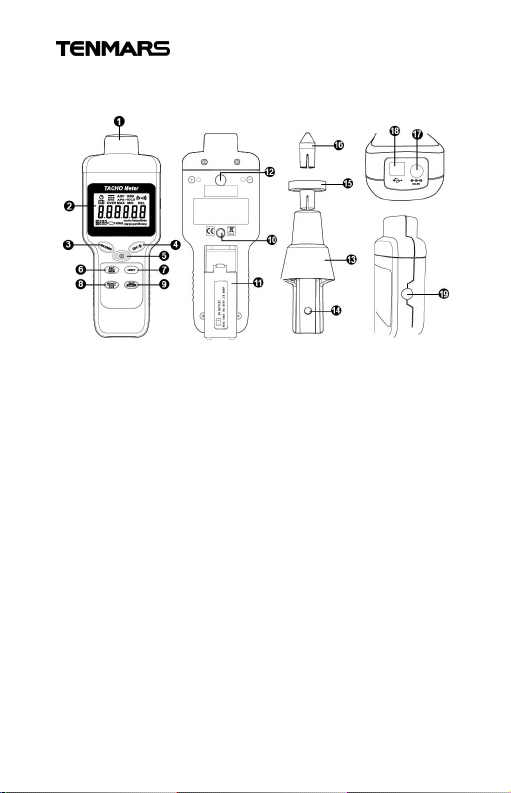
4.1 Meter Descriotion
1. Sensor
2. LCD
3. MAX/MIN
4. Data Hold/Backlight
5. Power
6. REC / MEM
7. UNIT
8. Clear readings
9. AVG / Buzzer
10. Tripod unt
11. Battery cover
12. Contact adaptor
mounting nut
13. Contact adaptor
14. Fixed screw
15. Circular X 0.1M
contact probe
16. Contact tip
17. Power port
(TM-4100DN)
18. USB port (TM-4100DN)
19. RS-232 port
(TM-4100DN)
3
Page 5
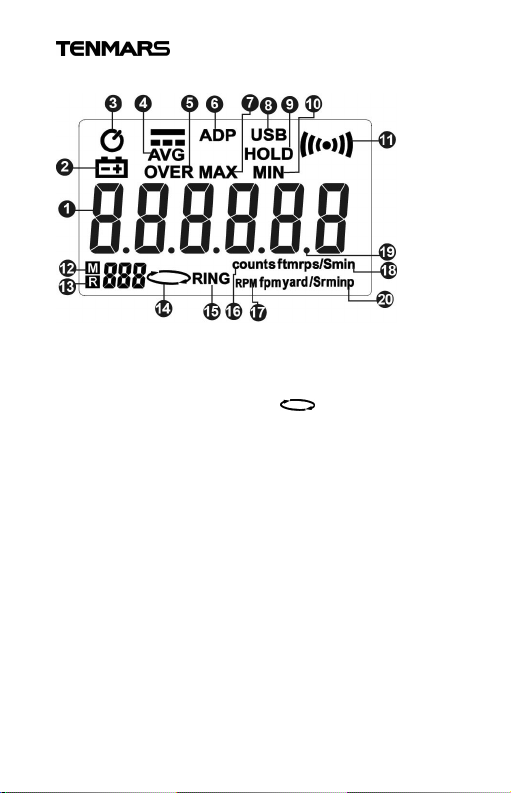
4.2 LCD Decription
TM-4100N/TM4100DN
1. Display
2. Low battery
3. Auto power off
4. AVG
5. OVER
6. AC power indicator
7. Maximum hold
8. USB indicator
9. Data Hold
10. Minimum hold
11.Buzzer symbol
12. M-Memory
13. R- Record
14. –Contact indication
15. RING Symbol
16. Unit of counts
17. RPM (r/min)
18. r/s; r/min; ms; m/s;
m/min; ft/min
19. Point
20. yard/min
4
Page 6
TM-4100N/TM4100DN
5 General Specifications
Display:6 digits LCD display with maximum 999999.
Noncontact IR and contact measurements.
Range of noncontact measurement: 50~500mm.
Sampling rate
>60 rpm 12 ~ 60 rpm Average
0.5 sec. >1 sec. >2 sec.
Functions: maximum/minimum values, data hold,
average value, auto power off, buzzer,backlight
Manual recording: 200 data (TM-4100N)
Auto recording: 200 data (TM-4100N)
Battery life: about 20 hours
(with continuous measurement and buzzer off)
Power: 9V (NEDA 1604 IEC 6F22 JIS 006P) x 1
External power supply(TM-4100DN)
1.Support USB power input
2.Optional adaptor:
Adaptor: AC 100~240V to
DC 9V/0.5A
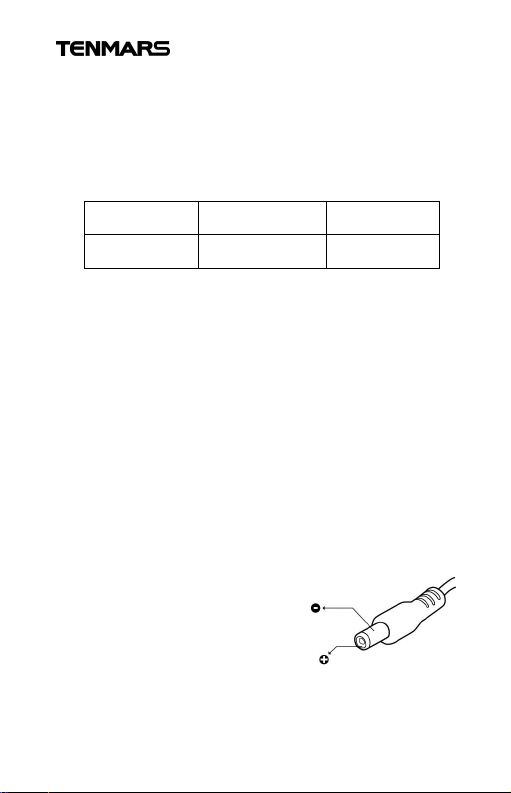
Plug: The center pin: +
O.D.: 5.5mm; I.D.: 2.1mm
20,000 data (TM-4100DN)
20,000 data (TM-4100DN)
The shell:
5
Page 7
TM-4100N/TM4100DN
Low battery voltage measurement
The “ADP” appears on the LCD and auto power off
function is disabled when the meter is connected with
power adaptor.
The “USB” appears on the LCD and the auto power
off function is disabled when the meter is connected
to pc with a USB cable.
The “ ” appears on the LCD when the contact
connector is mounted on the meter.
The “RING” appears on the LCD when the reflected
IR light is received.
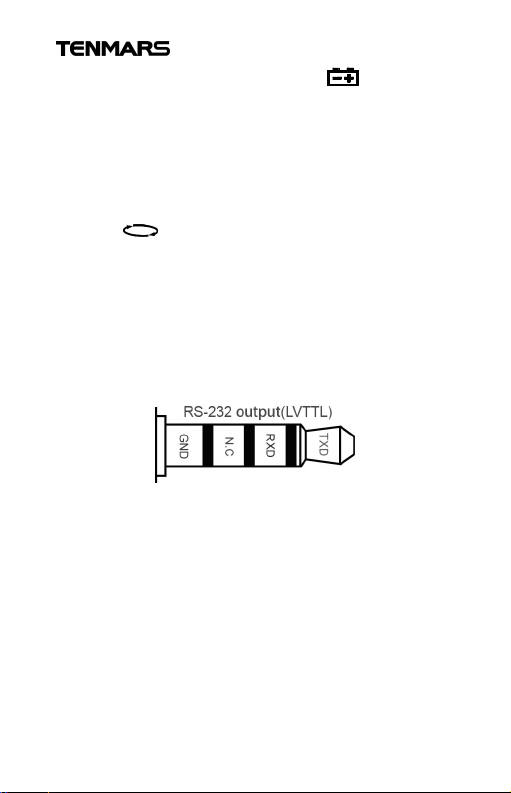
RS-232 port instruction (TM-4100DN):
Output:Earphone port (Diameter 3.5mm/4 plug
head).
Output voltage:3.3V (LVTTL). See below.
Dimensions: 186x70 x36 mm (L x W x H).
Weight: Approx 230g (battery included)
Operating temperature and humidity range:
0°C ~ +50°C,<80%RH.
Storage temperatures and humidity range:
0°C ~ +60°C,<70%RH.
6
Page 8
TM-4100N/TM4100DN
measurement
r/min
r/s
0.01/0.1
ms
0.01/1C
ounts0~999999
1
±1dgt ~±2
0dgt
.
measurement
r/min
r/s
0.01/0.1
ft/min
3.937
~6555
yard/min
1.
312~218
5
m/min
1.200~199
8.0
0.001/0.01/0.1
0.01
1Counts0 ~ 999999
1
±1dgt~±20dg
t
.
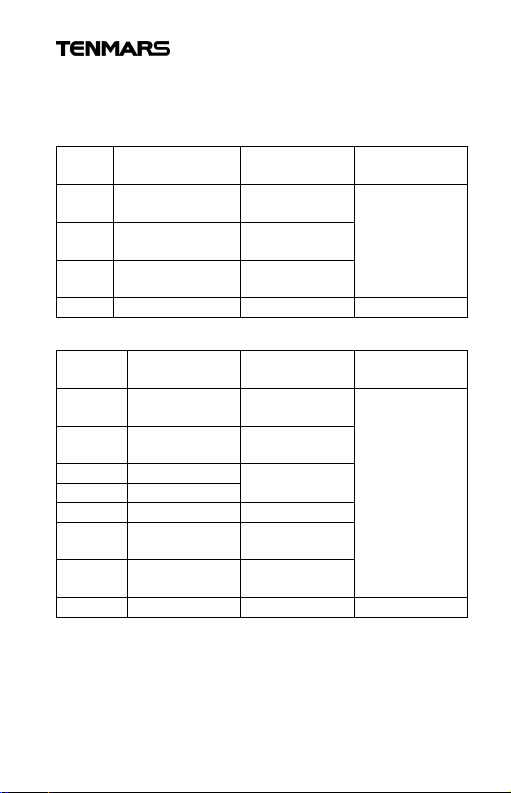
6 Electrical Specification
Accuracy is indicated as [% rdg + dgt]
ambient temperature range: 18°C (64°F) ~ 28°C (82°F)
Noncontact
Unit
RPM
RPM
Cycle
RPM/count
12.00 ~ 99960 0.01/0.1/1
0.2000 ~ 1666.0
0.6000 ~ 5000
Resolution Accuracy
0.0001/0.001/
0.0001/0.001/
±0.04%±2dgt.
Contact
Unit
RPM
RPM
m/s 0.0200 ~ 33.30
Cycle 3.000 ~ 5000
1 foot / minute = 0.00508 m / s = 0.3048 m / min
1 yard / minute =0.01524 m / s = 0.9144 m / min
RPM/count
12.00 ~ 19980 0.01/0.1/1
0.2000 ~ 333.0
Resolution Accuracy
0.0001/0.001/
0.001/0.01/0.1/
0.0001/0.001/
0.001/0.01/0.1/
7
1
±0.04%±2dgt.
Page 9
TM-4100N/TM4100DN
7 Operation
7.1 Power on/off
Press “ “ to turn the power on or off.
7.2 Auto power off
Turn on the meter, press and hold “ ” for more
than 2 seconds to enable/disable the auto power off
function When the auto power off is enabled, “ ”
appears on the LCD.
7.3 Data Hold
Press “ “ to hold readings on the LCD and
“ ” is displayed, press “ ” again to
disable data hold.
7.4 Backlight
Press and hold “ ” for more than 2 seconds to
turn the backlight on or off.
The backlight will automatically turn off after being lit for
30 seconds.
7.5 Average (AVG)
Press “ ” to enable / disable the average function;
use this function is for getting a more stable regadings
for unstable measurement values.
8
Page 10
TM-4100N/TM4100DN
7.6 Buzzer on/off
Press and hold “ ” for more than 2 seconds to
turn on or off the buzzer (the “ ” appears on the
LCD when buzzer is on). It sounds once for each
object counted (noncontact measuremnts) and
twice for each lap counted (contact
measurements).
7.7 Unit
Press “ ” repeatedly to change the units.
Noncontact measurement:
RPM r/min r/s ms counts
Contact measurement: “ ” appears on the LCD
Metric:RPM r/min r/s ms counts m/s m/min
Imperial:r/min r/s ms counts ft/min yard/min
7.8 MAX/MIN
Press “ ”repeatedly to select the displayed
reading of MIN and MAX, press and hold the “ ”
for more than 2 seconds to exit this function.
Note: This function can hold and update the maximum
and minimum values out of measurement history and is
unavailable in counter mode.
9
Page 11
TM-4100N/TM4100DN
7.9 Reset (RESET/CLR)
Press “ ” to clear the measurement values in
“MAX/MIN” and “counts” mode.
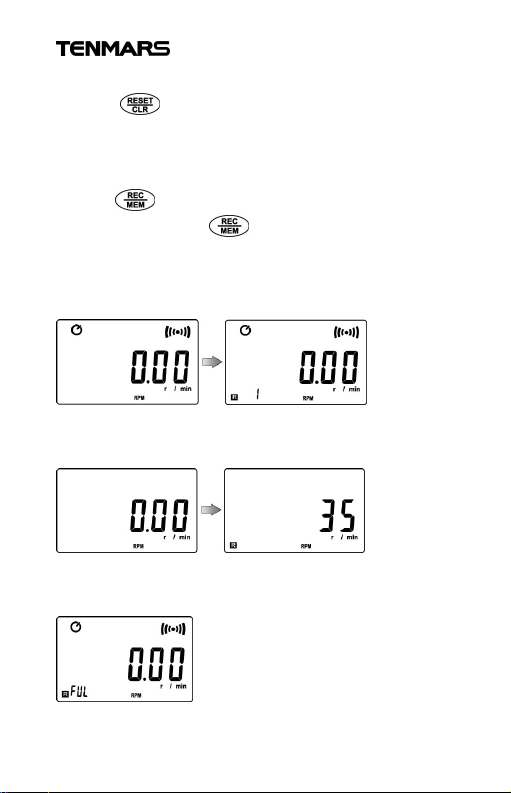
7.10 Save single record manually (REC key)
Press “ ”, “R” and the record number appears on
the LCD. Press the “ ” again to record a new
data .
TM-4100N: The record number is shown in the lower left
corner of LCD with small font.
TM-4100DN: The record number is shown in the right
side on LCD with large font.
When memory space is full, “FUL” will be displayed in
the lower right corner.
10
Page 12

TM-4100N/TM4100DN
7.11 Reading memory
Press and hold “ ” more than 2 seconds to enter
the reading memory mode, press “ ” or “ ”
to read the data, press and hold “ ” for more than
2 seconds exit the mode.
Note: When reading memory from TM4100DN, the
number of data shown first, then shown the data of
memory.
7.12 Clear memory
In the reading memory mode, press and hold “ ”
for more than 2 seconds until “ ” flashes, press
“ ” to clear the memory.
7.13 Precautions on tachometer measurement
This is a handheld tachometer that emits and
receives reflected LED light for the measurement
of both contact and non-contact mode. It
measures rotational speeds and counts the
moving objects with data hold, maximum,
minimum and average functions.
11
Page 13
TM-4100N/TM4100DN
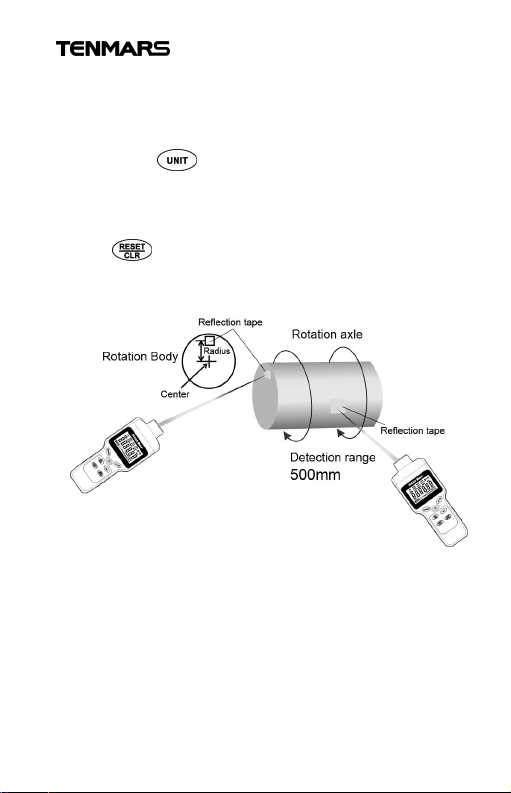
7.13.1 Noncontact speed measurement mode
Take a tape (10mmx10mm in dimension), stick the
tape on outeredge of measurement object, then
press “ ” to selet units. Point the LED light
to the tape until value displayed.
It may count moving objects as well. Press the
“ ” to clear counter values and reset the
counter.
12
Page 14
TM-4100N/TM4100DN
60rpm.
19,999
rpm. Stop operating the
meter
immediately.
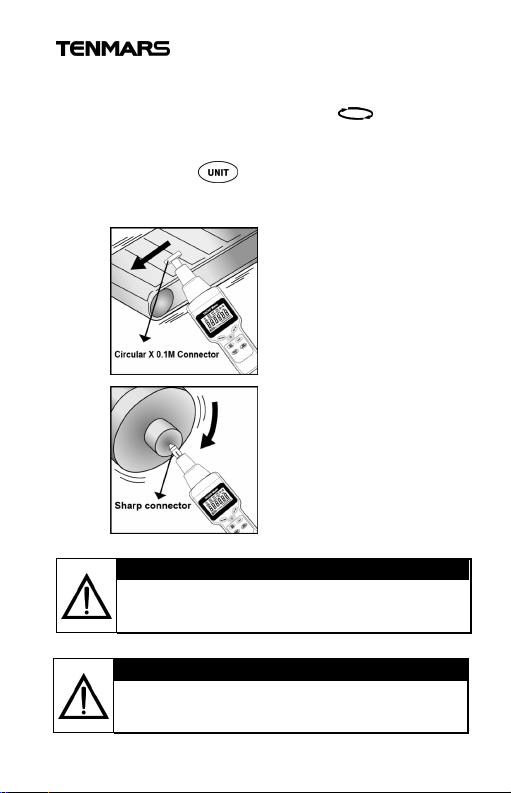
7.13.2 Contact tachometer (optional)
Insert the contact connector and screw it on the
meter’s sensor port. The icon “ ” appears
on the LCD. DO NOT press the connector hard
for safety concern
Press the “ ” to select the proper unit for
the following measurement.
Insert x0.1M probe
surface speed
measurement
(m/s, m/min, ft/min,
yard/min)
Insert sharp connector
for motor speed
measurement
(r/min, r/s, ms, counts)
It takes more time to display rpm values at lower
speeds, e.g. 5 seconds for 12rpm and 1 second for
The “OVER” indicator displays when speed is
measured by a contact connector at over
Note:
Warning!
13
Page 15
TM-4100N/TM4100DN
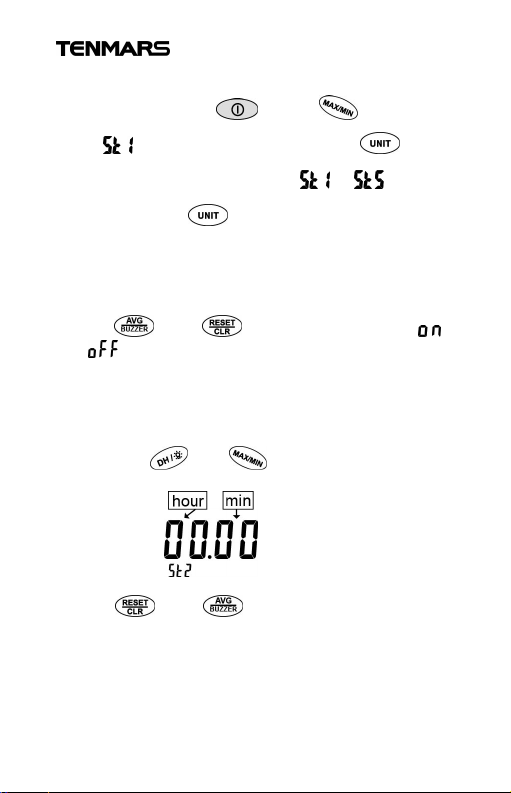
8 Setup Mode
Press and hold both “ ” and “ “ together
until “ ” appears on the LCD, press “ ”
repeatedly to select the functions ( ~ ) in
sequerce; press ” “ again to exit the setup mode.
See 8.1~8.5 to set up.
8.1 St1 (Auto Power On/Off)
Press “ ” or “ ” to select auto power ” ”
or ” ”.
Note: This function does not work when the meter is
connected to a power adaptor or USB cable.
8.2 St2 (Auto Power Off Timer)
Press the “ ” or “ ”to select the hour or
minutes.
Press “ ” or “ ” to increase or decrease the
numbers. Default time is 5 minutes and the range is
from 5 minutes to 99 hours and 59 minutes.
14
Page 16
TM-4100N/TM4100DN
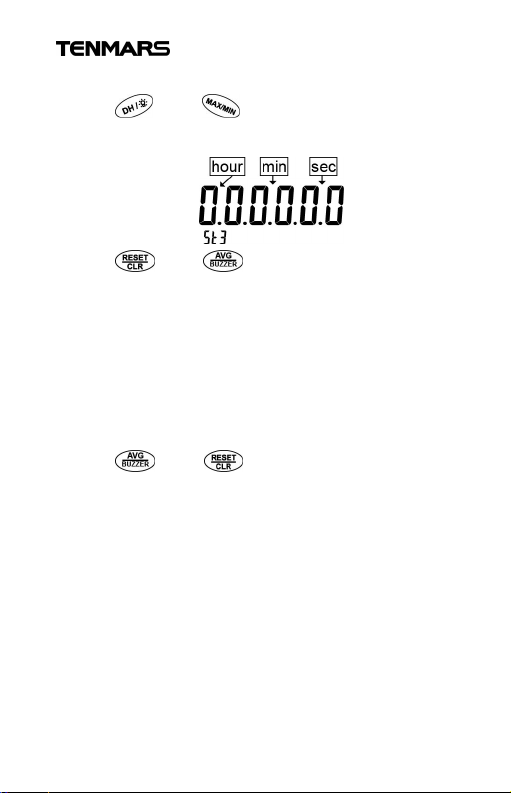
8.3 St3 (Data Logger Interval)
Press “ ” or “ ” to select hour,minute, and
second.
Press “ ” or “ ” to increase or decrease the
numbers. Default time is 0 (no auto recording), and the
range of interval time is from 10 seconds to 23 hours, 59
minutes, and 59 seconds.
(The interval time reset to 0 when you restart the meter).
8.4 St4 (Backlight Timer)
Press “ ” or “ ” to increase or decrease by
30 seconds each time and select the following timers in
squences:
00.30>>01.00>>01.30>>02.00>>02.30>>03.00>>03.30
>>04.00>>04.30>>05.00.
Default time is 30 seconds and the rang is from 30
seconds to 5 minutes.
15
Page 17
TM-4100N/TM4100DN
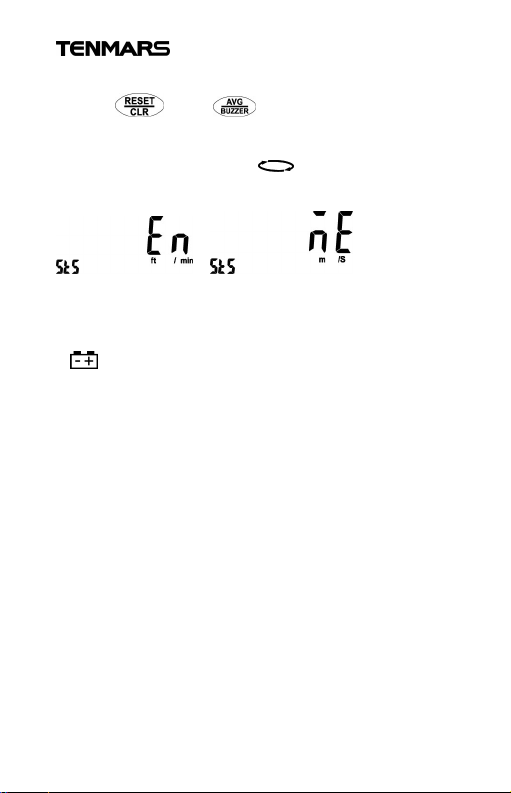
8.5 St5 (Units)
Press “ ” or “ ” to select imperial or
metric unit.
Imperial and metric units are validated when contact
connector is mounted and “ ” appears on the
LCD.
(Imperial) (Metric)
9 Maintenance or Repair
1.Replace battery immediately when the LCD displays
.
2.If dirty, plcase wipe it with a soft cloth, such as glass
cleaning cloth, and not use a solvent such as
chemical.
3.Remove the battery out of the meter when it will not be
used for longer than one month. In order to prevent
battery leakage and causing damages to internal
componment.
4.In fault on the meter, it can only be sent to the
authorized service suppliers or sent back to the
original factory for maintenance.
16
Page 18
TM-4100N/TM4100DN
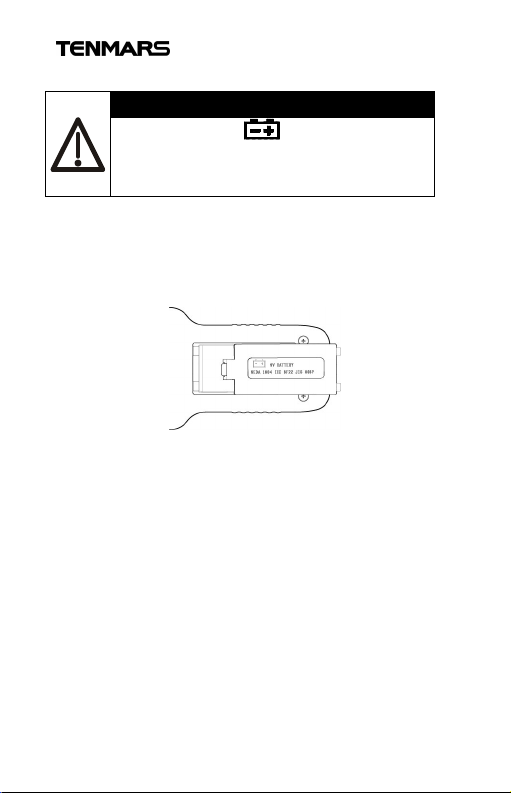
warning
10 Battery replacement
If the symbol “ ” appears on the
LCD, please replace the battery
immediately
Turn off the power.
Open the battery cover at the back of the meter,
remove the battery.
Please insert a new 9V battery according to the
polarities.
Put the battery cover back in place.
17
Page 19
TM-4100N/TM4100DN
11 Software installation
1. Link website https://www.tenmars.com/
or scan below QR code:
2. Search TM-4100DN.
3. Click on the TM-4100DN photo.
4. Click File Download, then select Software
Download.
5. Download and unzip the software.
6. For the latest software information and installation
procedures, please refer to the software
installation guide.
12 Product disposal
Note: This symbol indicates that the
meter and its accessories must be
separated and processed properly.
18
Page 20

 Loading...