

Page 1
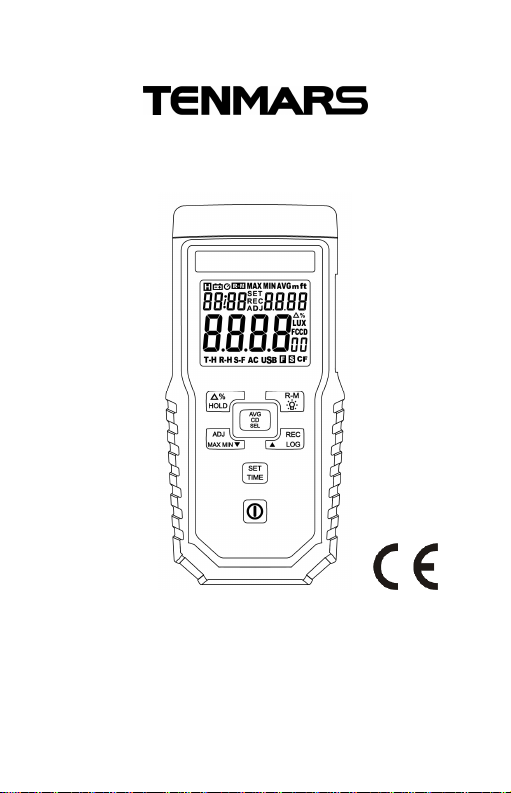
Lux Light Meter
TM-215
User’s Manual
HB2TM2150001
Page 2

Page 3

CONTENTS
1 Introduction.......................................................1
2 Accessories.......................................................1
3 Safety Precaution..............................................1
4 Meter Description..............................................2
5 Operation..........................................................3
5.1 Power Button..............................................3
5.2 Turn on backlight (Backlight)......................3
5.3 Data hold (HOLD) ......................................3
5.4 Time display (Time)....................................3
5.5 Luminous intensity display (CD) .................4
5.6 Auto zero (ADJ 0).......................................4
5.7 Manual Record...........................................5
5.8 Manual Record Reading.............................5
5.9 Auto-recording (Data Logger).....................6
5.10 Disable Auto Power Off..............................7
5.11 Transmittance Δ% ...................................... 7
5.12 Averaging 4 or 5 points ..............................8
5.13 Maximum and Minimum Hold ...................11
5.14 Function Settings (Setup).........................11
6 Software Installation........................................18
7 General Specifications ....................................19
8 Electrical Specifications:..................................20
8.1 Quality Indices..........................................20
8.2 Relative Visible Spectrum Response........21
9 Maintenance or Repair....................................22
10 PRECAUTIONS..............................................22
11 AC to DC Adaptor ...........................................23
12 Replace the battery.........................................23
13 End of Life Disposal ........................................24
Page 4
TM-215
1 Introduction
Lux Light Meter is designed for measuring
Luminance (unit: Lux/FC) and Luminous intensity
(unit: candela or CD), while complying with the
specifications: DIN5032-7-2017 Class C, JJG
245-2005 Class B, JIS C 1609-1: 2006 Class
A,CNS5119.
2 Accessories
1 Meter
1 User manual
1 USB cable
1 9V battery
1 Carrying case
1 AC 100~240V to DC 9V/0.5A(9mm) adaptor
3 Safety Precaution
Note! Please refer to this manual.
Improper use may damage the meter and its
components.
Complies with European Directive.
Do not operate in environments with flammable gas or
humid environments.
Operating altitude: up to 2000M.
Operating environment: Indoor use; Pollution degree 2.
Clean with soft cloth when dirty, such as glasses cloth. Do
not clean with chemicals and other solvents.
Class B – Equipment for use in all establishments other
Group 1 – RF energy generated is needed for internal
than domestic.
functioning.
1
Page 5
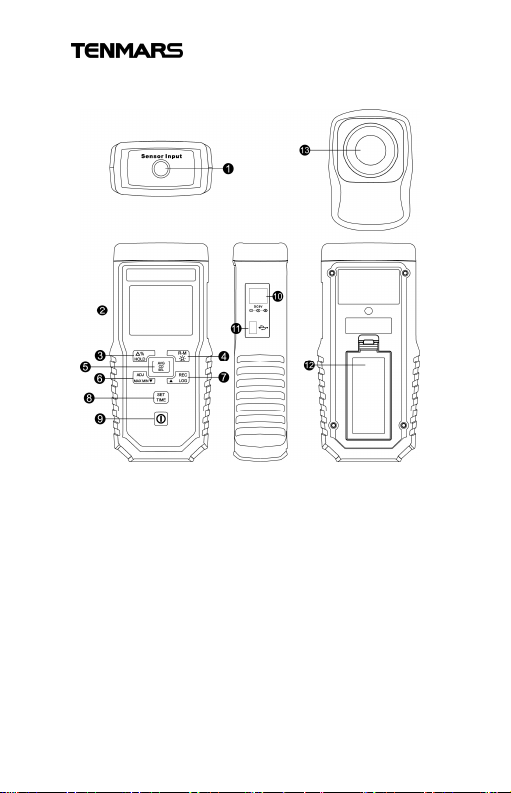
4 Meter Description
Probe jack
2.
Display
10DCpower jack
Transmittance button
4.
Backlitght button
12Battery cover
5 points)
and minimum button
Auto record (LOG)
Set button
TM-215
1.
3. Data hold button /
5. Candela (CD) button /
6. Zero button / Maximum
7. Manual record (REC)/
8. Time display button /
9. Power button
11. USB port
13 Light-detecting
Average button (for 4 or
2
Page 6
TM-215
5 Operation
5.1 Power Button
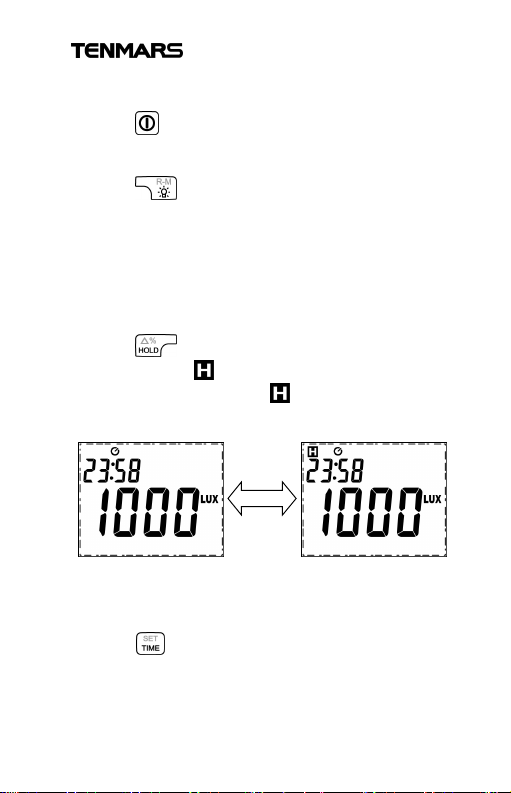
Press button to turn on or turn off the power.
5.2 Turn on backlight (Backlight)
Press button to turn on or turn off the
backlight.
The backlight will be turned off automatically after
lighting up for 15 seconds.
The backlight will be turned on automatically when
the meter is connected to USB orAC POWER.
5.3 Data hold (HOLD)
Press button to hold the displayed value,
then a symbol will appear. Press again to
disable it and the symbol disappears.
When the reading is held, you can only turn off
the power and use the backlight switch.
5.4 Time display (Time)
Change the display mode of hour-minute, second,
date or year.
Press button to change the display mode. If
rebooting, the display mode will be set to "hour:
minute".
3
Page 7
TM-215
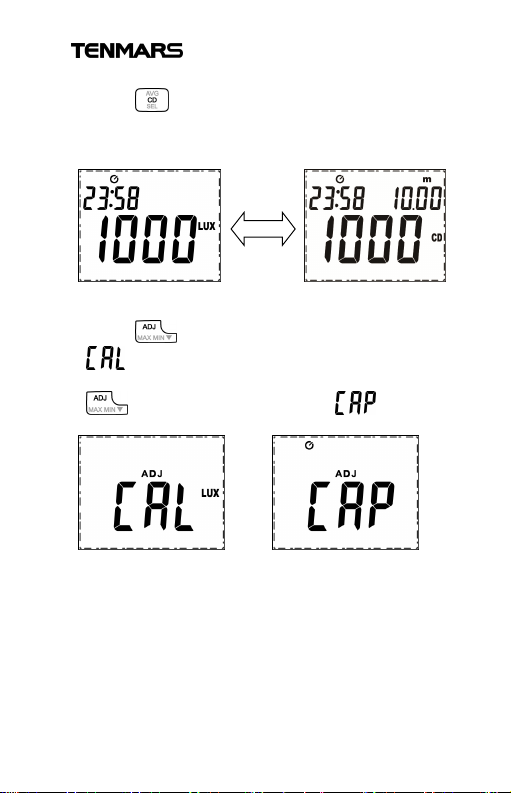
5.5 Luminous intensity display (CD)
Press button to convert as Luminous intensity
mode (CD). The digit shown on the upper right
corner of the display represents the distance setting
value. Press again to exit.
5.6 Auto zero (ADJ 0)
Press button to zeroing and the symbol
will appear. If the meter is not covered with a
cap during ADJ or not covered with a capwhen
button pressed, the symbol will
appear.
4
Page 8
TM-215
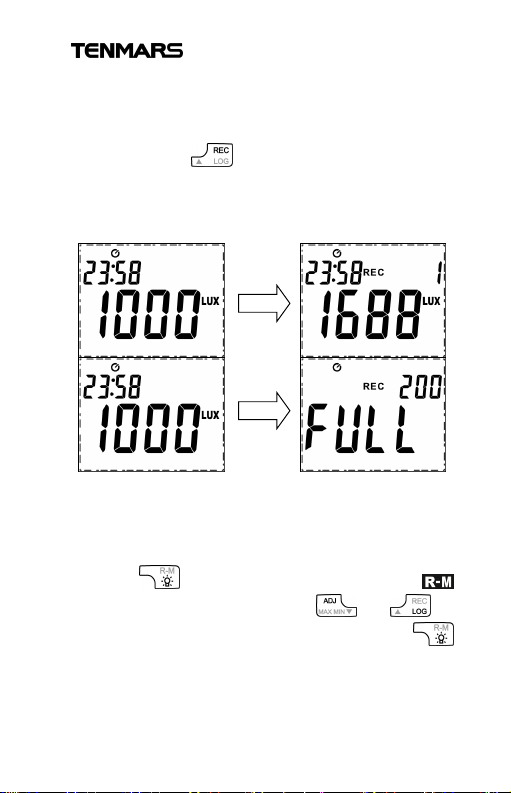
5.7 Manual Record
With the function, the present value displayed can
be recorded manually, including time, the luminance
value, and the distance for luminous intensity.
With pressing button, the current recorded
number and the symbol REC display. The logs of
manual record are up to 200. If more than 200 logs,
the symbol FULL displays, the logs can be cleared
up in the settings.
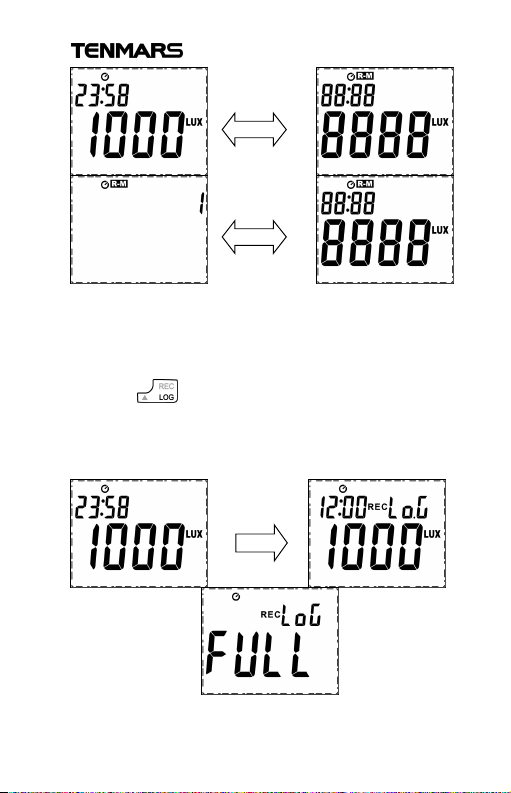
5.8 Manual Record Reading
This function can read 200 records of manual data,
including time, illuminance value, candle value and
candle distance setting.
Press more than 2 seconds , and
appears on the LCD, Press or to
select the log number for reading, Press
more than 2 seconds to quit this mode.
5
Page 9
TM-215
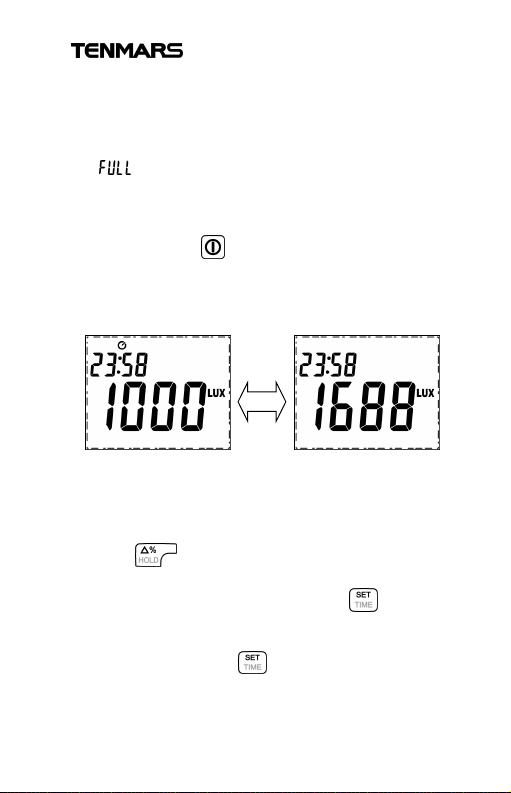
5.9 Auto-recording (Data Logger)
This function is designed to record the present
luminance value, time, and the maximum log
number is 7000.
Press button for 2 seconds to enable or
disable the auto-record function. The symbol LOG
and REC display as display turned on, and the
interval is 1 minutes in the initial setting. The symbol
REC will flash when recording.
6
Page 10
TM-215
Connect the meter to a computer for the settings
of auto-recording and data-reading.
The function auto-power off will be disabled when
automatic recording enabled.
When the log number is up to 7000, the symbol
appears until exiting the auto-recording
mode or power off.
5.10 Disable Auto Power Off
Press and hold button for 2seconds to disable
or reset to the auto-power-off when power on.
The time for auto-power off is 15 minutes.
Auto-power off function will be disabled after USB
and AC power is connected.
5.11 Transmittance Δ%
This function is designed for the measurement of
light transmittance.
Press button for 2 seconds to enter or exit
the menu for transmittance. Entering the menu and
the reference value is shown, press button for
1 second to confirm the present reference value,
and enter the mode of transmittance percentage. At
this moment, press button for 2 seconds to
confirm the present reference value.
7
Page 11
TM-215
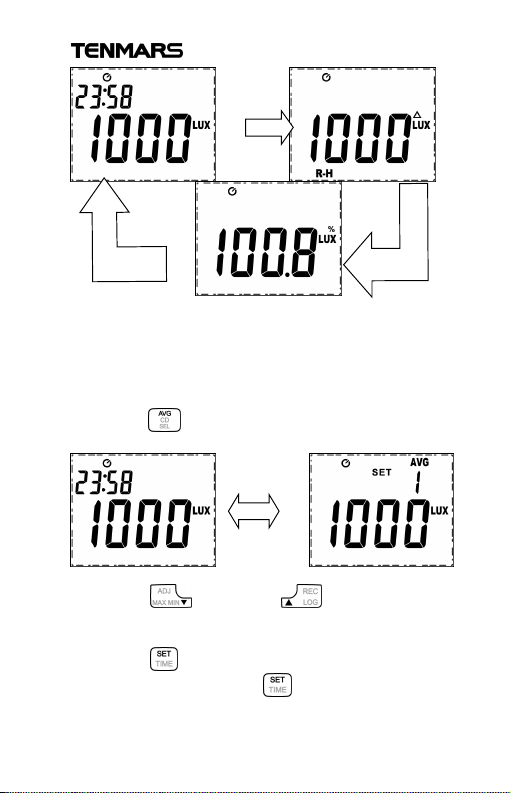
5.12 Averaging 4 or 5 points
This function is designed to calculate the average
value with four or five measuring points as the
average of the luminance measurement for the
environment.
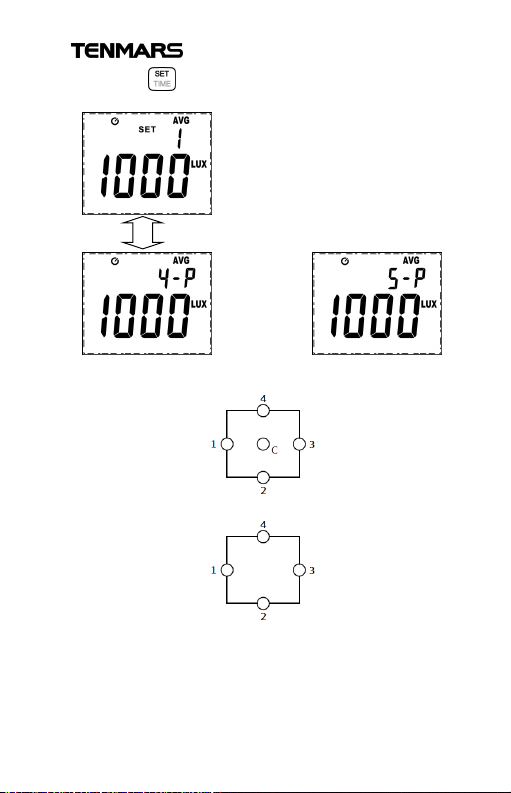
1.Press button for 2 seconds to enter or exit
the menu of 4-5 Point AVG.
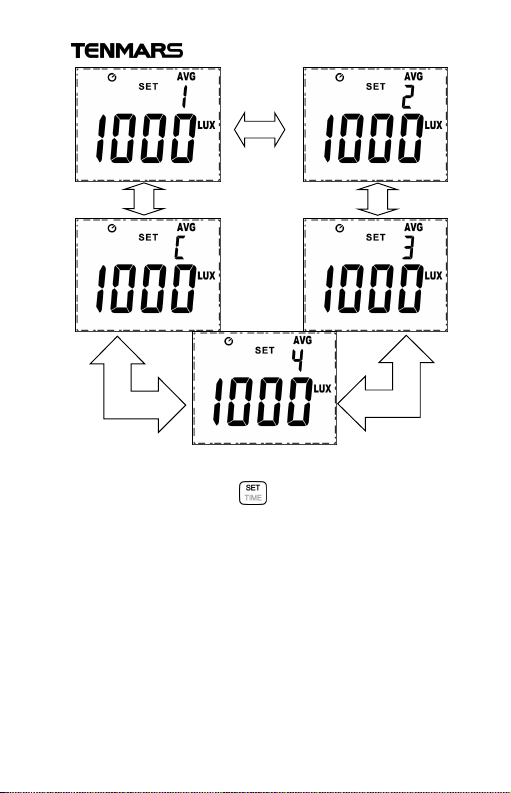
2.Press button or button to select
points 1, 2, 3, 4, and C.
3.With button pressed, the luminance
measuring starts; with button pressed again,
the measuring data are recorded.
8
Page 12
TM-215
4. After the four points or the central point
determined, press button for 2 seconds to
average the 4 or 5 points.
9
Page 13
TM-215
10
OR
5. Press button for 2 seconds to return to the
mode of recording point setting.
Average of five points =(P1+P2+P3+P4+2PC)/6;
Average of four points =( P1+P2+P3+P4)/4
Exiting the menu of 4-5 Point AVG, the value will
return to zero.
Page 14
TM-215
11
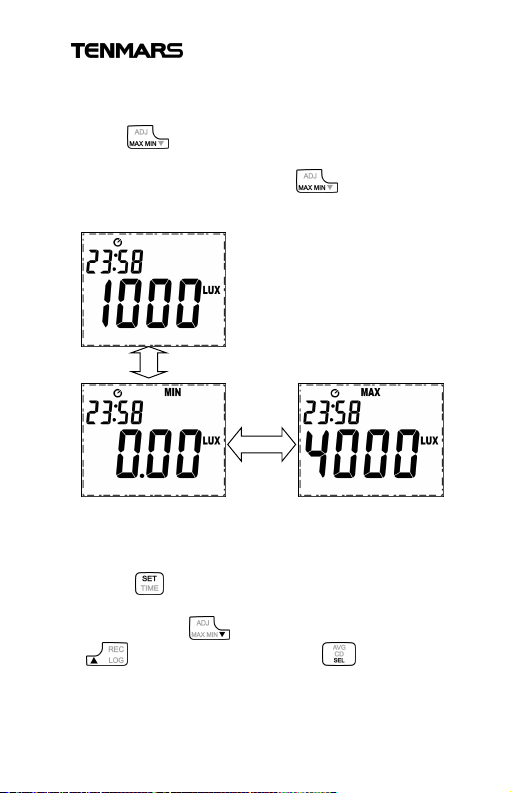
5.13 Maximum and Minimum Hold
This function is designed to hold the maximum and
minimum values displayed.
Press button for 2 seconds to enter or exit the
MAX/MIN menu while holding the present maximum
or minimum value; then press button for 1
second to switch the maximum and minimum values
displayed.
5.14 Function Settings (Setup)
This function is for modifying the setting parameters
of the meter
Press button for 2 seconds to enter or exit the
SETUP mode. As entering the SETUP mode, what
the showing button is for moving down,
button is for moving up, button is for
selection. Use the buttons to adjust the setting
function described as the following steps 1 to 10.
Page 15
TM-215
12
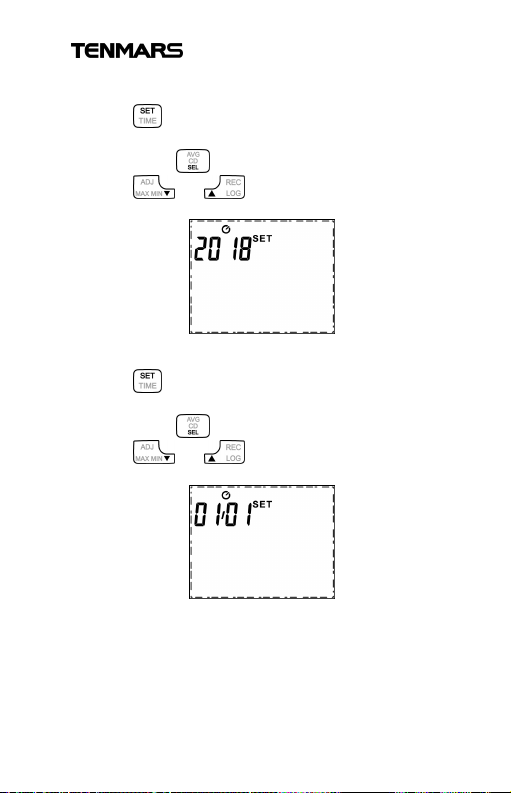
1.Adjustment of Year:
Press button to enter or exit the adjustment
mode. When starting adjustment, the display will
flash. Press button for the adjustment of digits.
Press or to adjust the number where
the maximum is 9999.
2.Adjustment of Month and Date:
Press button to enter or exit the adjustment
mode. When starting adjustment, the display will
flash. Press button for the adjustment of digits.
Press or to adjust the number with
the range from 01 /01 to 12/31.
Page 16
TM-215
13
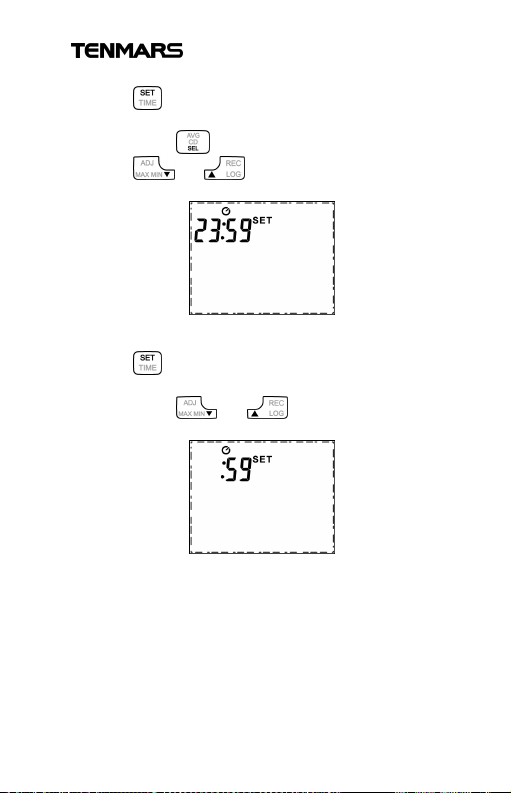
3.Adjustment of Hour and Minute:
Press button to enter or exit the adjustment
mode. When starting adjustment, the display will
flash. Press button for the adjustment of digits.
Press or to adjust the number with
the range from 00:00 to 23:59.
4.Adjustment of Second:
Press button to enter or exit the adjustment
mode. When starting adjustment, the display will
flash. Press or to adjust the number
with the range from 00 to 59.
Page 17
TM-215
14
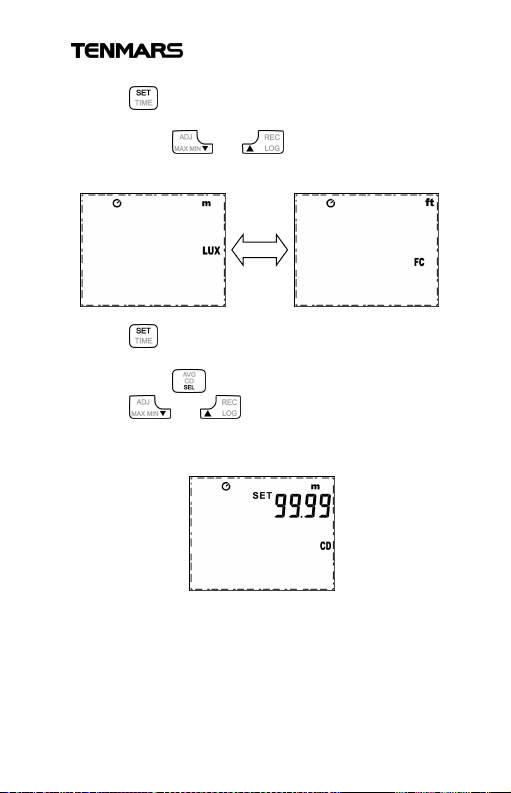
5.Unit setting:
Press button to enter or exit the adjustment
mode. When starting adjustment, the display will
flash. Press or toswitch the units LUX
& m or FC & ft.
6.CD distance setting:
Press button to enter or exit the adjustment
mode. When starting adjustment, the display will
flash. Press button for the adjustment of digits.
Press or to adjust the number with the
range from 00.01 to 99.99m, where the initial setting
is 1.00m.
CD = Lux × r
2
Page 18
TM-215
15
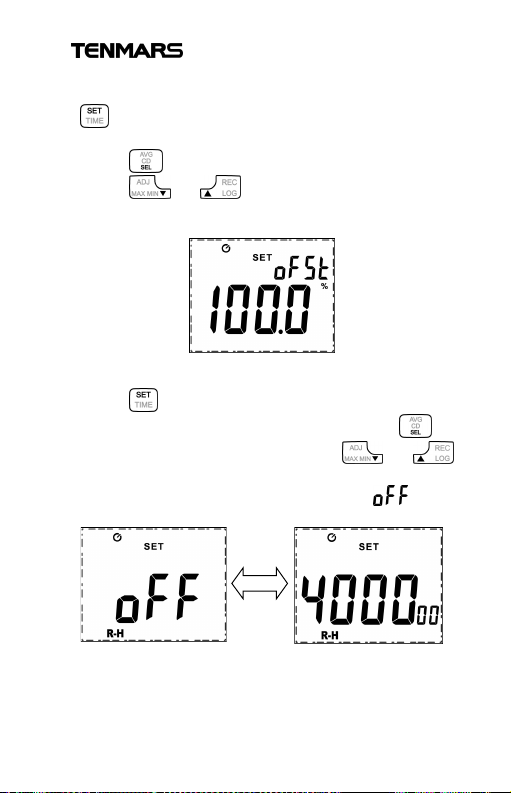
7.OFFSET settings:
The luminance output value can be adjusted. Press
button to enter or exit the adjustment mode.
When starting adjustment, the display will flash.
Press button for the adjustment of digits.
Press or to adjust the number with the
range from 0.1% to 999.9%, where the initial setting
is 100.0%.
8.Settings for switch the shifting mode from auto to
fixed:
Press button to enter or exit the adjustment
mode while the symbol R-H will flash. Press
button to enable or to disable. Press or
to adjust the shift with the selection of 400.0, 4000,
40000, 400000, where the initial setting is .
Page 19
TM-215
16
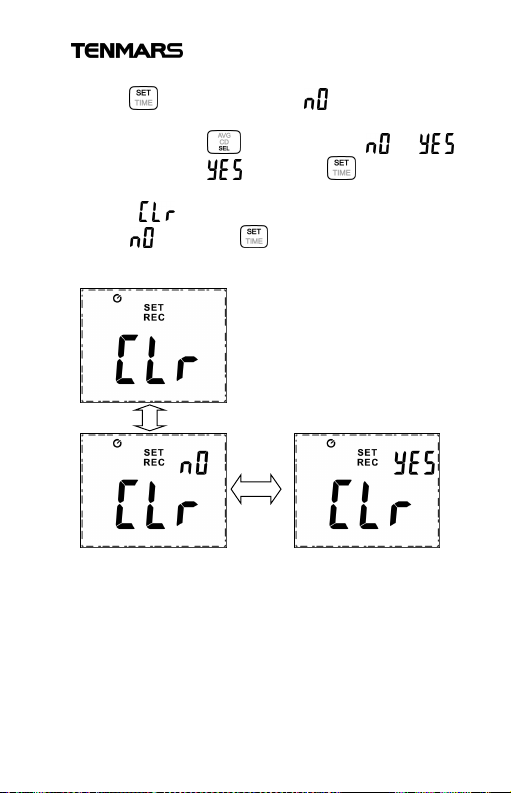
9.Clearing Record Manually:
Press button, the symbol located on the
upper right corner of the display flashes, and
repeatedly press button to select or .
When you select and press button, the
recorded data will be cleared manually, while the
symbol flashes once at the moment; if to
select and press button, nothing will be
cleared.
Page 20
TM-215
17
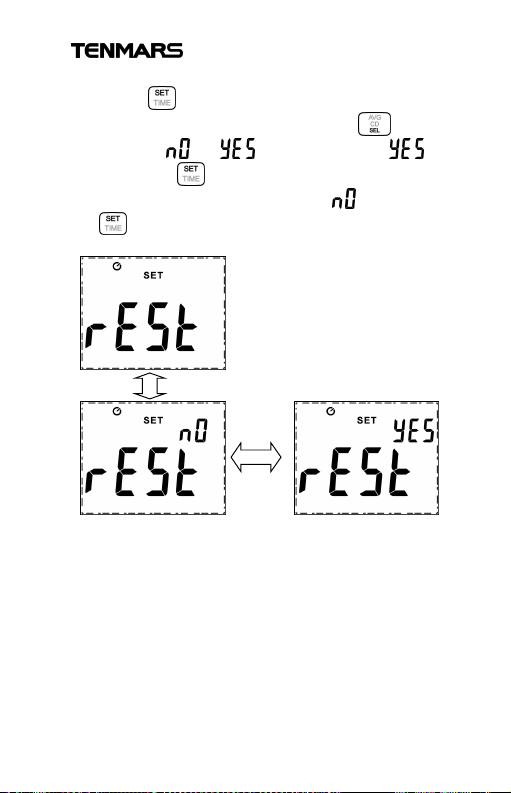
10. Reset:
Press button the upper right corner of the
display will start flashing, and press button
to select or . When you select
and press button, the data will be reset and
the meter will reboot; if to select and press
button, nothing will be reset.
Page 21
TM-215
18
6Software Installation
Supported operating systems: Windows7/Windows
8.1/Windows10
Place the CD included with this meter into the
CD/DVD-ROM drive of the PC to connect to and
install the desktop program:
As the desktop application installed completely,
remove the disc from the CD/DVD ROM drive.
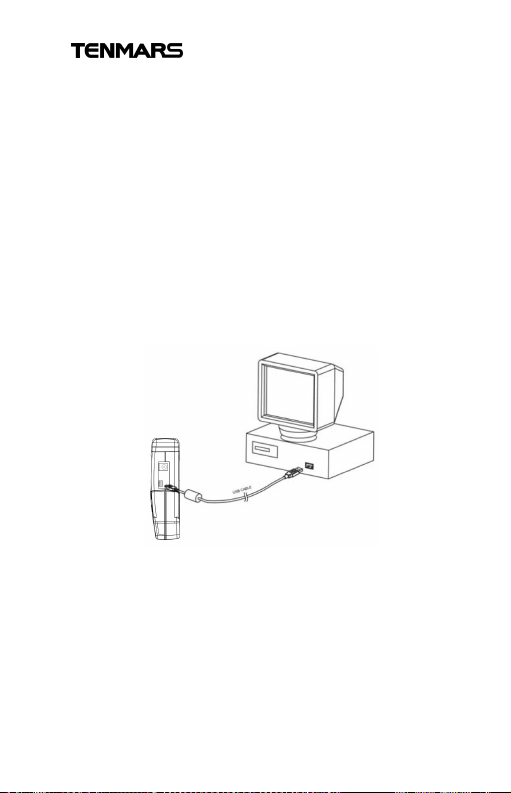
Connect the USB cable included with this meter to
the PC, as shown in the figure below.
Execute the PC desktop software program: Double-click
the left mouse button on the desktop program to execute
the desktop program.
Page 22

TM-215
19
7 General Specifications
Display of reading: LCD display with 4 digits,
where the maximum number shown is 9999.
Unit: LUX /FC/CD
Data holding function (HOLD)
Automatic and manual shifting
Backlight display
Auto power off (15 minutes after last usage) and
disable the function.
Maximum/minimum hold.
Overload indication: “OL”.
Datalogging capacity 7000 records.
Interval of data storage: 1 second to 10 days.
Low battery indication
Average of 4 or 5 point
Transmittance measurement
Battery: 9V (NEDA 1604, IEC 6F22 or JIS 006P)
Battery life: about 60 hours
Standby power consumption: 90μW
Operating power consumption: 90mW
Operating temperature and humidity: 0°C to 50°C
(32°F to 122°F ) relative humidity< 80%
Storage temperature and humidity: -10°C to
60°C(10°F to 140°F ) , relative humidity < 80%
Weight: about 300g
Dimension:
Meter 140 (L) x 65 (W) x 37.5 (H) mm
Sensor 81 (L) x 57 (W) x 28 (H) mm
Length of wring for light sensor: Approx. 100 cm.
Page 23
TM-215
20
40.00/400.0/4,000/40,00
0
Foot-Candle
0.01/0.1/1/10 Foot
-
Candle
10˚: ±1.5%
30˚: ±3%
sources)
JJG 245
-
2005
JJG 245
-
2005
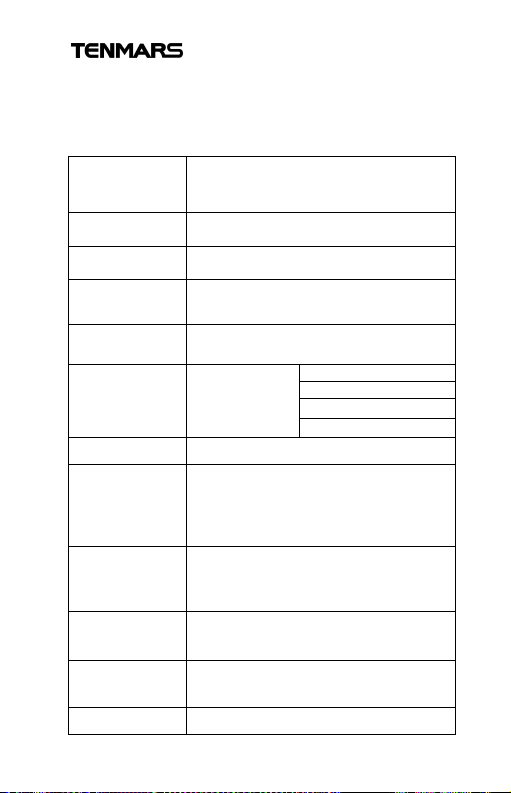
8 Electrical Specifications:
8.1 Quality Indices
Accuracy is specified for ambient temperatures
between 15°C to 28°C (59°F to 82°F)
Standard
Test Range
Accuracy
Relative spectral
response (f1´)
Cosine
characteristic (f2)
Oblique incident
light
characteristic
Accuracy ±3% (for light source A of 2856˚K )
Linearity (JISC
1609-1:2006)
(Accuracy of
various light
Initial Adjustment
(f
)
ADJ
DIN5032 Part7
Linearity(f3)
DIN5032 Part7
Comply with DIN 5032 Part7 Class C、JIS
C 1609-1:2006 Class A、JJG 245-2005
Class B
400.0/4000/40,000/400,000Lux
0.1/1/10/100 Lux
±8% CIE visible light V(λ)
±6%
angle
< 3000 Lux :±5% with reading ± 1
3000 Lux to 9999 Lux:±7.5% with reading
± 1
> 10000Lux(930 FC) N/A
±5% with reading ± 1
±2.5%
60˚: ±10%
80˚: ±30%
Range
change(f11)
Fatigue(f5) -1%
±2%
Page 24
TM-215
21
IR response(fIR) ±4%
UV response(fUV) ±2.5%
Temperature(f6T) ±1%
Response time
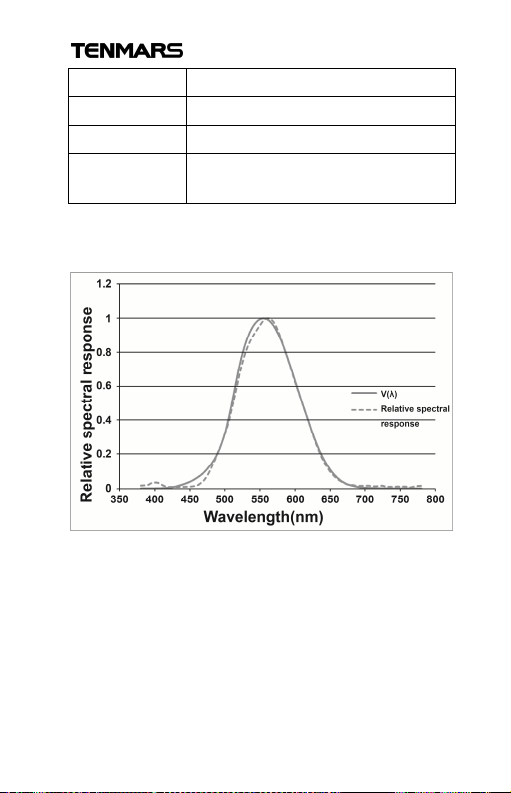
8.2 Relative Visible Spectrum Response
Relative CIE 1931 standard spectral response
Auto shifting: ≦ 5 seconds
Manual shifting: ≦2 seconds
Page 25
TM-215
22
9 Maintenance or Repair
1.When the symbol “ ” appears on the LCD display,
it indicates the battery low. Please replace the
battery immediately to ensureaccuracy.
2.If dirty, please wipe it with a soft cloth, such as
glasses cloth, and notuse a solvent such as
chemicals.
3.If not in use for a long time, remove the battery to
prevent battery liquid from leaking that may corrode
the internal components.
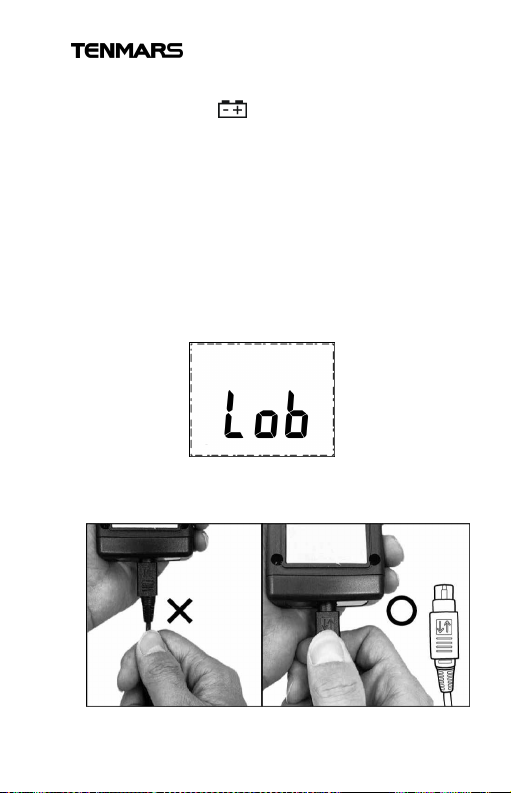
4.When the symbol “Lob” appears on the LCD display,
it indicates the battery low. Please replace the
battery immediately for normal operation.
10 PRECAUTIONS
Removing Probe (With LOCK) :
Page 26
TM-215
23
11 AC to DC Adaptor
External AC 100~240V to DC 9V/0.5A power
supply
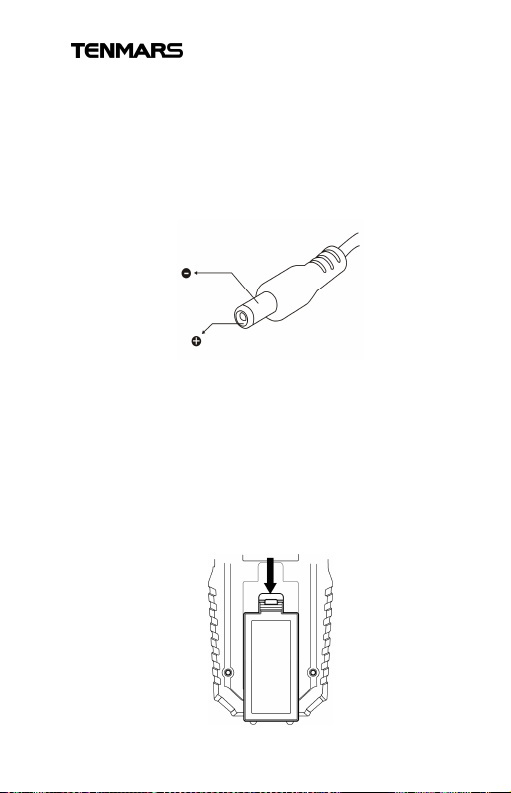
Plug: The pin in the center connects to the
positive electrode and the outer case is negative
electrode
Diameter: 5.5mm; internal diameter: 2.1mm
12 Replace the battery
1. Turn off the power.
2.Open the frame and battery cover at the back of
the meter, remove the battery.
3.Install a new 9V battery. Please pay attention to
the polarity positions of positive and negative.
4.Put the battery cover and frame back in place.
Page 27

24
13 End of Life Disposal
Note: This symbol indicates that the meter and
its accessories must be separated and
processed properly.
.
TM-215
Page 28
Professional Electrical and
Environment Test & Measurement
Instruments:
LED light meter, Temperature & Humidity
meter,Infrared Thermometer, Sound level
meter, Light meter, EMF meter, UV Light
meter, RF meter, Hot wire Anemometer, Co
meter,Anemometer, Lan cable tester, Co2
meter, Solar power meter, Radiation meter,
Clamp meter, Multimeter, Phase Rotation
test, Digital Insulation tester
Our products of high quality are
selling well all over the world
TENMARS ELECTRONICS CO., LTD.
6F, NO.586 Ruiguang Rd, Neihu Dist.
Taipei City, Taiwan
E-mail: [email protected]
http://www.tenmars.com
 Loading...