

Page 1
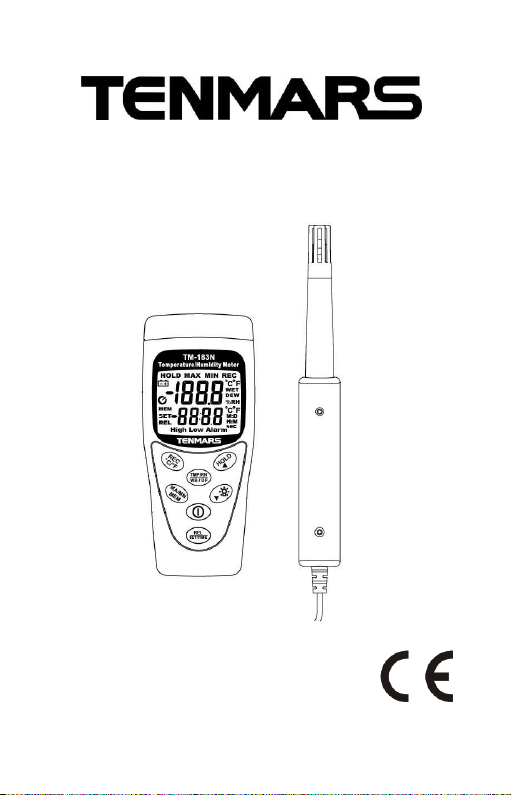
TM-183N
Temperature/Humidity Meter
User’s Manual
HB2TM183N000
Page 2

Contents
1 Introduction ...................................................... 1
2 Accessories ..................................................... 1
3 Safety Precaution ............................................. 1
4 Instrument Description ..................................... 2
5 Operation ......................................................... 3
5.1 Temperature Unit Switch: ............................. 3
5.2 Data Hold: .................................................... 3
5.3 Maximum/Minimun Read Value
Lock(MAX/MIN): ......................................... 4
5.4 Backlight : .................................................... 5
5.5 Temperature/Dew Point/Wet Bulb/Relative
Humidity Switch: ......................................... 5
5.6 Relative Value (REL): ................................... 5
5.7 Manual Recording: ....................................... 6
5.8 Read Data Recorded in Memory: ................. 6
5.9 Setting mode: ............................................... 8
6 General Specifications ................................... 14
7 Electrical Specification ................................... 15
7.1 Temperature: .............................................. 15
7.2 Humidity: .................................................... 15
8 Maintenance or Repair ................................... 16
9 Battery Replacement ..................................... 16
10 Product Disposal ............................................ 17
Page 3
TM-183N
1
1 Introduction
This meter uses precision capacitive humidity
sensor and NTC temperature sensor designs.
2 Accessories
1 Meter
1 Temperature and Humidity probe
1 9V battery
1 Carrying case
1 User’s Manual
3 Safety Precaution
Note! Please refer to this manual.
Improper use may damage the meter
and its components.
Complies with European Directive.
⚫ Do not operate in environments with flammable gas
or humid environments.
⚫ Operating altitude: up to 2000M.
⚫ Operating environment: Indoor use;Pollution degree2.
⚫ Clean with soft cloth when dirty, such as glasses cloth.
Do not clean with chemicals and other solvents.
⚫ EMC: EN61326-1:CISPR 11:Group 1, Class B
Class B – Equipment for use in all
establishments other than domestic.
Group 1 – RF energy generated is needed for
internal functioning.
Page 4
TM-183N
2
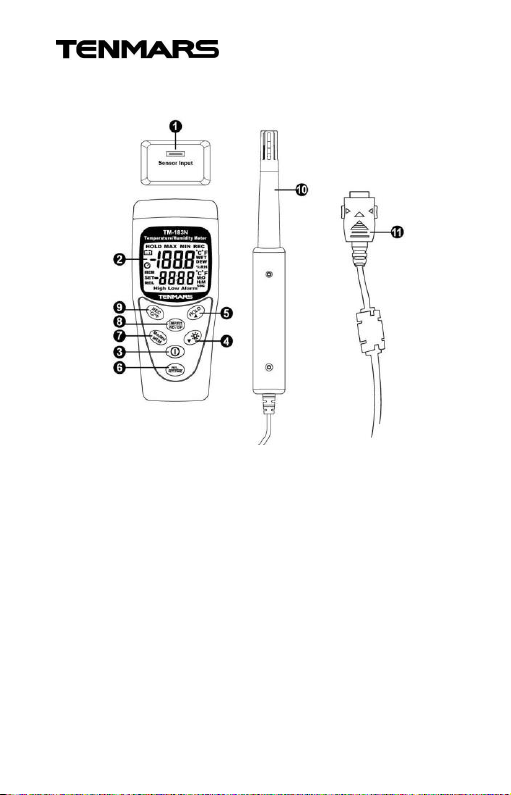
4 Instrument Description
1. Temperature/humidity probe input terminal
2. LCD display
3. On/off button
4. Backlight and setting downwards button
5. HOLD and setting upwards button
6. Relative value/alarm setting/time display switch
button
7. Maximum/minimum value and read record button
8. Dew point/wet bulb/temperature/relative humidity
switch
9. Switches between the ℃ or ℉ temperature unit
and saves record
10. Temperature and Humidity probe
11. Temperature and Humidity probe connector
Page 5
TM-183N
3
5 Operation
1. Connect the temperature/humidity probe onto this
meter.
2. Press the button to turn on/off and it will show
full display for 0.5 seconds. Then, display the
program version for 0.5 seconds, and then enter
measuring mode.
3. Please connect the probe before powering on, or
else it will display wrong values.
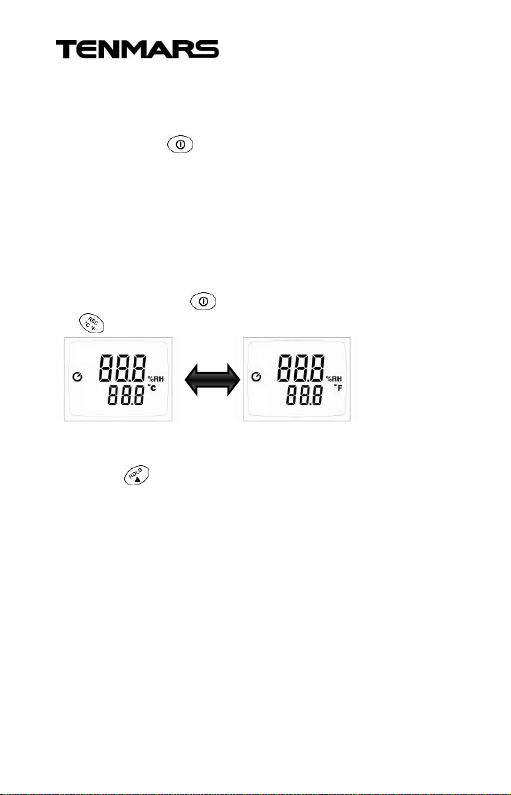
5.1 Temperature Unit Switch:
Press and hold the button and then press
the button to switch between the temperature units.
5.2 Data Hold:
Press the button to and on/off data hold “HOLD”
symbol will be displayed on the LCD.
Page 6
TM-183N
4
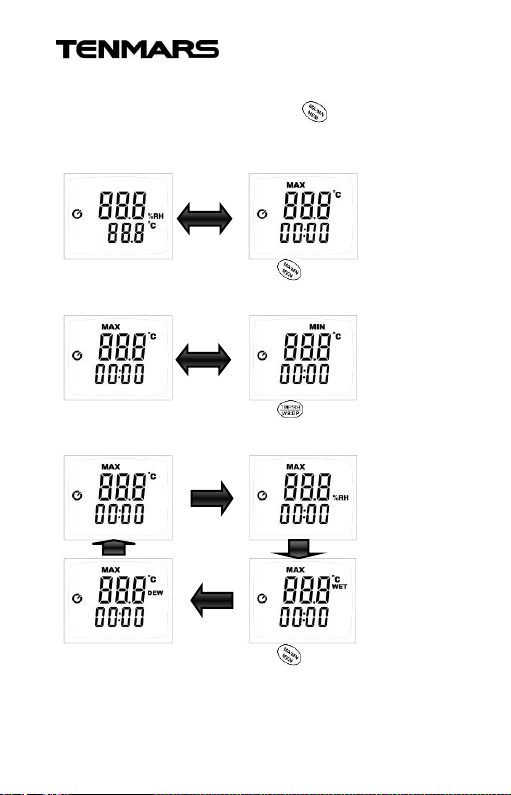
5.3 Maximum/Minimun Read Value Lock(MAX/MIN):
Under measurement mode, press the button for less than
1 second to enter MAX/MIN mode and start timing. The main
display area displays the currently tested temperature and the
secondary display area displays the recording time.
Under MAX/MIN mode, press the button repeatedly for
less than 1 second and the main display area of the LCD will
display the currently tested MAX→MIN values in cycle.
Under MAX/MIN mode, press the button repeatedly and
the main display area of the LCD will display ℃
→%RH→WET→DEW in this order.
Under MAX/MIN mode, press the button for over 1 second
to exit MAX/MIN mode.
Page 7
TM-183N
5
5.4 Backlight :
Press the button to turn the backlight on or off. The backlight
will automatically turn off after 15 seconds.
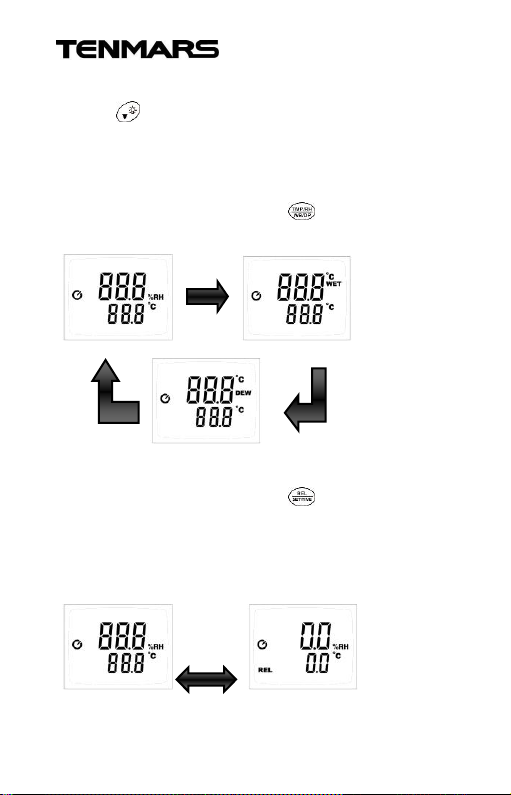
5.5 Temperature/Dew Point/Wet Bulb/Relative
Humidity Switch:
Under measurement mode, press the button to switch
between dew point measurement → wet bulb measurement →
relative humidity measurement in this order.
5.6 Relative Value (REL):
Under measurement mode, press the button for less than 1
second to enable or disable the REL function. When the REL
function is enabled, the thermometer and hygrometer will record
the current read value and the LCD display will be reset to zero.
The thermometer and hygrometer will use this read value as the
reference value and deducted from the measured values
afterwards.
Page 8
TM-183N
6
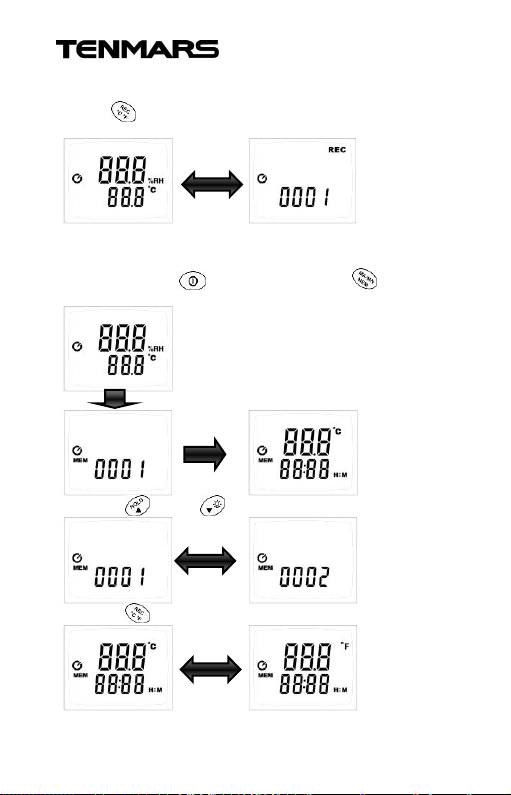
5.7 Manual Recording:
Press the button and the text REC will be displayed on the LCD. It
will also record the currently displayed data into memory.
5.8 Read Data Recorded in Memory:
Press and hold the button and then press the button to
enter read recorded data in memory mode.
Press the button or button to read other recorded data.
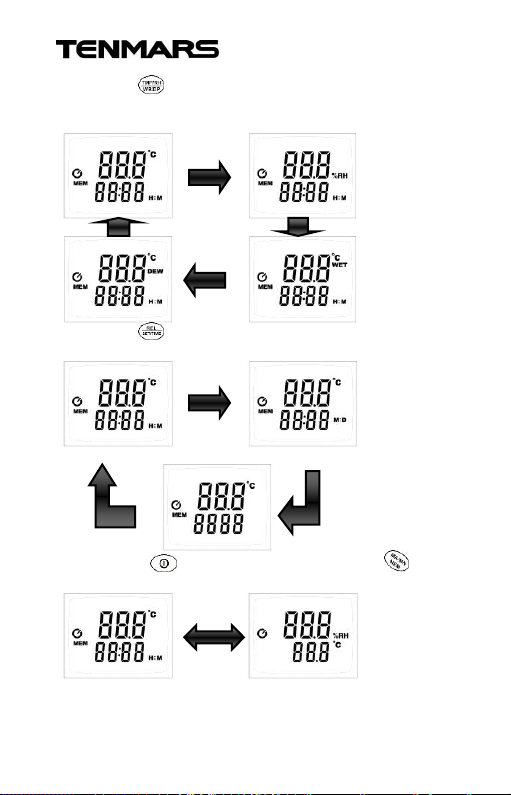
Press the button to change the temperature unit.
Page 9
TM-183N
7
Press the button to change the displayed data
(temperature → humidity → dew point temperature →
wet bulb temperature).
Press the button to change the displayed time
(hour:minute → month:day → Year)
Press the button again and then press to exit
read data recorded in memory mode.
Page 10
TM-183N
8
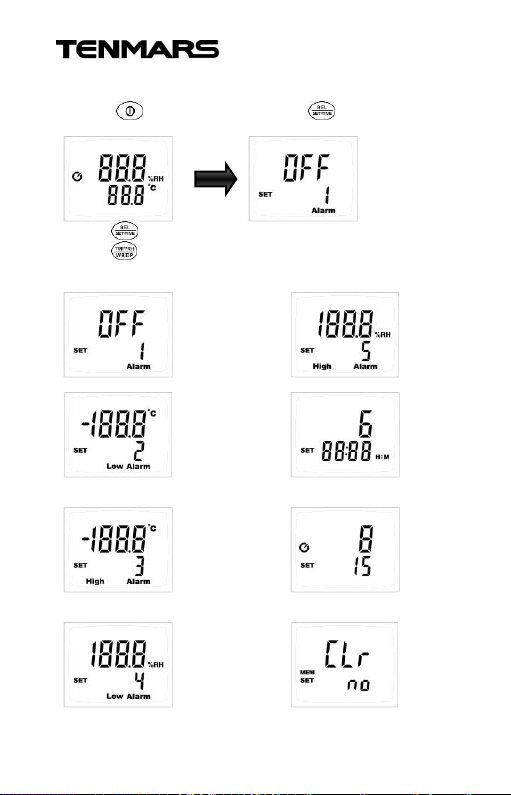
5.9 Setting mode:
Press the button and then press the button to enter the
setting mode.
Press the button to switch between setting modes. (Remark 1);
Press the button to record settings and exit setting mode.
Remark 1: You can set eight functions in setting mode
1. Enable alarm function setting 5. High humidity alarm setting.
2. Low temperature alarm setting. 6. Time setting.
3. High temperature 7.Automatic shutdown
alarm setting. time setting.
4. Low humidity alarm 8. Clear records.
setting.
Page 11
TM-183N
9
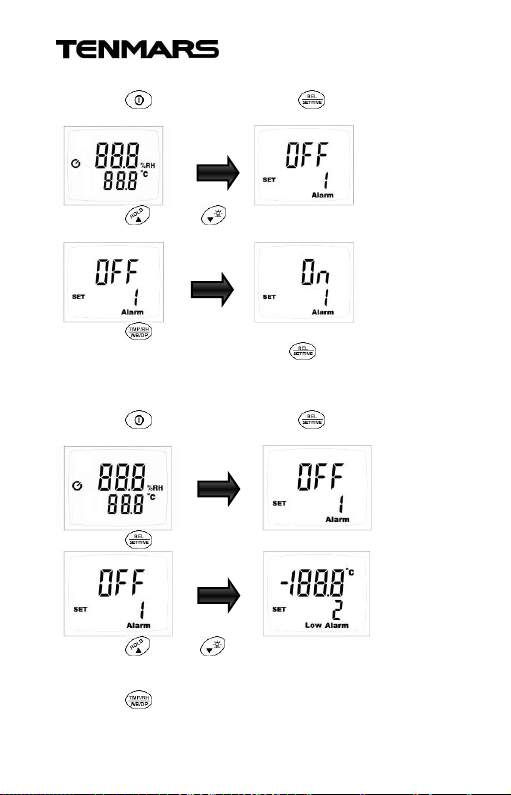
Enable alarm function setting:
Press the button and then press the button to enter setting
mode.
Press the button or button and Alarm on will be displayed
on the LCD.
Press the button to record settings and exit setting mode.
When the alarm sound is enabled, the button can be pressed
to turn off the alarm sound and cancel the alarm.
5.9.1 Low temperature alarm setting
Press the button and then press the button to enter setting
mode.
Press the button again to enter low temperature alarm setting.
Press the button or button to increase or reduce the low
temperature alarm range.
Low temperature alarm range: -30.0℃~70.0℃ (-22.0℉~158.0℉).
Press the button to record settings and exit setting mode.
Page 12
TM-183N
10
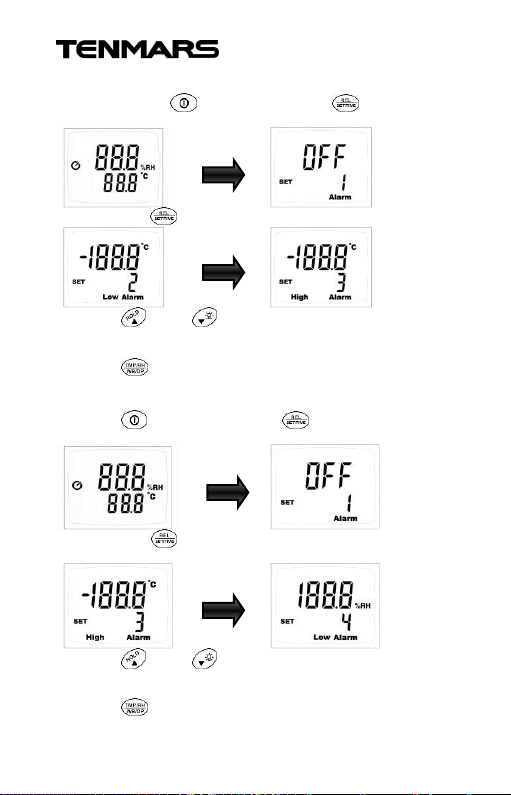
5.9.2 High temperature alarm setting
Press and hold the button and then press the button to enter
settings mode.
Then press the button twice to enter high temperature alarm setting.
Press the button or button to increase or reduce the high
temperature alarm range.
High temperature alarm range: -30.0℃~70.0℃ (-22.0℉~158.0℉).
Press the button to record settings and exit setting mode.
5.9.3 Low humidity alarm setting
Press the button and then press the button to enter setting
mode.
Then press the button three times to enter low humidity alarm
setting.
Press the button or button to increase or reduce the low humidity
alarm range.
Low humidity alarm range: 0%RH~100.0%RH.
Press the button to record settings and exit setting mode.
Page 13
TM-183N
11
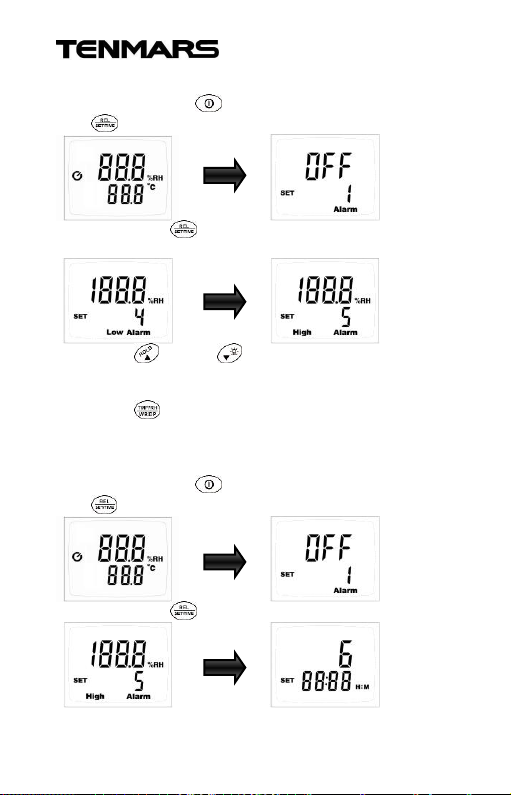
5.9.4 High humidity alarm setting
Press and hold the button and then press
the button to enter setting mode.
Then press the button four times to enter high humidity
alarm setting.
Press the button or button to increase or reduce the
high humidity alarm range.
High humidity alarm range: 0%RH~100.0%RH.
Press the button to record settings and exit setting
mode.
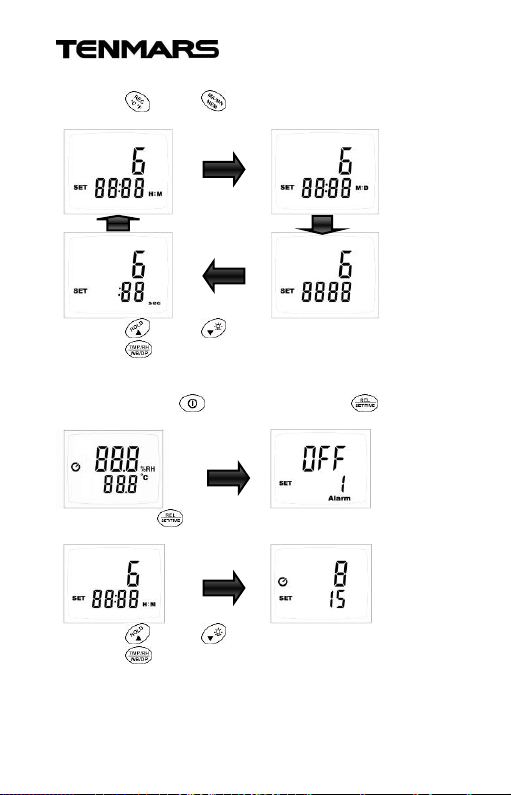
5.9.5 Time setting
Press and hold the button and then press
the button to enter setting mode.
Then press the button five times to enter time setting.
Page 14
TM-183N
12
The time format of this model is the 24 hour format.
Press the button or button to change between date, time
and unit.
Press the button or button to change the values.
Press the button to record the settings and exit setting mode.
5.9.6 Automatic shutdown time setting
Press and hold the button and then press the button to
enter setting mode.
Then press the button six times to enter automatic shutdown
time setting.
Press the button or button to change the value.
Press the button to record settings and exit setting mode.
When the automatic shutdown time is set to 0, it will disable the
automatic shutdown function.
The maximum automatic shutdown time setting is 99 minutes.
Page 15
TM-183N
13
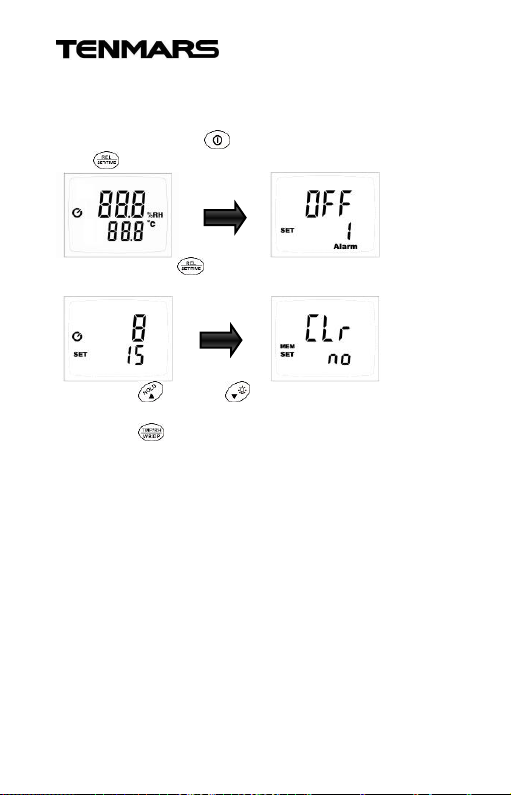
5.9.7 Clear memory setting
This option is only available when there are data
recorded on this unit.
Press and hold the button and then press
the button to enter setting mode.
Then press the button seven times to enter
automatic shutdown time setting.
Press the button or button to select whether to
clear data.
Press the button to confirm whether to clear data
and exit setting mode.
This function will clear all recorded data.
Page 16

TM-183N
14
6 General Specifications
Read value display: Dual LCD display. The maximum
displayed value of the main display area is 1999 and
the maximum displayed value of the secondary
display area is 9999.
Data hold
Low battery indication
Over load indication: OL or -OL
Backlight
Automatic shutdown (preset to 15 minutes) and
disable automatic shutdown function.
Maximum/minimum/measurement elapsed time.
Alarm
Battery: 9V (NEDA 1604, IEC 6F22 or JIS 006P).
Battery life: Approximately 100 hours
Standby power consumption: Approximately 27uW.
Operation power consumption: Approximately 35mW.
Operating temperature and humidity: 5℃ to 50℃
with relative humidity under 95% (no dew).
Storage temperature and humidity: -10℃ to 60℃
with relative humidity under 70% (no dew).
Dimensions:130x56x38mm(length x width x height)
Testing cable length: approximately 900 mm
Probe length: approximately 200 mm
Weight: Approximately 170 grams (not including
battery weight).
Page 17
TM-183N
15
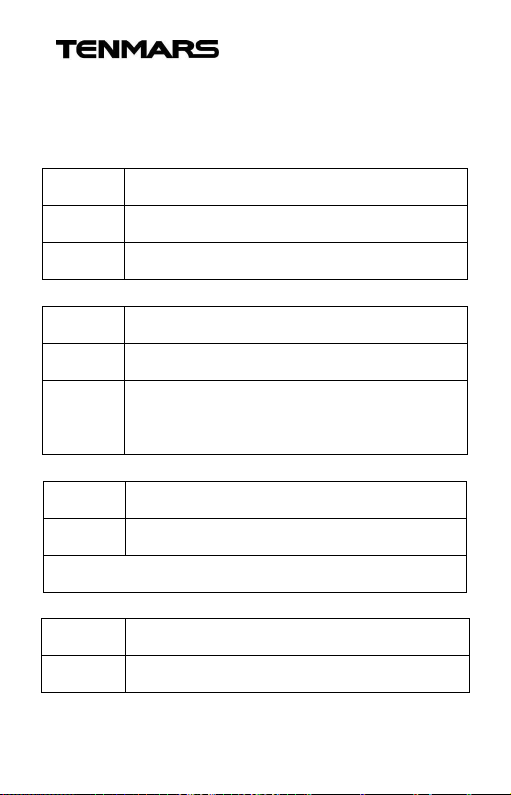
7 Electrical Specification
Accurate environmental conditions are: 23°C ± 5°C and
RH <80%
7.1 Temperature:
-20.0℃~+60℃ (-4.0℉~+140.0℉)
Resolution
0.1
Accuracy
±0.8℃ (±1.5℉)
7.2 Humidity:
1%~99.0%RH
Resolution
0.1 %RH
Accuracy
±3.0%(20.0~80.0%RH,@25℃)
±5.0%(<20.0%RH>80.0%RH,@25℃)
7.3 Dew point temperature(DEW)
-63.0℃~+60℃(--81.4℉~+140.0℉)
Resolution
0.1
The value is calculated from the RH and Temperature.
7.4 Wet bulb temperature(WET)
-20.1℃~+60℃(-4.18℉~+140.0℉)
Resolution
0.1
Page 18
TM-183N
16
The value is calculated from the RH and Temperature.
8 Maintenance or Repair
1. When the symbol is displayed on the LCD, it means
that there is insufficient power; please change the battery
immediately in order to ensure its accuracy.
2. Do not place the meter in locations that have high
temperature, humidity or that are exposed to direct sunlight.
3. Remember to turn off the power after usage; remove the
battery if not used for a long period of time in order to
prevent battery leakage and causing damages to internal
components.
4. When the instrument failure, only by the authorized service
provider or return the original repair.
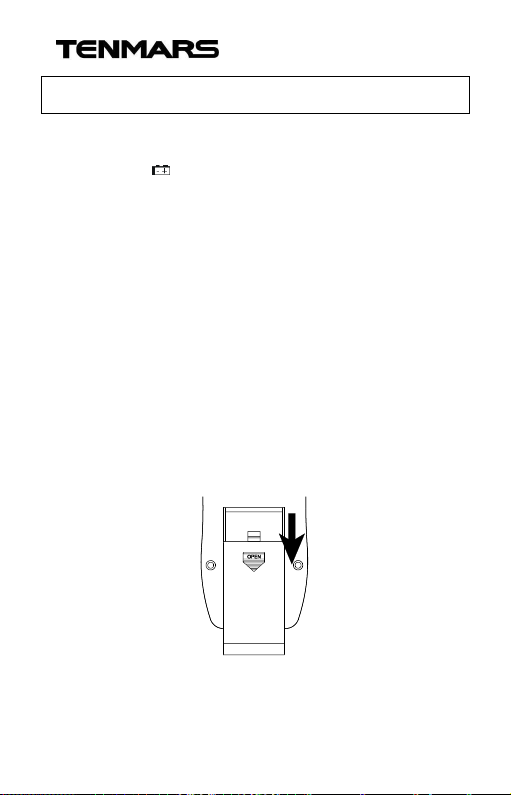
9 Battery Replacement
1. Turn off the power.
2. Open the battery cover at the back of the meter,
remove the batteries.
3. Please insert a new 9V battery according to the
polarities.
4. Put the battery cover back in place.
Page 19

TM-183N
17
10 Product Disposal
Note: This symbol indicates that the
meter and its accessories must be
separated and processed properly.
Page 20

Page 21

Professional Electrical and
Environment Test & Measurement
Instruments:
Battery Capacity, Impedance Tester,
TACHO Meter, LED light meter, Temperature &
Humidity meter, Infrared Thermometer, Sound
level meter, Light meter, EMF meter, UV Light
meter, RF mete r, Hot wire Anemometer, CO
meter, Anemometer, Lan cable tester, CO2
meter, Solar power meter, Radiation meter,
Clamp meter, Multimeter, Phase Rotation test,
Digital Insulation tester.
Our products of high quality are selling
well all over the world
TENMARS ELECTRONICS CO., LTD.
6F, NO. 586 Ruiguang Rd, Neihu Dist.
Taipei City, Taiwan
E-mail: [email protected]
http://www.tenmars.com
 Loading...