

Page 1

TENMARS
Sound
Datalogging
TM-l03
Level Meter
Page 2
CONTENTS
o
General
o
Name and
a
Calibration
o
Measurement
o
Operating
a
Measurement...............................................
O
Setup
o
User
Description & Specifications..........
Funtions
Procedures
Preparation
...........................
precautions
End......................................9
User
End Manipulation
Menu....................9
................ 3
...........6
............7
TENMARS
Thank you
To
recommend
carefully
This
Type2
1
7
8
This
measurement
lndustrial
environments.
o
Ranges
31 .SHZand
o
Display
.
With
A
1.
for
ensure
that
that
before
unit
conforms
for
Sound
Sound Level
safety
from
B KHZ .
with
two
equivalent
and
C.
GENERAL
using
our
you
requirements
30dB to 130d8
0.1d8
Sound Level
get
can
you
read
use.
to the lEC651
Level
Meters.
Meter
has
offices
and
steps
weighted
and
DESCRIPTION
the
most from
follow
Type2,
been
designed
of safety
quality
control in
at frequencies
on a 4
digits LCD.
sound
Meter.
the manual
ANSI
Engineers,
pressure
&
it, we
to meet
various
Tt\4-'10s
51.4
the
Health,
between
levels,
SPECIFICATIONS
1.1.
Display
Resolution
1.2.
Standard
Type2.
1.3.
Frequency
1.4.
Measuring
C Weighting
1.5.
Frequency
1.6.
Microphone
microphone.
1.7. Time
1.8.
Level
1.9.
Accuracy
:
4
digits LCD
:
0.1d8,
applied
range
level
35-130d8.
weighting
:
weighting
ranges
:
t1.sdB.
with
maximum/minimum,
Display
:
lEC651
:
3'l .5Hz-8KHz.
range
1/2 inch
:
FAST(125mS),SLOW(1
:
30
-130d8(Auto
EN.1
Type2,
:
A Weighting
:
A,/C.
Electret
Update
:
0.5
ANS|
30
condenser
Range).
sec.
1.4
-130d8.
sec).
Page 3
TENMARS
Tt\,l- 103
TENMARS
Dynamic
1.10.
MA)UMIN
1.11.
Minimum
HOLD : The
DATA
1.12.
1 .13.
1.14. Low
1.15.
1.16.
1.17. Operation
1 .18.
1 .19.
1.20.
1.21.
1.22.
be locked
can
REo:According
to save the data.
Battery lndication:
display'E!".
Power Supply
006P batteryxl
Power Life :
above sea
Operation
809,i
below
Storage
70%
below
Dimension:
Weight: About
Accessories:
.
case
9V
range : 50d8.
:
Hold readings
value.
while
io the
:
9V
pcs.
About 50
:
height
level.
temperature
RH
"
Temperature
.
RH
200mm(L)x55mm(W)x38mm(H)
1709.
lnstruction
Battery,
for the
reading data
pressing
NEDA 1604
2000M under
windscreen.
the button
timing that
Replace battery
(alkaline
hrs
Humidity
&
Humidity
&
(lncluding
manual
shown
the elevation
batteries)
'
Maximum
on
by user
is setup
as
IEC 6F22'JlS
'
Battery)
:
5'C
-40
:
-1
0.C
-60'C
carrying
and
LCD
LCD
C
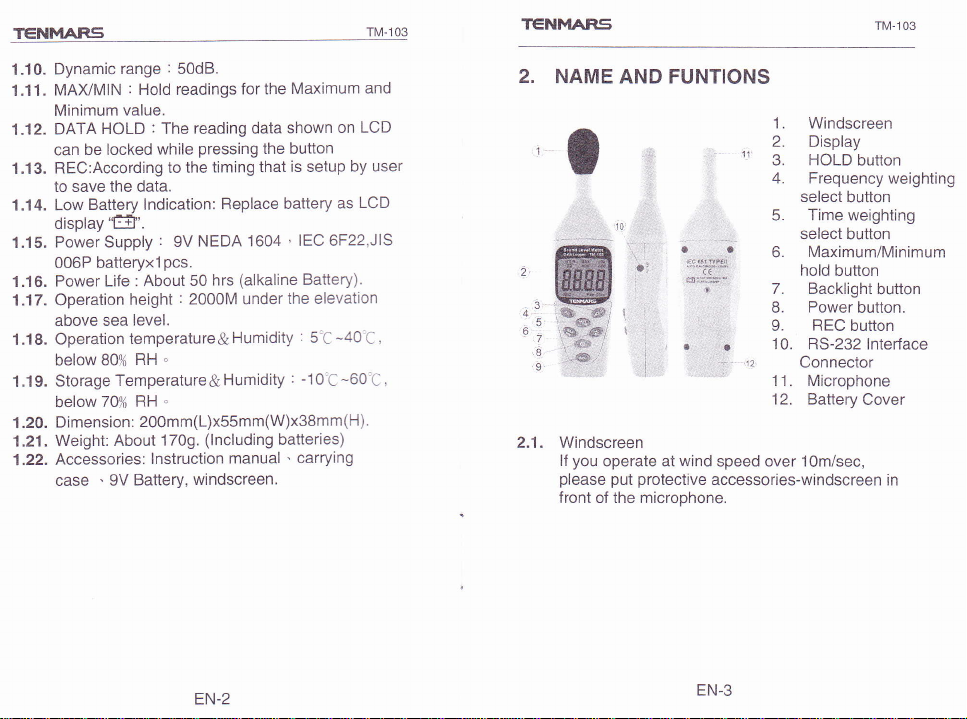
2. NAME
AND FUNTIONS
I
"'
i,
.[,:ifJ**,*",
,!
.,,
1ffMh
ffi'
...^.,,,".,.
-?i
ffi
,
,
&*@,
4e
r;@',
2.1. Windscreen
you
lf
operate at
please
put protective
front of the microphone.
. .
IirzConnector
wind
u
.lil:il;l:l'''.n
Maximum/Minimum
6.
n3ffliJ'n",1,u""
7
power
8.
L
10.
11. Microphone
12. Battery
speed over 1Om/sec,
accessories-windscreen
bution.
REC
button
RS-232 lnterface
Cover
in
EN-2
EN-3
Page 4

TENMARS
TENMARS Tt\,l-103
2.2.
Di spl ay
b
HOLD
F:n
[/rAX
MtN
-r
i
ef
dBA
dBc
a. Low battery
b.DATA HOLD
indication
c.Maximum
d.Minimum
e.A-Weighting
f.
C-Weighting
g.Slow
F.ff.ff
Fast Slow
h. Fast response
i. REC
Sound
i.
ihs
HOLD
button.
reading
The
while
Frequency Weighting
2.4.
:
A
A-Weighting. For
measurements. C
low-frequency
the
Weighted level is much higher than
pressing
data shown on
the button.
:
content of
weighted level, then there is a large amount of
low{requency noise)
weighting
Time
2.5.
FAST
:
SLOW
noise.
MA)?MIN hold
2.6.
r
Press the key to activate the
"MAX"
symbol
instrumenl measures and show
select button.
for normal measurements.
:
for checking average
button
appears
LCD
select button.
general
sound level
C-Weighting.
noise.(lf the C-
level
on the display and
indication
indication
indication
response
response
level read
be locked
can
For checking
the A-
fluctuation
of
function. The
the Maximum
out
value of
when a lower value occurs.
2.7. Backlight
to easy readings in dark environments. Press
more than 1
however
2.8. Power button.
The
ON
automatically
2-9. REC
Press the
REC
parameter
iiself when a larger value is measured.
I
Press the
appears on the display and the instrument
measures
parameter
r
and displays
which automatically updates itself
The MA)(/MlN function will
The MAXMIN is
second.
Turn off the meter.
Press
button.
the button
it automatically OFF after 15 seconds.
key for
or OFF.
button
button
again to stop
which automatically updates
key
again and
the "MlN"
the Minimum value
pressed
you
to
second
'l
sec to turn the sound level meter
The
auto
after 5 minutes idle time
to
start
recording.
be disable
for more than 1
enable the display backlight
disable backlight,
power
will
recording
THE MINIMAL INTERVAL IS 1
MAXIMUM INTERVAL
MINUTES
2.1
RS-232
0.
lnterface Connector
RS-232 interface with
AND 59 SECONDS
TIME IS 7 HOURS
personal.
a
2.11. Microphone
1/2
2.12. Battery
inch Electret Condenser microphone.
cover
symbol
of the
if:
which
be off
data and
SECOND AND
press
59
EN-4
EN-5
Page 5

TENMAR5
TENMARS
TM-1 03
3. CALIBRATION PROCEDURES
Using a standard Acoustic Calibrator
3.1.
l KHz Sine wave)
t-il
ffi-
i
fl
T
Make the button settings.
3.2.
Time weighting : FAST
lnsert the Microphone nozzle carefully
3.3.
insedion hole of the calibrator.
Press A,/C button then
3.4.
hold the 2
second. LCD
buttons
will
Acoustic
Sound
be
calibrator
level meter
Display
press
the HOLD button,
at the same
blinking to confirm
EN-6
time more
:
(94d8,
dBA
into the
than 1
calibration.
When LCD blinked,
3.5.
HOLD buttons. The sound
94.0 dBA.
The
3.6.
meter reads
The calibration
94 dB calibration
94.0
release the A,/C and
level meter will display
is
process
dB. Recalibration cycle
done.
can be
repeated until the
:
1
4. MEASUREMENTPREPARATION
Battery Loading
4.1.
Remove the battery cover
Battery.
one 9V
Battery Replacemeni
4.2.
below the operating
drops
appears.
with new one.
lf it appears, battery
5. OPERATING
Wind
5.1.
5.2.
5.3.
5.4.
5.5.
blowing
additional extraneous
instrument
mount the windscreen
to
undesirable
To achieve
extension
the
sound reflection
Calibrate
instrument
operation at
Do not
temperature
Keep microphone
main
body
the instrument
store
in the
signals.
more accurate
cable
was not
bad environment.
or operate
and high
PRECAUTIONS
across
presence
to separate
so that
can be eliminated.
on the back and
When the battery voltage
voltage,
the microphone
noise. Once using the
preventing
measurement, use an
the effect of unexpected
before operation
in
for a long time or
use
the instrument
humidity environment.
avoid severe
dry and
EN-7
the mark
should be
wind, it is necessary
of
to
the Microphone
would bring
the
year.
put
replaced
pick
up
if the
at high
vibration.
in
Ffi
from
Page 6

TENMAR.S
Please
5.6.
take
instrument
is not
in use.
out the
in low
6. MEASUREMENT
6.1. Open
6.2.
6.3. Hold the
6.4. When MA)V
6,5.
7.
battery
battery
Turn
on
time
and weighting.
of short
response
level,
use the
general
measuring
tripod
and
noise
source, the
displayed.
mode is
holds
the maximum
Press
once
select MIN
MAX/MIN
disappears.
Turn
off the
when it is
SETUP
cover and install
compadment.
power
bursts or
to FAST. To
slow setting.
noise
sound level
sound level
instrument
point
MIN
chosen.
to select MAX
value, Press
mode.
instrument
not in
USER END
battery and keep
humidity
environment. When
a g Volt battery
and
select the desired response
lf the
sound source
only catching
measure
comfodably
the microphone
sound
(maximum,
The instrument
or minimum
sound
average sound
Select A weighting
and C weighting
of acoustic
pressure
material.
in hand
the
at
level
minimum
captures
noise level.
value. Press
again
"MAX"
use.
to exit the
or " MlN" symbot
and remove
the battery
the
consists
peak,
for
fix
or
suspected
will
be
hold)
and
again to
set
on
for
T€NI*IAR'S
System Required
it
in
7.2.
r
Windows
Minimum Hardware
7.3.
I
Pentium
12BMB RAM;
available
Recommended
above
8. USER
2000, Windows
Required
lll 500MHZ
At least 1OMB
to install
END
User End
display
MANIPULATION
XP
PC
compatible,
hard disk space
program.
resolution is 800X600
Tt\,4-103
or above
or
MENU
.-:rvi ,:f:l:*i
r--;;fi;*".--*--"-*l
i i ;::" ,:.::
i,'-"'"i
l:*""*l
.'''-"'"*r
!
1'-..-".--
*,*
@I
-'- -r-.,-,,-
+
:
:
'
"'"'q
@
)
2
|
7.1. The
I
User End
Custom
package
designed
RS-232
EN-8
contains
cable for
User End
Page 7

TENMARS
Tool Bar
8.1.
Tool
bar section has
[Conneci
[Erase
[Save
Use
PC. This
Use button
records from Meter to Local
Use button
saved in memory.
Use button
meter to be same with the
the
Please do time re-setup
replacement
Use button
records from the list
enabled after
Use button
To Meter]
All Records]
Records
button
[Connect
step is the first
[Download
[Erase
[Update
is
battery
[Save
[Print]
6 buttons:
fDownload
to File]
lUpdate
[Print]
to meter] to connect meter and
step
All Records] to
All Records] to erase all the records
Meter Date/Time] to let the time in
taken out, the clock in the meter will stop.
removed
or
downloading records.
and
Records
to txt file. This
box
print
to
EN-10
All Records]
Meter Date/Time]
to
this
use
software.
computer.
computer
load it into the meter after
of battery.
to File]
all the downloaded data.
download
time. Remember if
to export the
button
will
TM-103
be
TENI'IARS
Data
Real
Meter
Sound
8.2.
time data
Real
data including
status,
Current
records
also displayed
are
Group
8.3.
Group
selected
dba/dbc
Status
8.4.
Status
recording,
as
Sound
8.5.
section
This
Records
8.6.
will be
Data
[download
Connected
8.7.
The light
means connected,
Procedure
1. Place
Double
2.
After
3.
programlData
section
value,
dB
REC,
HOLD,
situation
meter
memory,
in the
information
group information
status,
message
at
information
daia
records
Message
is to display
connected,
Meter
is used
Data
downloaded
records]
Signal
indicated
is used
to
red
install
ihe setup
"setup.exe"
click
finishing
MN0MIN
the
Setting
to set
button
setup
Logger\sound
Program. v/
to displayed
is used
dBfudBC
including
interval,
left side.
Data
section
number
disconnected,
into this
means disconnected.
USER
disc
status,
status.
total
meter
is used
including
in selected
current
Data
into
interval
section
pressed
is
connection
END SOFTWARE
the CD-ROM.
into
the CD-ROM.
in
process,
EN-11
real time
Fasvslow
group
date
display
io
time,
start
status
mete
meter.
after
status.
go
to stad--all
"to run the
meter
and
time,
and
end
group'
Green
So'.rnd
rnttr
TN/-1 03
total
time,
such
I
I
lqvU
vt"0
 Loading...