

Page 1

CO2 / Temp / RH Indoor Air Quality Meter
Users Manual V.1.0
Page 1
Page 2

TABLE OF CONTENTS
1. FEATURES & SPECIFICATIONS............................................................................ 3
2. WHAT’S IN THE BOX.............................................................................................. 6
3. START UP AND GENERAL OPERATION............................................................... 7
Start Up ............................................................................................................................................................7
LCD Display...................................................................................................................................................8
Display Screen (1-7)...................................................................................................................................9
Clear Memory................................................................................................................................................9
Recording and Datalogging..................................................................................................................10
Datalogging Power Saving Mode....................................................................................................... 11
CFM / P (Cubic Foot Per Minute per Person) Calculation Example.....................................12
Parameter Setup Screen (1-5).............................................................................................................. 13
0ppm and 400ppm CO2 Calibration ..................................................................................................19
4. PC SOFTWARE & DRIVER INSTALLATION........................................................ 21
5. USING PC SOFTWARE......................................................................................... 25
6. WARRANTY .......................................................................................................... 33
Page 2
Page 3

1. FEATURES & SPECIFICATIONS
Features
• 3 Independent CO
• User operated CO
, humidity and temperature sensors.
2
calibration.
2
• Datalogging : 50,000 records.
• Fast USB download (50,000 records in less than 10 seconds).
• Internal backup battery to maintain date / time setting.
• Power management IC to increase batter efficiency.
• Easy- to-Use PC software for parameter settings and data analysis.
• Internal CO
alarm buzzer.
2
Specifications
• CO
Sensing Method : NDIR (Non-Dispersive Infrared)
2
• Measures : Carbon dioxide in PPM, temperature (℉ or ℃), % Relative
Humidity
• CO
• CO
Measurement range : 0~9999 ppm (2001~9999 ppm over range)
2
Accuracy : ± 75ppm, ± 8% of reading (0~2000 ppm)
2
• Display Resolution : ±1 ppm
• Datalogging : 50,000 records.
Page 3
Page 4
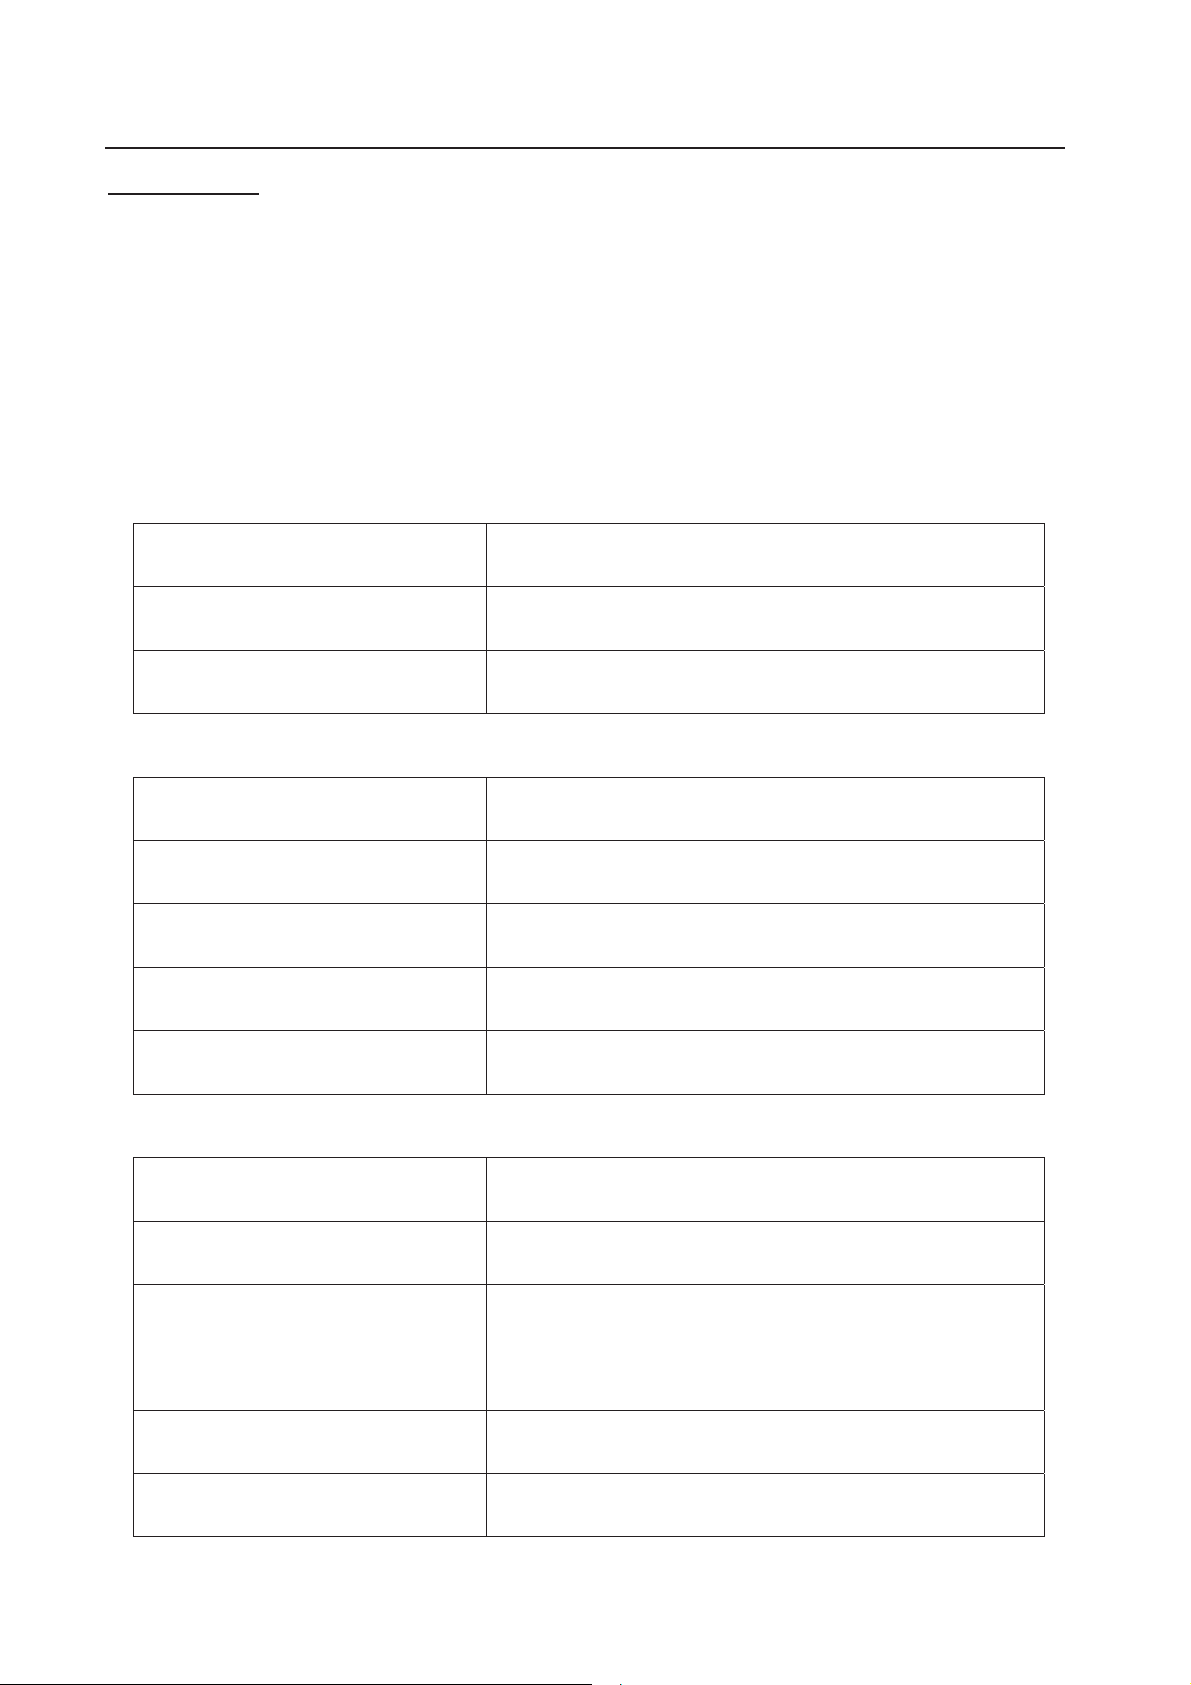
Applications
• Building HVAC monitoring.
• Indoor air quality survey.
• Locate the presence of combustion fumes from vehicles and
appliances.
General
Operation Condition
Storage Temperature
CO2 Sensor
Measurement Range 0~9999 ppm (2001~9999 ppm over range)
Accuracy ± 75ppm, ± 8% of reading (0~2000 ppm)
Resolution ±1 ppm
Response Time
Relative Humidity Sensor
32-122
0-95%,RH,non-condensing
-4 to 140
Type Non-dispersive infra-red (NDIR)
Reaches 90% in approximately 2 minutes
°F (0-50°C)
°F (-20 to 60°C)
Type CMOSens
Measurement Range 1%-99%
Accuracy ±3.0%RH(20~80%) at 25°C
±5.0%RH(<20%,>80%) at 25°C
Resolution 0.1%
Response Time 8 Seconds
Page 4
Page 5
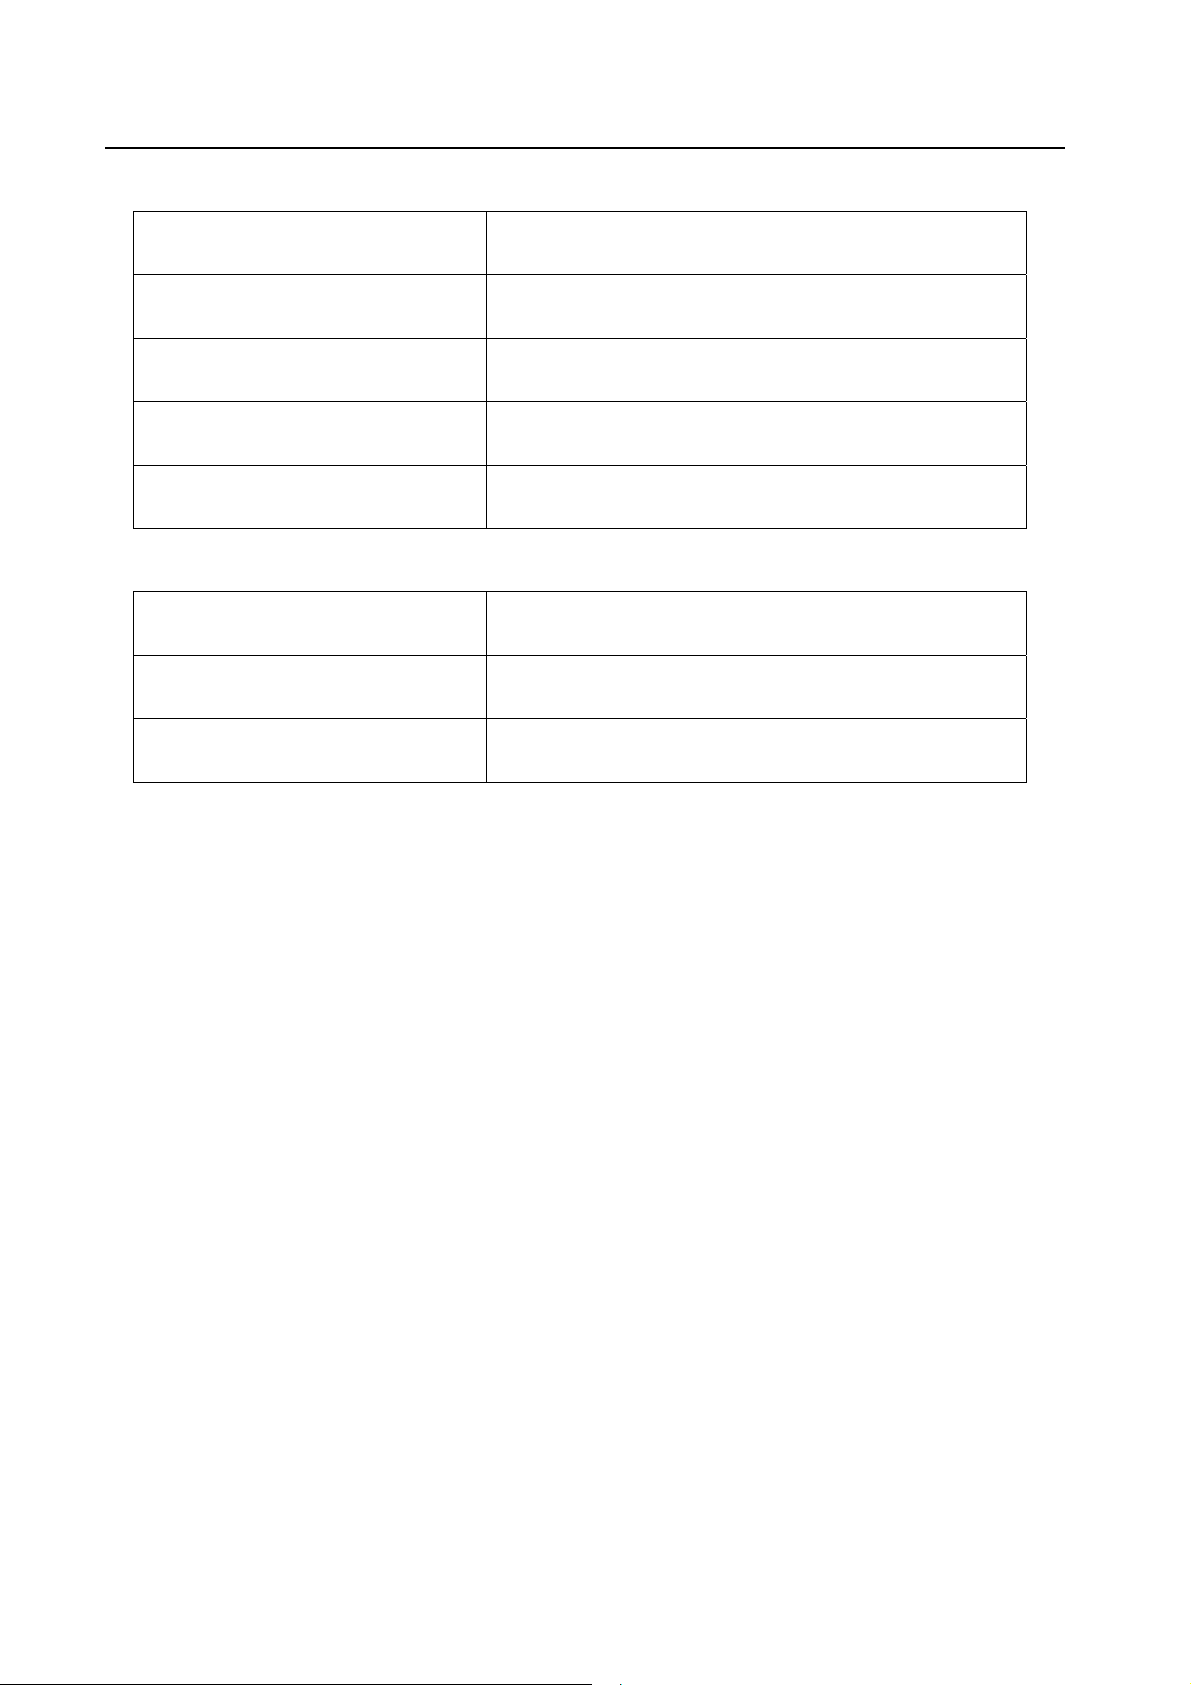
Temperature Sensor
Type Thermistor
Measurement Range
Power Supply
Battery Operation 24 hours
External Power Supply 6V VDC with 0.5A
0 to 50
Accuracy
Resolution
Response Time 1 seconds
Battery 4 AA alkaline battery
±1.0
0.1
°C
°C from 0-50°C
°C
Page 5
Page 6
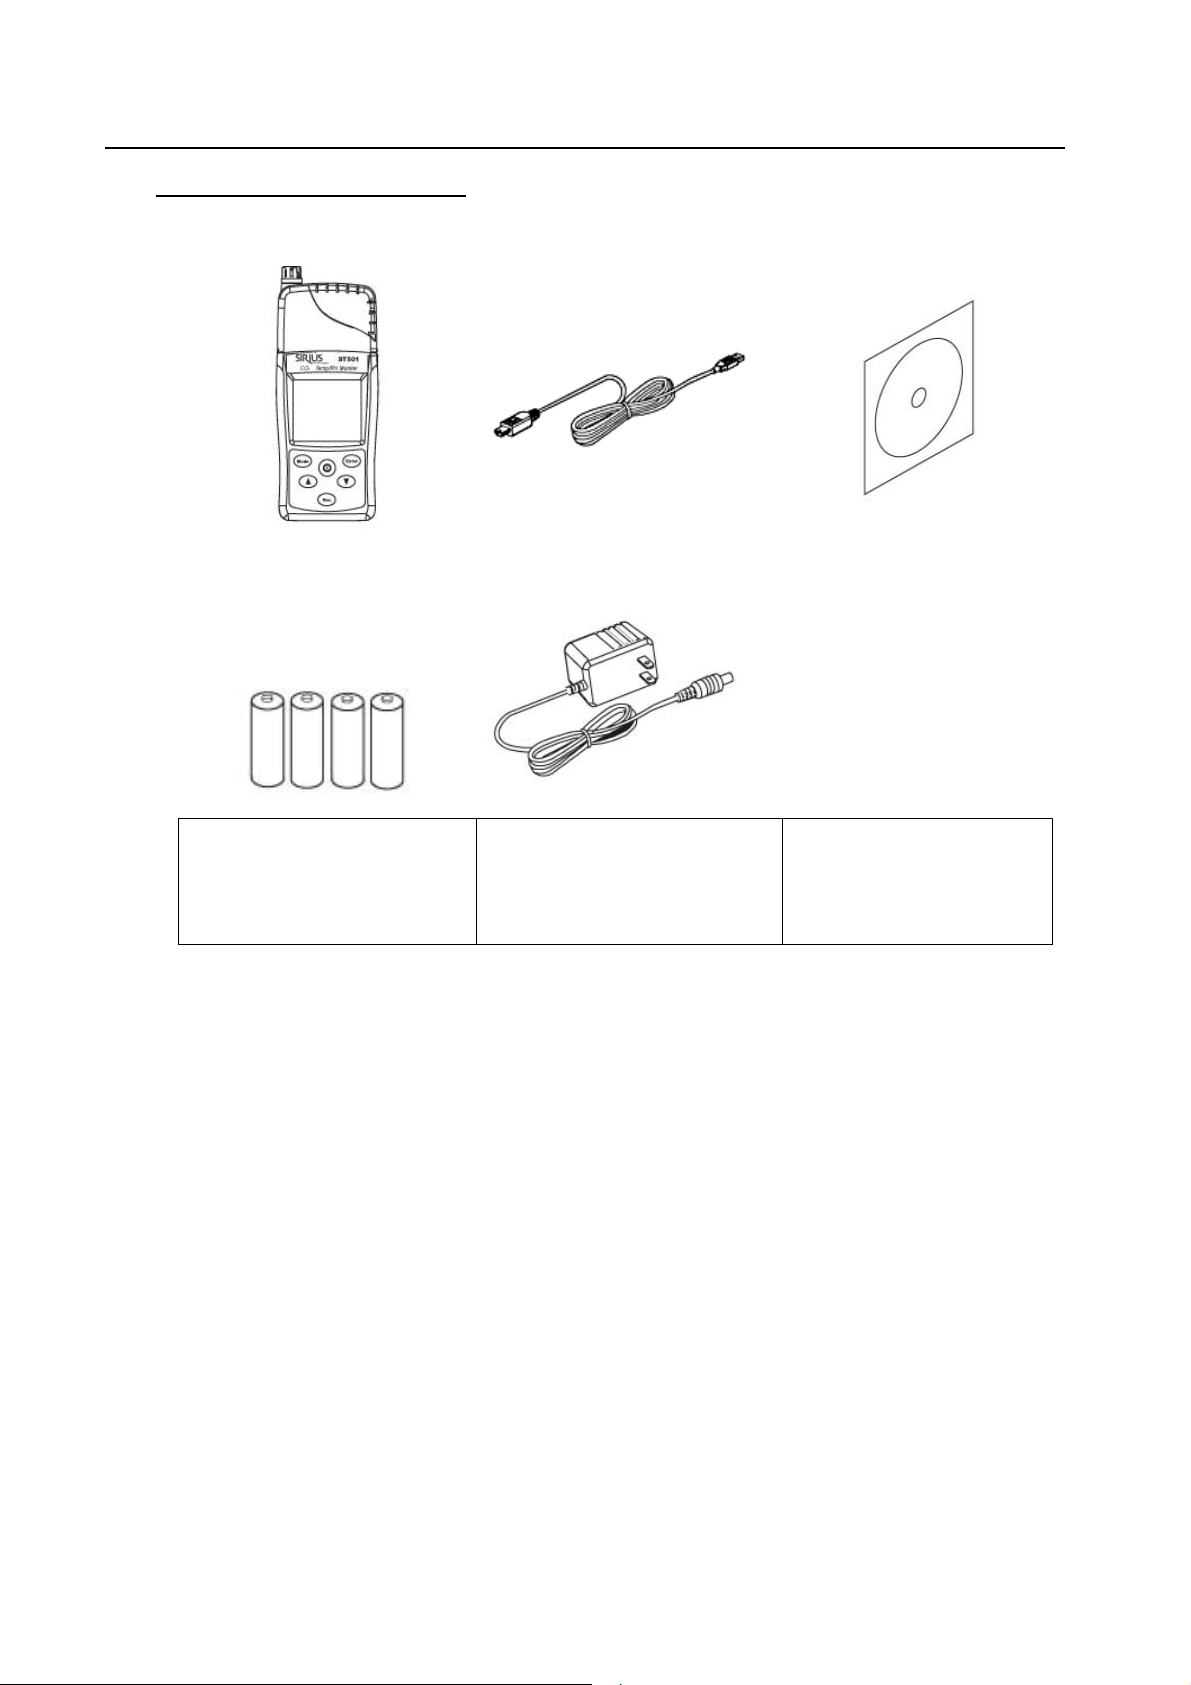
2. WHAT’S IN THE BOX
1.Main Unit 2. USB Cable 3. Installation Disk
4. 4X1.5V AA
Alkaline Battery
5. 6V DC Adaptor
Page 6
Page 7
3. START UP AND GENERAL OPERATION
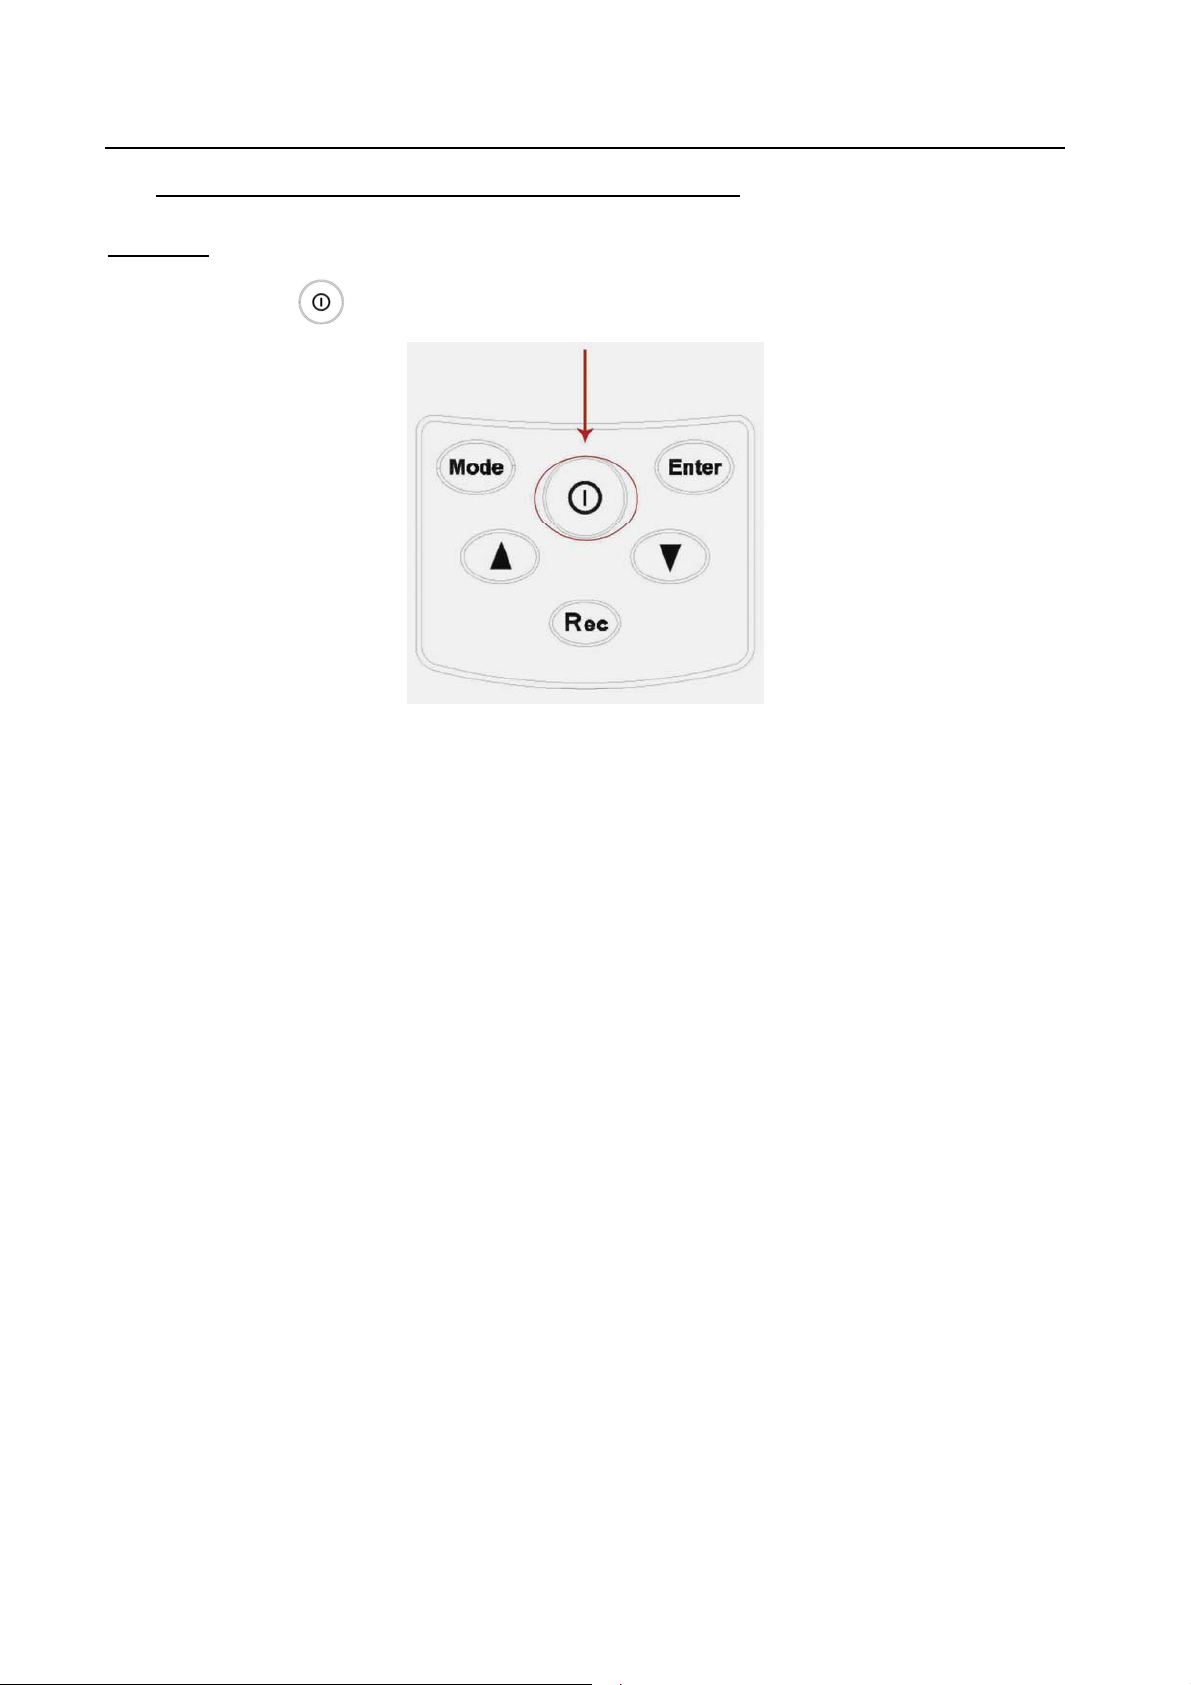
Start Up
• Hold the
Power button for 2 seconds to turn on Meter.
• Wait few seconds until the “Warm-up” sign turns off.
• The unit is ready to use.
Page 7
Page 8
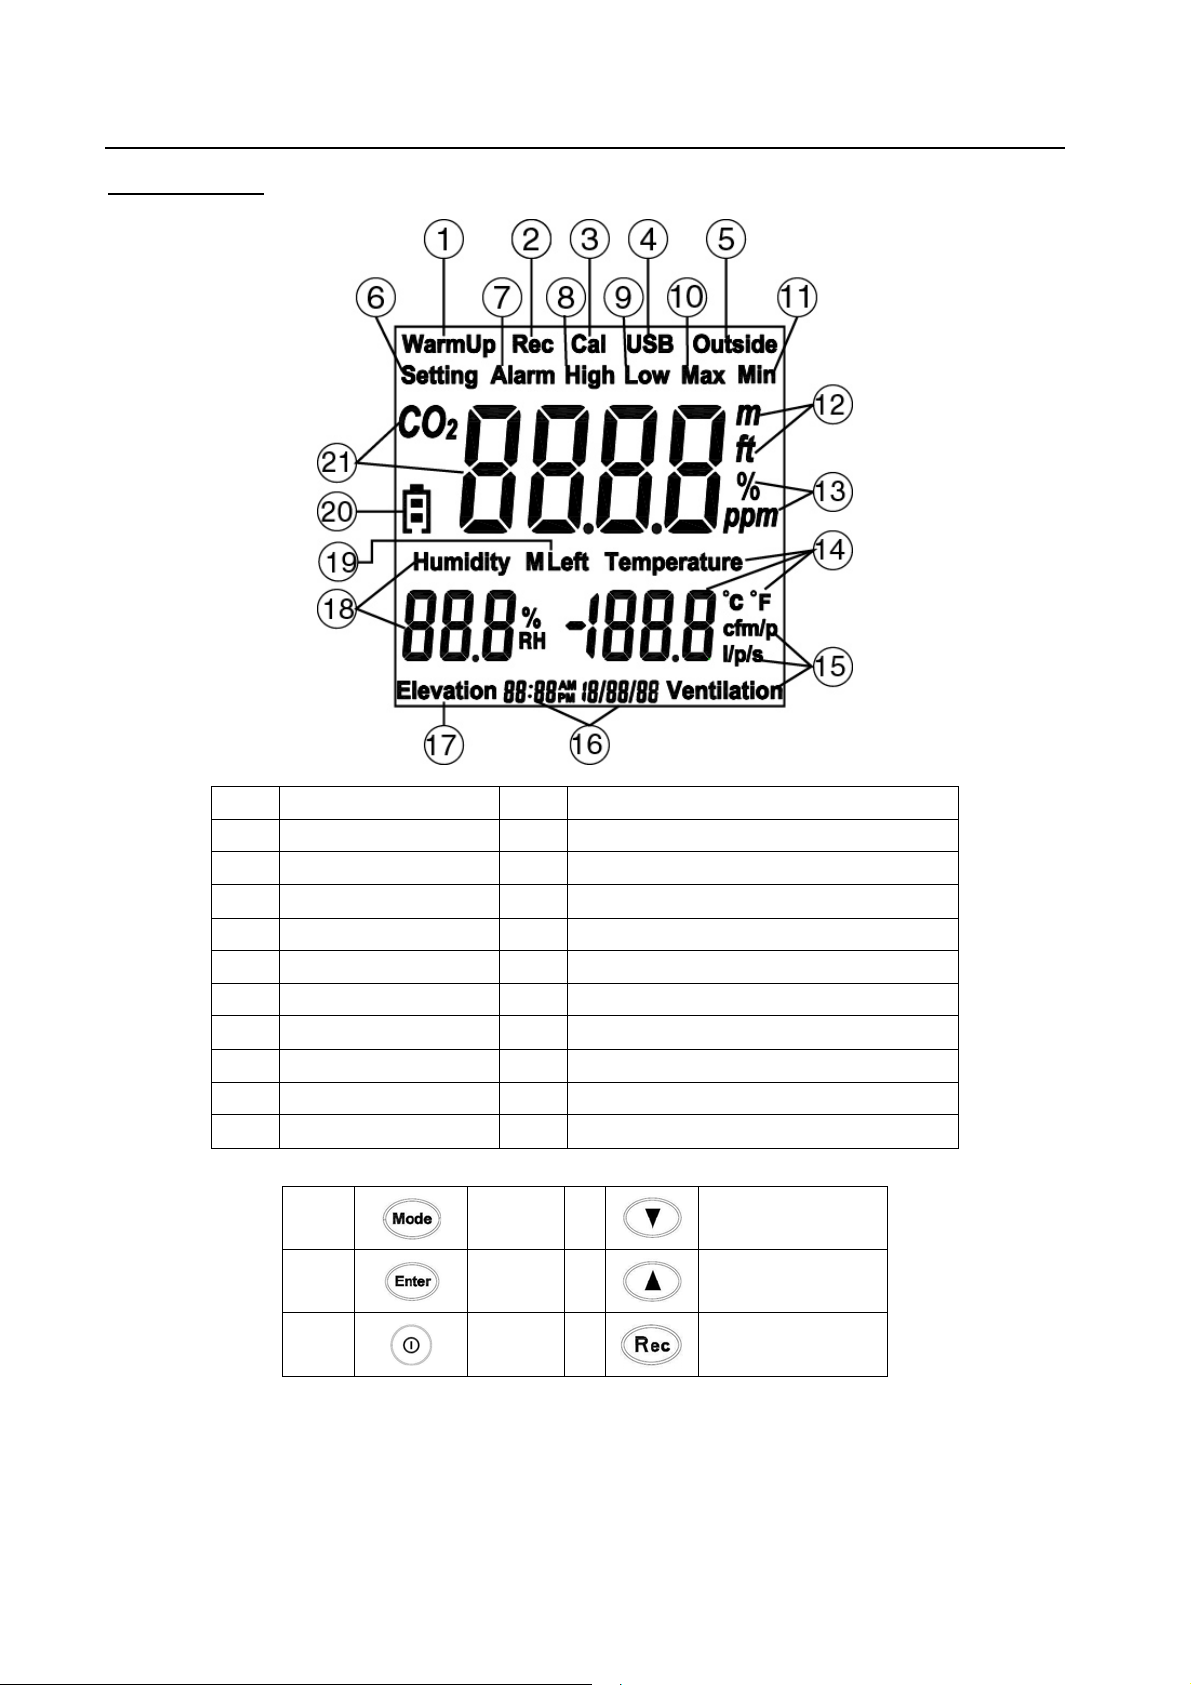
LCD Display
1. Warm Up 12. Meter / Foot
2. Recording 13. % PPM
3. Calibration 14. Temperature Reading
4. USB 15. Flow Rate
5. Outside- CO2 16. Time & Date
6. Setting 17. Elevation
7. Alarm 18. Humidity
8. High 19. Memory Left
9. Low 20. Battery
10. Maximum 21. CO2 Reading
11, Minimum
1.
2.
3.
Mode 4. Down Arrow
Enter 5. Up Arrow
Power 6. Record
Meter Buttons
Page 8
Page 9
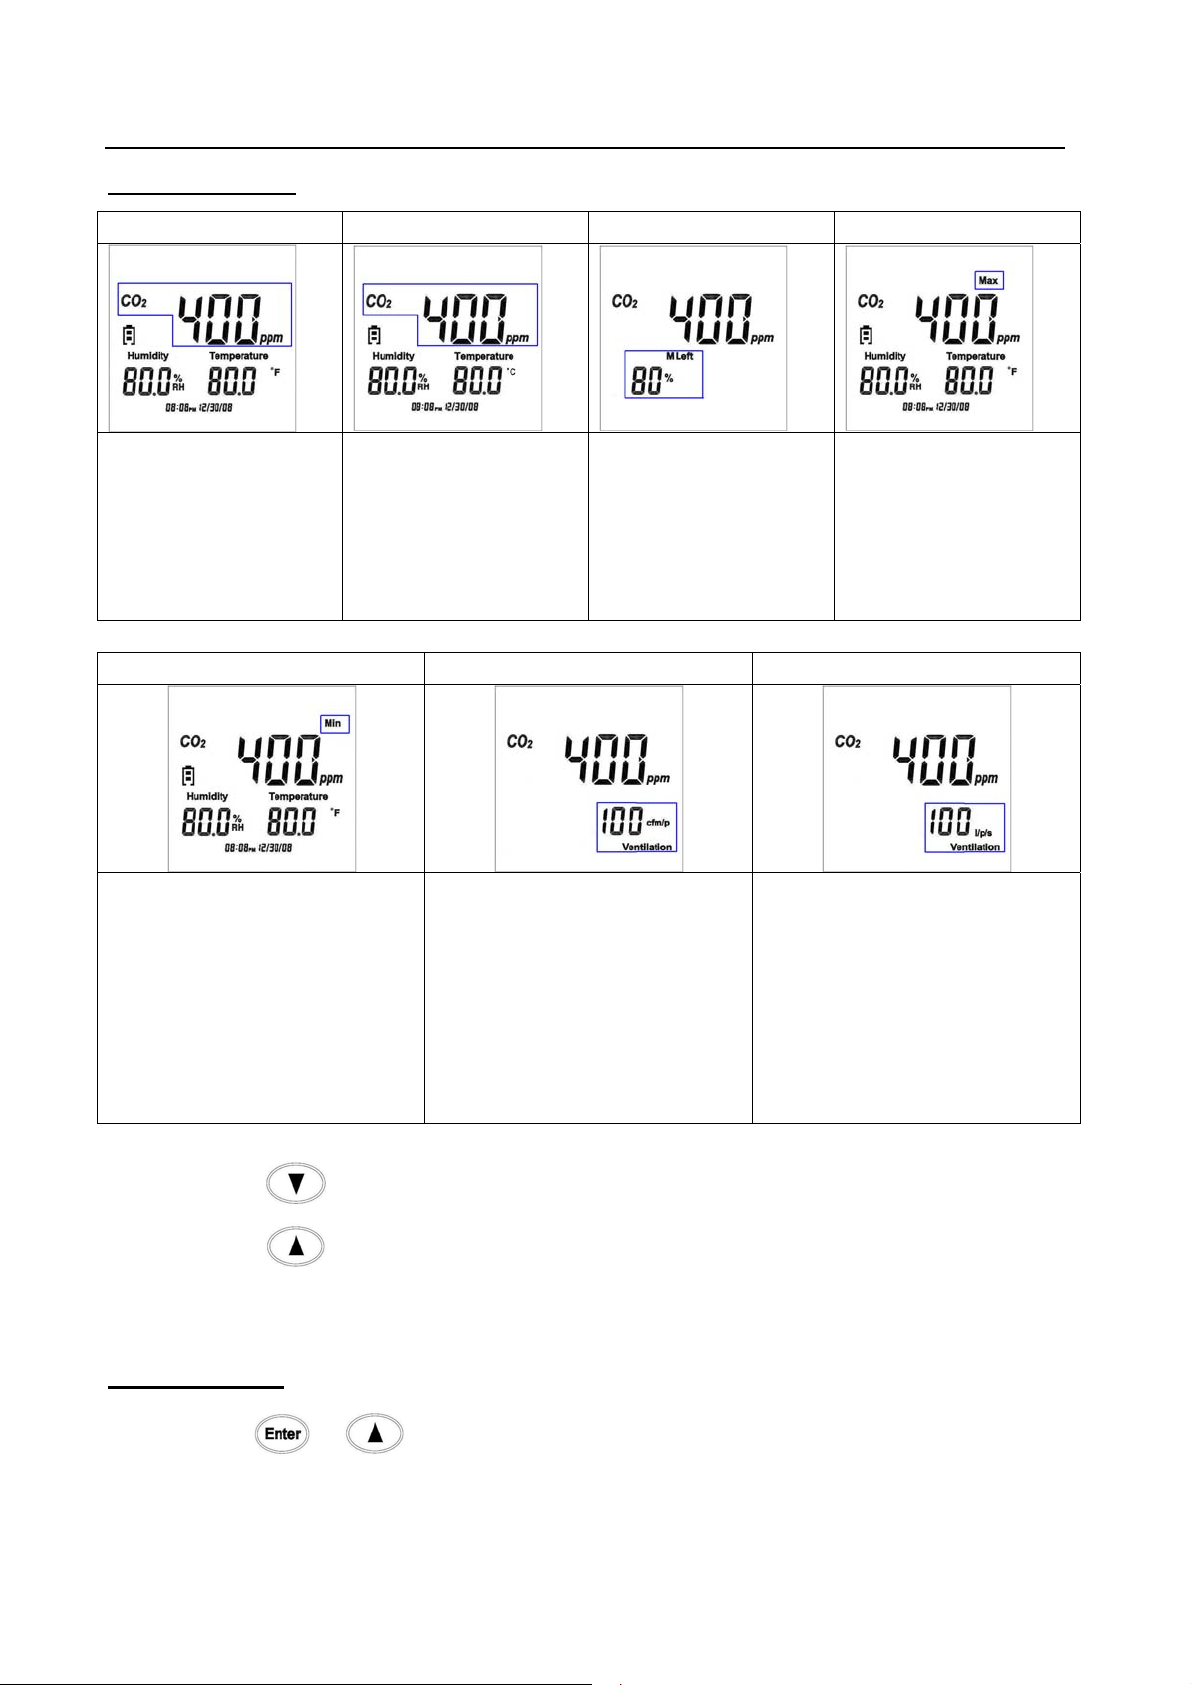
Display Screen (1-7)
1. 2. 3. 4.
Main Screen
Temp.(F)
5. 6. 7.
Minimum Reading:
CO
2
Humidity &
Temperature
Main Screen
Temp.(C)
CFM / P ventilation
(Cubic Foot Per
Minute Per Person)
Maximum
% of Memory Left
Reading:
CO
/ Rh / Temp
2
l / p / s Ventilation
(Liter Per Second)
• Press to rotate the screen in the clockwise direction.=2
• Press
to rote the screen in the counter-clockwise direction.
Clear Memory
• Press
& together to clear the datalogging memory and
restore the memory capacity back to 100%.
Page 9
Page 10
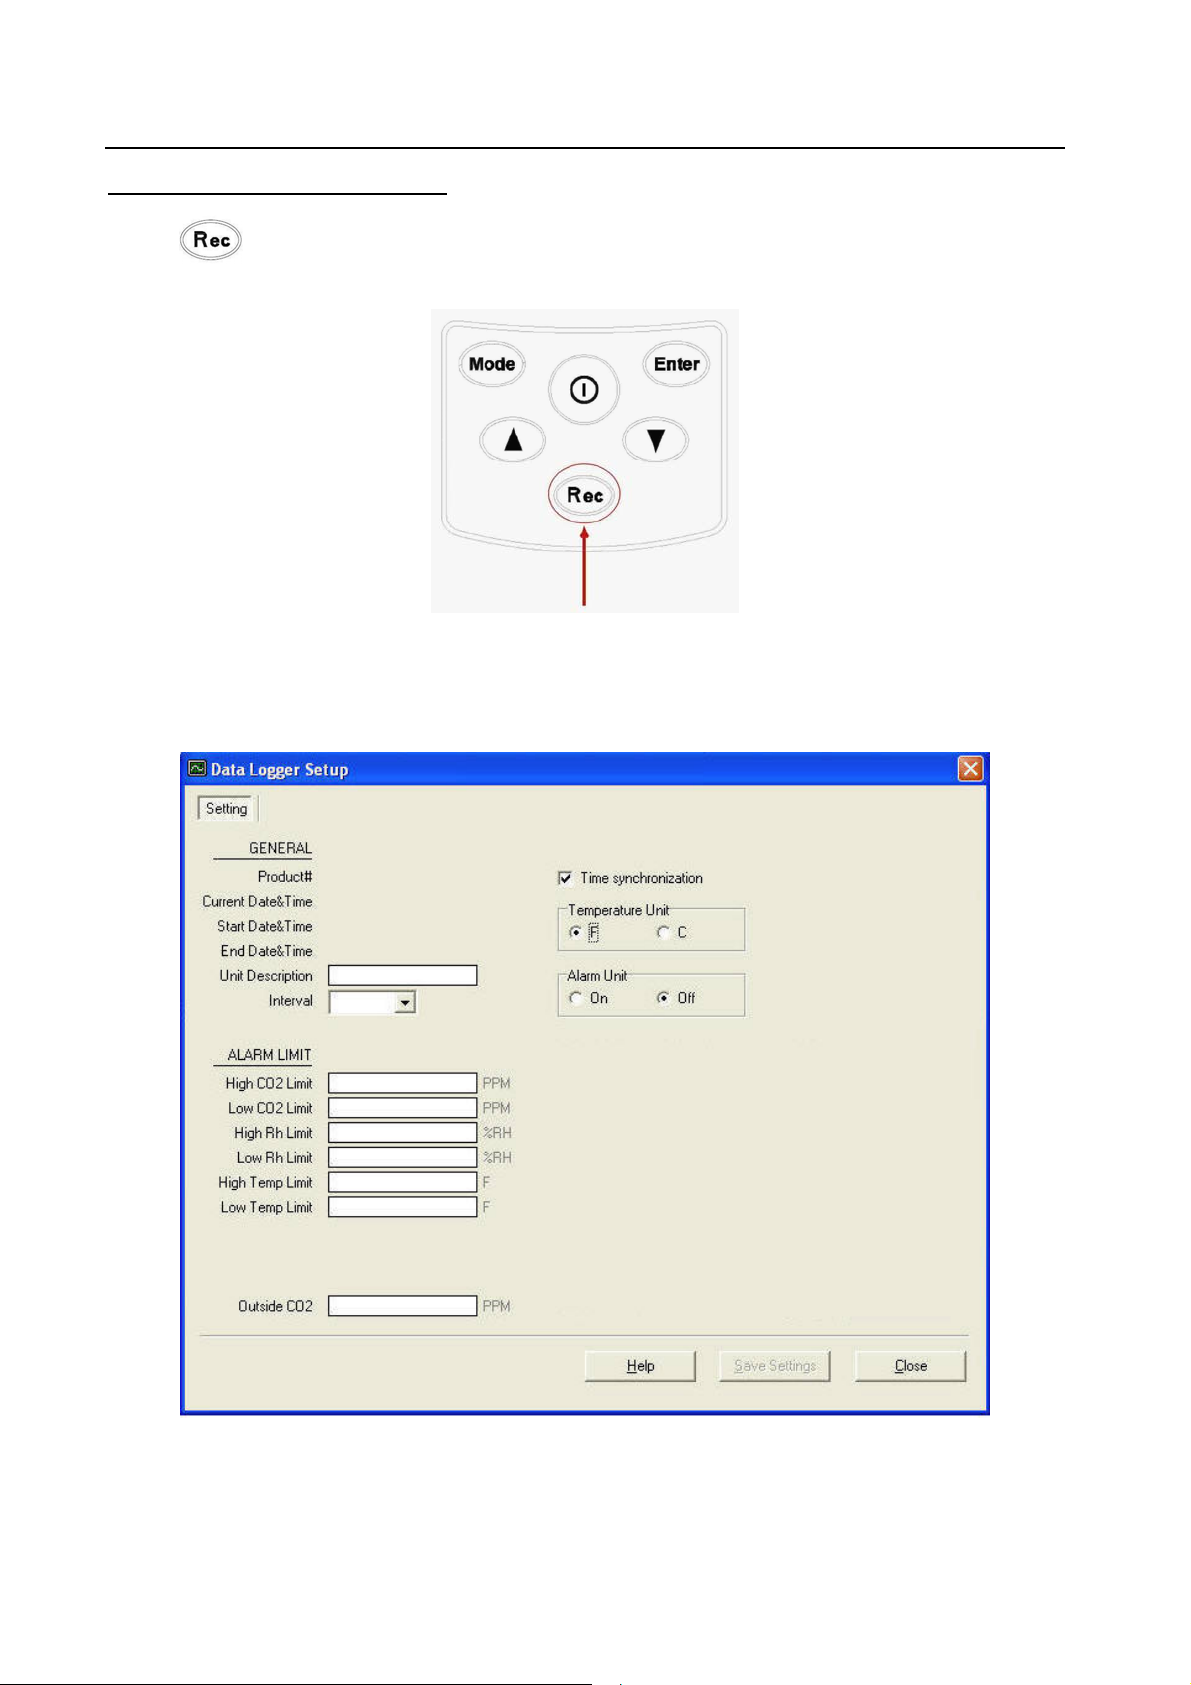
Recording and Datalogging
Hold
for 2 seconds to start data recording.
Sampling rate (5sec / 10sec / 1min / 5min / 10min / 30min / 1 hour / 2 hour)
can only be set from PC setup screen.
Page 10
Page 11
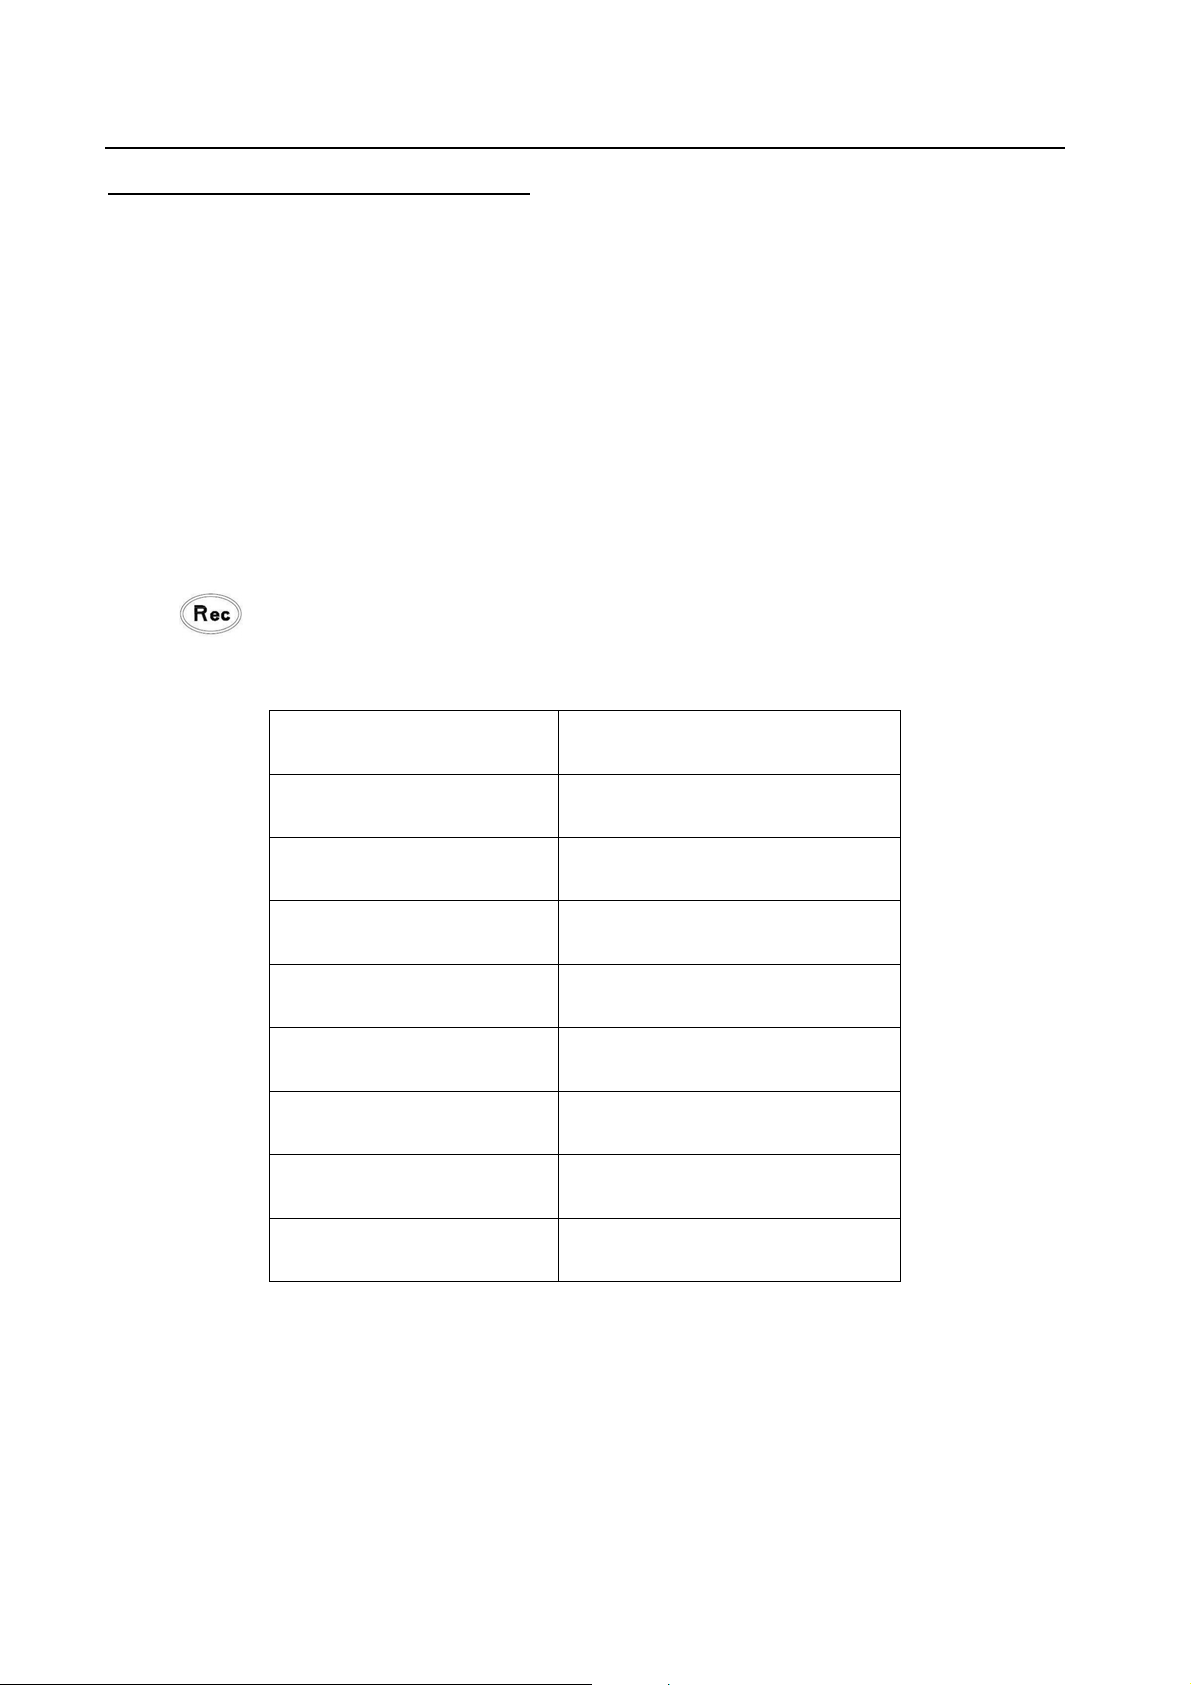
Datalogging Power Saving Mode
Sampling rate longer than 5 minutes (5min / 10min / 30min / 1 hour) will
automatically turn on power-saving mode. The Meter will be in power-saving
mode during the non-sampling period. One minute before the sampling time,
the Meter will turn on to take the sample. After the sampling is done, the
Meter will turn back to power-saving mode. While in the power-saving mode,
the Meter will not respond to any key inputs.
Hold
for 2 seconds to exit the datalogging mode.
Sampling Interval Power-Saving
5 seconds
10 seconds
1 minutes
5 minutes
10 minutes
30 minutes
1 hour
9
9
9
9
2 hour
Page 11
9
Page 12

CFM / P (Cubic Foot Per Minute per Person) Calculation Example
CFM/P=10600 / (Cs-Co)
• Cs=CO2 reading
• Co=CO2 outside reading
Example:
10,600 Constant
650
400
Cs=CO
Co=CO
reading
2
outside reading
2
42.4 CFM / P
10,600 / (650-400) = 42.4 (CFM / P)
L / P / S (Liter Per Second)
L / P / S= (CFM/P)x28.32 / 60
Example:
48.60 =CFM / P (Cubic Foot Per Minute / person)
28.32 =1 Cubic Foot = 28.3168466 Liters
60.00 =Divided by 60 to get per second reading
22.9 =L / P / S (Liter Per Second)
48.6 x28.32 / 60=22.9 (L / P / S)
Page 12
Page 13
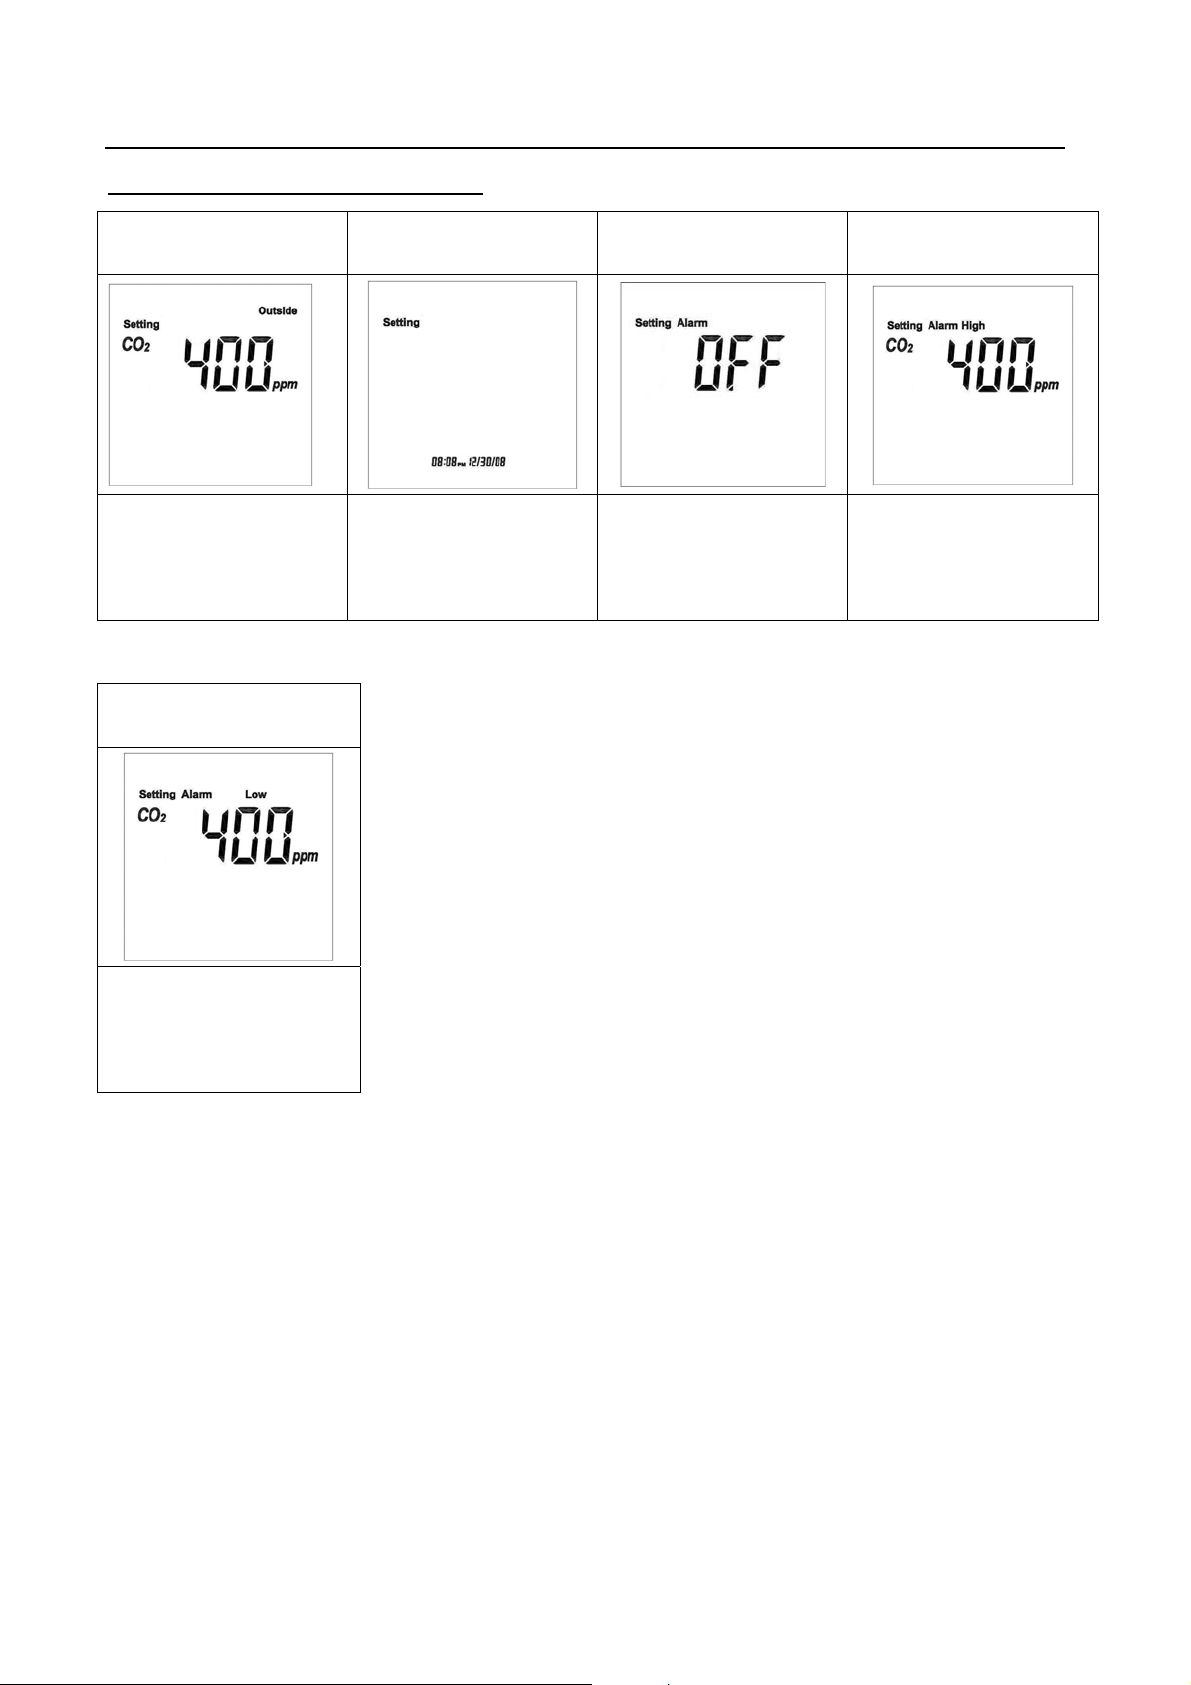
Parameter Setup Screen (1-5)
1. 2. 3. 4.
Setting Outside
CO
Value
2
5.
Low CO2
Clock
Setting
Alarm Buzzer
Setting
High CO
Alarm Setting
2
Alarm Setting
Page 13
Page 14
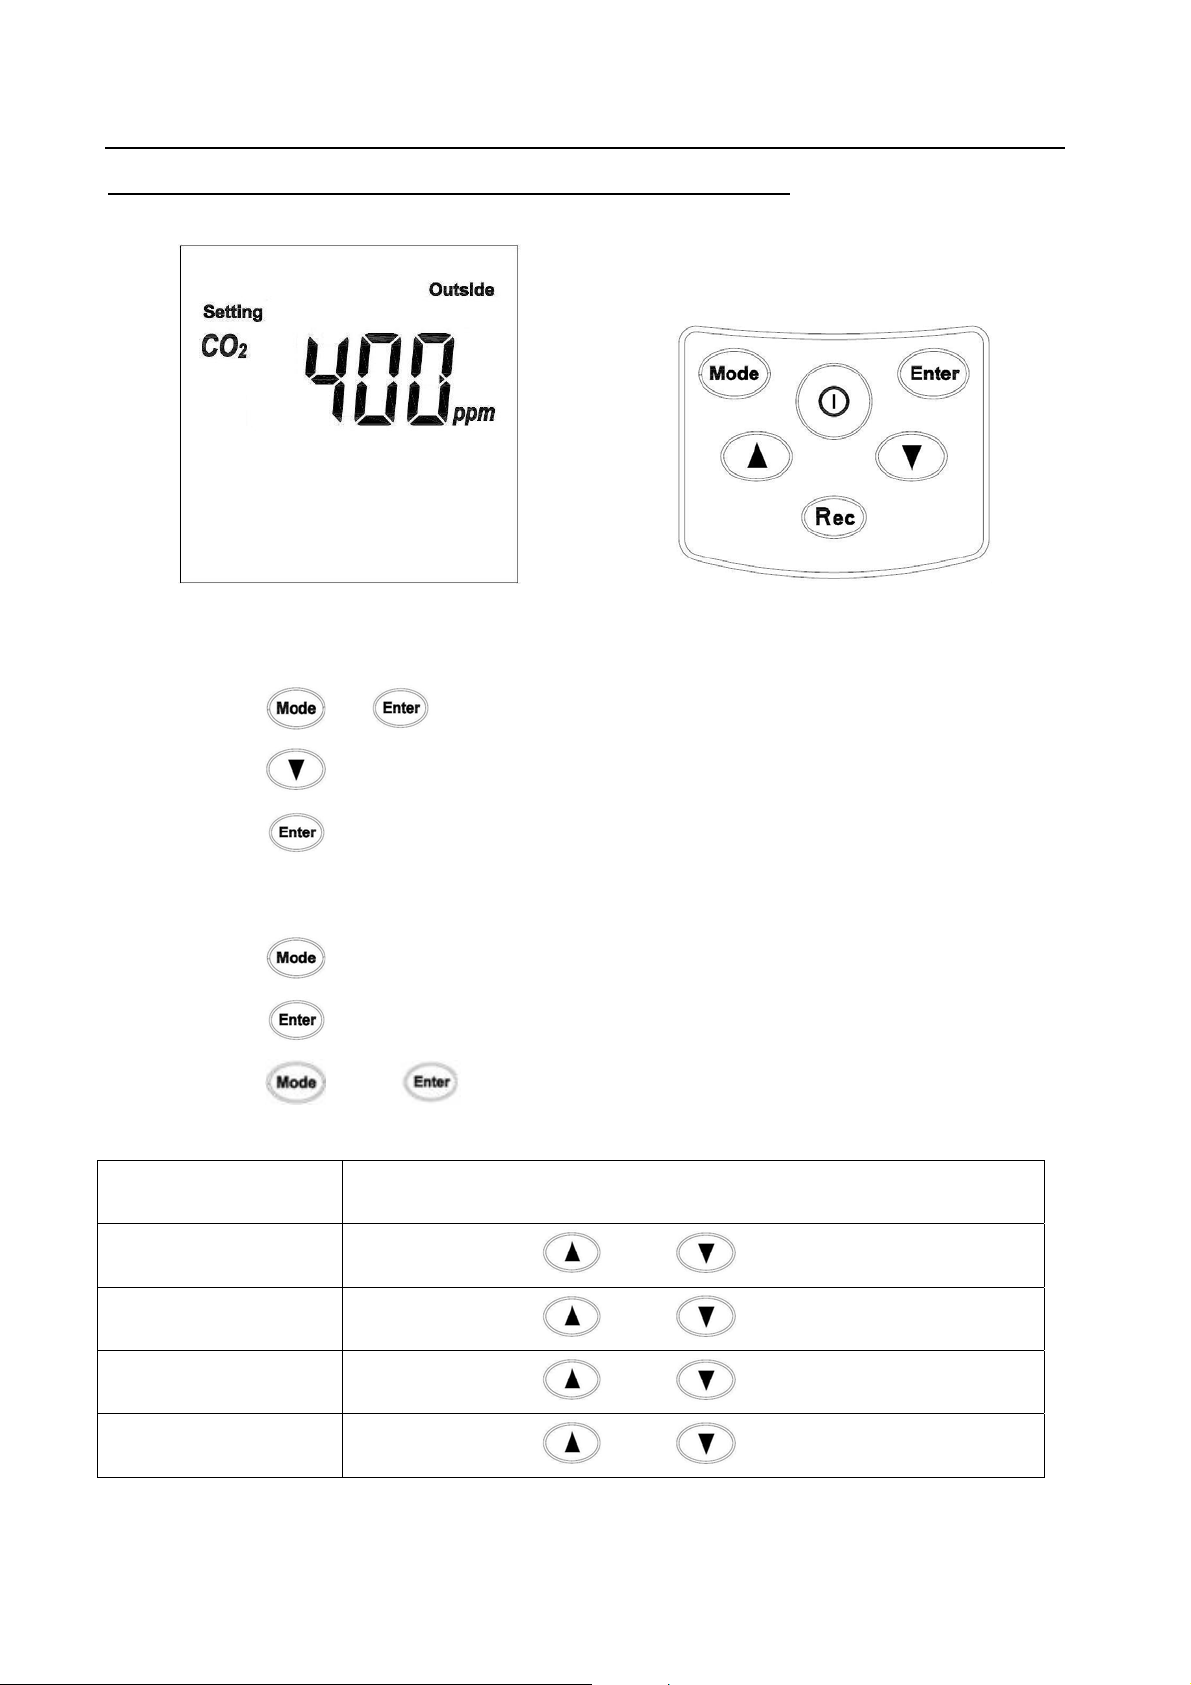
1. Enter Outside CO2 Value (default setting is 400ppm)
Enter Outside CO2 Manually:
• Press
+ to enter the setting menu.
• Press 5 times.
• Press
to enter the Outside CO2 setting Menu (First digit starts to
flash).
• Press
• Press
• Press
to rotate between digits.
to save.
and to return to the Main menu.
Unit Enter Value
1st digit
Use
and Select (0-9)
2nd digit
3rd digit
4th digit
Use
Use
Use
and Select (0-9)
and Select (0-9)
and Select (0-9)
Page 14
Page 15
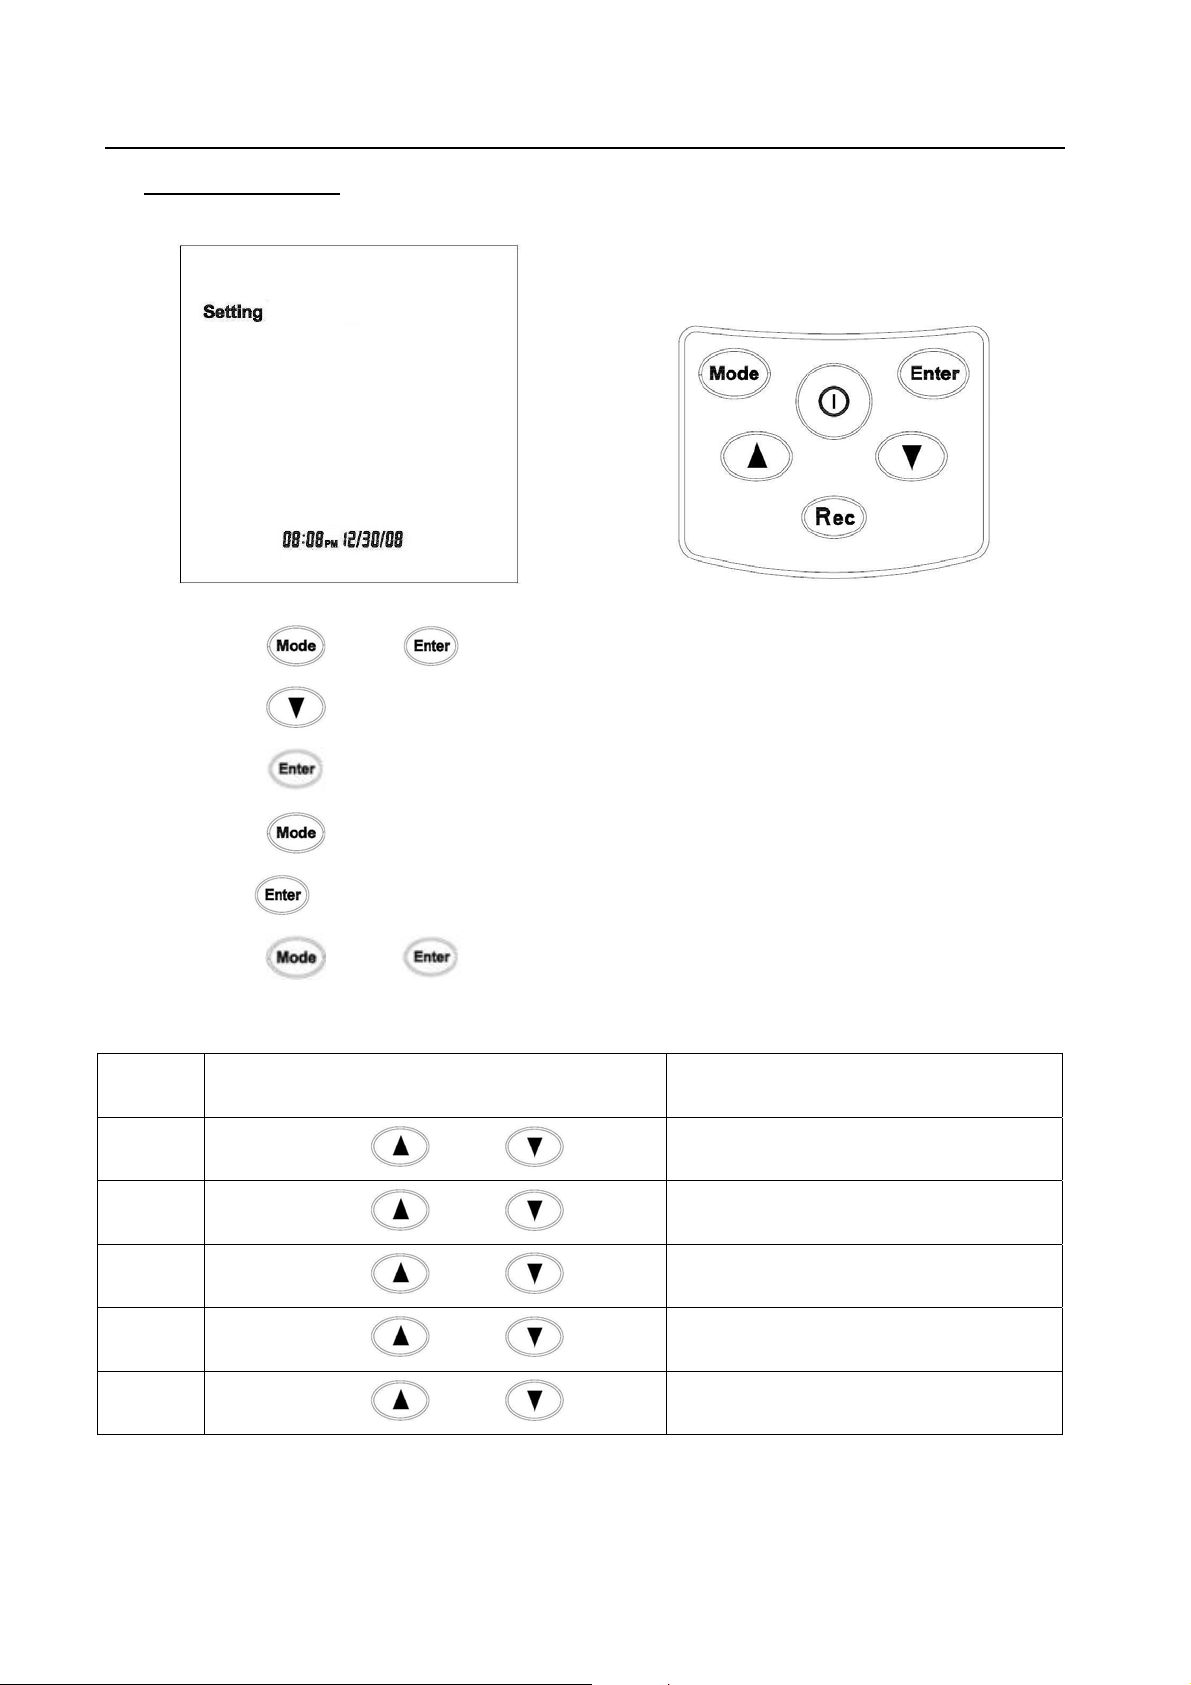
2. Clock Setting
• Press and to enter the setting menu.
• Press 1 x time to reach the Clock-Setting screen.
• Press
• Press
• Press
• Press
to enter Clock-Setting mode.
to rotate between digits.
to save and exit the Time Setting menu.
and to return to the Main menu.
Unit Enter Value (0-9) Range
Hour
Minute
Month
Use
Use
Use
and
and
and
(0AM -11PM)
(0-59)
(1-12)
Date
Year
Use
Use
and
and
Page 15
(1 to 31)
(2001-2037)
Page 16
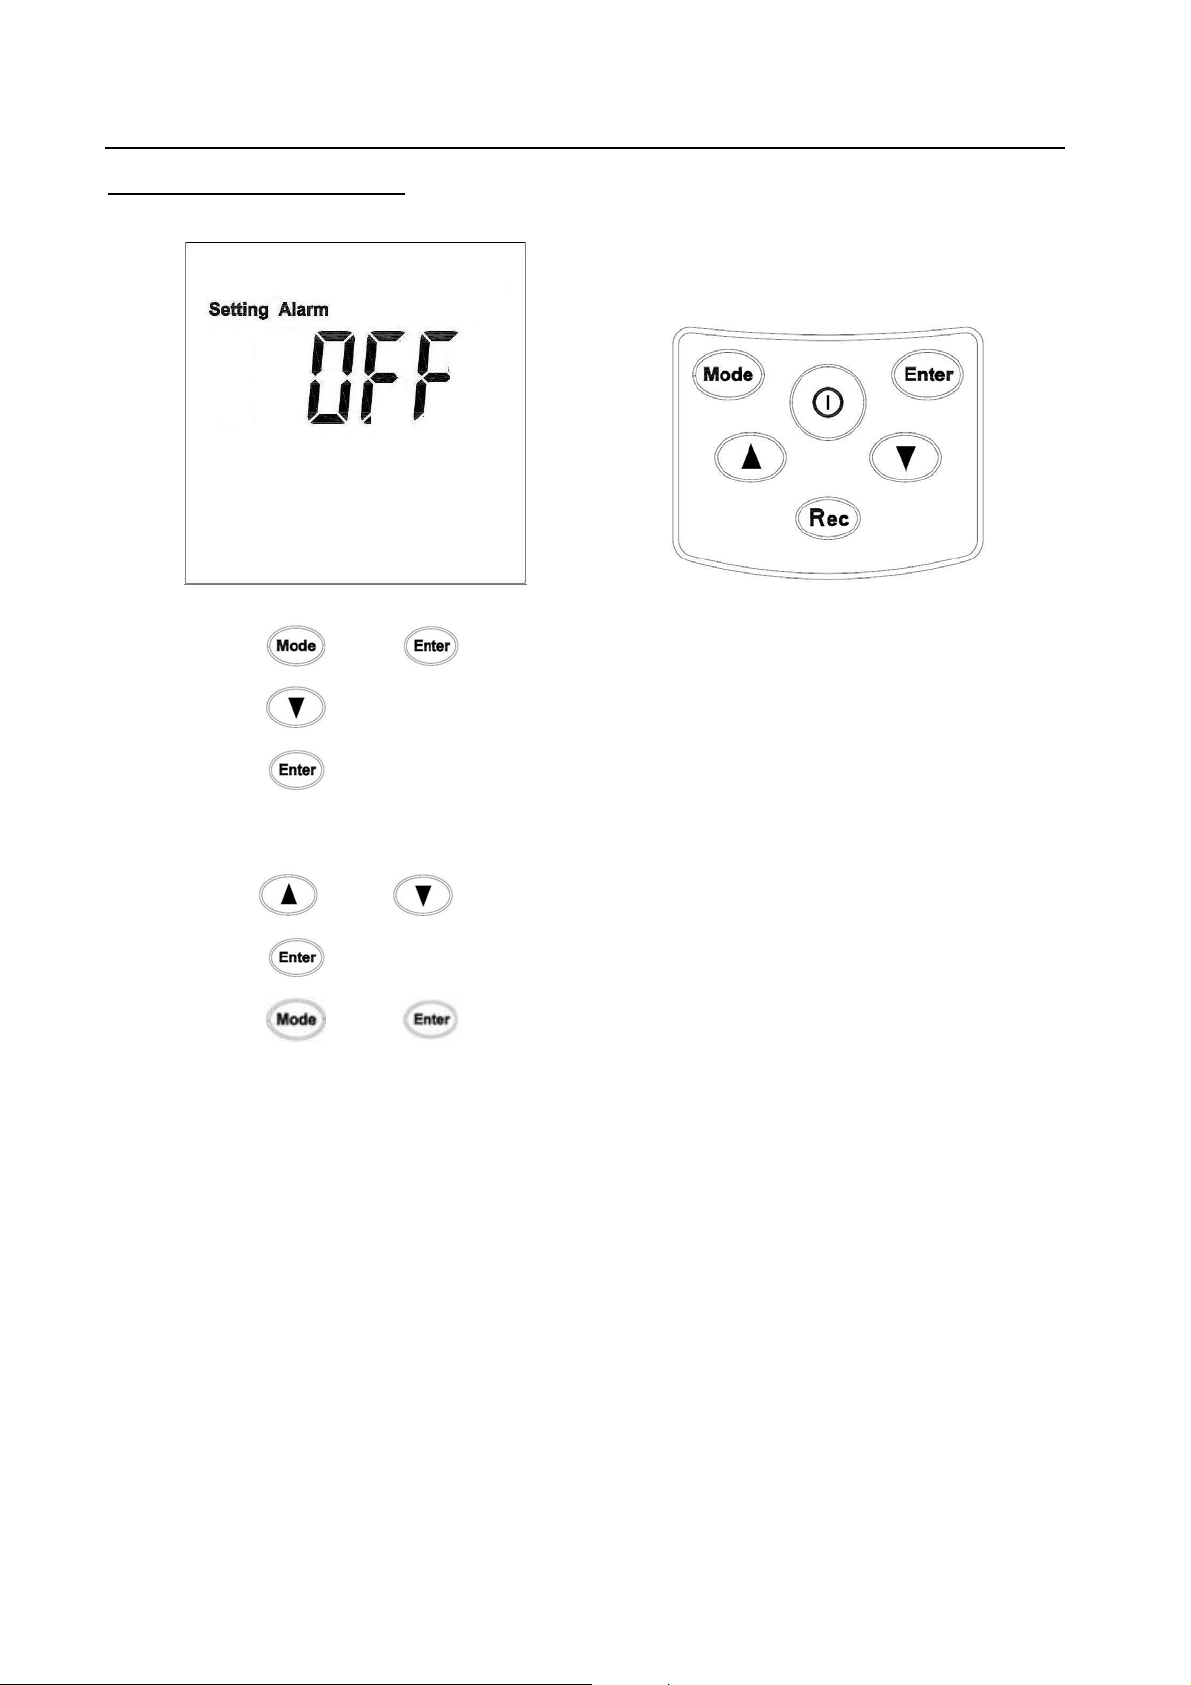
3. Audible Alarm Setting
• Press and to enter the setting menu.
• Press 2 times.
• Press
to enter the Audible Alarm Setting Page. Current audible
alarm status (On / Off) will start to flash.
• Use
• Press
• Press
and keys to switch between On / Off.
to save and exit.
and to return to the Main menu.
Page 16
Page 17
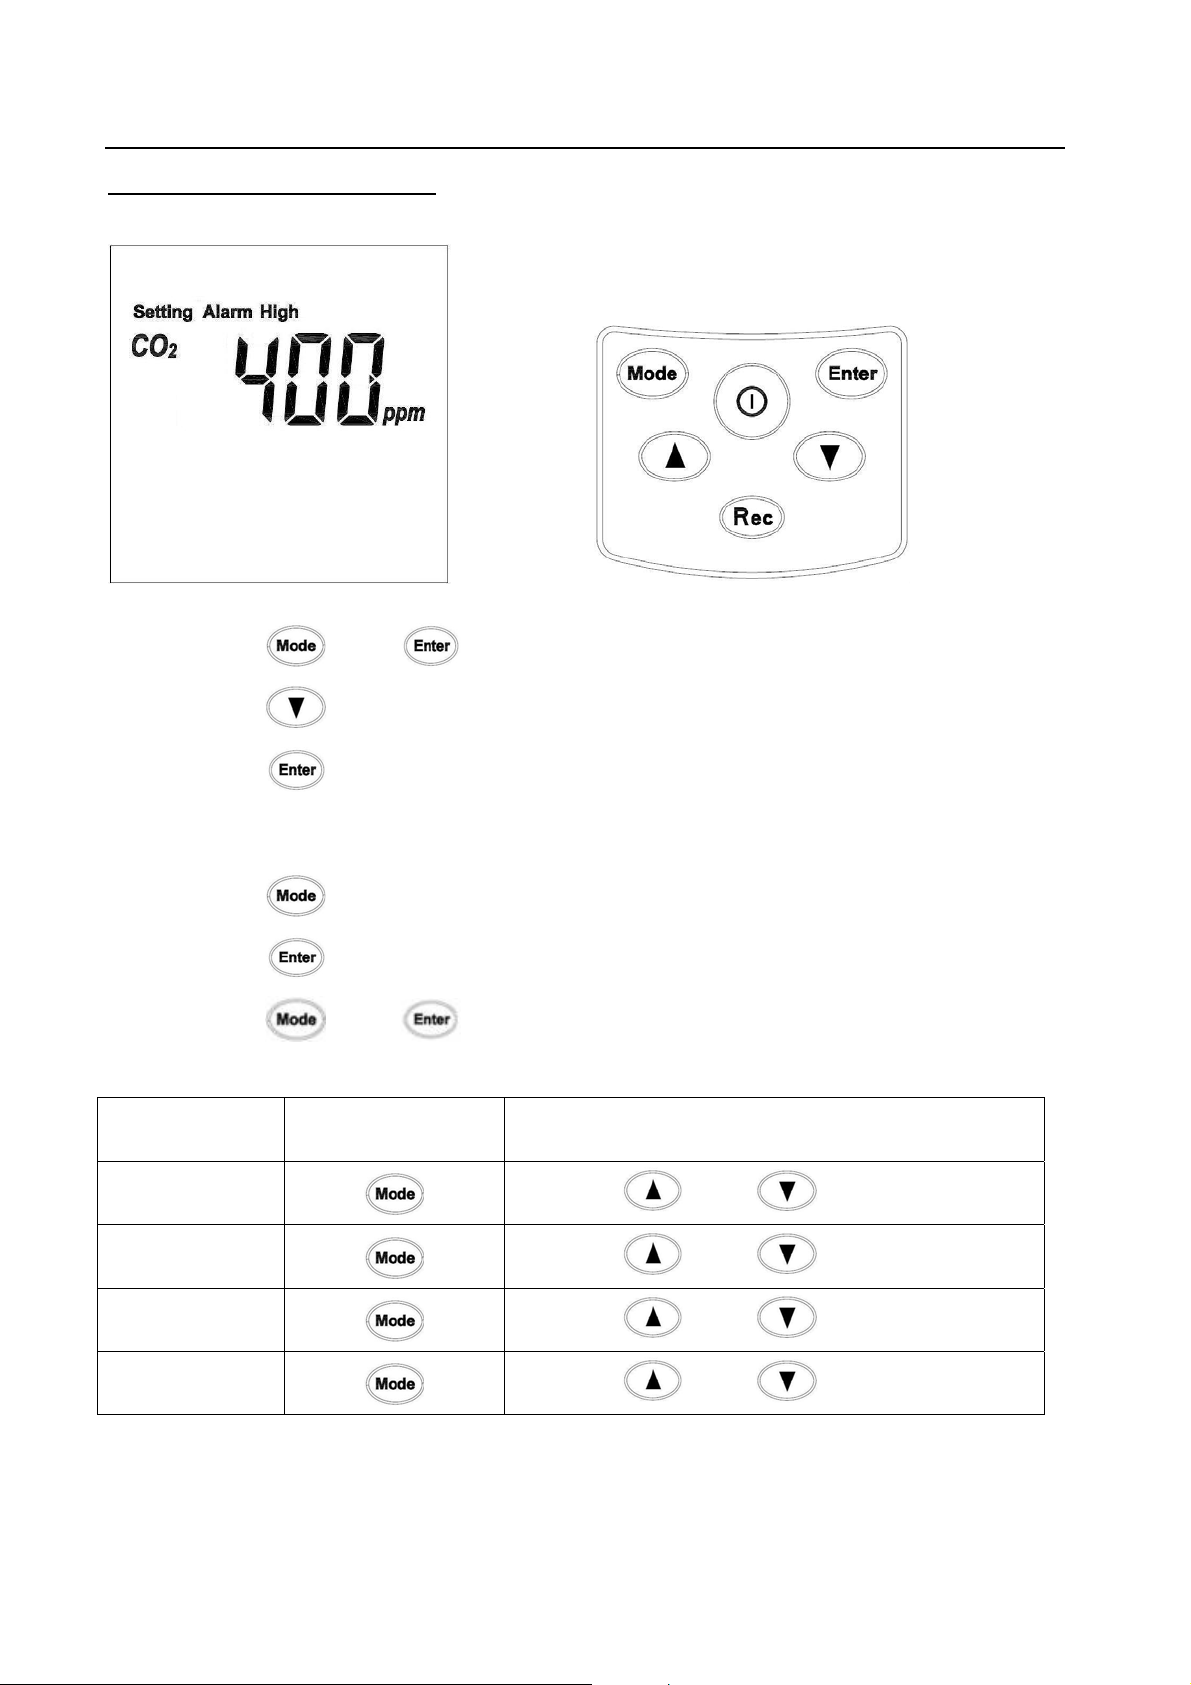
4. CO2 High Alarm Setting
• Press and to enter the setting menu.
• Press 3 times.
• Press
to enter the High Alarm Setting Menu (First digit starts to
flash).
• Press
• Press
• Press
to rotate between digits.
to save and exit the High Alarm Setting menu.
and to return to the Main menu.
Unit Select Digit Enter Value
1st digit
2nd digit
Use
Use
and Select (0-9)
and Select (0-9)
3rd digit
4th digit
Use
Use
Page 17
and Select (0-9)
and Select (0-9)
Page 18
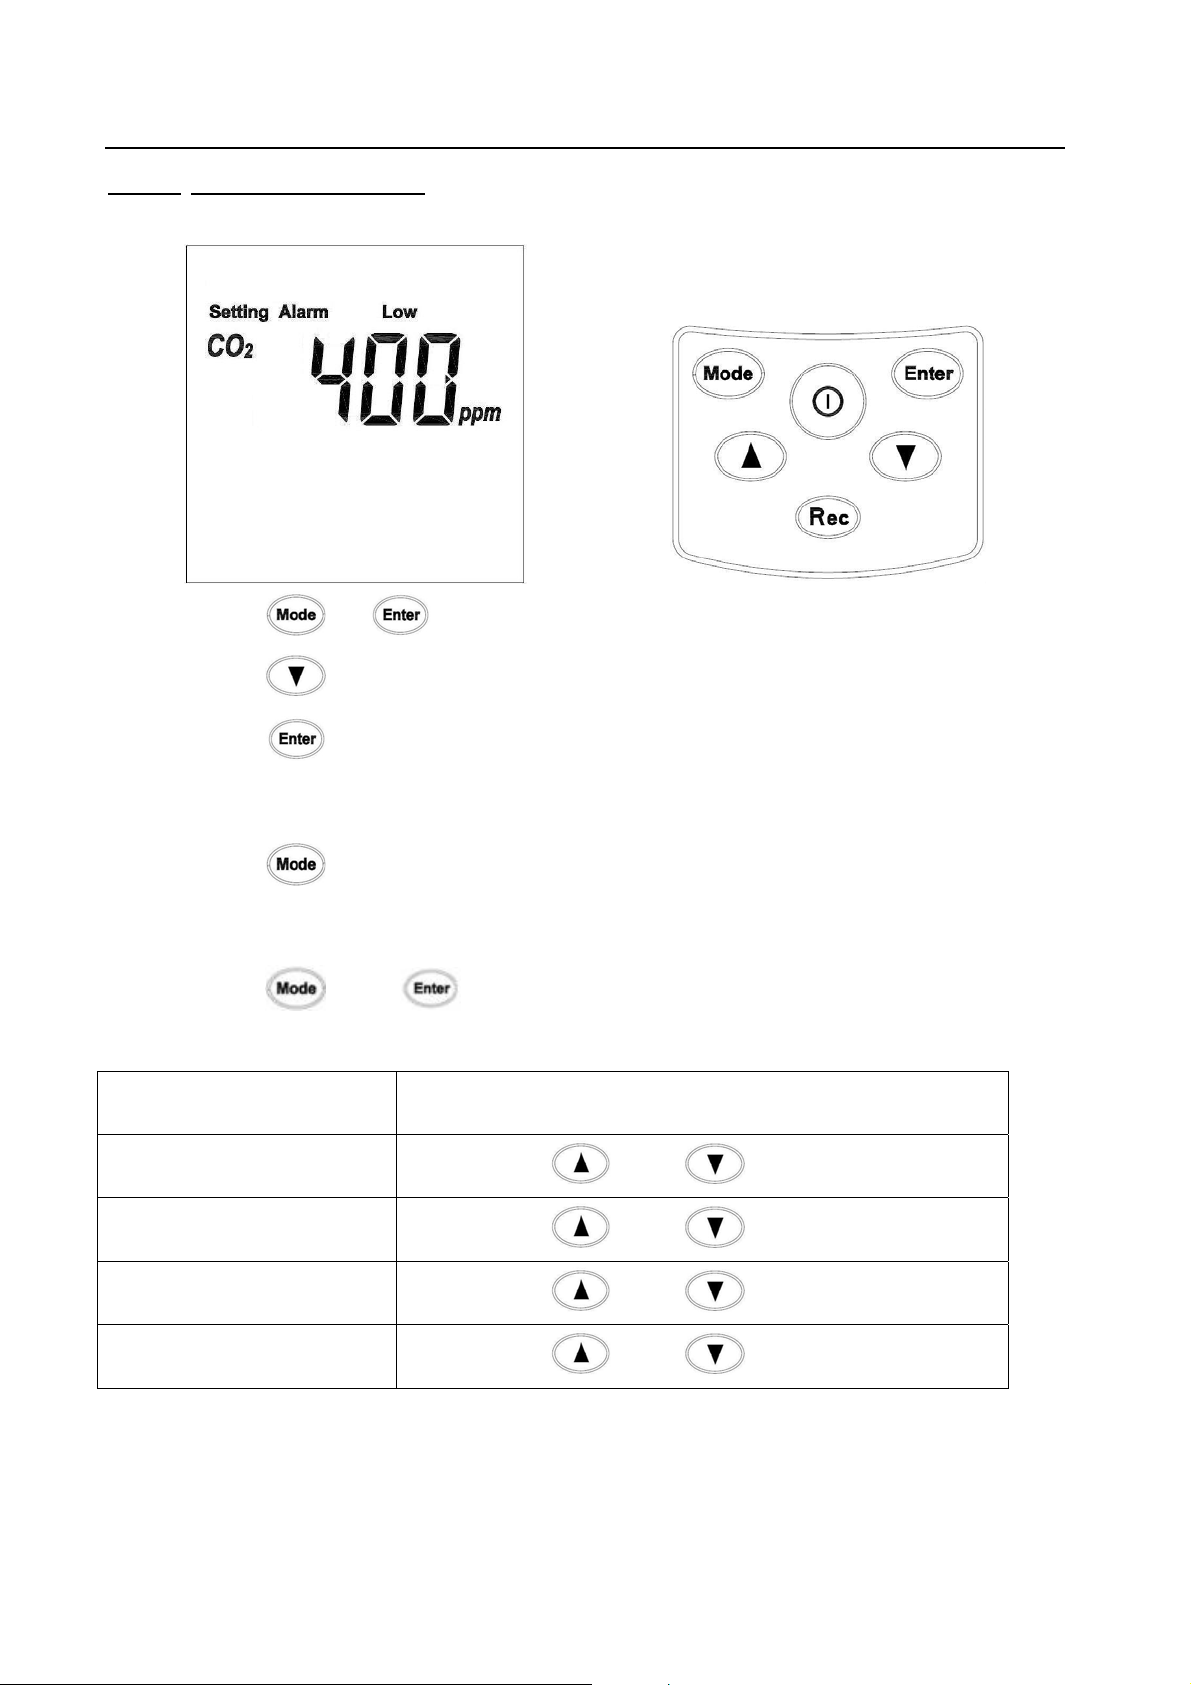
5. CO2 Low Alarm Setting
• Press + to enter the setting menu.
• Press 4 times.
• Press
to enter the Low Alarm Setting Menu (First digit starts to
flash).
• Press
to rotate between digits.
• Press Enter to save and exit the Low Alarm Setting menu.
• Press
and to return to the Main menu.
Unit Enter Value
1st digit
2nd digit
3rd digit
Use
Use
Use
and Select (0-9)
and Select (0-9)
and Select (0-9)
4th digit
Use
and Select (0-9)
Page 18
Page 19
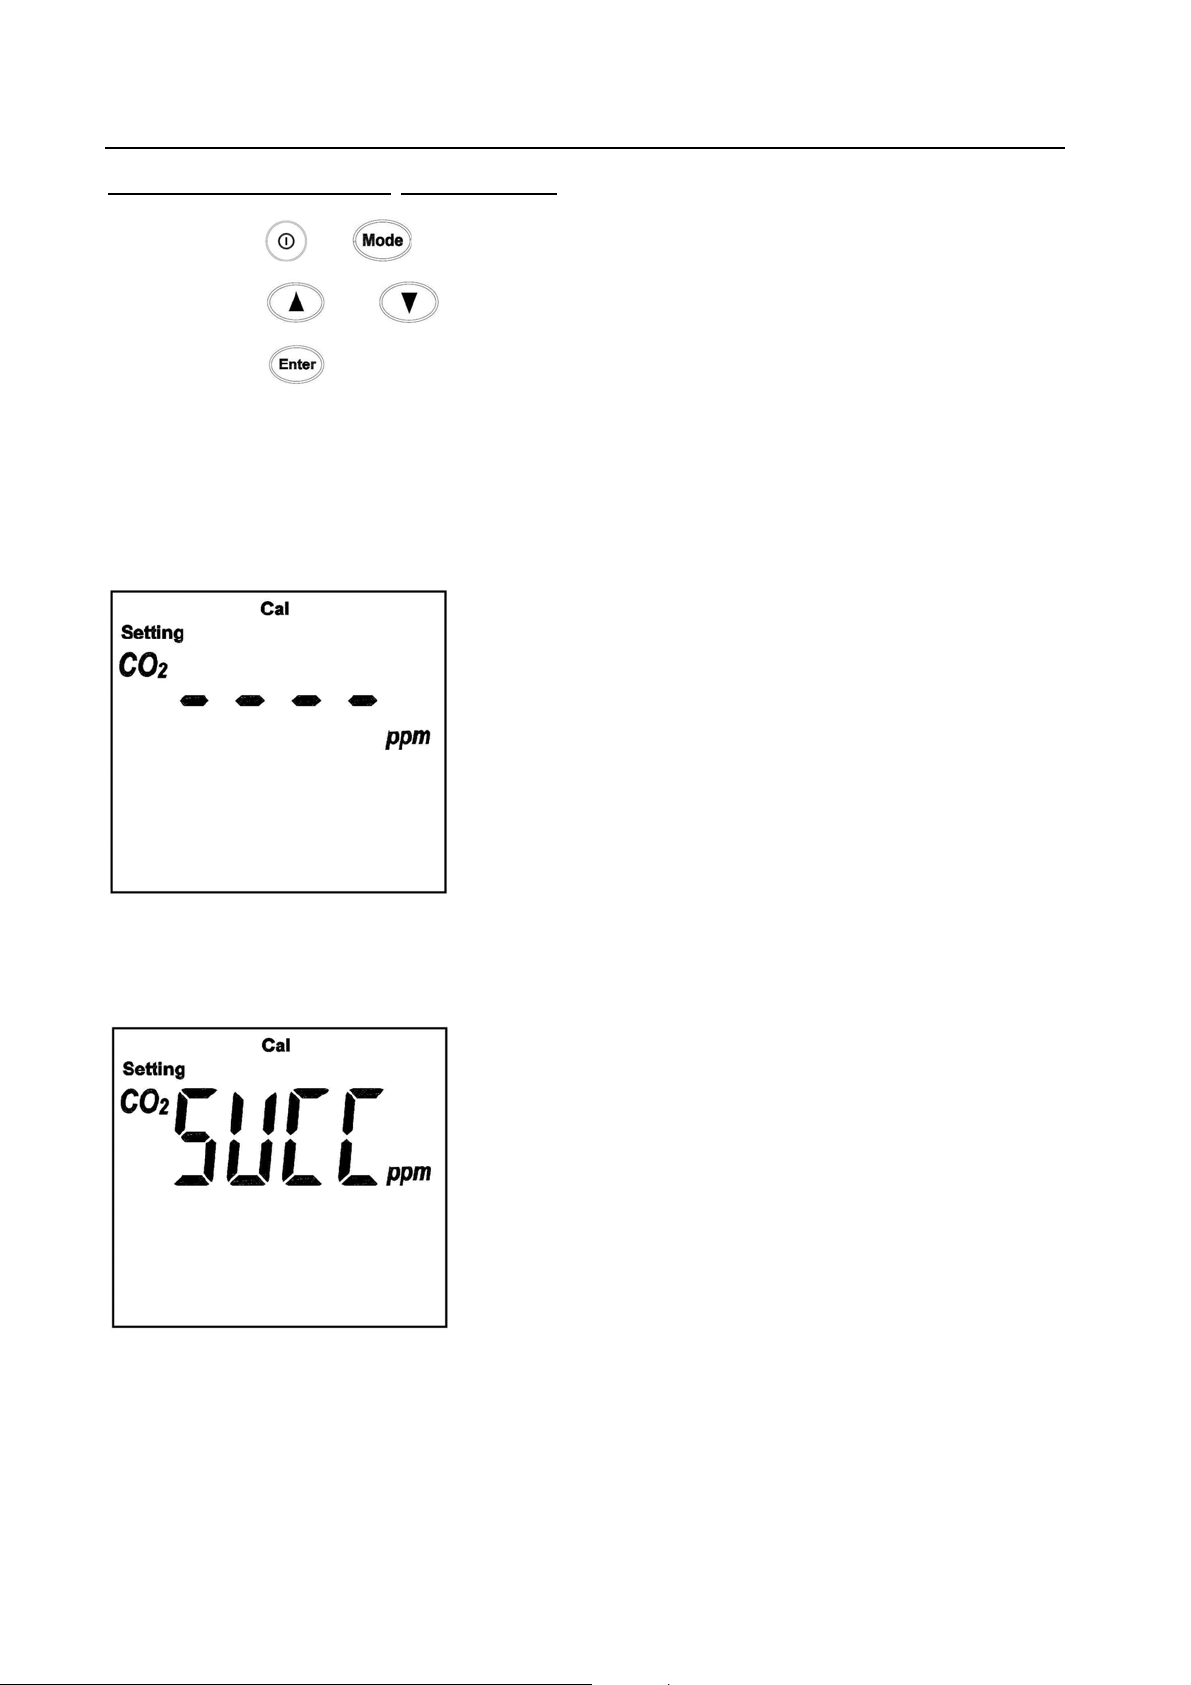
0ppm and 400ppm CO2 Calibration
• Press
• Press
• Press
+ together to enter CO2 Calibration menu.
or to switch between 0 or 400ppm calibration.
to start calibration.
While calibrating, the LCD will show :
Do not press any button during the calibration.
If the calibration is successful, the LCD will show :
Page 19
Page 20
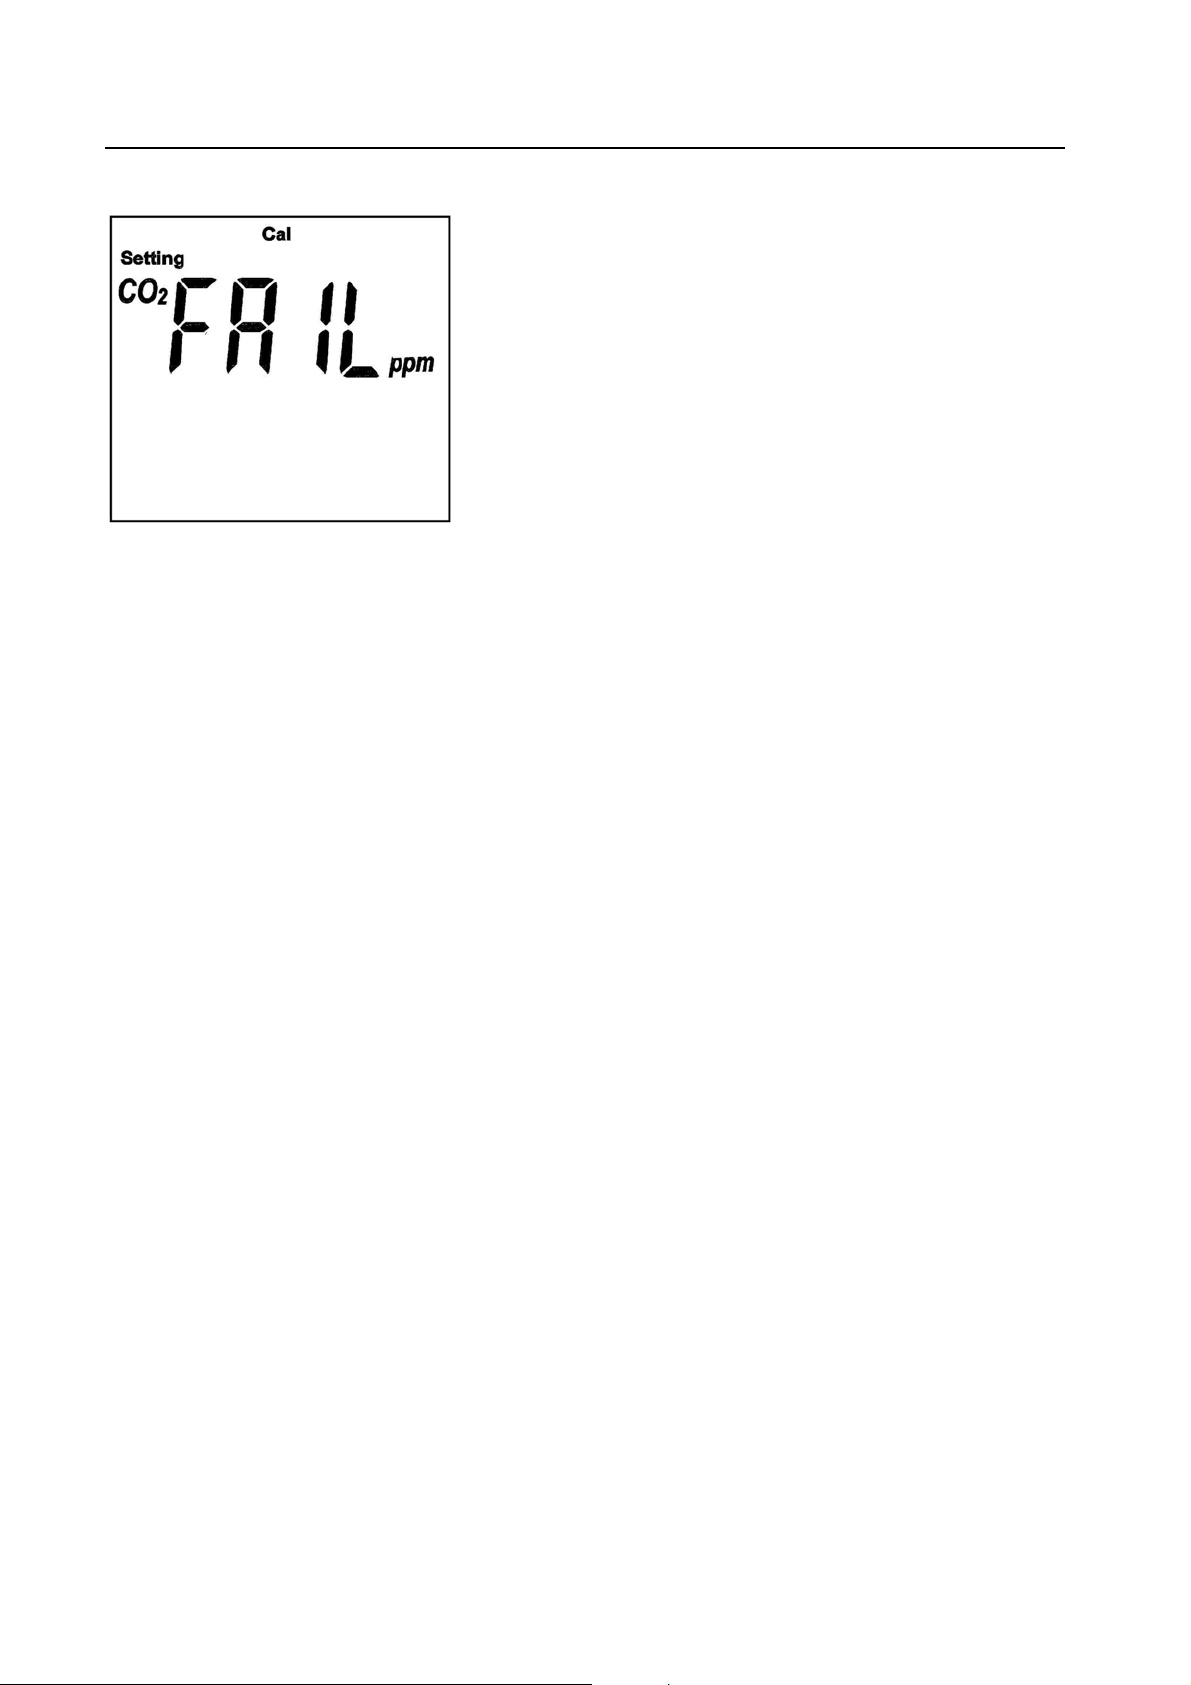
If the calibration failed, the LCD will show:
• Press power to power off and restart again.
Now the Meter is working with new calibrated value.
Page 20
Page 21

4. PC SOFTWARE & DRIVER INSTALLATION
Installation Requirements:
Minimum system requirements for the software:
-Pentium III - 500 MHz processor or equivalent with 128 megabytes of RAM.
Optimal Performance:
-Pentium 4 - 2.8 gigahertz processor or equivalent with 256 megabytes or
RAM.
Operating System Requirements:
-Windows 2000
-Windows XP
-Window 7
Page 21
Page 22
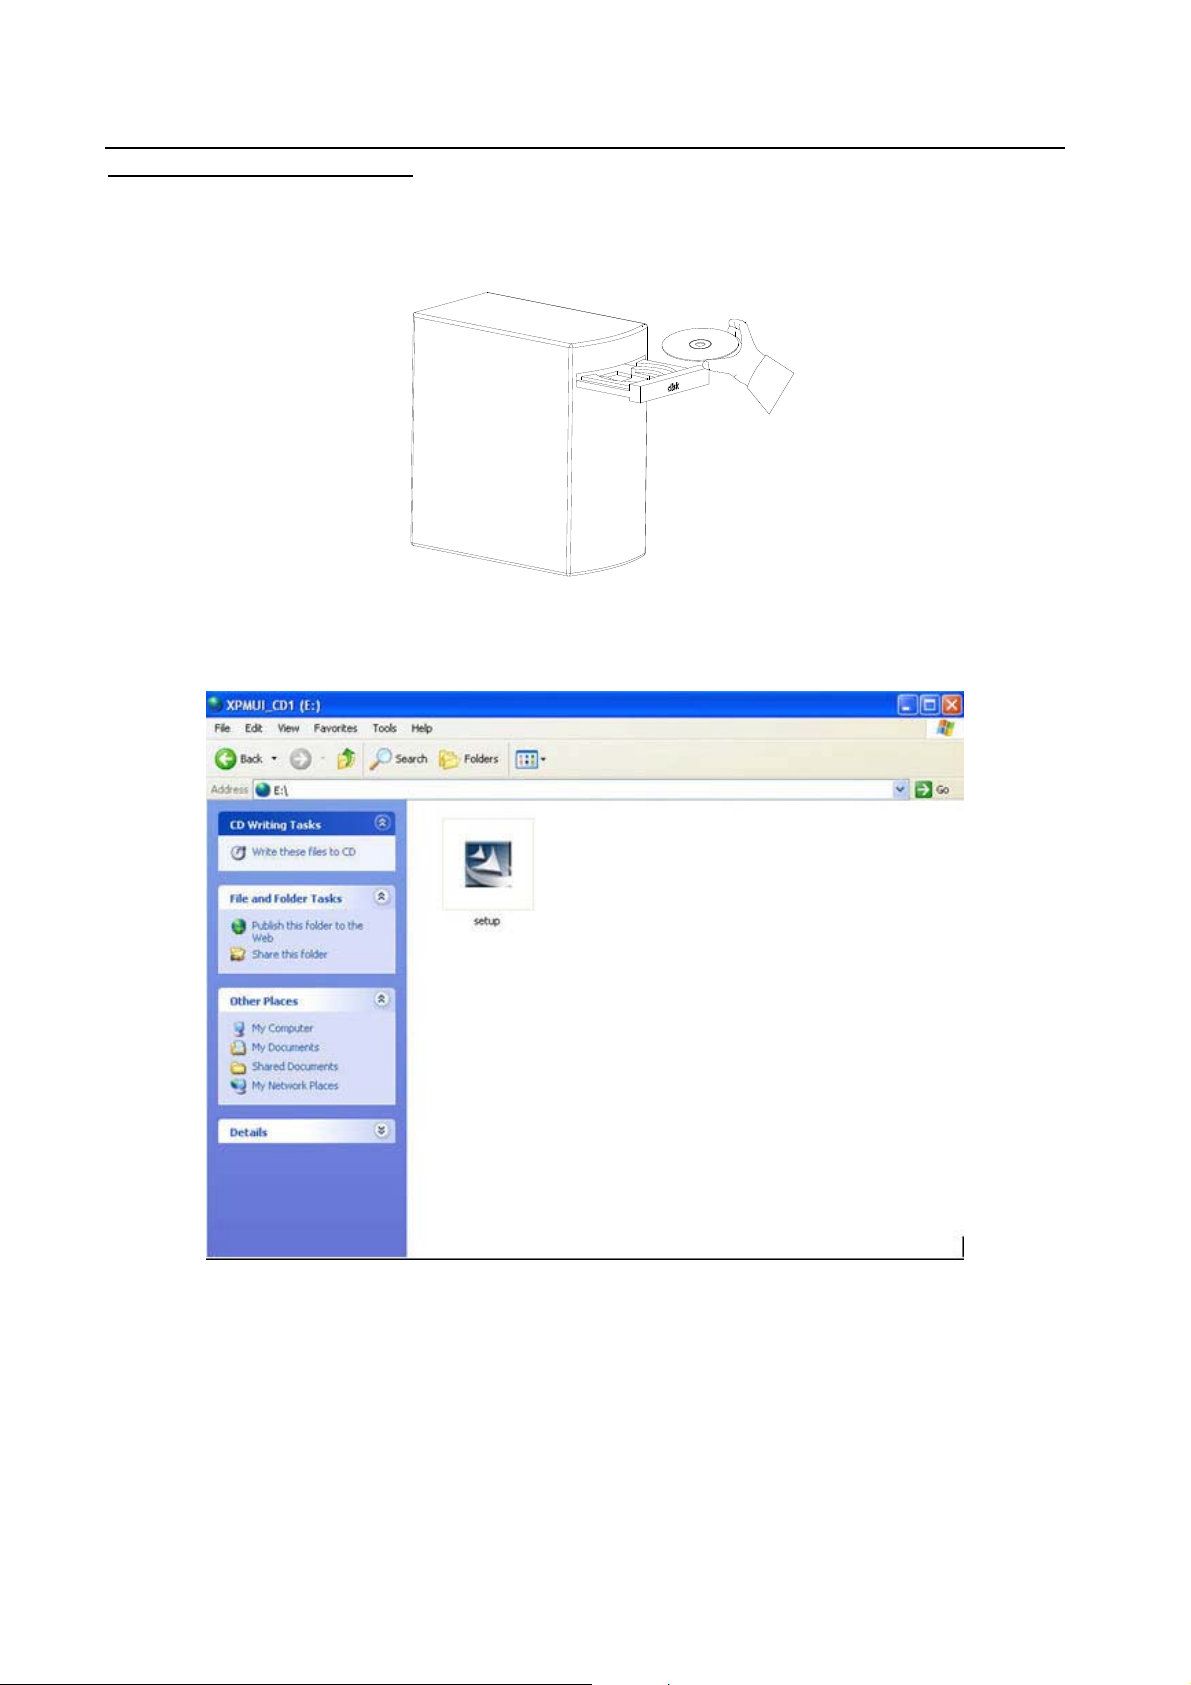
PC DRIVER INSTALLATION
• Insert the CD into the disk drive.
• Click Setup to start installation.
Page 22
Page 23
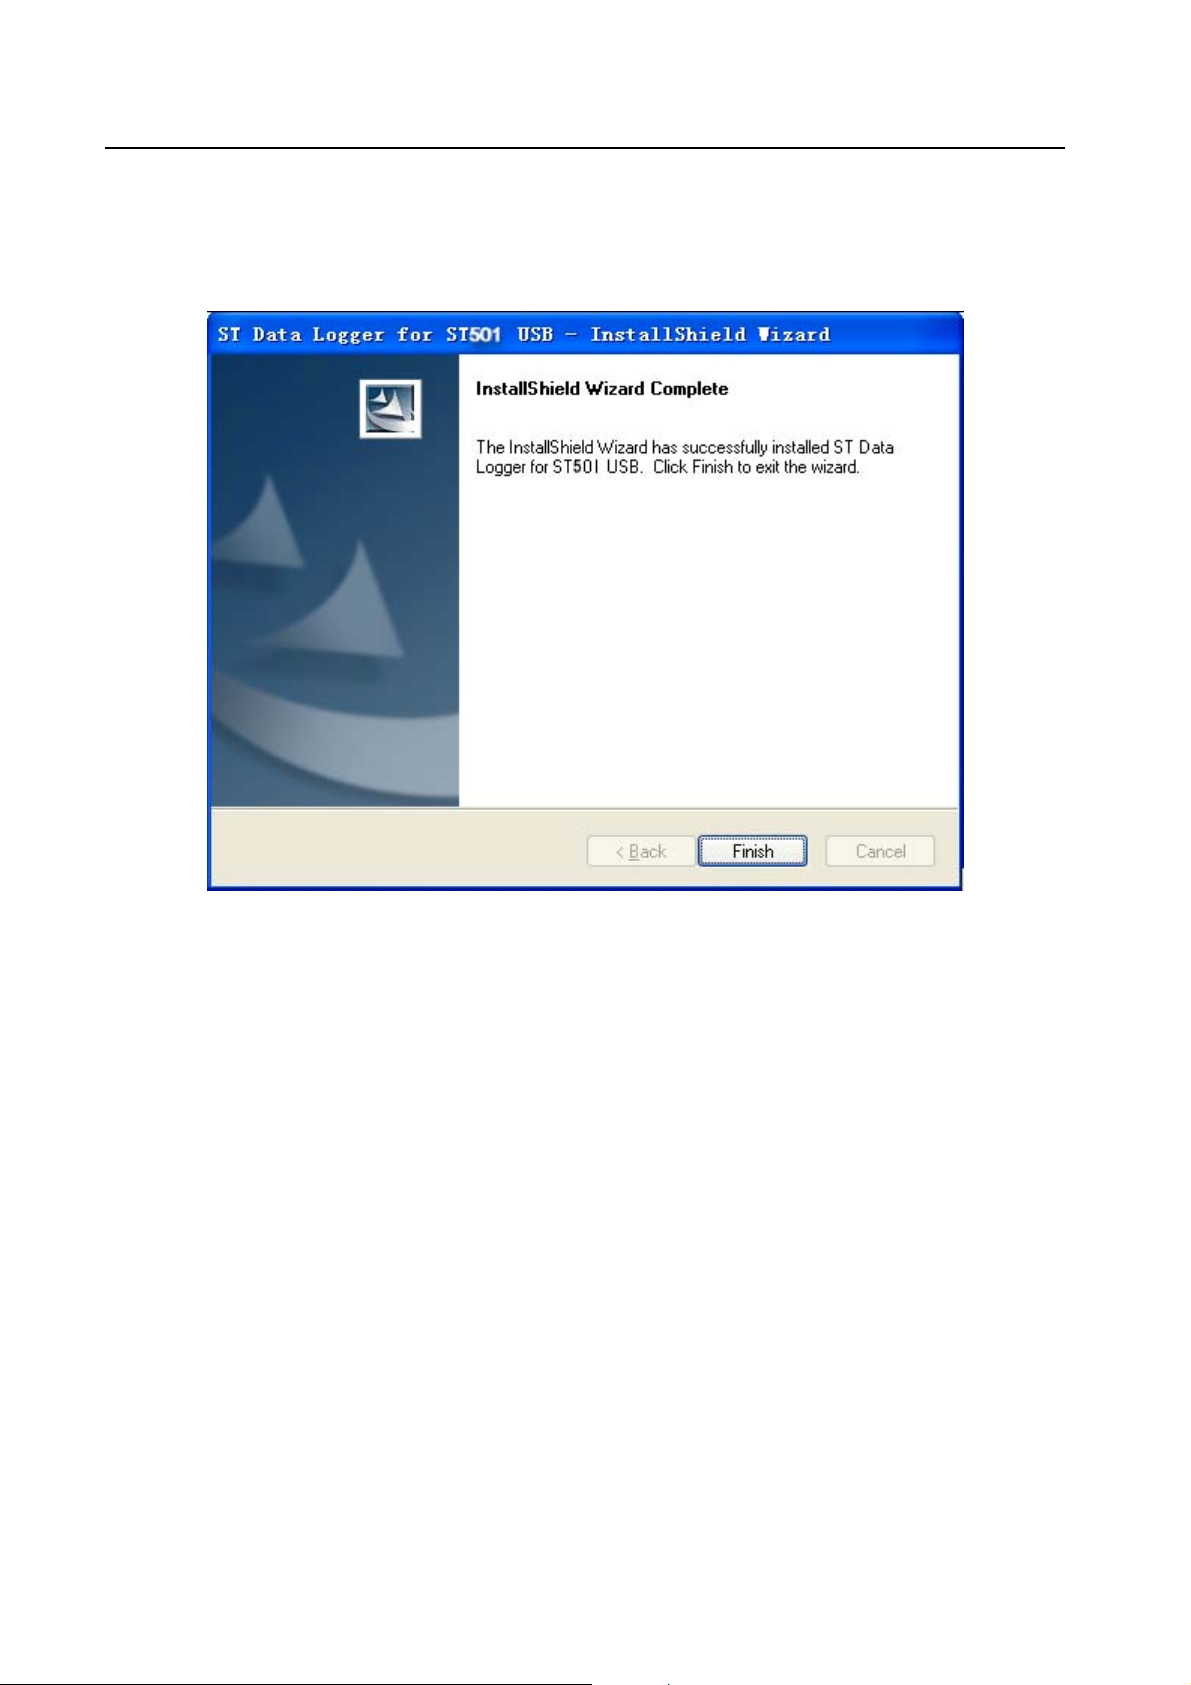
• Follow the steps on the Installation Shield Wizard and click Finish to
complete the installation.
Page 23
Page 24
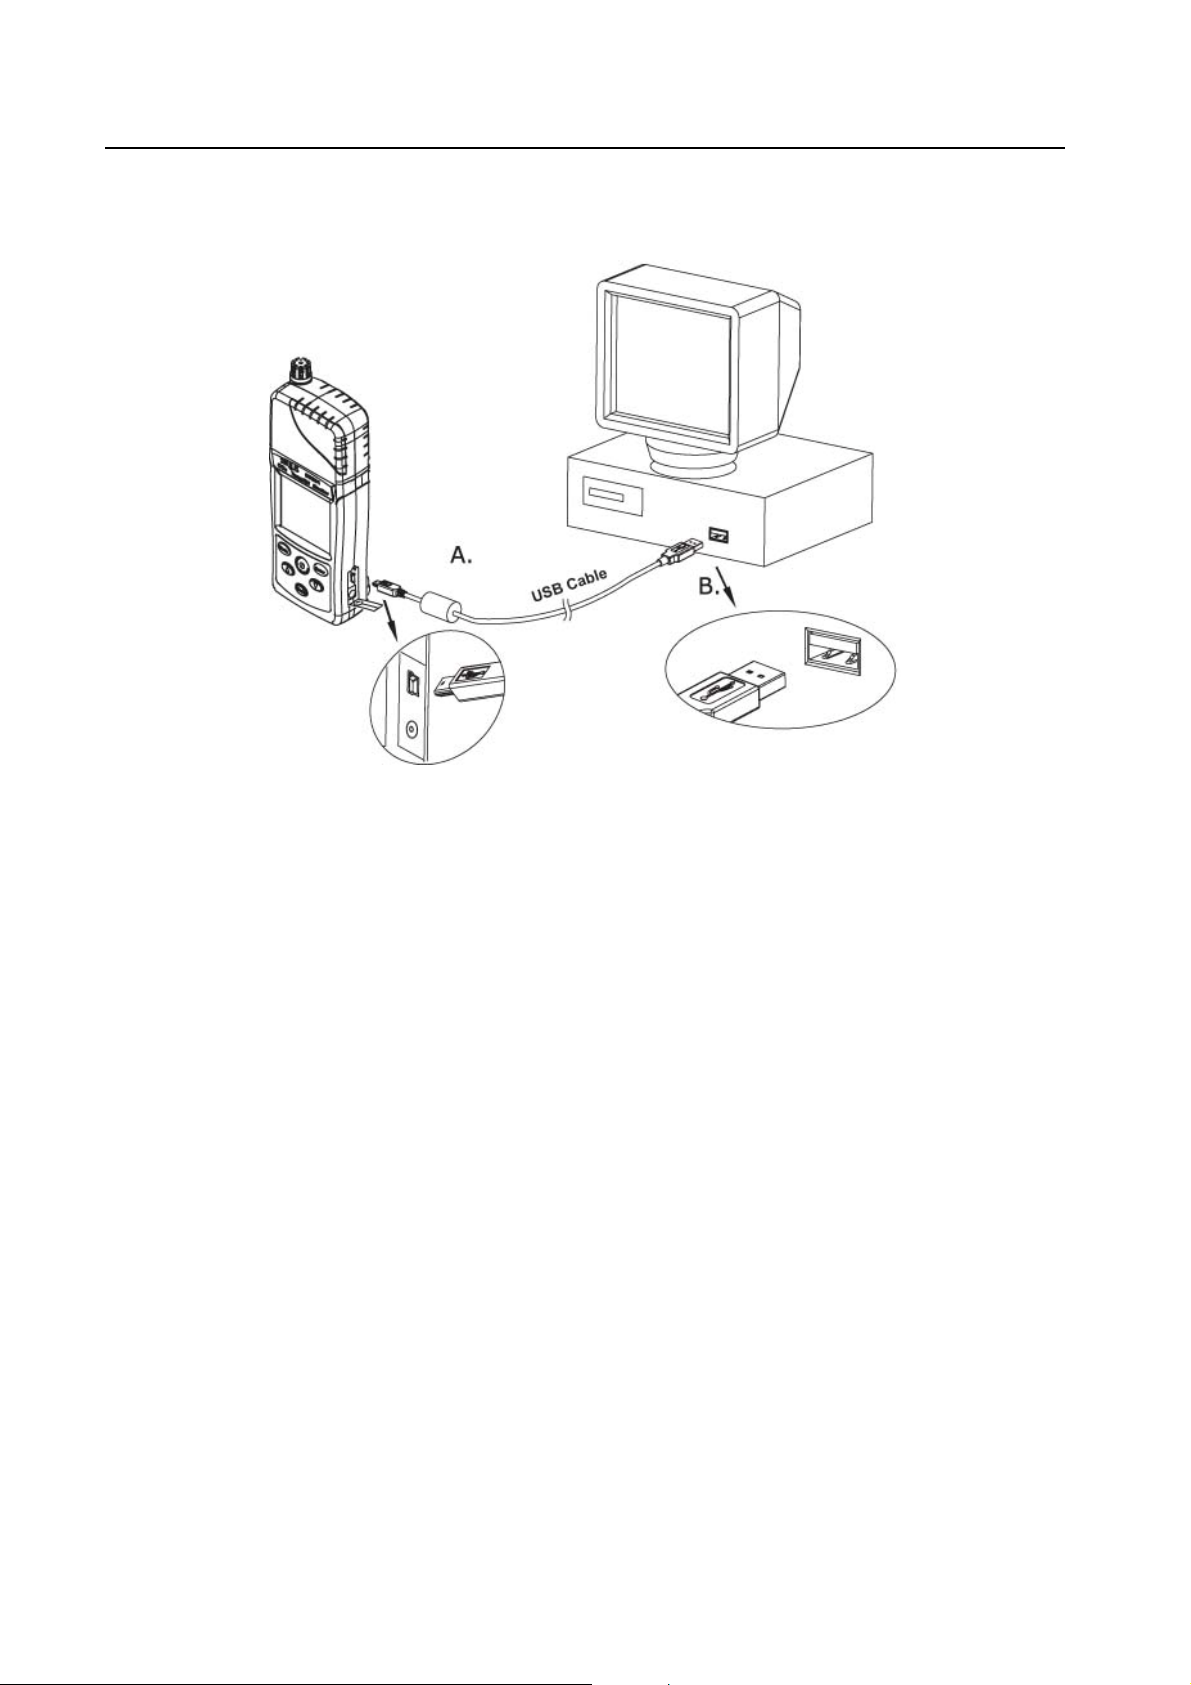
• Connect Meter and PC together with a USB cable.
Page 24
Page 25
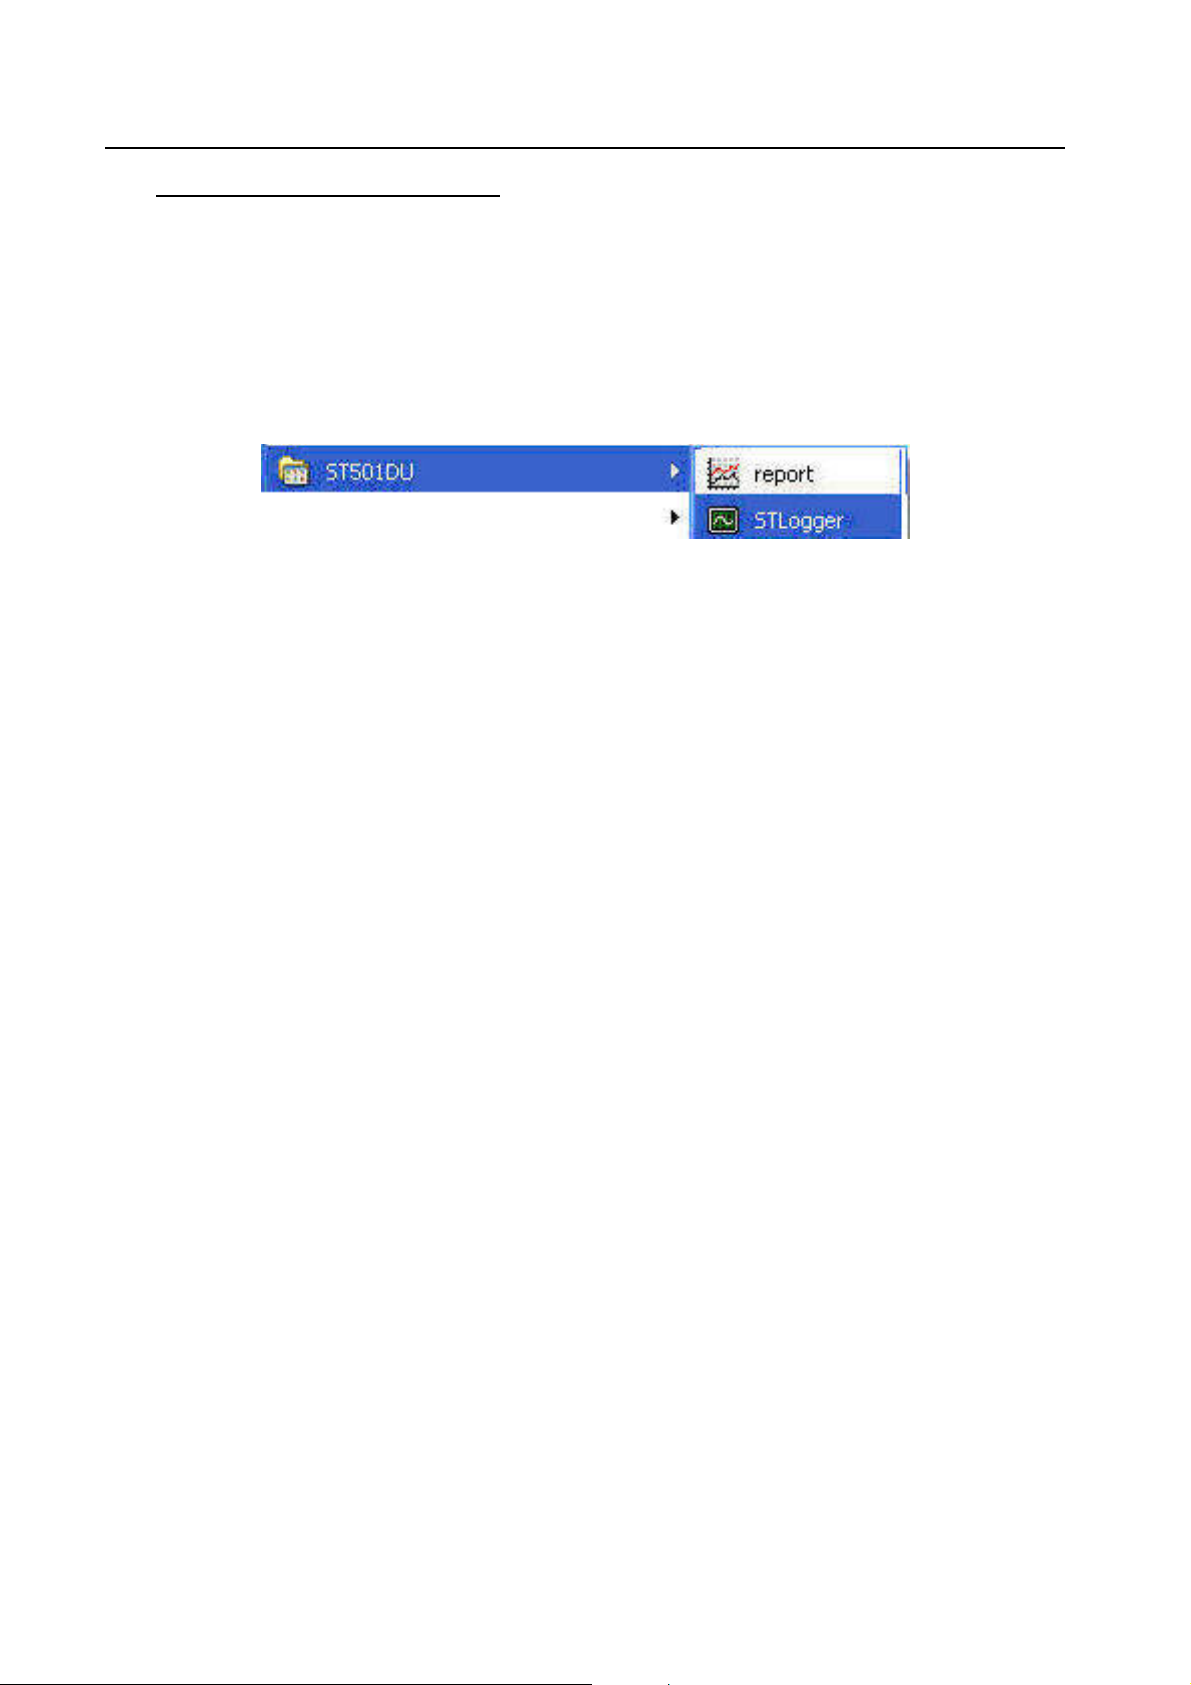
5. USING PC SOFTWARE
• Start Window XP software.
• Click on All programs, Click on Meter.
• Click on ST Logger to start the PC program.
Page 25
Page 26
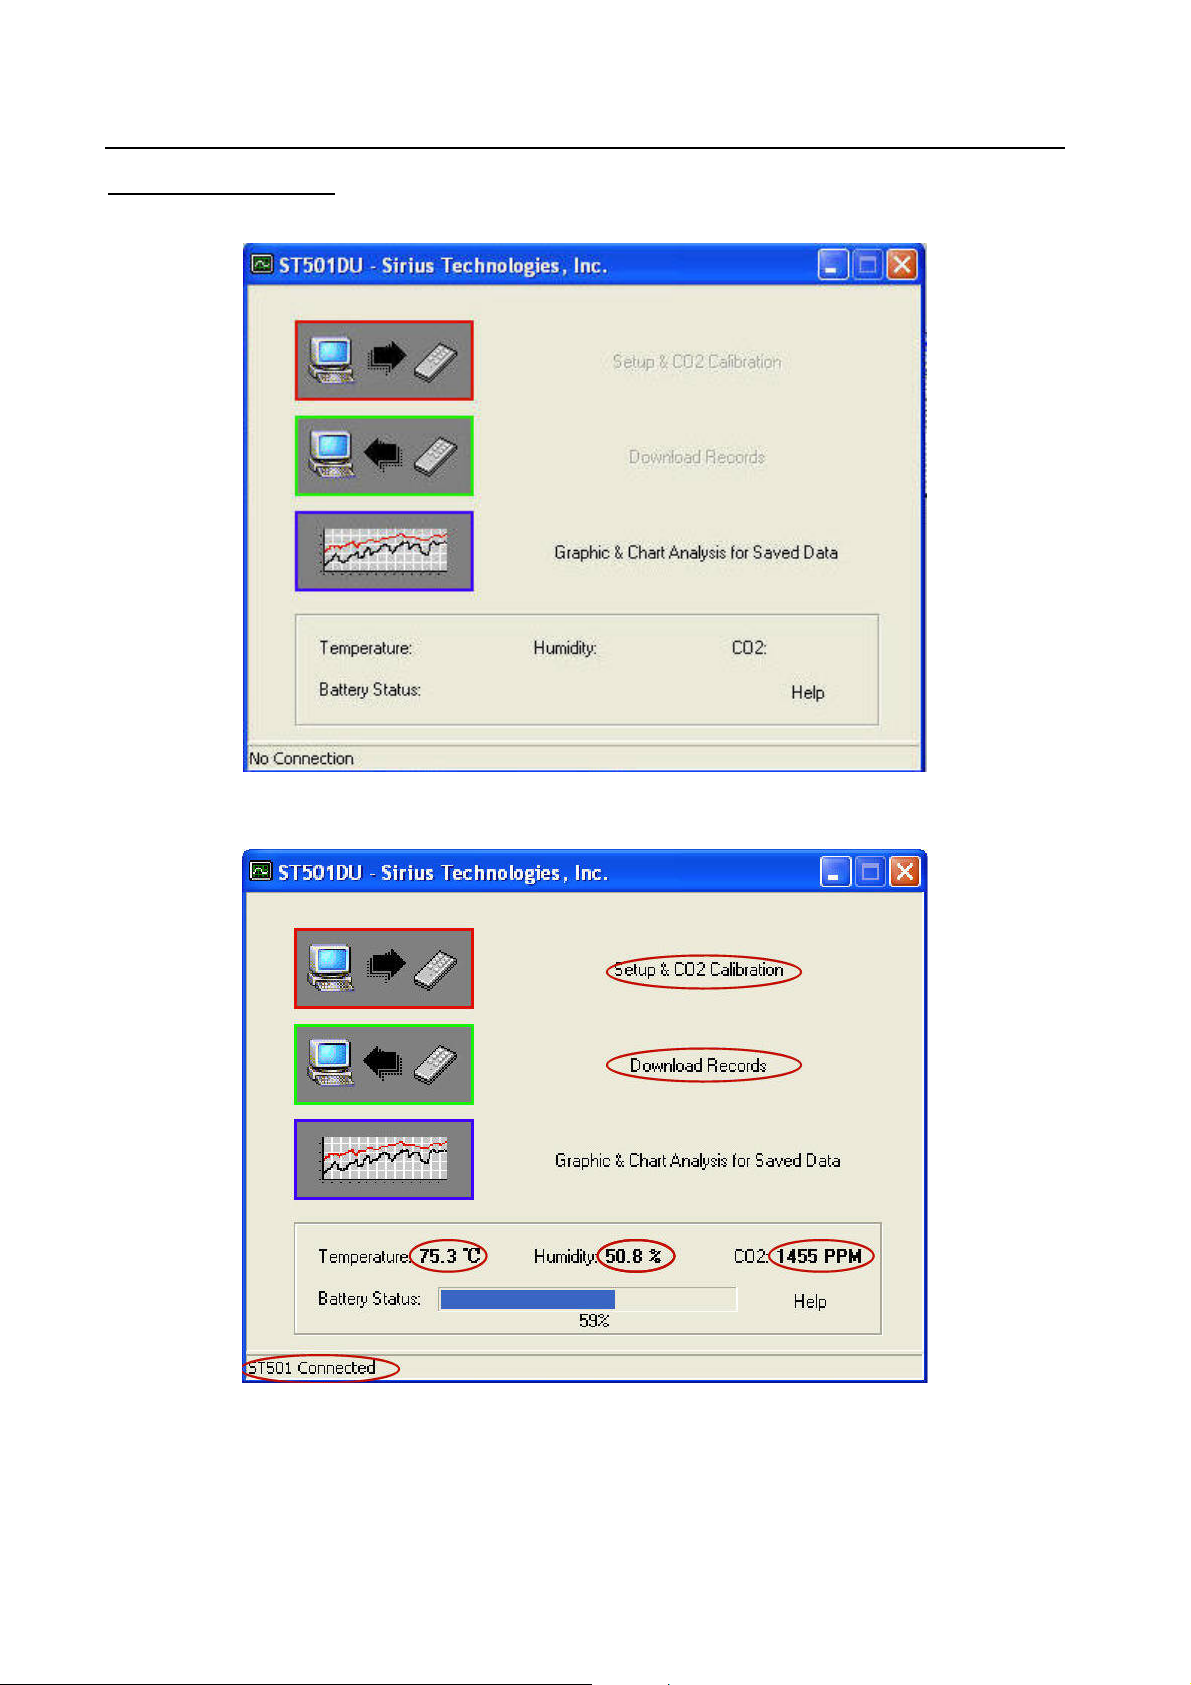
Connection Status
No Connection Screen
Connected Screen
Page 26
Page 27
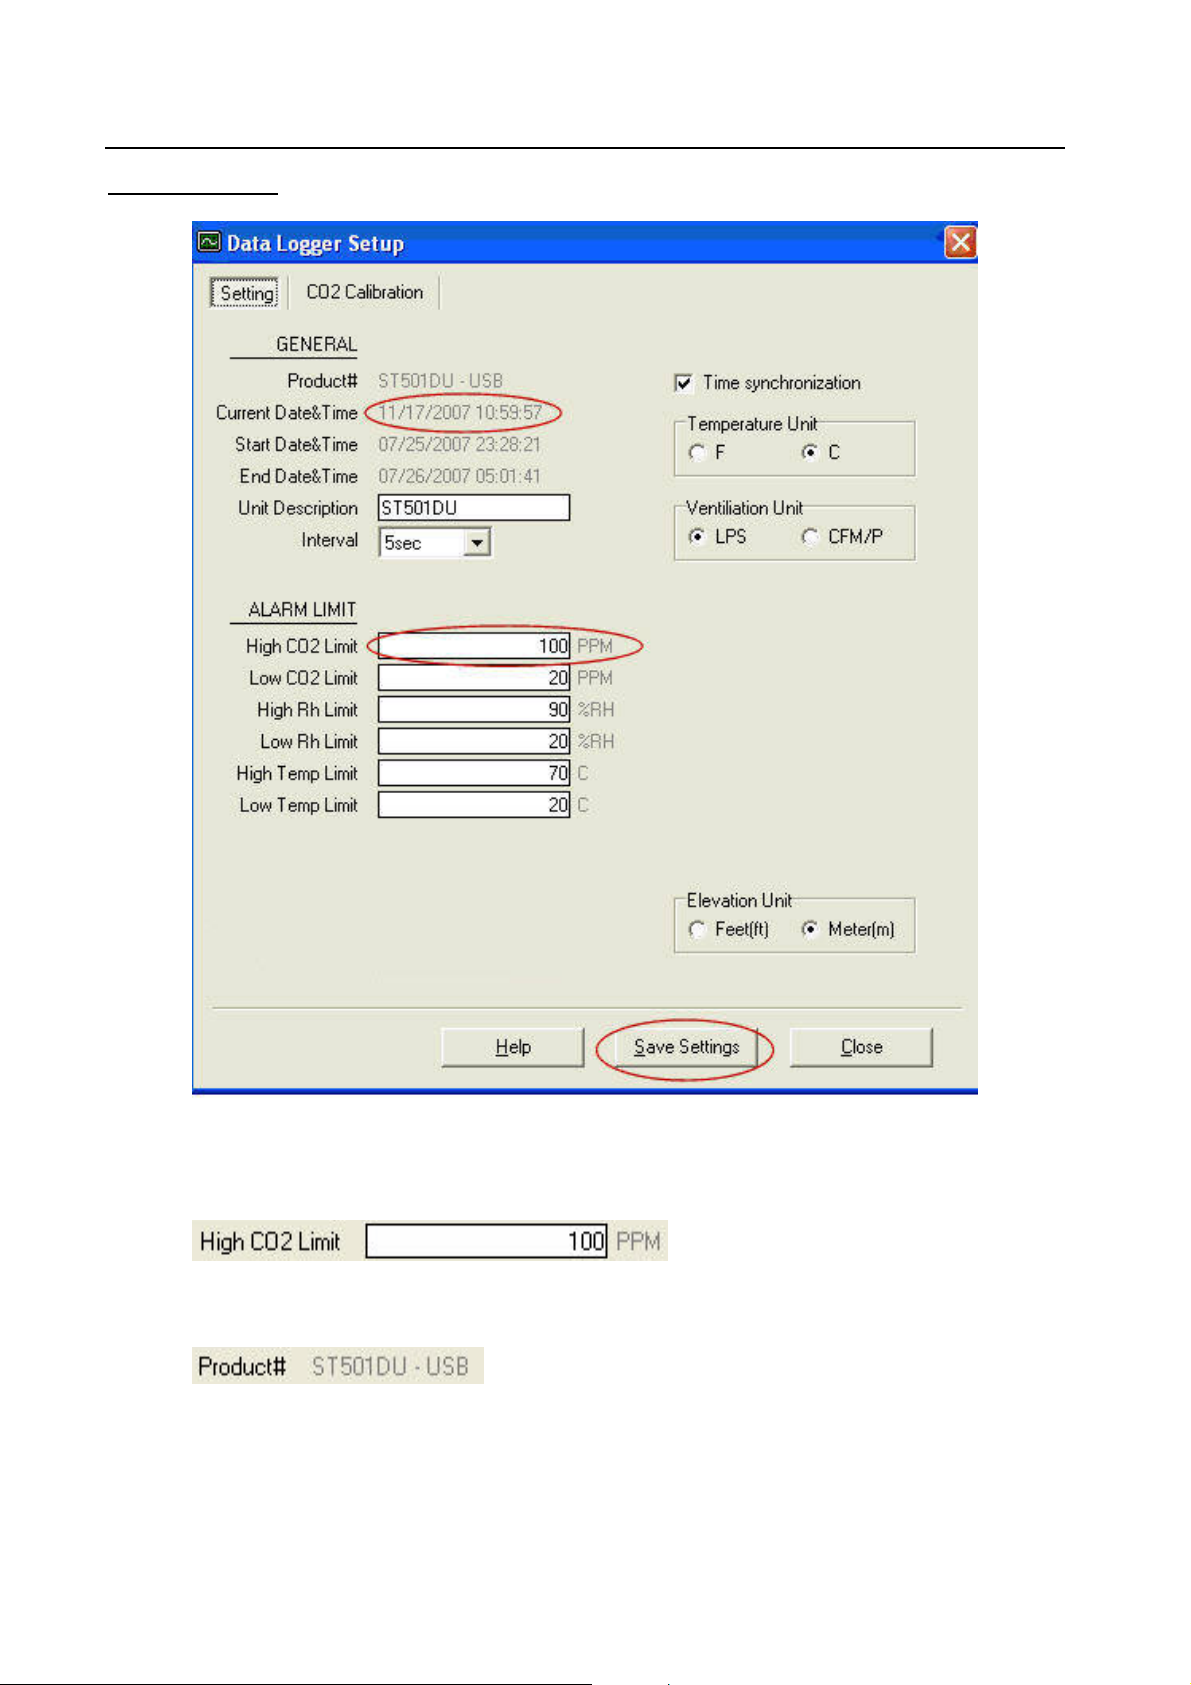
Setup Screen
• The values in the white area can be changed by the user.
• The value in the inverted area can not be changed by the user.
• Click Save Settings to save the values to Meter.
Page 27
Page 28
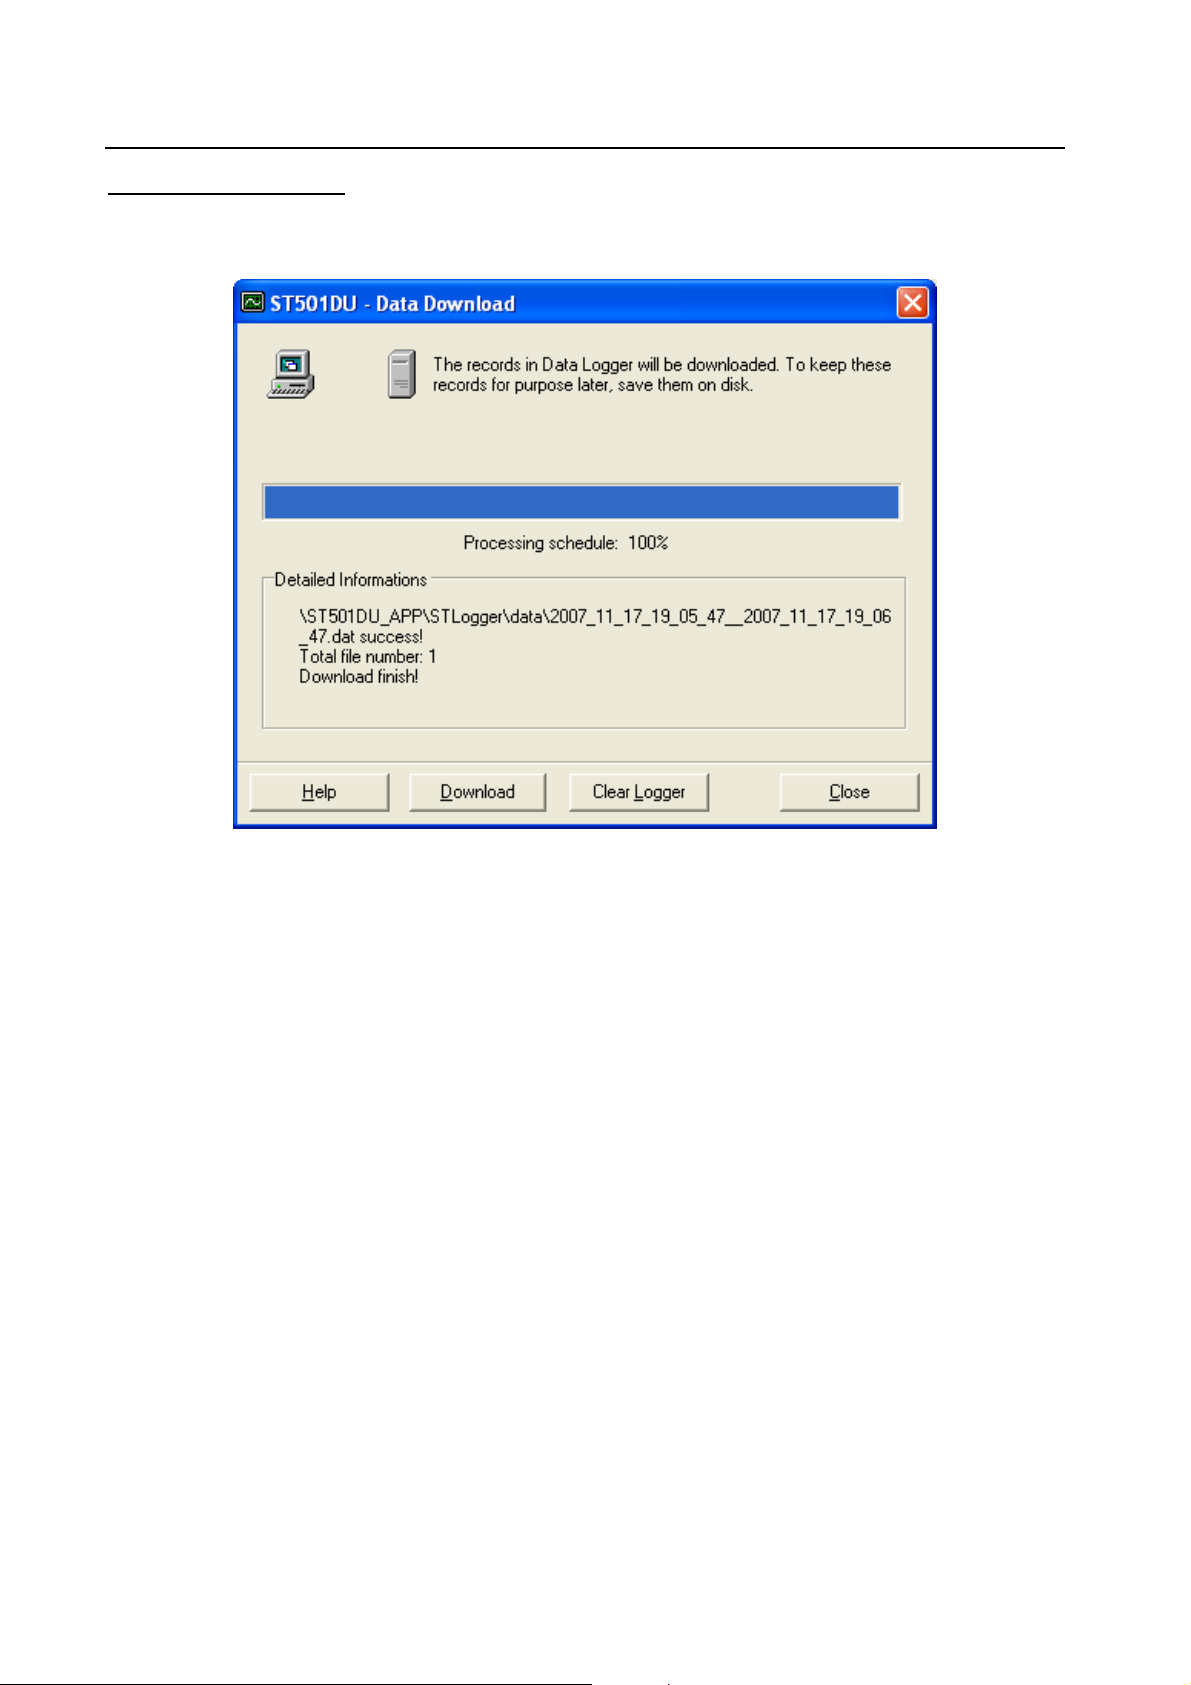
Download Records
• Click Download to download the stored data.
Download completed screen
Page 28
Page 29
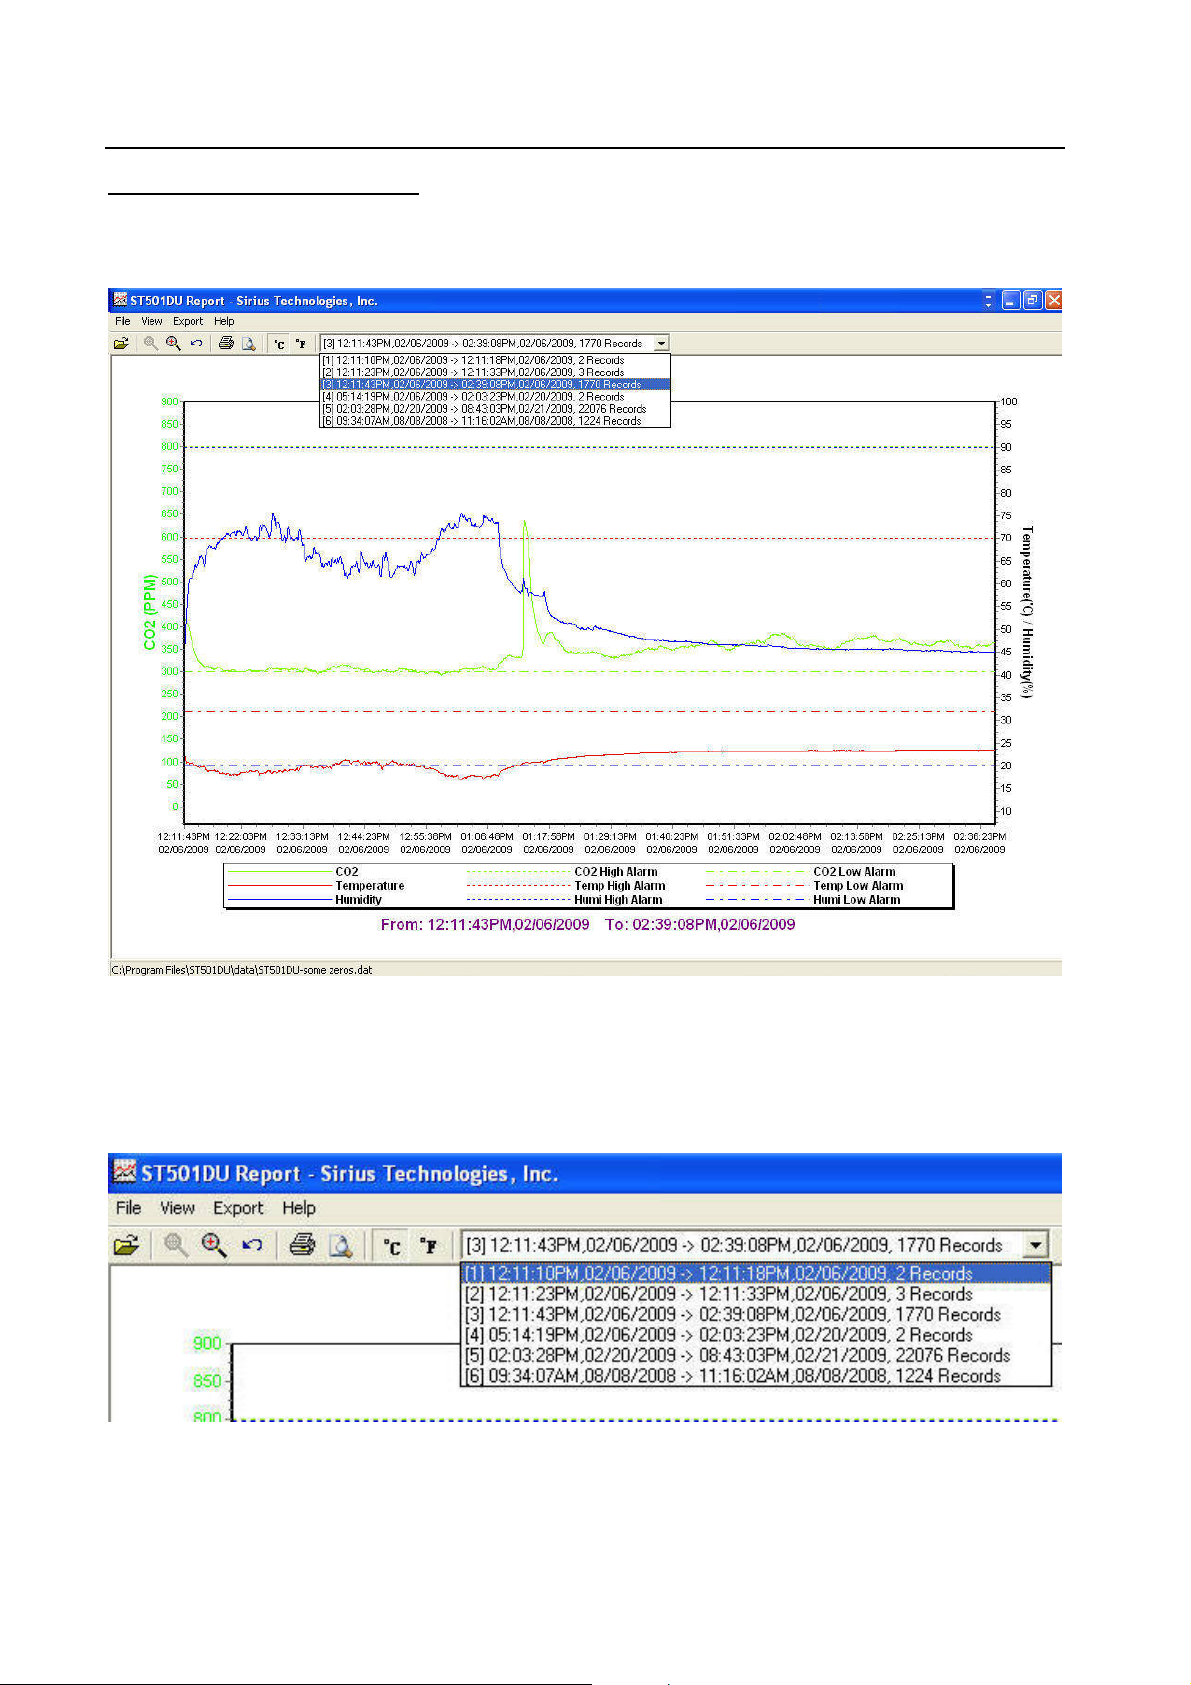
Graphic & Chart Analysis
• Downloaded data will first be displayed in graphic format.
• Each data groups are listed according to the date of acquisition. Lowest
group number represents earliest acquisition date.
Page 29
Page 30
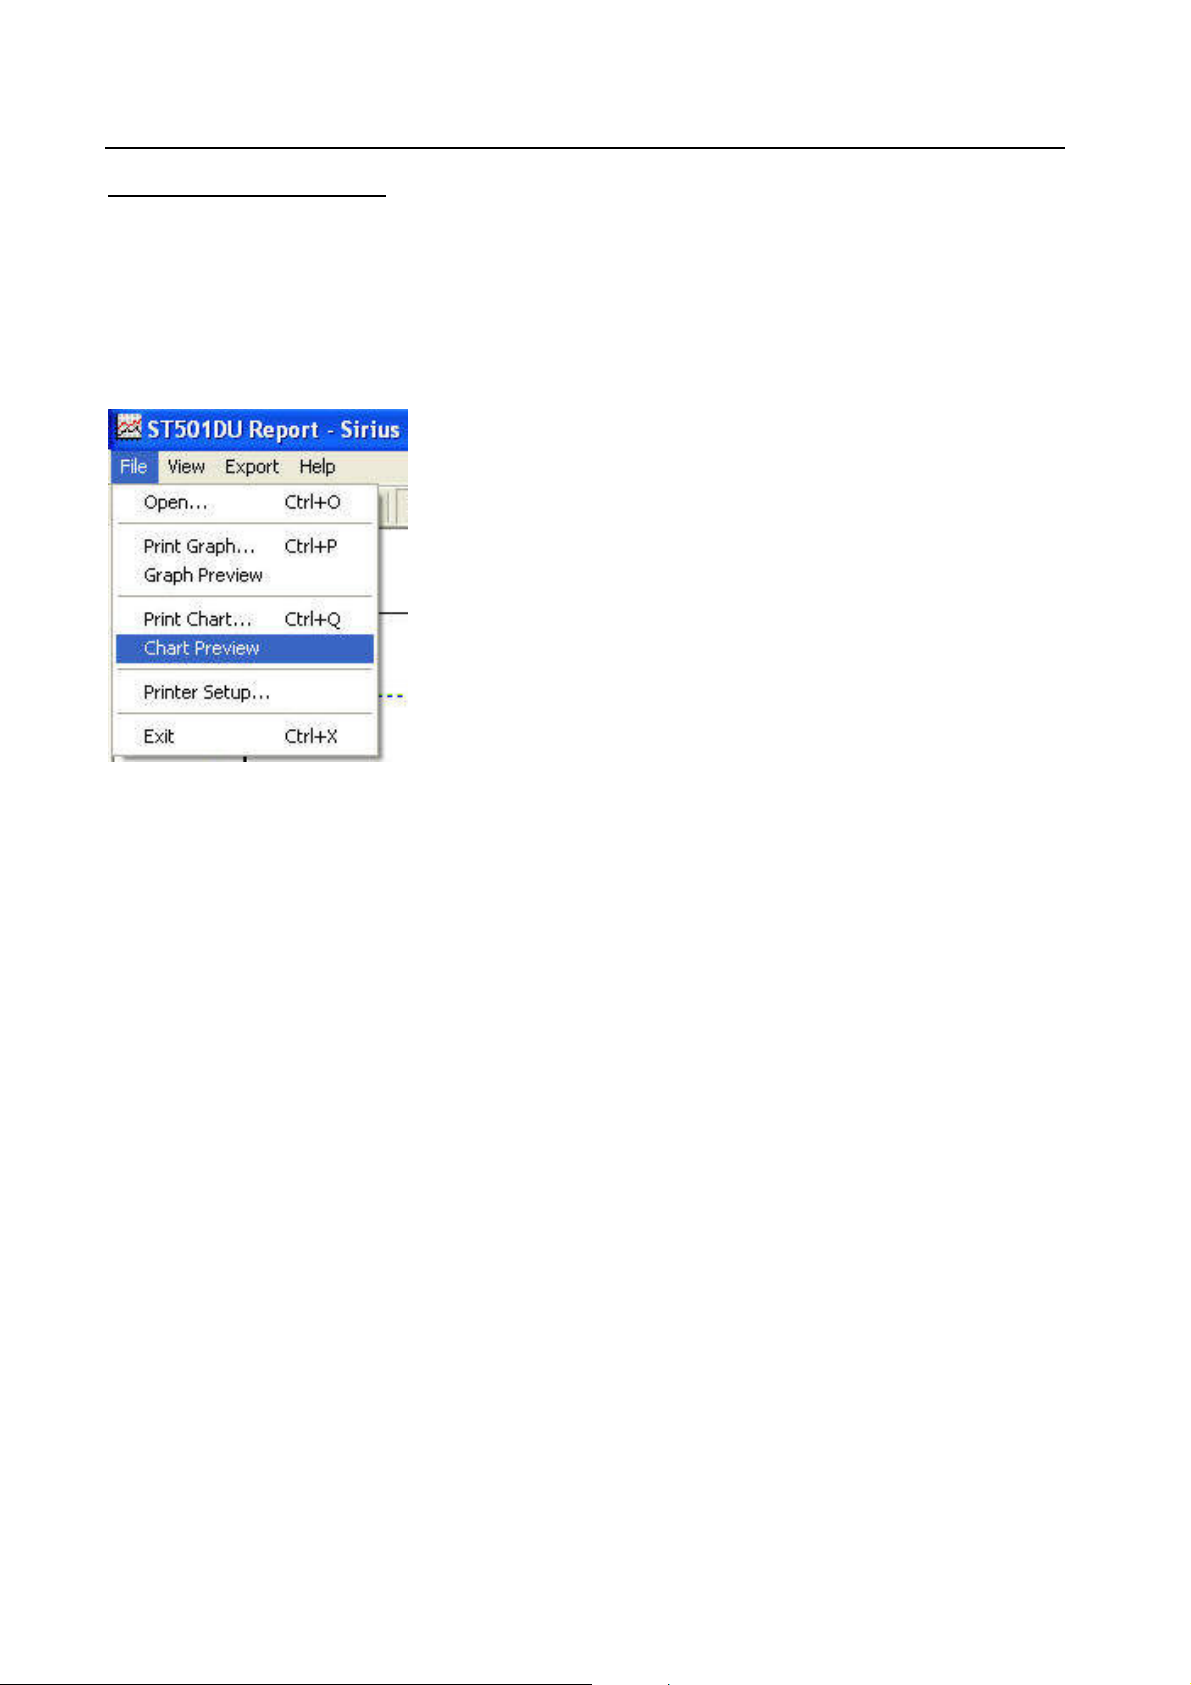
Data in Text Format
To display data in Listing format:
• Click File
• Click Chart Preview
Page 30
Page 31
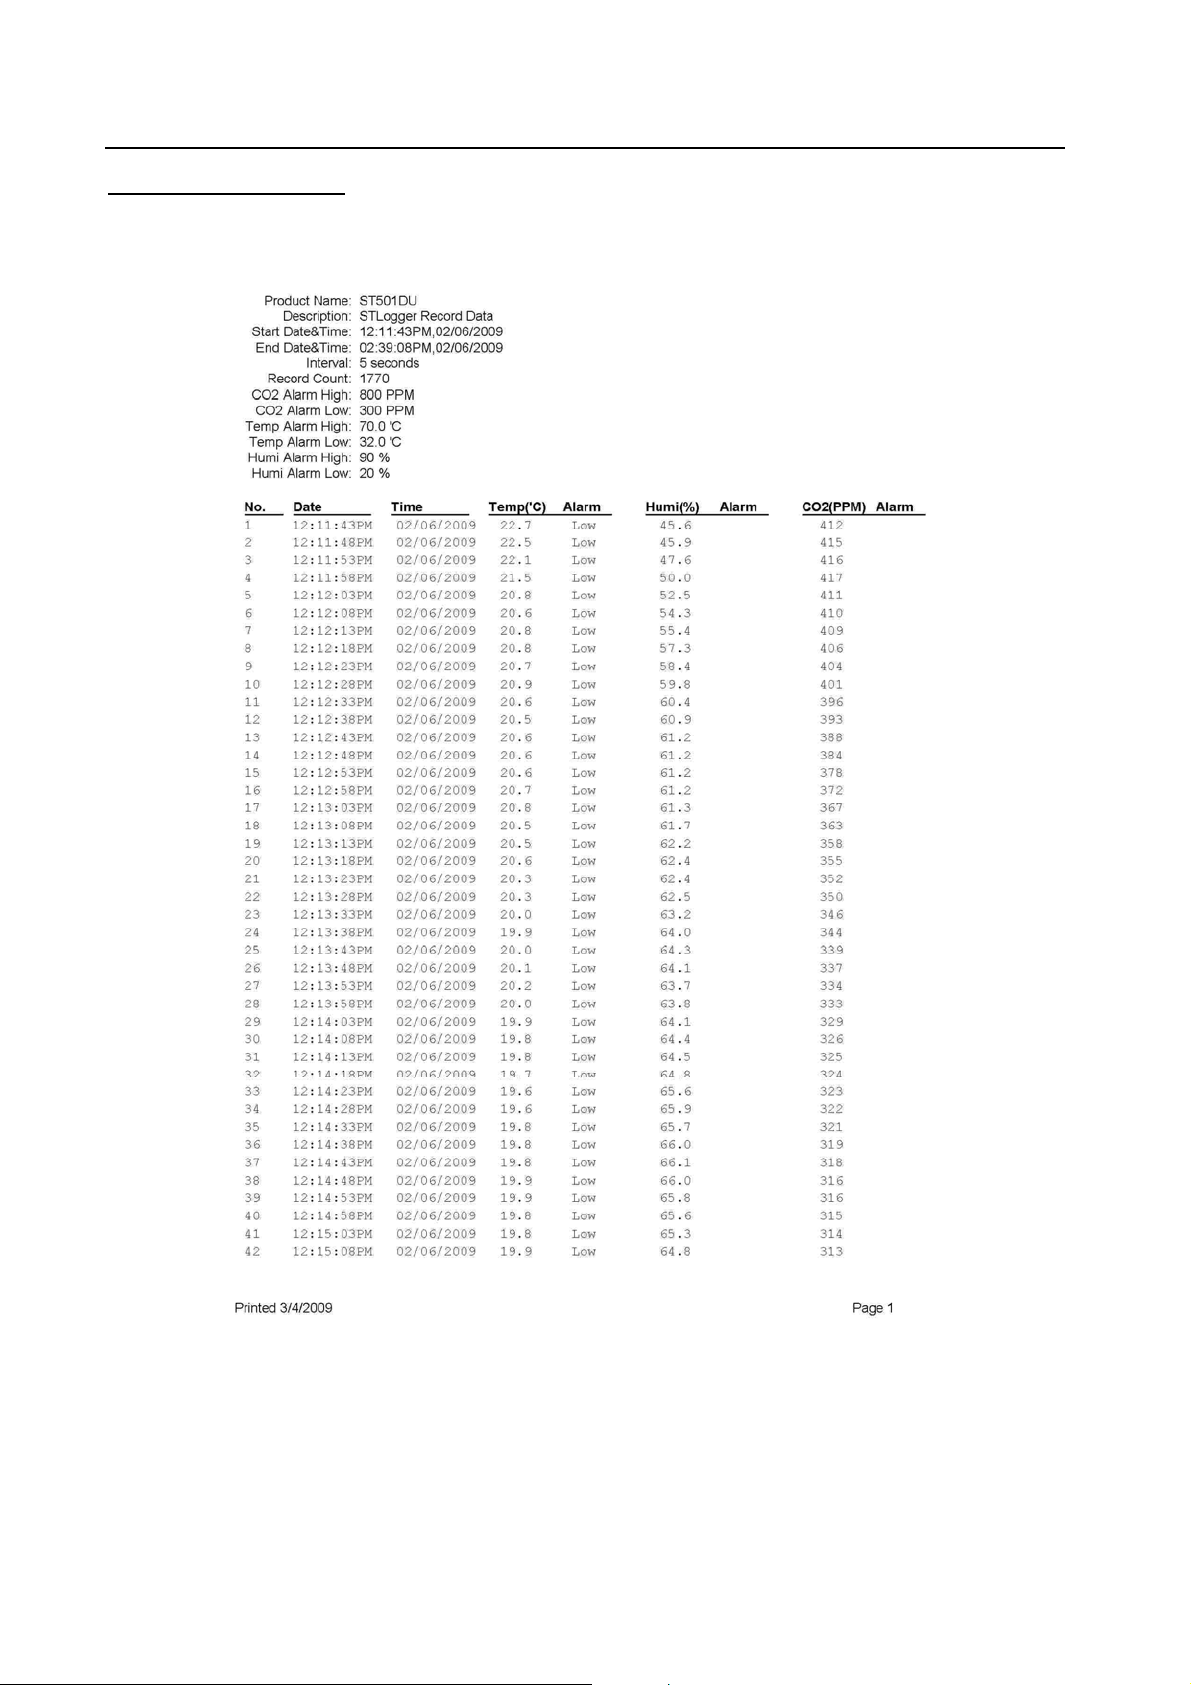
Text Listing Format
Page 31
Page 32
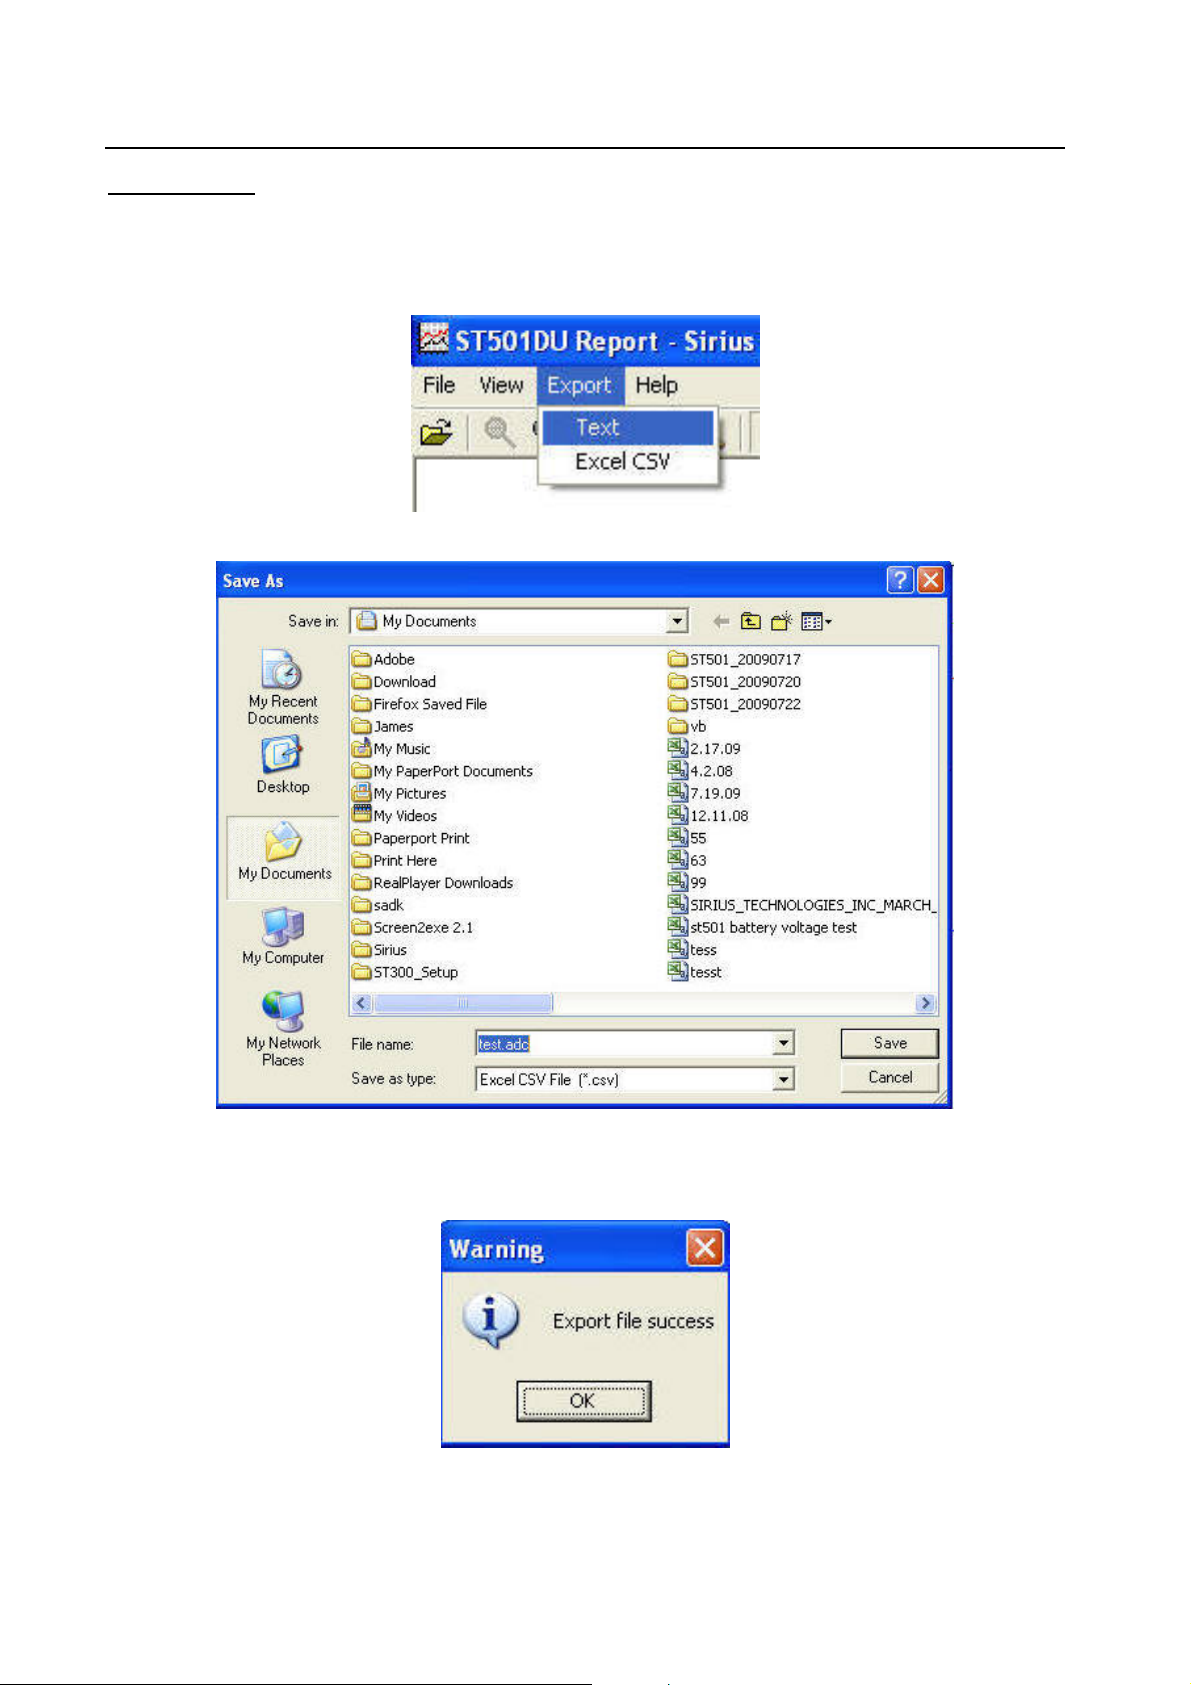
Data Export
Select export data type: Text or Excel CSV
Click Save to save the file in .CSV/Txt format.
File Saved.
Page 32
Page 33

6. WARRANTY
Meter is warranted for a period of twelve (12) months from the date of
purchase to be free of defects in material or workmanship. This warranty
does not apply to damage resulting from accident, alteration, abuse, loss of
parts or repair by other than Sirius Technologies, Inc. The equipment will be
repaired or replaced, at our option, without charge to the owner for parts or
labor incurred in such repair. This warranty shall not apply unless the
equipment is returned for our examination with all transportation charges
prepaid.
Page 33
 Loading...