

Page 1
ST-141 Dual Channel Vibration Meter
ST-141D Recording 2-Channel
Vibration Meter
User’s Manual
HB2TM1410000
Page 2

Page 3

Contents:
1 Introduction ....................................................... 1
2 Accessories ....................................................... 1
3 Safety Precaution .............................................. 1
4 Instrument Description ...................................... 2
5 Operation .......................................................... 3
5.1 Turn on the backlight .................................. 4
5.2 Manual recording for each single data file .. 4
5.3 Record for a long time ................................ 4
5.4 Access the data recorded in the memory .... 5
5.5 Lock the maximum and minimum reading .. 5
5.6 Freeze window function .............................. 5
5.7 Automatic shutdown function ...................... 5
5.8 Zero function .............................................. 6
5.9 Installation of accelerometer ....................... 7
5.10 Function settings ........................................ 8
6 Software Installation: ....................................... 11
7 General Specifications .................................... 12
8 Electrical Specification: ................................... 13
9 Maintenance or Repair .................................... 14
10 Battery Replacement ....................................... 14
11 Product Disposal ............................................. 14
Page 4
ST-141/ST-141D
- 1 -
1
1 Introduction
This meter can measure the vibration by the rotator
and the reciprocator, as well as the damage of
bearings. The items include acceleration, velocity,
and displacement; through the meter, you can
determine if to repair or renew the machines.
2 Accessories
1
Meter
1
User’s Manual
2
Accelerometer
2
Low noise cable
2
Magnetic base
6
1.5V LR6/AA battery
1
1
Carrying case
9V AC to DC adaptor
1
USB cable and Installation disk (ST-141D)
1
Handheld probe + round probe + pointed probe
3 Safety Precaution
Caution! Please refer to this manual.
Improper use may damage the meter
and its components.
Complies with European Directive
Do not operate in environments with flammable gas or
humid environments.
Operating altitude: up to 2000M.
Operating environment: Indoor use; Pollution degree 2.
Clean with soft cloth when dirty, such as glasses cloth.
Do not clean with chemicals and other solvents.
EMC: EN61326-1:CISPR 11:Group 1, Class B
Class B–Equipment for use in all establishments other
than domestic.
Group 1–RF energy generated is needed for internal
functioning.
Page 5
ST-141/ST-141D
- 2 -
2
4 Instrument Description
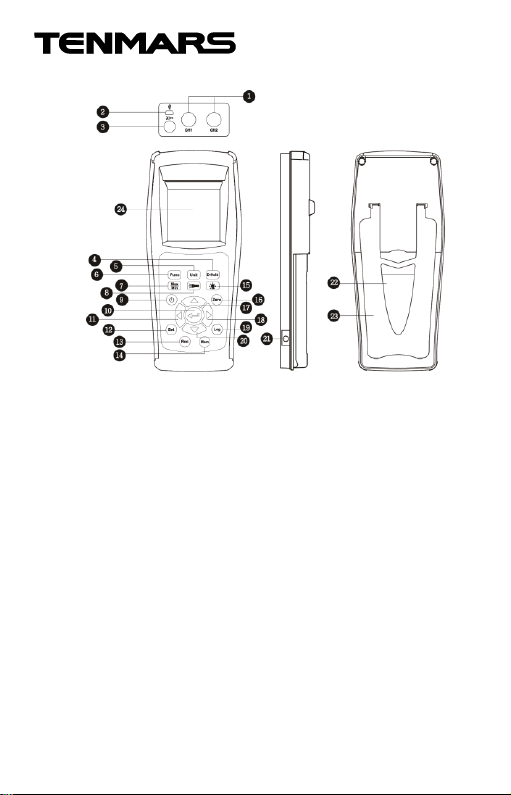
1. Accelerometer input
2. USB port (ST-141D)
3. Led working light
4. Freeze window function
button
5. Unit selection function
button
6. Function selection button
7. Maximum / minimum
value function button
8. LED working light function
button
9. Determining function
button
10. Power switch function
button
11. Leftward function button
12. Setting function button
13. Single record function
button
14. Access record function
button
15. Backlight function
Button
16. Zero setting function
button
17. Up / acceleration HI
function button
18. Rightward function
button
19. Automatic recording
function button
20. Downward / acceleration
LO function button
21. External power of DC 9V
22. Battery cover
23. Tilt stand
Page 6

ST-141/ST-141D
- 3 -
3
5 Operation
1. Assemble the accelerometer and the magnet
base. Lock one end of the cable, and mount
the other end of the cable on the
accelerometer input of the meter. Then, make
the accelerometer suck against the DUT
(device under test).
2. The other way is to assemble the
accelerometer and the handheld probe. Lock
one end of the cable, and mount the other end
of the cable to the accelerometer input of the
meter. Then, take the probe with hand and
detect the DUT.
3. In boot state, press to turn on or off, press
for more than 1 second to disable the
function of automatic shutdown, the automatic
shutdown sign on the LCD will also disappear.
*In setup mode, the power cannot be turned
off. Please exit the setup mode in advance.
4. Press to select the measurement mode:
Acceleration (ACC) True root mean square
value (RMS) → Acceleration (ACC) Peak
value (PEAK) → Velocity (VEL) True root
mean square value (RMS) → Velocity (VEL)
Peak value (PEAK) → Displacement (DISP)
peak to peak value (PP). Every time when
button is pressed, the measurement condition
is switched.
5. In the acceleration (ACC) measurement mode,
press or to select HI or LO range
(For the measured frequency, HI range is
10Hz ~ 5KHz, LO range is 10Hz ~ 1KHz.), The
measurement is through the filter circuit and
complies to ISO 2954.
Page 7

ST-141/ST-141D
- 4 -
4
6. Press to select the measurement unit.
Every time when is pressed, the
measurement condition is switched.
7. Read the measured value displayed on the
LCD.
8. Press for more than 1 second to turn on
the LED working light as auxiliary lighting;
quickly press to disable this function.
5.1 Turn on the backlight
In boot state, press to light on the backlight;
press again to turn off the backlight function.
*The backlight will auto turn off after it is lighted on
for 15 seconds.
*If the meter is connected with an external power
supply, the backlight will turn on automatically.
5.2 Manual recording for each single data
file
Press to save one data file, then LCD will
display the "REC" sign and its final file number, for
example: 0001. Every time when the button is
pressed, the file number is plus 1.
5.3 Record for a long time
Press to start for a long time recording; at the
moment, LCD will display the "REC" sign and
disable the automatic shutdown function. Press
for more than 1 second to cancel the long time
recording. For the sampling time, please read the
step 2 in the section 5.10 function settings.
Page 8

ST-141/ST-141D
- 5 -
5
5.4 Access the data recorded in the
memory
For accessing the recording data, please first
press , LCD will display "MEM" sign at the
moment; then enter the memory reading mode to
access the data file in the memory. Press /
to switch the data file, press again to exit this
mode.
5.5 Lock the maximum and minimum
reading
In the measurement mode, press , both MAX /
MIN start at the same moment. Every time when
button is pressed, the mode will be displayed
according to the cycle of . Press for
more than 1 second to stop the function.
5.6 Freeze window function
Press to freeze the window and stop updating
the temperature reading value. And then press
for more than 1 second to cancel the freezing
window.
*In addition to the power button, backlight button,
working light, all other buttons are invalid.
5.7 Automatic shutdown function
The device will automatically turn off after 15
minutes if no action. Press for more than 1
second to turn on or off the automatic shutdown
function
Page 9

ST-141/ST-141D
- 6 -
6
5.8 Zero function
In the measurement mode, press to turn on
the zero function, and press again to turn off
the zero function.
1. In the measurement mode, press for more
than 1 second to enter the zero setting.
2. Press to select the zero function, press
or to select the zero channel.
3. Press , this meter will automatically access the
desired zero value and display it on the LCD.
4. After setting, press again to exit the zero
setting and enter the measurement mode.
Page 10
ST-141/ST-141D
- 7 -
7
5.9 Installation of accelerometer
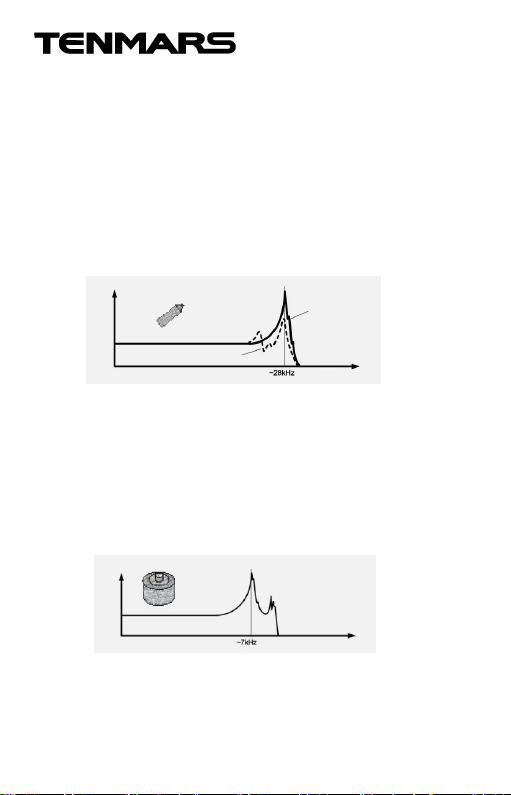
If you need to set up a permanent measurement
point on a machine, but you expect not to drill any
hole on the machine, you may use the stud of
bonding type which can be fixed with a rigid
adhesive on the measurement point. We
recommend using the epoxy resin type or the
cyanoacrylate adhesive type, because the soft
adhesive type will significantly reduce the valid
frequency range of the accelerometer.
If the measuring point is a plane, you may use the
permanent magnet base to achieve a simple
installation. However, this method will make the
resonant frequency of the test accelerometer
reduced to 7kHz; therefore, it cannot be applied on
the measurement of more than 2kHz. The suction
force of the magnet can withstand vibration force up
to 1000 - 2000m/s², which is dependent on the size
of the accelerometer.
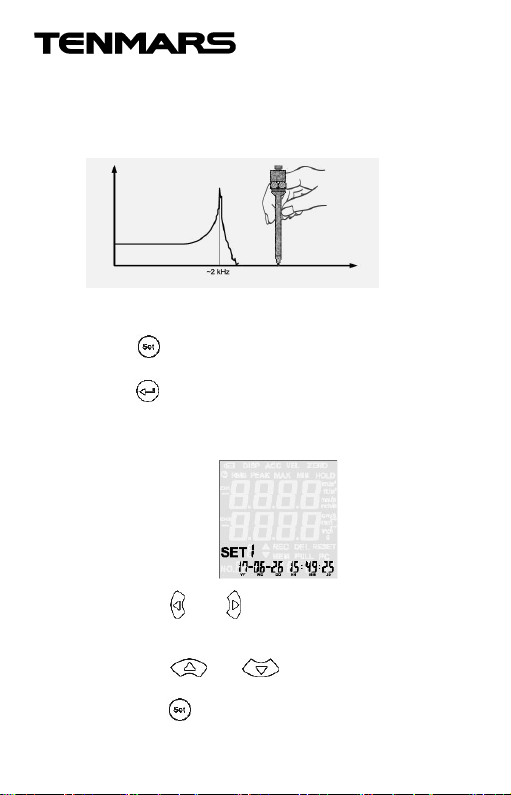
If the accelerometer is mounted on the top of a
handheld probe, it can help the rapid measuring
work. Because the overall stiffness reduces, the
Epoxy resin or
cyanoacrylate
adhesive
Frequency
Adhesive
Accelerometer output
Frequency
Accelerometer output
Permanent
magnet base
Page 11
ST-141/ST-141D
- 8 -
8
considerable tolerance in measurement will arise.
Do not expect the repeatable results. In order to
limit the measurement range to be about 1000Hz,
the low-pass filter should be used.
5.10 Function settings
Press for more than 1 second to enter the
setting mode.
Press to exit this mode.
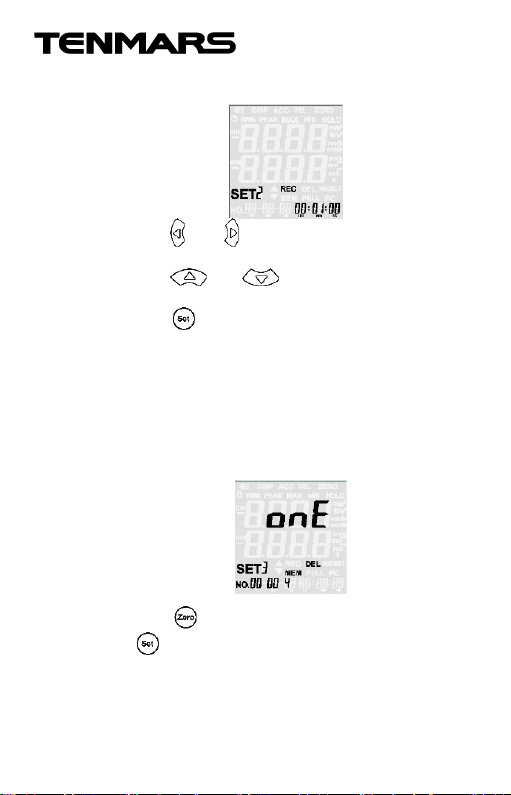
Step 1. Set the year, month, date and time:
1. Enter the setting mode of year, month, date
and time.
2. Press or to select the item to be
corrected; the number of the selected item will
flash.
3. Press or to modify the preset
value.
4. Press again to enter step 2.
Frequency
Accelerometer output
Handheld probe
Page 12
ST-141/ST-141D
- 9 -
9
Step 2. Set the auto recording time:
1. Press or to select the items to be
corrected.
2. Press or button to modify the
auto recording time.
Press button again to enter step 3.
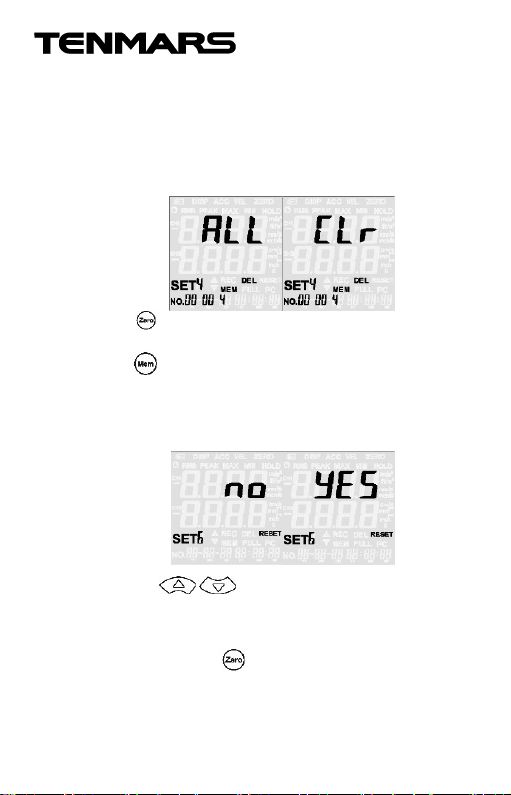
Step 3. Erase single data file saved in the
memory:
1. If no record, this step will be automatically
disable.
2. Entering the single data file mode, the LCD
displays the total number of data files, and the
“onE“ sign will flash.
3. Press to clear one data file.
Press button again to enter step 4.
Page 13
ST-141/ST-141D
- 10 -
10
Step 4. : Erase the all data files recorded in
the memory:
1. If no record, this step will be automatically
disable.
2. Entering the all data file mode, both the total
number of data files on the LCD displays and
the “onE“ sign will flash.
Press , both the total number of data files on the
LCD displays and the “CLr” sign will flash; then,
press button again to enter step 5.
Step 5. Return to the original default settings
1 The RESET sign “no” flashes on the LCD
displays
2 Press / to determine whether to return
to the factory settings.
3 The RESET sign “YES” will flashes on the LCD
display. Press again to confirm the factory
settings and return to step 1.
Page 14
ST-141/ST-141D
- 11 -
11
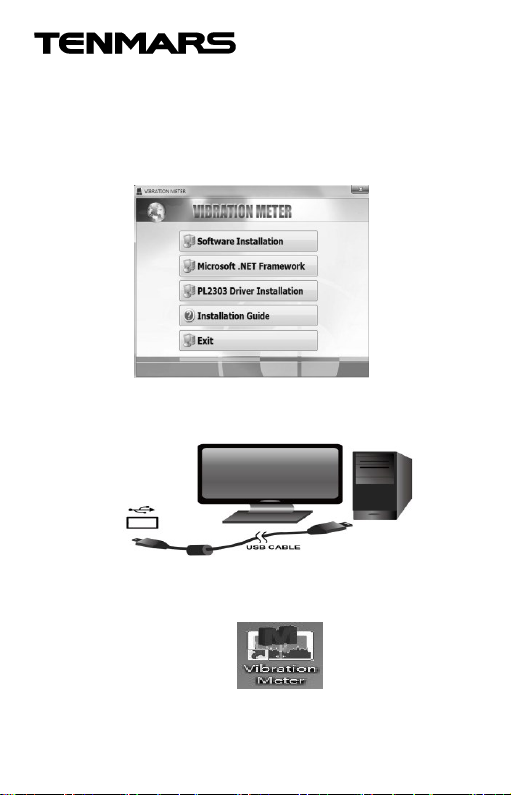
6 Software Installation:
OS: XP/Windosws7/Windows 8.1/Windows10
Download the PL-2303 software:
Install the CD into the PC to install the software
first.
Execute the program of PC desktop software:
Connect the USB cable to connect the meter
and the computer according to the drawing.
Select the desktop icon and click twice on left
key of the mouse to run the procedure.
Page 15
ST-141/ST-141D
- 12 -
12
7 General Specifications
The maximum dots of liquid crystal display (LCD): 1999.
Measurement items: VEL (velocity), /ACC (acceleration),
/DISP (displacement)
Function: acceleration (RMS, PEAK, MAX, min) .
velocity (RMS, PEAK, MAX, min).
displacement (P-P, MAX, min , P-P).
Unit: acceleration: m/s², g, ft/s².
velocity: mm/s, cm/s, inch/s.
displacement: mm, inch.
Frequency characteristics:
LO range: 10hz ~ 1khz. meet the international standard
ISO 2954-2012.
HI range: 10hz ~ 5khz.
Auto power off and disable auto power off.
Over load sign: “OL”
The manual recording can be saved up to 199 data files
(ST-141),or the manual recording plus automatic recording
can be saved up to 15000 data files (ST-141D).
Low battery status: " " symbol.
Battery: 1.5V× 6 pcs. (LR6 SIZE AA 1.5V).
Battery life: about 80 hours (alkaline battery).
Operating consumption current: less than 30mA @ 9V.
Operating temperature of the accelerometer: -20°C to
70°C.
Operating temperature and humidity of the meter: -10°C
to 50°C, less than 80% RH.
Storage temperature and humidity: -10ºC to 60ºC (14ºF
to 140ºF ), < 70%RH
Weight: about 730 g (including protective cover and
accelerometer).
Dimension: 240 (L) x 100 (W) x 45 (H) mm.
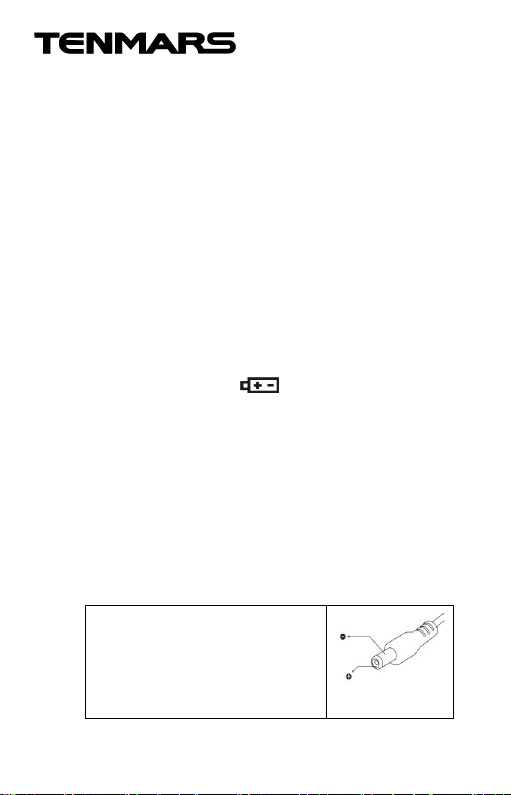
AC to DC Adaptor
External AC 100~240V converted
to DC 9V/0.5A power supply
Plug: The connection pin in the
center is the positive electrode, and
the outer case is negative.
Diameter: 5.5mm; inner diameter:
2.1mm
Page 16

ST-141/ST-141D
- 13 -
13
8 Electrical Specification:
The environmental temperature range of measurement:
23±3°C
Acceleration ACC (RMS,PEAK,MAX HOLD) 1g =9.81m/s2
Range
0.5~199.9
m/s2
0.05~20.3
9g
2〜656
ft/s2
Resolution
0.1 m/s²
0.01g
1 ft/s2
Accuracy
±(5%+5d)
@79.4Hz
and158Hz
±(5%+5d)
@79.4Hz
and158Hz
±(5%+5d)
@79.4Hz
and158Hz
Calibration
point
50m/s
2
(158Hz)
50m/s2
(158Hz)
50m/s2
(158Hz)
Velocity VEL (RMS, PEAK, MAX HOLD)
Range
0.5~199.9
mm/s
0.05~19.99
cm/s
0.02~7.87
inch/s
Resolution
0.1 mm/s
0.01cm/s
0.01inch/s
Accuracy
±(5%+5d)
@79.4Hz
and158Hz
±(5%+5d)
@79.4Hz
and158Hz
±(5%+5d)
@79.4Hz
and158Hz
Calibration
point
50mm/s
(158Hz)
50 mm/s
(158Hz)
50 mm/s
(158Hz)
Displacement DISP (P-P, MAX HOLD P-P)
Unit
mm
inch
Range
0.005~1.999mm
0.002~0.078inch
Resolution
0.001 mm
0.001 inch
Tolerance
±(5%+5d)
@79.4Hz
and158Hz
±(5%+5d)
@79.4Hz
and158Hz
Calibration
point
0.141mm(158Hz
)
0.141mm(158Hz)
Page 17

ST-141/ST-141D
- 14 -
14
9 Maintenance or Repair
1. When the LCD shows the symbol “ ”, it
means that the electric quantity is low, please
replace with batteries immediately to ensure
accuracy.
2. When the meter is dirty, please wipe it with a
soft cloth, such as glasses cloth, and do not
wipe it with chemical solvents.
3. If not using for a long time, please remove the
batteries to prevent the leakage of battery
electrolyte solution which will corrode the
internal components.
4. If fault on the meter, it can only be sent to the
service suppliers who are authorized, or sent
back to the original factory for maintenance.
10 Battery Replacement
1. Turn off the power.
2. Open the bracket and the battery cover on the
back of meter, and remove the batteries.
3. Install six new batteries of AA type and comply
with the polarity positions of positive and
negative.
4. Install the battery cover and the bracket back.
11 Product Disposal
Caution: This symbol indicates that
equipment and its accessories shall
be subject to a separate collection
and correct disposal.
Page 18

ST-141/ST-141D
- 15 -
15
Page 19

ST-141/ST-141D
- 16 -
16
Page 20

TENMARS ELECTRONICS CO., LTD
6F, 586, RUI GUANG ROAD, NEIHU,
TAIPEI 114, TAIWAN.
E-mail: [email protected]
http://www.tenmars.com
Professional Electrical and Environment
Test & Measurement Instruments:
LED light meter, Temperature & Humidity
meter,Infrared Thermometer, Sound level
meter, Light meter, EMF meter, UV Light
meter, RF meter, Hot wire Anemometer, Co
meter,Anemometer, Lan cable tester, Co2
meter, Solar power meter, Radiation meter,
Clamp meter, Multimeter, Phase Rotation
test, Digital Insulation tester
Our products of high quality are selling well
all over the world
 Loading...