

Ten-Haaft Oyster, Caro, Cosmo, Digital CI Oyster, Digital CI Caro Operating Instructions Manual
...
Stand: 08/2008 Sprache: englisch
Innovative Mobile Technology
Operating instructions
Digital CI

2
Proper use and operation
This product has been designed for use in a fixed installation on mobile
homes or camper trailers with maximum speeds of 130 km/h. It is
designed to automatically aim a parabolic antenna mounted on a
stationary vehicle at geostationary television satellites transmitting
directly to Europe. The power to the system is supplied by a standard
vehicle electric system with a rated voltage of 12 or 24 Volt. For
installations where a connection to the vehicle's electrical system is
provided, a suitable 230-Volt to 12-Volt power converter must be used.
Use of the equipment for any other purpose than the one specified is
not permitted.
Please ensure that the following instructions are observed:
Do not clean your mobile home with the mounted satellite system in a
single-bay or drive-through car wash or with a high-pressure cleaner.
It is not permitted to change the overall device by removing or adding
individual components.
It is not permitted to use other parabolic/flat antennas or receiver
heads (LNBs) than those originally installed at the equipment.
Installation must only be performed by sufficiently qualified personnel.
All instructions in the supplied Installation Instructions, which form
part of the Operating Instructions, must be carefully followed.
All of the relevant and approved guidelines of the automotive industry
must be observed and complied with.
The equipment must only be installed on hard vehicle roofs which are
sufficiently strong and inherently stable.
No regular maintenance is required for the product. All housings and
enclosures must not be opened. Always ask a qualified professional to
carry out any maintenance work.
In the event of any problems, or if you are unsure about anything,
please contact the manufacturer directly or a specialist workshop
which is approved by the manufacturer.

3
Table of contents
Proper use and operation.................................................................................................................. 2
Table of contents................................................................................................................................. 3
1 Introduction ..................................................................................................................................... 4
2 Connections ..................................................................................................................................... 6
3 Remote control .............................................................................................................................. 7
4 Control of the receiver.................................................................................................................. 9
5 Control without remote control...............................................................................................11
6 Menu functions.............................................................................................................................12
7 Common Interface (CI)................................................................................................................ 21
8 Timer ................................................................................................................................................22
9 Favorite channels list ..................................................................................................................24
10 Hard disk (HD) recording (optional)......................................................................................25
11 DVB-T (terrestrial TV, optional) .............................................................................................. 28
12 Editing transponders / channels ............................................................................................29
13 Games.............................................................................................................................................30
14 Receiver configuration .............................................................................................................31
15 Editing channel list....................................................................................................................35
16 Channel search ...........................................................................................................................37
17 Signal-strength display ............................................................................................................40
18 Operation with additional satellite receiver.......................................................................41
19 Functions of the satellite system........................................................................................... 42
20 RS232 interface..........................................................................................................................58
21 Receiver data............................................................................................................................... 59
22 Safety information..................................................................................................................... 60
23 Appendix: Search satellites ..................................................................................................... 62
24 Appendix: Channel list (TV stations).....................................................................................66
25 Appendix: TV channels..............................................................................................................68
26 Appendix: Encrypted programs (CI) ......................................................................................69
27 Protection of the environment............................................................................................... 70
28 Index.............................................................................................................................................. 71
Software version EU/2.07

4
1 Introduction
These instructions describe the functions of your digital CI satellite
system, including the options "HD" (video recorder function, see page
25) and "DVB-T" (abbreviated "+T" in the following, see page 28).
Optional functions are identified accordingly.
Your ten Haaft digital satellite-reception system is an intelligent and
fully automatic system that does not require any of the manual
adjustments associated with conventional systems.
Unlike normal television antennas for terrestrial reception, a satellite
antenna must be precisely aimed southward into the satellite's signal
beam. This signal beam must not be interrupted by trees or other
obstacles, as this will prevent reception.
Please ensure that the system always has a clear view to the south
towards the satellite. If the signal is blocked — for example by a tree
— it is quite possible that a good satellite signal may be received
without any problems in a position just a few meters away. In
Scandinavia, even mountains in the far distance can interrupt the
satellite signal.
Oyster
®
Digital only
To allow reception even under such adverse conditions, the antenna
unit of the Oyster
®
Digital system can be removed from the vehicle top
and be set up near the vehicle in a position where a signal can be
received. This requires a special pedestal and an extension cable which
are available as an optional "ground assembly kit".
Satellite systems installed on buildings must usually only be adjusted
once. By contrast, a mobile system will need to be readjusted even if it
is moved only a few centimetres. Owners of a ten Haaft satellite
system can perform this adjustment at the push of a button.

5
Our digital CI satellite systems stand for exceptional operating
convenience and a multitude of channels. At the touch of a button, the
system opens and searches for receivable satellites. The microprocessor controlled fine-tuning and the digital receiver technology
ensure the best possible picture quality, providing you with immediate
access via your remote control to the full range of TV and radio
programs broadcast by the new digital satellites. You can even adjust
the volume of your television set with the satellite system's remote
control. This eliminates the inconvenient handling of two remote
controls.
To further enhance the operating convenience, a new function has
been implemented in your satellite system to allow the system to be
switched off with the antenna remaining open. This eliminates the
daily opening and retracting of the antenna when staying in one
location for
several days without having to dispense with the extremely
efficient power-saving stand-by mode.
The first few pages of these instructions explain the general functions
of the receiver and are followed by an explanation of all the functions
specific to the satellite system and the search functions.
Your digital CI satellite system can receive unencrypted "Free-To-Air"
(FTA) programs, but also encrypted (encoded) programs. The integrated
"Common Interface" (CI) accepts decoder modules for the various
different encryption methods. It can hence receive encrypted (pay-TV)
channels, provided that you have procured the corresponding decoder
module and valid "conditional access" smart card. For further
information please refer to section "Common Interface" on page 21.
6
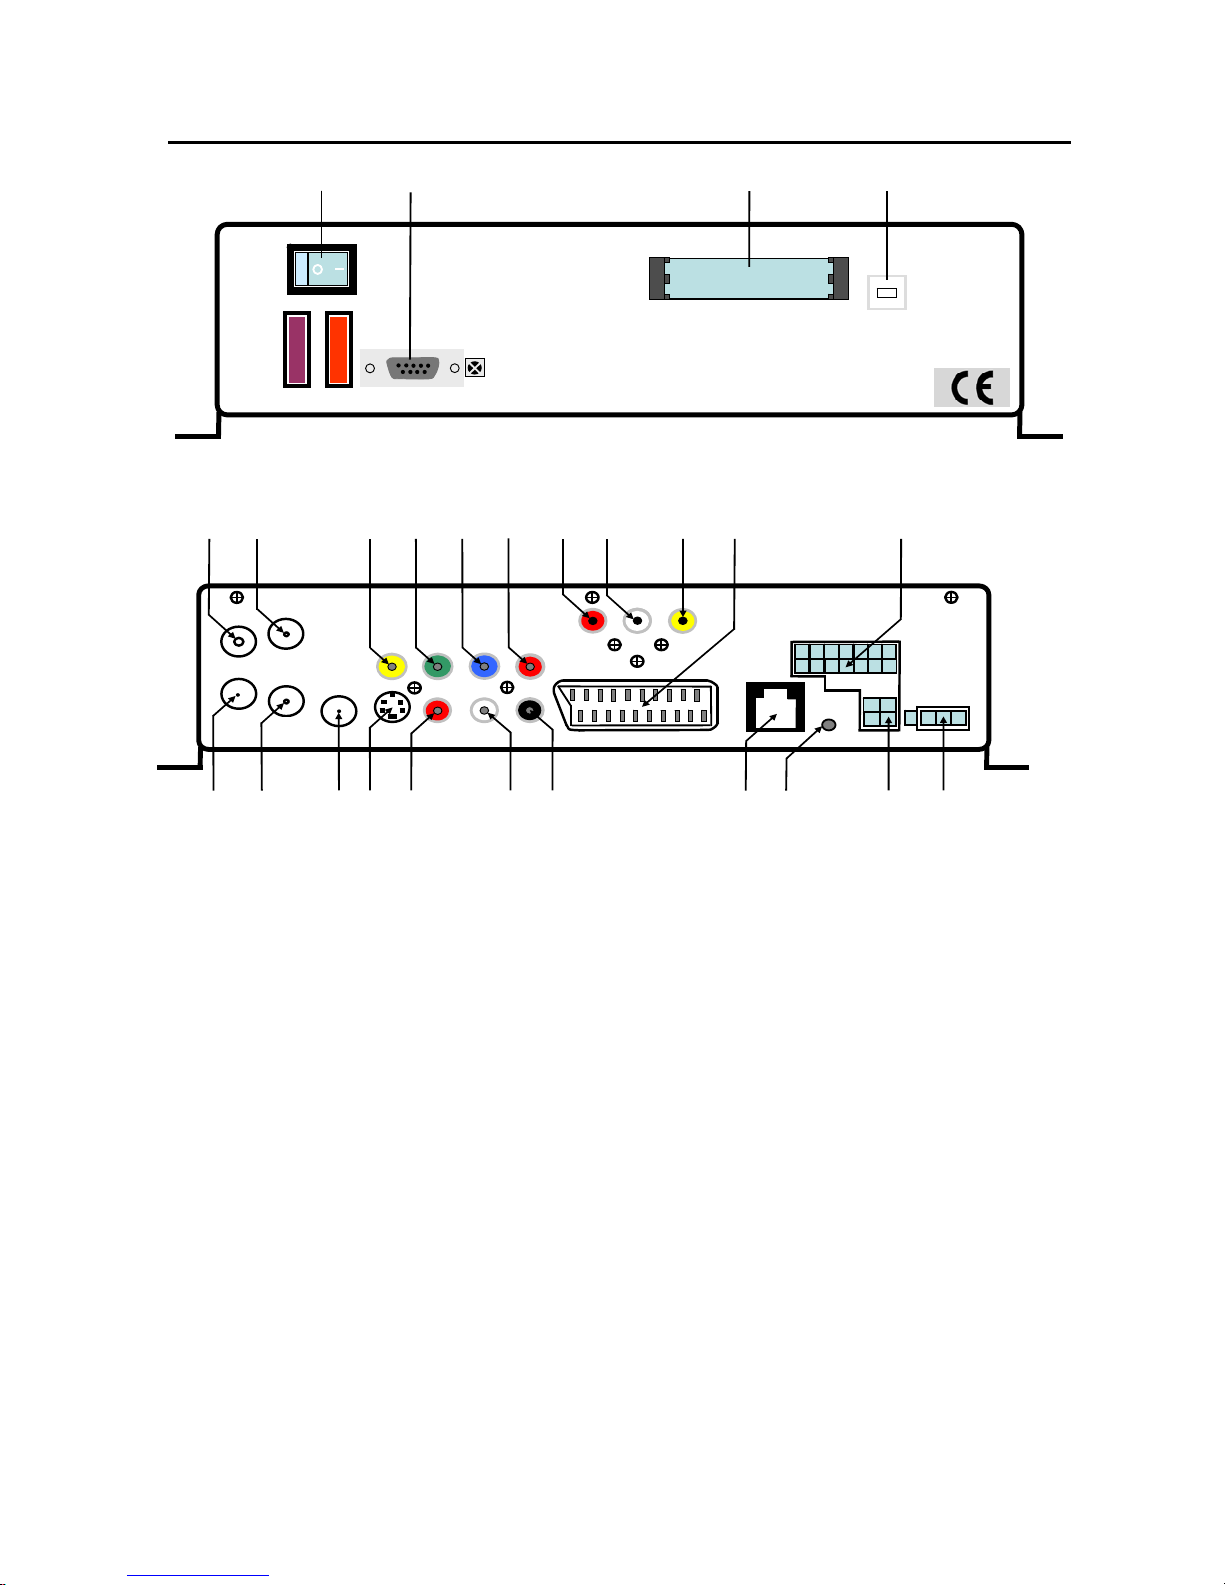
2 Connections
1 Power supply
2 Oyster® only: for 4-pin connector of satellite system
3 Auxiliary external infrared receiver (optional)
4 For satellite mouse connector (channel display and remote-control receiver)
5 Digital audio out, switchable in menu, e.g. for 5.1 sound systems
6 Audio out left, also for external speakers, HiFi system etc.
7 Audio out right, also for external speakers, HiFi system etc.
8 Brightness and colour components (S-VHS -signal or Y/C-signal)
9 Analogue high-frequency signal
10 LOOP for sat signal, e.g. for auxiliary receiver
11 LOOP for DVB-T signal, for auxiliary DVB-T receiver or decoder (optional)
12 Connection for antenna cable from optional or external DVB-T antenna (optional)
13 F-jack for satellite cable (coaxial cable of satellite system)
14 PAL video signal: for colour, brightness, sync
15 Y-signal / G-signal (for many LCD devices)
16 U-signal / B-signal (for many LCD devices) RGB-signals / YUV-signals
17 V-signal / R-signal (for many LCD devices)
18 Audio-DVD in right
19 Audio-DVD in left
20 Video-DVD in
21 SCART socket
22 CARO® and Cosmo® only: for 14-pin connector of satellite system
A Master switch ON/OFF C Slot for CI module
B RS-232 port for software updates D PC interface, harddisk (optional)
IN
SAT
TV OUT
IN
12 – 24 V
SAT
MOUSE
ANTENNA
CONTROL
EXT IR
DVD IN
R L SPDIF
OUT
11 10 9 8 7 6 5 4 3 2 1
12 13 14 15 16 17 18 19 20 21 22
TV
OUT
U/B
Y/G
AUDIO
CVBS
Y/C
V/R
OUT
DVB-T
OFF ON
HD
3A 10A
RS 232
COMMON INTERFACE
A
B
C
D
7
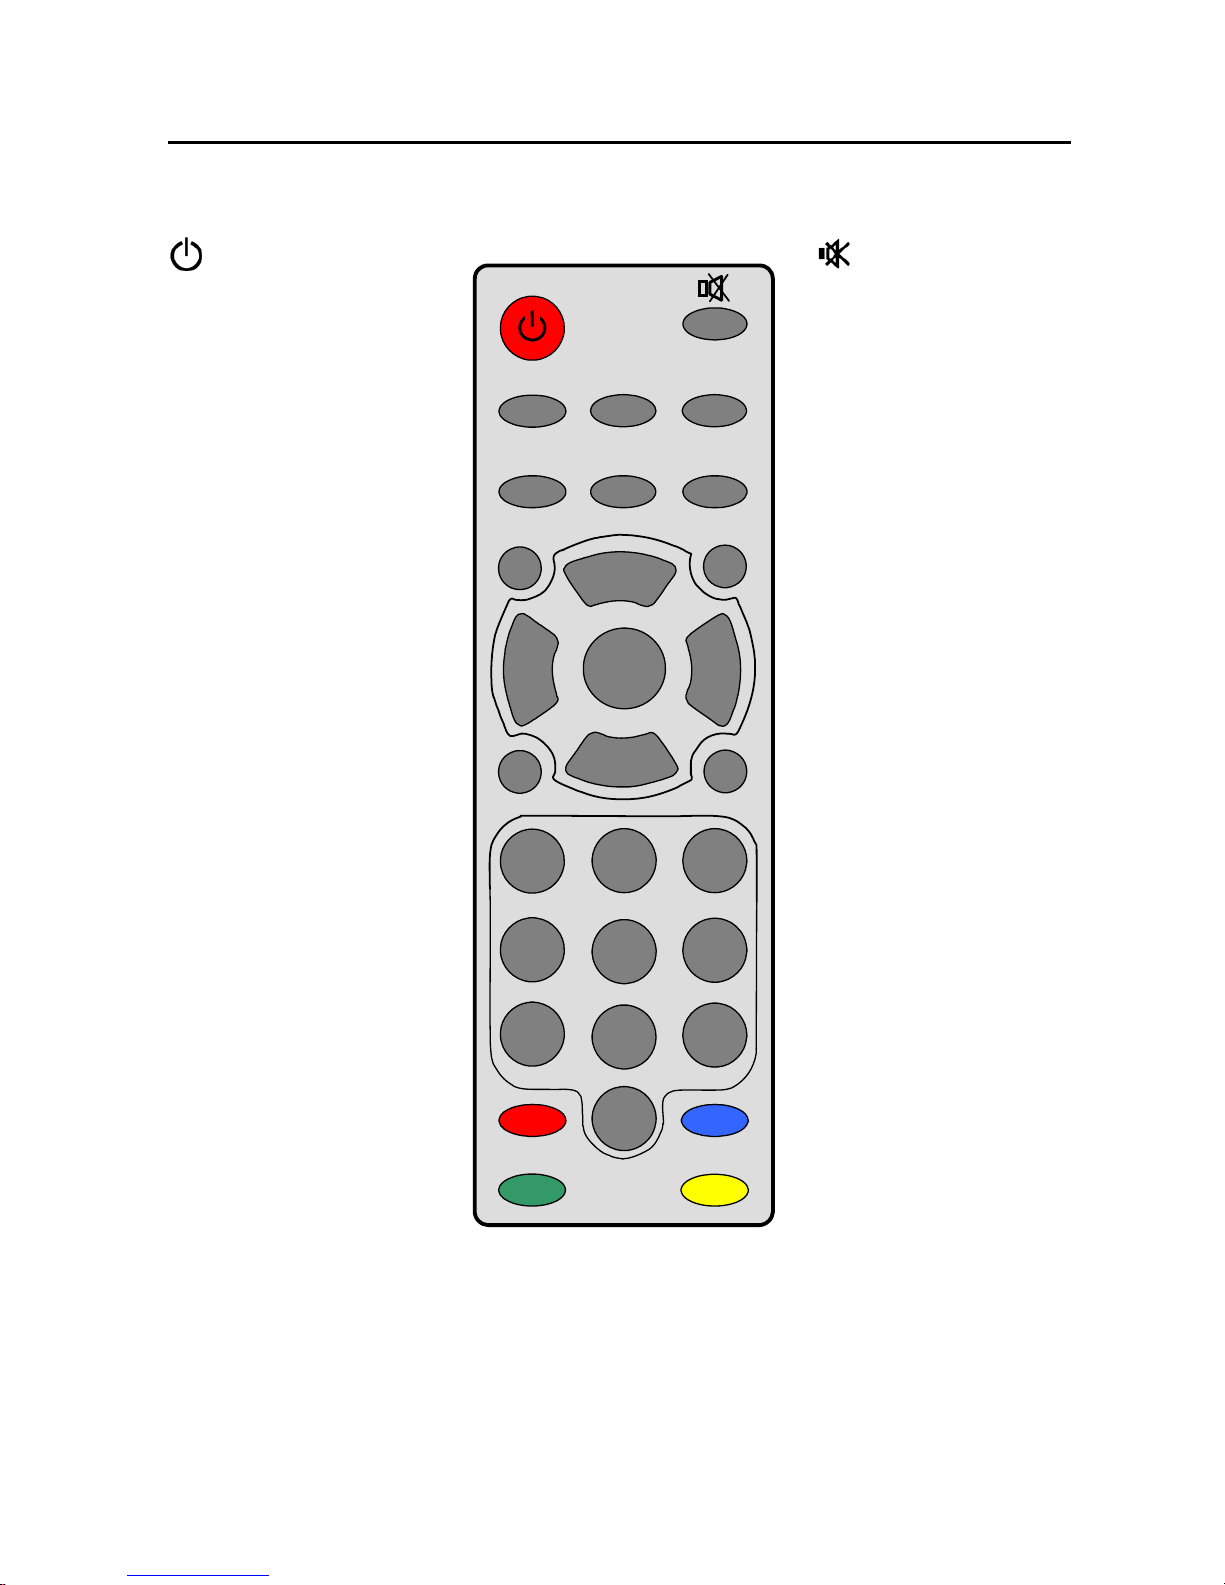
3 Remote control
The keys are explained in detail on the following pages.
: Switches the
system on or off.
Opens/retracts
antenna.
TV: Activation of TV
mode. Antenna moves
into previous reception
position if no picture is
received.
AV: Activates the
loop-trough of the
satellite signal.
LIST: Display of
program list
-: Volume down.
Changing of values in
menus.
OK: Select or confirms
functions.
INFO: Display of
current program
information (EPG).
PVR (red): Opens the
control menu of the
optional Personal
Video Recorder.
(green): not assigend.
: Mute function of
speakers and SLEEP
function of system
(press 3 sec to switch
off the system
WITHOUT retracting
the antenna).
RADIO: Activation of
radio mode
SWAP: Return to
previously selected
channel
EXIT: Closes on-screen
menus
+: Volume up.
Changing of values in
menus.
MENU: Display of onscreen menus
P+: Program up.
upward in menus.
P-: Program down.
downward in menus.
0..9: Number keys for
direct channel
selection
(blue): Direct
selection, video/audio
settings
(yellow): Starts the
DVB-T mobile scan
(optional).
1
2 3
6
5
4
7
8
9
0
OK
MENU
INFO
LIST
EXIT
P+
P-
PAUSE
AV TEXT SWAP
ABC DEF
GHI JKL MNO
TV
RADIO
-
+
PQRS TUV WXYZ
PVR
8
OK
P+
P
-
+
Tel.: +49 (0) 72 37/48 55 - 0
www.ten-haaft.com
1
2
3
4
5
6
-
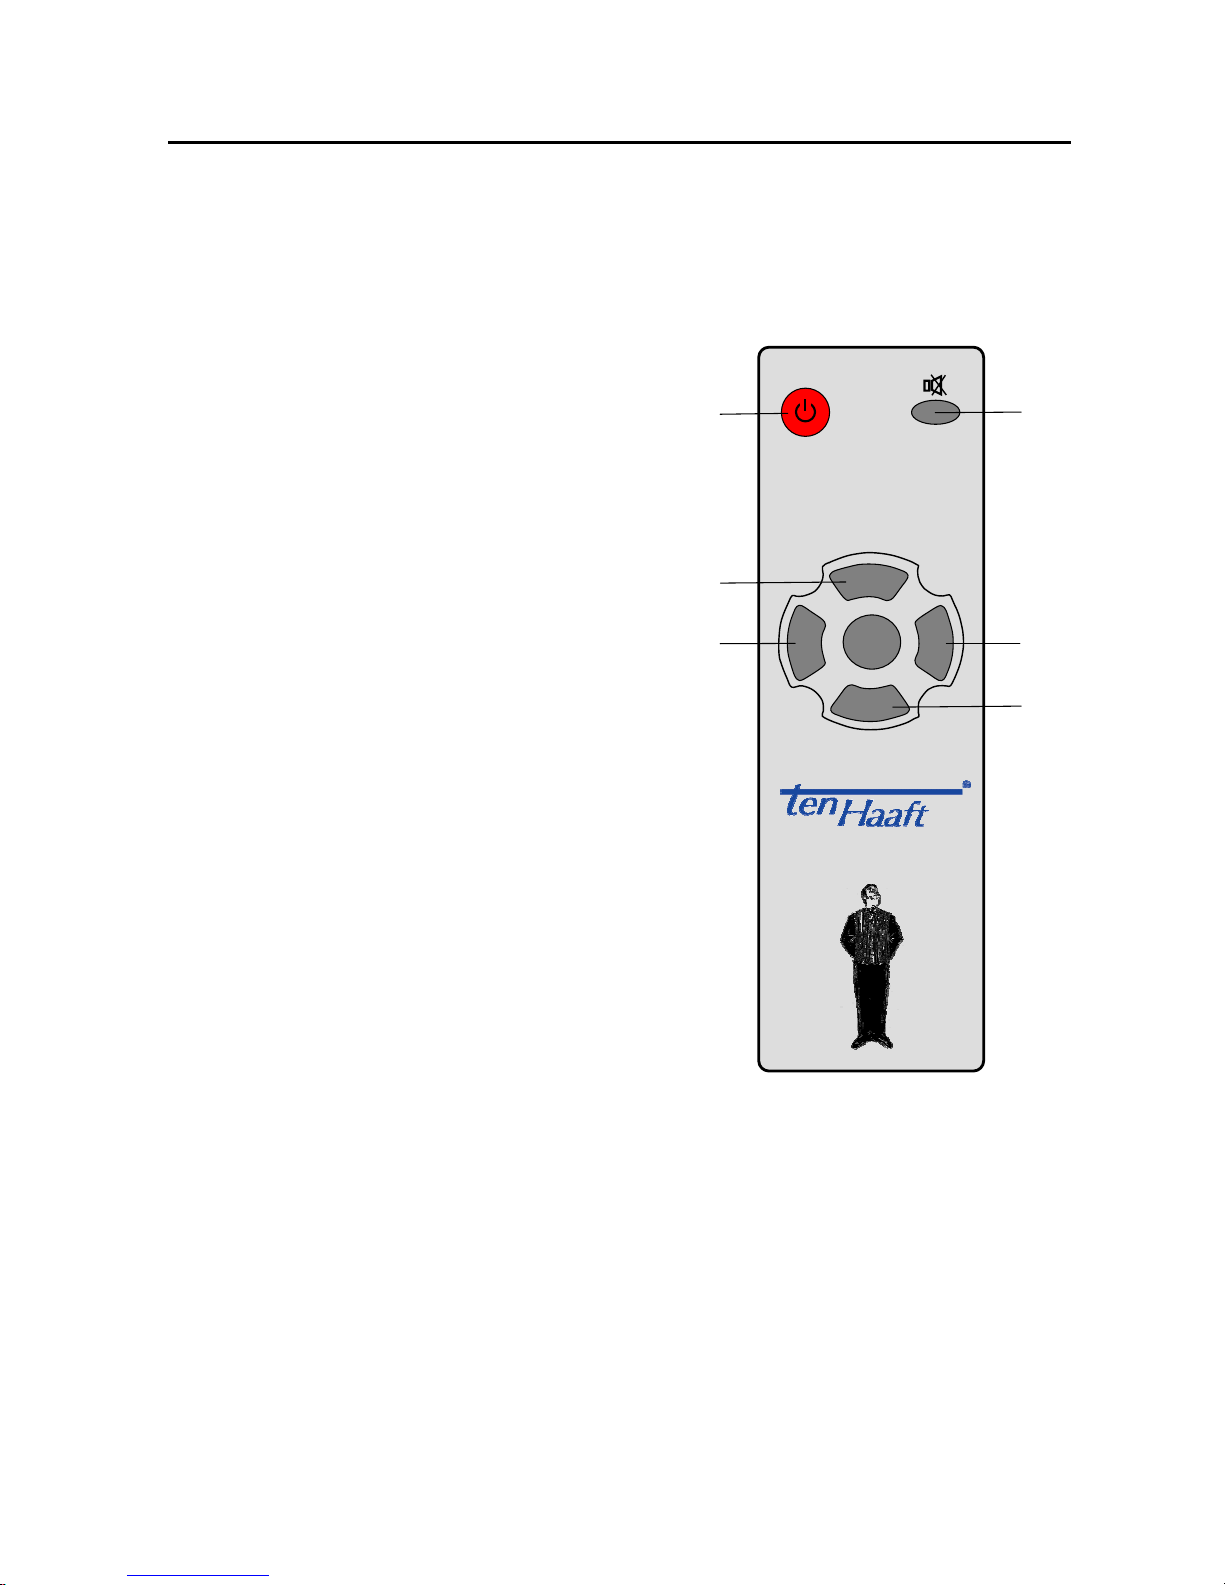
3.1 'Easy' remote control
The satellite system can also be controlled with an easy-to-use simple
auxiliary remote control. This 'Easy' remote control is shown in the
following graphic.
The 'Easy' remote control has the
following functions:
1 Satellite system on and off
(stand-by). The antenna
retracts when the system is
switched off. In this stand-by
mode, timer programmes are
not monitored.
2/6 Change to the previous or next
channel in the channel list.
These keys are also used to
navigate within menus or lists.
3/5 Volume up/down.
These keys are also used to
navigate within menus or to
scroll the pages of lists.
4 (MUTE key): If this button is pressed for more than 3 seconds, the
satellite system switches into stand-by mode WITHOUT retracting
the antenna (sleep mode).
If the timer is programmed, the sleep function will set the timer
into stand-by mode.
A short press mutes the sound or turns it back on.

9
4 Control of the receiver
The receiver is ready for operation when the master switch on the rear
side is in position "I". If the switch is in position "0" the satellite system
is completely disconnected from its power supply.
For normal TV operation the following functions can be selected with
the remote control (see page 7):
Satellite system on and off (stand-by).
The antenna retracts when system is switched off.
In this stand-by mode, timer programs are not monitored.
MUTE
If this button is pressed for more than 3 seconds, the
satellite system switches into stand-by mode WITHOUT
retracting the antenna (sleep mode).
If the timer is programmed, the sleep function will set the
timer into stand-by mode.
A short press mutes the sound or turns it back on.
P+/CH
P-/CH
Change to the previous or next channel in the channel
list. These keys are also used to navigate within menus or
lists.
TV
RADIO
Change between TV and radio mode.
In TV mode, the antenna will move into the position of the
last known reception if no satellite signal is received while
the key is pressed.
+/VOL
—/VOL
Volume up/down.
These keys are also used to navigate within menus or to
scroll the pages of lists.
MENU
Opens the settings menu for the current program and the
system menu. Press MENU again to directly open the main
menu.

10
OK
Display of the status bar. Confirms, opens or edits the
currently active item.
Hides help functions when in PVR mode (optional).
EXIT
Use EXIT in all menus to exit the menu. Outside of menus,
this key activates the channel list.
INFO
Displays the EPG. A single press will display information
about the current program, a second press opens a list
with a program overview for the whole day.
LIST
Activates either the TV or radio channel list, depending on
operating mode. Can be used within the EPG to directly
program the timer.
SWAP Change back to the last selected channel.
Use SWAP to toggle between the windows in multiplewindow menus.
AV
Deactivation of internal LNB voltage supply and loopthrough of satellite signal from SAT IN to SAT OUT (if SAT
OUT port is fitted). To be used with a second receiver
connected to the SAT OUT socket.
TEXT
Display of the videotext decoder and display of the
videotext on screen.
PAUSE
Still picture. The picture is frozen (stopped) and will be
continued by pressing the key again.
PVR
Starts the optional Personal Video Recorder (PVR) for the
recording and playback of programs to and from the
internal hard disk.
(yellow)
Direct access to the DVB-T mobile search (only with "+T"
model).
11
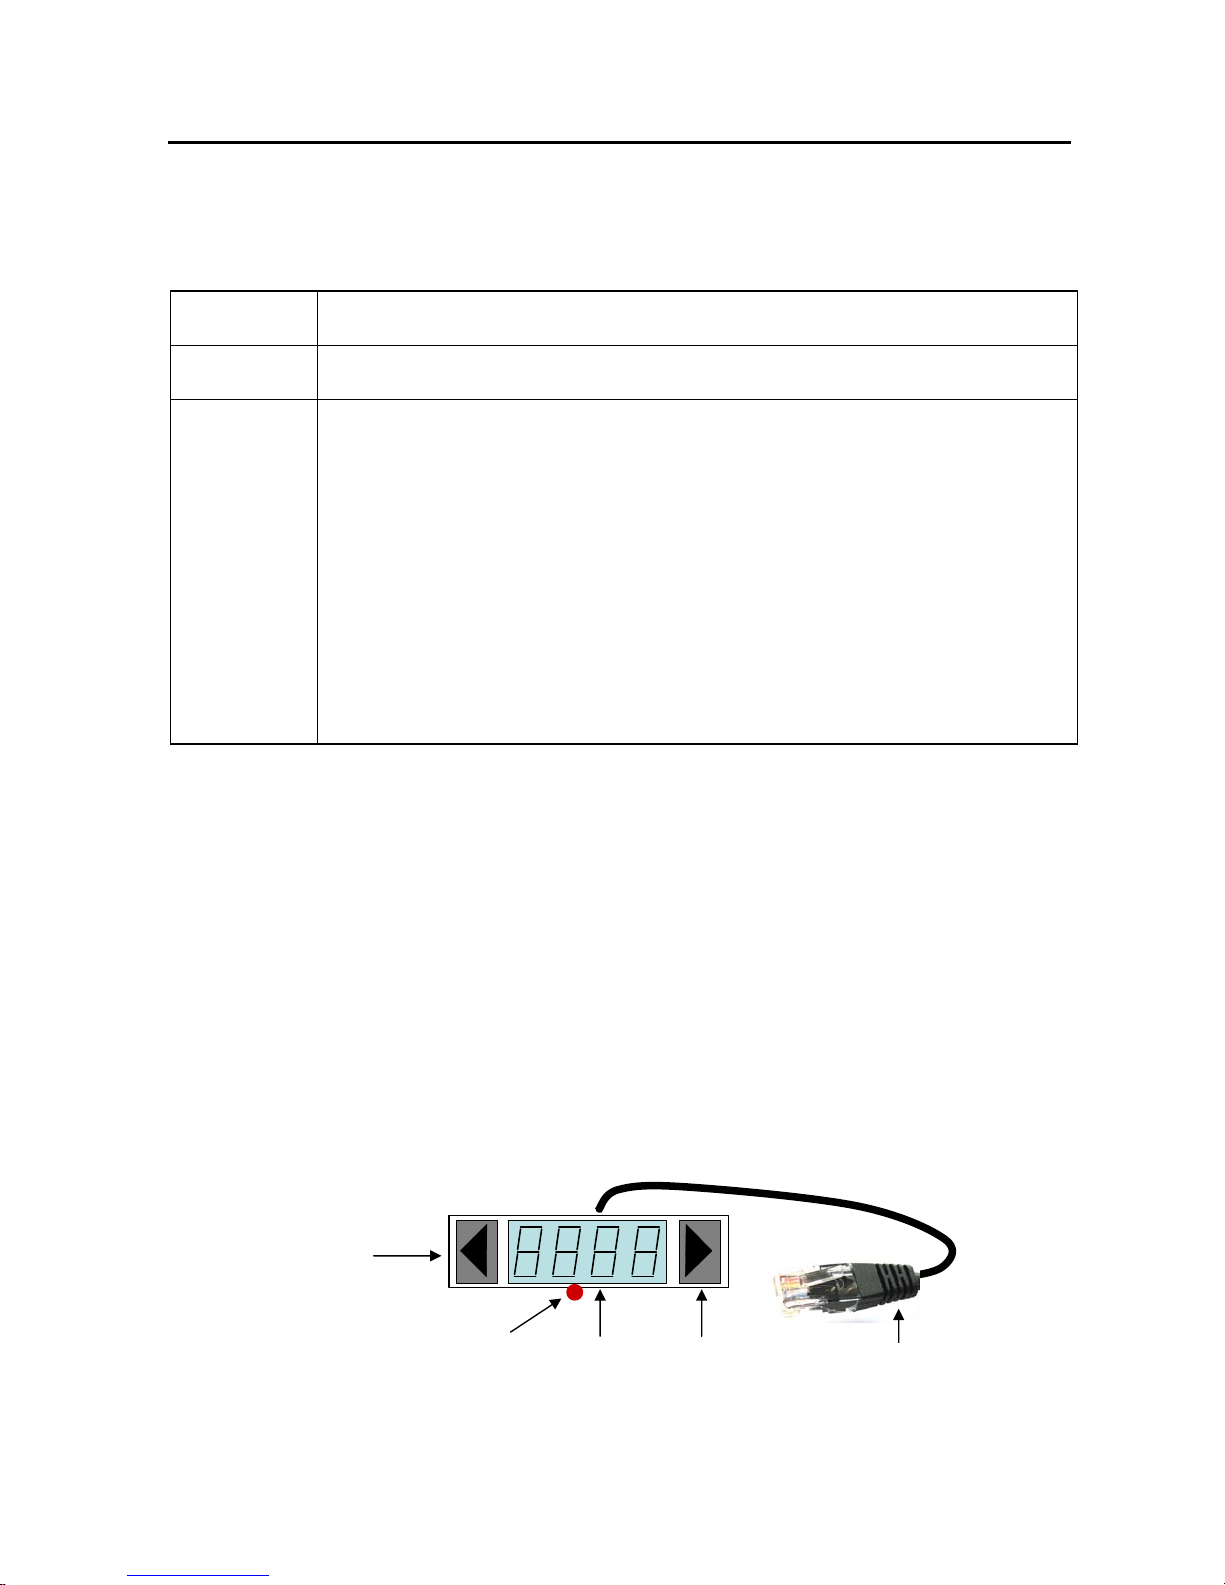
5 Control without remote control
The two keys on the satellite mouse (see graphic on page 11 below)
allow the following basic functions of the receiver to be controlled
without the remote control:
Change to the next channel in the channel list.
Change to the previous channel in the channel list.
/
Pressing both keys briefly at the same time toggles
between RADIO and TV mode.
Pressing both keys longer will cause the antenna to
retract und the system to switch off. This corresponds
to pressing the red stand-by key (ON/OFF) on the
remote control.
When in stand-by mode, a brief press on both keys
switches the system back on.
Another control element is the master switch on the front of the
receiver. In position "0" or "OFF" the complete system is disconnected
from the vehicle's power supply. The switch must be in position "I" or
"ON" for the system to operate.
The antenna will only retract automatically by command of the control
line (terminal 15/ignition) if the master switch is set to "I" or "ON".
Should the system no longer respond to commands, set the master
switch to "0" for approx. 10 seconds and then back to "I" to reboot the
operating software of the receiver.
Right satellite-
mouse key
Satellite-mouse
connector (RJ-45)
Display
Left satellite-
mouse key
Remote-control
receiver

12
6 Menu functions
Menu structure
Basic settings MENU............................................................................................14
Picture/sound settings .............................................................................19
Teletext / Videotext..................................................................................
20
EPG ................................................................................................................17
Favorite channels list ................................................................................24
Edit channel ................................................................................................29
Edit transponder ........................................................................................29
Main menu (channel list, edit settings, options, timer)
Channel selection and Channel list ..............................................................15
List: TV, Radio
Electronic Program Guide ................................................................................17
Overview
Current program
Selection of subchannels .................................................................................19
Premiere / Options channels / Portal channels

13
The receiver is operated via the remote control provided. The following
keys are used to navigate within the on-screen menus:
MENU
Opens the quick-reference menu for the simple access to
settings of the current channel and the functions of the
satellite system.
Press MENU again to open the main menu.
P+ / P-
Moves the highlighted bar up or down one option.
+ / -
Within lists: scrolls through the pages in the list.
Within input fields: changes the set value.
OK Opens, confirms or edits the highlighted item.
EXIT
Exits the active menu. Press EXIT repeatedly to exit all
menus.
SWAP Use SWAP to toggle between the windows.
EPG
Displays the EPG. Press once to display information about
the current program. Press again to display a list with a
program guide for the day.
LIST Displays the channel list.
PVR
Displays the menu of the hard disk Personal Video
Recorder (PVR, optional, see page 25.)
To access the satellite system's functions, press MENU once, then use
P+/P- (CH/CH) to move the highlighted bar to
Oyster/CARO/Cosmo Digital and then press OK.
For a comprehensive description of all of the satellite system's
functions please see page 42 and following pages.

14
6.1 Basic settings
After initial activation, adjustment of some default settings of the
control software may be required. Proceed as follows:
1. Start the Main menu.
2 x MENU
2. Select the menu "Edit Settings" and then the sub-
menu "General Options".
P+/P-
OK
3. Set your time zone. The setting e.g. for central
Europe (CET) is: +1:00. Daylight-saving time is set
automatically if the "Summer time control"
function for Europe is enabled.
To adjust the time, use the arrow buttons or enter
the digit directly. Use LIST to toggle between plus
and minus.
0 — 9
+ / -
LIST
4. Select your language. + / -
5. Press EXIT to exit the basic settings. EXIT
6. Select "Save Settings". Press OK and wait until the
menu disappears.
P+/P-
OK
7. Volume default setting: Set the volume of your TV
set to minimum and that of your receiver to
maximum. Now, increase the volume at the TV
until a pleasant level is reached. Operate the
receiver within the upper quarter of the volume
range, if possible, to ensure an optimal sound
quality.
+ / -
For a detailed description of all configuration options please refer to
section "Receiver configuration" on page 31.

15
6.2 Channel selection
The receiver maintains an internal channel list. This list contains all
channels of the activated satellites. The channels of deactivated
satellites are not displayed.
There are several alternatives for selecting channels:
P+/P/
Change to the previous or next channel in the channel list
TV
RADIO
Change between TV and radio mode.
SWAP
Switch between current channel and the previous
channel.
The software stores as previous channel the channel that
was last active for more than one second. You can
therefore scroll through the list by quickly pressing P+ or
P—. The channels only activated briefly in the process will
not be stored by the SWAP function.
0 — 9
You can also select channels by pressing the number keys.
In this case, you can shorten the input by pressing OK (if
the channel number has just one digit) or cancel the input
by pressing EXIT.
To enter a number with less than four digits, you can
complete the input by holding the key of the last number
down.
Note: By directly typing in numbers you can also select
deactivated channels (see page 32).
Do not start the direct entry of channel number with the
number "0" as this will open the favourite channels list.

16
6.3 Channel list
The channel list can also be displayed directly:
LIST
Displays the complete channel list. Use the button P+ or
P— to select a channel. Press OK to activate. Within the
channel list, you can use the TV/RADIO key to toggle
between the TV and the radio list.
EXIT
With the status bar hidden, press EXIT to display the
channel list.
To exit a list already displayed, press EXIT.
TV
RADIO
Change between TV and radio list.
0 - 9
You can also directly input the channel number by
pressing the number keys. In this case, you can shorten
the input by pressing OK (if the channel number has just
one digit) or cancel the input by pressing EXIT.
MENU
Opens a menu containing the options "Edit channels" and
"Edit transponders" (see page 29).
Use "EPG display" to activate a combined display of list
and EPG.
Option "Edit list" allows the sorting of the channel list
(see page 35).
INFO Activates/deactivates the combined list/EPG display.
While the channel list is displayed on screen with the EPG display
deactivated, the satellite allocated to the highlighted channel is
displayed in the lower right-hand corner of the screen.

17
6.4 Electronic Program Guide (EPG)
DVB-compliant stations broadcast additional information about their
programs, such as titles or details about current or upcoming programs.
Some stations may even broadcast a program schedule for up to 64
days in advance. This service is currently e.g. provided by almost all
German stations transmitting on Astra 1, usually with a preview period
of approx. 5 days. The receiver automatically detects EPG data and
provides the information available.
Please ensure that the correct local time is set in Main Menu Æ Edit
Settings Æ Timezone (+1:00 for Central Europe, +0:00 for Great
Britain), as otherwise wrong starting and end times of the programs
will be displayed.
Status bar
Once you have selected a channel, the status bar will display the title
and a brief description (if available) of the current program. For further
information please start the EPG.
EPG
This is your Electronic Program Guide. The EPG comprises the following
functions:
Details
Press the INFO key to display the EPG within the
current program. Comprehensive information about
the current program will be displayed.
Details of
next program
Press + or — to display information about the next
program.
Overview of day
Press INFO again to switch from the details display
to the list display. This list contains all programs of
the current day (from 6 a.m. until 6 a.m. of the
following day).
The title bar shows the date to which the program
guide refers. On the right you will see the number

18
of days for which information is available and
which day you have selected.
Use P+ / P- to scroll through the entries of the list,
use +/- to scroll the pages.
To switch to the following day, navigate to the end
of the list and press P+ or +. To switch to the
previous day, navigate to the beginning of the list
and press P- or -.
Note: If you have just selected a channel for the
first time, the data in the list may still update while
you navigate in it.
Overview of day
details
To display details about a listed program, press OK
to display the details screen. Within the details
screen, press + or — to navigate to the next or
previous program.
Some stations provide very extensive detailed
information which may not completely fit into the
screen. In such cases, use P+/P- to scroll through
the text.
LIST
Use LIST to copy the program currently shown in
the EPG or the selected program into the timer. For
further information please see page 22.
Please note that EPG information is always displayed in the language
broadcast by the station.
Few stations do not broadcast any EPG information or only very brief
EPG information without any additional details.

19
6.5 Subchannels (encrypted/audio)
When watching a multilingual program, press MENU to open a context
menu and to select an audio channel with a different language.
The first menu item is "Audio channel". Press OK to select this option
and then select an audio channel from the list. Alternatively, you can
activate the same function by pressing the blue key. Select the desired
subchannel (channel for original language) from the list.
If the audio channels provide language identifiers, these will also be
displayed.
Options channels
The German pay-TV channel "Premiere" for example transmits its
optional TV channels (Sport and Premiere Direkt) in a process similar to
the audio channels described above. To do this, Premiere provides socalled portal channels which form the basis from which the subchannels can be selected.
To switch to these channels, first select the corresponding portal
channel and then open the selection list via Menu Æ Audio channel Æ
OK. From the selection list, select an optional channel and accept it by
pressing OK. Alternatively, you can reach the selection list directly by
pressing the blue key on the remote control.
Radio stations
Some providers are transmiting several free-to-air radio programs on
separate audio channels of a TV channel. This does not comply with the
usual DVB-S procedure, but however, these channels can also be
selected using the process described above. The station names are also
displayed in the audio channels list.
However, radio stations should rather be stored in a separate radiostations list (RADIO key).

20
6.6 Teletext / videotext
The digital CI receiver can directly decode and display teletext or
videotext in case your television set or flat-panel display does not
support this feature.
If the current station broadcasts correctly coded teletext, the option
Teletext will appear in the context menu. Select this option and press
OK. You may also activate the videotext directly by pressing TEXT.
TEXT Activates the teletext. Press repeatedly to switch between
the various display types.
0 — 9 Page number input (between 100 and 899)
P+/P— Scrolls pages in increments of 1. Unstored pages are
skipped.
+/— Normal mode: volume control
Sub-page mode: scrolling of sub-pages in increments of 1.
MUTE Mutes the sound
OK (De-)activates the sub-page mode. With the sub-page
mode activated, a green >
is displayed in the second line
at the current sub-page.
MENU Selects page 100
INFO/EPG Reveals hidden text
SWAP If pressed repeatedly:
Æ zoom upper half Æ zoom lower half Æ normal mode
Æ zoom upper half Æ ...
LIST Hides teletext window until the selected page is loaded or
new sub-pages are available.
The teletext remains active in the background.
EXIT Hides the teletext window.
The teletext remains active in the background.
PAUSE Stops the teletext, the page will no longer be updated.
Press again to restart the update feature.

21
7 Common Interface (CI)
At the front of the device there are two slots for modules to decode
encrypted programs.
To prevent damage only modules with the "PC Card" logo must be
inserted. Any other modules may damage the receiver beyond repair.
Do not use excessive force to insert the modules. Rather pull the
module back out of the slot and try inserting it again. Ensure that you
insert the module with the correct side up and correctly inserted into
the slot.
Smartcards are sometimes printed in a confusing way as they are often
designed to be used with other decoders. Most common-interface
modules allow cards with the golden contacts facing upward. Before
inserting a smartcard into the common-interface module, make sure
that the usually gold-coloured contacts on the smartcard are clean and
free of dust.
If a decoder module has been correctly identified, its name is displayed
in the main menu under "Encryption". When you select the entry for
this module in the list and press OK, a menu will be displayed based on
the corresponding decoder module. Please contact the module
manufacturer in case of any questions concerning the module. Note:
Some modules only register completely and provide a menu system if a
valid smartcard is inserted.
The keys OK and EXIT are used to navigate within the manufacturerspecific menus. If a menu does not respond to the OK or EXIT
command, the dialog can be cancelled by pressing MENU. The receiver
then interrupts the connection to the module's menu system.
Please note: Not all encryption systems are available to commoninterface modules yet. Please check with your pay-TV provider, if a
matching module is available.

22
8 Timer
The timer can manage up to 12 recording sessions. Either a defined
recording date or individual days of the week can be selected.
To program sessions, select "Timer" from the main menu. The overview
shows all dates of the 12 entries. Use the OK key to edit individual
entries. To determine whether a fixed date or fixed weekdays are
programmed in the timer, press the LIST key when in the date line. If a
time before the starting time or identical to the starting time is set as
end time, the recording will continue into the following day.
The correct function of the timer requires the internal clock to be set
correctly. Check the time displayed in the status bar to verify.
To exit the timer settings, press EXIT at any time. If any setting has
been changed or added, press OK to confirm the storing of the changes.
Programming programs from the EPG
Programs from the EPG can be directly copied into a free timer position
by pressing LIST in the overview of the day or in the details window of
the EPG. The timer menu then appears so that the new entry can be
edited manually. Press EXIT twice to exit the settings dialog.
Timer recording — receivers without "HD" option
The timer is used to conveniently record programs on the hard disk (see
page 25) at preset times. The timer function is also available on devices
without optional hard disk. This function is particularly helpful if you
want to be sure not to miss a program on a certain channel. The
receiver will then switch over to the channel as programmed in the
timer.

23
Timer and Stand-by
The timer is only active when the system is switched on or has been set
to sleep mode with the antenna open (see page 7). The timer is inactive
in stand-by mode. The antenna does never open automatically and
without direct user control.
In sleep mode, the system checks whether there are timer programs
that have to be processed. In this case, the sat mouse will show four
vertical bars (||||), indicating that the system is in timer stand-by and is
hence being controlled by the timer which will reactivate the system at
the preset time. The power consumption in timer stand-by is higher
than in regular stand-by.
Sleep-timer
The sleep-timer automatically switches off the system at a preset time.
To activate the sleep-timer, select MENU Æ Main menu Æ Extras Æ
Sleep-Timer.
In the configuration settings of the satellite system (see page 49), you
can select whether the system shall retract completely when the sleep
timer is active or whether it shall switch into the sleep mode with the
antenna open.
The sleep-timer works completely independently of the regular timer.
Please note:
When your receiver is switched off by the sleep-timer, the TV set may
remain on and hence consume power. Some TV sets switch off
automatically if no video signal is received or are remote-controlled via
the SCART cable. The digital CI receiver provides the corresponding
control signals at its SCART port. Please refer to the operating manual
of your TV set to determine the options.
 Loading...