

Tengri Remote Cockpit Setup Manual
2
3
4
5
1
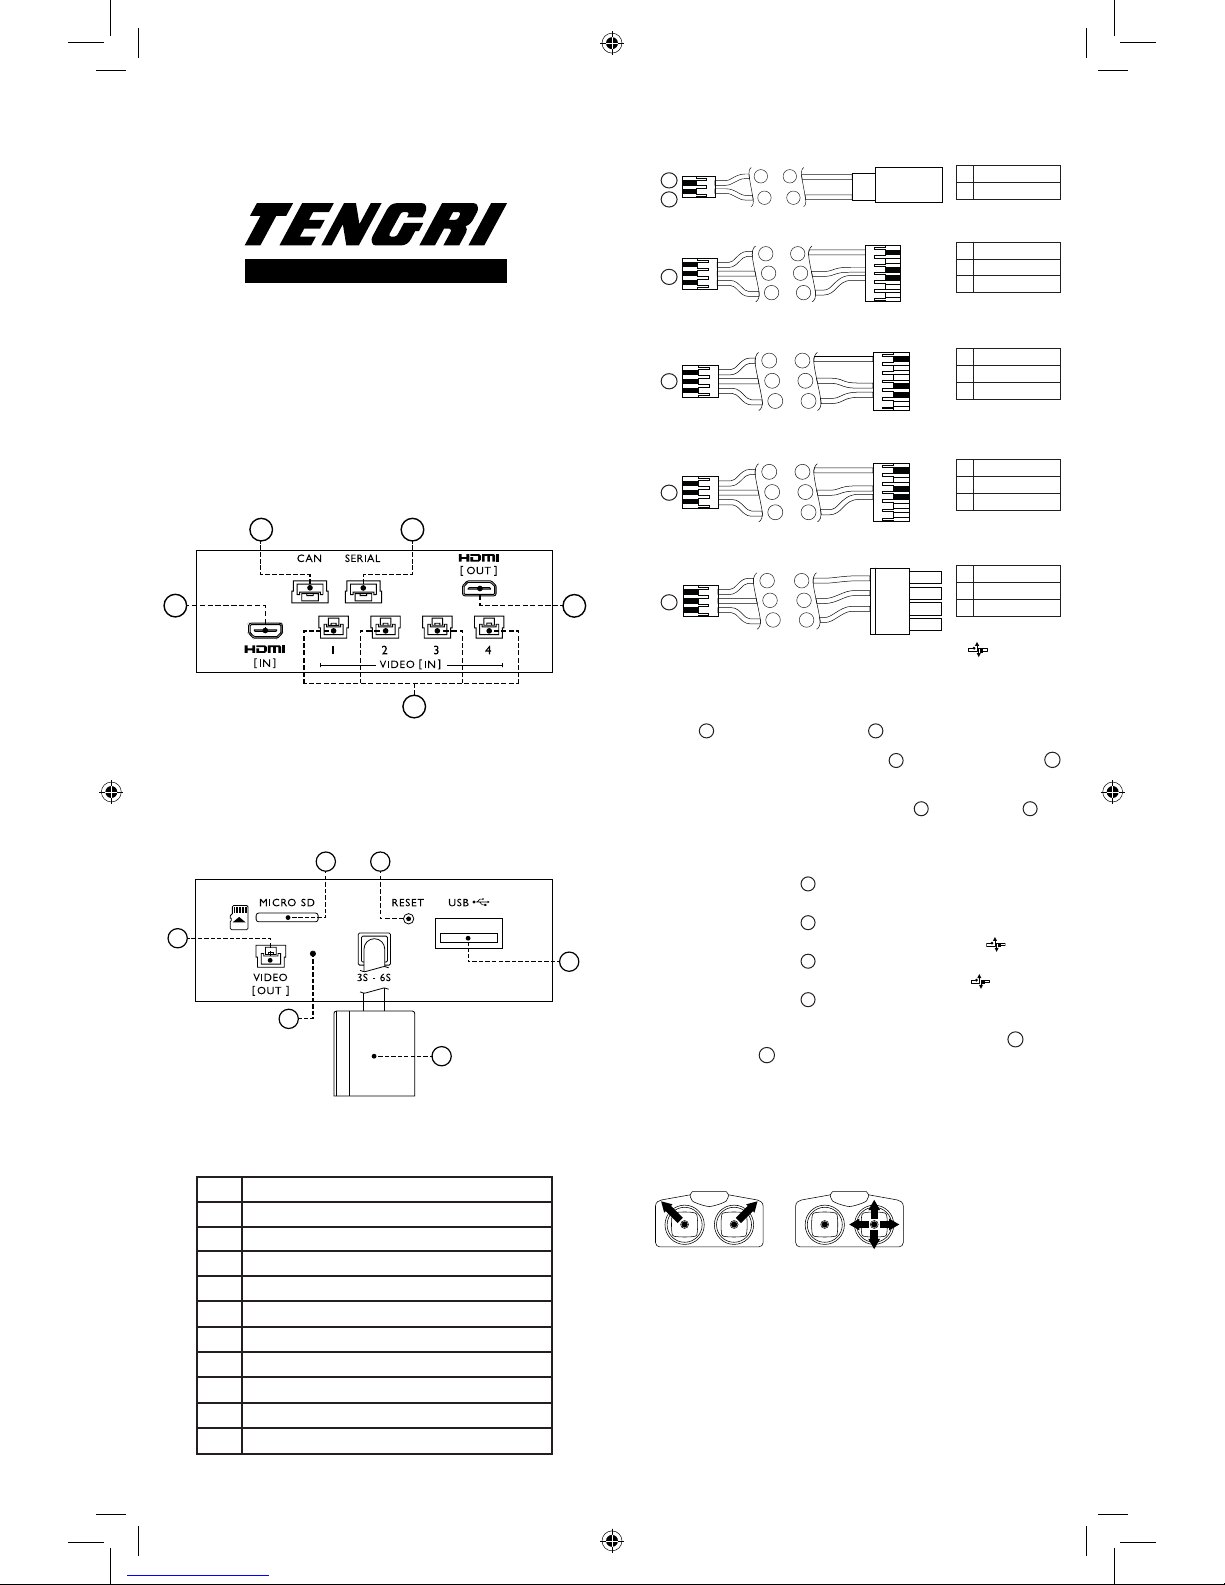
XT60
6
8
9
10
11
7
1
CAN bus port
2
Serial port
3 Micro HDMI out
4
Analog camera inputs
5
Micro HDMI camera input
6
Micro SD card slot
7
Factory reset button
8
USB port
9
Power in (3S – 6S)
10
Power indicator
11
Analog video out
Dimensions
:
84.2 mm x 68.8 mm x 23.5 mm
(without XT60 power cable)
Weight
:
160 g (with XT60 power cable)
Operating Temperature:-40 C to 60 C
Input Voltage
:
3S - 6S (11.1 V - 25.2 V)
Supported
Flight Controllers
:
All APM/PX4 based Flight Controllers
DJI NAZA-M V2
DJI A2
2
2
2
1
Package Contents:
1x - TENGRI Remote Cockpit unit
1x - Setup guide
5x - Analog video Input/Output cables
4
11
aba
b
1x - Serial cable for CUAV Pixhack V3
a White (Signal)
c Black (GND)
a Green
b Blue
c Black (GND)
1x - CAN Bus cable for DJI NAZA/A2
a Red (CAN H)
b Blue (CAN L)
c Green (GND)
a
c
b
c
b
a
NAZA - PMU CAN bus
A2 - CAN1 bus
TELEM 1
1x - Serial cable for Pixhawk1
a Yellow
b Brown
c Black (GND)
a
c
b
c
a
b
TX
RX
TELEM 1/TELEM 2
1x - Serial cable for Pixhawk 2.1/Pixhawk3 Pro
a Yellow
b Orange
c Black (GND)
a
c
b
c
a
b
TX
RX
TELEM 1/TELEM 2
Installation steps:
Specications:
For further support please visit www.tengriuav.com/support
5. Wait for Remote Cockpit to start
• The connected Flight Controller will be automatically detected
1. Connect video cameras to Remote Cockpit analog camera
inputs or HDMI camera input
54
6. Congure Remote Cockpit using radio controller sticks
• Sticks up and out to enter conguration menu
• To navigate use Aileron/Elevator stick
2
3. Connect Remote Cockpit CAN bus port or Serial port to
Flight Controller
(Supported serial baud rate: 921600 baud)
Pixhawk1/ Pixhawk2.1/ Pixhawk3 Pro:
Connect Remote Cockpit to TELEM1/TELEM2 port
CUAV Pixhack V3:
Connect Remote Cockpit to TELEM1 port
DJI NAZA:
Connect Remote Cockpit to NAZA PMU CAN bus port
DJI A2:
Connect Remote Cockpit to A2 GPS CAN1 bus port
1
1
1
2
2
2. Connect Remote Cockpit HDMI out or Analog video out
to video transmitter
3
11
4. Connect battery (3S - 6S) to Remote Cockpit power in
• Power indicator lights up in red
12
10
Revision 1.0.1 November, 2017
REMOTE COCKPIT
SETUP GUIDE
www.tengriuav.com
a
c
b
c
a
b
TX
RX
RemoteCockpit_SetupGuide.indd 1 06-12-2017 21:40:10

NOTE: The Remote Cockpit can be mounted either horizontally
or vertically (upright) on the UAV using double sided tape of
sucient strength depending on your UAV frame and mounting
location (topside/underside). It is highly recommended that the
unit is mounted on the UAV so that it is well ventilated and exposed
to airow during ight. In very warm operating environments,
the use of a small external fan is also recommended. To prevent
overheating, do not keep the unit turned on for extended periods
of time when not in use.
CAUTION: The surface temperature of the casing can become hot
when switched on and not exposed to airow. Handle with care.
Warranty
The period of warranty shall start from the date of delivery of the
product to the user and shall remain in force for a period of 90 days
therefrom. The warranty shall cover all parts of the product solely
against any defect or fault that may have occurred during production,
assembly and/or due to the utilization of defective parts therein. In
such an event, TENGRI shall, at its discretion, provide the user with one
of the following:
Product repair services,
Product replacement, or
Exchange the product for a refund of the purchase price.
Note that under no circumstances will a refund of the purchase price
be made unless and until reasonable attempts have been made at
repairing or replacing the product complained about. Such obligations
on the part of TENGRI shall be annulled under the following conditions
or circumstances, including but not limited to:
– If the product becomes faulty or damaged due to use that is
contrary to its ordinary and intended usage or contrary to the
terms, conditions and operating instructions set out in this
document as well as those made available elsewhere by TENGRI
(including at www.tengriuav.com)
– If the product has been previously modied, repaired or
tampered with (in any manner or form) by any unauthorized
party, including the user.
– If the fault or damage is caused by accident, misuse or abuse
of the product, re, earthquake, liquid contact, or other such
external causes.
– If the fault or damage is caused as a result of the product being
plugged into an inappropriate voltage or where installation is
carried out in an incorrect manner.
– If the product is damaged due to use with third party accessories,
devices or products.
Disclaimer
The user agrees that he/she is solely responsible for his/her own
conduct while using this product, and for any consequences thereof.
TENGRI UAV PTE LTD (hereinafter referred to as “TENGRI”) accepts
no liability for any damage, injury or any legal responsibility incurred
directly or indirectly from the use of the product. The user agrees
to use this product solely for its intended purposes, those being
purposes that are proper and in accordance with any applicable
domestic and international laws and regulations as well as any terms,
conditions, guidelines and warnings that TENGRI has made or may
make available.
TENGRI REMOTE COCKPIT
Terms of Use and Product Information
IMPORTANT: The user of this product is strongly advised to read the
entirety of this document as the information contained therein shall
aect his/her safety as well as legal rights and responsibilities.
By using this product, you, the user, hereby conrm that you have
read the following disclaimer, warranty and warning carefully and
understand and agree to abide by the terms and conditions set out
therein.
TO THE EXTENT PERMITTED BY LAW, TENGRI DISCLAIMS ALL
STATUTORY AND IMPLIED WARRANTIES AND THE WARRANTY AND
THE REMEDIES PROVIDED FOR HEREIN ARE EXCLUSIVE AND IN LIEU
OF ALL OTHER REPRESENTATIONS, WARRANTIES AND REMEDIES,
WHETHER STATUTORY, IMPLIED OR EXPRESS, ORAL OR WRITTEN.
TENGRI IS A REGISTERED TRADEMARK OF TENGRI UAV PTE LTD
If, following the submission of an application for warranty services
via www.tengriuav.com, it is veried that your product is eligible for
mail-in service, TENGRI will send you instructions via email on how to
properly pack and address your product, so that it may be shipped
to our service location. Note however that TENGRI reserves the right
to reassess the eligibility of your product for warranty services in
accordance with the above disqualications, following a rst-hand
examination of the product and/or in light of an initial misdiagnosis
or misinformation provided by the user. Once service is complete, the
service location will return either the product or its replacement to
you. The cost of shipping for the purposes of warranty services shall
be borne by the user.
RemoteCockpit_SetupGuide.indd 2 06-12-2017 21:40:10
 Loading...