

Tenera Continuum, Sure-Lift, Auto-Lift, CareRING Installation Instructions Manual
Sheer Window Shades
distance from the ends of headrail.
r
Top Vi ew
Remove tab if using a satellite
battery pack or DC power supply.
Top limits should be equal
distance from the ends of headrail.
Space Evenly
Space Evenly
2" – 3"
2" – 3"
Jamb Jamb
Space Evenly2" – 3" 2" – 3"
Jamb Jamb
Top Limits
Space Evenly
Panel Split
Space Evenly
2" – 3"2" – 3"
Auto-Lift, Continuum, Sure-Lift & CareRING Installation Instructions
Thank you for choosing Tenera Sheer Shadings. With proper installation and care,
your new shades will provide many years of beauty and performance.
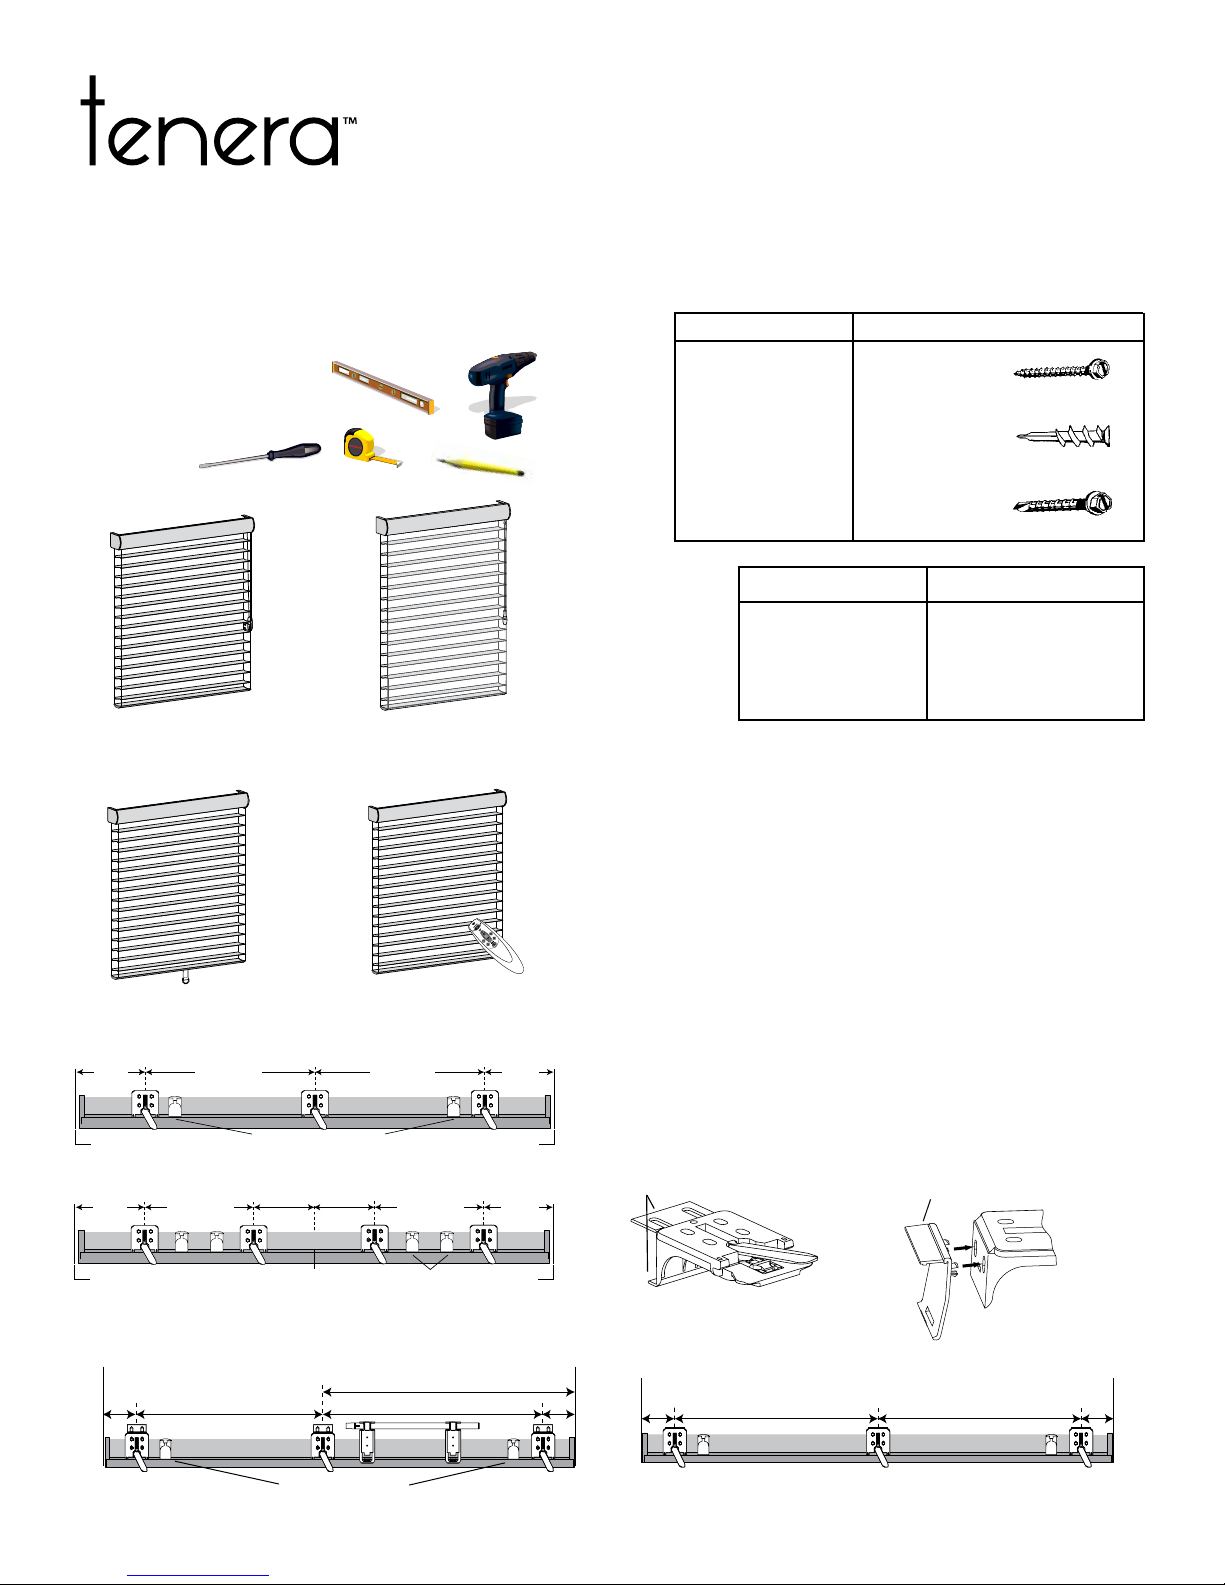
Tools Needed
Power Drill, 1/4” Driver and drill bits
Tape Measure
Flat blade Screwdriver
Phillips Screwdriver
Pencil
Level
Continuum™ Cord Loop Control Sure-Lift™ Retractable Pull Cord
Mounting Surface
Wood
#6 Hex Head
Fastener
Provided
Drywall, Plaster
Wall Anchors
Not Provided
Metal
Sheet Metal
Not Provided
Shade Width
12” - 36”
36 1/16” - 79”
79 1/16” - 96”
96 1/16” - 108”
Brackets Required
2
3
4
5
INSTALL THE BRACKETS
Inside Mount
- Measure 2” from each jamb for bracket location. If more
than two brackets came with your order, space
additional brackets evenly between the two and mark
their location. Allow a minimum of 18” between the
brackets at the motor end for the battery wand (Auto-Lift).
CareRING Cordless Lifting System
2-On-1 Headrail (Continuum and Sure-Lift Only)
2"
Auto-Lift® Motorization
Standard Shade
Shadings with Battery Wand
18" Minimum for Battery Wand
Space Evenly Space Evenly
Top limits should be equal
JambJamb
2"
- Determine whether or not to remove any tabs from the
installation brackets. If using a back cover, use pliers to
remove both tabs from the brackets. If using battery
wand without back cover, leave both tabs on brackets.
If using a satellite battery pack or DC power supply
without a back cover, remove the top tab (Auto-Lift).
- Mount brackets using the screws provided. Be sure the
front edges of the brackets are aligned and level to
each other. Shim the brackets if necessary.
Important: Do not overtighten the screws.
Removable Tabs
Back
Motor
Side
Auto-Lift Shade
Installation Bracket
Shadings with Optional Satellite Battery Pack or DC Power Supply
Jamb
2"
Space EvenlySpace Evenly
Cover
Bracket
Tenera Installation Instructions
Installation
Bracket
Jamb
2"
Moto
Side
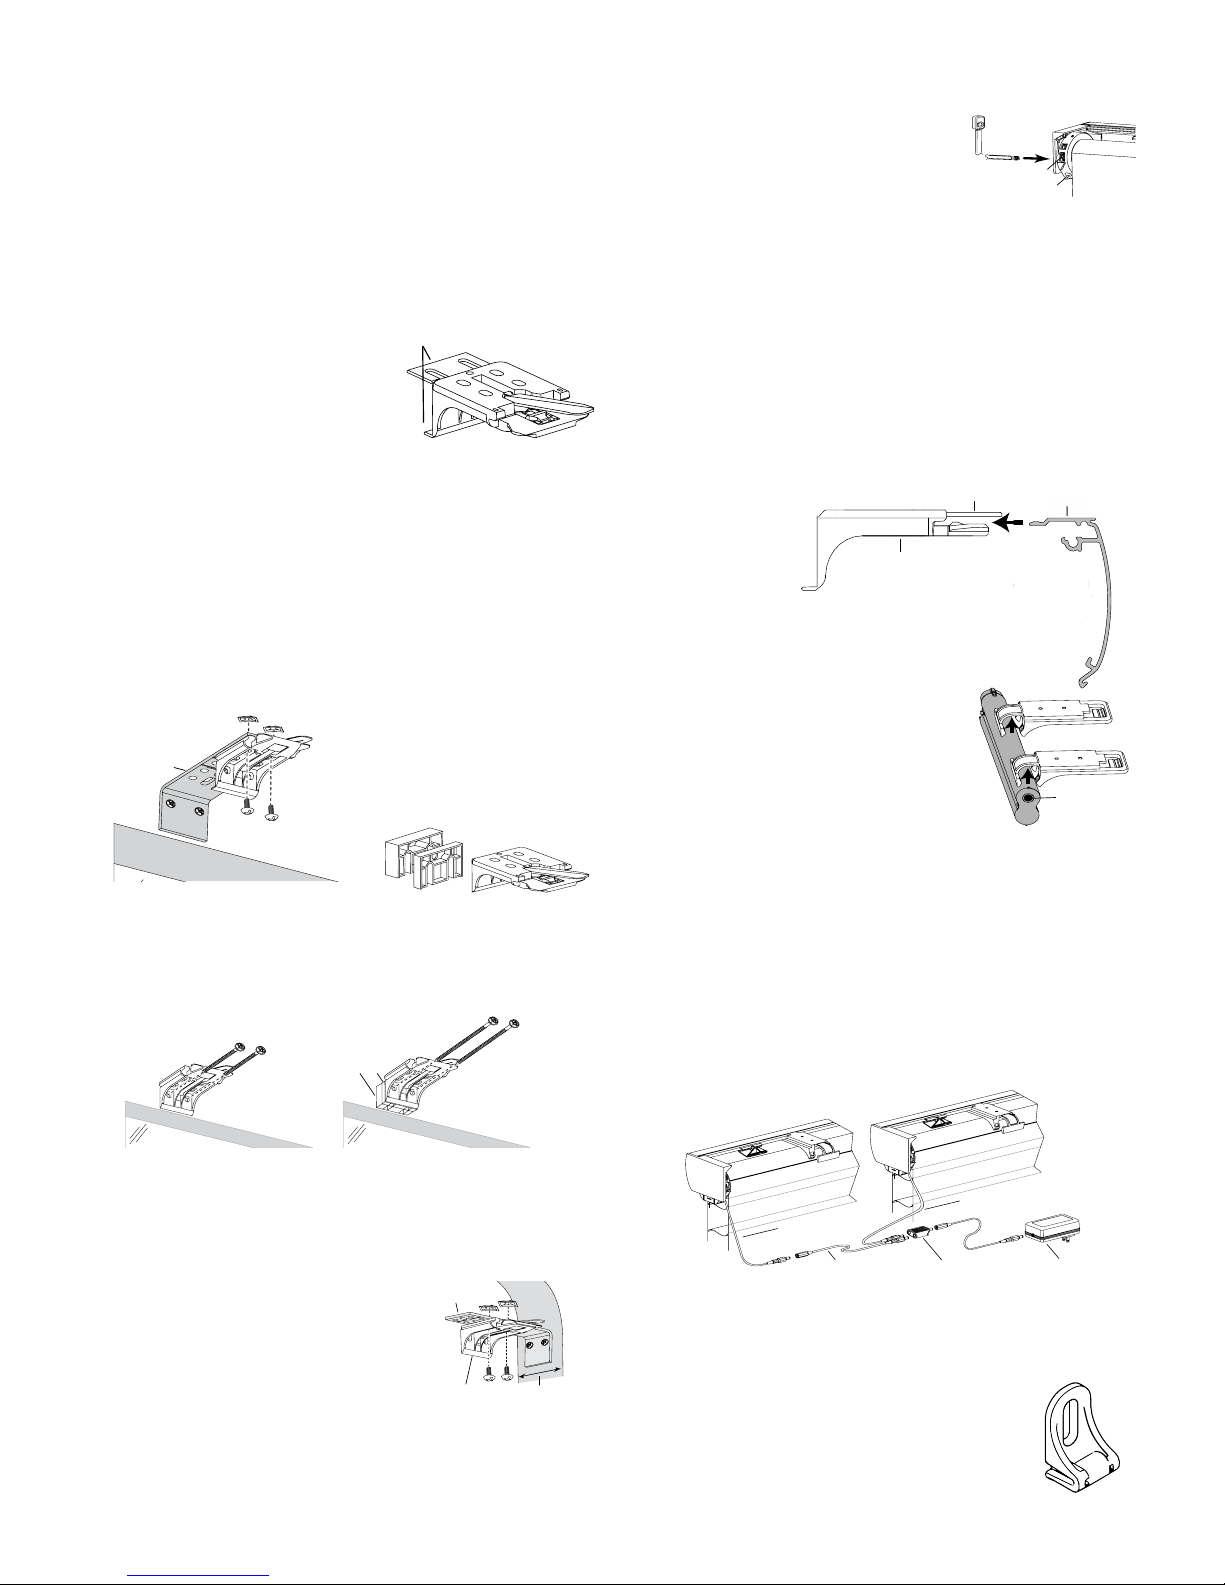
INSTALL THE BRACKETS (Cont.)
Installation Bracket
1
/2"
1
/4"
Spacer Blocks
No Spacer Blocks
Spacer Blocks
Longer
Screws
1
/4"1/2"
Speed Nuts
Extension
Bracket
Extension
Bracket
Speed
Nuts
Minimum Mounting
Surface Width
Installation
Bracket
3-Pin Port
Antenna
Back
of Shading
Headrail
Installation
Bracket
Lever
Slide the Headrail
between the Lever
and the Bracket.
Headrail
de
the H
eadra
il
ween the Lever
the Br
acke
t.
Place the socket
toward the motor end.
Power Cable
from Shading
Power Cable
from Shading
Extension Cable Connector
DC Power Supply
Outside Mount
- Center the headrail over the window opening at the
desiredheightandlightlymarkeachendonaat
mounting surface.
- Mark 2” from each end of the headrail. Allow a
minimum of 18” between the brackets at the motor end
for the battery wand.
-Useplierstobreakobothremovabletabsfromthe
brackets. (Removed top tabs can be used as shims
when needed.)
Removable Tabs
- Center the installation /
extension brackets on your
marksandmountushagainst
the mounting surface using
the screws provided. Use drywall
anchors if necessary. Be sure
the top of the installation brackets are aligned.
- For Auto-Lift, must use spacer blocks to allow for
battery wand.
Optional Extension Brackets or Spacer Blocks
- If using extension brackets, attach them to the
mounting surface. Then attach installation bracket to
the underside of each extension bracket using the
screws and speed nuts provided.
INSTALL THE SHADE
* For Auto-Lift, take care when
handling the antenna wire
attached to the motor cartridge.
Do not cut or remove this
antenna. If you have an external
eye, plug it into the 3-pin port on
the back of the shade, being sure the plug is oriented
correctly.
- Position the shade so that the front (colored fabric)
faces you.
- Slide the headrail into the installation brackets so the
edge of the headrail is between the lever and the
bracket as shown.
- Firmly push the headrail into each bracket until it clicks
and the lever snaps to the right side of the bracket.
- Important: Carefully pull on the headrail at each
bracket to ensure it is installed securely.
MOUNT BATTERY WAND INTO WAND CLIPS
(AUTO-LIFT ONLY)
- Place the battery wand with its
socket toward the motor end of
the shade.
- Push the battery wand straight up
into the battery wand clips until
it snaps into place. Check to make
sure the wand is secure.
- If using spacer blocks, the solid side of the spacer block
faces the mounting surface. Attach the spacer blocks
with the installation bracket using two screws long
enough for secure mounting. Use a maximum of three
1/2” spacer blocks per installation bracket.
End Mount
-Useplierstobreakobothremoveabletabsfromthe
installation brackets.
- If you ordered a back cover, attach the back cover
brackets to the installation bracket.
- Mount extension brackets to
each side of the opening at the
desired height of the shading.
Mounting surface must be vertical
andat.
- Attach the installation brackets to
the extension brackets using the provided screws and
speed nuts.
Tenera Installation Instructions
If you have a DC power Supply with Daisy-Chain
Connectors (AUTO-LIFT ONLY)
- The daisy chain feature allows up to three
battery-powered shades to be powered by a single DC
power supply. Each shade has its own receiver eye and
can operate independently.
- Route the power cables from each shade to the
connector, using an extension cable, if necessary.
- Plug an extension cable into the connector and the DC
power supply. Two extension cables and two connectors
are used for three shades.
INSTALL CORD TENSIONER
(CONTINUUM ONLY)
- See Cord Tension Lock Installation Instructions
INSTALL OPTIONAL MAGNETIC HOLD-DOWNS
- Fully lower shade.
- Line up magnetic ball of hold-down
bracket with bottom rail.
- Mark with a pencil and secure to the wall
or door.
 Loading...