

Tendercare Nursery Snugseat Spring, Junior Snugseat Spring, Senior Snugseat Spring User Manual

Tendercare Ltd
The Snugseat Spring User Manual
Document No 034-01v7 Snugseat Spring
User Manual.doc
Authority. Quality Controller
Authorised. J Adams
Page 1
November 2009
USER MANUAL
Mobility Nursery Snugseat Spring
Mobility Junior Snugseat Spring
Mobility Senior Snugseat Spring
IMPORTANT
Please read these instructions carefully
Before using your Snugseat
Tendercare Ltd
The Snugseat Spring User Manual
Document No 034-01v7 Snugseat Spring
User Manual.doc
Authority. Quality Controller
Authorised. J Adams
Page 2
November 2009
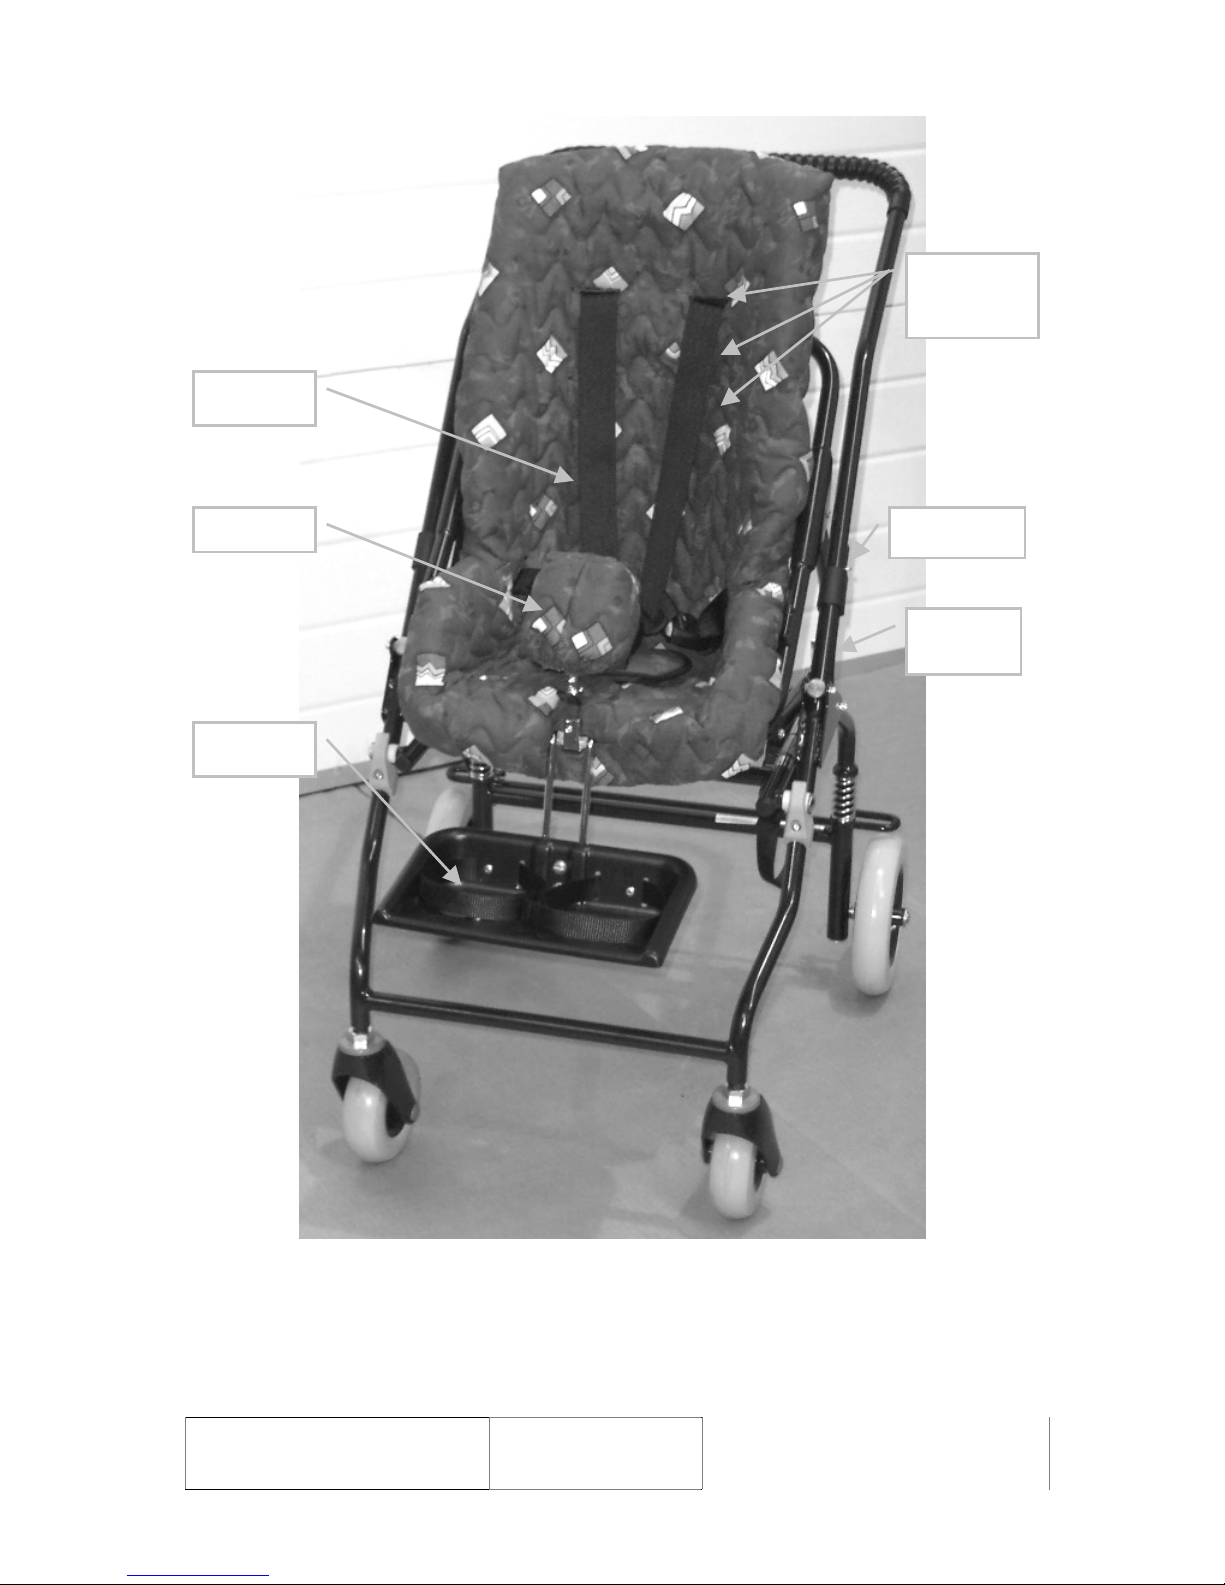
SNUGSEAT AND SNUGSEAT SPRING BUGGY
Frame Lock
Footrest
Seat Tilt
Lock
Harness
Mounting
Slots
Pommel
Harness

Tendercare Ltd
The Snugseat Spring User Manual
Document No 034-01v7 Snugseat Spring
User Manual.doc
Authority. Quality Controller
Authorised. J Adams
Page 3
November 2009
SNUGSEAT SPRING BUGGY
BRAKE
PEDAL
FRAME
LOCK
SEAT FRAME
SUPPORT
SEAT FRAME
LOCK
Tendercare Ltd
The Snugseat Spring User Manual
Document No 034-01v7 Snugseat Spring
User Manual.doc
Authority. Quality Controller
Authorised. J Adams
Page 4
November 2009
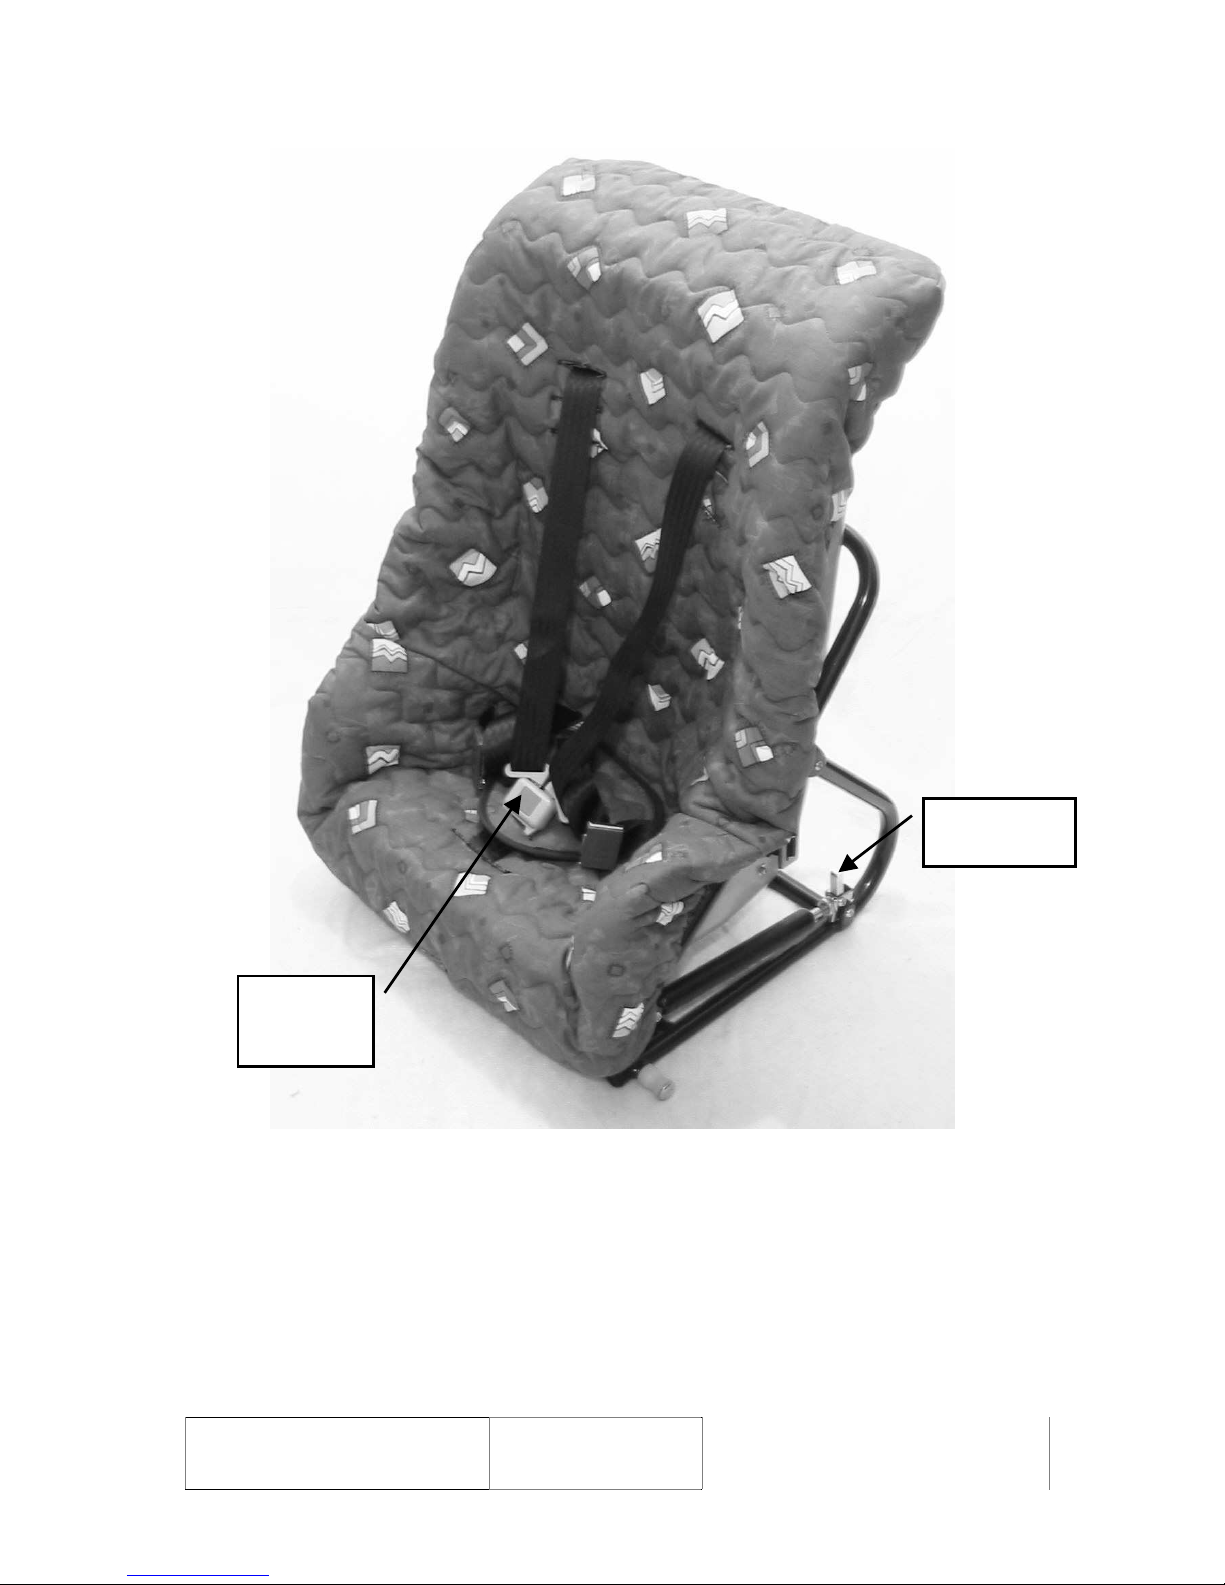
SNUGSEAT SEAT UNIT
GAS STRUT
CATCH
HARNESS
RELEASE
CATCH

Tendercare Ltd
The Snugseat Spring User Manual
Document No 034-01v7 Snugseat Spring
User Manual.doc
Authority. Quality Controller
Authorised. J Adams
Page 5
November 2009
Item Description Page
1
Who to contact if you have difficulty……………………………………………..
6
2
Intended user……………………………………………………………………….
6
3
Unpacking…………………………………………………………………………..
8
4
Preparing for use…………………………………………………………………...
9
4.1 Unfolding the frame and assembling the buggy…..……….…………………… 9
4.2 Brakes………………………...………………………….……………………… 10
4.3 Fitting seat to buggy...…………………………………….…………………….. 10
4.4 Fitting footrests to seat.…………………………………….…………………… 11
4.5 Fitting pommel to seat…………………………………….…………………….. 12
4.6 Tilt in Space……………………………………………….……………………. 12
5
Setting up the seat unit………………………………………………………..……
13
5.1 Fitting support pads…………………………………….………………….…… 14
5.2 Setting up the patterned cover………………………….………………………. 17
5.3 Adjusting the harness…………………………………………………………… 18
5.4 To lock and release the harness………………………………………………… 18
5.5 Final checks……………………………………………………………………... 18
6
Accessories…………………………………………………………………………..
19
6.1 Playtray………………………………………………………………………….. 19
6.2 Shopping Basket…………………………………………………………………. 21
6.3 Equipment Carrying Tray………………………………………………………... 22
6.4 Sun Canopy………………………………………………………………………. 23
6.5 Rain Cover……………………………………………………………………….. 24
7
User instructions…………………………………………………………………….
25
7.1 Getting into the Snugseat…..…………………………………………………….. 25
7.2 Getting out of the Snugseat….…………………………………………………… 25
8
Attendant pushing...…………………………………………………………………
25
8.1 Pushing…………………………………………………………………………… 25
8.2 Brakes……………………………………………………………………………. 26
8.3 Comfort…………………………………………………………………………... 26
8.4 Lifting and general safety………………………………………………………… 26
9
Cleaning……………………………………………………………………………...
27
9.1 Buggy and seat shell..…………………………………………………………… 27
9.2 Patterned covers and tummy pad.….…………………………………………… 27
9.3 Modular foam pads……….…………………………………………………….. 27
9.4 5-Point harness………………………………………………………………….. 27
10
Maintenance………………………………………………………………………...
27
10.1 Routine maintenance…………………………………………………………… 27
10.2 Six monthly maintenance….……………………………………………………. 28
11
Oxygen cylinder…………………………………………………………………….
28
12
Warranty……………………………………………………………………………
29
13
Transporting the Snugseat………………………………………………………..
29
13.1 Preparing Snugseat for transport……………………………………………… 29
13.2 Attaching Snugseat to vehicle…………………………………………………. 30
13.3 Car fixing kit…………………………………………………………………... 32
14
Repairs………………………………………………………………………………
34

Tendercare Ltd
The Snugseat Spring User Manual
Document No 034-01v7 Snugseat Spring
User Manual.doc
Authority. Quality Controller
Authorised. J Adams
Page 6
November 2009
1. Who to contact in difficulty
Tendercare Ltd
PO Box 3091, Littlehampton, BN16 2WF
Tel (01903) 726161 Fax (01903) 734083
Email: info@tendercareltd.com
www.tendercareltd.com
2. Intended user
The Snugseat postural control seating system is designed to enhance the sitting of disabled
children who have postural instability with minimal skeletal deformities.
The buggy is of lightweight but rugged construction and this makes them suitable for daily
use. The buggy has two fixed wheels at the rear mounted on spring suspension and two castor
wheels at the front for easy steering. The buggy comes in two sizes Nursery/Junior and Senior
and these will accommodate all sizes of snug seat.
The seat unit is available in three sizes, Nursery, Junior and Senior. The seat is supplied with
an attractive cover and modular pad inserts to meet the needs of a wide range users. The seat
has tilt in space seating, five-point harness, pommel and footrest. The seat can be quickly
fitted and removed from the buggy, which can be folded for transport. The complete system
has passed impact tests and has been designed for use as a vehicle seat when restrained in
accordance with this manual (see section 12).
The following accessories for use with the Snugseat are available from Tendercare Ltd.
Aluminium carrying tray, Shopping basket, Rain-hood, Sun canopy, Snug-toes, Headrest and
Car fixing kit.
These instructions apply to all sizes.
SEAT SIZE
– mm
MODEL
MAX OCCUPANT
WEIGHT
WIDTH DEPTH HEIGHT
Nursery 50 kg 300 250 550
Junior 50 kg 340 320 610
Senior 50 kg 390 380 660
Important: - The maximum occupant weight includes the occupant and all accessories.
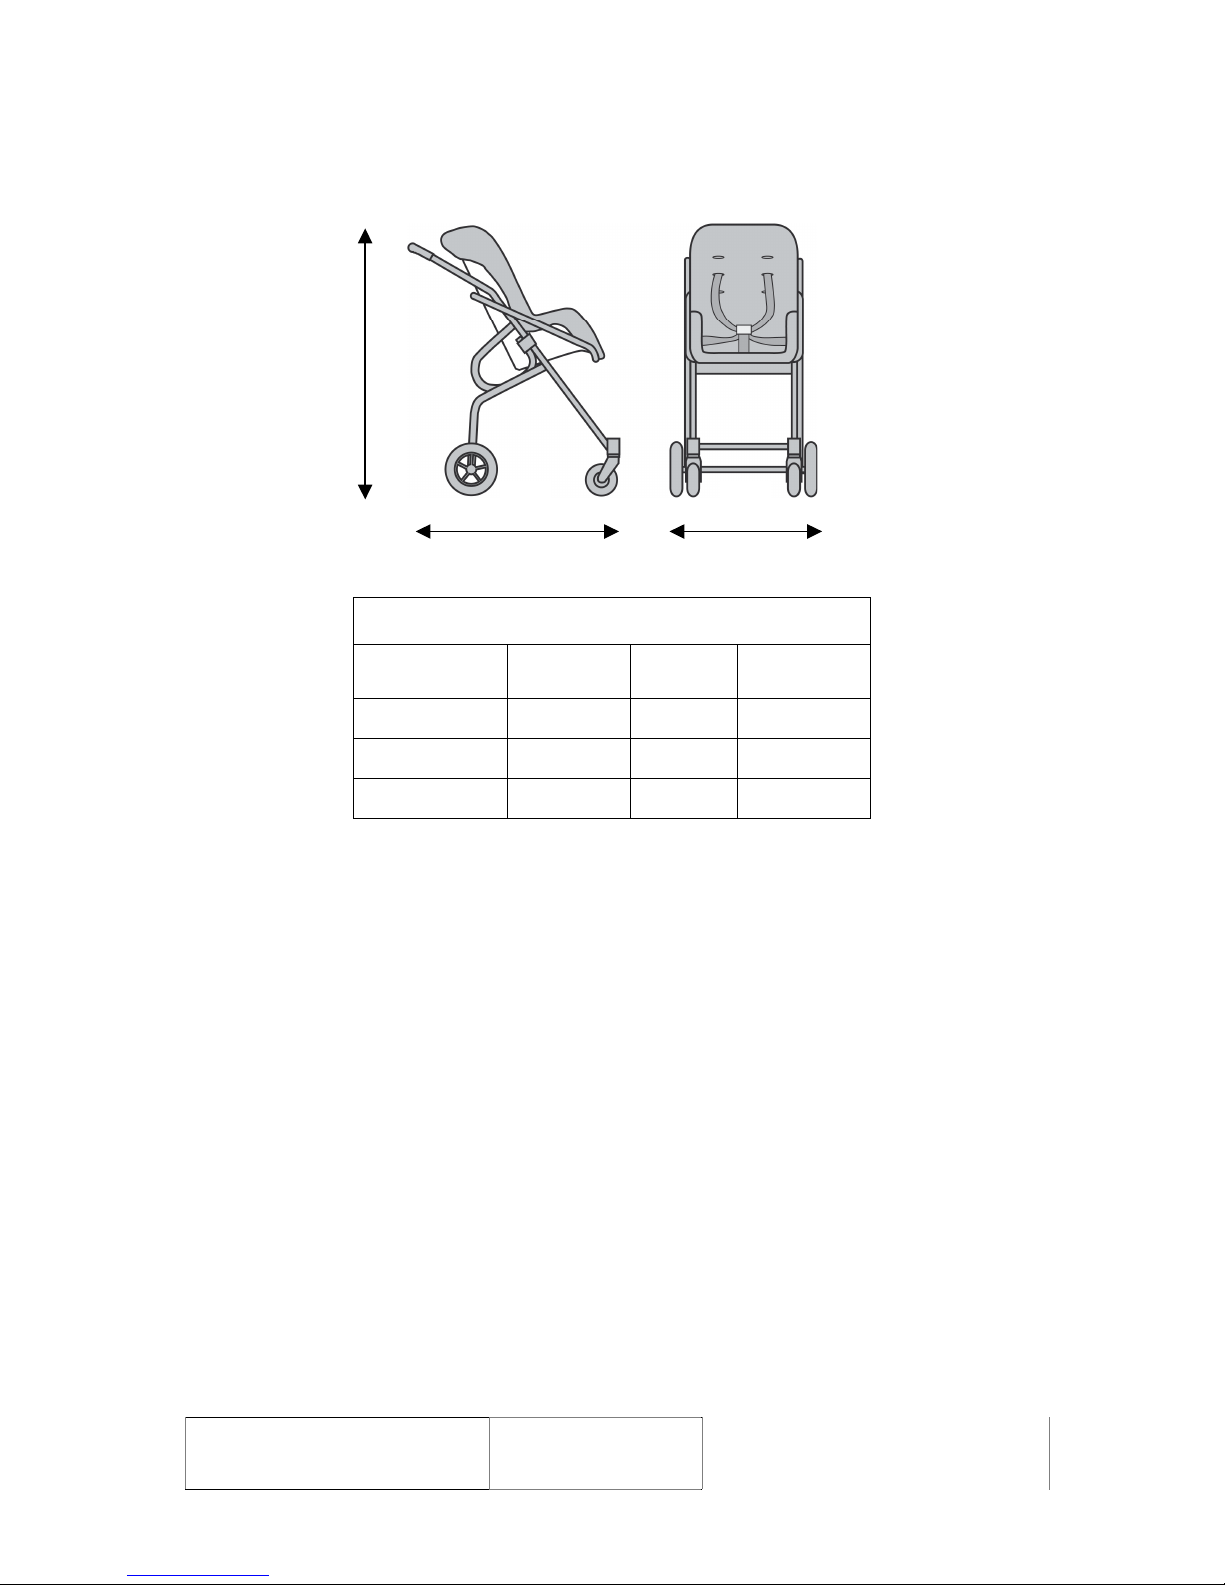
OVERALL SIZE
DIMENSION
mm
Nursery Junior Senior
Dim A
845 845 915
Dim B
615 615 650
Dim C
1020 1090 1170
Tendercare Ltd
The Snugseat Spring User Manual
Document No 034-01v7 Snugseat Spring
User Manual.doc
Authority. Quality Controller
Authorised. J Adams
Page 7
November 2009
C
FOLDED FRAME SIZES
DIMENSION
mm
Nursery Junior Senior
Dim A
780 780 850
Dim B
615 615 650
Dim C
290 290 290
All sizes and weights are given as a guide. Tendercare Ltd reserves the right to amend
specifications at any time as part of their product development programme.
A
B

Tendercare Ltd
The Snugseat Spring User Manual
Document No 034-01v7 Snugseat Spring
User Manual.doc
Authority. Quality Controller
Authorised. J Adams
Page 8
November 2009
3. Unpacking
The Snugseat spring buggy is delivered in a cardboard carton of approximate weight 15kg and
size 600 mm wide x 470 mm deep x 1050 mm high. The Snugseat seat unit, upholstery and
modular padding are delivered in a cardboard carton of approximate weight 13kg and size 480
mm wide x 530 mm deep x 800 mm high.
Warning: - The transit carton is quite bulky so moving and unpacking must be done with
care. Observe all lifting and handling regulations.
Stand the Carton upright making sure it is supported and cannot fall over. Open the carton
carefully and remove any packages or packing, which could obstruct the removal of the buggy
or seat. Carefully remove the buggy or seat and any other packages, which are still in the
carton.
Check that you have the following items: -
Item Component Number Yes No
1. Buggy 1
2. Seat Unit 1
3. 5 point harness fitted to seat unit 1
4. Footrest 1
5. Pommel 1
6. Bag containing seat cover, tummy pad and pommel covers
1
7. Bag containing modular pads and wedges 1
8. User Manual 1
If any items are damaged or missing please contact Tendercare,
Preferably by fax 01903-734083 within 36 hours of delivery.
Remove the upholstery and modular pads from their plastic bags and any protective packaging
from the frame. After unpacking and checking you have all components and that they are in
good condition dispose of the packaging at your local recycling centre.
Tendercare Ltd
The Snugseat Spring User Manual
Document No 034-01v7 Snugseat Spring
User Manual.doc
Authority. Quality Controller
Authorised. J Adams
Page 9
November 2009
4. Preparing the buggy for use
Warning. When opening or folding the buggy, ensure that you hold the frame so that you
avoid any danger of catching your fingers in moving parts.
Keep children clear of the wheelbase during opening and folding.
4.1 Unfolding and assembling the buggy
4.1.1 Unfolding the frame.
Standing at the side of the buggy: -
Unfasten the strap holding the buggy in the folded position by
squeezing the plastic prongs together and pulling the catch apart.
(See picture opposite).
1) Carefully spread the wheels apart and lift up the push handle making
sure the two plastic clips are near the top of the push handle tubes
and the pegs on the push handle fit into the holes in the rear frame.
(See picture opposite).
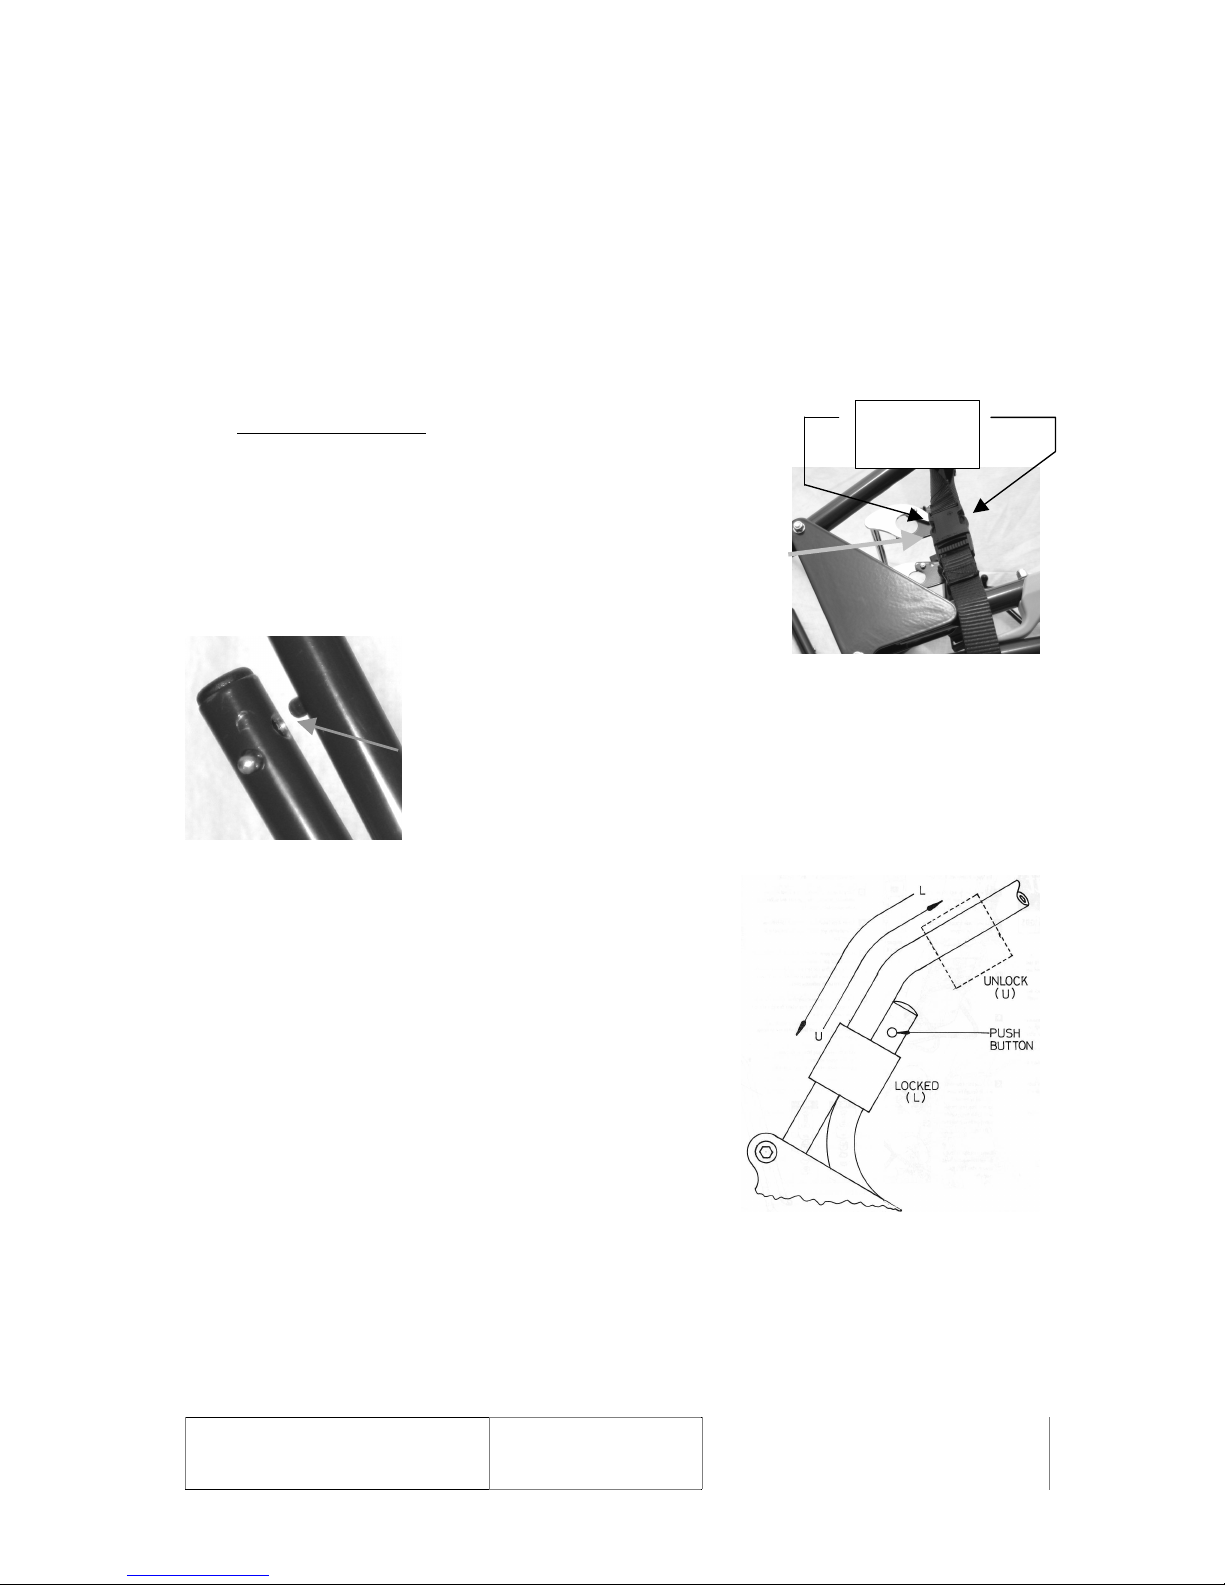
Lock the frame open using the two safety catches, which
are on each side of the frame near the top hinges. (See
picture opposite).
Press in the silver coloured push button and slide the
plastic locking clip down the tube and over the button.
Do this on both sides of the Snugseat.
The frame is now locked.
Warning: - If the locking clips are not in the correct position or the push buttons do not
protrude so allowing the locking clips to move back up the frame, then the
frame may collapse in use.
SQUEEZE
HERE
Tendercare Ltd
The Snugseat Spring User Manual
Document No 034-01v7 Snugseat Spring
User Manual.doc
Authority. Quality Controller
Authorised. J Adams
Page 10
November 2009
4.1.2 Folding the frame
To unlock the frame and fold the buggy reverse the above.
4.2 Brakes
1. The brake-operating pedal is on the right hand side at the rear of
the pushchair. (See picture opposite).
2. To put the brakes on press the pedal down and backwards with the
sole of your foot until it locks into place.
3. To release the brake, place your toe under the pedal and lift up.
Warning: - The brake lever will come up quickly be careful it does not catch your ankle.
4.3 Fitting seat to buggy
Open the chrome plated locking bar at the rear of the buggy
by pulling bar “A” backwards. Then undo the safety strap
“B” which is to the right of the locking bar by squeezing the
catch pins and pulling the catch apart. (See picture opposite)
Carefully place the seat unit between the buggy frames so that
the white front rollers are behind the grey retaining brackets
on the front of the buggy. (See picture opposite).
A
B
ON
OFF
Tendercare Ltd
The Snugseat Spring User Manual
Document No 034-01v7 Snugseat Spring
User Manual.doc
Authority. Quality Controller
Authorised. J Adams
Page 11
November 2009
Lower the rear of the seat unit into the chrome
plated lock and push the lock lever forwards
as far as it will go. Finally fit the safety strap
over the seat frame cross bar and lock by
pressing the two halves of the catch together.
(See picture opposite).
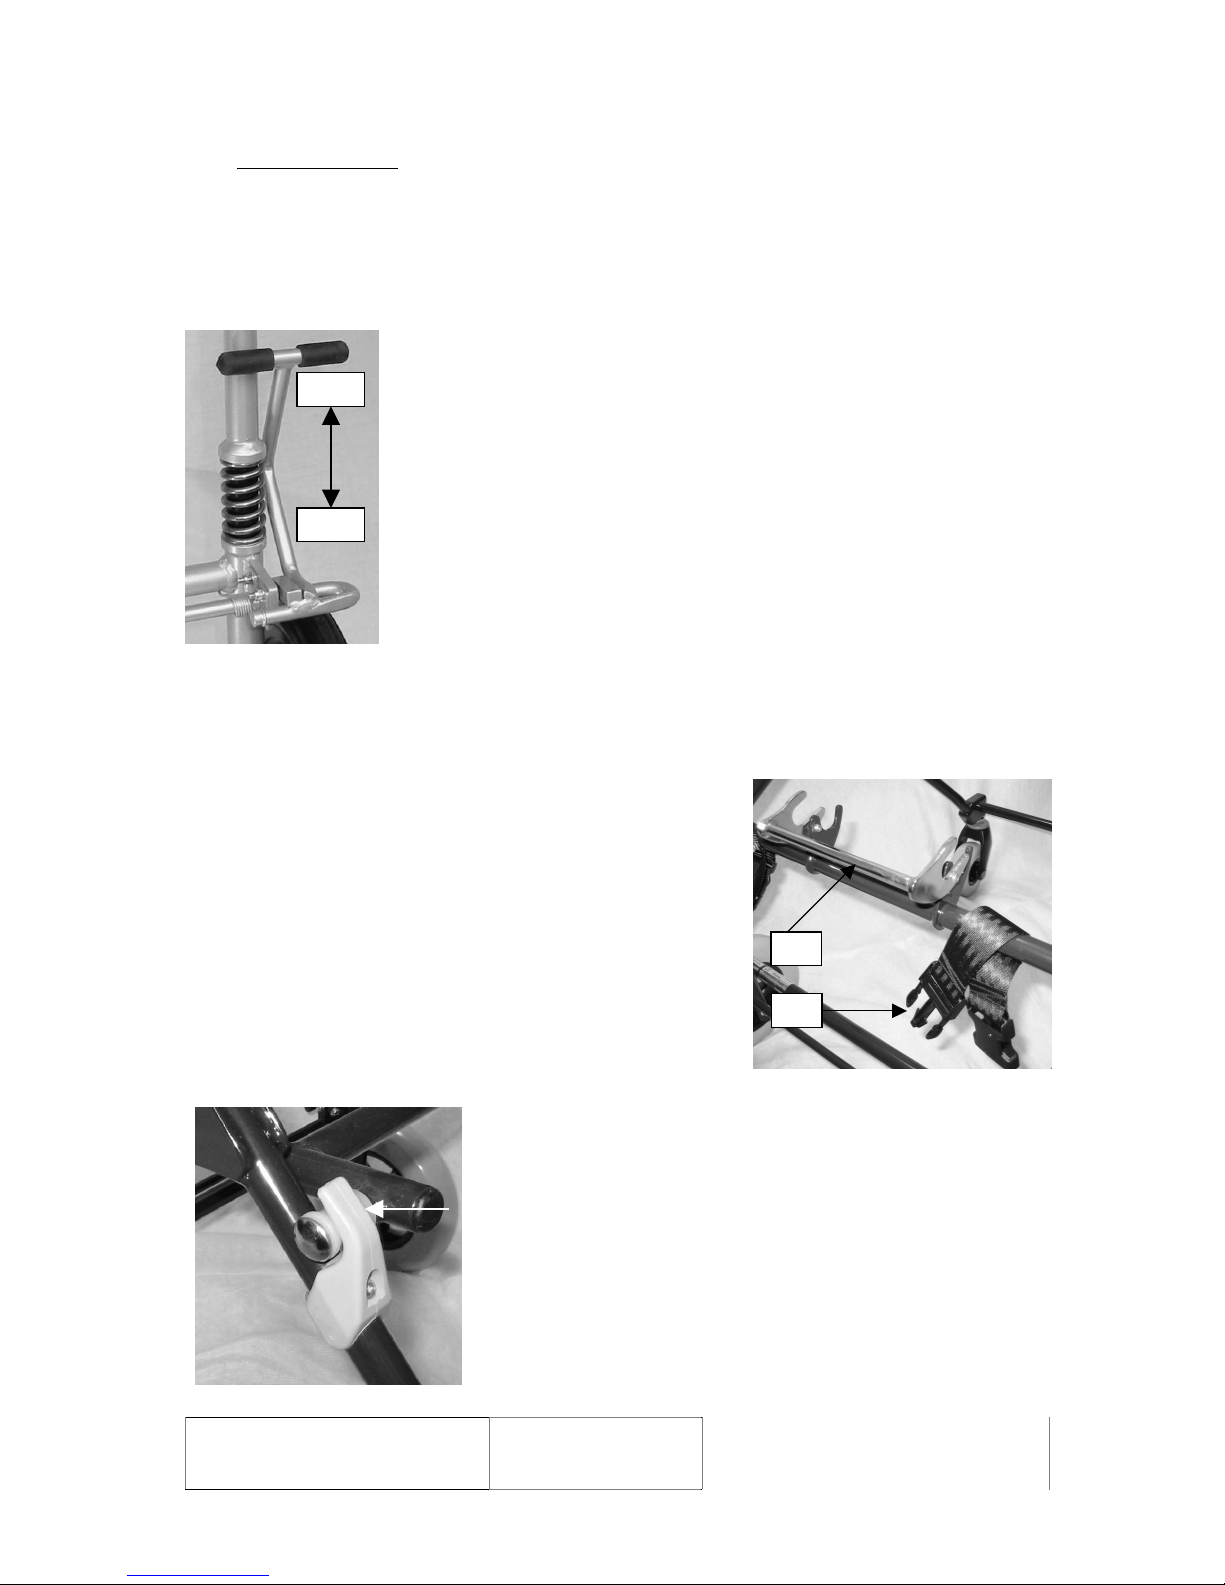
4.4 Fitting footrests to seat
Pass the two chrome bars of the footrest through the slit
in the front of the seat cover and insert them into the
corresponding holes in the seat frame. (See picture
opposite)
Lock footrest in place by tightening (turn clockwise) the
two thumbscrews under the seat frame.
NOTE: - The seat cover is not shown for clarity.
To adjust the height of the footrest, loosen the two
screws in the centre of the footrest. (See picture
opposite). Turn the screws anticlockwise using a flat
bladed screwdriver whilst holding the nut at the back
of the footrest with a 10mm spanner.
Move the footrest to the desired height and retighten
both screws (turn clockwise).
The foot straps are held with Velcro. To fit and
adjust simply pull them apart place around the feet
and push together.
Foot Strap Velcro Fixing

Tendercare Ltd
The Snugseat Spring User Manual
Document No 034-01v7 Snugseat Spring
User Manual.doc
Authority. Quality Controller
Authorised. J Adams
Page 12
November 2009
4.5 Fitting pommel to seat
The pommel is mounted on an adjustable steel frame so that the height and depth can be
adjusted using thumbscrews. (See picture below).
To fit the pommel, pass the chrome bar with a slot in it through the slit in the front of the seat
cover. Then looking under the front of the seat, remove the thumbscrew shown in the picture
opposite. Insert the slotted bar of the pommel into the mounting slot then insert and tighten
the thumbscrew. (See picture above).
NOTE: - The seat cover is not shown for clarity.
To adjust the depth, loosen the thumbscrew under the seat and move the pommel in or out
until it is in the desired position then retighten the screw.
To adjust height, loosen the thumbscrew on the front of the pommel support tube. Move the
pommel to the desired height then retighten the screw making sure that the screw fits into one
of the indentations in the pommel support bar.
4.6 Tilt-in-Space
The angle of the seat and backrest (Tilt in Space) can be infinitely adjusted throughout its
range. Adjust the seat angle as follows: -
On the Nursery and Junior sizes there is a single gas spring. The gas
spring release lever, a small chrome lever, is located at the rear of
the seat. To operate place one hand in the middle at the front of the
seat just above the footrest location, and with the other hand gently
press the gas spring release lever backwards (see picture opposite).
Allow the seat to recline slowly, when the required position is
reached release the lever to lock the seat in position.
Pommel attachment thumbscrew
Height adjustment thumbscrew

Tendercare Ltd
The Snugseat Spring User Manual
Document No 034-01v7 Snugseat Spring
User Manual.doc
Authority. Quality Controller
Authorised. J Adams
Page 13
November 2009
The senior size has two gas springs one either side of the seat.
The gas spring release lever, a chrome bar, is located under the
front of the seat. To operate place one hand on the middle front
of the seat just above the footrest location, and with the other
hand gently lift the gas spring release lever upwards (see picture
opposite). Allow the seat to recline slowly, when the required
position is reached release the lever to lock the seat in position.
Important: - Always ensure the 5-point harness is used and correctly adjusted before
reclining or returning the seat to a more upright position.
Warning: - Always support the front of the seat when reclining, as the gas springs are very
quick in operation. If the front of the seat is not supported, the seat may
move swiftly and could cause the occupant distress.
To return the seat to a more upright position, place one hand on the middle front of the seat,
just above the footrest location and use your body weight to push down. If extra leverage is
required place one hand on the footrest instead of the seat. At the same time use the other
hand to operate the gas spring release lever. When the required position is reached release the
lever.
5.0 Setting up the seat unit
When setting up the seat unit always ensure the following is done: -
• Always consult your Therapist or Rehabilitation Engineer for advice.
• Ensure that the child is relaxed and happy and if possible in an environment in which
they are familiar.
• If possible, sit the child on a flat box of the correct height that has a conforming
surface.
• Assess level of sitting ability.
• Take the measurements listed below.
Measurement Symbol Millimetres Inches
Pelvic Width P.W.
Seat Depth S.D.
Set Seat Depth S.D. – 25mm (1”) -25mm= -1” =
Footrest Height F.H.

Tendercare Ltd
The Snugseat Spring User Manual
Document No 034-01v7 Snugseat Spring
User Manual.doc
Authority. Quality Controller
Authorised. J Adams
Page 14
November 2009
Example: -
Seat depth measured on the child is 279mm (11")
Set seat depth (SSD) is 279mm - 25mm =254mm, (11"-1" = 10")
S.S.D. = 254mm or 10"
This is the measurement from the front of the seat to the back pad.
5.1 Fitting support pads
For details of the correct position of the pads see picture on page 14.
Select the correct seat cushion and Velcro it into the seat shell, so that the front of the cushion
is flush with the front edge of the shell. The flat cushion gives a neutral hip angle and the
ramped cushion will achieve a flexed hip angle.
Select the combination of back pads required to give the required set seat depth (S.S.D.) and
Velcro in position.
Using the lateral pelvic support pads, position in the shell as shown in the picture on page 14
until the distance between the pads is equal to the pelvic width (P.W.).
Adjust footplate to the required height (F.H.) See section 4.4.
Position the child in the seat and fit the 5-point harness (See section 5.3)
Check the following: -
• The pelvis is in the mid line position and not anteriorly rotated (i.e. not sacral seating)
• The pelvic lateral supports provide enough support without being over tight.
• The hips are about the mid line
• The footrest is adjusted to the correct height
• The abduction is satisfactory. If more abduction is required fit a pommel. (See section
4.5).
IMPORTANT: - DO NOT use the pommel as a stop to prevent the child sliding forwards.

Tendercare Ltd
The Snugseat Spring User Manual
Document No 034-01v7 Snugseat Spring
User Manual.doc
Authority. Quality Controller
Authorised. J Adams
Page 15
November 2009
SNUG SEAT PADS
AND
SUPPORT ELEMENTS
SEAT
CUSHION
HEAD
SUPPORT
LATERAL
PELVIC
SUPPORT
B
ACKREST
CUSHION
LUMBER
SUPPORT
LATERAL
TRUNK
SUPPORT
POMMEL
FOOT
SUPPORT

Tendercare Ltd
The Snugseat Spring User Manual
Document No 034-01v7 Snugseat Spring
User Manual.doc
Authority. Quality Controller
Authorised. J Adams
Page 16
November 2009
With the child in the seat measure the correct positions of the following supports: (See page 14 for position of supports)
Remove the child from the seat.
At the required Lumber Support (L.S.) position on the backrest pad, Velcro two wedge shaped
pads with the narrow edge towards the middle of the seat. Ensure that the lumber pad has
promoted a symmetrical lumber curve and not simply displaced the pelvis forward.
At the required Lateral Trunk Support (L.T.S.) positions, Velcro the lateral trunk supports to
retain the trunk in a symmetrical and upright position. Ensure that the supports are positioned
as far back as possible so that they do not interfere with arm movement.
At the required Head Support (H.S.) positions, Velcro the head supports to the back pad to
help maintain head stability. The small flat pads are used for lateral support and the wedge
pads for posterior support. The thickness and position of the pads will determine the support
of the head and stability in a forward direction.
If required, attach the pommel to seat and adjust for correct position.
Note: -Always remove pommel before placing child in the seat.
Position the child in the seat and assess the child's posture. If the posture is correct remove the
child.
Take a photograph or draw a sketch of the pad positions. The child’s carers should retain one
copy for their reference and a further copy should be placed in the child’s file.
The child's posture in the seat will need to be reassessed on a regular basis, consult your
paediatric therapist with regard to how often this should be.
Measurement Symbol Millimetres Inches
Lumber Support L.S.
Lateral Trunk Supports L.T.S
Head Support H.S.

Tendercare Ltd
The Snugseat Spring User Manual
Document No 034-01v7 Snugseat Spring
User Manual.doc
Authority. Quality Controller
Authorised. J Adams
Page 17
November 2009
5.2 Setting up the Patterned cover
The 5-point harness is fitted to the seat cover before the seat cover is fitted to the Snugseat.
Tip. The harness length adjuster always goes over the user’s thighs, NEVER the
shoulders.
Fit the harness to the seat cover by inserting all straps from the
patterned side of the cover. When passing the buckle through
the slots in the harness always twist the buckle so that the
smallest side passes through the slot first. (See picture
opposite).
Insert both shoulder straps and black buckles through the
nearest slot that is above the child’s shoulder height.
Insert the pelvic straps and buckles through the slots in the
seat section, which are at the rear and side of the seat. Always
make sure that the harness adjustment mechanism remains on the patterned side of the cover.
To insert the groin strap first remove the buckle. Note how the webbing is threaded through
the buckle. (See picture on page 17). Thread the groin strap through the slots in the Tummy
pad, Patterned cover, Seat cushion then through the slot in the seat shell so that the strap
comes out the front of the casting between the holes that the footplate rods fit into. Thread the
strap through the buckle as shown below. Finally adjust the strap to the desired length and
then push the buckle into the slot in the casting.
Shoulder Strap
Pelvic Strap
Harness
Length
Adjuster
Quick Release
Catch
Groin Strap
5 Point Harness

Tendercare Ltd
The Snugseat Spring User Manual
Document No 034-01v7 Snugseat Spring
User Manual.doc
Authority. Quality Controller
Authorised. J Adams
Page 18
November 2009
Insert the shoulder and pelvic strap buckles through
the slots in the seat shell. Pull on the straps so that the
buckles are flat against the seat shell. (See picture
opposite).
Fit the patterned cover over the seat shell, make sure
that the cover is correctly fitted and not twisted.
Always make sure that the harness adjustment
mechanism remains on the patterned side of the cover.
To remove the cover and harness do the above in reverse order.
5.3 Adjusting the harness
Adjustments are made using the harness adjustment mechanism, which is on the pelvic straps.
To make the harness longer press in the brass strip in the top of the harness adjustment
mechanism and pull the shoulder strap until the desired length is obtained. Alternatively, turn
the adjustment mechanism on its side to lengthen the straps.
To make the harness shorter, pull the short length of strap protruding through the harness
adjustment mechanism until the desired length is obtained.
5.4 To lock and release the harness
To lock the harness pass the long straps over the child’s shoulders and press the short chrome
strips into the quick release buckle on the groin strap.
To release the harness, press the red button on the buckle and pull the shoulder straps off the
child’s shoulders.
5.5 Final checks
1. Check that the 5-point harness is secure and adjusted correctly.
2. Check that the cover is correctly positioned.
3. Check that the pads are in the correct position.
GROIN STRAP
BUCKLE
GROIN
STRAP

Tendercare Ltd
The Snugseat Spring User Manual
Document No 034-01v7 Snugseat Spring
User Manual.doc
Authority. Quality Controller
Authorised. J Adams
Page 19
November 2009
4. Check that the Mobility Seat is located and locked correctly in the Mobility Chassis.
5. Check that the safety strap is over seat frame cross bar and is locked.
6. Position the child correctly in the seat, and assess the child's posture if the child's
posture appears to have changed remove the child and compare the pad set up with
that recorded at the assessment and if necessary adjust the pads and try again.
7. Check footplate position and adjust if necessary.
6.0: Accessories
6.1: Playtray
The Snugseat playtray offers height, depth and
angle adjustment, so that it can be adapted to
suit your needs.
The play tray comes supplied with the
following:
• 2 fixed vertical stems (fitted to the
tray)
• 2 depth adjustment brackets and
thumbscrews (fitted to the tray)
• 2 height and angle adjustment brackets
and 4 thumbscrews (fitted to the seat
frame)
Fig 6.1.1
Fig 6.1.2
To fit the play tray to the seat frame, locate
the 2 vertical stems on the bottom of the tray
into the 2 receivers on the seat unit.
Screw the 2 thumbwheels supplied with the
tray into the welded nut on the receivers as
shown (see left). Position the tray to the
required height, and then secure it in place
by tightening the thumbscrews.

Tendercare Ltd
The Snugseat Spring User Manual
Document No 034-01v7 Snugseat Spring
User Manual.doc
Authority. Quality Controller
Authorised. J Adams
Page 20
November 2009
To adjust the angle of the playtray, loosen the
2 angle adjustors screws as shown.
Once loose, adjust the angle as required and
retighten.
Fig 6.1.3
Fig 6.1.4
To adjust the depth of the playtray, loosen
the 2 thumbscrews under the base of the tray
as shown (left).
Slide the tray in or out to the required depth,
and then retighten the screws.
Notes:
• When adjusting the Tilt In Space facility, the angle of the playtray must be adjusted to the
new horizontal position (see above instructions for how to adjust the angle of the tray).
• All items must be removed from the playtray before making any adjustment to the tray or seat
to avoid the risk of causing accidental harm to the occupant.
• The playtray must be removed before folding the pushchair.
• The playtray must be removed when transporting the chair in specially adapted vehicles.
• The playtray cannot be used at the same time as the rain cover.
• Never leave you child unattended with the play tray fitted, especially when items are
positioned on the tray.
• Extra care must be taken when placing food or drink on the tray.
• Maximum carrying capacity of the play tray is 5kg.

Tendercare Ltd
The Snugseat Spring User Manual
Document No 034-01v7 Snugseat Spring
User Manual.doc
Authority. Quality Controller
Authorised. J Adams
Page 21
November 2009
6.2 Shopping Basket
Fig 6.2.1
Fitting / removing the shopping basket:
There are 4 hanging points; the 2 front hanging clips are located under the plastic mounting
point on the front of the frame, whilst the 2 rear positions are located on the rear cross bar as
shown (see above).
To fir the shopping basket, clip the snap hooks on the hanging points.
To remove the shopping basket, unhook the 4 clips.
The shopping basket includes an expandable section to help with loading of bulky items. To
expand the basket, simply peel apart the Velcro to release the extra material.
Important:
• Always check that the shopping basket is securely fitted before use.
• The maximum carrying load for the shopping basket is 3kg.
• Always ensure that the total load of the occupant and accessories does not exceed the maximum carry
limit stated for the pushchair.
• The shopping basket and all contents must be removed when folding the pushchair
• The shopping basked and all contents must be removed when using the pushchair as a seat in a motor
vehicle.

Tendercare Ltd
The Snugseat Spring User Manual
Document No 034-01v7 Snugseat Spring
User Manual.doc
Authority. Quality Controller
Authorised. J Adams
Page 22
November 2009
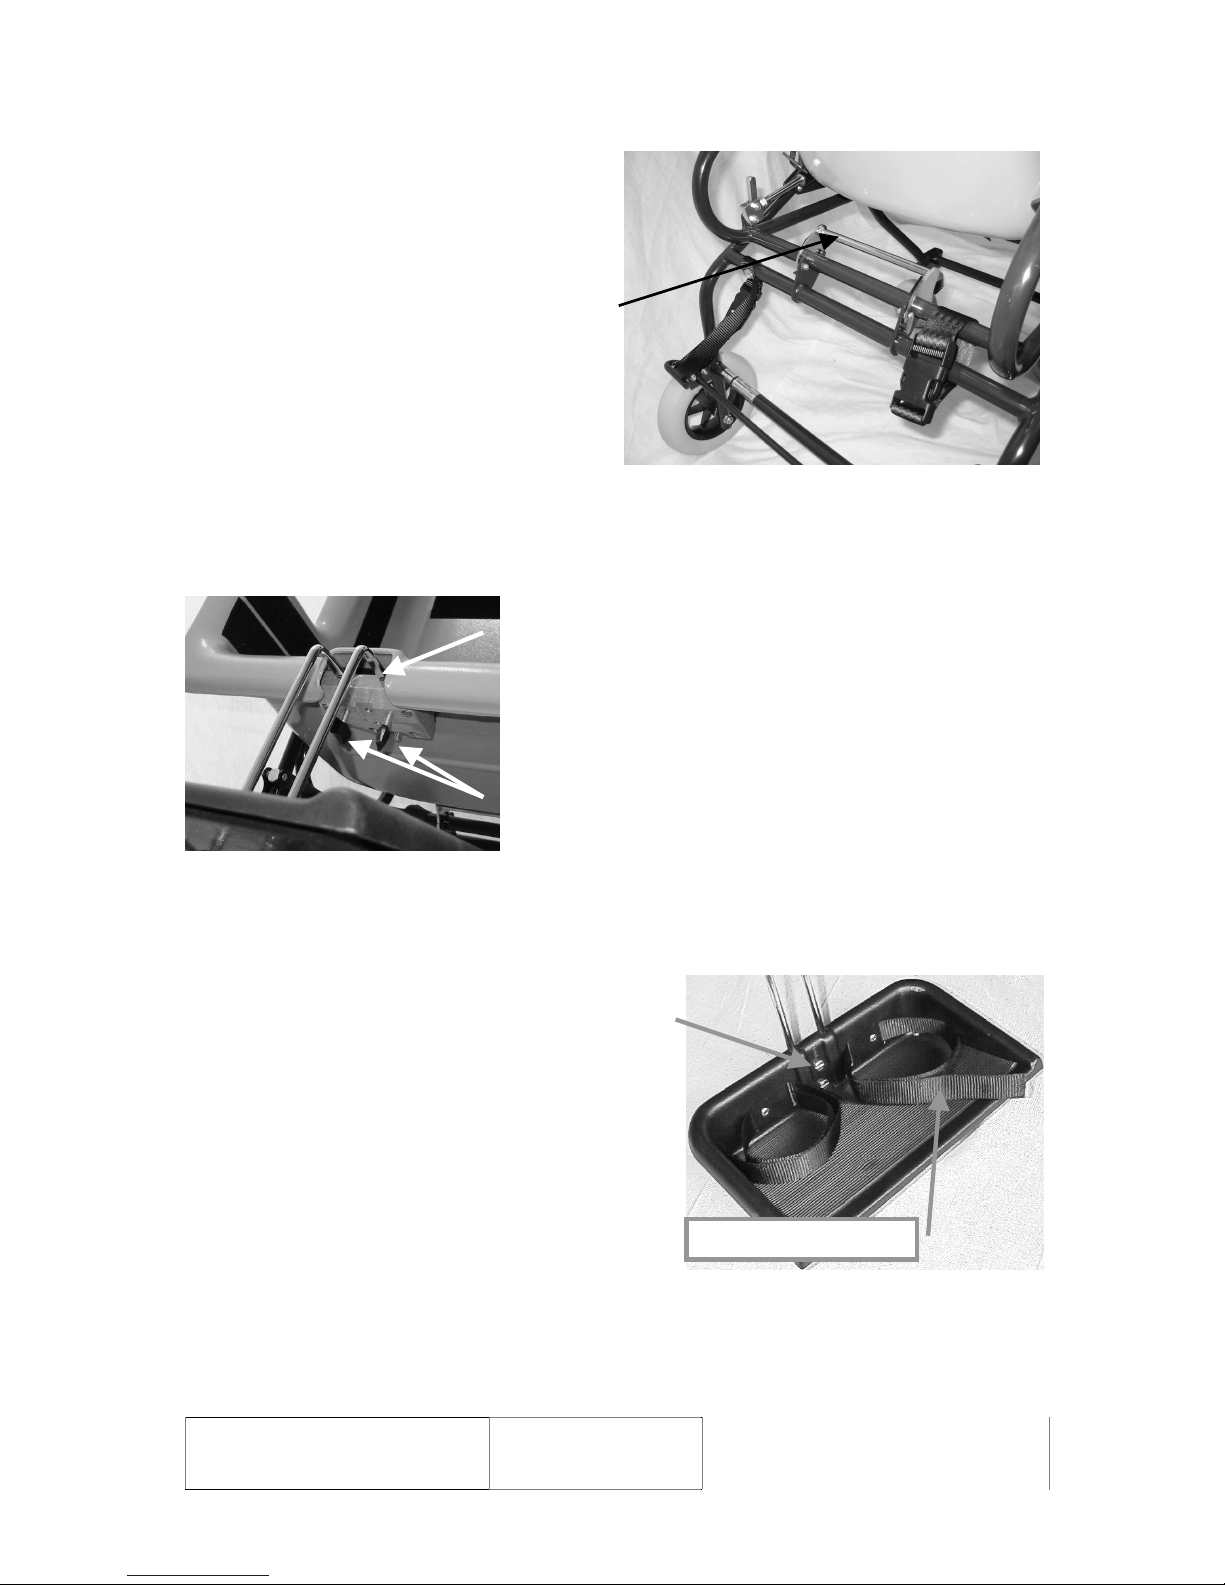
6.3 Equipment Carrying Tray
To fit the equipment carrying tray,
simply feed the tray into the frame
from the front of the buggy, and hook
the tray over the front and rear cross
bars as shown (right).
Fig 6.3.1
Important:
• Always ensure the equipment-carrying tray is correctly fitted before use
• The maximum carrying load for the tray is 25Kg
• Always ensure that the total load of the occupant and accessories does not exceed the
maximum carry limit for the pushchair.
• The equipment-carrying tray must be removed before folding the chassis
• The equipment-carrying tray must be removed when using the pushchair as a seat in a
motor vehicle.

Tendercare Ltd
The Snugseat Spring User Manual
Document No 034-01v7 Snugseat Spring
User Manual.doc
Authority. Quality Controller
Authorised. J Adams
Page 23
November 2009
6.4 Sun Canopy
Fig 6.4.1
To fit the sun canopy to the chassis:
First unfold the sun canopy.
Then clip the 4 fixing brackets onto the frame
(see arrows, left), so that the top clips sit just
beneath the push handle adjustor.
The sun canopy can then be angled to the
desired position. To remove the sun canopy,
simply pull off the clips.
IMPORTANT:
• You must remove the sun canopy
before folding the frame
• You must remove the sun canopy
when using the pushchair as a seat in
a motor vehicle.

Tendercare Ltd
The Snugseat Spring User Manual
Document No 034-01v7 Snugseat Spring
User Manual.doc
Authority. Quality Controller
Authorised. J Adams
Page 24
November 2009
6.5 Rain Cover
To fit the rain cover:
Attach the 4 push-on clips to the upper frame
of the pushchair, with the open clip section
pointing downwards.
The lower clip fits directly above the nylon
locking slider, while the upper clip attaches to
the upper frame tube.
Feed the open flap of material around the rear
frame, inside the push handles.
Next fold the cover down, and secure the
bottom using the 2 elastic hooks by wrapping
them around the lower frame tube.
Finally, secure the upper flap of material
using the 2 upper elastic hooks.
To fold the cover back when not needed,
simply release the 2 lower elastic hooks and
fold back. The cover can be secured in the
open position by attaching the hooks to the
upper frame.
Fig 6.5.1
IMPORTANT:
• The cover is for outdoor use only.
• The cover must be folded back if the child remains in the pushchair when taken
indoors. Otherwise the child may overheat. The cover must also be folded back in
warm sunny weather.
• Ensure your child’s fingers are clear of the frame when folding the rain cover back, as
the scissor action of the cover frame can tray small fingers.
• The rain cover must be completely removed before folding the wheelbase.
• The rain cover must be removed when using the wheelbase as a seat in a motor
vehicle.

Tendercare Ltd
The Snugseat Spring User Manual
Document No 034-01v7 Snugseat Spring
User Manual.doc
Authority. Quality Controller
Authorised. J Adams
Page 25
November 2009
7. User Instructions
7.1 Getting into the Snugseat
1) Put the brakes on.
2) Place the child into the seat so that their feet are on the footplate.
3) Fit the safety harness to the child and lock the harness.
4) Fit the foot straps.
7.2 Getting out of the Snugseat
1) Put the brakes on.
2) Undo the safety harness and foot straps.
3)
Lift child from the Snugseat.
8. Attendant pushing
8.1 Pushing
Important: - At the start of every journey make sure that the two white plastic rollers on
the seat are correctly located into the grey retaining brackets on the front
of the buggy and that the seat is fully locked into the chrome catch at the
back of the buggy. Also check that the safety strap beside the chrome lever
is locked in place.
Do not allow children to play with the gas spring release lever.
1) The Snugseat is easy to push over hard, even surfaces but may be more difficult over
rough, uneven surfaces and the wheels can sink into soft ground. Never force the
Snugseat if it becomes stuck, this may cause the rear wheels to lift and the Snugseat
to be tipped forwards. If the Snugseat gets jammed on a stone or cracked pavement,
tip the Snugseat backwards to raise the front wheel over the obstacle and then proceed.
On soft ground it may be easier to pull the Snugseat backwards.
2) The buggy has castor wheels and is easily steered simply by turning the Snugseat in
the desired direction.
3) Whenever possible avoid steep and uneven surfaces because there is a danger that the
Snugseat may tip over. If you cannot avoid difficult surfaces you must take extra care
when travelling across them.
4) Do not use the Snugseat in sandy conditions.
5) Always use two hands for pushing the Snugseat.
6) For the comfort of the occupant always avoid pushing too fast or making sudden fast
turns, jerking, jolting and bumping. Many occupants are liable to be affected by rough
handling, which can cause loss of confidence, discomfort or pain.
7) Avoid kerbs. Wherever possible use ramped kerbs or slopes. This will make pushing
the chair easier and safer and will be more comfortable for the occupant.
8) Avoid steep kerbs and flights of steps because of the danger of losing your grip on the
chair or of the occupant being tipped out. Always use a ramp or lift if available.

Tendercare Ltd
The Snugseat Spring User Manual
Document No 034-01v7 Snugseat Spring
User Manual.doc
Authority. Quality Controller
Authorised. J Adams
Page 26
November 2009
9) To tip the Snugseat backwards when climbing kerbs stand behind and holding onto the
push handle with both hands, press down and pull backwards. The front of the chair
will lift.
IMPORTANT: - Take great care when doing this to avoid the combined weight of the
Snugseat and occupant overcoming your strength and tipping back onto
you. Never try to tip the Snugseat if the occupant is much heavier than
you are.
10) Always look well ahead so that you have plenty of time to avoid hazards.
11) Be considerate to other people and watch out for pedestrians who may stop or
suddenly change direction.
8.2 Brakes
1) Always put the brakes on when placing the child in or taking them out of the seat and when
leaving the Snugseat unattended.
8.3 Comfort
1) Always be considerate to the occupant.
2) Before setting out on a journey make sure the occupant is comfortably and correctly
seated and that the safety harness is correctly fitted and adjusted. Always ensure that
both feet are on the footrest and that clothing is tucked in and cannot catch on
doorways or other obstructions.
3) Remember the occupant is in front of you. They will want to be part of your
conversations and interests. Also their view will be different to yours when it comes
to looking into shop windows, etc. it can be extremely frustrating to hear something
exciting being discussed when it is situated somewhere behind the occupant’s eyes,
and thus, out of sight.
8.4 Lifting and general safety
1) The Snugseat is designed to carry one person only. Never allow children to play on, or
stand on the footrest or frame. Never hang anything such as bags on the push handle. If
you do, there is a danger of the Snugseat tipping backwards.
2) If it is necessary to lift the Snug Seat whilst it is occupied always use two people, one
either side of the Snugseat.
3) For your own safety and good practice never lift the empty Snugseat until it has been
properly folded. Always use good lifting practice.
4) Do not allow children to play with the gas spring release lever.
5) Never leave the child/occupant unattended, even with the harness fitted.
6) Keep children clear of the wheelbase during opening and folding.

Tendercare Ltd
The Snugseat Spring User Manual
Document No 034-01v7 Snugseat Spring
User Manual.doc
Authority. Quality Controller
Authorised. J Adams
Page 27
November 2009
9. Cleaning
9.1 Buggy and seat shell.
1) To clean the buggy or seat shell, wipe with a damp cloth and dry thoroughly.
2) For more stubborn stains wipe with a damp cloth and warm water in which a little mild
soap has been dissolved. Dry thoroughly
3) Never use furniture polish or any spirit to clean the frame.
9.2 Patterned covers & tummy pad.
1) Remove the cover from the Snugseat. Remove the harness from the cover. Wash as per
instructions on the cover (40°C Synthetic Wash).
2) Dry cover thoroughly before re-assembly. Do not tumble dry.
9.3 Modular foam pads
1) Make a sketch or take a photograph of the position of foam pads.
2) Remove foam pads that need cleaning.
3) Wipe with a damp cloth and dry thoroughly.
4) Using the sketch or photo, refit the pads in exactly the same position.
9.4 Five point harness
1) Remove harness from the seat.
2) Wipe with a damp cloth and dry very thoroughly. Do not tumble dry.
3) Do Not immerse in water or wash in a machine.
10. Maintenance
Should a problem be found when carrying out the regular checks, it should be immediately
reported to the issuing authority or Tendercare Ltd.
10.1 Routine maintenance
The users family can easily carry out the following tasks. No tools are required.
1) Always wipe the buggy and seat dry. Never put it away damp.
2) Check that the two-footrest retaining thumbscrews are in place and are hand tight (daily).
3) Check that the two pommel retaining thumbscrews are in place and are hand tight (daily).
4) Check operation of the brake, folding and reclining mechanisms (weekly).
5) Check condition of harness, stitching and buckle (weekly).
6) Clean frame when necessary (we suggest at least once a week).
If you find any faults refer to your issuing authority or Tendercare Ltd.

Tendercare Ltd
The Snugseat Spring User Manual
Document No 034-01v7 Snugseat Spring
User Manual.doc
Authority. Quality Controller
Authorised. J Adams
Page 28
November 2009
10.2 Six monthly maintenance
Only someone who is a competent tradesman or repairer should carry out this work. If a
major fault is found stop using the Snugseat until it has been corrected.
1) Fold and open the buggy. Check that all movements through the folding range are free.
Examine frame for any damage. Check operation of the seat recline mechanism.
2) Examine upholstery and foot straps for wear and arrange for replacement if necessary.
3) Examine nuts, bolts, pivots and frame plugs for tightness and general condition.
4) Check that the footrest and pommel retaining thumbscrews are in place and are hand tight.
5) Examine brake assembly for wear, damage and correct operation.
6) Examine tyres for sharp objects, cuts or splits.
7) Examine castor and wheel bearings and suspension for excessive wear.
8) Check castors and rear wheels for free rotation, security and accumulation of fluff and grit.
Remove with a dry lint free cloth.
9) Check the two plastic rollers on the front of the seat locate properly into the two retaining
brackets on the front of the buggy and that there is no wear or damage.
10) Check the chrome locking lever and mountings for wear or damage and correct operation.
11) Check the safety strap, clips and mounting for damage or wear.
For all other repairs refer to your issuing authority or Tendercare Ltd.
11. Oxygen Cylinder
1) If a portable oxygen cylinder is required, the maximum size recommended by Tendercare is
type PD 455 mm long x 100 mm diameter weight approximately 10 kg. For cylinder and
safety information contact:-
BOC Gases, Customer Service Centre, Priestley Road, Worsley, Manchester M28 2UT.
Telephone 0800 111 333.
Warnings:-
If using medical oxygen cylinders ensure compliance with applicable regulations.
When mounting an oxygen cylinder onto the Snugseat care must be taken to ensure
the Snugseat will not be damaged in any way. In addition the stability of the
Snugseat and seat must not be adversely affected. If necessary, stability tests should
be carried out on the loaded assembly.

Tendercare Ltd
The Snugseat Spring User Manual
Document No 034-01v7 Snugseat Spring
User Manual.doc
Authority. Quality Controller
Authorised. J Adams
Page 29
November 2009
2) If an oxygen cylinder is required it must be mounted in an approved carrying tray, be
adequately supported and restrained considering the intended use and environment.
Important: When the Snugseat is used, as a seat in a vehicle the oxygen cylinder and
carrying tray must be removed.
3) Valve, gauges and fittings must be adequately protected from mechanical damage.
4) When using an oxygen cylinder, users and carers should be aware of the potential hazard
caused by smoking, naked flames or other exposed heat sources, oil or grease.
5) Because the fitting and use of oxygen are outside the control of Tendercare Ltd, Tendercare
Ltd does not accept any liability relating to the use of oxygen with the Snugseat.
12. Warranty
1) Tendercare undertakes to repair or replace free of charge, any parts or part found to be
defective due to manufacture within a period of 12 months from the date of delivery.
2) Tendercare Limited will not repair or replace free of charge any part or parts found to be
defective due to abuse, misuse or lack of correct maintenance.
3) Equipment for warranty claims should be returned in a strong carton. There may be a
charge for collection. Contact Tendercare Customer Service Department on 01903
726161.
13. Transporting the Snugseat
The Snugseat buggy and seat unit can be folded for transport in the luggage area of a vehicle.
The Snugseat assembly has been successfully impact tested against International Standard
ISO7176-19 and may be used as a vehicle seat.
Important: - When used as a vehicle seat the following instructions must be followed.
13.1 Preparing Snugseat for Transport
1) Check that the child is correctly strapped in the seat using the 5-point harness. Check
that the 5-point harness is properly adjusted.
2) Remove the following if fitted, Pommel, Play tray, Rain-hood, Shopping basket or
Aluminium carrying tray.
3) Check that the seat is in the most upright position (Not reclined).

Tendercare Ltd
The Snugseat Spring User Manual
Document No 034-01v7 Snugseat Spring
User Manual.doc
Authority. Quality Controller
Authorised. J Adams
Page 30
November 2009
13.2 Attaching Snugseat to Vehicle
1) The Snugseat must be attached to the vehicle using a 4-point wheelchair webbing
restraint. (See the pictures on page 24).
Note: - (Such restraints are manufactured by Unwin Safety Systems).
2) Only a trained person should attach the restraints.
3) Position the assembly correctly in the vehicle over the floor track with the front of the
Snugseat facing towards the front of the vehicle (in the direction of travel). Put The
Brakes On.
4) Attach the front restraints to the floor track and Snugseat front cross bar making sure
they are in line with the floor track (See picture 2 on page 25).
5) Attach the rear restraints to the floor track and snug seat / buggy making sure the strap
goes around both the seat and buggy frame. (See picture 3 on page 25).
6) Open the lever of the over centre buckle and pull through the excess webbing to
tighten the belt. Snap down lever to tension (See pictures 4 & 5 on page 25).
7) To release the buggy follow the above instructions in reverse order.
IN EMERGENCY PRESS THE RELEASE BUCKLES
Warnings: -
1. The above only secures the Snugseat not the passenger. It is essential that the
Snugseat harness be fitted to the passenger.
2. The Snugseat should only be secured in vehicles using a 4-point webbing restraint
system that complies with ISO 10542 Part 2, SAE2249 or DIN 75078/2. NO other
restraint system can be used
3. If transporting medical oxygen cylinders ensure compliance with applicable
standards.
4. Any item involved in an accident no matter how minor MUST BE WITHDRAWN
FROM SERVICE IMMEDIATELY AND REPLACED.

Tendercare Ltd
The Snugseat Spring User Manual
Document No 034-01v7 Snugseat Spring
User Manual.doc
Authority. Quality Controller
Authorised. J Adams
Page 31
November 2009

Tendercare Ltd
The Snugseat Spring User Manual
Document No 034-01v7 Snugseat Spring
User Manual.doc
Authority. Quality Controller
Authorised. J Adams
Page 32
November 2009
13.3 Car fixing kit
The seat can be used as a car seat on condition that it is fitted to the car using the approved
Tendercare fixing kit TS6390.
1. Check that the child is correctly strapped in the seat using the correct 5-point harness.
Check that the 5-point harness is properly adjusted.
2. Remove the following if fitted, Pommel, Play tray.
3. Check that the seat is properly anchored. Inspect the fixing kit, 5-point harness and
release buckles daily for wear, damage and correct operation.
Important: - DO NOT USE IF YOU ARE NOT SATISFIED THAT IT IS SAFE
Warnings: -
1) Before starting work see pictures and instructions on Page 26.
2) Before drilling any holes in the vehicle to fit seat check for position of petrol tank,
cables etc to avoid any damage.
3) Before fitting bolts into anchorage points, check that there is adequate clearance for the
bolt length. If there is insufficient clearance shorten the bolt before fitting.
4) Anchorages should only be mounted directly to secure metal panel or metal floor. If
necessary cut through carpet, parcel shelf or other trim to allow access. Do not allow
the webbing to rub against sharp edges, or alter the design and specification in any
way.
5) Always consult a reputable garage if you are unsure where to fix the anchorage straps.
6) To maintain safety replace seat or harness assemblies which are badly worn, damaged
or involved in a serious accident
7) Do not place heavy objects on the vehicle parcel shelf, which could injure a child in
the Snugseat.

Tendercare Ltd
The Snugseat Spring User Manual
Document No 034-01v7 Snugseat Spring
User Manual.doc
Authority. Quality Controller
Authorised. J Adams
Page 33
November 2009

Tendercare Ltd
The Snugseat Spring User Manual
Document No 034-01v7 Snugseat Spring
User Manual.doc
Authority. Quality Controller
Authorised. J Adams
Page 34
November 2009
14. Repairs
1) Repairs; for all repairs contact your issuing authority.
2) Major repairs; for all major repairs e.g. bent or damaged frame, the equipment should be
returned to the factory. Contact Tendercare Ltd customer services on 01903 726161.
3) An approved agent may carry out the following repairs and replacements. Replacement of
Wheels, brakes and Gas strut. A workshop manual is available to repairers from
Tendercare Ltd.
Important Points
1) Do not reuse Nyloc nuts. Always replace with a new Nyloc nut.
2) Always use Loctite thread locking compound Grade 241.
3) Always use recommended components and parts available from Tendercare Ltd.
4) Do not modify or repair the frame
 Loading...