

Page 1

Mini Tilt Wheelchair User Manual v2
Authority. Quality Controller
Authorised. J Adams November 05
+
UUSSEERRM
MAA
N
NUUAALL
FFoor
r
M
MIINNIITTIILLTT
W
WHHEEEELLCCHHAAIIRR
IMPORTANT
Please read these instructions carefully
Before using your wheelchair
Page 2
Mini Tilt Wheelchair User Manual v2
Authority. Quality Controller
Authorised by, J Adams
Page 2 of 15
November 05
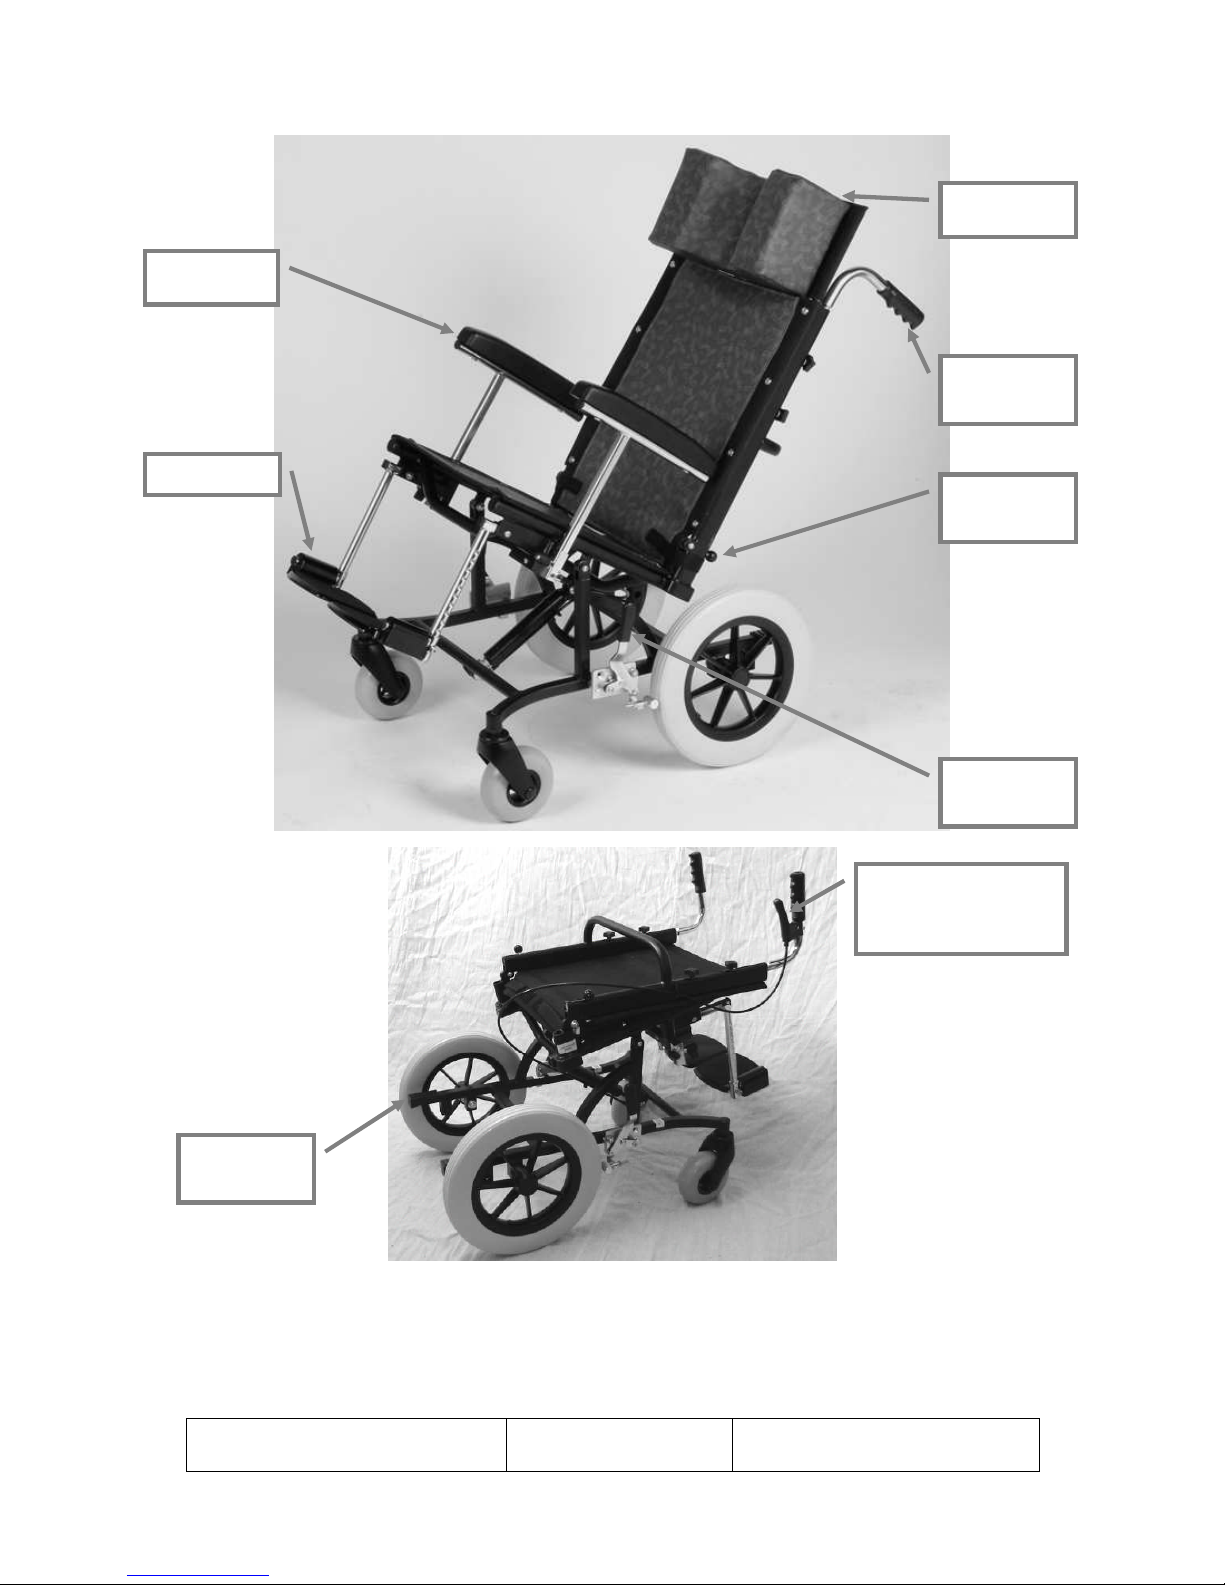
Headrest
Push
Handle
Tipping
Lever
Brake
Lever
Armrest
TTEENNDDEERRCCAARRE
E
MINI TILT WHEELCHAIR
Backrest
Lock
Gas Strut
Operating Lever
Page 3

Tendercare Ltd
Mini TiltWheelchair User Manual
Mini Tilt Wheelchair User Manual v2
Authority. Quality Controller
Authorised by, J Adams
Page 3 of 15
November 05
CONTENTS
ITEM DESCRIPTION PAGE
1 Who to contact if you have difficulty………………………………. 4
2 Intended user………………………………………………………… 4
3 Unpacking……………………………………………………………. 4
4 Preparing for use…………………………………………………….. 5
4.1 Unfolding and assembling the wheelchair……………………….. 5
4.2 Adjusting the footrests…………………………………………… 6
4.3 Fitting and removing headrest……………………………………. 7
4.4 Tilt in Space……………………………………………………… 8
4.5 Tyres and Brakes…………………………………………………. 8
4.6 Rear Wheel Position……………………………………………… 9
4.7 Tipping the Wheelchair………….………………………………. 10
5 User instructions…………………………………………………….. 10
5.1 Getting into the wheelchair………………………………………. 10
5.2 Getting out of the wheelchair…………………………………….. 10
5.3 Sideways transfer………………………………………………… 10
6 Attendant Pushing…………………………………………………… 11
6.1 Pushing…………………………………………………………… 11
6.2 Brakes…………………………………………………………….. 11
6.3 Comfort…………………………………………………………... 12
6.4 Lifting and general safety………………………………………... 12
7 Cleaning……………………………………………………………… 12
8 Maintenance…………………………………………………………. 12
8.1 Routine maintenance…………………………………………….. 12
8.2 Six monthlymaintenance………………………………………… 13
9 Warranty……………………………………………………………... 13
10 Transporting the wheelchair………………………………………... 13
11 Repairs……………………………………………………………….. 15
Page 4

Tendercare Ltd
Mini Tilt Wheelchair User Manual
Mini Tilt Wheelchair User Manual v2
Authority. Quality Controller
Authorised by, J Adams
Page 4 of 15
November 05
1. Who to contact in difficulty
Tendercare Ltd
PO Box 3091, Littlehampton, BN16 2WF
Tel (01903) 726161 Fax (01903) 734083
Email: [email protected]
2. Intended user
This product benefits from a tilt in space facility and has been designed for use as a
wheelchair or wheelbase for use with special seating systems. It is available in three seat
widths 305mm (12”), 356mm (14”) and 406mm (16”). These instructions apply to all sizes.
The wheelchair has four wheels the front wheels are castors to allow easy steering. The
backrest can be folded for transit. The armrests lift off for easy side transfer and the push
handles are adjustable in height to suit a wide range of attendants.
The maximum carrying weight including the user and all accessories should not exceed 102kg
(16 stone).
3. Unpacking
The wheelchair is delivered in a cardboard carton approximate weight 23 kg and size 700 mm
wide x 570 mm deep x 950 mm high.
Warning the transit carton is heavy so moving and unpacking must be done with care.
Observe all lifting and handling regulations.
1) Stand the Carton upright making sure it is supported and cannot fall over. Open the
carton and remove any packages or packing, which could obstruct the removal of the
frame.
2) Carefully pull out the wheelchair and check that you have the following items:-
Item Component Number Yes No
1. Mini Tilt wheelchair 1
2. Armrests 2
3. Push handles 2
4. Thumb screws (for push handles) 4
5. Footrests 2
6. User Manual 1
If any items are damaged or missing please contact Tendercare,
Preferably by fax 01903-734083 within 36 hours of delivery.
3) After unpacking and checking you have all components and that they are in good
condition, carefully dispose of the packaging at your local recycling centre.
Page 5
Tendercare Ltd
Mini Tilt Wheelchair User Manual
Mini Tilt Wheelchair User Manual v2
Authority. Quality Controller
Authorised by, J Adams
Page 5 of 15
November 05
4. Preparing for use and operation
Warning: - when assembling the wheelchair for use, ensure that you hold the frame so
that you avoid any danger of catching your fingers in moving parts.
4.1 Assembling the wheelchair
1) Carefully lift the wheelchair upright.
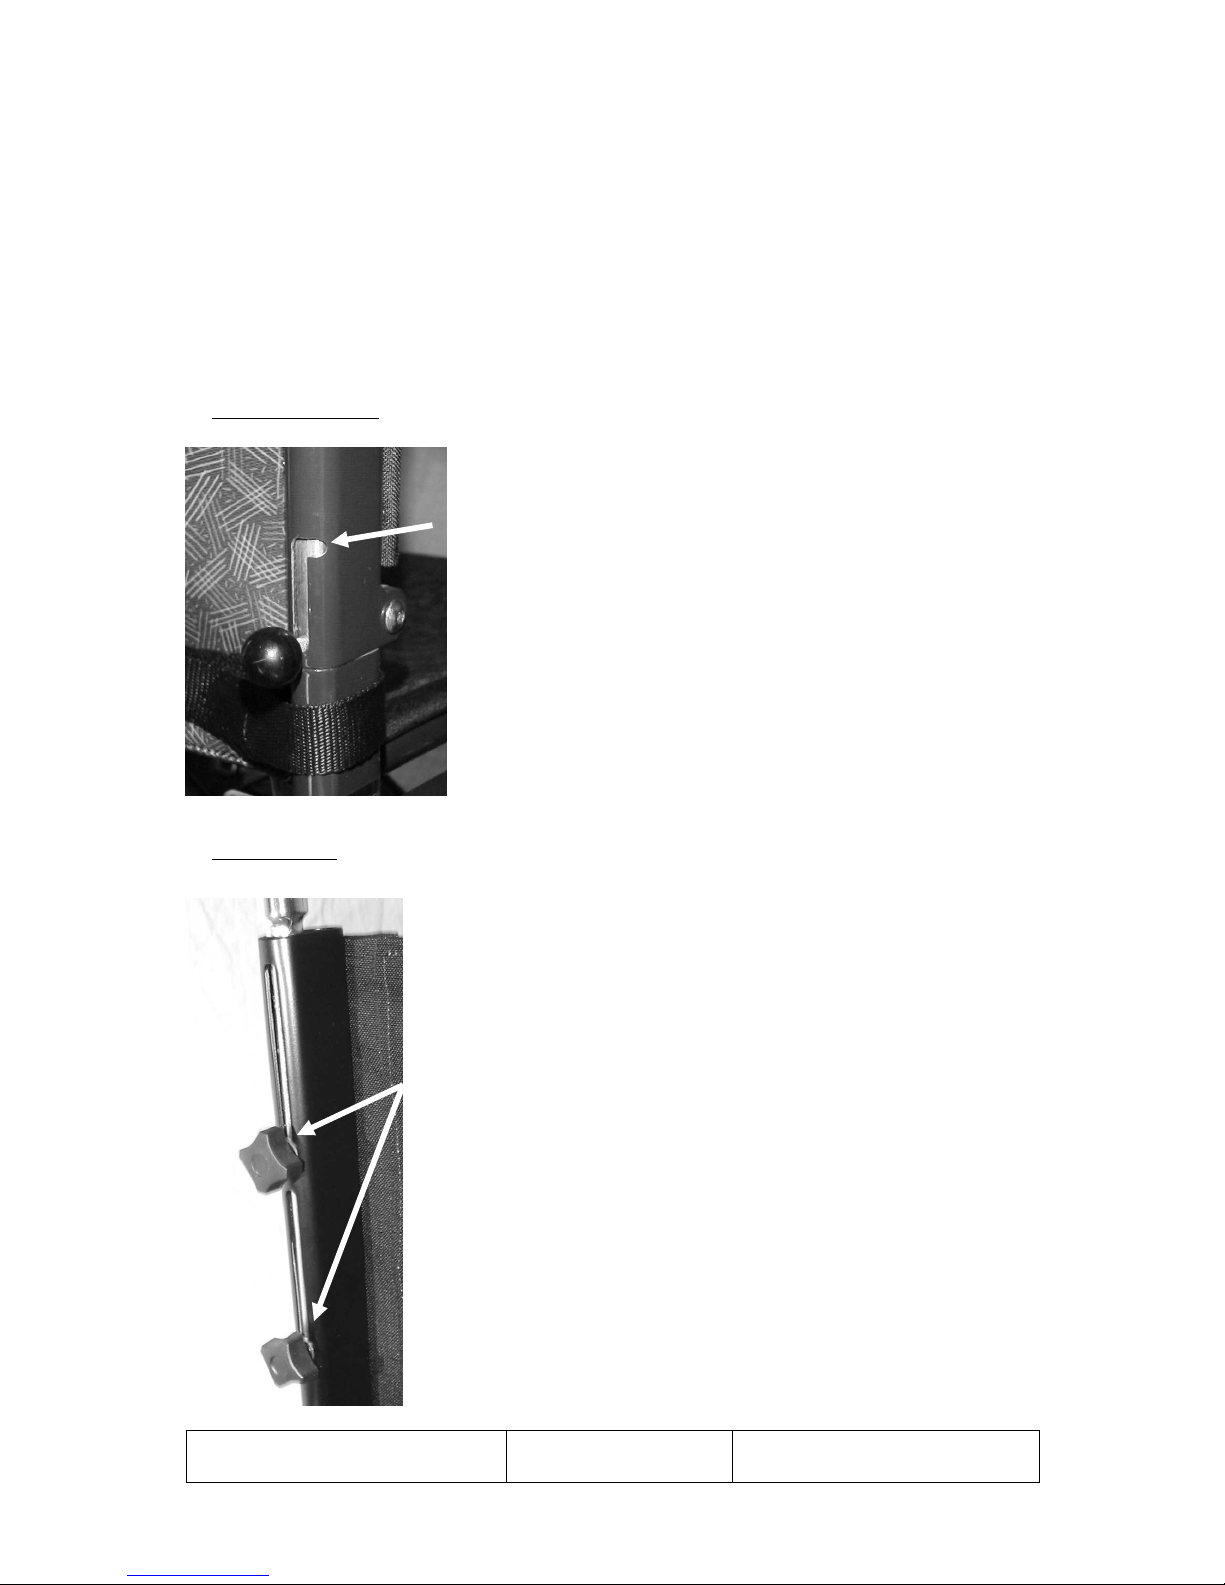
2) Backrest supports.
Standing behind the wheelchair lift the two-backrest locking
pins using the ball shaped handgrips at the bottom of the
backrest tubes. Turn them so that they lock into the groove
arrowed opposite.
Lift backrest supports vertical.
Lock the supports in position by moving the handgrips out of
the arrowed groove (see photo) and make sure they move to the
bottom of the slot in the backrest tube.
3) Push handles.
The height of the push handles can be adjusted to suit the needs of a
large range of attendants.
To adjust the height to suit you, simply loosen (turn anti clockwise)
the two thumbscrews at either side and near the top of the backrest.
(See photo opposite). Lift or lower the push handles to a height that
suits you then retighten (turn clockwise) the thumbscrews.
Tip: - To prevent the push handles moving in use these screws must
be tight. You should regularly check that they are tightened
properly.
Page 6
Tendercare Ltd
Mini Tilt Wheelchair User Manual
Mini Tilt Wheelchair User Manual v2
Authority. Quality Controller
Authorised by, J Adams
Page 6 of 15
November 05
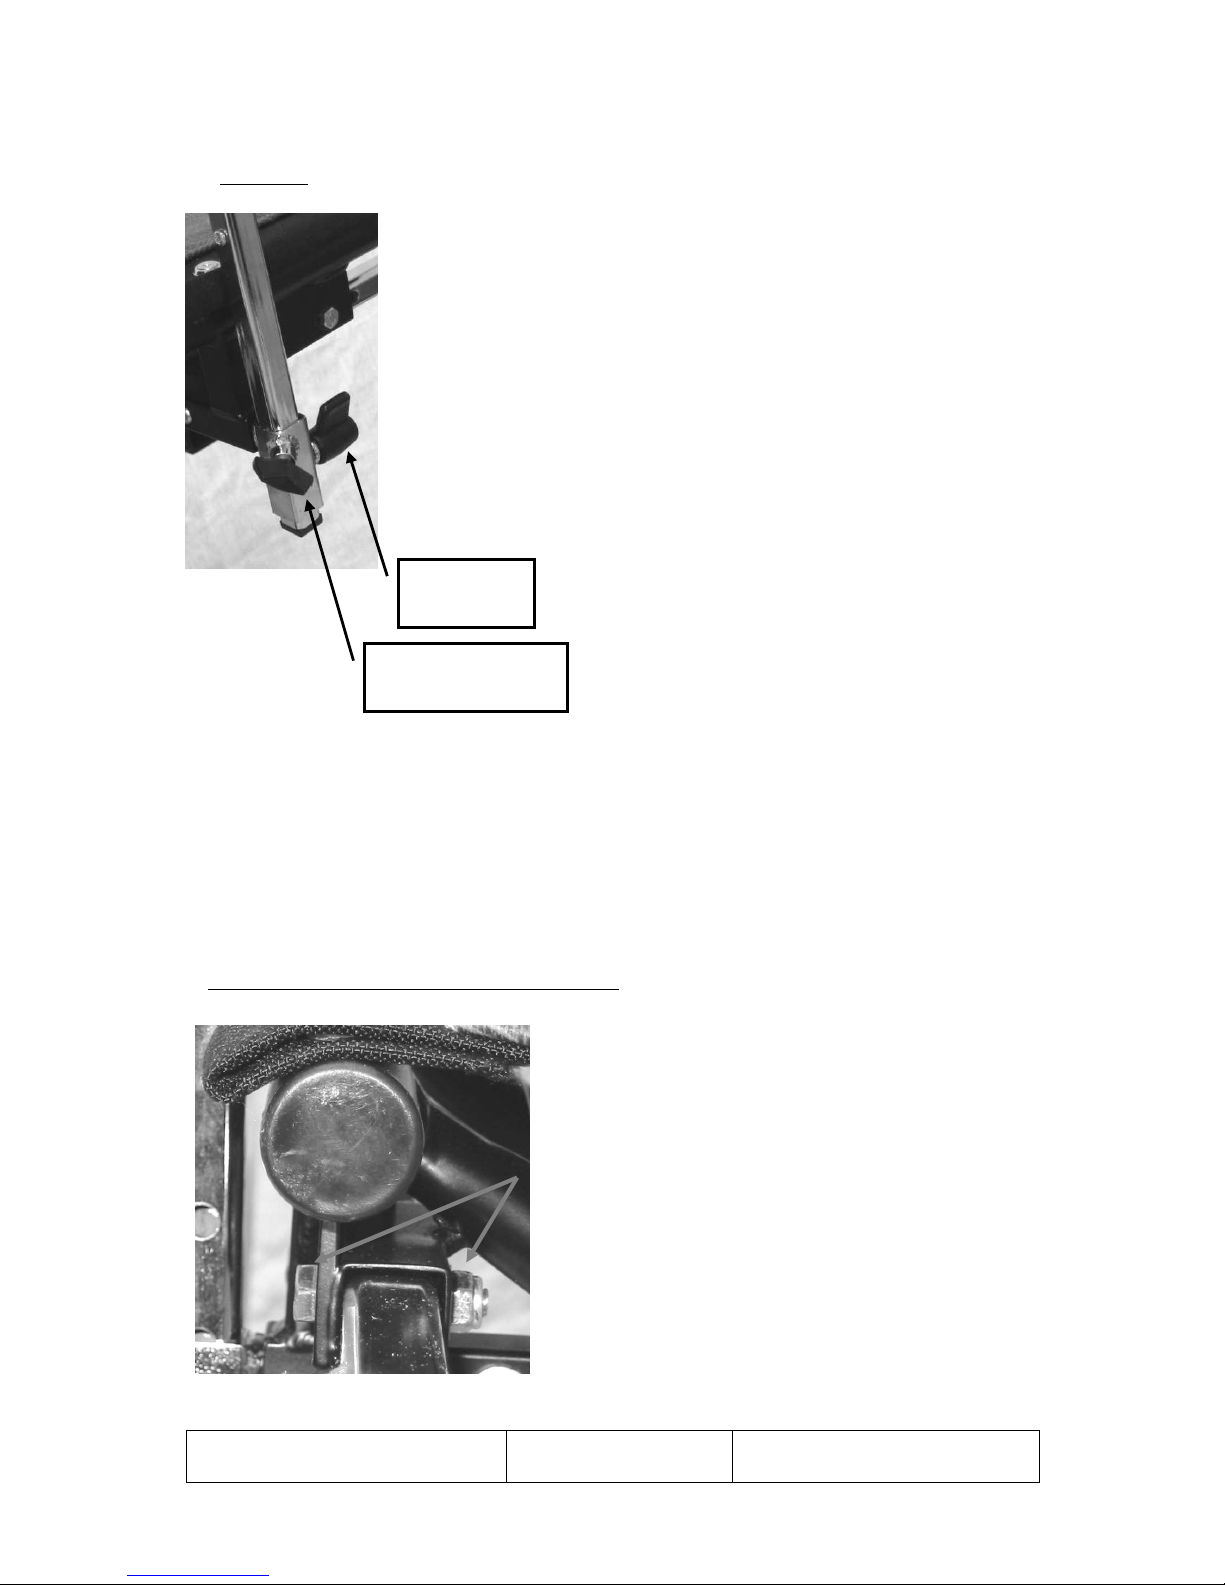
4) Armrests.
To fit the armrest loosen thumbscrew “A” (turn anti clockwise) and
turn catch “B” a quarter turn then push the armrest into the socket.
Make sure that the longer part of the tube supporting the armpad points
to the backrest.
To lock the armrest turn catch “B” upright and tighten the thumbscrew
“A”. (See photo opposite
To adjust the height of the armrest loosen the thumbscrew, turn the
catch and move the armrest to the desired height. Turn the catch
making sure it is one of the holes in the armrest vertical tube and
retighten the thumbscrew.
To fold the wheelchair, do the reverse of the above.
4.2 Adjusting footrests
The footrests are fitted to the wheelchair when it is supplied. They can be moved forward and
back, up and down. The footplate can be lifted to the vertical when getting into and out of the
wheelchair.
1. Moving the footrests forward and backwards.
The footrest can be fitted in one of two positions.
To move the footrest, remove the nut, washer and bolt
located under the front of the seat support tube using
10mm spanners. (See Picture opposite). Move the
footrest to the alternative position. Reinsert the bolt
from the outside of the wheelchair fit the washer and
nut and tighten.
CATCH
“B”
THUMBSCREW
Page 7
Tendercare Ltd
Mini Tilt Wheelchair User Manual
Mini Tilt Wheelchair User Manual v2
Authority. Quality Controller
Authorised by, J Adams
Page 7 of 15
November 05
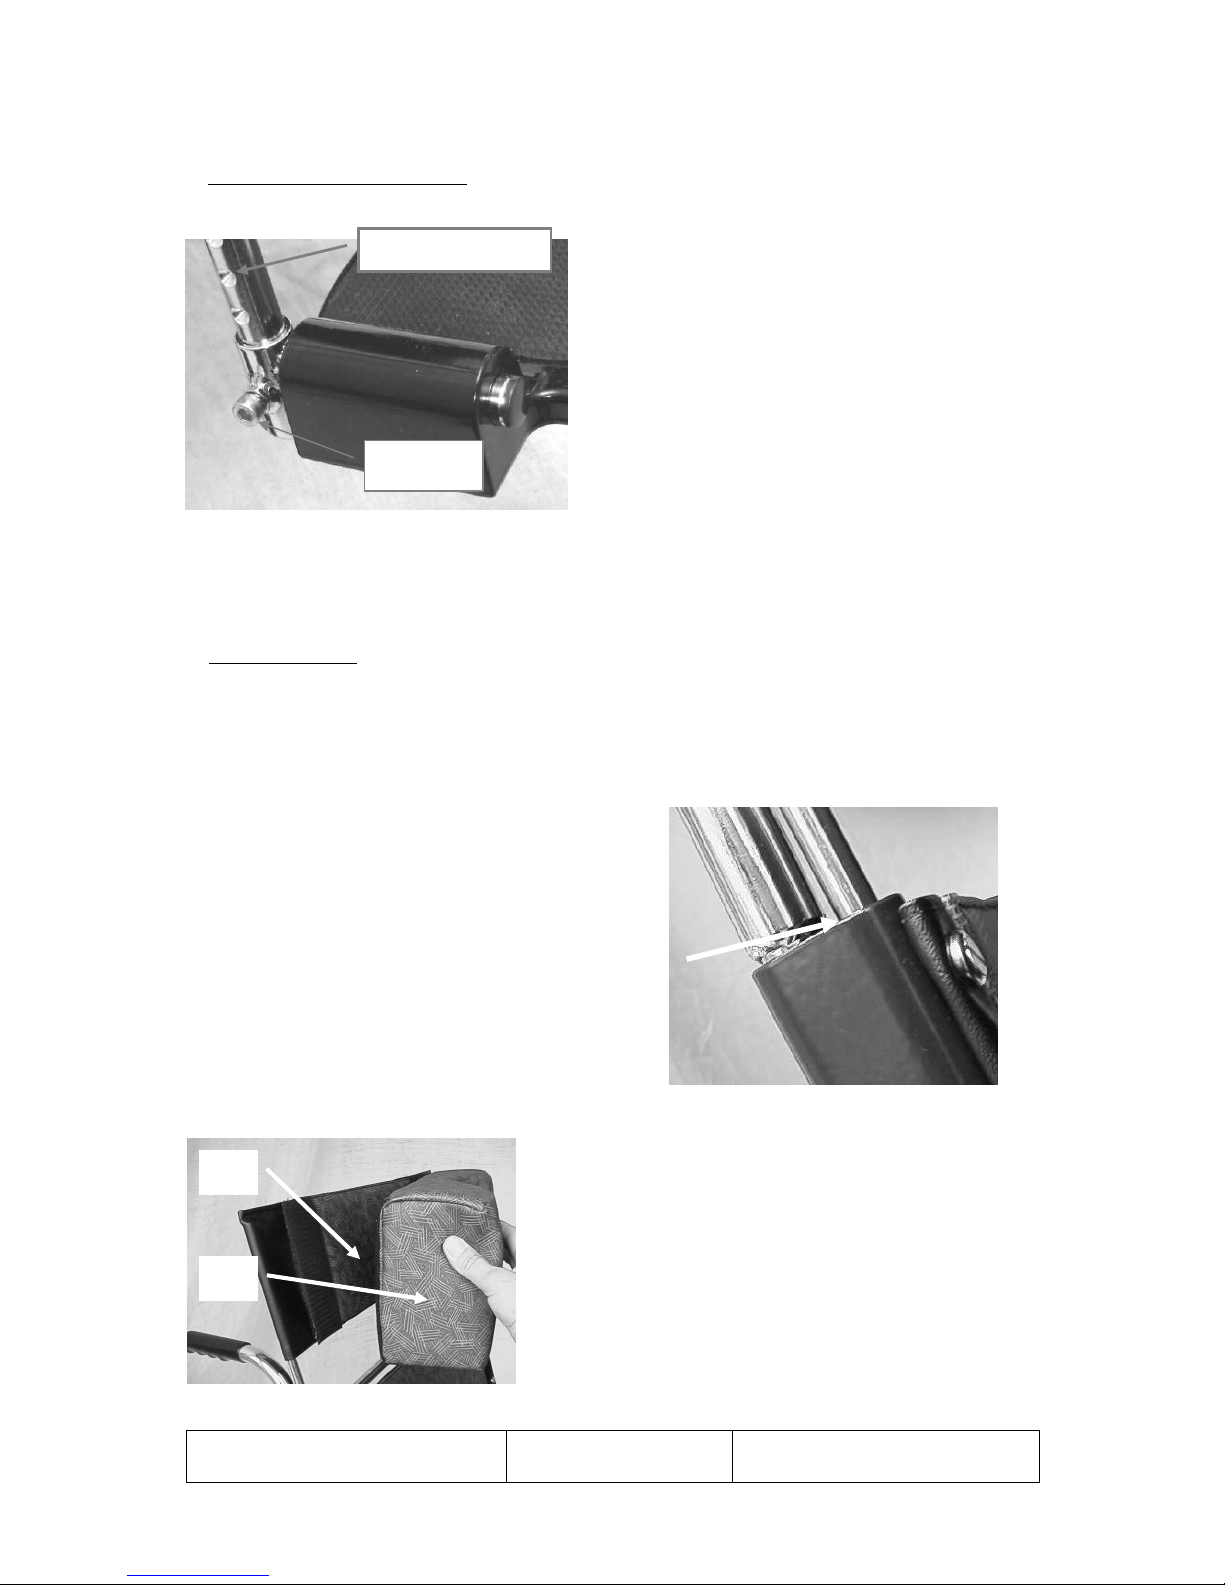
2. Adjusting the footrest height
Using a 5mm hexagon key loosen the screw on
the side of the footrest. (See photo opposite.)
Move the footrest to the desired height and
retighten the screw.
IMPORTANT: -Make sure the screw fits into an indentation in the footrest
support rod.
3. Lifting footplate
The footplates can be lifted into vertical position to make it easier to get in and out of the
wheelchair. To do this, simply hold the front of the footplate and lift up.
4.3 Fitting and Removing Headrest (Optional Extra)
If the headrest is purchased as an optional extra it
should be fitted as follows: -
Place the headrest support tubes into the top of the
backrest tubes just in front of the push handles (see
photo opposite).
Fit the headrest upholstery (A) over the two support
rods.
Attach the headrest cushion (B) using the Velcro strips.
Reverse the above to remove the headrest
INDENTATION
SCREW
Page 8
Tendercare Ltd
Mini Tilt Wheelchair User Manual
Mini Tilt Wheelchair User Manual v2
Authority. Quality Controller
Authorised by, J Adams
Page 8 of 15
November 05
4.4 Tilt in Space
The angle of the seat and backrest can be adjusted to any angle between the upright and fully
reclined position.
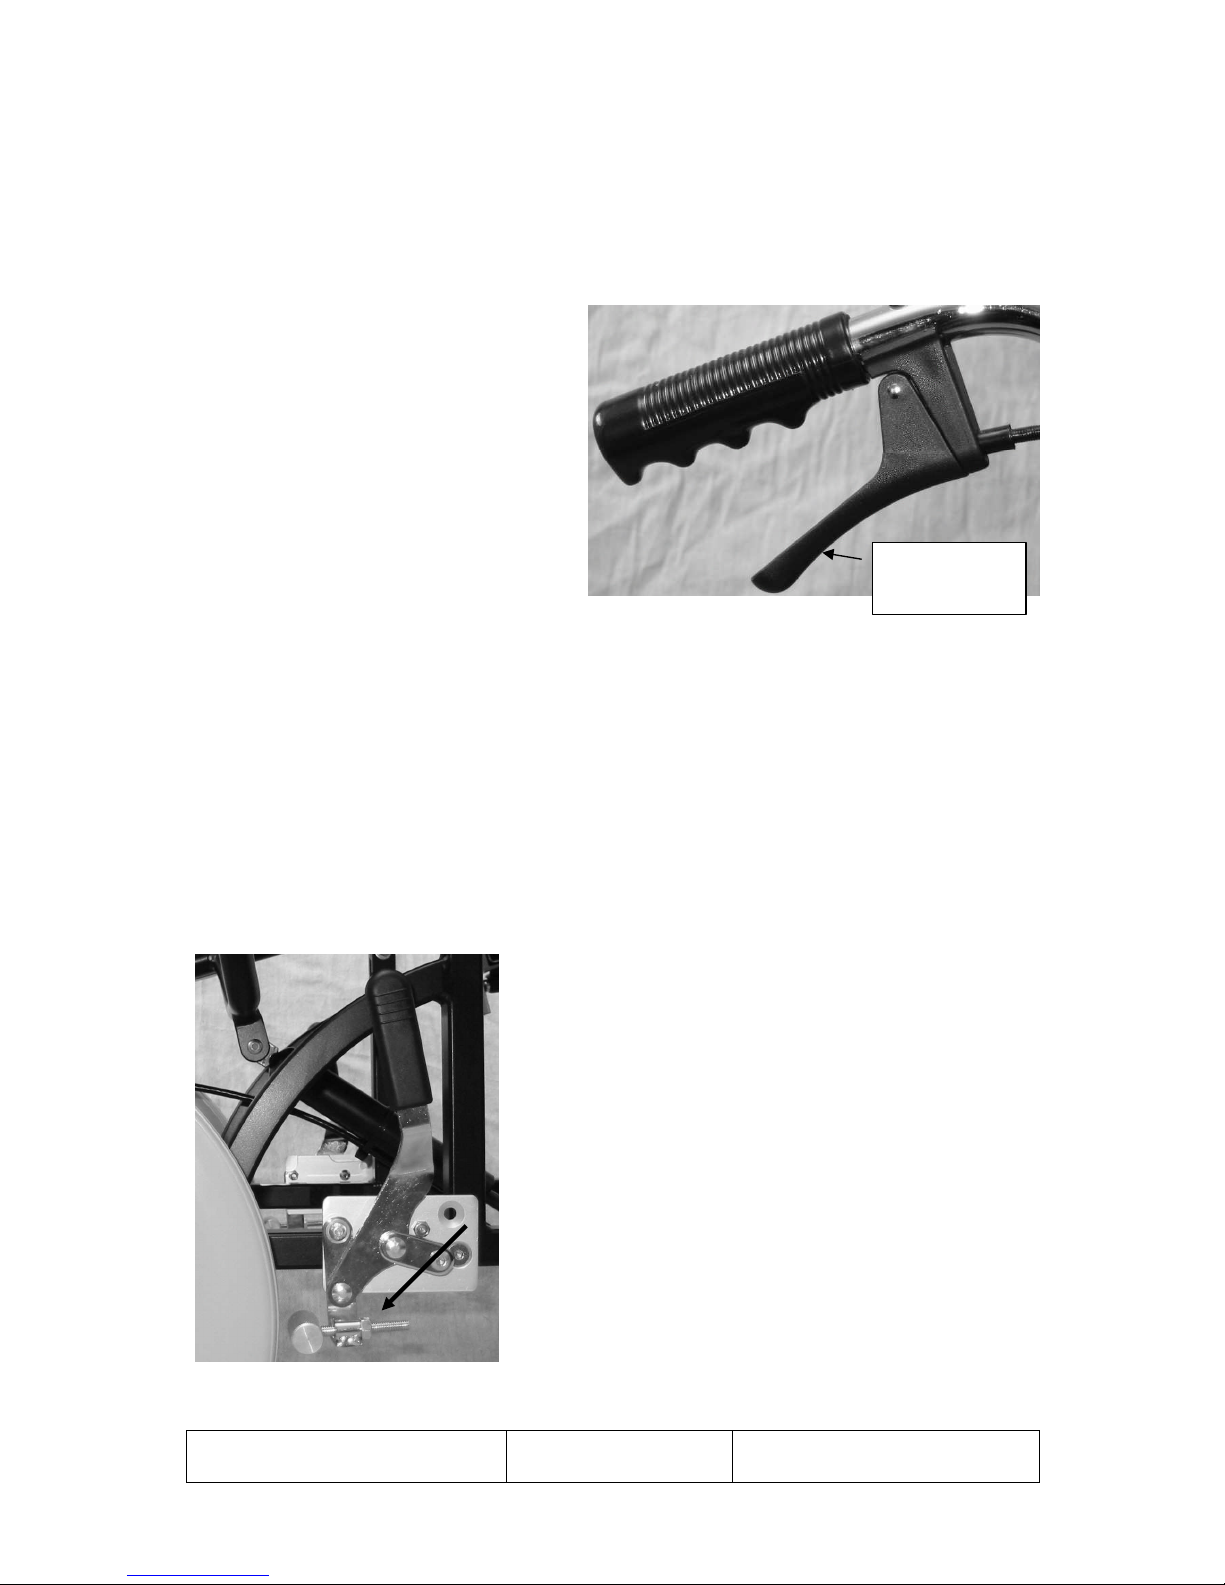
To recline the seat, put the brakes on and
stand behind the wheelchair. Holding both
push handles squeeze the operating lever
(see photo opposite) and push down
evenly on both handles. Release the
lever when the seat is at the desired angle.
To bring the seat upright put the brakes on
and stand behind the wheelchair. Holding
both push handles squeeze the operating
lever (see photo opposite) and lift evenly
on both handles. Release the lever when
the seat is at the desired angle.
Important: - Always put the brakes on and move both push handles
together when adjusting the seat angle.
4.5 Tyres and Brakes
The tyres are made from a solid material and do not require any attention other than being
cleaned with a damp cloth when dirty.
Check brakes by moving both levers forward as far as they will go. The wheels should now
be locked. If the wheels move the brakes need adjusting.
Adjust the brakes by loosening the nut (arrowed) locking
the brake pad in place. Turn the brake pad so that it is
near to, but not touching, the tyre. Retighten the locking
nut.
Always adjust both brakes at the same time and recheck
that the brakes work properly.
Note: Don’t leave the brakes ON for a long period. If
you do a flat section may appear on the tyre. When not
using the wheelchair i.e. overnight or during storage
make sure the brakes are OFF.
OPERATING
LEVER
Page 9
Tendercare Ltd
Mini Tilt Wheelchair User Manual
Mini Tilt Wheelchair User Manual v2
Authority. Quality Controller
Authorised by, J Adams
Page 9 of 15
November 05
LOOKING FROM REAR
FRONT
MOUNTING
HOLES
REAR
MOUNTING
HOLES
4.6 Rear Wheel Position
The rear wheel is supplied mounted in its forward position to provide optimum ease of
manoeuvring and tipping. However, a small number of people may require a greater degree of
stability. If this is the case the rear wheel and brake can be moved to its rear mounting. It is
recommended that a technician or competent person only does this.
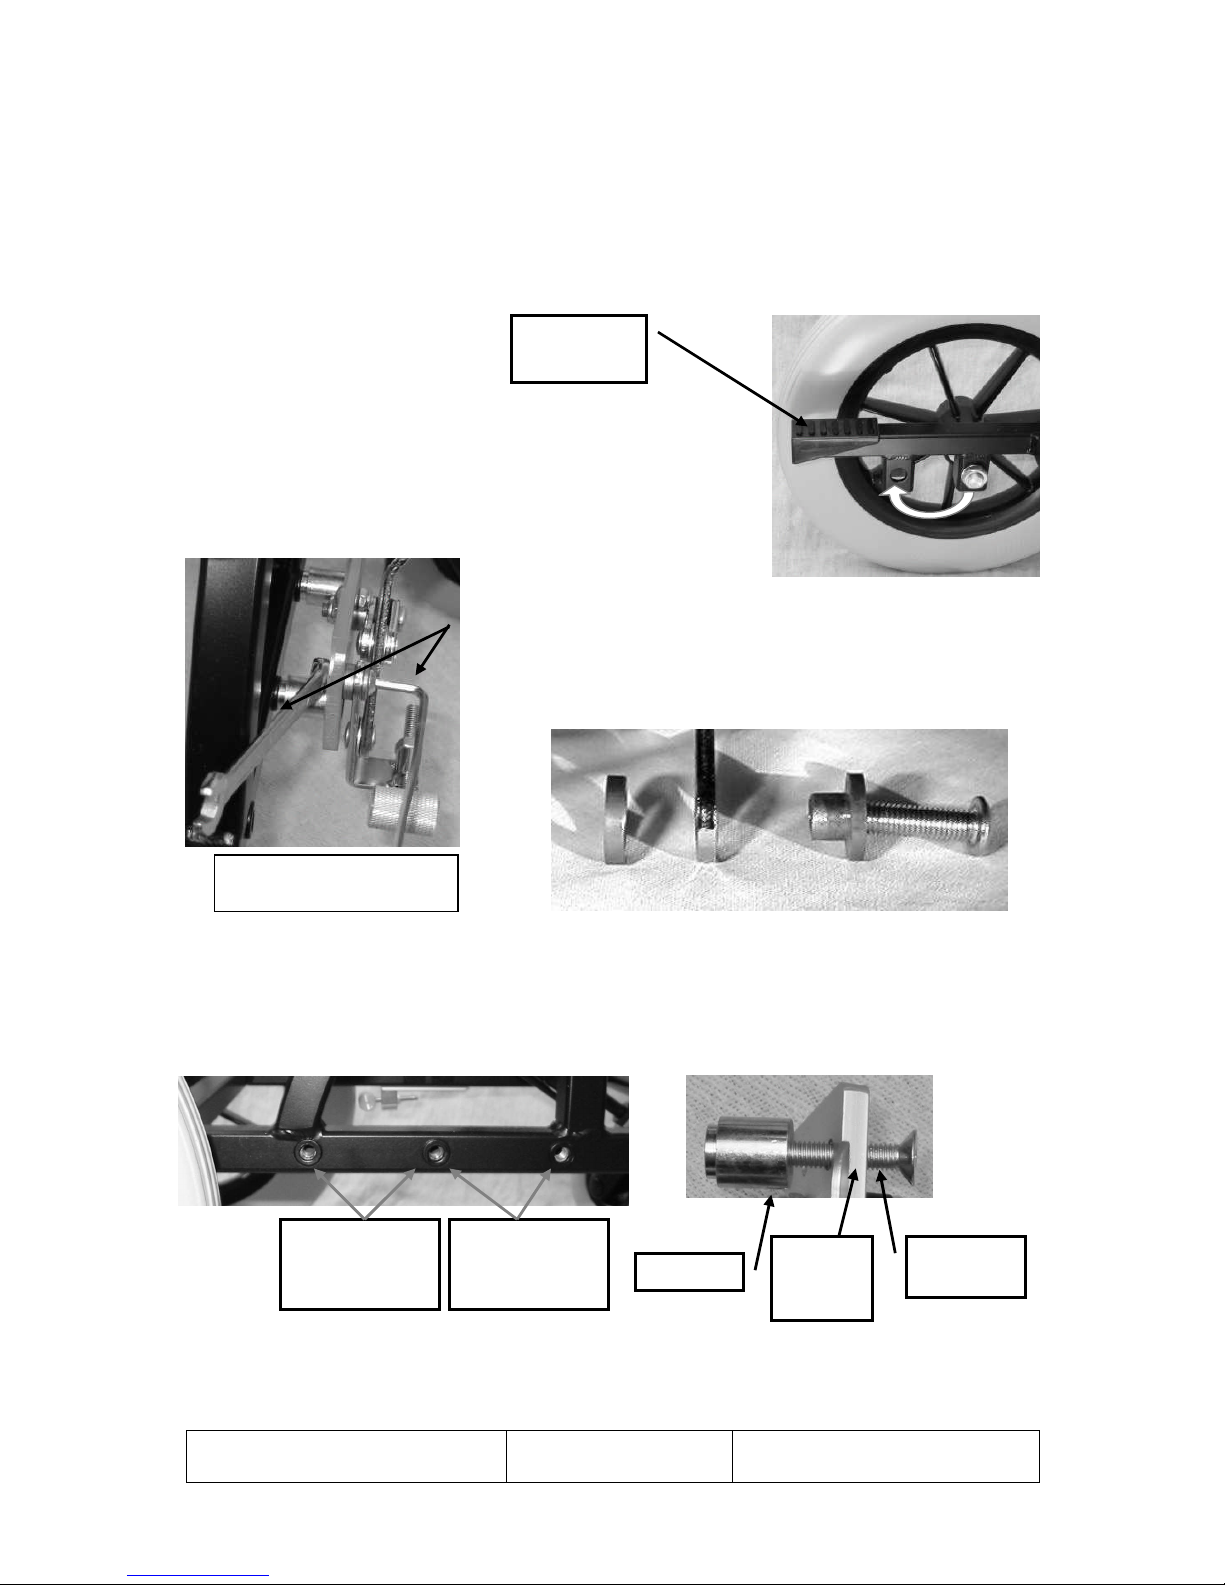
Using two 19mm spanners undo the axle-mounting nut. Make
sure you note the position of the washer. Move the wheel to
the rear hole refit the washer, apply Loctite to the threads refit
the nut and tighten. (See picture opposite).
To move the brake assemblyuse a 3 mm hexagon key and 8
mm spanner to remove the rear brake linkage screw making a
note of the position of the spacers. (See photographs opposite
and below).
Using a 4 mm hexagon key remove the two back-plate retaining screws and move the plate
back so that its fixing screws fit the into the two rear holes on the wheelchair frame. Refit the
screws making sure that the washer and spacer is correctly positioned. (See Photographs
below).
Finally adjust the brakes as described in section 4.5 above.
TIPPING
FIXING
SCREW
BRAKE
BACK
PLATE
Page 10
Tendercare Ltd
Mini Tilt Wheelchair User Manual
Mini Tilt Wheelchair User Manual v2
Authority. Quality Controller
Authorised by, J Adams
Page 10 of 15
November 05
4.7 Tipping the Wheelchair
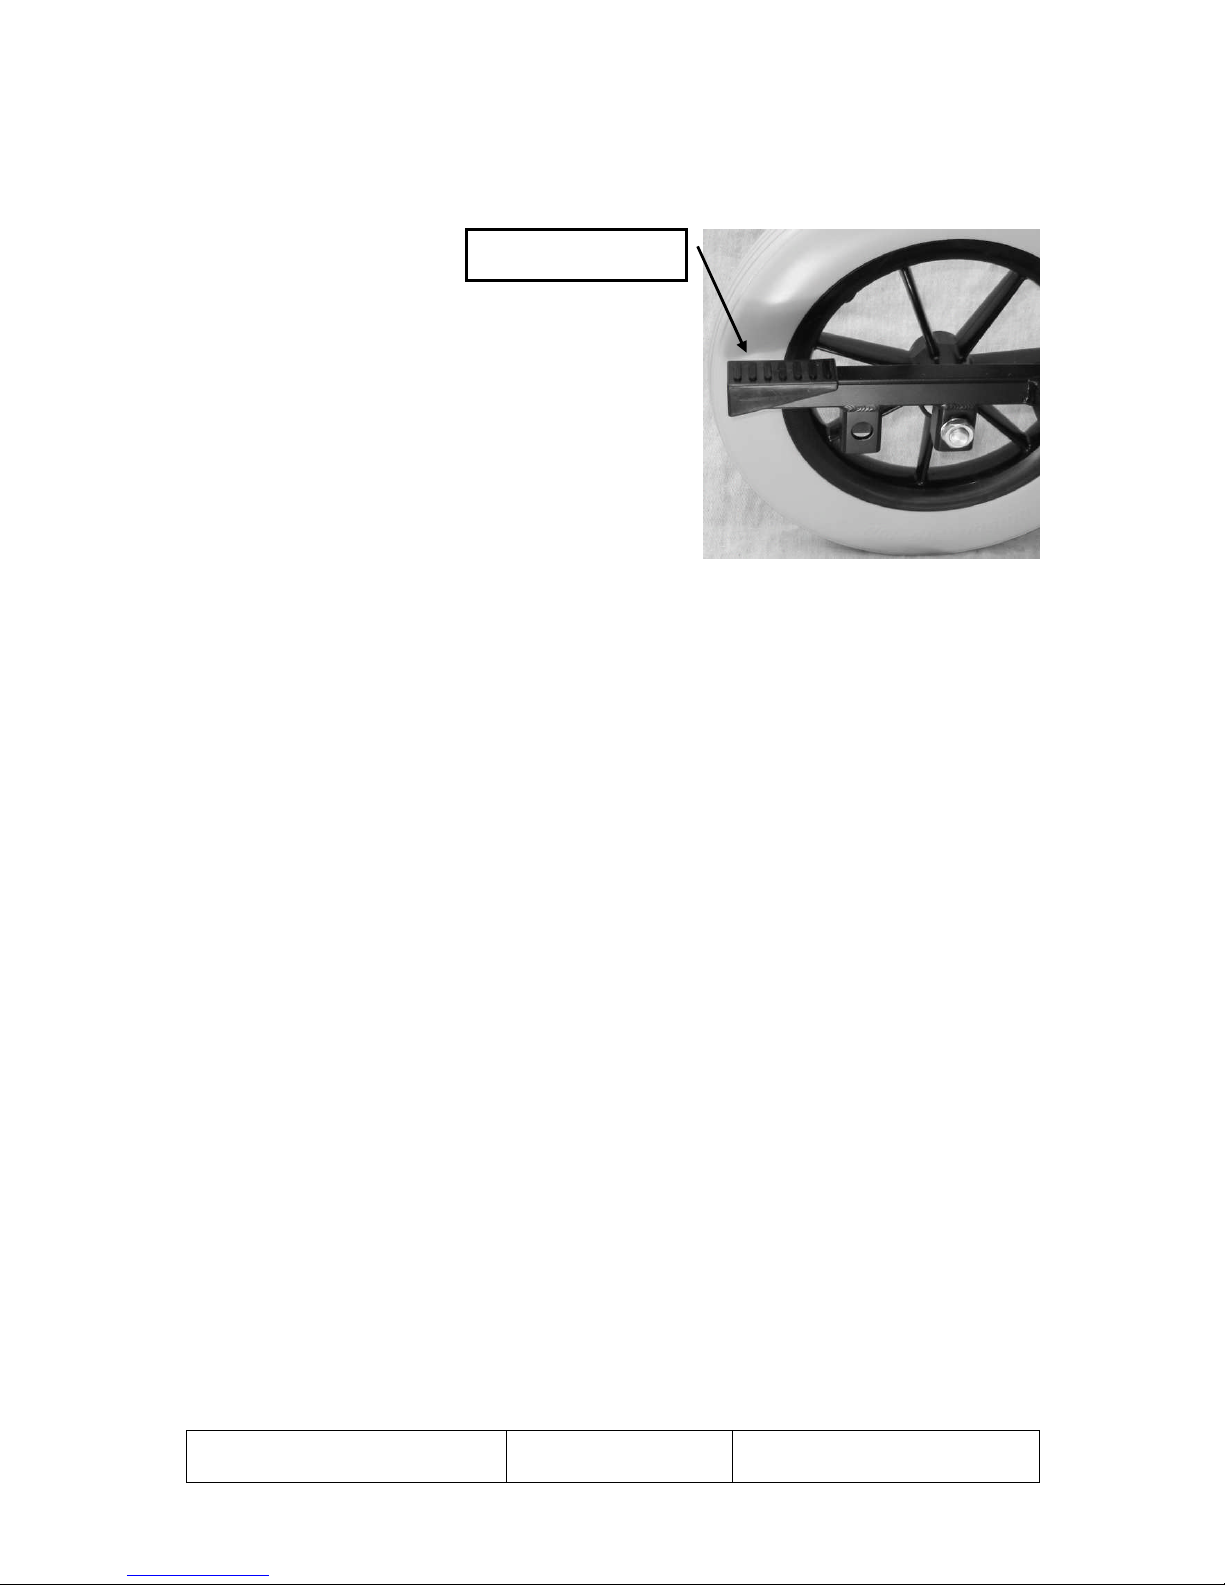
To tip the wheelchair backwards when climbing kerbs
stand behind the wheelchair holding onto both push
handles. Place one foot, either the right or left
whichever suits you, onto the tipping lever as shown in
the picture opposite. Press down with your foot and
pull back with your arms. The front of the chair will
lift.
IMPORTANT: - Take great care when doing this to avoid the combined weight of
the wheelchair and occupant overcoming your strength and tipping
back onto you. Never try to tip the wheelchair if the occupant is
much heavier than you are.
5. User Instructions
5.1 Getting into the wheelchair
1) Put the brakes on.
2) Lift the footplates.
3) Lower yourself onto the seat using the armrests for support.
4) Lower footrest into place and rest your feet on them.
5.2 Getting out of the wheelchair
1) Put the brakes on.
2) Lift footrests.
3) Place arms on armrests.
4) Slowly push yourself up to a standing position.
5.3 Sideways Transfer
1) Put the brakes on.
2) Lift footplates and put feet on the ground.
3) Lift off armrest on the side you are transferring from.
4) Place transfer board from the wheelchair seat to the easy chair, bed etc.
5) Slide across the board whilst leaning slightly forwards and taking care not to move the
wheelchair or transfer board
TIPPING LEVER
Page 11

Tendercare Ltd
Mini Tilt Wheelchair User Manual
Mini Tilt Wheelchair User Manual v2
Authority. Quality Controller
Authorised by, J Adams
Page 11 of 15
November 05
6. Attendant Pushing
6.1 Pushing
1) The wheelchair is easy to push over hard, even surfaces but may be more difficult over
rough; uneven surfaces and the wheels may sink into soft ground. Never force the
wheelchair if it becomes stuck, this may cause the rear wheels to lift and the user may be
tipped out of the chair. If the wheelchair gets jammed on a stone or cracked pavement, tip
the wheelchair backwards using the tipping levers to raise the castors over the obstacle and
then proceed. On soft ground it may be easier to pull the wheelchair backwards.
2) Whenever possible avoid steep and uneven surfaces because there is a danger that the
wheelchair may tip over. If you cannot avoid difficult surfaces you must take extra care
when travelling across them.
3) Do not use the wheelchair in sandy conditions.
4) Always use two hands for pushing the wheelchair.
5) The wheelchair is steered by the front castors. Most pavements slope slightly towards the
kerb and the chair will have a tendency to curve in the downward direction towards the
road. Two hands will be needed to prevent this.
6) For the comfort of the occupant always avoid pushing too fast or making sudden fast turns,
jerking, jolting or bumping. Many occupants are liable to be affected by rough handling,
which can cause loss of confidence, discomfort or pain.
7) Avoid kerbs. Wherever possible use ramped kerbs or slopes. This will make pushing the
chair easier and safer and will be more comfortable for the occupant.
8) Avoid steep kerbs and flights of steps because of the danger of losing your grip on the
chair or of the occupant being tipped out. Always use a ramp or lift if available.
9) Always look well ahead so that you have plenty of time to avoid hazards.
10) Be considerate to other people and watch out for pedestrians who may stop or suddenly
change direction.
6.2 Brakes
1) Always put the brakes on when getting into or out of the wheelchair and when leaving the
occupied wheelchair unattended.
2) To avoid making flat sections on the tyres never store the wheelchair with the brakes on for
long periods i.e. overnight or during storage.
Page 12

Tendercare Ltd
Mini Tilt Wheelchair User Manual
Mini Tilt Wheelchair User Manual v2
Authority. Quality Controller
Authorised by, J Adams
Page 12 of 15
November 05
6.3 Comfort
1) Always be considerate to the occupant
2) Before setting out on a journey make sure the occupant is comfortably and correctly seated
and that any safety straps of harnesses are correctly adjusted and used. Always ensure that
both feet are on the footrests and that clothing is tucked in and cannot catch on the wheels.
3) Remember the occupant is in front of you. They will want to be part of your conversations
and interests. Also their view will be different to yours when it comes to looking into shop
windows, etc. it can be extremely frustrating to hear an exciting bargain being discussed
when it is situated somewhere behind the wheelchair occupant’s ear, and thus, out of sight.
6.4 Lifting and general safety
1) The wheelchair is designed to be used by one person only. Never allow children to play
on the wheelchair or stand on the footrests or tipping levers. Never hang anything such as
bags on the push handles. If you do, there is a danger of the wheelchair tipping backwards.
2) Never try to lift the wheelchair when the user is sitting in it.
3) For your own safety and good practice never lift the empty wheelchair until it has been
properly folded. Always use good lifting practice.
7. Cleaning
1) Whenever the wheelchair gets dirty it should be cleaned using a damp cloth and then dried
thoroughly.
2) For more stubborn stains wipe with a damp cloth using a mild solution of warm water and
soap.
3) Never use furniture polish or spirit to clean the frame.
8. Maintenance
8.1 Routine maintenance
The user or their family can easily carry out the following tasks. No tools are required.
1) Always wipe the wheelchair dry. Never put it away damp.
2) Check all four-push-handle retaining knobs are in place and are hand tight (daily).
3) Check brake operation (weekly).
4) Check operation of tilt mechanism (weekly).
5) Clean frame when necessary (we suggest at least once a week).
Page 13

Tendercare Ltd
Mini Tilt Wheelchair User Manual
Mini Tilt Wheelchair User Manual v2
Authority. Quality Controller
Authorised by, J Adams
Page 13 of 15
November 05
8.2 Six monthly maintenance
Someone who is a competent tradesman or repairer should only carry out this work. If a
major fault is found stop using the wheelchair until it has been corrected.
1) Examine the frame for any damage. If frame is damaged DO NOT use the wheelchair until
it has been repaired.
2) Examine upholstery for wear and arrange for replacement if necessary.
3) Examine nuts, bolts, pivots and frame plugs for tightness and general condition.
4) Examine push-handle retaining knobs and check they are hand tight.
5) Examine brake assemblies for wear, damage and adjustment.
6) Examine tilt mechanism and check operation of reclining mechanism.
7) Examine front castors for free rotation of castor assembly and wheel. Check rear wheels
for free rotation.
For all other repairs refer to your issuing authority or Tendercare Ltd.
9. Warranty
1) Tendercare undertakes to repair or replace free of charge, any parts or part found to be
defective due to manufacturer within a period of 12 months from the date of delivery.
2) Tendercare Limited will not repair or replace free of charge any part or parts found to be
defective due to abuse, misuse or lack of correct maintenance.
3) Equipment for warranty claims should be returned in a strong carton. There may be a
charge for collection. Contact customer service department on 01903 726161.
10. Transporting
The Mini Tilt wheelchair can be transported in the luggage boot of a motorcar.
The Mini Tilt wheelchair has been successfully impact tested against International Standard
ISO7171-19 and may be used as a vehicle seat.
When used as a vehicle seat the following instructions must be followed.
The front of the wheelchair must be facing towards the front of the vehicle. (In the
direction of travel).
The seat must be in the most upright or mid reclined position.
Page 14
Tendercare Ltd
Mini Tilt Wheelchair User Manual
Mini Tilt Wheelchair User Manual v2
Authority. Quality Controller
Authorised by, J Adams
Page 14 of 15
November 05
If a seat cushion is used this must be attached to the wheelchair backrest. (This is
necessary to prevent the cushion from moving and allowing the occupant to “submarine”
under the seat belt).
The wheelchair must be attached to a vehicle using a 4-Point wheelchair restraint
that complies with ISO 10542, SAE2249 or DIN7507/2. No other restraint system can
be used.
A trained person should only attach the restraints.
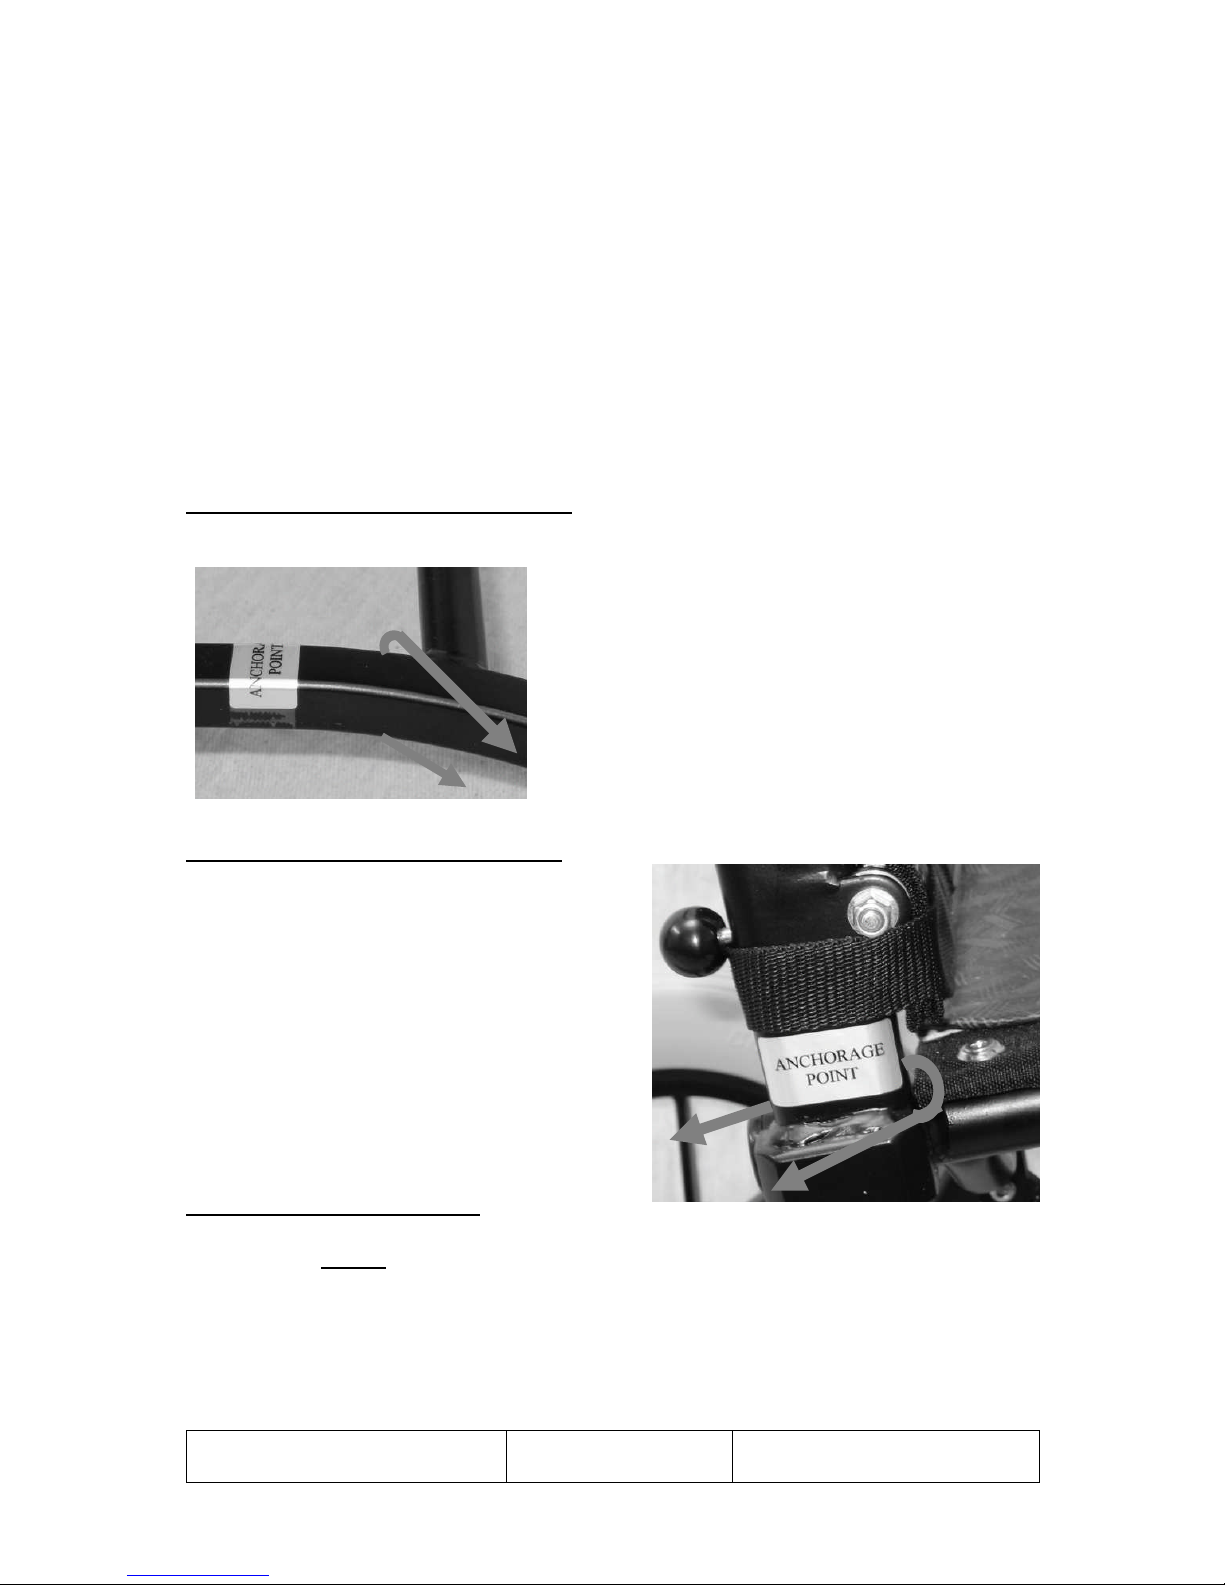
The restraint anchorage points are marked on the wheelchair with silver labels as shown in
the photograph below.
Front Restraint Location Point
The front restraint must be attached to front frame
behind the cross tube with the webbing passing over
the side tube. (See picture opposite).
Rear Restraint Location Point
The rear restraint must be fitted around the
backrest tube just above the joint of the backrest
with the upper side frame i.e. between the seat
and backrest upholstery. (See picture opposite).
Important: - In addition to securing the
wheelchair the occupant must always be
restrained by an approved vehicle belt providing
lap and over the shoulder protection.
Fitting Passenger Belts
The passenger MUST be restrained using an approved vehicle safety belt. Tendercare Ltd
recommends the use of either a split reel double inertia seat belt or 3-point occupant restraint
system. (Such restraints are manufactured by Unwin Safety Systems & Q’Straint).
Alternatively the user may be transferred to an approved vehicle seat and the wheelchair
folded and placed safely in the luggage area of the vehicle.
Page 15

Tendercare Ltd
Mini Tilt Wheelchair User Manual
Mini Tilt Wheelchair User Manual v2
Authority. Quality Controller
Authorised by, J Adams
Page 15 of 15
November 05
A trained person should only attach the restraints.
Important Points.
In an emergency press the quick release buckles
1) The lap strap must be located as low down over the hips as possible. It must not cross
the stomach of the passenger.
2) Adjust the shoulder strap/s so that it does not press against the passenger’s neck but
passes over middle of the shoulder.
Warnings: -
The Mini Tilt Wheelchair should only be secured in vehicles using a 4-point webbing restraint
system that complies with ISO 10542 Part 2, SAE2249 or DIN 75078/2. NO other
restraint system can be used.
Any item involved in an accident no matter how minor MUST BE WITHDRAWN FROM
SERVICE IMMEDIATELY AND REPLACED.
11. Repairs
1) Repairs; for all repairs contact your issuing authority.
2) Major repairs; for all major repairs e.g. bent or damaged frame, the equipment should be
returned to the factory. Contact Tendercare Ltd customer services on 01903 726161.
3) An approved agent may carry out the following repairs and replacements. A workshop
manual is available to repairers.
Brake adjustment, replacement of front castors; rear wheels, armpads, seat and
backrest upholstery, gas strut and interconnecting cables.
Important Points
1) Do not reuse Nyloc nuts. Always replace with a new Nyloc nut.
2) Always use Loctite thread locking compound Grade 241.
3) Always use recommended components and parts available from Tendercare Ltd.
4) Do not modify or repair the frame
 Loading...