

Page 1

Cloud Wheelbase and Interface Workshop Manual
Document No: 057-02 v1a Page 1 of 32 July 2018
Cloud Wheelbase and Interface Workshop Manual.doc
Cloud®
WHEELBASE AND INTERFACE
WORKSHOP MANUAL
IMPORTANT
Please read these instructions carefully before using the Wheelbase or
Interface. In addition, we have a YouTube channel (link:
https://www.youtube.com/channel/UCDafsIXX5Pi0QcgREZZoxbg/featured)
with a series of ‘How to guides’ to provide a visual demonstration. Please
note that these videos are not a substitute for reading your manual.
Page 2
Cloud Wheelbase and Interface Workshop Manual
Document No: 057-02 v1a Page 2 of 32 July 2018
Cloud Wheelbase and Interface Workshop Manual.doc
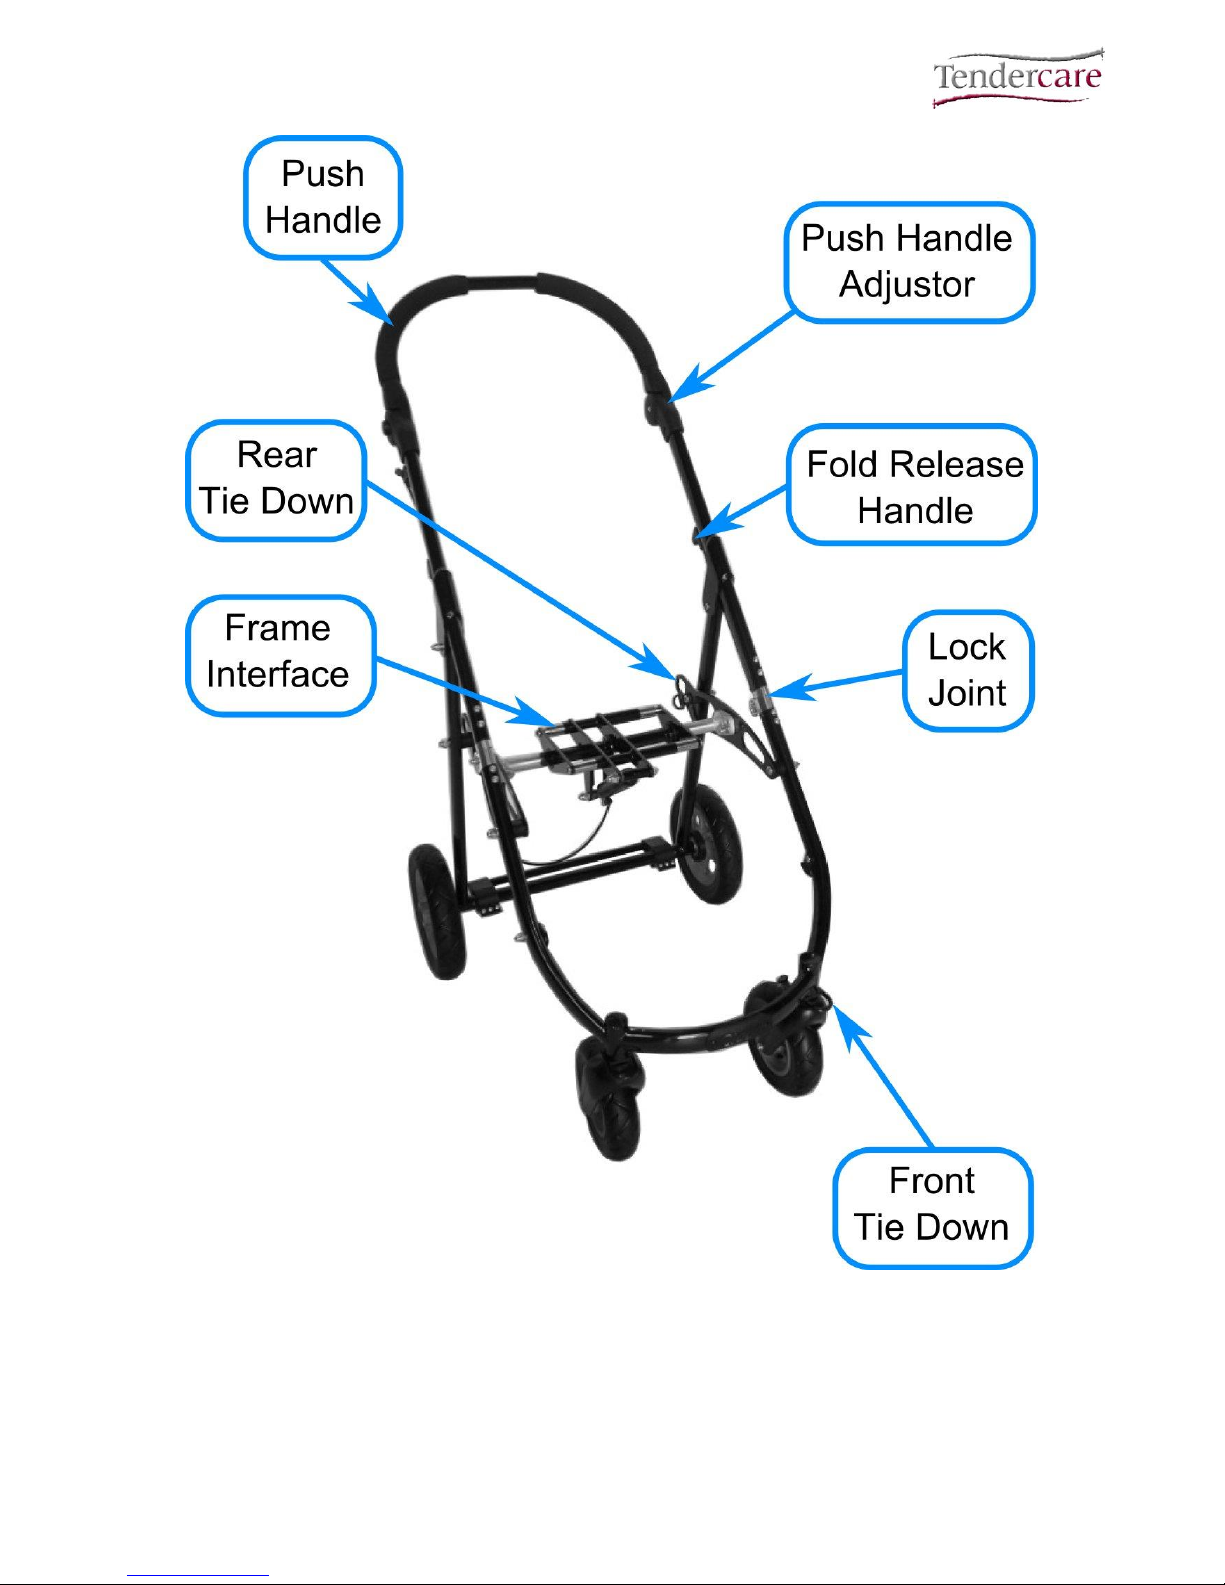
Fig 0.1 Cloud Chassis Front View
Page 3
Cloud Wheelbase and Interface Workshop Manual
Document No: 057-02 v1a Page 3 of 32 July 2018
Cloud Wheelbase and Interface Workshop Manual.doc
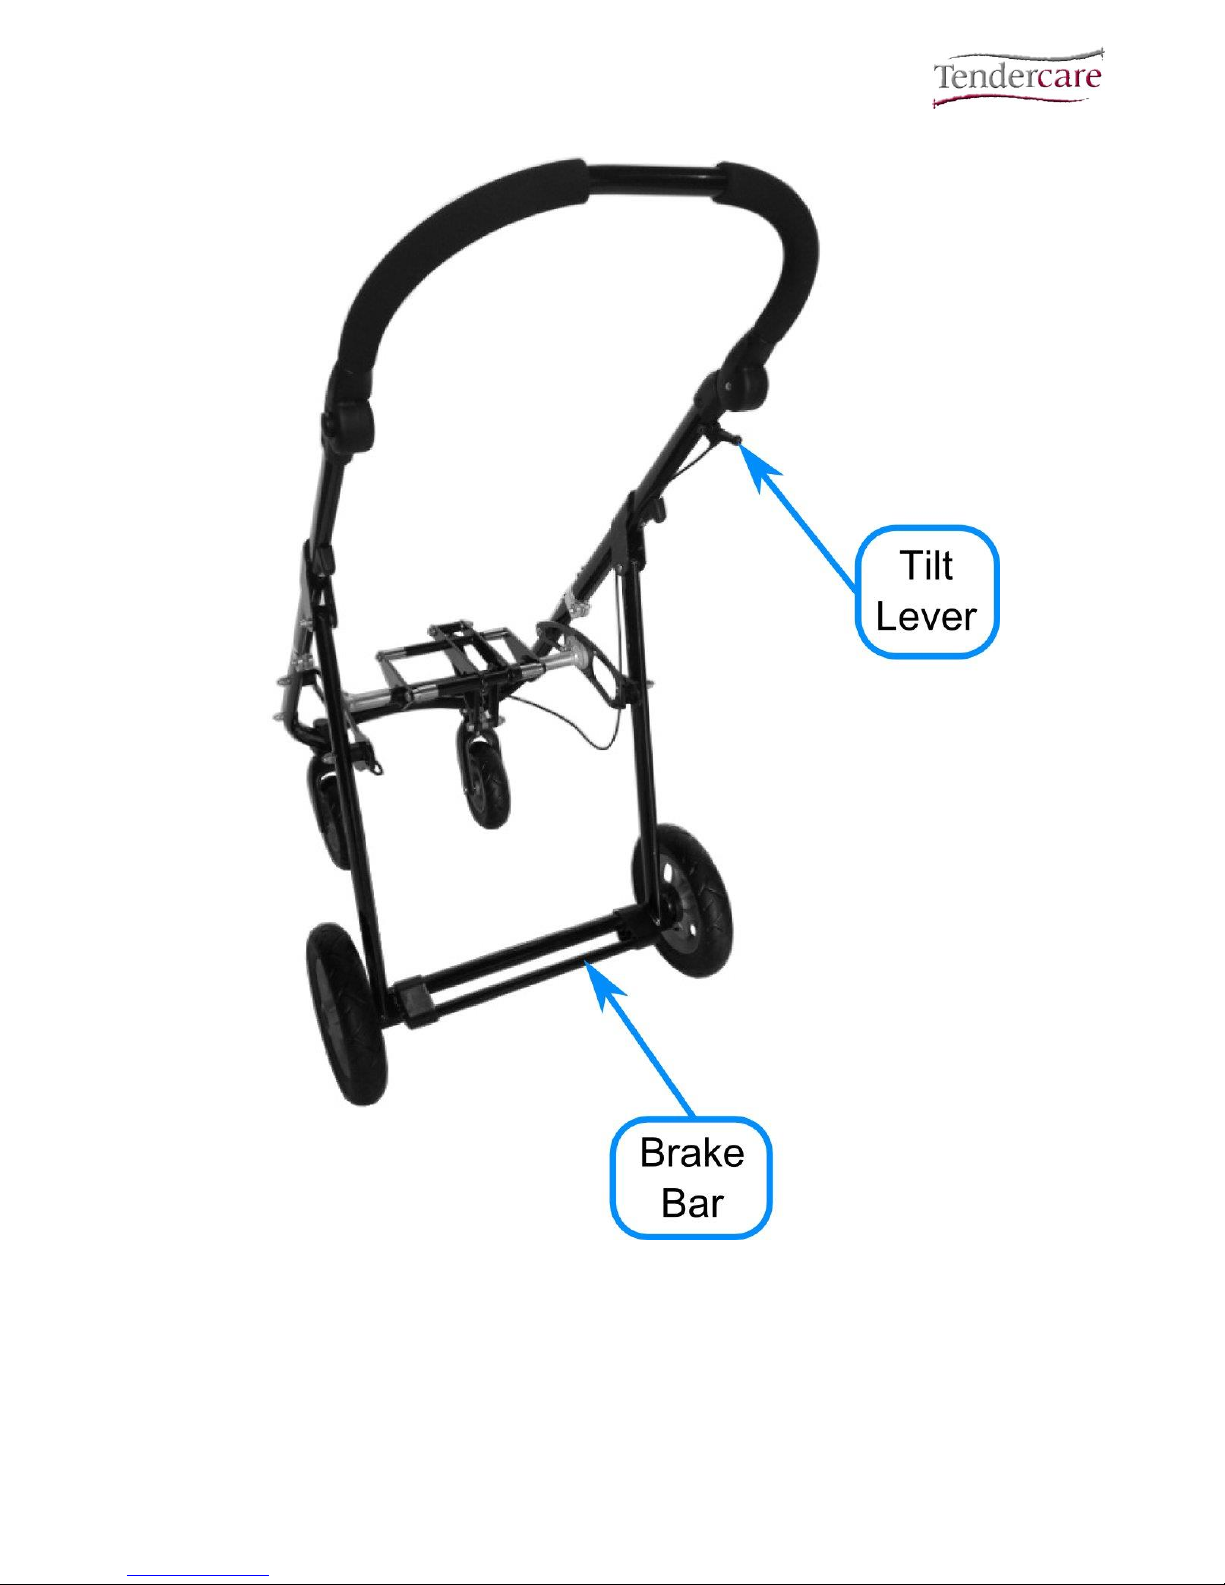
Fig 0.2 Cloud Chassis Rear View
Page 4

Cloud Wheelbase and Interface Workshop Manual
Document No: 057-02 v1a Page 4 of 32 July 2018
Cloud Wheelbase and Interface Workshop Manual.doc
Fig 0.3 Cloud Chassis Folded
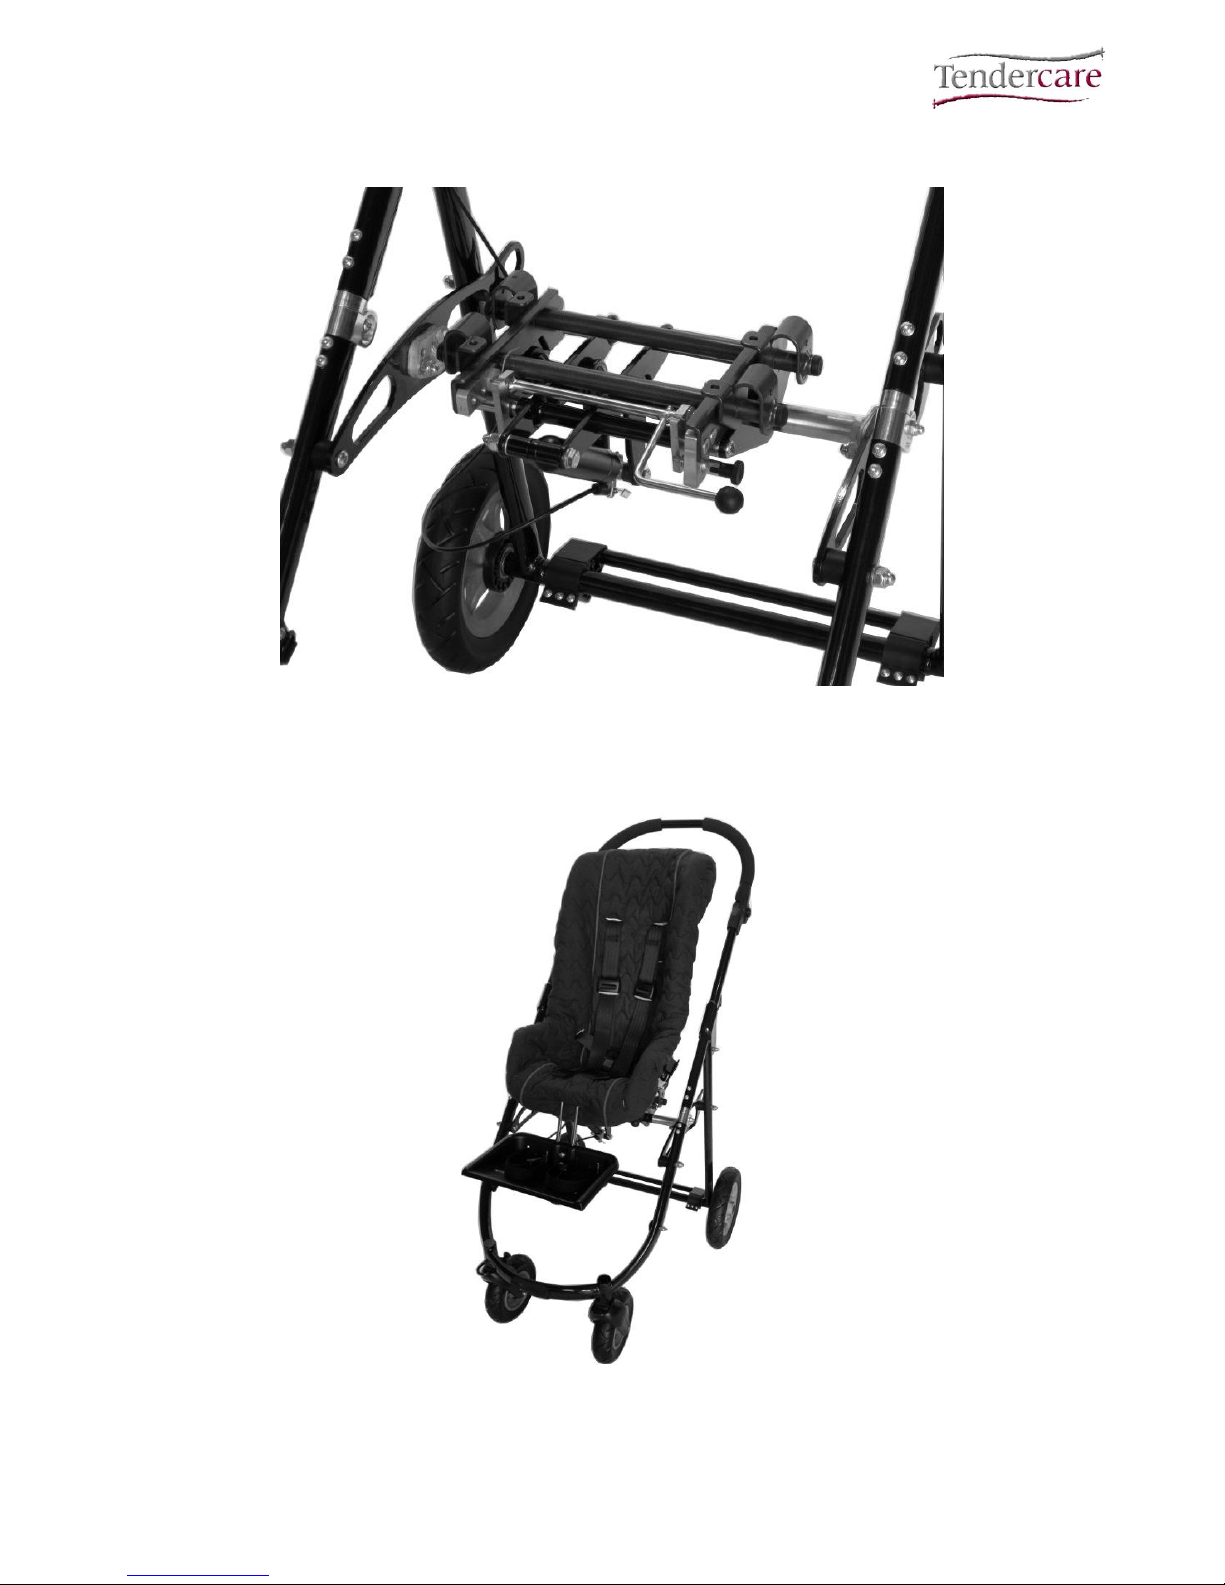
Fig 0.4 Seat Interface
Interface Clips
Page 5
Cloud Wheelbase and Interface Workshop Manual
Document No: 057-02 v1a Page 5 of 32 July 2018
Cloud Wheelbase and Interface Workshop Manual.doc
Fig 0.5 Interface Fitted To Frame
Fig 0.6 Cloud Chassis with Snug Seat
Page 6
Cloud Wheelbase and Interface Workshop Manual
Document No: 057-02 v1a Page 6 of 32 July 2018
Cloud Wheelbase and Interface Workshop Manual.doc
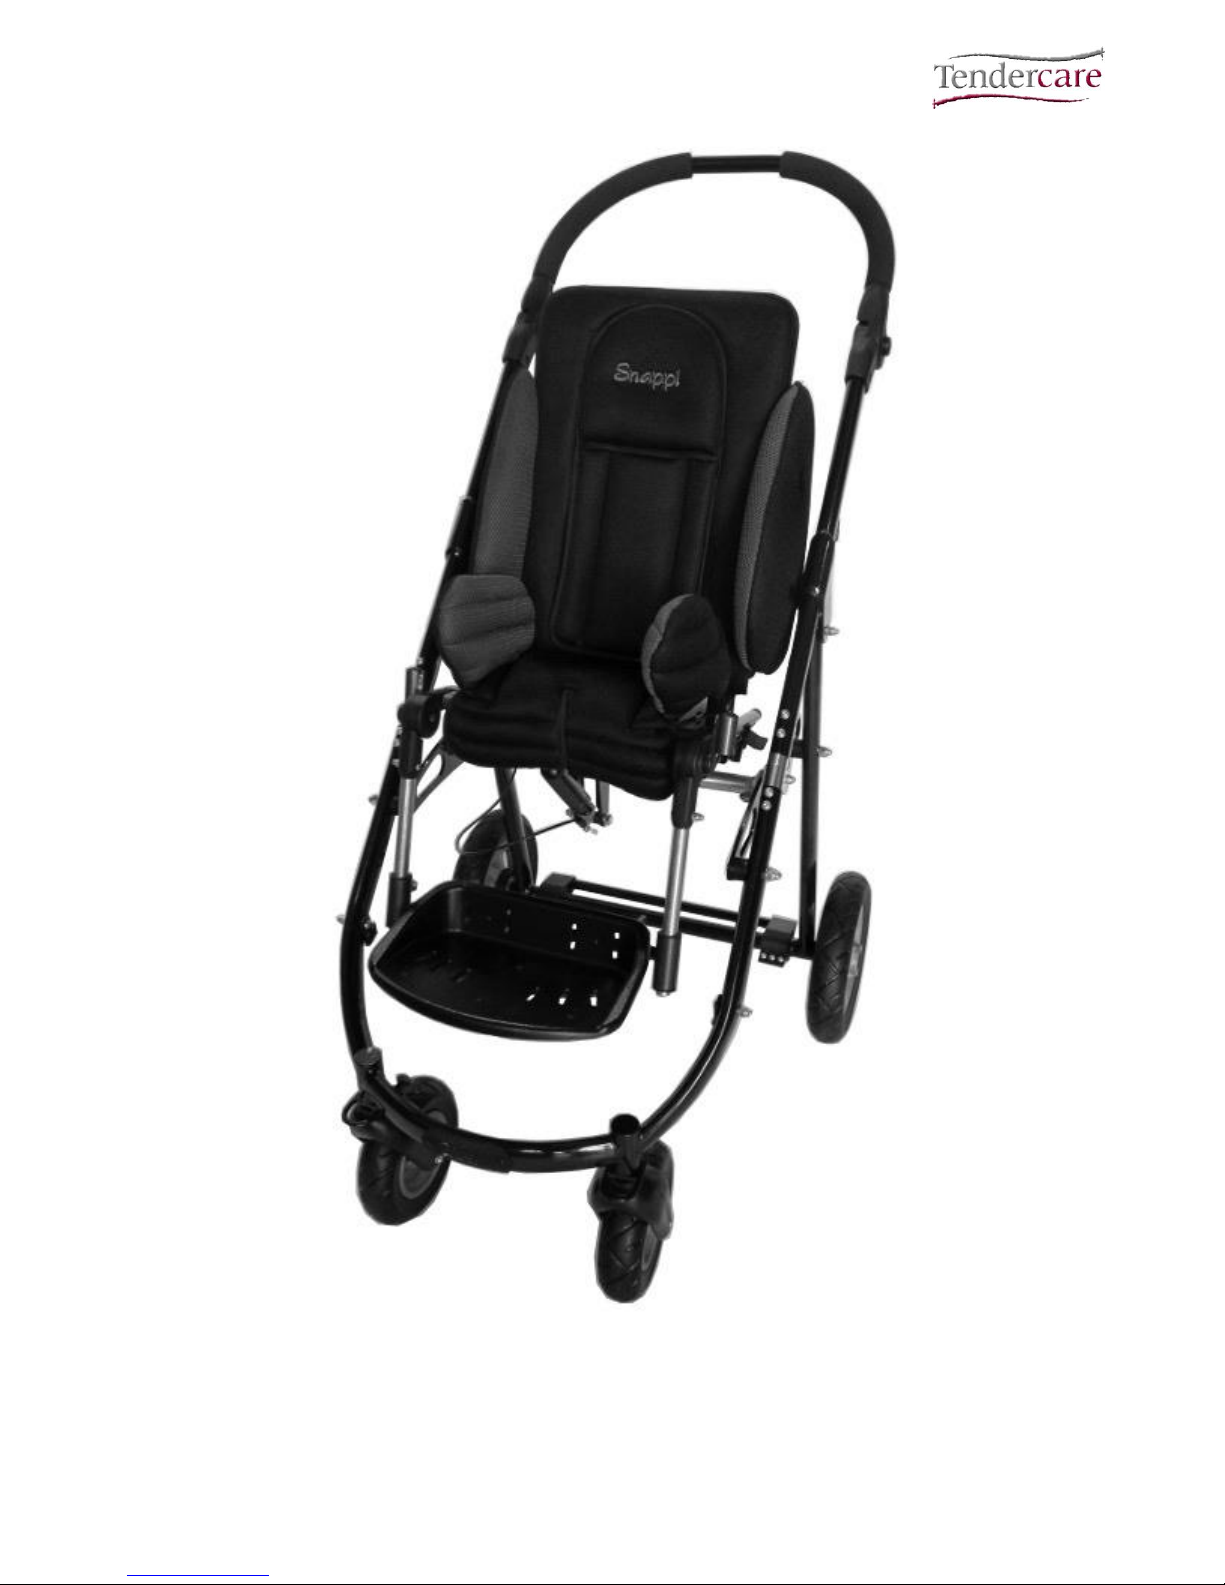
Fig 0.7 Cloud Chassis with Snappi Seat
Page 7

Cloud Wheelbase and Interface Workshop Manual
Document No: 057-02 v1a Page 7 of 32 July 2018
Cloud Wheelbase and Interface Workshop Manual.doc
CONTENTS
Item
Description
Page
1
Your Cloud Wheelbase and Interface Workshop Manual
8 – 9
2
Transit Packaging
10
3
Tools & Torque Settings
11
4
Preparing for use and operation
11
4.1 Unfolding the frame
11
4.2 Pin Brakes
11
4.3 Tilt In Space
12
4.4 The Interface
12
5
Fitting Special Seat
13 – 14
6
Final Checks
14
7
Maintenance
14
7.1 Routine maintenance
14
7.2 Six monthly maintenance
15
8
Repairs
16
8.1 Rear wheels
17
8.2 Castor assembly
18
8.3 Pin Brake Assembly
19 – 23
8.4 Mid Section & Gas Strut
23 – 24
8.4.1 Change the end fittings on the gas spring cable
24 – 26
8.4.2 Replace the tilt cable, leaving the release lever in place
26 – 27
8.4.3 Replace the tilt cable and release lever assembly
28
8.5 The Interface
28 – 29
8.6 Replace Push Handle Adjustors
30 - 31
9
Cleaning
32
10
Parts Lists
32
Page 8

Cloud Wheelbase and Interface Workshop Manual
Document No: 057-02 v1a Page 8 of 32 July 2018
Cloud Wheelbase and Interface Workshop Manual.doc
1: Your Cloud Wheelbase / Interface Workshop Manual
The purpose of this manual is to help you get the best from your wheelbase & interface. It
does this by telling you how to complete those maintenance and repair tasks that can be
carried out by a competent person. The manual also tells you when you should contact the
manufacturer who is:
Tendercare Ltd.
PO BOX 3091, Littlehampton, BN16 2WF
Tel: (01903) 726161 Fax: (01903) 734083
Email: [email protected]
Web: www.tendercareltd.com
IMPORTANT:
This manual must be read and used in conjunction with the user manual.
The Wheelbase is made of a strong and lightweight aluminium alloy. The wheelbase
provides a tilt in space facility and has 2 fixed rear wheels and 2 castor wheels at the front
for easy steering. The wheelbase comes in two sizes with corresponding interfaces to suit
a range of different seats.
The Interface provides a lightweight, easy to operate, quick release system that can be
fitted to a wide range of special seating systems. Please note the interface requires
additional framework to fit to a seat and has been designed to take 19mm (3/4”) aluminium
or mild steel tube.
The interface can be quickly fitted and released from the wheelbase, which can be folded
for transport. The Cloud has been successfully impact tested as a wheelbase and
interface with the Snappi, Snug and Modular seating systems. When fitting third party
seating systems to the Cloud, the manufacturer of the system must carry out a risk
assessment before use.
Interfacing Options:
Seat / Interface Version
Max Carry Weight (Kg)*
Maximum Seat Width (mm)
Cloud Size 1
65
380
Cloud Size 2
65
440
Important:
Maximum width i.e. the maximum space available for seating systems being
fitted into frame.
*Maximum carry weight is defined as the user weight, weight of the seating
system, plus any accessories / equipment which may be fitted or carried on
the chassis. Warning: Never exceed the maximum stated carry weight.
Frame Weight:
Size 1: 12 kg
Size 2: 13 kg
Page 9
Cloud Wheelbase and Interface Workshop Manual
Document No: 057-02 v1a Page 9 of 32 July 2018
Cloud Wheelbase and Interface Workshop Manual.doc
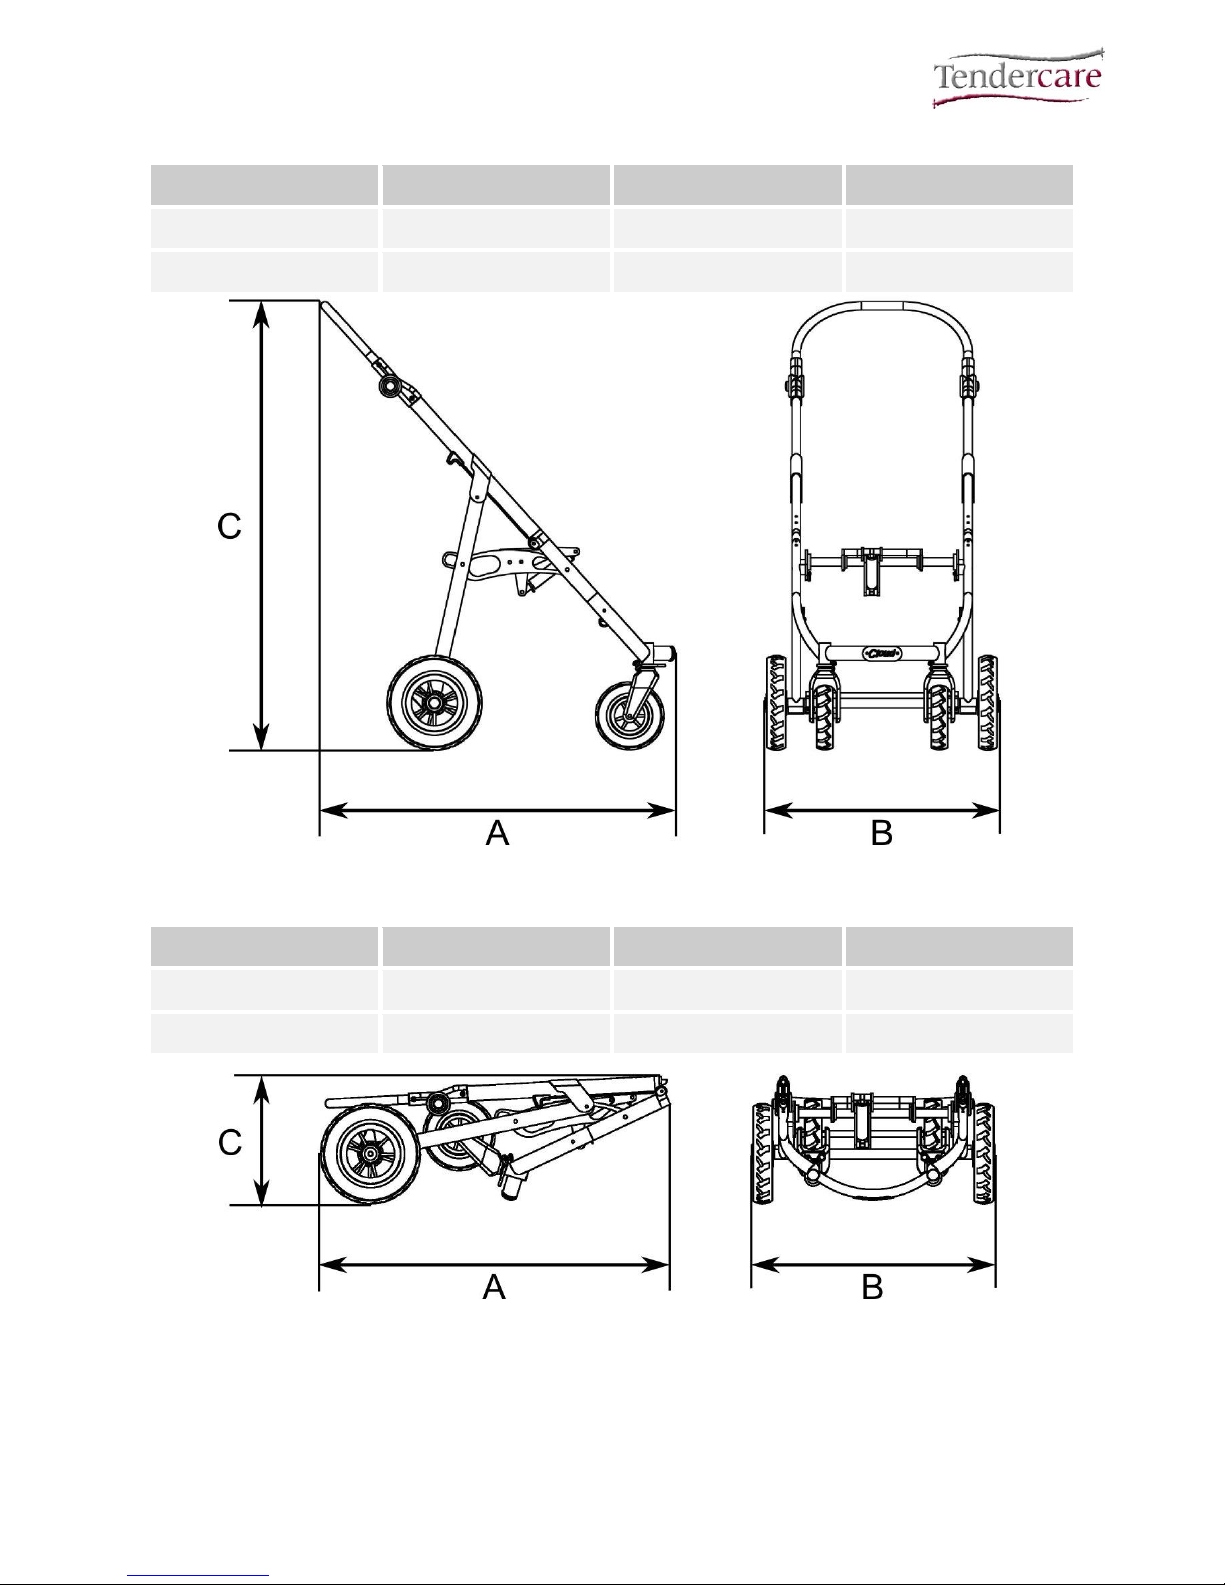
Cloud Chassis Open Dimensions (mm):
Chassis
A B C
Size 1
928
608
1182
Size 2
990
668
1219
Cloud Chassis Folded Dimensions (mm):
Chassis
A B C
Size 1
878
608
302
Size 2
913
668
330
All sizes and weights are given as a guide. Tendercare ltd reserves the right to amend
specifications at any time as part of their product development programme.
Page 10

Cloud Wheelbase and Interface Workshop Manual
Document No: 057-02 v1a Page 10 of 32 July 2018
Cloud Wheelbase and Interface Workshop Manual.doc
2: Transit Packaging
The wheelbase will be delivered in a cardboard box. This measures 680mm wide x
480mm deep x 1030mm high and weighs approximately 14kg.
WARNING:
The transit carton is quite bulky so moving and unpacking must be done with care.
Observe all lifting and handling regulations.
Stand the box upright, making sure it is supported and cannot fall over. Open the box and
remove any packing or packages, which could obstruct the removal of the wheelbase.
Now remove the wheelbase. Please note if you ordered a seat, this will be delivered in a
separate box and will have a separate user manual for operating the seat.
The carton should contain the following items:
Item
Component
QTY.
Yes
No
1
Cloud Chassis
1
2
User Manual
1
Important:
If you have ordered the Cloud with an interface; this will be supplied fitted to
the frame. The interface can easily be separated by releasing the interface
catch. Please refer to section 4.4 for more information on working with the
interface.
If any items are damaged or missing, please contact Tendercare, either by
email at [email protected], or by phoning us on (01903) 726161 within
36 hours of delivery.
After unpacking and checking you have all components and they are in good condition,
dispose of the packaging at your local recycling centre. Alternatively retain and reuse.
Page 11

Cloud Wheelbase and Interface Workshop Manual
Document No: 057-02 v1a Page 11 of 32 July 2018
Cloud Wheelbase and Interface Workshop Manual.doc
3: Tools and Torque Settings
The following tools are required to dismantle, reassemble and repair the Wheelbase /
Interface:
Spanners and sockets: 10mm, 13mm and 19mm
Hexagon Keys: 4mm, 5mm and 6mm
Torque Wrench: Range 0 to 50 Nm
Torque Settings If Not Specified
Spanner Size (mm)
Torque (Nm)
10
15
13
25
19
50
4: Preparing for use and operation
WARNING:
When opening or folding the wheelbase, ensure that you hold the frame so that you
avoid any danger of catching your fingers in moving parts.
The following pre-delivery procedures should be carried out to check that the wheelbase
and interface has not suffered damage during transit and that all features operate
satisfactorily. Refer to the user manual for detailed instructions on performing each action.
4.1 Unfolding the Frame
Unfold and assemble the frame: Follow the instructions in section 4.1 of the user manual
Checks:
Make sure all joints move freely
Make sure the frame locks latch correctly
Check that the push handle adjustors work
Ensure that all fixings are secure and that the frame has not been bent or otherwise
damaged during transit.
4.2 Brakes
Test the brakes: Follow the instructions in section 4.2 of the user manual
Checks:
Make sure the brakes work correctly
Check that the fixing bolts are secure
WARNING:
The break mechanism is spring loaded so care must be taken when operating it.
Page 12

Cloud Wheelbase and Interface Workshop Manual
Document No: 057-02 v1a Page 12 of 32 July 2018
Cloud Wheelbase and Interface Workshop Manual.doc
4.3 Tilt in Space
Test the tilt in space mechanism: Follow the instructions on section 4.3 of the user
manual.
Checks:
Make sure that the tilt lever is free to move.
Check that the centre section tilts correctly and locks throughout its adjustment
range.
Check that the 4 bolts that mount the centre section into the frame are secure.
IMPORTANT:
Always ensure any harness provided for the child is used and correctly adjusted before
reclining or returning the seat to a more upright position.
Always support the seat when tilting, as the gas springs can be quick to operate. If the seat is
not supported, is may move swiftly and could cause the occupant distress.
4.4 The Interface
Test the operation of the interface: Follow the instructions on section 4.4 of the user
manual to attach and remove the interface.
Checks:
1. Make sure that the interface frame has not been bent or damaged during transit
2. Check that the spring clips move freely and snap back to their closed position when
the lever is released
3. Make sure the interface latches down and locks securely to the frame
4. Check that the secondary latch mechanism functions correctly
5. Check that the interface releases correctly and that there is not excessive friction on
the lever when releasing it from the frame
IMPORTANT:
The interface is spring loaded, so ensure your fingers are clear of the clips before fitting.
Page 13
Cloud Wheelbase and Interface Workshop Manual
Document No: 057-02 v1a Page 13 of 32 July 2018
Cloud Wheelbase and Interface Workshop Manual.doc
5: Fitting a Special Seat
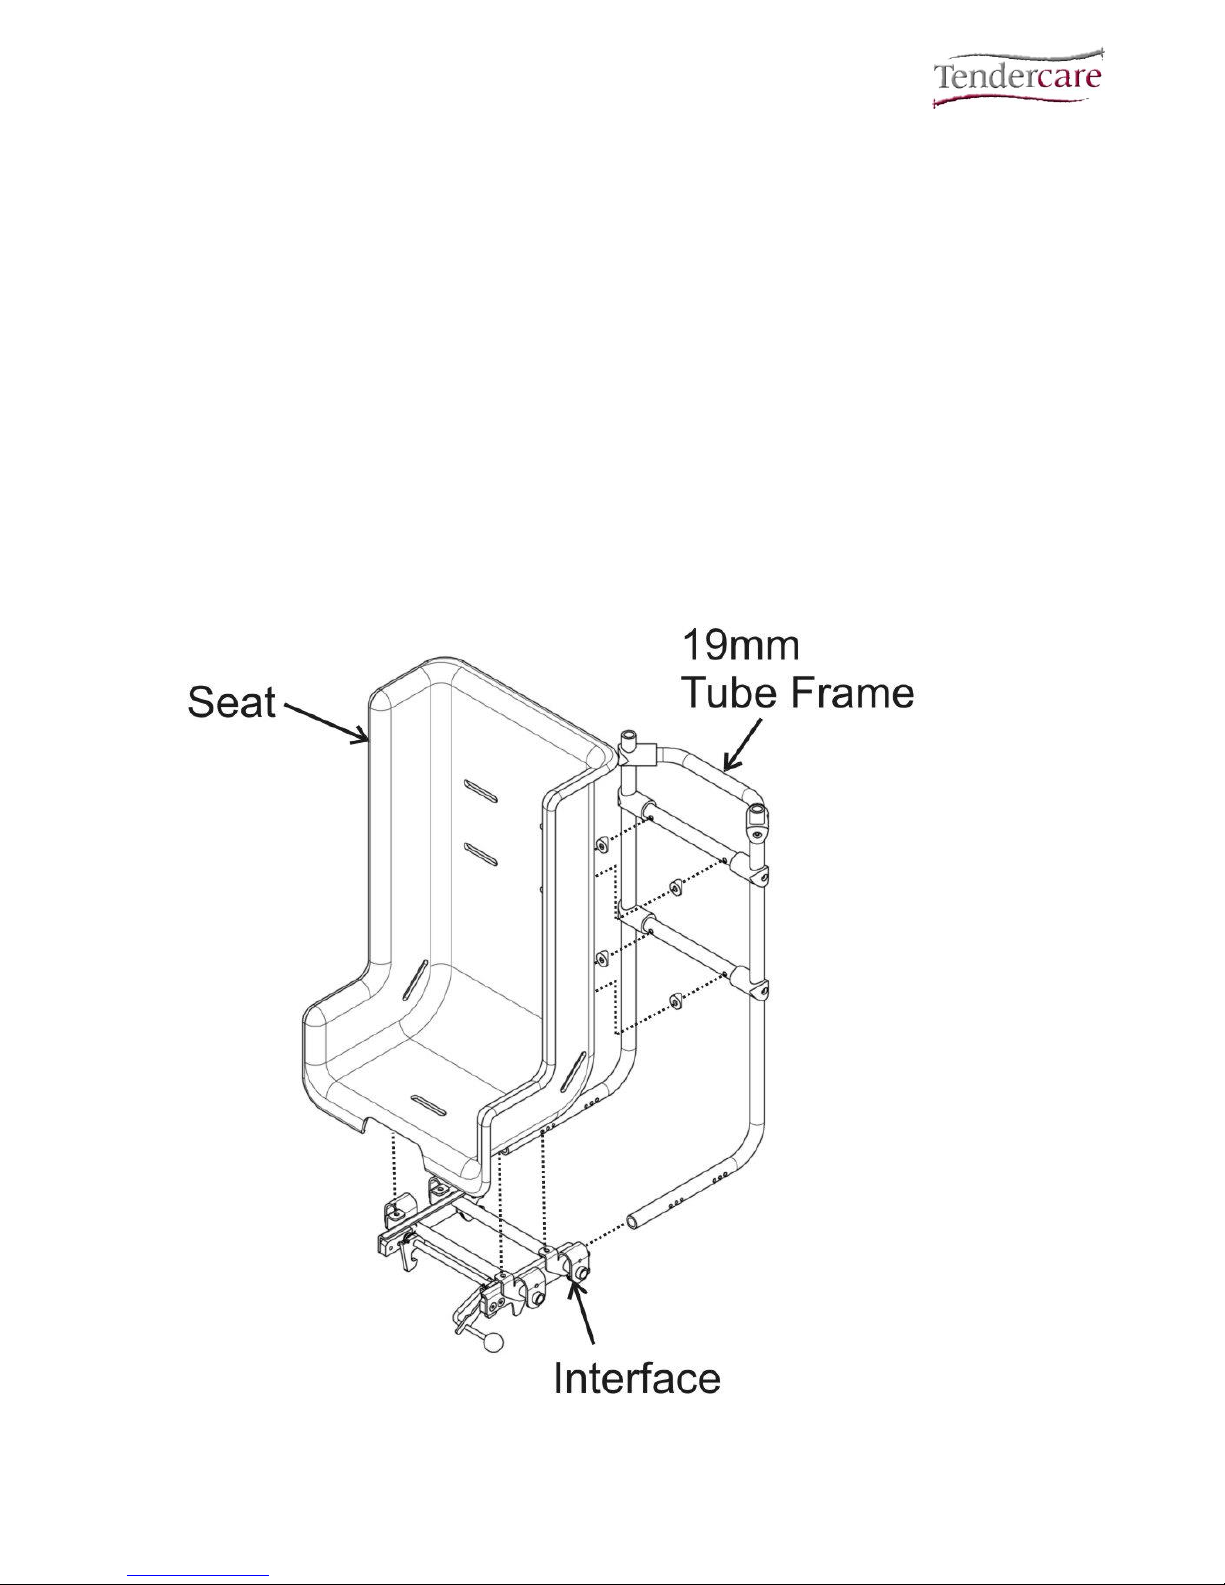
The interface is designed to bolt onto the base of a special seating system using the 4
base fixing points.
The interface should always be fitted with a suitable framework and includes 4 tube
mounting brackets that fit 19mm or ¾” aluminium or mild steel tube.
We recommend using ¾” x 10 SWG (or 19 x 3mm metric) aluminium tube in grade 6063
T6 for the frame mounting. Alternatively 16 SWG (1.6mm) mild steel tubing can be used.
Due to the wide range of different special seating systems, Tendercare do not supply
fixing brackets for these items. Please refer to the special seat manufacturers instructions.
An example set up using the interface is shown below:
Fig 5.0.1
Page 14

Cloud Wheelbase and Interface Workshop Manual
Document No: 057-02 v1a Page 14 of 32 July 2018
Cloud Wheelbase and Interface Workshop Manual.doc
Important:
The Cloud chassis has been successfully impact tested as a wheelbase and
interface with the Snappi, Snugseat and Modular seating systems. When
fitting third party seating systems to the Cloud, the manufacturer of the
seating system must carry out a risk assessment before use.
When fitting a third party seat stability may be affected. A test is necessary to
confirm that the static stability is satisfactory. A stability test to meet the
requirements of EN.ISO7176 must be completed by the commissioning
wheelchair service. This test must be passed before handover of the system.
6: Final checks
1. Check that the special seat is firmly attached to the interface and framework.
2. Check that all harnesses are secure and adjusted properly.
3. Check that the interface is located and locked correctly in the wheelbase.
7: Maintenance
Should a problem be found when carrying out the regular checks, it should be immediately
reported to the issuing authority or Tendercare Ltd.
7.1 Routine maintenance
The user’s family can easily carry out the following tasks. No tools are required.
1. Always wipe the wheelbase and seat frame dry. Never put them away damp.
2. Check all nuts, bolts, and hand wheels are tight (daily)
3. Check operation of the brake, folding, and tilt mechanisms (weekly).
4. Clean frame when necessary (we suggest at least once a week).
5. If your pushchair is fitted with pneumatic tyres, regularly check the condition of the
tyre. Ensure tyres are inflated to 36 psi (if too low use a suitable hand or foot pump,
do not use an air-line or mechanical inflator, and do not over inflate the tyre). In the
event of a puncture, you will need to purchase a set of tyre levers and a puncture
repair kit form a reputable bicycle shop. Always follow the instructions given in the
puncture repair kit.
If you find any faults refer to your issuing authority or Tendercare Ltd.
Page 15

Cloud Wheelbase and Interface Workshop Manual
Document No: 057-02 v1a Page 15 of 32 July 2018
Cloud Wheelbase and Interface Workshop Manual.doc
7.2 Six-monthly maintenance
Only someone who is a competent tradesman or repairer should carry out this work. If a
major fault is found stop using the wheelbase until it has been corrected.
1. Fold and open the wheelbase. Check that all movements through the folding
range are free. Examine frame for any damage.
2. Check operation of the wheelbase tilt in space mechanism.
3. Examine nuts, bolts, pivots and frame plugs for tightness and general condition.
4. Examine brake assembly for wear, damage and correct operation.
5. Examine tyres for sharp objects, cuts or splits.
6. Examine castor and wheel bearings for excessive wear.
7. Check castors and rear wheels for free rotation, security and accumulation of fluff
and grit. Remove any fluff and grit with a dry lint free cloth.
8. Check the Interface fits securely into the frame, and that it is not worn or damaged.
9. Check the interface clips to ensure they can rotate freely and that the springs
return the clips to the closed position when released.
10. Check the handle folding mechanism for wear, damage and correct operation.
For all other repairs refer to your issuing authority or Tendercare Ltd.
Page 16

Cloud Wheelbase and Interface Workshop Manual
Document No: 057-02 v1a Page 16 of 32 July 2018
Cloud Wheelbase and Interface Workshop Manual.doc
8: Repairs
Only an authorised repairer should carry out the following repairs.
1. Repairs: For all repairs contact your issuing authority
2. Major repairs: For all major repairs e.g. bent or damaged frame, the wheelbase /
interface should be returned to the factory. Contact Tendercare ltd, customer
services on 01903 726161, or email to [email protected]
3. Factory replacement components should be used in all repairs. These are available
from Tendercare. Please refer to the parts lists at the end of this manual (section
10) for details of replacement parts.
Important points when performing a repair:
1. Do not reuse Nylock nuts, always replace with a new nut
2. Always use Loctite thread locking compound grade 243 on all threads when
reassembling any part of the system.
3. Always use the recommended component parts available from Tendercare Ltd.
4. Do not attempt to correct bent framework or perform any modifications to welded
parts. If any main framework sections are bent or damaged please return the
product to the factory.
Page 17
Cloud Wheelbase and Interface Workshop Manual
Document No: 057-02 v1a Page 17 of 32 July 2018
Cloud Wheelbase and Interface Workshop Manual.doc
8.1: Rear Wheels
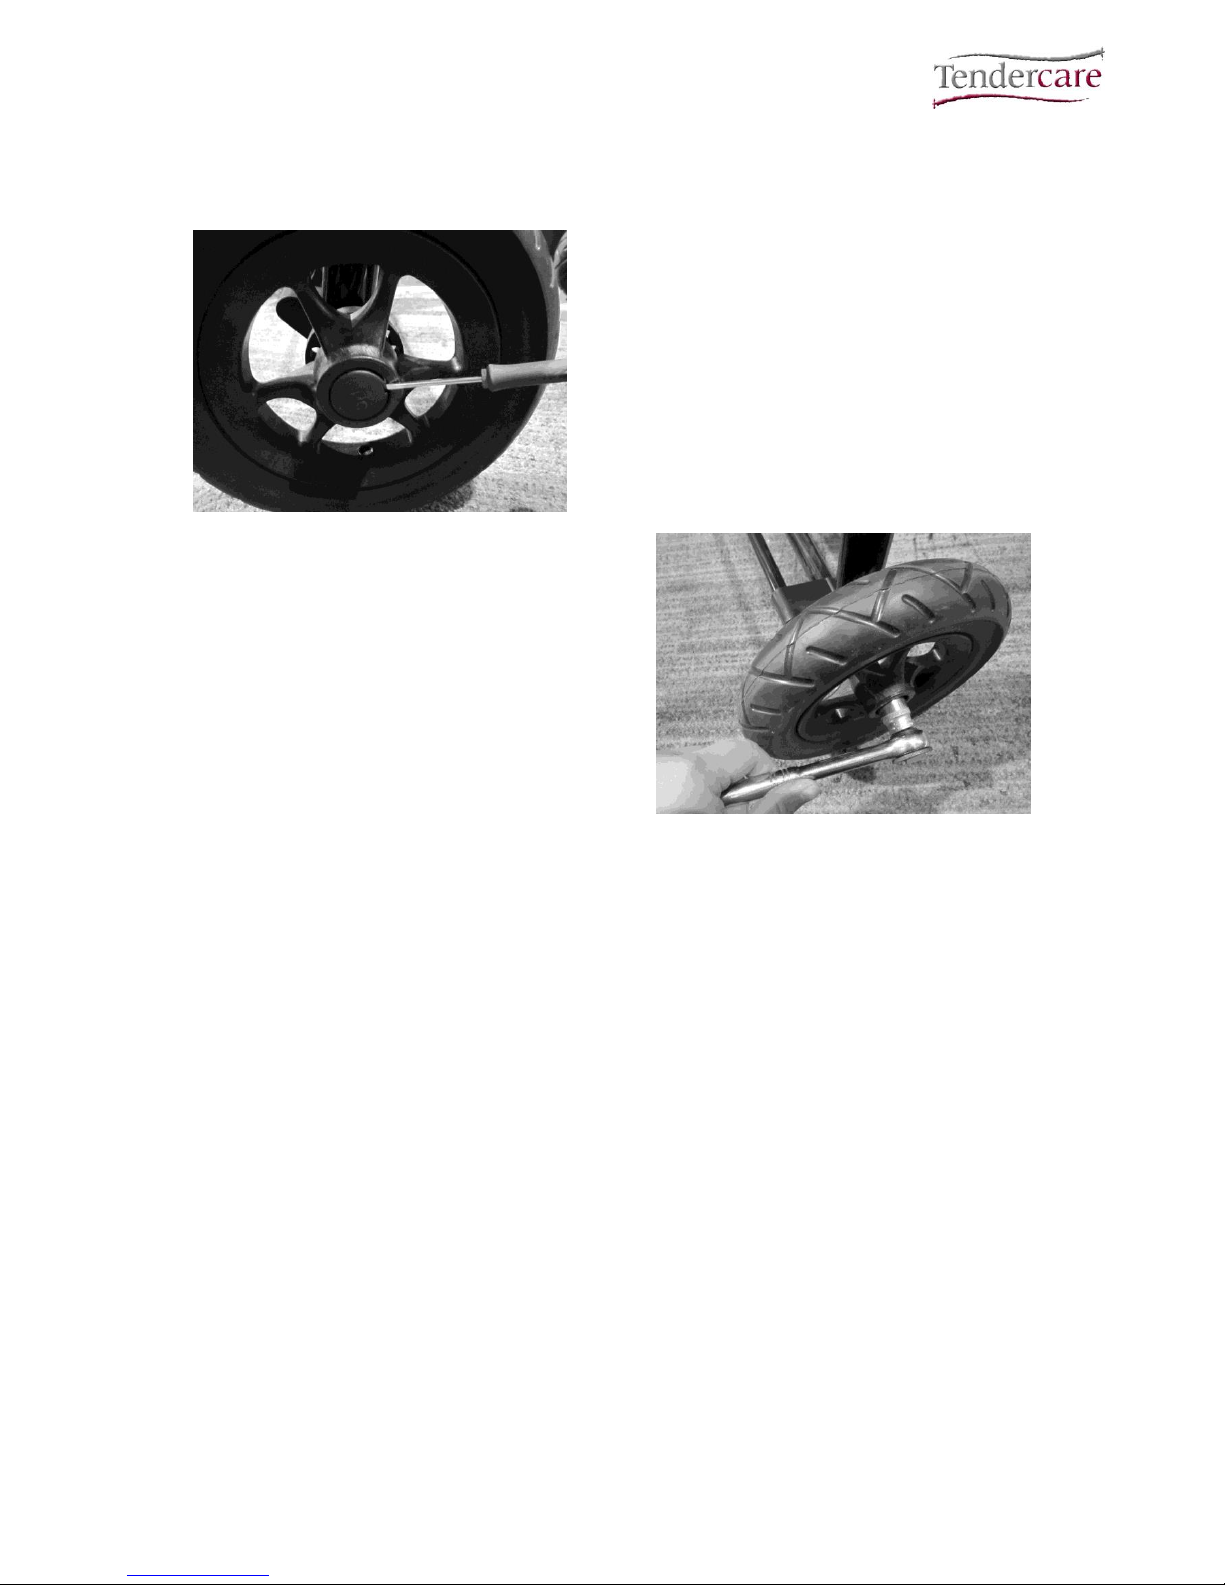
Replace if damaged or worn. To change the rear wheel:
Fig 8.1.1
Remove the wheel cap using a small
screwdriver (see fig 8.1.1 left)
Using a 19mm spanner, undo the
axle bolt and remove the wheel from
the frame (see fig 8.1.2 below)
Place the M12 bolt through the rear
wheel and into the threaded hole in
the frame.
Tighten to 35Nm with a torque
wrench
Finally push fit the wheel cap over
the bolt head.
Fig 8.1.2
Page 18
Cloud Wheelbase and Interface Workshop Manual
Document No: 057-02 v1a Page 18 of 32 July 2018
Cloud Wheelbase and Interface Workshop Manual.doc
8.2: Front Castors
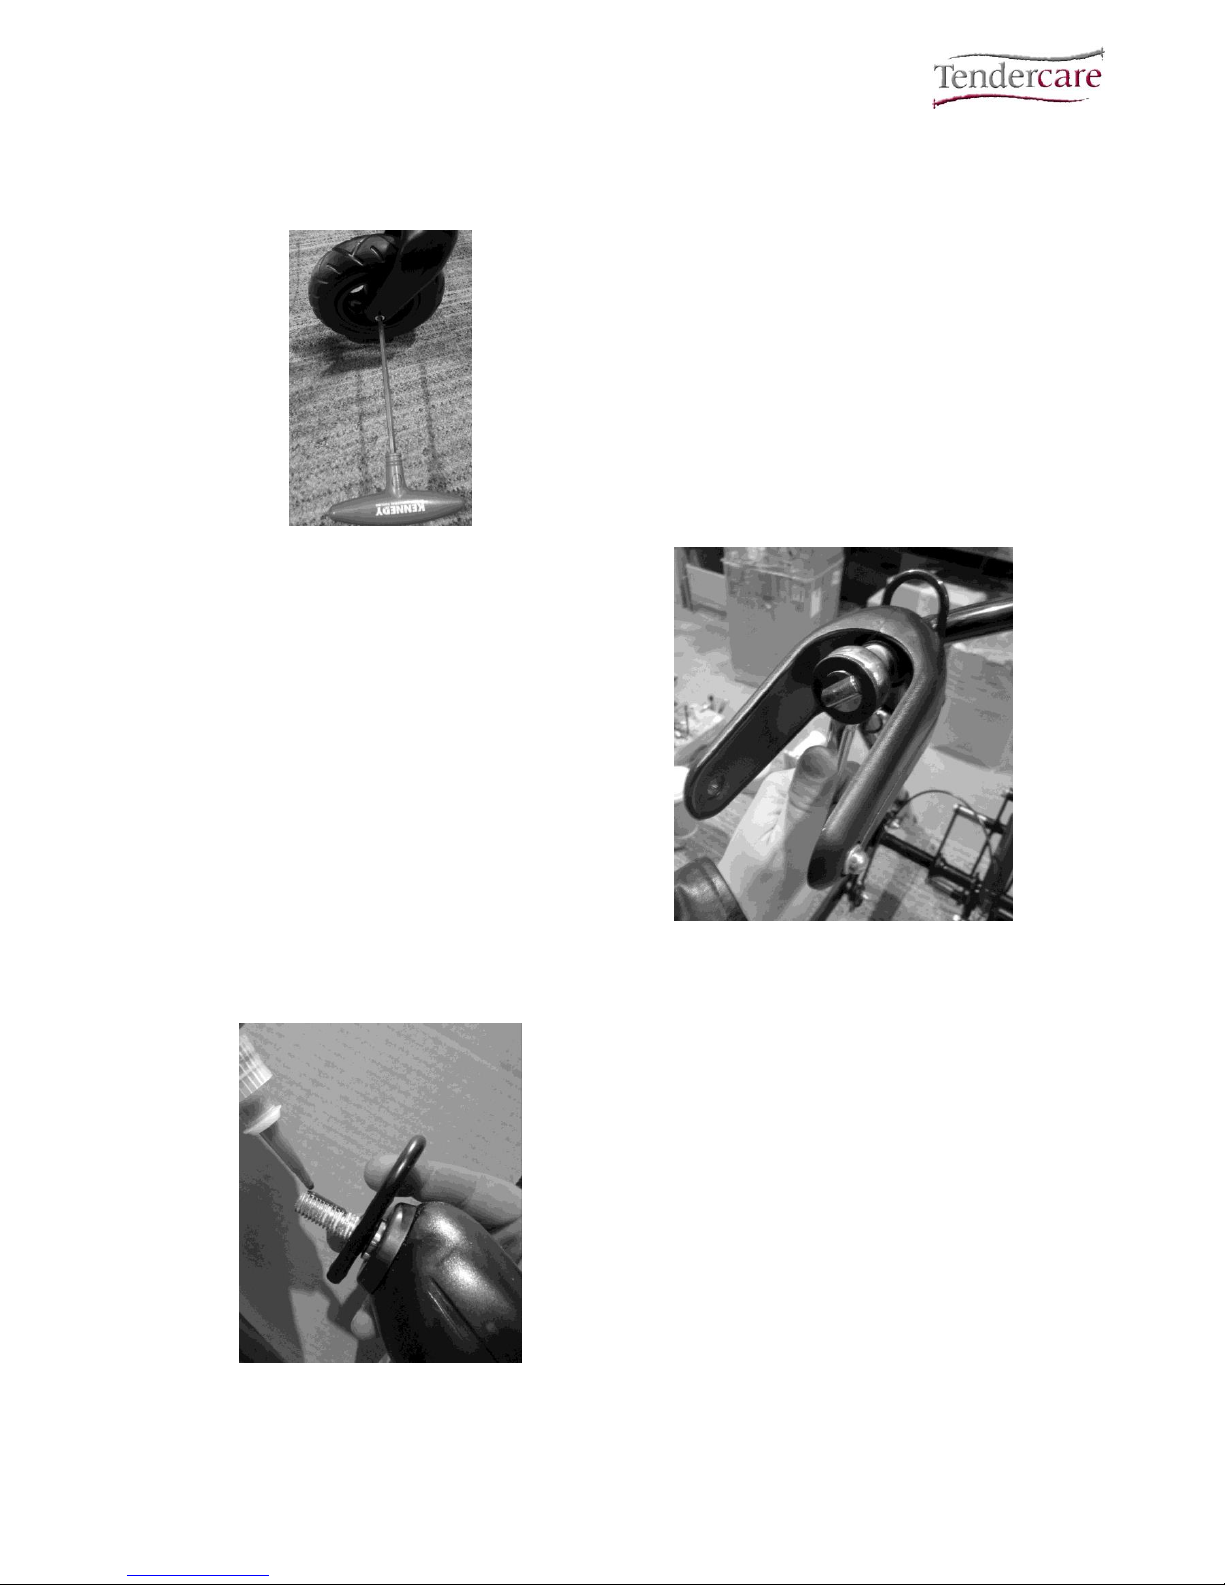
Replace if damaged or worn. To change the front castor:
Fig 8.2.1
Remove the wheel by unscrewing
the M8 socket cap bolt using a 5mm
hexagon key (see Fig 8.2.1, left).
Next remove the castor housing and
front tie down by undoing the main
M12 bolt using a 19mm spanner as
shown in Fig 8.2.2 (below).
To fit the new castor, first ensure the
wheel is removed from its housing.
Place the M12 front castor bolt
through the castor housing and the
tie down bracket, making sure to
keep the loop of the tie down bracket
facing the front of the frame. Apply
some Loctite to the thread on the
M12 bolt (see fig 8.2.3 below).
Fig 8.2.2
Fig 8.2.3
Tighten the M12 bolt to 35Nm with a
torque wrench. This should secure
the castor hosing and front tie down
bracket.
Screw the new wheel into the castor
housing using a 5mm hexagon key
and tighten firmly (no other tool is
required to fit the wheel as the castor
housing includes a captive nylock
nut).
Page 19
Cloud Wheelbase and Interface Workshop Manual
Document No: 057-02 v1a Page 19 of 32 July 2018
Cloud Wheelbase and Interface Workshop Manual.doc
8.3: Pin Brake Assembly
Replace the brake bar if it is bent or damaged. The springs, actuators and guide bushes
can also be replaced if worn.
IMPORTANT
The brake system uses two compression springs. Care must be taken when working on the
brake mechanism. The following instructions are the recommended method to safely
dismantle the brake assembly. If you are not confident to work on this assembly please
return your frame to the Tendercare factory.
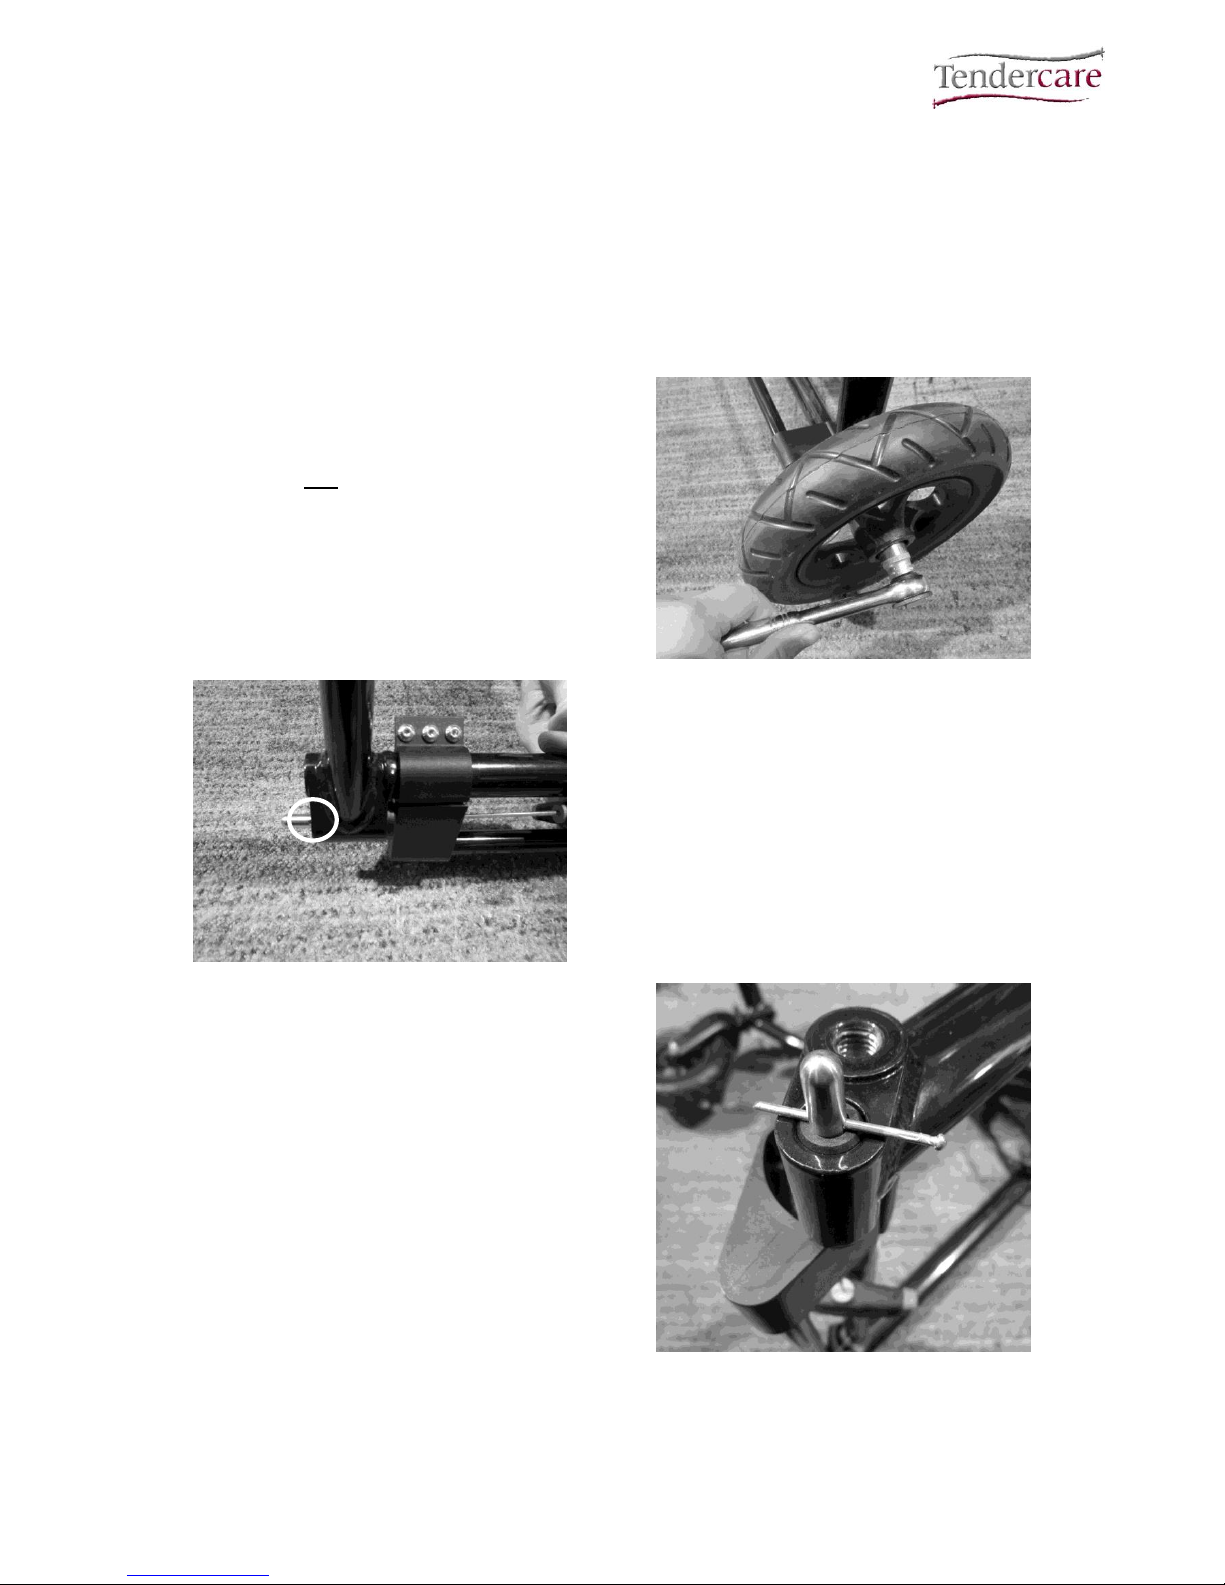
To remove the pin brake. First set to the
brake to the ON position (for instructions
how to do this please refer to the user
manual).
Then, remove the rear wheels (see section
8.1).
Fig 8.3.1
Fig 8.3.2
With the brake bar set to ‘On’ place a hex
key or screwdriver through the access hole
in the brake actuator to push the pin out as
far as it will go- this will reveal the 2mm
‘assembly’ hole in the brake pin (see Fig
8.3.2, left).
Push a 2mm pin through the assembly hole
(pins will be provided with replacement
brake parts).
This will hold the brake pins in the fully
extended position.
Fig 8.3.3
Page 20
Cloud Wheelbase and Interface Workshop Manual
Document No: 057-02 v1a Page 20 of 32 July 2018
Cloud Wheelbase and Interface Workshop Manual.doc
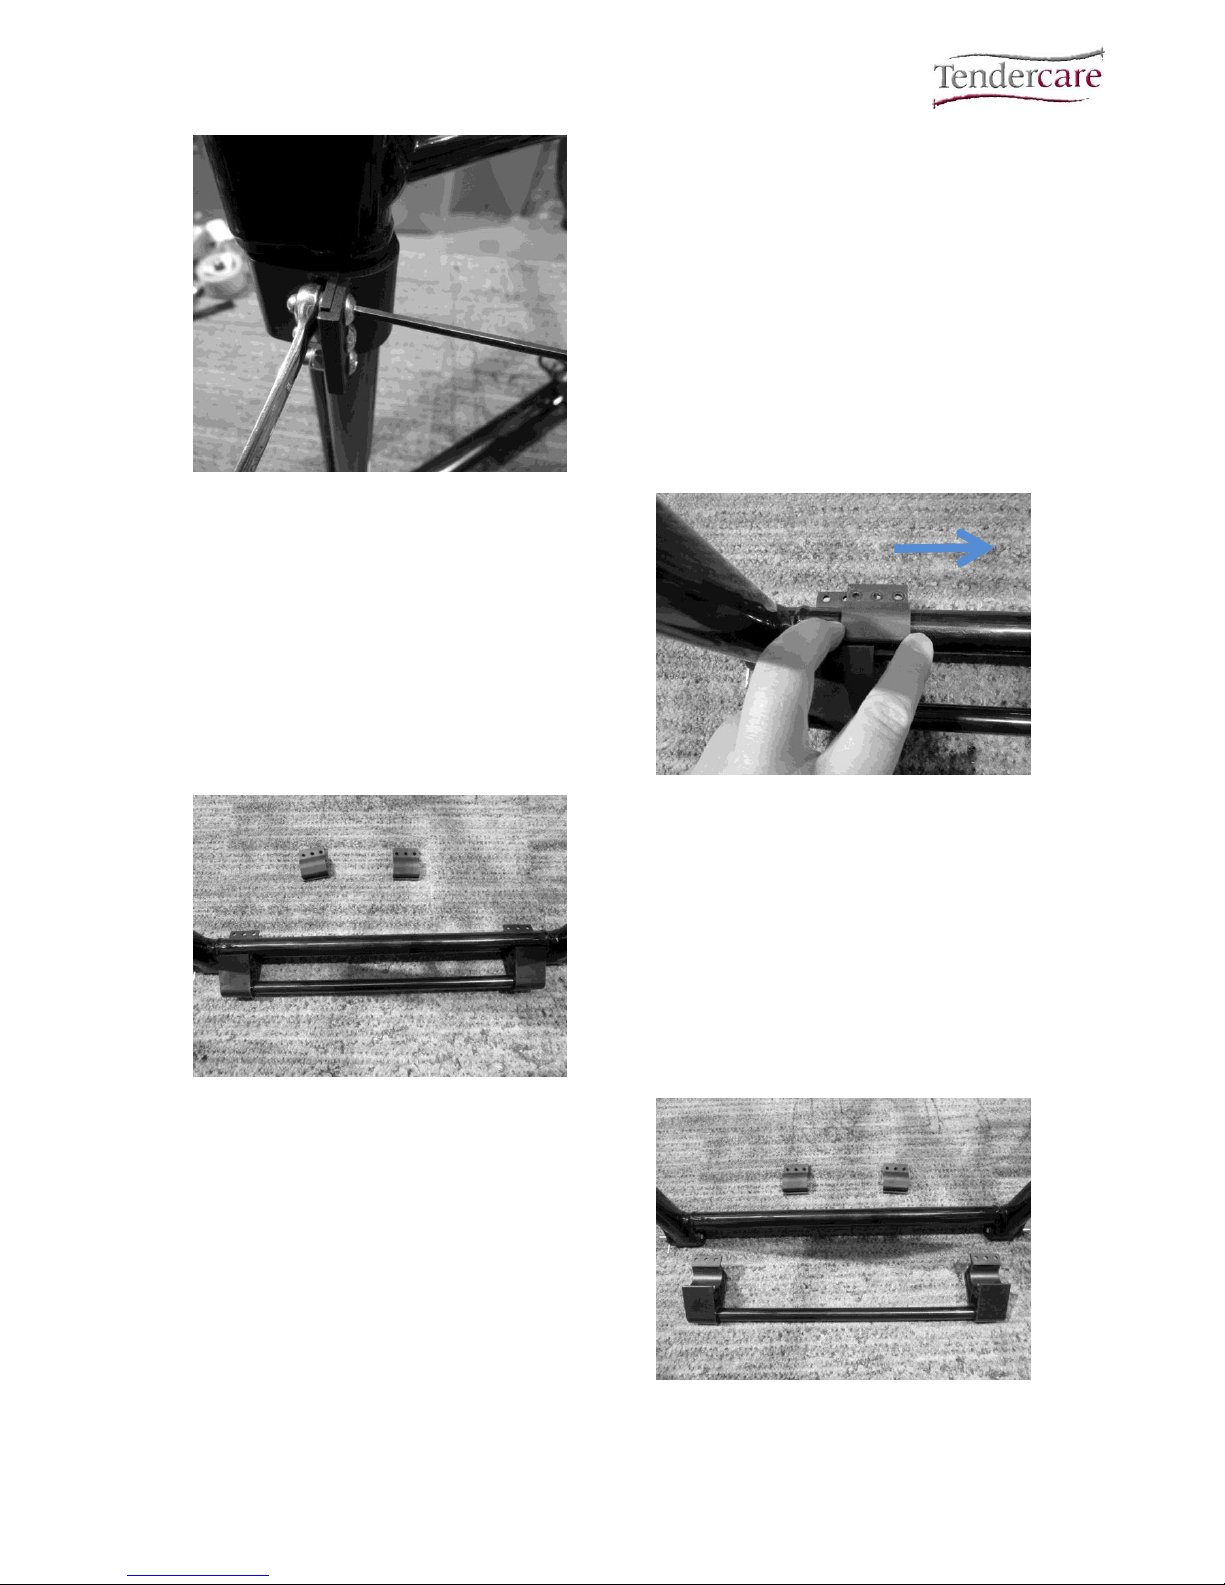
Fig 8.3.4
Using a hex key and spanner / socket
remove the 6 socket button bolts that
secure the brake actuator to the actuator
caps as shown (see Fig 8.3.4, left).
With all the bolts removed, slide the brake
actuator caps towards the middle of the
frame and remove them as shown (see fig
8.3.5, right).
Fig 8.3.5
Fig 8.3.6
Fig 8.3.6 Left: The brake bar with the
actuator caps removed.
You will now be able to remove the brake
bar assembly from the frame.
Fig 8.3.7
Page 21
Cloud Wheelbase and Interface Workshop Manual
Document No: 057-02 v1a Page 21 of 32 July 2018
Cloud Wheelbase and Interface Workshop Manual.doc
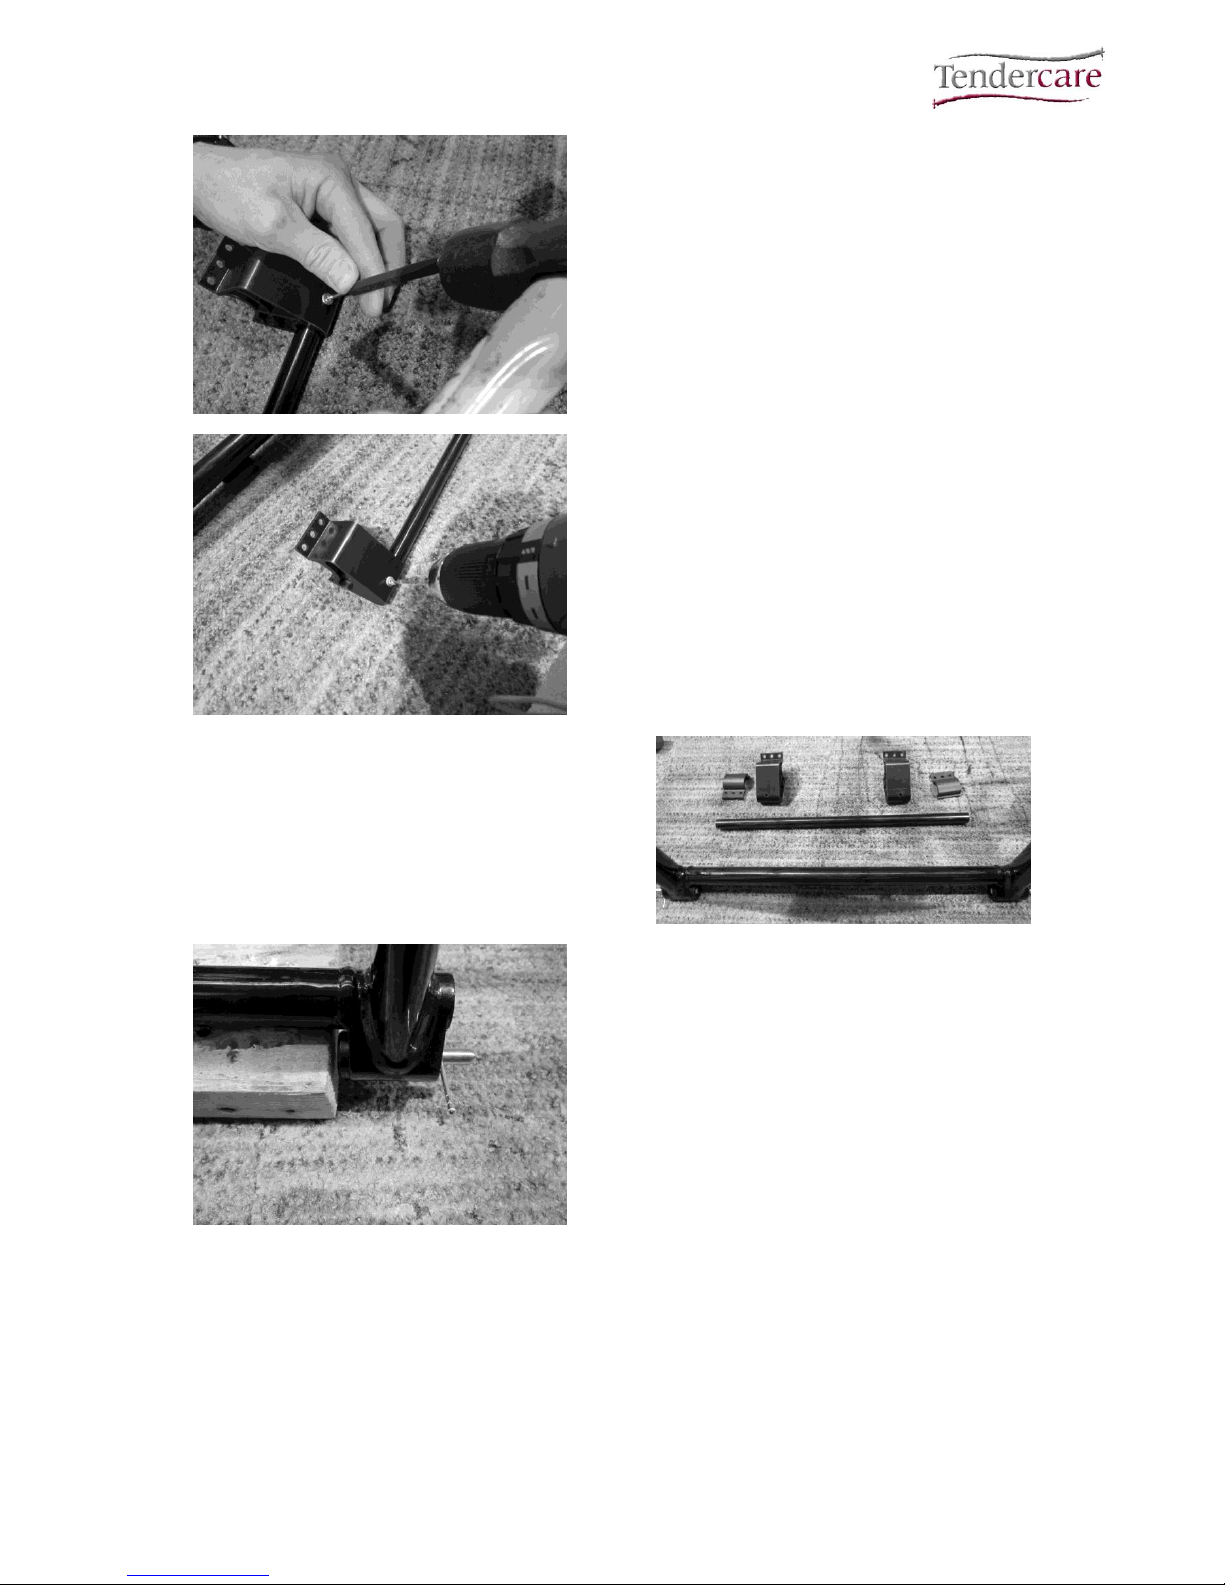
Fig 8.3.8A
Fig 8.3.8B
The brake bar is fitted to the actuators using
4mm aluminium pop rivets. Care must be
taken when removing the rivets to avoid
damaging the actuator plastics.
We recommend using a punch / hammer to
knock the head out of the rivet (see Fig
8.3.8A, left) and then carefully drill through
the rivet with a 4mm drill bit as shown (see
fig 8.3.8B, left).
Fig 8.3.9 Right: The brake bar removed
from the actuators.
Fig 8.3.9
Fig 8.3.10
To remove the lock pins, springs and guide
bushes: First place a block of wood on the
inside of the frame as shown in fig 8.3.10
(this is to provide a stop for the brake pin
when the spring is released).
Page 22
Cloud Wheelbase and Interface Workshop Manual
Document No: 057-02 v1a Page 22 of 32 July 2018
Cloud Wheelbase and Interface Workshop Manual.doc
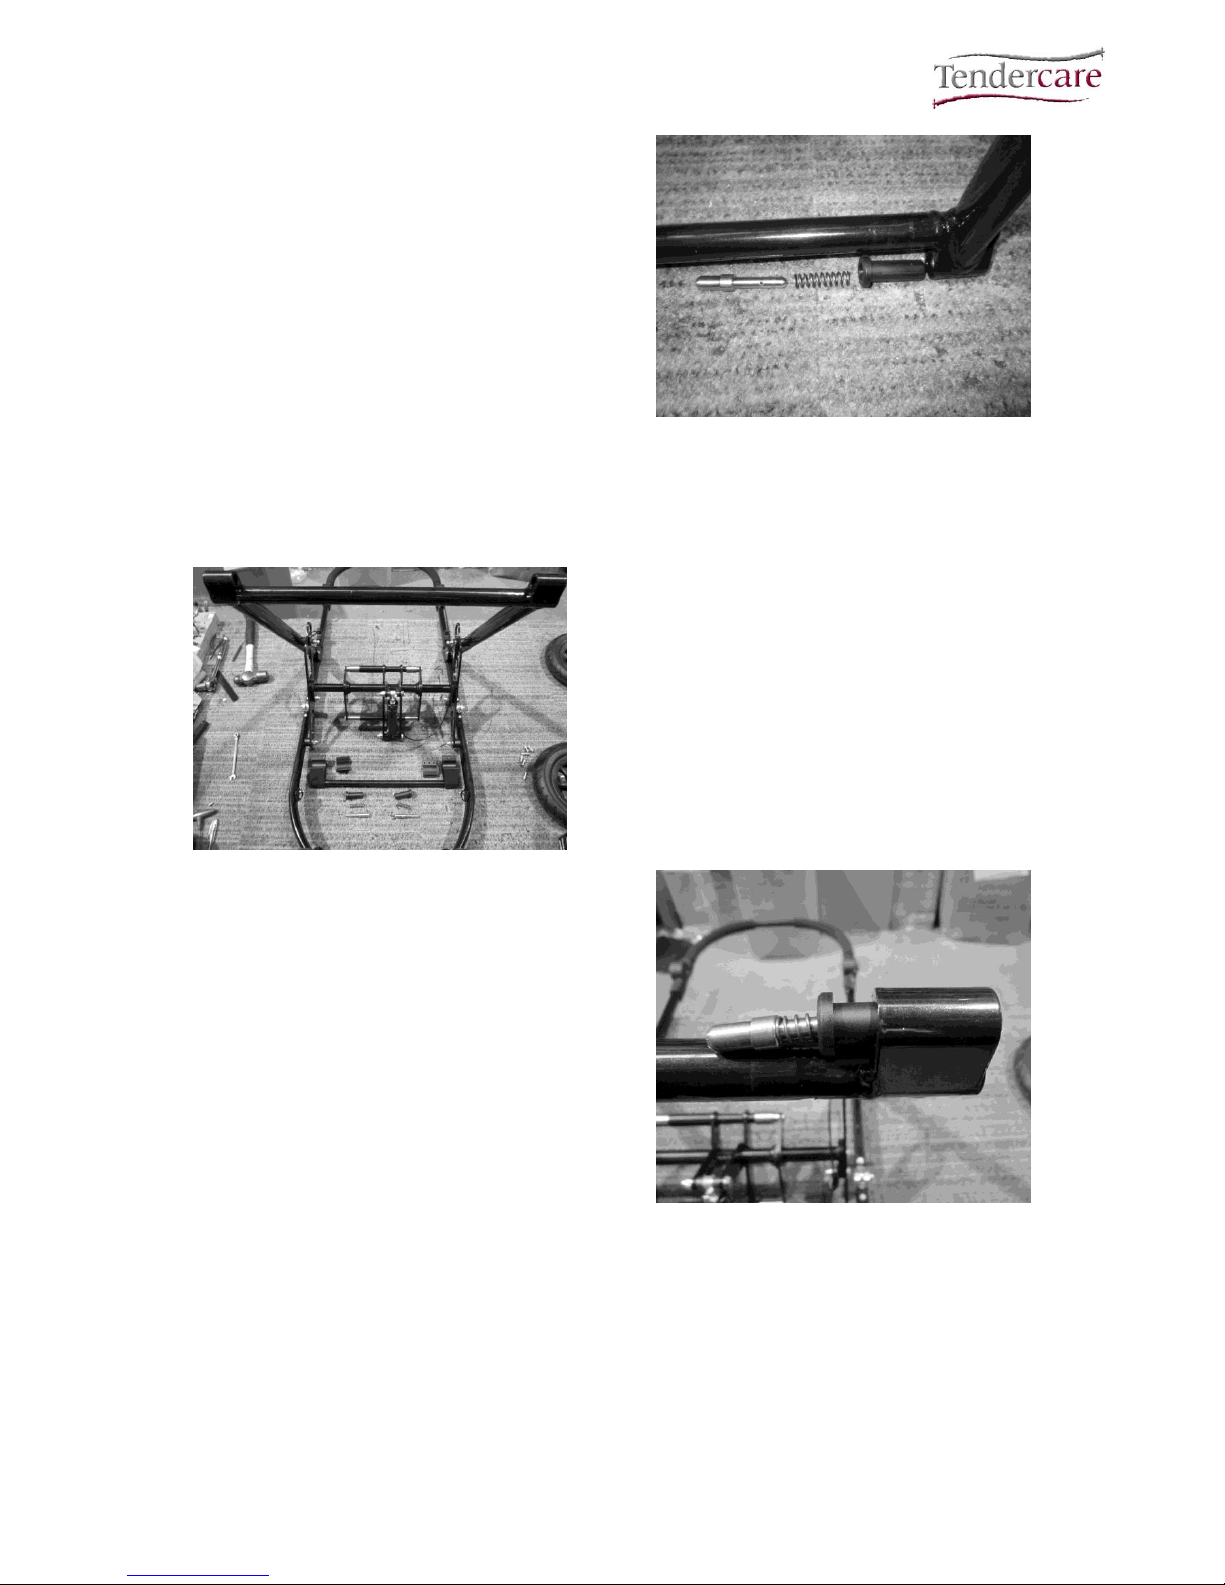
With the block of wood held in place, pull
out the 2mm pin to release the brake pin.
With the pressure of the spring safely
released, now push the brake pin, spring
and guide bush out of the mounting on the
frame.
Fig 8.3.11
To re-assemble the pin brake assembly:
Fig 8.3.12
Place the wheelbase with the front frame
down onto a flat surface as shown (see fig
8.3.12, left). This provides easier access to
the brake mounting points.
Slide the guide bush, spring and brake pin
into the mounting point as shown (see fig
8.3.13, right).
Fig 8.3.13
Page 23
Cloud Wheelbase and Interface Workshop Manual
Document No: 057-02 v1a Page 23 of 32 July 2018
Cloud Wheelbase and Interface Workshop Manual.doc
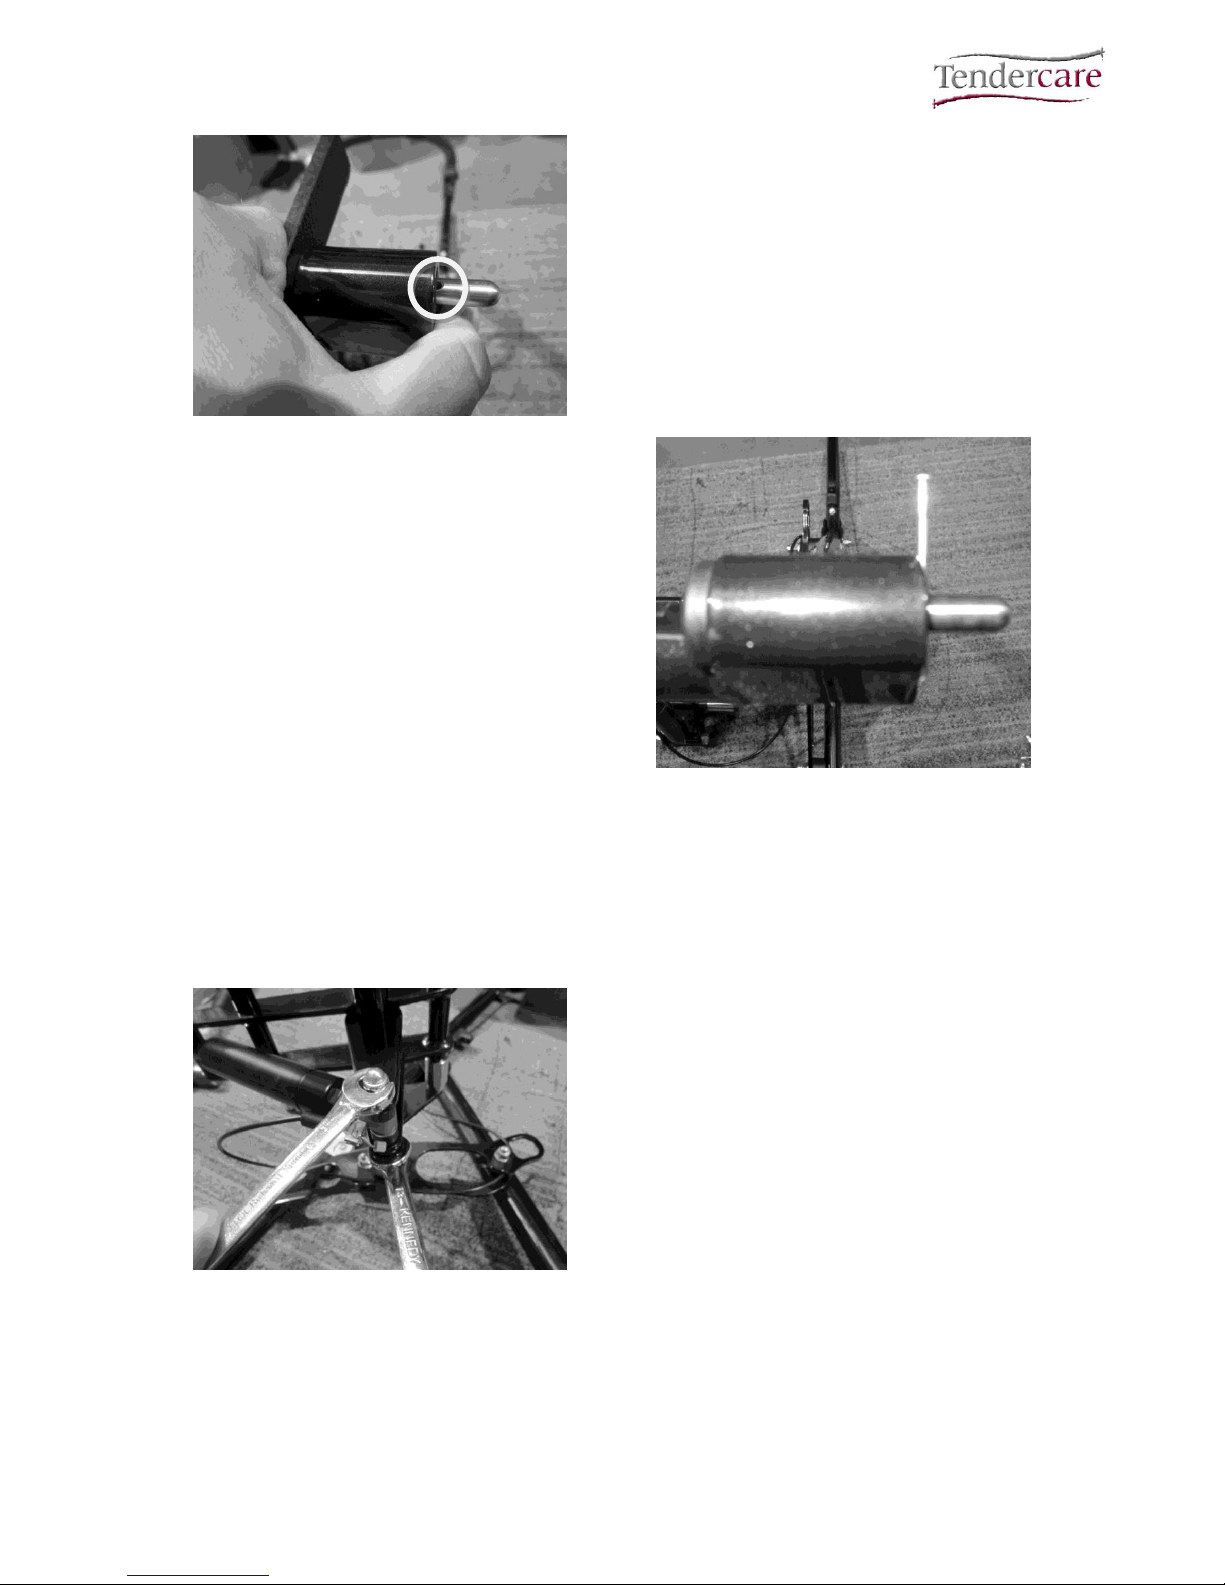
Fig 8.3.14
Ensure you have a pair of 2mm pins
available.
Push the brake pin into the frame against
the spring as shown, such that the
assembly hole is visible. Placing a piece of
flat material against the back of the pin can
make it easier to push through (see fig
8.3.14, left).
Push a 2mm pin through the hole to lock the
pin in place.
Repeat this for both sides, and then follow
the reverse of the dismantling instructions to
assemble the rest of the brake assembly.
Fig 8.3.15
8.4: Mid Section and Gas Strut
Replace the gas spring if it is damaged or worn.
To remove the gas strut:
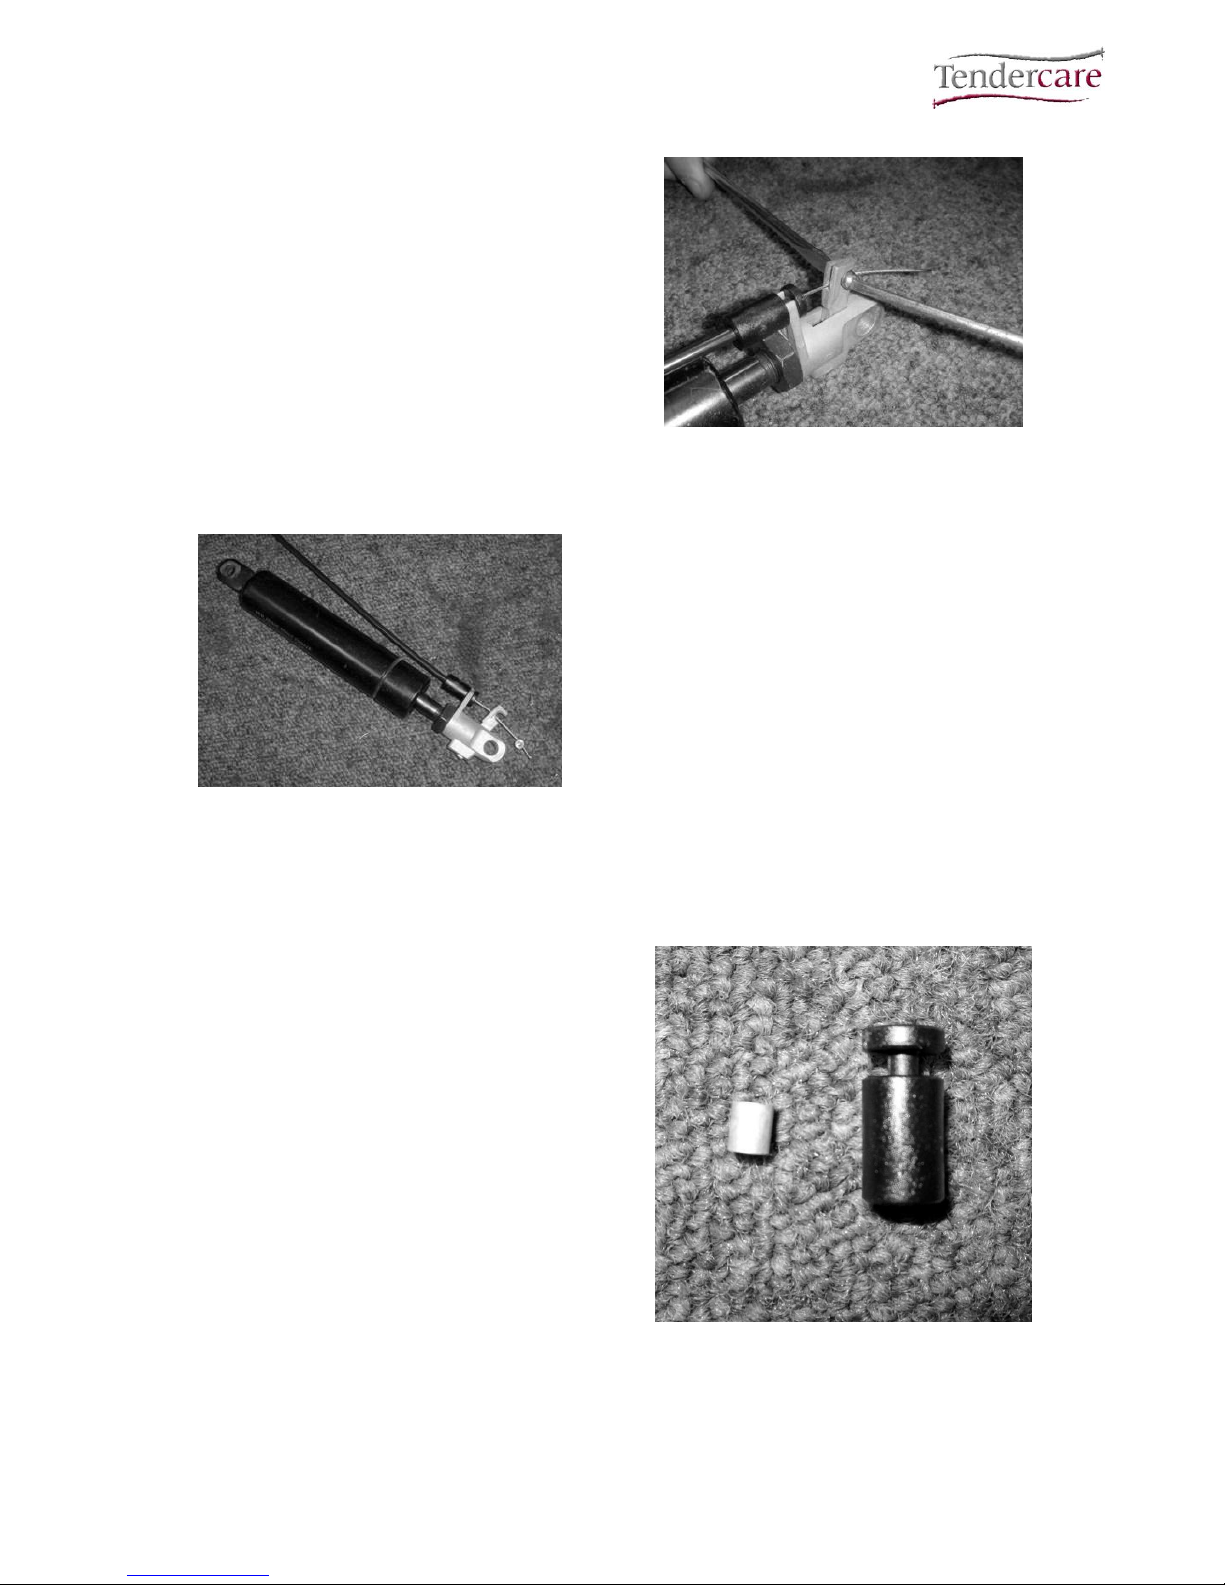
Fig 8.4.1
Lift the frame onto a suitable
workbench and lay it on its side
Using a pair of 13mm spanners undo
the gas strut fixing bolts. Take note
of the position of the washers and
spacers.
Page 24
Cloud Wheelbase and Interface Workshop Manual
Document No: 057-02 v1a Page 24 of 32 July 2018
Cloud Wheelbase and Interface Workshop Manual.doc
To remove the Bowden cable, use 2
small screwdrivers to release the
“screw nipple” (see right) and then
slide it along the excess cable as
shown in fig 8.4.3
Fig 8.4.2
Fig 8.4.3
Place a small screwdriver between
the gas spring and the plastic clip on
the Bowden cable and lever the clip
away from the spring housing.
To fit the new gas spring, clip the
cable onto the head of the new
spring, slide the screw nipple into the
lever and tighten. Then remount in
the same way as the original spring
was fitted.
Once fitted, test the operation of the
gas strut as detailed in section 4.3 of
this manual
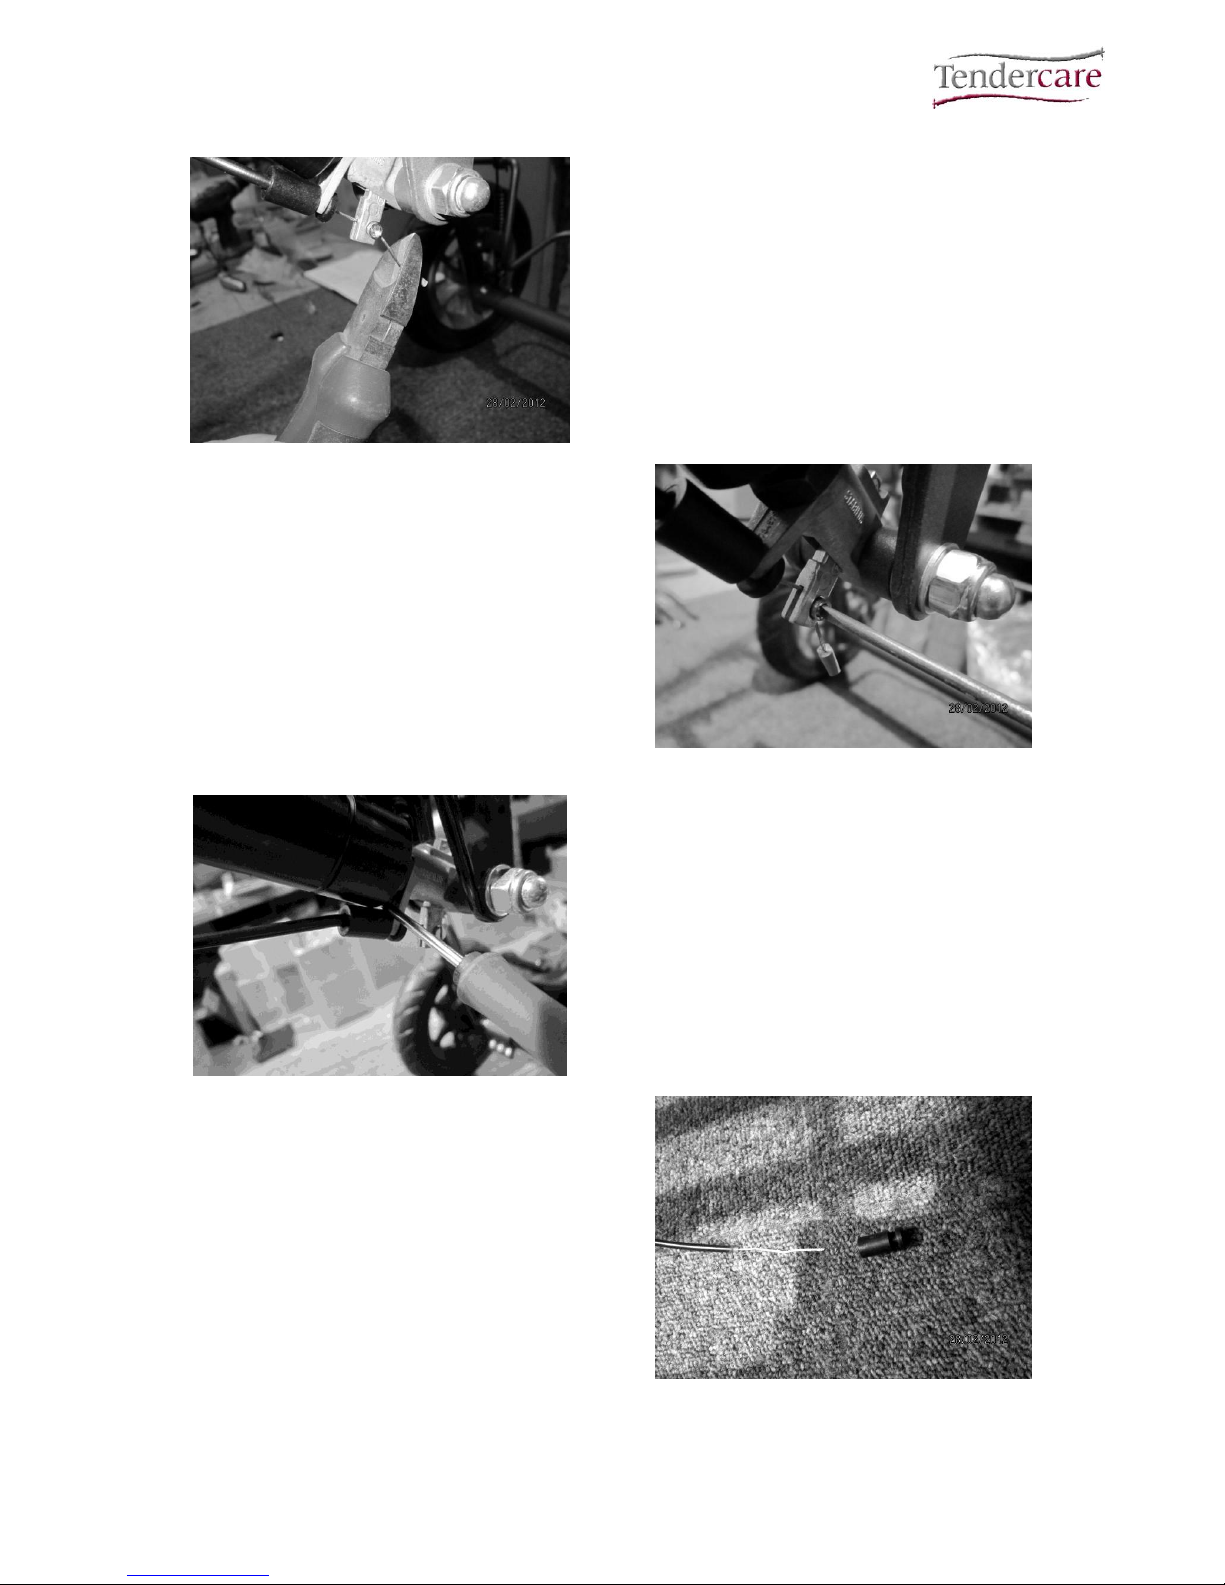
8.4.1 Change the end fittings on the gas spring cable:
To replace the end fitting on the gas spring:
To order just the end fittings, order part
SN7300B (please see the Cloud Chassis
parts list). Alternatively a whole tilt cable
assembly can be ordered under part code
SN3700.
Right: The end fittings as supplied; Aaluminium crimp fitting B- the plastic cable
mounting
Fig 8.4.1.1
A
B
Page 25
Cloud Wheelbase and Interface Workshop Manual
Document No: 057-02 v1a Page 25 of 32 July 2018
Cloud Wheelbase and Interface Workshop Manual.doc
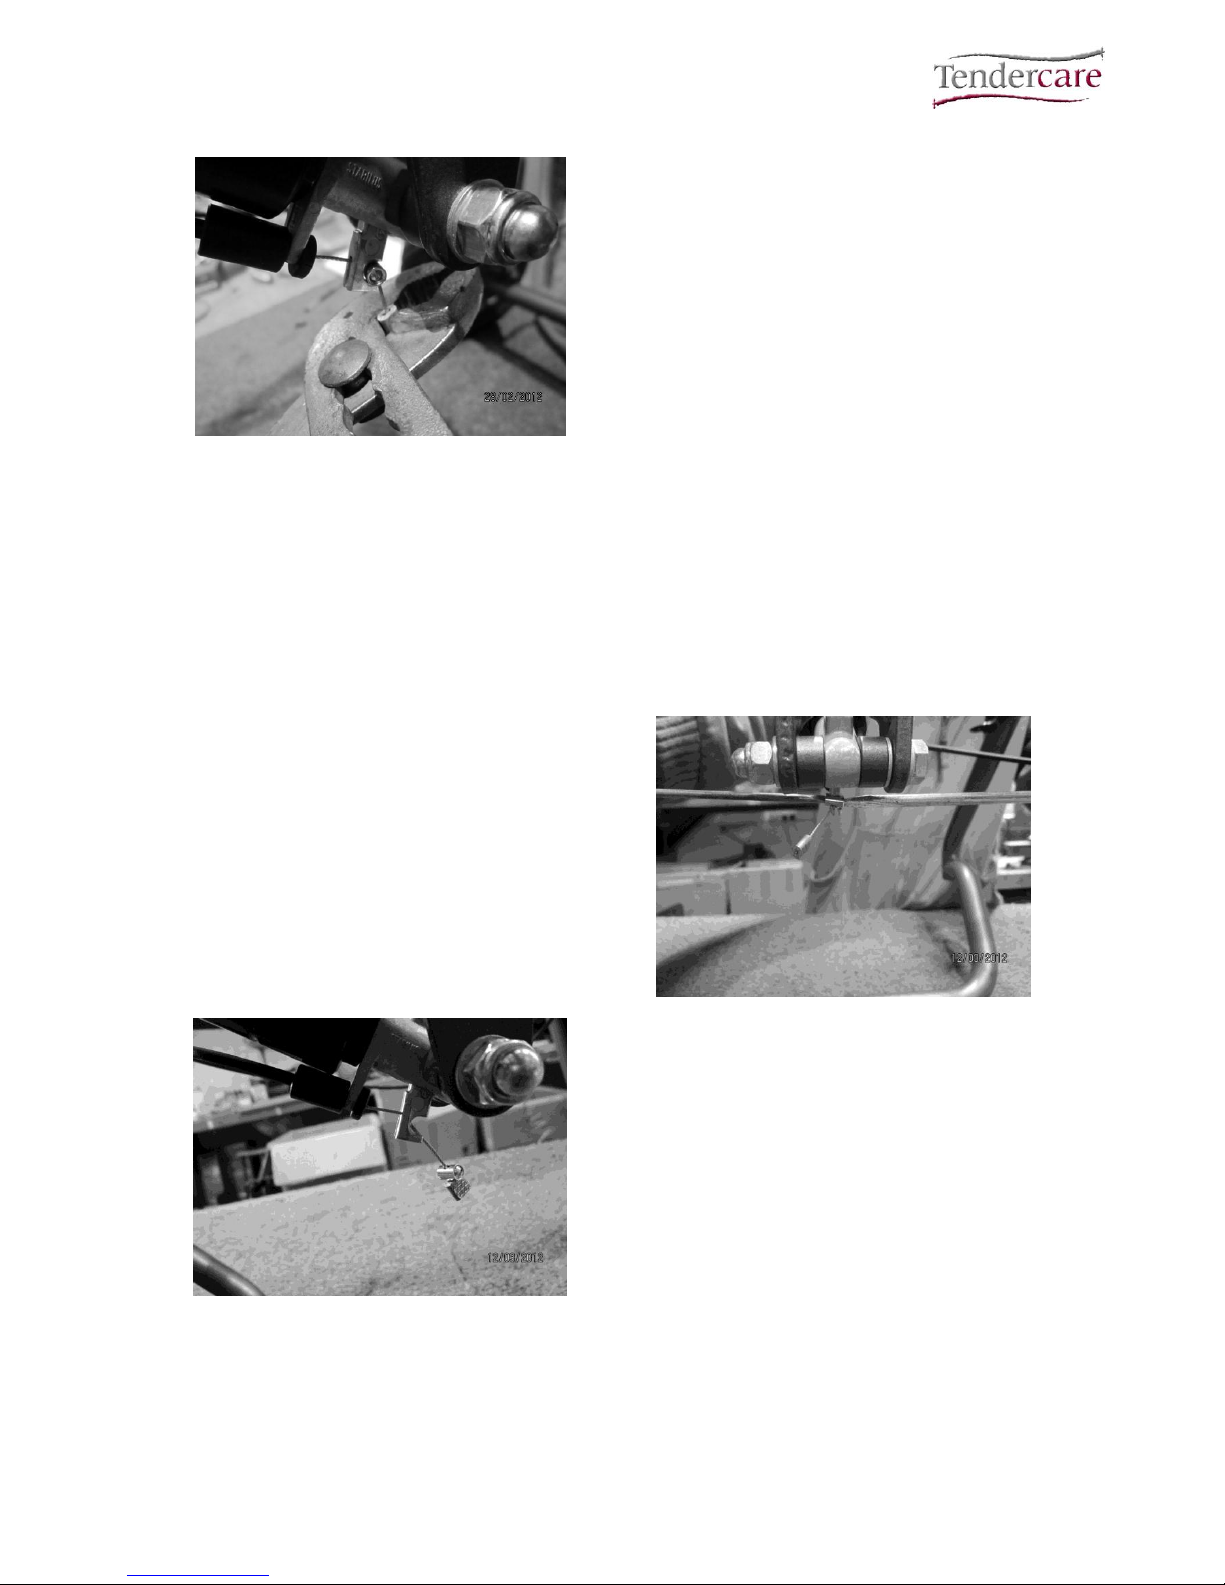
Fig 8.4.1.2
First cut the end of the steel cable and
crimp fitting off of the old cable using a pair
of wire cutters. Leave as much of the
excess cable as possible when doing this.
Next loosen the ‘screw nipple’ with a small
screwdriver and slide off the end of the
cable (please retain this part).
Fig 8.4.1.3
Fig 8.4.1.4
Remove the old cable end fitting using a
screwdriver and slide off the end of the
cable.
Next take the new end fitting and slide onto
the end of the cable, then push fit back onto
the clip point on the gas spring.
Fig 8.4.1.5
Page 26
Cloud Wheelbase and Interface Workshop Manual
Document No: 057-02 v1a Page 26 of 32 July 2018
Cloud Wheelbase and Interface Workshop Manual.doc
Fig 8.4.1.6
Slide the ‘screw nipple’ back onto the cable,
into the scoop in the gas spring head lever,
making sure all the slack is taken up in the
cable, tighten with the screwdriver. Finally
grip the aluminium end crimp in a large pair
of grips, slide over the cut end of the cable
and squash to prevent the cable end from
fraying.
Finally test the operation of the gas spring, if the gas spring will not release, check the
cable for slack and adjust the ‘screw nipple’ as required. For more details on the correct
operation of the tilt mechanism please refer to the user manual.
8.4.2: Replace the tilt cable, leaving the release lever in place:
Replace the tilt cable if damaged or worn. This is the preferred method providing the
release lever is OK. If the release lever needs to be replaced follow the instructions in
section 8.4.3.
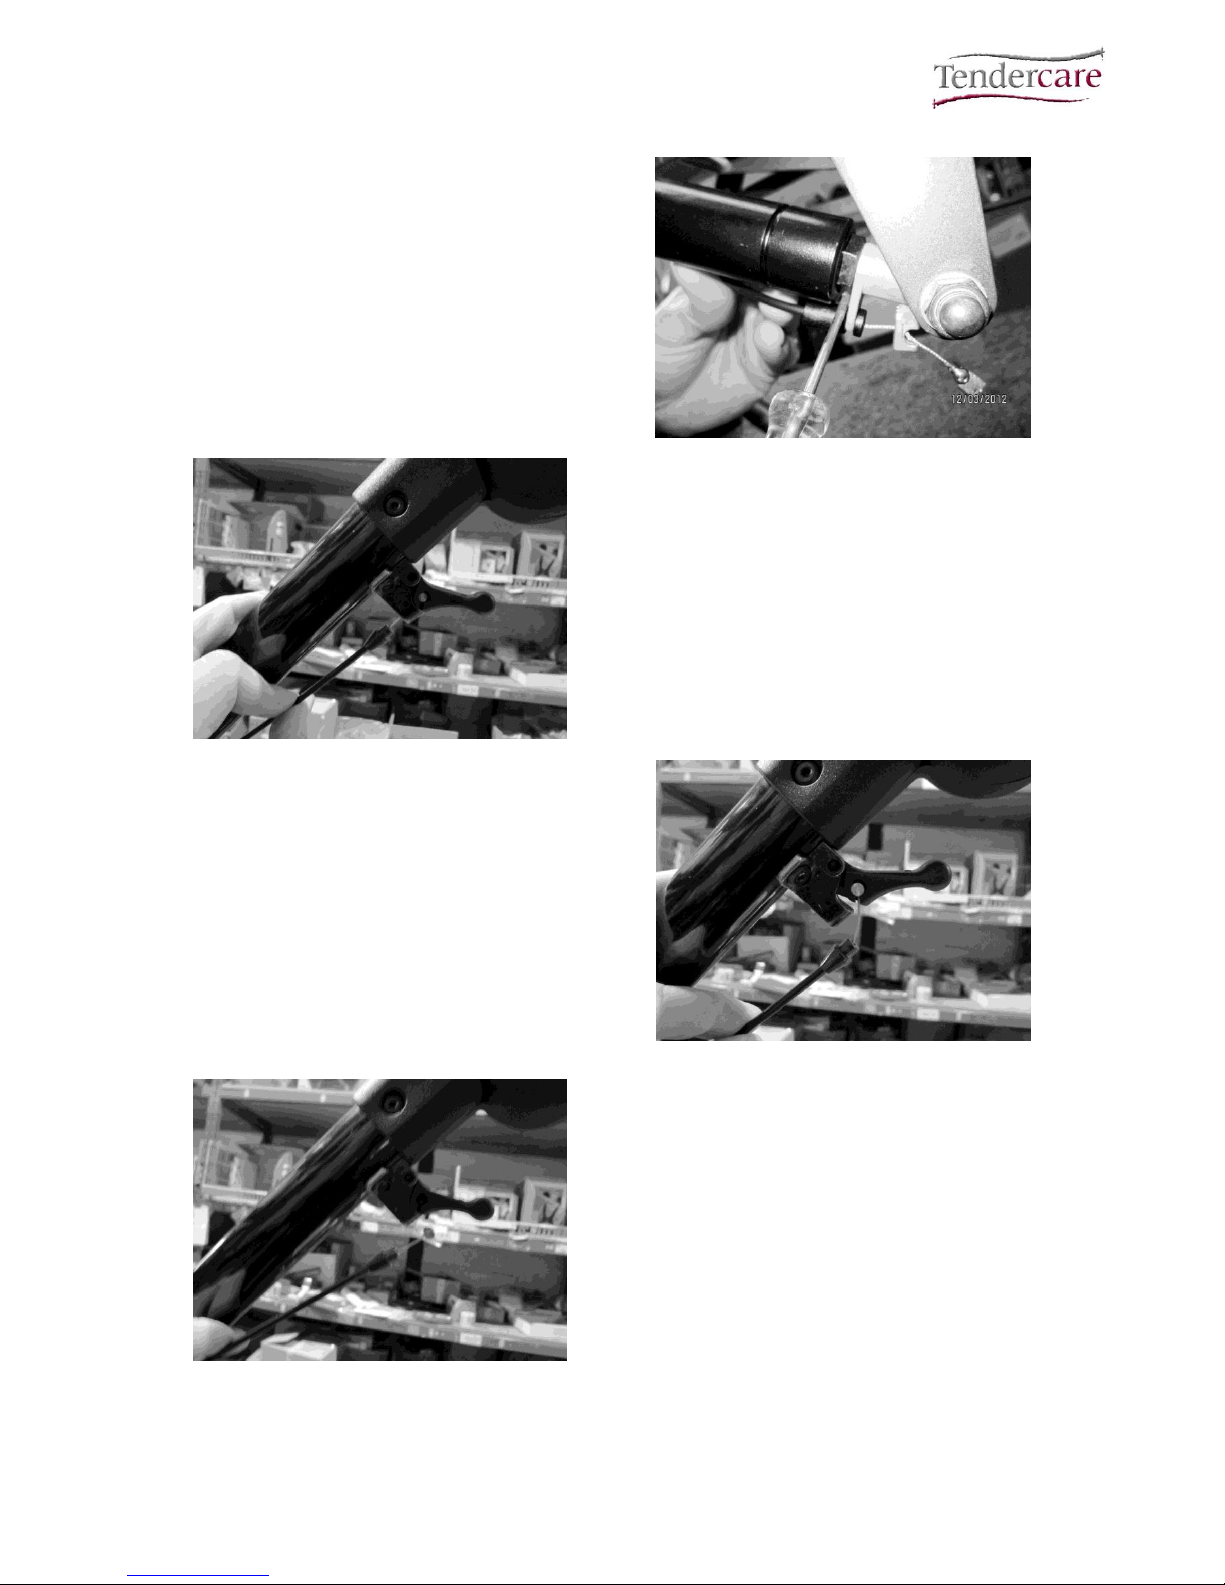
First release the ‘screw nipple’ on the old tilt
cable using 2 screw drivers.
Fig 8.4.2.1
Fig 8.4.2.2
Slide this down to the end of the cable to
provide some slack as shown (see left).
Note the new cable will also need to be
loosened off.
Page 27
Cloud Wheelbase and Interface Workshop Manual
Document No: 057-02 v1a Page 27 of 32 July 2018
Cloud Wheelbase and Interface Workshop Manual.doc
Using a small screwdriver, separate the
cable mounting from the gas spring as
shown (right).
Fig 8.4.2.3
Fig 8.4.2.4
Slide the cable cover and conical mounting
point down as far as it will move, taking up
the spare cable from the bottom so that the
cable is exposed at the release lever end.
Lift the lever up, and slide the cable out of
the slot in the lever mounting.
Fig 8.4.2.5
Fig 8.4.2.6
Unhook the cable from the lever, and then
slide the cable out from the frame taking
note of the routing (the correct routing is via
the rear D ring, up and through the upper to
rear frame joint).
Note that the replacement cable is supplied
with the mounting and lever, separate the
new cable from the mounting and then fit
onto the original mounting on the frame, by
following the reverse of this procedure.
Page 28
Cloud Wheelbase and Interface Workshop Manual
Document No: 057-02 v1a Page 28 of 32 July 2018
Cloud Wheelbase and Interface Workshop Manual.doc
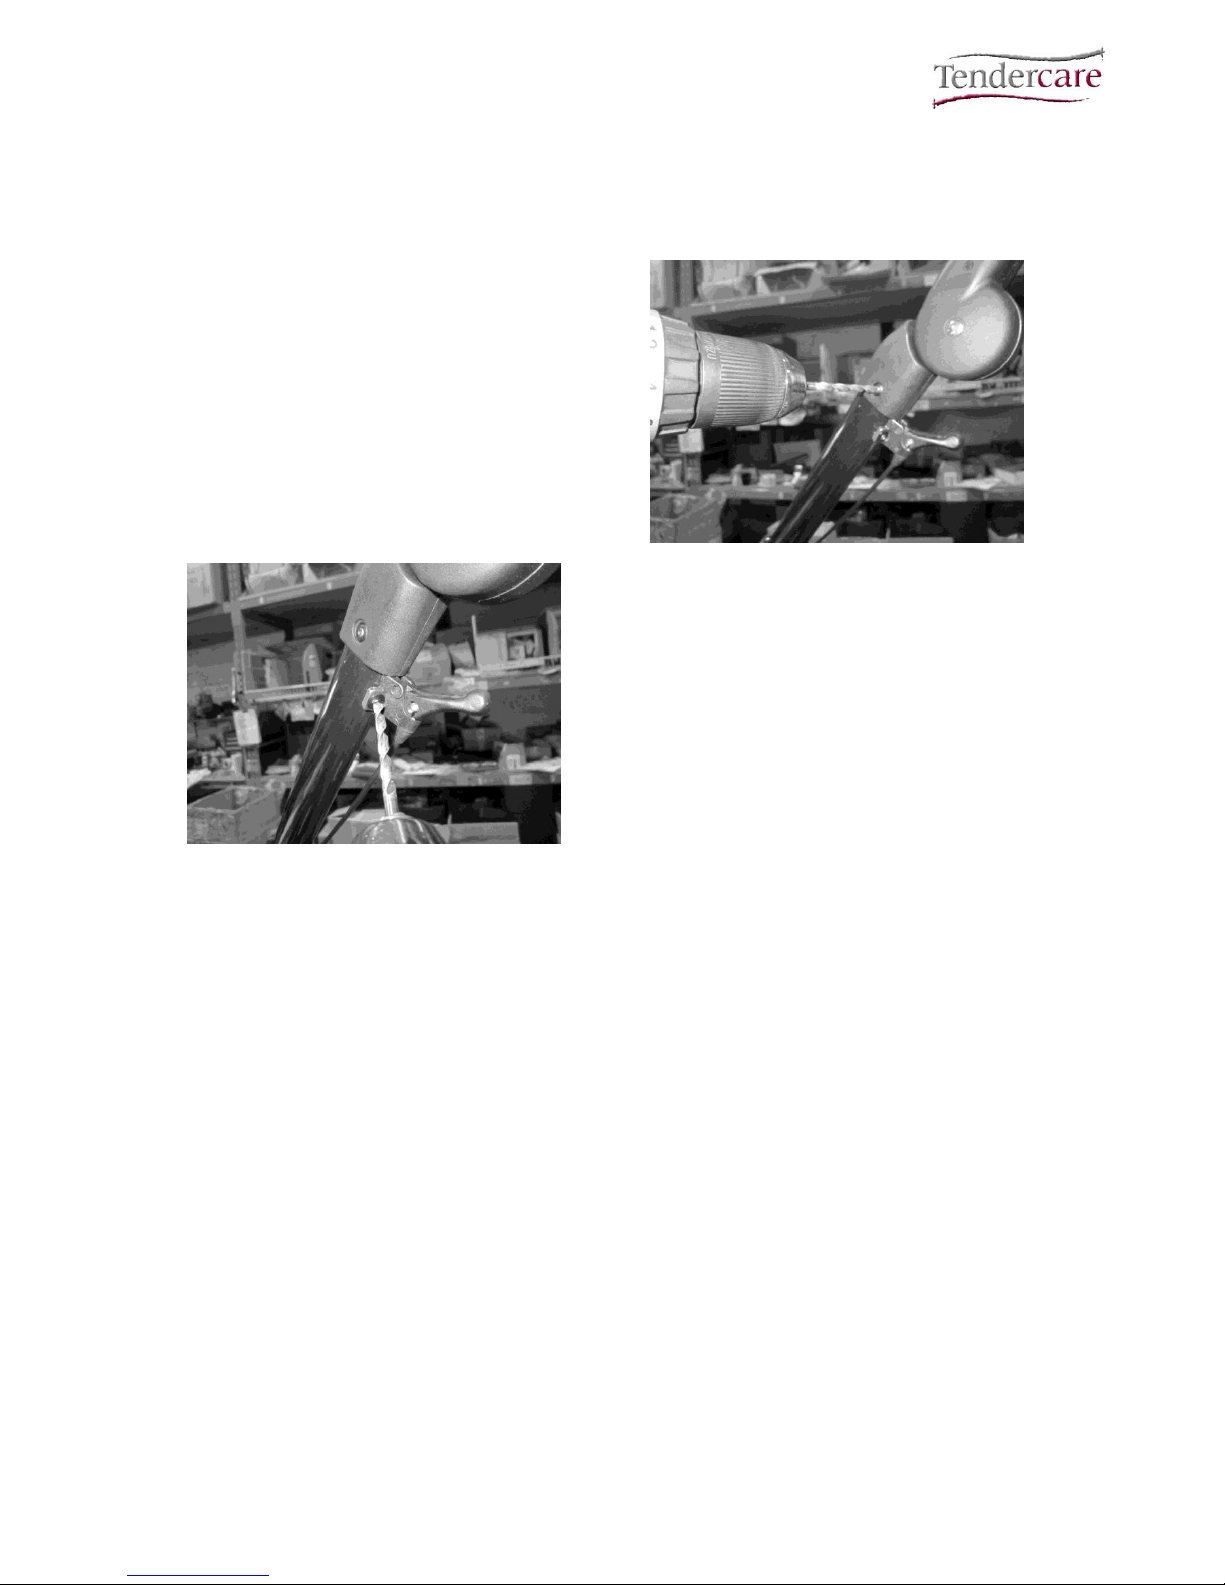
8.4.3: Replace the tilt cable and release lever assembly:
Replace the entire cable and lever assembly if the lever is damaged or worn. Note that to
do this you must first remove the push handles as detailed in section 8.6
First remove the push handle adjustors
from the frame (see section 8.6 for more
details).
Leave the adjustors fitted to the upper
push handle, and refit once the cable has
been replaced.
Fig 8.4.3.1
Fig 8.4.3.2
After removing the push handle, drill off the 2
pop rivets securing the release lever to the
frame.
Separate the cable from the gas spring, and
remove the entire cable taking note of its
routing (for more details on releasing the
cable from the frame, see section 8.4.1 and
8.4.2).
Fit the new lever with 2 x 4.8mm x 14mm black pop rivets, and route the cable via the top
frame to rear frame joint and rear D ring as before, and re-attach to the gas spring
following the instructions detailed in section 8.4.1 and 8.4.2 of this manual.
8.5: The Interface
Replace the interface clips (see Fig 0.4) if they are damaged or bent; replace the springs if
they are stretched or overly soft in operation.
IMPORTANT
The interface uses 2 strong torsion springs that are under load. Care must be taken when working on
the interface clip mechanism. The following instructions are the recommended method for
dismantling the assembly to safely release the tension on the springs. If you are not confident to
work on this assembly please return your frame to the Tendercare factory.
Page 29
Cloud Wheelbase and Interface Workshop Manual
Document No: 057-02 v1a Page 29 of 32 July 2018
Cloud Wheelbase and Interface Workshop Manual.doc
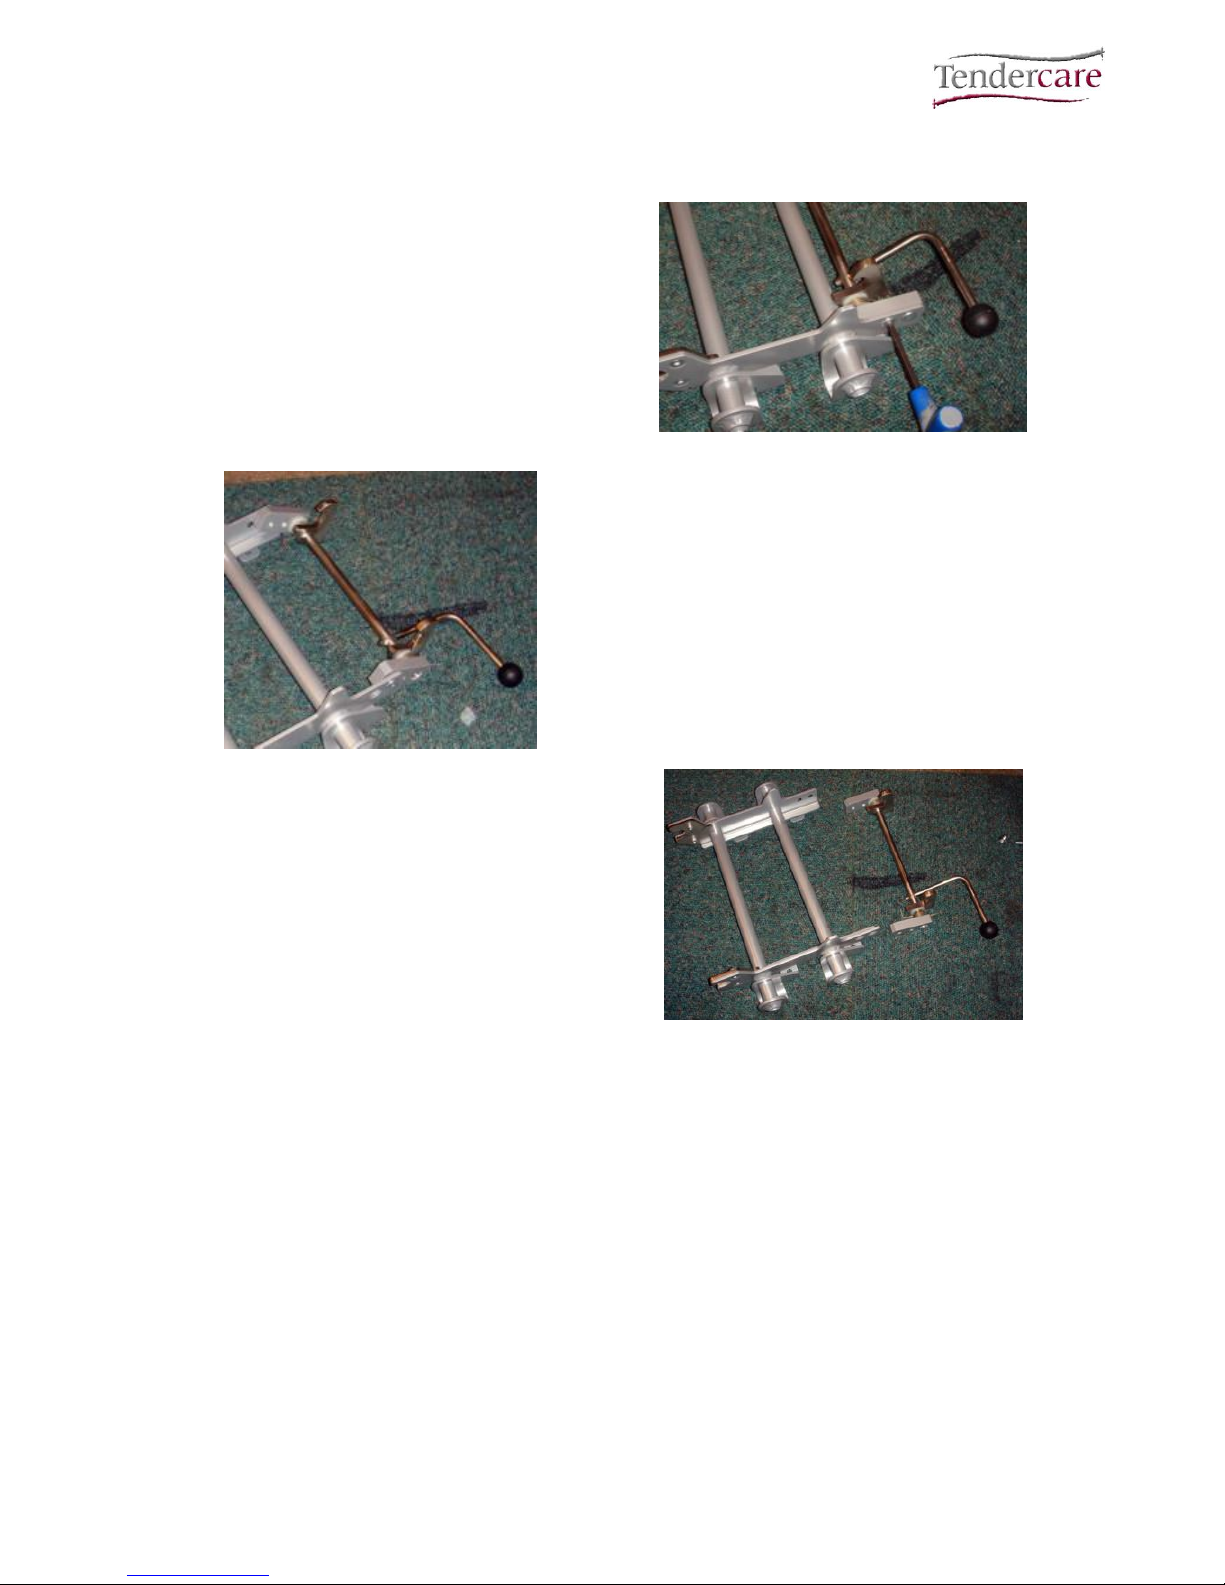
To dismantle the interface:
Remove the front screws from the
mounting using a 4mm hexagon key
as shown (see fig 8.5.1, right).
Loosen the rear screws but DO NOT
remove them as the tension on the 2
torsion springs must be released
before removing the clip mechanism
from the interface frame.
Fig 8.5.1
Fig 8.5.2
To release the tension on the springs:
Rotate the clips forward and lift the
frame so that it pivots on the 2
loosened rear screws. Keep lifting
until the 2 spring arms are released
from the interface frame cross bar,
as shown (see fig 8.5.2, left)
Once the springs have been
released, remove the 2 rear screws
units a 4mm hexagon key. The
interface clip assembly can then be
easily taken apart by sliding off the 2
mounting blocks, springs and
washers.
Fig 8.5.3
Take note of the position of the 2 chamfers of the mounting blocks as these MUST be put
back in the correct orientation or the interface mechanism will not function properly.
Also take careful note of the orientation of the springs- the springs are handed and must
be re-fitted correctly or there will not be sufficient tension on the mechanism to close the
clips.
To reassemble the interface follow the reverse of these instructions and test as detailed in
section 4.4 of this manual.
Page 30
Cloud Wheelbase and Interface Workshop Manual
Document No: 057-02 v1a Page 30 of 32 July 2018
Cloud Wheelbase and Interface Workshop Manual.doc
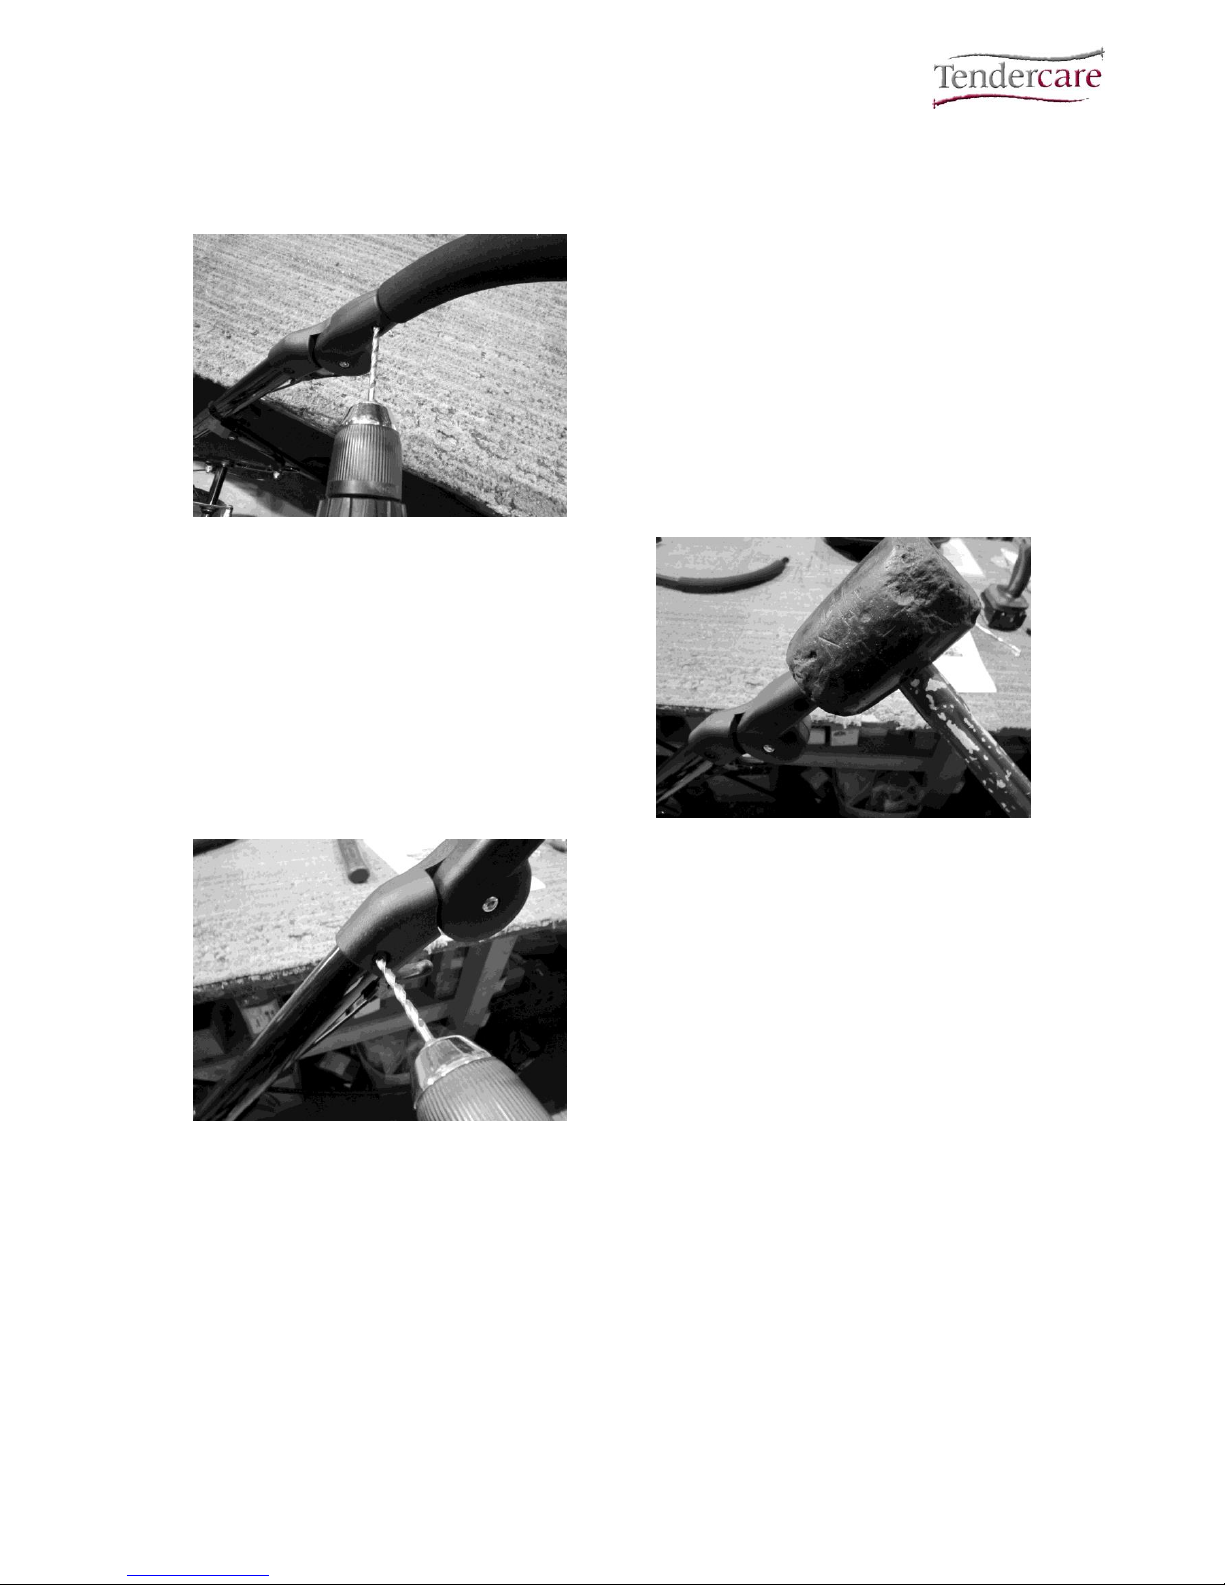
8.6: Replace Push Handle Adjustors
Replace if damaged.
Fig 8.6.1
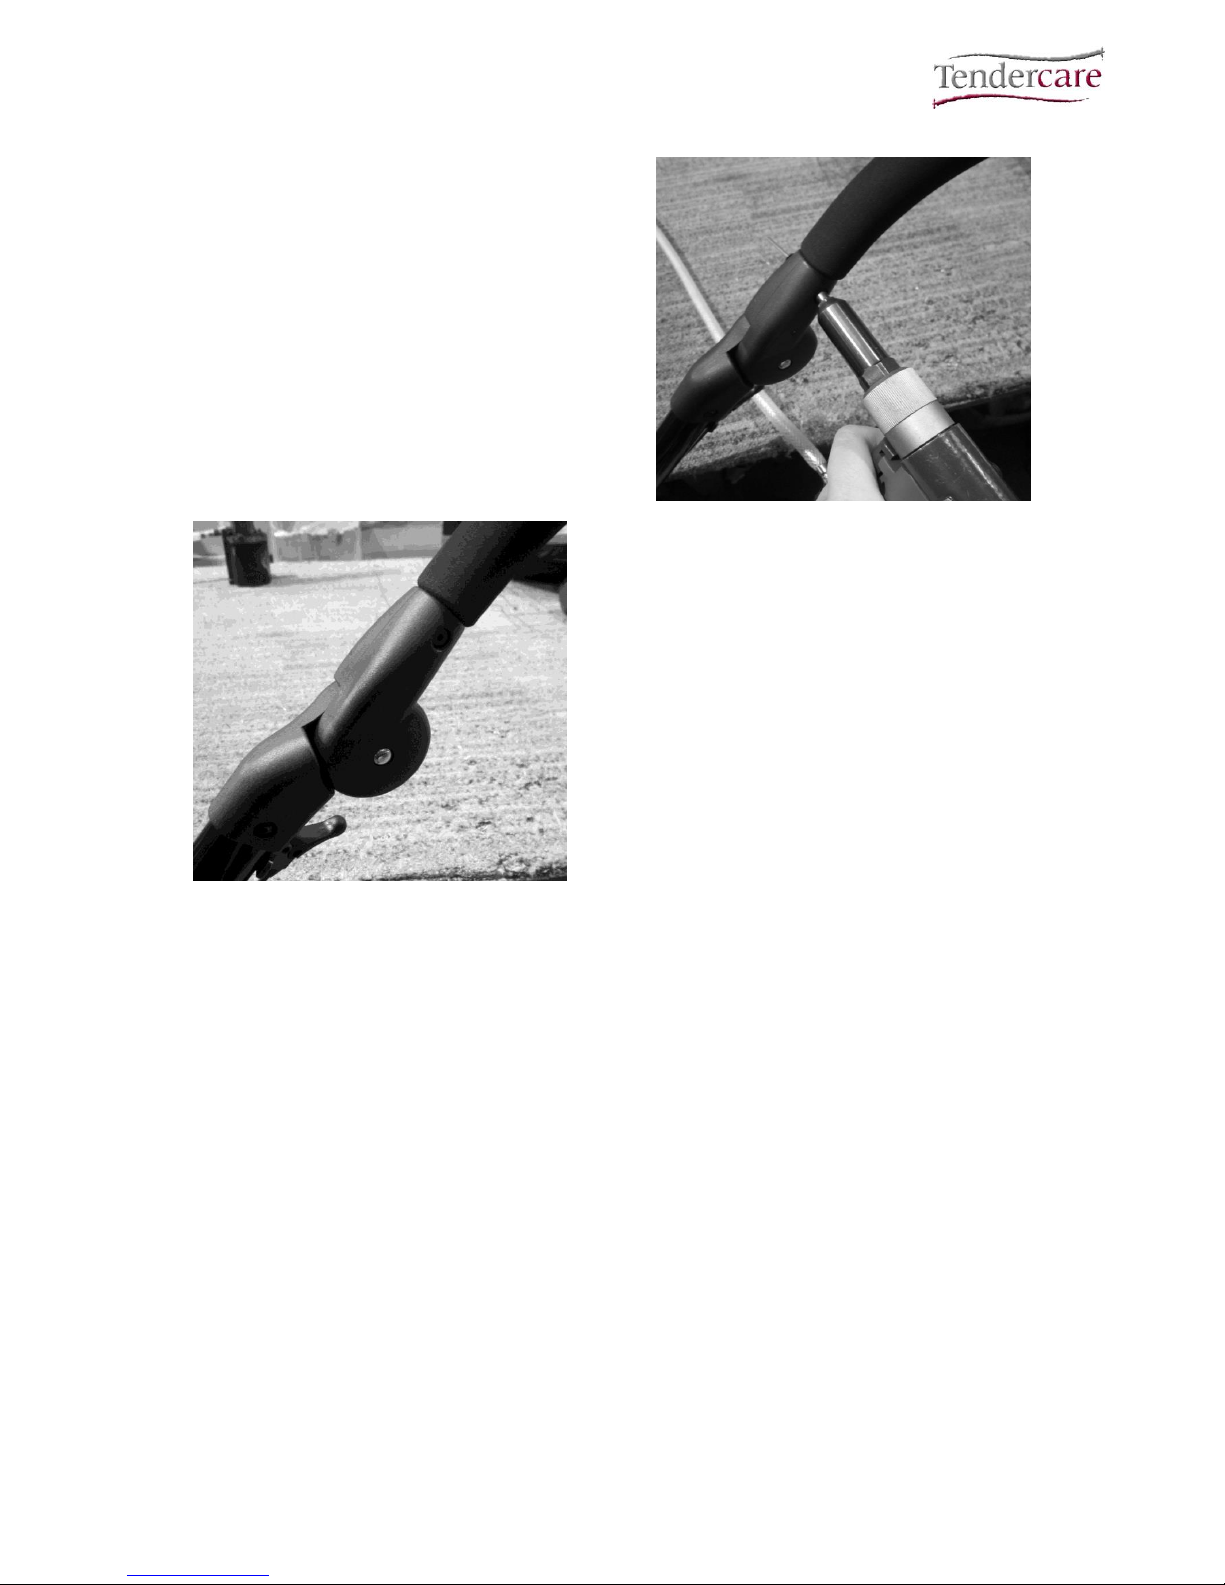
First Drill off the 8 x pop rivets securing the
old adjustors with a 5mm drill, and then
separate the adjustors from the upper frame
and push handle tubes.
Upend the frame and remove the rivet ends
from inside the tube.
Take the new adjustor and tap onto the
frame using a mallet until the hole in the
adjustor lines up with the hole in the frame.
Ensure that the adjustor is positioned so
that the round body is facing down and that
the release button is to the outside of the
frame. Please note that the push handle
adjustors used on the Cloud are handed.
Fig 8.6.2
Fig 8.6.3
Note the fit of the adjustor is very tight, if it is
not possible to get the hole to fully line up it
may be necessary to clear the holes using a
5mm drill bit.
Page 31
Cloud Wheelbase and Interface Workshop Manual
Document No: 057-02 v1a Page 31 of 32 July 2018
Cloud Wheelbase and Interface Workshop Manual.doc
Secure the new adjustors onto the frame
with 4 x 4.8mm x 14mm black pop rivets.
Next fit the push handle into the top of the
adjustors (ensuring that both adjustors are
set at the same angle), tap down with the
mallet and secure with a further 4 x 4.8 x
14mm black pop rivets.
Fig 8.6.4
Fig 8.6.5
Left: The new push handle adjustor fitted to
the frame.
Page 32

Cloud Wheelbase and Interface Workshop Manual
Document No: 057-02 v1a Page 32 of 32 July 2018
Cloud Wheelbase and Interface Workshop Manual.doc
9: Cleaning
1. To clean the wheelbase or interface, wipe with a damp cloth and dry thoroughly.
2. For more stubborn stains wipe with a damp cloth and warm water in which a little
mild soap has been dissolved. Dry thoroughly.
3. Never use furniture polish or any spirit to clean the frame.
10: Parts Lists
Please refer to the appropriate parts list and exploded diagram for the part of the system
you are interested in. The pages available that apply to this manual are;
Swirl Chassis Parts List and Snappi Interface parts list.
 Loading...