


Copyright Statement
© 2015 Shenzhen Tenda Technology Co., Ltd. All rights reserved.
Tenda is a registered trademark legally held by Shenzhen Tenda Technology Co., Ltd. Other brand and product
names mentioned herein are trademarks or registered trademarks of their respective holders. Copyright of the
whole product as integration, including its accessories and software, belongs to Shenzhen Tenda Technology Co.,
Ltd. No part of this publication can be reproduced, transmitted, transcribed, stored in a retrieval system, or
translated into any language in any form or by any means without the prior written permission of Shenzhen Tenda
Technology Co., Ltd.
Disclaimer
Pictures, images and product specifications herein are for references only. To improve internal design, operational
function, and/or reliability, Tenda reserves the right to make changes to the products without obligation to notify
any person or organization of such revisions or changes. Tenda does not assume any liability that may occur due
to the use or application of the product described herein. Every effort has been made in the preparation of this
document to ensure accuracy of the contents, but all statements, information and recommendations in this
document do not constitute the warranty of any kind, express or implied.

Contents
Chapter 1 Product Introduction ...................................................................................................................................... 2
1.1 Overview ........................................................................................................................................................... 2
1.2 Features .............................................................................................................................................................. 2
1.3 LED .................................................................................................................................................................... 2
1.4 Button ................................................................................................................................................................. 3
Chapter 2 Install Wireless USB Adapter ........................................................................................................................ 4
2.1 Physical Connection ........................................................................................................................................... 4
2.2 Driver and WLAN Utility Installation ............................................................................................................... 4
Chapter 3 Connect to WiFi ................................................................................................................................ .............. 7
3.1 Via Tenda WLAN Utility ................................................................................................................................... 7
3.2 Via Windows Built-in WLAN Program ............................................................................................................. 8
Windows 7 .................................................................................................................................................................. 8
Windows 8 ................................................................................................................................................................ 10
3.3 Via WPS ........................................................................................................................................................... 10
By WPS Button (Available for W311M/W311Ma) .................................................................................................. 10
PBC Connection ....................................................................................................................................................... 11
PIN Code Connection ............................................................................................................................................... 13
Chapter 4 Tenda WLAN Utility ..................................................................................................................................... 17
4.1 STA Mode ............................................................................................................................................................... 18
Available Networks ................................................................ ................................................................ ......... 19
Link Information ............................................................................................................................................. 21
Profile.............................................................................................................................................................. 22
Advanced ........................................................................................................................................................ 32
About .............................................................................................................................................................. 32
Help ................................................................................................................................................................... 33
4.2 AP Mode ................................................................................................................................................................. 33
AP Setup ......................................................................................................................................................... 34
Advanced ........................................................................................................................................................ 34
Access Control ................................................................................................................................................ 35
Connected Devices .......................................................................................................................................... 36
4.3 STA+AP Mode ....................................................................................................................................................... 36
AP ................................................................................................................................................................... 37
Appendix 1 Disable Other Wireless Adapter ................................................................................................................ 39
Appendix 2 WPS Profile ................................................................................................................................................. 40
Appendix 3 Safety and Emission Statement ................................................................................................................. 42

About this Manual
Thank you for purchasing our product. This manual applies to W311M, W311MI and W311Ma. W311M is taken
as a guide to illustrate their functions and features. And their respective differences will be specially marked.
Before Installation
1. This user guide may instruct you to install and configure the device. Please read carefully before you start to
use this product.
2. To avoid possible network conflicts between this Tenda network adapter and those of other manufactures, it’s
recommend that you first disable the network adapters of other manufacturers before installing the driver. See
Appendix 1 Disable Other Wireless Adapter for details.
May you have a nice experience!
1

Chapter 1 Product Introduction
1.1 Overview
The Wireless USB Adapter of W311M series adopts 11n technology, which makes the wireless transmission speed
up to 150Mbps. It supports soft AP function. That means you can use it as an AP. Installing this product with a
desktop PC or a notebook establishes a cost-effective wireless network swiftly and conveniently. The compactness
design makes you take it everywhere.
W311M W311Ma W311MI
1.2 Features
Up to 150Mbps wireless speed
Complies with IEEE 802.11b, IEEE 802.11g, and IEEE 802.11n standards
Supports soft AP feature
USB2.0 port
Detects wireless network and adjusts transmitting rate automatically
Provides two working modes: Infrastructure and Ad-Hoc
Complies with Windows XP/ Windows 2000/ Windows 7/ Windows 8/ Windows Vista
1.3 LED
(W311M and W311Ma are equipped with a LED indicator, but W311MI is not.)
Solid: Indicates the wireless adapter works properly.
Blinking: Indicates the wireless adapter is transmitting data.
Off: Indicates the wireless adapter works improperly.
2

1.4 Button
(W311M and W311Ma are equipped with a WPS button, but W311MI is not.)
WPS button: Press it to do a WPS pair with a remote device (AP, router).
3
Chapter 2 Install Wireless USB Adapter
The installation steps below are described on Windows 7. You can take them for reference if you are using other
system operations.
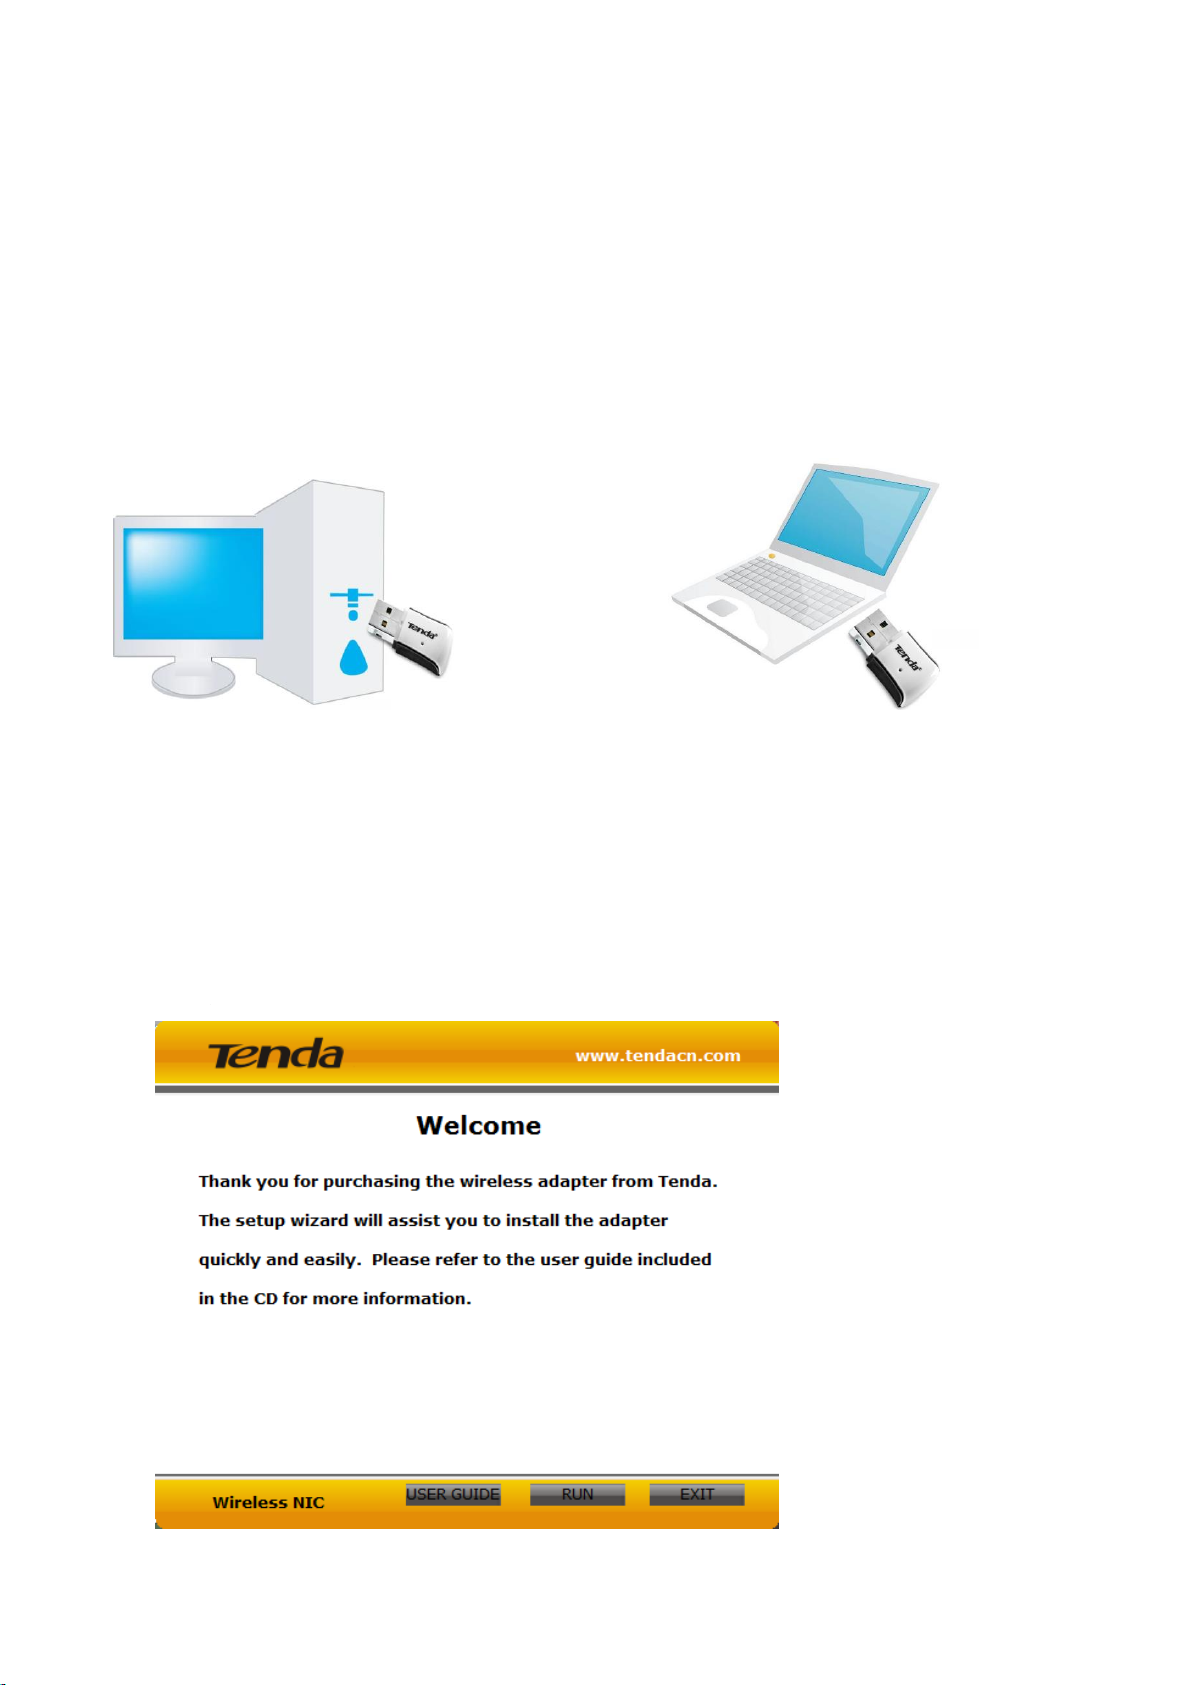
2.1 Physical Connection
Insert the Wireless USB Adapter into a USB port of your computer (desktop or laptop).
2.2 Driver and WLAN Utility Installation
After you have finished the physical installation, install the driver and Tenda WLAN Utility for a perfect
experience.
1. Insert the included CD in your PC's CD-ROM drive, and the CD will run automatically; if not, double click
Tenda.exe file attached to the CD. Click RUN to start setup.
4
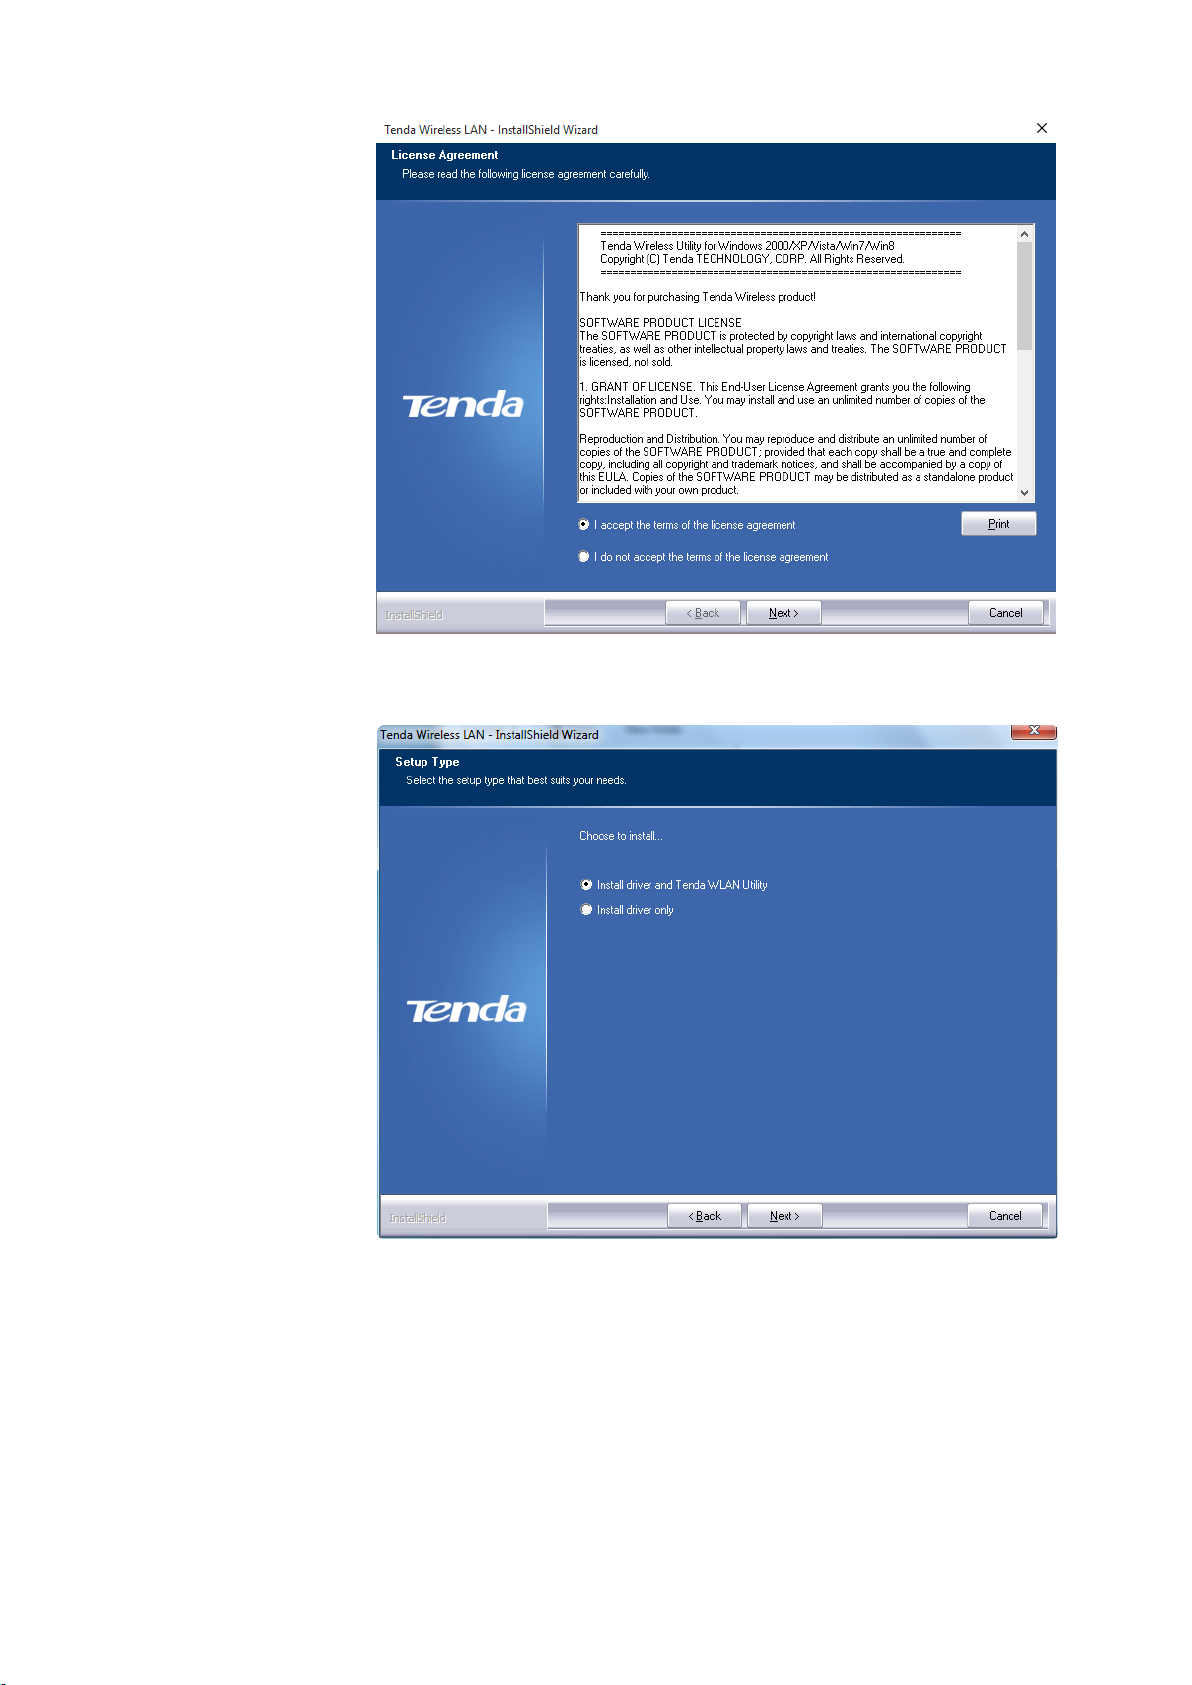
2. Check "I accept the
terms of the license
agreement" and click
Next.
3. It is recommended to
choose “Install driver
and Tenda WLAN
Utility” setup. And
click Next.
5
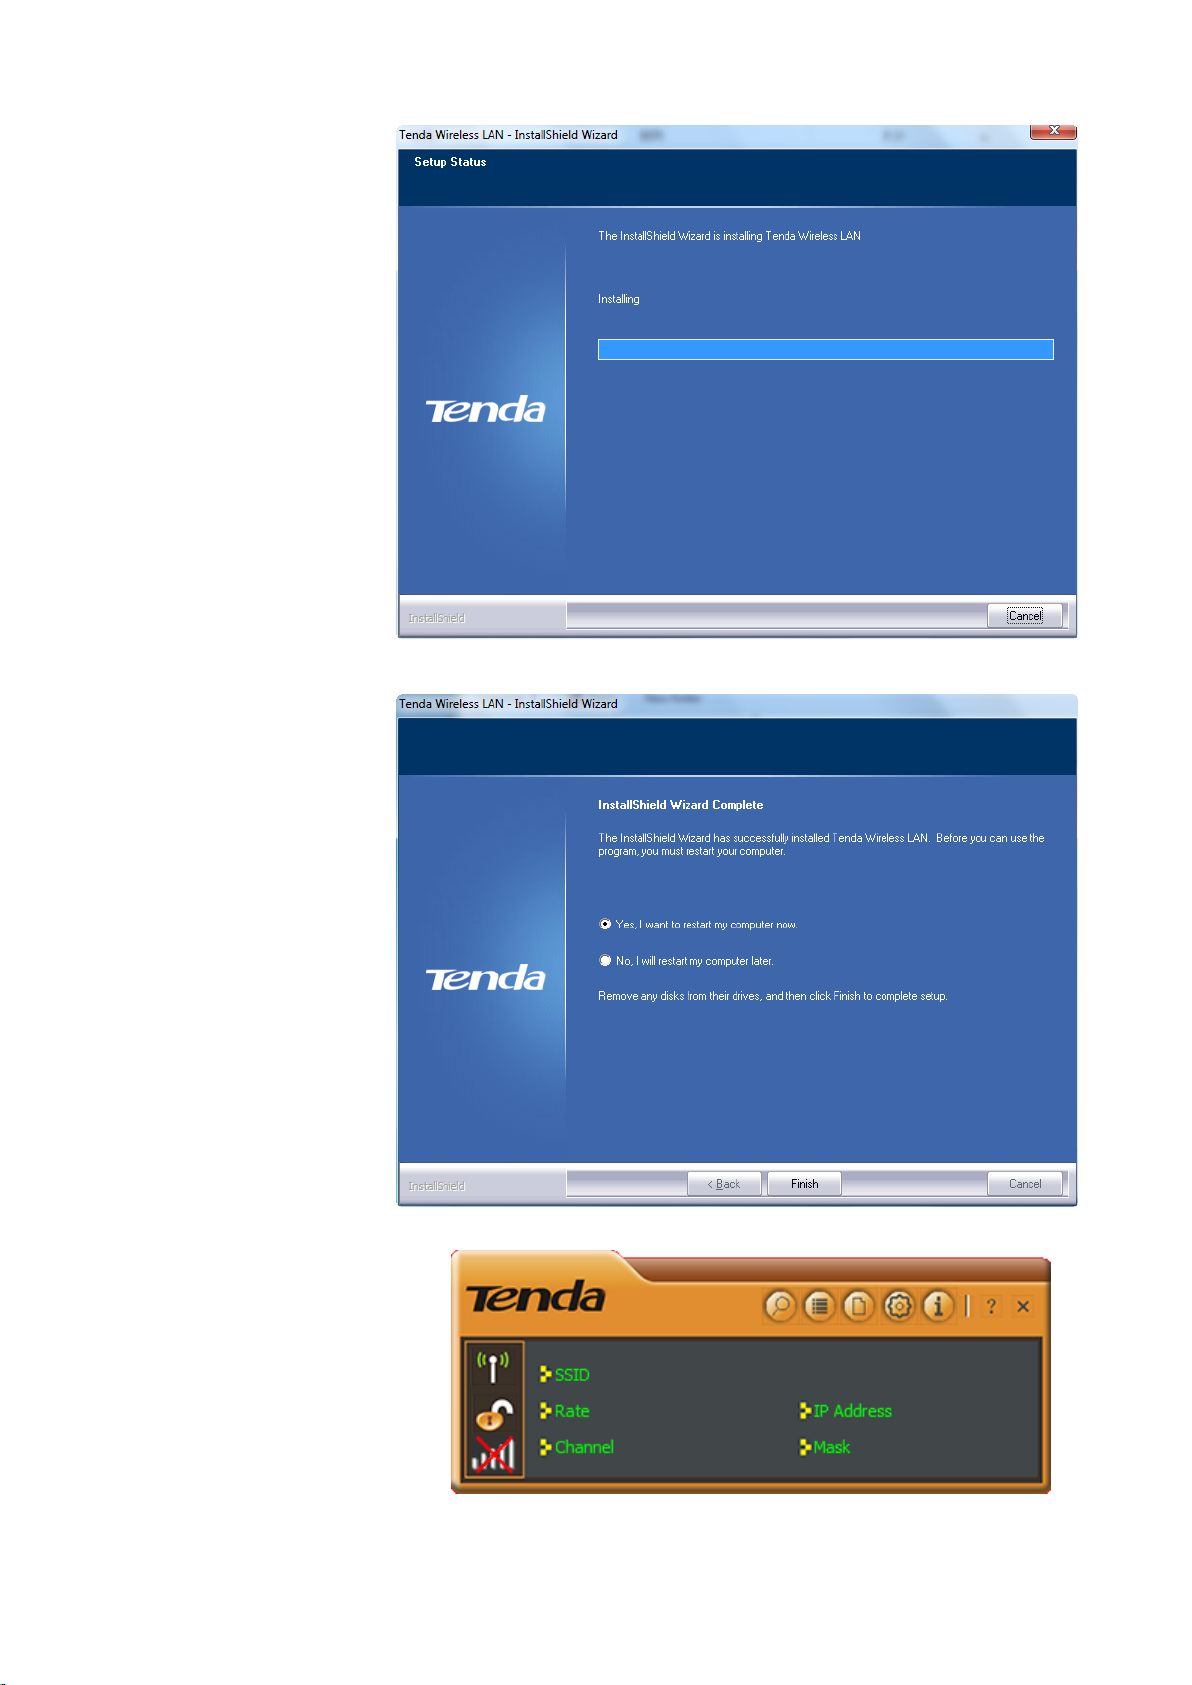
Installing…
4. Install Shield Wizard
completely. Click Finish
to get setup done. To
activate the setup, it is
recommended to restart
your computer now.
5. Tenda WLAN utility will run
automatically.
6
Chapter 3 Connect to WiFi
You can connect to WiFi via Tenda WLAN utility, Windows built-in WLAN program or WPS feature.
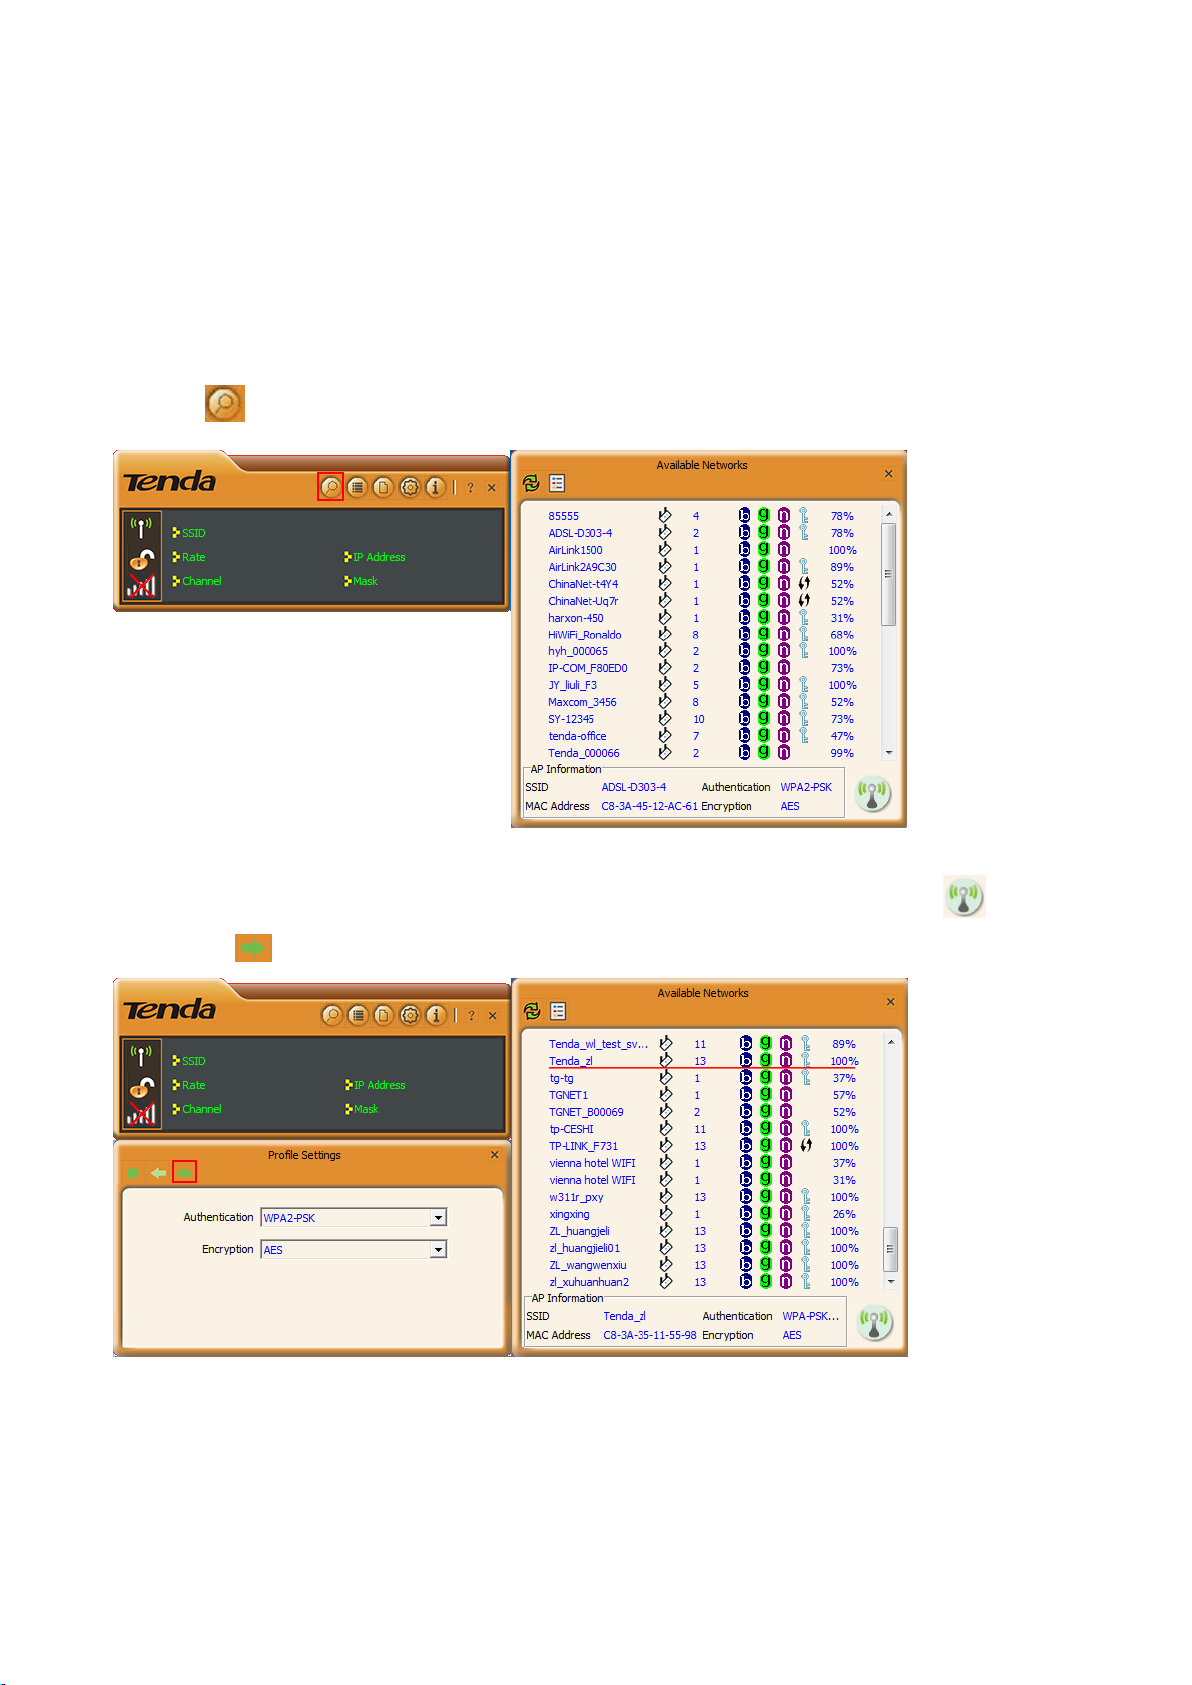
3.1 Via Tenda WLAN Utility
1. Click icon to display the available wireless networks.
2. Double click the wireless network you will connect (Or select the wireless network and click icon),
and click icon to continue.
7
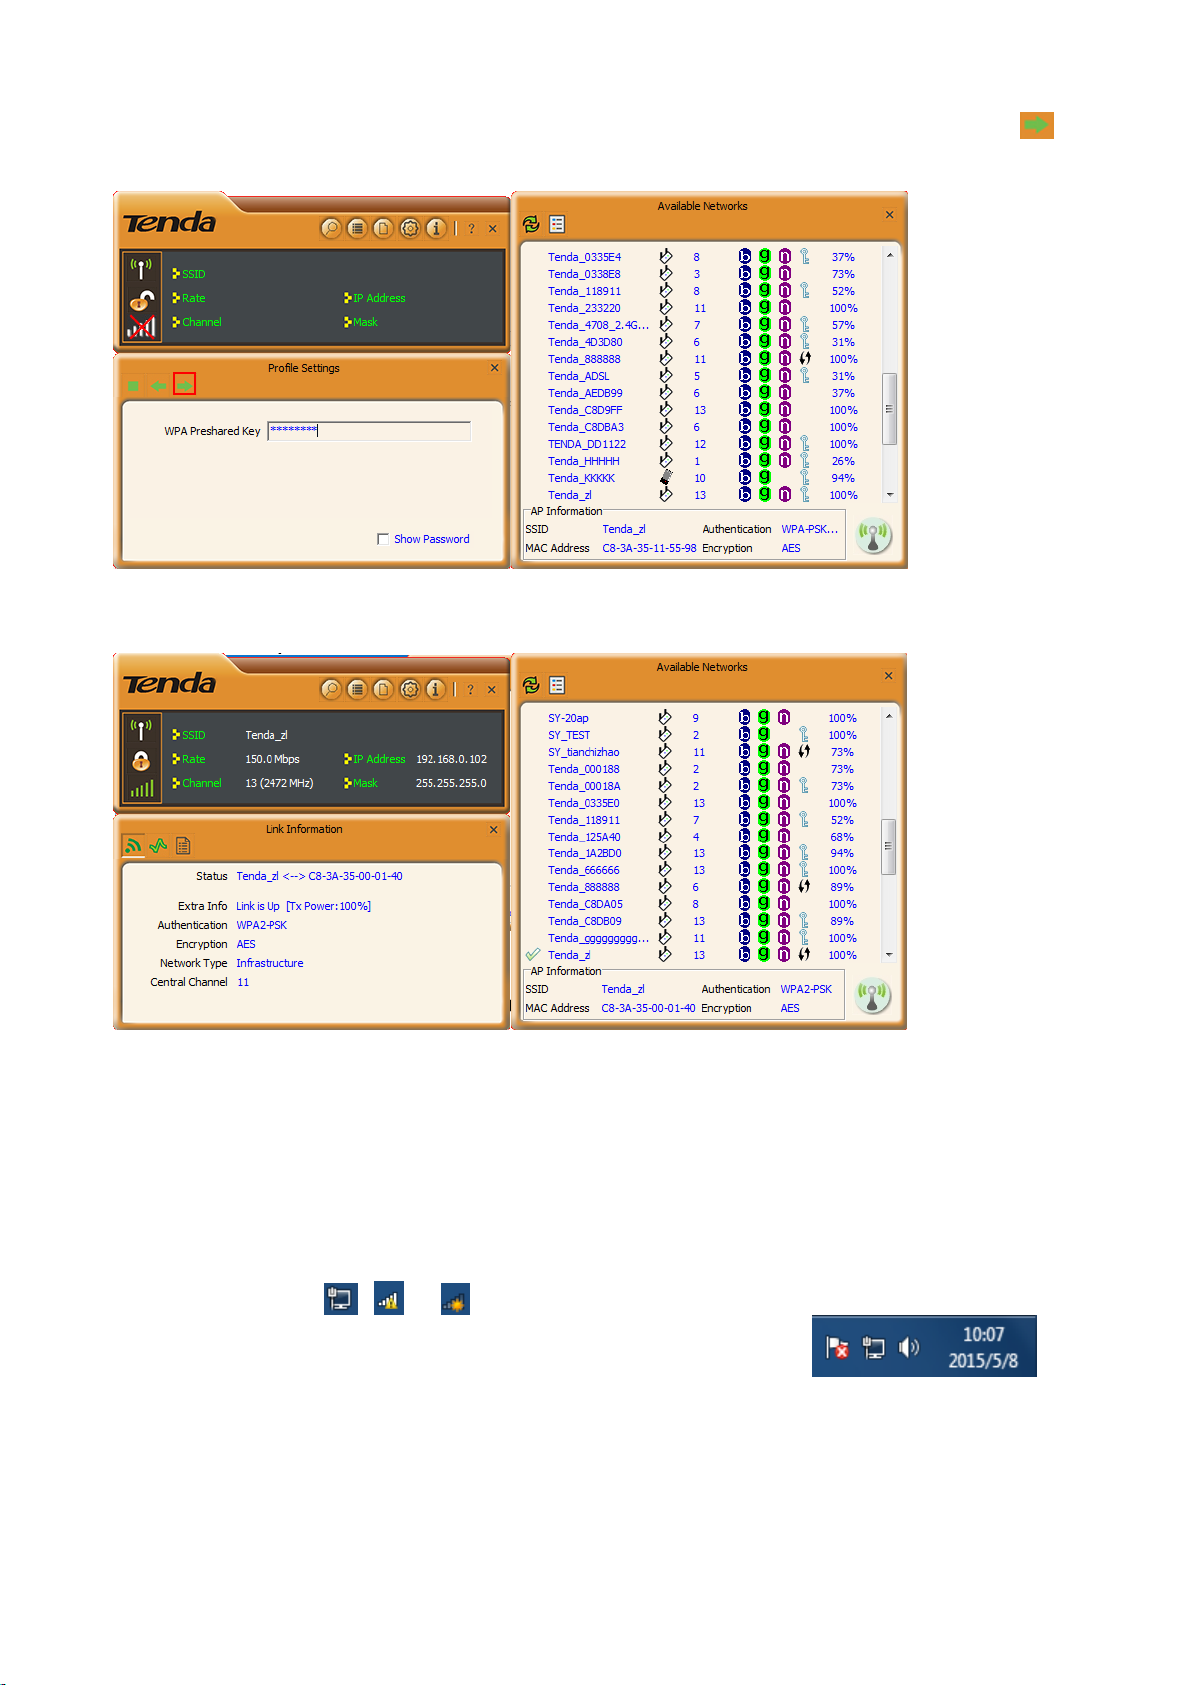
3. Do as the screen prompts. (The current wireless network requires wireless password. Input it and click
icon to continue.)
4. Connected successfully!
3.2 Via Windows Built-in WLAN Program
Windows 7
1. Left click Network ( or ) icon on the lower right corner of
desktop to display the available wireless networks.
8
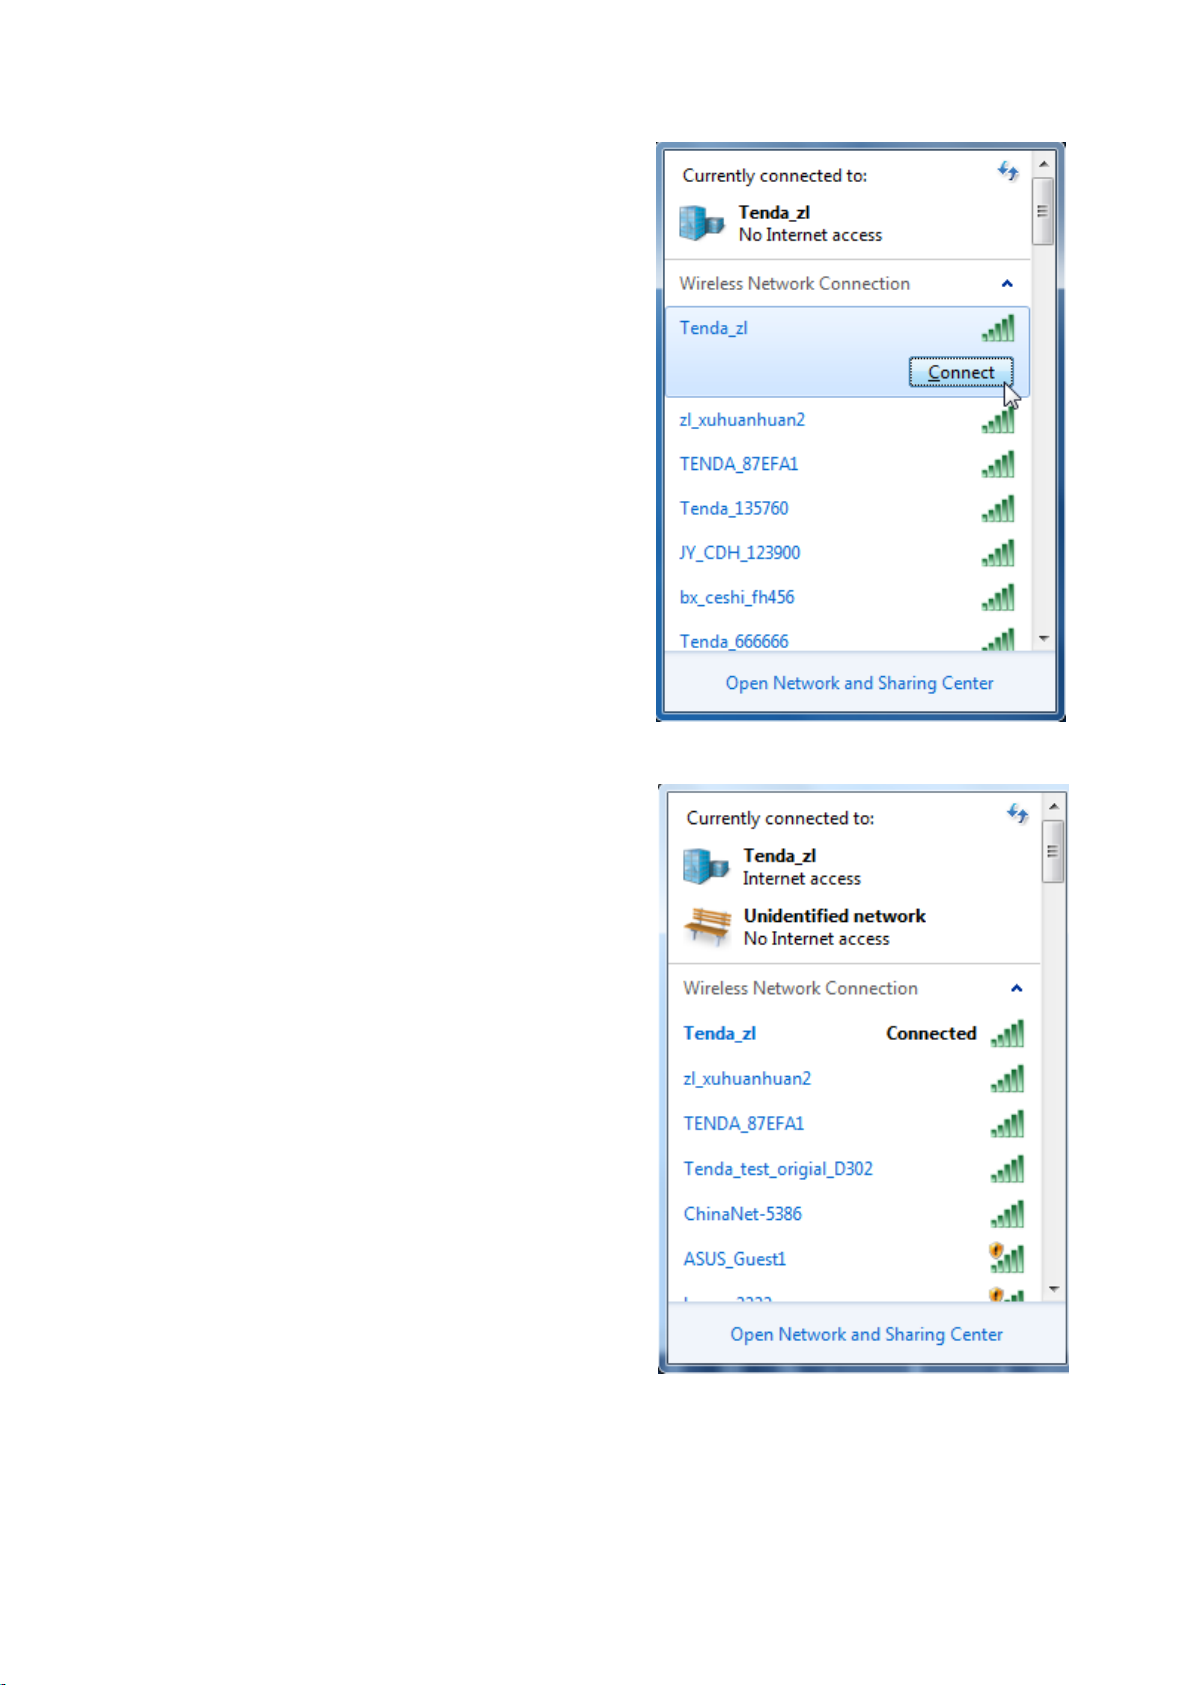
2. Select a wireless network you want to connect, click
Conncet and do as the screen prompts.
Connected successfully!
9
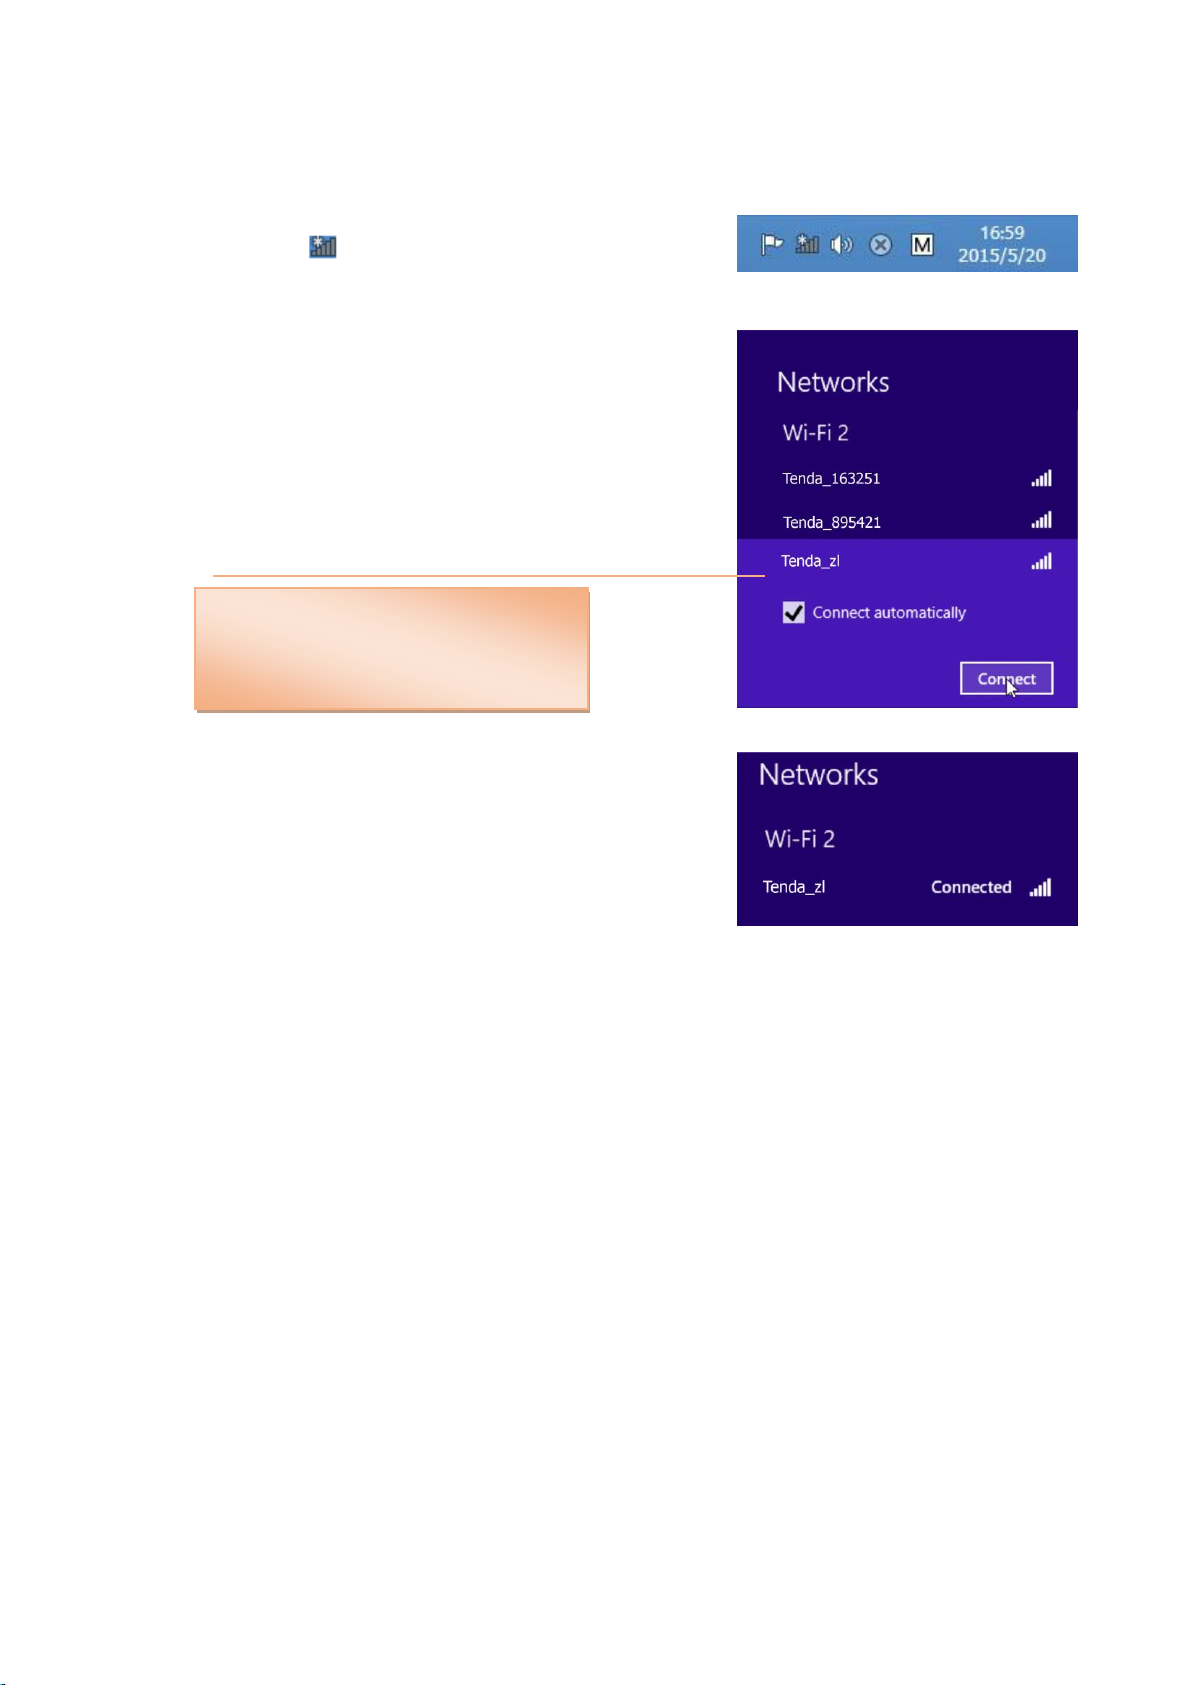
Windows 8
If you cannot find your wireless network
from the list, ensure the Airplane Mode is
not enabled on your PC.
Tip
Step 1: Click the icon on the bottom right corner of your desktop.
Step 2: Select your wireless network from the list, click Connect and
then follow onscreen instructions.
Step 3: When your wireless network is connected successfully, the
following screen will appear.
3.3 Via WPS
Or you can connect to an AP or wireless router via this wireless adapter (STA Mode) by WPS. WPS setting
supports PBC and PIN code modes. The operations below are for references.
By WPS Button (Available for W311M/W311Ma)
(W311M and W311Ma are equipped with a WPS button, W311MI is not.)
Process
1. Enable the WPS feature of the remote AP or router and press the WPS button on it.
2. In two minutes, press the WPS button on the wireless adapter.
3. Wait the wireless adapter for getting an IP address and then you can access the Internet.
10

PBC Connection
Process
1. Enable the WPS (PBC) feature of the remote router. (The detailed operations see router manual.)
2. Double click icon on the
desktop to enable Tenda WLAN utility.
And click icon.
3. Click icon to add a WPS profile.
4. Select Push-Button of WPS Method
and click icon.
11

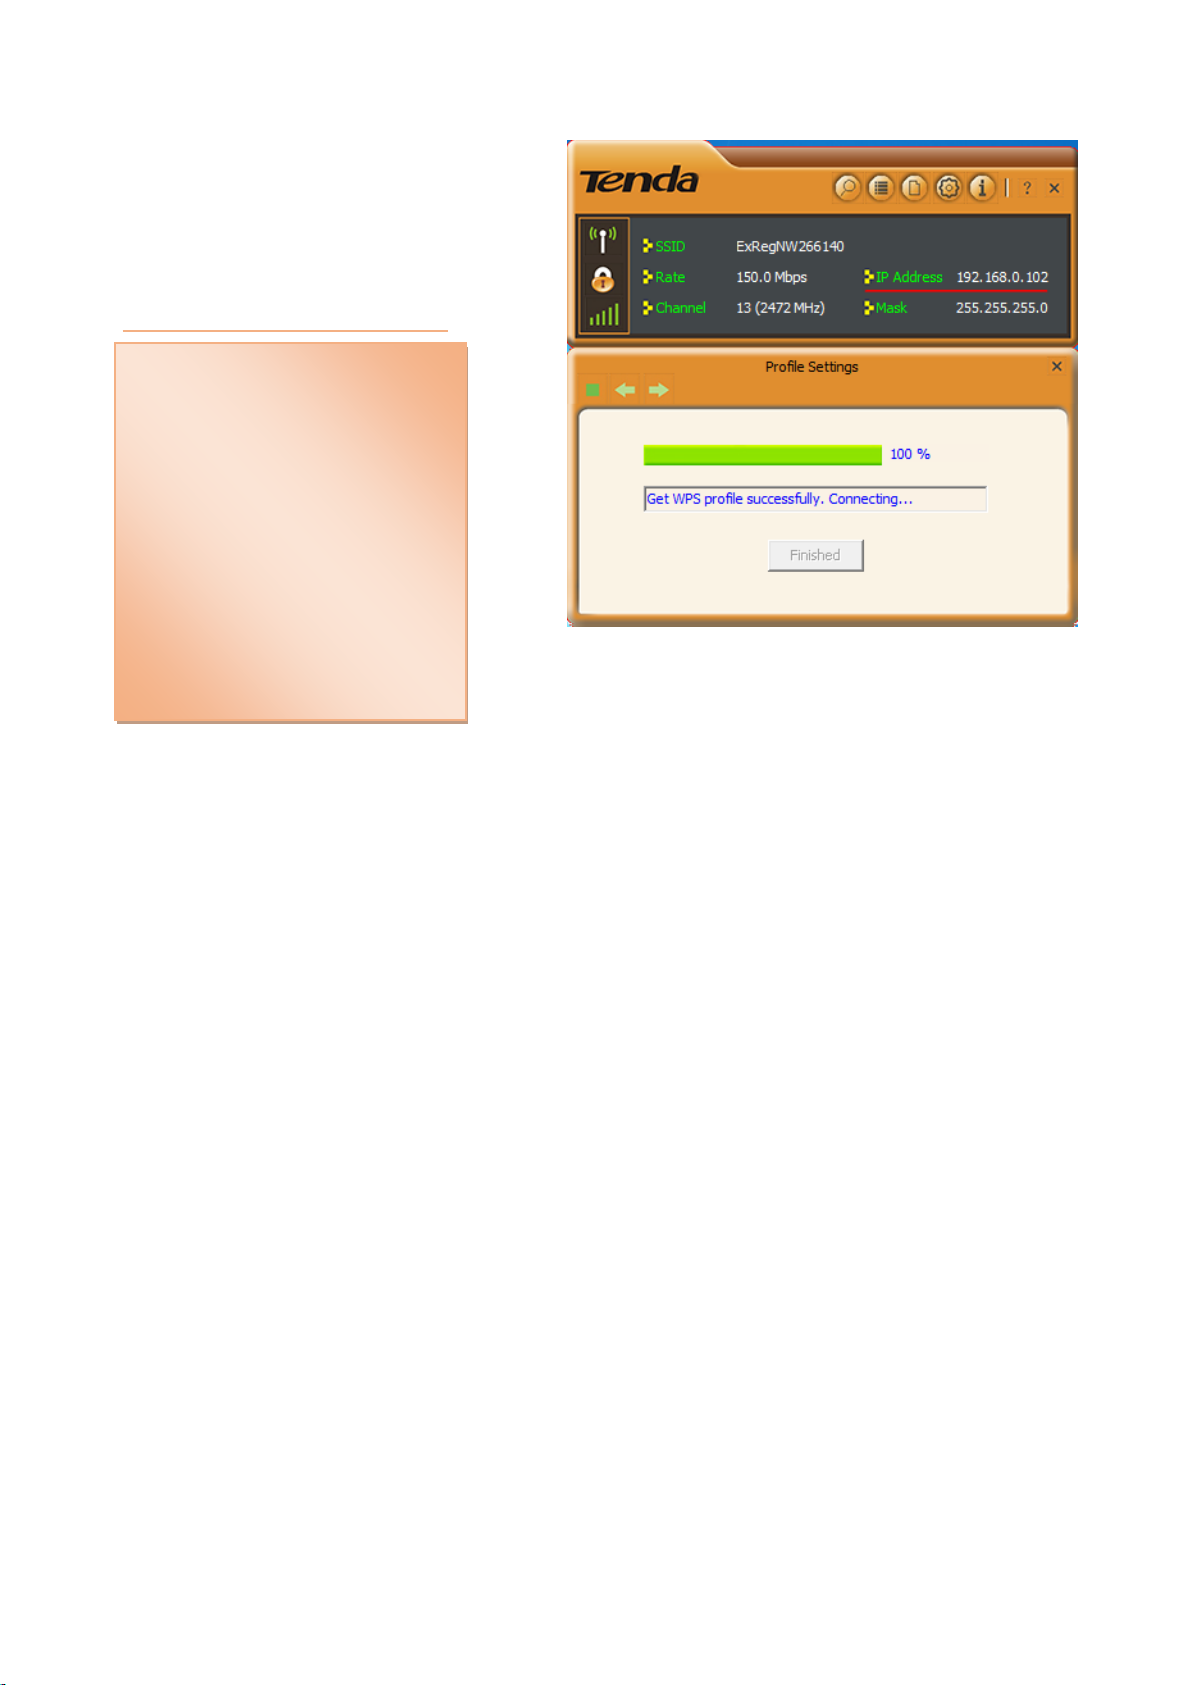
5. Click button to start PBC
connection.
The wireless adapter gets an IP address from
the remote AP/ router. Connection between the
remote AP/ router and the wireless adapter is
established successfully.
12

PIN Code Connection
Process
1. Click icon.
2. Select PIN of WPS Method, select the
remote AP you want to PIN from the WPS
AP List. And click icon.
13

Here you have two options: Type PIN in AP and
Type PIN below. Choose one you like to use.
3. Type PIN in AP
Select Type PIN in AP and note down the Pin
code number (here is 19559032), and copy this
group number to the remote AP (or router). (The
detailed operation on the remote device see its
manaul.)
4. Click button to PIN.
14

5. The wireless adapter gets an IP address from
WPS Profile: If you click this button
instead of clicking , you can PIN
to the remote device by customizing
the encryption method. The details
see Appendix 2 WPS Profile.
the remote AP/ router. Connection between
the remote AP/ router and the wireless adapter
is established successfully.
3. Type PIN below
Select Type PIN below and copy the PIN code
number from the remote AP (or router) into the
Pin Code field of the wireless adapter. And click
icon.
4. Click button to PIN.
15
The wireless adapter gets an IP address from the
1. Under the WPS connection mode,
when multiple routers simultaneously
enable the WPS function, it may
cause connection failure.
2. If the router connects to the adapter
using the WPS, only one client can be
connected at one time, and so if the
router needs to connect to multiple
clients through WPS, you should
repeat the WPS operation.
Note
remote AP/ router. Connection between the remote
AP/ router and the wireless adapter is established
successfully.
16

Chapter 4 Tenda WLAN Utility
When you are installing the driver, select “Install driver and Tenda WLAN Utility” and the adapter driver and
client utility will be installed. All functions of this adapter can be configured via Tenda’s utility interface (In the
following text it is abbreviated as UI). Click shortcut on your PC’s desktop to start the UI.
Click the Tenda UI icon located in the task bar to shift between STA
(Station) mode and AP mode, and to exit UI.
Main icons description:
① RF ON/OFF button, which is used to turn on/off the radio feature of the wireless adapter. It may be like
or .
② Key mark. Unlocked means the current wireless network is unsecured. It may be like or .
③ This icon indicates the current status of wireless connection in STA (Station mode). It may be like ,
or . ( indicates the wireless adapter works in AP mode.)
17

4.1 STA Mode
Icon
Description
Available Networks
Click this icon to display list of the avaliable netwroks.
Link Information
Click this icon to display the current client link status.
Profile Settings
Click this icon to go to profile configuration interface.
Advanced
Click this icon to go to the wireless mode (band) configuration interface.
About
Click this icon to read more info about this driver.
Help
Click this icon to read the user guide of this wireless USB adapter.
In STA (Station) mode, the wireless adapter serves as a wireless single receiver. A desktop computer installed with
it can get a WiFi connection request, and connect to a wireless network freely.
The main interface of STA mode is shown as below:
Description about the function icons on the interface:
18

Available Networks
Key mark, which means the
wireless network is secured.
The available networks that the wireless adapter scanning are displayed here. Select a wireless network and the
details of the network will be displayed in “AP Information”.
: Rescan button. Click it to update the
network list.
: Add to a Profile. Clcik it to add a wireless
network to a profile.
How to connect to an open (unencrypted) wireless network?
Select a wireless network which is unencrypted
and click icon to connect it.
19

How to connect to an encrypted wireless network?
Authentication Knowledge:
WEP: Supports 10/26-bit Hex characters and 5/13-bit ASCII.
WPA-PSK: Supports 8-63-bit ASCII and 8-64-bit Hex characters.
WPA2-PSK: Supports 8-63-bit ASCII and 8-64-bit Hex characters.
WPA-PSK/WPA2-PSK: Supports 8-63-bit ASCII and 8-64 -bit hex characters.
The Hex characters consist of numbers 0~9 and letters a-f.
ASCII characters consist of any Arabic digitals/letters and characters.
Indicates the current wireless
network is encrypted.
1. Select a wireless network (encrypted) from the
available networks list and click icon. It
will direct you to the interface below.
2. Click inco to enter the screen below
where you are required to input wireless
password.
Connected successfully!
20

Link Information
Reset counter. Click this icon to clear statistics.
Link information displays the connection info of the linked wireless network.
: Link Status. Click it to view the linked
wireless network info (SSID, MAC address,
authentication, encryption, network type and
channel). See below.
: Throughput. Click it view the link
quality, link speed, throughput and the signal
strength that the wireless adapter receiving.
: Statistics. Statistics screen displays the
total Rx and Tx data packets, including
transmitted, retransmitted and fail to receive
ACK after all retries.
21

Profile
Profile is used to save particular wireless network
parameters. When the adapter is successfully
connected to a network, the name of this network
will automatically be added here, which helps the
adapter to quickly connect to this wireless network
again. However, there is one exception, when you
have set to the hidden SSID, the SSID that cannot be
scanned, then you must manually connect by adding
the profile name. The main interface is as shown
below.
: Add. To create a new profile.
: Delete. To delete the existing profile.
: Edit. To modify the existing profile settings.
: Add WPS Profile. It requires that the connecting wireless device supports the WPS function. WPS helps
you to initiate wireless encryption and secure your wireless network quickly. See Connect to WiFi (Via WPS) for
the detailed process.
Two network modes are available: Infrastructure
(Connect to AP) and Ad-Hoc (Connect to other
computers).
22
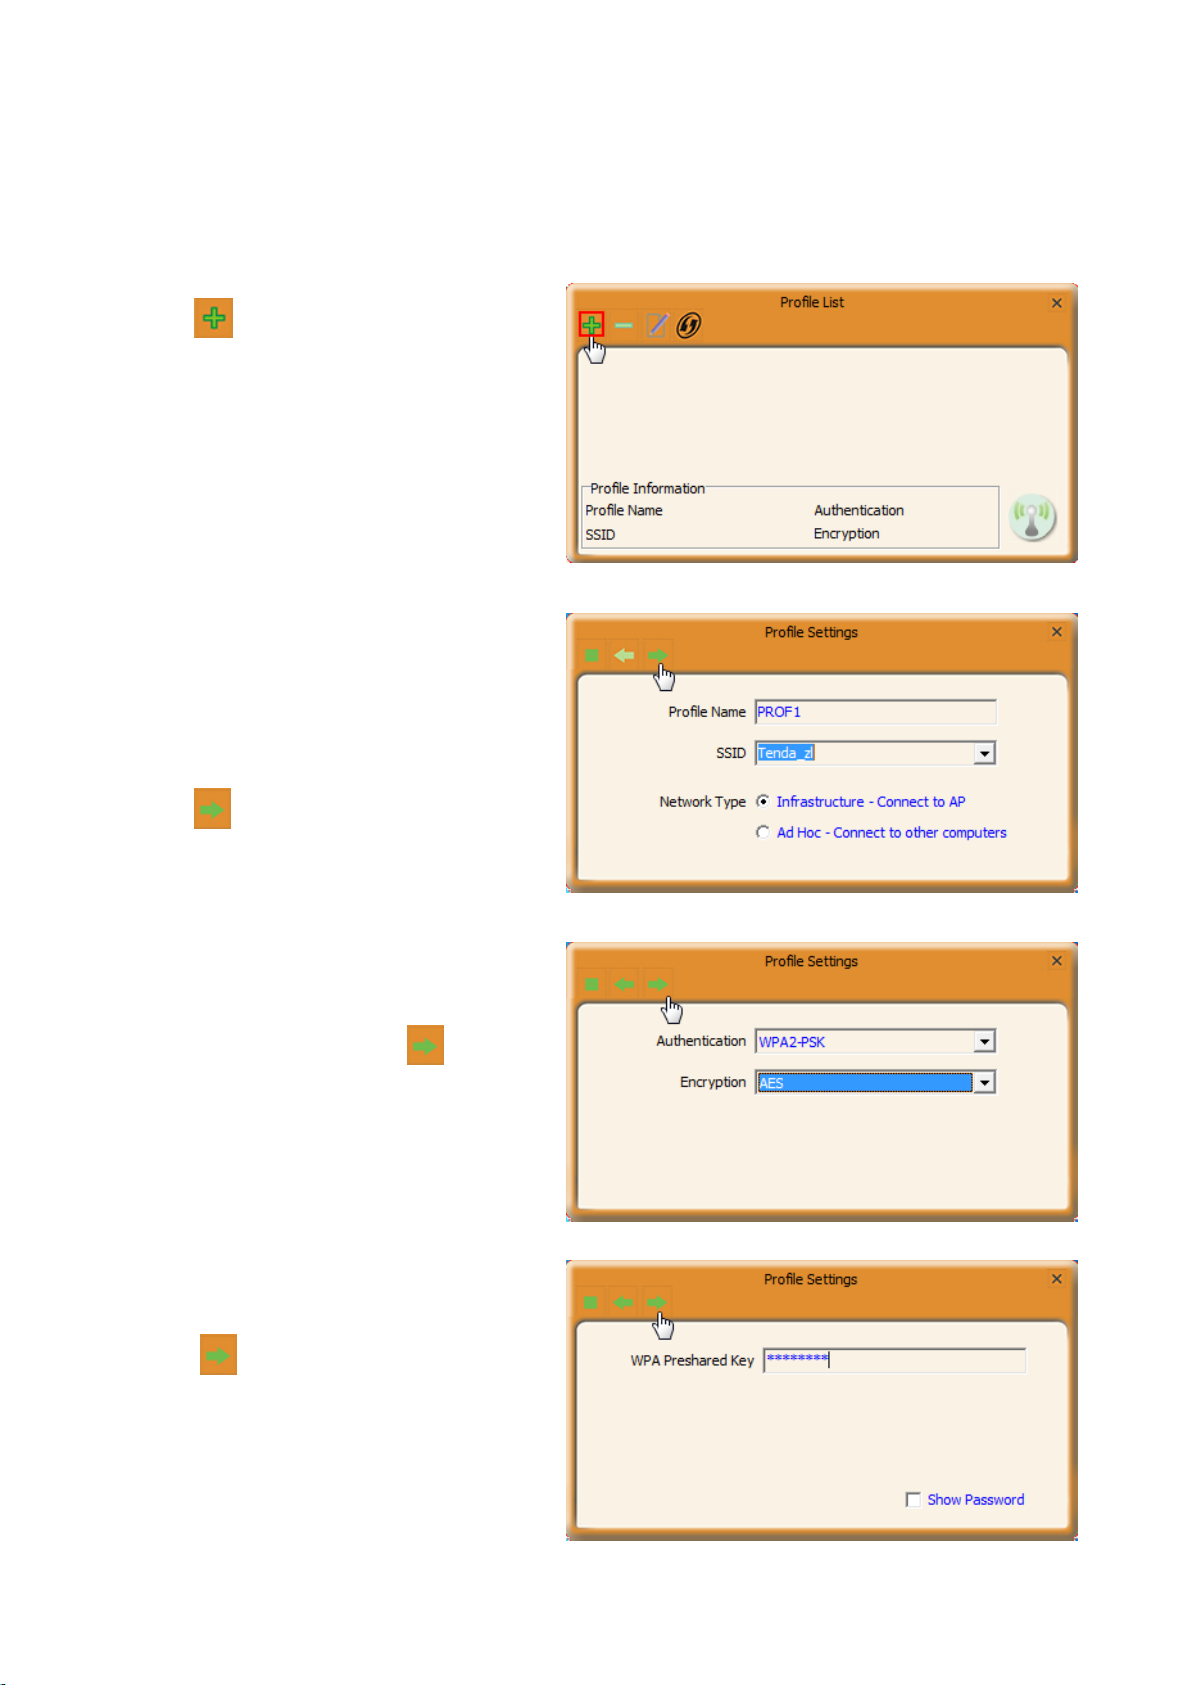
Infrastructure
Infrastructure is an application mode that integrates the wired and wireless LAN architectures.
When you are connecting the wireless adapter to an AP or a wireless router, select Infrastructure mode.
1. Click .
2. Select the network type as “Infrastructure”.
3. Define the profile. (Optional)
4. Enter/Select the SSID you want to add it to a
profile.
5. Click .
6. Select the authentication and encryption of the
SSID added above. And click .
7. Enter the wireless password of the SSID and
click .
26

If the SSID of the wireless router or AP you
wish to connect is hidden, then the wireless
adapter cannot scan the SSID, thus you need to
connect it by creating the corresponding profile.
Note
Added successfully!
Now you can click to connect the wireless
network via the profile.
Ad-Hoc
Ad-Hoc is a special wireless mobile network application mode. All nodes in the network are equal. Usually it is
used to do a resource sharing between LAN computers.
Using the Ad-hoc mode to establish a wireless network requires that each computer should be equipped with a
wireless network adapter. By connecting these wireless adapters, computers are able to share the resources.
Note that Ad-Hoc feature is unavailable for Windows 8.
Instance
PC1 (Desktop) is sharing some files with PC2 (Desktop or Laptop). Now Ad-Hoc mode is working.
27
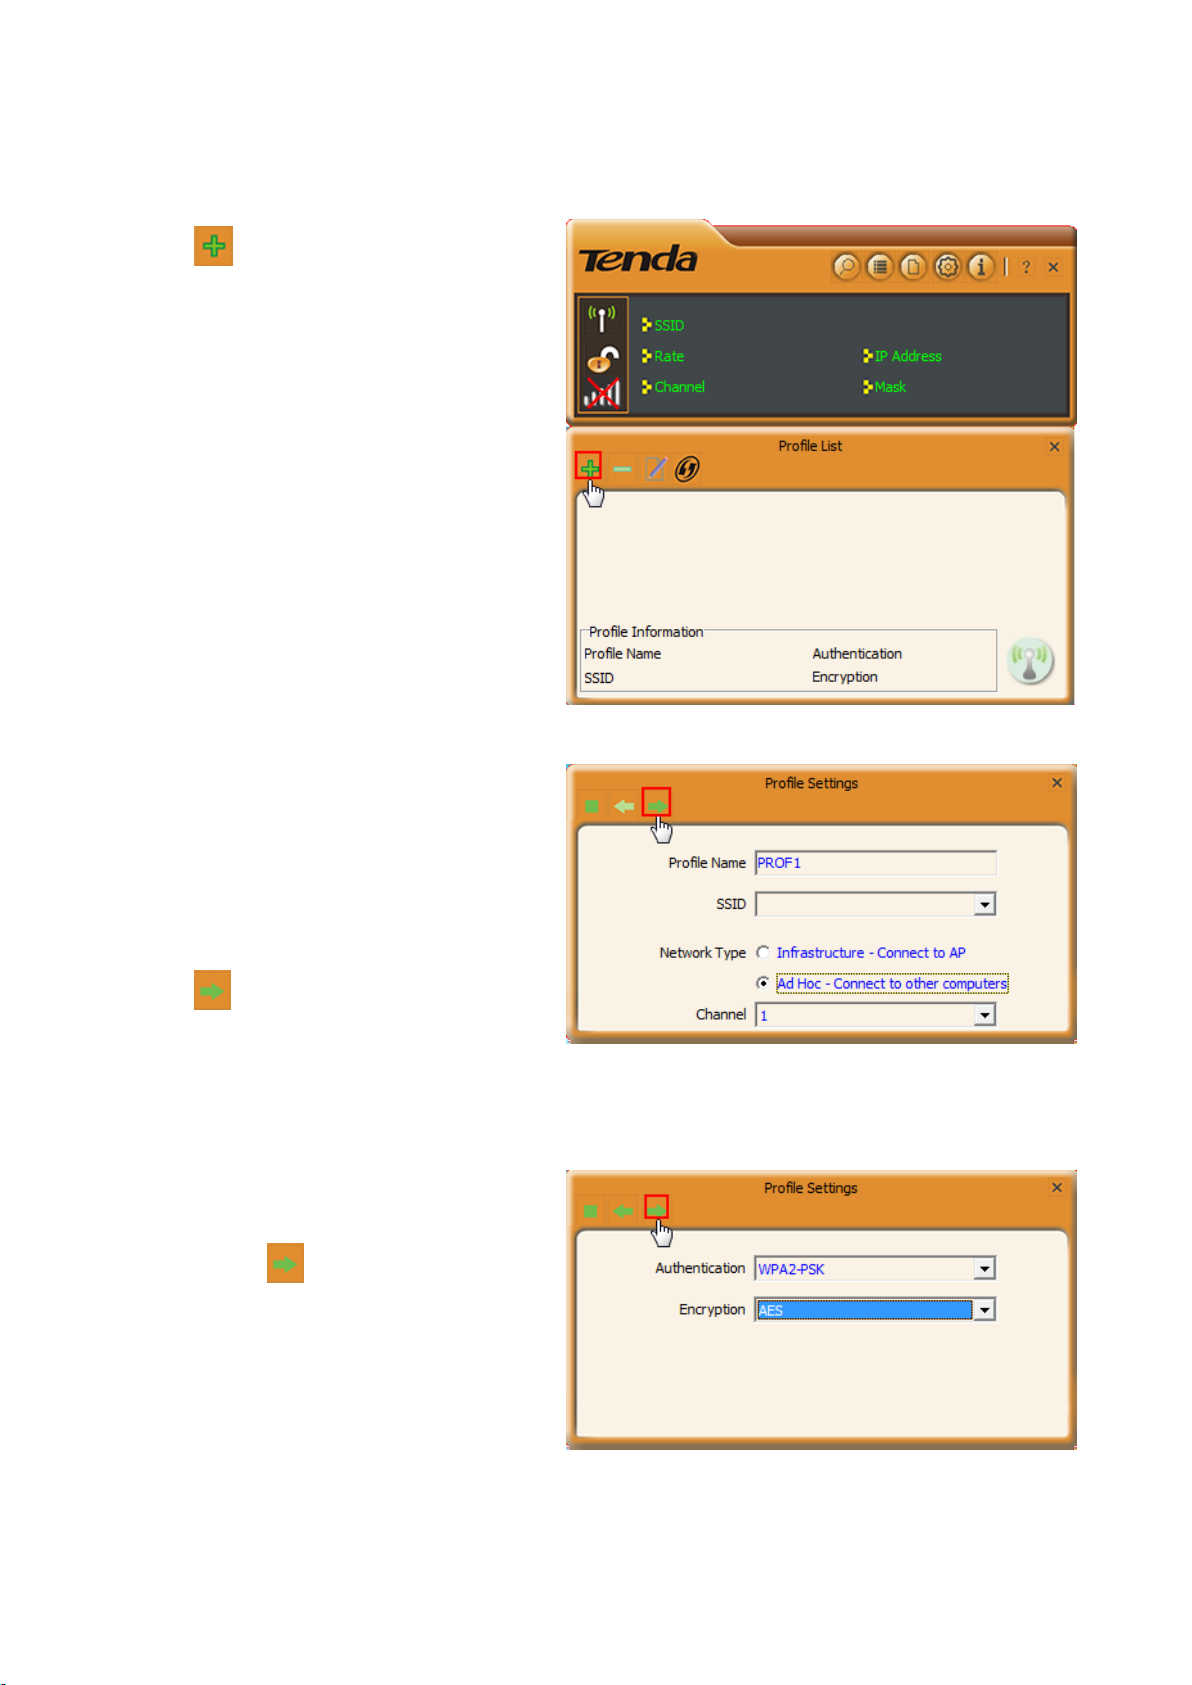
Process
1) Create a new Ad-hoc profile on the wireless adapter of PC1.
a. Click .
b. Select Ad-Hoc Network Type.
c. Define the profile. (Optional)
d. Specify a network name in the SSID field to
identify the wireless network, like Tenda.
e. Configure the channel.
f. Click .
g. Configure the authentication and encryption
type and click .
28
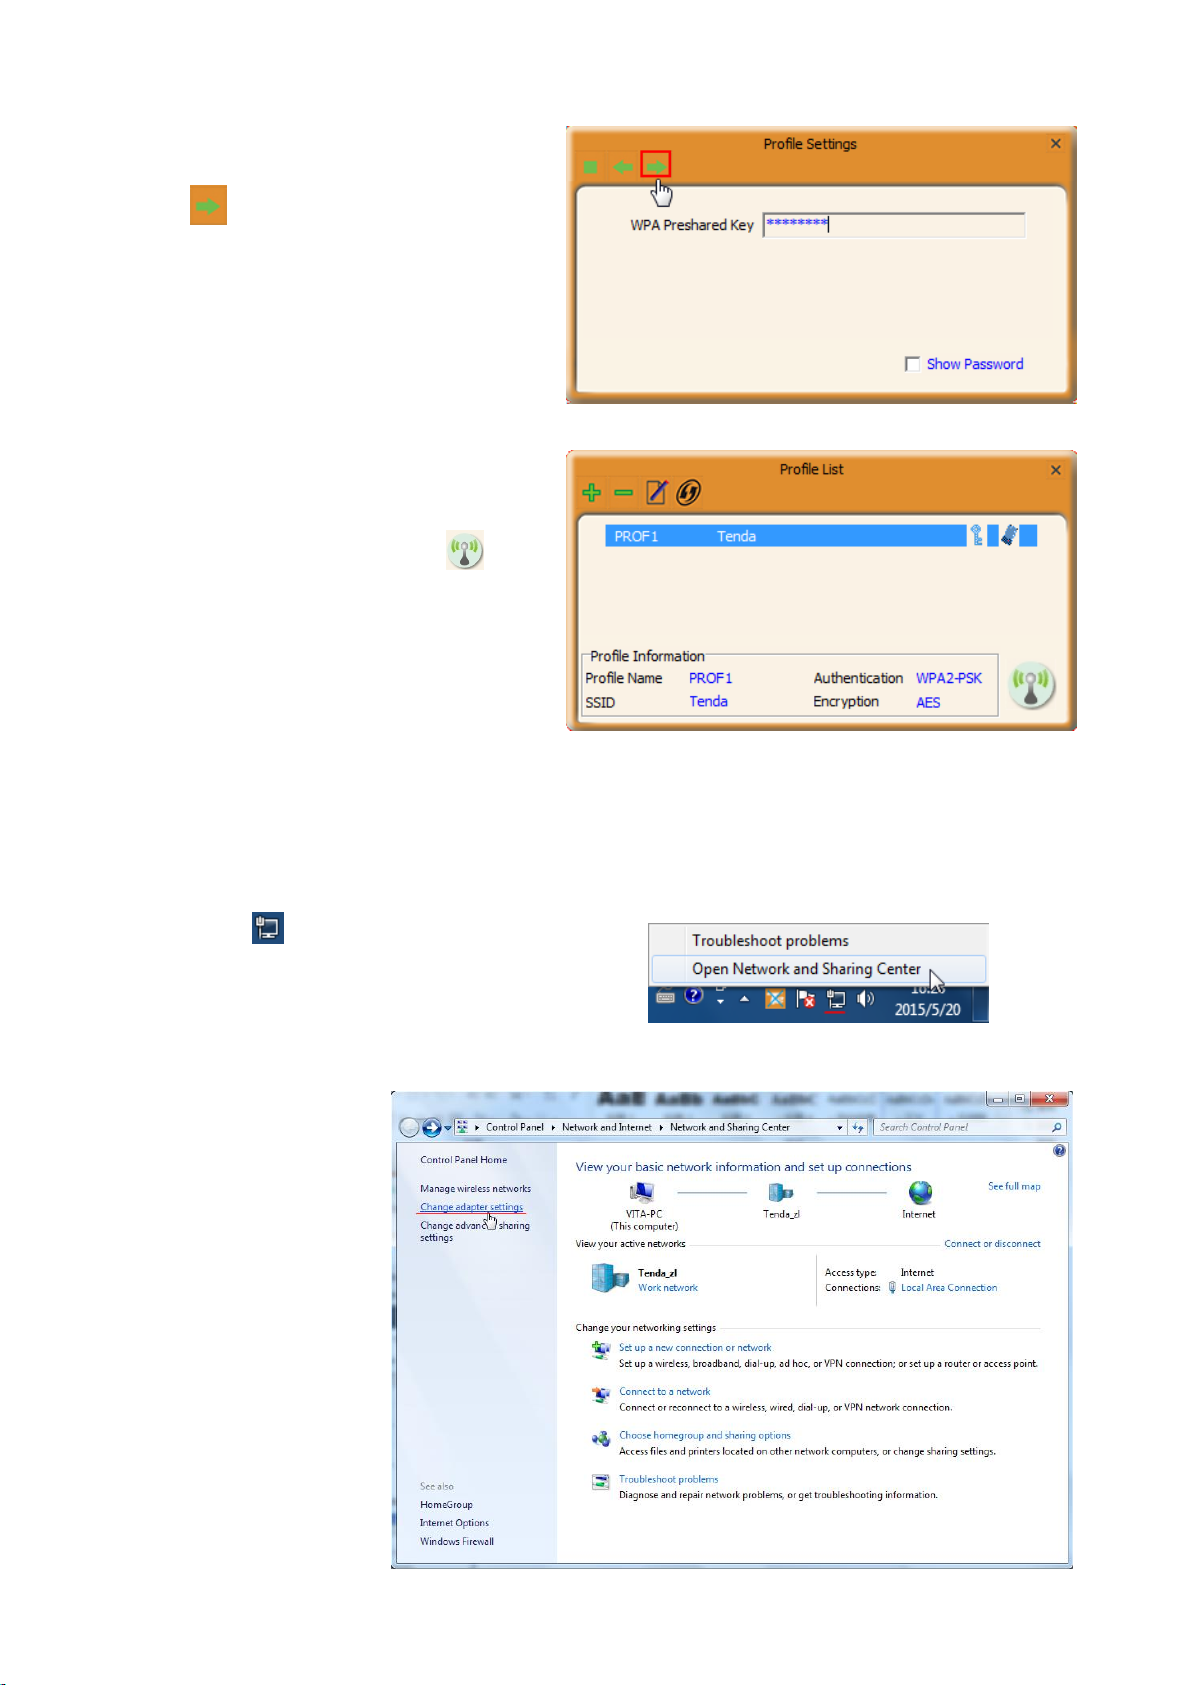
h. Configure the password for connection, and
click .
After a profile is successfully added, the profile can
be seen on the profile list, select it and icon on
the lower right corner.
2) Configure a static IP address for the wireless adapter of PC1.
You must allocate a static IP for each wireless adapter to be connected in Ad-hoc mode.
a. Right click on the lower right corner of your
computer’s desktop and click Open Network and
Sharing Center.
b. Click Change adapter
settings.
29
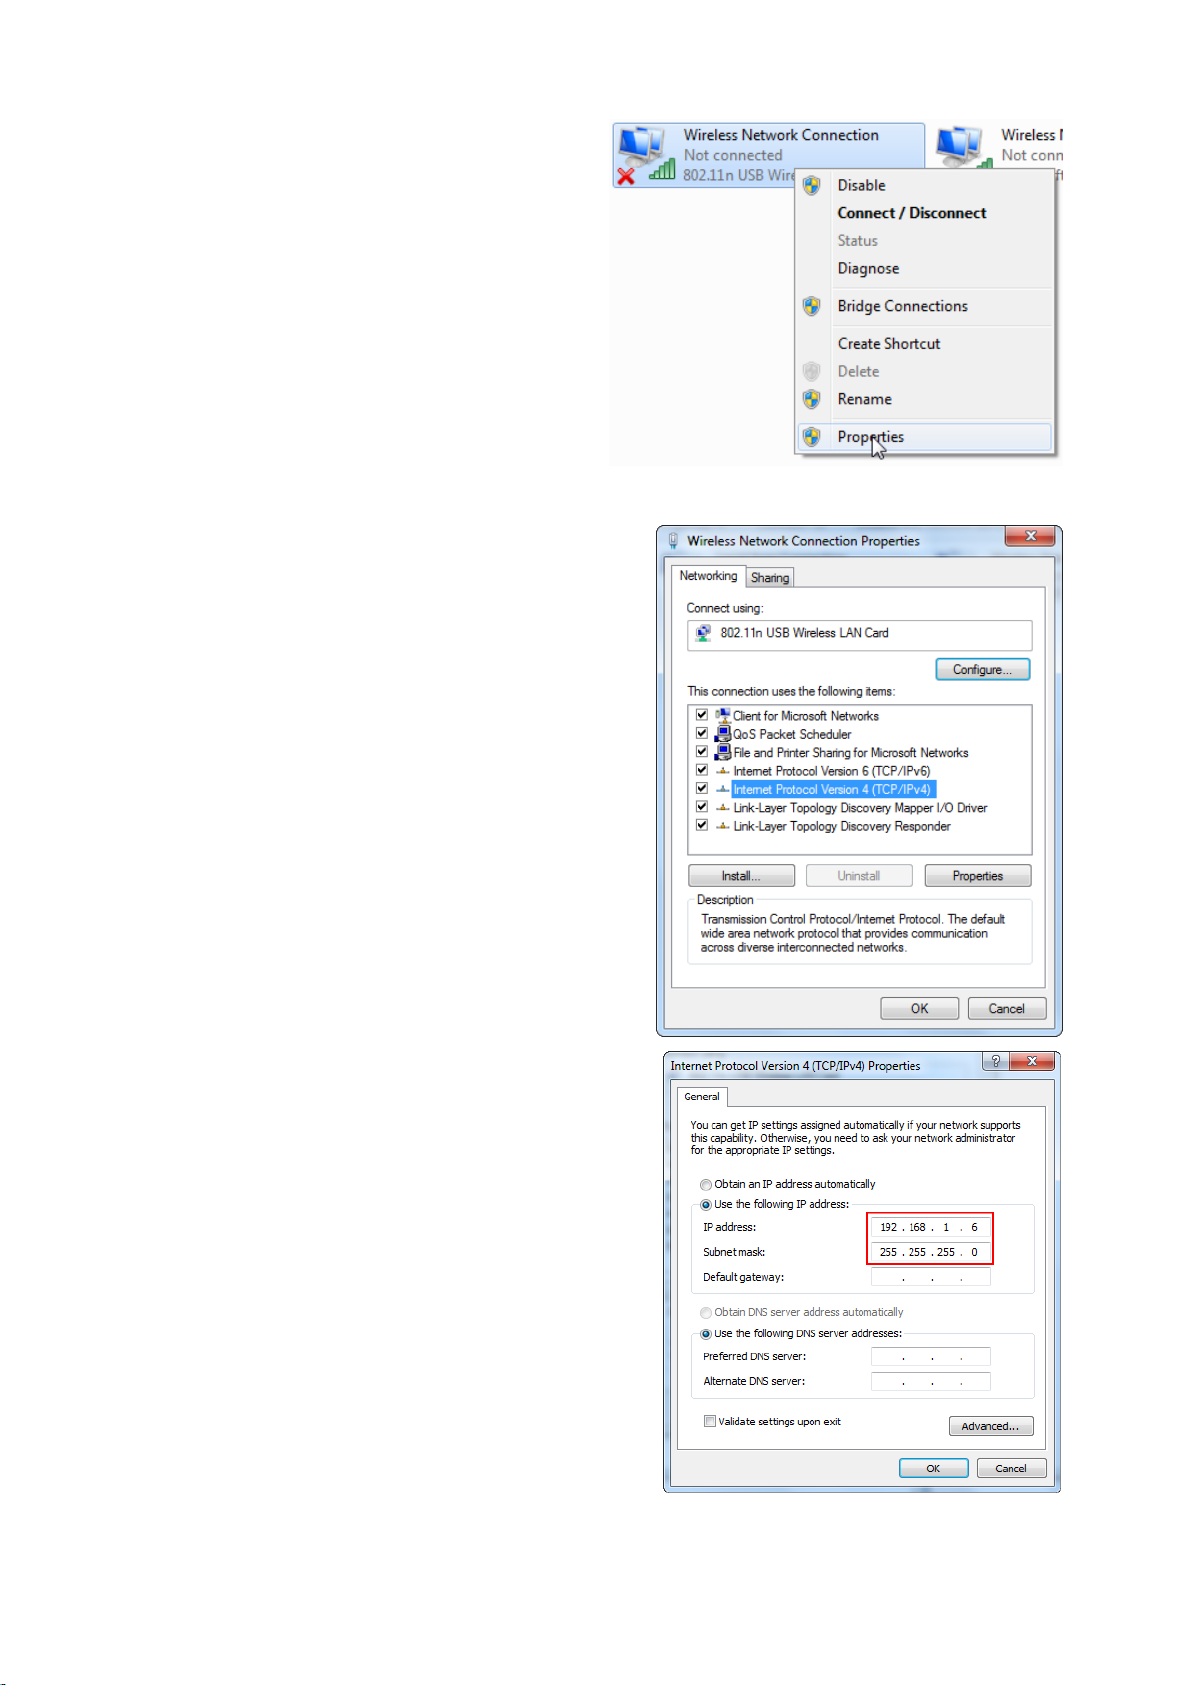
c. Right click Wireless Network Connection and
select Properties.
d. Double click Internet Protocol Version 4 (TCP/IPv4).
e. Configure an IP address as you like, such as 192.168.1.6.
And click OK to save.
30

3) Configure a static IP address for wireless adapter of PC2. Configure the wireless adapter of PC2 a
static IP address which is in the same network segment with that of PC1. For example, IP address of PC1’s
wireless adapter is 192.168.1.6; then you should set that of PC2 to be 192.168.1.x (x can be any number from
2~255).
4) Connect the SSID you have set to PC1’s wireless adapter. (Windows 7)
1. Left click Network ( or ) icon on the lower right corner of
desktop to display the available wireless network.
2. Select the wireless network you set (Here is Tenda), click
Conncet and do as the screen prompts.
Connected successfully! And you can share the file with PC1.
31

Advanced
Select a proper channel range for a
valid wireless channel recognition.
This section is used to set the wireless mode and country region code for the current wireless adapter. This
wireless adapter supports 2.4GHz.
About
This screen mainly displays the version information of the UI’s different programs as well as Tenda’s copyright
statement.
32

Help
Click icon to read the user guide of this wireless adapter.
4.2 AP Mode
In AP mode, the wireless adapter servers as an access point to transmit wireless signal and create a wireless
network, allowing other wireless clients to access the network.
Right click the UI icon on the taskbar of your computer desktop and select “Switch to AP Mode”.
The main interface of AP mode is different from that of STA mode.
When it is switched to AP mode, the wireless adapter will automatically set its IP address as 192.168.123.1, and
other clients that connected to this AP will automatically obtain the IP addresses of: 192.168.123.X (X is any
integer from 2 to 254).
33

AP Setup
Here you can set the basic AP info of the wireless adapter, including SSID (Default: SoftAPxx), wireless mode,
channel (Default: 1), authentication type and encryption type.
: Cancel. Click this icon to cancel current
operation.
: Back. Click this icon to return to the previous
operation.
: Next. Click this icon to go to the next
operation.
Advanced
Here you can set the advanced parameters of the wireless adapter when working in AP mode, such as No
forwarding among wireless clients and TX power.
No forwarding among wireless clients: This
feature isolates the communications among the
wireless clients that are connected to the wireless
adapter (in AP mode).
TX power: You can adjust the transmission power
for the wireless adapter as you need.
your settings.
: Click this button to save and apply
34

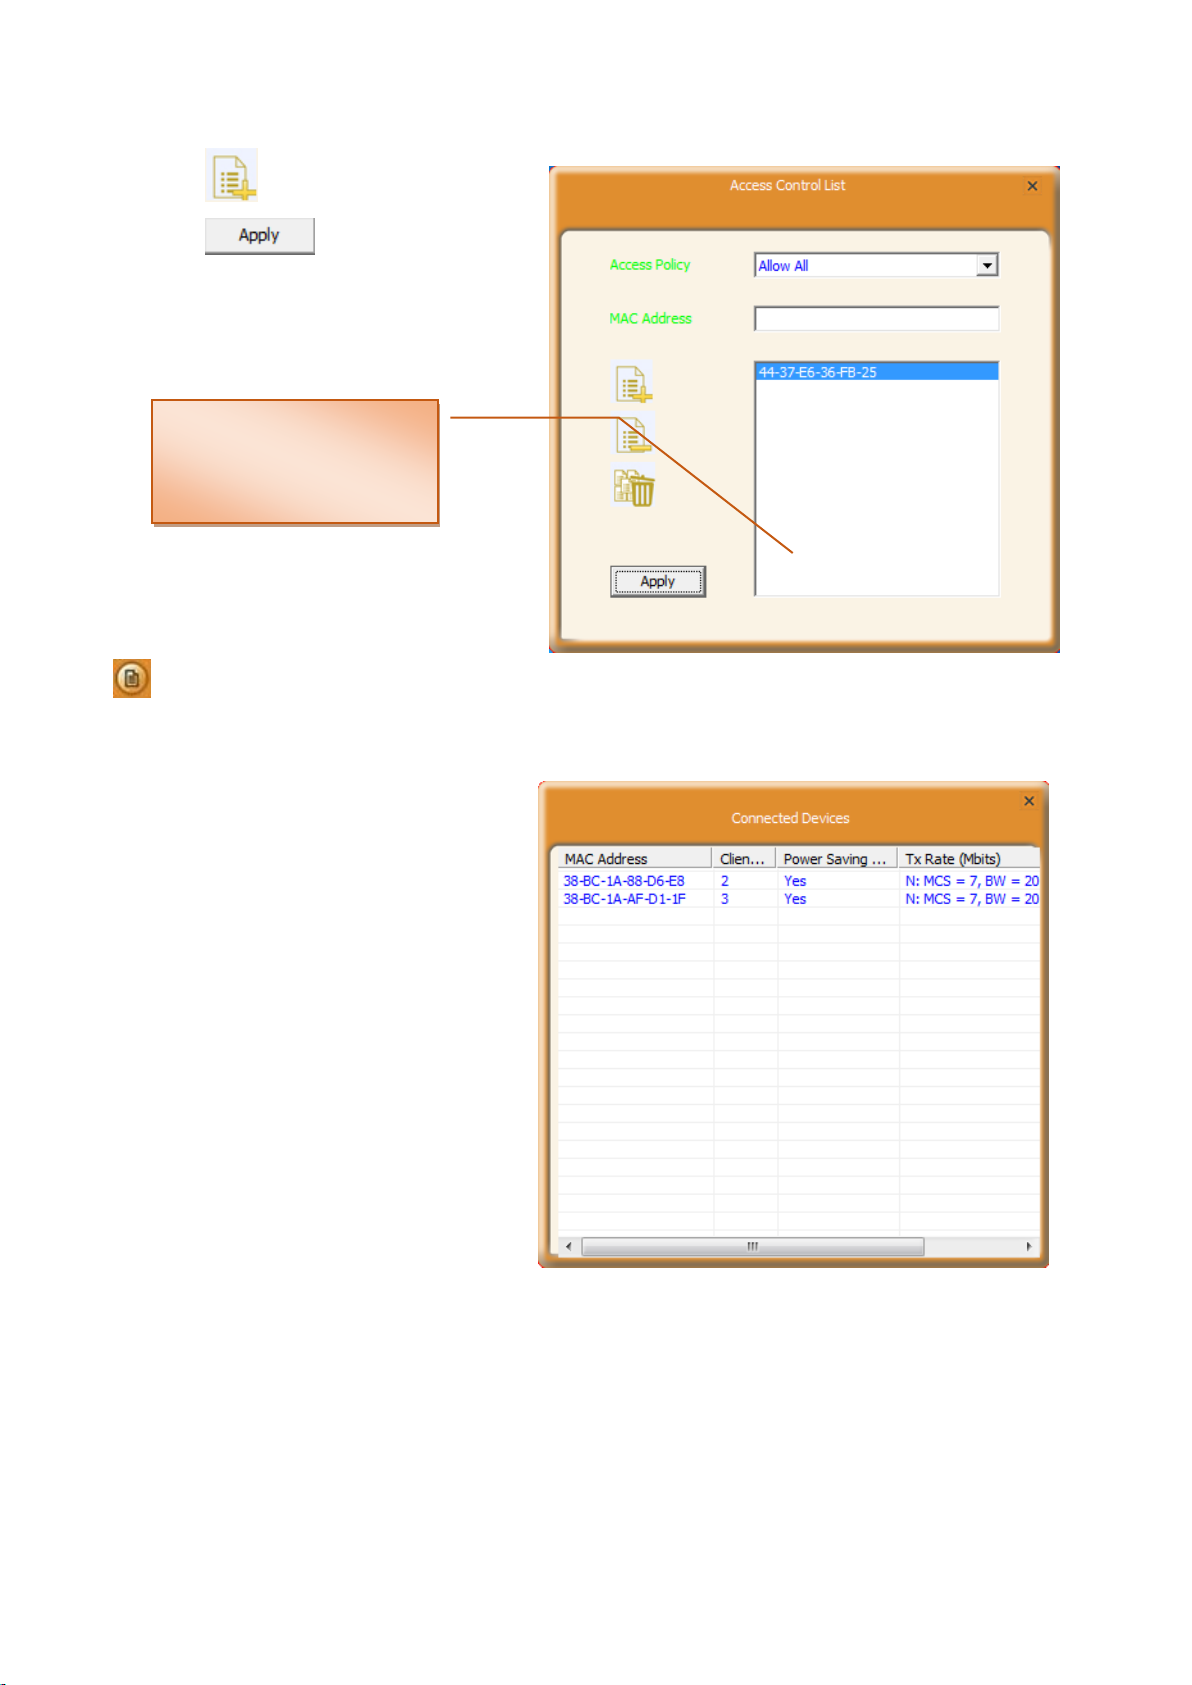
Access Control
Access Control is based on the MAC address to allow or prohibit a specified client’s access to this wireless
network.
Access Policy:
Disable: To disable the filter function.
Allow All: To permit all hosts whose MAC
addresses are included in the list to access the
wireless network, other hosts whose MAC
addresses have not been added to the list will be
prohibited by default.
Reject All: To prohibit all hosts whose MAC
addresses are included in the list from accessing
the wireless network, other hosts whose MAC
addresses have not been added to the list will be
permitted by default.
MAC Address: To input the client’s MAC address
you want to filter in this field.
: Add. To add the MAC address to the list.
: Delete. To delete an existing MAC address in the list.
: Remove All. To delete all clients’ MAC address in the list.
How to set the wireless client access rights?
Instance
For your wireless network security, you set your own PC (whose MAC address is 44-37-E6-36-FB-25) to access
the wireless network of the adapter.
Process
1. Enter the MAC address of your own PC into the
MAC address field.
35
If you want to do access
control for multiple clients,
just repeat steps 1 to 3.
2. Click icon to add it into the list.
3. Click icon to save and apply
your settings.
Connected Devices
When a client connects to this wireless adapter
(AP mode) and has successfully obtained an IP
address, the client’s MAC address and Tx Rate
can be recorded here.
4.3 STA+AP Mode
In STA+AP mode, the wireless adapter can serve as a client to receive wireless signal from a wireless router or AP;
also it can serve as an AP to send wireless signal for other wireless clients connecting. Note that this mode is
available for windows 7 or higher version OS.
36

1. Right click icon on the taskbar and select Switch to
STA+AP Mode.
2. Set the SSID and its password if the wireless
adapter works as an AP. And click OK to
apply the settings.
It comes to the main STA+AP mode interface.
AP
Here you can configure AP parameters of this wireless adapter and check the connected wireless clients.
: AP configuration
SSID: Configure the wireless network name of
AP.
WPA2 Pre-Shared Key: Configure the wireless
password.
ICS WAN: Select a WAN for Internet sharing.
37

Other icon features are most similar to that of STA
mode and AP mode. Please take the responding for
references.
: MAC Table
BSSID is the wireless MAC address of the AP.
In MAC table, the MAC info of clients connecting
to the AP will be displayed here.
Note
38
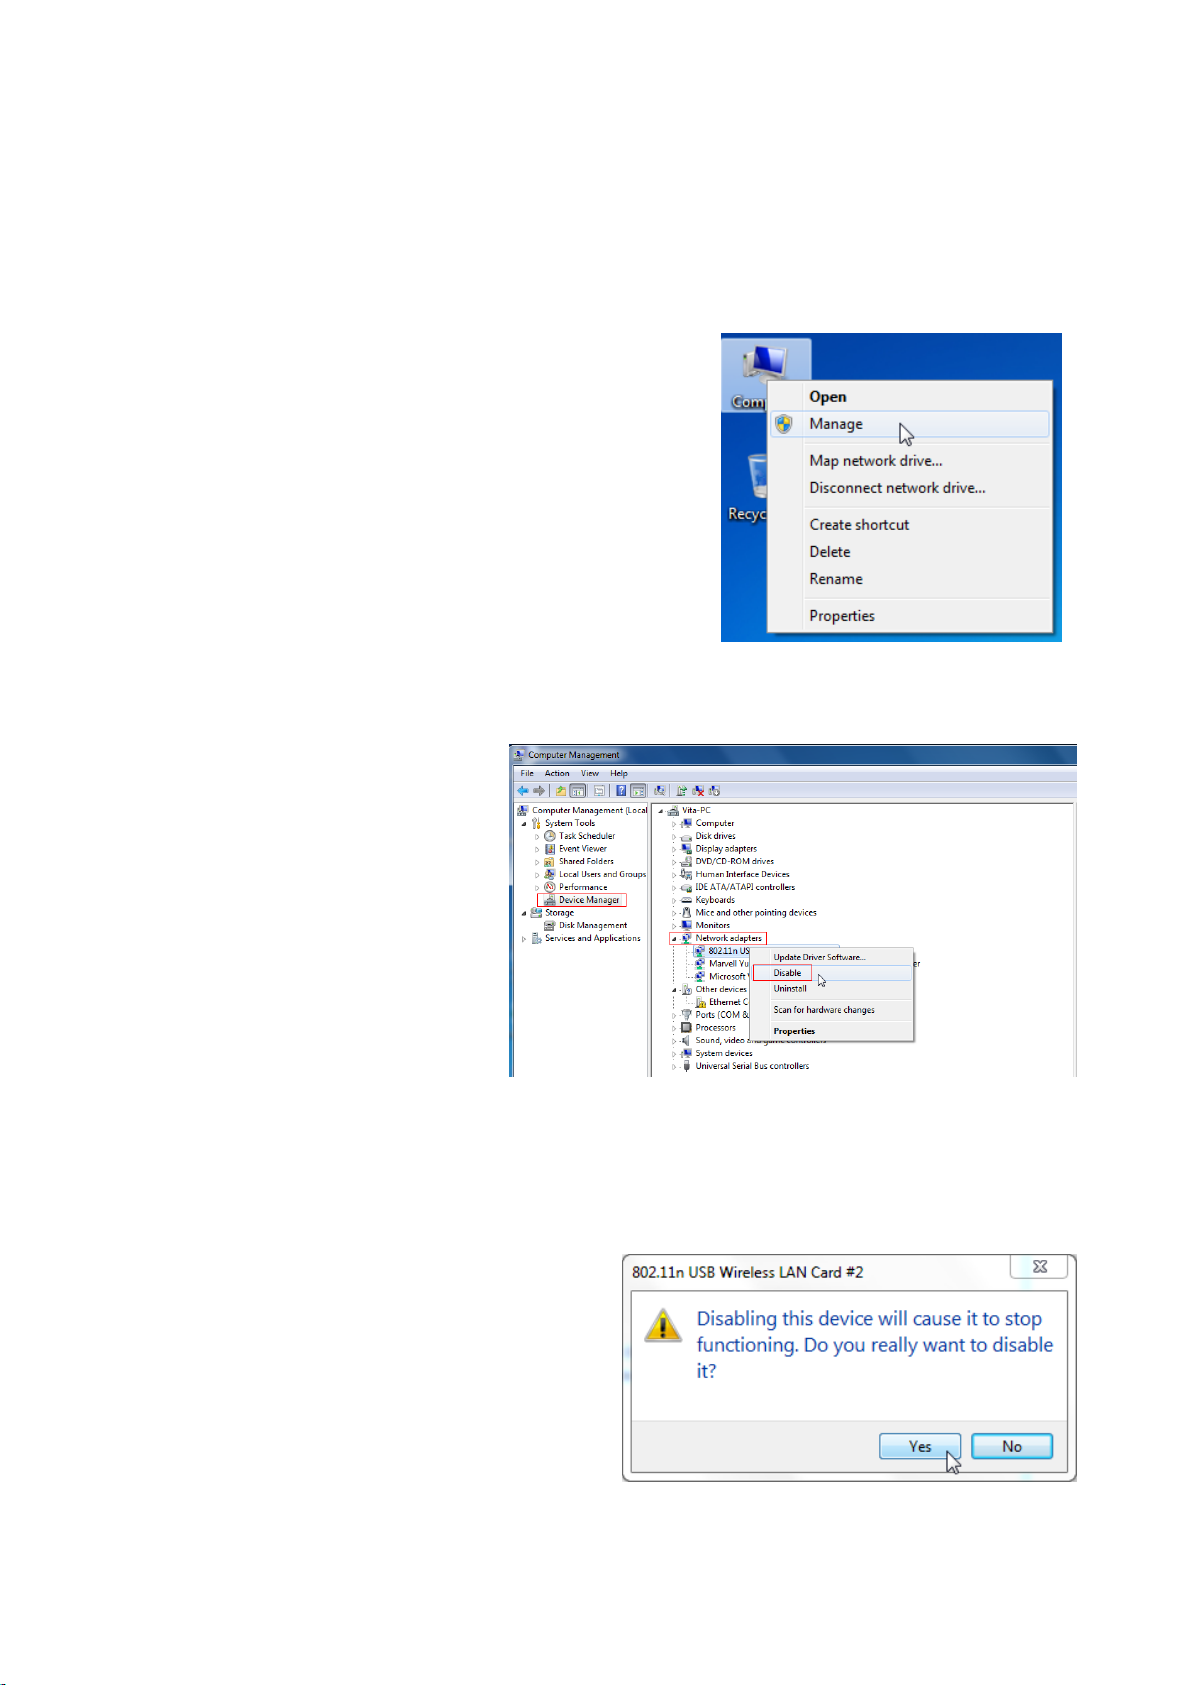
Appendix 1 Disable Other Wireless Adapter
Windows 7 is used as a guide to illustrate details. If you are using other operation systems, take that of Windows
7 for reference.
1. Right click “Computer” and select“Manage”.
2. On the Computer Management screen,
select“Device Manager”-“Network
adapters”, and right click the network
adapter you want to disable and click
“Disable”.
3. Click the “Yes” on the dialogue box to disable the
network adapter.
39

Appendix 2 WPS Profile
WPS Profile settings in Type PIN below Method can help customize a profile.
Customize the SSID as you like (Default SSID:
ExRegNW266140); also, you can change the
authentication and encryption.
Click to continue.
Customize the wireless password and click
to continue.
Click to PIN.
40

Note that after you have set the WPS profile,
the wireless info you have customized above
will be applied to the remote AP (or router).
Note
Connected successfully!
41

Appendix 3 Safety and Emission Statement
CE Mark Warning
This is a Class B product. In a domestic environment, this product may cause radio interference, in which case the
user may be required to take adequate measures. This device complies with EU 1999/5/EC.
NOTE: (1) The manufacturer is not responsible for any radio or TV interference caused by unauthorized
modifications to this equipment. (2) To avoid unnecessary radiation interference, it is recommended to use a
shielded RJ45 cable.
FCC Statement
This device complies with Part 15 of the FCC Rules. Operation is subject to the following two conditions: (1) This
device may not cause harmful interference, and (2) this device must accept any interference received, including
interference that may cause undesired operation.
This equipment has been tested and found to comply with the limits for a Class B digital device, pursuant to Part
15 of the FCC Rules. These limits are designed to provide reasonable protection against harmful interference in a
residential installation. This equipment generates, uses and can radiate radio frequency energy and, if not installed
and used in accordance with the instructions, may cause harmful interference to radio communications. However,
there is no guarantee that interference will not occur in a particular installation. If this equipment does cause
harmful interference to radio or television reception, which can be determined by turning the equipment off and
on, the user is encouraged to try to correct the interference by one of the following measures:
— Reorient or relocate the receiving antenna.
— Increase the separation between the equipment and receiver.
— Connect the equipment into an outlet on a circuit different from that to which the receiver is connected.
— Consult the dealer or an experienced radio/TV technician for help.
FCC Caution: Any changes or modifications not expressly approved by the party responsible for compliance
could void the user's authority to operate this equipment.
This transmitter must not be co-located or operating in conjunction with any other antenna or transmitter.
The manufacturer is not responsible for any radio or TV interference caused by unauthorized modifications to this
equipment.
Radiation Exposure Statement
NOTE: (1) The manufacturer is not responsible for any radio or TV interference caused by unauthorized
modifications to this equipment. (2) To avoid unnecessary radiation interference, it is recommended to use a
shielded RJ45 cable.
42
 Loading...