

Page 1
Step 1: Connecting the Router
Installation Guide
AC1200 Wireless Hotspot Router
Model: W15E
Packing List
Wireless Hotspot Router x 1
Power adapter x 1
Ethernet cable x 1
Pad x 4
Installation guide x 1
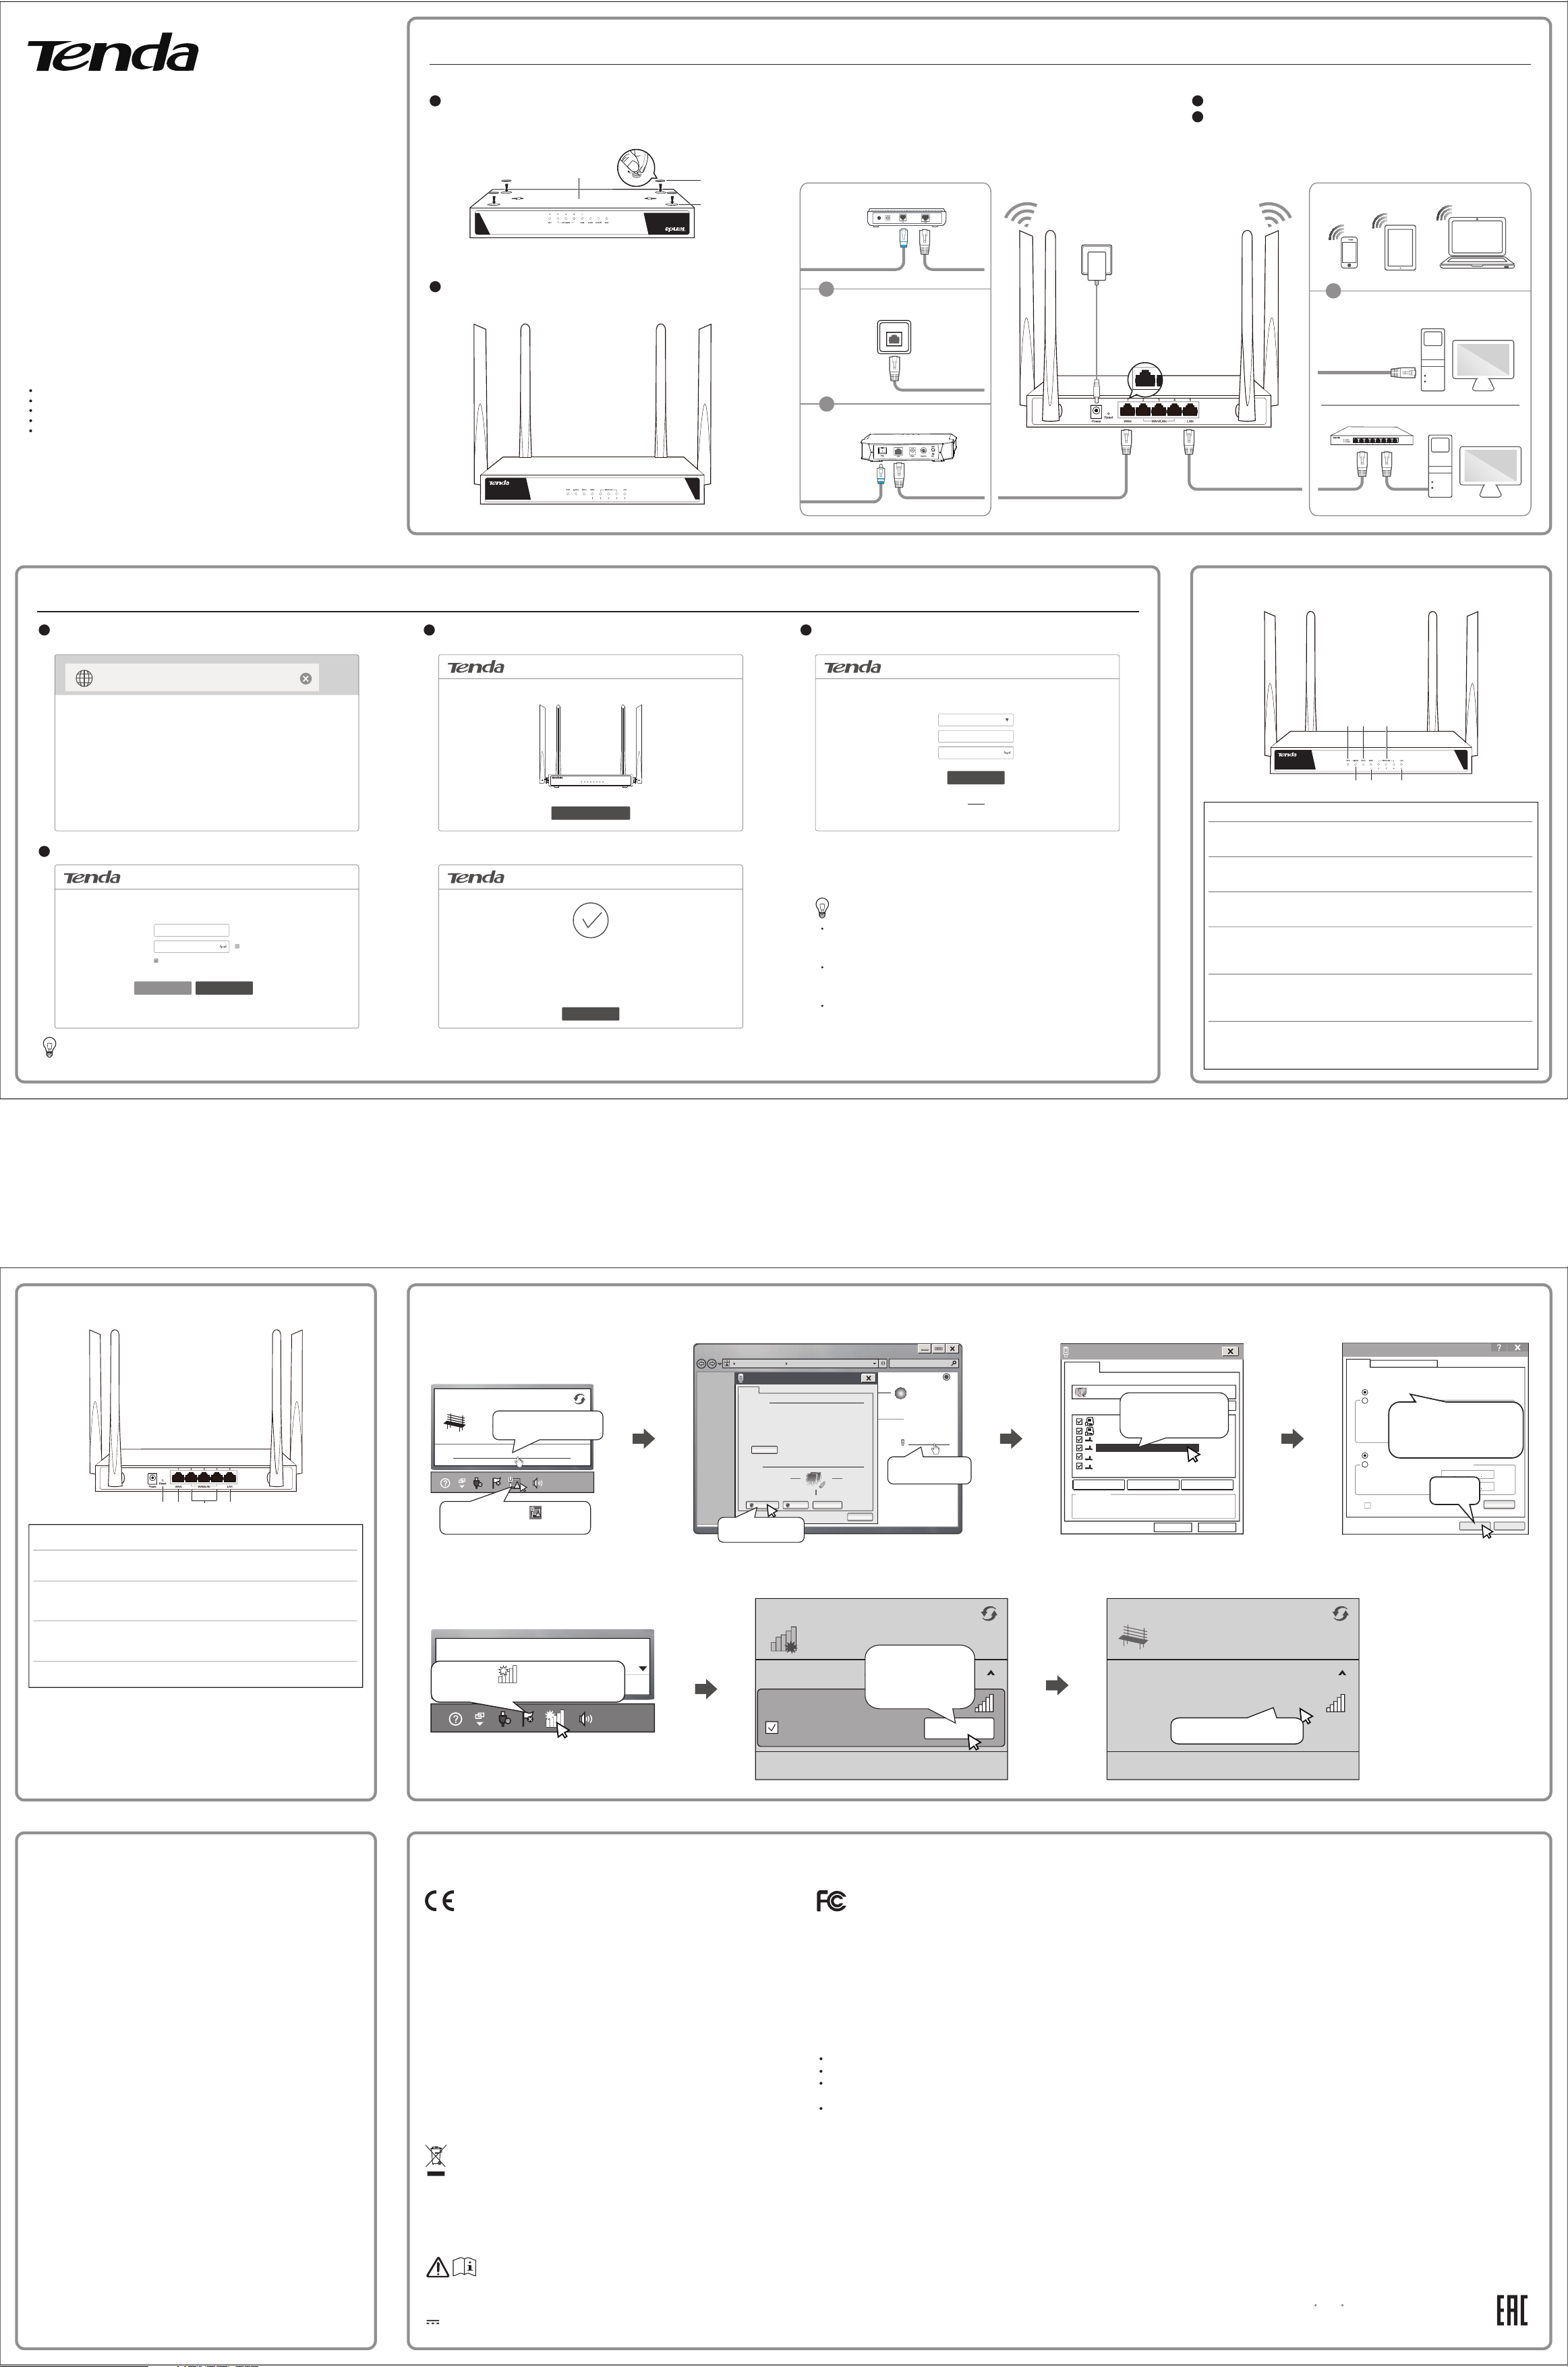
1.Installing Router
Place the router upside down on the workbench, and paste the four
1
footpad stickers onto the round recesses at the bottom of the router.
Bottom
2
Place the router right side up on the workbench, and adjust the
position of the antennas as below.
Pad
Round recess
AC1200 Wireless Hotspot Router
W15E
2.Connecting to WAN Port
For ADSL scenario, connect the Ethernet cable that has been connected to the
ADSL modem to the WAN port of the router.
For FTTB scenario, connect the Ethernet cable provided by the ISP to the WAN
port of the router.
For FTTH scenario, connect the Ethernet cable that has been connected to the
optical modem to the WAN port of the router.
ADSL
Phone cable
or
FTTB
or
FTTH
ADSL modem
Power receptacle
Cable port
1
WAN
Optical modem
WAN port
3. Connecting Computer, Smart Phones or Other Clients
1
Power on the router with the attached power adapter in the package.
2
Connect your computer to one LAN port of the router, or a switch that has
been connected to the router with the Ethernet cable. Wireless clients, such
as smart phones, can connect to the Wi-Fi network of the router.
Wireless connection
or
Wired connection
Switch
LAN port
If any item is missing, or damaged, please keep the original package and contact the local reseller
or distributor immediately.
Before using this router, please read this Installation Guide carefully for proper and quick installation.
For detailed product information or more functions, please visit http://www.tendacn.com.
W15E
AC1200 Wireless Hotspot Router
Step 2: Configuring the Router
Start a browser, enter tendawifi.com or 192.168.0.1, and press Enter.
1
tendawifi.com
Set your wireless network name and Wi-Fi password, and click Next.Wait a second for the completion of settings.
4
进入
Wireless Settings
Please set your wireless network name and password
SSID: Tenda_A0BE70
WiFi Password: No password required
By default, the Set the wireless password as login password is
enabled. You can also disable this option and customize your login
Tips
password.
Enter 8 or more ch
Set the wireless password as login password
Back
Next
Click Start.The system automatically detects your internet connection type. Enter
23
Welcome to Tenda Wireless Hotspot Router
Click Start to configure the internet and wireless settings quickly.
Set tings c omple ted!
You are d iscon necte d. Pleas e recon nect to :
Clic k More to co nfigu re othe r funct ions, s uch as po rtal a uthor izati on and ba ndwidt h contr ol.
Tenda _A0BE 70
Or Tenda _A0BE 70_5G
For more functions, visit http://www.tendacn.com to download user
guide of the router.
Start
Mor e
Optical cable
related values according to the on-screen instructions, and click Next.
Internet Settings
Please select an internet connection type
Connection Type: PPPoE
PPPoE Username:
PPPoE Password:
Next
Skip
Tip s
By default, the wireless network has no password. You need to
reconnect to the Wi-Fi signal once the SSID or WiFi password is
changed.
By default, the SSID of the 2.4 GHz network is Tenda_XXXXXX (see the
label at the bottom of the router), and the SSID of the 5 GHz network
is Tenda_XXXXXX_5G.
The computer can connect to the Wi-Fi signal only when a wireless
adapter is installed and works properly.
LED Indicator
W15E
AC1200 Wireless Hotspot Router
LED Indicators
SYS
2.4GHz
5GHz
1
2/3/4
5
Description
Solid on: The system is faulty;
Blinking: The system works properly;
Off: The system is not powered on.
Solid on: The 2.4 GHz Wi-Fi is enabled without data transmission;
Blinking: Data is transmitted over 2.4 GHz;
Off: The 2.4 GHz Wi-Fi is disabled.
Solid on: The 5 GHz Wi-Fi is enabled without data transmission;
Blinking: Data is transmitted over 5 GHz;
Off: The 5 GHz Wi-Fi is disabled.
WAN port indicator
Solid on: No data is transmitted over WAN port 1.
Blinking: Data is transmitted over WAN port 1.
Off: No device connects to WAN port 1, or connection is faulty.
WAN/LAN port 2/3/4 indicators (By default, thay are LAN port indicators.)
Solid on: No data is transmitted.
Blinking: Data is transmitted.
Off: No device connects to these ports, or connection is faulty.
LAN port indicator
Solid on: No data is transmitted over LAN port 5.
Blinking: Data is transmitted over LAN port 5.
Off: No device connects to LAN port 5, or connection is faulty.
5GHz2/3 4/
SYS
2.4GHz15
Port, and Button
Reset
15
Port or Button
Reset
1
2/3/4
5
Description
Reset button. After the router is powered on, use a paper clip to hold down
the Reset button for 8 seconds to restore the device to factory settings.
It is the WAN port used to connect to the internet using Ethernet cable.
The Ethernet cable may be a cable connected to the ADSL modem,
optical modem, or cable modem, or a cable provided by the ISP.
They can be used either as WAN ports or LAN ports. By default, they are
LAN ports. You can login to the router web UI to change them to WAN
ports.
It is the LAN port used to connect to a device such as a computer or switch.
2/3 4/
Appendix 1: Configure Your Computer (Example: Windows7)
or VPN co nnect ion,o r set up a
-up, or V PN netw ork con necti on
work co mpute r,or cha nge sha ring
Close
Sear ch Cont rol Pan el
Inter net
See ful l map
Conne ct or dis conne ct
No Inte rnet ac cess
Local Ar ea Conn ectio n
??
1.Click Local Area
Connection
Cur rentl y conne cted to:
Uni denti fied ne twork
2. Click Open Network
No In terne t acces s
and Sharing Center;
Ope n Netwo rk and Sh aring C enter
2:30 PM
3/21/2014
1. Right-click the icon in the
lower-right corner of the desktop.
Netw ork and I ntern et
Contr ol Pane l Home
Chang e adapt er sett i
Chang e advan ced sh
setti ngs
See als o
HomeG roup
Inter net Opt ions
2.Click Properties
Loca l Area Con necti on Stat us
查看基 本网络信息 并设置连接
Gener al
Conn ectio n
IPv4 Co nnect ivity :
TD- PC
Iv6 PConn ectiv ity:
Media S tate:
Durat ion:
Speed :
Detai ls...
Activ ity
SentRecei ved
41,627,94 761,78 4,832
Bytes :
Prope rtie sDisab le
Netw ork and S harin g Cente r
No Inte rnet ac cess
No Inte rnet ac cess
Diagn ose
Enabl ed
05:52 :33
1.0 Gbp s
Appendix 2: Example: Connection WiFi (Windows 8)
Not connected
Connections are available
Select your wireless
network from the list,
click Connect and
then follow onscreen
instructions.
Connect
Click the icon in the lower-right corner
Open Network and Sharing Center
of the desktop.
10/57/201
10:32 PM
Wireless Network Connection
Tenda_XXXXXX
Connect automatically
LLooccaall AArreeaa CCoonnnneeccttiioonn PPrrooppee rrttiieess
Networking
Conn ect usi ng
Real tek PCI e GBE Fami ly Cont rolle r
This connection uses the following items:
Inst all.. .Prop ertie s
Desc ripti on
Tran smiss ion Con trol Pr otoco l/Int ernet P rotoc ol. The de fault
wide a rea net work pr otoco l that pr ovide s commu nica tion
acro ss dive rse int ercon necte d netwo rks.
Find and double click
Internet Protocol
QoS Pack et Schedu ler
Version 4(TCP/IPv4);
File and Pri nter Shar ing for Micros oft Netwo rks
Inte rnet Prot ocol Versi on 6(TCP/ IPv6)
Inte rnet Prot ocol Versi on 4(TCP/ IPv4)
Link -Laye r Topo logy Disc overy Map per I/0 Driver
Link -Laye r Topo logy Disc overy Respo nder
Unin stall ...
Configure...
OK
Canc el
Currently connected to:
Tenda_XXXXXX
Internet
Wireless Network Connection
Tenda_XXXXXX Connected
Connect ed succ essfu lly!
IInntt eerrnneett PPrroottoocc ooll VVeerrssiioo nn 44 ((TTCCPP//IIPPvv44))PP rr ooppeerrttiieess
Gene ralAltern ate Con figur ation
You can get IP settings assigned automatically if your network supports
this capability. Otherwise,you need to ask your network administrator for
the appropriate IP settings.
Obtain an IP address automati cally
Use the following IP address:
IP address :
1.Select Obtain an IP address
Subnet ma sk:
automatically and Obtain
Defaul t gateway:
DNS server address
automatically
Obtain DNS server addres s aut omatically
Use the following DNS server addresses:
Preferr ed DNS server:
Alterna te DNS server:
Validate set tings upon exit
2.click OK
Advanced
OKK
O
Cancel
FAQ
Q: I cannot login to the web UI of the router after entering www.tendawifi.com
or 192.168.0.1. What should I do?
A: 1. Ensure that the Ethernet cables are correctly connected.
2. If you connect your computer to the router using Ethernet cable, ensure that
the Obtain an IP address automatically of your computer is selected.
3. If you use wireless devices, such as smart phones, to connect to the Wi-Fi, ensure
that the wireless devices have been successfully connected to the Wi-Fi.
4. Clear the cache of your web browser or replace the web browser, and try to
login again.
5. Use another computer or smart phone and try to login again.
6. Press the Reset button with a paper clip for 8 seconds to restore the device to
factory settings, and try to login again.
Q: I can scan the SSID, but cannot connect to it. What should I do?
A: 1. Verify that the WiFi password is correct.
2. Clear the cache of your wireless clients (such as smart phone and notebook),
and try again.
3. Connect your computer to the router using Ethernet cable, and login to the
web UI of the router. Change the SSID or Wi-Fi password, and try to reconnect
and login again.
Q: The Wi-Fi signal is successfully connected, but I still cannot access the
internet. What should I do?
A: 1. Verify that you connect to the correct SSID.
2. Access the System Info page of the router web UI, and verify that the connection
status of corresponding port is Connected.
Q: What should I do if I forget the Wi-Fi password?
A: 1. Connect your computer to the router using Ethernet cable, and login to the
web UI of the router. Choose Wireless > Basic, view or reset the Wi-Fi password.
2. If the above method does not work, power on the router, press the Reset button
with a paper clip for 8 seconds to restore the device to factory settings. In this
case, you need to reconfigure the internet settings and WiFi password.
Safety and Emission Statement
CE Mark Warning
This is a Class B product. In a domestic environment, this product may cause radio
interference, in which case the user may be required to take adequate measures.
This equipment should be installed and operated with minimum distance 20cm
between the radiator & your body.
The mains plug is used as disconnect device, the disconnect device shall remain
readily operable.
NOTE: (1) The manufacturer is not responsible for any radio or TV interference caused
by unauthorized modifications to this equipment. (2) To avoid unnecessary radiation
interference, it is recommended to use a shielded RJ45 cable.
Declaration of Conformity
Hereby, SHENZHEN TENDA TECHNOLOGY CO., LTD. declares that the radio equipment
type W15E is in compliance with Directive 2014/53/EU.
The full text of the EU declaration of conformity is available at the following internet
address: http://www.tendacn.com/en/service/page/ce.html
Operate Frequency: 2400-2483.5MHz; 5150-5250MHz
EIRP Power (Max.): 2.4GHz: 19.8dBm; 5.1GHz: 22.5dBm
Software Version: V15.11.0.5
RECYCLING
This product bears the selective sorting symbol for Waste electrical and electronic
equipment (WEEE). This means that this product must be handled pursuant to
European directive 2012/19/EU in order to be recycled or dismantled to minimize its
impact on the environment.
User has the choice to give his product to a competent recycling organization or to the
retailer when he buys new electrical or electronic equipment.
Caution:
Adapter Model: BN036-A12012E
Manufacturer: SHENZHEN HEWEISHUN NETWORK TECHNOLOGY CO., LTD
Input: 100-240V~, 50/60Hz, 0.4A
DC Voltage
Open Network and Sharing Center
FCC Statement
This equipment has been tested and found to comply with the limits for a Class B
digital device, pursuant to Part 15 of the FCC Rules. These limits are designed to
provide reasonable protection against harmful interference in a residential installation.
This equipment generates, uses and can radiate radio frequency energy and, if not
installed and used in accordance with the instructions, may cause harmful interference
to radio communications. However, there is no guarantee that interference will not
occur in a particular installation. If this equipment does cause harmful interference to
radio or television reception, which can be determined by turning the equipment off
and on, the user is encouraged to try to correct the interference by one or more of the
following measures:
Reorient or relocate the receiving antenna.
Increase the separation between the equipment and receiver.
Connect the equipment into an outlet on a circuit different from that to which the
receiver is connected.
Consult the dealer or an experienced radio/TV technician for help.
This device complies with Part 15 of the FCC Rules. Operation is subject to the
following two conditions: (1) this device may not cause harmful interference, and (2)
this device must accept any interference received, including interference that may
cause undesired operation.
Radiation Exposure Statement
This equipment should be installed and operated with minimum distance 20cm
between the radiator & your body.
Caution:
Any changes or modifications not expressly approved by the party responsible for
compliance could void the user's authority to operate this equipment.
This transmitter must not be co-located or operating in conjunction with any other
antenna or transmitter.
NOTE: (1) The manufacturer is not responsible for any radio or TV interference caused
by unauthorized modifications to this equipment. (2) To avoid unnecessary radiation
interference, it is recommended to use a shielded RJ45 cable.
Open Network and Sharing Center
Technical Support
United States Hotline: 1-800-570-5892
Canada Hotline: 1-888-998-8966
Hong Kong Hotline: 00852-81931998
Skype: Tendasz
Website: http:// www.tendacn.com
E-mail: support@tenda.com.cn
Address Info:
6-8 Floor, Tower E3, No.1001, Zhongshanyuan Road, Nanshan District, Shenzhen,
China. 518052
* Operating temperature: 0 C ~ 40 C;
operating humidity: 10%RH ~ 90%RH (non-condensing)
 Loading...