

Page 1

Page 2

Copyright statement
© 2016 Shenzhen Tenda Technology Co., Ltd. All rights reserved.
Tenda is a registered trademark legally held by Shenzhen Tenda Technology Co., Ltd. Other
brand and product names mentioned herein are trademarks or registered trademarks of
their respective holders. Copyright of the whole product as integration, including its
accessories and software, belongs to Shenzhen Tenda Technology Co., Ltd. No part of this
publication can be reproduced, transmitted, transcribed, stored in a retrieval system, or
translated into any language in any form or by any means without the prior written
permission of Shenzhen Tenda Technology Co., Ltd.
Disclaimer
Pictures, images and product specifications herein are for references only. To improve
internal design, operational function, and/or reliability, Tenda reserves the right to make
changes to the products without obligation to notify any person or organization of such
revisions or changes. Tenda does not assume any liability that may occur due to the use or
application of the product described herein. Every effort has been made in the preparation of
this document to ensure accuracy of the contents, but all statements, information and
recommendations in this document do not constitute a warranty of any kind, express or
implied.
-i-
Page 3

Preface
Contact Method
Contact Information
Technical support
Email
support@tenda.com.cn
Sales Email
sales@tenda.com.cn
Telephone
(86 755) 2765 7180
Website
http://www.tendacn.com
Skype
Tendasz
YouTube
Tendasz1999
This user guide instructs you to install and configure the wireless USB adapter U12. Please
read carefully before you start to use this product.
If you have any problem or suggestion about the product or the User Guide, contact us.
-ii-
Page 4

Table of contents
Chapter 1 Product introduction .................................................................................................. 1
1.1 Overview ....................................................................................................................................................................... 1
1.2 Features ........................................................................................................................................................................ 1
1.3 Package contents .......................................................................................................................................................... 1
Chapter 2 Product installation .................................................................................................... 2
2.1 Connecting the wireless USB adapter to your computer .............................................................................................. 2
2.2 Installing the program ................................................................................................................................................... 2
Chapter 3 Product function ......................................................................................................... 4
3.1 Overview ....................................................................................................................................................................... 4
3.2 Selecting a WiFi network from the available networks list for WiFi network connection ........................................... 5
3.2.1 Connecting to a WiFi network whose name is not hidden.................................................................................... 5
3.2.2 Connecting to a WiFi network whose name is hidden .......................................................................................... 6
3.3 Using the WPS function for WiFi network connection ................................................................................................. 7
3.3.1 Connecting to a WiFi network using the WPS button ........................................................................................... 8
3.3.2 Connecting to a WiFi network using a PIN code ................................................................................................. 11
3.4 Using Windows built-in WiFi program for WiFi network connection......................................................................... 12
3.4.1 Using Windows 8 built-in WiFi program .............................................................................................................. 12
3.4.2 Using Windows 7 built-in WiFi program .............................................................................................................. 13
3.4.3 Using Windows XP built-in WiFi program ........................................................................................................... 14
3.5 Details about the program .......................................................................................................................................... 16
Chapter 4 Uninstalling the program .......................................................................................... 17
4.1 Uninstalling the program on Windows 10 .................................................................................................................. 17
4.2 Uninstalling the program on Windows 8 .................................................................................................................... 17
4.3 Uninstalling the program on Windows 7 .................................................................................................................... 19
Appendix ................................................................................................................................. 21
FAQs .................................................................................................................................................................................. 21
Disable other network adapters ....................................................................................................................................... 22
Safety and emission statement ......................................................................................................................................... 23
-iii-
Page 5

1.1 Overview
This wireless USB adapter U12 is used to set up a high-speed WiFi connection between a
computer and a wireless router, regardless of whether the computer has wireless connection
functionality.
The wireless USB adapter has a WPS button and an LED, as shown in the following figure.
Product introduction
Chapter 1 Product introduction
1.2 Features
Support the speed of up to 867 Mbps (5GHz) + 400Mbps (2.4GHz).
Be Compliant with IEEE 802.11ac/a/b/g/n standards.
Support WEP, WPA-PSK, and WPA2-PSK security modes.
Support the WPS function.
Be compatible with Windows 10/8.1/8/7/XP, and MAC OS.
Adopt a USB3.0 interface that offers 10 times of the data transfer speed of an USB 2.0
interface and compatible with USB2.0.
Support flexible placement with the included USB extension cable.
1.3 Package contents
Wireless dual band USB adapter * 1
USB extension cable * 1
CD Resource * 1
Install Guide * 1
-1-
Page 6

Product installation
Chapter 2 Product installation
Before accessing the UI of the wireless USB adapter, perform the following procedure to
finish installation.
To avoid network conflicts between this wireless USB adapter and other network adapters, it
is recommended that you disable other network adapters before installing the wireless USB
adapter. For details, see Disable other network adapter.
2.1 Connecting the wireless USB adapter to your computer
Method 1 Connect the wireless USB adapter to the USB port of your computer using the USB extension
cable.
For flexible placement to get better WiFi signals from a router, it is recommended that you
use the USB extension cable.
Method 2 Connect the wireless USB adapter to the USB port of your computer directly.
2.2 Installing the program
Windows 7 is used as an example to describe the installation procedure. You can refer to this
procedure when installing the program on another OS.
Step 1 Insert the included CD Resource to the CD drive of your computer.
If your computer has no CD drive, go to www.tendacn.com to download the program of the
product and make sure that the directory of the downloaded program does not include
Chinese characters. Otherwise the installation may fail.
-2-
Page 7

Product installation
Step 2 Open the root directory of the CD Resource and double-click to run the
installation wizard.
Step 3 Select Accept the agreement and click Install Now.
Wait a few minutes for the installation process to complete and the program UI to appear
----End
-3-
Page 8

3.1 Overview
Element
Description
To configure WPS function, click this button.
To turn on or turn off the WiFi function of this USB adapter, click this button.
To refresh the available networks list, click this button.
It indicates that the network is encrypted.
To view more information about a WiFi network, click this button.
On this main UI, you can connect the wireless USB adapter to a WiFi network or perform
other operations.
Product function
Chapter 3 Product function
The elements on the main UI are described below.
You can connect this wireless USB adapter to a wireless router by:
Selecting a WiFi network from the available networks list
Using the WPS function
Using Windows built-in WiFi program
-4-
Page 9

Product function
3.2 Selecting a WiFi network from the available networks list for WiFi network connection
If you have a WiFi router with internet connectivity, you can connect the wireless USB
adapter to the router for internet service.
3.2.1 Connecting to a WiFi network whose name is not hidden
Step 1 Launch the program UI and click your WiFi name.
Step 2 Enter the WiFi password and click Connect.
-5-
Page 10

Product function
After you are connected to the WiFi network, you can click to see more information
about the connected network.
----End
3.2.2 Connecting to a WiFi network whose name is hidden
Step 1 On the main UI, click Manually add network information.
-6-
Page 11

Product function
Step 2 On the pop-up dialog box, enter the information of your WiFi network, such as the network
name (WiFi Name) and security key (WiFi Password), and click Connect.
----End
3.3 Using the WPS function for WiFi network connection
If your router supports WPS function, you can use the WPS function of this wireless USB
adapter to perform WiFi network connection without entering a WiFi password.
-7-
Page 12

There are two ways to perform WPS function:
Using the WPS button
Using a PIN code
3.3.1 Connecting to a WiFi network using the WPS button
Product function
3.3.1.1 Using the WPS button on the program
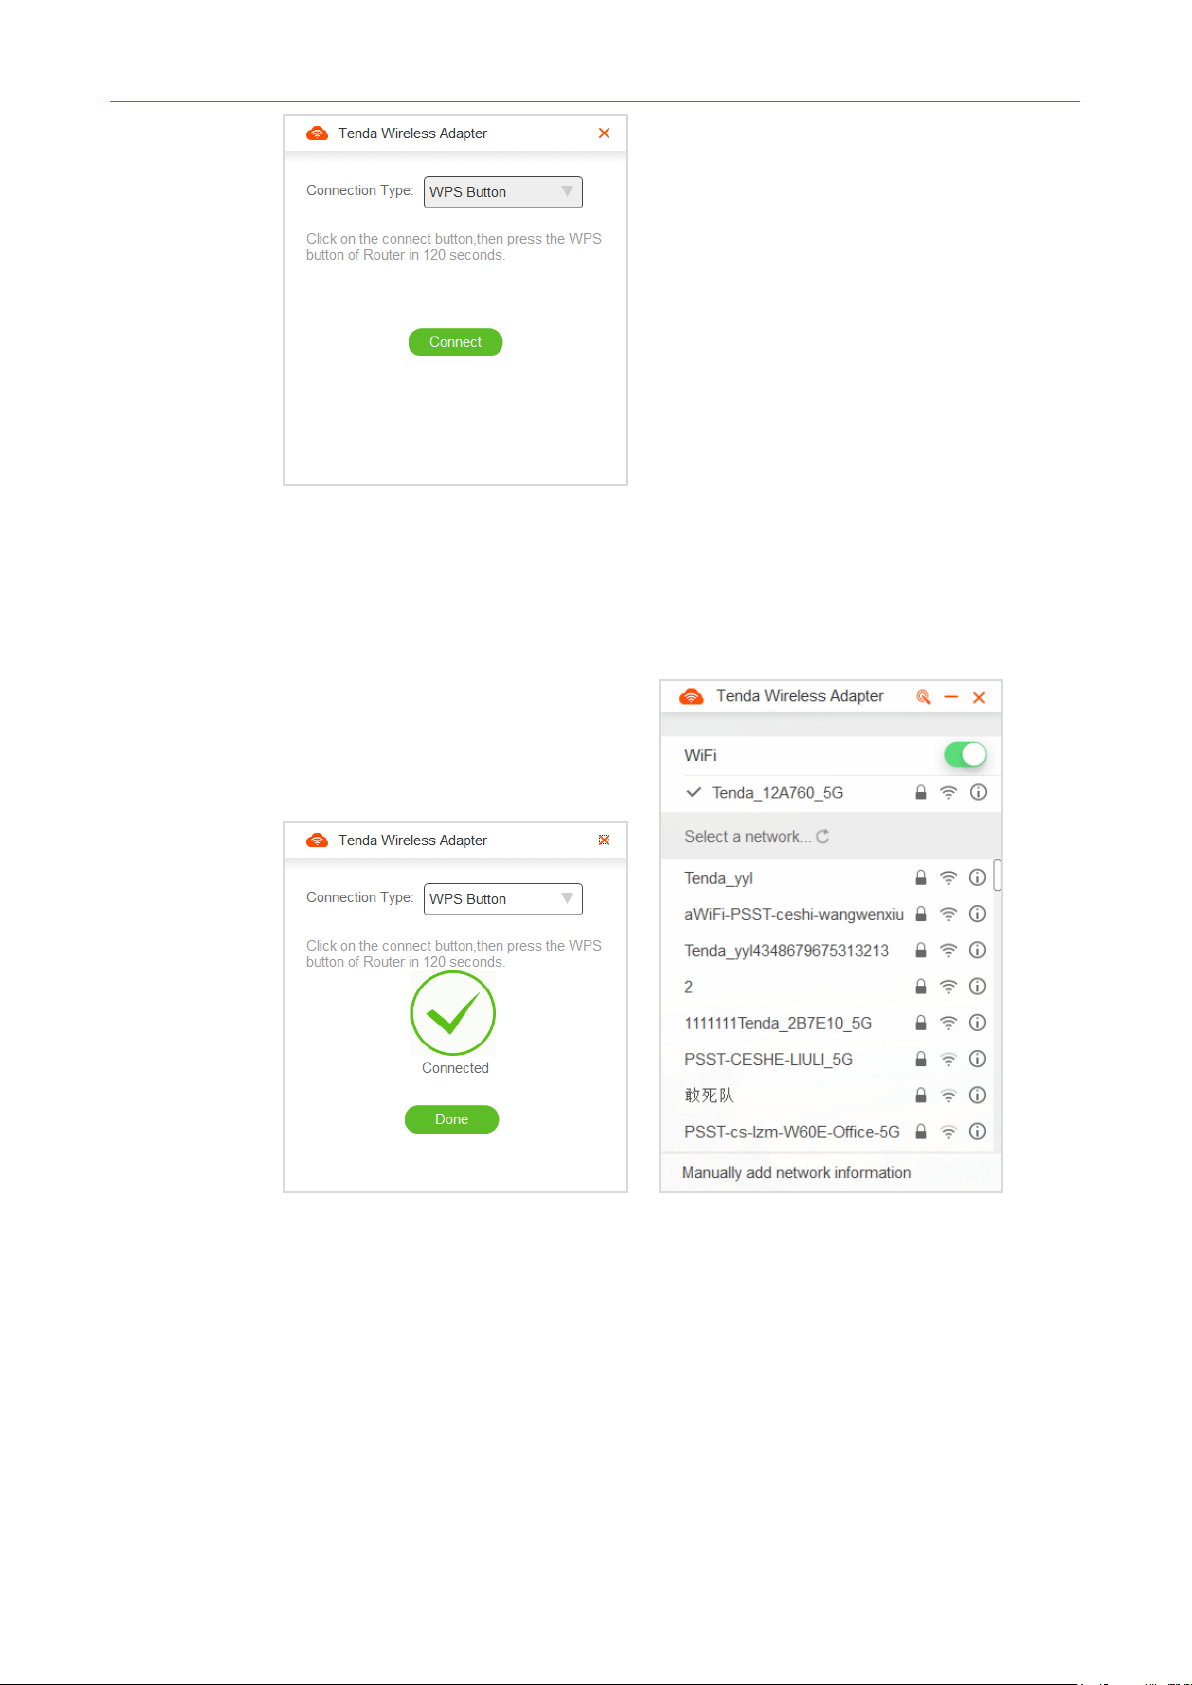
Step 1 Launch the main UI of this wireless USB adapter and click .
Step 2 Set Connection Type to WPS button and click Connect.
-8-
Page 13
Product function
Step 3 Within two minutes, enable the WPS function of your router. For details, see the user guide
of your router.
The wireless USB adapter starts to connect to the router.
After the connection is successful, you can go to the main UI of the wireless USB adapter to
check the connection status of the the WiFi network.
----End
3.3.1.2 Using the WPS button on the product
Step 1 Launch the main UI of this wireless USB adapter.
-9-
Page 14

Step 2 Hold down the WPS button on the product for 1~3 seconds.
Product function
Step 3 Within two minutes, enable the WPS function of your router. For details, see the user guide
of your router.
The wireless USB adapter starts to connect to the router.
After the connection is successful, you can go to the main UI of the wireless USB adapter to
check the connection status of the the WiFi network.
-10-
Page 15

----End
Product function
3.3.2 Connecting to a WiFi network using a PIN code
Step 1 Launch the web UI of your router, enable WPS function, and note down the PIN code. For
details, see the user guide of your router.
Step 2 Launch the main UI of this wireless USB adapter and click .
Step 3 Set Connection Type to PIN Code, enter the PIN code of your router, and click Connect.
-11-
Page 16

Product function
When the connection is successful, you can go to the main UI of the wireless USB adapter to
check the state.
----End
3.4 Using Windows built-in WiFi program for WiFi network connection
Except using the UI of the wireless USB adapter, you can use the Windows built-in WiFi
program to connect the wireless USB adapter to a WiFi network.
Windows 8/7/XP OS are used as examples to describe the WiFi network connection
procedure. You can refer to the procedures when performing the WiFi network connection
on another OS.
3.4.1 Using Windows 8 built-in WiFi program
Step 1 Click the icon or on the lower right corner of your desktop.
-12-
Page 17

Product function
Step 2 Select the WiFi name of your router from the list, click Connect and then follow onscreen
instructions.
If you cannot see the list, make sure that the Airplane Mode is not enabled on your
computer.
When you are connected to the WiFi network, Connected appears.
----End
3.4.2 Using Windows 7 built-in WiFi program
Step 1 Click the network icon ( , or ) on the lower-right corner of your desktop to
display the available WiFi networks.
Step 2 Select the WiFi name of your router, click Conncet and follow onscreen instructions.
-13-
Page 18

When you are connected to the WiFi network, Connected appears.
Product function
----End
3.4.3 Using Windows XP built-in WiFi program
Step 1 Right-click My Network Places, and select Properties.
Step 2 Right-click Wireless Network Connection, and select View Available Wireless Networks.
-14-
Page 19

Product function
Step 3 Find and click the WiFi name of your router and then follow onscreen instructions.
Step 4 When you are connected to the WiFi network, Connected appears.
----End
-15-
Page 20

3.5 Details about the program
If you want to obtain information about the program, such as its version, contact method, or
website, right-click the icon in the lower-right corner of your desktop, and click About.
Then the About information appears.
Product function
-16-
Page 21

Chapter 4 Uninstalling the program
Windows 10/8/7 OS are used as examples to describe the uninstallation procedures. You can
refer to the procedures when uninstalling the program on another OS.
4.1 Uninstalling the program on Windows 10
Step 1 Click the icon and select All apps.
Uninstalling the program
Step 2 Choose Tenda > Uninstall.
Step 3 On the pop-up dialog box, click Uninstall.
----End
4.2 Uninstalling the program on Windows 8
Step 1 Move the cursor to the upper-right corner of the desktop and click Settings.
-17-
Page 22

Step 2 Click Control Panel.
Uninstalling the program
Step 3 Click Uninstall a program under Programs.
Step 4 Right-click the program and choose Uninstall.
-18-
Page 23

Step 5 On the pop-up dialog box, click Uninstall.
Uninstalling the program
----End
4.3 Uninstalling the program on Windows 7
Step 1 Click Start and select Control Panel.
Step 2 Click Uninstall a program under Programs.
-19-
Page 24

Step 3 Find and right-click the program to uninstall it.
Uninstalling the program
Step 4 On the pop-up dialog box, click Uninstall.
----End
-20-
Page 25

FAQs
Appendix
Q1 I failed to connect to a WiFi network using the wireless USB adapter. What should I do?
A1 Verify that:
You have entered the correct WiFi password.
You have entered the correct WiFi name and WiFi password if you are manually
connecting to a hidden network.
Q2 I failed to do WPS connection with my router. What should I do?
A2 Verify that:
The radio signals between the wireless router and the wireless USB adapter are not
blocked.
The WPS function of the router is enabled. For details, see the user guide of the router.
The WPS function of the wireless USB adapter is enabled, which means that the LED of
the wireless USB adapter is blinking.
-21-
Page 26

Disable other network adapters
To avoid network conflict between this wireless USB adapter and other network adapters, it
is recommended that you first disable other network adapters before installing the wireless
USB adapter. Here we take Windows 7 OS as an example. The steps on other OS are similar.
Step 1 Right-click Computer and select Manage.
Step 2 On the pop-up screen, select Device Manager > Network adapters, and right-click the
network adapter you want to disable and click Disable.
Appendix-Safety and Emission Statement
Step 3 On the pop-up dialog box, click Yes to disable the network adapter.
----End
-22-
Page 27

Safety and emission statement
Declaration of Conformity
Hereby, SHENZHEN TENDA TECHNOLOGY CO. LTD. declares that the radio equipment type
U12 is in compliance with Directive 2014/53/EU.
The full text of the EU declaration of conformity is available at the following internet address:
http://www.tendacn.com/en/service/page/ce.html
Operate Frequency:
2.4G: EU/2400-2483.5MHz (CH1-CH13)
5G: EU/5150-5250MHz (CH36-CH48)
EIRP Power (Max.):
2.4GHz: 12.9dBm
5GHz: 12.8dBm
Appendix-Safety and Emission Statement
FCC Statement
This device is restricted to be used in the indoor.
This device complies with Part 15 of the FCC Rules. Operation is subject to the following two
conditions: (1) This device may not cause harmful interference, and (2) this device must
accept any interference received, including interference that may cause undesired operation.
This equipment has been tested and found to comply with the limits for a Class B digital
device, pursuant to Part 15 of the FCC Rules. These limits are designed to provide reasonable
protection against harmful interference in a residential installation. This equipment
generates, uses and can radiate radio frequency energy and, if not installed and used in
accordance with the instructions, may cause harmful interference to radio communications.
However, there is no guarantee that interference will not occur in a particular installation. If
this equipment does cause harmful interference to radio or television reception, which can
be determined by turning the equipment off and on, the user is encouraged to try to correct
the interference by one of the following measures:
— Reorient or relocate the receiving antenna.
— Increase the separation between the equipment and receiver.
-23-
Page 28

Appendix-Safety and Emission Statement
— Connect the equipment into an outlet on a circuit different from that to which the
receiver is connected.
— Consult the dealer or an experienced radio/TV technician for help.
FCC Caution: Any changes or modifications not expressly approved by the party responsible
for compliance could void the user's authority to operate this equipment.
This transmitter must not be co-located or operating in conjunction with any other antenna
or transmitter.
Radiation Exposure Statement
This equipment complies with FCC radiation exposure limits set forth for an uncontrolled
environment. This equipment should be installed and operated with minimum distance 20cm
between the radiator & your body.
NOTE: (1) The manufacturer is not responsible for any radio or TV interference caused by
unauthorized modifications to this equipment. (2) To avoid unnecessary radiation
interference, it is recommended to use a shielded RJ45 cable.
-24-
 Loading...