

Page 1
Page 2

Copyright Declaration
is the registered trademark of Shenzhen Tenda
Technology Co., Ltd. Other trademark or trade name mentioned herein are
the trademark or registered trademark of the company. Copyright of the
whole product as integration, including its accessories and software,
belongs to Shenzhen Tenda Technology Co., Ltd. Without the permission of
Shenzhen Tenda Technology Co., Ltd, individual or party is not allowed to
copy, plagiarize, imitate or translate it into other languages.
All the photos and product specifications mentioned in this manual are for
references only, as the upgrading of software and hardware, there will be
changes. And if there are changes, Tenda is not responsible for informing in
advance. If you want to know more about our products information, please
visit our website at www.tenda.cn
Page 3

Brief Content
Chapter 1 Introdution ................................................................................1
1.1 Product Features........................................................................... 1
1.2 Package contents..........................................................................2
1.3 Mininum Requirements ................................................................. 2
Chapter 2 Hardware Installation ..................................................................4
Chapter 3 Configuration ..............................................................................5
3.1 Log in ............................................................................................ 5
3.2 Wizard........................................................................................... 6
3.3 Status ............................................................................................8
3.4 LAN Setting...................................................................................9
Chapter 4 Radio Setting ............................................................................ 11
4.1 Basic Setting ............................................................................... 11
4.2 Mode Setting ...............................................................................12
4.2.1 AP mode ..........................................................................12
4.2.2 WDS P2P Bridge ............................................................. 14
4.2.3 WDS P2MP Bridge ..........................................................15
4.2.4 WDS AP Repeater ........................................................... 17
4.2.5 Client mode...................................................................... 18
4.3 Access Filter................................................................................20
Chapter 5 System Tools ............................................................................21
5.1 Change Password.......................................................................21
5.2 Firmware Upgrade ......................................................................21
5.3 Reboot ........................................................................................22
5.4 Restore Factory Default ..............................................................22
5.5 Restore/Backup Setting ..............................................................23
5.6 Exit .............................................................................................. 24
5.7 Help............................................................................................. 24
Appendix I: Glossary ................................................................................. 26
Appendix II: TCP/IP Address Setting (Take Winxp as example)................ 27
Page 4

Instruction Manual TWL54A Access Point
Chapter 1 Introdution
Thank you for choosing the Tenda TWL54A/54A+ Wireless Access
Point.The device up to 54Mbps data rate and fully compatible with
IEEE802.11b/g standard. Integrated the wireless APǃRepeaterǃP2Pǃ
P2MPǃClient Mode. Especially designed for small office, family, or students’
dorm wireless surfing need.
It’s easy to use,you can complete the installation and configuration easily
according to the user’s manual, and before installing ,read this manual
carefully.
1.1 Product Features
¾ Supports IEEE802.11b\IEEE802.11g\IEEE802.11e(QoS) and 802.11i
Standard;
¾ Support five working mode: wireless AP repeater,
point-to-point(P2P),point-to-Multipoint(P2MP)\and wireless client;
¾ Supports auto-sense/ 54/48/36/24/18/12/9/6/11/5.5/2/1Mbps data rate
¾ 1x10/100Mbps LAN Port;
¾ Support xDSL/Cable MODEM static or dynamic IP access;
¾ Long distance coverage, max 100m indoor,and 300m outdoor(Limited
by the environments);
¾ Remote Web management;
¾ Supports 64-/128bit WEP ǃ WPA and WPA2 encryption type for
1
Page 5

Instruction Manual TWL54A Access Point
security;
¾ Supports 802.11b/802.11g auto accommodate mode or setting
manually;
¾ Win2000/XP,Linux,Novell,Mac OS supported;
¾ Supports auto MDI/MDIX;
¾ Supports IE5.5,Netscape 6.1 or beyond browser;
¾ 32 MAC address-based access filter.
The TWL54A/54A+ Access Point has been designed for use with 802.11g
and 802.11b products. The Access Point is compatible with 802.11g and
802.11b adapters, such as the Notebook Adapters for your laptop
computers, PCI Adapters for your desktop PCs, and USB Adapters for
when you want to enjoy USB connectivity.
To link your wired network with your wireless network, connect the Access
Point’s Ethernet network port to any switch or router.
1.2 Package contents
1. TWL54A/54A+ wireless Access Point x1
2. Power Adapter x1
3. Fast Installation Guide x1
4. Setup CD-ROM x1
5. Quality Passed Certificate x1
6. Warranty x1
1.3 Mininum Requirements
1. 400MHz or faster processor
2. 128MB of RAM
3. Internet Explorer 5.5 or Netscape,Navigator6.1 or Higher for
Web-based configuration
4. CD-ROM Drive
2
Page 6

Instruction Manual TWL54A Access Point
5. Windows 2000orXP
6. Network Adapter
3
Page 7

Instruction Manual TWL54A Access Point
Chapter 2 Hardware Installation
This chapter explains how to connect the Access Point for setup,the detail
process as below:
1. Connect your Ethernet network cable to your network router or switch
or PC. Then connect the other end of the network cable to the
TWL54A/54A+’s LAN port
2. connect the power adapter to the AP’s Power port.Then plug the power
adapter into an electrical outlet.The LEDs on the front panel will light up
as soon as the AP’s powers on.
Then, the wireless adapter can associate with the AP.
Refer to the topology below:
Diagram of connection
4
Page 8

Instruction Manual TWL54A Access Point
Chapter 3 Configuration
Now that you’ve connected the AP to your wired network,you are ready to
begin setting it up.This chapter will take you through all the steps necessary
to configure your AP.
3.1 Log in
Launch Internet Explorer or Netscape Navigator,In the Address field, enter
the AP’s default IP address,192.168.0.254,Press Enter key, the login screen
will appear.Before do this,you need set your PC’s IP address is
192.168.0.x(x is any one value of 1-253),and subnet mask is
255.255.255.0.(Please refer to the Appendix II for the detail of TCP/IP
setting)
Enter admin in the user name field,password is admin when this is your
first time open the Web-based management interface.(You can set a new
password from the System Tool – Change password tab)
Click Ok, the welcome screen will appear;
5
Page 9

Instruction Manual TWL54A Access Point
Click Next, we will see the Wizard screen,from here we have 5 choice
tabs,that’s the 5 different operating mode of the TWL54A/A+—APǃWDS
P2P BridgeǃWDS P2MP BridgeǃWDS AP Repeater and the client. The
specific setting for each mode will be talked about later.
3.2 Wizard
If the wizard page hasn’t appears, you also can click the wizard tab in the
left to active.
For different requirement, you can select one of the suitable operating mode.
Here, we’ll take AP mode as example to introduce the settings method.
Choose AP mode and click Next
6
Page 10

Instruction Manual TWL54A Access Point
This page will ask you to enter the SSID,Channel settings for your wireless
network.
SSID:The name of your wireless network.The default value is “Default”
Channel:Select the operating frequency for your wireless network.
Click the Next button to continue or the Back button to return to the
previous screen.
Then you’ll see the security setting screen.you can select the different level
of security:
Authentication: WEP_Open System/Share Key, WPA, WPA2, and
WPA_WPA2_Mixed
Key Type: Choose ASCII or Hex format.
Key Size: 64-Bit or 128-Bit (Note: If you select 64-bit please enter 10
Hexadecimal characters or 5 ASCII Characters for the key content. for 128
7
Page 11

Instruction Manual TWL54A Access Point
-bit ,should enter 26 Hexadecimal characters or 13 ASCII Characters).
Key Select: when using the WEP encryption mode, you could save 4 suits
key.
Cipher: when using WPA/WPA2 or Mixed authentication , you can choose
AES or TKIP encryption mechanism.
The TWL54A/A+AP Supports wireless encryption as shown in Table 1.
Table 1: Wireless Security
Mode
WEP WPA WPA2 WPA_WPA2_Mixed
AP
Yes Yes Yes Yes
Repeater
Yes NO NO NO
P2P
Yes NO NO NO
PMP
Yes NO NO NO
Client
Yes Yes Yes Yes
Note: After click Apply to save your settings,you have to reboot the device
(From System Tools—Reboot)to let your settings take effect.
3.3 Status
This page shows the AP’s product information and working status.
8
Page 12

Instruction Manual TWL54A Access Point
Product information: Display current firmware version,MAC Address,LAN IP
address,subnet mask,Gateway etc.
Radio Status: Current operating mode,SSID,RF mode,Channel and
Encryption mode etc.
Association Table:To display the clients’ information which linked
with the AP. Including the MAC address, Status,Mode,rate,signal strength
indicator(RSSI),etc. Click Refresh button to update the linking info.
3.4 LAN Setting
From LAN Setting Screen ,we can set the LAN port’s network parameter
9
Page 13

Instruction Manual TWL54A Access Point
Manual: if you want to assign a static or fixed IP address to the AP,then
select this,and enter the specified IP address(The default IP is
192.168.0.254),Subnet mask,and Gateway
DHCP Client:if your network router will automatically assign an IP address
to the AP,then you can select this.
Note: If you changed the IP address here, your login IP address to the
Web-based management interface vary corresponding.
10
Page 14
Instruction Manual TWL54A Access Point
Chapter 4 Radio Setting
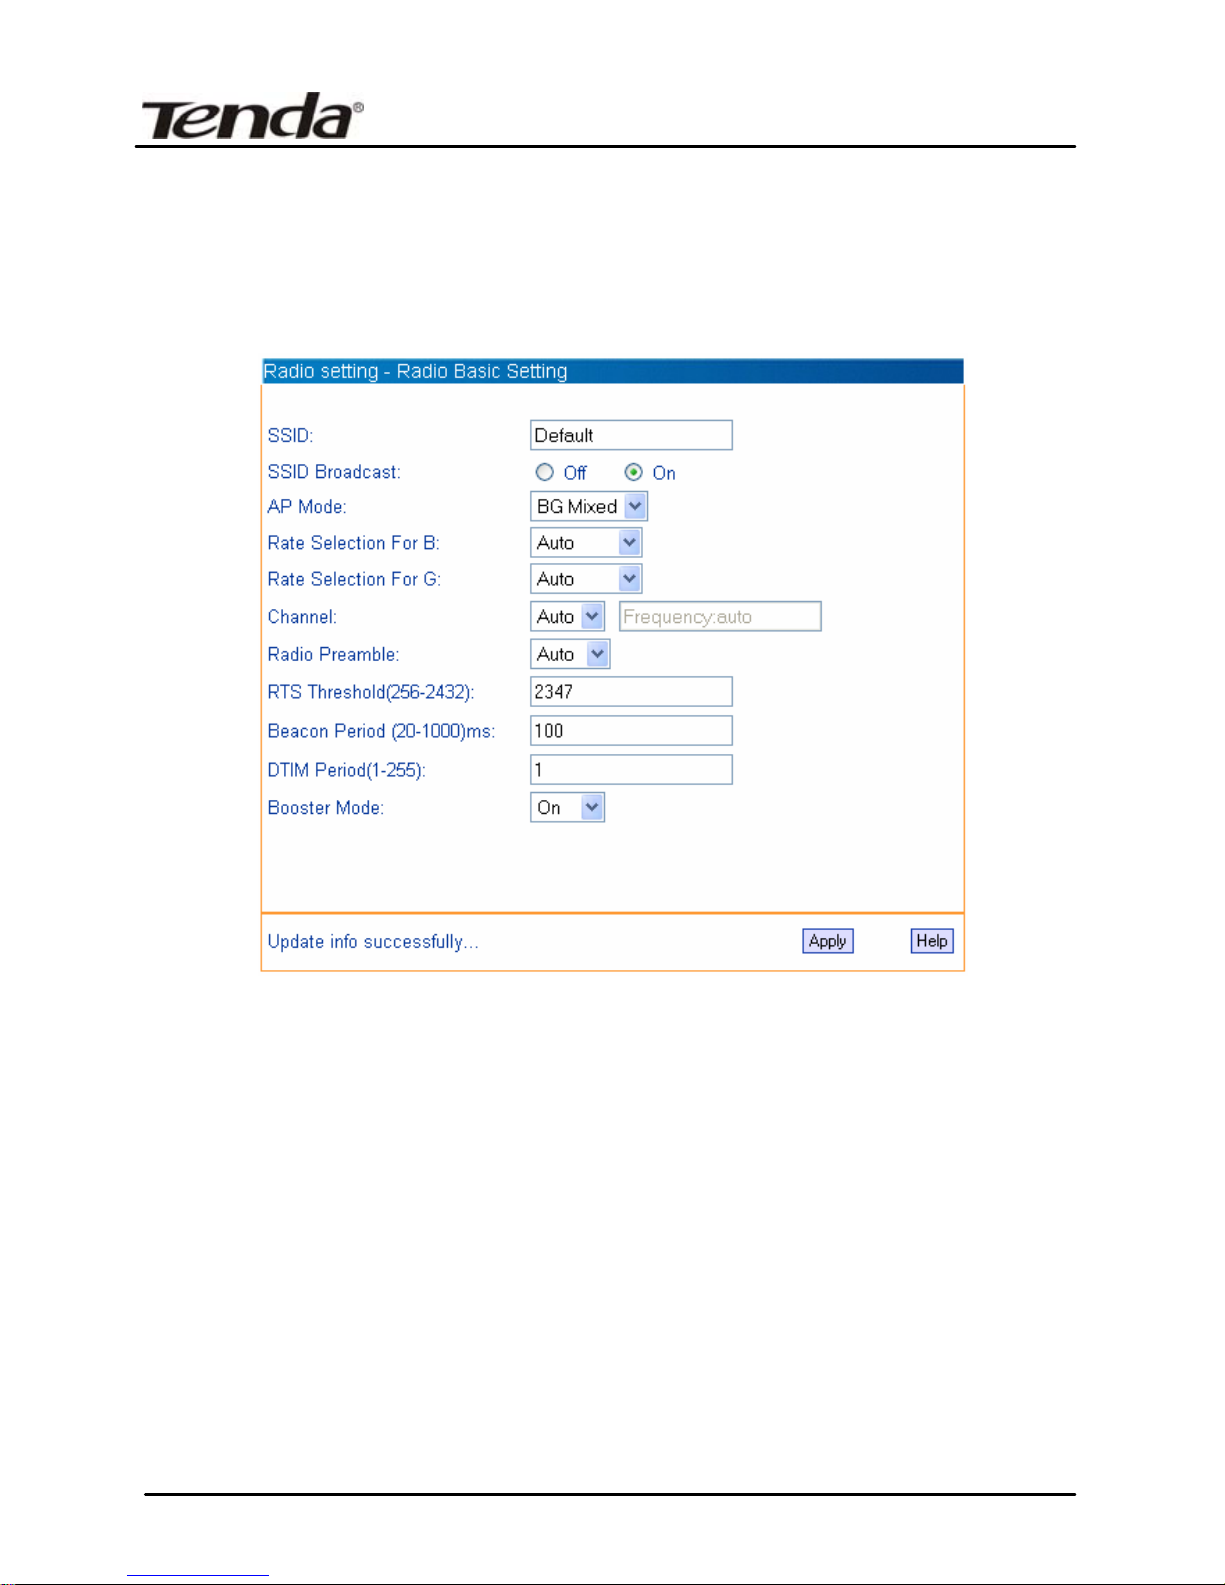
4.1 Basic Setting
Click Radio Setting—Basic Setting tab. This screen ask you to set the basic
parameter for your wireless network.
SSID: Enter the name of your wireless network.
SSID Broadcast: Enable/disable the SSID broadcast feature
AP Mode: Selects 802.11g,802.11b, BG Mixed
Rate selection for B: Selects the transmission rate of B mode,auto or a fixed
rate,11/5.5/2/1Mbps
Rate selection for G: Selects the transmission rate of G mode, auto or a
fixed rate, 54/48/36/24/18/12/11/9/6/5.5/2/1Mbps
Channel: Select the operating channel for your wireless network,auto or
fixed, range from1-13.
Radio Preamble: Selects short ,long,or Auto.
RTS: RTS threshold. This value should remain its default setting of
2347(Bytes).
Beacon: This value indicates the frequency interval of the beacon(in
milliseconds)
11
Page 15

Instruction Manual TWL54A Access Point
DTIM: This value indicates how often the AP sends out a DTIM.
Booster mode: When used with Marvell client cards,Boost Mode enhances
throughput an additional 30% at 54Mbps.
Click Apply to save your settings,and Help for more information.
4.2 Mode Setting
The first step in using the TWL54A is selecting the operating mode.The
default operating mode is AP mode. To select a mode, click the Mode
Setting tab. Choose your preferable mode from the drop-down menu.
Here,we can see the TWL54A supports 5 operating modes,which will be
introduced respectively.
4.2.1 AP mode
The most basic mode of the device. When the system is reset to the default
factory settings,the operating mode reverts to AP mode. In this mode,the AP
will act as a central hub for different wireless LAN clients.For example,when
traveling to a hotel that has high-speed internet access,you can connect to
the internet through the AP which is connected to an Ethernet cable in the
room(see Figure 1)
DHCP (Fail)--
12
Page 16

Instruction Manual TWL54A Access Point
Figure 1
Click Mode Setting tab and choose AP,the following screen will appear.
z SSID: The name of your wireless network.
z Channel: The operating channel
z Encryption: Select disable or WEP, WPA ,WPA2, WPA_WPA2
Mixed mode for security.
13
Page 17

Instruction Manual TWL54A Access Point
Click Apply to save your settings.
4.2.2 WDS P2P Bridge
In this mode,2 APs in two remote locations connect to each other to provide
a wireless bridge between 2 remote LANs,as shown in Figure 2.The two
TWL54A devices operating in P2P mode do not allow client associations. It
is mostly used by enterprise to connect 2 remote office’s network together.
Figure 2
Click Mode Setting tab and choose WDS P2P Bridge, the following screen
will appear.
14
Page 18

Instruction Manual TWL54A Access Point
z SSID: The name of your wireless network.
z Channel: The operating channel
z WDS remote AP mac List:MAC address of the other P2P bridge that
this bridge connected to(Also you can through the Scan function and
Add the selected item to the list).
z Encryption: support only WEP mode for security.
Click Apply to save your settings.
4.2.3 WDS P2MP Bridge
An TWL54A device operating in Point-To-Multipiont(P2MP) bridge mode
wirelessly connects two or more wired networks,as shown in Figure 3 .
The root TWL54A device(LAN1) operates in P2MP mode,while the other
TWL54A devices(LAN2,LAN3)must operate in P2P mode.
When operating in P2MP bridge, The TWL54A device does not allow client
associations.
15
Page 19

Instruction Manual TWL54A Access Point
Figure 3
Click Mode Setting tab and choose WDS P2MP Bridge,the following screen
will appear.
16
Page 20

Instruction Manual TWL54A Access Point
z SSID: The name of your wireless network.
z Channel: The operating channel
z WDS remote AP mac List:MAC address(es) of the P2P bridge that are
connected to this P2MP bridge. Up to six MAC addresses can be
entered.( Also you can through the Scan function and Add the
selected item to the list).
z Encryption: support only WEP mode for security.
Click Apply to save your settings.
4.2.4 WDS AP Repeater
A repeater is placed between an AP and a client to extend the distance
between the two WLAN devices. Functioning as a WDS repeater,the
TWL54A connects to both a client card as an AP and to another AP. In
typical repeater applications, APs connecting to other APs equipped with
WDS functionality must also support WDS.
Figure 4 shows an example of a Repeater network with two TWL54A
Repeaters connected to a TWL54A(AP mode),with each Repeater allowing
wireless clients to associate.
Figure 4
Click Mode Setting tab and choose WDS AP Repeater, the following screen
will appear.
17
Page 21

Instruction Manual TWL54A Access Point
z SSID: The name of your wireless network.
z Channel: The operating channel
z WDS mode: Dynamic key or Static key;At least one of the two
associated repeater should be setted static key.if select dynamic key
for one repeater,you don’t have to fill the other repeater’s MAC
address at the mac list field.
z WDS remote AP mac List:MAC address(es) of the repeaters that are
connected to this repeater.Up to six MAC Addresses can be
entered.(Also you can through the Scan function and Add the
selected item to the list).
z Encryption:support only WEP mode for security.
Click Apply to save your settings.
4.2.5 Client mode
When config as Client mode, the TWL54A device associates with an AP
within its range.The divice behaves like a normal wireless client.
18
Page 22

Instruction Manual TWL54A Access Point
Figure 5 shows the Client mode TWL54A operating as a wireless client in
infrastructure mode. Connect the LAN port of the TWL54A with the wired
Ethernet interface.
Figure 5
Click Mode Setting tab and choose Client,the following screen will appear.
z SSID: The wireless network’s name you want to associate with.
z Channel: The operating channel of the wireless network
z MAC addr: The MAC address of the wireless network.
z Scan: you can through the scan function to display exit wireless
network of the neighborhood,and click Add to establish connection
with it.
z Encryption: Select disable or WEP,WPA,WPA2,WPA_WPA2 Mixed
mode for security.
19
Page 23

Instruction Manual TWL54A Access Point
4.3 Access Filter
Click Radio setting---Access Filter tab ,the follow screen will appear.
The Access filter page allows you to configure the AP to allow or block
association with itself based on the MAC address of clients.Up to 32 MAC
addresses can be added to the list.
Filter mode: you can select off to disable the filter function. Or Allow / Block
client with the MAC address listed.
MAC address:The PCs MAC addresses to filter.click Add to take it in.Or
Delete to remove it from the list.
Open/Close Association Table: To view the current association
information with the device.Click Refresh to update the association info,and
Add to take in the selected item to filter list.
Click Apply to save your settings.
20
Page 24

Instruction Manual TWL54A Access Point
Chapter 5 System Tools
Click System Tools tab, there are 5 submenu-----Change
password,Firmware upgade,Reboot, Restore factory and Restore/Backup
Setting.
5.1 Change Password
To change the password,enter the new password in the New password and
Confirm New password fields and click Apply.
NOTE: For security reason,it is strongly recommend that you change the
default user name and password.
5.2 Firmware Upgrade
On this screen you can upgrade the AP’s firmware.Do not upgrade the
firmware unless you are experiencing problems with the AP or the new
firmware has a feature you want to use. To upgrade the AP’s firmware:
1. Download the firmware file from our website: www.tenda.cn.
2. Extract the firmware file on your computer.
3. On the Firmware Upgrade screen,enter the location of the firmware file
in the field provided,or click the Browse button and find the file.
4. Click Upgrade button,and follow the on-screen instructions.
21
Page 25

Instruction Manual TWL54A Access Point
You can click the Help button for more information.
NOTE: While in the period of the upgrade firmware or new software,
please mind preventing power break, or turned-off,that will result in a deadly
hurt to the device.After the process completed , the device will rebooted
automaticly, the total period will take about several minutes, please waiting
patiently.
5.3 Reboot
Reboot the AP to make the changed settings effective. Before rebooting
completed, the AP will break its connection automatically.
5.4 Restore Factory Default
That will erase all of your settings(including wireless security, current
working mode, etc),and replace them with the factory defaults.
22
Page 26

Instruction Manual TWL54A Access Point
z Working Mode: AP mode
z Default user name: admin
z Default password: admin
z Default IP address: 192.168.0.254
z Default subnet mask: 255.255.255.0
z Default Gateway: 192.168.0.1
5.5 Restore/Backup Setting
On this page you can create a backup setting file or save a setting to the AP.
Export: To save a backup setting file on your computer,click the Export
button and follow the on-screen instructions.
Import: To upload a setting file to the AP,click Browse to select the exist
setting file, then click Import button and follow the on-screen instructions.
Don’t forget reboot the device to take effect finally.
23
Page 27

Instruction Manual TWL54A Access Point
5.6 Exit
Click the Exit button to log out the web-based utility.
5.7 Help
Click the Help button to get more information about the AP’s settings and
applications.
24
Page 28

Instruction Manual TWL54A Access Point
25
Page 29

Instruction Manual TWL54A Access Point
Appendix I: Glossary
Access Point(AP): Any entity that has station functionality and provides
access to the distribution services, via the wireless medium(WM) for
associated stations.
Channel: An instance of medium use for the purpose of passing protocol
data units(PDUs) that may be used simultaneously,in the same volume of
space,with other instances of medium use(on other channels) by other
instances of the same physical layer(PHY),with an acceptably low frame
error ratio(FER) due to mutual interference.
SSID: Service Set identifier.An SSID is the network name shared by all
devices in a wireless network.your network’s SSID should be unique to your
network and idertical for all devices within the network.It is case-sensitive
and must not exceed 20 characters(use any of the characters on the
keyboard).Make sure this setting is the same for all devices in your wireless
network.
WEP: Wired Equivalent Privacy (WEP) is the method for secure wireless
data transmission. WEP adds data encryption to every single packet
transmitted in the wireless network. The 40bit and 64bit encryption are the
same because of out 64 bits, 40 bits are private. Conversely, 104 and 128
bit are the same. WEP uses a common KEY to encode the
data. Therefore, all devices on a wireless network must use the same key
and same type of encryption. There are 2 methods for entering the KEY,
one is to enter a 16-bit HEX digit. Using this method, users must enter a
10-digit number( for 64-bit) or 26-digit number( for 128-bit) in the KEY
field. Users must select the same key number for all devices. The other
method is to enter a text and let the computer generate the WEP key for
you. However, since each product use different method for key
generation. It might not work for different products. Therefore, it is NOT
recommend to use.
WPA/WPA2: A security protocol for wireless networks that builds on the
basic foundations of WEP.It secures wireless data transmission by using a
key similar to WEP,but the added strength of WPA is that the key changes
dynamically.The changing key makes it much more difficult for a hacker to
learn the key and gain access to the network.WPA2 is the second
generation of WPA security and provides a stronger encryption mechanism
through Advanced Encryption Standard(AES),which is a requirement for
some government users.
26
Page 30

Instruction Manual TWL54A Access Point
Appendix II: TCP/IP Address Setting (Take Winxp as example)
Click the “Start—>Settings—>Control Panel” (Fig- 1) :
Fig-1
Click “Network and Internet Connections”, the windows as below will appear
(Fig- 2) :
27
Page 31

Instruction Manual TWL54A Access Point
Fig- 2
Click the “Network Connections”, as Fig- 3:
28
Page 32

Instruction Manual TWL54A Access Point
Fig- 3
Choose “Local Area Connection” , right-click on the icon, choose the
“Properties”, then the “Local Area Connection Properties”windows
appear, choose the “Internet Protocol( TCP/IP)” in the “This connection
uses the following items” , click the “Properties”.
Fig- 4
Choose the “Use the following IP address”, enter the IP address as:
192.168.0.xxx.
xxx is an integer between 1~253喋喌, Subnet mask is :
255.255.255.0(As Showed in Fig- 5)
29
Page 33

Instruction Manual TWL54A Access Point
Fig- 5
Click “OK” to apply and return to the “Local Area Connection Properties”
windows.
Continue click “OK” to exit the setting windows.
30
Page 34

 Loading...