

Page 1

600Mbps Wireless N Router F9
User Guide
Page 2

Copyright Statement
© 2017 Shenzhen Tenda Technology Co., Ltd. All rights reserved.
is a registered trademark legally held by Shenzhen Tenda Technology Co., Ltd. Other brand and
product names mentioned herein are trademarks or registered trademarks of their respective holders. Copyright
of the whole product as integration, including its accessories and software, belongs to Shenzhen Tenda
Technology Co., Ltd. No part of this publication can be reproduced, transmitted, transcribed, stored in a retrieval
system, or translated into any language in any form or by any means without the prior written permission of
Shenzhen Tenda Technology Co., Ltd.
Disclaimer
Pictures, images and product specifications herein are for references only. To improve internal design,
operational function, and/or reliability, Tenda reserves the right to make changes to the products without
obligation to notify any person or organization of such revisions or changes. Tenda does not assume any liability
that may occur due to the use or application of the product described herein. Every effort has been made in the
preparation of this document to ensure accuracy of the contents, but all statements, information and
recommendations in this document do not constitute a warranty of any kind, express or implied.
Page 3
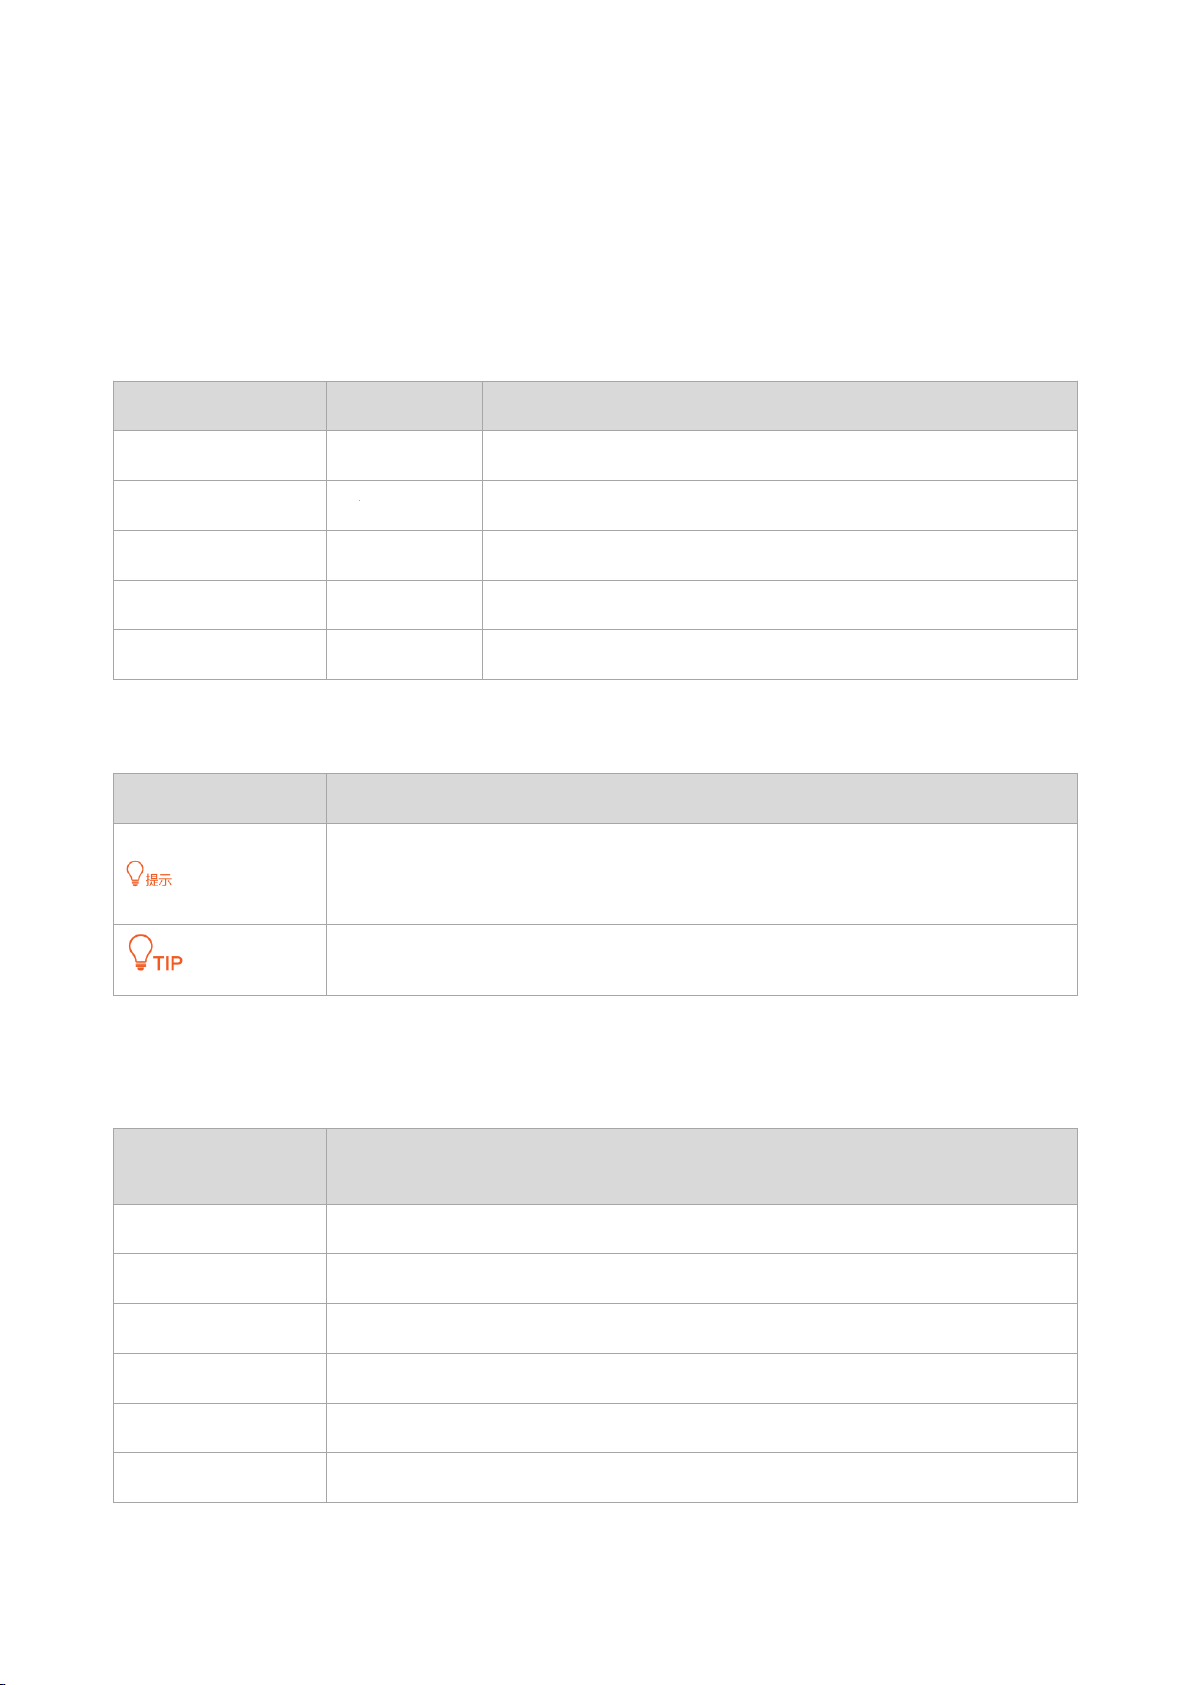
Item
Presentation
Example
Cascading menus
>
System > Live Users
Parameter and value
Bold
Set User Name to Tom.
Variable
Italic
Format: XX:XX:XX:XX:XX:XX
UI control
Bold
On the Policy page, click the OK button.
Message
“ ”
The “Success” message appears.
Symbol
Meaning
This format is used to highlight information of importance or special interest.
Ignoring this type of note may result in ineffective configurations, loss of data or
damage to device.
This format is used to highlight a procedure that will save time or resources.
Acronym or
Abbreviation
Full Spelling
ISP
Internet Service Provider
WPS
WiFi Protected Setup
PPPoE
Point-to-Point Protocol over Ethernet
DHCP
Dynamic Host Configuration Protocol
ISP
Internet Service Provider
DNS
Domain Name System
Preface
Thank you for choosing Tenda! Please read this user guide before you start with AC18.
Conventions
The typographical elements that may be found in this document are defined as follows.
The symbols that may be found in this document are defined as follows.
Acronyms and Abbreviations
Page 4

AP
Access Point
WISP
Wireless Internet Service Provider
DDNS
Dynamic Domain Name System
DMZ
Demilitarized Zone
Hotline
Global: (86) 755-27657180
Email
support@tenda.com.cn
Canada: 1-888-998-8966
Hong Kong: 00852-81931998
Website
http://www.tendacn.com
Skype
tendasz
Additional Information
For more information, search this product model on our website at http://www.tendacn.com.
Technical Support
If you need more help, contact us by any of the following means. We will be glad to assist you as soon as
possible.
Page 5

Contents
1 Get to Know Your Device ............................................................................................................................ 7
1.1 Introduction ...................................................................................................................................................... 7
1.2 Features ............................................................................................................................................................ 7
1.3 Environment ...................................................................................................................................................... 8
1.4 Overview ........................................................................................................................................................... 8
2 Quick Internet Setup ................................................................................................................................. 11
2.1 Internet Setup through a Smart Phone ............................................................................................................. 11
2.2 Internet Setup through a Computer ................................................................................................................. 12
2.3 Importing the PPPoE User name and Password from the Original Router .......................................................... 15
3 Layout ..................................................................................................................................................... 17
4 Status ...................................................................................................................................................... 18
4.1 Internet Connection Status .............................................................................................................................. 18
4.2 Online Devices and Real-Time Speed ............................................................................................................... 20
4.3 System Information ......................................................................................................................................... 20
5 Internet Settings ...................................................................................................................................... 22
5.1 PPPoE .............................................................................................................................................................. 23
5.2 DHCP ............................................................................................................................................................... 24
5.3 Static IP Address .............................................................................................................................................. 24
5.4 WISP Mode ..................................................................................................................................................... 25
5.5 Universal Repeater Mode ................................................................................................................................ 28
5.6 AP Mode ......................................................................................................................................................... 31
6 Wireless Settings ...................................................................................................................................... 35
6.1 WiFi On/Off Button .......................................................................................................................................... 35
6.2 WiFi Name and Password ................................................................................................................................ 36
6.3 WiFi Signal Strength ......................................................................................................................................... 37
6.4 WiFi Schedule .................................................................................................................................................. 38
6.5 WPS ................................................................................................................................................................ 39
6.6 Wireless Parameters ........................................................................................................................................ 39
7 Bandwidth Control ................................................................................................................................... 41
7.1 Setting Download/Upload Limit ....................................................................................................................... 42
7.2 Blocking a Device ............................................................................................................................................. 42
Page 6

7.3 Removing a device from Blacklisted Devices List ............................................................................................... 43
7.4 Application Scenario ........................................................................................................................................ 43
8 MAC Address Filter ................................................................................................................................... 44
8.1 Adding a MAC Address Filter Rule .................................................................................................................... 45
8.2 Removing a MAC Address Filter Rule ................................................................................................................ 45
8.3 Application Scenario ........................................................................................................................................ 46
9 IP-MAC Binding ........................................................................................................................................ 47
9.1 Adding an IP-MAC Binding Rule........................................................................................................................ 47
9.2 Removing an IP-MAC Binding Rule ................................................................................................................... 48
10 Port Forwarding ....................................................................................................................................... 49
10.1 Adding a Port Forwarding Rule ....................................................................................................................... 49
10.2 Removing a Port Forwarding Rule .................................................................................................................. 50
10.3 Application Scenario ...................................................................................................................................... 50
11 DDNS ...................................................................................................................................................... 53
11.1 Adding a DDNS Rule ....................................................................................................................................... 53
11.2 Application Senario ........................................................................................................................................ 54
12 DMZ Host ................................................................................................................................................ 58
13 UPNP ....................................................................................................................................................... 59
14 Administration ......................................................................................................................................... 60
14.1 Login Password .............................................................................................................................................. 60
14.2 WAN Parameters ........................................................................................................................................... 61
14.3 LAN Parameters ............................................................................................................................................. 63
14.4 Remote Web-based Management .................................................................................................................. 66
14.5 Date & Time .................................................................................................................................................. 68
14.6 Device Management ...................................................................................................................................... 69
Appendix ........................................................................................................................................................ 74
A.1 Join Your WiFi .................................................................................................................................................. 74
A.2 Configure Your Computer ................................................................................................................................ 77
A.3 FAQ ................................................................................................................................................................. 82
A.4 Safety and Emission Statement ........................................................................................................................ 83
Page 7

F9 is a wireless router that helps you quickly set up wired and wireless
internet connections at home. It boasts four external antennas and
offers a wireless transmission rate of as high as 600 Mbps. With
excellent wall penetration performance, it provides high-quality WiFi
coverage.
1 Get to Know Your Device
1.1 Introduction
1.2 Features
4 * 100 Mbps auto-negotiation Ethernet port
4 * external omnidirectional antennas at 2.4GHz
Supports WiFi Schedule, and turning on/off WiFi with one button
Input: 9 V 1 A
Up to 600 Mbps wireless transmission rate
Supports Universal Repeater and Bandwidth Control features
Supports PPPoE user name and password migration for effortless internet configuration
Page 8
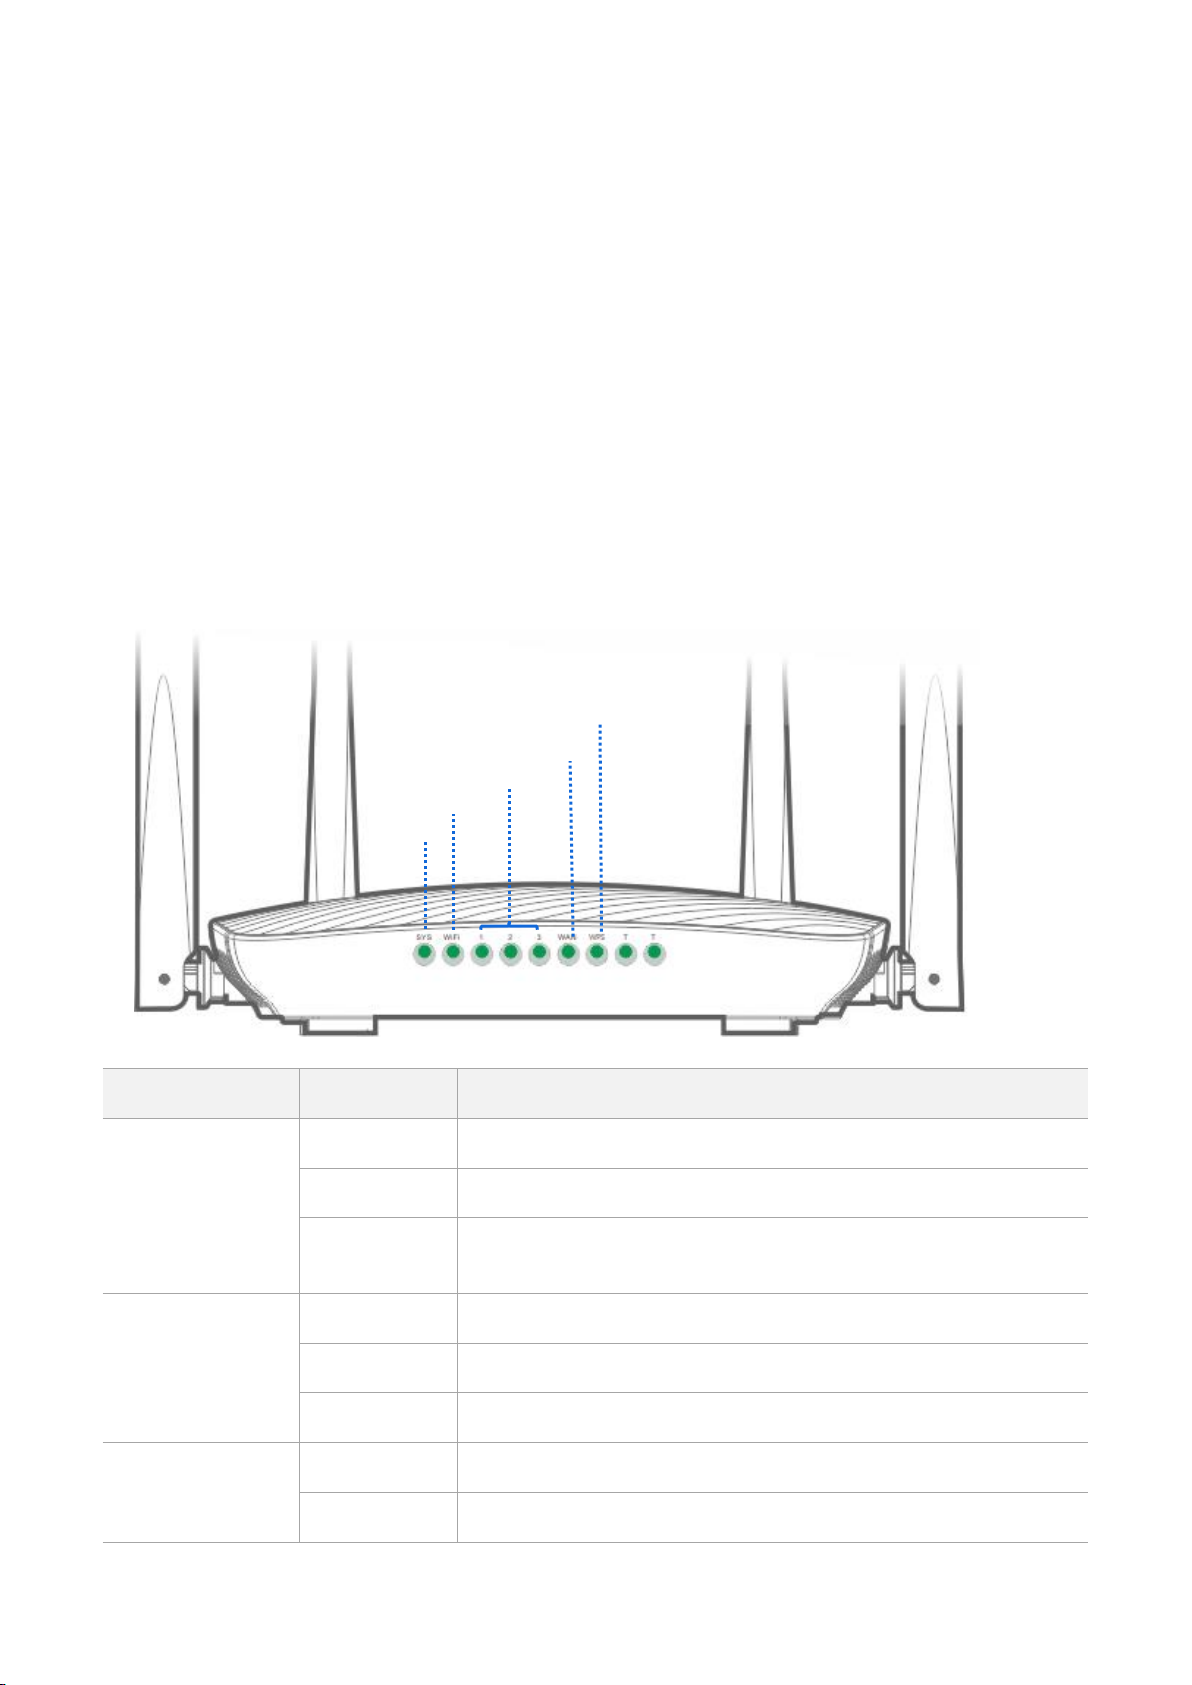
LED Indicator
Status
Description
SYS
Solid on
The system is not working properly.
Blinking
The system is working properly.
Off
The router is not connected to a power supply properly, or not
connected to a power supply.
WiFi
Solid on
The wireless feature is enabled.
Blinking
The router is transmitting or receiving wireless data.
Off
The wireless feature is disabled.
1/2/3
Solid on
The LAN port is connected properly.
Blinking
The LAN port is transmitting or receiving data.
SYS
1.3 Environment
The router should be used in an indoor environment that meeting the following demands:
Place it in an environment with the temperature of 0 °C - 40 °C, the humidity of 10 % - 90 %RH
non-condensing and well-ventilation.
Place it in an environment with minimum number of walls and ceilings between the router and smart
phones and laptops.
Keep it away from household applications, such as microwave oven, ceiling fan, and so on.
Keep it away from any large metal surfaces, such as a solid metal door or aluminum studs.
Keep it away from other materials, such as glass, brick, and so on.
1.4 Overview
LED Indicators
Page 9
LED Indicator
Status
Description
Off
The LAN port is not connected, or not connected properly.
WAN
Solid on
The WAN port is connected properly.
Blinking
The WAN port is transmitting or receiving data.
Off
The WAN port is not connected, or not connected properly.
The LED indicator is reserved.
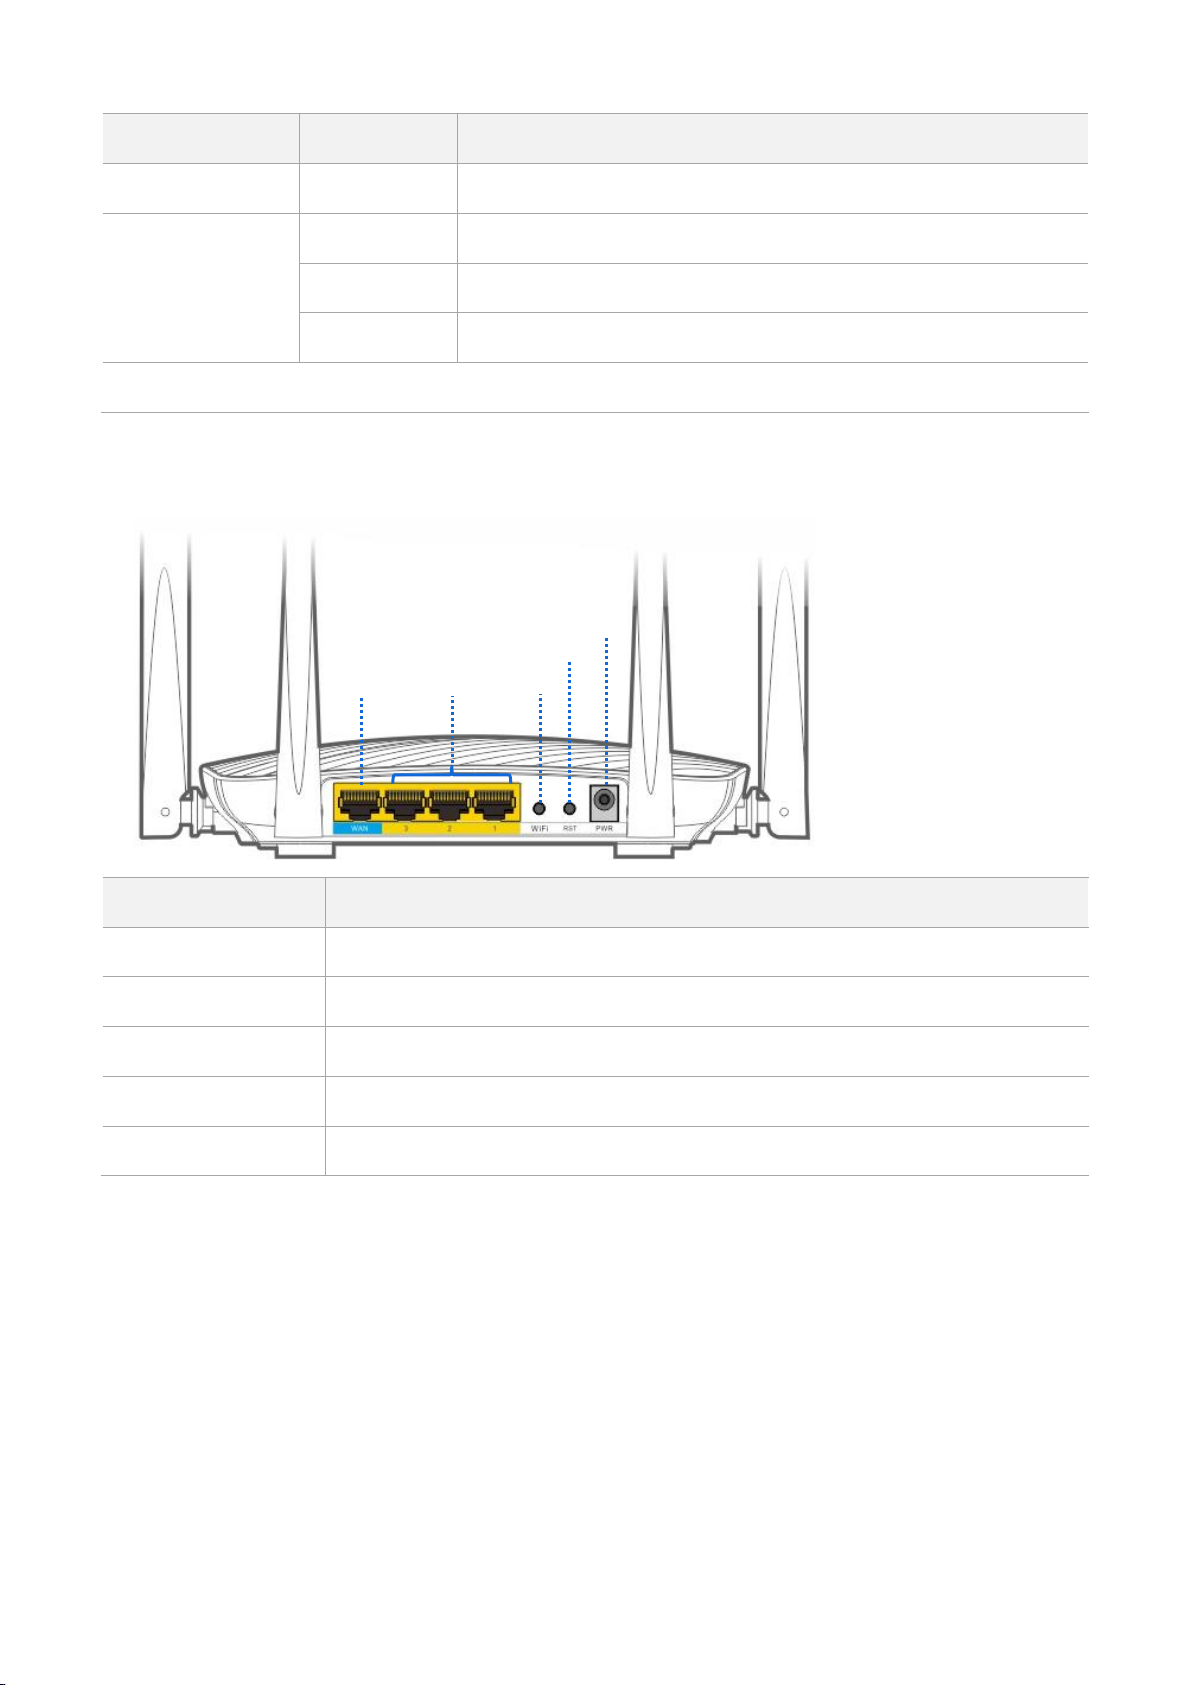
Port & Button
Description
WAN
It’s used to connect to an Ethernet cable with internet connectivity.
1/2/3
It’s used to connect to a wired device, such as a computer and so on.
WiFi
Press it to enable/disable WiFi feature.
RST
Hold it down for 8 seconds until all LEDs light up for once to restore to factory settings.
PWR
It’s used to connect to the included power adapter for power supply.
WAN
WiFi
RST
PWR
Port & Button
Page 10
1
2
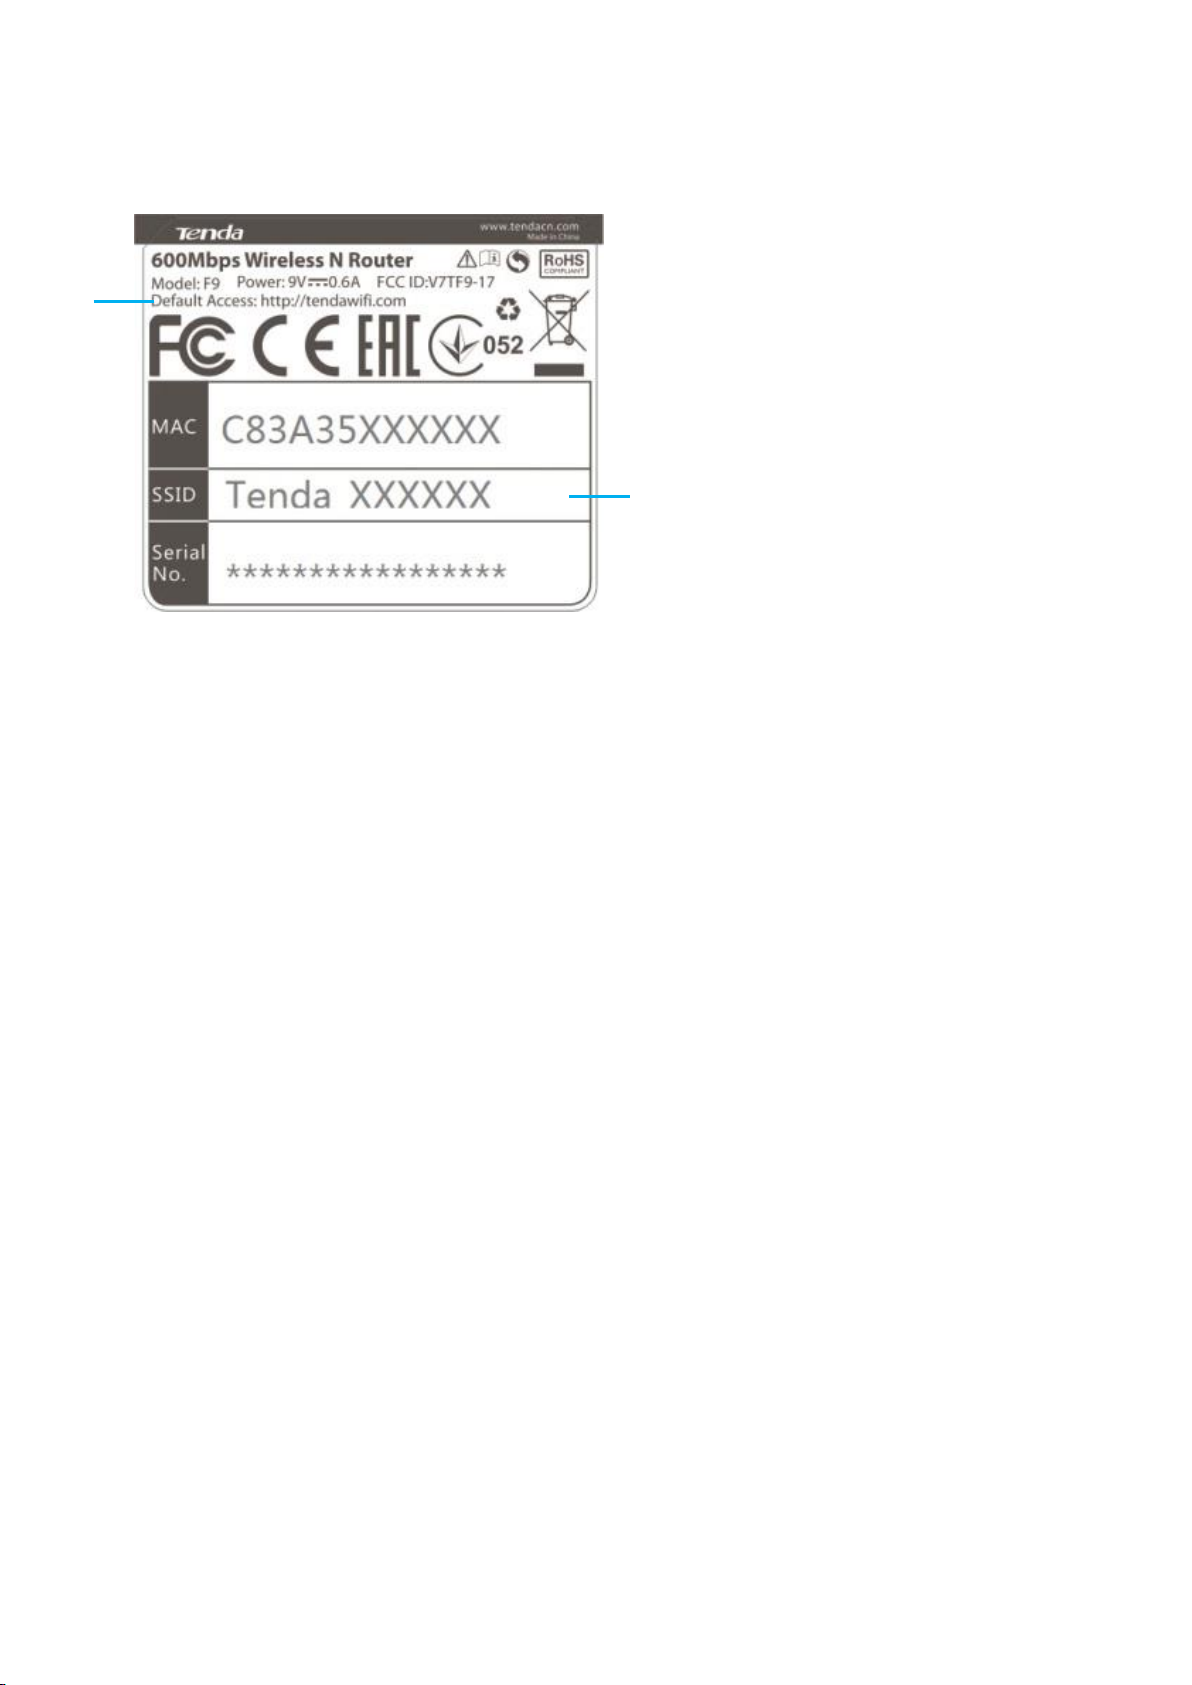
Label
The label on the bottom panel of the router presents default access address, WiFi name, and so on.
1. The default login address. It is used to log in to the web UI of the router. You can also use 192.168.0.1 to log in
to the web UI.
2. Default WiFi Name.
When you use this router for the first time, the wireless devices, such as smart phone and so on, can search
and connect to the wireless network, and log in to the web UI of the router to configure it for internet
access.
After the router access the internet, if you do not change the WiFi name, the wireless devices, such as smart
phone and so on, can search and connect to the wireless network for internet access.
Page 11
2 Quick Internet Setup
2.1 Internet Setup through a Smart Phone
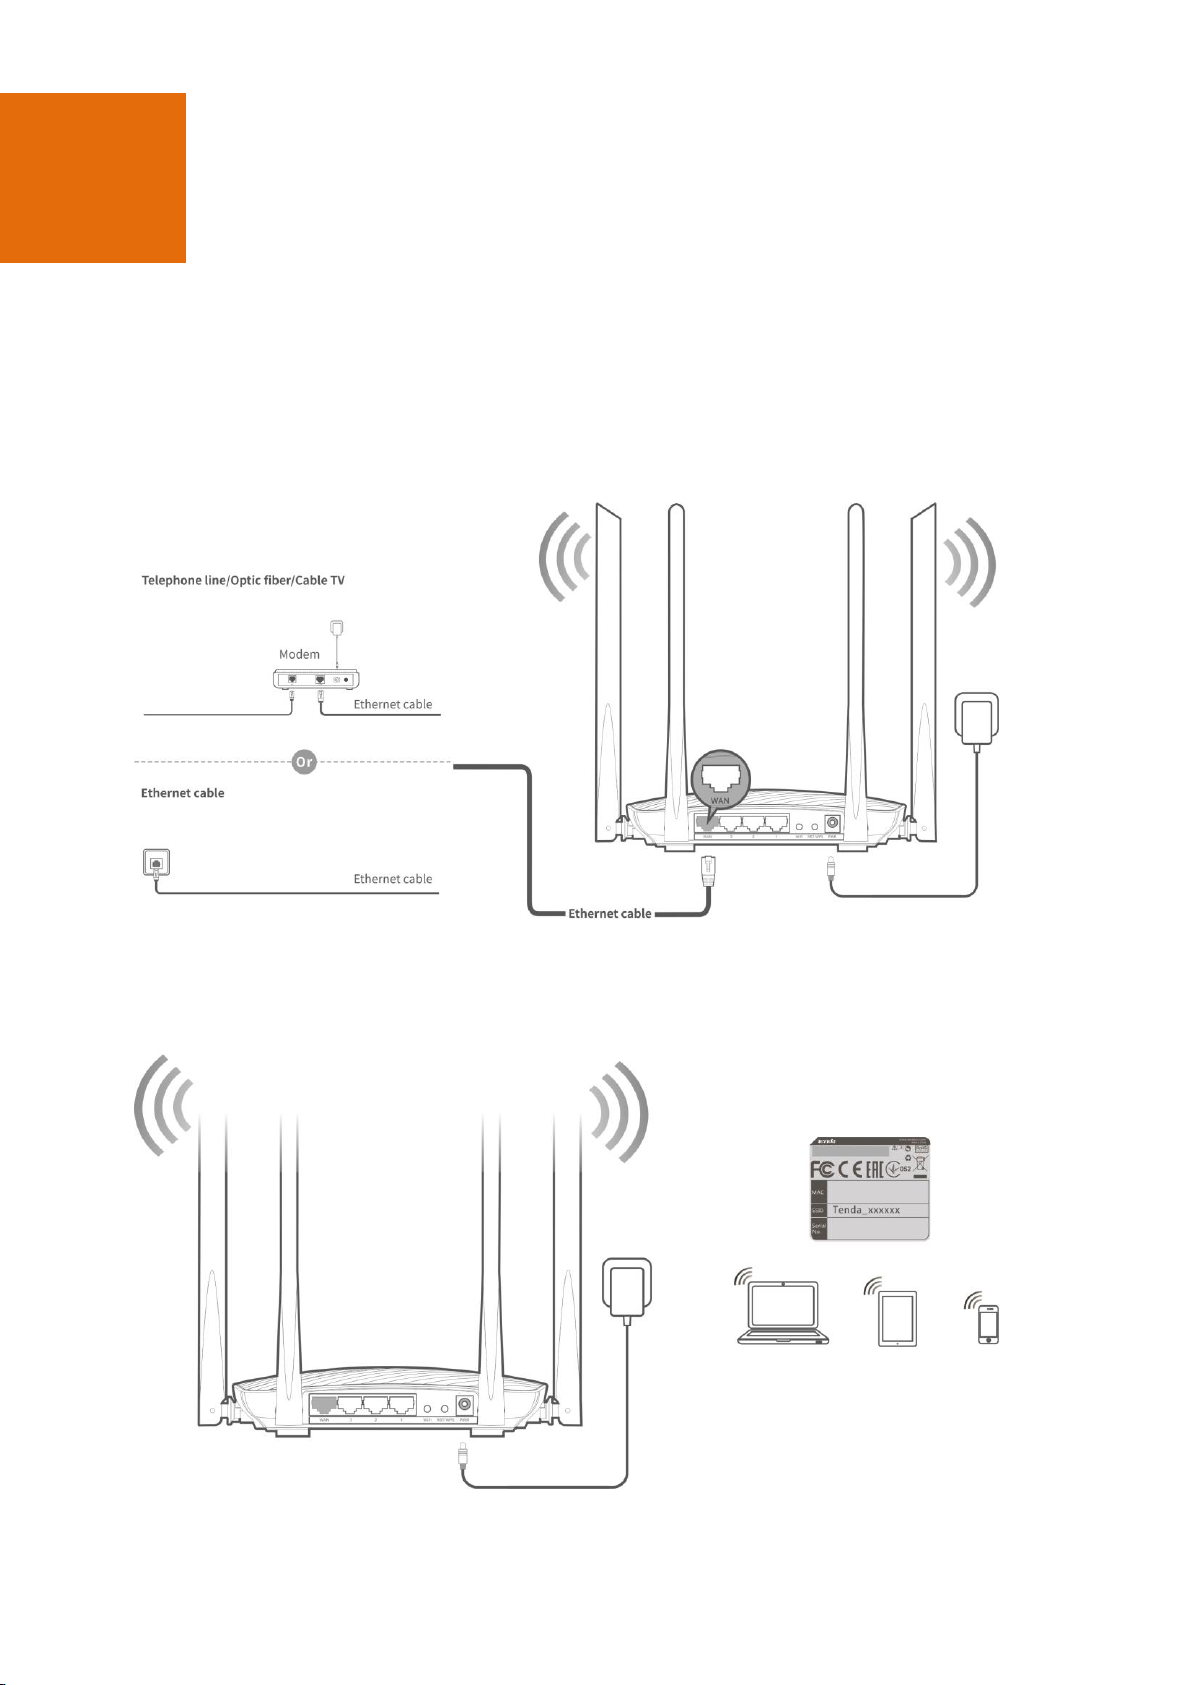
Step 1 Connect the router.
1. Power on the router using the included powered adapter.
2. Connect the Ethernet cable with internet connectivity to the WAN port of the router.
Step 2 Use a wireless device, such as a smart phone, to connect to the WiFi name labeled on the bottom
panel of the router.
Step 3 Start a web browser on the wireless device, and visit tendawifi.com or 192.168.0.1.
Page 12
Step 4 The router detects the connection type automatically. Enter the required information based on the
onscreen instruction. Take PPPoE an example.
1. Connection Type: Select PPPoE.
2. User Name: Enter the PPPoE user name and password provided by your internet service provider (ISP).
3. Password: Enter the PPPoE password provided by your ISP.
Step 5 Customize a WiFi name and WiFi password.
Step 6 Click OK to apply the settings.
--End
Wait for a minute, you can access the internet. You need to use your wireless device, such as smart phone, to
connect to the wireless network again.
If you want to configure more functions, refer to the following parts in this user guide.
2.2 Internet Setup through a Computer
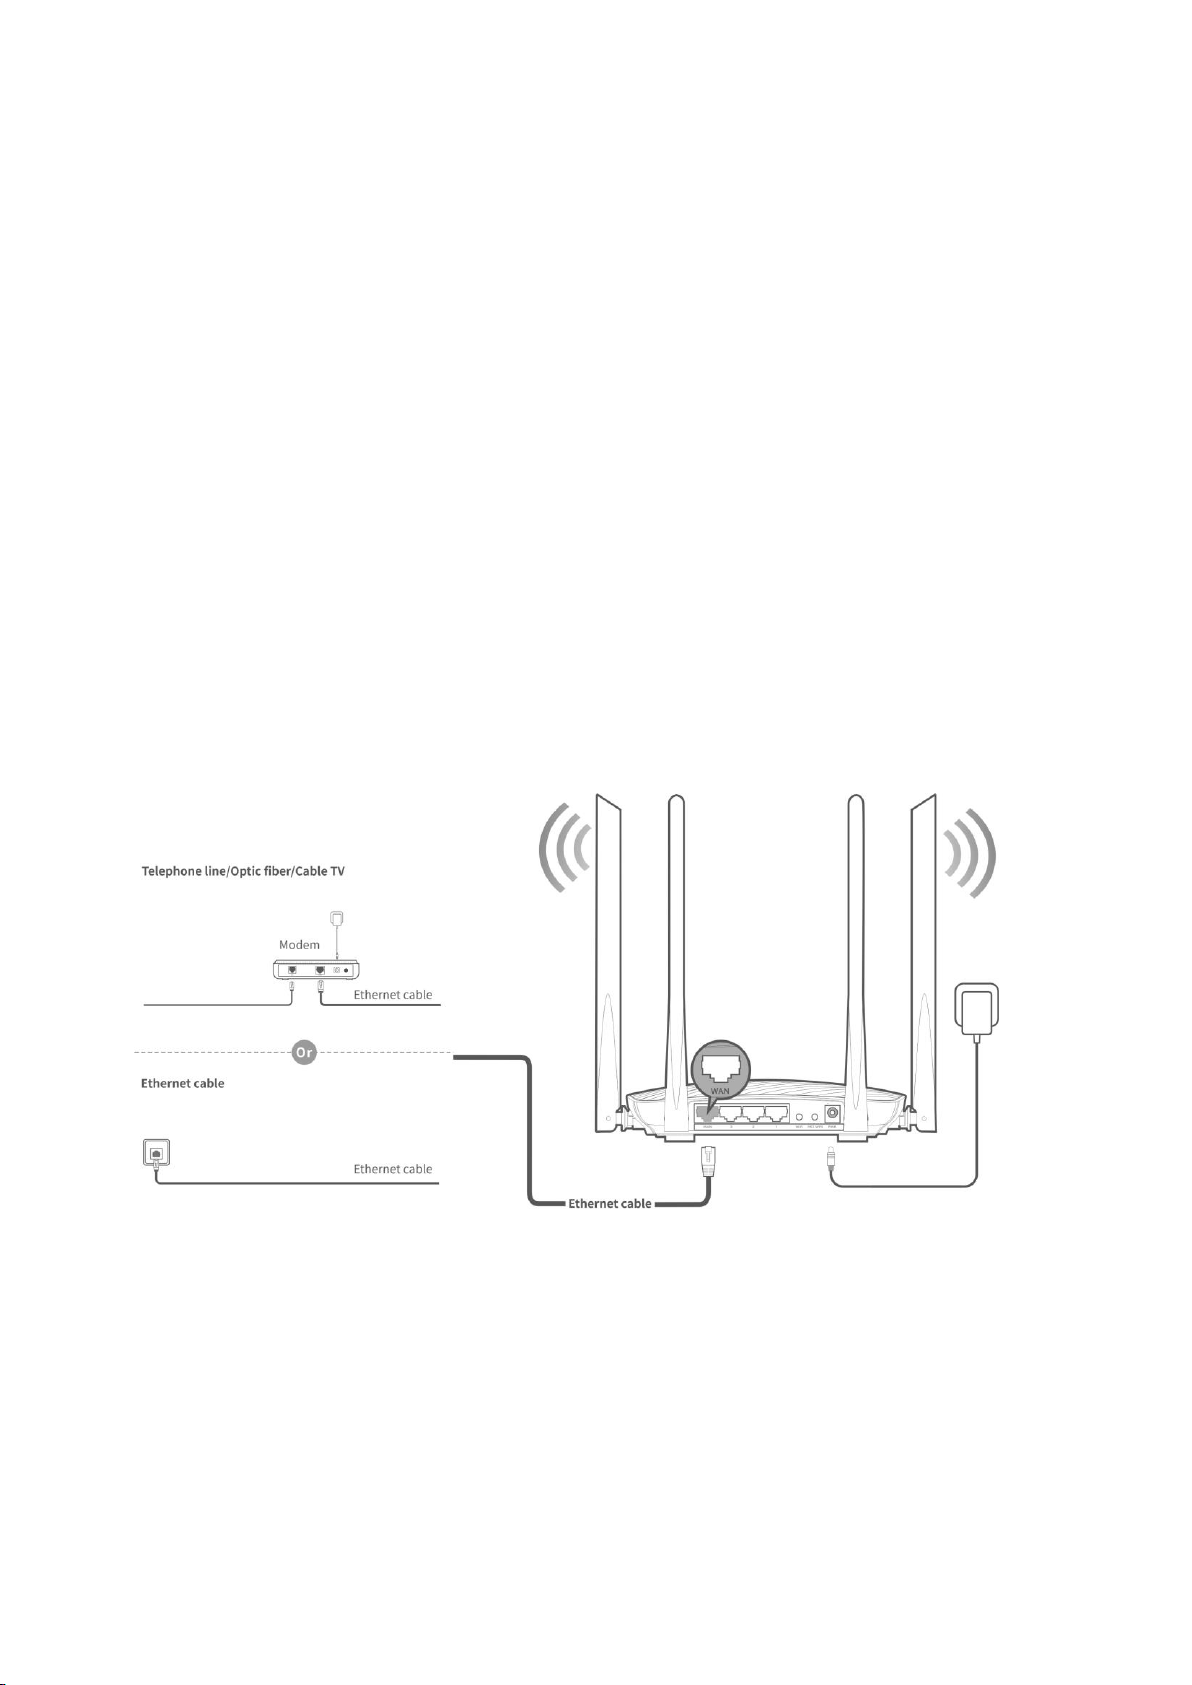
Step 1 Connect the router.
1. Power on the router using the included powered adapter.
2. Connect the Ethernet cable with internet connectivity to the WAN port of the router.
3. Connect the computer to port 1, 2, or 3 using an Ethernet cable.
Page 13

Step 2 Start a web browser on the computer, enter tendawifi.com or 192.168.0.1 in the address bar, and
press Enter.
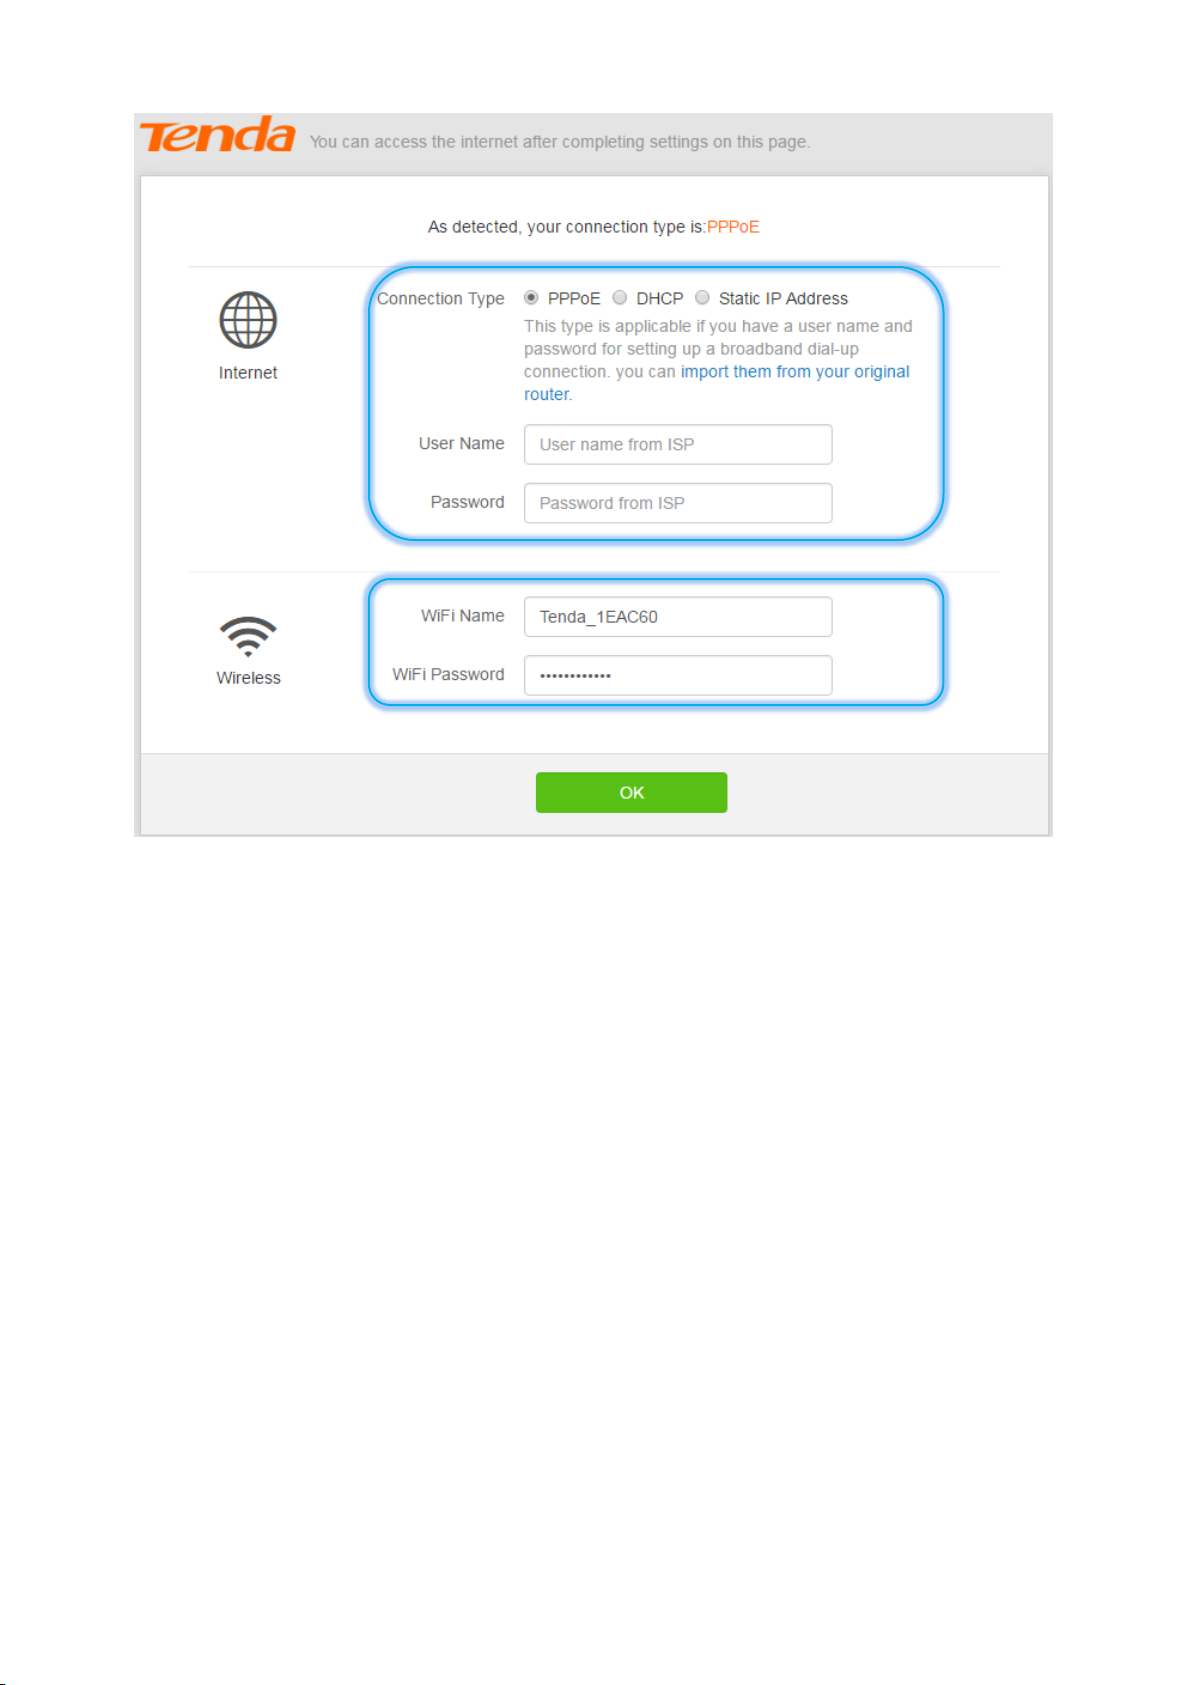
Step 3 The router detects the connection type automatically. Enter the required information based on the
onscreen instruction. Take PPPoE an example.
1. Connection Type: Select PPPoE.
2. User Name: Enter the PPPoE user name provided by your ISP.
3. Password: Enter the PPPoE password provided by your ISP.
Step 4 Customize a WiFi name and WiFi password.
Step 5 Click OK to apply the settings.
Page 14
--End
Configuration Succeeded.
Page 15
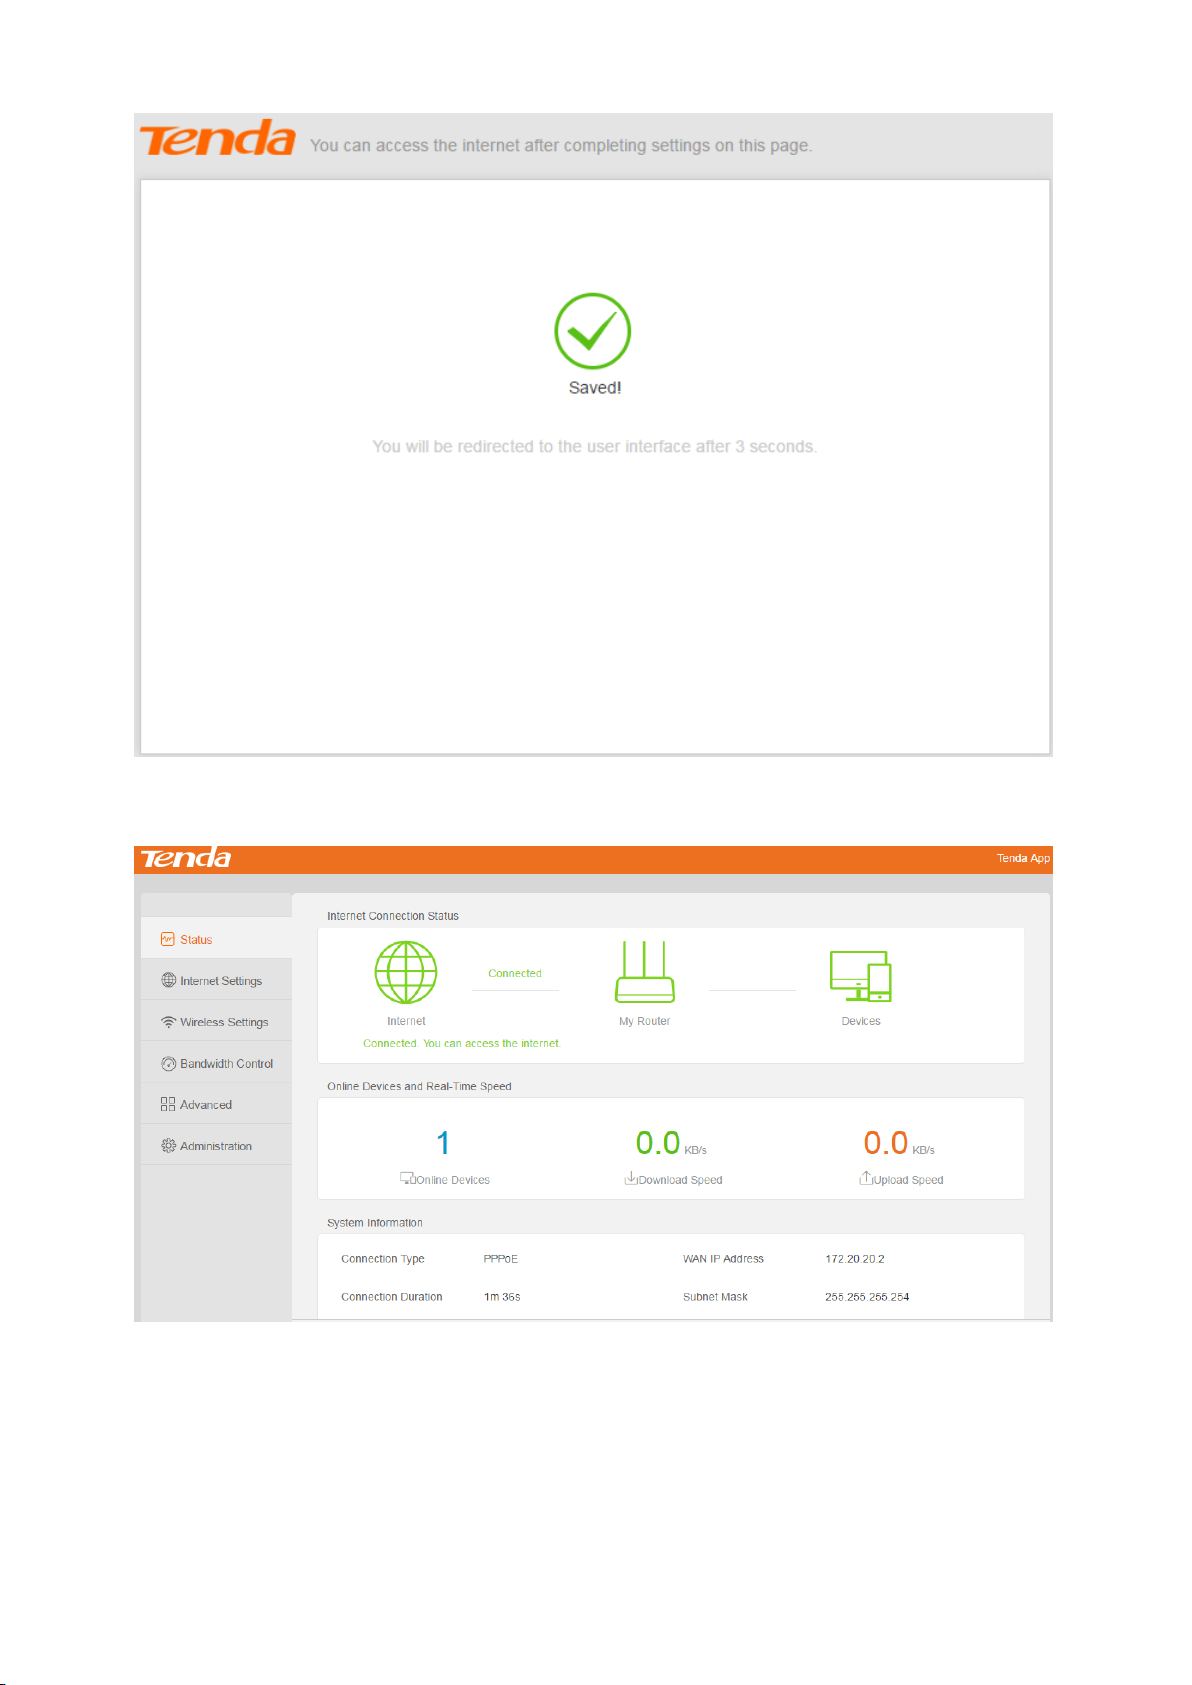
The router will redirect to the web UI of the router. If you want to configure more functions, refer to the
following parts in this user guide.
2.3 Importing the PPPoE User name and Password
from the Original Router
If you use this router to replace an original one and you have set up a dial-up connection on the original router,
perform the following steps to import the PPPoE user name and password to this router from the original router.
Page 16
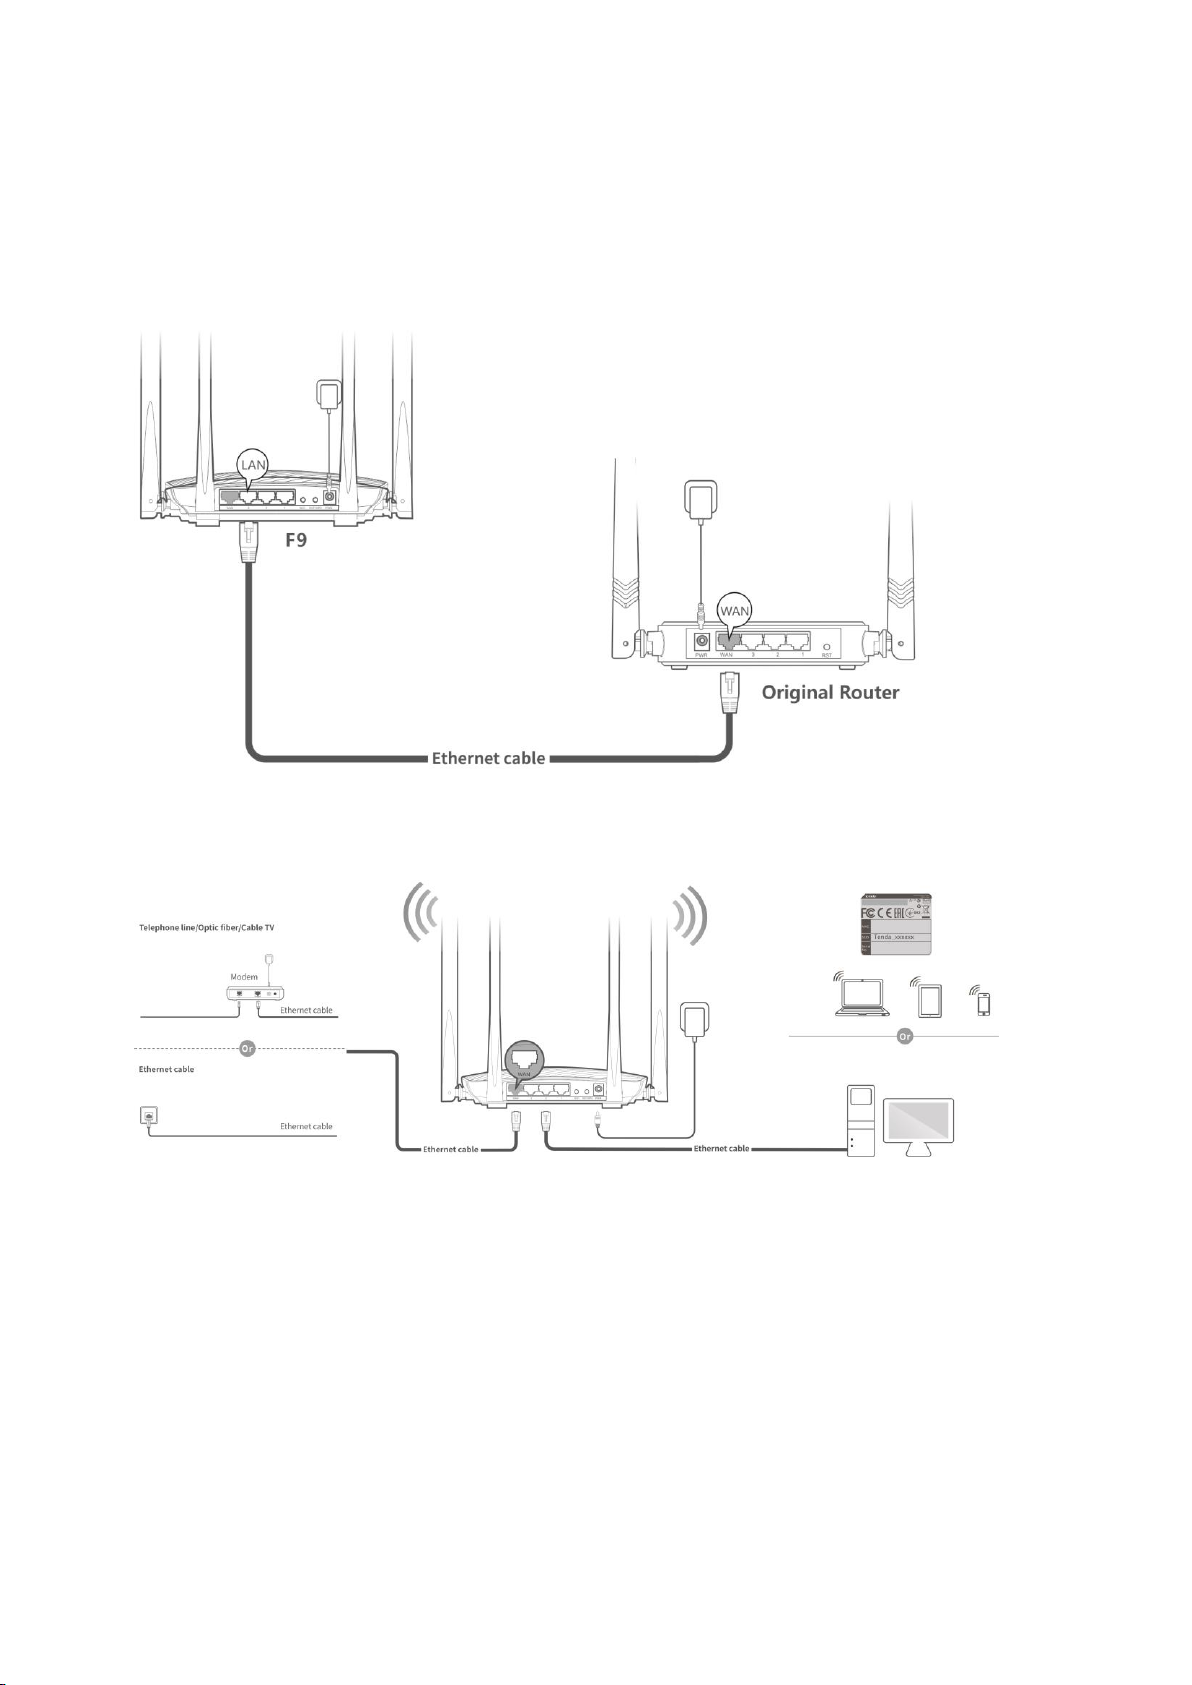
Step 1 Power on the original router and this router.
Step 2 Connect the WAN port of the original router to any LAN port of this router using an Ethernet cable.
When all the LAN LED indicators of this router turn to solid on for 3 seconds from quick blinking, the PPPoE user
name and password are succeeded in importing.
Step 3 After importing succeeded, connect the Ethernet cable with internet connectivity to the WAN port of
this router.
--End
Page 17
Parameters
Description
Navigation Bar
Functions menu is displayed on the left. When users select a function, the
corresponding configuration area of the function is displayed on the right.
Configuration Area
This area is used to configure functions for users.
This button is used to apply the settings you have configured.
This button is used to cancel the settings you have configuration.
A QR code will appear after clicking Tenda App. You can scan it to download Tenda App
for remote management. Tenda App can help you configure the following functions:
Accelerate WiFi, WiFi Schedule, Transmit Power, and so on.
Click to visit Tenda Facebook.
Click to visit Tenda Twitter.
3 Layout
This chapter introduces the layout of the web UI. The web UI consists of navigation bar and configuration area,
which is shown as follows:
Page 18
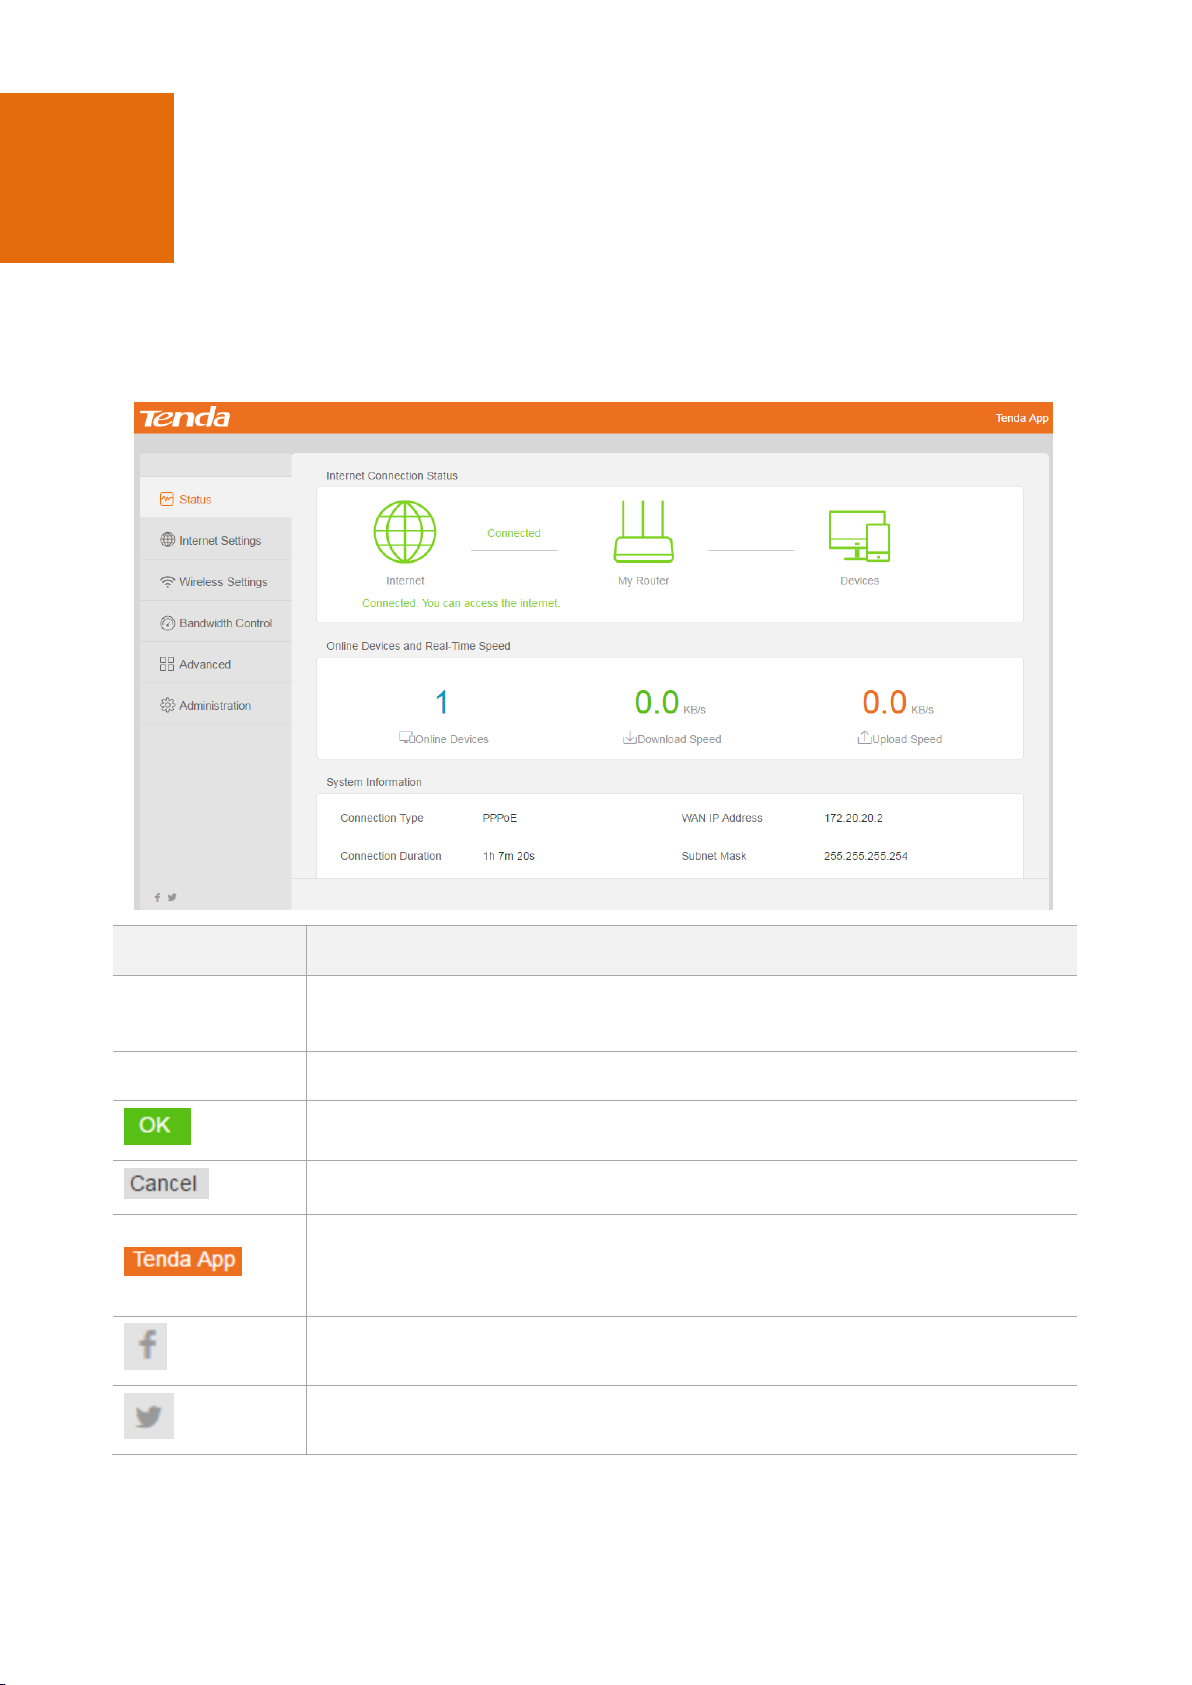
4 Status
In Status page, you can check internet connection status, online devices, and real-time speed, and system
information. When you configure the internet settings, but cannot access the internet, you can refer to the
instructions on this page to solve the problem.
Choose Status to enter the page.
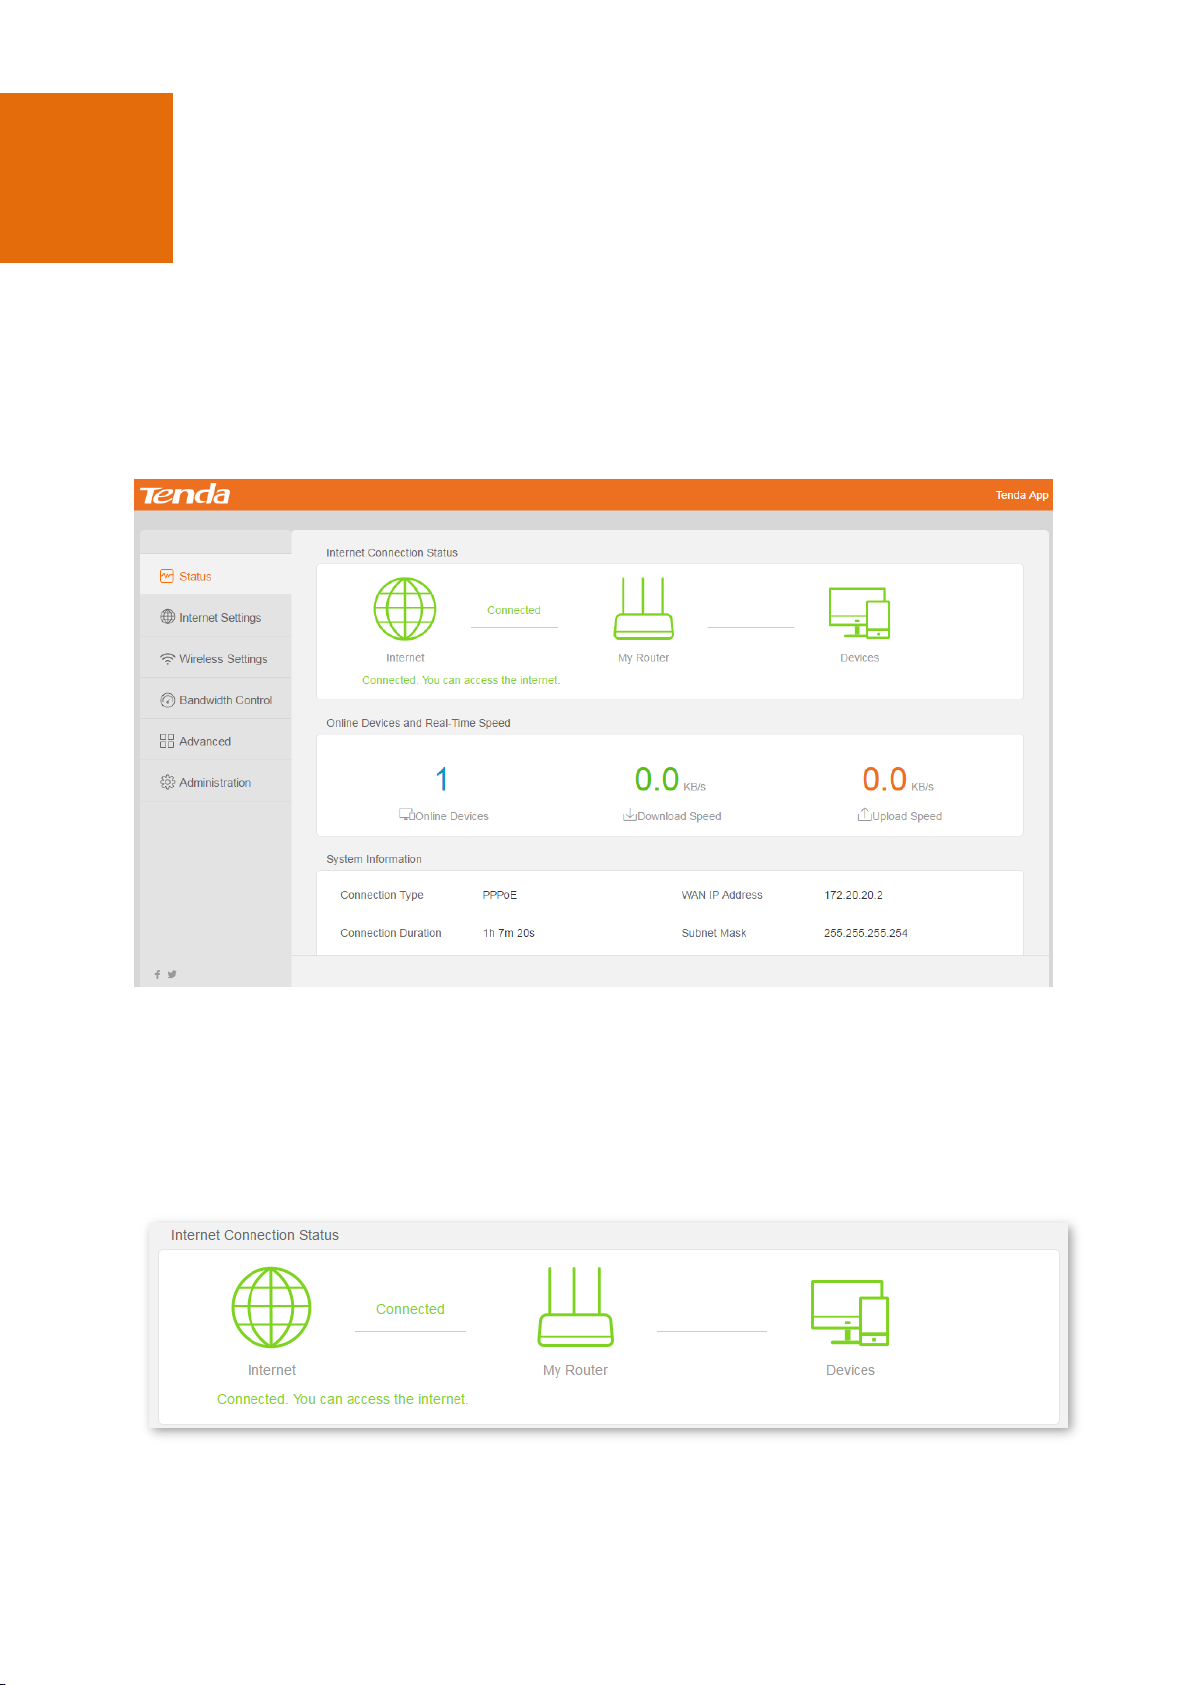
4.1 Internet Connection Status
In this part, you can check the internet connection status. After configuring internet settings, you can check
whether you can access the internet on this page.
When “Connected. You can access the internet.” is displayed, the router is connected to the internet successfully.
Computers can connect to the router using Ethernet cables for internet access. Wireless devices, such as smart
phones, can connect to the wireless network for internet access.
When other information is displayed, refer to the instructions. Refer to the following details:
Page 19
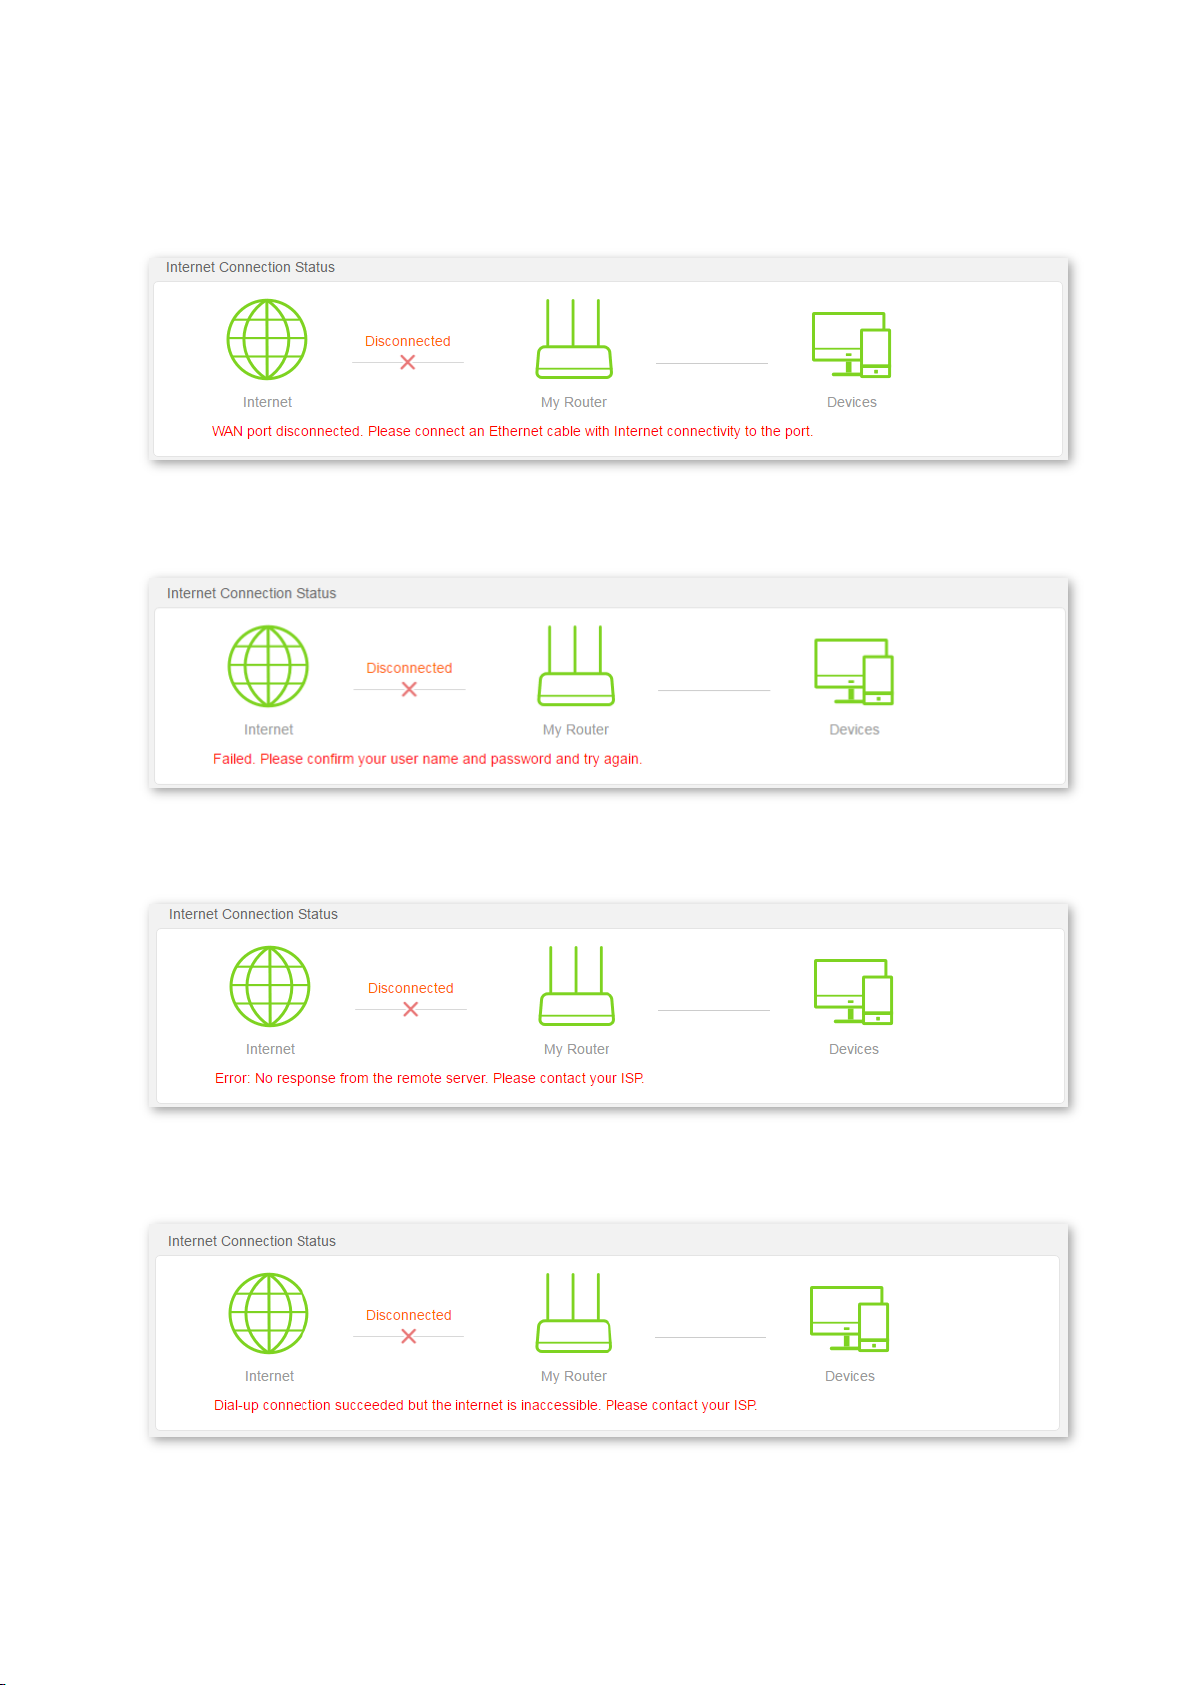
If “WAN port disconnected. Please connect an Ethernet cable with internet connectivity to the port.” is displayed,
check whether the Ethernet cable with internet connectivity is connected to the WAN port of the router properly.
If it is connected properly, but the WAN LED indicator is off, contact your ISP.
If “Failed. Please confirm your user name and password and try again.” is displayed, verify that the user name
and password you entered are correct. If they are correct but the problem persists, contact your ISP.
If “Error: No response from the remote server. Please contact your ISP.” is displayed, Please refer to the
instructions to solve the problem.
If “Dial-up connection succeeded but internet is inaccessible. Please contact your ISP.” is displayed, it indicates
that the router is working properly but the remote server works improperly. Contact your ISP.
If “The router has obtained a valid IP address but cannot access the internet. Please try the solutions below one
by one.” is displayed, Refer to the onscreen instructions to solve the problem.
Page 20

If “Internet is inaccessible. Please contact your ISP.” is displayed, please enter correct IP address and other
parameters. If the parameters are correct but the problem persists, contact your ISP.
4.2 Online Devices and Real-Time Speed
In this part, you can check the number of clients and current downloading/uploading speed in LAN. If you want
to know details about the downloading/uploading speed of each client, please refer to Bandwidth Control.
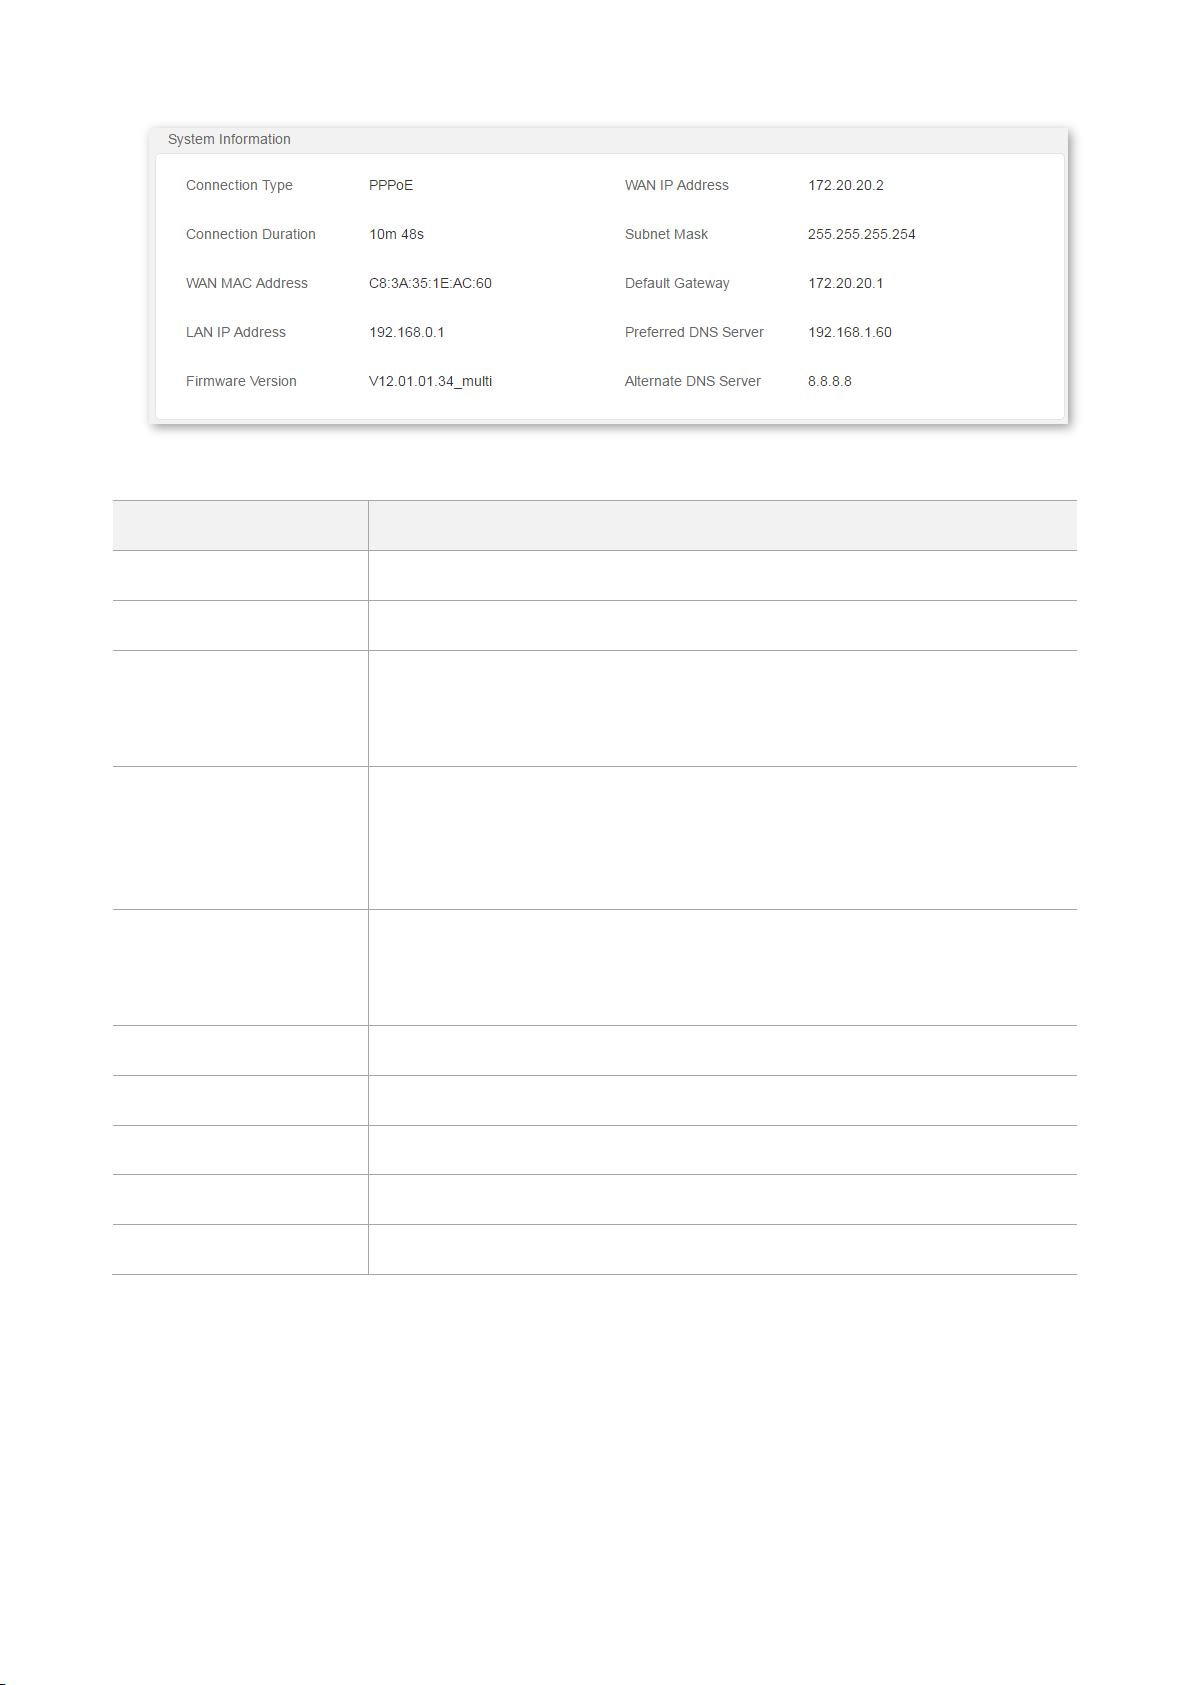
4.3 System Information
In this part, you can check the connection type, WAN MAC address, LAN/WAN IP address, and so on.
Page 21
Parameters
Description
Connection Type
It specifies the connection type of the router.
Connection Duration
It specifies the connection duration that the router is connected to the internet.
WAN MAC Address
It specifies the MAC address of WAN port of the router.
After you perform MAC address clone, you can check whether the WAN MAC
address is changed to the one you clone.
LAN IP
It specifies the IP address of LAN port. It can be used to log in to the web UI of
the router.
You can use IP address 192.168.0.1 or domain name tendawifi.com to log in to
the web UI.
Firmware Version
It specifies the firmware version of the router.
After you perform firmware upgrade, you can check whether the firmware is
the version you have upgraded.
WAN IP
It specifies the WAN IP address of the router.
Subnet Mask
It specifies the subnet mask corresponding to the WAN IP address.
Default Gateway
It specifies the gateway address the router obtains.
Preferred DNS Server
It specifies the preferred DNS server IP address the router obtains.
Alternate DNS Server
It specifies the alternate DNS server IP address the router obtains.
Parameters Description
Page 22
Parameters
Description
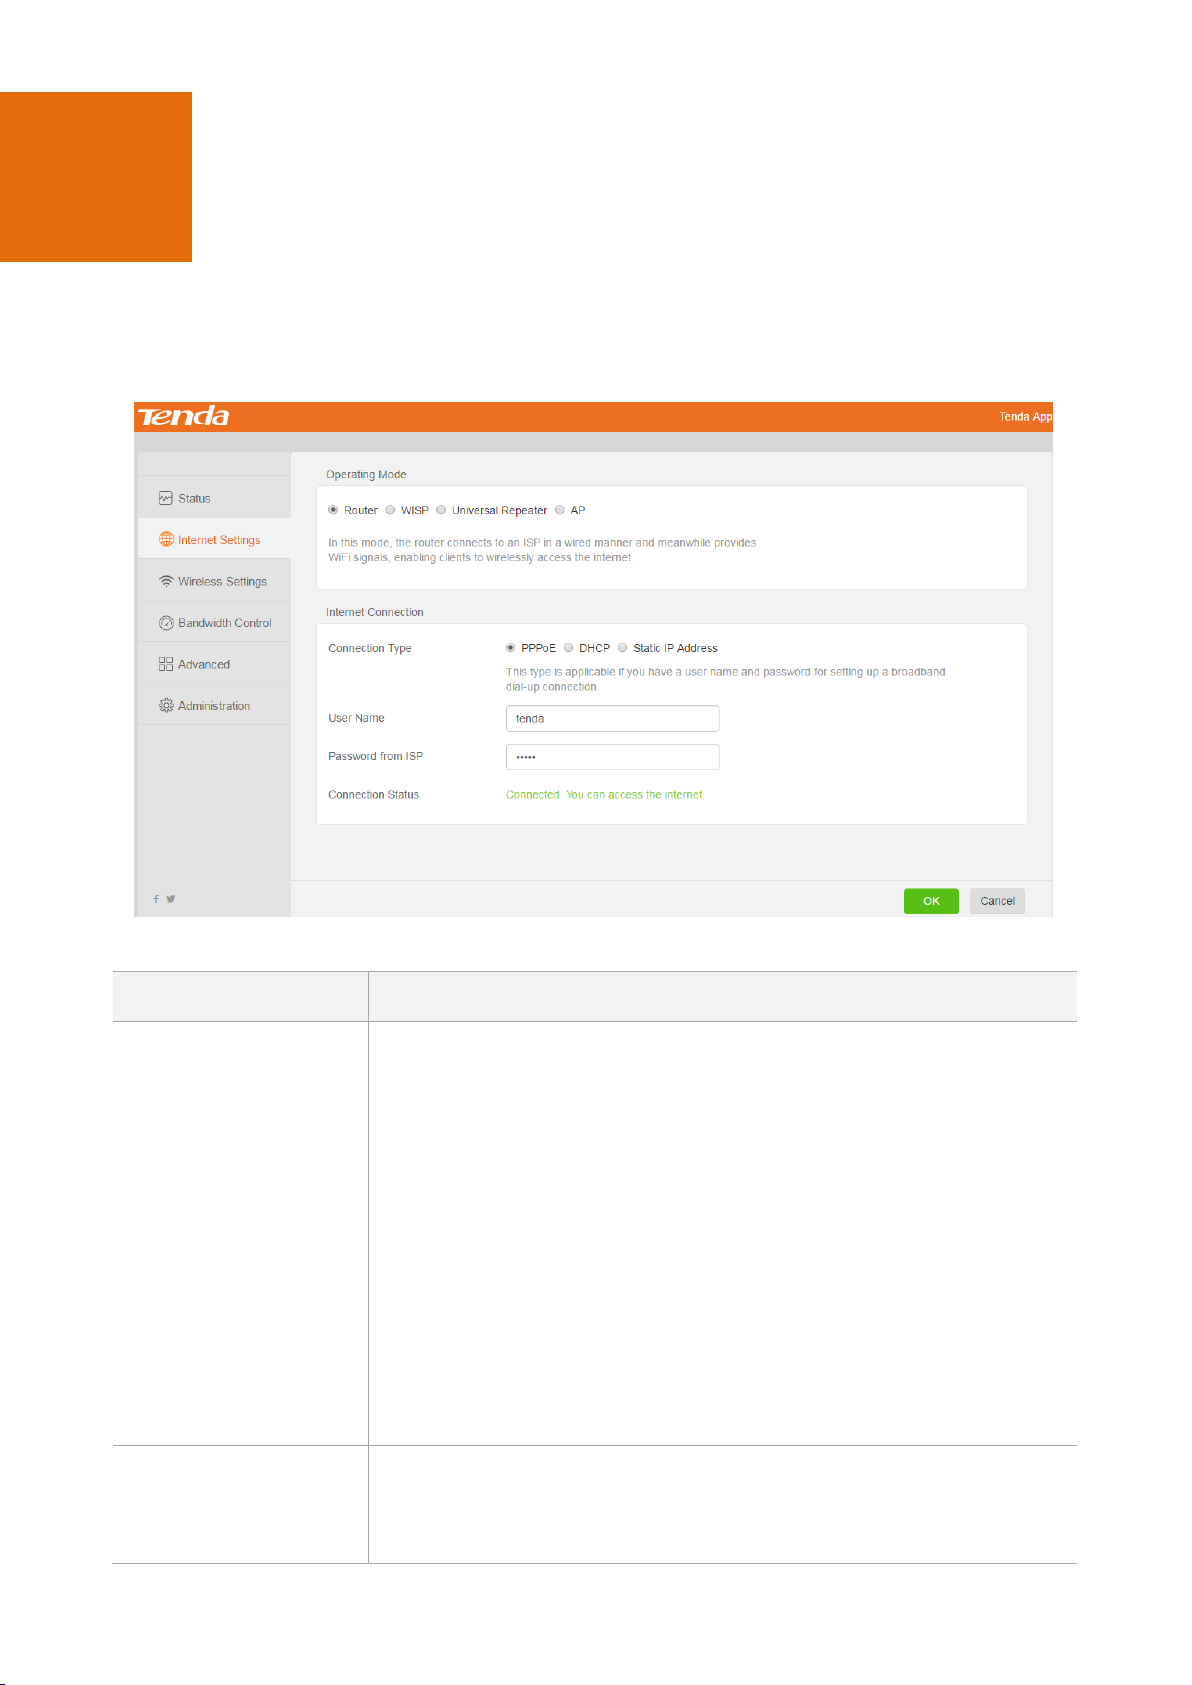
Operating Mode
Select an operating mode according to the following descriptions:
Router: In this mode, the router connects to the internet in a wired
manner through WAN port. Clients can connect to the router in a wireless
or wired manner.
WISP: In this mode, the router extends a WiFi signal of ISP or any WiFi
signals nearby. Clients can connect to the router in a wireless or wired
manner.
Universal Repeater: The router extends any WiFi signals nearby. Clients
can connect to the router in a wireless or wired manner.
AP: The router serves as an access point, and is connected to the internet
in a wired manner. All ports are used to connect to wired devices, such as
routers, switches, computers, and so on. Clients can connect to the router
in a wireless or wired manner.
Connection Type
Select a connection type according to the following description:
PPPoE: The ISP provides PPPoE user name and password for internet
access.
5 Internet Settings
In the Internet settings page, you can configure the settings to enable the router to access the internet.
Choose Internet Settings to enter the page.
Parameters Description
Page 23
Parameters
Description
DHCP: The ISP does not provide any parameters for internet access.
Static IP address: The ISP provides a static IP address and other related
parameters for internet access.
PPPoE user name and
password
Enter the PPPoE user name and password provided by your ISP.
IP address, subnet mask,
default gateway,
preferred/alternate DNS
server address
Enter the IP address, subnet mask, default gateway, and DNS server addresses
provided by your ISP.
Click this icon to the WiFi signals nearby.
Select
Select the WiFi name you want to extend.
WiFi Name
It specifies the name of wireless network.
MAC Address
It specifies the MAC address corresponding to a wireless network.
Channel
It specifies the wireless channel at which the wireless network works.
Security Mode
It specifies the security mode of the wireless network.
Strength
It specifies the WiFi signal strength of the wireless network.
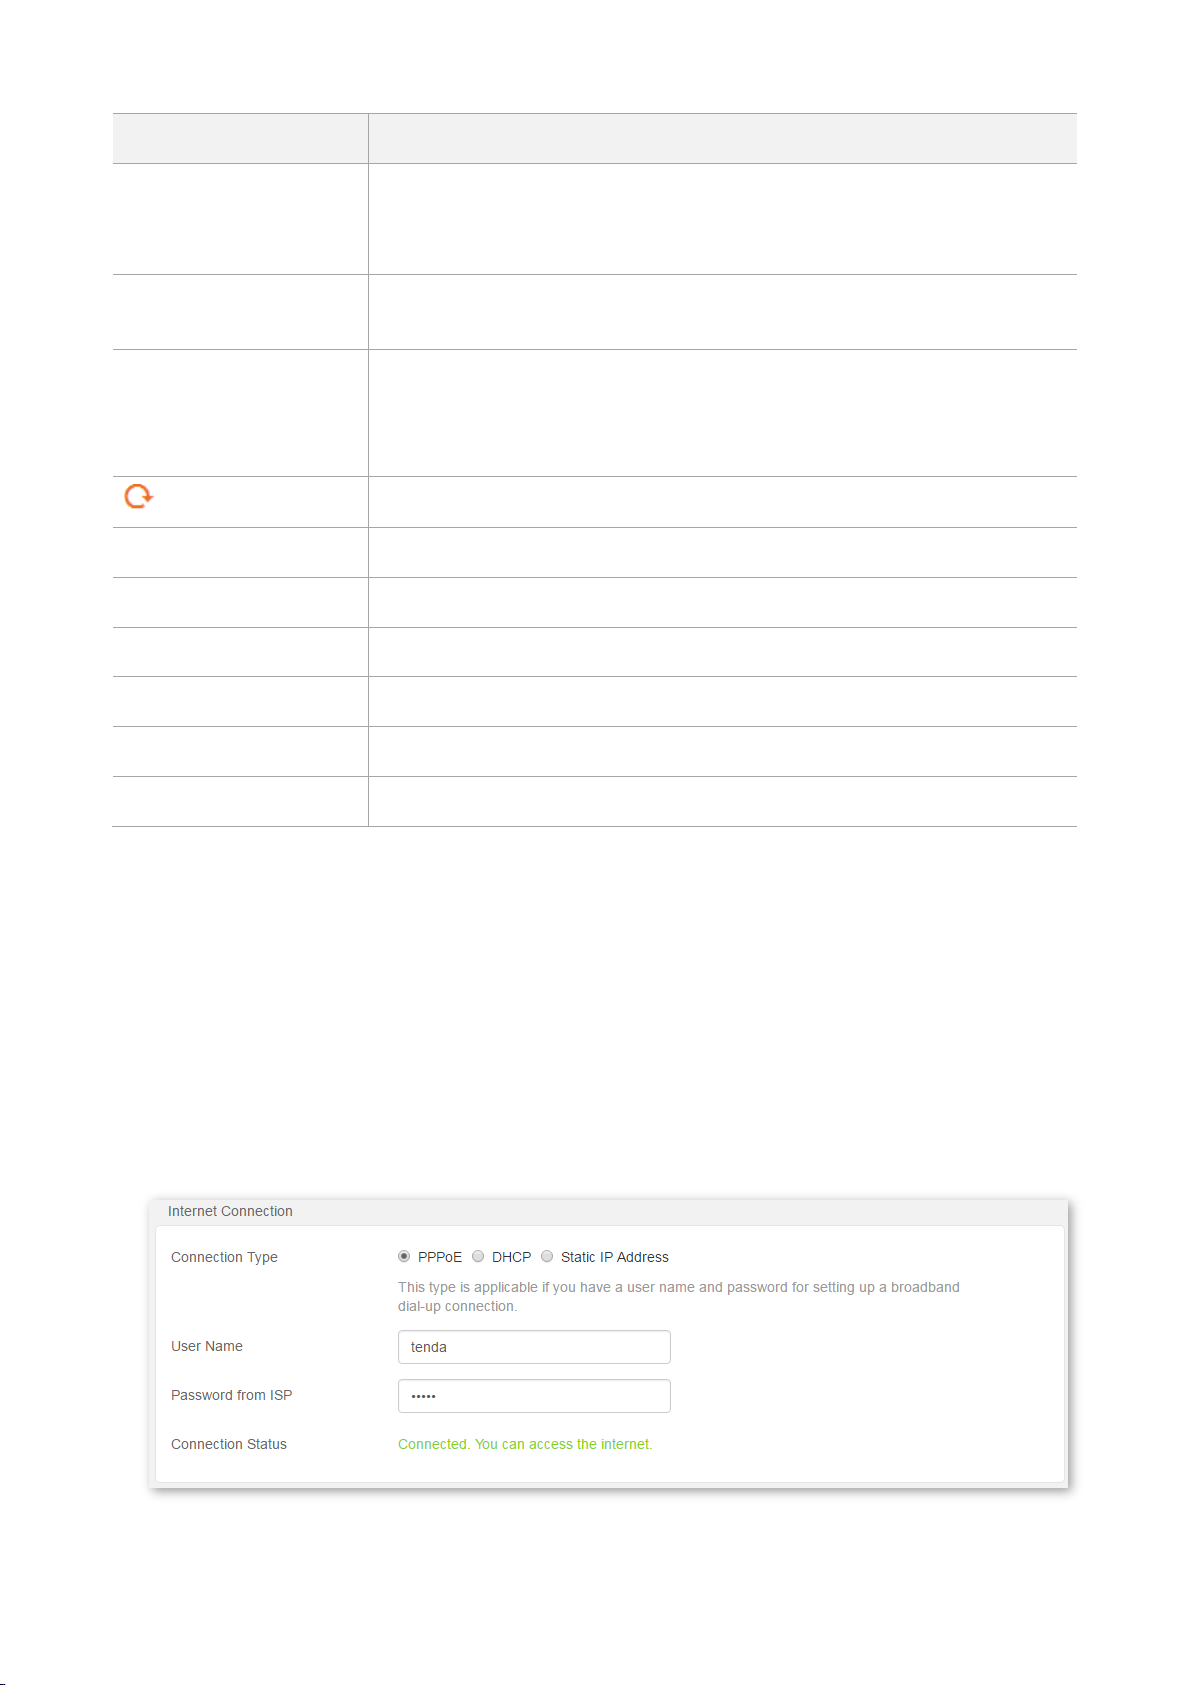
5.1 PPPoE
Configuration Procedure
Step 1 Choose Internet Settings.
Step 2 Connection Type: Select PPPoE.
Step 3 User Name: Enter the user name provided by your ISP.
Step 4 Password: Enter the password provided by your ISP.
Step 5 Click OK to apply the settings.
--End
Page 24
Wait for a moment, when the Connection Status displays “Connected. You can access the internet.”, the router is
connected to the internet successfully.
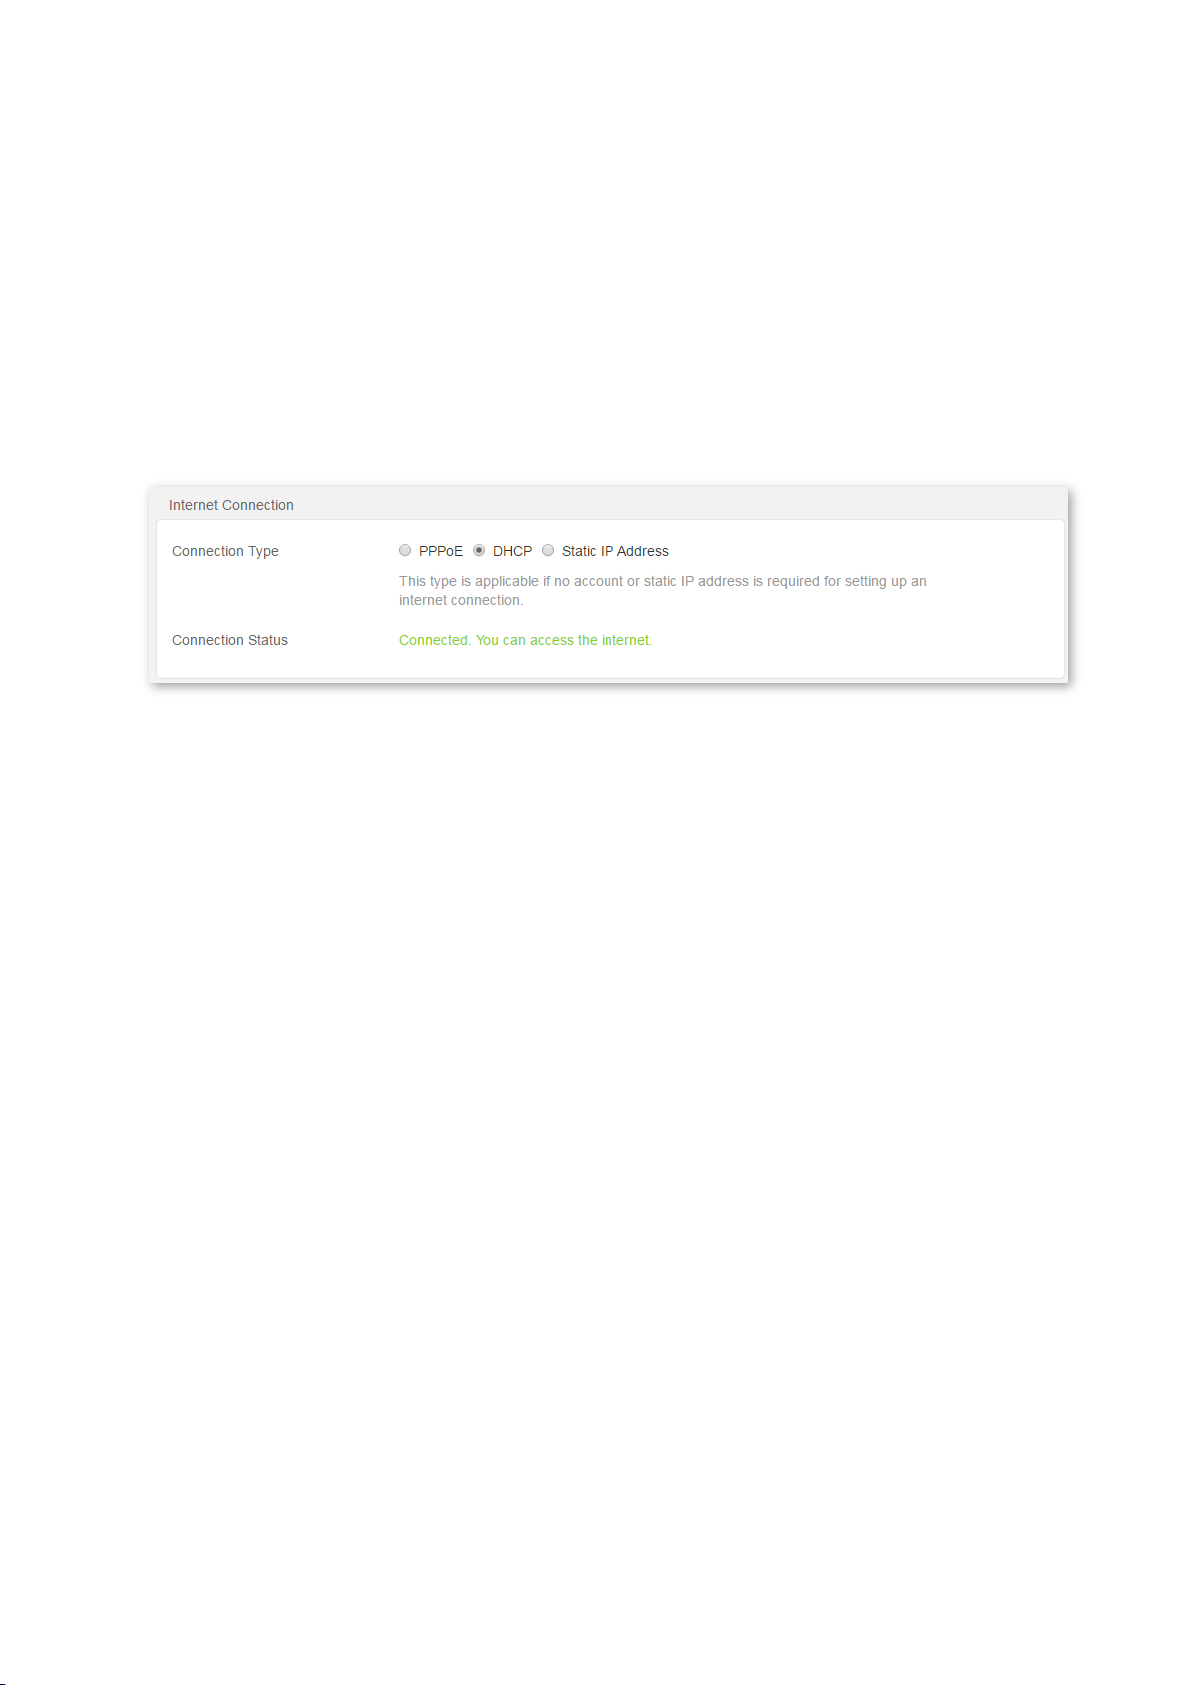
5.2 DHCP
Configuration Procedure
Step 1 Choose Internet Settings.
Step 2 Connection Type: Select DHCP.
Step 3 Click OK to apply the settings.
--End
Wait for a moment. When the Connection Status displays “Connected. You can access the internet.”, the router is
connected to the internet successfully.
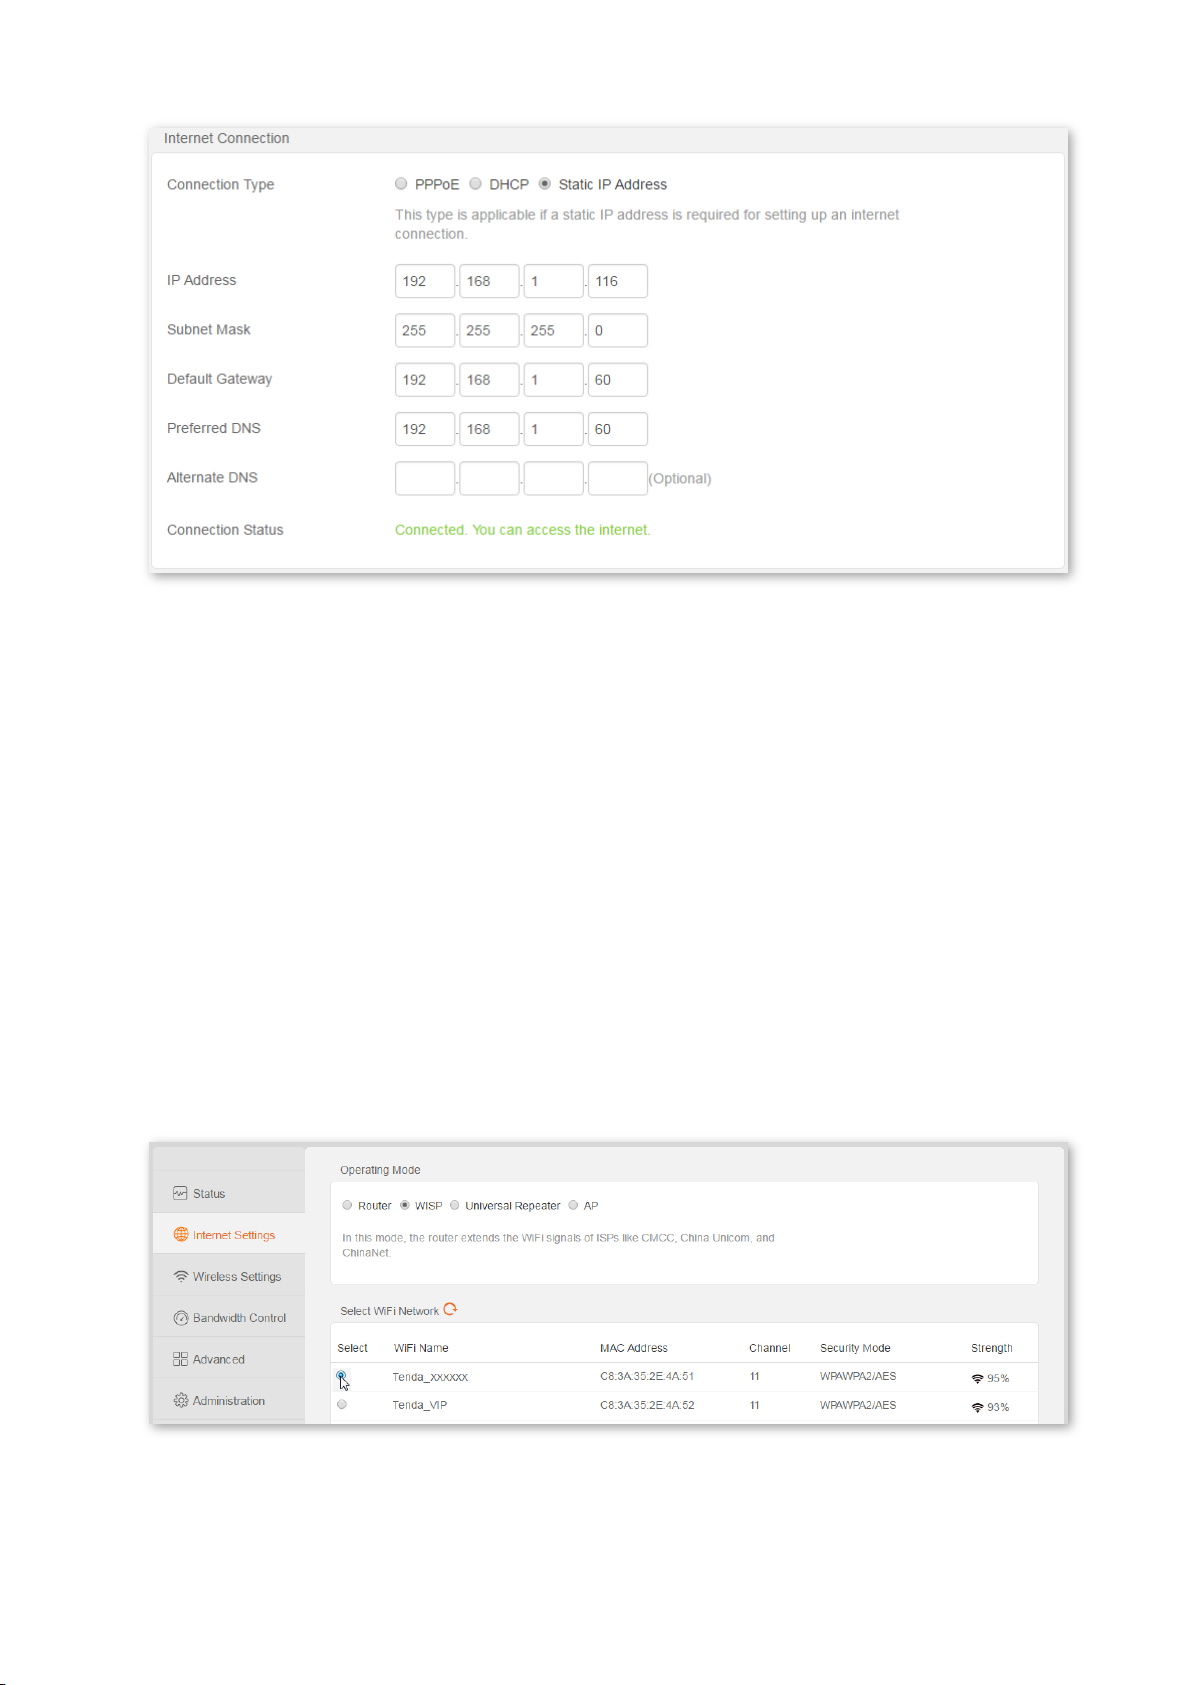
5.3 Static IP Address
Configuration Procedure
Step 1 Choose Internet Settings.
Step 2 Connection Type: Select Static IP address.
Step 3 IP Address/Subnet Mask/Default Gateway/Preferred DNS/Alternate DNS: Enter the IP address and
other related parameters provided by your ISP.
Step 4 Click OK to apply the settings.
Page 25
--End
Wait for a moment. When the Connection Status displays “Connected. You can access the internet.”, the router is
connected to the internet successfully.
5.4 WISP Mode
In WISP mode, the router can extend a WiFi signal of ISP for internet access. Also, it can extend WiFi signals
nearby.
WISP Mode Configuration
Step 1 Choose Internet settings.
Step 2 Select WISP.
Step 3 Select the WiFi name you want to extend.
Step 4 Enter the WiFi password of the wireless network in the Password of the upstream WiFi network box,
which is 12345678 in this example.
Step 5 Click Connect.
Page 26

--End
Wait for a moment and log in to the web UI again. When the page displays “Connected. You can access the
internet.”, the router is connected to the internet successfully.
Application Scenario
Jack purchases F9 to provide wired and wireless networks. The ISP provides the following parameters:
The Name of the Access Point: Tenda_XXXXXX
Password: 12345678
Solution
Set the operating mode to WISP for internet access.
Configuration Procedure
Step 1 Log in to the web UI of the router, and choose Internet Settings.
Step 2 Select WISP.
Step 3 Select the name of the access point, which is Tenda_XXXXXX in this example.
Page 27

Step 4 Enter the password of the access point in the Password of the upstream WiFi network box, which is
12345678 in this example.
Step 5 Click Connect.
--End
Wait for a moment and log in to the web UI again. When the page displays “Connected. You can access the
internet.”, the router is connected to the internet successfully.
Verification
Check whether the wireless clients, such as smart phones, can connect to the wireless network of F9 for internet
access.
Page 28

5.5 Universal Repeater Mode
In Universal Repeater mode, the router extends the upstream wireless network to cover wider area for better
internet surfing experience.
Universal Repeater Mode Configuration
Step 1 Choose Internet Settings.
Step 2 Select Universal Repeater.
Step 3 Select the WiFi name of upstream router.
Step 4 Enter the password of the upstream router in the Password of the upstream WiFi network box, which
is 12345678 in this example.
Step 5 Click Connect.
--End
Wait for a moment and log in to the web UI again. When the page displays “Connected. You can access the
internet.”, the router is connected to the internet successfully.
Page 29

Application Scenario
Jack purchases F9 to provide wired and wireless networks. The router locates at living room, so the WiFi signal is
strong in living room and main bedroom, but in washing room and second bedroom, the WiFi signal is too poor
to surf the internet. Now, Jack wants to surf the internet anywhere at home.
Solution
Add a F9 and set the operating mode to Universal Repeater to extend the WiFi signal.
The following diagram is for reference.
Assume that the WiFi name and password of the original router is shown as follows:
WiFi Name: Tenda_XXXXXX
Page 30

WiFi Password: 12345678
Configuration Procedure
Step 1 Log in to the web UI of the router, and choose Internet Settings.
Step 2 Select Universal Repeater.
Step 3 Select the wireless name of original router, which is Tenda_XXXXXX in this example.
Step 4 Enter the password of the original router in the Password of the upstream WiFi network box, which is
12345678 in this example.
Step 5 Click Connect.
--End
Wait for a moment and log in to the web UI again. When the page displays “Connected. You can access the
internet.”, the router is connected to the internet successfully.
Page 31

Verification
Connect to the WiFi signal anywhere at home using a smart phone and check whether it can surf the internet
normally. The WiFi name and password of F9 can be checked in Wireless Settings > WiFi Name and Password
part.
5.6 AP Mode
In AP mode, the router serves as an access point, and is connected to the internet in a wired manner. All ports
are used to connect to wired devices, such as routers, switches, computers, and so on.
AP Mode Configuration
Step 1 Choose Internet Settings.
Step 2 Select AP.
Step 3 Click OK to apply the settings.
Step 4 Click OK on the pop-up window.
Page 32

--End
Wait for a moment and log in to the web UI again. When the page displays “Connected. You can access the
internet.”, the router is connected to the internet successfully.
Application Scenario
Jack already has purchased a wired router to provide wired network. Now, wireless coverage is required.
Solution
Add a F9 and set the operating mode to AP. Connect any port of F9 to the LAN port of the wired router.
Page 33

The following diagram is for reference.
Configuration Procedure
Step 1 Choose Internet Settings.
Step 2 Select AP.
Step 3 Click OK to apply the settings.
Step 4 Click OK on the pop-up window.
--End
Wait for a moment and log in to the web UI again. When the page displays “Connected. You can access the
internet.”, the router is connected to the internet successfully.
Page 34

Verification
Check whether the wireless device, such as smart phones can connect to F9 for internet access.
Page 35

6 Wireless Settings
In wireless Settings page, you can enable/disable wireless function of the router, change WiFi name and
password, change WiFi signal strength, set WiFi schedule, and change the wireless parameters.
Choose Wireless Settings to enter the page.
6.1 WiFi On/Off Button
By default, the router enables WiFi function. You can also disable it according to you needs.
Configuration Procedure of Disabling WiFi
Method 1: Press the WiFi button on the rear panel of the router. Method 2: Choose Wireless Settings, find WiFi
On/Off button, and click it to set it to .Observe the WiFi LED. When it turns off, the WiFi function is
disabled.
Configuration Procedure of Enabling WiFi
Method 1: Press the WiFi router on the rear panel of the router.
Method 2: Choose Wireless Settings, find WiFi On/Off button, and set it to .Observe the WiFi LED. When
it lights up again, the WiFi function is enabled.
Page 36

Status
Description
The WiFi function is enabled.
The WiFi function is disabled.
Parameters
Description
WiFi Name
It specifies the wireless network name. When the router is connected to the internet
successfully, wireless clients, such as smart phones, can connect to this name for internet
access.
Hide WiFi
When this option is selected, the wireless clients cannot search the WiFi name of the router,
and you need to enter it on your device manually.
Security Mode
It specifies the security mode of the wireless network.
None: A wireless client can connect to the wireless network without a password.
WPA-PSK: The wireless clients can only use WPA-PSK security mode to connect to the
wireless network.
WPA2-PSK: The wireless clients can only use WPA2-PSK security mode to connect to the
wireless network.
WPA/WPA2-PSK Mixed: The wireless clients can use WPA-PSK or WPA2-PSK security
mode to connect to the wireless network.
WiFi Password
It specifies the wireless password of the wireless network. To secure the wireless network,
you’d better set a password for your wireless network.
6.2 WiFi Name and Password
In this part, you can change the WiFi name, security mode, and WiFi password.
Parameters
Changing WiFi Name and WiFi Password
Step 1 Choose Wireless Settings to enter the page.
Page 37

Parameters
Description
Low
The wireless transmitting power is low. This mode is applicable to the environment of barrier
free and with small area.
High
The wireless transmitting power is high. This mode is applicable to the environment of multi
obstacle and with large area.
Step 2 WiFi Name: Set WiFi Name to Tenda_XXXXXX.
Step 3 WiFi Password: Set WiFi Password to 12345678.
Step 4 Click OK to apply the settings.
--End
After the configuration, wireless clients, such as smart phones, can connect to Tenda_XXXXXX for internet access.
6.3 WiFi Signal Strength
In this part, you can change WiFi signal strength.
Parameters
Changing WiFi Signal Strength
Step 1 Choose Wireless Settings to enter the page.
Step 2 Set Strength to Low.
Step 3 Click OK to apply the settings.
--End
Page 38

Parameters
Description
WiFi Schedule
Enable/Disable the WiFi Schedule Function.
Turn WiFi Off At
It specifies the time and date you will turn the WiFi off. In this period, the router does not
provide WiFi.
Turn WiFi Off On
6.4 WiFi Schedule
In this part, you can configure WiFi schedule. After the settings take effect, the WiFi will be turned off during the
period you set. By default, the WiFi Schedule is disabled.
After the WiFi is turned off, if you want to turn it on, press the WiFi button on the rear panel of the
router.
WiFi Schedule Configuration
Step 1 Choose Wireless Settings to enter the page.
Step 2 WiFi Schedule: Set WiFi Schedule to Enable.
Step 3 Turn WiFi Off At: Set Turn WiFi Off At to 23:00 ~ 07:00.
Step 4 Turn WiFi Off On: Set Turn WiFi Off On to Everyday.
Step 5 Click OK to apply the settings.
--End
Parameters
Page 39

6.5 WPS
In this part, you can configure WPS function. The WPS function enables wireless devices to quickly connect to an
encrypted WiFi network of the router. This function is disabled by default.
Enabling the WPS function via web UI
To connect a wireless device to the router using the WPS function, select the Enable, and follow the onscreen
instruction.
Enabling WPS function via WPS button
Hold on the WPS/RST button on the rear panel of the router for about 1 second and then release it to enable the
WPS function.
6.6 Wireless Parameters
In this part, you can change network mode, wireless channel, wireless bandwidth, and anti-interference settings.
Page 40

Parameters
Description
Network Mode
Network Mode
11b: It indicates that clients compliant with 802.11b can connect to the router. The
maximum wireless rate is 11 Mbps.
11g: It indicates that clients compliant with 802.11g can connect to the router. The
maximum wireless rate is 54 Mbps.
11b/g: It indicates that clients compliant with the 802.11b or 802.11g protocol can
connect to the router. The maximum wireless rate is 54 Mbps.
11b/g/n: It indicates that clients compliant with the 802.11b, 802.11g, or 802.11n
protocol can connect to the router. The maximum wireless rate is 600 Mbps.
Wireless
Channel
It specifies the operating channel of the WiFi network. A channel different from nearby
channels are recommended for less interference and better wireless transmission
efficiency. You can use a third-party tool to identify the channels different from nearby
channels.
Wireless
Bandwidth
It specifies the bandwidth of the operating channel of the WiFi network. Change the default
setting only when necessary.
Auto: It specifies that a router can switch its channel bandwidth between 20 MHz and
40 MHz based on the ambient environment.
20MHz: It indicates that the channel bandwidth of a router is 20MHz.
40MHz: It indicates that the channel bandwidth of a router is 40MHz.
Anti-interference
By default, the anti-interference function is disabled.
If smart phones can search many WiFi signals nearby, you’d better enable this function.
Parameters
Page 41

Parameters
Description
Online Devices
Device Name
It displays the information of online devices including device name
and IP address. If the router cannot identify a device, it displays .
You can click to change the device name.
Download/Upload
Speed
It displays the current upload/download speed of the corresponding
device.
Download/Upload
Limit
Upload Limit specifies the maximum upload speed at Mbps of
the corresponding device.
Download Limit specifies the maximum download speed at
Mbps of the corresponding device.
Internet Access
You can click the button under Internet Access to disallow the
corresponding device to access the internet and add it to Blacklisted
Devices list.
Blacklisted
Devices
Device Name
It displays the name of the blacklisted device.
MAC Address
It displays the MAC address of the blacklisted device.
Unlimit
You can click this button to remove the blacklisted device from the
Blacklisted Devices list.
7 Bandwidth Control
In Bandwidth Control page, you can check the information of online devices, set the maximum download/upload
speed for each device, and allow/disallow the devices to access the internet.
Choose Bandwidth Control to enter this page.
Parameters
Page 42

7.1 Setting Download/Upload Limit
Step 1 Choose Bandwidth Control to enter the page.
Step 2 Find the corresponding device according to the device name and set the download or upload limit.
Step 3 Click OK to apply the settings.
--End
7.2 Blocking a Device
Step 1 Choose Bandwidth Control to enter the page.
Step 2 Find the corresponding device according to the device name and set the button to .
Step 3 Click OK to apply the settings.
--End
The device is displayed in Blacklisted Devices list:
Page 43

7.3 Removing a device from Blacklisted Devices List
Step 1 Choose Bandwidth Control to enter the page.
Step 2 Find the corresponding device according to the device name and click .
Step 3 Click OK to apply the settings.
--End
7.4 Application Scenario
Jack purchases F9 to provide wired and wireless network. He finds multiple devices sharing the connection often
compete for bandwidth. To ensure that every device can access the internet properly, he specifies the maximum
download/upload speed for each device.
Configuration Procedure
Step 1 Choose Bandwidth Control to enter the page.
Step 2 Find the corresponding device according to the device name and set Download Limit to 512KB/s.
Step 3 Click OK to apply the settings.
--End
Verification
HD videos can be played on the devices normally.
Page 44

Parameters
Description
Filter Mode
Blacklist: Disallowed only the devices with listed MAC addresses to
access the internet.
Whitelist: Allow only the devices with listed MAC addresses to access
the internet.
Blacklisted MAC Address
Enter the MAC address of the blacklisted device.
Whitelisted MAC Address
Enter the MAC address of the whitelisted device.
Remark
Enter a note for the MAC address.
Operation
: Add a MAC address filter rule.
: Remove a MAC address filter rule.
You can click this interlinkage to whitelist all online devices.
This interlinkage is hidden after you configure Whitelist and apply the
settings.
8 MAC Address Filter
In MAC Address Filter part, you can allow/disallow the device to access the internet. If you find unknown devices
are connected to your router in Bandwidth Control page, you can configure MAC Address Filter function to block
the device. Meanwhile, you can only allow several devices to access the internet through your router.
Choose Advanced to enter the page.
Parameters
Page 45

8.1 Adding a MAC Address Filter Rule
Step 1 Choose Advanced to enter the page.
Step 2 Filter Mode: Set Filter Mode to Blacklist.
Step 3 Blacklisted MAC Address: Enter a MAC address of blacklisted device, which is C8:3A:35:13:05:18 in this
example.
Step 4 Remark (Optional): Enter a note for the MAC address, which is unknown device in this example.
Step 5 Click .
Step 6 Click OK to apply the settings.
--End
8.2 Removing a MAC Address Filter Rule
Step 1 Choose Advanced to enter the page.
Step 2 Click corresponding to the rule you want to remove.
Step 3 Click OK to apply the settings.
--End
Page 46

8.3 Application Scenario
Jack purchases F9 to provide wired and wireless network. He usually finds unknown devices are connected to his
router in Bandwidth Control page. So he only allows the devices belonging to his families to access the internet
through the router.
Solution
Configure the MAC Address Filter function to allow devices belonging to families to access the internet.
Assume that the MAC addresses of the devices are as follows:
− 14:5F:94:BC:FC:81
− 1C:5C:F2:B4:40:01
Configuration Procedure
Step 1 Choose Advanced to enter the page.
Step 2 Whitelisted MAC Address: Enter a MAC address of whitelisted device, which is 14:5F:94:BC:FC:81 in
this example.
Step 3 Remark (Optional): Enter a note for the MAC address, which is Kid’s Phone in this example.
Step 4 Click .
Step 5 Perform Step 2 to Step 4 to add the MAC address 1C:5C:F2:B4:40:01.
Step 6 Click OK to apply the settings.
--End
Verification
Only the devices listed in Whitelisted MAC Address can access the internet through the router. The other devices
cannot connect to the router.
Page 47

Parameters
Description
IP Address
Enter an IP address to be assigned to a specified device in LAN.
MAC Address
Enter the MAC address of the specified device.
Action
: Add an IP-MAC Binding rule.
: Remove an IP-MAC Binding rule.
9 IP-MAC Binding
In IP-MAC Binding part, you can assign an IP address to a specified device in LAN. So when the device is
connected to the router, it always obtains the fixed IP address.
This function is often used in combination with the Port Forwarding, DDNS functions.
Choose Advanced to enter the page.
Parameters
9.1 Adding an IP-MAC Binding Rule
Step 1 Choose Advanced to enter the page.
Step 2 IP Address: Enter an IP address to be assigned to a specified device in LAN, which is 192.168.0.110 in
this example.
Step 3 MAC Address: Enter the MAC address of the specified device, which is C8:3A:35:13:05:18 in this
example.
Page 48

Step 4 Click .
Step 5 Click OK to apply the settings.
--End
After the settings take effect, the device whose MAC address is C8:3A:35:13:05:18 always obtains the IP address
192.168.0.110.
9.2 Removing an IP-MAC Binding Rule
Step 1 Choose Advanced to enter the page.
Step 2 Click corresponding to the rule you want to remove.
Step 3 Click OK to apply the settings.
--End
Page 49

Parameters
Description
Internal IP Address
It specifies the IP address of a server that resides on the LAN of the router.
Internal Port
It specifies the service port number of a server that resides on the LAN of the router.
External Port
It specifies a router port accessible to internet users. When you select an internal port,
the external port is auto-populated.
Protocol
It specifies the protocol of a service provided through the router for internet users. If
you are uncertain about which service protocol is used, Both is recommended.
Operation
: Add a Port Forwarding rule.
: Remove a Port Forwarding rule.
10 Port Forwarding
In Port Forwarding part, you can add Port Forwarding rules.
If computers are connected to the router to form a LAN and access the internet through the router, internet
users cannot access the servers built on the hosts on the LAN, such as web servers, email servers, and FTP
servers. To enable internet users to access a LAN server, enable the port forwarding function of the router, and
map one service port to the IP address of the LAN server. This enables the router to forward the requests arriving
at the port from the internet to the LAN server.
Choose Advanced to enter the page.
Parameters
10.1 Adding a Port Forwarding Rule
Step 1 Choose Advanced to enter the page.
Step 2 Internal IP Address: Enter the IP address of the internal server, which is 192.168.0.110 in this example.
Step 3 Internal Port: Click and select an internal port from the drop-down list, or enter one manually,
which is 21 in this example.
Page 50

Step 4 Protocol: Click and select a protocol, which is Both in this example.
Step 5 Click .
Step 6 Click OK to apply the settings.
--End
Configuration succeeded.
10.2 Removing a Port Forwarding Rule
Step 1 Choose Advanced to enter the page.
Step 2 Click corresponding to the rule you want to remove.
Step 3 Click OK to apply the settings.
--End
10.3 Application Scenario
Jack purchases F9 to provide wired and wireless network. Now, he wants internet users to access the web server
built on his computer.
Page 51

The following diagram is for reference.
Solution
Configure the Port Forwarding function to enable internet users to access the web server.
Assume that the information of the web server is as follows:
IP Address of the Computer Built the Web Server: 192.168.0.110
MAC Address of the Computer Built the Web Server: C8:3A:35:13:05:18
User Name and Password: admin
Port of the Web Server: 80
Configuration Procedure
Step 1 Configure the Port Forwarding function.
1. Choose Advanced to enter the page.
2. Internal IP Address: Enter the IP address of the web server, which is 192.168.0.110 in this example.
3. Internal Port: Select the corresponding internal port of the server, which is 80 (HTTP) in this example.
4. Protocol: Select the protocol of the server, which is Both in this example.
5. Click .
6. Click OK to apply the settings.
Page 52

Step 2 Assign a fixed IP address to the computer built the web server.
1. Choose Advanced to enter the page.
2. In IP-MAC Binding part, enter the IP address of the computer built the web server, which is
192.168.0.110 in this example.
3. Enter the MAC address of the computer built the web server, which is C8:3A:35:13:05:18 in this
example.
4. Click .
5. Click OK to apply the settings.
--End
Verification
Internet users use “Protocol name:// WAN IP address: External port” to visit the web server, which is
http://102.33.66.88:80 in this example.
If the WAN IP address is dynamic or you do not know it, you can refer to DDNS .
Page 53

Parameters
Description
DDNS
It specifies whether to enable the DDNS function.
Service Provider
It specifies a DDNS service provider. The supported service providers include dyn.com,
oray.com and no-ip.com.
DDNS Username
It specifies the user name registered on a DDNS service provider's website for logging in
to the DDNS service.
DDNS Password
It specifies the password registered on a DDNS service provider's website for logging in
to the DDNS service.
Domain Host Name
It specifies the DDNS domain name register on a DDNS service provider's website.
Connection Status
It indicates the current status of the DDNS service.
11 DDNS
In DDNS part, you can add DDNS rules.
DDNS maps the WAN IP address (public IP address) of the router to a domain name for dynamic domain name
resolution. This ensures proper operation of functions that involve the WAN IP address of the router, such as the
port forwarding function.
Choose Advanced to enter the page. By default, the function is disabled. Select Enable and the page is as follows:
Parameters
11.1 Adding a DDNS Rule
Step 1 Choose Advanced to enter the page.
Step 2 DDNS: Select Enable.
Page 54

Step 3 If you already have a DDNS account, you can select the service provider, and go on.
If you do not have a DDNS account or your DDNS account provider is not included in the list, select a
service provider from the list, click to register one, and the go on.
Step 4 DDNS Username: Enter the DDNS username for logging in to your DDNS service.
Step 5 DDNS Password: Enter the DDNS password for logging in to your DDNS service.
Step 6 DDNS Host Name: Enter a domain name registered on the website of your DDNS service provider.
Step 7 Click OK to apply the settings.
--End
11.2 Application Senario
Jack purchases F9 to provide wired and wireless network. Now, he wants internet users to access the web server
built on his computer through domain name.
Page 55

The following diagram is for reference.
Solution
Configure the Port Forwarding and DDNS functions to enable internet users to access the web server through
domain name.
Assume that the information of the web server is as follows:
IP Address of the Computer Built the Web Server: 192.168.0.110
MAC Address of the Computer Built the Web Server: C8:3A:35:13:05:18
User Name and Password: admin
Port of the Web Server: 80
Configuration Procedure
Step 1 Register a DDNS account.
1. Choose Advanced to enter the page.
2. In DDNS part, select Enable .
3. Set Service Provider to oray.com and click .
Page 56

4. Log in to the website of the DDNS service provider, and register a DDNS account. Assume that the
DDNS account information is as follows:
Service Provider: oray.com
DDNS Username: Tom-Jerry
DDNS Password: tomjerry123456
Domain Name: tom-jerry.imwork.net
Step 2 Configure DDNS function.
1. Choose Advanced to enter the page.
2. Set Service Provider to oray.com.
3. Set DDNS Username to Tom-Jerry.
4. Set DDNS Password to tomjerry123456.
5. Click OK to apply the settings.
--End
Wait for a moment. When the Connection Status displays Connected, the settings take effect.
Page 57

Step 3 Perform the steps in Configuration Procedure of Port Forwarding to configure Port Forwarding
function.
--End
Verification
Internet users can use http://tom-jerry.imwork.net to visit the web server.
Page 58

12 DMZ Host
In DMZ Host part, you can set a computer as a DMZ host.
A DMZ host on a LAN can communicate with the internet without limit. You can set a computer that require
higher internet connection throughput, such as a computer used for video conferencing or online gaming, as a
DMZ host for better user experience.
Choose Advanced to enter the page. By default, this function is disabled.
A DMZ host is not protected by the firewall of the router. A hacker may leverage the DMZ host
to attack your LAN. Therefore, enable the DMZ function only when necessary.
Manually set the IP address of the LAN computer that functions as a DMZ host (Refer to
IP-MAC Binding), to prevent IP address changes, which lead to DMZ function failures.
Security software, antivirus software, and the built-in OS firewall of the computer may cause
DMZ function failures. Disable them when using the DMZ function. If the DMZ function is not
required, it is recommended that you disable it and enable your firewall, security, and antivirus
software.
Setting a Computer as a DMZ Host
Step 1 Choose Advanced to enter the page.
Step 2 Select Enable.
Step 3 Set Host IP to the IP address of the DMZ host.
Step 4 Click OK to apply the settings.
--End
Page 59

13 UPNP
In UPNP part, you can enable/disable UPnP function.
This function enables the router to map ports. It can enhance user experience especially during online gaming
and P2P download.
Choose Advanced to enter the page. By default, it is enabled.
If you want to disable it, select Disable, and click OK to apply the settings.
Page 60

14 Administration
This section describes how to administer and maintain your router and home network.
14.1 Login Password
To ensure network security, a complex login password is recommended. A login password consisting of more
types of character, such as uppercase letters, lowercase letters, and special characters, has better security.
Configuration Procedure
Step 1 Choose Administration > Login Password to enter the page.
Step 2 Set New Password to a new password (5-32characters), and Confirm Password to the new password.
Step 3 Click OK to apply the settings.
---End
Verification
Verify that you can log in to the router web UI only after entering the new password on the login page.
Page 61

14.2 WAN Parameters
To change WAN parameters, choose Administration > WAN Parameters to enter the page.
MTU
MTU specifies the maximum size of a packet that the router can transmit. MTU varies across connection types.
The default setting is recommended.
You can try changing the MTU when:
You cannot access some websites or encrypted websites (such as online banking or Paypal websites).
You cannot access an FTP server or a POP server.
Clone MAC
It specifies the MAC address of the router. If the router cannot access the internet after you configure its internet
settings, your ISP may have bound your account with the MAC address of your computer that was used to verify
internet connectivity after you subscribed to the internet service. Therefore, only the computer can access the
internet with the account.
In this case, you can try either of the following methods to address the issue.
Page 62

Method 1
Configuration Procedure
Step 1 Connect the computer to the router.
Step 2 Log in to the router web UI.
Step 3 Choose Administration to enter the page.
Step 4 Set Clone MAC Address to Clone Local Host MAC.
Step 5 Click OK to apply the settings.
---End
Method 2
Configuration Procedure
Step 1 Connect another device (such as a smart phone or tablet) to the router.
Step 2 Log in to the router web UI.
Step 3 Choose Administration to enter the page.
Step 4 Set Clone MAC Address to Manual.
Step 5 Enter the MAC address of the computer that can access the internet in the format of xx:xx:xx:xx:xx:xx.
Step 6 Click OK to apply the settings.
---End
The Restore Default MAC is the default MAC address of the router. If you do not need to use the Clone MAC
function, keep the default settings.
WAN Speed
It specifies the throughput of the WAN port. By default, the throughput of the WAN port is set to 100M Full
Page 63

Duplex. Change the setting only when it is necessary.
14.3 LAN Parameters
This function enables you to set the LAN IP address, preferred DNS server, alternative DNS server and DHCP
server of the router.
To change LAN parameters, choose Administration > LAN Parameters to enter the page.
Modifying the LAN IP Address
If you use multiple routers or other network devices (such as switches and APs) at the same time, IP address
conflicts may occur. If the router is involved in an IP address conflict, change the LAN IP address of the router.
Configuration Procedure
Step 1 Choose Administration > LAN Parameters to enter the page.
Step 2 Set LAN IP Address to an IP address that is not in use, such as 192.168.5.1.
Step 3 Click OK to apply the settings.
Page 64

---End
Verification
Verify that you can access the router web UI at 192.168.5.1 or tendawifi.com.
After the settings take effect, the system displays the login page at the new LAN IP address. After you log in to
the router web UI, the system displays the updated LAN IP address range of the router on the LAN Parameters
page. See the following figure. The LAN IP address is changed to 192.168.5.1 and the IP address range is changed
to 192.168.5.100~200. That is, the router assigns only the IP addresses within this range to devices connected to
the router.
Enabling or Disabling the DHCP Server
The default setting is recommended. If you need to change the settings, refer to the parameters in the following
table.
Page 65

Parameters
Description
LAN IP Address
It specifies the LAN IP address of the router, that is, the login address of the router web
UI.
DHCP Server
If the Enable is selected, the server assigns one IP address within a specified IP
address range to each device connected to the router.
If the Enable is deselected, no IP address is assigned to the devices connected to
the router (such as laptops and mobile phones). These devices can access the
internet only after IP addresses are manually set on them. Manual IP address
setting is complicated and may easily cause IP conflicts. Generally, it is
recommended that you enable the DHCP server.
Start IP/End IP
It specifies the range of IP addresses that can be assigned to devices connected to the
router.
Preferred/Alternative
DNS Server
It specifies the preferred and alternative DNS servers of devices connected to the
router.
By default, the DHCP server of the router is enabled. It is recommended that you retain the
default settings. If you disable the DHCP server, you need to set IP address information on each
device connected to the router, which will probably cause IP address conflicts.
It is recommended that you retain the default DHCP server settings to ensure internet
connectivity.
Parameters
Setting DNS Server Addresses
This function enables you to set DNS server addresses for devices connected to the router. If you do not
configure DNS settings, the DHCP server of the router assigns the default DNS server address (LAN IP address of
the router) to the devices.
Page 66

14.4 Remote Web-based Management
This function enables you to remotely log in to the web UI of the router over the internet.
To configure the function, choose Administration > Remote Web-based Management to enter the page. By
default, the function is disabled. Select the Enable to enable the function.
Application Scenario
An F9 is used to set up a LAN at an apartment and the router must be logged in and managed over the internet.
Assume the public IP address of the router is 102.33.66.88 and the public IP address of the computer for remote
login is 218.88.93.33.
Page 67

The following diagram is for reference.
The computer used to remotely log in to the router web UI must be assigned a public IP address. If it is
assigned a private IP address, use the public IP address of the router to which the computer connects
for remote login. Private IP addresses are not applicable to remote management.
Configuration Procedure
Step 1 Choose Administration > Remote Web-based Management to enter the page.
Step 2 Select the Enable.
Step 3 Set Management IP Address to Specific, and enter the WAN IP address (public IP address) of the
computer where remote management is to be performed. In this example, set it to the WAN IP address
of computer 2, which is 218.88.93.33. If you are uncertain about the IP address of the computer, set
Management IP Address to All (default value). In this case, all computers can log in to the router web
UI over the internet.
Step 4 Set Port to the port number of the web server, which is generally 8080. You can also select a port
number from 1024~65535, but the port number must not be the same as that for Port Forwarding.
Step 5 Click OK to apply the settings.
Page 68

---End
Remote Access
Enter http://102.33.66.88:8080 in the address bar of a web browser of computer 2 and log in to the router web
UI to perform remote management.
The public IP address of the router may change. Therefore, you need to confirm the IP address each
time you want to remotely log in to the router web UI, which is troublesome. To address this issue, you
can use the DDNS function to bind the public IP address with a fixed domain name, so that you can use
the domain name to log in to the router web UI. To implement this measure, configure the DDNS
function and then the remote management function of the router.
14.5 Date & Time
If the system time of the router is incorrect, all the router functions depending on the system time are affected,
including the WiFi Schedule and Automatic Maintenance functions. Upon completion of configuration with the
Quick Setup Wizard, the router synchronizes its system time with the computer used to configure the router. You
can change the setting manually.
Configuration Procedure
Step 1 Choose Administration > Date & Time to enter the page.
Step 2 Select your time zone from the Time Zone drop-down list.
Step 3 Click OK to apply the settings.
--End
Page 69

14.6 Device Management
This section helps you maintain your router to improve the performance of your router and extend the durability
of your router.
Reboot Router
If a setting fails to take effect or the router fails to work properly, you can try rebooting the router. To reboot the
router, choose Administration > Device Management, and click Reboot.
Click OK in the dialog box that appears.
Restore to Factory Settings
If you are uncertain about why the internet is inaccessible through the router or forget the login password of the
router, you can reset the router to restore to factory settings.
The router can be reset on the web UI or using the Reset button.
Reset the Router on the Web UI
Choose Administration > Device Management and click Reset.
Page 70

Click OK on the dialog box that appears.
It is recommended that you reset the router only when you forget your login password or Tenda
technical support asks you to do so.
Ensure that the power supply of the router is normal when the router is reset.
Resetting the router deletes all your customized settings. Therefore, you can access the internet
only after reconfiguring the router.
Reset the Router Using the Reset Button
Hold on the WPS/RST button of the router for about 8 seconds and release the button when all the LED
indicators blink once.
Backup/Restore a Configuration File
This function enables you to back up the current configuration of the router to your computer. After the
configuration is changed, you can use the backup file to restore the configuration of router. This saves router
configuration time.
To back up or restore the configuration of your router, choose Administration > Device Management and
perform either of the following procedures.
Page 71

To back up the current configuration, click Backup.
To restore a file of configuration:
Step 1 Click Restore and select the file of the configuration to be restored.
Step 2 Click Open.
Step 3 Click OK on the dialog box that appears.
---End
Export Syslog
This function logs all key events that occur after the router is started. You can export the logs.
To export the logs:
Choose Administration > Device Management and click Export.
Firmware Upgrade
The latest firmware version for the router is available at Tenda official website (http://www.tendacn.com/). You
Page 72

can download the latest version to upgrade your router or upgrade online directly.
To upgrade your router, choose Administration > Device Management and select Local Upgrade or Online
Upgrade to follow.
It is recommended that you connect your computer to the router using an Ethernet cable for
upgrading the router. If you connect your computer to the router wirelessly, an upgrade may fail
and the router may not work properly.
Verify that the power supplies of the router and computer are normal during an upgrade.
If you cannot access the router login page at tendawifi.com after an upgrade, clear the cache of
the web browser and try again.
Local Upgrade
Step 1 Click Local Upgrade.
Step 2 Select the file for upgrading the router and click Open.
Step 3 Click OK on the dialog box that appears.
---End
Online Upgrade
Step 1 Click Online Upgrade.
Step 2 The router detects whether the new firmware available. If there is, you can upgrade to the latest
firmware.
---End
Page 73

Automatic Maintenance
To configure the automatic maintenance function, choose Administration > Device Management. When this
function is enabled, the router reboots during 03:00~05:00 a.m. every day when the traffic is lighter than 3 KB/s,
so as to improve the system stability and router service life. By default, this function is enabled. If you want to
disable it, unselect the Enable option and click OK.
Page 74

Appendix
A.1 Join Your WiFi
A computer can connect to the WiFi network of the router only if it has a wireless network adapter. This part
instructs you how to connect to your wireless network via your notebook or other wireless devices. We take
Windows 8, Windows 7, and Windows XP as examples here.
Windows 8
Step 1 Right-click in the lower-right corner of the desktop.
Step 2 Select the WiFi network of the router from the network list that appears.
Step 3 Enter the WiFi password (network security key) of the WiFi network.
Step 4 Click Next.
---End
If you cannot find the icon, move the cursor to the upper-right corner of the desktop,
choose Settings > Control Panel > Network and Internet > Network and Sharing Center, click
Change adapter settings, right-click WiFi, and choose Disable. Then, right-click WiFi, and
choose Enable.
If the WiFi network is not detected, check whether the Airplane mode is enabled.
Windows 7
Step 1 Right-click in the lower-right corner of the desktop.
Step 2 Select the WiFi network of the router from the network list that appears.
Step 3 Enter the WiFi password (network security key) of the WiFi network.
Step 4 Click OK.
Page 75

---End
If you cannot find the icon, choose Start > Control Panel > Network and Internet >
Network and Sharing Center, click Change adapter settings, right-click Wireless Network
Connection, and choose Disable. Then, right-click Wireless Network Connection, and choose
Enable.
If the wireless network is not detected, click in the upper-right corner to refresh the list
of wireless networks.
Windows XP
Step 1 Click in the lower-right corner of the desktop.
Step 2 Select the WiFi network from the list that appears.
Step 3 Enter the WiFi password (network security key) of the WiFi network.
Step 4 Click Connect.
Page 76

---End
If the computer is connected to the network, Connected appears.
Page 77

A.2 Configure Your Computer
Perform the configuration procedure corresponding to Windows 8, Windows 7, or Windows XP, depending on
your OS. A computer installed with a wired network adapter is used as an example to describe the procedures.
The procedures for configuring computers installed with a wireless network adapter are similar to these
procedures.
Windows 8
Step 1 Right-click in the lower-right corner of the desktop and choose Open Network and Sharing
Center.
Step 2 Click Ethernet and then Properties.
Step 3 Double-click Internet Protocol Version 4 (TCP/IPv4).
Page 78

Step 4 Select Obtain an IP address automatically and Obtain DNS server address automatically, and click OK.
Step 5 Click OK in the Ethernet Properties window.
---End
Windows 7
Step 1 Click in the lower-right corner of the desktop and choose Open Network and Sharing Center.
Page 79

Step 2 Click Local Area Connection and then Properties.
Step 3 Double-click Internet Protocol Version 4 (TCP/IPv4).
Page 80

Step 4 Select Obtain an IP address automatically and Obtain DNS server address automatically, and click OK.
Step 5 Click OK in the Local Area Connection Properties window.
---End
Windows XP
Step 1 Right-click My Network Places on the desktop and choose Properties.
Page 81

Step 2 Right-click Local Area Connection and choose Properties.
Step 3 Double-click Internet Protocol (TCP/IP).
Step 4 Select Obtain an IP address automatically and Obtain DNS server address automatically, and click OK.
Page 82

Step 5 Click OK in the Local Area Connection Properties window.
---End
A.3 FAQ
Q1: What should I do if I cannot access the router login page at tendawifi.com or 192.168.0.1?
A1: Try the following methods:
Ensure that the connection between the router and your computer is correct. If you connect to the router
wirelessly, ensure that the connected WiFi network belongs to the router.
Set the computer to obtain an IP address automatically.
Clear the cache of your web browser.
Use another web browser or computer to try again.
Reset the router. Power on the router, hold down the WPS/RST button for about 8 seconds.
Q2: What should I do if I cannot access the internet after configuring internet settings?
A2: Try the following methods:
Verify that the router is connected properly. If you use a mobile phone to access the internet through the
router, verify that your mobile phone is connected to the WiFi network properly.
Set the computer to obtain an IP address automatically.
Use an Ethernet cable to connect your computer to the router, log in to the router web UI, change the WiFi
name and password of the router, and reconnect to the WiFi network.
Clone the MAC address of your computer to your router.
Contact your ISP for help.
Page 83

Internet Connection
Type
Description
PPPoE
Your internet service provider provides a user name and password for you to set up a
dial-up connection.
Static IP Address
Your internet service provider provides an IP address and other related parameters for
you to connect to the internet.
Dynamic IP
You internet service provider does not provide any parameters for you to connect to the
internet.
Q3: What should I do if I forget the WiFi password?
A3: Try the following methods:
Log in to the web UI of the router, and check it on Wireless Settings > WiFi Name and Password page.
If you forget the login password as well, reset the router to factory default settings by holding down the
WPS/RST button on the back panel of the router for 8 seconds. Then you can reset a login password and
WiFi password.
Q4: How to select a connection type?
A4: Follow the instructions in the table.
A.4 Safety and Emission Statement
CE Mark Warning
This is a Class B product. In a domestic environment, this product may cause radio interference, in which case the
user may be required to take adequate measures.
This equipment should be installed and operated with minimum distance 20cm between the radiator & your
body.
NOTE: (1) The manufacturer is not responsible for any radio or TV interference caused by unauthorized
modifications to this equipment. (2) To avoid unnecessary radiation interference, it is recommended to use a
shielded RJ45 cable.
Declaration of Conformity
Hereby, SHENZHEN TENDA TECHNOLOGY CO. LTD. declares that the radio equipment type F9 is in compliance
with Directive 2014/53/EU.
The full text of the EU declaration of conformity is available at the following internet address:
http://www.tendacn.com/en/service/page/ce.html
Page 84

Operate Frequency: 2412-2472MHz
EIRP Power (Max.): 19.5 dBm
Software Version: V12.01.01.34
Caution:
Adapter Model: BN049-A05009E
Manufacture: SHENZHEN HEWEISHUN NETWORK TECHNOLOGY CO., LTD.
Input: 100-240 V ac 50 Hz/60 Hz 0.3 A
Output: 9 V dc, 600 mA
DC Voltage
RECYCLING
This product bears the selective sorting symbol for Waste electrical and electronic equipment (WEEE). This
means that this product must be handled pursuant to European directive 2012/19/EU in order to be recycled or
dismantled to minimize its impact on the environment.
User has the choice to give his product to a competent recycling organization or to the retailer when he buys a
new electrical or electronic equipment.
FCC Statement
This device is restricted to be used in the indoor.
This device complies with Part 15 of the FCC Rules. Operation is subject to the following two conditions: (1) This
device may not cause harmful interference, and (2) this device must accept any interference received, including
interference that may cause undesired operation.
This equipment has been tested and found to comply with the limits for a Class B digital device, pursuant to Part
15 of the FCC Rules. These limits are designed to provide reasonable protection against harmful interference in a
residential installation. This equipment generates, uses and can radiate radio frequency energy and, if not
installed and used in accordance with the instructions, may cause harmful interference to radio communications.
However, there is no guarantee that interference will not occur in a particular installation. If this equipment does
cause harmful interference to radio or television reception, which can be determined by turning the equipment
off and on, the user is encouraged to try to correct the interference by one of the following measures:
— Reorient or relocate the receiving antenna.
— Increase the separation between the equipment and receiver.
— Connect the equipment into an outlet on a circuit different from that to which the receiver is connected.
— Consult the dealer or an experienced radio/TV technician for help.
FCC Caution: Any changes or modifications not expressly approved by the party responsible for compliance could
void the user's authority to operate this equipment.
Page 85

This transmitter must not be co-located or operating in conjunction with any other antenna or transmitter.
Radiation Exposure Statement
This equipment complies with FCC radiation exposure limits set forth for an uncontrolled environment. This
equipment should be installed and operated with minimum distance 20cm between the radiator & your body.
NOTE: (1) The manufacturer is not responsible for any radio or TV interference caused by unauthorized
modifications to this equipment. (2) To avoid unnecessary radiation interference, it is recommended to use a
shielded RJ45 cable.
 Loading...