


 Loading...

Copyright Statement
Copyright Statement
© 2016 Shenzhen Tenda Technology Co., Ltd. All rights reserved.
Tenda is a registered trademark legally held by Shenzhen Tenda Technology Co., Ltd. Other brand and product names mentioned herein are trademarks or registered trademarks of their respective holders. Copyright of the whole product as integration, including its accessories and software, belongs to Shenzhen Tenda Technology Co., Ltd. No part of this publication can be reproduced, transmitted, transcribed, stored in a retrieval system, or translated into any language in any form or by any means without the prior written permission of Shenzhen Tenda Technology Co., Ltd.
Disclaimer
Pictures, images and product specifications herein are for references only. To improve internal design, operational function, and/or reliability, Tenda reserves the right to make changes to the products without obligation to notify any person or organization of such revisions or changes. Tenda does not assume any liability that may occur due to the use or application of the product described herein. Every effort has been made in the preparation of this document to ensure accuracy of the contents, but all statements, information and recommendations in this document do not constitute the warranty of any kind, express or implied.
i

|
|
Copyright Statement |
Contents |
|
|
I Get to Know the Adapter ..................................................................................... |
1 |
|
1 Overview ............................................................................................................................................................. |
1 |
|
2 Package Contents ................................................................................................................................................ |
1 |
|
3 |
LED/Interface/Button.......................................................................................................................................... |
2 |
II Access the Internet.............................................................................................. |
3 |
|
1 |
Install Your Adapters ........................................................................................................................................... |
3 |
2 Secure Your Powerline Network.......................................................................................................................... |
4 |
|
3 Add Adapters to a Private Powerline Network ................................................................................................... |
6 |
|
III Manage Your Adapters....................................................................................... |
7 |
|
1 |
UI Installation ...................................................................................................................................................... |
7 |
2 Run the UI ......................................................................................................................................................... |
12 |
|
3 Change Device Name ........................................................................................................................................ |
13 |
|
4 Change Network Name..................................................................................................................................... |
15 |
|
5 Reset.................................................................................................................................................................. |
18 |
|
6 Upgrade............................................................................................................................................................. |
19 |
|
Appendix ............................................................................................................. |
21 |
|
1 Configure Your Computer ................................................................................................................................. |
21 |
|
|
Windows 8 ....................................................................................................................................................... |
21 |
|
Windows 7 ....................................................................................................................................................... |
22 |
2 FAQs .................................................................................................................................................................. |
25 |
|
3 |
Technical Support.............................................................................................................................................. |
27 |
4 |
Technical Specifications..................................................................................................................................... |
27 |
5 |
Safety and Emission Statement......................................................................................................................... |
28 |
ii

Contents
I Get to Know the Adapter
Before you use the PLC product, take a moment to become familiar with the package contents and the front panel. Pay particular attention to the LEDs on the front panel.
1 Overview
PH3 AV1000 Gigabit Powerline Adapters are designed for online video/audio player, web camera, IPTV and other high bandwidth applications. It adopts electrical circuit to transmit Internet data with electrical power, which in a sense reduces the Ethernet cable cost and easily extends network coverage to where the electrical power can get within the valid range. The rate of these powerline adapters are up to 1000Mbps, giving a guarantee of a more fluent online playing experience.
2 Package Contents
Unpack the package. Your box should contain the following items:
AV1000 Gigabit Powerline Adapter * 2
Install Guide * 1
Ethernet Cable * 2
* If any item is incorrect, missing or damaged, please keep the original package and contact the vendor for replacement immediately.
1
I Get to Know the Adapter
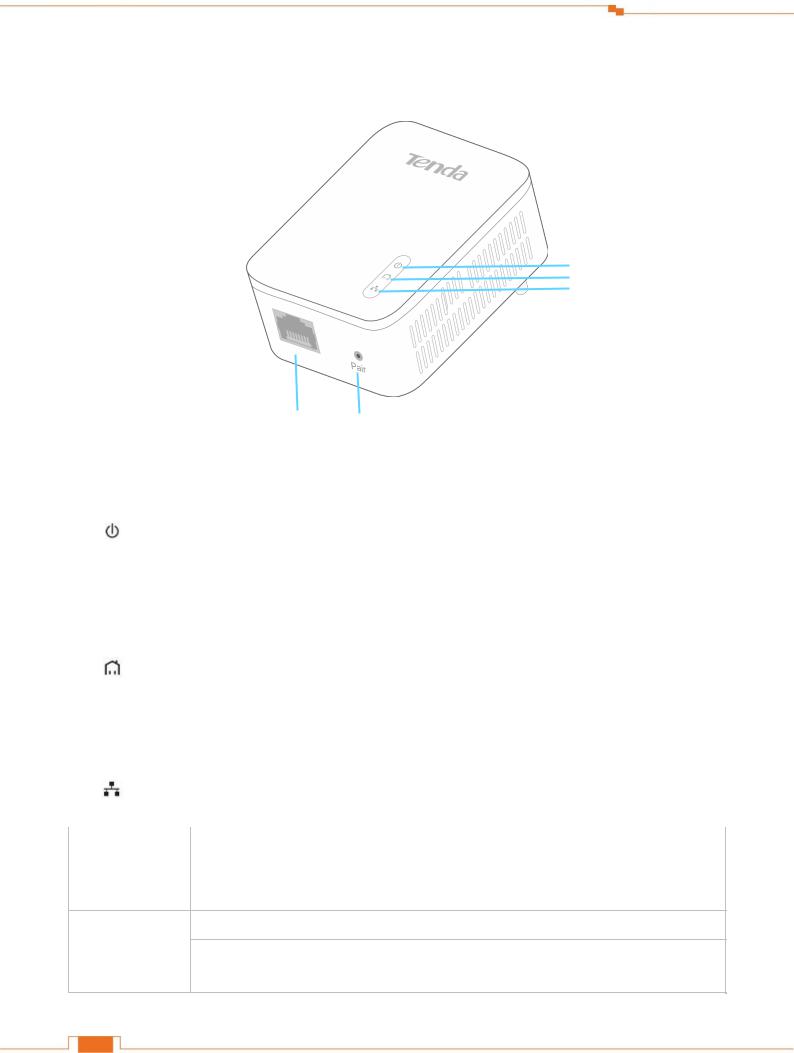
3 LED/Interface/Button
Power LED
PLC LED
Ethernet LED
|
|
|
|
|
|
|
|
|
|
Ethernet Port |
|
Pair Button |
||
|
|
|
|
|
|
|
|
|
|
|
|
|
|
|
|
|
LED |
|
|
Color |
|
|
Status |
|
|
Description |
|
||
|
|
|
|
|
|
|
|
|
||||||
|
|
|
|
|
|
|
|
|
|
|
|
|
|
|
|
|
|
|
|
/ |
|
|
|
Off |
|
The device is NOT receiving electrical power. |
|||
|
|
Power |
|
|
|
|
|
|
|
|
|
|
|
|
|
|
|
Green |
|
Solid |
|
The electrical power is on. |
|||||||
|
|
|
|
|
|
|
||||||||
|
|
|
|
|
|
|
|
|
|
|
|
|
||
|
|
|
|
|
Green |
|
Slow blinking |
|
The device is in power saving mode. |
|||||
|
|
|
|
|
|
|
|
|
|
|
|
|
|
|
|
|
|
|
|
/ |
|
|
|
Off |
|
The device doesn’t pair with other powerline devices, or is |
|||
|
|
|
|
|
|
|
|
|
powered off. |
|||||
|
|
|
|
|
|
|
|
|
|
|
|
|
||
|
|
|
|
|
|
|
|
|
|
|
|
|
||
|
|
PLC |
|
Green |
|
Solid |
|
The device is connected to a powerline network. |
||||||
|
|
|
|
|
|
|
|
|
|
|
|
|
||
|
|
|
|
|
Green |
|
Fast blinking |
|
The device is pairing with a powerline devices. |
|||||
|
|
|
|
|
|
|
|
|
|
|
|
|
|
|
|
|
|
|
|
|
|
|
|
|
|
|
|
The powerline signal of the adapter is poor; try plugging the |
|
|
|
|
|
|
Red |
|
Solid |
|
adapter closing to your router or modem until the PLC LED |
|||||
|
|
|
|
|
|
|
|
|
|
|
|
|
turns to green. |
|
|
|
|
|
|
|
|
|
|
|
|
|
|
||
|
|
Ethernet |
|
/ |
|
|
|
Off |
|
No Ethernet cable is detected on the Ethernet port. |
||||
|
|
|
|
|
|
|
|
|
|
|
|
|
||
|
|
|
|
|
Green |
|
Solid |
|
The Ethernet cable is connected properly. |
|||||
|
|
|
|
|
|
|
|
|
|
|||||
|
|
|
|
|
|
|
|
|||||||
|
|
Interface/Button |
|
Description |
|
|
|
|||||||
|
|
|
|
|
|
|||||||||
|
|
|
|
|
|
|
|
|
||||||
|
|
Ethernet Port |
|
|
For connecting to the Internet, a computer, or other network devices via an Ethernet |
|||||||||
|
|
|
|
cable. |
|
|
|
|||||||
|
|
|
|
|
|
|
|
|
|
|||||
Press and hold it for about 1 second to start pairing.
Pair |
Press and hold it for about 6 seconds (the Power LED will be off and then light up |
|
again) to restore the adapter to factory default. |
2
Access the Internet
II Access the Internet
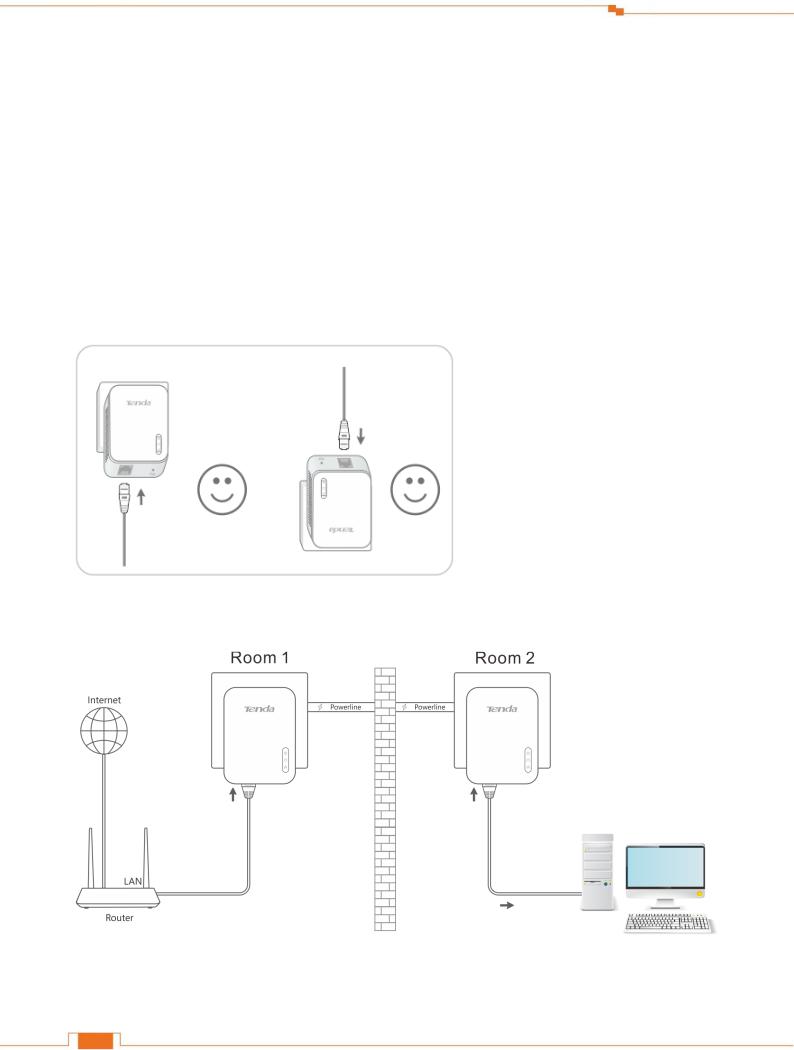
This section explains how to access the Internet via a pair of Powerline Adapters, including how to position and use your Powerline Adapters, how to connect them and access the Internet. Here’s an example for you.
1 Install Your Adapters
Attention
The adapter can only be used in vertical directions.
Plug and Play
Connect one adapter to one of the LAN ports of an ADSL modem/wireless router for Internet access, and plug it into a wall outlet nearby.
3
Access the Internet
Connect the other adapter to a computer or other wired devices, and plug it to a wall outlet.
Wait until the PLC LEDs on the two adapters are lit.
Then you can try accessing the Internet via your computer. If you cannot access the Internet after the operation above, please refer to Q1 for solution.
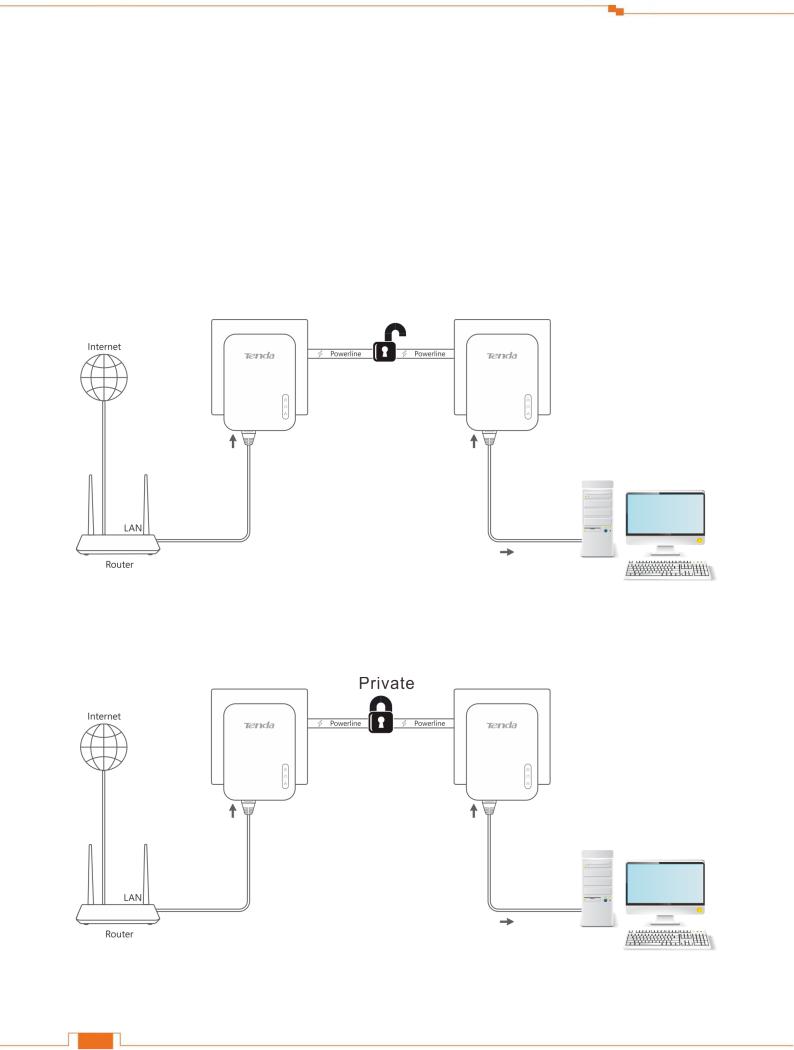
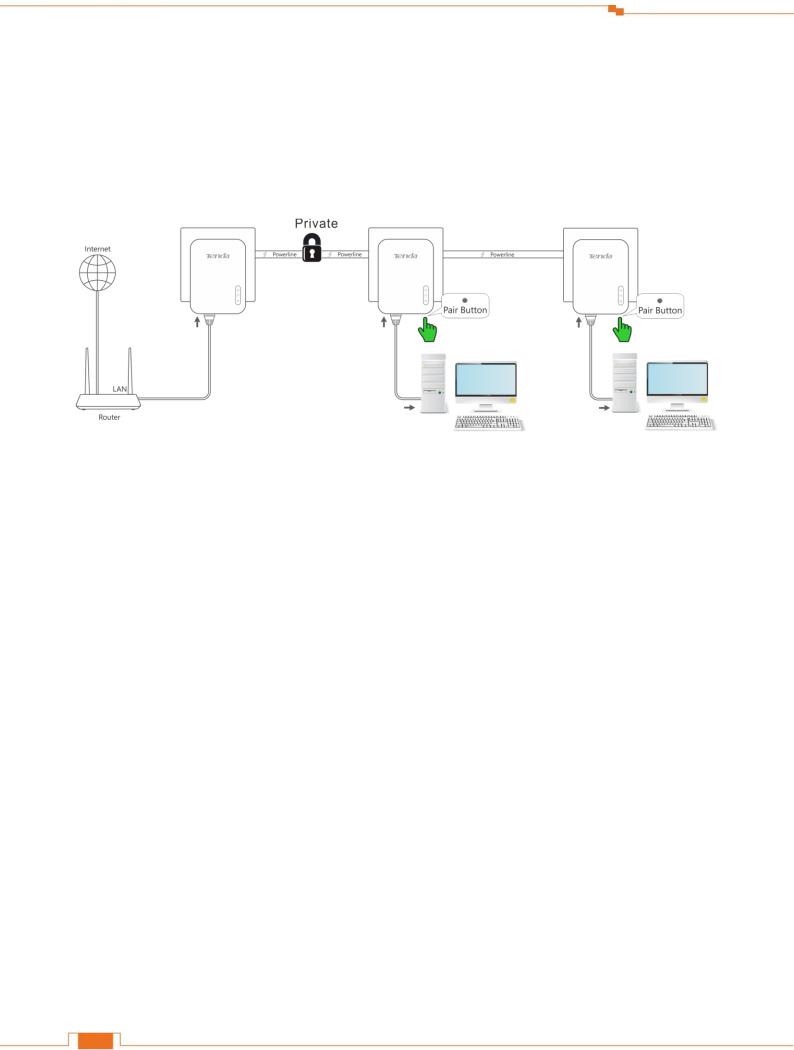
2 Secure Your Powerline Network
Two or more powerline adapters under the same electrical circuit will automatically interconnect to create an unencrypted public network (Named “HomePlugAV”).
If you want to create a secure powerline network (Named “Private”), use the Pair button to pair the two adapters with each other.
4
Access the Internet
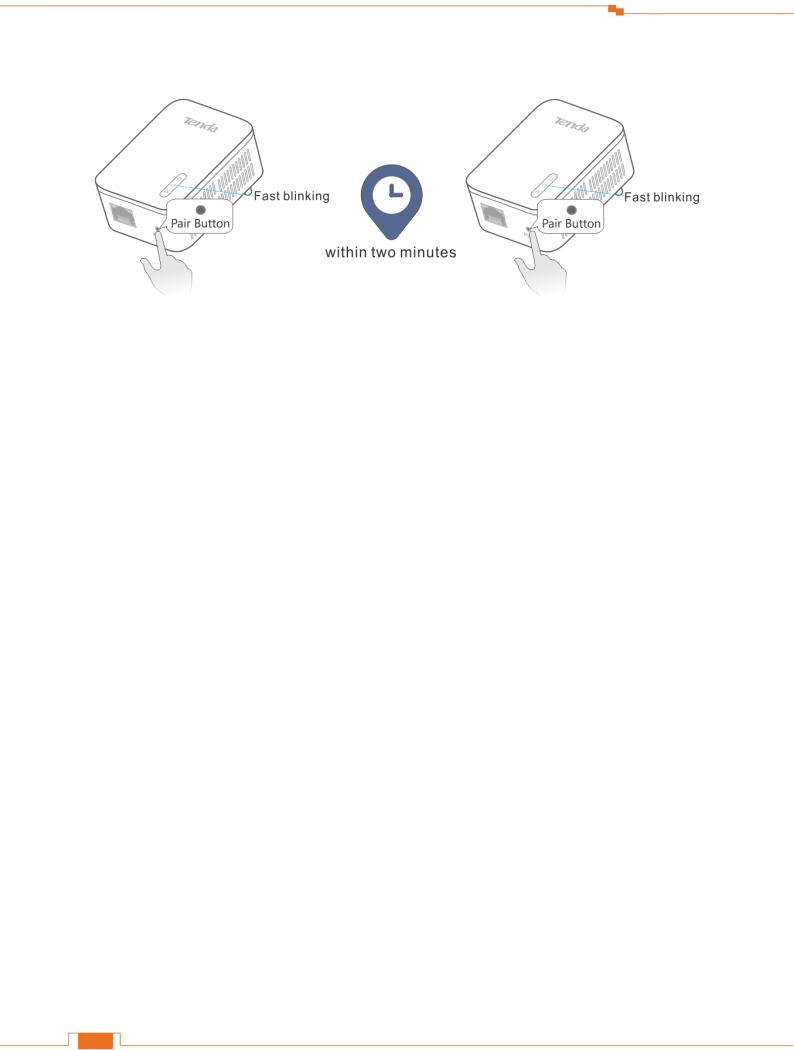
Procedure:
Plug in your adapters.
Wait until the PLC LEDs on the two adapters are lit.
Press the Pair button on one adapter for 1 second, and the PLC LED on the adapter starts blinking.
Then press the Pair button on the other adapter for 1 second. Both buttons must be pressed within two minutes.
Observe the PLC LEDs on the two adapters until they are lit again. It indicates that a secure powerline network is established successfully between the two adapters.
5
Access the Internet
3 Add Adapters to a Private Powerline Network
If you want to add more powerline adapters to a private powerline network, follow the steps below:
Press the Pair button on any powerline adapter in the security powerline network for 1 second.
Within two minutes, plug in the new powerline adapter, and press its Pair button for 1 second.
Observe the PLC LEDs on the two adapters until they are lit.
Done.
6
Manage Your Adapters
III Manage Your Adapters
This section introduces how to manage your adapters using the UI, including changing your
Powerline adapters’ device name/network name, resetting your Powerline adapters, and etc.
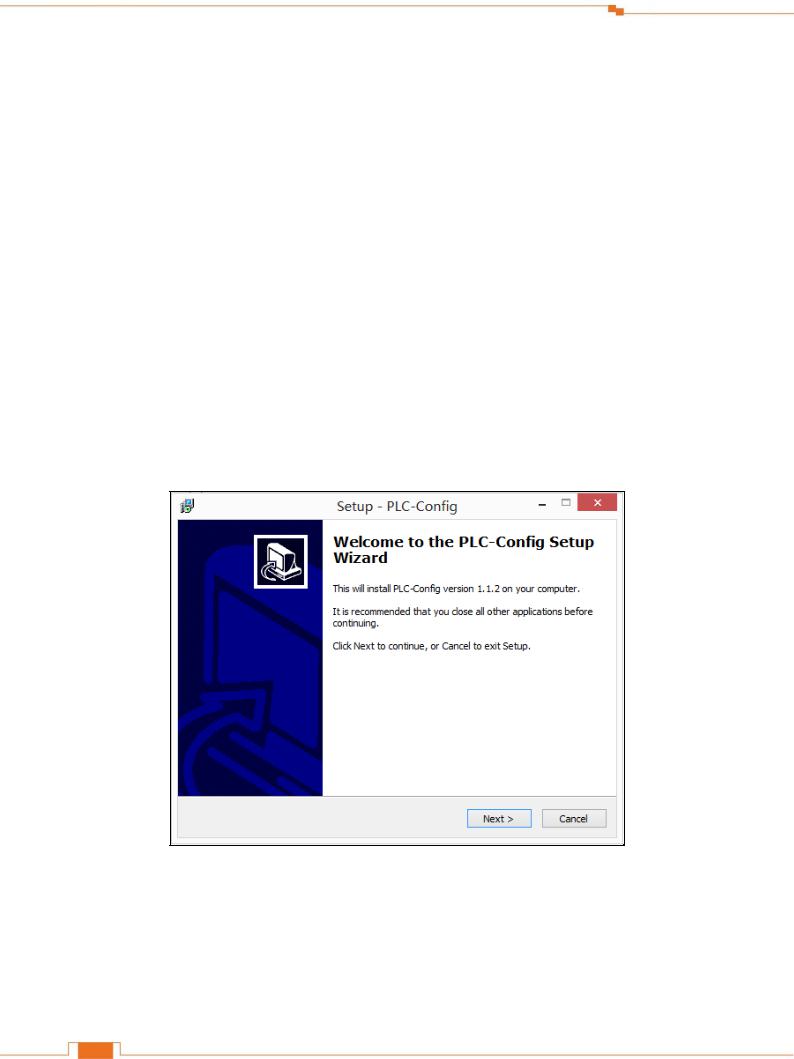
1 UI Installation
This section instructs you to install the adapter s’ UI on your computer.
If you are a Windows 8 user, simply follow steps below. If you are using other operation systems, instructions herein are also good for references.
To install the UI:
Go to Tenda official website http://www.tendacn.com to download the management software. Save it to your local host, and unzip it.
Double click the setup icon to run the management software, and click Next when you see the screen below.
7
Loading...