

Page 1

N300 Mini WiFi Range Extender A301
User Guide
1
Q1.
Page 2

Copyright Statement
© 2020 Shenzhen Tenda Technology Co., Ltd. All rights reserved.
is a registered trademark legally held by Shenzhen Tenda Technology Co., Ltd. Other
brand and product names mentioned herein are trademarks or registered trademarks of their
respective holders. Copyright of the whole product as integration, including its accessories and
software, belongs to Shenzhen Tenda Technology Co., Ltd. No part of this publication can be
reproduced, transmitted, transcribed, stored in a retrieval system, or translated into any language
in any form or by any means without the prior written permission of Shenzhen Tenda Technology
Co., Ltd.
Disclaimer
Pictures, images and product specifications herein are for references only. To improve internal
design, operational function, and/or reliability, Tenda reserves the right to make changes to the
products without obligation to notify any person or organization of such revisions or changes.
Tenda does not assume any liability that may occur due to the use or application of the product
described herein. Every effort has been made in the preparation of this document to ensure
accuracy of the contents, but all statements, information and recommendations in this document
do not constitute a warranty of any kind, express or implied.
i
Page 3
Preface
Item
Presentation
Example
Cascading menus
>
Internet Settings > LAN Setup
Parameter and value
Bold
Set SSID to Tom.
Variable
Italic
Format: XX:XX:XX:XX:XX:XX
UI control
Bold
On the Quick Setup page, click the Save button.
Symbol
Meaning
This format is used to highlight information of importance or special interest. Ignoring
this type of note may result in ineffective configurations, loss of data or damage to
device.
This format is used to highlight a procedure that will save time or resources.
Thank you for choosing Tenda! Please read this user guide before you start.
Conventions
This user guide is applicable to A301. The contained images and UI screenshots are subject to the
actual products.
The typographical elements that may be found in this document are defined as follows.
The symbols that may be found in this document are defined as follows.
ii
Page 4
Acronyms and Abbreviations
Acronym or Abbreviation
Full Spelling
MAC
Medium Access Control
SN
Serial Number
RST
Reset
SSID
Service Set Identifier
UI
User Interface
WPA-PSK
WiFi Protected Access-Pre-shared Key
WPS
WiFi Protected Setup
Hotline
Global: (86) 755-27657180 (China Time Zone)
United States: 1-800-570-5892 (Toll Free: 7 x 24 hours)
Hong Kong: 00852-81931998
Email
support@tenda.cn
Technical Support
If you need more help, contact us by any of the following means. We will be glad to assist you as
soon as possible.
iii
Page 5

Contents
1 Get to know your device ............................................................................................................... 1
1.1 Overview ................................................................................................................................ 1
1.2 LED indicator, button, and label ............................................................................................. 1
1.2.1 LED indicators .............................................................................................................. 1
1.2.2 Buttons ........................................................................................................................ 2
1.2.3 Labels .......................................................................................................................... 3
2 Quick Setup ................................................................................................................................... 4
2.1 Extend your existing WiFi network through the Web UI ....................................................... 4
2.2 Extend your existing WiFi network with the WPS button ...................................................... 7
3 Use a mobile device to manage the extender .............................................................................. 9
3.1 Log in to the extender ............................................................................................................ 9
3.2 Check the internet status ..................................................................................................... 11
3.3 Modify the SSID and password of the extender .................................................................. 13
3.4 Hide the WiFi network of the extender ............................................................................... 15
3.5 Manage online devices ........................................................................................................ 20
3.5.1 Check online devices ................................................................................................. 20
3.5.2 Block online devices .................................................................................................. 22
3.5.3 Unblock devices ........................................................................................................ 23
3.6 Extend another WiFi network .............................................................................................. 24
3.7 Change the operating mode ................................................................................................ 27
3.7.1 Switch the extender from the repeater mode to the AP mode ................................ 27
3.7.2 Switch the extender from the AP mode to the repeater mode ................................ 30
3.8 Set up a login password ....................................................................................................... 31
3.9 Reboot the extender ............................................................................................................ 33
3.10 Reset the extender ............................................................................................................. 34
3.10.1 Reset the extender through thr Web UI ................................................................. 34
3.10.2 Reset the extender with the RESET button ............................................................. 35
4 Use a laptop or computer to manage the extender ................................................................... 36
4.1 Log in to the extender .......................................................................................................... 36
4.2 Check the internet status ..................................................................................................... 38
4.3 Manage online devices ........................................................................................................ 39
4.3.1 Check online devices ................................................................................................. 39
4.3.2 Block online devices .................................................................................................. 40
4.3.3 Unblock devices ........................................................................................................ 41
iv
Page 6

4.4 Extend another WiFi network .............................................................................................. 42
4.5 Modify the SSID and password of the extender ............................................................... 45
4.6 Hide the WiFi network of the extender ............................................................................... 46
4.7 Change the operating mode ................................................................................................ 47
4.7.1 Switch the extender from the repeater mode to the AP Mode ............................... 48
4.7.2 Switch the extender from the AP mode to the repeater mode ................................ 51
4.8 Set up a login password ....................................................................................................... 52
4.9 Reboot the extender ............................................................................................................ 53
4.10 Reset the extender ............................................................................................................. 54
4.10.1 Reset the extender with Web UI ............................................................................. 54
4.10.2 Reset the extender with the RESET button ............................................................. 54
4.11 Export logs .......................................................................................................................... 55
4.12 Upgrade the extender ........................................................................................................ 56
Appendixes ......................................................................................................................................... 57
A.1 Set your computer to obtain an IP address automatically .................................................. 57
A.1.1 Windows 7 ................................................................................................................ 57
A.1.2 Windows 10 .............................................................................................................. 61
A.2 Default Parameter Values .................................................................................................... 63
v
Page 7
1 Get to know your device
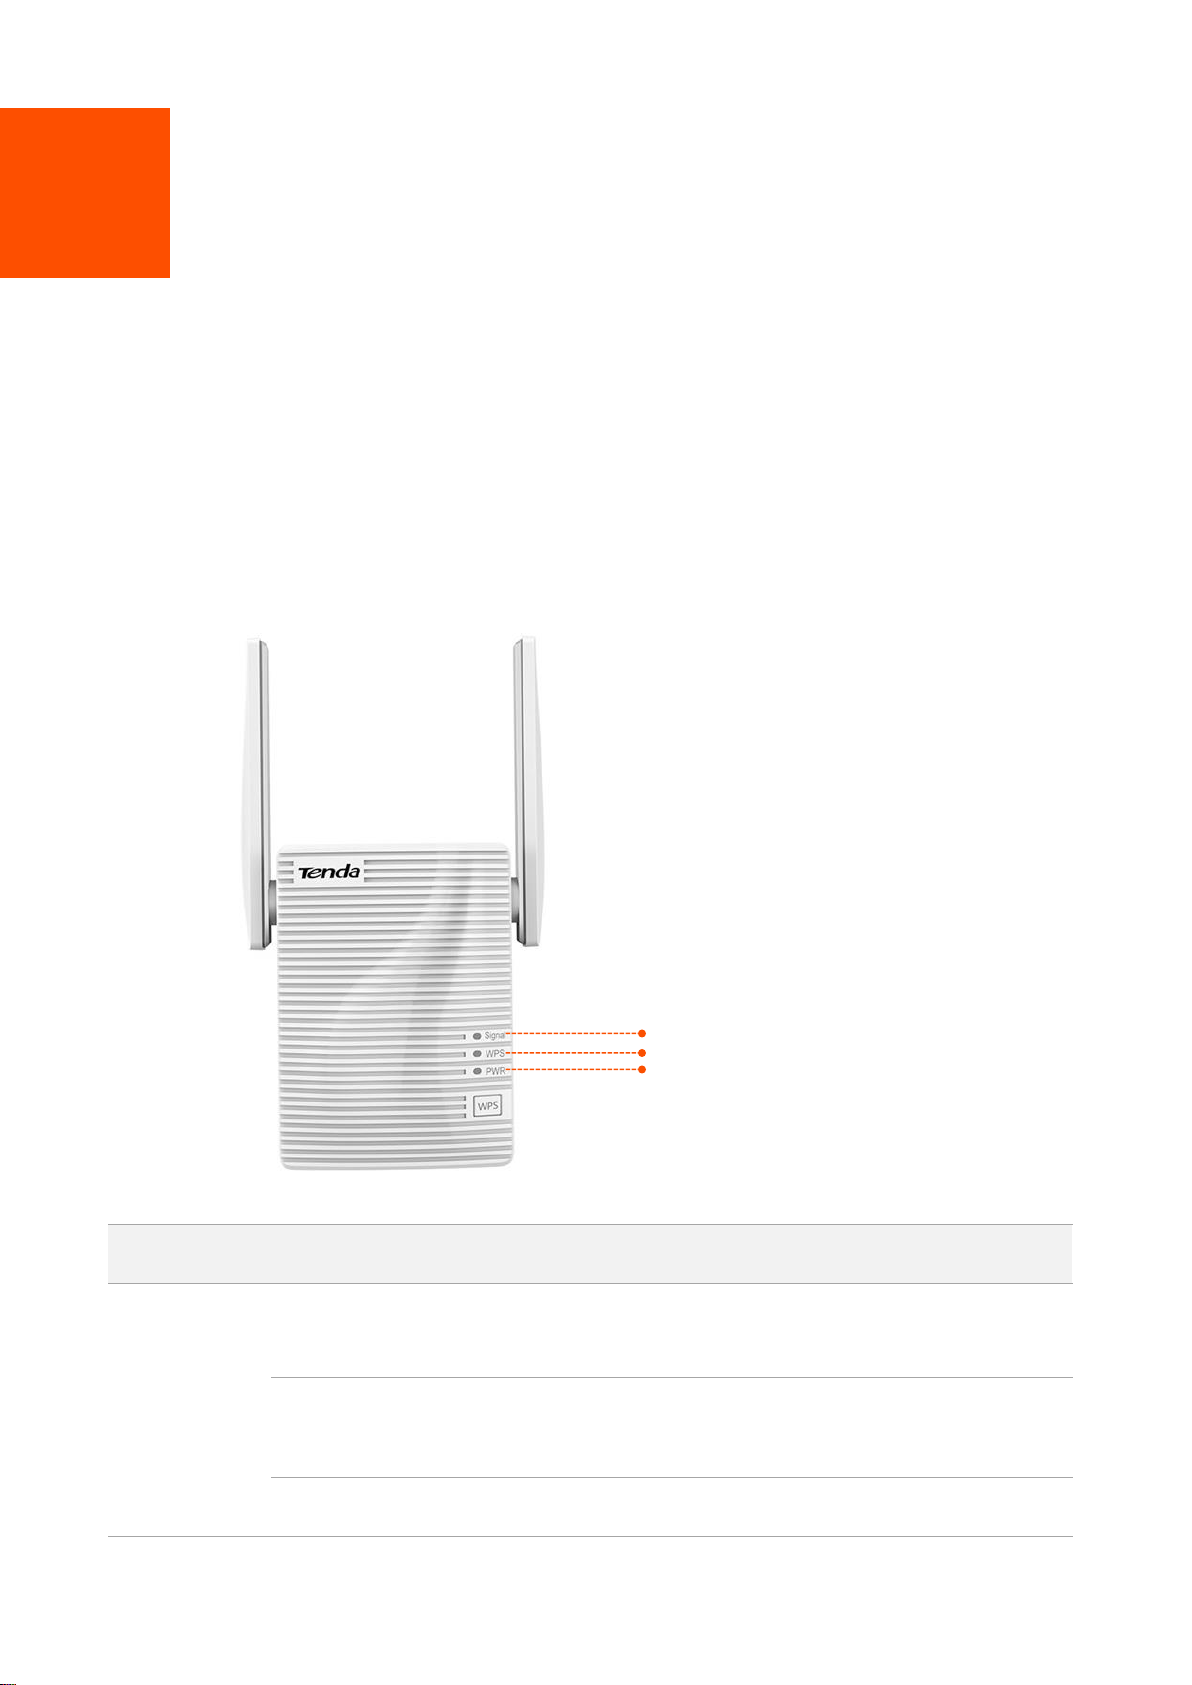
LED indicator
Status
Description
Signal
Solid blue
The extender has connected to your WiFi router, and its position is
proper.
Solid red
The extender is too far away from your WiFi router.
Relocate the extender closer to the router.
Off
The extender does not connect to your WiFi router.
Signal
WPS
PWR
1.1 Overview
Tenda A301 is a high-performance WiFi extender operating in the 2.4 GHz band. It helps provide a
larger WiFi coverage. Meanwhile, it can work well with mainstream WiFi routers available on the
market.
1.2 LED indicator, button, and label
1.2.1 LED indicators
1
Page 8
LED indicator
Status
Description
WPS
Solid on for 2
mins > off
A WPS connection is established.
Blinking
The extender is performing WPS negotiation.
Off
The WPS function is disabled or no WPS connection is in progress.
PWR
Solid on
The extender is connected to a power source properly.
Off
The extender is not powered on.
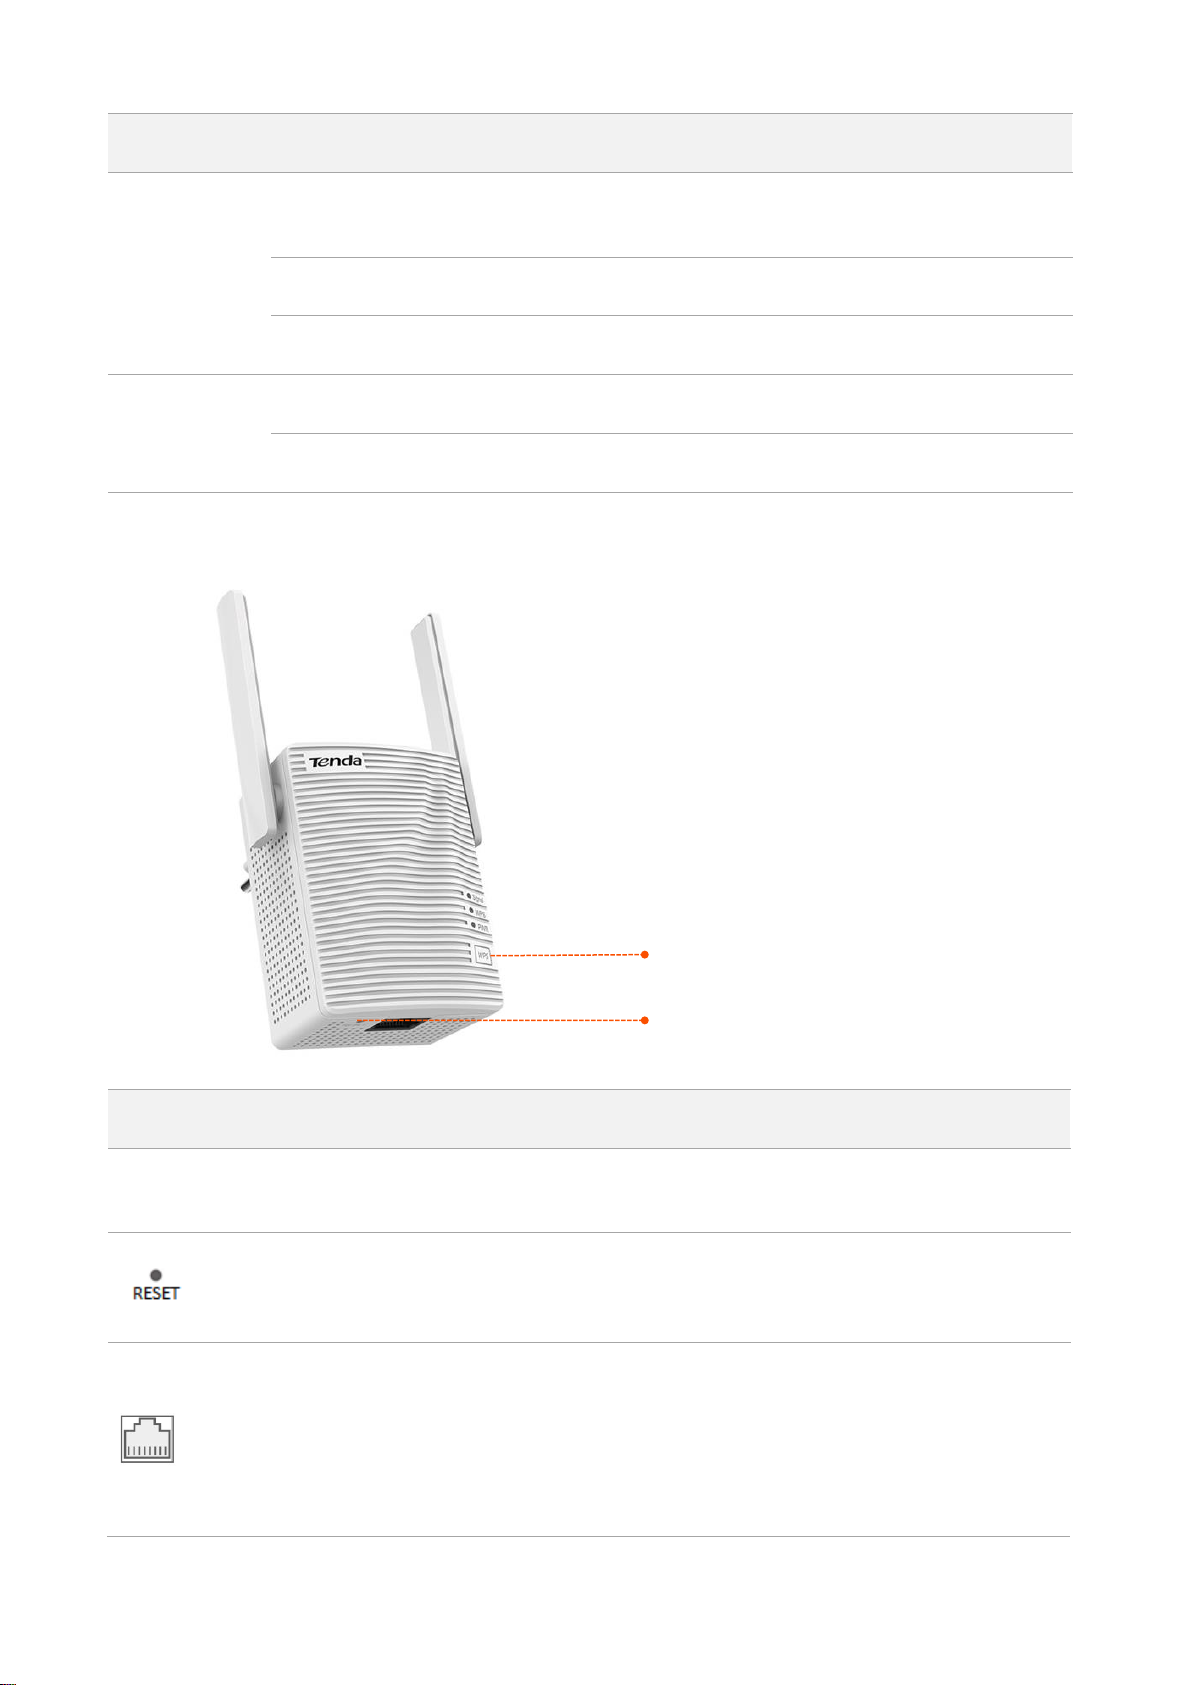
1.2.2 Buttons
Button/Port
Description
WPS
Press the button of the router, and enable the WPS function of another device within
2 minutes to establish a WPS connection.
When the PWR LED indicator of the extender is solid on, hold down this button using a
needle, and release it when all the LED indicators blink once then turn off. When the
PWR LED indicator turns solid on again, it is reset successfully.
LAN port.
In repeater mode, this port allows a wired device, such as a desktop computer, to be
connected to the repeater to access the internet.
In AP mode, it is used to connect to your upstream device such as a wired router,
enabling the repeater access the internet.
WPS button
RESET button
2
Page 9
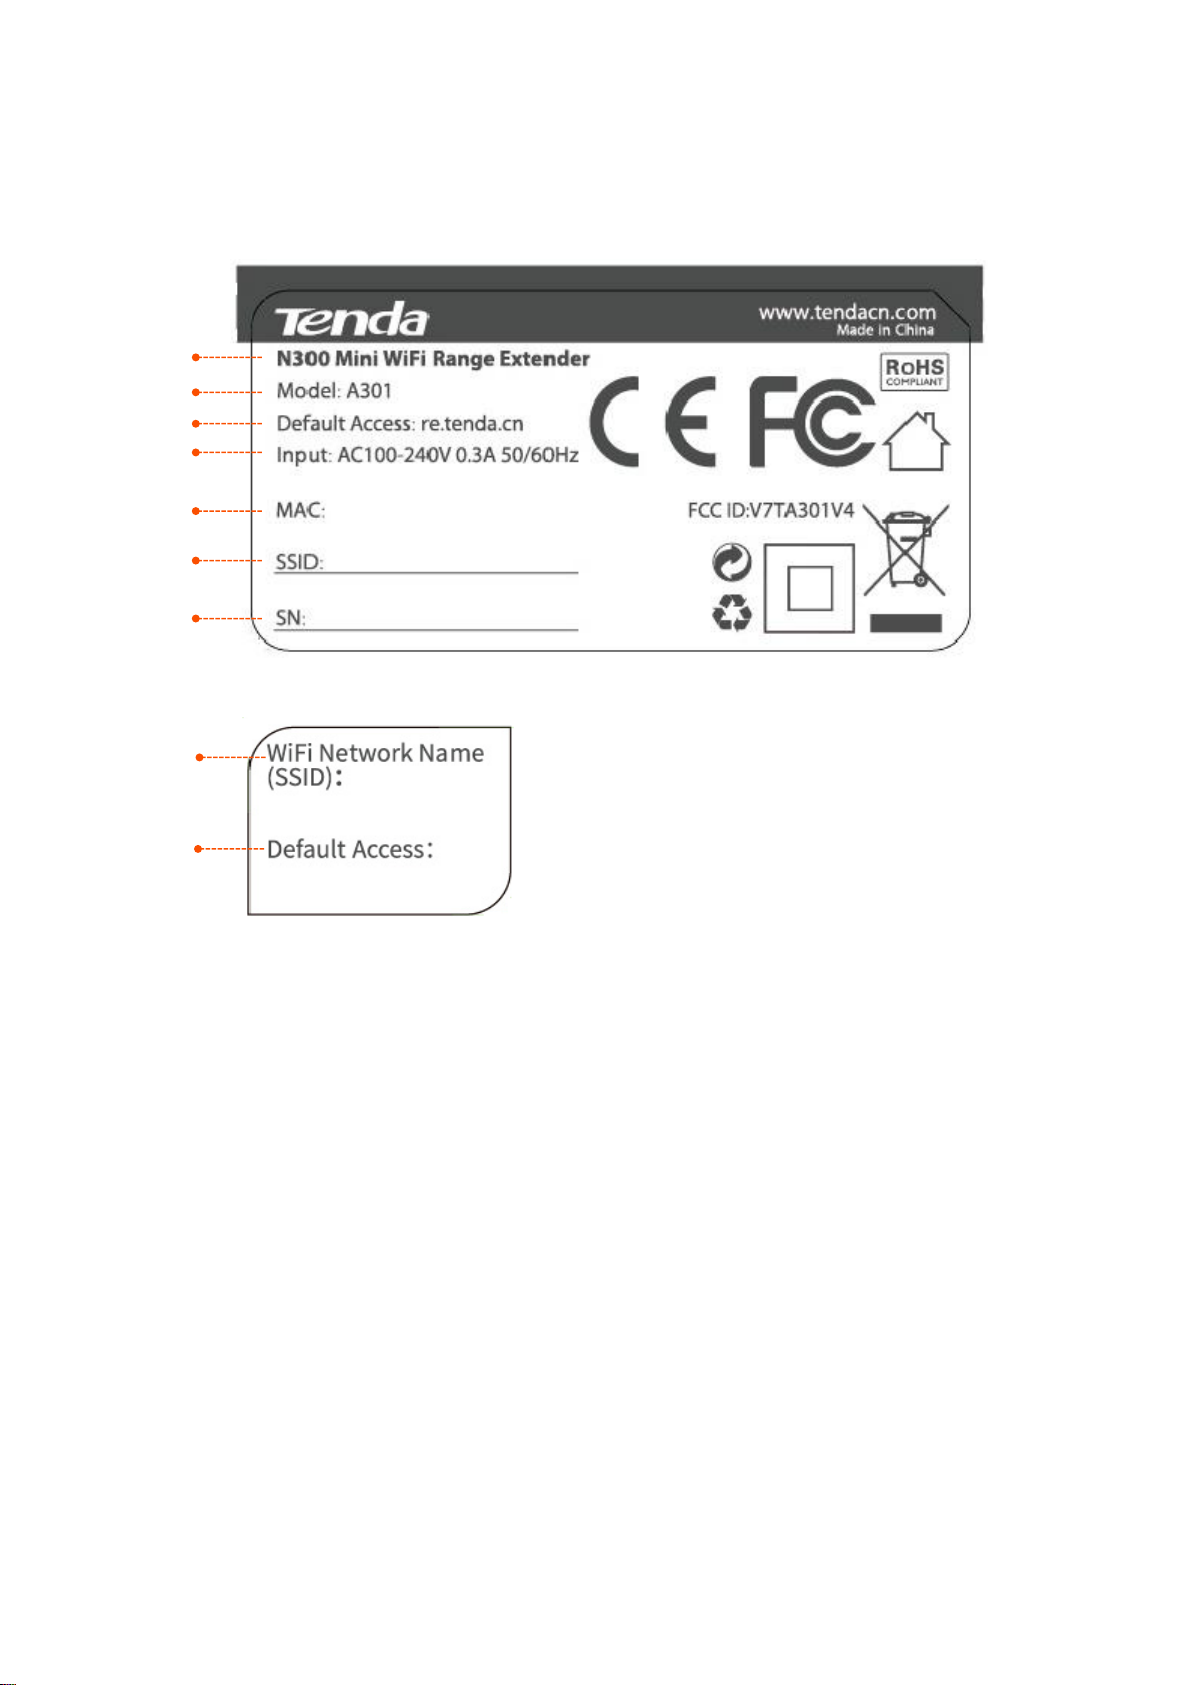
1.2.3 Labels
(1) Product name of the extender.
(2) Model: Product model of the extender. You can use this model as a key word for searching related
supporting materials across various channels, such as Tenda official website, or e-commerce
websites.
(3) Default Access: Default domain name for logging in to the web UI of the extender.
(4) Input: Power specification of the extender.
(5) MAC: MAC address of the extender. A MAC address refers to the unique physical address of the
device.
(6) SSID: Default wireless network name of the extender.
(7) SN: The unique serial number of the extender.
(1)
(2)
(3)
(4)
(5)
(6)
(7)
(6)
(3)
The labels present WiFi network name (SSID), login address and other information of the extender.
Label on the rear panel of the extender:
Label on the top panel of the extender:
3
Page 10
2 Quick Setup
2.1 Extend your existing WiFi network through the
Web UI
You can use a WiFi-enabled device, such as a smart phone, a laptop or a desktop computer
installed with a wireless adapter, to configure the extender through the web UI.
When using a mobile device for setup, disable its mobile data or cellular network before
configuration. A smart phone for setup is used for illustration here.
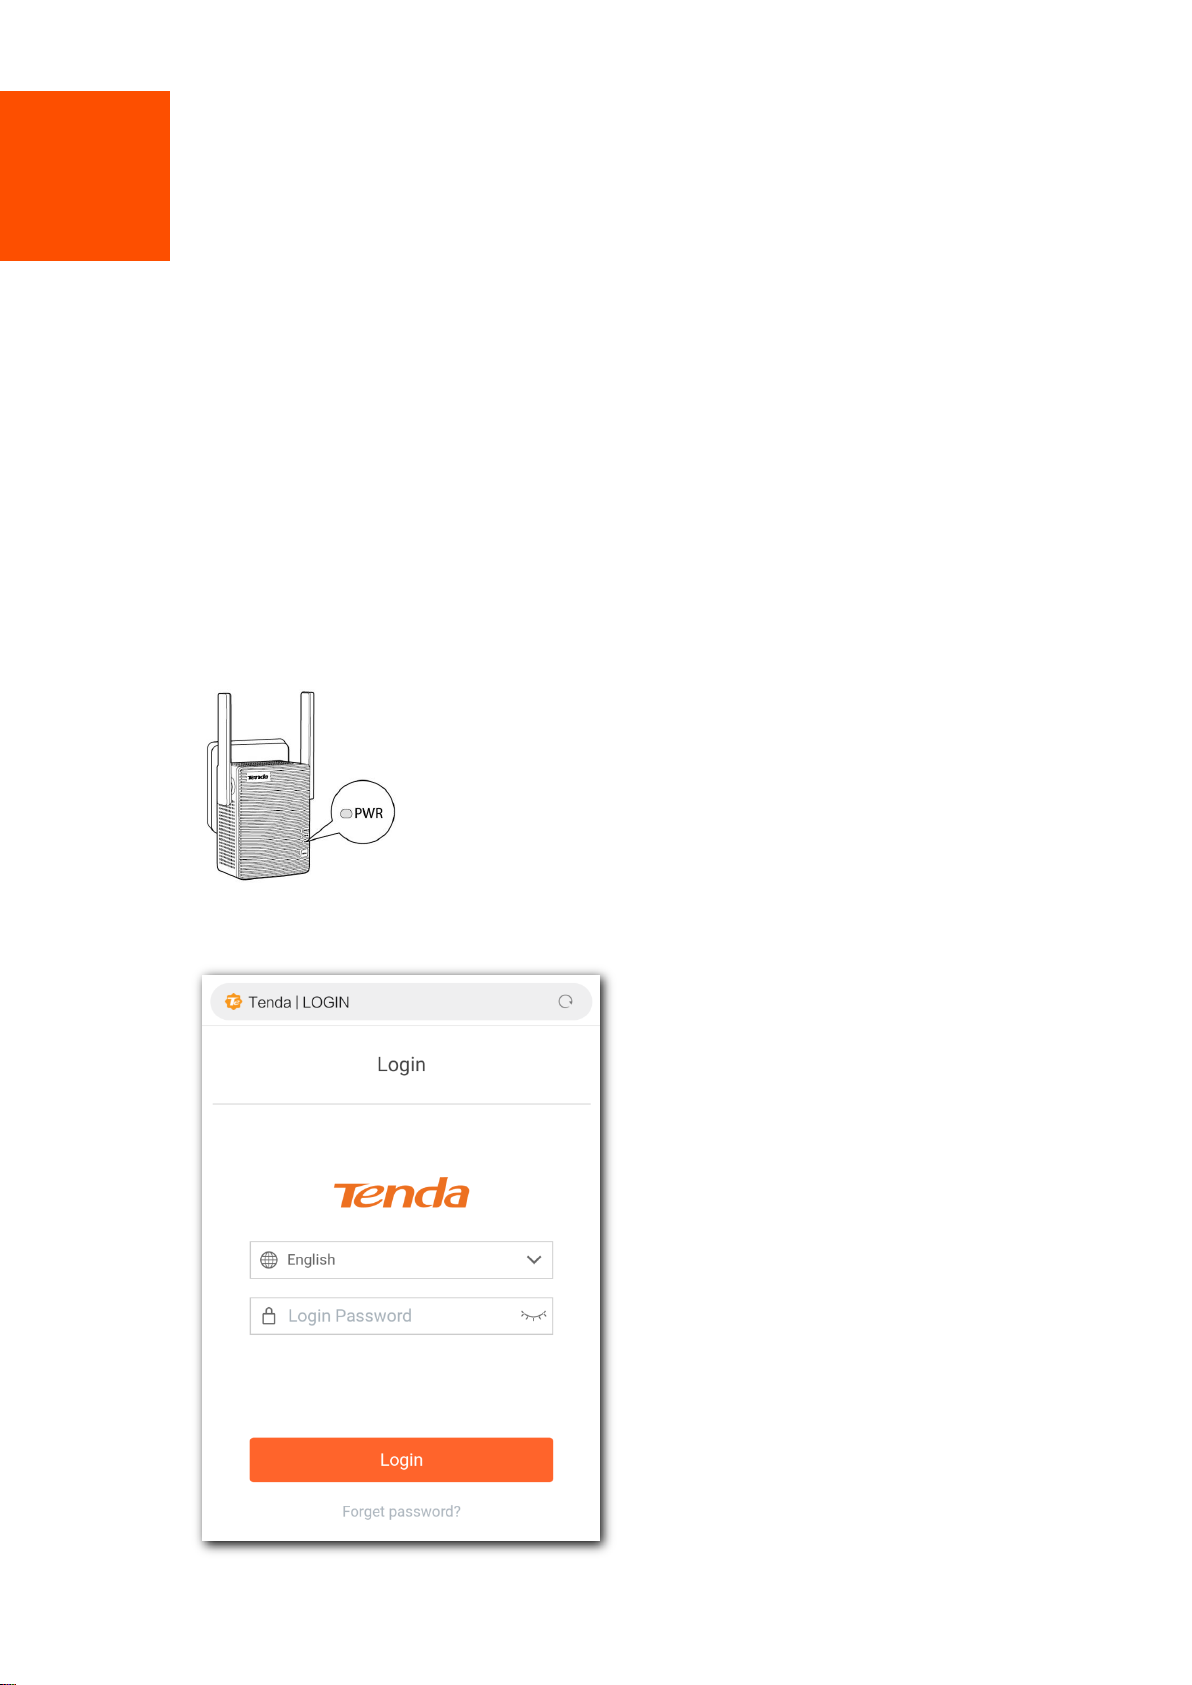
Step 1 Plug the extender into a power source near your wireless router in the same room. Wait
until the PWR LED indicator of the extender lights solid on.
Step 2 Connect your smart phone to the open WiFi network named Tenda_EXT of the extender.
4
Page 11
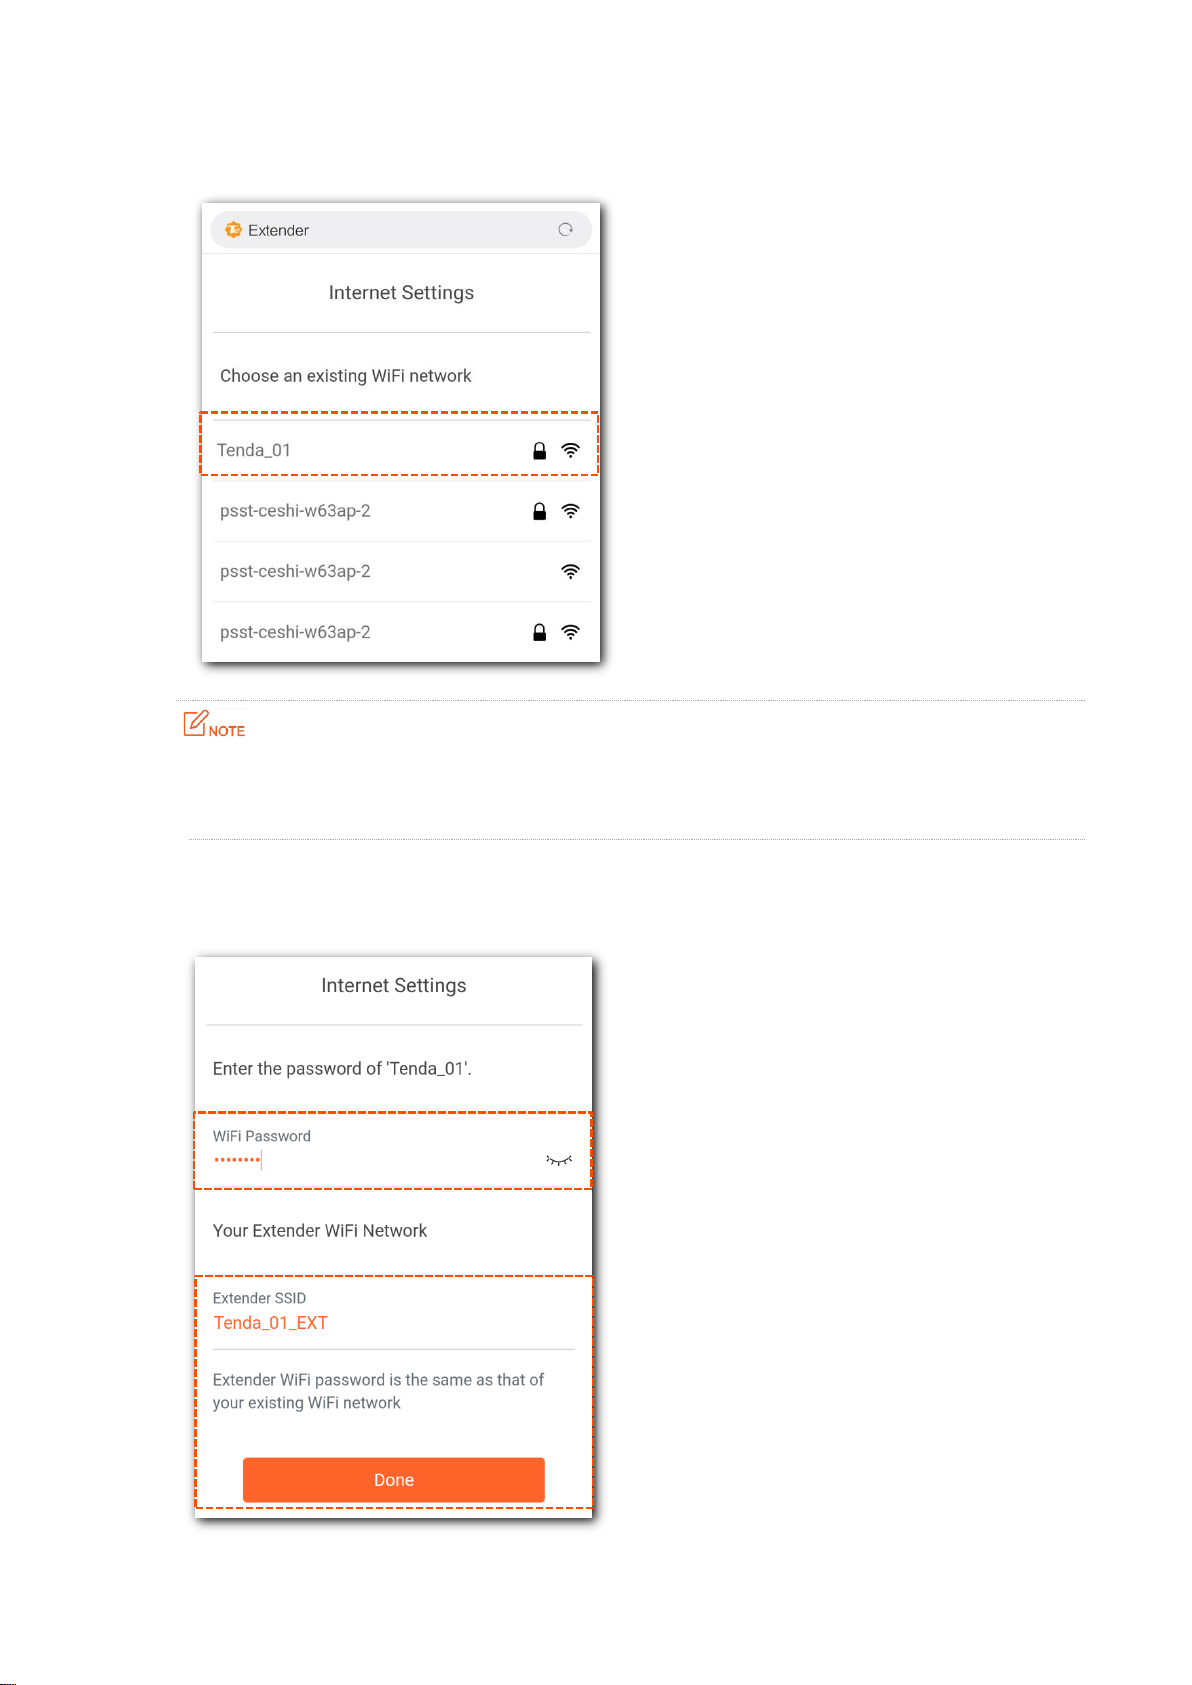
Step 3 After the smart plug is connected to the extender, the Internet Settings page pops up.
Select the WiFi network you want to extend, which is Tenda_01 in this example.
If the Internet Settings page does not pop up, check whether the smart phone has connected to the
default WiFi network named Tenda_EXT of the extender. If not, start a web browser on the device, and
visit re.tenda.cn.
Step 4 Enter the WiFi Password of the WiFi network you selected, modify the SSID of extender
as needed, which is Tenda_01_EXT in this example, and tap Done.
5
Page 12

Step 5 Wait until the Signal LED indicator lights solid blue. Then relocate the extender by
following the on-screen tips for optimal connection quality.
For better performance:
−
Place the extender within the range of your existing WiFi coverage.
−
Place it at an open area without obstacles.
−
Keep it away from electronics with strong interference, such as microwave ovens, Bluetooth-enabled
devices, and refrigerators.
−
Adjust the antennas upward and vertical to the ground.
---- End
Now, you can connect your WiFi-enabled devices to the WiFi network of the extender to access
the internet with the information below:
− SSID: Tenda_01_EXT
− WiFi password: It is the same as that of your wireless router
If you want to modify the SSID of extender and WiFi password, refer to Modify the SSID and password of
the extender with a mobile WiFi-enabled device, or Modify the SSID of extender and WiFi password with
a laptop or desktop computer installed with a wireless adapter.
6
Page 13
2.2 Extend your existing WiFi network with the WPS
button
You can use this method if your router has a WPS button, which may be indicated by , , or .
Otherwise, use Extend your exisiting WiFi network through the Web UI.
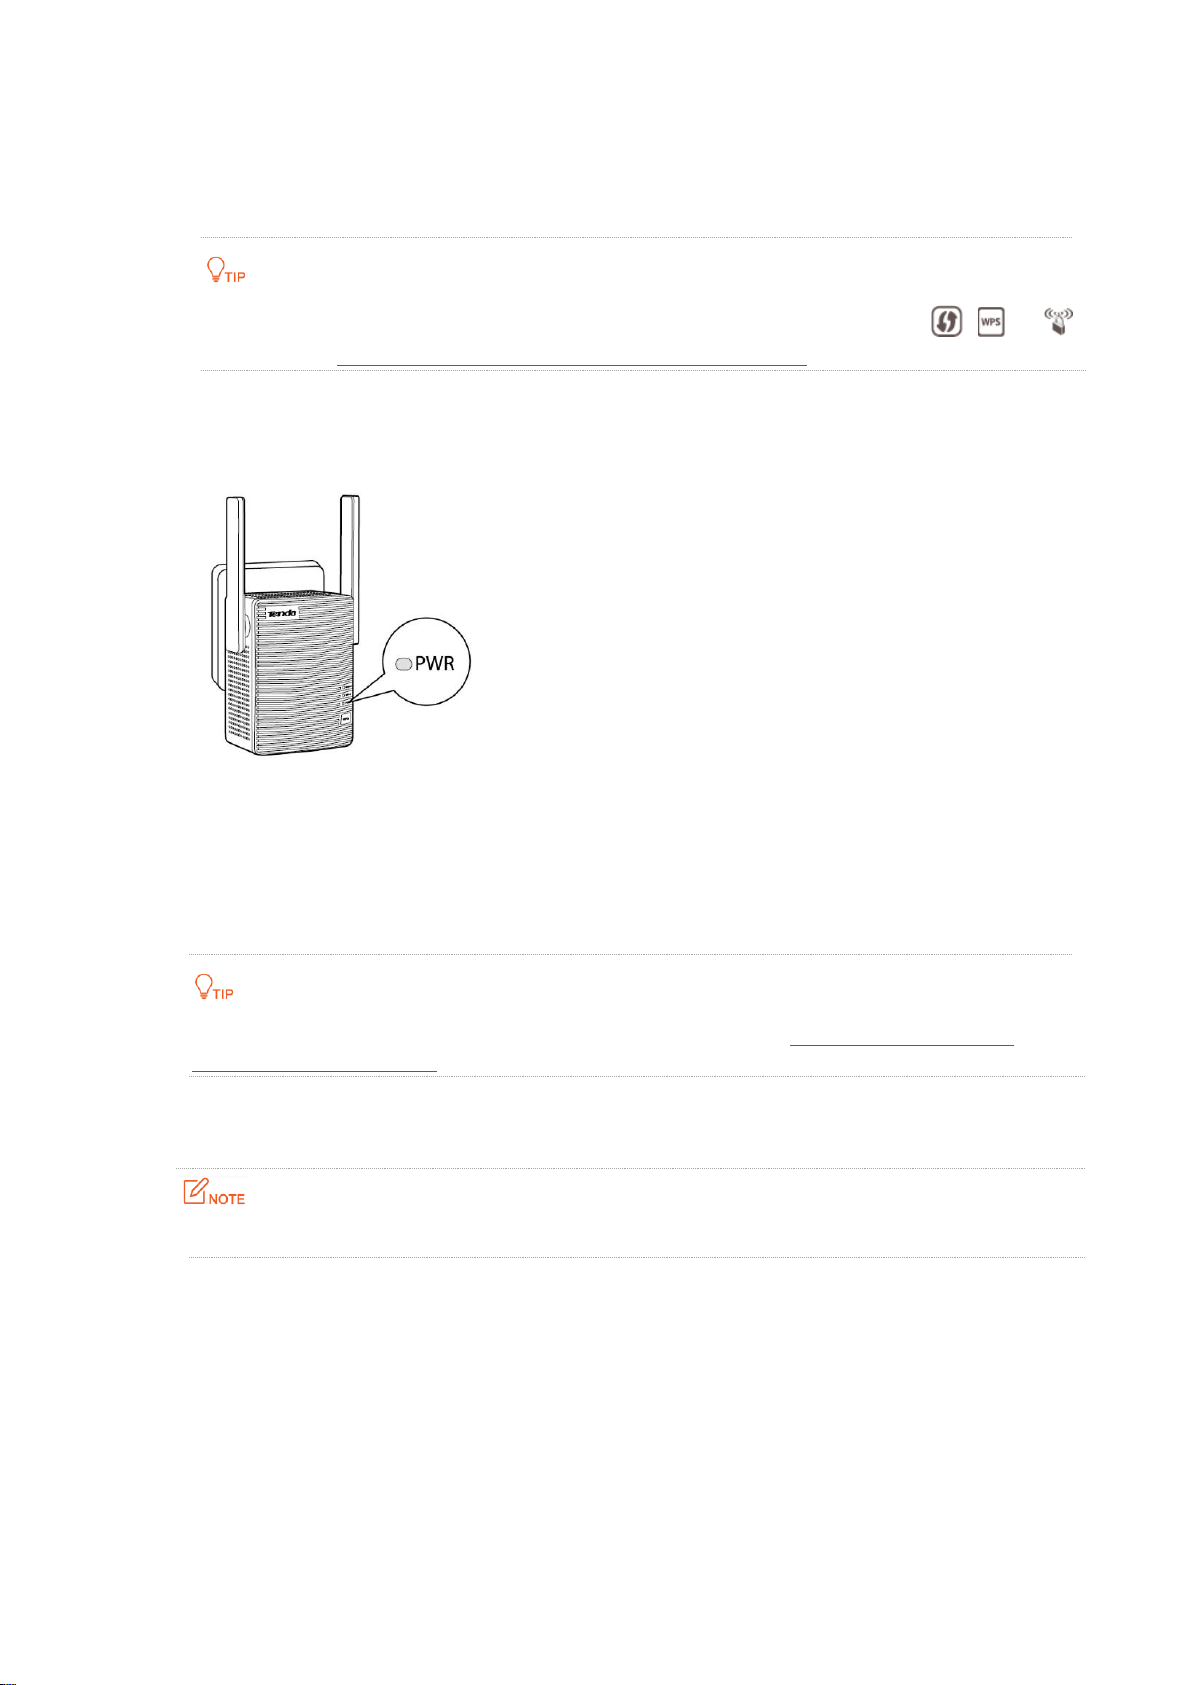
Step 1 Plug the extender into a power source within 2 meters of your wireless router in the same
room. Wait until the PWR LED indicator lights solid on.
Step 2 Press the WPS button on the wireless router. Within 2 minutes, press the WPS button on
the extender.
Step 3 Wait until the Singal LED indicator on the extender lights solid blue. The extender extends
your existing WiFi network successfully.
If the PWR LED indicator on the extender does not light solid blue, try extend your exisiting WiFi
network through the Web UI.
Step 4 Plug the extender into a power source halfway between the wireless router and the WiFi
dead zone.
The location you choose must be within the WiFi coverage of your existing wireless router.
Wait about 1 minute until the Signal LED indicator lights one of the following statuses:
− Solid blue: Proper position and good connection quality.
− Solid red: Move the extender closer to the WiFi router.
− Off: Move the extender closer to the WiFi router.
7
Page 14

For better performance:
−
Place the extender within the WiFi coverage of your existing router.
−
Place it at a spacious position without obstacles.
−
Keep it away from electronics with strong interference, such as microwave ovens, Bluetooth devices,
and refrigerators.
−
Adjust the antennas upward and vertical to the ground.
---- End
Now, you can connect your WiFi-enabled devices to the extended WiFi network to access the
internet using the information below:
− SSID of the extended network: Your existing WiFi network name.
− WiFi password of the extended network: Same as your existing router.
If you want to modify the SSID of extender and WiFi password later, refer to Modify the SSID and
password of the extender with a mobile WiFi-enabled device, or Modify the SSID and password of the
extender with a laptop or desktop computer installed with a wireless adapter.
8
Page 15
3 Use a mobile device to
manage the extender
3.1 Log in to the extender
Disable the Mobile Data (or cellular network if any) of your smart phone first.
Step 1 Connect your smart phone to the WiFi network of the extender.
Step 2 Open a web browser on your smart phone, and access re.tenda.cn.
---- End
If you do not set a login password, you will be directed to the homepage of the extender. See the
following figure:
9
Page 16
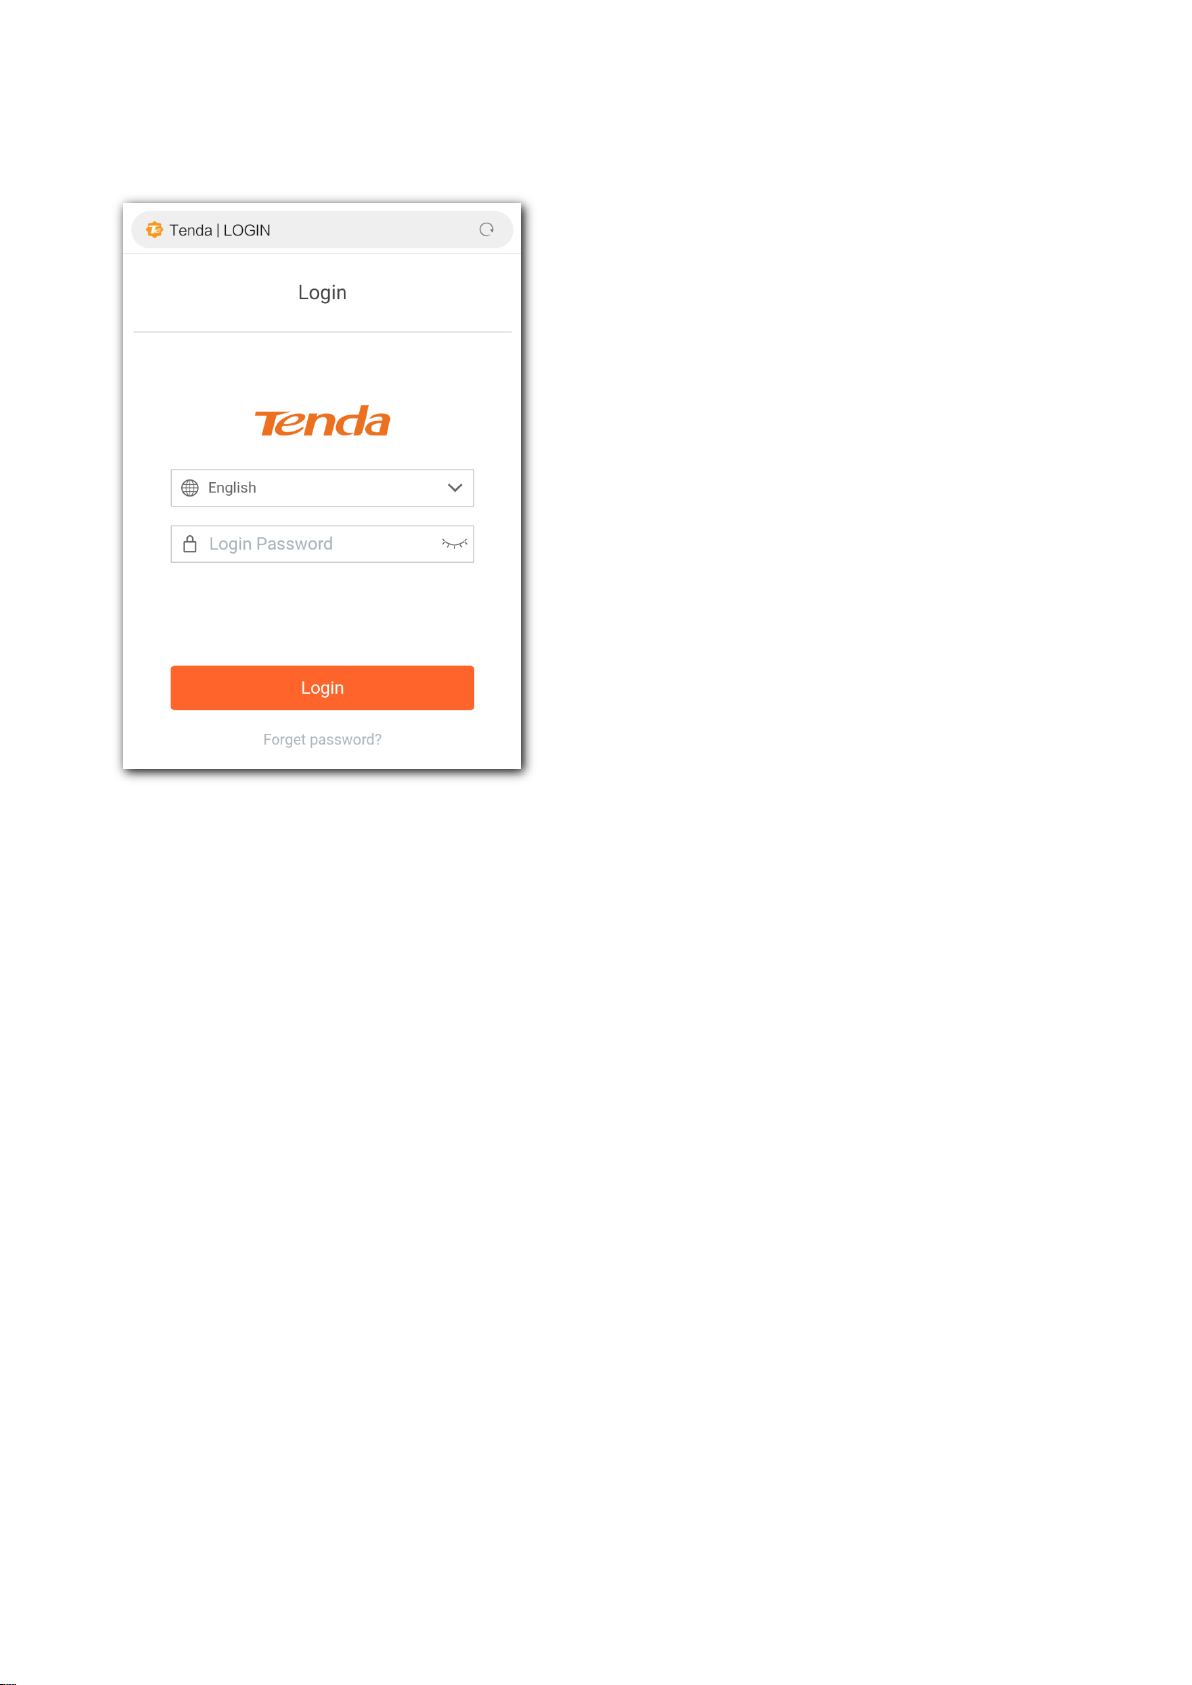
If you have set up a login password, enter the Login Password you set on the Login page. Then you
will be directed to the homepage of the extender.
10
Page 17

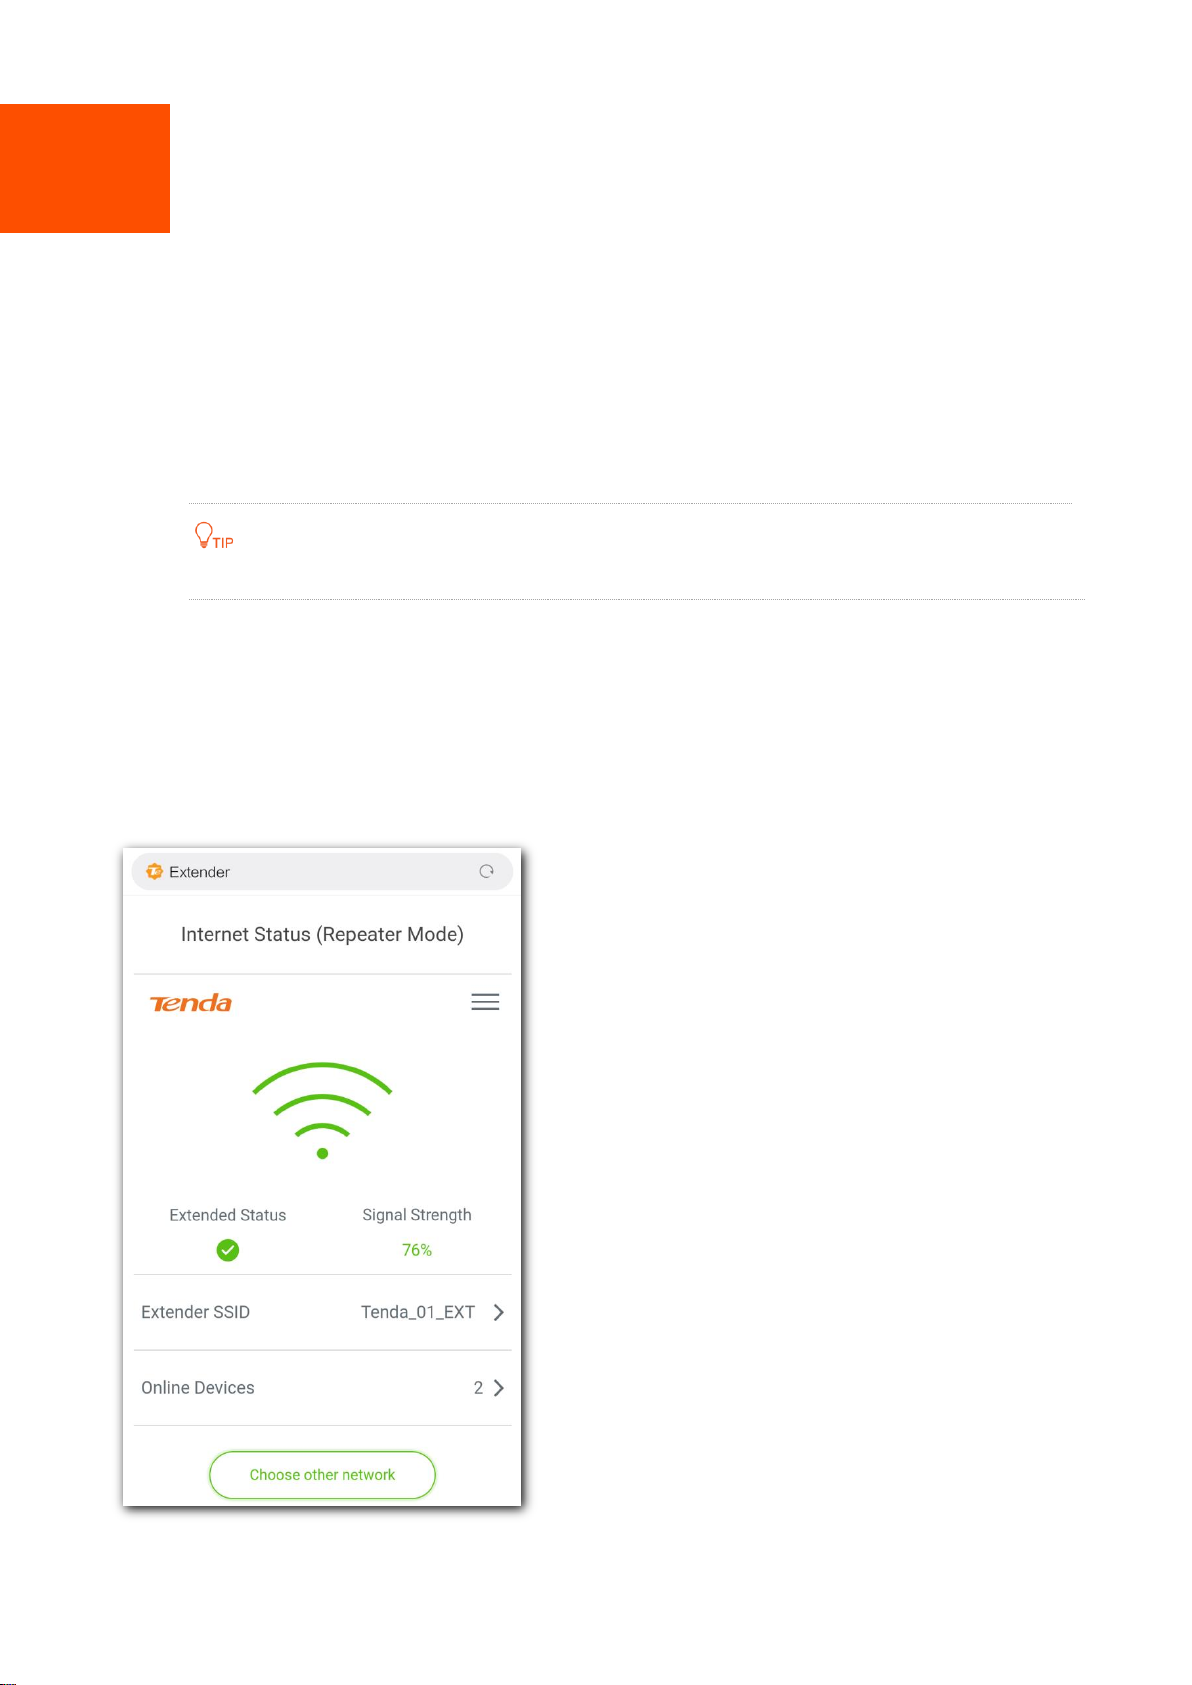
3.2 Check the internet status
To enter the page, perform the following steps.
Step 1 Connect your smart phone to the WiFi network of the extender.
Step 2 Open a web browser on your smart phone, and access re.tenda.cn. The homepage of the
extender pops up. See the following figure.
---- End
You can check the extended status and signal strength on this page.
Extended status
: Extended.
: Fail to extend.
11
Page 18

Signal strength
Signal strength
LED indicator color
Description
0%
Off
Fail to extend.
1% to 37%
Red
Extended, but the extender is a little far away from your router.
You can try relocating it closer to the router to get better connection
quality.
38% to 100%
Blue
Extended, and the connection quality is good.
You can move the extender a little far away from your existing router to
get wider WiFi coverage.
12
Page 19
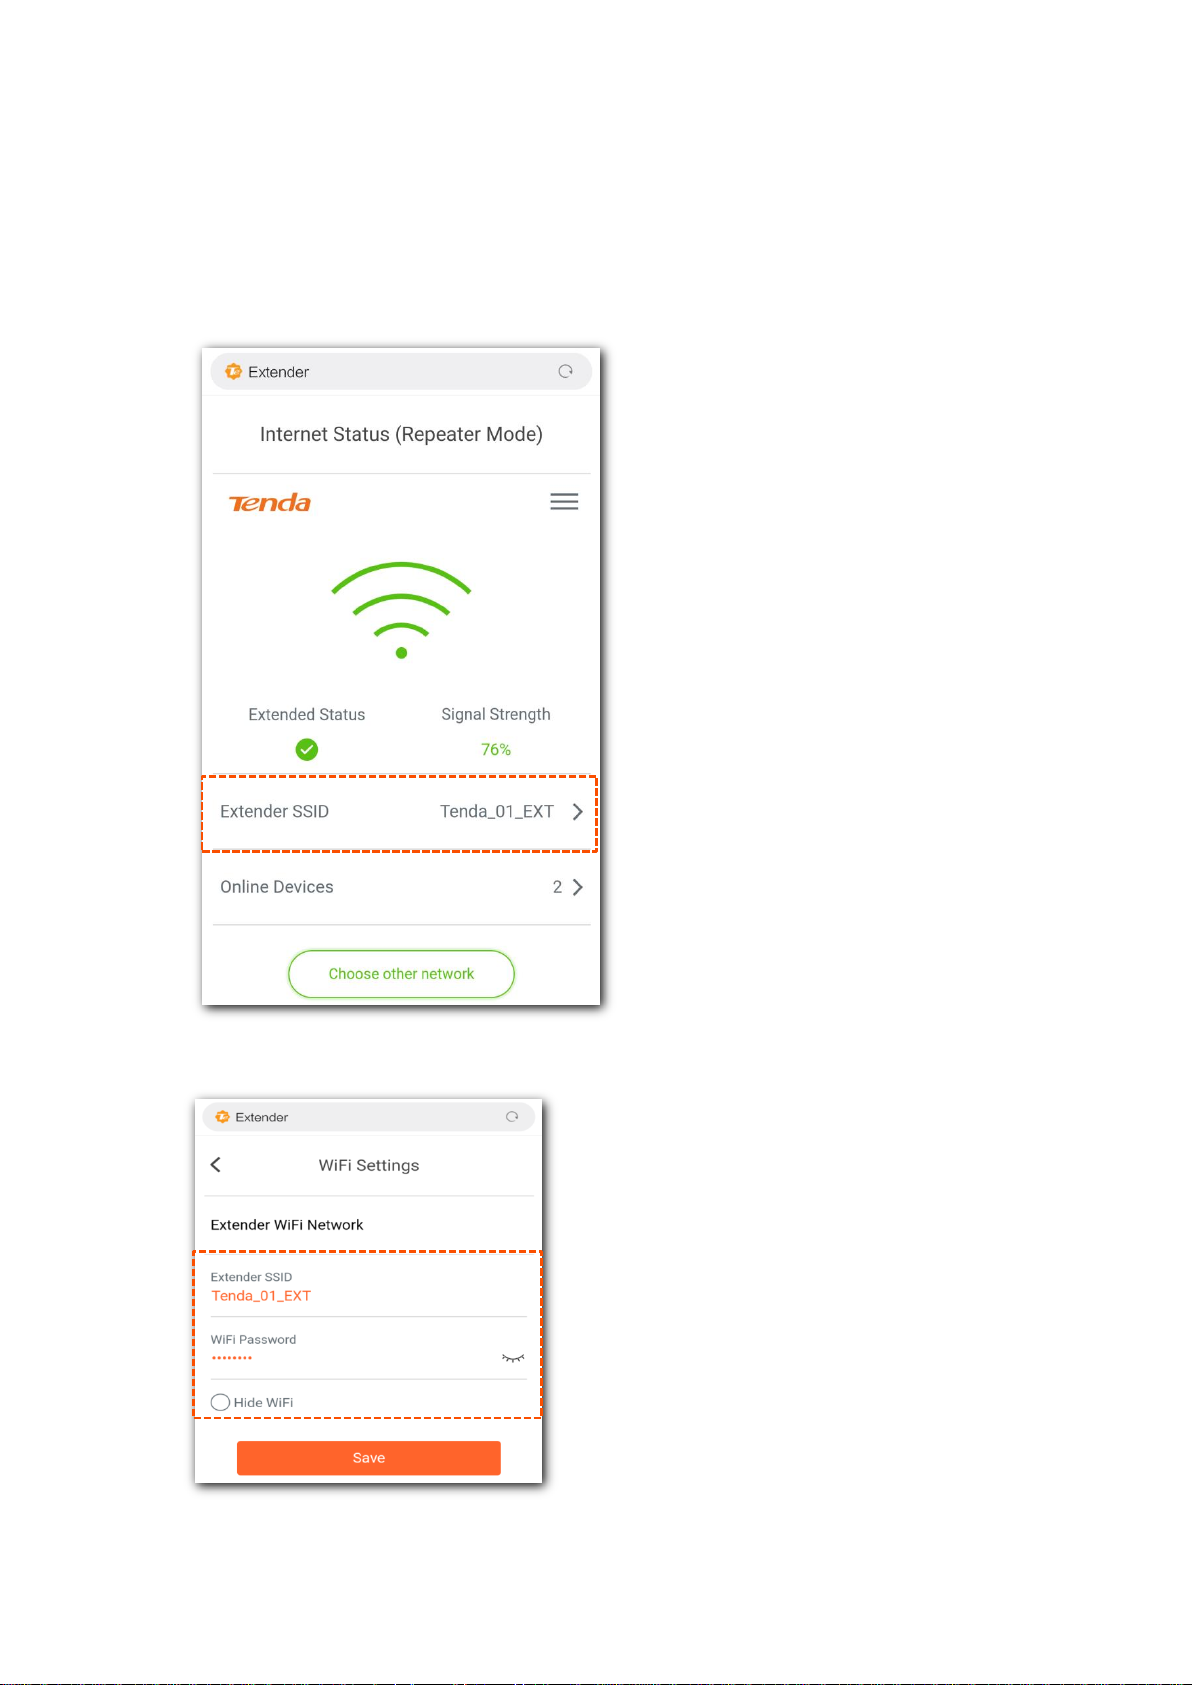
3.3 Modify the SSID and password of the extender
Step 1 Connect your smart phone to the WiFi network of the extender.
Step 2 Open a web browser on your smart phone, and access re.tenda.cn. The homepage of the
extender pops up.
Step 3 Tap the Extender SSID field. The WiFi Settings page pops up.
Step 4 On the WiFi Settings page, modify the Extender SSID and WiFi Password as required.
Then, click Save to apply the settings.
---- End
13
Page 20

After the configurations are saved, you need to reconnect your WiFi-enabled devices to the
extender using the SSID and WiFi password you set here.
14
Page 21
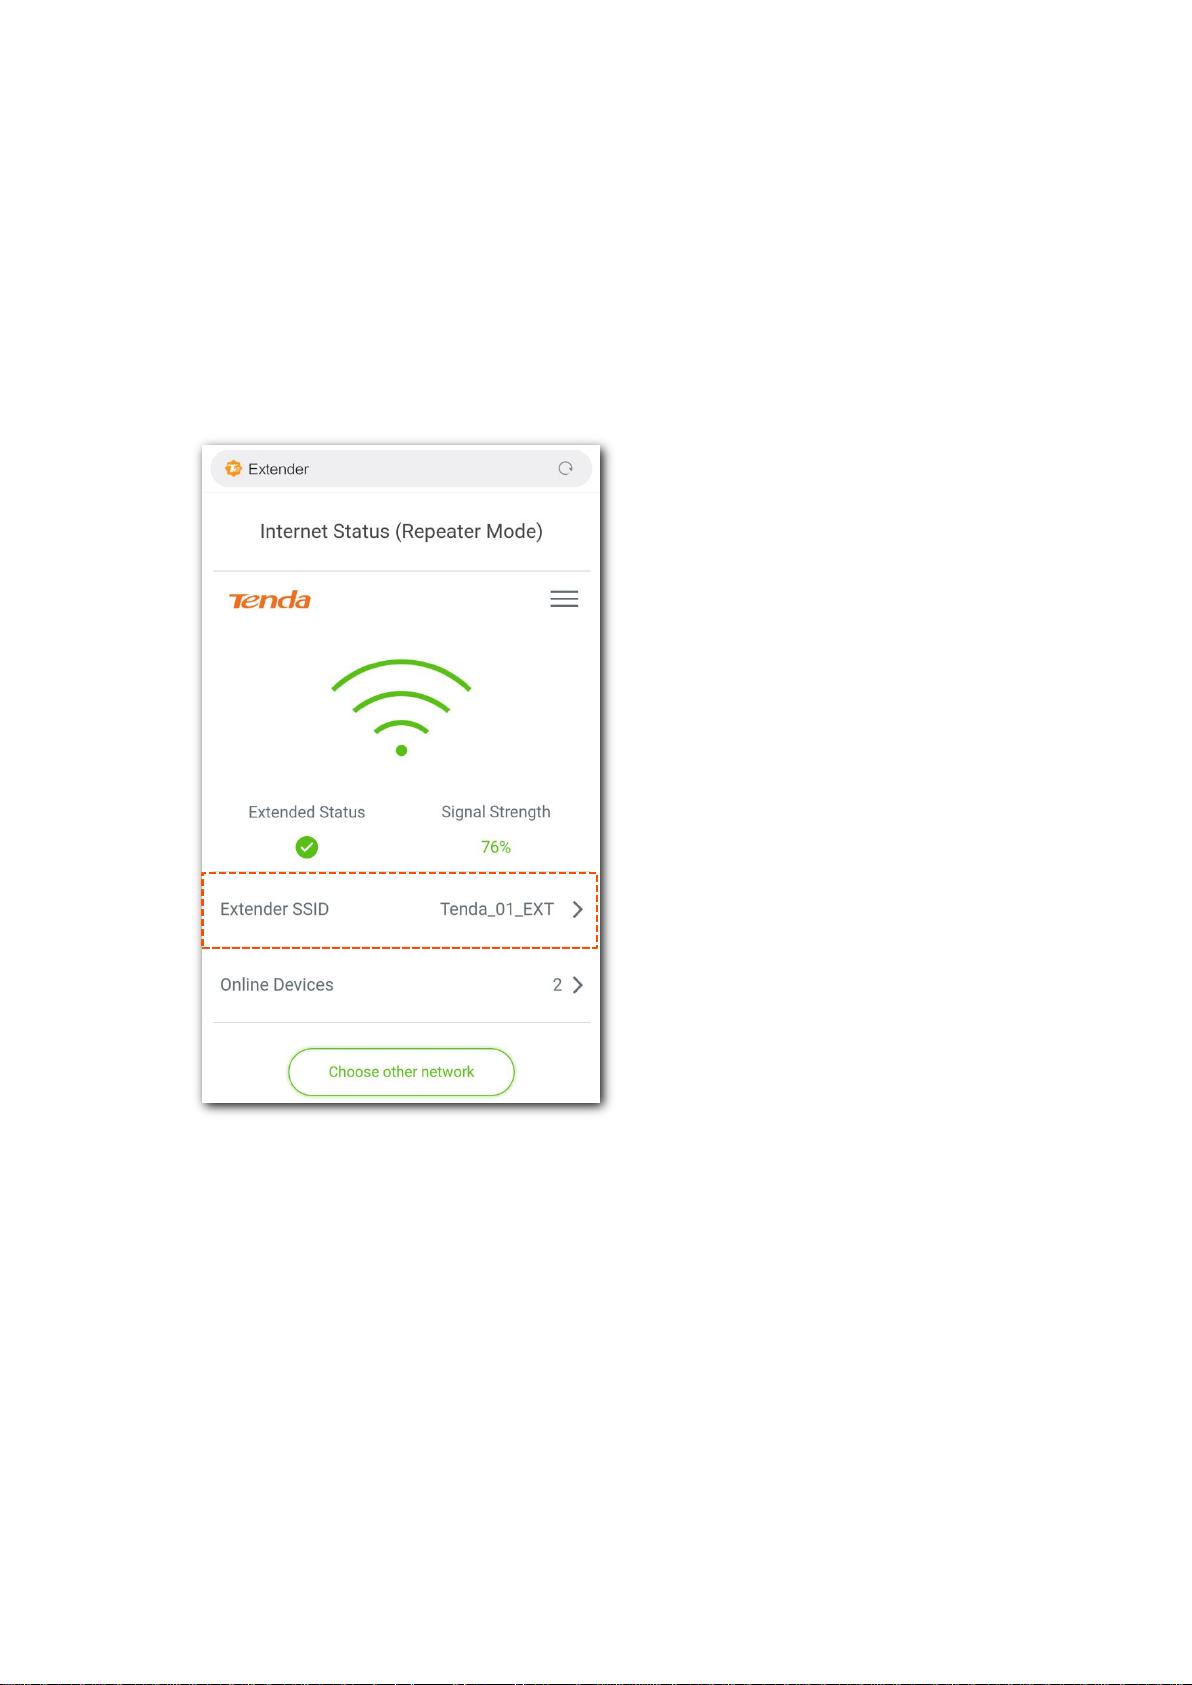
3.4 Hide the WiFi network of the extender
The extender supports to hide its WiFi network so that wireless devices cannot scan it, thus
improving the security of the WiFi network of the extender.
Step 1 Connect your smart phone to the of the WiFi network of the extender.
Step 2 Open a web browser on your smart phone, and access re.tenda.cn. The homepage of the
extender pops up.
Step 3 Tap the Extender SSID field. The WiFi Settings page pops up.
15
Page 22

Step 4 On the WiFi Settings page, tick Hide (or Hide WiFi, depending on your actual software
version), and tap Save to apply your settings.
---- End
After the configurations are saved, the extender cuts the connections of clients.
To connect to the WiFi network of the extender again, you need to manually enter its SSID and
WiFi password on your wireless devices.
Scenario 1: Connect mobile devices to a hidden WiFi network (Example: Android OS)
Step 1 Tap Settings > WLAN on the smart phone.
Step 2 Scroll down to the bottom, locate the Add network and tap it.
16
Page 23

Step 3 On the Add network page:
1. Enter the SSID of extender, which is Tenda_01_EXT in this example.
2. Select the security mode of the WiFi network, which is WPA/WPA2 PSK in this example.
3. Enter the WiFi password of extender, and tap .
4. Repeat the above steps to connect other wireless devices to the WiFi network of the
extender.
---- End
Wait a moment. Your wireless devices are connected to the WiFi network of the extender
successfully.
17
Page 24

Scenario 2: Connect a laptop or a desktop computer installed with a wireless adapter to a
hidden WiFi network (Example: Windows 7 OS)
Step 1 Click the WiFi icon on the lower right corner.
Step 2 Scroll down to the bottom of the SSID list, and click Other Network.
There are two Other Networks. The one indicated with is an open network.
Step 3 Enter the SSID of extender, which is Tenda_01_EXT in this example, and click OK.
18
Page 25

Step 4 Enter the WiFi password of extender, which is 12345678 in this example, and click OK.
---- End
Wait a moment. The computer is connected to the extender successfully.
19
Page 26

3.5 Manage online devices
In this section, you can view how many clients connected to the extender and their IP addresses,
as well as block/unblock devices.
3.5.1 Check online devices
Step 1 Connect your smart phone to the WiFi network of the extender.
Step 2 Open a web browser on your smart phone, and access re.tenda.cn. The homepage of the
extender pops up.
Step 3 Locate Online Devices. The digit on the right indicates the number of online devices.
20
Page 27

Step 4 Tap Online Devices filed to enter the detailed page.
---- End
From the list, you can view the client name and its IP address.
21
Page 28

3.5.2 Block online devices
Tap Online Devices on the homepage of the Web UI of the extender to enter the detailed page.
Locate the device you want to block, and click Block.
The button used for blocking device(s) may be indicated by text Block. It depends on your actual
software version.
The blocked device is removed to the Blocklist section.
22
Page 29

3.5.3 Unblock devices
Tap Online Devices on the homepage of the Web UI of the extender to enter the detailed page.
Locate the device you want to unblock, and click Unblock.
Unblocked devices can connect to the extender again.
23
Page 30

3.6 Extend another WiFi network
If you want to use the extender to extend another WiFi network, or the SSID and/or WiFi password
of your existing router is modified, you need to extend the WiFi network of the router again.
Step 1 Connect your smart phone to the WiFi network of the extender.
Step 2 Open a web browser on your smart phone, and access re.tenda.cn. The homepage of the
extender pops up.
Step 3 On The homepage of the extender, tap Choose other network.
24
Page 31

Step 4 Choose the WiFi network you want to extend, which is Tenda_02 in this example.
Step 5 Enter the WiFi Password of the WiFi network you selected, modify the SSID of extender as
needed, which is Tenda_02_extender in this example, and tap Done.
25
Page 32

Step 6 Wait until the Singal LED indicator lights solid blue or red. Then, relocate the extender by
following the on-screen tips for optimal connection quality.
For better performance:
−
Place the extender within the range of your existing WiFi network.
−
Place it at a spacious position without obstacles.
−
Keep it away from electronics with strong interference, such as microwave ovens, Bluetooth devices,
and refrigerators.
−
Adjust the antennas upward and vertical to the ground.
---- End
After the extending succeeds, you need to reconnect your wireless devices to the wireless
network of the extender for internet access.
26
Page 33

3.7 Change the operating mode
This extender can operate in the following two modes:
Repeater Mode: This mode is used to extend WiFi coverage of your existing WiFi network.
By default, the repeater works in this mode.
AP Mode: This mode is used to convert a wired network to a WiFi network.
3.7.1 Switch the extender from the repeater mode to the AP
mode
Step 1 On the homepage of the extender, tap the navigation menu on the upper right
corner.
Step 2 Tap Switch to AP Mode.
27
Page 34

Step 3 Tap OK to continue. Wait until the extender completes rebooting.
Step 4 Modify the SSID and WiFi Password as needed and click Done.
28
Page 35

Step 5 Reconnect to the SSID of the extender, and visit re.tenda.cn. The following figure pops up.
Step 6 Use an Ethernet cable to connect the LAN port of your repeater to a LAN port of your
existing router. The following page pops up.
---End
Now, the extender works in AP mode. You can access the internet on your wireless devices by
connecting the SSID of the extender.
29
Page 36

3.7.2 Switch the extender from the AP mode to the repeater
mode
Configurations (except SSID and WiFi password you set) will be cleared after you switch
the extender from AP mode to Repeater mode.
Configuration procedure:
Step 1 On the homepage of the extender, tap the navigation menu on the upper right
corner.
Step 2 Tap Switch to Repeater Mode.
Step 3 Click OK on the page.
Step 4 Wait until the progress bar is complete. Then reconfigure it to extend your existing WiFi
network.
---End
After you set the extender to the repeater mode, remove the Ethernet cable between the
extender and your existing router.
30
Page 37

3.8 Set up a login password
Step 1 On the homepage of the extender, tap the navigation menu on the upper right
corner.
Step 2 Tap Set Login Password.
Step 3 Enter a login password in the New Password field and enter it again the Confirm field, and
tap Save to apply your settings.
---- End
31
Page 38

After the configurations are saved, you will be redirected to the login page. Enter the Login
Password you set for login.
32
Page 39

3.9 Reboot the extender
If a setting fails to take effect or the router fails to work properly, you can try rebooting the router.
Step 1 On the homepage of the extender, tap the navigation menu on the upper right
corner.
Step 2 Tap Reboot.
Step 3 Tap Reboot to continue.
---- End
Wait until the extender completes rebooting.
33
Page 40

3.10 Reset the extender
If you are uncertain about why the internet is inaccessible through the extender or you forget the login password of the extender, you can reset the router.
Resetting the extender clears all current configurations. You need to configure the extender again.
3.10.1 Reset the extender through thr Web UI
Step 1 On the homepage of the extender, tap the navigation menu on the upper right
corner.
Step 2 Tap Reset.
Step 3 Tap OK to continue.
---- End
Wait until the extender complete resetting. Then reconfigure it.
34
Page 41

3.10.2 Reset the extender with the RESET button
With the PWR LED indicator of the extender solid on, hold the RESET button down with a pin.
Then release it when all the LED indicators blink once then turn off. When the PWR LED indicator
turns to solid on again, the extend is restored to factory settings successfully.
35
Page 42

4 Use a laptop or computer to
manage the extender
The following introduces how to manage the extender with a laptop or a desktop computer
installed with a wireless adapter. This guide uses “computer” to indicate both laptop and desktop
computer installed with a wireless adapter.
4.1 Log in to the extender
Ensure that your computer is set to Obtain an IP address automatically.
Step 1 Connect your computer to the WiFi network of the extender.
Step 2 Start a web browser on your computer, enter re.tenda.cn in the address bar, and press
Enter (for Windows) or Return (for Mac OS) on the keyboard.
---- End
36
Page 43

If you do not set a Login Password, you will be directed to the homepage of the extender. See the
following figure:
If you have set up a Login Password, enter the Login Password you set, and click Login. Then you
will be directed to the homepage of the extender.
37
Page 44

4.2 Check the internet status
Status
Description
Extended successfully.
Fail to extend.
Signal strength
LED indicator color
Description
0%
Off
Extend failure.
1% to 37%
Red
Extended, but the extender is a little far away from your router.
You can try relocating it closer to the router to get better connection
quality.
38% to 100%
Blue
Extended, and the connection quality is good.
You can move the extender a little far away from your existing router
to get wider WiFi coverage.
On the homepage of the Web UI of the extender, you can view the internet status of the extender.
See the following figure.
Extended status
Signal strength
38
Page 45

4.3 Manage online devices
Click this icon to personalize the device name.
4.3.1 Check online devices
Step 1 To enter the page, choose System Status.
Step 2 Click X Online Device(s). X indicates the number of current online devices.
Step 3 The Online Device (X) window appears. X indicates the number of current online devices.
---- End
From the Online Device list, you can check and/or edit the devices names, and view their MAC
addresses.
39
Page 46

4.3.2 Block online devices
Step 1 In this section, you are allowed to view on-line device(s) and block unknown device(s). To
enter the configuration page, choose System Status.
Step 2 Click X Online Device(s). X indicates the number of current online devices.
Step 3 On the Online Device window that pops up, locate the device you want to block, and click
Block.
---- End
40
Page 47

Blocked devices cannot connect to the extender. To view the blocked device, click Blocklist on the
System Status page. Then the Blocklist window pops up.
4.3.3 Unblock devices
Step 1 To enter the configuration page, choose System Status.
Step 2 Click Blocklist.
Step 3 In the Blocklist window that pops up, locate the device you want to unblock, and click
Unblock on the right.
---- End
Unblocked devices can connect to your extender again.
41
Page 48

4.4 Extend another WiFi network
If you want to use the extender at another place, or if the wireless information (including SSID
and/or WiFi password) of your existing router is modified, you need to re-configure your extender.
Step 1 To enter the configuration page, choose Re-extend.
Step 2 Select the WiFi network you want to re-extend, which is Tenda_Test in this example.
42
Page 49

Step 3 Enter the WiFi password of the WiFi network you selected, modify the SSID of extender
as needed, which is Tenda_Test_extender in this example, and click Next.
Step 4 Wait until the Extended successfully page pops up. The LED indicator on the extender may
light solid blue or red.
Step 5 Relocate the extender guided by the LED indicator colors.
− Solid blue: Proper position and good connection quality.
− Solid red: Move the extender closer to the WiFi router.
43
Page 50

For better performance:
−
Place the extender within the range of your existing WiFi network.
−
Place it at a spacious position without obstacles.
−
Keep it away from electronics with strong interference, such as microwave ovens, Bluetooth devices,
and refrigerators.
−
Adjust the antennas upward and vertical to the ground.
---- End
After the extending succeeds, you need to reconnect your wireless devices to the wireless
network of the extender.
44
Page 51

4.5 Modify the SSID and password of the extender
Step 1 To enter the configuration page, choose WiFi Settings.
Step 2 On the WiFi Settings page, modify the SSID and WiFi Password as required. And click
Save at the bottom to apply your settings.
−
Hide indicates hiding the SSID of extender. See Hide the WiFi network of the extender for details.
−
No Password indicates the extender offers an open WiFi network.
---- End
After the configurations are saved, you need to reconnect your WiFi-enabled devices to the
extender using the SSID and WiFi password you set here.
45
Page 52

4.6 Hide the WiFi network of the extender
The extender supports to hide its WiFi network so that wireless devices cannot scan it, thus
improving the security or the WiFi network of the extender.
Step 1 To enter the configuration page, choose WiFi Settings.
Step 2 On the WiFi Settings page, tick Hide.
Step 3 Click Save at the bottom to apply your settings.
---- End
After the configurations are saved, the extender disconnects all clients connected to it.
To connect to the WiFi network of the extender again, you need to manually enter its SSID and
WiFi password on your wireless devices. See Scenario 1: Connect mobile devices to a hidden WiFi
network (Example: Android OS) (with a mobile WiFi-enabled devices) and Scenario 2: Connect a
laptop or a desktop computer installed with a wireless adapter to a hidden WiFi
network (Example: Windows 7 OS) (with a laptop or a desktop computer installed with a wireless
adapter) to connect your wireless devices to the hidden wireless network the extender.
46
Page 53

4.7 Change the operating mode
This extender can operate in the following two modes:
Repeater Mode: to extend WiFi coverage of your existing WiFi network. By default, the
extender works in this mode.
AP Mode: to convert a wired network to a WiFi network.
To change the operating mode of the extender, choose Operating Mode to access the
configuration page.
47
Page 54

4.7.1 Switch the extender from the repeater mode to the AP
Mode
Step 1 Choose Operating Mode to enter the configuration page.
Step 2 Click AP Mode.
Step 3 Click Switch Mode.
Step 4 Click OK on the pop-up window.
Step 5 Wait a moment until the progress bar is complete, and you will be redirected to the Login
page.
48
Page 55

Step 6 Connect to the internet.
1. Connect your management computer to a SSID of the extender, start a web browser, and
visit re.tenda.cn. It shows the page to set up the SSID and WiFi password of the extender.
2. Modify the SSID and WiFi Password as needed and click Done.
3. Reconnect the WiFi network you set and login to the web UI again. The following figure
appears.
49
Page 56

4. Use an Ethernet cable to connect the LAN port of your extender to a LAN port of your
existing WiFi router. The following page pops up.
---End
Now, the extender works in AP mode. You can access the internet on your wireless devices by
connecting the SSIDs of the extender.
50
Page 57

4.7.2 Switch the extender from the AP mode to the repeater
mode
Configurations (except SSID and WiFi password you set) will be cleared when you switch
from AP mode to Repeater mode.
Configuration procedure:
Step 1 Choose Operating Mode to enter the configuration page.
Step 2 Click Repeater Mode.
Step 3 Click Switch Mode.
Step 4 Click OK on the page.
Step 5 Wait until the progress bar is complete. Then reconfigure it to extend your existing WiFi
network.
---End
51
Page 58

After you set the extender to the repeater mode, please remove the Ethernet cable between the
extender and your existing router.
4.8 Set up a login password
Step 1 To enter the configuration page, choose Administration.
Step 2 Enter a login password in the New Password field and enter it again in the Confirm field.
Step 3 Click Save at the bottom to apply your settings.
---- End
After the configurations are saved, you will be redirected to the login page. Enter the Login
Password you set for logging in.
52
Page 59

4.9 Reboot the extender
If a setting fails to take effect or the router fails to work properly, you can try rebooting the router.
Step 1 To enter the configuration page, choose Administration.
Step 2 Click Reboot.
Step 3 Click Reboot to continue.
---- End
Wait for the extender completes rebooting.
53
Page 60

4.10 Reset the extender
If you are uncertain about why the internet is inaccessible through the extender or you forget the login password of the extender, you can reset the router.
Resetting the extender clears all configurations. You need to configure the extender again.
4.10.1 Reset the extender with Web UI
Step 1 To enter the configuration page, choose Administration.
Step 2 Click Reset.
Step 3 Click Reset to continue.
---- End
Wait for the extender complete resetting. Then configure it again.
4.10.2 Reset the extender with the RESET button
With the PWR LED indicator of the extender solid on, hold the RESET button down with a pin.
Then release it when the all LED indicators blink once then turn off. When the PWR LED indicator
turns solid on again, the extender is restored to factory settings successfully.
54
Page 61

4.11 Export logs
System logs records events happened since the extender was started last time. You can export the
system logs if necessary.
Only laptop or desktop computer installed with a wireless adapter supports to export system logs.
Step 1 To enter the configuration page, choose Administration.
Step 2 Click Export Logs.
---- End
A file named RepeaterSystem.log will be downloaded to your local computer.
55
Page 62

4.12 Upgrade the extender
Only laptop or desktop computer installed with a wireless adapter can upgrade the extender.
Step 1 Go to www.tendacn.com, search for the product model, download the proper firmware
version package to your local computer, and unzip it.
Generally, the file format of an upgrade firmware is .bin.
Step 2 Log in to the Web UI of the extender, and choose Administration.
Step 3 Click Firmware Upgrade.
Step 4 Upload the firmware you have unzipped.
Step 5 Click OK to continue.
---- End
Wait until the progress bar completes.
56
Page 63

Appendixes
A.1 Set your computer to obtain an IP address
automatically
A.1.1 Windows 7
Step 1 Click in the lower-right corner of the desktop and choose Open Network and
Sharing Center.
57
Page 64

Step 2 Click Change adapter settings.
Step 3 Right-click Wireless Network Connection.
58
Page 65

Step 4 Click Property.
Step 5 Double-click Internet Protocol Version 4 (TCP/IPv4).
59
Page 66

Step 6 Select Obtain an IP address automatically and Obtain DNS server address automatically,
and click OK.
Step 7 Click OK in the Internet Protocol Version 4(TCP/IPv4) Properties window.
---- End
60
Page 67

A.1.2 Windows 10
Step 1 Click in the lower-right corner of the desktop and choose Network settings.
Step 2 Click Change adapter options.
Step 3 Right click on the connection which is being connected, and then click Properties.
61
Page 68

Step 4 Double-click Internet Protocol Version 4 (TCP/IPv4).
Step 5 Select Obtain an IP address automatically and Obtain DNS server address automatically,
and click OK.
Step 6 Click Close in the Ethernet Properties window.
----End
62
Page 69

A.2 Default Parameter Values
Parameter
Default Value
Login address
re.tenda.cn
Login password
None
IP address
192.168.0.254
*Once the extender extends to the WiFi router successfully, the
upstream WiFi router with DHCP sever enabled automatically assigns
the extender an IP address.
Subnet mask
255.255.255.0
*Once the extender extends to the WiFi router successfully, the
upstream WiFi router with DHCP sever enabled automatically assigns
the extender a subnet mask.
DHCP server status
Enabled
*It depends on the extended status. If extended successfully, the DHCP
server becomes disabled. Otherwise, it is enabled.
SSID
Tenda_EXT
WiFi Password
None
Blocklist
None
The following table lists the default parameter values of the extender.
63
 Loading...