

Page 1

Page 2

Preface
ii
Copyright Statement
is the registered trademark of Shenzhen Tenda Technology Co., Ltd. All the products
and product names mentioned herein are the trademarks or registered trademarks of their
respective holders. Copyright of the whole product as integration, including its accessories and
software, belongs to Shenzhen Tenda Technology Co., Ltd. No part of this publication can be
reproduced, transmitted, transcribed, stored in a retrieval system, or translated into any language
in any form or by any means without the prior written permission of Shenzhen Tenda Technology
Co., Ltd. If you would like to know more about our product information, please visit our website
at http://www.tendacn.com.
Disclaimer
Pictures, images and product specifications herein are for references only. To improve internal
design, operational function, and/or reliability, Tenda reserves the right to make changes to the
products without obligation to notify any person or organization of such revisions or changes.
Tenda does not assume any liability that may occur due to the use or application of the product
described herein. Every effort has been made in the preparation of this document to ensure
accuracy of the contents, but all statements, information and recommendations in this document
do not constitute the warranty of any kind, express or implied.
Convention
This user guide applies to G103.
If not specifically indicated, this device or the ONU stands for GPON ONU G103.
Note:
This format is used to highlight information of importance or special interest. Ignoring this type of
note may result in ineffective configurations, loss of data or damage to device.
Tips:
This format is used to highlight a procedure that will save time or resources.
Page 3

Preface
iii
Setup Wizard of Common Functions
How to configure Internet Settings
How to modify your login password
How to dial up to connect to the Internet
How to configure TCP/IP settings for your PC
Technical Support
Website: http://www.tendacn.com
Telephone: (86 755) 2765 7180
Email: support@tenda.com.cn
Page 4

Preface
iv
Contents
Chapter I Product Overview ................................................................................................................. 1
1. About this Product ............................................................................................................................ 1
2. Package Contents ............................................................................................................................. 1
3. Physical Appearance ........................................................................................................................ 2
3.1 LED Indicators, Interfaces & Buttons ........................................................................................ 2
3.2 Label .......................................................................................................................................... 3
4. Main Features ................................................................................................................................... 4
Chapter II Internet Setup ...................................................................................................................... 5
Step 1: Connect Your Device ............................................................................................................... 5
Step 2: Configure Your Device ............................................................................................................. 6
Step 3: Dial up to Connect to the Internet ............................................................................................ 8
Windows 8 ....................................................................................................................................... 8
Windows 7 ..................................................................................................................................... 14
Windows XP .................................................................................................................................. 19
Chapter III Function Brief .................................................................................................................. 25
1. Internet Setup ................................................................................................................................. 25
1.1 LOID ........................................................................................................................................ 25
1.2 SN ............................................................................................................................................ 26
1.3 SLID ......................................................................................................................................... 26
2. System Status ................................................................................................................................. 27
3. Device Management ....................................................................................................................... 28
3.1 Change Login Password ........................................................................................................... 30
3.2 Login IP Config ........................................................................................................................ 30
3.3 Device Manage......................................................................................................................... 31
Chapter IV Appendix ........................................................................................................................... 33
Page 5

Preface
v
1. Configure PC .................................................................................................................................. 33
1.1 Windows 8 ................................................................................................................................ 33
1.2 Windows 7 ................................................................................................................................ 35
1.3 Windows XP ............................................................................................................................ 37
2. FAQs .............................................................................................................................................. 39
3. Specifications ................................................................................................................................. 42
4. Safety and Emission Statement ...................................................................................................... 43
Page 6

1
Chapter I Product Overview
1. About this Product
Tenda G103 brings stimulating fast speed into your e-life via FTTH deployment. Compliant with
ITU-T G.984 standard, G103 can be widely used in broadband telecommunication network all
over the world. G103 has one 10/100/1000M BASE-T RJ45 port to which you can connect a PC,
router or IPTV set-top box. With the plug-and-play feature and OMCI remote management, it
becomes easier to install and maintain G103.
2. Package Contents
Unpack the package and verify the following items are included:
ONU
Power Adapter
Ethernet Cable
Install Guide
If any item is missing, incorrect or damaged, please contact our reseller with the original package
for replacement.
Product
Overview
Page 7

2
3. Physical Appearance
Green
Blinking
Blinking
Green
Blinking
3.1 LED Indicators, Interfaces & Buttons
LED
Color Status Description
Indicators
Product
Overview
POWER Green
PON
LOS Red
LAN
Solid Proper connection to power supply
Off Improper connection to power supply
Solid GPON connection has been established.
GPON connection is being established.
Off No GPON connection is established.
The Rx optical power of the ONT is lower than the optical
receiver sensitivity or no optical signal is received.
Off The device is receiving optical power normally.
Proper connection has been established, however, without
Solid
data transmission.
Data is being transmitted on this port.
No Ethernet cable connected or Ethernet cable loosely
Off
connected.
Page 8

3
Interface / Button Description
PON SC/UPC fiber optic port for connecting to the optical network
The RJ45 port which is used for connecting to the PC, Router or
LAN
other Ethernet device
PWR Power receptacle for connecting to the included power adapter
ON/OFF ON/OFF button for powering on/off the device
Product
Overview
Pressing it for over 4 seconds restores the device to factory default
RST
settings.
Light LED indicators button for turning on/ off LED lights of this device
3.2 Label
1. This device’s default login IP address for accessing its web management page.
2. This device’s login username, neither configurable nor needs to be entered.
3. This device’s default login password. For better security, we strongly recommend you
change it on the Device Management > Change Login Password page.
Page 9

4
4. Main Features
Compliant with ITU-T G.984, G.988
Support OMCI remote management
One 10/100/1000M BASE-T RJ45 port and one GPON port (SC/UPC)
Downstream rate of up to 2.5Gbps and upstream rate of up to 1.25Gbps
DC: 9V 1A
Product
Overview
Page 10

5
Chapter II Internet Setup
Step 1: Connect Your Device
Note:
1. Do confirm your access type matches this GPON ONU before selecting it. Mainstream fiber
access technology can be divided into two incompatible types: EPON and GPON.
2. When this device is powered on, please do not look straight the PON port in the eye and the
laser beam in the optical fiber to avoid eye damage.
1. Connect the fiber to the PON port of your device;
2. Connect your PC to the LAN port of your device using an Ethernet cable;
3. Connect the included power adapter for power supply;
4. Press the ON/OFF button on the device to power it on.
Internet
Setup
Tips:
1. You can also connect a router or other Ethernet device to the LAN port of this device.
2. When this device is powered on, you can press the Light button to turn on/off all LED lights.
Page 11

6
Step 2: Configure Your Device
1. Set your PC to an IP address within the following range: 192.168.1.X (2~254), and with the
subnet mask of 255.255.255.0. For specific steps, see 1 Configure PC.
2. Launch a browser, say IE, enter 192.168.1.1 in the address bar and press Enter.
3. Type in the default password admin (case-sensitive) on the pop-up login window and click
Login.
Tips:
1. If you’re failed to log in, please check your physical connections, and verify that all cables are
Internet
Setup
connected properly and all LED indicators are in normal status.
2. If you still cannot log in, please refer to Q1 of appendix 2 FAQs.
3. The default login password is admin. For better security, we strongly recommend you change it.
4. If wrong passwords are entered three times in a row, you have to wait for one minute to try to
log in again.
Page 12
7
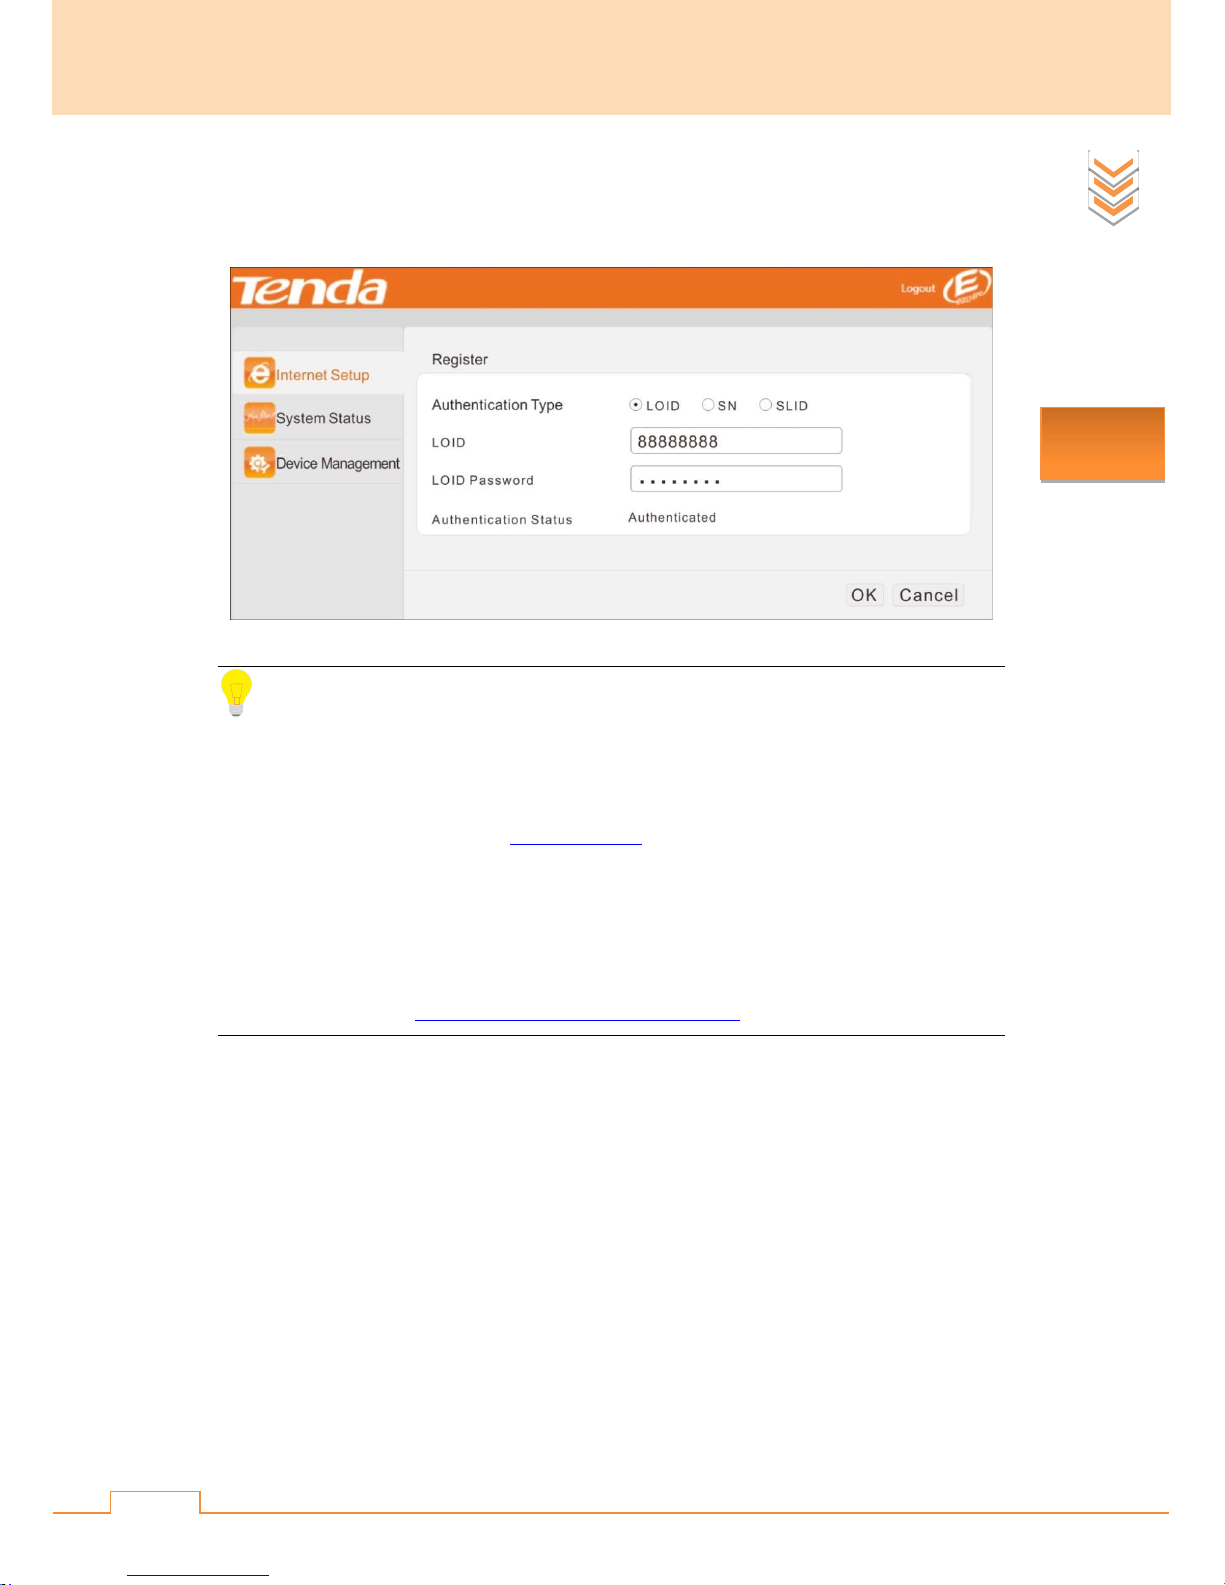
4. Select LOID, SN or SLID according to the authentication type provided by your ISP, enter
relevant information in the corresponding field and click OK. Screen below displays the
Authenticated status.
Internet
Setup
Tips:
1. Three authentication types are available here: LOID, SN and SLID. Please select the
corresponding authentication type according to Internet setup information provided by your ISP.
For specific configuration steps, see 1. Internet Setup.
2. When the authentication status displays Authenticated and the PON LED lights up, it indicates
the device has been registered successfully (You can also go to the System Status page to view the
ONU register status.). For surfing the Internet via the GPON, continue to finish your dial-up
connection settings (see Step 3: Dial up to Connect to the Internet).
Page 13
8
Step 3: Dial up to Connect to the Internet
Following demos show how to dial up to connect to the Internet in Windows 8, Windows 7 or
Windows XP. Configurations steps vary in other operation systems.
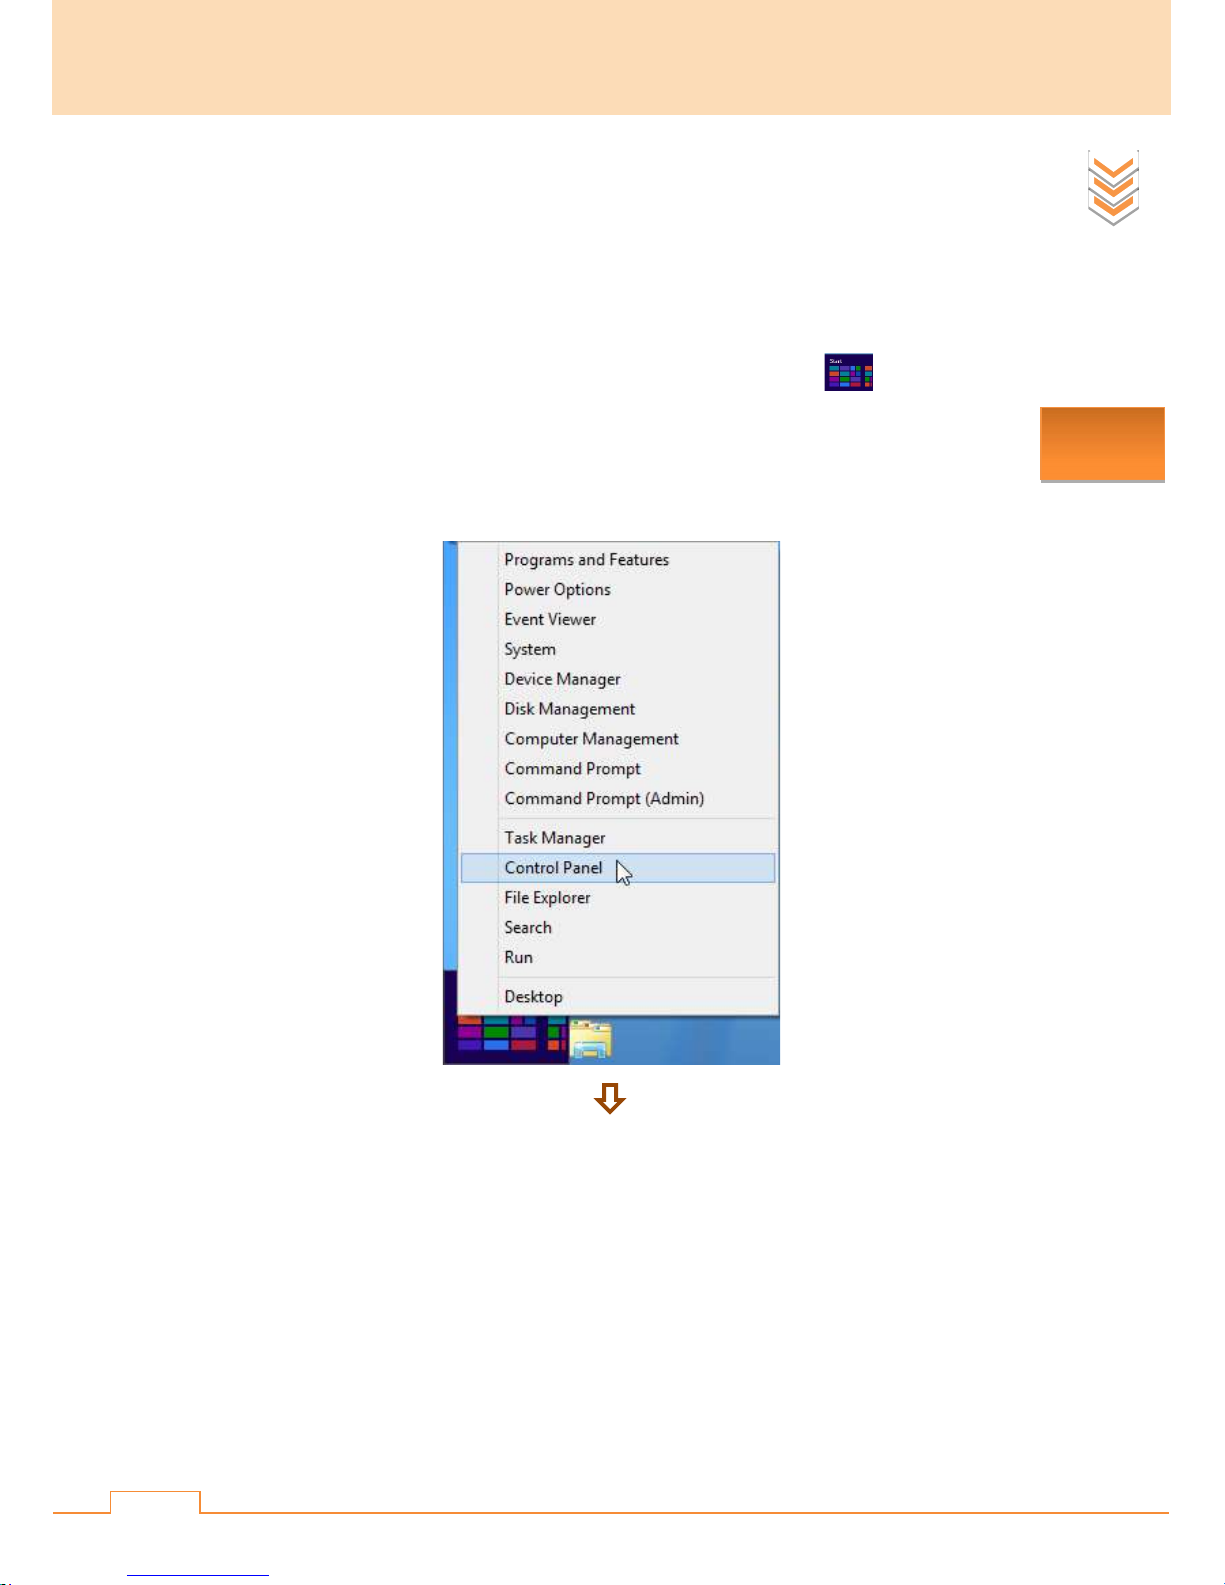
Windows 8
❶ Move your mouse cursor into the bottom left corner till the Start icon displays. Right
click the start icon and a command list appears.
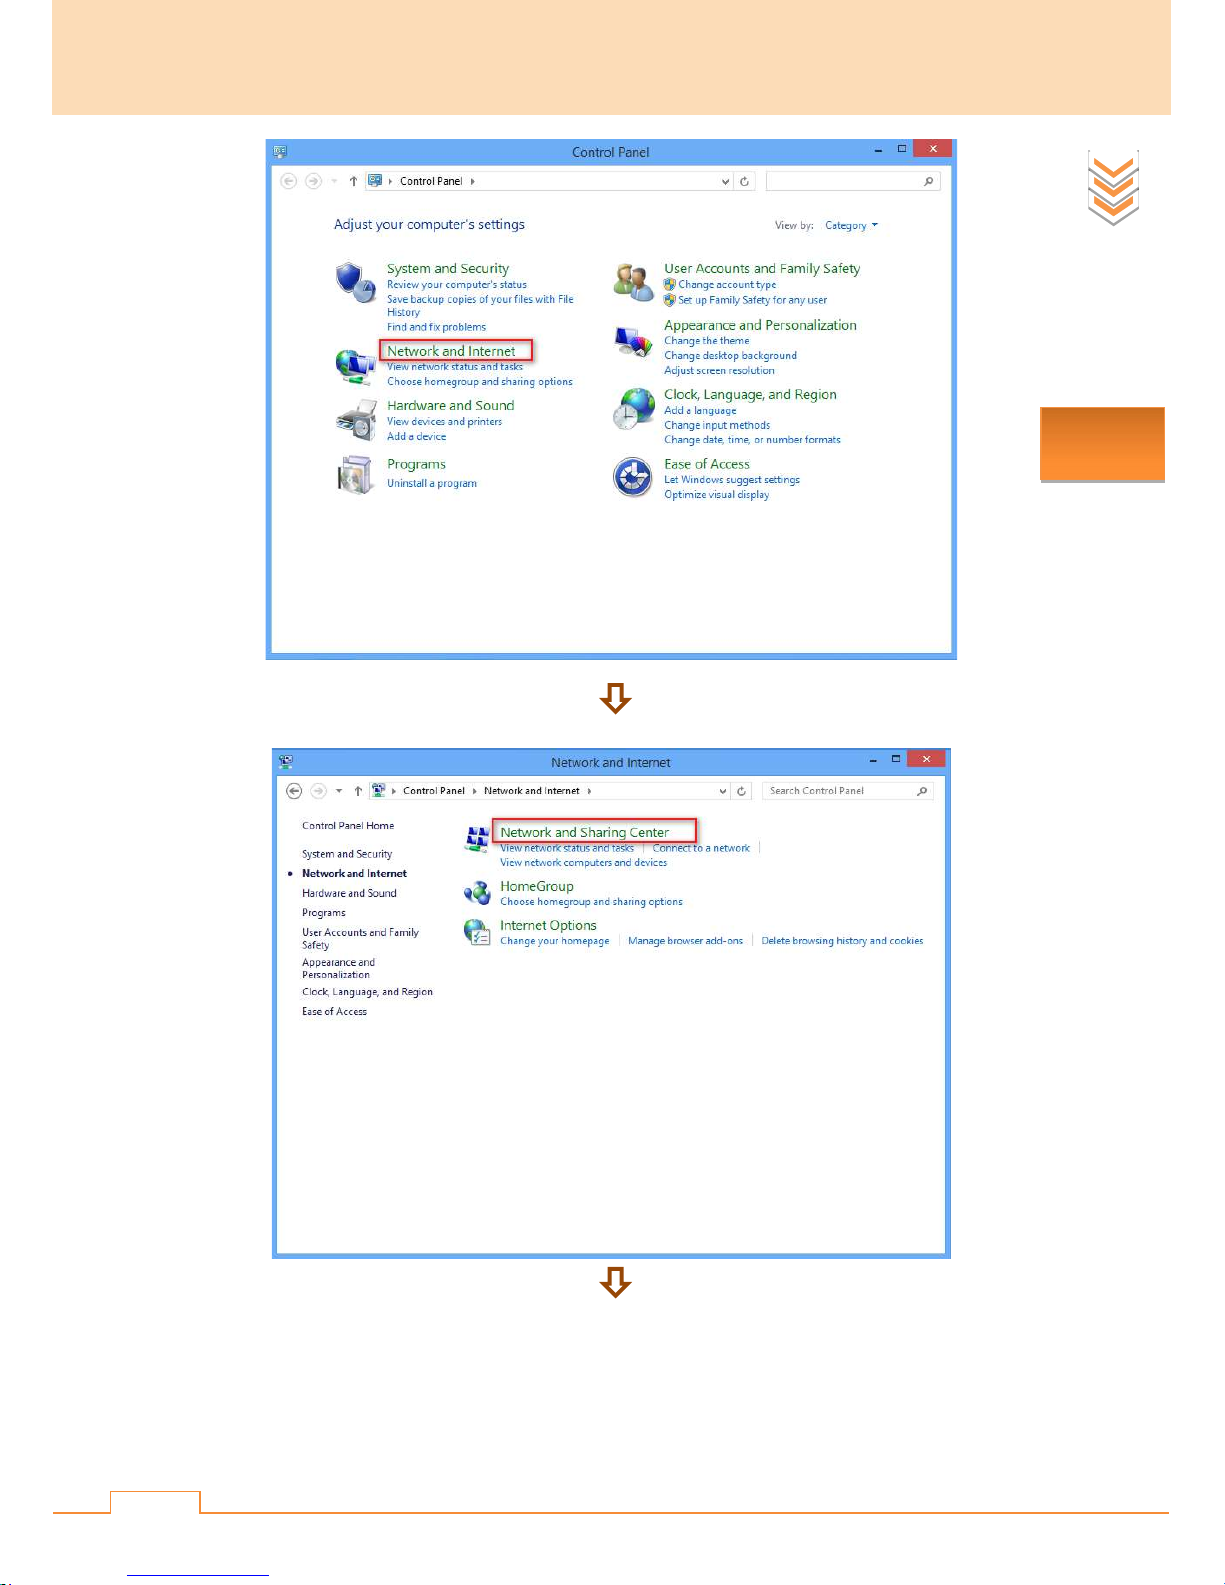
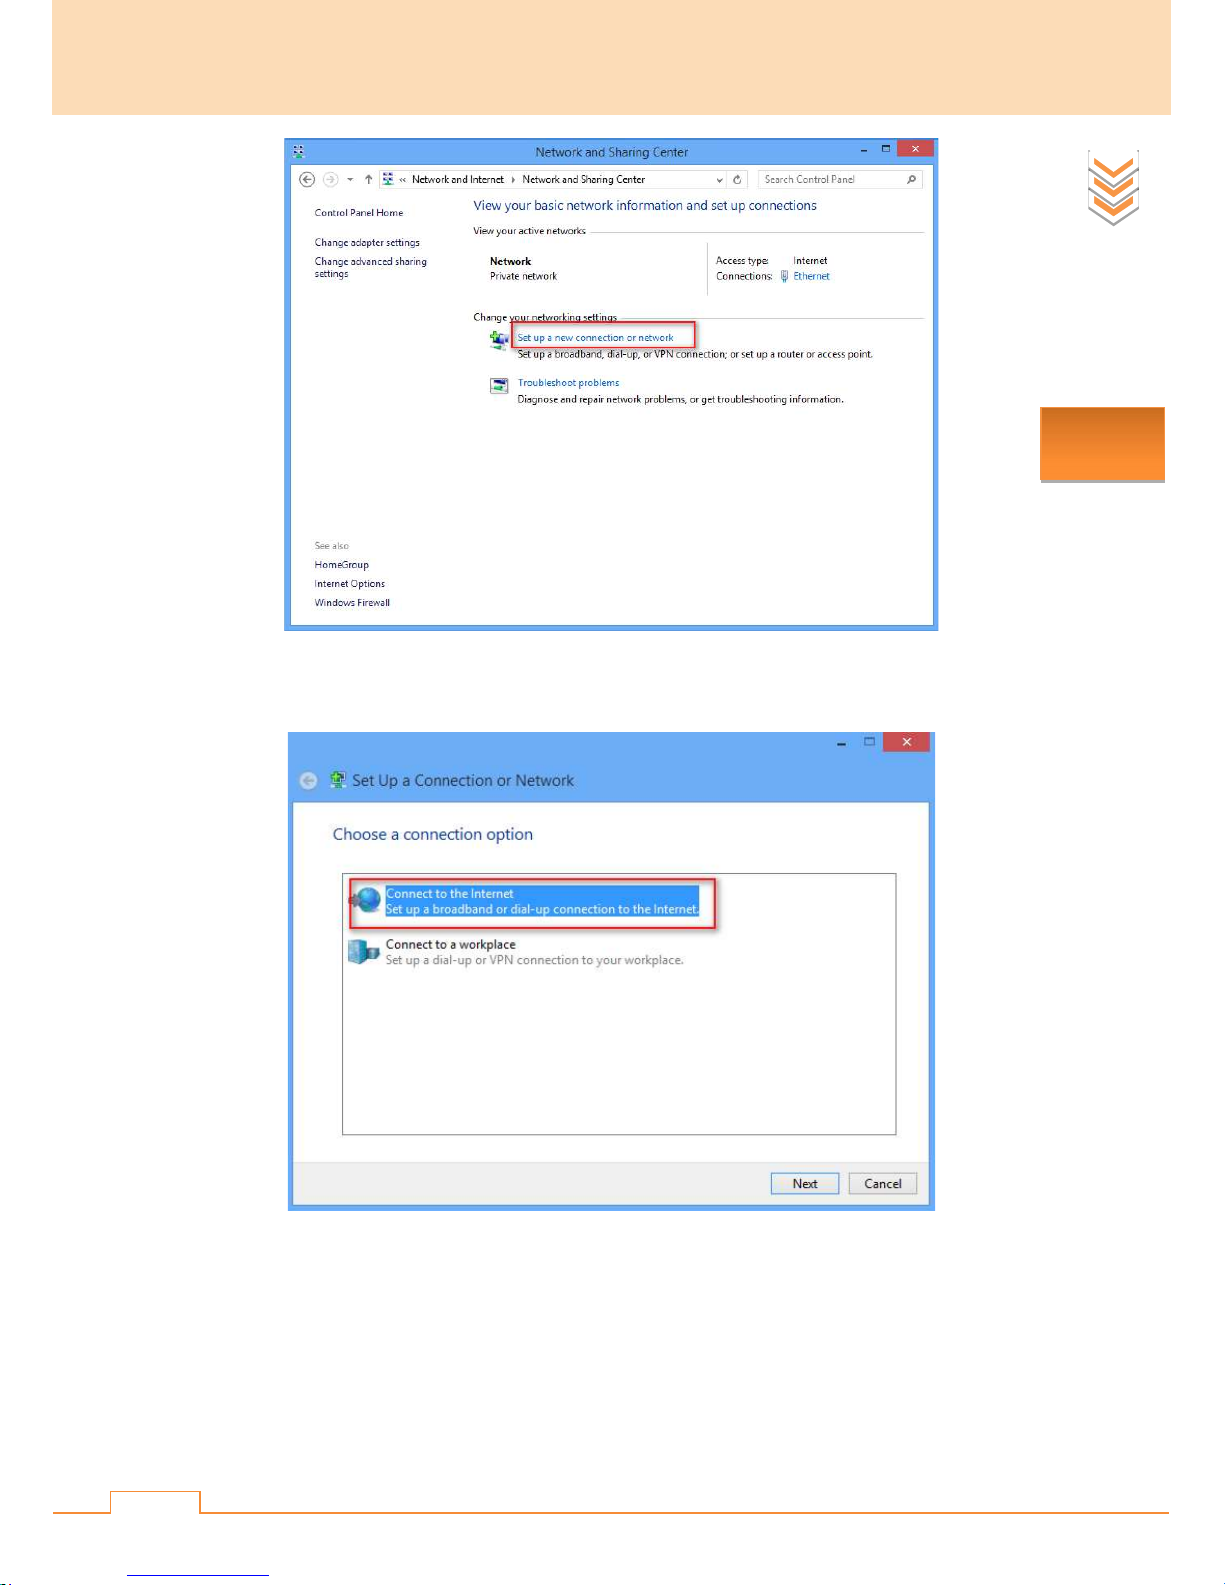
❷ Click Control Panel > Network and Internet > Network and Sharing Center > Set up a
new connection or network.
Internet
Setup
Page 14
9
Internet
Setup
Page 15
10
Internet
Setup
❸ Click Connect to the Internet > Next.
❹ Click Broadband (PPPoE).
Page 16

11
❺ Enter the user name and password your ISP has provided, check Remember this password
Internet
Setup
and click Connect.
Page 17

12
❻ Click Skip > Close.
Internet
Setup
Page 18
13
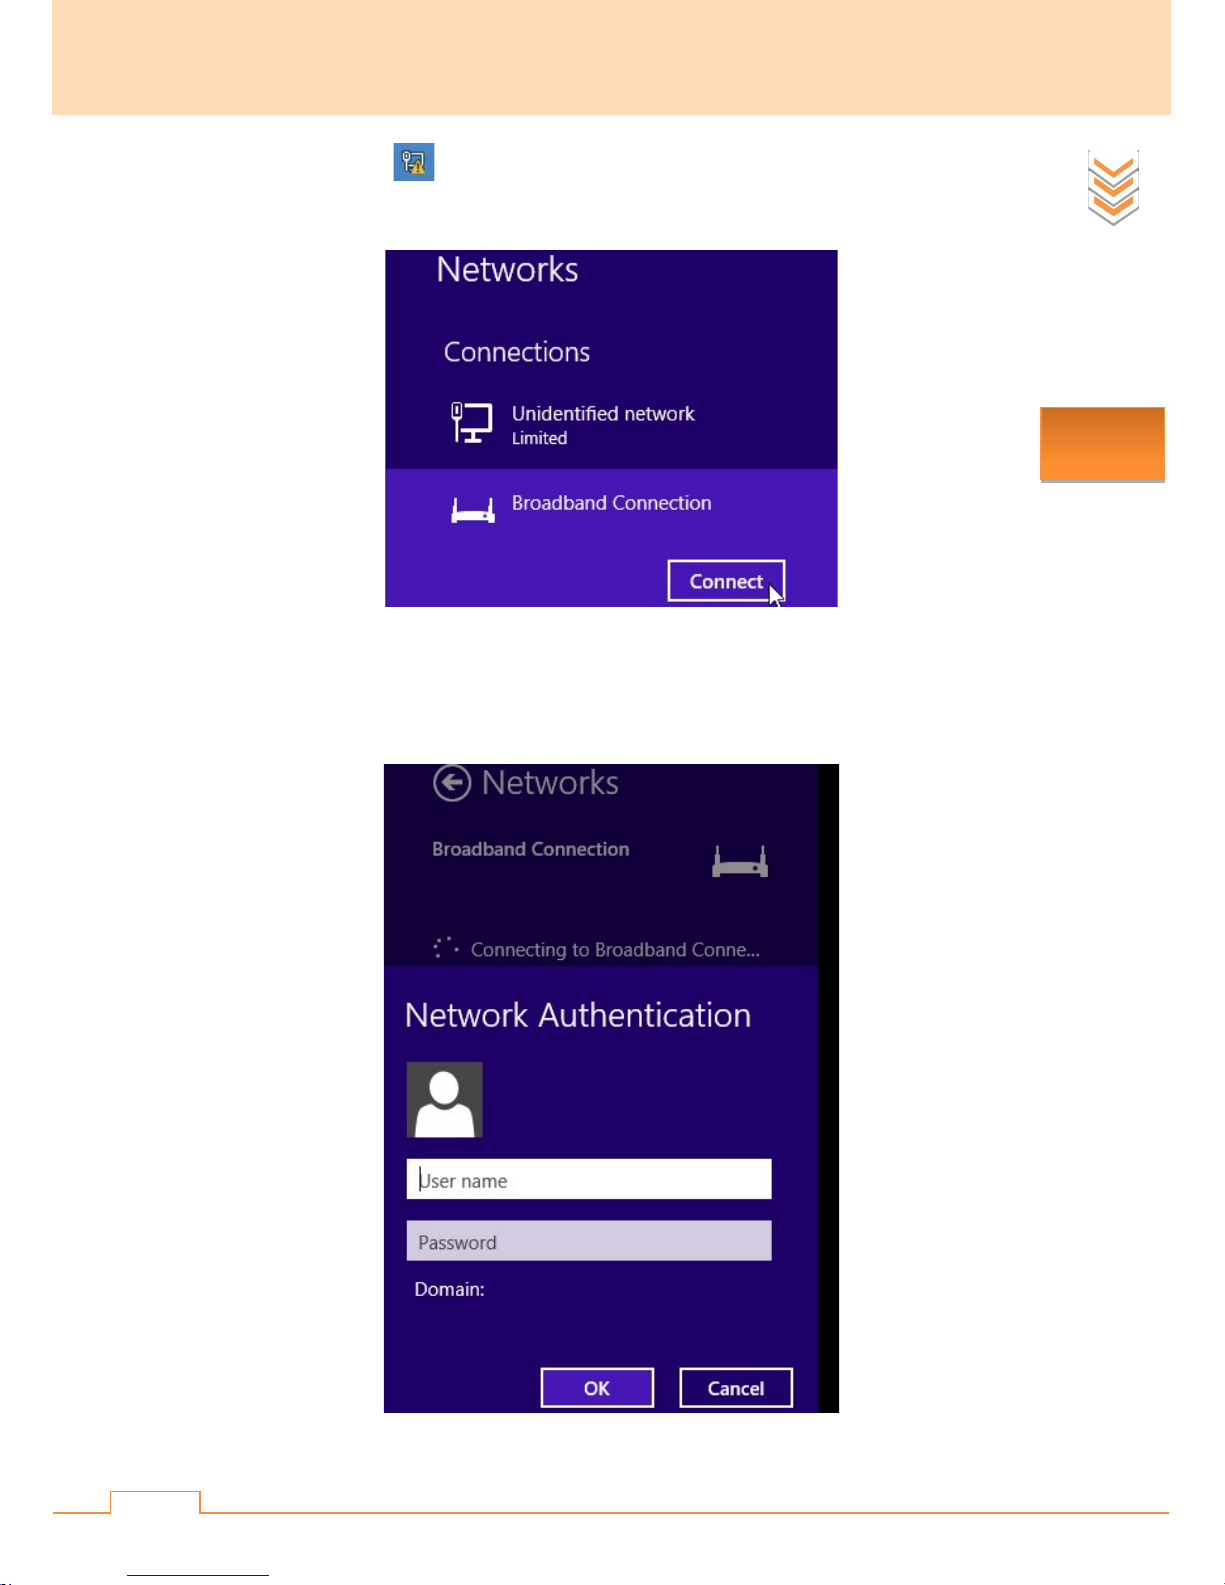
❼ Click the icon on the bottom right corner of your computer, select Broadband
Connection and click Connect.
❽ If you have entered the ISP user name or password previously, just click Connect. If you’ve
Internet
Setup
just left the ISP user name or password blank, enter the ISP username and password here and then
click OK.
Page 19
14
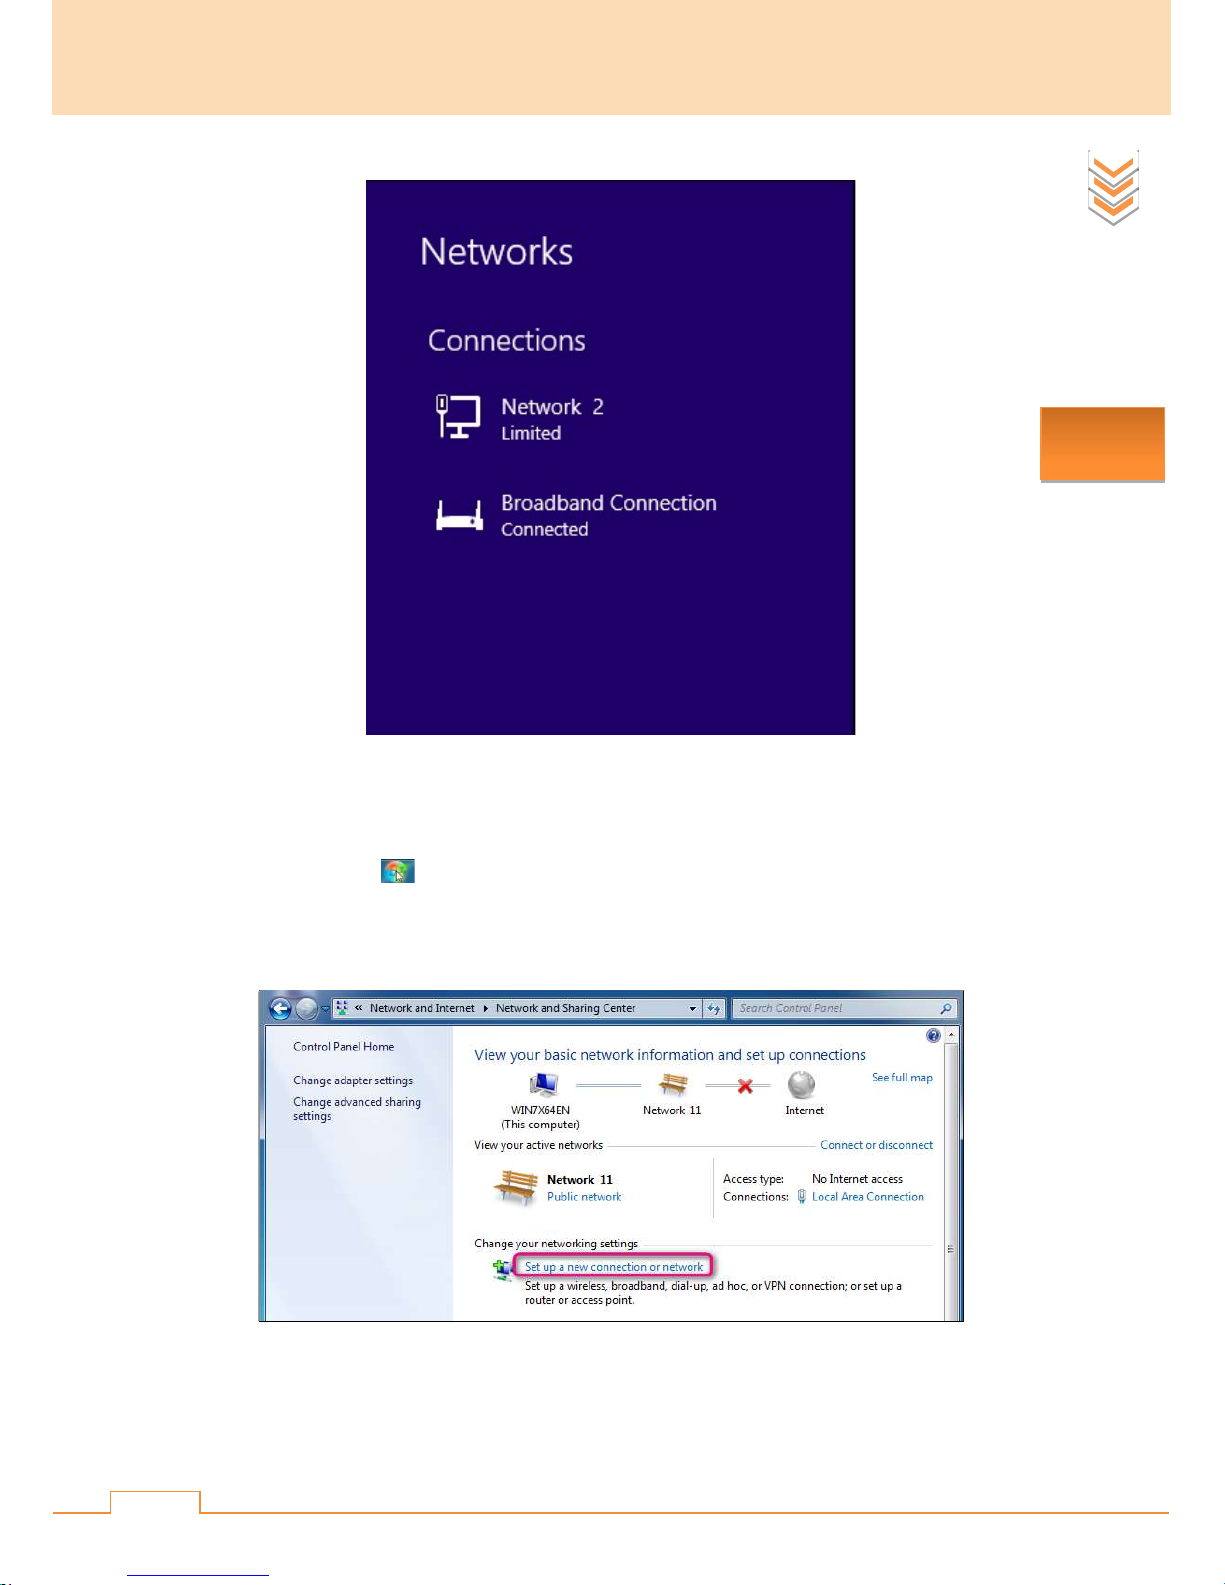
If it displays Connected as shown below, you can surf the Internet normally.
Internet
Setup
Windows 7
❶ Click the icon on the bottom left corner of your desktop.
❷ Click Control Panel > Network and Internet > Network and Sharing Center > Set up a
new connection or network.
❸ Click Connect to the Internet > Next.
Page 20

15
❹ Click Broadband (PPPoE).
Internet
Setup
❺ Enter the user name and password your ISP has provided, check Remember this password
and click Connect.
Page 21

16
Internet
Setup
Page 22
17
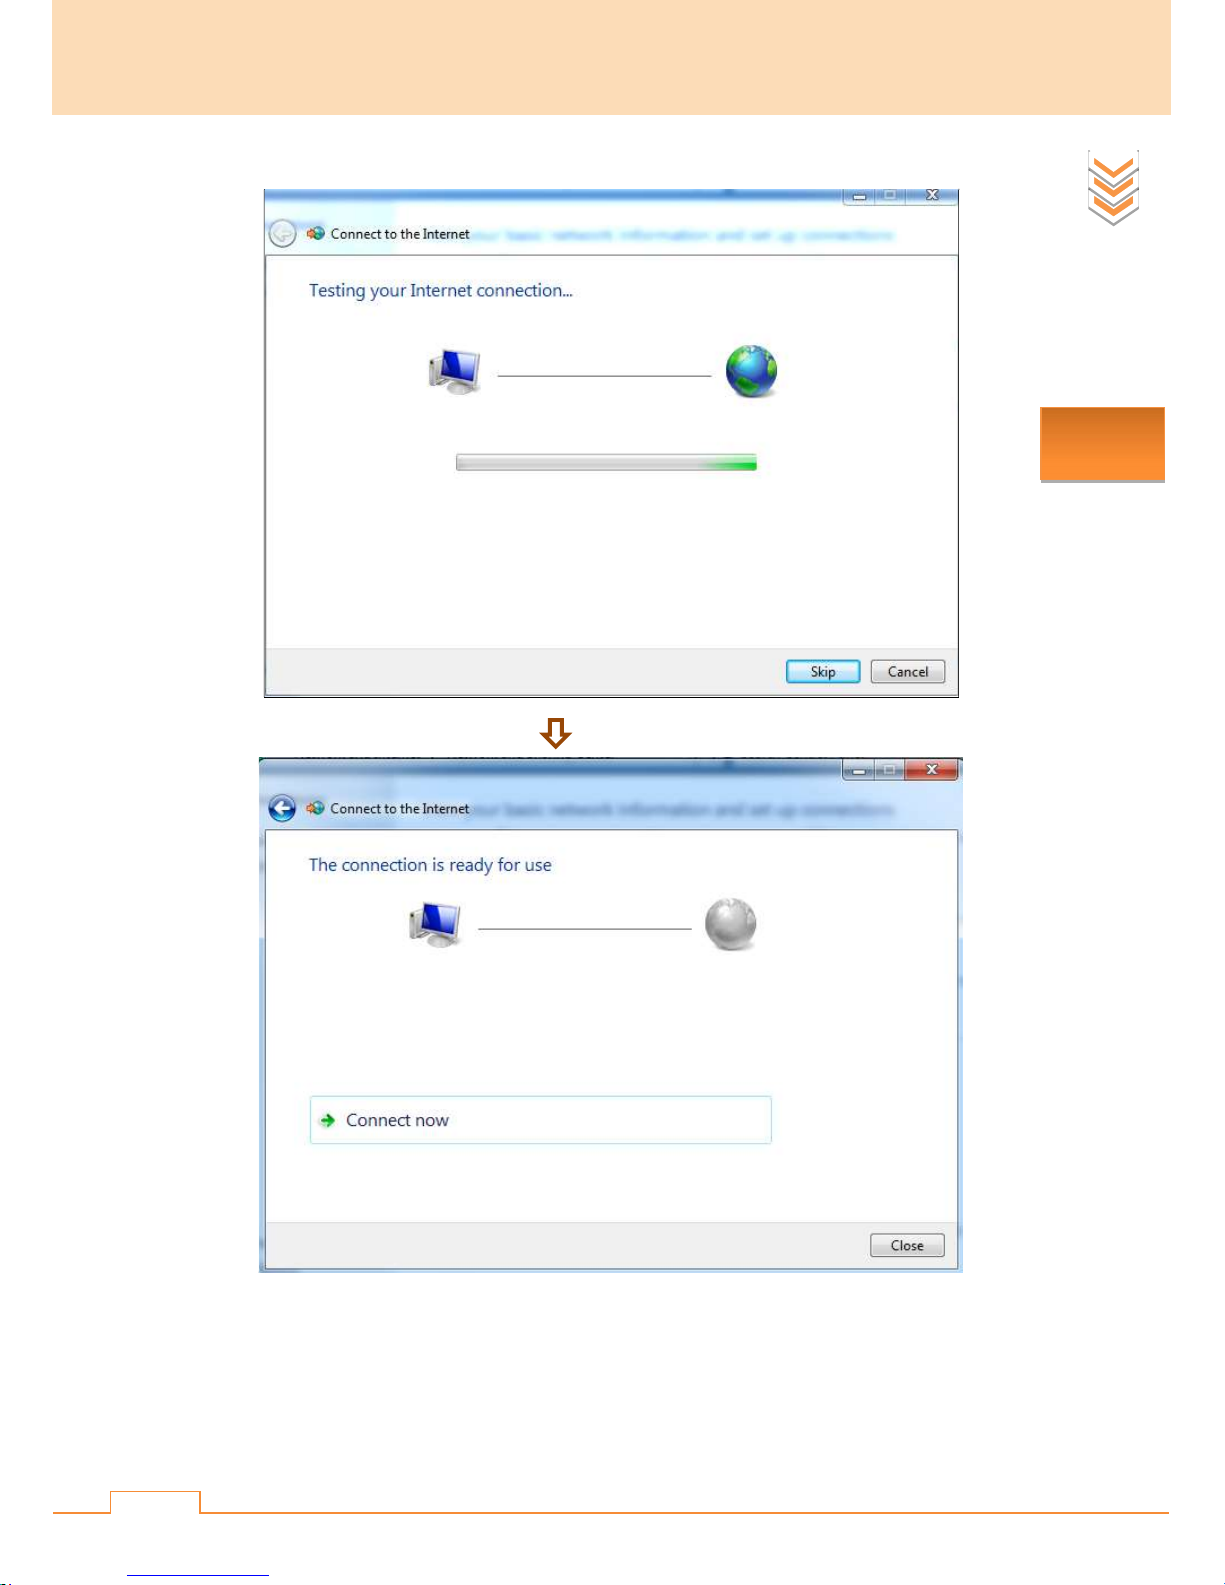
❻ Click Skip > Close.
Internet
Setup
Page 23

18
❼ Click the icon on the bottom right corner of your computer, select Broadband
Connection and click Connect.
Internet
Setup
❽ If you have entered the ISP user name or password previously, just click Connect. If you just
leave them blank, enter the ISP username and password here and then click Connect.
Page 24
19
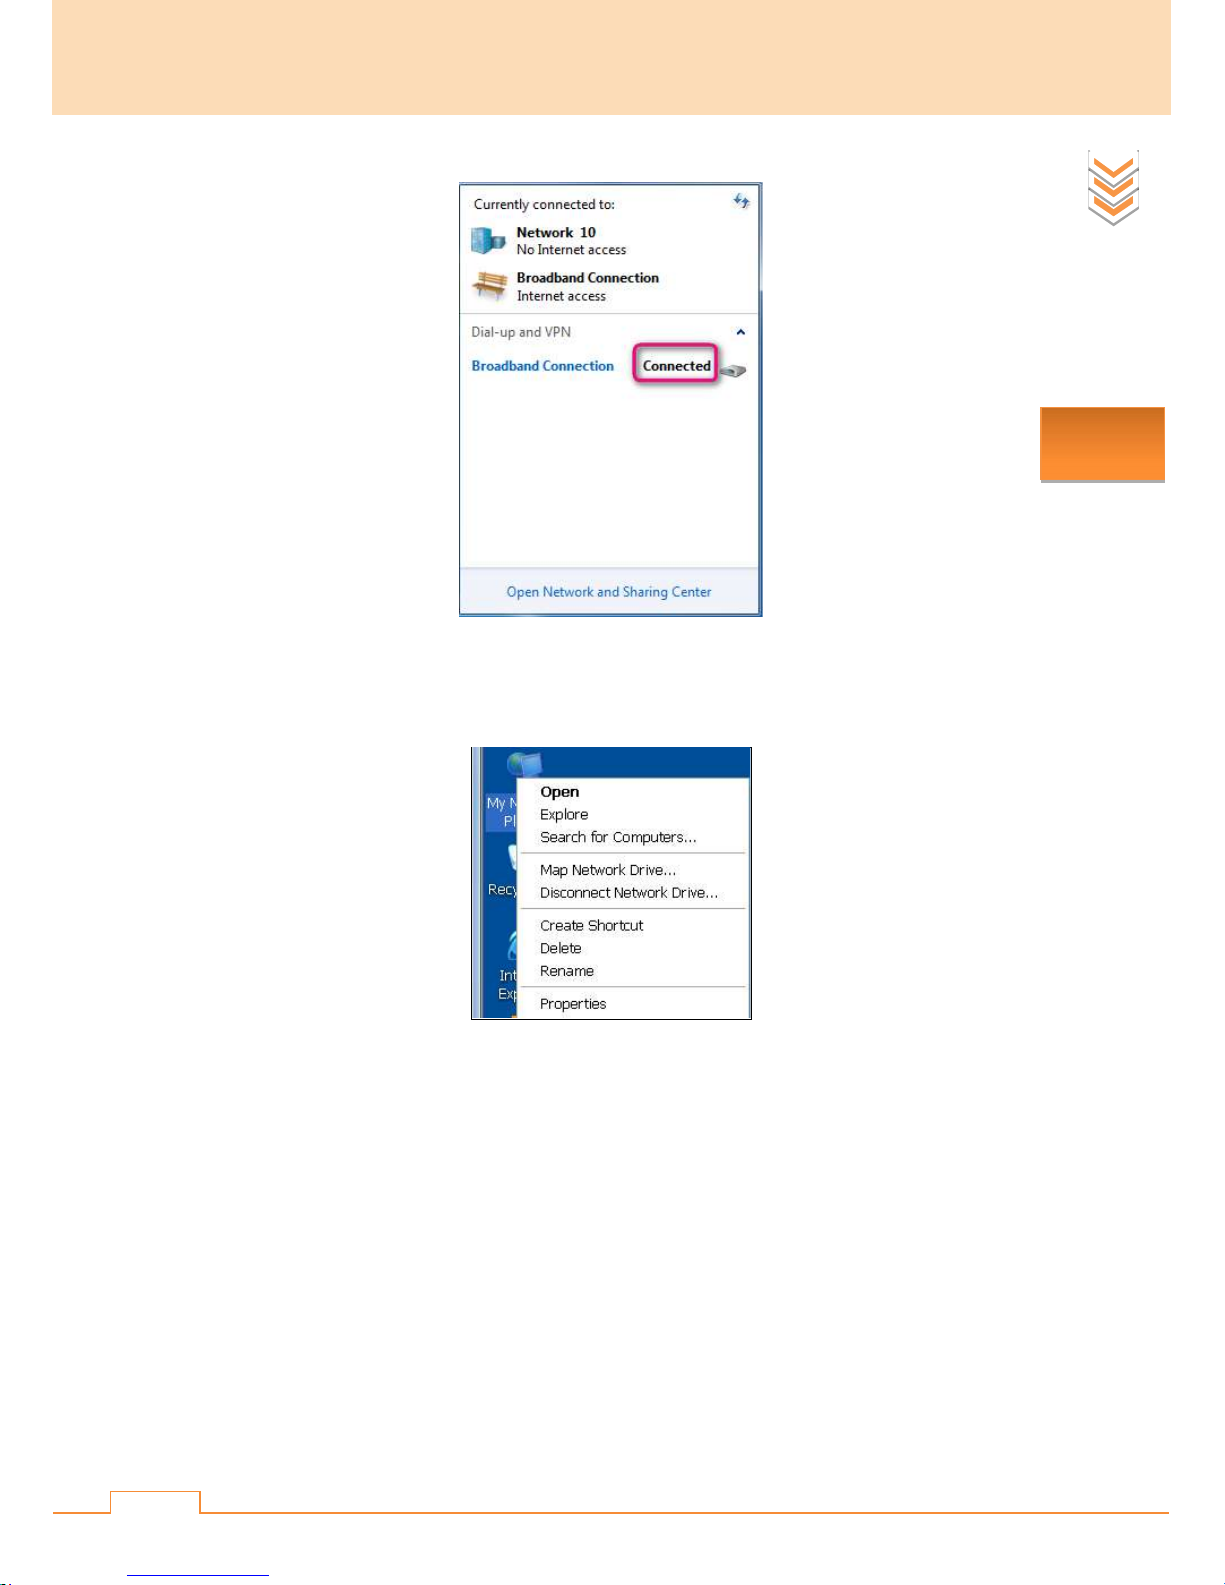
If it displays Connected as shown below, you can surf the Internet normally.
Windows XP
Internet
Setup
❶ Right click My Network Places and select Properties.
Page 25

20
❷ Click Create a new connection.
❸ Click Next.
Internet
Setup
Page 26
21
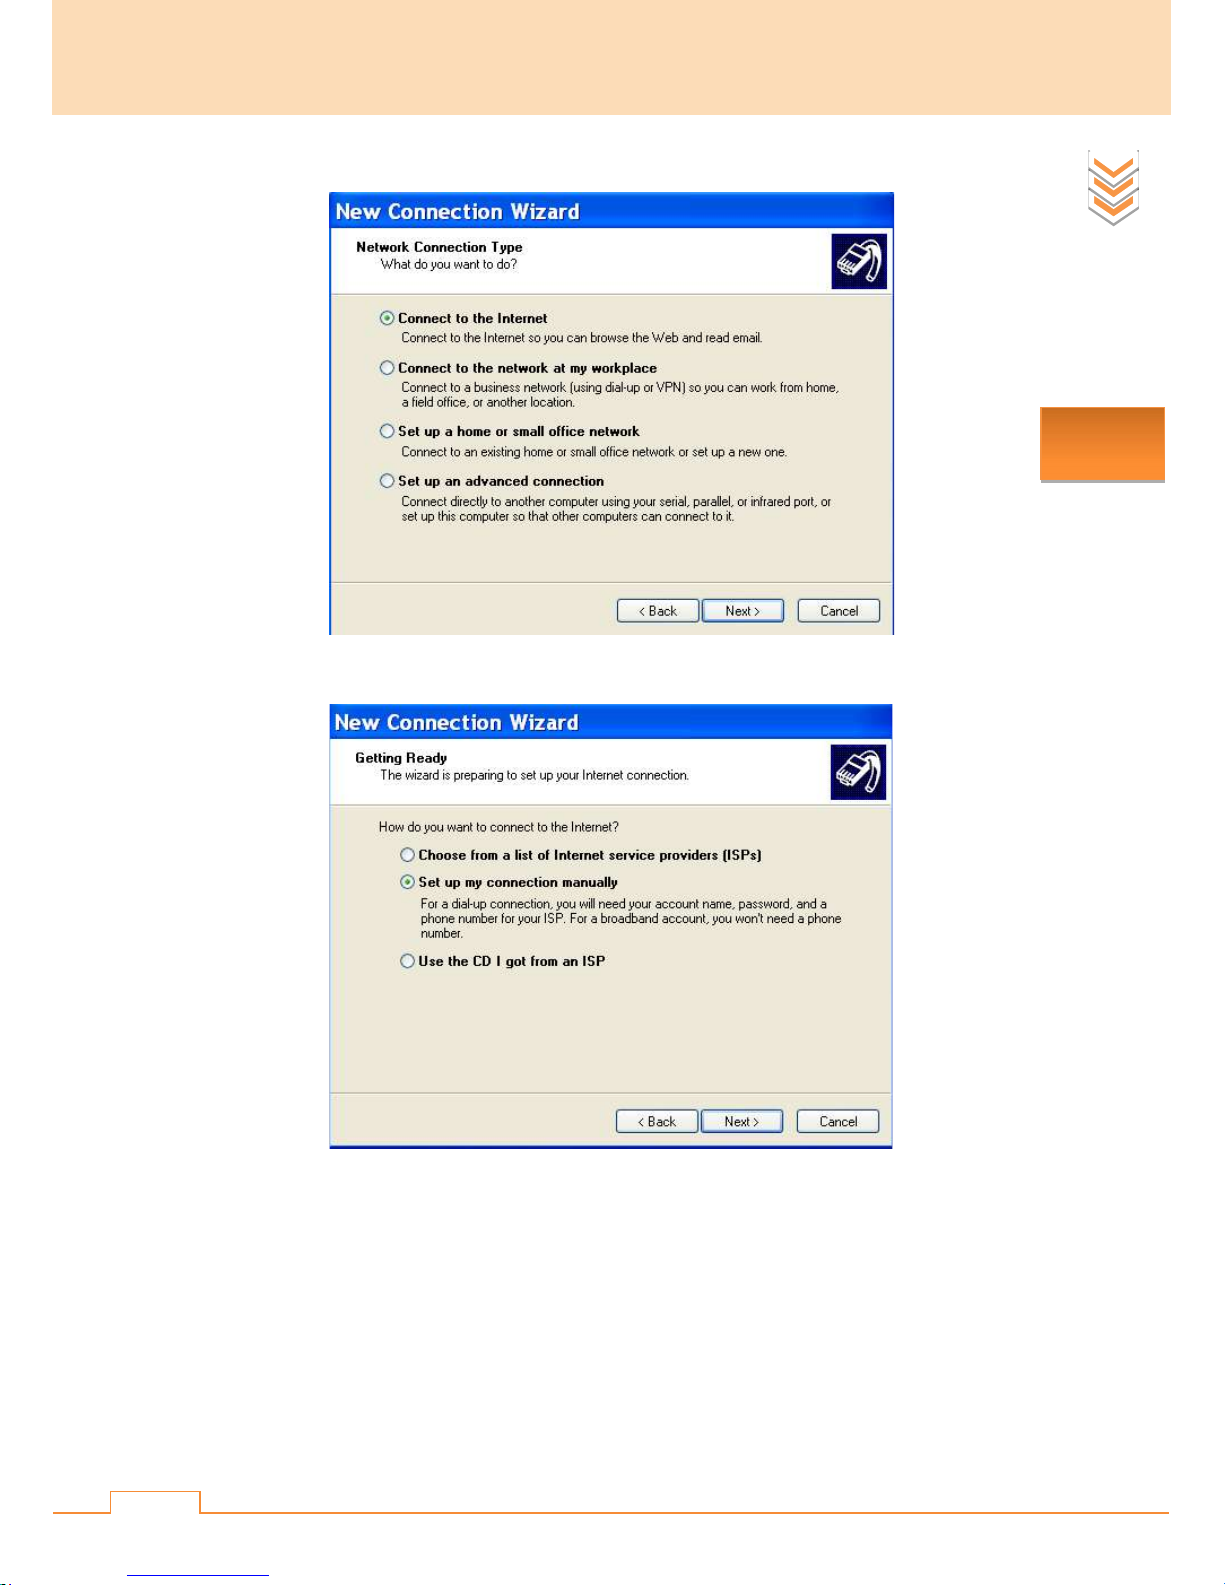
❹ Select Connect to the Internet and click Next.
Internet
Setup
❺ Select Set up my connection manually and click Next.
Page 27
22
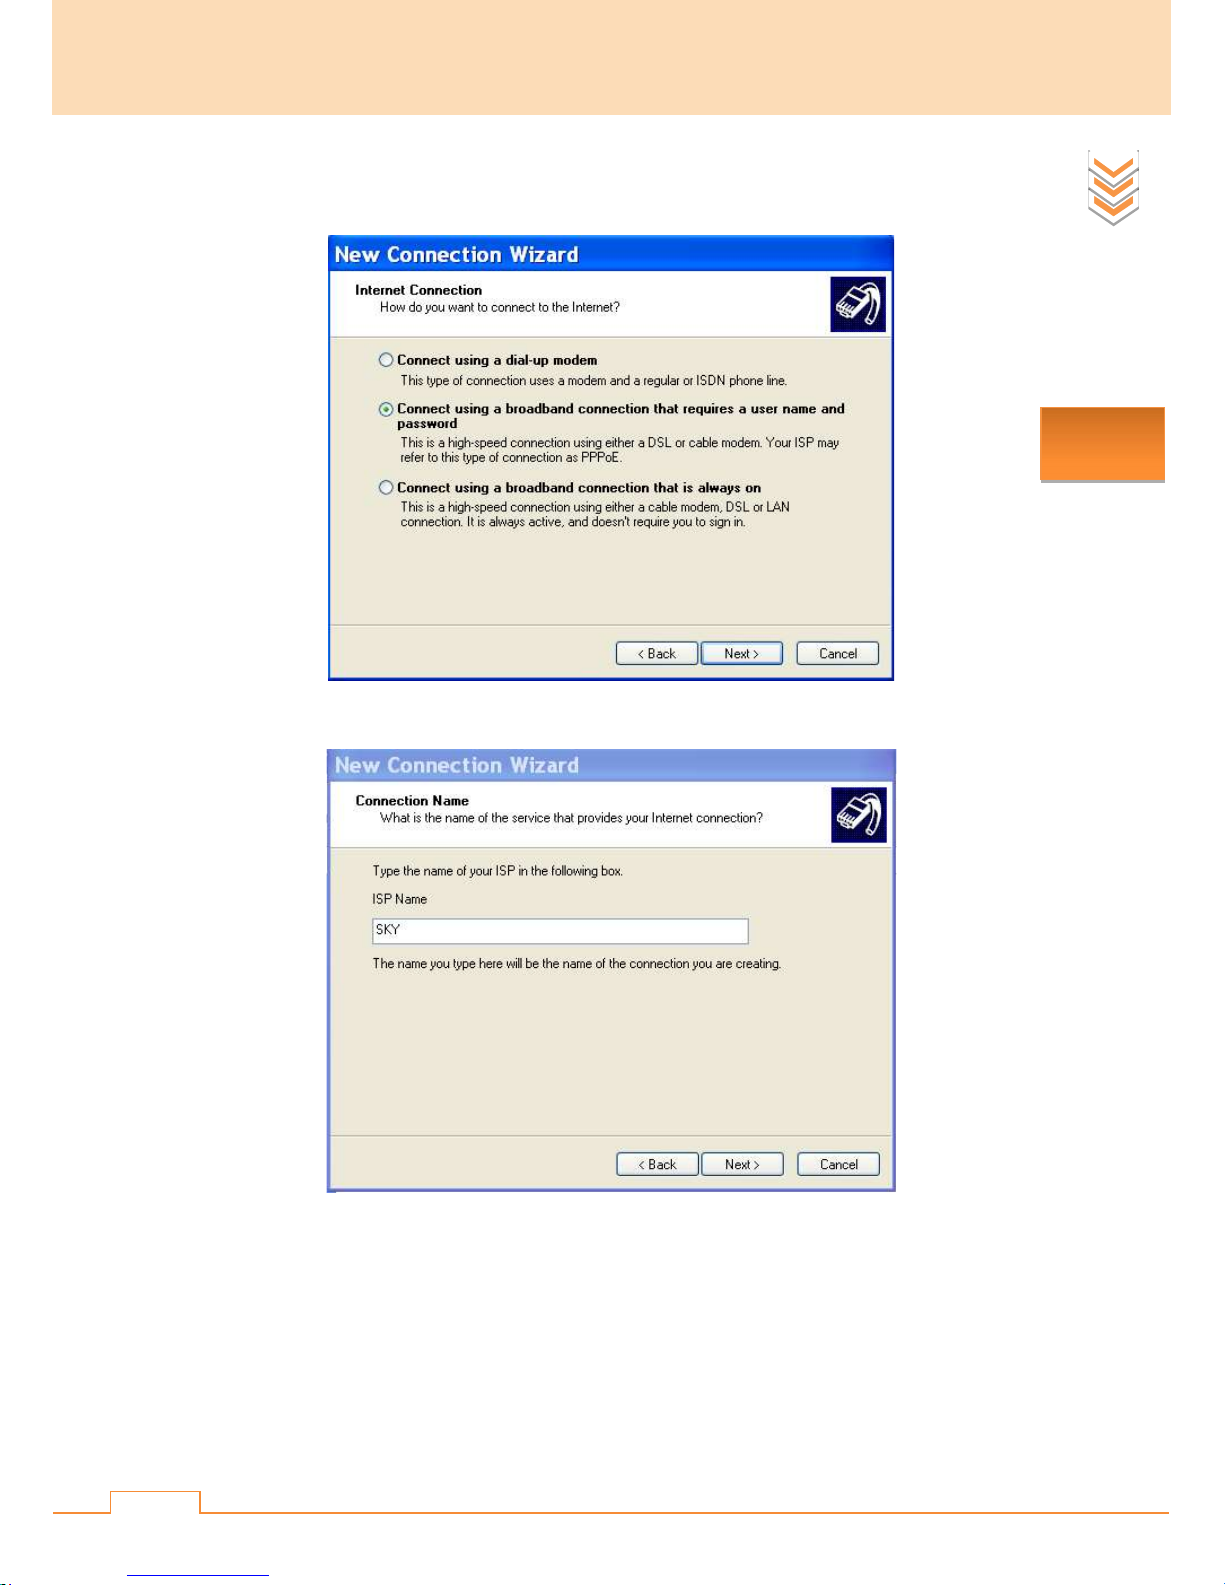
❻ Select Connect using a broadband connection that requires a user name and password
and click Next.
Internet
Setup
❼ Type in the name of your ISP, say SKY, and click Next.
Page 28

23
❽ Type in an ISP user name and password or leave them blank temporarily, and click Next.
Internet
Setup
❾ Check Add a shortcut to this connection to my desktop and click Finish.
Page 29
24
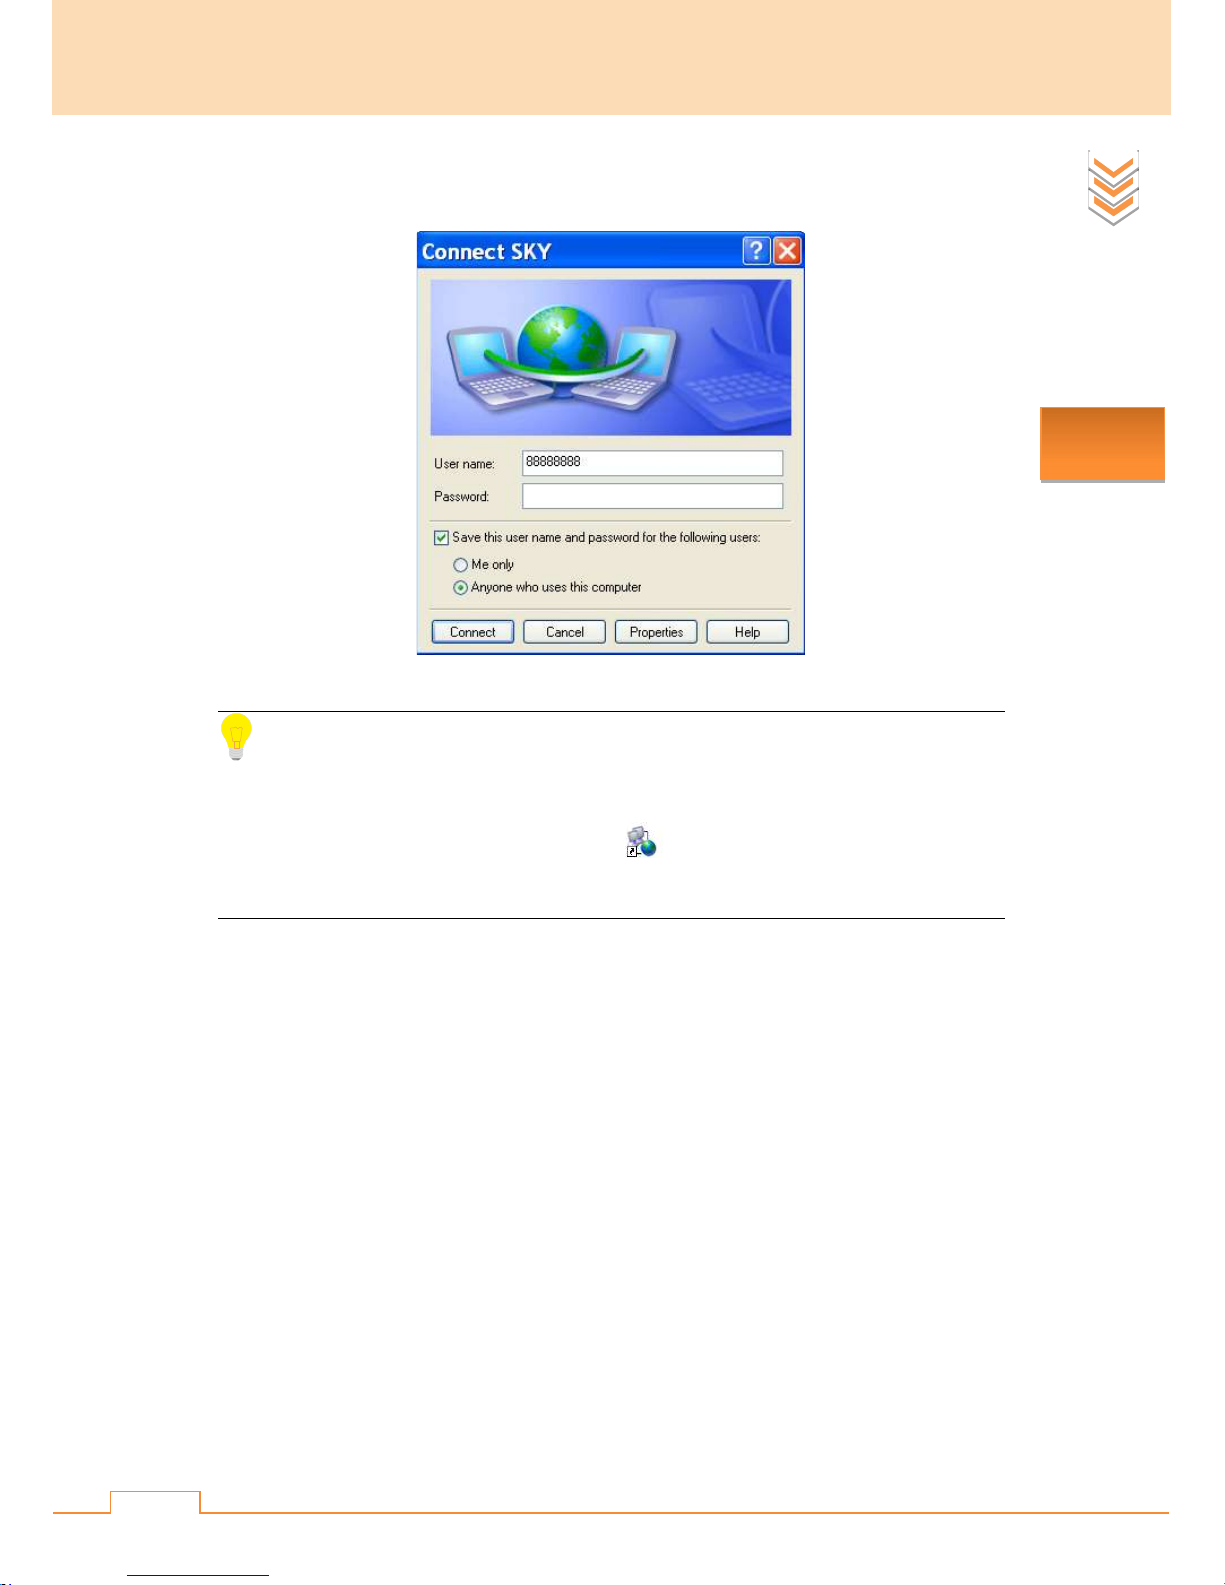
❿ If you have entered the ISP user name or password previously, just click Connect. If you just
leave them blank, enter the ISP username and password here and then click Connect.
Internet
Setup
Tips:
To connect to the Internet next time, right click My Network Places and select Properties to go
for dial-up connection or directly click the icon on your desktop to dial up to connect to
the Internet.
Page 30

25
Chapter III Function Brief
1. Internet Setup
This page allows you to register your ONU device.
Function
Brief
Parameters on this page are described below:
Parameter Description
After connecting the fiber to the ONU device, only when you have
authenticated your ONU device to the ISP OLT, can your ONU device access
Authentication
Type
Authentication
Status
the Internet. Three authentication types are available on this ONU device.
LOID: The logical ID (LOID + LOID password) provided by your
ISP for registration. In some areas, no LOID password is needed. Just
leave the LOID Password field blank.
SN: Serial number authentication.
SLID: Password authentication.
Display the ONU’s current authentication status.
Authenticated: The ONU has been authenticated successfully and
you can dial up to connect to the Internet.
Not authenticated: Authentication failure. You can check whether the
LOID information you’ve entered is correct or not.
1.1 LOID
When LOID is selected, enter LOID and LOID password (In some areas, no LOID password is
needed. In this case, just leave the LOID Password field blank.) provided by your ISP for
Page 31

26
registration, and then click OK. Screen below displays the Authenticated status.
1.2 SN
Function
Brief
SN, serial number authentication. When SN is selected, enter SN information provided by your
ISP for registration, and then click OK. Screen below displays the Authenticated status.
1.3 SLID
SLID, password authentication. When SLID is selected, enter SLID information provided by your
Page 32

27
ISP for registration, and then click OK. Screen below displays the Authenticated status.
Function
Brief
2. System Status
Click System Status to view device information.
Parts of parameters on this page are described below:
Parameter Description
Page 33

28
ONU Register
Status
ONU ID Display the ONU ID, i.e., ONU ID distributed by OLT.
Laser Pulse
Optical Power
Transmitted
Optical Power
Received
Display this device’s current register status. When Registered is
displayed, it means you can dial up to connect to the Internet.
Display this device’s laser status.
Auto: Normal (Burst)
Always be luminous: If light is being emitted, malfunction
occurs.
Display this device’s transmitting optical power (normal range: 0.5 ~
+5dBm).
Display this device’s receiving optical power (normal range: -8 ~
-28dBm).
3. Device Management
This section is used for some system settings and system maintenance. The following parts are
Function
Brief
included:
Change Login Password: For the sake of your device, you’d better change the login
password.
Login IP Config: Used for modifying this device’s login IP address.
Device Manage: Used for restarting, resetting, upgrading your device and exporting system
logs, etc.
Click Device Management to enter screen below:
Page 34

29
Function
Brief
Page 35
30
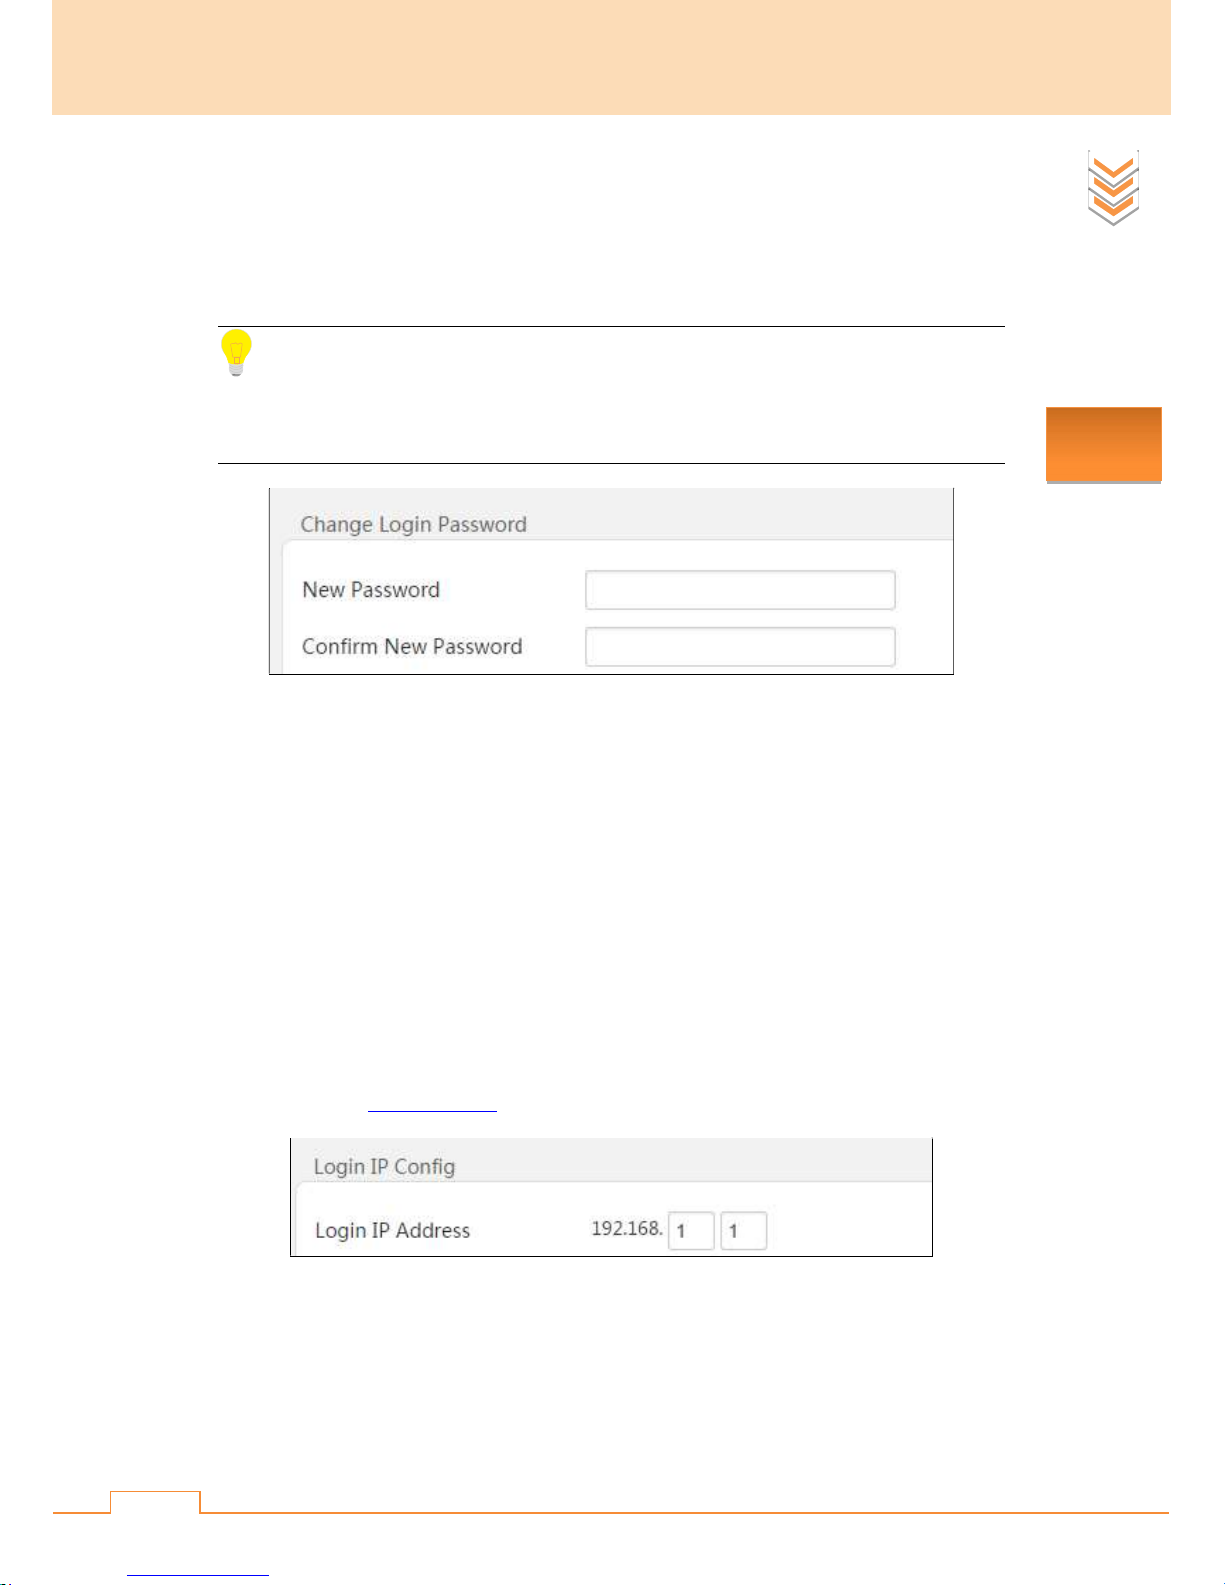
3.1 Change Login Password
To prevent others from accessing your device’s web management page to modify settings without
your permission, we strongly recommend you change your login password.
Click Device Management to enter screen below:
Tips:
1. The default login password is admin (case-sensitive).
2. For the sake of your network security, it is advisable to modify the default login password.
Function
Brief
Configuration Steps:
❶ New Password: Type in the login password you wish to configure;
❷ Confirm New Password: Type in the login password you’ve configured again to confirm
your password;
❸ Click OK at the bottom of this page.
3.2 Login IP Config
Here you can modify your login IP address. Once the login IP address is changed, you also need to
set your PC’s IP to one that is different but on the same network segment with the login IP. For
detailed steps, see 1. Configure PC.
Configuration Steps:
❶ Login IP Address: Type in the IP address you wish to configure in the input field;
❷ Click OK at the bottom of this page.
Page 36

31
3.3 Device Manage
Device Reboot
When some settings are not activated or there goes something wrong with your device, you can
reboot your device.
Configuration Steps:
❶ Click Reboot;
❷ Click OK on the pop-up dialogue box.
Restore Default Factory
When you cannot access the Internet and you cannot locate where the problem is, you can restore
your device to factory default settings.
Tips:
1. Restoring your device to factory defaults will clear all your previous settings. After resetting
Function
Brief
your device, you need to re-configure your device. Do not restore your device to factory defaults
unless necessary.
2. Do verify that power is delivered normally on your device.
Configuration Steps:
❶ Click Reset;
❷ Click OK on the pop-up dialogue box.
Logs
If you want to view the operation of your system or you need to send your system logs to our
technical staff when you are running into problems, click Download and then follow onscreen
Page 37
32
instructions to export logs.
Firmware Upgrade
If your device is in normal operation, it is not advisable to upgrade your device. If you want to
acquire the latest software version or better value-added functions for your device, you can access
our official website www.tendacn.com to download the latest software for upgrading.
Note:
While upgrading, please verify that power is delivered properly on your ONU and PC, otherwise
the ONU will be damaged.
Configuration Steps:
❶ Launch a web browser and go to http://www.tendacn.com to download the latest firmware to
the corresponding directory on your PC;
❷ Click Download to locate and select the profile and then follow onscreen instructions until
the upgrade completes.
Function
Brief
Page 38
Appendix
33
Chapter IV Appendix
1. Configure PC
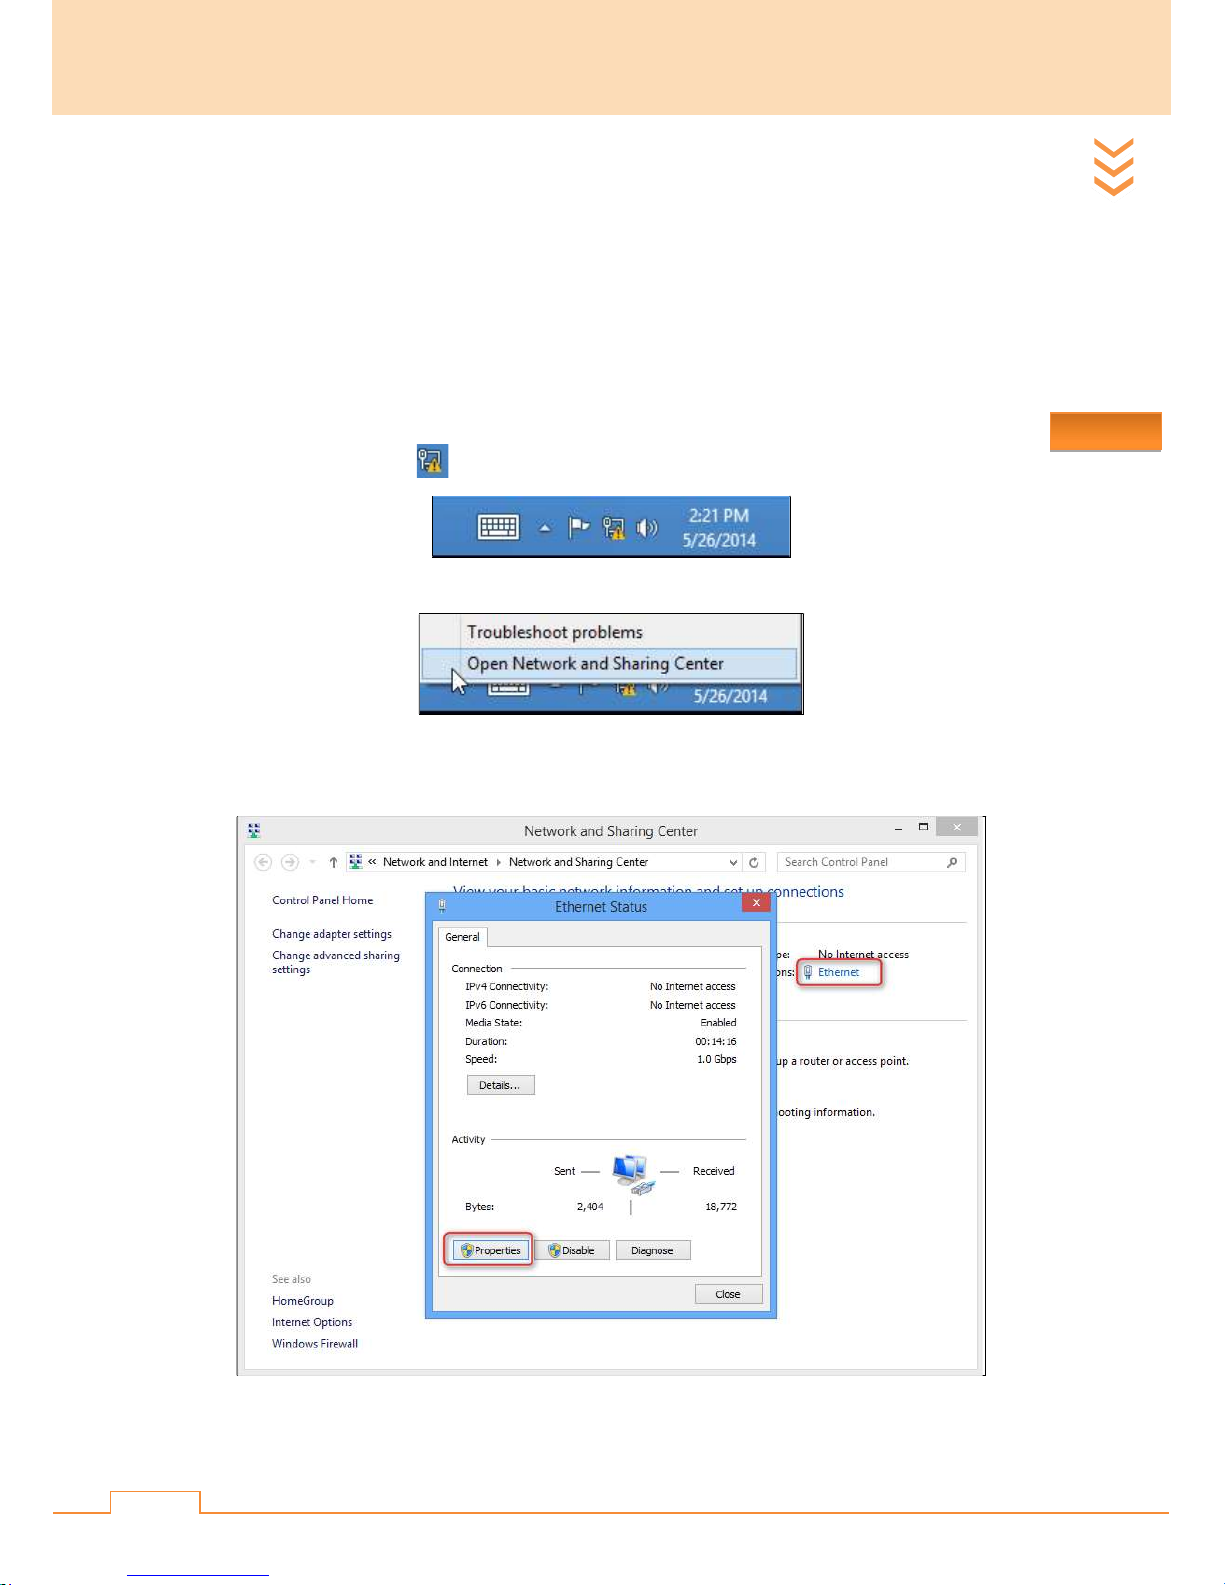
1.1 Windows 8
❶ Right click the icon on the bottom right corner of your desktop.
❷ Click Open Network and Sharing Center.
❸ Click Ethernet > Properties.
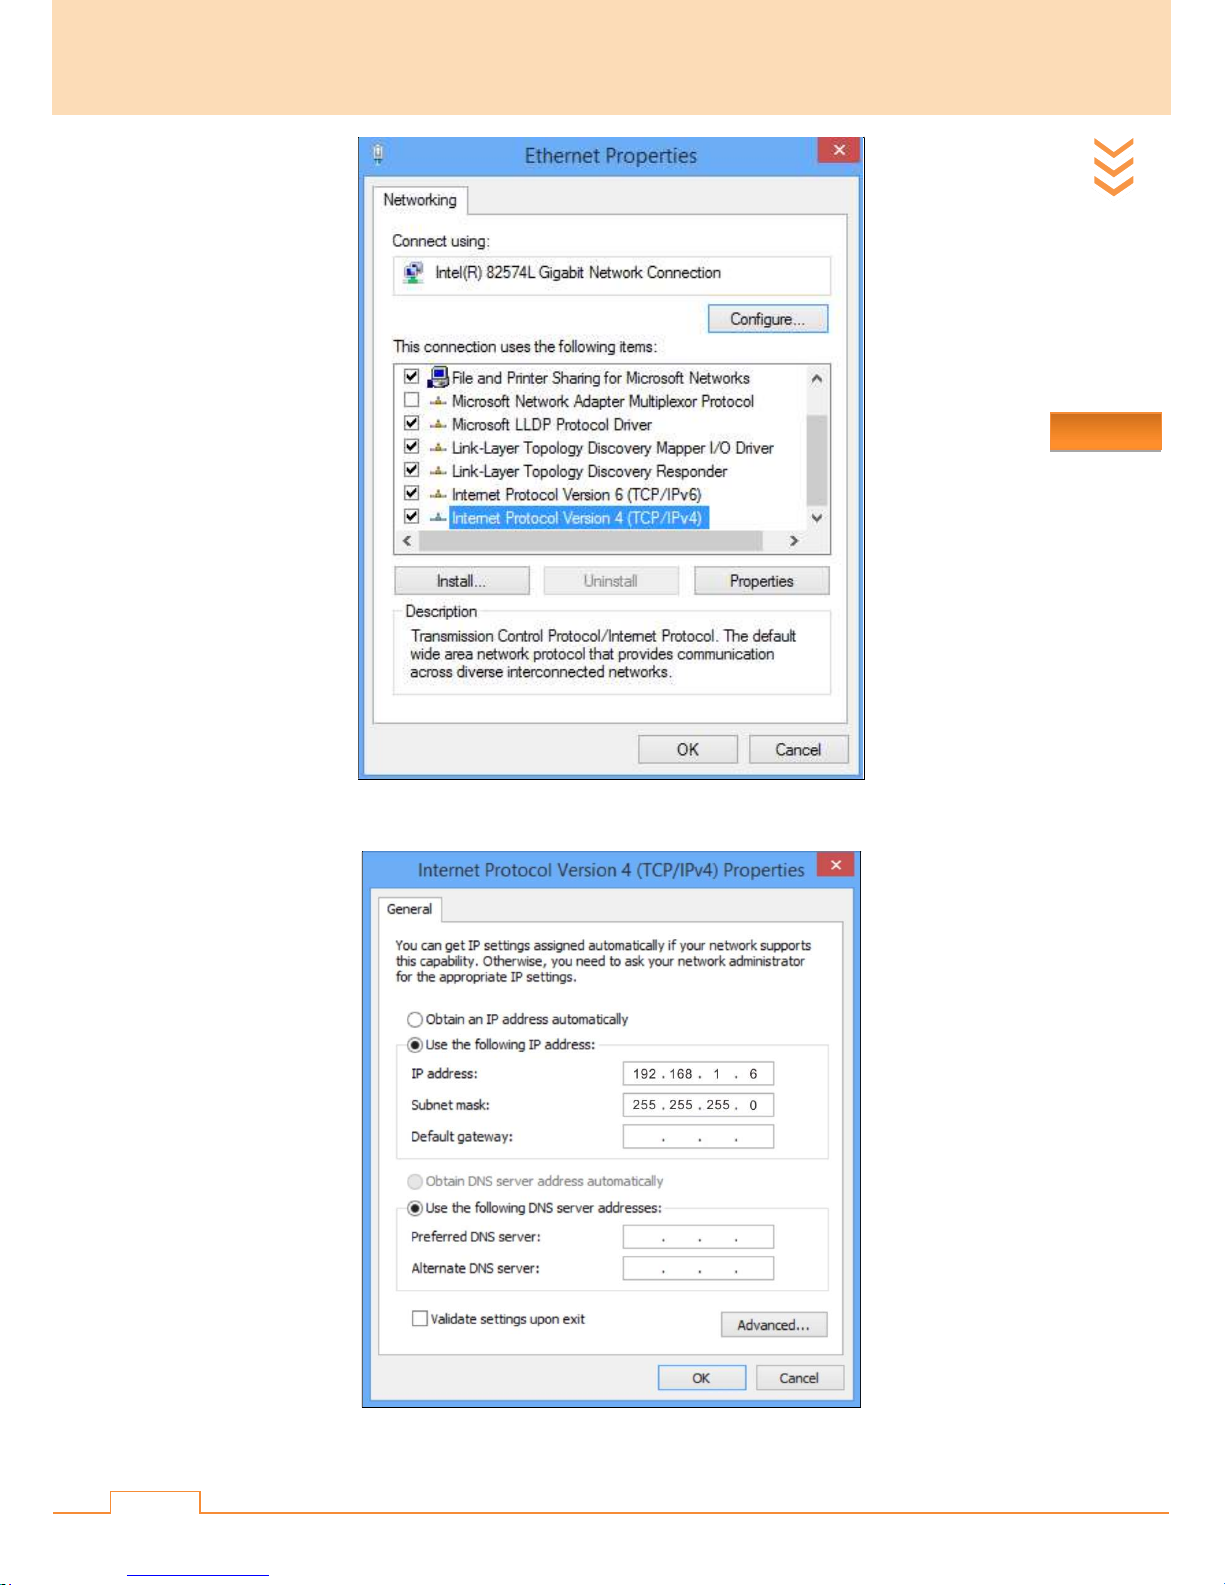
❹ Find and double click Internet Protocol Version 4(TCP/IPv4).
Page 39
Appendix
34
❺ Select Use the following IP address, type in the IP address: 192.168.1.x (2~254), Subnet
mask: 255.255.255.0 and click OK.
Page 40

Appendix
35
❻ Click OK on the Ethernet Properties window (see step ❹ for the screenshot).
1.2 Windows 7
❶ Click the icon on the bottom right corner of your desktop.
❷ Click Open Network and Sharing Center.
Tips:
If you cannot find the icon on the bottom right corner of your desktop, follow steps below:
Click Start > Control Panel > Network and Internet > Network and Sharing Center.
❸ Click Local Area Connection > Properties.
❹ Find and double click Internet Protocol Version 4(TCP/IPv4).
Page 41

Appendix
36
❺ Select Use the following IP address, type in the IP address: 192.168.1.x (2~254), Subnet
mask: 255.255.255.0 and click OK.
❻ Click OK on the Local Area Connection Properties window (see step ❹ for the
screenshot).
Page 42

Appendix
37
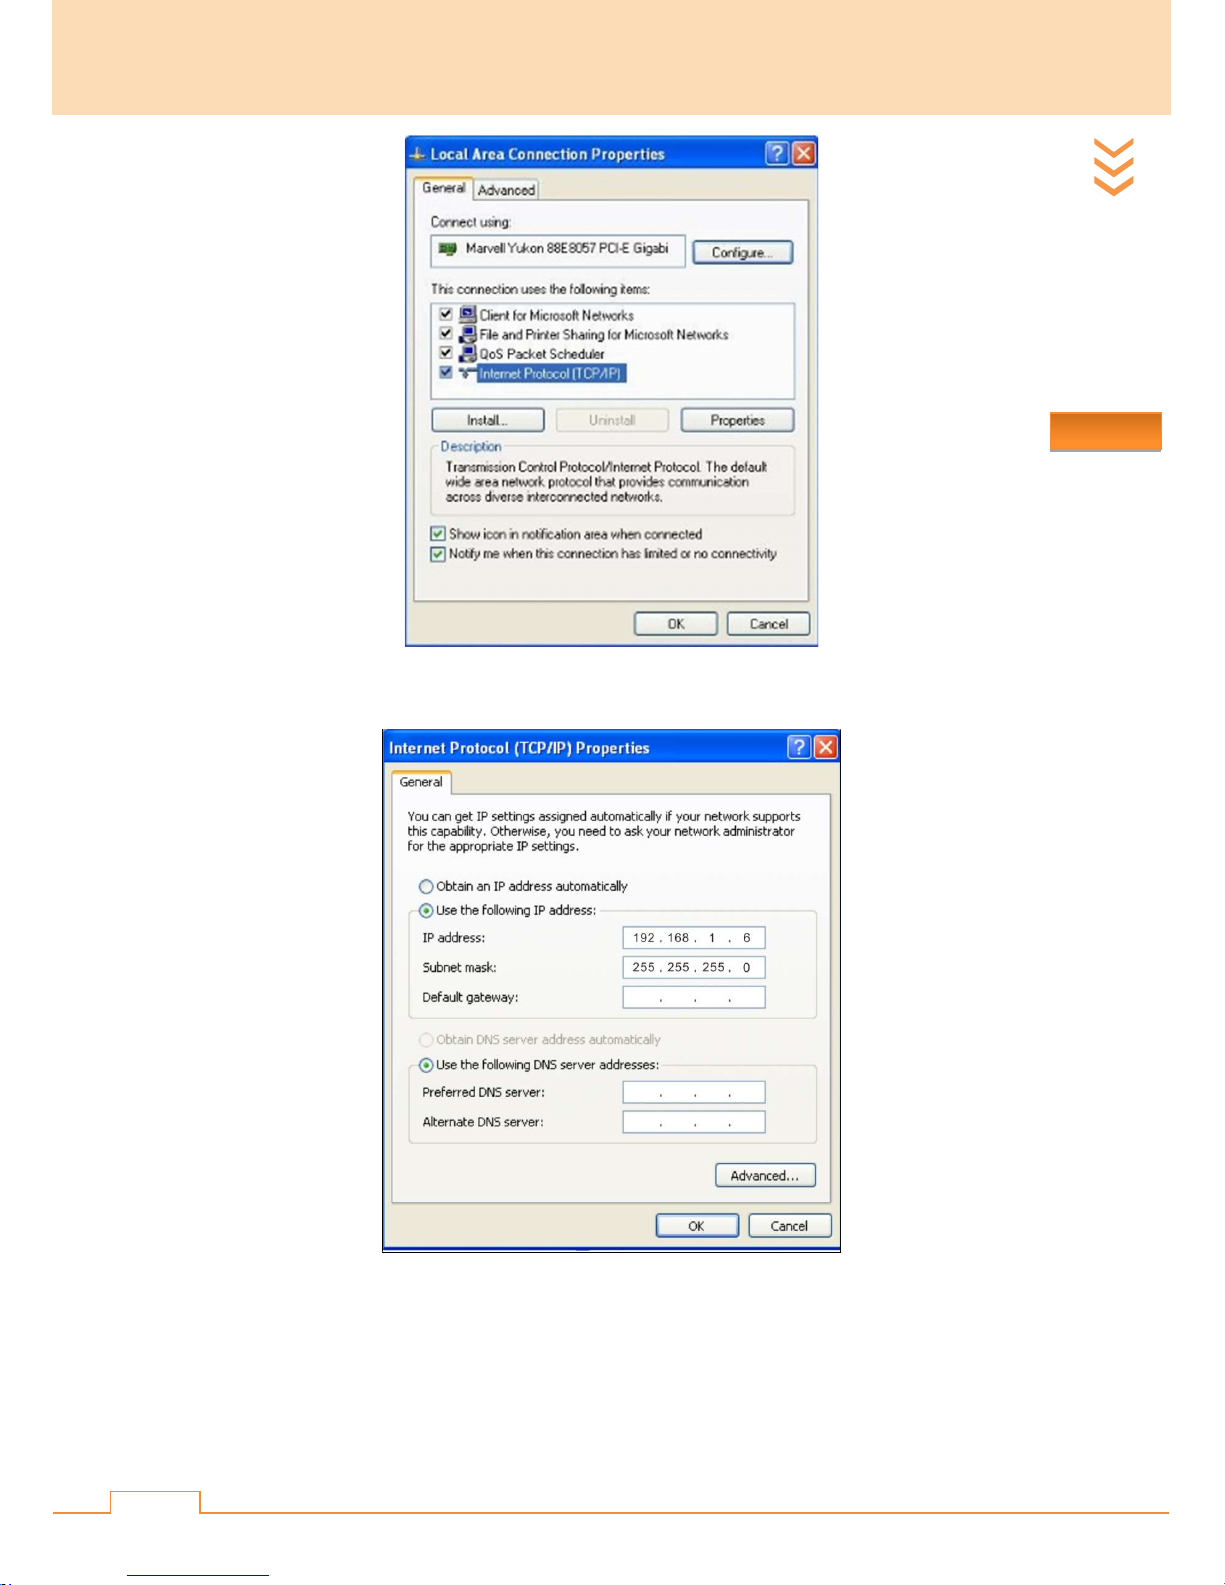
1.3 Windows XP
❶ Right click My Network Places on your desktop and select Properties.
❷ Right click Local Area Connection and select Properties.
❸ Scroll down to find and double click Internet Protocol (TCP/IP).
Page 43
Appendix
38
❹ Select Use the following IP address, type in the IP address: 192.168.1.x (2~254), Subnet
mask: 255.255.255.0 and click OK.
❺ Click OK on the Local Area Connection Properties window (see step ❸ for the
screenshot).
Page 44

Appendix
39
2. FAQs
This section provides solutions to problems that may occur during installation and operation of the
device. Read the following if you are running into problems.
If your problem is not covered here, please feel free to go to www.tendacn.com to find a solution
or email your problems to: support@tenda.com.cn. We will be more than happy to help you out as
soon as possible.
Q 1: I entered 192.168.1.1 in the address bar but cannot access its web page. What should I
do?
A: Try the following solutions one by one:
❶ Verify that Ethernet cable is connected properly and corresponding LED lights are in
normal status;
❷ Check your PC’s IP settings. Verify your PC’s IP is on the same network segment as
that of this device’s login IP address. If you do not modify your login IP address, set
your PC’s IP address within the range of 192.168.1.X (2~254);
❸ Clear your browser’s cache. Take IE8 for example: Click the browser’s Tools >
Internet Options > Delete… > check Temporary Internet Profiles, Cookies >
Delete;
❹ Turn to another browser and enter 192.168.1.1 in its address bar;
❺ Turn to another PC and try again;
❻ Pressing and holding the RST button with something like a needle for over 4 seconds
restores this device to factory default settings. Then input 192.168.1.1 in the address
bar of web browser to re-log in.
Q 2: The ONU failed to be registered. What should I do??
A: Try the following solutions one by one:
❶ Verify that fiber cable is connected properly;
❷ Verify that the ONU’s receiving optical power is within its normal range of -8~-28dBm
which you can view on the System Status page;
Page 45

Appendix
40
❸ Verify the authentication information you’ve entered is correct;
❹ If your problem still exists, contact your ISP.
Q 3: I’ve forgotten this device’s login password. What should I do?
A: Pressing and holding the RST button on this device for over 4 seconds restores it to factory
defaults.
Page 46

Appendix
41
Q4: The device is correctly connected but cannot access the Internet. What should I do?
A:
❶ Check whether LED indicators work normally or not. Normally, the POWER, PON
LED stays solid, the LOS LED is off and LAN LED keeps blinking. When malfunction
occurs, try below solutions one by one:
If the POWER LED light is off, please verify that the ON/OFF button is turned on
and power adapter is properly connected;
If the PON LED light is off, please verify LOID/SN/SLID authentication
information you’ve entered is correct and the PON port is properly connected.
If the LOS LED stays blinking, please verify that the PON port has been tightly
connected, the fiber end face is clean, the fiber is not over-bending and the
network access type you’ve selected is correct. Or you can change your fiber.
❷ Verify your PPPoE username and password are correctly entered;
❸ If a router has been connected to the LAN port of your device, verify that relevant
settings are correctly configured on the router;
❹ Consult your ISP (Internet Service Provider) if the problem remains unsolved.
Page 47

Appendix
42
3. Specifications
ownstream
Item Description
Standard & Protocol ITU-T G.984 , ITU-T G.988
Dimensions 142mm*92mm*31mm
Appearance
Transmission
Rate
Power Source 9V 1A
Environment
Requirement
Ports
LED Lights
D
Upstream 1.25Gbps
Operation
Storage
1 * PON port
1 * RJ45 port
POWER, PON, LOS, LAN
2.5Gbps
0℃~40℃
10%~90%RH, non-condensing
-40℃~70℃
5%~90%RH, non-condensing
Page 48

Appendix
43
4. Safety and Emission Statement
CE Mark Warning
This is a Class B product. In a domestic environment, this product may cause radio interference, in
which case the user may be required to take adequate measures.
NOTE: (1) The manufacturer is not responsible for any radio or TV interference caused by
unauthorized modifications to this equipment. (2) To avoid unnecessary radiation interference, it is
recommended to use a shielded RJ45 cable.
FCC Statement
This equipment has been tested and found to comply with the limits for a Class B digital device,
pursuant to part 15 of the FCC Rules. These limits are designed to provide reasonable protection
against harmful interference when the equipment is operated in a commercial environment. This
equipment generates, uses, and can radiate radio frequency energy and, if not installed and used in
accordance with the instruction manual, may cause harmful interference to radio communications.
Operation of this equipment in a residential area is likely to cause harmful interference in which
case the user will be required to correct the interference at his own expense.
FCC Caution: Any changes or modifications not expressly approved by the party responsible for
compliance could void the user's authority to operate this equipment.
This device complies with part 15 of the FCC Rules.
Operation is subject to the following two conditions:
(1) This device may not cause harmful interference, and (2) this device must accept any
interference received, including interference that may cause undesired operation. The
manufacturer is not responsible for any radio or TV interference caused by unauthorized
modifications to this equipment.
Page 49

Appendix
44
NOTE: (1) The manufacturer is not responsible for any radio or TV interference caused by
unauthorized modifications to this equipment. (2) To avoid unnecessary radiation interference, it is
recommended to use a shielded RJ45 cable.
 Loading...