

Page 1

II
Page 2

II
Copyright Statement
is the registered trademark of Shenzhen Tenda Technology Co., Ltd. All the
products and product names mentioned herein are the trademarks or registered trademarks of
their respective holders. Copyright of the whole product as integration, including its accessories
and software, belongs to Shenzhen Tenda Technology Co., Ltd. Without prior expressed written
permission from Shenzhen Tenda Technology Co., Ltd, any individual or party is not allowed to
copy, plagiarize, reproduce, or translate it into other languages.
All photos and product specifications mentioned in this manual are for references only. Upgrades
of software and hardware may occur; Tenda reserves the right to revise this publication and to
make changes in the content here of without obligation to notify any person or organization of
such revisions or changes. If you would like to know more about our product information, please
visit our website at http://www.tendacn.com
Page 3

III
Contents
Contents.............................................................................................................................................III
Chapter 1 Product overview................................................................................................................5
1.1 Package list............................................................................................................................5
1.2 System Requirement............................................................................................................. 5
1.3 Introduction........................................................................................................................... 6
1.4 Features................................................................................................................................. 6
1.5 Hardware overview............................................................................................................... 7
2.1 Desktop Installation.............................................................................................................. 8
2.2 Wall Installation.................................................................................................................... 9
Chapter 3 Smartphone Setting and Viewing....................................................................................... 9
3.1 Download and install APP by Smart phone........................................................................10
3.2 Smartphone Setting and Viewing........................................................................................10
3.3 Viewing by Smartphone......................................................................................................19
3.4 Setting and management of camera....................................................................................20
3.4.1 Replay recording video in micro SD card............................................................... 21
3.4.2 View photo /video saved in smartphone..................................................................22
3.5 Device settings.................................................................................................................... 26
3.5.1 Change device name............................................................................................. 27
3.5.2 Change device password.......................................................................................28
3.5.3 Set and change the device WiFi............................................................................29
3.5.4 SDCard Recording Setting....................................................................................32
3.5.5 Setting IR-LED........................................................................................................ 34
3.5.6 Setting device time zone....................................................................................... 36
3.5.7 Email alarm........................................................................................................... 37
3.5.8 FTP Setting............................................................................................................40
3.5.9 DDNS Setting....................................................................................................... 42
3.5.10 Indicator LED Setting.........................................................................................43
3.5.11 User Management............................................................................................... 44
Page 4

IV
3.5.12 Device reboot......................................................................................................46
3.5.13 FAQ.....................................................................................................................47
Chapter 4 PC Viewing.......................................................................................................................47
Chapter 5 Web Viewing and Setting................................................................................................. 48
5.1 How to login Web............................................................................................................ 48
6.Official Website download.............................................................................................................55
Page 5

5
Chapter 1 Product overview
1.1 Package list
Please check carefully if all listed items are included in the package as below:
IP-Camera
Quick Installation Guide
Power Adapter
Please strictly follow the input voltage power of the adapter required, or it will damage the
device and this situation does not belong to the range of warranty. After purchase, if any
accessories mentioned above is missing or damaged, contact the place of purchase
immediately.
1.2 System Requirement
1. CPU: 2.0GHz or above (recommend 3.0GHz)
2. RAM: 256MB or above (recommend 1.0GB)
3. Graphic card: 64MHz or above
4. OS: Windows 7/8, Vista, XP, Mac OS,
5. Internet Explorer6.0 or above, or compatible browser, Firefox etc.
6. Android 2.3 or above
7. IOS 6.1 or above
Page 6

6
1.3 Introduction
Tenda C50s V4.0 HD IP Camera provides a professional home or small business surveillance
Solution. Through our mobile phone APP allows you to view , configure, and control your Tenda
IP camera by using your mobile device .
1.4 Features
1.720P HD plus IRCUT:720p HD Video Quality to ensure that you can get rich detail and crisp
image quality. With IRCUT to ensure that the images are real color.
2.PTZ:You can PTZ control, move to the area you want to see, cover wider areas. (PTZ camera)
3. Plug and Play: Based on P2P cloud Technology, no need to configure the wireless Router and
DDNS, then you can view immediately easily.
4. Remote Viewing:With P2P technology (TendaViewer APP, TendaViewer for PC Software) ,you
can view live video remotely through the iPhone, Android phone, PC.
5. H.264 Video Compression:H.264 video compression technology, need the minimum
bandwidth network traffic while high image quality, more suitable for smartphone viewing.
6. Night Vision: This device can work well during the day, with infrared LED, it can also work at
night, round-the-clock surveillance.
7. Wi-Fi Connect: Using WiFi, camera easily connects to a wireless Router. You can easily get rid
of the trouble of deployment the Ethernet cable.
8. Micro SD/TF storage:You can store image and video on your Micro SD/TF card.
9. Motion detection and alarm:If you need to monitor a certain area, when an exception occurs
in the region, trigger an alarm automatically, send alarm information by e-mail, FTP.
10. Two-way audio:Not just screen monitor, you can also voice intercom. When you find the
abnormal situation, you can be reminded by voice intercom, to ensure safety.
Page 7
7
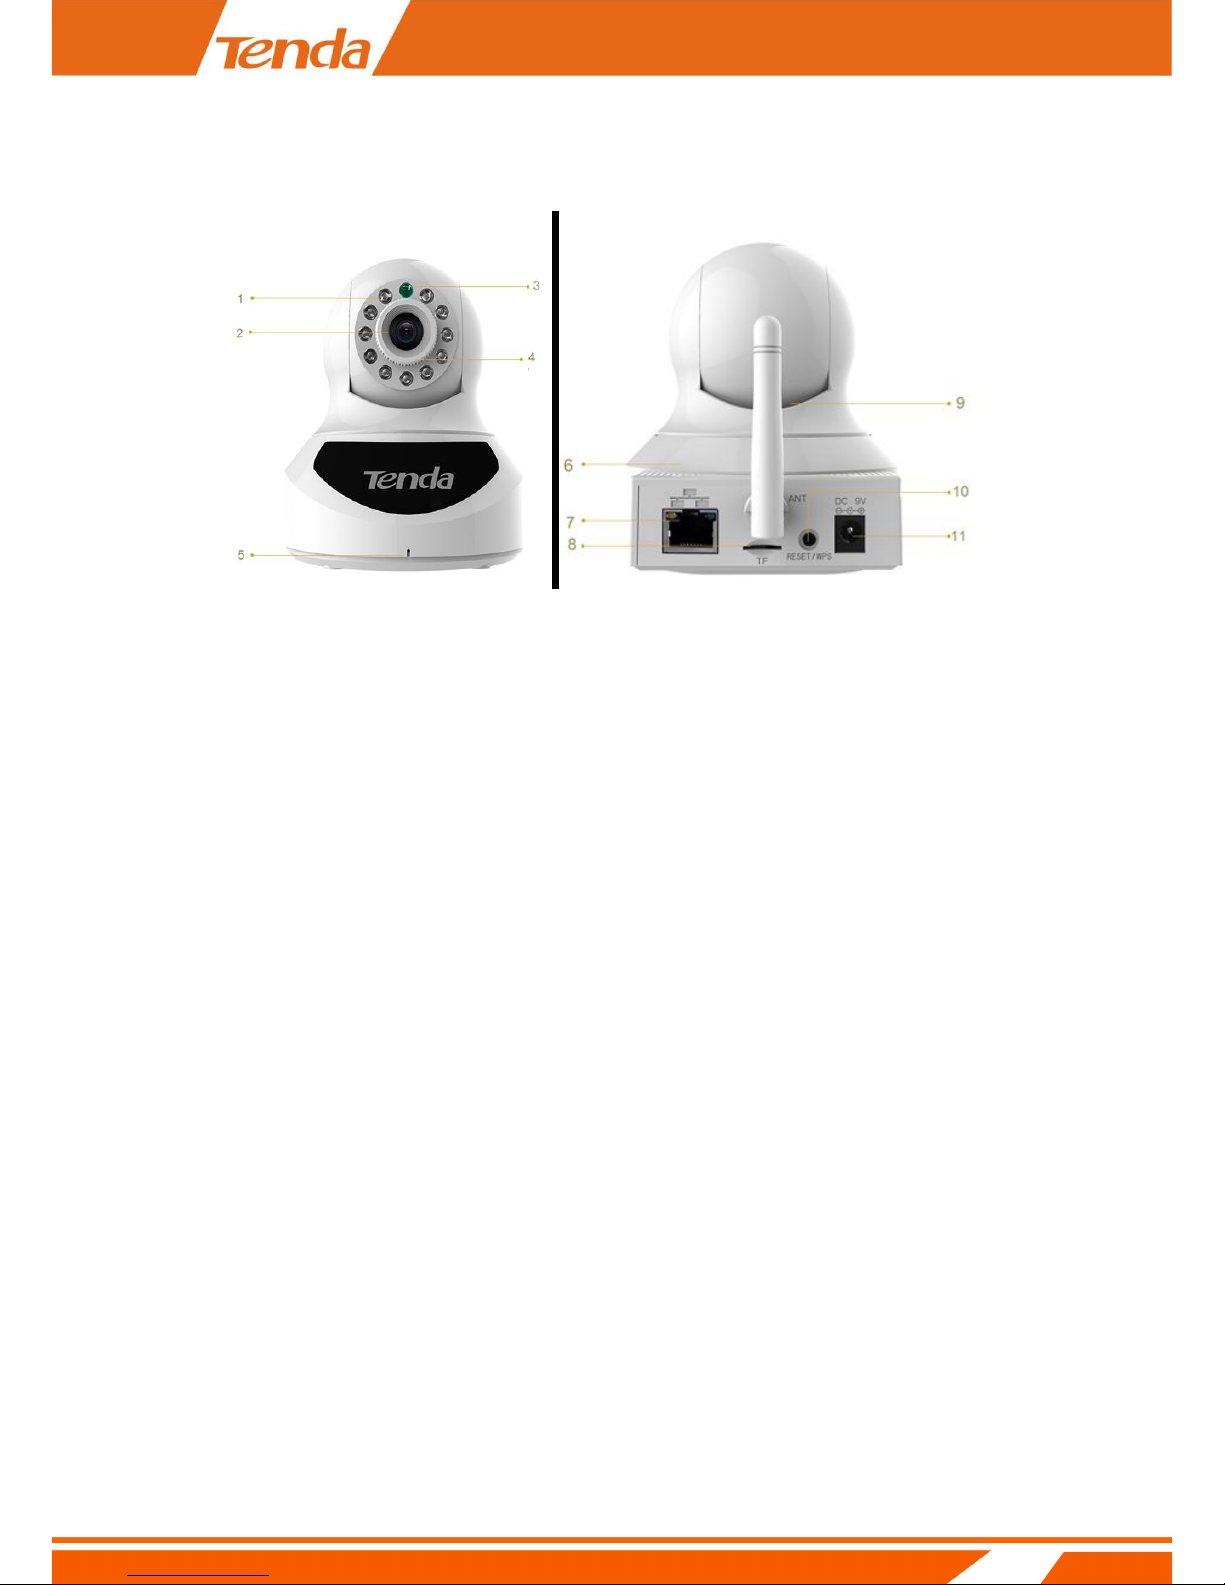
1.5 Hardware overview
C50s V4.0
1. IR LED
2. Lens
3. Indicator LED: Light up when starting, and extinguish when normal work
4. Focus ring:If camera image is not clear, you can rotate the white circle to improve.
5. MIC
6. Speaker
7. RJ45
8. TF/Micro SD card interface
9. Antenna
10. Reset
11. Power interface
Page 8
8
Chapter 2 Installation
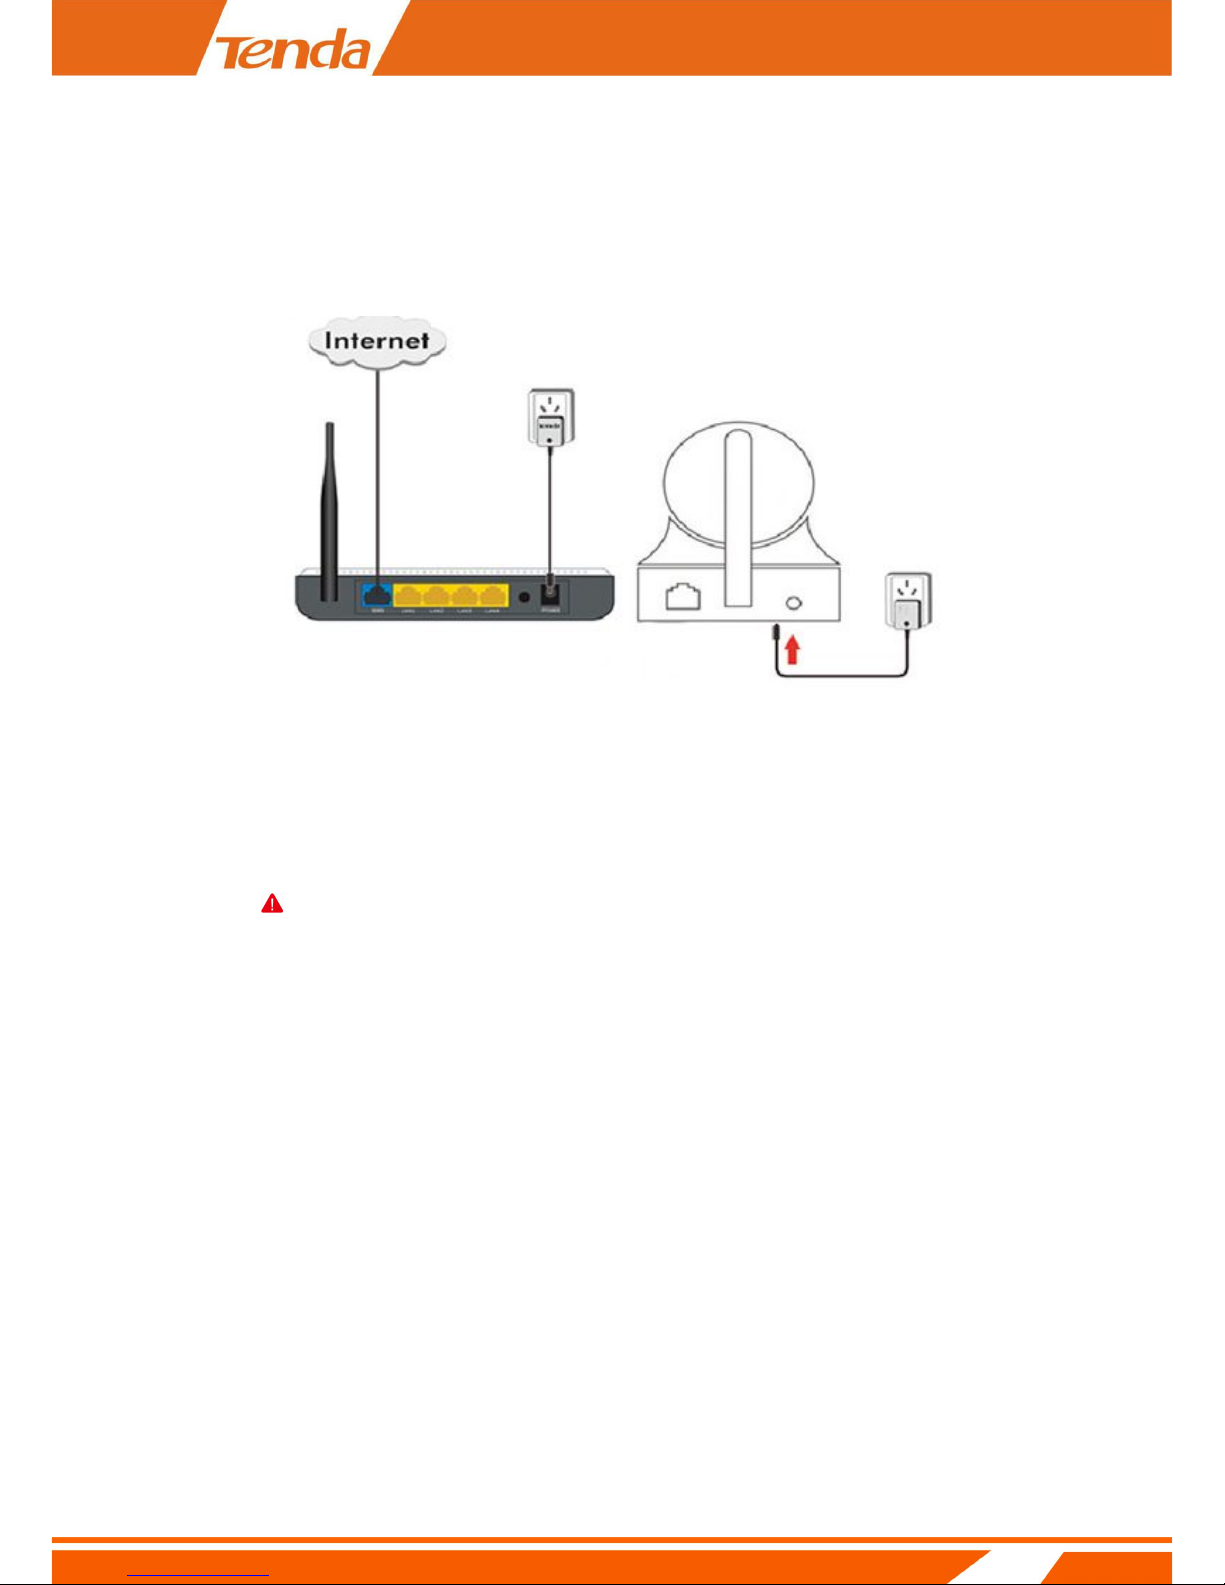
2.1 Desktop Installation
There are two ways to connect the camera to network:
1. Wireless connection:
a) A wireless Router that can connect to Internet is Ready.
Note
Please ensure the DHCP function of your Router is enable.
b) Put the camera in the area that wireless signal can cover .
c) Connect the included power adapter to the camera.
More details about setting information ,please reference C50s V4.0Quick Installation Guide
2. Cable connection :
a)A Router that connect to Internet is Ready. Please ensure the DHCP function of your
Router is enable.
b) Connect the camera to the LAN port of the Router directly with ethernet cable . Please
ensure the DHCP function of your Router is enable.
Page 9

9
c) Connect the included power adapter to the camera. More details about setting
information, please reference C50s V4.0Quick Installation Guide .
2.2 Wall Installation
According to your needs, refer to the figure to install.
❶ Turn the collar on the bracket to loosen it then move the camera to the position you want.
❷ Turn the collar on the bracket to tighten it, then fix the bracket to the wall using screws.
❸ Connect camera to bracket , turn the collar on the bracket clockwise to tighten it
Note: the bracket is optional fitting, if need, please purchase additionally.
Chapter 3 Smartphone Setting
3
2
1
Page 10

10
and Viewing
3.1 Download and install APP by
Smart phone
Scan the QR code of APP below to download and install TendaViewer APP.
iOS device: Search TendaViewer at App Store directly ,download and install the App .
Android device: Search TendaViewer at Google play directly ,download and install the App .
Visit Tenda official website www.tendacn.com directly, input your model at top right corner
to search ,
3.2 Smartphone Setting and Viewing
Step 1:Connect power adapter to the camera.
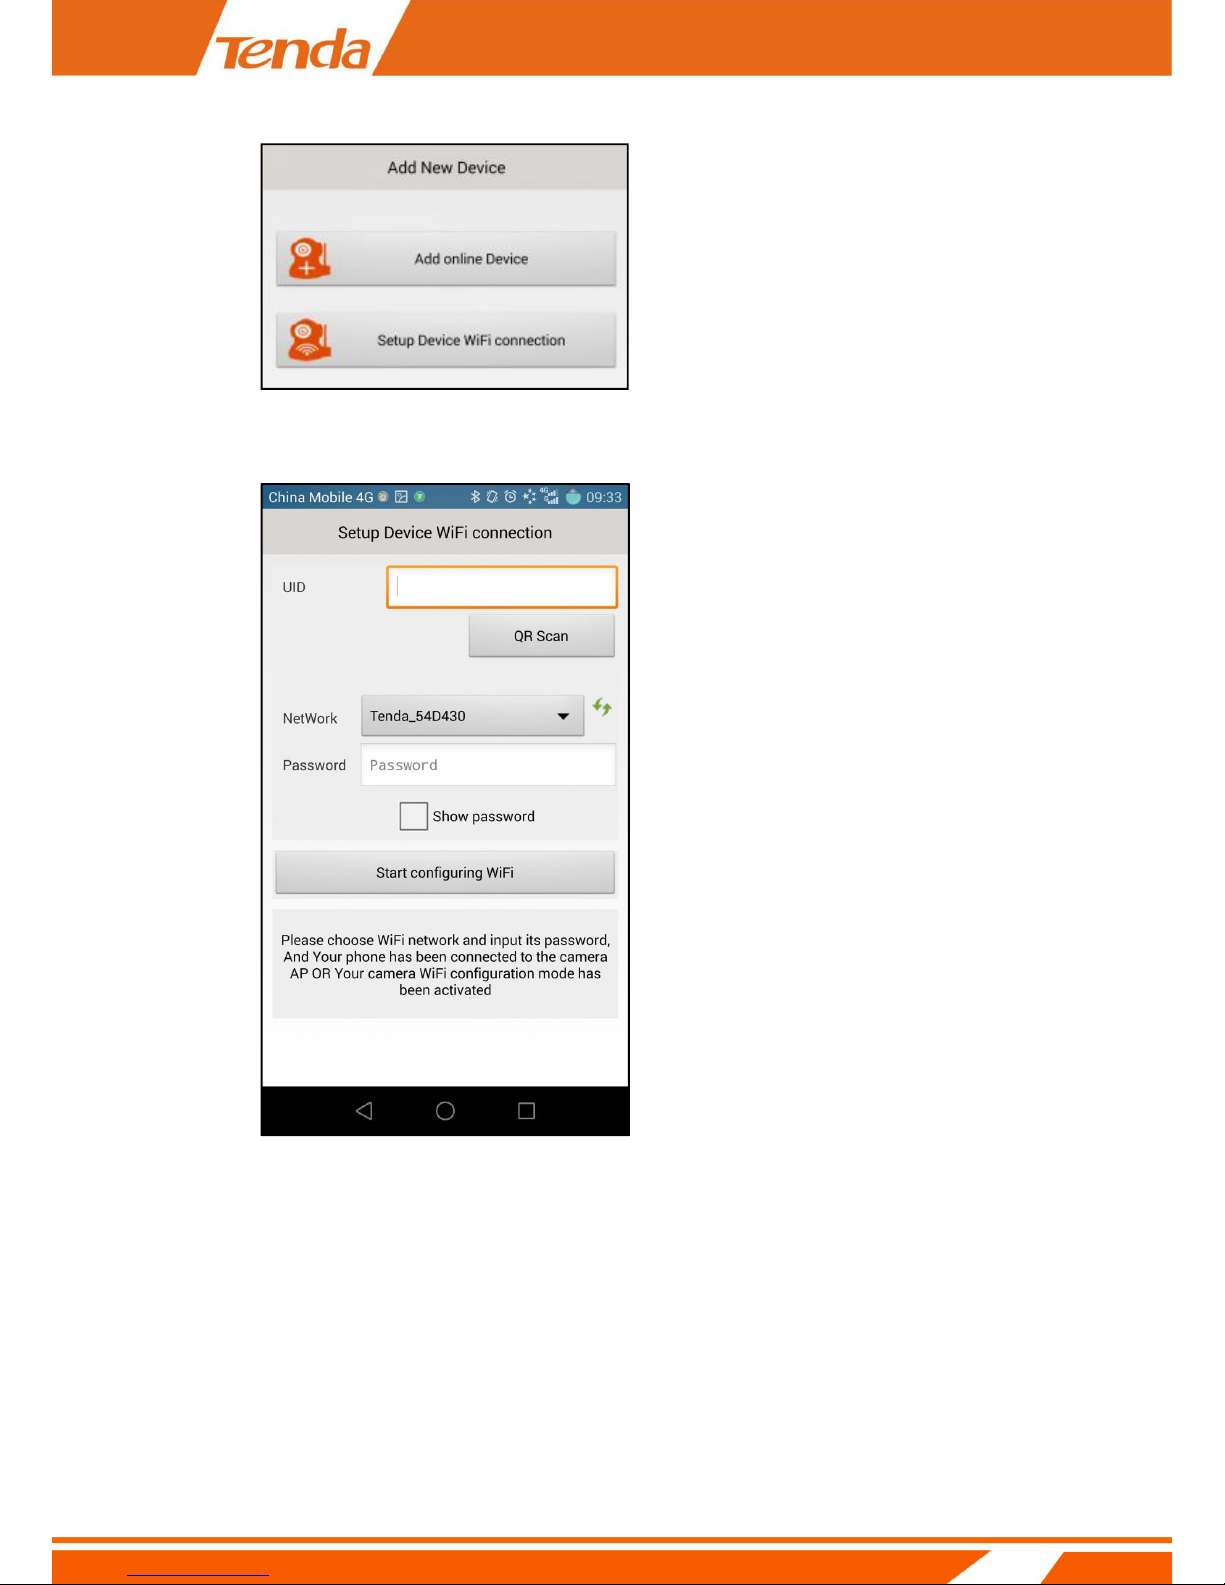
Step 2:Add new device
Run TendaViewer APP , click “+” first ,you can see page shows as below :
Page 11
11
then click "Setup Device WiFi connection ",you can see page shows as below :
click "QR Scan" button ,you can see page shows as below :
Page 12

12
After scan the QR Code of the UID. In Password field input the Router’s wireless
password.Click Start configuring WiFi , After the success of the configuration automatically to
finishing adding camera.
Note
Page 13

13
If you want to change the camera's WiFi connection , you need to keep pressing the RESET
button of the
camera about 5 seconds or till to hear the voice of "di" .Wait about 40 seconds .When the light
flashes ,you can redo the camera's WiFi smartconfig .
If Setup Device WiFi connection setting dose not succeed , you can try another way to set the
camera's WiFi connection as follow.
First Step:
Press the RESET button of the camera about two seconds ,then open the WiFi setting page
of your smart phone, search and connect to the access point of the camera .The name of access
point is "IPC-AP-xxx ". Also if the camera with LAN port , you can connect the camera to Router
with cable directly. Meanwhile the smartphone WiFi connect to Router.
Note
1. Short press the RESET button for 2 seconds, the device will reboot, after reboot, you can
also hear
the sound of the IRCUT switch.
2. In the access point "IPC-AP-xxx", "xxx" means the top eight numbers of the camera UID .If
there is no
access point of the camera when searchin , please keep pressing the RESET button of the camera
about 5 seconds or till to hear the voice of "di" .Wait about 40 seconds .When the light
Page 14
14
flashes ,press the RESET button again about two seconds .Then search again .
Second Step:
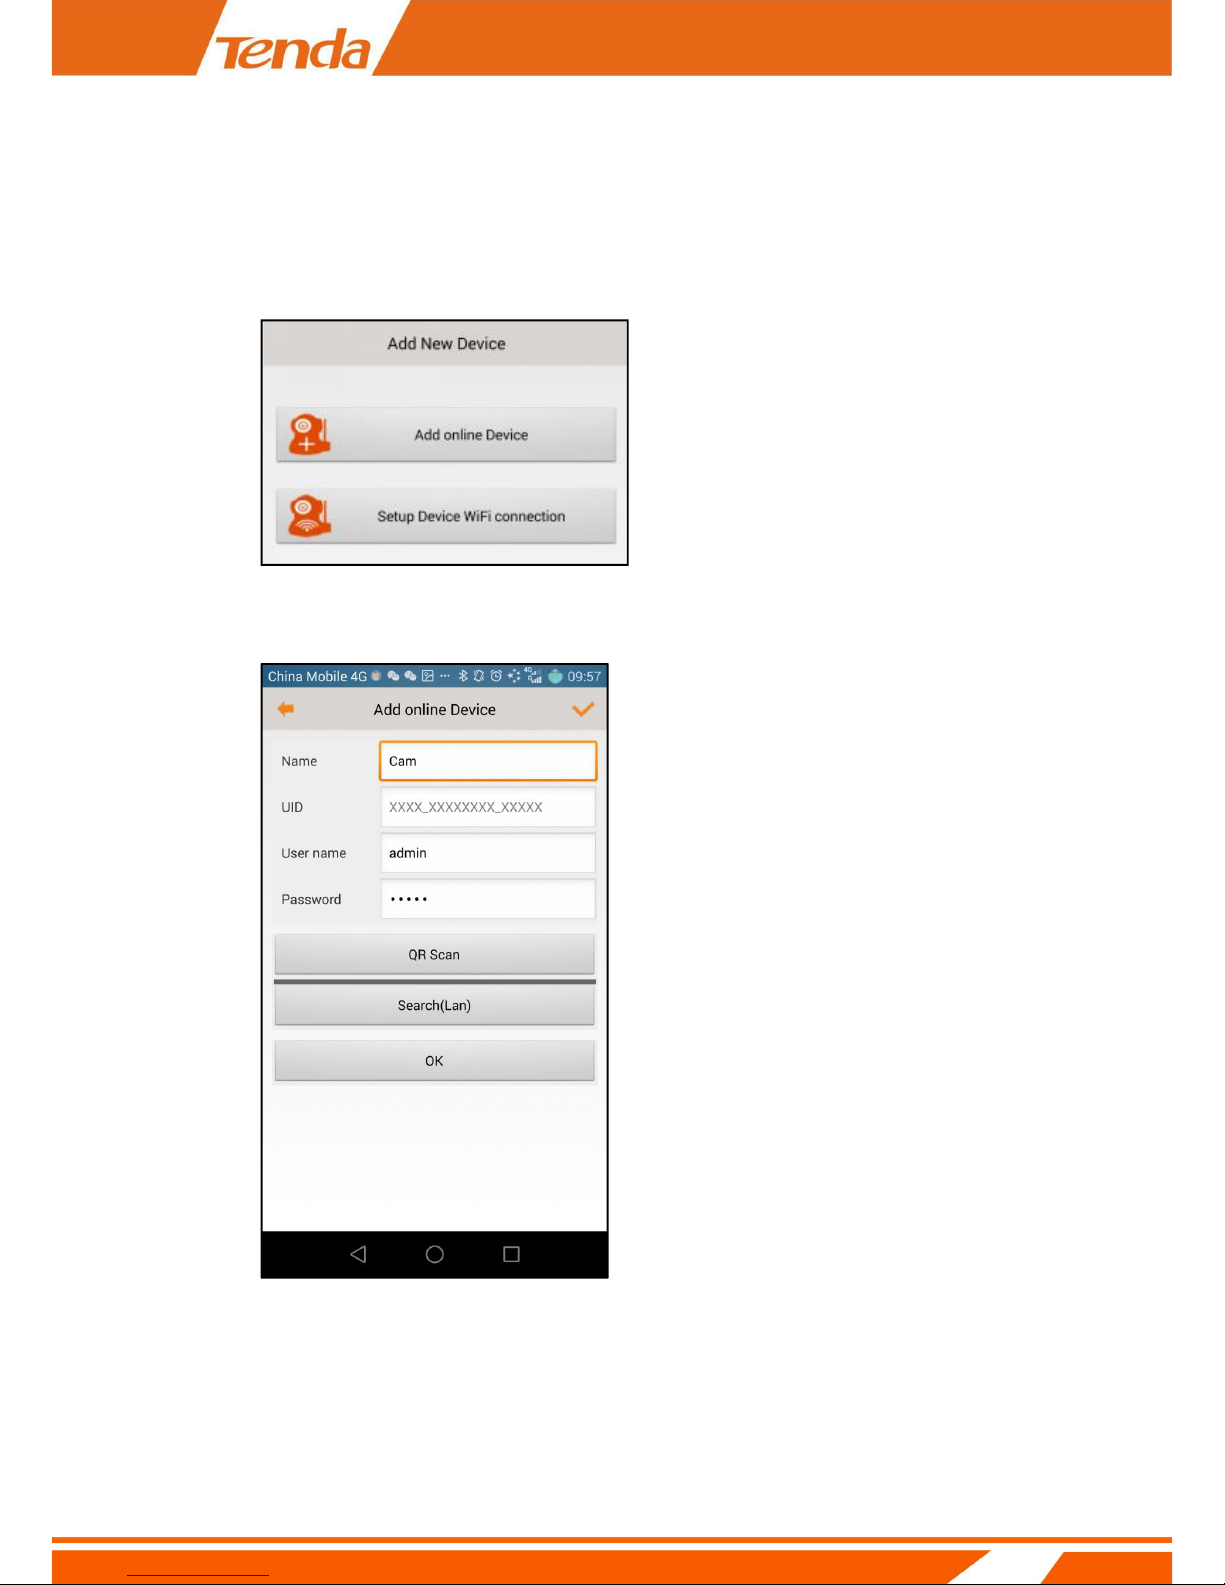
Run TendaViewer APP , click “+” first ,you can see page shows as below :
Click Add online Device ,you can see page shows as below :
Page 15
15
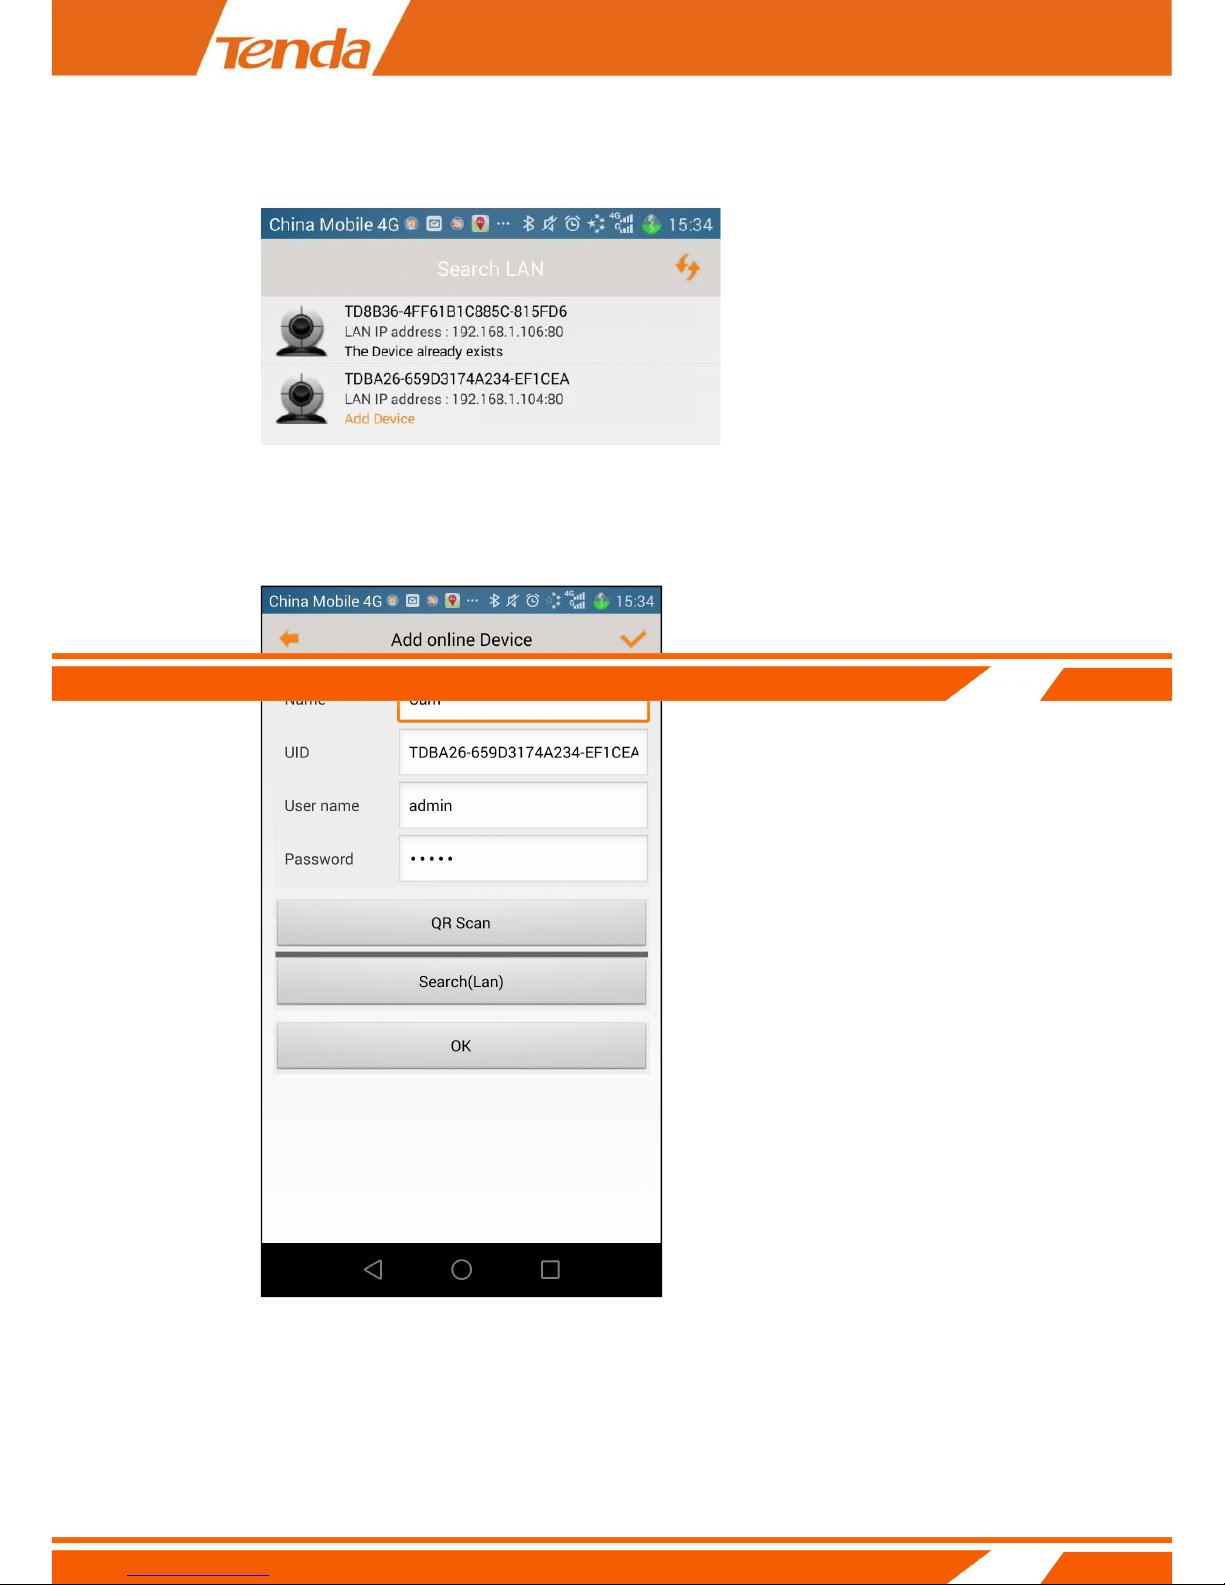
Click Search(Lan) button,you can see page shows as below :
Click the Camera in Search LAN interface,you can see page shows as below :
Click OK to finish adding camera at last.
Page 16
16
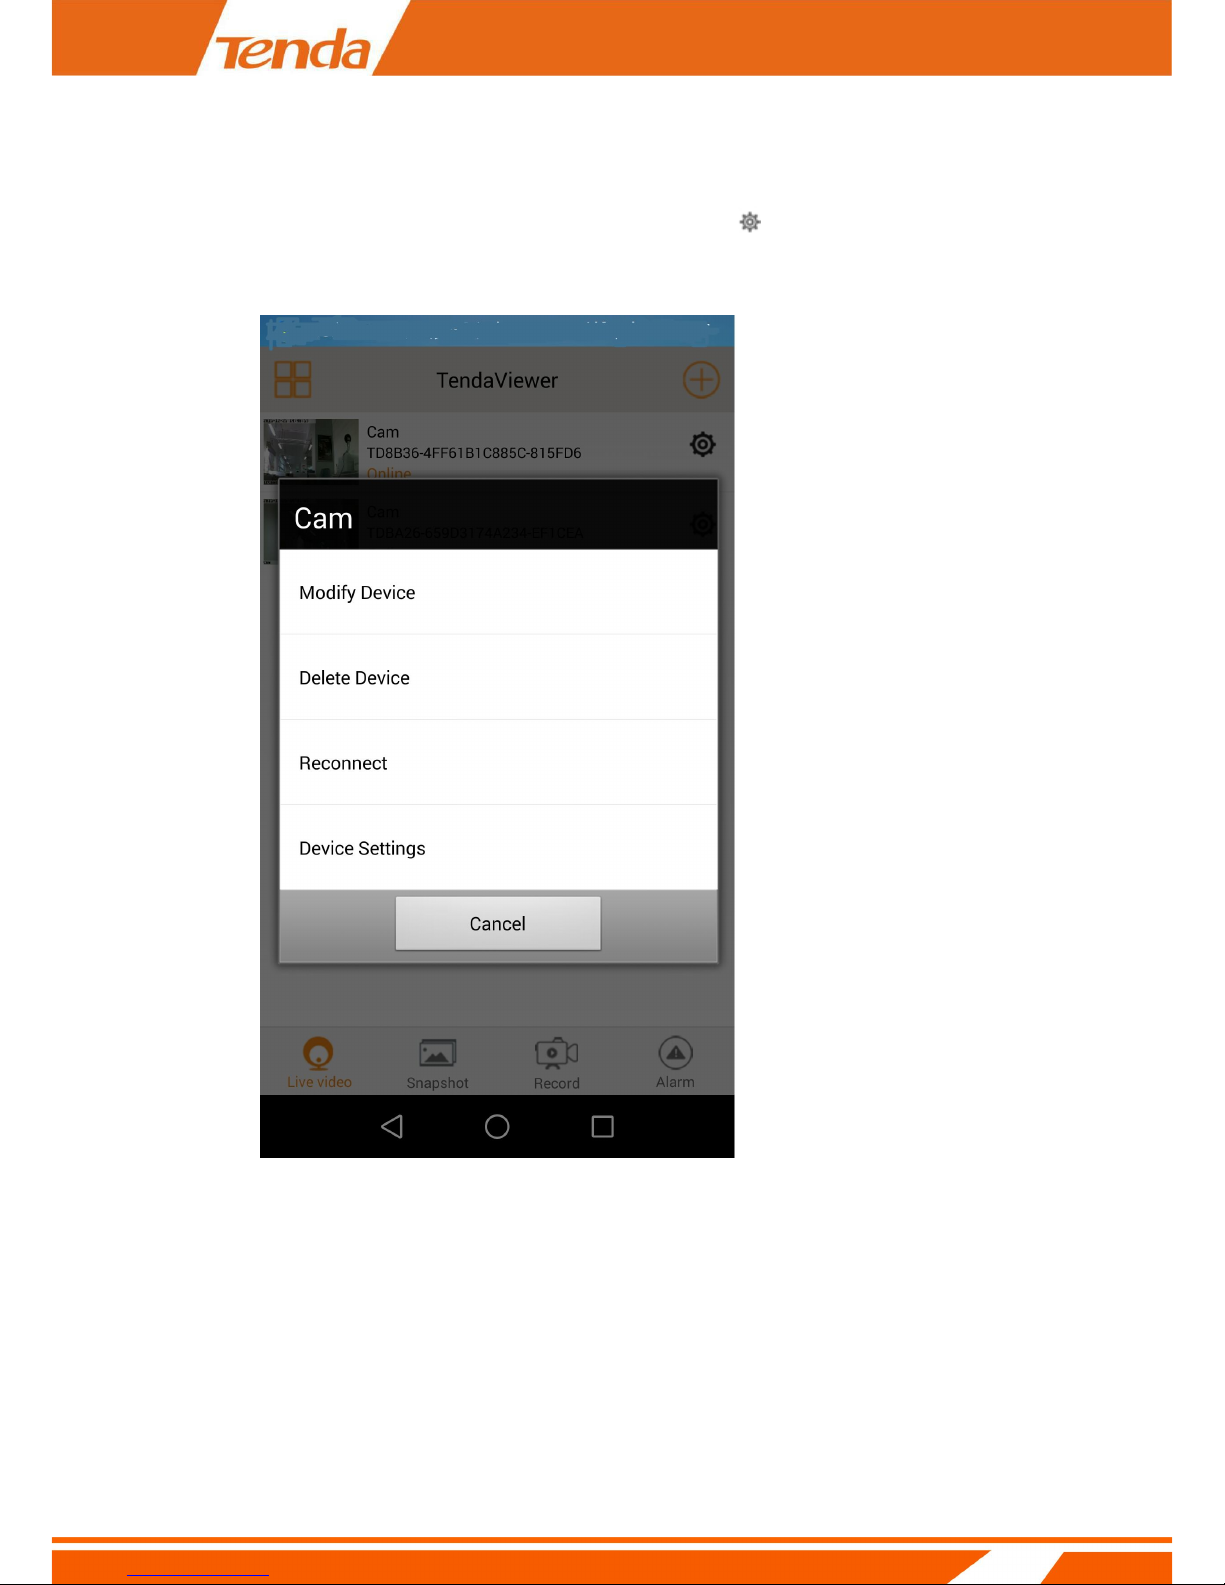
Third Step:
Click Live video icon first , then click the right side icon " ",you can see page shows as
below :
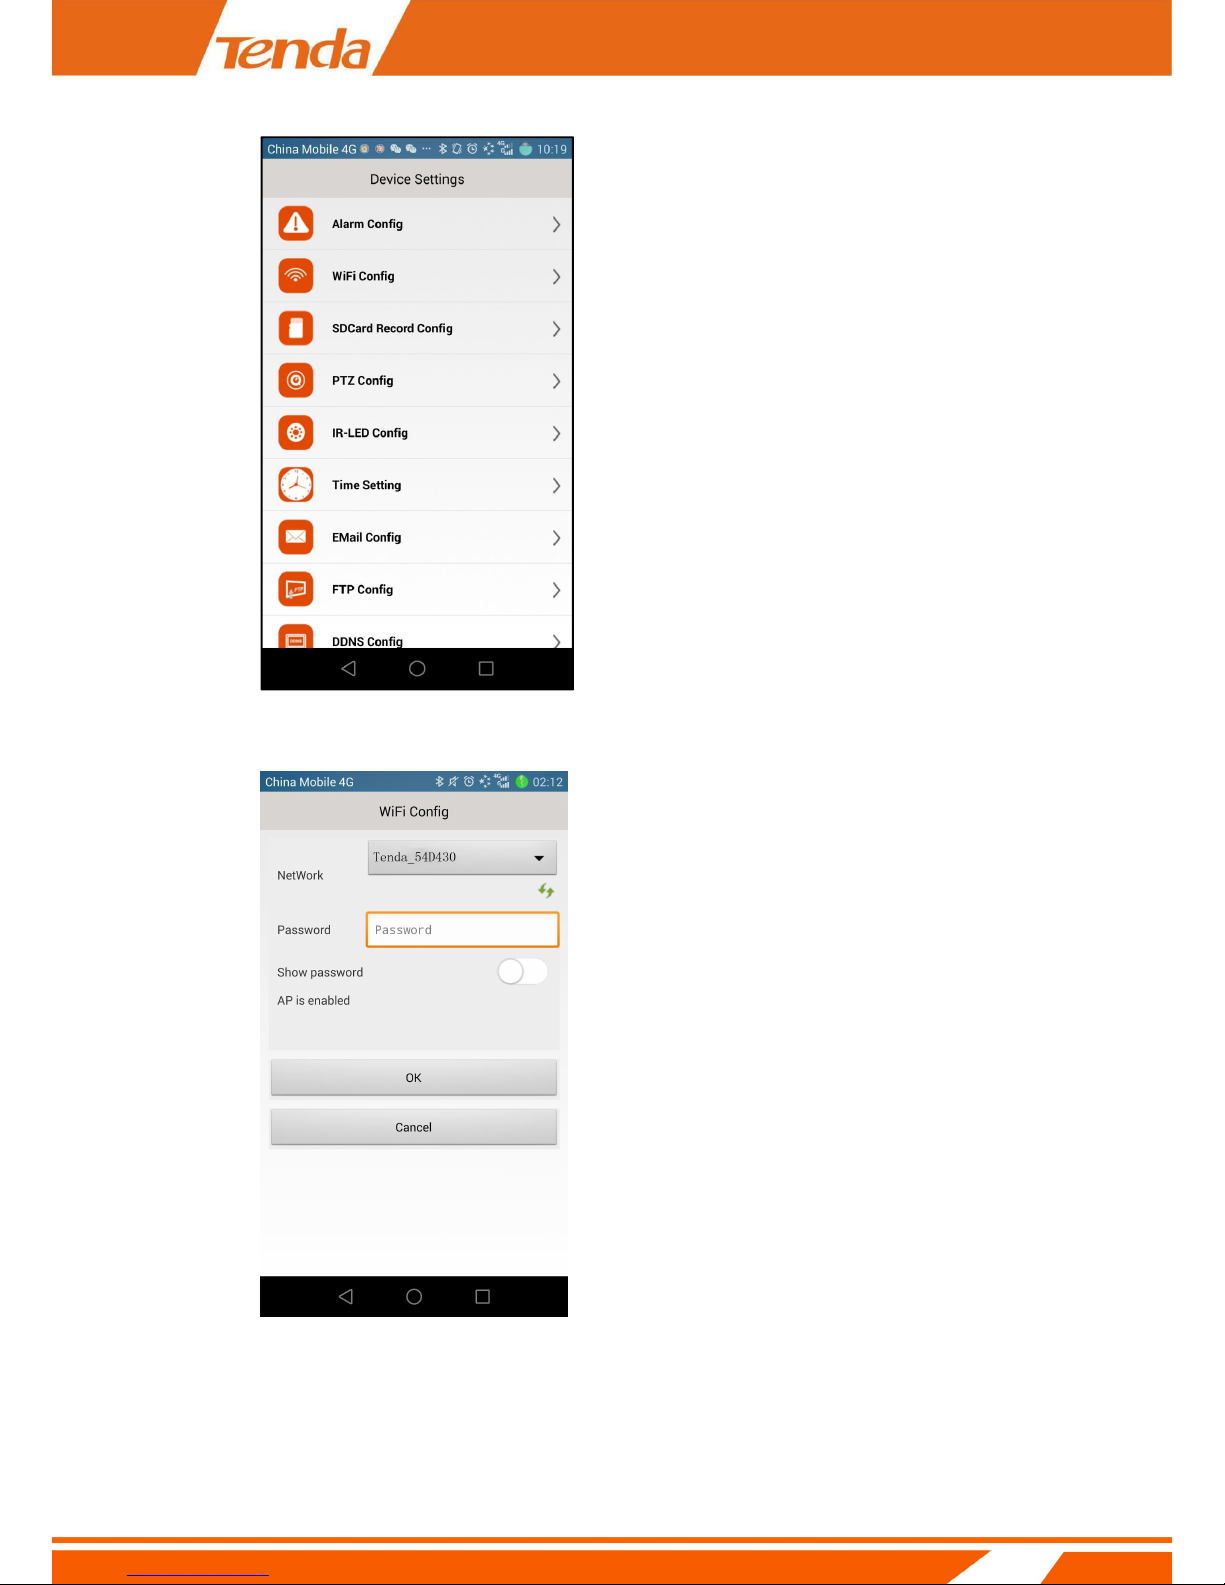
Click Device Settings,you can see page shows as below :
Page 17
17
Click WiFi Config,you can see page shows as below :
Choose a network what you want to connect, and enter the WiFi password.Then click
OK,you can see page shows as below .Click the “OK” button at the prompt dialog box, the
Page 18

18
equipment can be reset automatically. After waiting for equipment to restart, hear "di" twice,
which means the wireless set successfully.
Note
When the camera connects to the Router's wireless successfully ,the access point of the
camera will
disappear .The smart phone and camera will reconnect to the Router's WiFi automatically .
Page 19

19
3.3 Viewing by Smartphone
After setting the camera's WiFi connection successfully , you can view live video from the camera
and use the functions of listening ,speaking and so on .
Click this button, when become to listen;
Click this button, and keep pressing to speak;
Recording: smartphone recording .About replaying the recording ,please reference
section 3.4.2.1 View photo saved in smartphone
Photograph by smartphone. about viewing the Photograph, please reference section
3.4.2.2 View video saved in smartphone
Invert the video horizontally Invert the video vertically
Adjust the brightness of the video Adjust the contrast of the video
Click this icon first time, open the infrared LED .Ten second click, shut off the infrared LED.
Video quality options: “HD” “High” “Normal” “Low Bandwidth” four options .You can
choose one of them to view the video depend on the network bandwidth;
Auto Pan: When click the icon,the camera does horizontal cruise . The default value is 1 .
Auto Tilt: When click the icon,the camera does vertical cruise. The default value is 1 .
Page 20

20
3.4 Setting and management of
camera
(Figure: Main page of smartphone App )
After finishing adding camera, click the right side icon “ ” to set and manage the camera .
Page 21

21
3.4.1 Replay recording video in micro SD card
Run TendaViewer,click Record.you can see page shows as below . Then click “ ”.
local Record SD card Record
Downloaded Record Downloading Record
If you want to see other video recording video in micro SD card,you can click “ ” .
Page 22

22
3.4.2 View photo /video saved in smartphone
3.4.2.1 View photo saved in smartphone
Run TendaViewer,click Snapshot,you can see page shows as below .If you keep pressing the
picture,you can make more operations,such as:Delete Snapshot,Delete All Snapshot and Open
Snapshot.
Page 23

23
Then click “ ”,you can see page shows as below :
Choose the camera in the Select Device page .and you can view photo saved in smartphone.
Page 24

24
3.4.2.2 View video saved in smartphone
Run TendaViewer,click Record.you can see page shows as below , then click “ ”,you can
view video saved in smartphone. If you need to play the video files on the PC , it is recommended
to use the VLC Player.
local Record SD card Record
Downloaded Record Downloading Record
Page 25

25
Then click “ ”,you can see page shows as below :
Choose the camera in the Select Device page .and click “ ”,you can view video saved in
smartphone.
Page 26

26
3.5 Device settings
(Device settings page)
Page 27

27
3.5.1 Change device name
Run TendaViewer,click “ ”.you can see page shows as below :
Page 28

28
Click Modify Device.you can see page shows as below :
Input the new name of the camera in Name filed.Then clock OK to save.
3.5.2 Change device password
Page 29

29
In Device Settings page,click Change password. you can see page shows as below :
Input the Current password and New password,then click OK to save.
Note
If you forget the password of the camera,you can reset the camera.the password will
become
“admin”,which is the default password of the camera.
3.5.3 Set and change the device WiFi
Page 30

30
In Device Settings page.click WiFi Config, you can see page shows as below :
Page 31

31
In Network filed,choose your Router’s SSID to connect, and then enter WiFi password
of the Router.Click OK to finishing connecting at last.
The camera automatically reboot after you click OK. and you can see the hints: Device Reset,
like page
shows as below.When you hear the voice of di,that means the WiFi Setting is successful.
Page 32

32
3.5.4 SDCard Recording Setting
In Device Settings page.Click SDCard Record Config. you can see page shows as below :
Record:Which includes Close,On alarm and All day ,the default value is On alarm .If choose
All day , that
means recording twenty-four hours. If choose On alarm ,that means when the camera is
triggered monition detection, the camera will record(It needs to plug Micro SD Card first).
Resolution:Which includes HD, High and Normal, the default states is High.
File length:The video length range is 30-300 seconds, the default time is 30 seconds.
Record sound: If you open this function, then will bring together voice recording in the
video.
Loop recording: If you open this function, while the rest of the TF card don't have enough
Page 33

33
space, the camera
automatically overwrites the oldest video, and then continue to video.
3.5.4.1 Setting alarm recording
In Device Settings page.Click SDCard Record Config.,In Record filed choose on alarm,then
click OK to
save.
3.5.4.2 Setting full time recording
In Device Settings page.Click SDCard Record Config.In Record filed choose All day,and then
set up Resolution and File length.Cick OK to save.
3.5.4.3 Format Micro SD Card
In Device Settings page. Click SDCard Record Config.Click Format.If formatting is successful,
then the Free space is equal to the capacity of SD card .
Page 34

34
3.5.5 Setting IR-LED
In Device Settings page.Click IR-LED Config. you can see page shows as below :
IR-LED’s State: The default value is Auto.There are Close, Auto and Schedule three
options. And you
can use the scroll bar to adjust the Brightness for turning on IR-LED .Finally click OK to save.
Page 35

35
If you click Schedule, you can see page shows as below :
You must set Start Time and End Time,and then click OK to save.
Page 36

36
3.5.6 Setting device time zone
In Device Settings page.Click Time Setting. you can see page shows as below :
The default time zone is GMT+8.You can choose the local time zone.
If the device connect to the Internet ,it will obtain the network time and upgrade the device
automatically.
If the device didn’t connect to the Internet , you can select Device Time Sync With App to
get time from you smartphone.
Page 37

37
3.5.7 Email alarm
According to the following two-step setting, it can realize the Email alarm .When detects
alarming , it can send email to your appointed email box, but you need to set email service
parameters correctly.
Step 1:
In Device Settings page.Click Alarm Config. you can see page shows as below :
Select a Motion detection sensitivity level. Click E-Mali Alert to open this function.
Page 38

38
Step 2:
In Device Settings page.Click Email Config. you can see page shows as below :
Sender: Send email address from SMTP Server. Since common email providers have a better
service experience and the built-in email provider SMTP servers are easier to set up, you are
strongly advised to use Gmail, Yahoo and other common email services as the sender email.
Note
Check the sender mailbox SMTP service is turned on (refer mailbox user manual)
Recipient: Recipient is the email to accept the email alerts and we suggest that you make it
a different email from the sender email.
SMTP Server: The SMTP (short for Simple Mail Transfer Protocol) works like a post assistant,
handling the sending of emails from the camera to an email server. SMTP Server receives
outgoing mail messages from users to the mail recipients they are intended for.
Some common mailbox has built-in configuration, this does not need to fill.
Page 39

39
If your sender email provider is a public server, you can search the IP address of the email
provider’s SMTP
server or DDNS from Google.
If your sender email provider is a private one, you can consult with the email provider’s
customer service.
SMTP Port: Service port of SMTP server which you can get with the above procedure. Some
common
mailbox has built-in configuration, this does not need to fill.
Transport Layer Security: Encryption protocol of SMTP Server and you can also get it from
the above
Procedure. Some common mailbox has built-in configuration, this does not need to fill.
User: The account you use to login to the SMTP server which is also the sender email
address
Password: The password you use to login to the SMTP server which is also the sender email
password
When the Email setting is successful, you can see the hints: Operation Successful!. Like page
shows as below:
At the same time, before you set the mailbox can receive motion detecting images.
Page 40

40
3.5.8 FTP Setting
The device will snap live pictures and send them to FTP server when alarming and FTP can
store video,but
need to set the FTP setting correctly.
Step 1:
In Device Settings page.Click Alarm Config. you can see page shows as below :
Click FTP Upload to open this function. Select a Motion detection sensitivity level.
Page 41
41
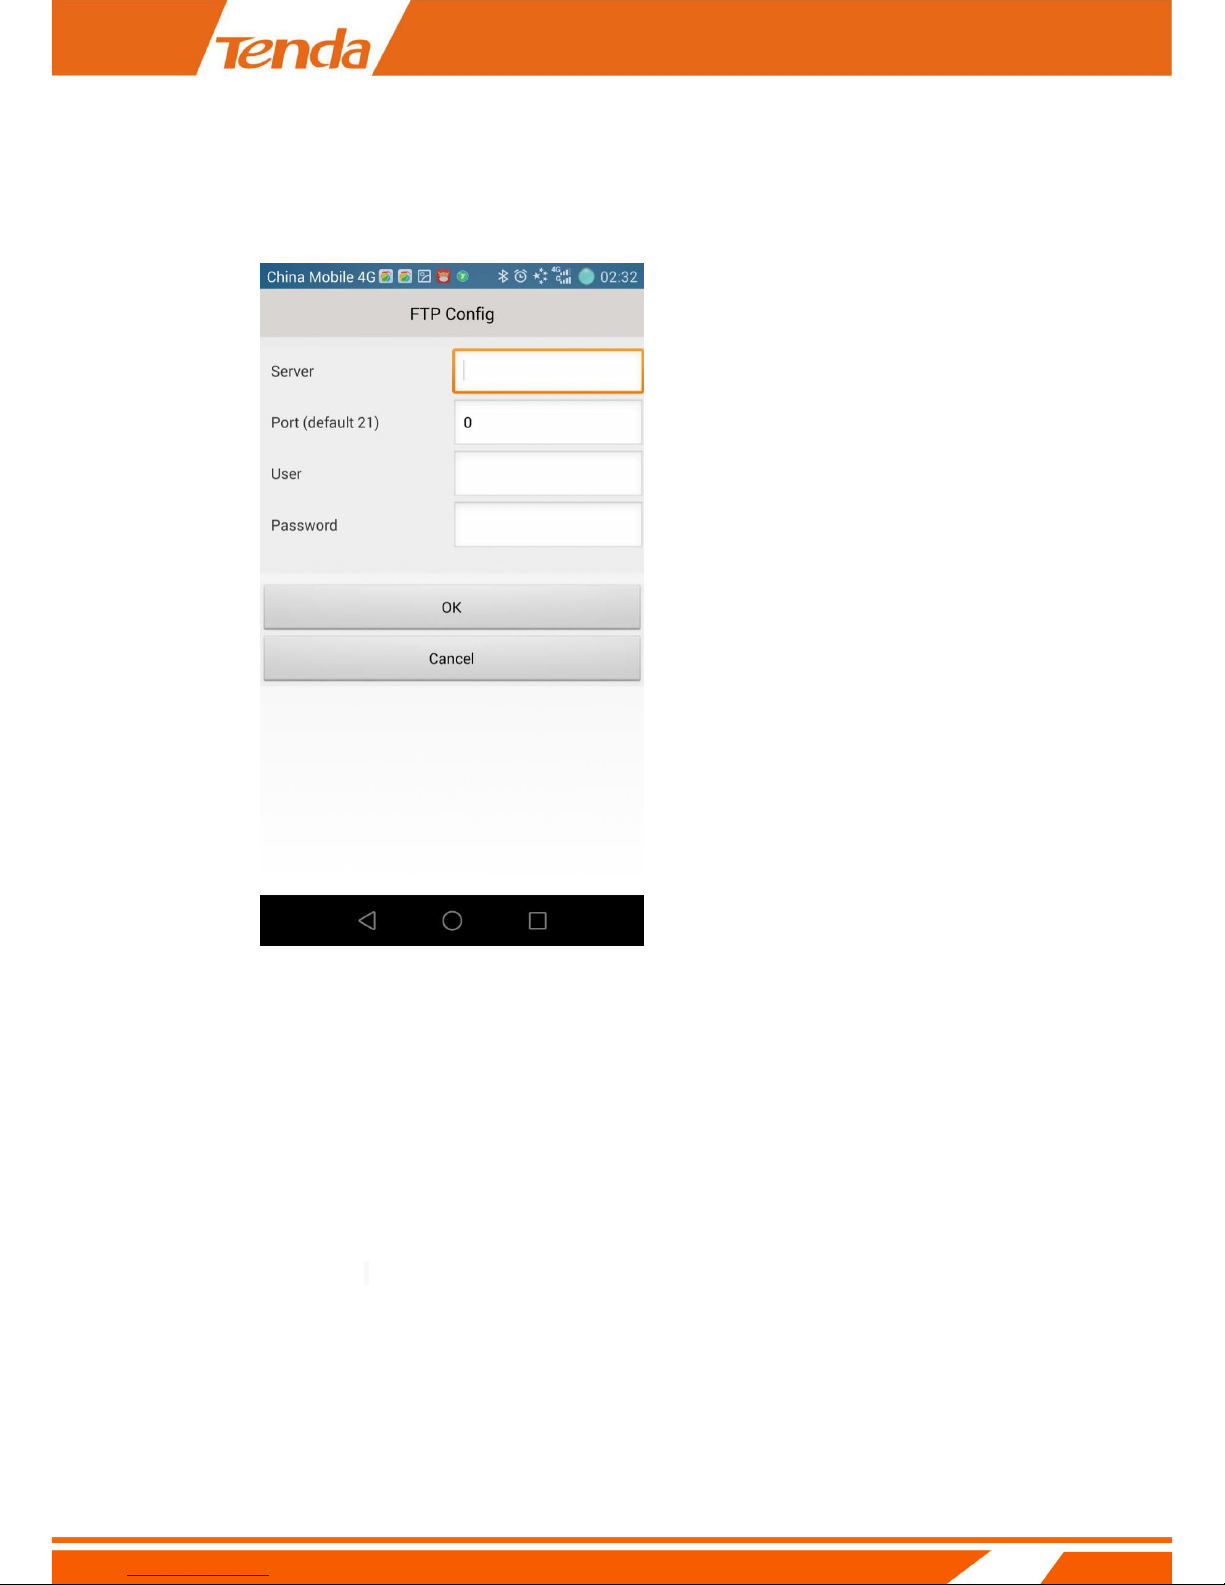
Step 2:
In Device Settings page.Click FTP Config. you can see page shows as below :
Server: FTP server’s IP address and DNS which could be required from FTP server provider.
Port: Communication port of FTP server and the default port is 21.
User: Username for you to sign in FTP server which could be required from FTP server
provider.
Password: Password for you to login FTP server which could be required from FTP server
provider.
At the same time, You can find pictures in the path set before.
Page 42

42
3.5.9 DDNS Setting
User can use third party DDNS, such as www.dynddns.org, just need to log in to the website
to apply for a free domain name, fill in the Settings box, and save the settings. Do the port
mapping, then you can remote access your IP camera.
Note
IP camera default to obtain the IP address automatically, if you need to remote access via
DDNS, the IP address should be fixed IP address manually, or it can’t port mapping.
Note
When use third party domain name, if the port number is not 80, you need to add a colon
behind the domain name and plus the port number, such as: http://chen.dynddns.org:8081.
Page 43

43
1) Problem of setting remote access, please refer to Addendum1
2) Please click Apply after modified parameter.
3.5.10 Indicator LED Setting
In Device Settings page.Click Misc Settings. you can see page shows as below :
In Misc Settings’s page,you can set the state of the LED.Which includes On and Off,the
default value is On.
When selecting "On", the indicator work logic is that when camera wired connection
Page 44

44
indicator off, when camera wireless connection indicator light, the wireless configuration process
indicator flashes. When you select "Off", indicator off always . click "OK" to save.
3.5.11 User Management
In Device Settings page.Click User Management. you can see page shows as below :
Click icon, you can see page shows as below :
User name:New User’s name
Password: New User’s password
Page 45

45
Group:Which includes Admin,Operator and Guest.If you choose Admin , New users can left
any operation for cameras.If you choose Operator or Guest ,you can only view live video from
the camera .The detail is below.
When all the parameters set up click OK to save it.
Page 46

46
3.5.12 Device reboot
In Device Settings page.Click Device reboot. you can see page shows as below :
Click Device reboot,and you can see the hints:Operation Successful.Like page shows as
below:
Page 47

47
3.5.13 FAQ
In Device Settings page.Click FAQ. It will jump to the official website "Service " section ,in
the search field, enter the product model to search, in the result list you can find FAQ.
Chapter 4 PC Viewing
Visit Tenda official website: www.tendacn.com, on the top right corner ,in the search field,
enter the product model to search, in the result list you can find TendaViewerForPC Software
and TendaViewerForPC Software User Manual ,downloads the TendaViewerForPC Software,
install TendaViewerForPC after decompressed.
More details please reference TendaViewerForPC Software User Manual
Page 48

48
Chapter 5 Web Viewing and
Setting
5.1 How to login Web
You can log in the Web through the following two ways:
Way 1: Run IPCameraSearch.exe to enter Web.
Login Tengda official website www.tendacn.com, in the top right input product model "C5 +",
and then search for and find "IPCameraSearchSoftware" in the list and download, after
decompress IPCameraSearchSoftware.rar, double-click the "IPCameraSearch.exe", run the search
tool , you can see page shows as below :
Page 49

49
Double click equipment in the Device List, you can see page shows as below :
3. Input admin in both user name and password on the appearing login window, and then click
LOGIN to enter the Web UI. you can see page shows as below ,select Browser Plug-ins.
Page 50

50
4. The web browser will show a message Please upgrade the plug-in!
5. Click OK and Player to download the web browser plug-in running
Page 51

51
6. Click Run to install the plug-in.
7. The web browser will show a warning message, please ignore it. Click Actions.
Page 52

52
8. Click More options and click Run anyway to install the web browser plug-in.
Page 53

53
9. Then you will see the live video and control panel
Return to the welcome page
Single camera view mode. For show back to single camera mode from
4 camera view mode or 9 camera view mode.
4 camera view mode. After set up multiple camera settings, you could
view up to 4 cameras by this mode
9 camera view mode. After set up multiple camera settings, you could
view up to 9 cameras by this mode
Click this button for camera settings. Refer to 3.5 Device settings
Resolution
Changed the resolution of the video, there are 3 options:
640x480, 320x240 and 160x120.
Definition
Change the video‘s quailty
Pan/Tilt Speed
Change the speed of the pan/tilt of the camera. There are 5 options:
Fastest, Fast, Normal, Slower and Slowest.
(only available for the camera with Pan/Tilt)
Page 54

54
There are 8 direction keys and the center button is rotation center.
(only available for the camera with Pan/Tilt)
The horizontal cruise will pan automatically
(only available for the camera with Pan/Tilt)
The vertical cruise will tilt automatically
(only available for the camera with Pan/Tilt)
Set preset position; this camera supports 6 preset positions.
What is a preset position? See tips below.
(only available for the camera with Pan/Tilt)
Go a specific preset position you have set
(only available for the camera with Pan/Tilt)
Take snapshot with the camera
Record video to PC, you can change the path in the settings menu
Way 2: Use TendaViewer APP in smartphone ,search camera and find IP address, then input the
IP address in brwser to enter the Web.
Run "Tenda Viewer", click "+" button on the top right corner , click "Add new online
device", click on "Search(LAN)", In the device list information appears as "192.168.XX" which
represents the IP address of the device. Then open a Web browser, in the address bar
directly enter the IP address of the camera and press Enter, the pop-up Web login window,
enter the user name: admin and password: admin, and then click "OK" to enter the Web
configuration interface.
Page 55

55
6.Official Website download
How to get the related software ,files and FAQ answer of Tenda IP camera ?
1. Visit tenda official website:www.tendacn.com.
2. Search your camera model in top right corner.
3. The related software, files and FAQ answer will be listed in the searching results .
 Loading...