

Page 1
V 2
www.tendacn.com
Page 2

Super easy IP Camera
2
is the registered trademark of Shenzhen Tenda Technology Co.,
Ltd. All the products and product names mentioned herein are the trademarks or
registered trademarks of their respective holders. Copyright of the whole product as
integration, including its accessories and software, belongs to Shenzhen Tenda
Technology Co., Ltd. Without prior expressed written permission from Shenzhen
Tenda Technology Co., Ltd, any individual or party is not allowed to copy, plagiarize,
reproduce, or translate it into other languages.
All photos and product specifications mentioned in this manual are for references
only. Upgrades of software and hardware may occur; Tenda reserves the right to
revise this publication and to make changes in the content hereof without obligation to
notify any person or organization of such revisions or changes. If you would like to
know more about our product information, please visit our website at
http://www.tendacn.com
Page 3

Super easy IP Camera
3
Contents
1. Product overview............................................................................................................................ 6
1.1 Package list............................................................................................................................6
1.2 System Requirement............................................................................................................. 7
1.3 Introduction...........................................................................................................................7
1.4 Features................................................................................................................................. 7
1.5 Hardware overview...............................................................................................................8
2. Installation.......................................................................................................................................9
2.1.Destop install.........................................................................................................................9
3. Smartphone View and Install........................................................................................................10
3.1 “CloudNeteye” download and install................................................................................. 10
3.1.1 iPhone.......................................................................................................................10
3.1.2 Android smartphone................................................................................................ 10
3.2 Add IP Camera....................................................................................................................10
3.2.1 IOS........................................................................................................................... 11
3.2.2 Android.................................................................................................................... 11
3.3 CloudNeteye Live View..................................................................................................... 12
3.4 IP Camera setting and management................................................................................... 13
3.4.1 Android smartphone................................................................................................ 13
3.4.1.1 Modify Camera..................................................................................................... 14
3.4.1.2 View Event............................................................................................................15
3.4.2 IPhone...................................................................................................................... 15
3.4.2.1 Modify camera......................................................................................................16
3.4.2.2 Event:.................................................................................................................... 17
4. PC View and Install...................................................................................................................... 17
4.1 Software function specification.......................................................................................... 17
Page 4

Super easy IP Camera
4
4.1.1 Add/Delete IP Camera.............................................................................................18
4.1.2 Video display........................................................................................................... 18
4.1.3 Main Functions........................................................................................................ 19
4.1.3.1 System setting....................................................................................................... 19
4.1.3.2 Playback, Browse snapshots and Event list..........................................................21
4.1.3.3 Software................................................................................................................ 23
4.1.4 Windows switching area..........................................................................................23
4.1.5 Device setting...........................................................................................................23
4.1.5.1 Edit Camera.......................................................................................................... 23
4.1.5.1.1 Schedule Recording...........................................................................................24
4.1.5.1.2 Remote setting................................................................................................... 24
4.1.5.2 Play/Stop all camera............................................................................................. 25
4.1.5.3 Export/Import device ,..........................................................................................25
5. Web View and Setting.................................................................................................................. 26
5.1 How to login Web.......................................................................................................................26
5.2. Web Set..............................................................................................................................28
5.2.1 View video...............................................................................................................28
5.2.2 Running....................................................................................................................30
5.2.3 Video Set..................................................................................................................31
5.2.3.1. Video parameter...................................................................................................31
5.2.3.2 Video attribute...................................................................................................... 32
5.2.3.3. Voice set...............................................................................................................33
5.2.3.4. OSD......................................................................................................................33
5.2.4 Network Set.......................................................................................................... 33
5.2.4.1. Network Parameter.............................................................................................. 33
5.2.4.2 Remote Access Setting (DDNS).....................................................................35
Page 5

Super easy IP Camera
5
5.2.5 WIFI.........................................................................................................................36
5.2.6 Alarm Set................................................................................................................. 36
5.2.7 Advanced Set........................................................................................................... 39
5.2.7.1. Automatic Capture...............................................................................................39
5.2.7.2. Email....................................................................................................................39
5.2.7.3. FTP.......................................................................................................................40
5.2.7.4 PTZ........................................................................................................................41
5.2.7.5. Record to TF/SD card..........................................................................................42
5.2.8 System Set................................................................................................................42
5.2.8.1. Time Set...............................................................................................................43
5.2.8.2 Initialization.......................................................................................................... 44
5.2.8.3 System log.............................................................................................................45
Chapter 6 Appendix.......................................................................................................................... 46
Appendix 1 FAQs..................................................................................................................... 46
Appendix 2 FCC....................................................................................................................... 49
Page 6

Super easy IP Camera
6
1. Product overview
1.1 Package list
Please check carefully if all listed items are included in the package as below:
1、One IP-Camera;
2、One Quick Installation Guide;
3、Mounting Bracket set;
4、One RJ45 Cable;
5、One Power Adapter;
Note: Please strictly follow the input voltage power of the adapter required, or it will damage the
device and this situation does not belong to the range of warranty. After purchase, if any
accessories mentioned above is missing or damaged, contact the place of purchase immediately.
1.2 System Requirement
1.CPU: 2.0GHz or above(recommend 3.0GHz)
2.RAM: 256MB or above(recommend 1.0GB)
3.Graphic card: 64MHz or above
4.OS: Windows 7,Vista, XP, Mac OS, Windows 8.
5.Internet Explorer6.0 or above, or compatible browser, Firefox etc
6.Android 2.3 or above
7.IOS 4.3 or above
1.3 Introduction
Tenda super easy IP Camera provides a professional home or small business surveillance Solution.
Through our mobile phone APPS “CloudNeteye” and PC software “CloudNeteyeForPC” users
can remote view directly, without DDNS domain name or setting any Port mapping on Router.
1.4 Features
Page 7

Super easy IP Camera
7
1.HD plus IRCUT(HD series):720p HD Video Quality, you can get rich detail and crisp image
quality. With IRCUT to ensure that the images are real color.
2.PTZ:You can PTZ control, move to the area you want to see, cover wider areas. (PTZ camera)
3.Plug and Play: Based on P2P cloud Technology, no need to configure the wireless Router and
DDNS, then you can view immediately, so easy.
4.Remote Viewing:User P2P APP you can remote view through the iPhone, Android phone, PC.
5.H.264 Video Compression:H.264 video compression technology, need the minimum
bandwidth network traffic while high image quality, more suitable for smartphone viewing.
6. Night Vision: This device can work well during the day, with infrared LED, it can also work at
the night, round-the-clock surveillance.
7. Wi-Fi Connect: Use Wi-Fi, camera easily connect to a wireless Router. You can easily get rid
of the trouble of deployment the Ethernet cable.
8.Micro SD/TF storage:You can store image and video on your Micro SD/TF card.
9.Motion detection and alarm:If you need to monitor a certain area, when an exception occurs
in the region, trigger an alarm automatically, send alarm information by e-mail, FTP.
10. Two-way audio :Not just screen monitor, you can also voice intercom. When you find the
abnormal situation, you can be reminded by voice intercom, to ensure safety.
Page 8

Super easy IP Camera
8
1.5 Hardware overview
C50S V2
Light up when starting,
extinguish when normal work
Page 9
Super easy IP Camera
9
2. Installation
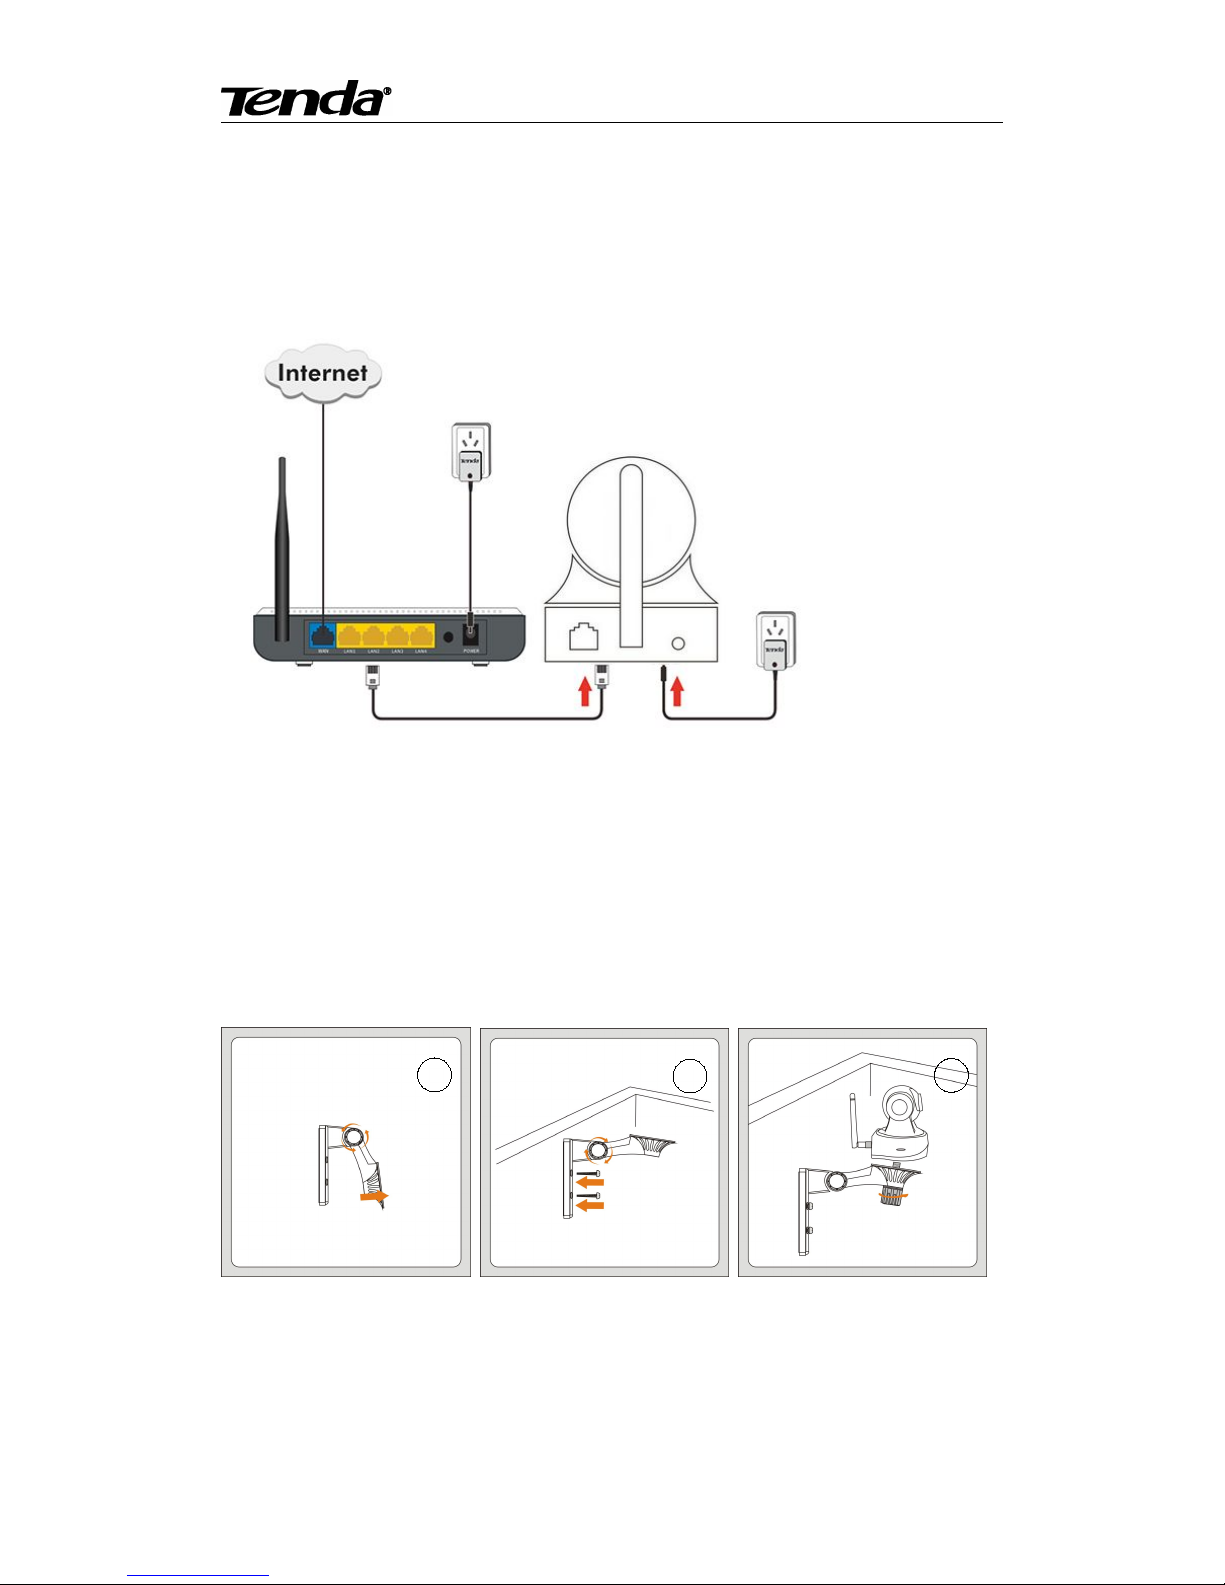
2.1.Destop install
Take out the camera, connect the included power adapter to camera, then connect Ethernet cable
between the camera and LAN port on your Router. (Please ensure the DHCP function of your
Router is enable.)
2.2Wall install
According to your needs, refer to the figure to install.
3
2
1
Page 10
Super easy IP Camera
10
Figure 1:Turn the collar on the bracket to loosen it then move the camera to the position you want .
Figure 2: Turn the collar on the bracket to tighten it,then fix the bracket to the wall using screws.
Figure 3:Camera connect to bracket, turn the collar on the bracket clockwise to tighten it.
3. Smartphone View and Install
3.1 “CloudNeteye” download and install
You can choose the following way to download and install "CloudNeteye".
3.1.1 iPhone
Serach “CloudNeteye” in “APP Store”, download and install.
3.1.2 Android smartphone
Search the " CloudNeteye" from “Google play”,download and install. If you do not have “Google
play” in smartphone, please downloand and install it at first.
3.2 Add IP Camera
As following, we will introduce how to add IP camera based on different operating systems IOS
and Android.
3.2.1 IOS
Page 11
Super easy IP Camera
11
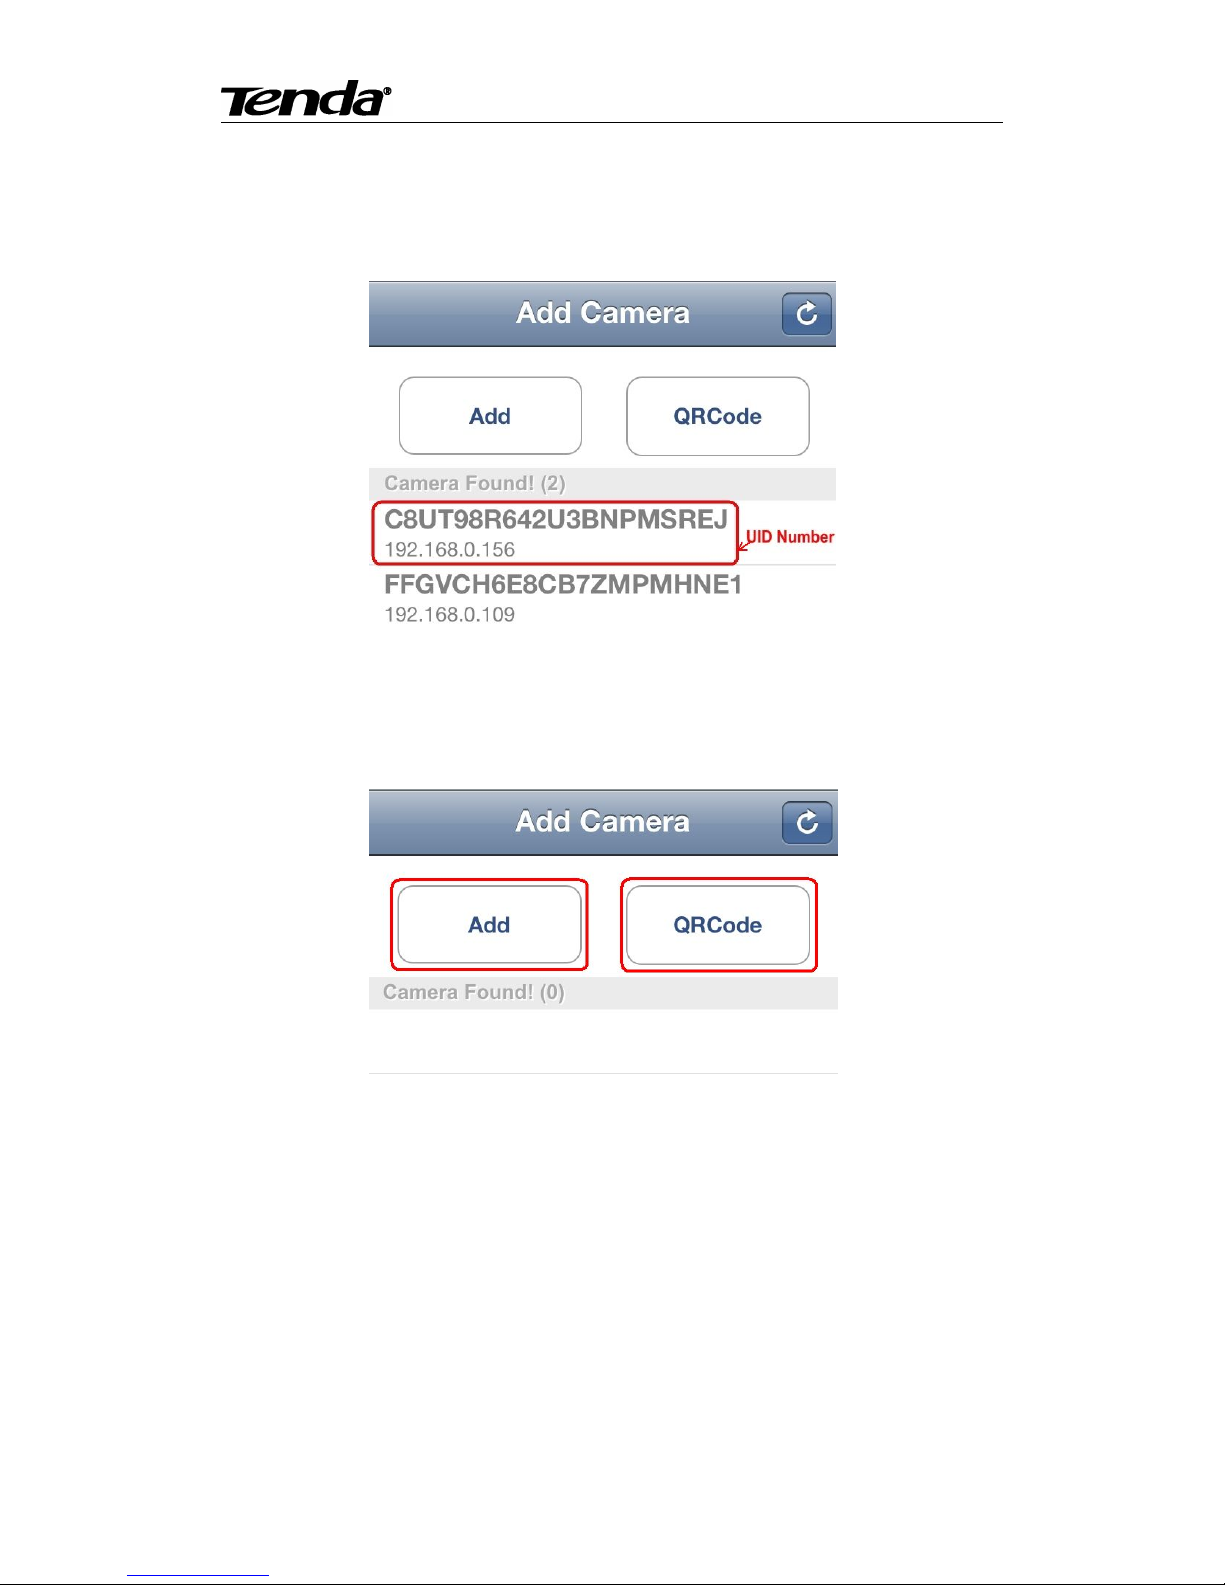
1. Run “CloudNeteye” APP on your IPhone.
2. You can choose one of following way A. B. C, to add camera.
A: If your iPhone and IP camera is connected to the same Router, “CloudNeteye” will search the
IP Camera automatically, and appear in the following screen.
You just need to click the camera UID Number , input password"admin "; then click "Save" to
finish add camera.
For some reason if your IPhone can't find camera automatically, pls click “Add” or “QRCode” as
the following screen.
B: Recommend to scan QR code to add camera. Click “QRCode”, and scan the UID QR code at
the bottom of the camera; input password “admin”; click “Save” to finish add camera.
C: Also, you can click “Add” to input camera UID number manually. (UID number is 20
alphanumeric below the UID QR code). Then input password “admin”, click “Save” to finish add
camera
Note: Because the UID number is case sensitive, please input the correct font format.
3.2.2 Android
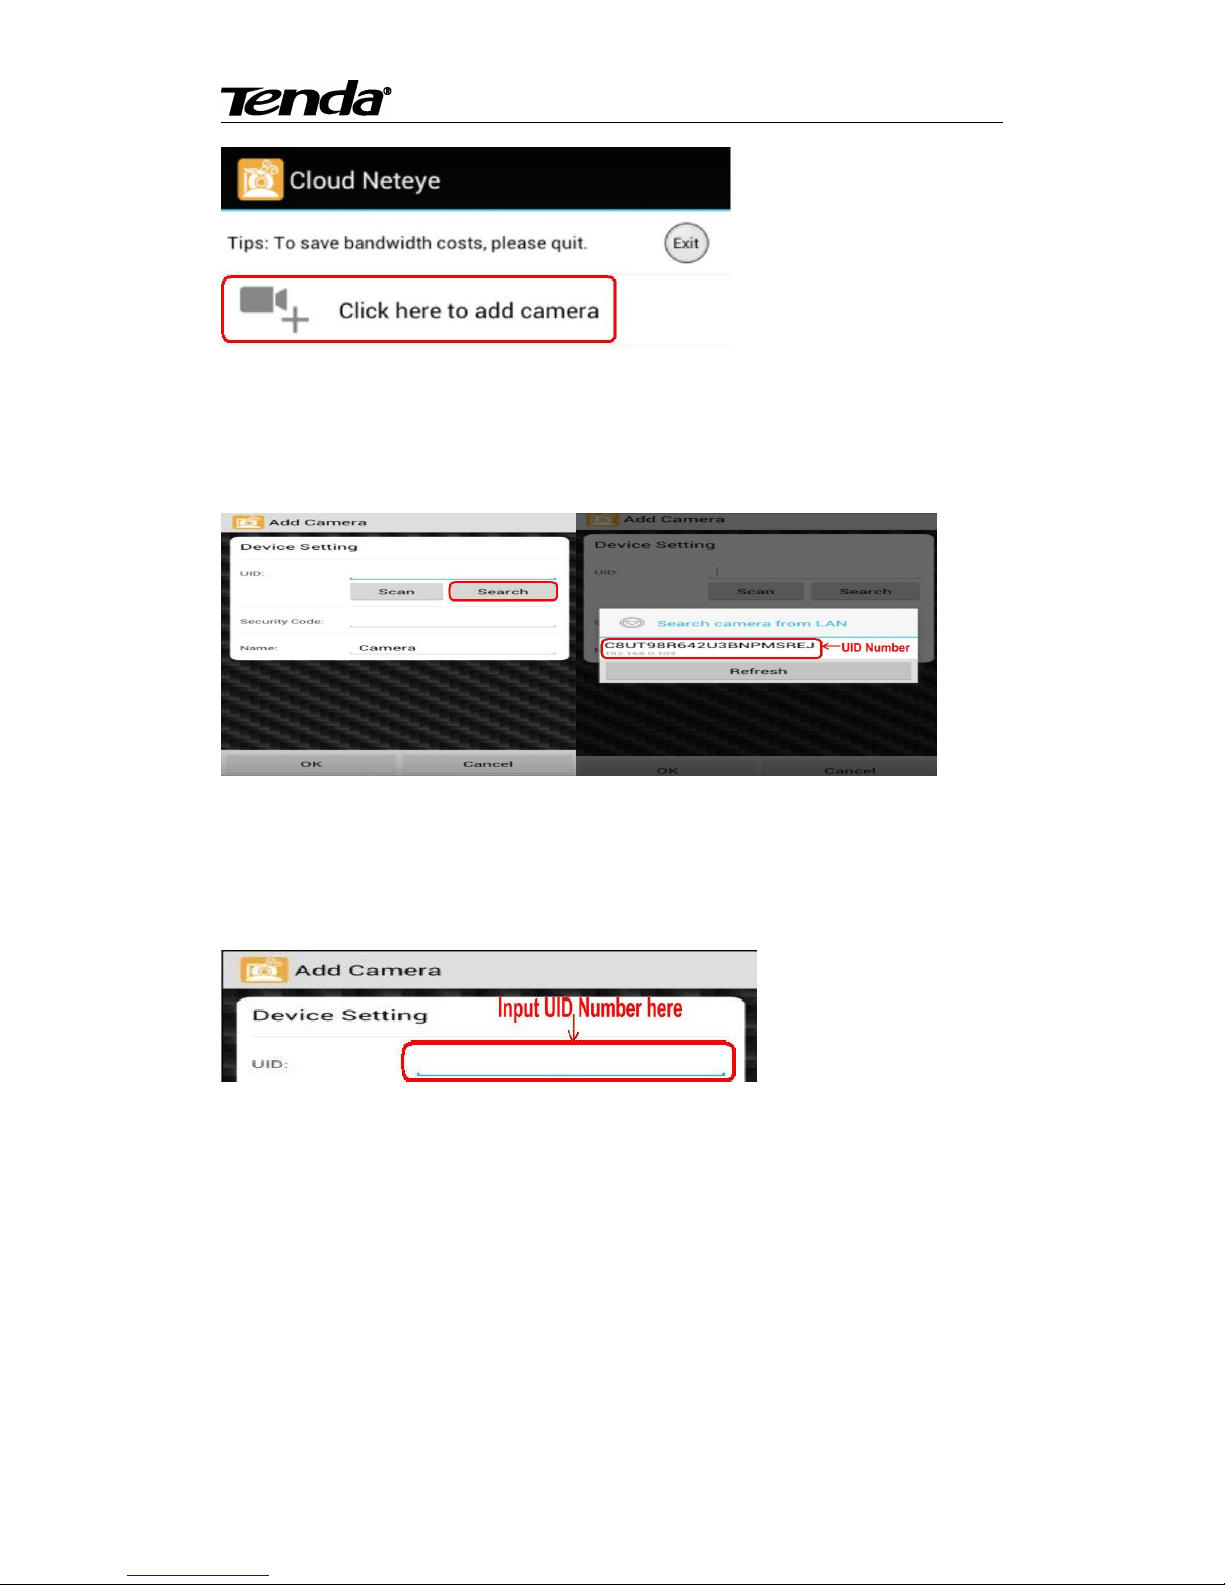
1. Run “CloudNeteye” on your smartphone.
2. Touch “Click here to add camera” in the following screen.
Page 12
Super easy IP Camera
12
3. You can choose one of following way A. B. C, to add camera.
A: If your smartphone and IP Camera is connected to the same Router, click “Search” to add
camera, as show in the following screen. Touch the UID number, then input password “admin”,
click “OK” to finish add camera.
For some reason if your smartphone can't find camera automatically, pls click “Scan” to add.
B: Scan the UID QR code at the bottom of the camera, input password “admin” , Click “OK” to
finish add camera.
C: Input UID number manually as show in the following picture; then input password" admin ",
click “OK” to finish add camera. (UID number is 20 alphanumeric below the UID QR code)
Note: Because the UID number is case sensitive, please input the correct font format.
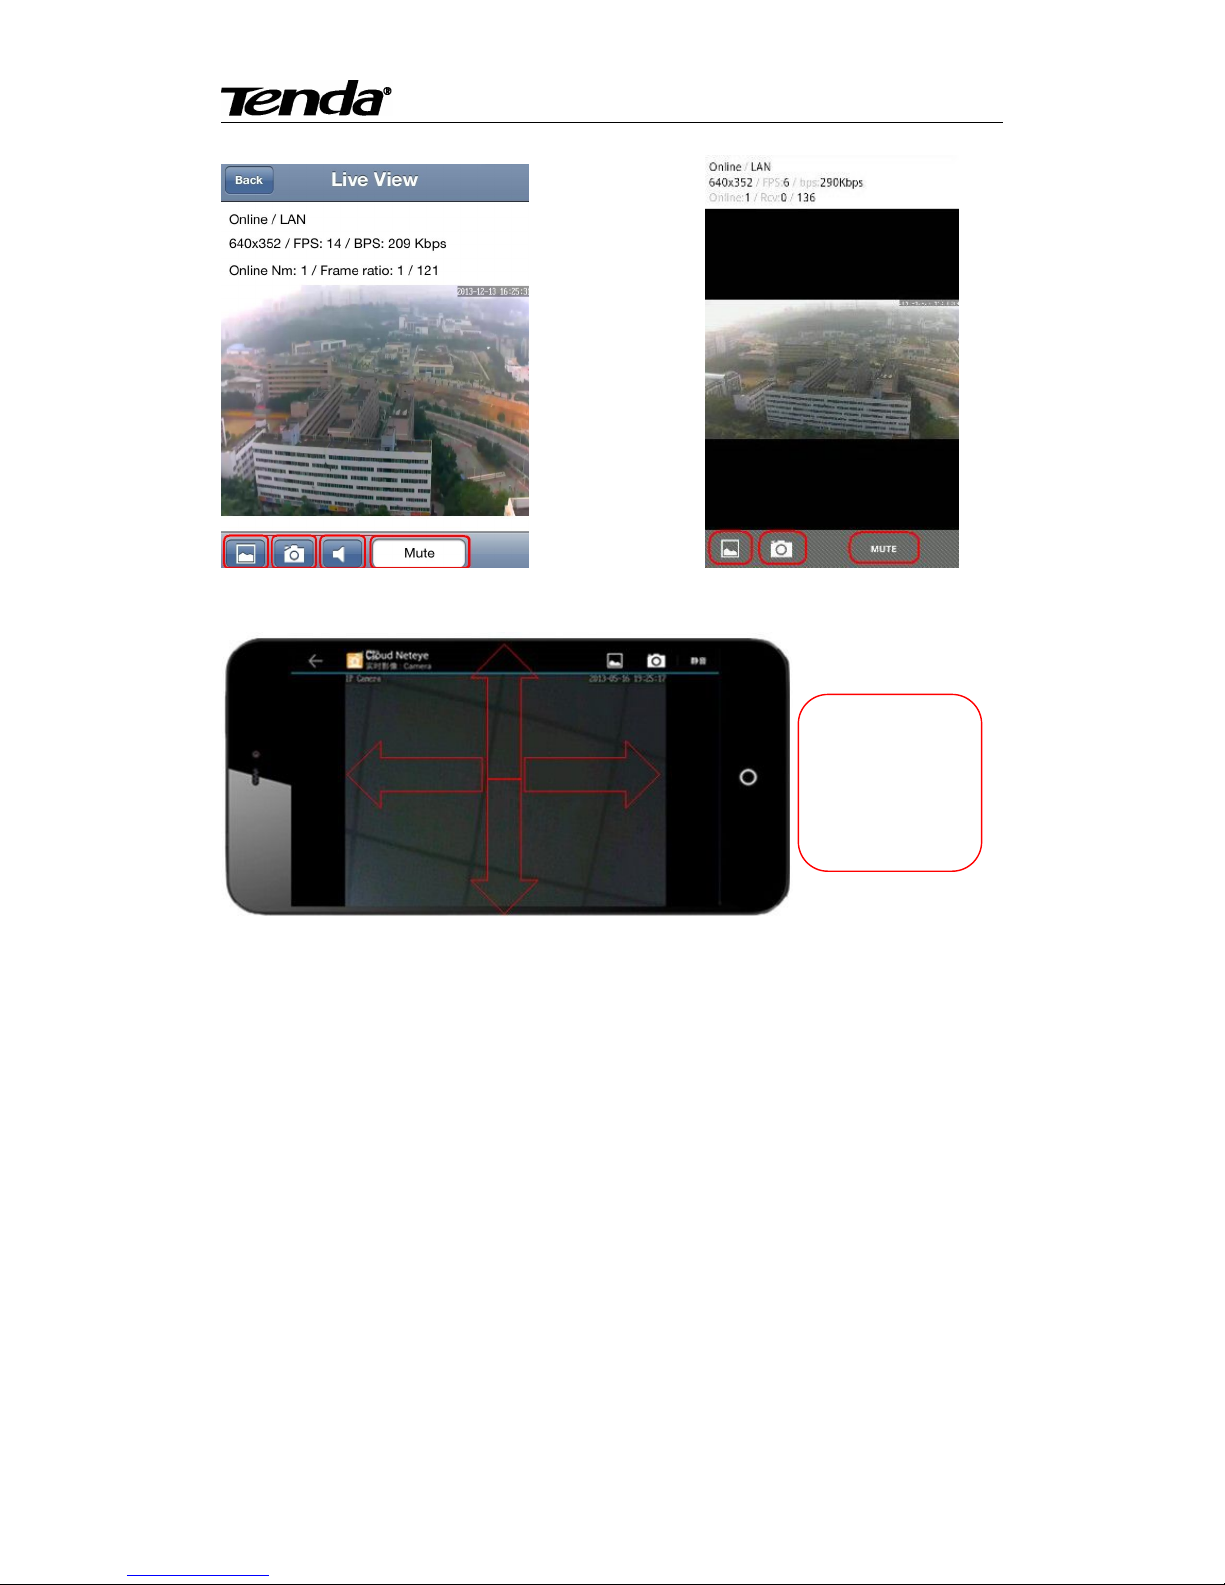
3.3 CloudNeteye Live View
After finish add IP camera(camera shows on line), you can view video, control PTZ, snapshot,
listen and speak etc.
Page 13
Super easy IP Camera
13
IOS Android
You can control
PTZ by Finger
sliding on screen,
UP, Down, Left
and Right.
Page 14
Super easy IP Camera
14
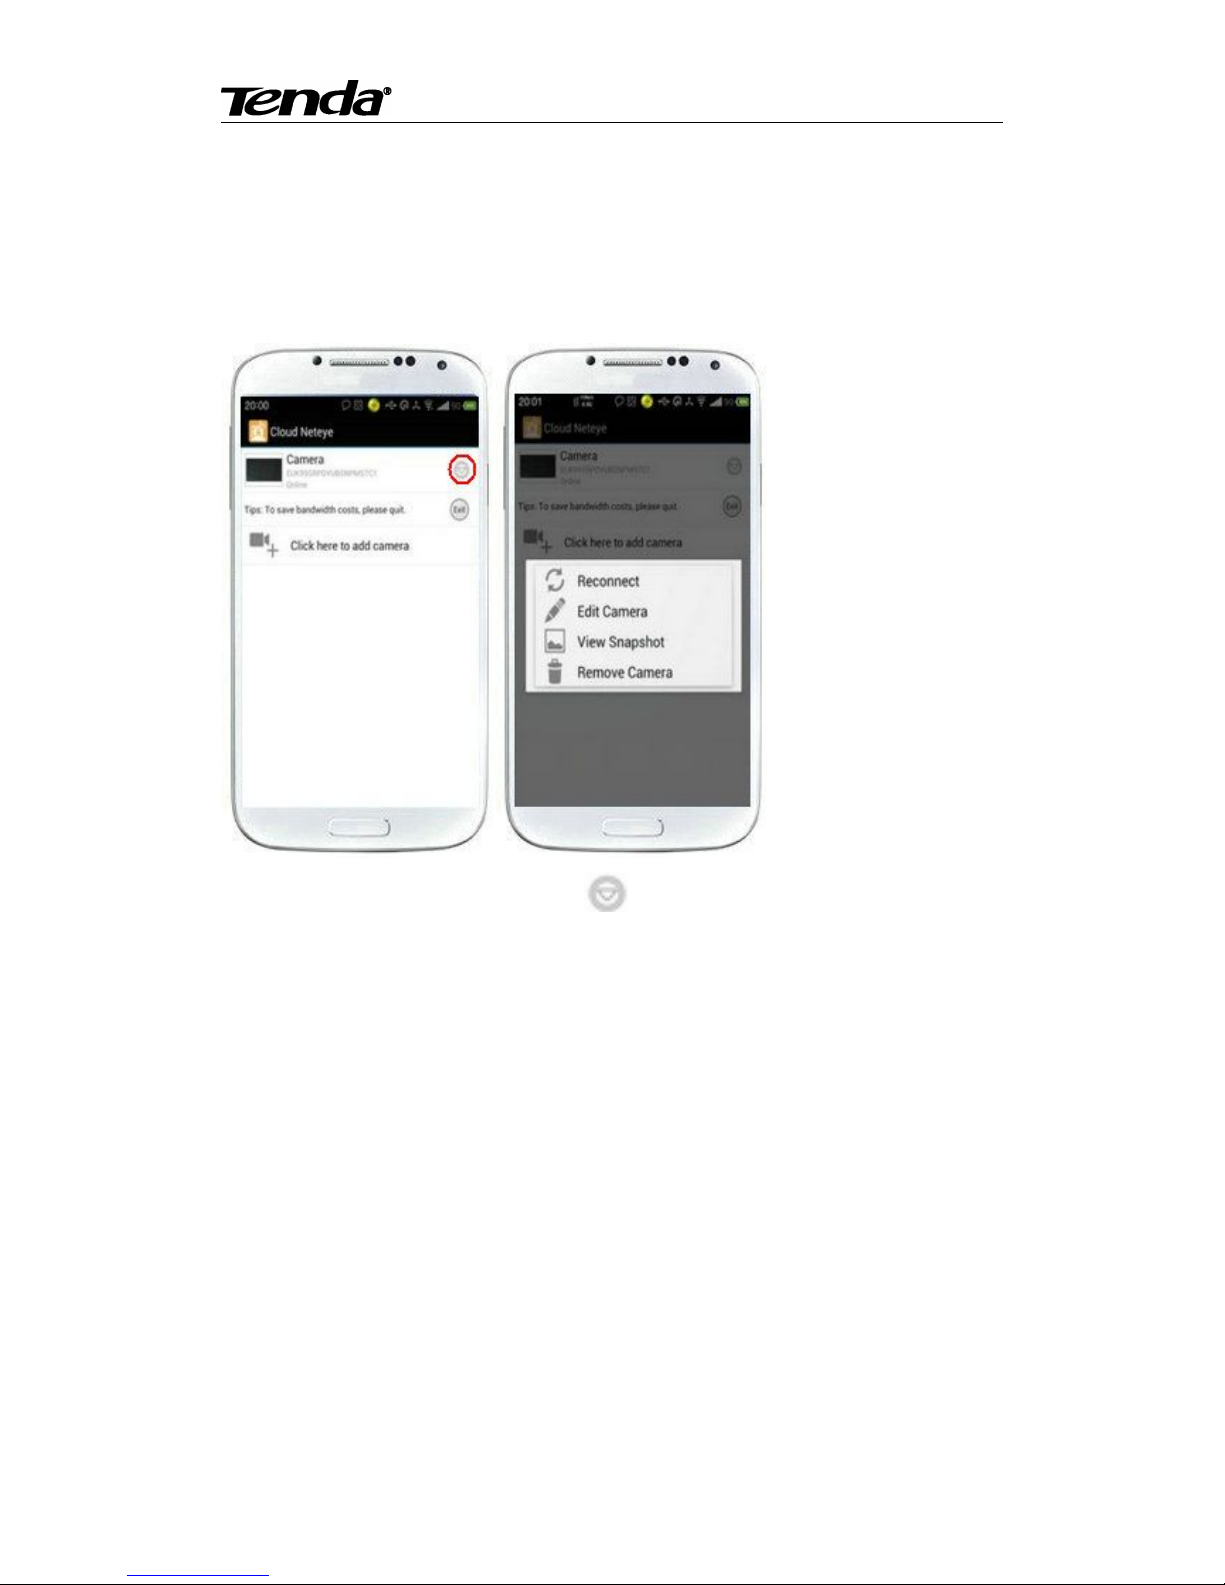
3.4 IP Camera setting and management
3.4.1 Android smartphone
Select device and hold on 3 seconds or click “ ” button near the device to do parameters
settings. User can set reconnect, edit camera, view snapshot and remove camera.
Page 15
Super easy IP Camera
15
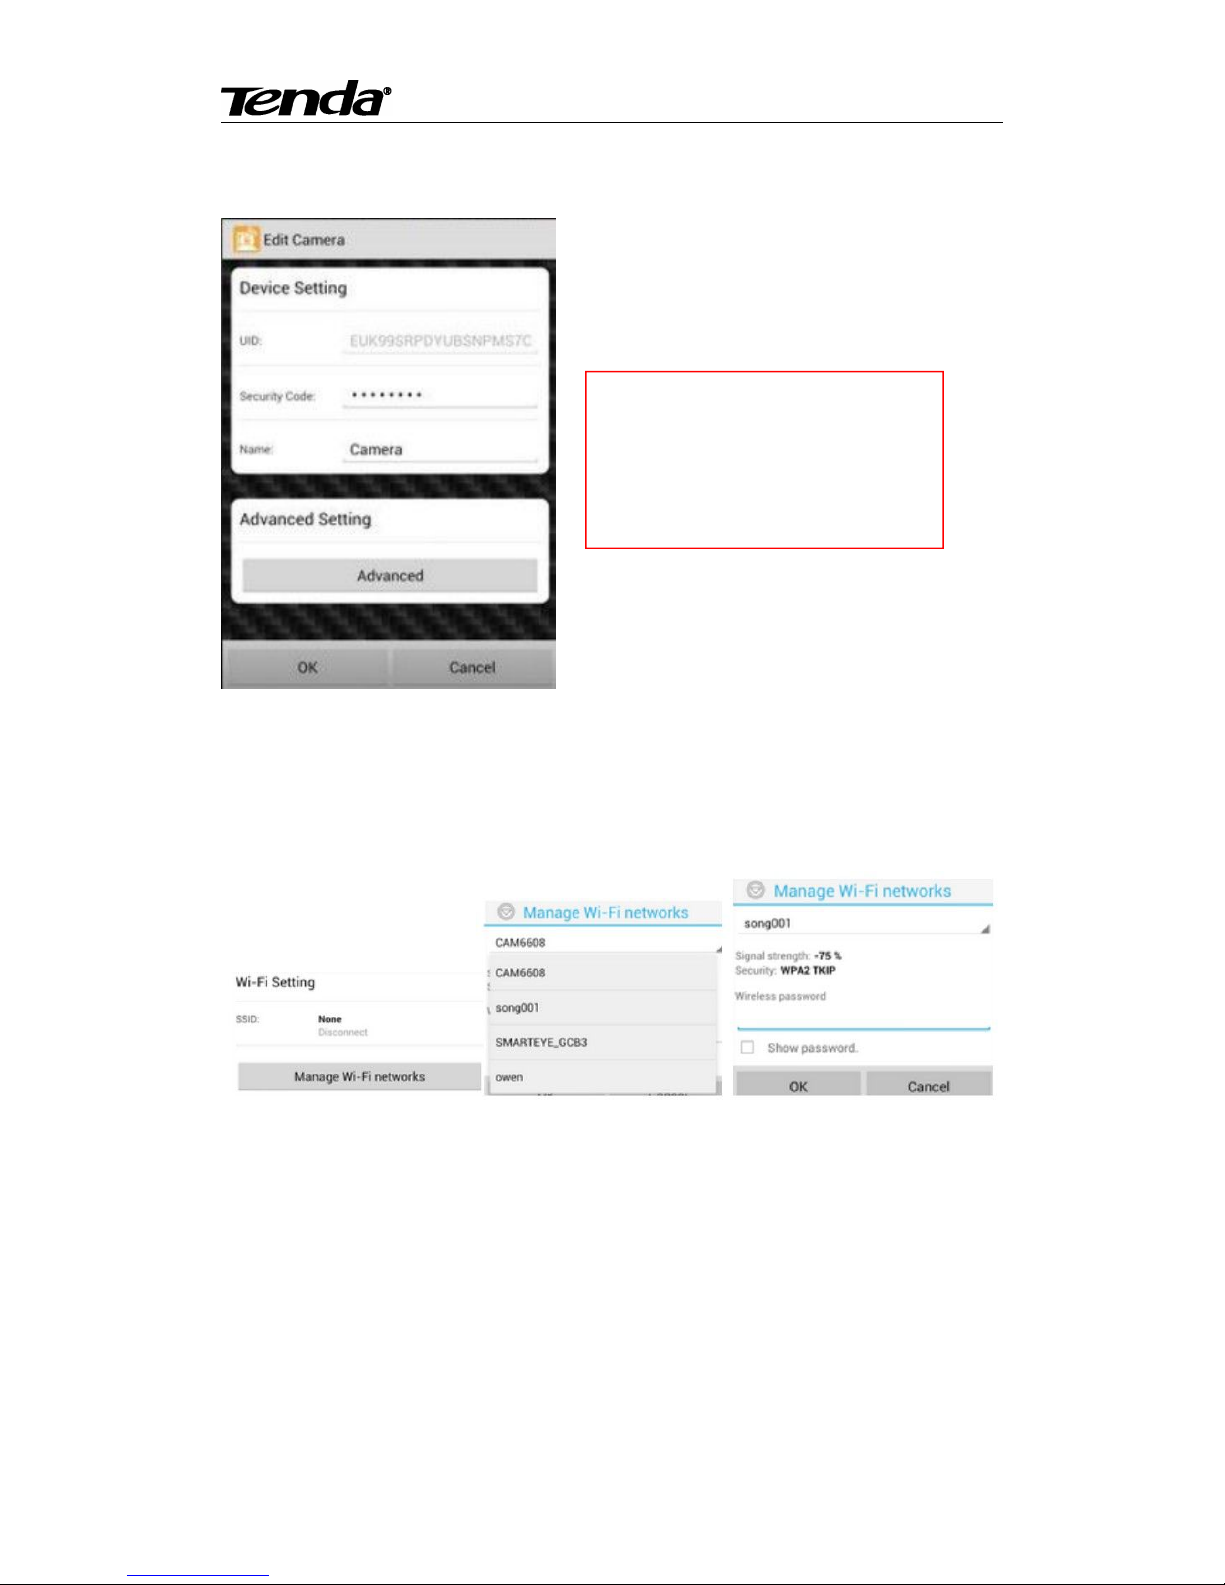
3.4.1.1 Modify Camera
Advanced Set
a) Can modify the camera’s password
b) Can adjust common video parameters: video quality, video flip, video mirror, Environment
mode
c) WiFi setting
Click “Manage Wi-Fi networks” to enter searched wireless list, and then you can select usable
wireless network.
d) Even Setting
1. Motion detection: If this function OFF, then the camera don’t send motion detction alarm. If
choose Low\Medium\High\Max means motion detection function ON. When sensitivity higher,
then the camera trigger alarm more easily; default area is full screen.
Enter “Edit Camera” to do two
settings as below:
1. Device Setting
2. Advanced Setting
Page 16

Super easy IP Camera
16
2. Notification: There is 4 alarm modes, Silent, Tones only, Vibrate only, Ringtone and Vibrate.
e) Recording Setting: There is 3 options, Off, Full time, Alarm. If choose “Off”, camera stop
recording; if choose “Full time”, camera record all day; if choose “Alarm”, camera start recording
after motion detection (need device’s motion detection ON, and insert MicroSD/TF card).
f) Format SDCard: click this button, format MicroSD/TF card (need camera with memory card,
otherwise without this button)
g) Device Information: Display Model, Version, Vender, Total size, Free size.
3.4.1.2 View Event
Click “View Event”, can check full time recording and motion detection recording.
3.4.2 IPhone
Click “ ” button beside the camera list, can do parameter settings and reconnect camera. User
can view event, add camera, view info.
Page 17

Super easy IP Camera
17
3.4.2.1 Modify camera
a)Security Code: can change the camera password
b) Video setting: can adjust common video parameters: Video quality, video flip, video mirror,
Environment mode
c) WiFi: Click “WiFi” to enter searched wireless list, and then you can select usable wireless
network.
d) Motion Detection: If this funtion OFF, camera can’t send motion detection alarm. If choose
Low\Medium\High\Max means motion detection function ON. When sensitivity higher, then the
camera trigger alarm more easily; default area is full screen.
e) Recording Mode: With 3 options Off/Full Time/Alarm. If choose “Off”, camera stop recording;
“Full time”, camera will record all the time; recommended “Alarm”, camera record after trigger
motion detection alarm (need motion detection function ON and device with MicroSD/TF card)
f) Format SDCard: click this button, then format the memory card (need camera with card,
otherwise, without this option
g) About Device: dispaly camera model, version, vender, total size and free size of memory card.
3.4.2.2 Event:
It can view the full time recording or alarm recording of camera
4. PC View and Install
Visit Tenda official website www.tendacn.com, search your model on the top right corner, click
and enter the product you found. Click the " Downloads" and get the "PC P2P remote Software" ,
install "CloudNeteyeForPC" after decompressed.
4.1 Software function specification
Page 18

Super easy IP Camera
18
Below pictures are the screenshot of “CloudNeteyeForPC”, we will explain detailed based
on the above 4 functions:
4.1.1 Add/Delete IP Camera
Add/Delete IP camera can search or manually add IP camera, can support max 16
cameras view at the same time. (when the button is in blue color, then can add or delete).
Click the blank of camera list, then click button ,click and search the connected camera in
the popup menu, double click the camera you found, the UID bar that is the UID bar of the
camera. Input the camera name you set (Letter and number), then input the default password
“ admin” or modify the password and click save to finish adding camera. Then you can see the
camera in the camera list. You can also input the camera name, UID bar and password and click
save, but you need to ensure the camera and computer in the same LAN.
Select the camera in the camera list, click delete camera button , then delete camera.
4.1.1 Video display
4.1.2 Main functions
4.1.3 Display Setting
4.1.4 Device list
Page 19

Super easy IP Camera
19
4.1.2 Video display
A. Show IP cam info, include name, connection way (LAN、P2P、RLY), resolutions and FPS.
B. Record manually. Click this button, when it shows in red, recording start; click again, recording
stop. This function is available when full time or schedule recording closed.
C. Control the IP Cam rotation manually. (need IP camera with pan tilt).
D. Two-way audio function, include listen and talk (need IP camera support this function).
E. Snapshot function.
F. Disconnect IP Cam function by manual.
G. When IP Cam connect as Relay, connection will close automatically after 1 minute. Users need
re-connect the camera manually. When disconnect, recording and alarm function is not available.
4.1.3 Main Functions
4.1.3.1 System setting
Click the setting button on the top right corner “ CloudNeteyeForPC” and enter the
system setting, as shown in the following photo:
Page 20

Super easy IP Camera
20
A: Snap shot and video recording path setting.
Users click “ ” to choose the disk and file in your computer to save snapshot and video
recording.
Users can set the length of single recording.
Users can set the camera stop recording when how many free space left in your disk.
Users can set to remove old video recording file when the free space is lower than setting.
B: Alarm settings
This function is available in condition of motion detection. When users closed motion detection in
smartphone APP setting, camera can’t alarm triggered.
Alarm can set as following:
1) Event recording, pls see 5.4 for reference.
2) Alarm sound effect, users can set the sound all wav format file in your computer.
A
B
C
Page 21

Super easy IP Camera
21
3) Send email when alarm,users can set their email address through Mail Setting.
Note 1:The following form is the parameter configuration of different email server:
Email server
SMTP host
SMTP host port
Yahoo
smtp.mail.yahoo.com
25
Sohu
smtp.sohu.com
25
Gmail
smtp.gmail.com
465
Tom
smtp.tom.com
25
After fill the information, pls click “Test”, choose “Allow” in appear tips, and click “Save” to
finish all email setting.
Pls see below picture for reference:
C: Misc setting
1) Set display language
Page 22

Super easy IP Camera
22
2) Set if close the status bar
3) Confirm when application close
4) Can choose if enable the login form
5) Set all device will be connected when program is started.
6) You can modify the password of the camera here.
4.1.3.2 Playback, Browse snapshots and Event list
Click the button ” on the top rigth corner of ” CloudNeteyeForPC”,can do the following
operations.
1) Playback
Search function, users can search all recording files of one or more camera in a certain time.
Delete function, can delete unnecessary files.
Users can view the payback of the recording, include play, pause, stop, drag watch and full screen
view.
Snapshot function, check snapshot pictures.
Event list
Page 23

Super easy IP Camera
23
Search function, users can search all even list of one or more camera in a certain time.
4.1.3.3 Software
Click the button on the top right corner of “CloudNeteyeForPC”, you can get the version
information of software.
4.1.4 Windows switching area
Display split, include 4, 6, 9, 16 split pane, double click to full screen view.When several camera
work together , you can select the suitable window to view, double click the camera can view in
full screen. You can also select to move the camera and the frame of camera.
4.1.5 Device setting
Page 24

Super easy IP Camera
24
4.1.5.1 Edit Camera
Choose some one IP camera in device list, click “ ”, can do “Schedule Recording”, “Remote
Setting” and “Remote Device Info”
4.1.5.1.1 Schedule Recording
1)Full-time recording. When open this function, manual recording function will stop.
2)According to the schedule. When this function start, manual recording function will stop.
3)Event recording. This function is available in condition of motion detection. When users closed
motion detection in smartphone APP setting, camera can’t alarm triggered.
4.1.5.1.2 Remote setting
Include Device password setting, WIFI setting, Camera video quality, video flip, environment
mode and motion detection settings.
Note: WiFi setting: click “Manager WiFi Network” click “WIFI SSID”, choose one available
Page 25

Super easy IP Camera
25
network in the following list; input password, then click “Save”.
4.1. 5.1.3 Remote device information: check the camera info.
4.1.5.2 Play/Stop all camera
“Play/Stop” all camera connected buttion , can support max 16 camera
connect or stop at the same time.
4.1.5.3 Export/Import device ,
Page 26

Super easy IP Camera
26
Click export or import the button , camera’s data will be import or export in form of
text.
5. Web View and Setting
5.1 How to login Web
You can log in the Web through the following two ways:
Way 1: Run “C50s v2.0 Setup Wizard” to enter Web.
Visit Tenda official website www.tendacn.com, search your model on the top right corner,
click and enter the product you found. Click the " Downloads" and get the "Setup Wizard" and
"User Manual"
Double click “C50s v2.0 Setup.exe”, run this software, click “next” according guide info,
until to following page.
1.As shown on the picture, click “ ”, (pls close the firewall and antivirus software in
your computer and make the DHCP server is ON in your Router); select camera in “Device list”;
2 Select the camera from the “device list”.
2
3
4
1
2
3
4
Page 27

Super easy IP Camera
27
3. Click “ ”, input “admin” in both user name and password on the appearing login
window, and then click “LOGIN” to enter the Web UI. You will then be able to watch videos or
do system setting. If you need to modify the IP address, please refer to the help item on the right
“How to Modify the Device IP config”.
Notes: The first time user enter into the UI, it will remind user to download player, click add in
item which under the address bar or “download player” and then install. As shown in the
following photo:
Open the loaded the folder and then double-click IPCamera.exe, select the installation path and
install video control.
Click here to run the
add in item and install
the player
Click here to install the
player
Page 28

Super easy IP Camera
28
User also can click and install the download play on top right corner web UI as below:
Way 2: Use “CloudNeteye” APPs in smartphone, search camera and find IP address, then input
the IP address in browser to enter the Web. Pls refer to User Manual “3.2 Add IP Camera”
section, use search IP camera function. In the device list info “ 192.168.X.X” means the camera’s
IP address. Open a browser in your computer, input the IP address and press “Enter”, input
“admin” in both user name and password on the appearing login window, and then click “LOGIN”
to enter the Web .
5.2. Web Set
5.2.1 View video
1) Status bar
2
3
4
5
1
Page 29

Super easy IP Camera
29
a. Monitor function button :Click the button,turn it like this ,you can hear the voice
from camera, click it again , it close and you can not hear the voice.
b. Communication button . Click the button, turn it like this , the voice will be
sent to the camera, click it again ,it close and the voice can not be sent to camera.
2) Multi-language mode selection
You can select simplified Chinese/Chinese Traditional/English/multi-language .
You can select 720P( Image quality is best), VGA(Image quality is good) to view video, for
example, using 720P under local area network, using VGA when the video is not smooth
3) PTZ Control
This camera support the PTZ function, click the up, down, left and right arrows, then can
control the camera to rotate, click the middle button can mediate the camera.
Turn the camera to a specific location, click ,then can set up preset position. User can
set up 8 preset position, for example, select 3 , click “SET” to save
the position.If you want to return to the position of 3, you can select 3 and click ,
then it can return to the preset position.
4) Snap/ record/TF/SD card/ replay
Click” snap”, it will have a small window to show the photo snapped, click save to save the
photo.
Click” record”, start record. Click again the “ record”, and then stop recording. You can
chose where you want to save the record.
Click “TF/SD”, the contents of TF/SD card will be shown in the pop-up page (if have install
TF/SD card. You can select the contents in the card and download.
Page 30

Super easy IP Camera
30
Click reply, it will pop-up a media player which can play video.
Tips:
1 The device supports max 32G MicroSD card. Please format the MicroSD card to FAT32
before use the card on camera. Please check if the TF/SD Card matches the camera or not
before purchasing the TF/SD Card.
2 Please insert the TF/SD card when the device power off, otherwise it will damage the
TF/SD card or the device can’t read the card.
5) Click “SYSTEM”, enter device configuration UI, you can configure your camera.
5.2.2 Running
Page 31

Super easy IP Camera
31
You can check some information of the device, such as software version, web version, Mac
address, TF/SD card status.
5.2.3 Video Set
5.2.3.1. Video parameter
The higher the value of bit rate, the clearer
the image, but the occupy band width is
also will be higher
The higher the value of frame, the smoother the
image it is.
Page 32

Super easy IP Camera
32
5.2.3.2 Video attribute
1) Click , and then click to adjust the ightness, color and
so on, so that can change the image quality.
2) Flip vertical and flip horizontal can adjust the video picture to up, down, left and right. This
can be use when device is installed in ceiling.
3) Frequency setting that is video lighting electric frequency rate adjustment, if the picture have
corrugation, it can be adjusted another frequency to remove the corrugation
4) When IR LED control is” auto”, and the external light is dark to some degree, the image is
black and white, if it shows the black and white status, but it is not night, you can close
infrared, then it can be normal. If the IR LED is closed at night or do not have light, the
Page 33

Super easy IP Camera
33
camera is blind
5.2.3.3. Voice set
It can adjust the voice of monitor and communication, the bigger the value, the bigger the voice.
(Notes: Please click the “Apply” after modified parameter)
5.2.3.4. OSD
It can change the name of camera while chose to turn on or turn off the video time and name.
(Notes: Please click the “Apply” after modified parameter)
5.2.4 Network Set
5.2.4.1. Network Parameter
There are both two way to obtain IP address and DNS setting. One is the fixed IP address,
one is dynamic IP address configuration. The camera defaults to obtain IP Address
Automatically” . User can chose dynamic IP address and DHCP service, then the Router which
Page 34

Super easy IP Camera
34
connect with your camera will assign an IP address to your camera automatically, setting the
interface configuration as default. Input the website in wan test bar for testing, such as input
www.tendacn.com.cn, click it. If it works, then your camera connecting is success.
(Notes: If the Router do not connect to the internet, the camera also can connect with
computer via Router (LAN), but it will not success if you do the WAN test.)
If you want to modify the IP address, select the “ fixed IP address”, modify the last section of
IP address, click the “SET”. The following picture is only for reference ,please modify the IP
address according to your network environment.
The default HTTP port is 80, if you do not modify the port, you can directly enter the camera IP in
the web address field; if you change the port, you need to add ":" and port number behind the IP
address. For example: If you modify the port is 8081, the camera IP address is 192.168.0.10. You
must enter 192.168.0.10:8081 to access camera.
Page 35

Super easy IP Camera
35
Camera support RTSP, if enable RTSP for verifying, you need to input the user name and
password when use RTSP to call the video.
Note: When you modify the parameters, you need to click “Save” to save your settings
5.2.4.2 Remote Access Setting (DDNS)
User can use third party DDNS, such as www.dynddns.org, just need to log in to the website
to apply for a free domain name, fill in the Settings box, and save the settings. Do the port
mapping, then you can remote access your IP camera. (Note: IP camera default to obtain the IP
address automatically, if you need to remote access via DDNS, the IP address should be manually
to be fixed IP address, or it can’t port mapping.
Note: When use third party domain name, if the port number is not 80, you need to add a
colon behind the domain name and plus the port number, such as: http://chen.dynddns.org:8081.
Note: 1. Problem of setting remote access, please refer to Addendum1
2.Please click “Apply” after modified parameter.
Page 36

Super easy IP Camera
36
5.2.5 WIFI
Select “Enable” and click “Scanning”, and then select wireless Router in Wifi List, enter its
password, click “Save” to save the wireless settings. After setting successfully, please pull out
network cable, then you can use the wireless function.
Note: When you modify the parameters, you need to click “Save” to save your settings
5.2.6 Alarm Set
If users set to monitor certain area, when there is exception occurs in this area, it will trigger
alarm, then can select motion detection. In the item of sensitivity, the higher the sensitivity value,
the easier to trigger alarm.
When the motion detection area is selected and applied, set the alarm mode (such as starting an
e-mail alert settings Email success) as well as selected arming time, when an exception occurs
within the selected area arming time will trigger an alarm, send pictures to corresponding mailbox.
Page 37

Super easy IP Camera
37
1) Area
Enable the "Motion Detection function" , that is you need to set the motion detection area.
Meanwhile you can choose high sensitivity ,medium or low in the monitor area
2)Alarm
Press the mouse button
and drag it as you want
can select the area of
random size
Page 38

Super easy IP Camera
38
A)Alarm Setting:
It can select several alarm way after triggered alarm.
B)Time Setting:Arming time is the time in the selected Arming, if exception occurs, alarm
will be triggered. Arming time defaults for all time . The Arming time corresponds to motion
detection alarm and audible alarm.
The device will be trigged only in the period of arming time which have detected alarm, you
can select the arming time according to your needing. Below picture is setting arming in 8:30-9:30
Monday. Click the square corresponding to arming time when setting, it will turn green after
selected.
Page 39

Super easy IP Camera
39
Notes: When setting time section, please adjust the system time at first. Please refer to 5.2.9.2
and set up system time.
(Note: Click the “apply” after modified parameter)
5.2.7 Advanced Set
5.2.7.1. Automatic Capture
Automatically take photo: During the selected time section, take a photo in each time interval and
send it to your mailbox. Select the capture, and then set the time section that you want to capture
photo..
Below is the image of 8:30-10:30 Saturday. Click the square corresponding to Arming time
when setting, it will turn green after selected.
(Note: Click the “save” after modified parameter)
5.2.7.2. Email
When detects alarming, it can send email to your appointed email box, but you need to set email
service parameters correctly. As shown below, click “Save” to save these parameters. Below is
email setting example, click set and save the parameter, and then click test. It can be checked if
this setting is success (user name and sender use the same email, the password is the password of
your mail box. Select your mailbox server which your user name belong to, to be the name of
server. Below for your reference.
Page 40

Super easy IP Camera
40
The contents filled in this photos is required item, you will fail to set the email if some
contents is incorrect.
Note: After fill all parameters, pls click “Send Email” to send test email.
(Note: Click the “save” after modified parameter)
5.2.7.3. FTP
The device will snap live pictures and send them to FTP server when alarming and FTP can store
video, but need to set the FTP setting correctly.
Before to use FTP function, please get the following ready.
Page 41

Super easy IP Camera
41
1) FTP user name and password
2) FTP storage space and the authority
3) Create sub-category to store the video or pictures.
5.2.7.4 PTZ
PTZ setting: Cruise laps, PTZ speed, self-test center and close the alarm when PTZ moving.
When setting up the appropriate data and click the application, then save and it works.
Rotation _number: Only can be number 1-50, click the UI left, right, up and down, the camera
will rotate as required.
(Note: For the number of cruise lap, better it is not too large; rotating too much long time will
shorten the machine life.)
Cradle Speed: PTZ speed have fast, medium and slow three levels for users to choose, on
behalf of the speed of PTZ rotation speed.
Center: When the self-test center opened, or when you restart the device camera
automatically centered by itself.
Stopptz: when start, the camera PTZ rotating, it will not trigger alarm, but when close this
function, camera rotating will also alarm.
Please click application after modified setting, then it can save.
Page 42

Super easy IP Camera
42
(Note: Click the “save” after modified parameter)s
5.2.7.5. Record to TF/SD card
Record to TF/SD card: start record to TF/SD card, it will automatic record and save to TF/SD
card in the selected time section.
Below is the image of 13:30—16:30 Tuesday. Click the square corresponding to Arming
time when settings, it will turn green after selected.
(Note: Click the “save” after modified parameter)
5.2.8 System Set
Page 43

Super easy IP Camera
43
There are 2 levels of user authorization in it.
Administrator: “admin” has the highest authority, can do any settings. The factory default
password: admin.
Guest: User can view the video, but can’t operate the device. The default password is guest.
Note: Pls change these 2 level passwords when your first use to ensure your safety.
Pls click “Apply” to save the settings.
5.2.8.1. Time Set
First time you use the camera, maybe the time on the picture is incorrect. Because camera need
to get current time by Internet. If the camera can connect to Internet, the time of the camera will
update automatically in a moment.
User can select the time zone
Note: Pls click “Save” to save the settings.
Page 44

Super easy IP Camera
44
5.2.8.2 Initialization
Reboot: When upgrade camera firmware, it will automatic restart camera. ”Audio format”
will l automatic restart camera.
Factory Default : Enable the camera back to factory setting.
Backup Data: If the back set up to date, the camera generate a file that you can save in your
computer, and you can directly import the file when needing. Your computer can back to the
parameter as you set before. This function is to facilitate the user to manage camera and do not
need to set the parameter any more.
Upgrade: Upgrade firmware is to upgrade camera system firmware and web, recovery and
restore your saved settings parameters.
Page 45

Super easy IP Camera
45
5.2.8.3 System log
System log is to record the user operation and alarm event, it shows the operation and the
time of event.
Page 46

Super easy IP Camera
46
Chapter 6 Appendix
Appendix 1 FAQs
1. After I connect the camera according to guide of Setup Wizard, and add camera by smartphone
scanning UID QR code, it shows “Unknown device”, why ?
When run “CloudNeteye” for the first time, pls make sure your smartphone and camera connect to
the same Wi-Fi Router.
(1) Check the camera’s power connection is normal or not. Check the camera’s LED is on or not,
if not bright, then check the camera’s power connection.
(2) Check the camera connect to Internet correctly or not. Camera must connect to the
Router’s LAN port, and check the Router’s LAN port LED is on or not. If no light, replace the
Ethernet cable and try again.
Note: The camera is unable to connect to the port of DSL MODEM, Cable MODEM, PON
MODEM that cascade to the Router.
(3) If still can’t view camera, pls enter Router configuration page to check if the DHCP function is
ON. (need DHCP function ON, because our IP Camera’ IP default to obtain from DHCP server).
2. When view with smartphone, camera shows “On Line”, but the picture is black screen, and
need wait for a moment, then the image display correctly. Why?
Because the video quality level is setted too high, and the network is not good enough, so the
camera response delayed. Pls change setting according to the next steps: Click “ ” or “ ”
click “Edit Camera” or “Advanced setting” “Video quality” , reduce a level (quality levels
are Max/High/Medium/Low/Min).
3. Run "CloudNeteye" APP on smartphones, why can't search camera?
Before running "CloudNeteye" APP , please according to the quick installation guide instruction,
run setup wizard, complete the camera configuration.
Before running CloudNeteye APP, please ensure that your smartphone and the camera is
connected to the same Router. Smartphone can via WI-FI to connect to the Router.
Page 47

Super easy IP Camera
47
4. Why I fail to recording. When click “Record to TF/SD Card”, then click “Apply” to save
setting, But after I refresh the page, the status still “Off”. Pls reset browser first: Tool
Internet OptionAdvancedReset. Close browser, and enter again. If the problem is still not
solved, then because that browser is not compatible with. Pls change another browser, like IE6,
IE8 and so on.
5. Why videos on camera are not true in color?
Cameras with CMOS chips are sensitive to light. Videos may not look good in color with dark
light or equipped infrared lens. To avoid this problem, please use CMOS cameras with dual filter
or a color lens.
8. Why smartphone viewing image is not clear?
Because the CloudNeteye default value of video quality is low, so the resolution is limited, you
can set by yourself. Run CloudNeteye, find the small triangle in device list, touch it enter into ”
Edit camera” - >” Advanced Settings” - >”Advanced” - >”Video setting” - >”Video Quality” page,
change video quality to “Medium”, “High” or “Max”. Note: The video quality is higher, the
greater consumption of mobile broadband traffic. To save your smartphone broadband traffic,
select the appropriate video quality.
9. Why my camera cannot connect to the existing wireless Router?
Before you can use connect to the existing wireless Router. you must first connect your PC to the
camera via an Ethernet cable and then enter WEB UI to configure some basic settings; or use
“CloudNeteye” or “CloudNeteyeForPC” to set WiFi.
10. My camera cannot be reset. What should I do?
Press the Reset button for about ten seconds when your camera is connected to power source.
11. Why do I have to reconfigure the camera to wirelessly connect to my wireless Router every
time when the Router restarts? Sometimes I cannot even search the wireless network of my Router.
A. Manually set your wireless Router’s channel to any number between 1-11. Do NOT use
channel 12 or channel 13.
B. Make sure your Router’s SSID is a combination of letters and numbers and does not include
Page 48

Super easy IP Camera
48
any special characters, Chinese characters or symbols!
C. Manually specify your wireless Router’s security settings, say, WPA2-PSK, AES. Do NOT use
the Auto option.
D. After you configured your Router as required above, connect your PC to the camera via an
Ethernet cable.
E. Open camera’s web page, search and select the Router’s SSID.
F. Enter the Router’s security key.
G. First disconnect the Ethernet cable and power supply from the camera and then reconnect the
camera to a power source.
H. Restart the camera and the problem will be resolved.
12. Why it is too slow when watched from my phone?
Please watch it via a 3G or WIFI connection. 2G connection may not be good enough for the
service. But sometimes the 3G network is not nice either. Try lowering the resolution on your
mobile phone if you use a H.264 format camera.
13. Is the camera’s wireless connection secured? Can others connect to my camera?
The camera’s wireless connection is well secured with WEP/WPA/WPA2 wireless encryptions.
14. What wireless protocols does the camera support?
It supports 802.11b/g/n and wireless transmission rate up to 150Mbps.
Page 49

Super easy IP Camera
49
Appendix 2 FCC
FCC Statement
This device complies with Part 15 of the FCC Rules. Operation is subject to the following two
conditions: (1) This device may not cause harmful interference, and (2) this device must accept
any interference received, including interference that may cause undesired operation.
This equipment has been tested and found to comply with the limits for a Class B digital device,
pursuant to Part 15 of the FCC Rules. These limits are designed to provide reasonable protection
against harmful interference in a residential installation. This equipment generates, uses and can
radiate radio frequency energy and, if not installed and used in accordance with the instructions,
may cause harmful interference to radio communications. However, there is no guarantee that
interference will not occur in a particular installation. If this equipment does cause harmful
interference to radio or television reception, which can be determined by turning the equipment
off and on, the user is encouraged to try to correct the interference by one of the following
measures:
- Reorient or relocate the receiving antenna.
- Increase the separation between the equipment and receiver.
- Connect the equipment into an outlet on a circuit different from that
to which the receiver is connected.
- Consult the dealer or an experienced radio/TV technician for help.
FCC Caution: Any changes or modifications not expressly approved by the party responsible for
compliance could void the user's authority to operate this equipment.
Page 50

Super easy IP Camera
50
This transmitter must not be co-located or operating in conjunction with any other antenna or
transmitter.
The manufacturer is not responsible for any radio or TV interference caused by unauthorized
modifications to this equipment.
Radiation Exposure Statement
This equipment complies with FCC radiation exposure limits set forth for an uncontrolled
environment. This equipment should be installed and operated with minimum distance 20cm
between the radiator & your body.
 Loading...