


AC8
Table of contents
 Loading...
I
AC1200 Dual-band Router
User Guide

i
Copyright Statement
© 2019 Shenzhen Tenda Technology Co., Ltd. All rights reserved.
is a registered trademark legally held by Shenzhen Tenda Technology Co., Ltd. Other
brand and product names mentioned herein are trademarks or registered trademarks of their
respective holders. Copyright of the whole product as integration, including its accessories and
software, belongs to Shenzhen Tenda Technology Co., Ltd. No part of this publication can be
reproduced, transmitted, transcribed, stored in a retrieval system, or translated into any language
in any form or by any means without the prior written permission of Shenzhen Tenda Technology
Co., Ltd.
Disclaimer
Pictures, images and product specifications herein are for references only. To improve internal
design, operational function, and/or reliability, Tenda reserves the right to make changes to the
products without obligation to notify any person or organization of such revisions or changes.
Tenda does not assume any liability that may occur due to the use or application of the product
described herein. Every effort has been made in the preparation of this document to ensure
accuracy of the contents, but all statements, information and recommendations in this document
do not constitute the warranty of any kind, express or implied.

ii
Preface
Thank you for choosing Tenda! Please read this user guide before you start.
Conventions
This user guide is applicable to the following routers. AC8 is used for illustration in this guide unless
it is specified. The contained images and UI screenshots are subject to the actual products.
Product model
Description
AC8
AC1200 Dual-band Gigabit Wireless Router
AC7
AC1200 Smart Dual-Band WiFi Router
AC5
AC1200 Smart Dual-band WiFi Router
Typographical conventions in this User Guide:
Item
Presentation
Example
Cascading Menus
>
Click Status > Device Status
Parameter and value
Bold
Set User Name to Tom.
UI control
Bold
On the Policy page, click the OK button.
Variable
Italic
Format: XX:XX:XX:XX:XX:XX
Message
“ ”
The “Success” message appears.
Symbols in this User Guide:
Item
Meaning
This format is used to highlight information of importance or special interest.
Ignoring this type of note may result in ineffective configurations, loss of data or
damage to device.
This format is used to highlight a procedure that will save time or resources.
Acronyms and Abbreviations
Acronym or Abbreviation
Full Spelling
DDNS
Dynamic Domain Name System
DHCP
Dynamic Host Configuration Protocol
DMZ
Demilitarized Zone
DNS
Domain Name System
IPTV
Internet Protocol Television

iii
Acronym or Abbreviation
Full Spelling
IPv4
Internet Protocol Version 4
IPv6
Internet Protocol Version 6
ISP
Internet Service Provider
PPP
Point To Point Protocol
PPPoE
Point-to-Point Protocol over Ethernet
PPTP
Point to Point Tunneling Protocol
SSID
Service Set Identifier
Technical Support
If you need more help, contact us by any of the following means. We will be glad to assist you as
soon as possible.
Hotline
Global: (86) 755-27657180
(China Time Zone)
United States: 1-800-570-5892
(Toll Free: 7 x 24 hours)
Canada: 1-888-998-8966
(Toll Free: Mon - Fri 9 am - 6 pm PST)
Hong Kong: 00852-81931998
Email
support@tenda.cn

iv
Content
1 Knowing your device ..................................................................................................................... 1
1.1 LED indicator .......................................................................................................................... 1
1.1.1 AC8/AC5 ...................................................................................................................... 1
1.1.2 AC7 .............................................................................................................................. 2
1.2 Ports and buttons ................................................................................................................... 3
1.2.1 AC8/AC5 ...................................................................................................................... 3
1.2.2 AC7 .............................................................................................................................. 3
1.3 Label ....................................................................................................................................... 4
2 Web UI ........................................................................................................................................... 6
2.1 Logging in to the web UI ........................................................................................................ 6
2.2 Logging out of the web UI ...................................................................................................... 7
2.3 Web UI layout ......................................................................................................................... 8
3 Status ............................................................................................................................................. 9
3.1 Viewing Internet connection status ....................................................................................... 9
3.2 Viewing online devices and real-time speed ....................................................................... 10
3.3 Viewing system information ................................................................................................ 11
4 Internet settings .......................................................................................................................... 12
4.1 Router mode ........................................................................................................................ 12
4.1.1 Setting up an internet connection with PPPoE ......................................................... 13
4.1.2 Setting up an internet connection with dynamic IP.................................................. 14
4.1.3 Setting up an internet connection with static IP ....................................................... 15
4.2 WISP mode ........................................................................................................................... 16
4.3 Universal repeater mode ..................................................................................................... 20
4.4 AP mode ............................................................................................................................... 24
5 Wireless settings ......................................................................................................................... 26
5.1 WiFi name and password ..................................................................................................... 26
5.1.1 Overview ................................................................................................................... 26
5.1.2 Customizing your WiFi name and password ............................................................. 27
5.2 Guest network ...................................................................................................................... 29
5.2.1 Overview ................................................................................................................... 29
5.2.2 Setting up the guest network .................................................................................... 30

v
5.3 WiFi signal strength .............................................................................................................. 31
5.4 Wireless parameters ............................................................................................................ 32
5.5 Beamforming ........................................................................................................................ 34
5.6 WPS ...................................................................................................................................... 36
5.6.1 Overview ................................................................................................................... 36
5.6.2 Connecting devices to the WiFi network using WPS ................................................ 36
6 Bandwidth control ....................................................................................................................... 39
6.1 Configuring bandwidth control ............................................................................................ 40
6.2 Blocking a device .................................................................................................................. 40
7 Parental controls ......................................................................................................................... 41
7.1 Overview .............................................................................................................................. 41
7.2 An example of configuring parental controls ....................................................................... 42
8 Sleeping mode ............................................................................................................................. 43
8.1 LED control ........................................................................................................................... 43
8.2 WiFi schedule ....................................................................................................................... 44
8.2.1 Overview ................................................................................................................... 44
8.2.2 An example of configuring WiFi schedule ................................................................. 44
9 Advanced ..................................................................................................................................... 46
9.1 MAC address filter ................................................................................................................ 46
9.1.1 Overview ................................................................................................................... 46
9.1.2 Setting MAC address filter rules ................................................................................ 46
9.1.3 An example of setting a MAC address filter rule ...................................................... 47
9.2 IPTV ...................................................................................................................................... 49
9.2.1 Overview ................................................................................................................... 49
9.2.2 An example of configuring IPTV ................................................................................ 49
9.3 IP-MAC binding..................................................................................................................... 51
9.3.1 Overview ................................................................................................................... 51
9.3.2 Configuring an IP-MAC binding rule .......................................................................... 51
9.4 Port forwarding .................................................................................................................... 53
9.4.1 Overview ................................................................................................................... 53
9.4.2 An example of configuring a port forwarding rule .................................................... 53
9.5 DDNS .................................................................................................................................... 56
9.5.1 Overview ................................................................................................................... 56
9.5.2 An example of configuring DDNS .............................................................................. 57
9.6 DMZ host .............................................................................................................................. 59

vi
9.7 UPnP ..................................................................................................................................... 60
9.8 Firewall ................................................................................................................................. 60
10 IPv6 .............................................................................................................................................. 61
11 Administration ............................................................................................................................. 64
11.1 Login password ................................................................................................................... 64
11.2 WAN parameters ................................................................................................................ 65
11.3 LAN parameters .................................................................................................................. 67
11.4 Remote web-based management ...................................................................................... 68
11.5 Date & Time ....................................................................................................................... 71
11.6 Device management .......................................................................................................... 72
Appendix ............................................................................................................................................ 77
A.1 Configuring the computer to obtain an IP address automatically ....................................... 77
A.1.1 Windows 8 ................................................................................................................ 77
A.1.2 Windows 7 ................................................................................................................ 79
A.1.3 Windows 10 .............................................................................................................. 81
A.2 Default parameters .............................................................................................................. 83
1
1 Knowing your device
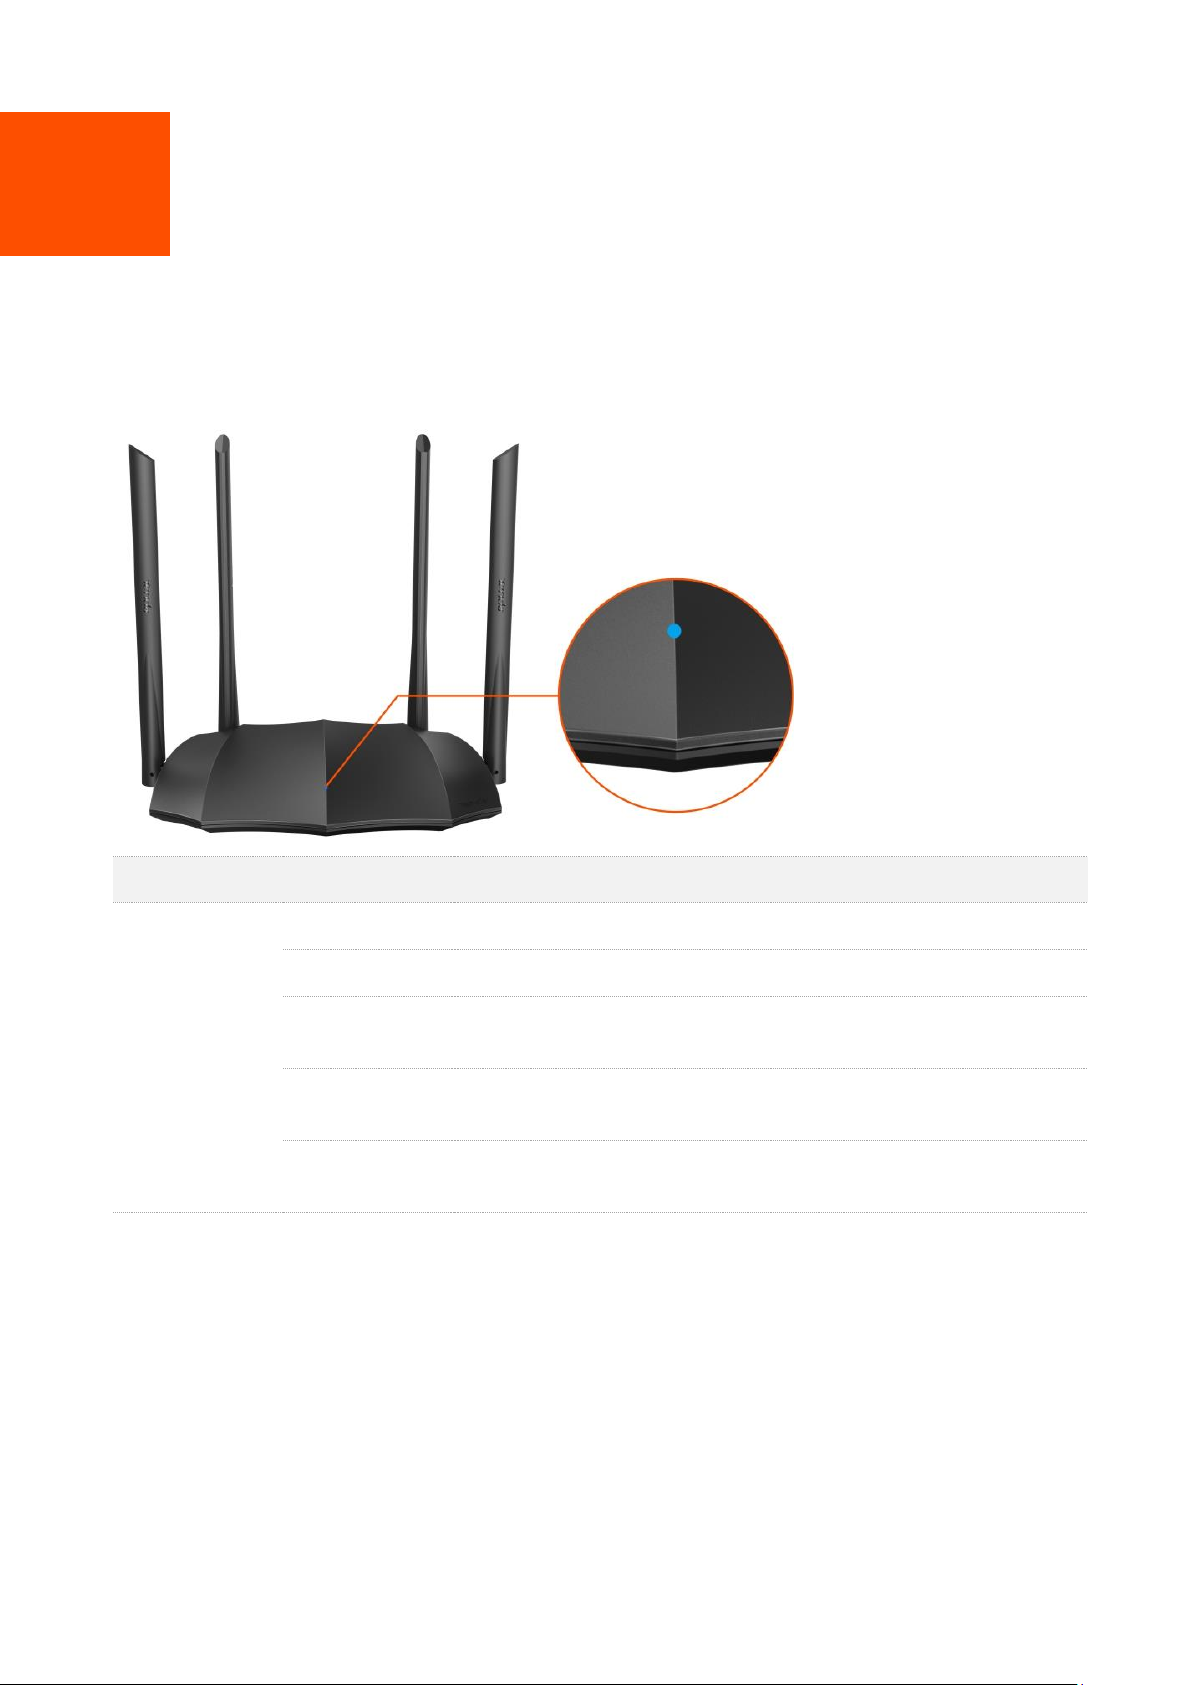
1.1 LED indicator
1.1.1 AC8/AC5
LED indicator
Status
Description
LED indicator
Solid on
The router is starting or connected to the internet successfully.
Slow blinking
The router fails to connect to the internet.
Fast blinking for
3 seconds
A wired device is connected or disconnected to the router.
Fast blinking for
8 seconds
The migration of PPPoE user name and password succeeds.
Fast blinking for
2 minutes
The router is performing WPS negotiation.
2
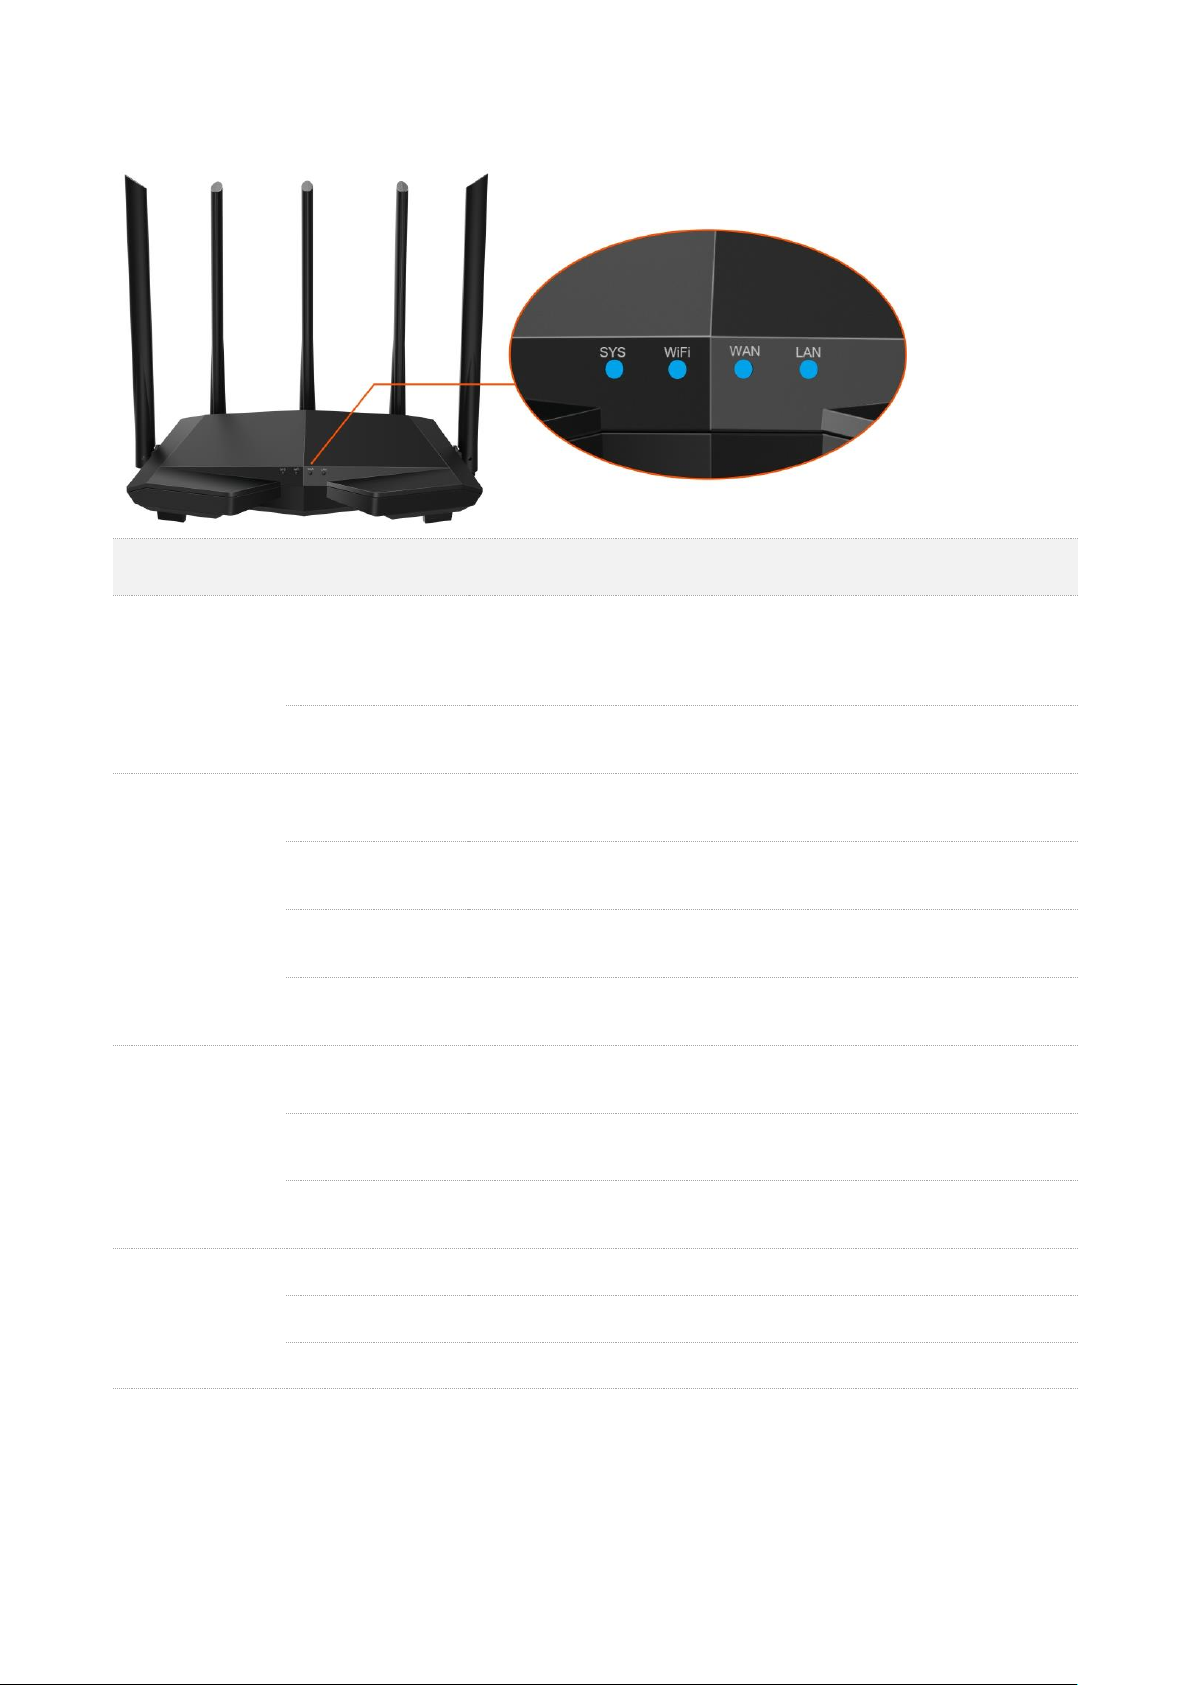
1.1.2 AC7
LED indicator
Status
Description
SYS
Solid on
The router is starting.
If the indicator still light solid on after the router completes
startup, it indicates that the system is faulty.
Blinking
The system is working properly.
WiFi
Solid on
At least the 2.4 GHz or 5 GHz WiFi network is enabled.
Fast blinking
Data is being transmitted wirelessly.
Slow blinking
The router is performing WPS negotiation.
Off
The WiFi network is disabled.
WAN
Solid on
The WAN port is connected properly.
Blinking
Data is being transmitted over the WAN port.
Off
The WAN port is disconnected or improperly connected.
LAN
Solid on
The LAN port is connected properly.
Blinking
Data is being transmitted over the LAN port.
Off
No device is connected to any LAN port of the router properly.
3
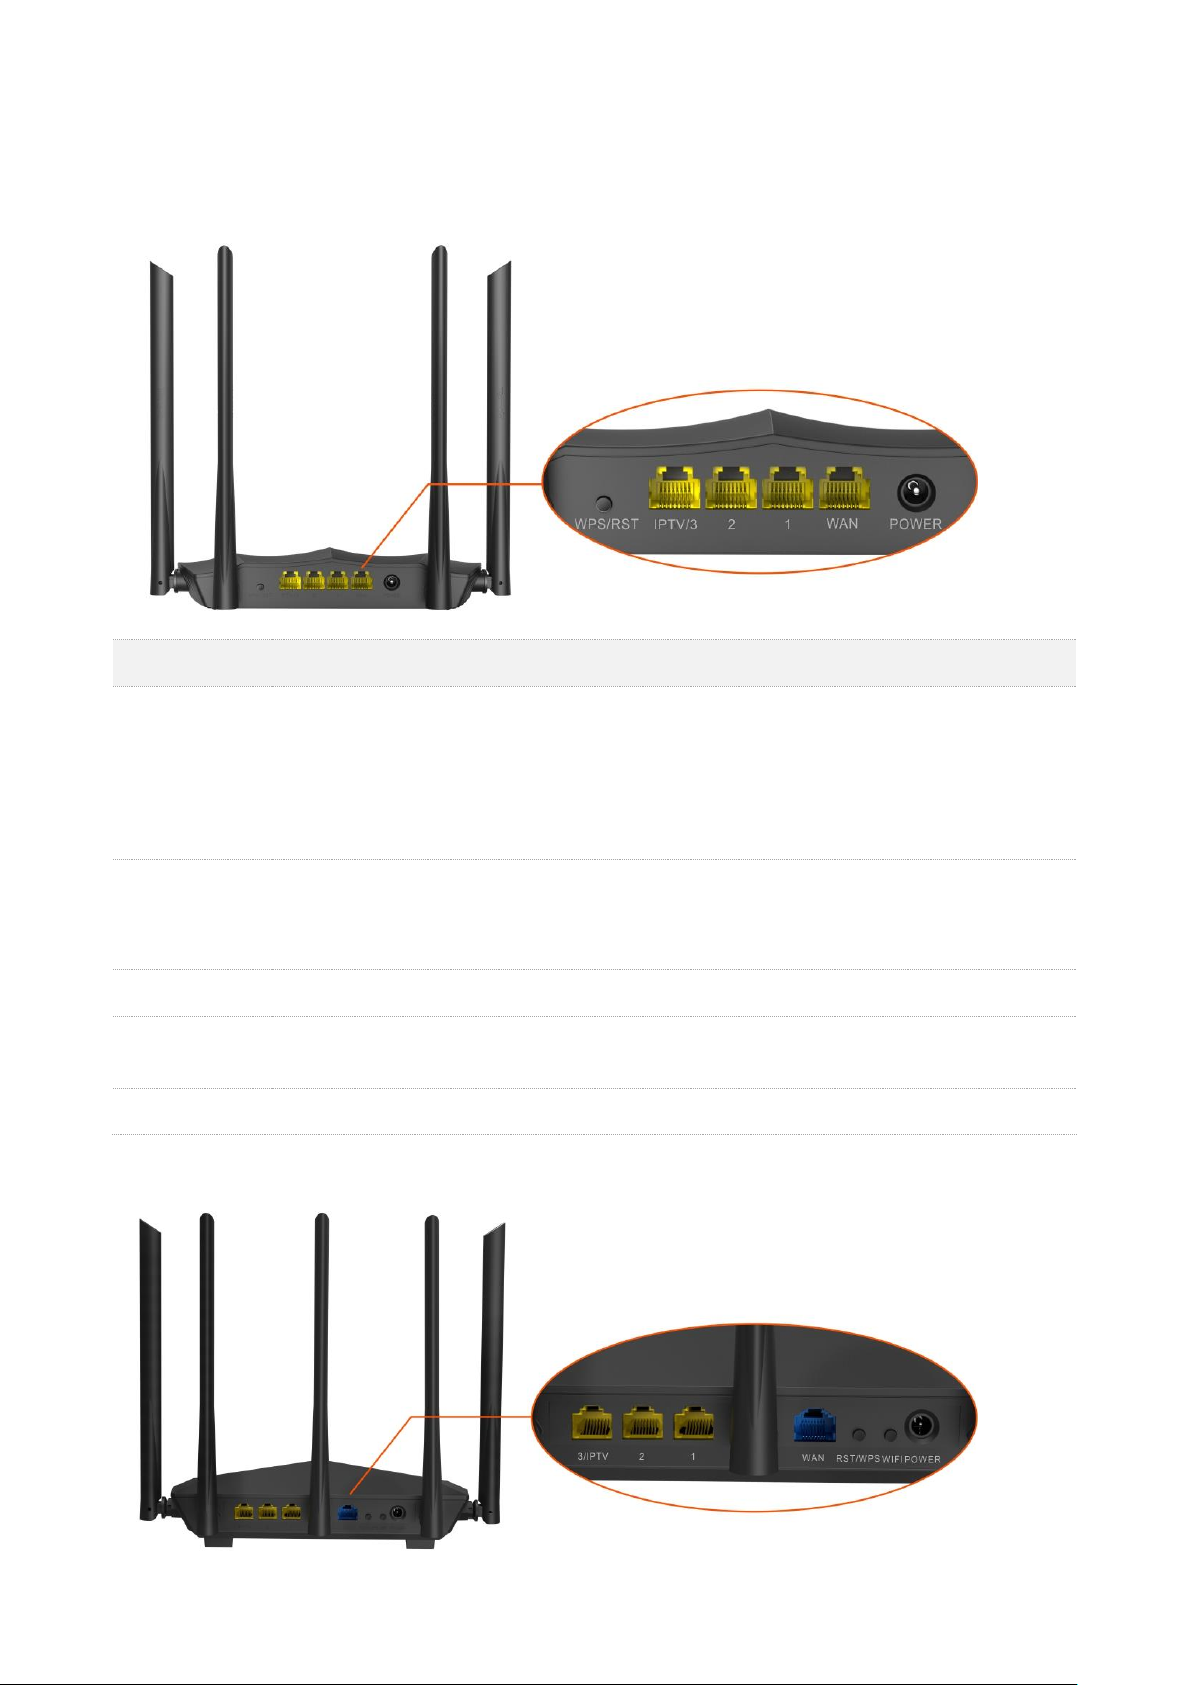
1.2 Ports and buttons
1.2.1 AC8/AC5
Button/Port
Description
WPS/RST
Used to start the WPS negotiation process, or to reset the router.
WPS: Press the button of the router for 1 to 3 seconds. Within 2 minutes, enable the WPS
function of the other WPS-supported device to establish a WPS connection.
Reset: Hold down the button for about 8 seconds, and then release it when the LED
indicator blinks fast. The router is reset successfully.
IPTV/3
By default, it is a LAN port.
If the IPTV function of the router is enabled, it serves only as an IPTV port used to connect
to a set-top box.
1/2
Used to connect to the wired devices such as computers or switches.
WAN
Used to connect this router to the internet, such as a LAN port from the modem or the
Ethernet jack provided by your ISP.
POWER
Used to connect to the included power adapter.
1.2.2 AC7

4
Port/Button
Description
POWER
Power jack.
Used to connect to the included power adapter.
WIFI
Used to enable/disable the WiFi network of the router.
RST/WPS
Used to start the WPS negotiation process, or to reset the router.
WPS: Press the button of the router for 1 to 3 seconds. Within 2 minutes, enable the
WPS function of the other WPS-supported device to establish a WPS connection.
Reset: Hold down the button for about 8 seconds. Release it when all the LED indicators
blink once. The router is reset successfully.
WAN
Used to connect this router to the internet, such as a LAN port from the modem or the
Ethernet jack provided by your ISP.
1/2
They are LAN ports used to connect to the wired devices such as computers or switches.
3/IPTV
By default, it is a LAN port.
If the IPTV function of the router is enabled, it serves only as an IPTV port used to connect
to a set-top box.
1.3 Label
The bottom label shows the SSID, login IP address, serial number and MAC address of the router.
See the following figure. Here AC8 is used for illustration.
IP Address: It is the default address used to log in to the web UI of the router.
MAC: It specifies the MAC address of the router.
Serial No.: It is required if you need technical assistance to repair your device.

5
SSID: It specifies the default WiFi name of the router.
Pin No.: It specifies the PIN code of the router.
6
2 Web UI
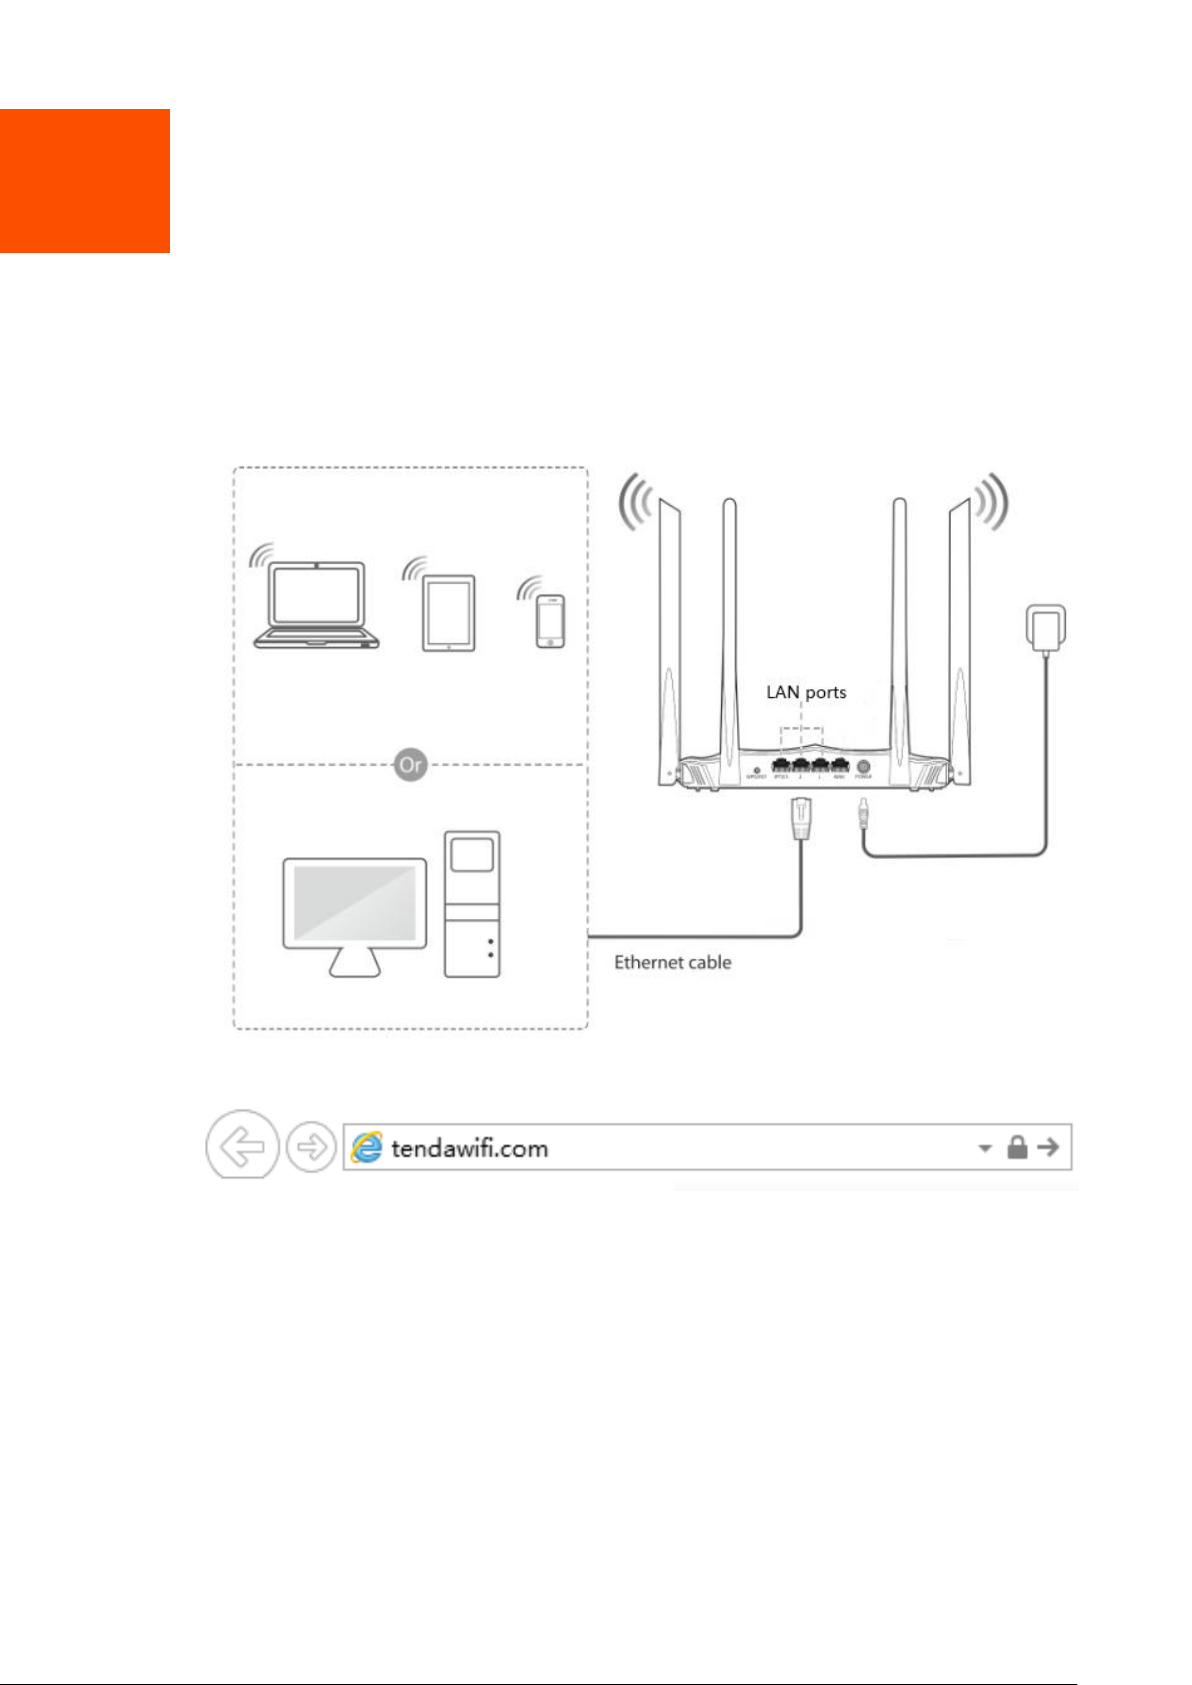
2.1 Logging in to the web UI
Step 1 Connect your smartphone to the wireless network, or connect your computer to a LAN
port of the router.
Step 2 Start a web browser on the device connected to the router, visit tendawifi.com.
---End
7
The following page appears.
If the above page doesn’t appear, check whether the computer is obtaining an IP address
automatically. Refer to A.1 configuring the computer to obtain an IP address automatically.
2.2 Logging out of the web UI
If you log in to the web UI of the router and perform no operation within 5 minutes, the router logs
you out automatically. You can also log out by clicking Logout on the upper right corner of the web
UI.

8
2.3 Web UI layout
The web UI of the router consists of two sections, including the navigation bar and the
configuration area. See the following figure.
SN
Name
Description
❶
Navigation
bar
Used to display the function menu of the router. Users can select functions in
the navigation bar and the configuration appears in the configuration area.
❷
Configuration
area
Used to modify or view your configurations.
1
2
9
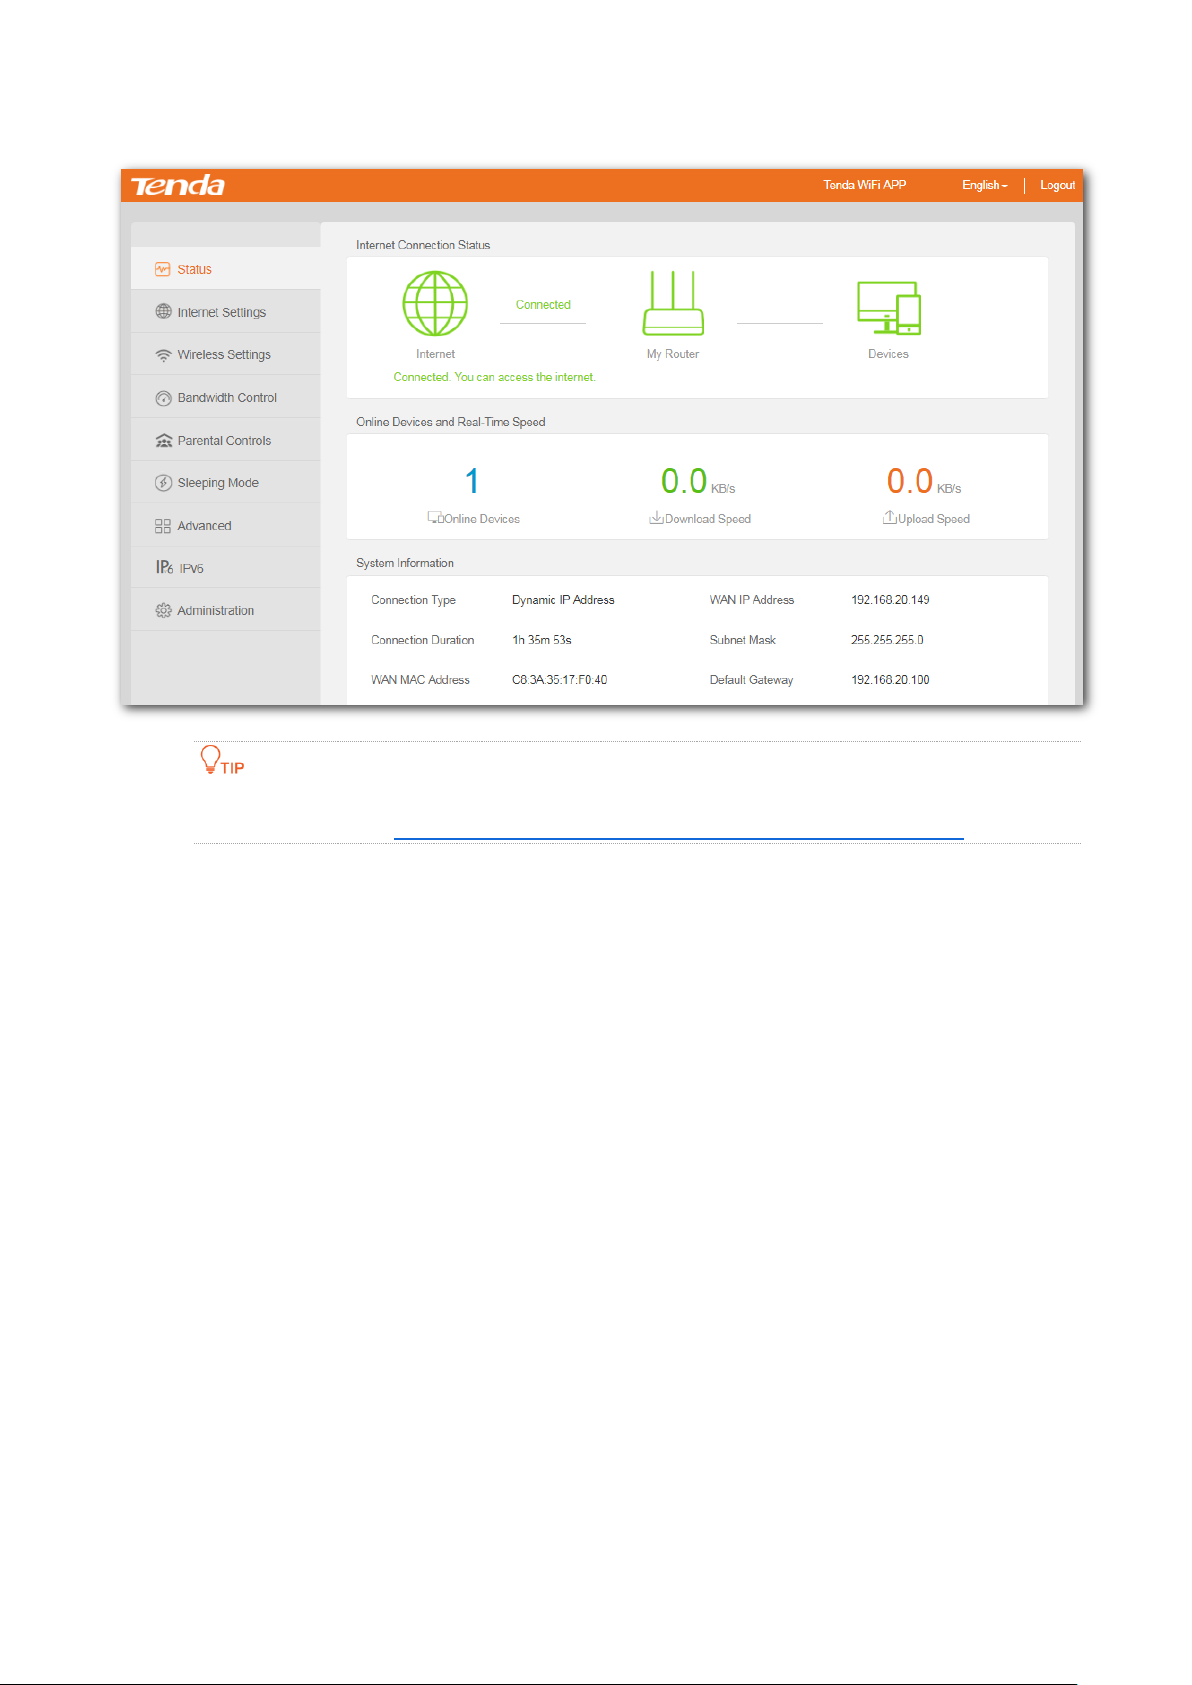
3 Status
Log in to the web UI of the router and choose Status to enter the page. On this page, you can:
− View internet connection status
− View online devices information
− View system information
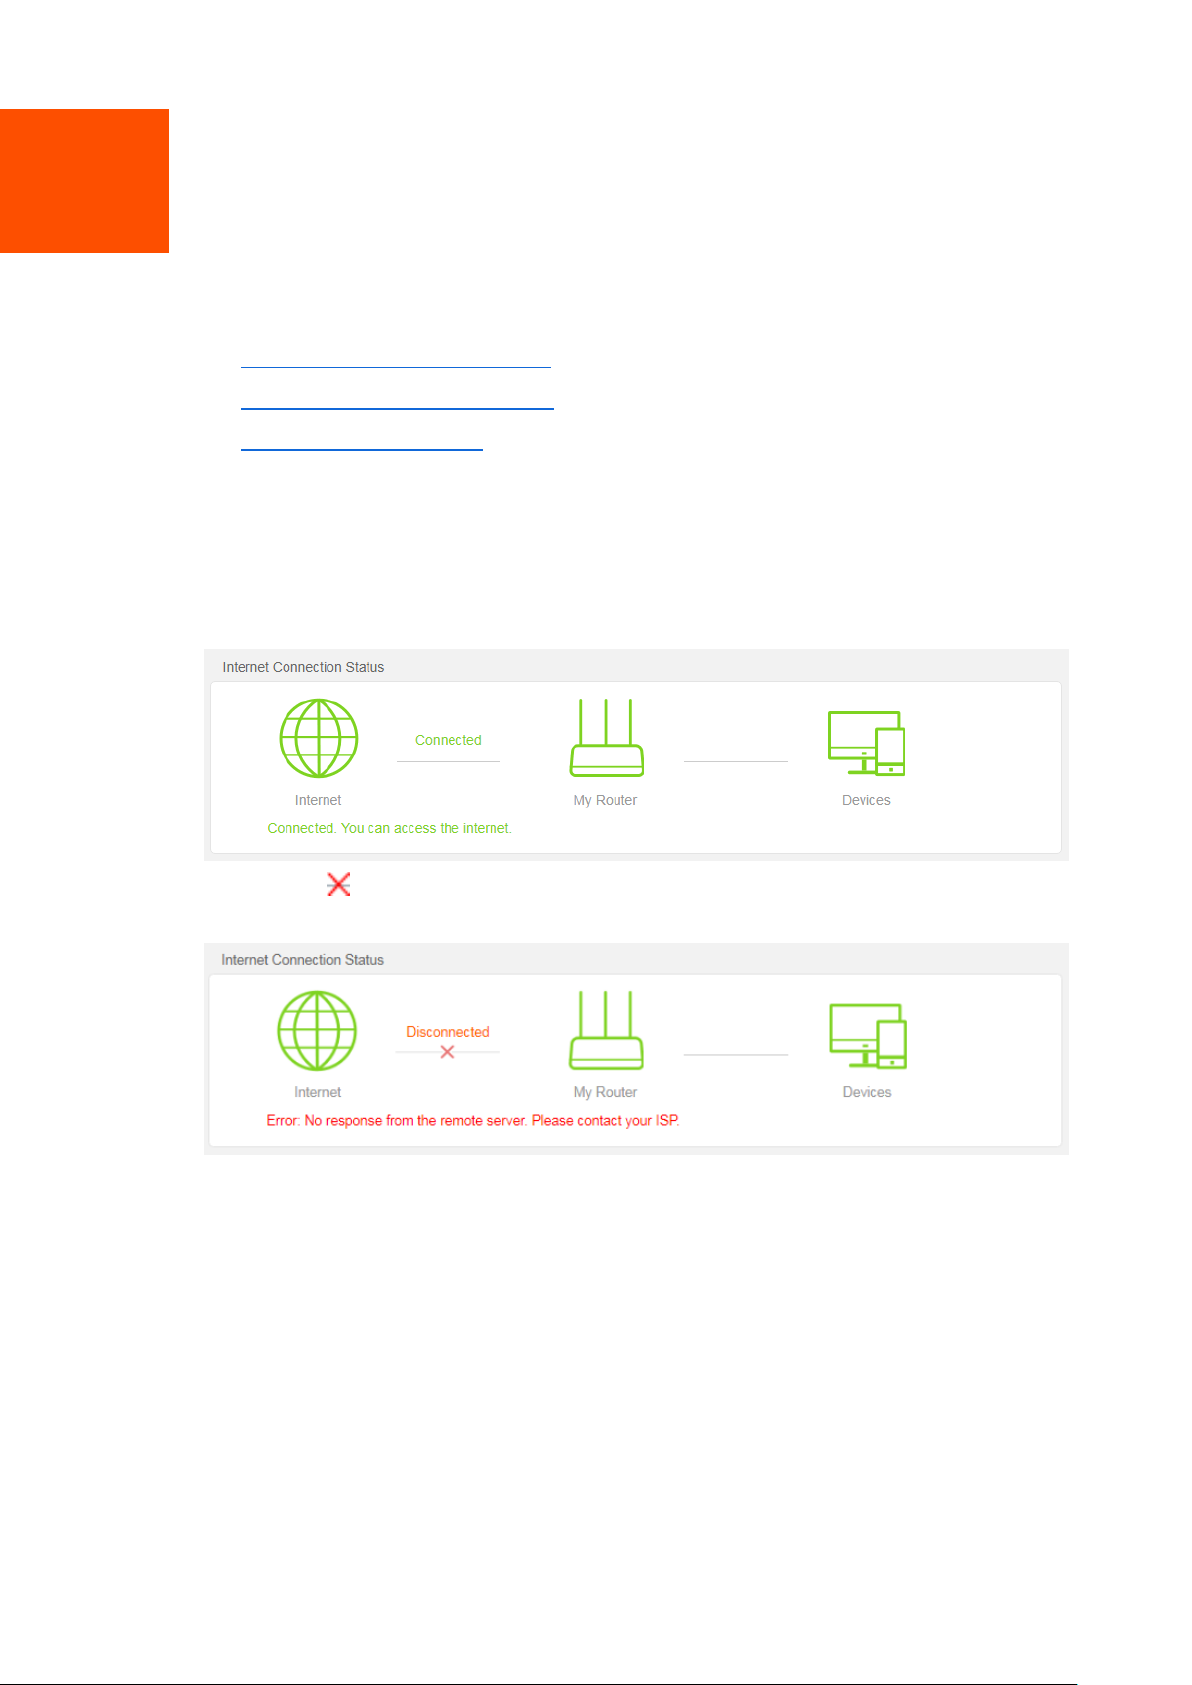
3.1 Viewing Internet connection status
If the message “Connected. You can access the internet” shows on the page, the internet
is accessible.
If a red cross appears, the internet connection is abnormal. Please follow the onscreen
instruction to resolve the issue.
10
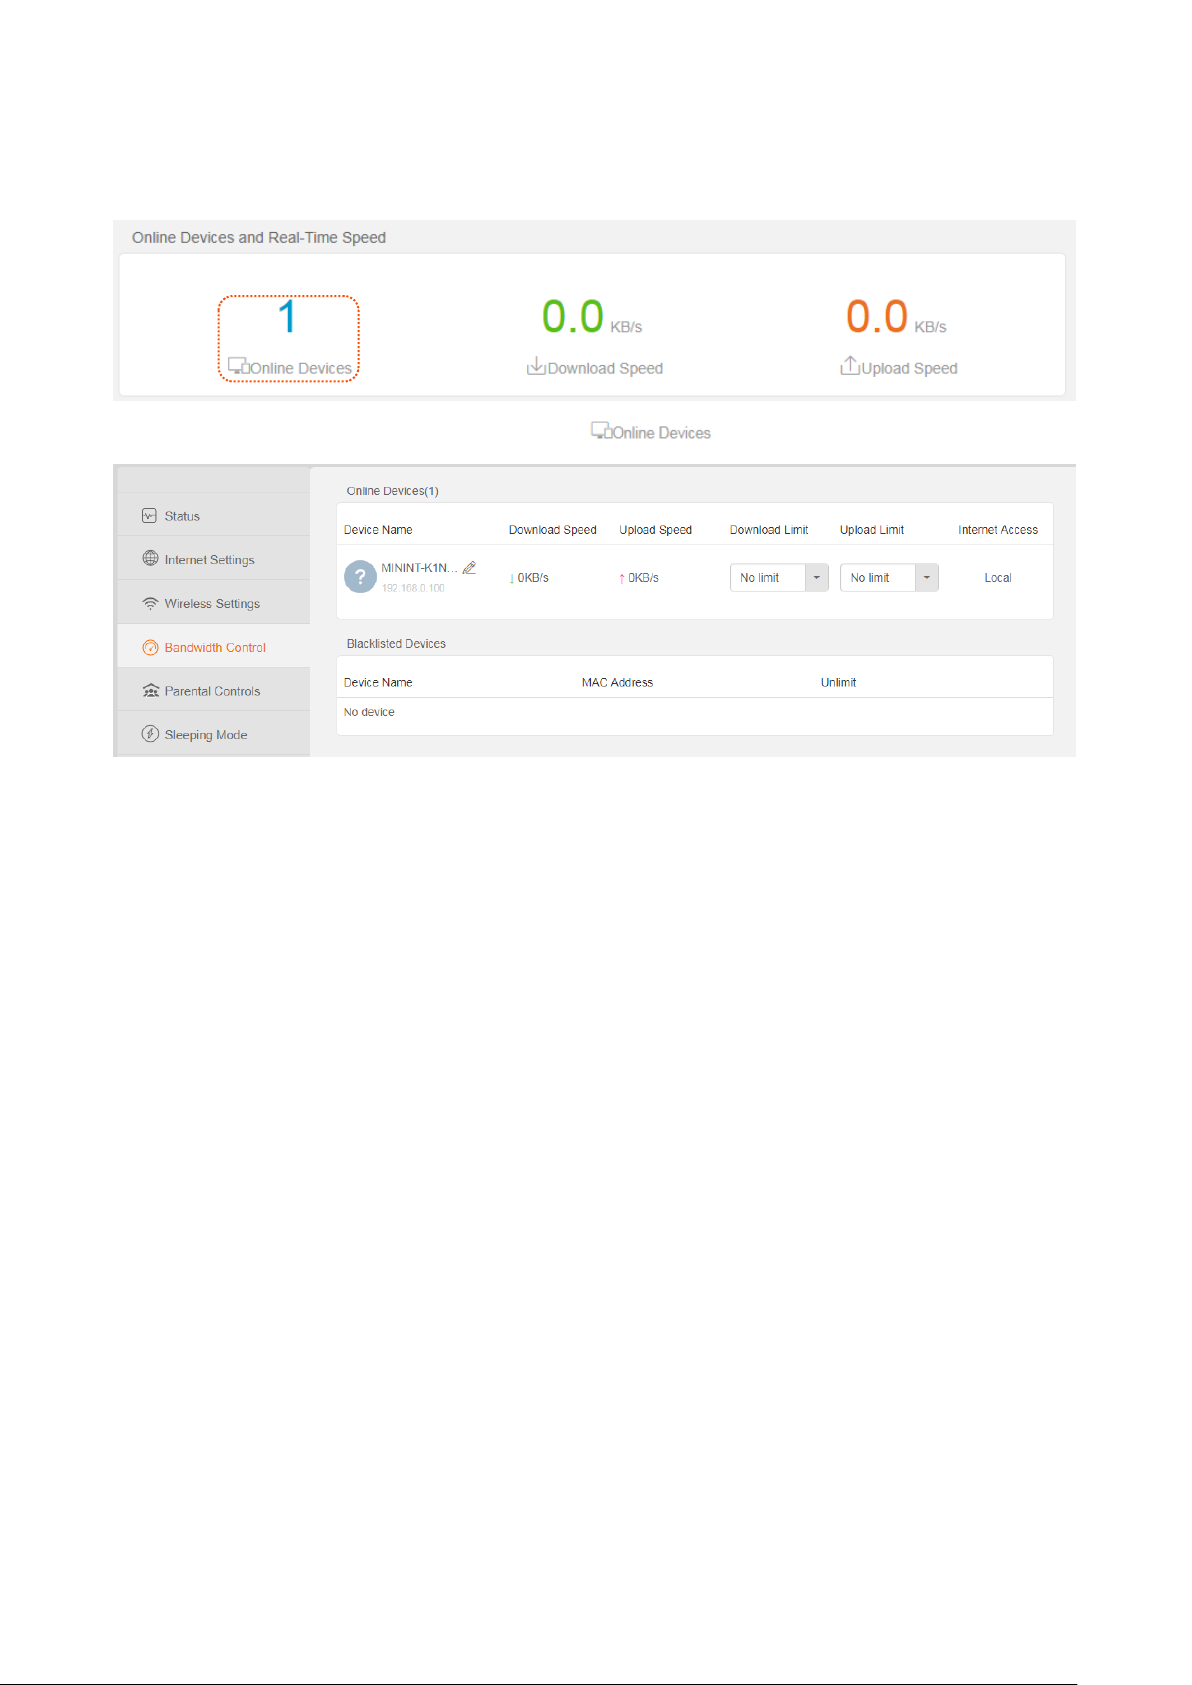
3.2 Viewing online devices and real-time speed
This section displays the number of online devices and the real-time upload/download speed.
To control the bandwidth of online devices, click to enter the configuration page.
11
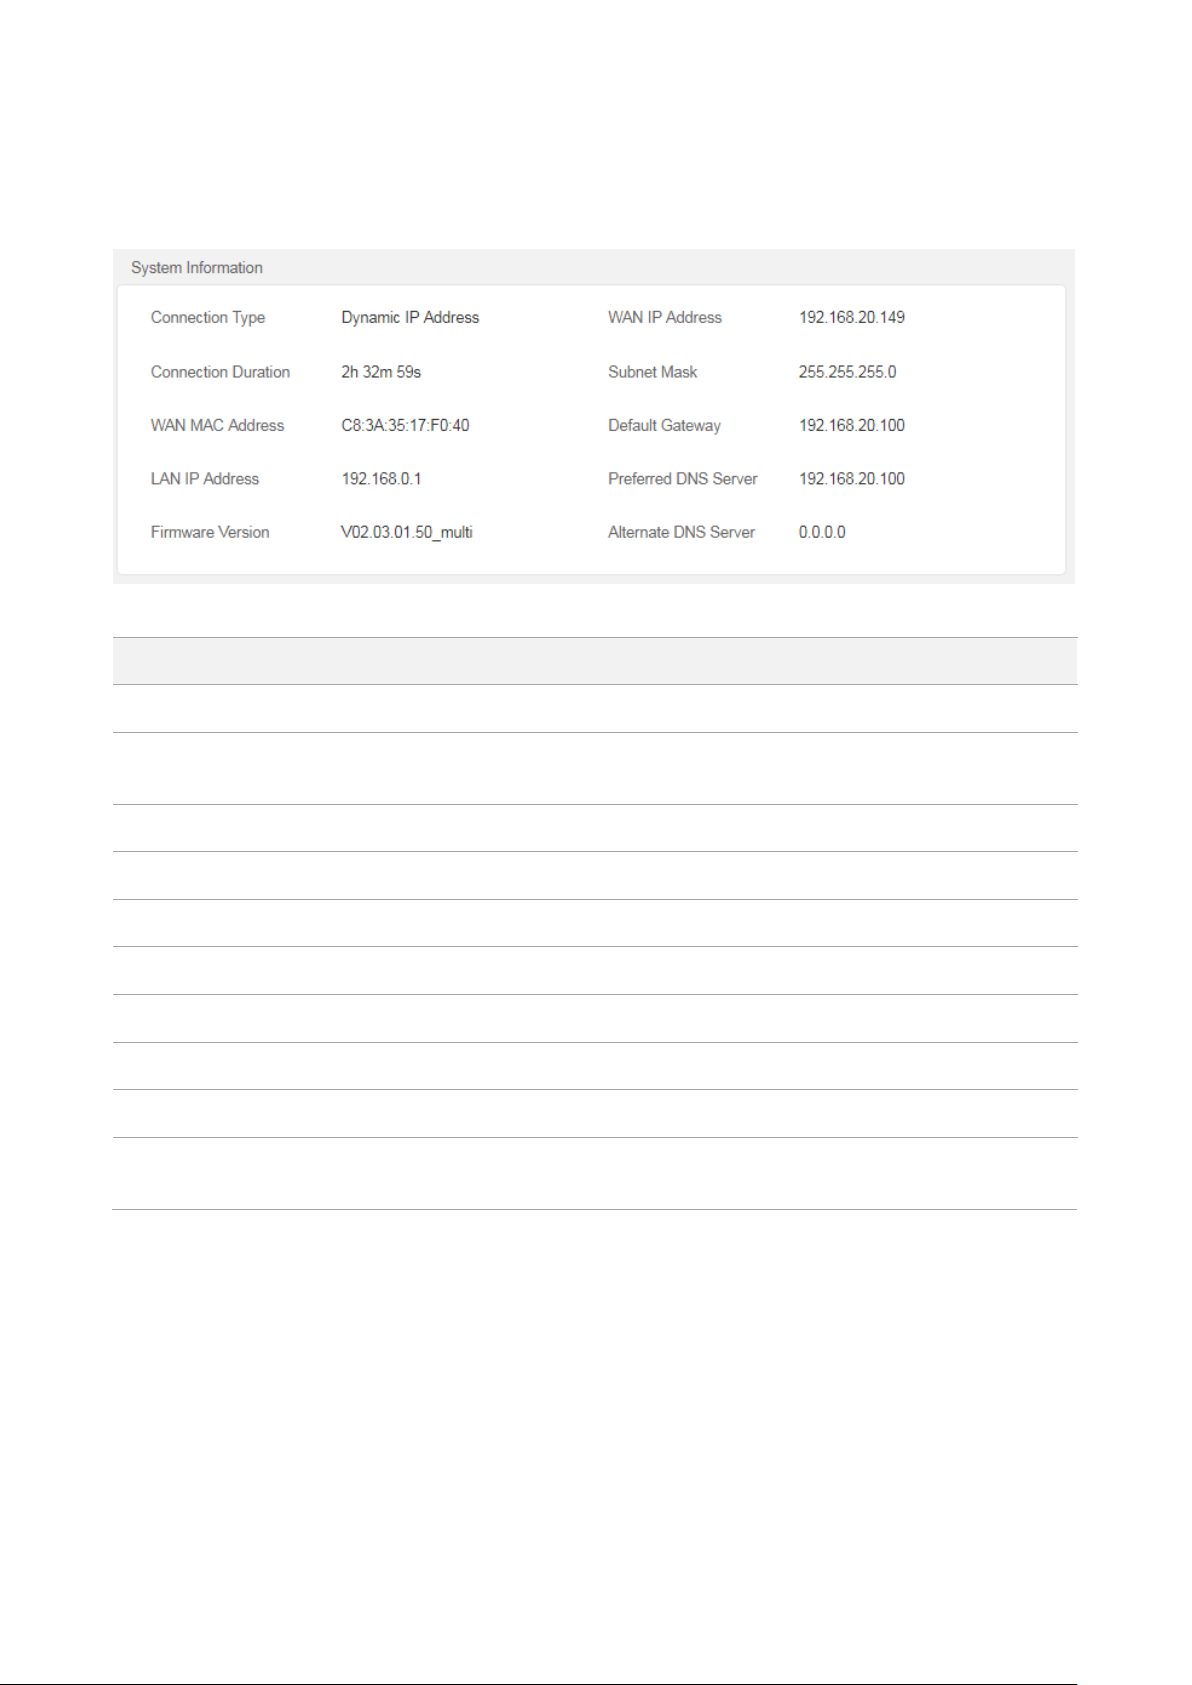
3.3 Viewing system information
This section displays the basic information of the router, including connection type, connection
duration, WAN IP address and so on.
Parameter description
Parameter
Description
Connection Type
It displays the current connection type of the router.
Connection Duration
It specifies the time that has elapsed since the router connects to the internet
successfully.
WAN MAC Address
It specifies the MAC address of the WAN port of the router.
LAN IP Address
It specifies the IP address of the LAN port for the router.
Firmware Version
It specifies the current version number of the router’s firmware.
WAN IP Address
It specifies the IP address of the WAN port.
Subnet Mask
It specifies the subnet mask of the WAN port.
Default Gateway
It specifies the default gateway of the WAN port.
Preferred DNS Server
It displays the preferred DNS server address of the WAN port.
Alternate DNS Server
It displays the Alternate DNS server address of the WAN port. If you do not set
this parameter, it shows 0.0.0.0.
12
4 Internet settings
On this page, you can complete the internet settings if you did not finish them by the quick setup
wizard, or change the settings as well. The router supports Router, WISP, Universal Repeater and
AP mode. By default, the router works in router mode.
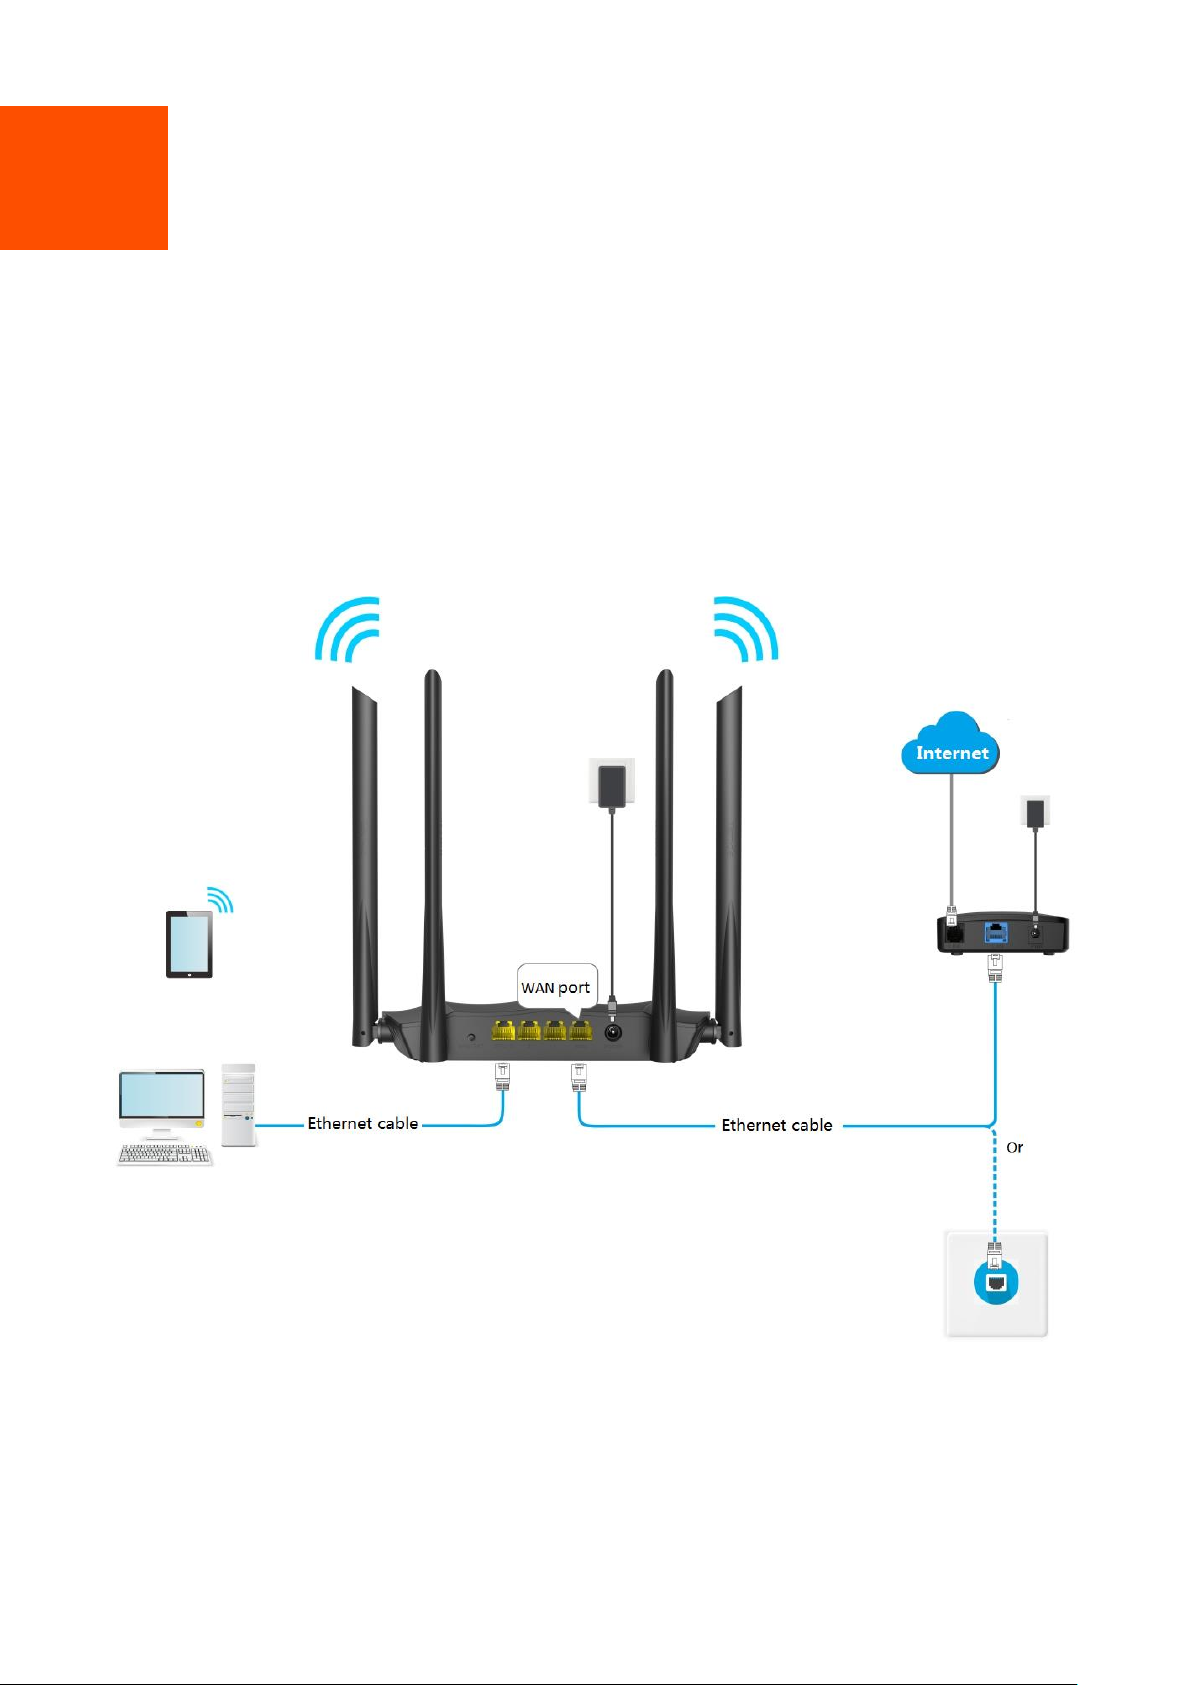
4.1 Router mode
In router mode, this router can connect to the internet through the WAN port, and provide both
wired and wireless network for clients. Applicable scenarios are as follows.
13
The following table may help you understand your internet connection type.
Parameter
Description
PPPoE
If you directly connect an Ethernet cable with internet connectivity to your
computer, you can access the internet only after setting up a dial-up connection
on the computer using a user name and password provided by your ISP.
Dynamic IP
If you directly connect an Ethernet cable with internet connectivity to your
computer, you can access the internet without configuring your computer.
Static IP Address
If you directly connect an Ethernet cable with internet connectivity to your
computer, you can access the internet only after setting static IP address and
other related information on your computer, your connection type is static IP
address.
If you are still uncertain about your internet connection type, consult your ISP.
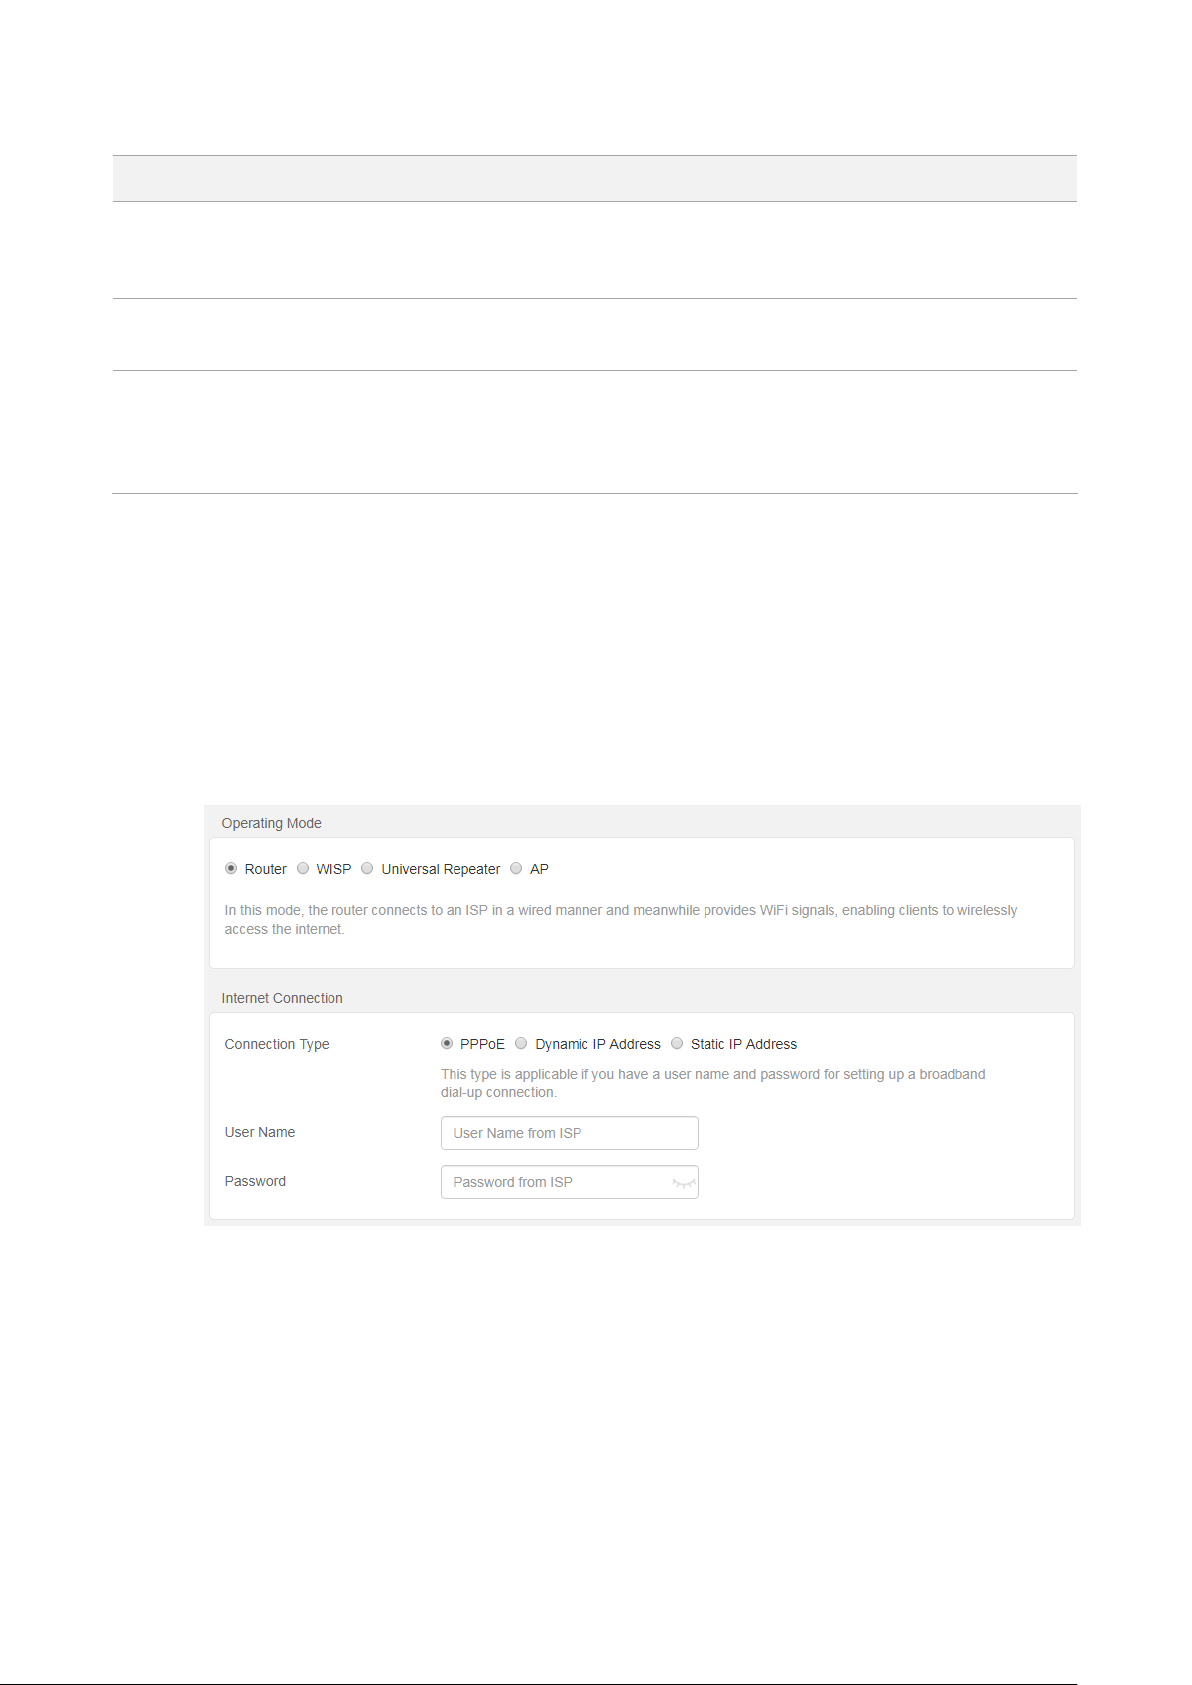
4.1.1 Setting up an internet connection with PPPoE
Step 1 Choose Internet Settings to access the configuration page.
Step 2 Set Operating Mode to Router.
Step 3 Set Connection Type to PPPoE.
Step 4 Enter User Name and Password provided by your ISP.
Step 5 Click OK at the bottom of the page.
---End
After the settings take effect, check the connection status. If “Connected. You can access the
internet.” is displayed, the router is connected to the internet successfully.
14
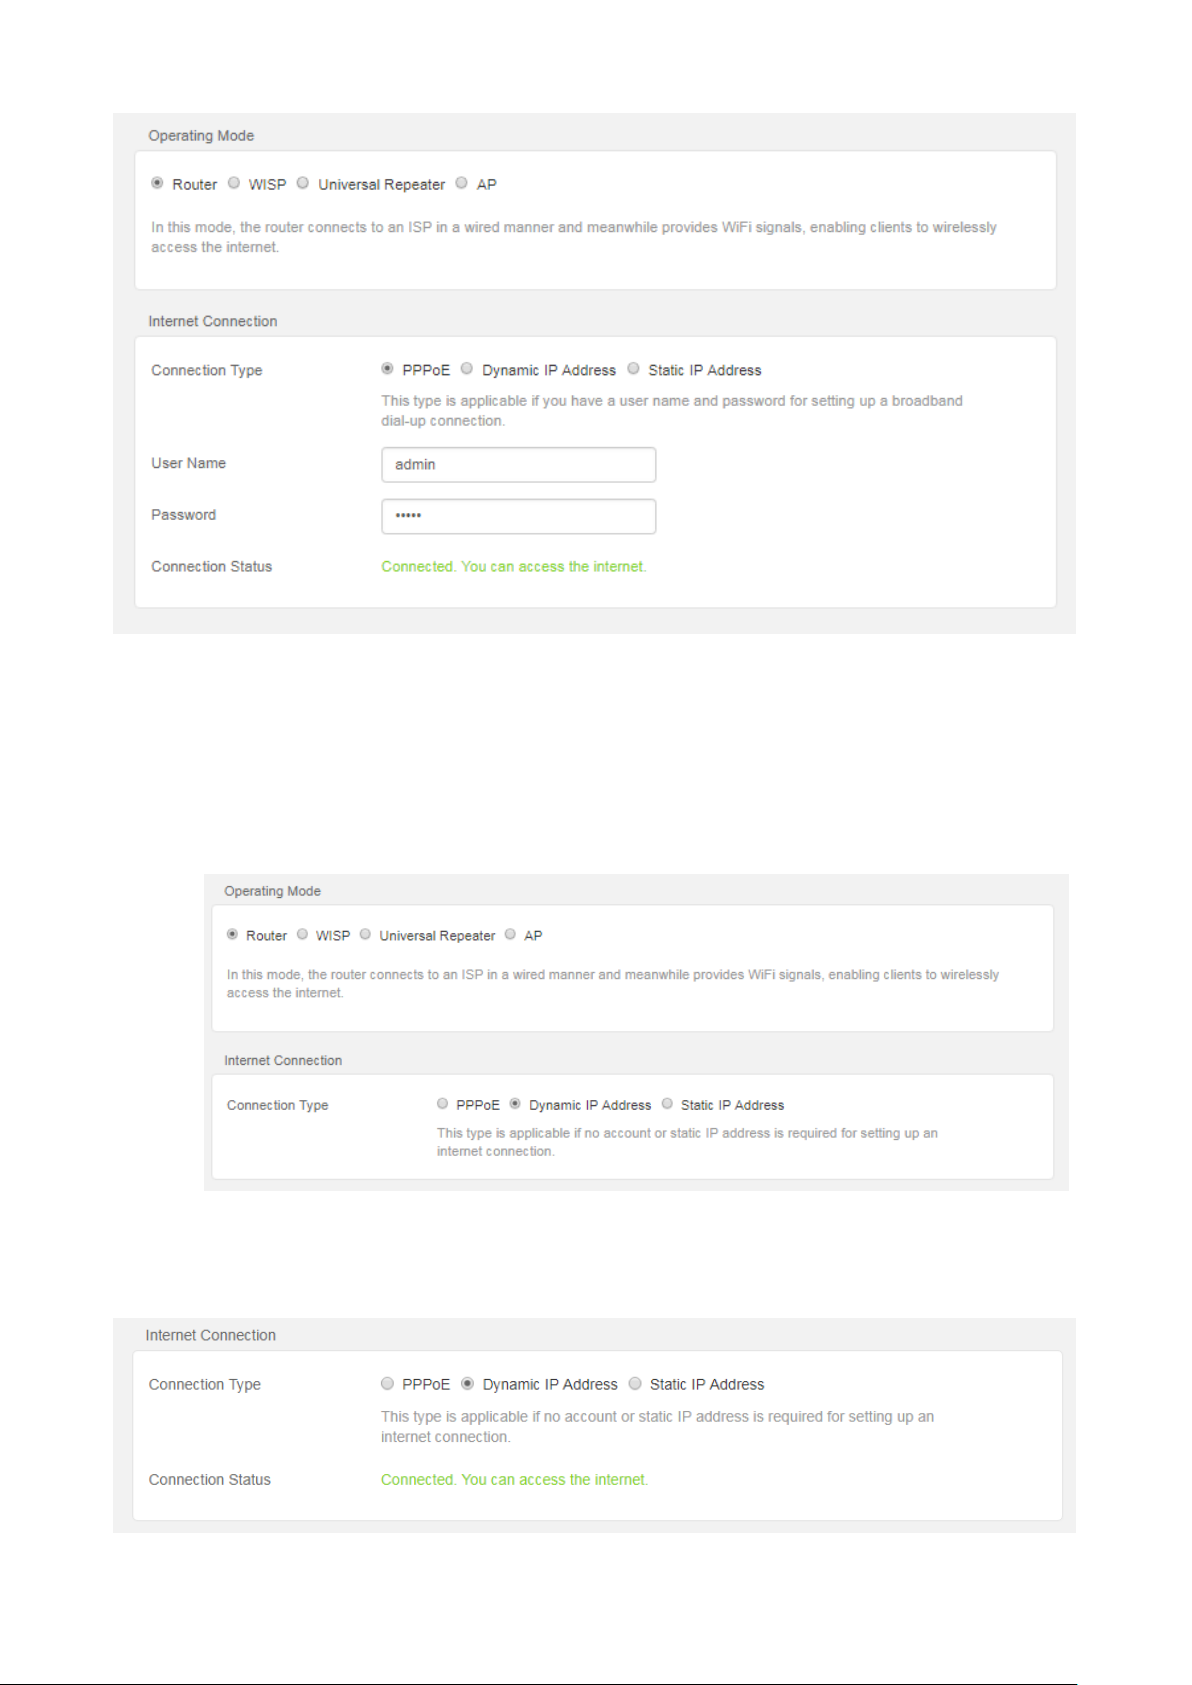
4.1.2 Setting up an internet connection with dynamic IP
Step 1 Choose Internet Settings to access the configuration page.
Step 2 Set Operating Mode to Router.
Step 3 Set Connection Type to Dynamic IP Address.
Step 4 Click OK at the bottom of the page.
---End
After the settings take effect, check the connection status. If “Connected. You can access the
internet.” is displayed, the router is connected to the internet successfully.
15
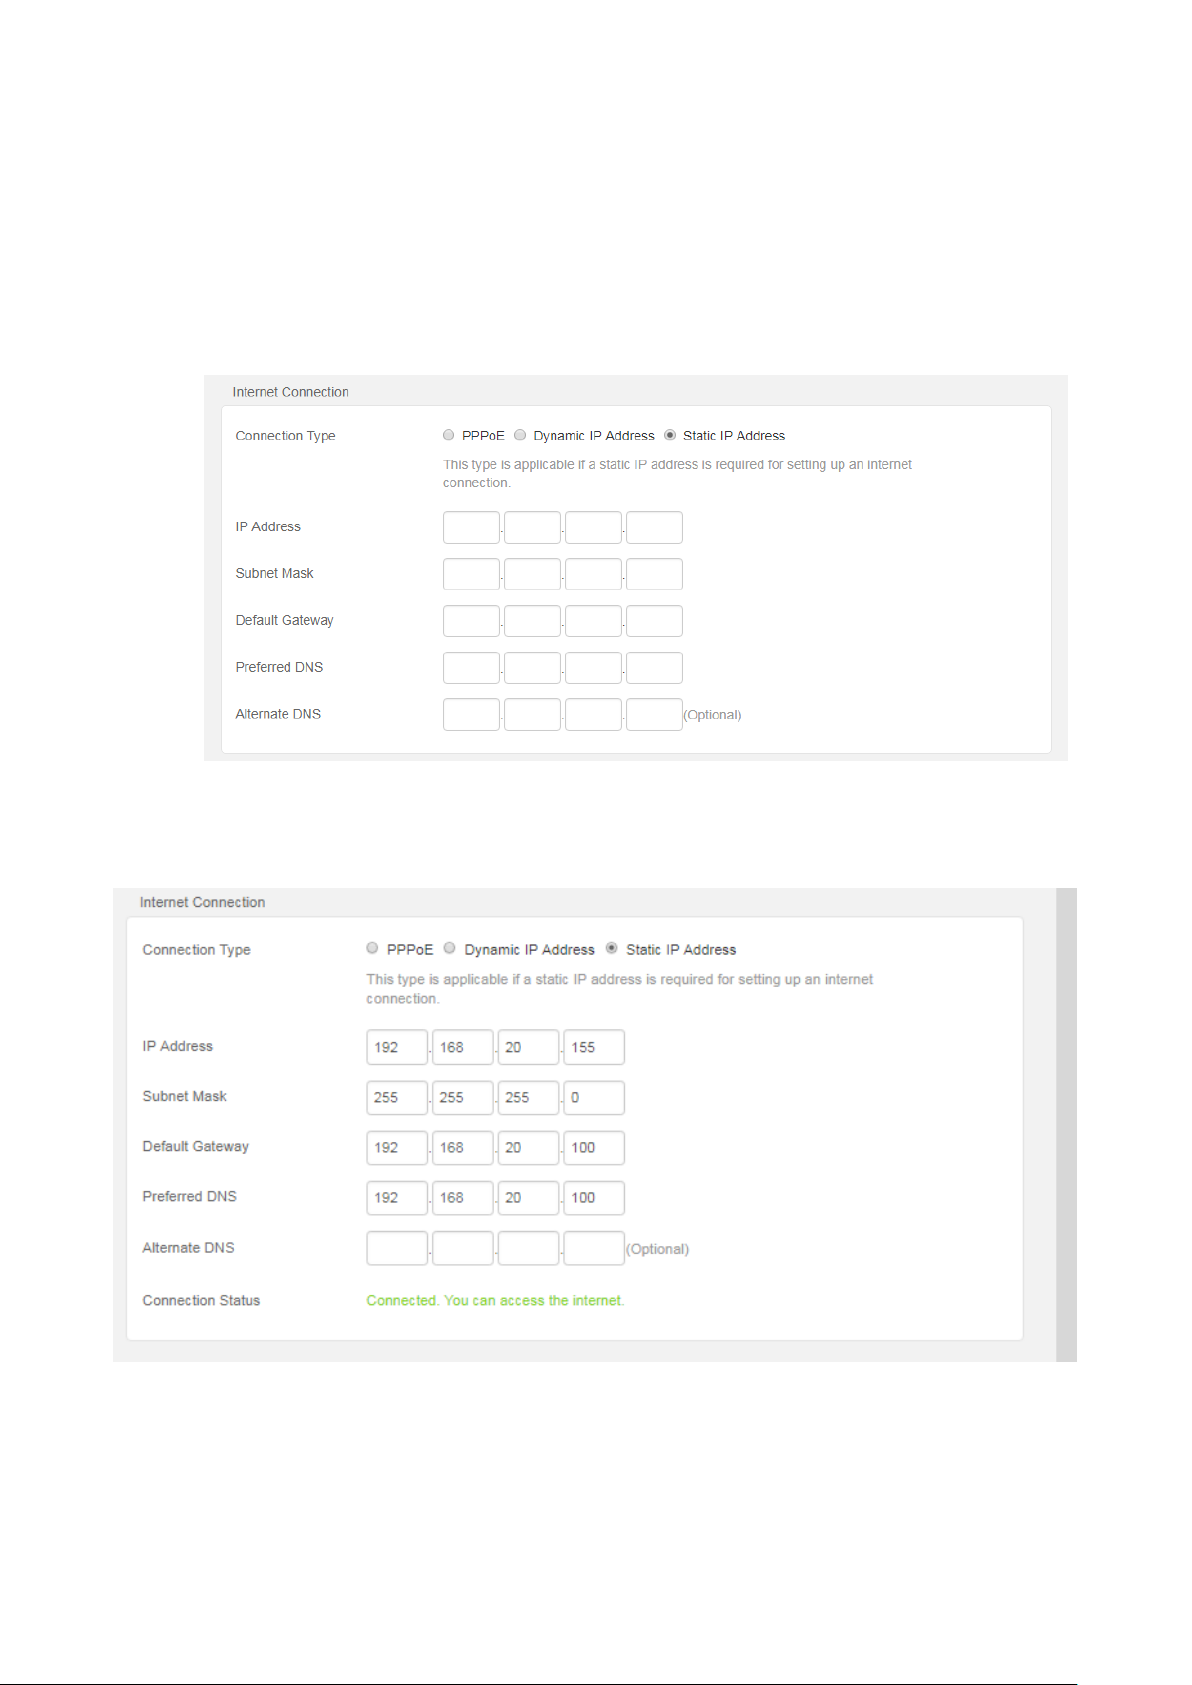
4.1.3 Setting up an internet connection with static IP
Step 1 Choose Internet Settings to access the configuration page.
Step 2 Set Operating Mode to Router.
Step 3 Set Connection Type to Static IP Address.
Step 4 Set the required parameters provided by your ISP.
Step 5 Click OK at the bottom of the page.
---End
After the settings take effect, check the connection status. If “Connected. You can access the
internet.” is displayed, the router is connected to the internet successfully.
16
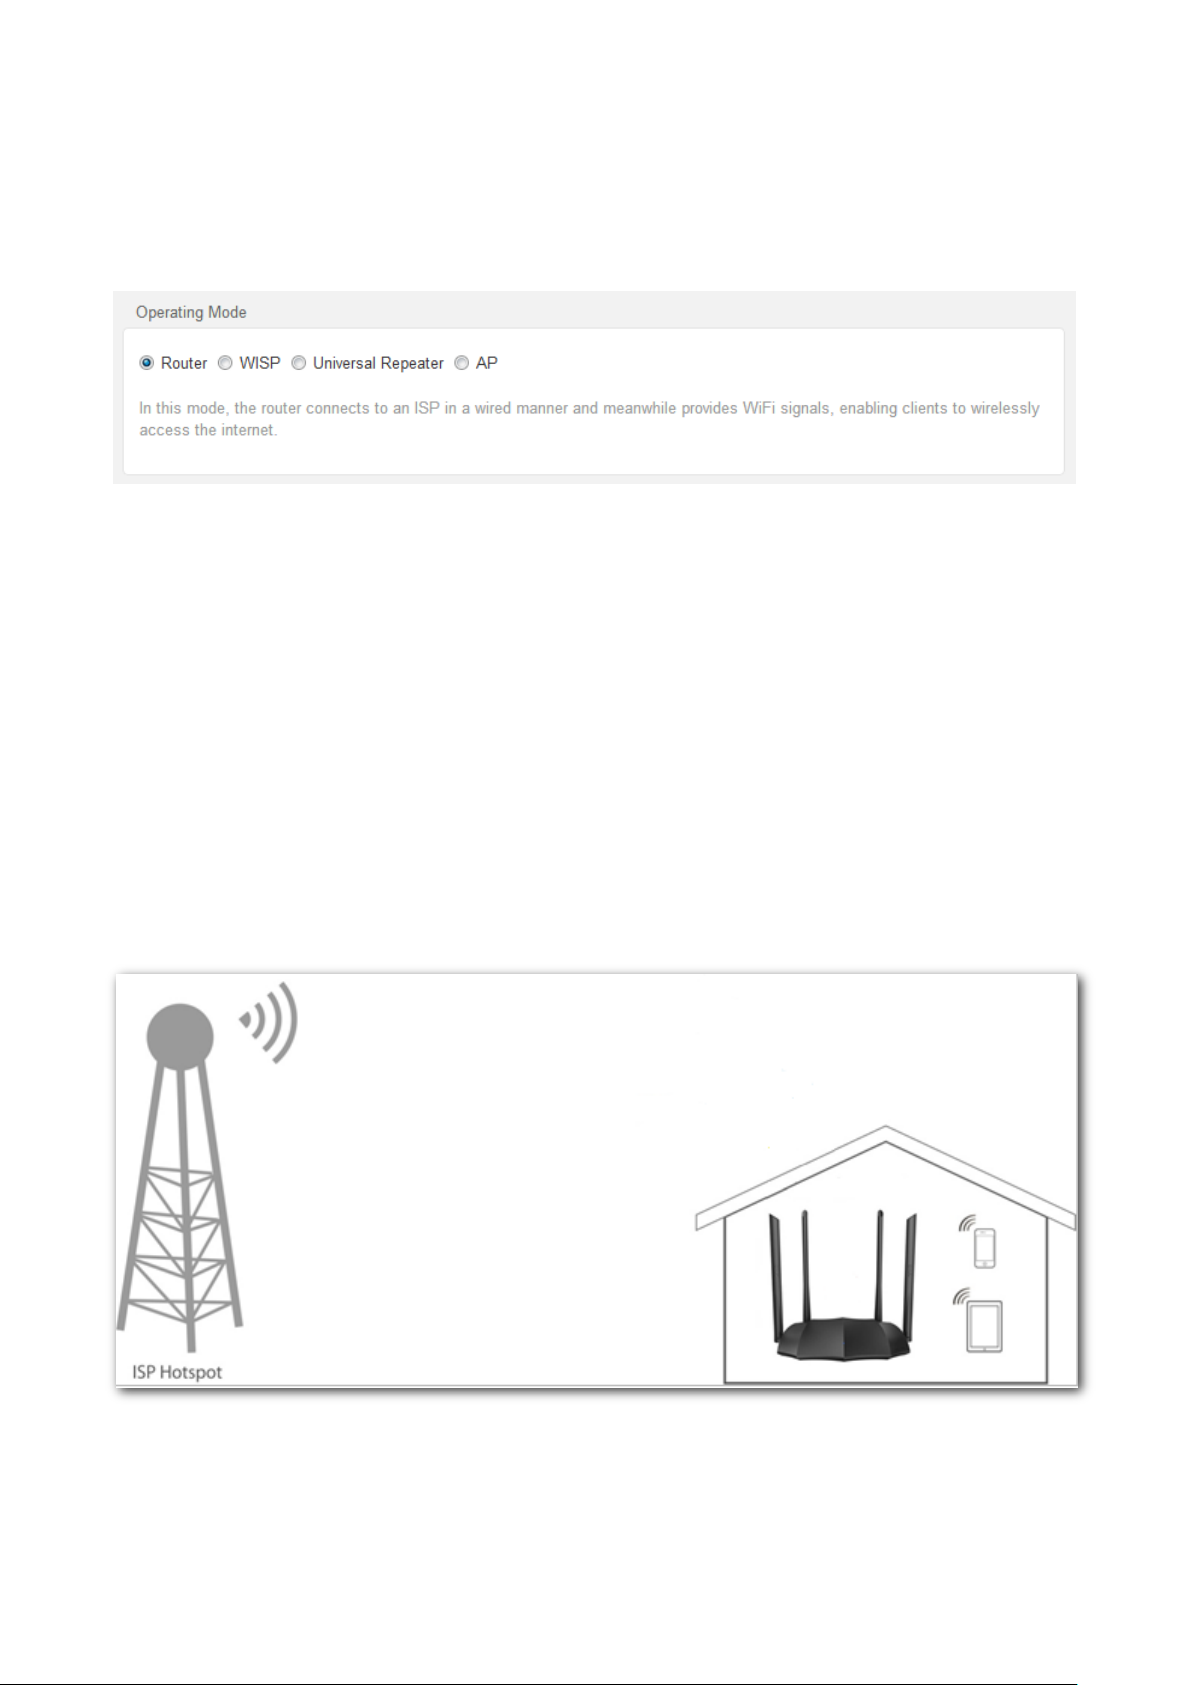
4.2 WISP mode
In WISP mode, this router can connect to a WiFi hotspot provided by ISP in a wireless manner, and
provide both wireless and wired network for clients to access internet.
Choose Internet Settings to access the configuration page.
An example of configuring WISP mode
Application scenario
Tom lives in the countryside, and it is not convenient for him to connect the internet in a wired
manner. To solve the problem, he sets the new router AC8 to WISP to connect to the ISP hotspot
wirelessly.
Tom’s ISP provides a hotspot for internet with the information below:
− SSID: ISP_A
− WiFi password: 87654321
− PPPoE user name: Tom
− PPPoE password: Tom123
Network topology
Configuration procedure
Step 1 Log in to the web UI of the router.
Step 2 (Optional). Set Connection Type to Dynamic IP Address, and click OK.
AC8
SSID: ISP_A
WiFi Password: 87654321

17
This step applies to the first setup of the router, used for you to skip the quick setup page.
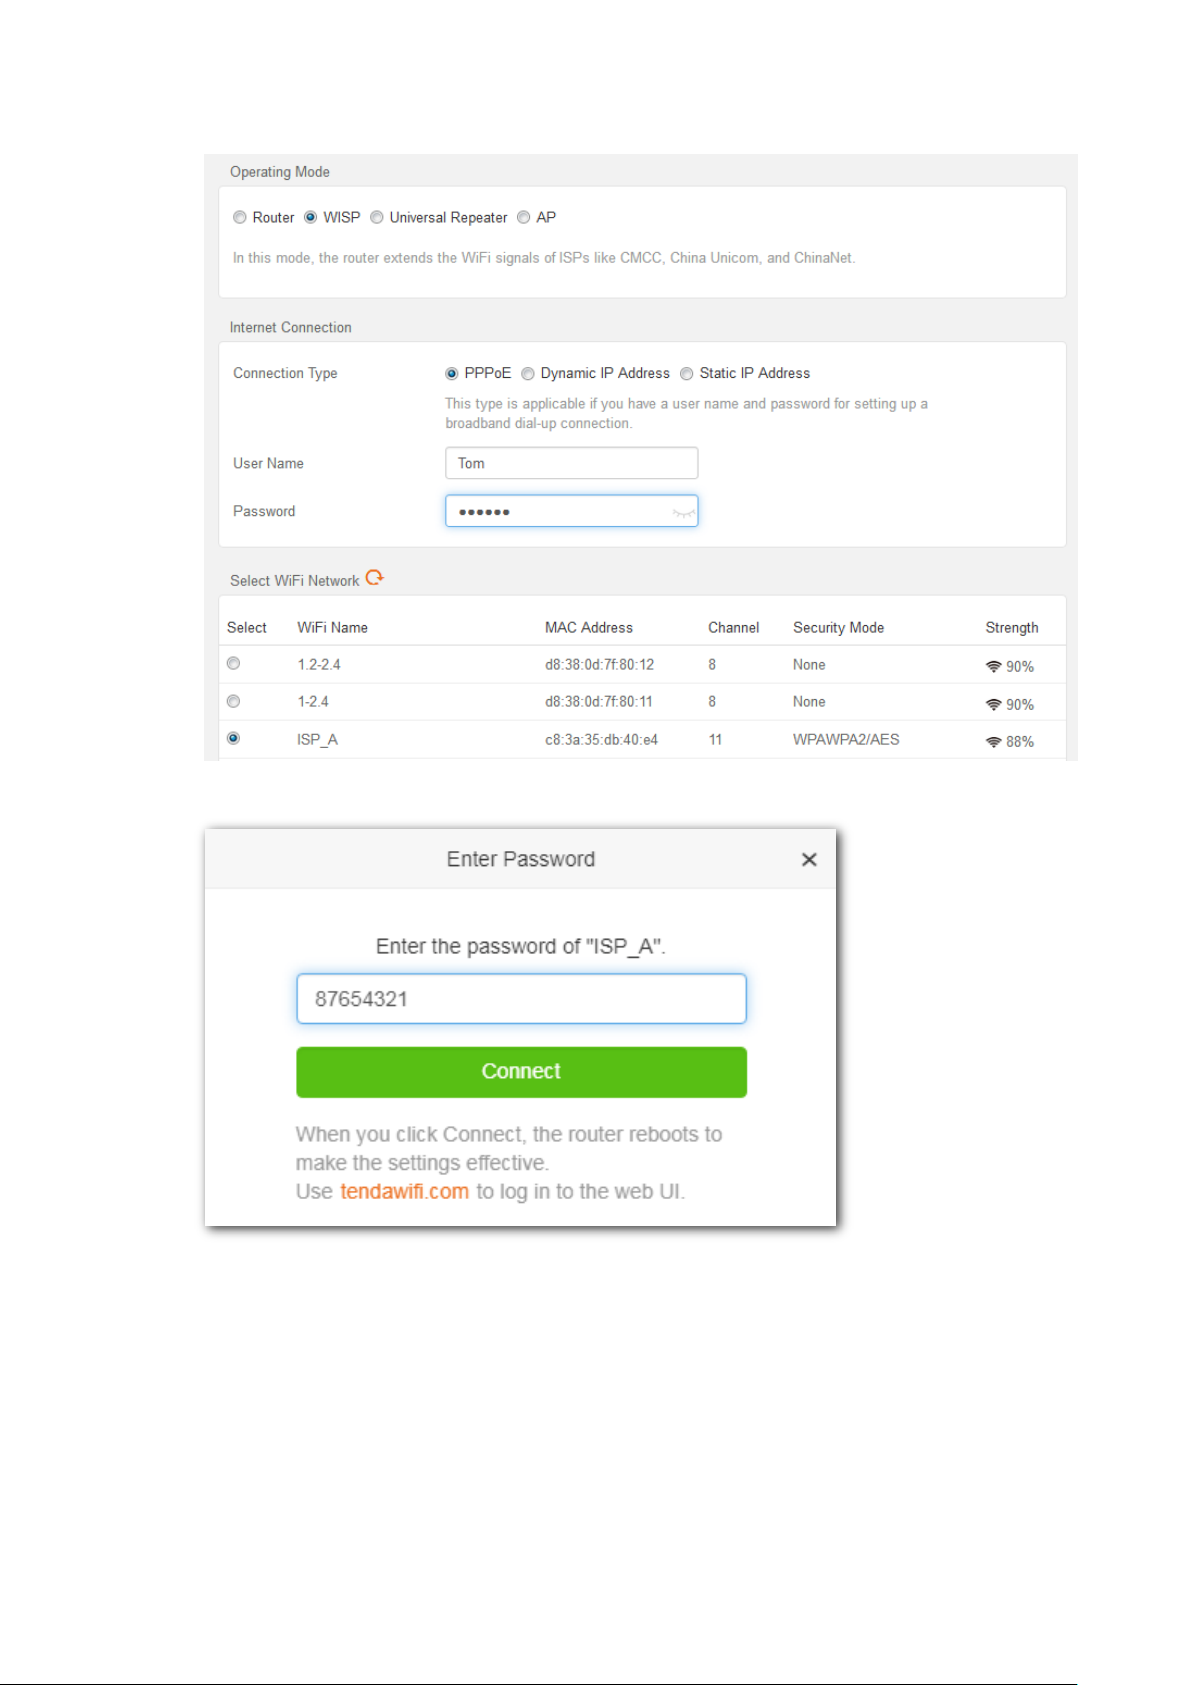
Step 3 Choose Internet Settings to access the configuration page.
Step 4 Set Operating Mode to WISP.
Step 5 Select the Connection Type of your ISP hotspot, which is PPPoE in this example. Enter the
PPPoE user name and password provided by your ISP, which is Tom/Tom123 in this
example.
18
Step 6 Choose the ISP hotspot, which is ISP_A in this example.
Step 7 Enter the password of the WiFi network ISP_A, which is 87654321 in this example.
19
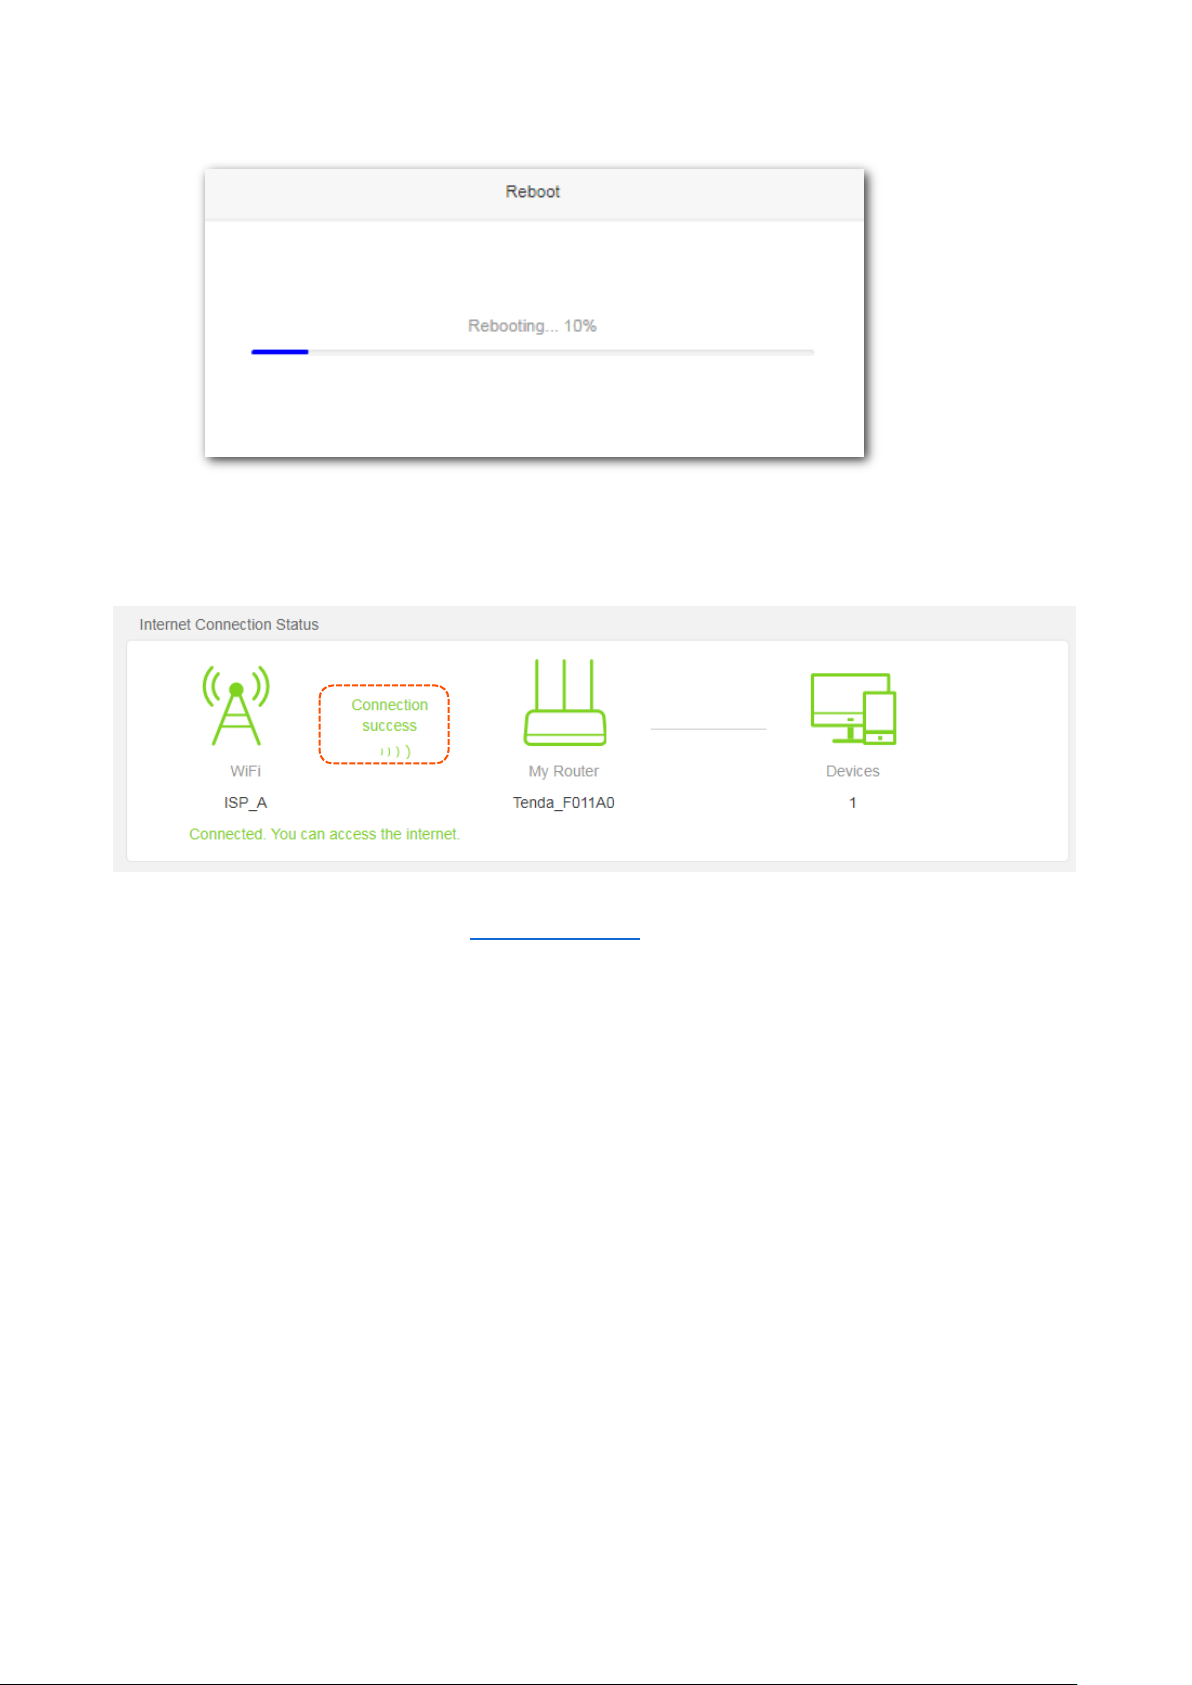
Step 8 Click Connect.
---End
Wait until the progress bar is complete. Log in to the web UI of the router again with the domain
name tendawifi.com. Choose Status > Internet Connection Status to check the connection status.
You can check the SSIDs for this router and the upstream device. If you need to change the router’s
SSID and password, please go to the Wireless Settings page.

20
4.3 Universal repeater mode
In universal repeater mode, the router can bridge the upstream wireless signals and expand your
wireless network coverage.
Choose Internet Settings to access the configuration page.
An example of configuring universal repeater mode
Application scenario
Tom uses a wireless router (main router) for internet access in his apartment. The router is placed
in the main bedroom, so the WiFi signal is strong in the main bedroom, but too poor in the dining
room and balcony to access the internet. To solve the problem, Tom bought a Tenda AC8 router,
and placed it in the living room.
The universal repeater mode of AC8 can meet the requirement.
Loading...