

Page 1

Quick Installation Guide
For product or function details, please visit www.tendacn.com
AC2100 Dual Band Gigabit WiFi Router
AC21
Package contents
• Wireless router * 1
• Power adapter * 1
• Ethernet cable * 1
• Quick installation guide * 1
To get the App for management, scan the
QR code, or search for Tenda WiFi in App
Store/Google Play
Page 2

Page 3

CONTENTS
01 / English
05 / Deutsch
07 / Español
09 / Čeština
11 / Italiano
13 / Français
15 / Magyar
17 / Português
19 / Polski
21 / Română
23 / Nederlands
25 / Türkçe
27 / 한국어
Page 4
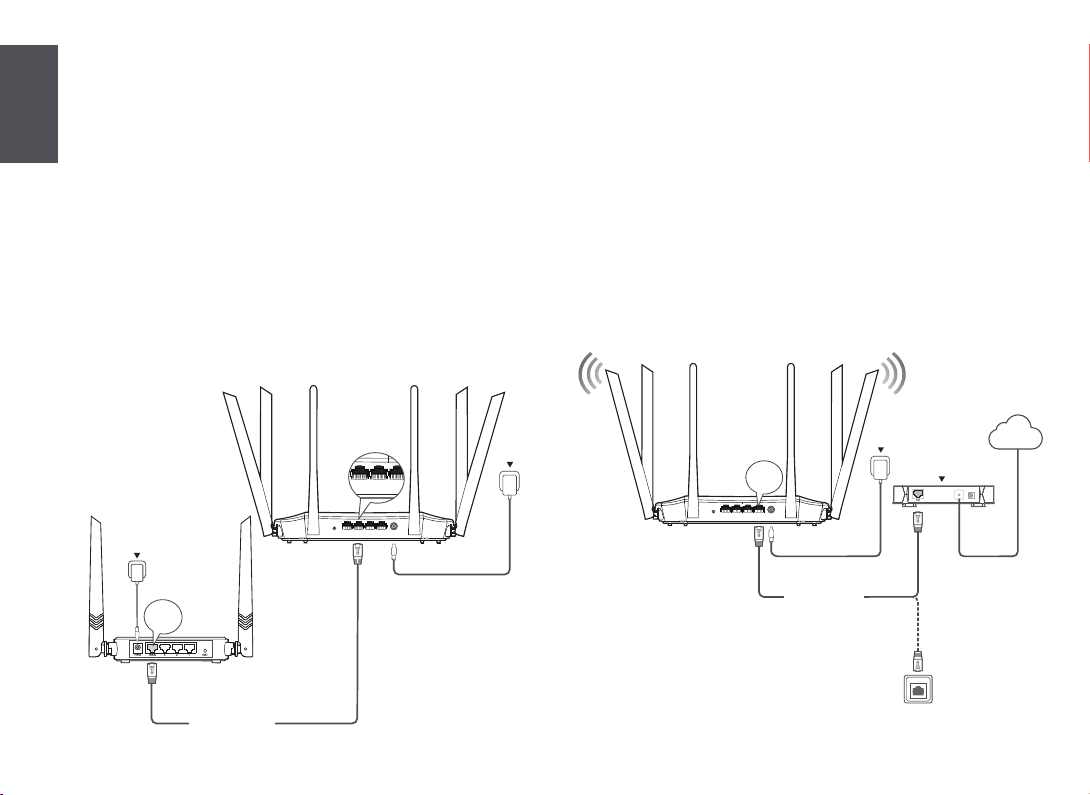
I. Connect your router
1
If you want to copy the PPPoE user name and password from your original router, start from Step 1. Otherwise, start from Step 2.
Step 1: Import your PPPoE user name and password from
English
your original router.
1. Power on your original and new routers.
2. Connect the WAN port of the original router to a LAN port (port 1, 2,
IPTV/3) of the new router using an Ethernet cable.
3. When the WAN and LAN LED indicators of the new router turn solid on
for 3 seconds after blinking fast, the PPPoE user name and password
are imported to your new router successfully.
4. Remove the original router.
WPS/RST POWERIPTV/3 WAN2
Power
1
New router
WAN
Original router
Power
Step 2: Connect your new router to the internet.
1. Power on the new router.
2. Connect the WAN port of the new router to the LAN port of your
modem or the Ethernet jack using an Ethernet cable. The WAN LED
indicator lights on.
Internet
WPS/RST POWERIPTV/3 WAN2
WAN
1
Ethernet cable
Power
Modem
Or
01
Ethernet cable
Ethernet jack
Page 5

II. Connect your devices to the new router III. Set up the new router for internet access
English
Method 1: Connect your WiFi-enabled device (such as a smart phone) to
the new router’s WiFi network using the SSID labeled on the
bottom of the router. There is no WiFi password by default.
Tenda_XXXXXX
Set ting
Tenda _XX XXXX
Method 2: Connect your wired device (such as a computer) to port 1, 2,
IPTV/3 of the router using an Ethernet cable. The LAN LED
indicator lights up.
WPS/RST POWERIPTV/3 WAN2
1
Ethernet cable
Ethernet cable
1. Start a web browser on a device that has connected to the router,
and visit tendawif i.com.
tendawif i.com
Tips
If you cannot log in to the web UI of the router, refer to Q1 in FAQ.
2. Click Start.
Tenda Router
Quick Setup Wizard
Start
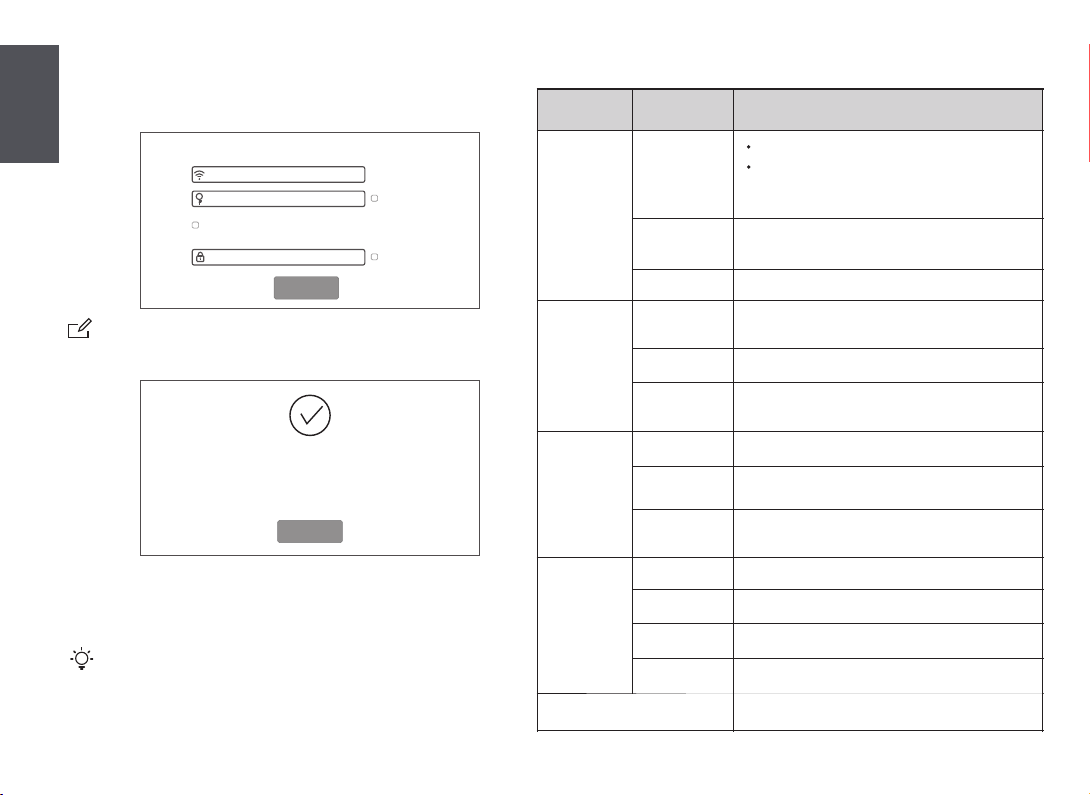
3. The router detects your internet connection type automatically.
Set required parameters and click Next.
Please select your connection type.
As detected, your connection type may be: PPPoE
Connection Type:
ISP User Name:
ISP Password:
Note
PPPoE is used for illustration here. If you migrated your PPPoE user name and
password from your original router, this router auto-lls the ISP User Name and
ISP Password.
PPPoE
Enter the user name from your ISP .
Enter the password from your ISP .
Import PPPoE user name and password
from the original router.
Next
Skip
02
Page 6
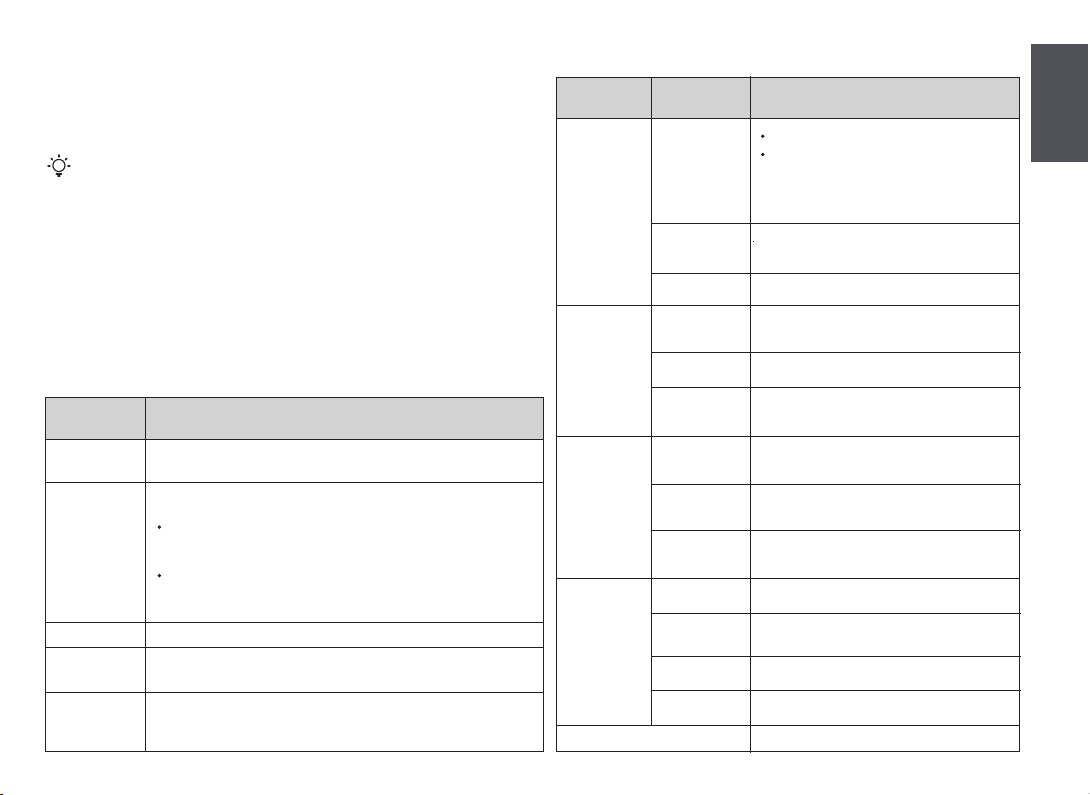
LED indicators
4 . Customize your WiFi name (SSID), WiFi password and the login
password as needed, and click Next.
English
WiFi Settings
Tenda_XXXXXX
WiFi password of 8-32 characters
Set the WiFi password as the login password of the
admin account.
Login password of 5-32 characters
Next
Not Required
Not Required
Note
The WiFi password is used to connect to the WiFi network, and the login password
is used to log in to the web UI of the router.
Done.
You’re all set! You can now connect to
Tenda_XXXXXX
To change settings of other features,click the "More" button below.
More
IV. Access the internet
WiFi-enabled devices: Connect your WiFi-enabled devices to the WiFi
network of the router using the WiFi name and WiFi password you set.
Tips
The By default, the WiFi name for both 2.4 GHz and 5 GHz are the same, if you need to
modify the WiFi name and WiFi password, see Q4 in FAQ.
Wired devices: Your wired devices connected to the router can access
the internet directly now.
03
LED indicator
SYS
WAN
LAN
WiFi
T
Status Description
The router is starting.
Solid on
Blinking
O
Solid on
Blinking
O
Solid on
Fast blinking
for twice
O
Solid on
Fast blinking
Slow blinking
O
If the indicator still lights solid on after the router
completes startup, it indicates that the router is
connecting to the internet successfully.
The router works properly, but fails to connect to
the internet.
The system is faulty.
The WAN port is connected properly, but no data
is being transmitted
Data is being transmitted over the WAN port.
The WAN port is disconnected or improperly
connected.
At least one LAN port is connected properly.
A new wired device is connected to the router.
No device is connected to any LAN port of the
router properly.
At least the 2.4 GHz or 5 GHz WiFi network is enabled.
Data is being transmitted wirelessly.
The router is performing WPS negotiation.
Both 2.4 GHz and 5 GHz WiFi networks are disabled.
This LED is reserved.
Page 7
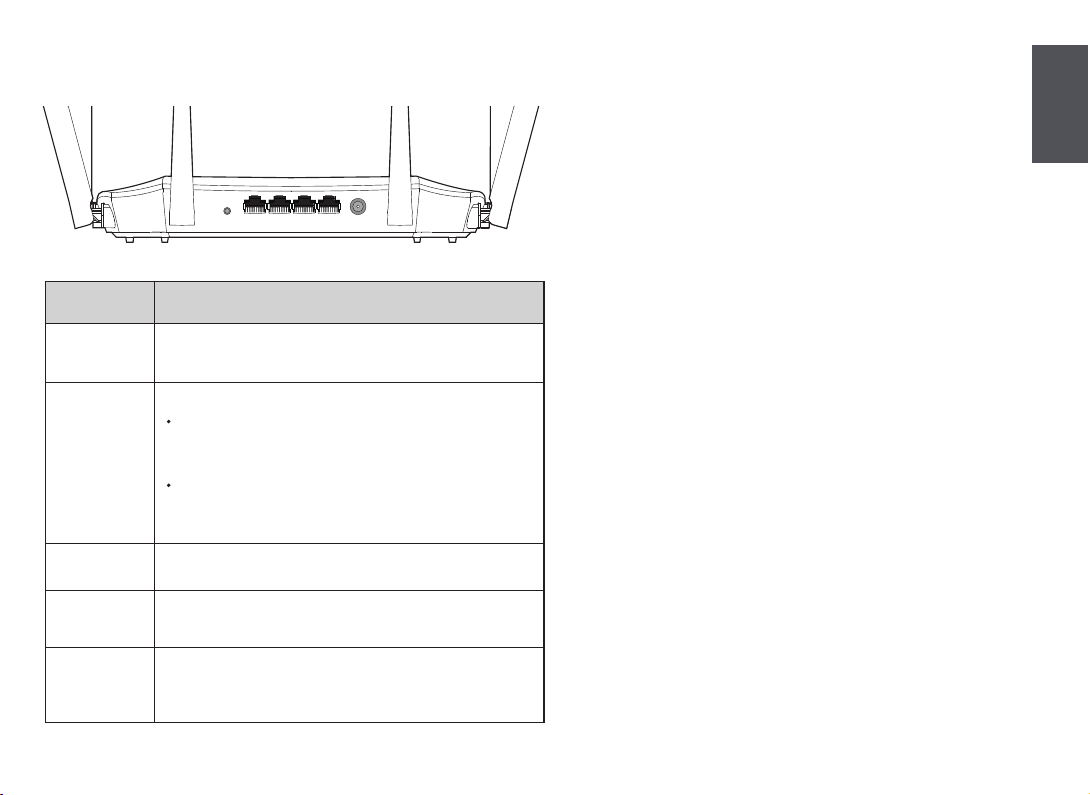
Jack, ports and buttons
English
POWER
WPS/RST
WAN
1/2
IPTV/3
WPS/RST POWERIPTV/3 WAN2
DescriptionJack/Port/Button
Power jack.
Used to connect to the included power adapter.
Used to start the WPS negotiation process, or to reset the router.
WPS: Press the button of the router for 1 to 3 seconds. Within 2
minutes, enable the WPS function of the other WPS-supported
device to establish a WPS connection.
Reset: When the SYS LED indicator blinks, hold the button down
for about 8 seconds, release it when all the LED indicators blink
once.
Used to connect this router to the internet.
They are LAN ports used to connect to the wired devices such
as computers or switches.
By default, it is a LAN port.
If the IPTV function of the router is enabled, it serves only as an
IPTV port used to connect to a set-top box.
1
04
Page 8

I. Schließen Sie Ihren Router an
Wenn Sie den PPPoE-Benutzernamen und das Passwort von Ihrem
ursprünglichen Router übernehmen möchten, beginnen Sie mit
Schritt 1. Andernfalls beginnen Sie mit Schritt 2.
Deutsch
Schritt 1: Importieren Sie Ihren PPPoE-Benutzernamen und
das Kennwort von Ihrem ursprünglichen Router.
1. Schalten Sie den alten und den neuen Router ein.
2.Verbinden Sie den WAN-Port des ursprünglichen Routers über ein
Ethernet-Kabel mit einem LAN-Port (Port 1, 2 und IPTV/3) des neuen
Routers.
3.Wenn die WAN- und LAN-LED-Anzeigen des neuen Routers nach
schnellem Blinken für drei Sekunden dauerhaft leuchten, wurden der
PPPoE-Benutzername und das Passwort des ursprünglichen Routers
erfolgreich auf den neuen Router importiert.
4. Entfernen Sie Ihren alten Router.
Schritt 2: Verbinden Sie den neuen Router mit dem Internet.
1. Starten Sie den neuen Router.
2. Verbinden Sie den WAN-Port des neuen Routers über ein
Ethernet-Kabel mit einem LAN- oder Ethernet-Port Ihres Modems. Die
WAN-LED-Anzeige beginnt zu leuchten.
Methode 2: Verbinden Sie Ihr kabelgebundenes Gerät (z.B. einen
Computer) über ein Ethernet-Kabel mit einem LAN-Port
(Port 1,2 und IPTV/3) des Routers. Die LAN-LED-Anzeige
beginnt zu leuchten.
III. Richten Sie den Internetzugang auf
dem neuen Router ein
1. Starten Sie einen Webbrowser auf einem Gerät, welches mit dem
Router verbunden ist und rufen Sie die Adresse tendawif i.com auf.
Tipps:
Wenn Sie sich nicht bei der Web-Benutzeroberäche des Routers anmelden können, lesen
Sie in den FAQ unter Q1 nach.
2. Klicken Sie auf Starten.
3. Der Router wird automatisch die Art Ihrer Internetverbindung erkennen.
Legen Sie die erforderlichen Parameter fest und klicken
Sie auf Nächst.
Hinweis:
PPPoE wird hier zur Veranschaulichung verwendet. Wenn Sie den PPPoE-Benutzernamen und
das Passwort von Ihrem ursprünglichen Router übernommen haben, trägt der neue Router
den ISP-Benutzer-Name und das ISP-Passwort automatisch ein.
II. Verbinden Sie Ihre Geräte mit dem
neuen Router
Methode 1: Verwenden Sie die SSID auf dem Etikett an der Unterseite
Ihres Routers, um Ihr WLAN-fähiges Gerät (z.B. ein
Smartphone) mit dem WLAN-Netzwerk des neuen Routers
zu verbinden. Standardmäßig gibt es kein WLAN-Passwort.
05
4 . Passen Sie den Namen Ihres WLANs (SSID), Ihr WLAN-Passwort und das
Anmeldepasswort je nach Bedarf an und klicken Sie auf Nächst.
Hinweis:
Das WLAN Passwort wird verwendet, um eine Verbindung zum WLAN Netzwerk
herzustellen und das Login-Passwort wird verwendet, um sich in der Weboberäche Ihres
Routers anzumelden.
Fertig.
Page 9

IV. Zugri auf das Internet
WLAN-fähige Geräte: Verbinden Sie Ihre drahtlosen Geräte mit dem
WLAN-Netzwerk des Routers. Verwenden Sie dabei den WLAN-Namen und
das WLAN-Passwort, das Sie festgelegt haben.
Tipps:
Standardmäßig ist der WLAN-Name für 2,4GHz und 5GHz identisch. Informationen zum
Ändern des WLAN-Namens und des WLAN-Passworts nden Sie unter Q4 in den FAQ.
Kabelgebundene Geräte: Ihre kabelgebundenen Geräte, die mit dem Router
verbunden sind, können jetzt direkt auf das Internet zugreifen.
Buchse, Anschlüsse und Tasten
Buchse/Anschluss/
Taste
POWER
WPS/RST
WAN
1/2
IPTV/3
Beschreibung
Stromanschluss.
Wird zum Verbinden mit dem mitgelieferten Netzteil zur Stromversorgung
verwendet.
Wird verwendet, um die WPS Übertragung Ihres Routers zu starten oder um
den Router zurückzusetzen.
WPS: Drücken Sie die Taste am Router für 1 bis 3Sekunden. Aktivieren Sie
innerhalb von 2Minuten die WPS-Funktion eines anderen Geräts, um eine
WPS-Verbindung aufzubauen.
Zurücksetzen: Wenn die SYS-LED-Anzeige blinkt, halten Sie die Taste für
etwa 8Sekunden gedrückt, bis alle LED-Anzeigen einmal blinken.
Wird verwendet, um diesen Router mit dem Internet zu verbinden.
Es handelt sich um LAN-Ports, die zur Verbindung mit kabelgebundenen
Geräten wie Computern oder Switches verwendet werden.
Voreingestellt ist dieser Port als LAN-Port.
Wenn jedoch die IPTV-Funktion des Routers aktiviert ist, funktioniert er nur
als IPTV-Port, über den eine Verbindung zu einer Set-Top-Box hergestellt wird.
LED-Anzeige
LED-Anzeige
SYS
WAN
LAN
WiFi
T
Status Beschreibung
Leuchtet
Blinkt
Aus
Leuchtet
Blinkt
Aus
Leuchtet
Zweimal
schnelles Blinken
Aus
Leuchtet
Schnelles
Blinken
Langsames
Blinken
Aus
Deutsch
Der Router wird gestartet.
Wenn die Anzeige nach dem Start des Routers
dauerhaft leuchtet, verbindet sich der Router
erfolgreich mit dem Internet.
Der Router funktioniert ordnungsgemäß, kann
aber keine Verbindung zum Internet herstellen.
Das System ist fehlerhaft.
Der WAN-Port ist war korrekt angeschlossen, es
werden aber keine Daten übertragen.
Daten werden über den WAN-Port übertragen.
Der WAN-Port ist nicht verbunden oder falsch
angeschlossen.
Mindestens ein LAN-Port ist korrekt verbunden.
Ein neues kabelgebundenes Gerät ist mit dem
Router verbunden.
Es ist kein Gerät korrekt mit einem LAN-Port des
Routers verbunden.
Mindestens das 2,4GHz- oder das
5GHz-WLAN-Netzwerk ist aktiviert.
Daten werden drahtlos übertragen.
Der Router führt die WPS-Kopplung durch.
Sowohl das 2,4GHz- als auch das
5GHz-WLAN-Netzwerk sind deaktiviert.
Diese LED ist reserviert.
06
Page 10

I. Conecte su enrutador
Si desea copiar el nombre de usuario y la contraseña de PPPoE de su
enrutador original, comience con el Paso 1. De lo contrario, comience
desde el Paso 2.
Español
Paso 1: Importe el nombre de usuario y la contraseña de
PPPoE de su enrutador original.
1. Encienda el enrutador original y el nuevo.
2.Conecte el puerto WAN del enrutador original a un puerto LAN
(puerto1, 2 e IPTV/3) del nuevo enrutador con un cable Ethernet.
3.Cuando los indicadores LED de WAN y LAN del enrutador nuevo se
encienden durante 3segundos después de parpadear rápido,
signica que el nombre de usuario y contraseña de PPPoE se
importaron al enrutador nuevo de forma correcta.
4. Retire el enrutador original.
Paso 2: Conecte nuevo enrutador a Internet.
1. Encienda el nuevo enrutador.
2. Conecte el puerto WAN del nuevo enrutador al puerto LAN de su
módem o su conector Ethernet utilizando un cable Ethernet. El
indicador LED de WAN se enciende.
II. Conecte sus dispositivos al nuevo
enrutador
Método 1: Conecte su dispositivo habilitados para WiFi (como un
teléfono inteligente) a la red WiFi del nuevo enrutador
utilizando el SSID etiquetado en la parte inferior del e
nrutador. No hay contraseña WiFi por defecto.
Método 2: Conecte su dispositivo con cable (como una computadora) a
un puerto LAN (puerto 1, 2 e IPTV/3) del enrutador con un
cable Ethernet. El indicador LED de LAN se enciende.
III. Congure el nuevo enrutador para
acceder a Internet
1. Abra un navegador en un dispositivo conectado al enrutador y visite
tendawif i.com.
Sugerencias:
Si no puede iniciar sesión en la interfaz web del enrutador, consulte la Q1 en la sección
de FAQ.
2. Haga clic en Inicio.
3. El enrutador detecta automáticamente su tipo de conexión a
Internet. Congure los parámetros requeridos y haga clic en
Siguiente.
Nota:
PPPoE se utiliza a modo de ilustración aquí. Si importó su nombre de usuario y contraseña
de PPPoE de su enrutador original, este enrutador rellenará de forma automática el Nombre
de usuario proporcionado por el ISP y la Contraseña proporcionada por el ISP.
4 . Personalice su nombre de WiFi (SSID), contraseña de WiFi y la contraseña
de inicio de sesión según sea necesario, y haga clic en Siguiente.
Nota:
La contraseña de WiFi se utiliza para conectarse a la red WiFi, y la contraseña de inicio de
sesión se utiliza para iniciar sesión en la interfaz web del enrutador.
Listo.
07
Page 11
IV. Acceda a Internet
Dispositivos habilitados para WiFi: Conecte sus dispositivos habilitados
para WiFi a la red WiFi del enrutador utilizando el nombre y la contraseña
de WiFi que conguró previamente.
Sugerencias:
Los nombres predeterminados de la red WiFi para 2,4GHz y 5GHz son el mismo. Si necesita
modicar el nombre y la contraseña de la red WiFi, consulte la Q4 en la sección de FAQ.
Dispositivos con cable: Ahora, los dispositivos con cable conectados al
enrutador pueden acceder a Internet directamente.
Conector, puertos y botones
Conector/Puerto/
Botón
POWER
WPS/RST
WAN
1/2
IPTV/3
Descripción
Clavija de alimentación.
Se utiliza para conectar al adaptador de corriente incluido.
Se utiliza para iniciar el proceso de negociación WPS o para reiniciar el
enrutador.
WPS: Presione el botón del enrutador durante 1 a 3segundos. En dos
minutos active la función WPS del otro dispositivo compatible con WPS
para establecer una conexión WPS.
Restablecer: Cuando el indicador LED de SYS parpadea, mantenga
presionado el botón durante unos 8segundos y suéltelo cuando todos
los indicadores LED hayan parpadeado una vez.
Se utiliza para conectar este enrutador a Internet.
Son puertos LAN que se utilizan para conectar dispositivos con cable, tales
como computadoras o conmutadores.
De forma predeterminada, es un puerto LAN.
Si la función IPTV del enrutador está activada, solo funciona como un puerto
IPTV para conectar un decodicador.
Indicadores LED
Indicador LED
SYS
WAN
LAN
WiFi
T
Estado Descripción
Se mantiene
Parpadeante
Apagado
Se mantiene
Parpadeante
Apagado
Se mantiene
Parpadeo rápido
en ambos
Apagado
Se mantiene
Parpadeo
rápido
Parpadeo lento
Apagado
El enrutador se está iniciando.
Si la luz indicadora permanece encendida de forma
ininterrumpida después de que el enrutador
completa el inicio, signica que el enrutador se está
conectando a Internet correctamente.
El enrutador funciona correctamente, pero no
puede conectarse a Internet.
El sistema está defectuoso.
El puerto WAN está conectado correctamente,
pero no se transmite ningún dato.
Los datos se transmiten a través del puerto WAN.
El puerto WAN está desconectado o conectado
incorrectamente.
Al menos un puerto LAN está conectado
correctamente.
Hay un nuevo dispositivo con cable conectado
al enrutador.
No hay dispositivos conectados correctamente a
ningún puerto LAN del enrutador.
Al menos la red WiFi de 2,4GHz o 5GHz está activada.
Los datos se están transmitiendo de forma
inalámbrica.
El enrutador está realizando la negociación WPS.
Las redes WiFi de 2,4GHz y 5GHz están
desactivadas.
Este LED está reservado.
Español
08
Page 12

I. Připojení routeru
Chcete-li zkopírovat uživatelské jméno a heslo PPPoE z původního
routeru, začněte Krok1. V ostatních případech začněte od Krok2.
Čeština
Krok1: Importujte své uživatelské jméno aheslo PPPoE z
původního routeru.
1. Zapněte napájení svého původního routeru anového routeru.
2.Připojte port WAN původního routeru kportu LAN (port 1, 2, IPTV/3)
nového routeru ethernetovým kabelem.
3.Když LED kontrolky sítě WAN aLAN nového routeru rychle bliknou a
potom 3sekundy svítí, importování vašeho uživatelského jména a
hesla PPPoE do nového routeru bylo úspěšně dokončeno.
4. Odpojte původní router.
Krok2: Připojte nový router kinternetu.
1. Zapněte nový router.
2. Připojte port WAN nového routeru kportu LAN modemu nebo do
konektoru/kabelu sítě Ethernet (připojení od vašeho poskytovatele
Internetu). Kontrolka WAN se rozsvítí.
II. Připojení zařízení knovému routeru
Metoda1: Zařízení spřístupem ksíti WiFi (například smartphone)
připojte k síti Wi-Fi nového routeru pomocí identikátoru
SSID uvedeného na spodní straně routeru. Ve výchozím
nastavení není přístup ksíti WiFi zabezpečen heslem.
Metoda 2: Připojte drátové zařízení (např. počítač) kportu LAN (port 1, 2,
IPTV/3) routeru ethernetovým kabelem. Kontrolka LAN se
rozsvítí.
III. Nastavení nového routeru pro přístup
kinternetu
1. Spusťte webový prohlížeč vzařízení (PC, notebook, atd.), které je
připojeno knovému routeru, azadejte stránky tendawif i.com.
Tipy:
Pokud se nemůžete přihlásit kwebovému uživatelskému rozhraní routeru, přečtěte si
Q1 vFAQ.
2. Klikněte na tlačítko Start.
3. Router automaticky rozpozná typ vašeho internetového připojení.
Nastavte požadované parametry aklikněte na tlačítko Další.
Poznámka:
PPPoE je zde použito pouze pro názornost. Pokud jste způvodního routeru přenesli
své uživatelské jméno aheslo PPPoE, router automaticky vyplní Uživatelské jméno
ISP aHeslo ISP.
4 . Podle potřeby upravte název sítě WiFi (SSID), heslo sítě WiFi a
přihlašovací heslo aklikněte na tlačítko Další.
Poznámka:
Heslo bezdrátové sítě se používá pro připojení ksíti WiFi routeru. Přihlašovací heslo se
používá kpřihlášení do webového uživatelského rozhraní routeru.
Hotovo.
09
Page 13

IV. Přístup na internet
Zařízení spřístupem ksíti WiFi: Připojte zařízení spřístupem ksíti WiFi ksíti
WiFi routeru pomocí nastaveného názvu sítě ahesla.
Tipy:
Ve výchozím nastavení je název sítě WiFi pro frekvenci 2,4GHz a 5GHz stejný. Pro změnu
názvu ahesla sítě WiFi viz Q4 vFAQ.
Drátová zařízení: Vaše drátová zařízení připojená krouteru nyní mají přímý
přístup kinternetu.
Konektor, porty atlačítka
Kontrolky LED
LED indikace
SYS
WAN
Stav Popis
Svítí
Bliká
Nesvítí
Svítí
Bliká
Router se spouští.
Pokud kontrolka po dokončení spuštění routeru
stále svítí, znamená to, že se router úspěšně
připojuje kinternetu.
Router funguje správně, ale nedokáže se připojit
kinternetu.
Závada systému.
Port WAN je správně připojen, ale neprobíhá
přenos dat.
Probíhá přenos dat přes port WAN.
Čeština
Konektor/port
/tlačítko
POWER
WPS/RST
WAN
1/2
IPTV/3
Popis
Konektor napájení.
Používá se kpřipojení dodávaného napájecího adaptéru.
Slouží kzapnutí WPS zabezpečení routeru (krátký stisk) nebo kresetování
routeru do továrního nastavení (dlouhý stisk po dobu 8 vteřin).
WPS: Stiskněte tlačítko routeru na 1 až 3sekundy. Do 2minut aktivujte
funkci WPS na druhém zařízení spodporou WPS pro navázání spojení WPS.
Reset: Když bliká kontrolka SYS, podržte tlačítko asi 8sekund auvolněte
jej, jakmile všechny kontrolky LED jednou bliknou.
Slouží kpřipojení tohoto routeru kInternetu.
Jedná se oporty sítě LAN, ke kterým se připojují drátová zařízení, například
počítače nebo přepínače.
Ve výchozí konguraci funguje jako port sítě LAN.
Pokud je však funkce IPTV routeru zapnutá, slouží pouze jako port IPTV pro
připojení set-top boxu.
LAN
WiFi
T
Nesvítí
Svítí
Dvakrát rychle
blikne
Nesvítí
Svítí
Rychle bliká
Bliká pomalu
Nesvítí
Port WAN je odpojen nebo není řádně připojen.
Alespoň jeden port LAN je řádně připojen.
Nové drátové zařízení bylo připojeno krouteru.
Kžádnému portu LAN routeru není řádně
připojeno žádné zařízení.
Je aktivována alespoň síť WiFi 2,4GHz nebo 5GHz.
Probíhá bezdrátový přenos dat.
Router provádí vyjednávání WPS.
Jsou deaktivovány obě bezdrátové sítě 2,4GHz
a5GHz.
Tato kontrolka LED je vyhrazena.
10
Page 14

I. Collegamento del router
Se si desidera copiare il nome utente e la password PPPoE dal router
originale, iniziare dal Passo 1. Altrimenti, partire dal Passo 2.
Italiano
Passo 1: Importare il nome utente e la password PPPoE dal
router originale
1. Accendere il router originale e quello nuovo.
2.Collegare la porta WAN del router originale alla porta LAN (porta 1, 2,
IPTV/3) del nuovo router utilizzando un cavo Ethernet.
3.Quando i LED WAN e LED del nuovo router si accendono con luce
ssa per 3 secondi dopo un lampeggiamento veloce, il nome utente
e la password PPPoE sono stati importati sul nuovo router.
4. Rimuovere il router originale.
Passo 2: Collegare il nuovo router a Internet.
1. Accendere il nuovo router.
2. Collegare la porta WAN del nuovo router alla porta LAN del tuo
modem o alla presa Ethernet utilizzando un cavo Ethernet. La spia
LED WAN si accende.
Metodo 2: Collegare il dispositivo cablato (ad esempio un computer) a
una porta LAN (porta 1, 2, IPTV/3) del router utilizzando un
cavo Ethernet. La spia LED LAN si accende.
III. Congurare il nuovo router per
l'accesso a Internet
1. Avviare un browser Web sul dispositivo collegato al router e visitare
tendawif i.com.
Suggerimenti:
Se non è possibile accedere all'interfaccia utente Web del router, fare riferimento a Q1
nelle FAQ.
2. Fare clic su Inizio.
3. Il router rileva automaticamente il tipo di connessione Internet.
Impostare i parametri richiesti e fare clic su Prossimo.
Nota:
PPPoE viene utilizzato come illustrazione. Se il nome utente e la password PPPoE sono
stati migrati dal router originale, il router compila automaticamente il . nome utente
ISP e la password ISP .
II. Collegare i dispositivi al nuovo router
Metodo 1: Collegare il dispositivo WiFi (ad esempio uno smartphone)
alla rete WiFi del nuovo router utilizzando l'SSID riportato
nella parte inferiore del router. Come impostazione
predenita non esiste
una password WiFi.
11
4 . Se necessario, personalizzare il nome WiFi (SSID), la password WiFi e
la password di accesso, quindi fare clic su Prossimo.
Nota:
Password del WiFi viene utilizzata per connettersi al WiFi del router e la password di
accesso viene utilizzata per accedere all'interfaccia utente del router.
Fatto.
Page 15

IV. Accedere ad internet
Dispositivi WiFi: Collegare i dispositivi WiFi alla rete WiFi del router
utilizzando il nome WiFi e la password WiFi impostati.
Suggerimenti:
I nomi delle reti Wi-Fi da 2,4 GHz e 5 GHz sono uguali. Se è necessario modicare il nome e
la password WiFi, consultare Q4 nelle FAQ .
Dispositivi con lo: I dispositivi cablati collegati al router possono
accedere a Internet direttamente.
Jack, porte e pulsanti
Jack/Porta/
Pulsante
WPS/RST
WAN
1/2
IPTV/3
Descrizione
Presa di alimentazione.
Utilizzato per collegare l'adattatore di alimentazione a corredo.POWER
Usato per avviare la negoziazione WPS del router, o per ripristinare il router.
WPS: Premere il pulsante del router per 1-3 secondi. Entro 2 minuti,
attivare la funzione WPS dell'altro dispositivo WPS supportato per stabilire
una connessione WPS.
Ripristinare: Quando la spia LED SYS lampeggia, tenere premuto il
pulsante per circa 8 secondi e rilascialo quando tutte le spie LED
lampeggiano una volta.
Utilizzata per connettere questo router a Internet.
Sono porte LAN utilizzate per collegarsi a dispositivi cablati come computer
o switch.
Per impostazione predenita, funziona come porta LAN.
Ma se la funzione IPTV del router è abilitata, funge solo da porta IPTV
utilizzata per collegarsi a un set-top box.
Indicatori LED
Indicatori LED
SYS
WAN
LAN
WiFi
T
Stato Descrizione
Accensione ssa
Accensione
intermittente
Spento
Accensione ssa
Accensione
intermittente
Spento
Accensione ssa
Lampeggiamento
veloce per due volte
Spento
Accensione ssa
Lampeggio
veloce
Lampeggio
lento
Spento
Il router sta avviandosi.
Se l'indicatore rimane acceso con luce ssa dopo
che il router ha completato l'avvio, signica che
il router si sta connettendo a Internet.
Il router funziona correttamente, ma non riesce a
connettersi a Internet.
Il sistema è in errore.
La porta WAN è collegata correttamente, ma non
viene trasmesso alcun dato.
Dati trasmessi attraverso la porta WAN.
La porta WAN è scollegata o collegata in modo
non corretto.
Almeno una porta LAN è collegata correttamente.
Un nuovo dispositivo cablato è connesso al
router.
Nessun dispositivo è collegato a una porta LAN
del router correttamente.
Almeno la rete WiFi a 2,4 GHz e/o a 5 GHz è abilitata.
I dati vengono trasmessi in modalità wireless.
Il router sta eseguendo la negoziazione WPS.
Le reti wireless a 2,4 GHz e a 5 GHz sono disabilitate.
Questo LED è riservato.
Italiano
12
Page 16

I. Connecter votre routeur
Si vous souhaitez copier le nom d'utilisateur et le mot de passe PPPoE
à partir de votre routeur original, commencez à l'Étape 1. Dans le cas
contraire, commencer à partir de l'Étape 2.
Français
Étape 1: Importer votre nom d'utilisateur et mot de passe
PPPoE à partir de votre routeur original
1. Allumer vos routeurs neufs et originaux.
2.Connecter le port WAN du routeur original à un port LAN (port 1, 2,
IPTV/3) du nouveau routeur à l'aide d'un câble Ethernet.
3.Lorsque les voyants LED WAN et LAN du nouveau routeur deviennent
xes pendant 3 secondes après avoir clignoté rapidement, votre nom
d'utilisateur et mot de passe PPPoE sont importés avec succès au
nouveau routeur.
4. Retirer le routeur original.
Étape 2: Connecter votre nouveau routeur à Internet.
1. Allumez le nouveau routeur.
2. Connecter le port WAN du nouveau routeur au port LAN de votre
modem ou votre prise Ethernet à l'aide d'un câble Ethernet. Le
voyant LED WAN s'allume.
II. Connecter vos appareils au nouveau
routeur
Méthode 1: Connectez votre appareil compatible Wi-Fi (par exemple
un smartphone) au réseau WiFi du nouveau routeur à
l'aide du SSID indiqué sous le routeur. Il n'y a pas de mot
de passe WiFi par défaut.
13
Méthode 2: Connecter votre appareil câblé (par exemple un ordinateur) à
un port LAN (port 1, 2, IPTV/3) du routeur à l'aide d'un câble
Ethernet. Le voyant LED LAN s'allume.
III. Congurer le nouveau routeur
pour accéder à Internet
1. Lancer un navigateur web sur un appareil connecté au routeur et
consulter le site tendawif i.com.
Conseils:
Si vous n'arrivez pas à vous connecter à l'interface utilisateur Web du routeur, se référer
à la Q1 dans la section FAQ .
2. Cliquer sur Commencer.
3. Le routeur détecte automatiquement votre type de connexion
internet. Dénissez les paramètres requis et cliquez sur Suivant.
Remarque:
Le PPPoE est utilisé à titre d'exemple. Si vous avez migré votre nom d'utilisateur et votre
mot de passe PPPoE à partir de votre routeur original, ce routeur remplit
automatiquement le Nom d'utilisateur ISP et le Mot de passe ISP.
4 . Personnalisez votre nom WiFi (SSID), votre mot de passe WiFi et le
mot de passe de connexion selon vos besoins, puis cliquez sur
Suivant.
Remarque:
Le mot de passe du WiFi est utilisé pour connecter le réseau WiFi, et mot de passe de
connexion est utilisés pour se connecter à l'IU web du routeur.
Terminé.
Page 17

IV. Accès à Internet
Appareils compatibles Wi-Fi : Connecter vos appareils compatibles WiFi au
réseau Wi-Fi du routeur à l'aide du nom et du mot de passe WiFi que vous
avez dénis.
Conseils:
La valeur Par défaut et le nom WiFi pour 2,4 GHz et 5 GHz sont les mêmes. Si vous devez
modier le nom et le mot de passe du WiFi, voir la Q4 dans la section FAQ.
Appareils câblés: Vos appareils câblés reliés au routeur peuvent
maintenant accéder directement à Internet.
Prises, ports et boutons
DescriptionPrise/Port/Bouton
POWER
WPS/RST
WAN
1/2
IPTV/3
Prise d'alimentation.
Utilisé pour se connecter à l'adaptateur d'alimentation fourni.
Utilisé pour démarrer la négociation WPS du routeur ou pour réinitialiser le
routeur.den Router zurückzusetzen.
WPS: Appuyez sur le bouton du routeur pendant 1 à 3 secondes. Dans un
délai de 2 minutes, activez la fonction WPS de l'autre appareil compatible
WPS pour établir une connexion WPS.
Réinitialiser: Lorsque le voyant LED SYS clignote, maintenez le bouton
enfoncé pendant environ 8 secondes, et relâchez-le lorsque tous les
voyants LED clignotent une fois.
Utilisé pour connecter ce routeur à internet.
Des ports LAN sont utilisés pour se connecter aux appareils câblés comme
les ordinateurs ou les commutateurs.
Par défaut, il fonctionne comme port LAN.
Si la fonction IPTV du routeur est activée, il fonctionne uniquement comme
port IPTV utilisé pour se connecter à une boîte de réglage.
Voyants LED
Voyant LED
SYS
WAN
LAN
WiFi
T
Statut Description
Allumé en
continu
Clignotant
Éteint
Allumé en
continu
Clignotant
Éteint
Allumé en
continu
Clignotement
rapide deux fois
Éteint
Allumé en
continu
Clignotement
rapide
Clignotement
lent
Éteint
Le routeur est en cours de démarrage.
Si le voyant reste allumé en continu une fois le
démarrage du routeur terminé, cela signie que
le routeur se connecte à Internet avec succès.
Le routeur fonctionne correctement mais ne
parvient pas à se connecter à Internet.
Le système est défaillant.
Le port WAN est correctement connecté, mais
aucune date n'est transmise.
Les données sont transmises par le port WAN.
Le port WAN est déconnecté ou n'est pas
correctement connecté.
Au moins un port LAN est branché correctement.
Un nouvel appareil câblé est connecté au routeur.
Aucun appareil n'est connecté correctement à
un port LAN du routeur.
Au moins le réseau 2,4Ghz ou 5GHz est activé.
Les données sont en cours de transmission sans l.
Le routeur effectue la négociation WPS.
Les réseaux Wi-Fi 2,4 GHz et 5 GHz sont désactivés.
Ce voyant LED est réservé.
Français
14
Page 18

I. Csatlakoztassa az útválasztót
Ha szeretné átmásolni a PPPoE felhasználónevet és -jelszót az eredeti
routerről, kezdje az 1. lépés. Ellenkező esetben ugorjon a 2. lépés.
Magyar
1. lépés: Importálja a PPPoE felhasználónevet és jelszót az
eredeti routerről.
1. Kapcsolja be az eredeti és az új routert.
2.Csatlakoztassa az eredeti router WAN portját az új router egyik LAN
portjához (1., 2. port, IPTV/3) egy Ethernet-kábellel.
3.Ha az új router WAN és LAN LED-jelzői a gyors villogást követően 3
másodpercig folyamatosan világítanak, a rendszer sikeresen
beimportálta a PPPoE felhasználónevet és jelszót az új routerre.
4. Távolítsa el az eredeti routert.
2. lépés: Csatlakoztassa az új routert az internethez.
1. Kapcsolja be az új routert.
2. Csatlakoztassa az új router WAN portját a modem LAN portjához
vagy Ethernet-kábellel az Ethernet csatlakozóhoz. A WAN LED-jelző
világít.
II. Csatlakoztassa az eszközöket az új
routerhez
1. módszer: Csatlakoztassa a WiFi-kompatibilis eszközt (pl. okostelefont)
az új router WiFi-hálózatához a router alján található címkén
feltüntetett SSID segítségével. Alapértelmezés szerint nincs
WiFi-jelszó. Kész.
2. módszer: Csatlakoztassa a vezetékes készüléket (pl. számítógépet)
a router egyik LAN portjához (1., 2. port, IPTV/3) egy
Ethernet-kábellel. A LAN LED-jelző világítani kezd.
III. Állítsa be az új routert az
interneteléréshez
1. Indítson el egy böngészőt az új routerhez csatlakoztatott valamelyik
eszközön, és látogasson el a tendawif i.com oldalra.
Tippek:
Ha nem tud bejelentkezni a router internetes felhasználói felületére, tekintse meg a
FAQ Q1 kérdését.
2. Kattintson a Start gombra.
3. A router automatikusan észleli az ön internetkapcsolat típusát.
Állítsa be a szükséges paramétereket, majd kattintson a Következő
gombra.
Megjegyzés:
A PPPoE itt szemléltetésre szolgál. Ha az eredeti routerről telepítette át a PPPoE
felhasználónevet és jelszót, ez a router automatikusan kitölti az ISP felhasználónév és
az ISP jelszó.
4 . Szükség szerint szabja személyre WiFi-nevét (SSID), WiFi-jelszavát és
a bejelentkezési jelszót, majd kattintson a Következő gombra.
Megjegyzés:
A WiFi-jelszó segítségével csatlakozhat a router Wi-Fi-hálózatához, a bejelentkezési
jelszó pedig a router webes felhasználói felületére való bejelentkezésre szolgál.
15
Page 19

IV. Internet hozzáférés
WiFi-kompatibilis eszközök: Csatlakoztassa a WiFi-kompatibilis
eszközöket a routerhez tartozó WiFi-hálózathoz a beállított WiFi név és
jelszó segítségével.
Tippek:
Alapértelmezés szerint a 2,4 GHz-es és az 5 GHz-es WiFi-hálózat neve megegyezik. A WiFi
név és jelszó módosításához tekintse meg a FAQ Q4 kérdését.
Vezetékes eszközök: A routerhez csatlakozó vezetékes eszközök mostantól
közvetlen internet-hozzáféréssel rendelkeznek.
Csatlakozó, portok és gombok
Csatlakozó/port/
gomb
POWER
WPS/RST
WAN
1/2
IPTV/3
Leírás
Tápcsatlakozó.
A mellékelt hálózati adapterhez történő csatlakoztatásra szolgál.
A router WPS-egyeztetésének elindítására vagy a router visszaállítására
szolgál.
WPS: Tartsa nyomva a router gombját 1-3 másodpercig. WPS kapcsolat
létrehozásához 2 percen belül engedélyezze a WPS által támogatott
másik eszköz WPS funkcióját.
Visszaállítás: Amikor a SYS LED-jelző villog, kb. 8 másodpercig tartsa
nyomva a gombot. Akkor engedje fel, amikor az összes LED-jelző egyszer
felvillan.
A router internethez történő csatlakoztatására szolgál.
Az egyéb vezetékes eszközök, pl. számítógépek vagy switchek
csatlakoztatására a LAN portok szolgálnak.
Alapértelmezésként LAN portként funkcionál.
A router IPTV funkciójának engedélyezése esetén kizárólag IPTV portként
működik, és egy set top boxhoz való csatlakoztatásra szolgál.
LED-jelzők
LED
visszajelző
SYS
WAN
LAN
WiFi
T
Státusz Leírás
Folyamatosan
bekapcsolva
Villog
Ki
Folyamatosan
bekapcsolva
Villog
Ki
Folyamatosan
bekapcsolva
Gyors villogás
kétszer
Ki
Folyamatosan
bekapcsolva
Gyors villogás
Lassú villogás
Ki
A router indítása folyamatban van.
Ha a jelzőfény még azután is folyamatosan
világít, miután a router befejezte az indítást,
ez azt jelzi, hogy a router sikeresen csatlakozik
az internethez.
A router megfelelően működik, azonban nem
sikerül csatlakoznia az internethez.
A rendszer hibás.
A WAN port megfelelően van csatlakoztatva,
azonban nincs folyamatban adatátvitel.
Adatátvitel van folyamatban a WAN porton keresztül.
A WAN port nincs, vagy nem megfelelően van
csatlakoztatva.
Legalább egy LAN port megfelelően van
csatlakoztatva.
Egy új vezetékes eszköz van csatlakoztatva a
routerhez.
A router egyik LAN portjához sincs megfelelően
csatlakoztatva eszköz.
Legalább a 2,4 GHz-es vagy az 5 GHz-es WiFi-hálózat
engedélyezve van.
Vezeték nélküli adatátvitel van folyamatban.
A router végrehajtja a WPS kapcsolódást.
A 2,4 GHz-es és az 5 GHz-es vezeték nélküli hálózat
egyaránt le van tiltva.
Ez a LED foglalt.
Magyar
16
Page 20

I. Conecte seu roteador
Se você deseja copiar o nome de usuário e a senha do PPPoE do seu
roteador original, inicie em Passo 1. caso contrario, iniciar do Passo 2.
Passo 1: Importe seu nome de usuário e senha PPPoE do
Português
roteador original.
1. Ligue o original e os novos roteadores.
2. Conecte a porta WAN do roteador original a uma porta LAN (porta
1, 2, IPTV/3) do novo roteador usando um cabo Ethernet.
3. Quando os indicadores de LED WAN e LAN do novo roteador
acendem por 3 segundos depois de piscar rapidamente, o nome de
usuário e a senha de PPPoE são importados com sucesso para o seu
novo roteador.
4. Remova o roteador antigo.
Passo 2: Conecte o novo roteador à Internet.
1. Ligue o novo roteador.
2. Conecte a porta WAN do novo roteador a uma porta LAN de seu
modem ou ao conector de Ethernet usando um cabo Ethernet. O
LED indicador de WAN acende uma luz.
II. Conectar os dispositivos ao novo
roteador
Método 1: Conecte seu dispositivo habilitado para WiFi (como um
smart phone) à rede WiFi do novo roteador usando o SSID
identicado na parte inferior do roteador. Não há senha de
WiFi por padrão.
Método 2: Conecte seu dispositivo com o (como um computador) a
uma porta LAN (porta 1, 2, IPTV/3) do roteador usando um
cabo Ethernet. O LED indicador de LAN acende uma luz.
III. Congure o novo roteador para
acesso à Internet
1. Inicie um navegador da Web no dispositivo que se conectou ao
roteador e visite tendawif i.com.
Dicas:
Se você não conseguir fazer login no IU do roteador, consulte Q1 nas FAQ.
2. Clique em Início.
3. O roteador detecta o tipo da sua conexão à internet automatica
mente. Dena os parâmetros necessários e clique em Próximo.
Nota:
PPPoE é usado para ilustração aqui. Se você migrou seu nome de usuário e senha
PPPoE do seu roteador original, este roteador preenche automaticamente o
Nome de Usuário de ISP e Senha de ISP .
4 . Personalize seu nome de WiFi (SSID), senha de WiFi e senha de login
conforme necessário e clique em Próximo.
Nota:
A senha Wi-Fi é usada para conectar-se à Wi-Fi do roteador, e a senha de login é usada
para acessar a interface Web de usuário do roteador.
Pronto.
17
Page 21

IV. Acessar a internet
Dispositivos habilitados para WiFi: Conecte seus dispositivos habilitados
para WiFi à rede WiFi do roteador usando o nome do WiFi e a senha de
WiFi que você deniu.
Dicas:
Por padrão, o nome do WiFi para 2,4 GHz e 5 GHz é o mesmo. Se você precisar modicar o
nome do WiFi ou a senha de WiFi, consulte Q4 nas FAQ.
Dispositivos com cabo: Seus dispositivo s com o conectados ao roteador
podem acessar a Internet diretamente agora.
Jack, portas e botões
DescriçãoJack/Porta/Botão
POWER
WPS/RST
WAN
1/2
IPTV/3
Jack de alimentação.
Usada para conectar o adaptador de energia incluso.
Usado para iniciar o processo de negociação WPS ou redenir o roteador.
WPS: Pressione o botão do roteador por 1 a 3 segundos. Em 2 minutos,
ative a função WPS do outro dispositivo suportado por WPS para
estabelecer uma conexão WPS.
Redenir: Quando o indicador LED do SYS piscar, mantenha este botão
pressionado durante cerca de 8 segundos e solte-o quando todos os
indicadores LED piscarem uma vez.
Usado para conectar este roteador à internet.
São portas LAN usadas para conectar dispositivos com o como
computadores ou switches.
Por padrão, ele funciona como uma porta de LAN.
Mas se a função de IPTV do roteador estiver ativada, ela será usada apenas
como uma porta de IPTV usada para conectar-se a um set-top box.
Indicadores LED
Indicador LED
SYS
WAN
LAN
WiFi
T
Status Descrição
Fixo
Piscando
Desligado
Fixo
Piscando
Desligado
Fixo
Piscando
rapidamente por
duas vezes
Desligado
Fixo
Piscando rápido
Piscando
lentamente
Desligado
O Roteador está iniciando.
Se o indicador continuar aceso após o roteador
concluir a inicialização, isso indicará que o roteador
está se conectando à Internet com sucesso.
O roteador funciona corretamente, mas não
consegue se conectar à Internet.
O sistema está apresentando falhas.
A porta WAN está conectada corretamente, mas
nenhuma data está sendo transmitida.
Os dados estão sendo transmitidos pela porta WAN.
A porta WAN está desconectada ou conectada
incorretamente.
Pelo menos uma porta LAN está conectada
corretamente.
Um novo dispositivo com o está conectado ao
roteador.
Nenhum dispositivo está conectado à porta LAN
do roteador adequadamente.
A rede WiFi de 2.4 GHz ou 5 GHz estão ativas.
Os dados estão sendo transmitidos sem o.
O Roteador está se conectando via WPS.
Ambas as redes sem o de 2,4 GHz e 5 GHz estão
desabilitadas.
Este LED está reservado.
Português
18
Page 22

I. Podłącz swój router
Jeśli chcesz skopiować nazwę użytkownika i hasło PPPoE z
oryginalnego routera, rozpocznij od Krok 1. W przeciwnym wypadku
Polski
zacznij od Krok 2.
Krok 1: Zaimportuj nazwę użytkownika i hasło PPPoE z
oryginalnego routera.
1. Podłącz oryginalny i nowy router.
2.Podłącz port WAN oryginalnego routera do jednego z portów LAN
(port 1, 2, IPTV/3) nowego routera przy użyciu kabla Ethernet.
3.Włączenie się kontrolek LED portów sieci WAN i LED nowego routera
na 3 sekundy po zakończeniu migania oznacza, że nazwa
użytkownika i hasło PPPoE zostały zaimportowane do nowego
routera.
4. Odłącz obecny router.
Krok 2: Połącz nowy router z Internetem.
1. Włącz zasilanie nowego routera.
2. Podłącz port WAN nowego routera do portu LAN oryginalnego
routera lub wejścia Ethernet za pomocą kabla Ethernet. Kontrolka
LED portu sieci WAN świeci.
II. Podłącz urządzenia do nowego routera
Metoda 1: Podłącz urządzenie z obsługą sieci Wi-Fi (takie jak smartfon)
do sieci Wi-Fi nowego routera za pomocą identykatora
SSID znajdującego się na spodzie routera. Nie ustawiono
domyślnie żadnego hasła WiFi.
19
Metoda 2: Podłącz urządzenie z obsługą sieci przewodowej (np. komputer)
do jednego z portów LAN (port 1, 2, IPTV/3) routera przy użyciu
kabla Ethernet. Kontrolka LED portu sieci LAN świeci.
III. Skonguruj nowy router pod kątem
dostępu do Internetu
1. Uruchom przeglądarkę internetową w urządzeniu podłączonym do
routera i wejdź na stronę tendawif i.com.
Wskazówki:
Jeśli nie możesz zalogować się do interfejsu przeglądarki internetowej routera, zobacz
odpowiedź na Q1 w sekcji FAQ.
2. Kliknij przycisk Start.
3. Router automatycznie wykryje typ twojego połączenia
internetowego. Ustaw wymagane parametry i kliknij Dalej.
Uwaga:
Na ilustracji przedstawiono PPPoE. Jeśli zaimportowano nazwę użytkownika i hasło
PPPoE z oryginalnego routera, pola Nazwa użytkownika ISP i Hasło ISP zostaną
uzupełnione automatycznie.
4 . W razie potrzeby dostosuj nazwę Wi-Fi (SSID), hasło sieci Wi-Fi i
hasło logowania, a następnie kliknij Dalej.
Uwaga:
Hasło Wi-Fi służy do łączenia się z siecią Wi-Fi routera, natomiast Hasło logowania służy
do logowania się do internetowego interfejsu użytkownika routera.
Gotowe.
Page 23

IV. Połącz się z Internetem
Urządzenia z obsługą sieci Wi-Fi: Podłącz urządzenia z obsługą sieci Wi-Fi
do sieci Wi-Fi routera za pomocą ustawionej nazwy sieci Wi-Fi i hasła sieci
Wi-Fi.
Wskazówki:
Domyślnie nazwy sieci Wi-Fi w pasmach 2,4 GHz i 5 GHz są takie same. Jeśli musisz zmienić
nazwę sieci Wi-Fi i hasło sieci Wi-Fi, zobacz odpowiedź na Q4 w sekcji FAQ.
Urządzenia przewodowe: Urządzenia przewodowe podłączone do routera
mogą teraz uzyskać bezpośredni dostęp do Internetu.
Gniazdo, porty i przyciski
Gniazdo/port/
przycisk
POWER
WPS/RST
WAN
1/2
IPTV/3
Opis
Gniazdo zasilania.
Służy do podłączenia do dołączonego zasilacza i zasilania urządzenia.
Służy do włączania funkcji WPS lub do resetowania routera.
WPS: Naciśnij przycisk routera i przytrzymaj go do 3 sekund. W ciągu 2
minut włącz funkcję WPS w drugim urządzeniu z obsługą WPS, aby
nawiązać połączenie WPS.
Reset: Gdy zaświeci się kontrolka LED SYS, naciśnij i przytr zymaj przycisk
przez około 8 sekund, a następnie zwolnij go, gdy wszystkie kontrolki
LED zamigają jeden raz.
Służy do łączenia routera z internetem.
Są to porty LAN służące do podłączania takich urządzeń przewodowych,
jak komputery i przełączniki.
Działa on domyślnie jako port LAN.
Jeśli jednak funkcja IPTV routera jest włączona, działa jedynie jako port IPTV,
służący do połączenia z dekoderem.
Kontrolki LED
Kontrolka LED
SYS
WAN
LAN
WiFi
T
Stan Opis
Ciągłe światło
Miganie
Wyłącz
Ciągłe światło
Miganie
Wyłącz
Ciągłe światło
Szybkie,
dwukrotne
miganie
Wyłącz
Ciągłe światło
Szybkie miganie
Powolne miganie
Wyłącz
Router rozpoczyna pracę.
Jeśli wskaźnik świeci światłem ciągłym po
zakończeniu uruchamiania routera, oznacza to,
że router nawiązał połączenie z Internetem.
Router działa prawidłowo, ale nie może połączyć
się z Internetem.
System jest wadliwy.
Port WAN jest prawidłowo podłączony, ale dane
nie są przesyłane.
Dane przesyłane są przez port WAN.
Port WAN jest odłączony lub niepoprawnie
podłączony.
Co najmniej jeden port LAN jest podłączony
prawidłowo.
Nowe urządzenie przewodowe zostało
podłączone do Internetu.
Do portu LAN routera nie zostało prawidłowo
podłączone żadne urządzenie.
Włączono co najmniej jedną sieć Wi-Fi w pasmach
2,4 GHz i 5 GHz.
Trwa bezprzewodowy transfer danych.
Urządzenie negocjuje WPS.
Wyłączone są sieci bezprzewodowe zarówno w
paśmie 2,4 GHz, jak i 5 GHz.
Ta dioda LED jest zarezerwowana.
Polski
20
Page 24

I. Conectaţi routerul
Dacă doriţi să copiaţi numele de utilizator PPPoE şi parola de pe routerul
iniţial, porniţi de la Pasul 1. În caz contrar, începeți de la Pasul 2.
Pasul 1: Importarea numelui de utilizator PPPoE și a parolei
Română
de pe routerul iniţial.
1. Porniți routerul inițial și routerul nou.
2.Conectați portul WAN al routerului inițial la portul LAN (portul 1, 2,
IPTV/3) al routerului nou, utilizând un cablu Ethernet.
3.Atunci când LED-urile indicatoare pentru WAN și LAN ale routerului
nou rămân aprinse timp de 3 secunde după ce au luminat
intermitent rapid, numele de utilizator PPPoE și parola sunt
importate cu succes pe routerul nou.
4. Deconectați routerul inițial.
Pasul 2: Conectarea routerului nou la internet.
1. Porniţi routerul nou.
2. Conectați portul WAN al noului router la portul LAN al modemului
sau la mufa Ethernet, utilizând un cablu Ethernet. LED-ul indicator
pentru WAN se aprinde.
II. Conectaţi-vă dispozitivele la routerul
nou
Metoda 1: Conectaţi dispozitivul cu WiFi (cum ar un smartphone) la
reţeaua WiFi a routerului nou folosind SSID-ul de pe
eticheta din partea de jos a routerului. Nu există nicio
parolă WiFi în mod implicit.
Metoda 2: Conectați dispozitivul cu r (cum ar un computer) la un port
LAN (portul 1, 2, IPTV/3) al routerului utilizând un cablu
Ethernet. LED-ul indicator pentru LAN se aprinde.
III. Conguraţi routerul nou pentru
acces la internet
1. Deschideți un browser web pe dispozitivul conectat la router și accesați
tendawif i.com.
Sfat:
Dacă nu vă puteţi conecta la interfaţa UI web a routerului, consultaţi Q1 din FAQ.
2. Faceți clic pe Start.
3. Routerul detectează automat tipul de conexiune la internet. Setaţi
parametrii necesari şi faceţi clic pe Urm.
Nota:
PPPoE este folosit cu scop ilustrativ aici. Dacă aţi migrat numele de utilizator PPPoE şi parola
de pe routerul iniţial, acest router completează automat câmpurile Nume de utilizator ISP
şi Parola ISP.
4 . Personalizaţi numele reţelei WiFi (SSID), parola WiFi şi parola de
conectare dacă este necesar, apoi faceţi clic pe Urm.
Nota:
Parola WiFi este utilizată pentru conectarea la rețeaua WiFi a routerului, iar parola de
autenticare este utilizată pentru conectarea la interfața bazată pe web a routerului.
Efectuat.
21
Page 25

IV. Accesarea internetului
Dispozitive cu WiFi: Conectaţi dispozitivele cu WiFi la reţeaua WiFi a
routerului utilizând numele WiFi şi parola WiFi pe care le-aţi setat.
Sfat:
În mod implicit, denumirea reţelelor WiFi de 2,4 GHz şi 5 GHz este aceeaşi. Dacă trebuie să
modicaţi numele reţelei WiFi şi parola WiFi, consultaţi Q4 din FAQ.
Dispozitive cu r: Dispozitivele cu r conectate la router pot accesa
internetul direct acum.
Mufe, porturi şi butoane
DescriereMufă/port/buton
POWER
WPS/RST
WAN
1/2
IPTV/3
Mufă de alimentare.
Folosită pentru conectare la adaptorul de curent inclus.
Utilizat pentru pornirea procesului de negociere WPS a routerului sau pentru
resetarea routerului.
WPS: Apăsaţi butonul routerului timp de 1 până la 3 secunde. În decurs
de 2 minute, activaţi funcţia WPS a celuilalt dispozitiv cu WPS pentru a
stabili o conexiune WPS.
Resetare: Atunci când LED-ul indicator SYS luminează intermitent,
menţineţi butonul apăsat timp de 8 secunde, eliberaţi-l când toate
LED-urile indicatoare luminează intermitent o singură dată.
Utilizat pentru conectarea acestui router la internet.
Acestea sunt porturi LAN utilizate pentru conectarea la dispozitive cu r
precum computere sau switch-uri.
În mod implicit, acesta funcționează ca port LAN.
Dar dacă funcția IPTV a routerului este activată, acesta funcționează numai ca
port IPTV, utilizat pentru conectarea la un receptor set-top box.
Indicatoare LED
Indicator LED
SYS
WAN
LAN
WiFi
T
Status Descriere
Rămâne aprins
Lumineaza
intermitent
Oprit
Rămâne aprins
Lumineaza
intermitent
Oprit
Rămâne aprins
Luminează
intermitent de
două ori
Oprit
Rămâne aprins
Clipire rapidă
Luminează
intermitent lent
Oprit
Routerul este în curs de pornire.
Dacă indicatorul rămâne aprins în continuare
după ce routerul nalizează pornirea, înseamnă
că routerul se conectează cu succes la internet.
Routerul funcţionează corespunzător, dar nu se
poate conecta la internet.
Sistemul este defect.
Portul WAN este conectat corect, dar nu se
transmit date.
Se transmit date prin portul WAN.
Portul WAN este deconectat sau nu este conectat
corect.
Cel puţin un port LAN este conectat
corespunzător.
Un dispozitiv cu r nou este conectat la router.
Niciun dispozitiv nu este conectat la vreun port
LAN al routerului corespunzător.
Cel puţin reţeaua WiFi de 2,4 GHz sau 5 GHz este
activată.
Se transmit date prin wireless.
Routerul efectuează negocierea WPS.
Rețelele wireless de 2,4 GHz și de 5 GHz sunt
dezactivate.
Acest LED este rezervat.
Română
22
Page 26

I. Sluit uw router aan
Als u de PPPoE-gebruikersnaam en het wachtwoord van uw
oorspronkelijke router wilt kopiëren, begint u bij Stap 1. Ga anders
verder met Stap 2.
Nederlands
Stap 1: Importeer uw PPPoE-gebruikersnaam
en -wachtwoord van uw oorspronkelijke router.
1. Schakel uw originele en nieuwe routers in.
2.Verbind de WAN-poort van de originele router via een Ethernet-kabel
met een LAN-poort (poort 1, 2, IPTV/3) van de nieuwe router.
3.Als de LED-lampjes voor WAN en LAN van de nieuwe router drie
seconden lang branden nadat ze snel hebben geknipperd, worden de
PPPoE-gebruikersnaam en het wachtwoord naar uw nieuwe router
geïmporteerd.
4. Verwijder de originele router.
Stap 2: Verbind uw nieuwe router met internet.
1. Schakel de nieuwe router in.
2. Sluit de WAN-poort van de nieuwe router aan op een LAN-poort van
uw modem of op de Ethernet-poort met een Ethernet-kabel. Het
LED-lampje van de WAN zal gaan branden.
II. Sluit uw apparaten aan op de nieuwe
router
Methode 1: Verbind uw wi-apparaat (zoals een smartphone) met het
wi-netwerk van de nieuwe router met de SSID aan de
onderkant van de router. Er is standaard geen
23
wi-wachtwoord ingesteld.
Methode 2: Verbind uw bekabelde apparaat (zoals een computer) via
een Ethernet-kabel met een LAN-poort (poort 1, 2, IPTV/3)
van de router. De LED-indicator van de LAN zal gaan
branden.
III. Stel de nieuwe router in voor
internettoegang
1. Start een webbrowser op een apparaat dat is verbonden met de
router en ga naar tendawif i.com.
Tips:
Als u zich niet kunt aanmelden bij de web-UI van de router, raadpleegt u Q1 in FAQ.
2. Klik op Start.
3. De router detecteert automatisch uw type internetverbinding. Stel
de vereiste parameters in en klik op Volgende.
Opmerking:
PPPoE wordt hier ter illustratie gebruikt. Als u uw PPPoE-gebruikersnaam en -wachtwoord
van uw oorspronkelijke router hebt gemigreerd, vult deze router automatisch de
ISP-gebruikersnaam
4 . Pas uw wi-naam (SSID), wi-wachtwoord en het wachtwoord om u
aan te melden aan en klik op Volgende.
Opmerking:
Het wi-wachtwoord wordt gebruikt om verbinding te maken met het wi-netwerk.
Het wachtwoord om u aan te melden gebruikt u om toegang te krijgen tot de
webinterface van de router.
Gereed.
en het ISP-wachtwoord van de internetprovider in.
Page 27

IV. Toegang tot internet
Wi-apparaten: Verbind uw wi-apparaten met het wi-netwerk van de
router met behulp van de wi-naam en het wi-wachtwoord dat u hebt
ingesteld.
Tips:
De wi-naam voor zowel 2,4 GHz als 5 GHz is standaard hetzelfde. Zie Q4 in FAQ voor het
wijzigen van de wi-naam en het wi-wachtwoord.
Bedrade apparaten: Uw bekabelde apparaten die op de router zijn
aangesloten, hebben nu rechtstreeks toegang tot internet.
Aansluiting, poorten en knoppen
Aansluiting/poort
/knop
POWER
WPS/RST
WAN
1/2
IPTV/3
Beschrijving
Voedingsaansluiting.
Wordt gebruikt om de meegeleverde voedingsadapter aan te sluiten.
Wordt gebruikt om het WPS-onderhandelingsproces te starten of om de
router te resetten.
WPS: Houd de knop van de router 1 tot 3 seconden ingedrukt. Schakel
binnen 2 minuten de WPS-functie van het andere WPS-apparaat in om
een WPS-verbinding tot stand te brengen.
Resetten: Wanneer het SYS LED-lampje knippert, houdt u de knop
ongeveer 8 seconden ingedrukt. Laat de knop los wanneer alle
LED-lampjes één keer knipperen.
Wordt gebruikt om deze router met internet te verbinden.
Dit zijn LAN-poorten die worden gebruikt om verbinding te maken met
bekabelde apparaten zoals computers of schakelaars.
Dit is standaard een LAN-poort.
Als de IPTV-functie van de router is ingeschakeld, werkt deze alleen als
IPTV-poort die wordt gebruikt om verbinding te maken met een settopbox.
LED-indicatoren
LED-indicator
SYS
WAN
LAN
WiFi
T
Status Beschrijving
Brandend
Knipperend
Uit
Brandend
Knipperend
Uit
Brandend
Twee keer snel
knipperend
Uit
Brandend
Snel knipperend
Langzaam
knipperend
Uit
De router wordt opgestart.
Als het lampje blijft branden nadat de router is
opgestart, geeft dit aan dat de router verbinding
heeft gemaakt met internet.
De router werkt, maar kan geen verbinding maken
met internet.
Het systeem is defect.
De WAN-poort is goed aangesloten, maar er
worden geen gegevens verzonden.
Gegevens worden verzonden via de WAN-poort.
De WAN-poort is niet goed aangesloten of
helemaal niet aangesloten.
Ten minste één LAN-poort is goed aangesloten.
Een nieuw bekabeld apparaat is verbonden met
de router.
Er is geen apparaat aangesloten op een
LAN-poort van de router.
Zowel het 2,4GHz- als het 5GHz-wi-netwerk is
ingeschakeld.
Gegevens worden draadloos verzonden.
De router voert WPS-onderhandeling uit.
Zowel het 2,4GHz- als het 5GHz-wi-netwerk is
uitgeschakeld.
Deze LED is gereserveerd.
Nederlands
24
Page 28

I. Router'ınızı Ağa Bağlayın
Mevcut router'ınızın PPPoE kullanıcı adı ve şifresini kopyalamak
istiyorsanız Adım 1, istemiyorsanız Adım 2 'den işlemlere başlayınız.
Türkçe
Adım 1: Mevcut router'ınızdan PPPoE kullanıcı adı ve
şifrenizi kopyalayınız
1. Mevcut ve yeni router'ınızı çalıştırınız.
2.Mevcut router'ınızın WAN portunu yeni router'ınızın LAN portuna
(port 1, 2 ve IPTV için port 3) bir Ethernet kablosu ile bağlayınız.
3.Yeni router'ınızın WAN ve LAN LED göstergeleri 3 saniye boyunca
hızlı bir şekilde yanıp söndükten sonra sabit olarak yanmaya
başladığında, PPPoE kullanıcı adı ve şifresi yeni router'ınıza başarıyla
aktarıldı demektir.
4. Mevcut router'ınızı kaldırabilirsiniz.
Adım 2: Yeni router’ınızı internete bağlayın.
1. Yeni router'ınızı çalıştırınız.
2. Yeni router'ınızın WAN portunu modeminizin LAN portuna bir
Ethernet kablosu ile bağlayınız. WAN Led göstergesi yanacaktır.
II. Ağ aygıtlarınızı yeni router'ınıza
bağlayın
Yöntem1: Kablosuz cihazlarınızı ( Akıllı telefon gibi) yeni router'ınızın
kablosuz ağına, router'ınızın altında bulunan etikette
belirtilen SSID (Kablosuz ağ adı) bilgisini kullanarak
bağlayınız. Vaarsayılan ayarlarda kablosuz ağ şifresi
bulunmamaktadır.
25
Yöntem 2: Kablolu cihazlarınızı ( Bilgisayar gibi) router'ınızın LAN portuna
bir Ethernet kablosu kullanarak bağlayınız. LAN LED göstergesi
yanacaktır.
III. Internet bağlantısı için router'ın
kurulumu
1. Router'ınızın bağlı olduğu cihaz üzerinde bir web tarayıcı çalıştırarak
tendawif i.com adresini ziyaret ediniz.
İpuçları:
Eğer Router’ın arayüzüne giriş yapamazsanız, Sık Sorulan Sorular kısmında yer alan
S1’e göz atınız.
2. Başlat’aTıklayınız.
3. Router'ınız internet bağlantınızın tipini otomatik olarak
algılayacaktır. Gerekli parametreleri girerek İleri'ye tıklayınız.
Not:
Burada PPPoE sadece örnek olarak kullanılmıştır. Eğer mevcut router'ınızdan PPPoE
kullanıcı adı ve şifrenizi yeni router'ınıza taşıdıysanız ISS Kullanıcı Adı ve ISS Şifresi
otomatik olarak doldurulacaktır.
4 . Kablosuz ağ adını (SSID), kablosuz ağ şifresini ve giriş şifresini
değiştirerek İleri'ye tıklayınız
Not:
Kablosuz ağ şifresi kablosuz ağlara bağlanmak için kullanılır, Giriş sifresi ise router'ın
web arayüzüne giriş yapmak için kullanılır.
Tamamlandı.
Page 29

IV. İnternete Erişim
Kablosuz aygıtlar: Kablosuz aygıtlarınızı router'ınızın kablosuz ağına
bağlamak için belirlemiş olduğunuz kablosuz ağ adını ve kablosuz ağ
şifresini kullanınız.
İpuçları:
Varsayılan olarak 2.4GHz ve 5GHz kablosuz ağ adları aynıdır. Kablosuz ağ adı ve kablosuz ağ
şifresini değiştirmek isterseniz Sıkça Sorulan Sorular kısmında S4'ü gözden geçiriniz.
Kablolu aygıtlar: Router'a bağlı olan kablolu aygıtlarınız internete erişebilir.
Jak, Portlar ve Butonlar
AçıklamaJak/Port/Buton
POWER
WPS/RST
WAN
1/2
IPTV/3
Güç Jak'i
Paket içerisinde yer alan adaptörü bağlamak için kullanılır.
WPS habelerşme işlemini başlatmak veya router'ı resetlemek için kullanılır.
WPS: Router'ın WPS butonuna 1-3 saniye kadar basılı tutunuz. İki dakika
içerisinde WPS bağlantısı yapmayı planladığınız diğer cihazın WPS
özelliğini etkinleştiriniz.
Reset: SYS LED göstergesi yanıp söndüğünde reset butonuna 8 saniye
kadar basılı tutunuz, tüm LED göstergeleri aynı anda yanıp söndüğünde
butonu bırakınız.
İnternete bağlanmak için kullanılır.
Bu portlar bilgisayar ve switch gibi kablolu cihazların bağlanması için
kullanılan LAN portlarıdır.
Varsayılan olarak, bir LAN portu olarak işlev görür.
Eğer router'ın IPTV fonksiyonu etkin ise, sadece IPTV portu olarak bir STB
cihazına bağlanmak için kullanılır.
LED Göstergeleri
LED Göstergesi
SYS
WAN
LAN
WiFi
T
Durumu Açıklama
Sabit Yanıyor
Yanıp Sönüyor
Kapalı
Sabit Yanıyor
Yanıp sönüyor
Kapalı
Sabit Yanıyor
Hızlı şekilde ikini
kez yanıp sönüyor
Kapalı
Sabit Yanıyor
Hızlı yanıp
sönüyor
Yavaş yanıp
sönüyor
Kapalı
Router açılıyor.
Router çalışmaya başladıktan sonra eğer
gösterge hala sabit yanıyorsa, bu router'ın
internete başarılı şekilde bağlandığını gösterir.
Router düzgün bir şekilde çalışıyor fakat internete
erişemiyor.
Sistem hatalı.
WAN portu düzgün olarak bağlı fakat veri
transferi yapılamıyor.
WAN portu üzerinden veri transferi yapıldı.
WAN portu bağlı değil veya düzgün bir şekilde
bağlanmamış.
En az bir LAN portu düzgün şekilde bağlı
Yeni bir kablolu aygıt router'a bağlandı
Router'ın herhangi bir LAN portuna bir cihaz
düzgün olarak bağlı değil
En azından 2.4GHz veya 5GHz kablosuz ağlardan
birisi etkin.
Veri kablosuz olarak iletilmiştir.
Router WPS uzlaşmayı gerçekleştiriyor.
Hem 2,4 GHz hem de 5 GHz kablosuz ağ
etkinleştirilmiştir.
Bu LED rezerve edilmiş durumda.
Türkçe
26
Page 30

I. 라우터를 연결하세요
III. 인터넷 액세스를 위한 새 라우터 설정
원래 라우터에서 PPPoE 사용자 이름 및 비밀번호를 복사하려면 1단계
부터 시작합니다. 그렇지 않으면 2단계부터 시작하십시오.
한국어
1 단계: 원래 라우터의 PPPoE 사용자 이름과 비밀번호를 가져옵니다.
1. 원래 라우터와 새 라우터에 전원을 켭니다.
2. 이더넷 케이블을 사용하여 원래 라우터의 WAN 포트를 새 라우터의
LAN 포트(포트 1, 2, IPTV/3)에 연결합니다.
3. 새 라우터의 WAN 및 LAN LED 표시등이 빠르게 깜박인 후 3초 동안
켜져 있으면 PPPoE 사용자 이름과 비밀번호를 새 라우터에
성공적으로 가져온것입니다.
4. 원래 라우터를 제거합니다.
2 단계: 인터넷에 새 라우터 연결
1. 새 라우터의 전원을 켭니다.
2. 이더넷 케이블을 사용하여 새 라우터의 WAN 포트를 모뎀의 LAN 포트
또는 이더넷 잭에 연결합니다. WAN LED 표시등이 켜집니다.
.
II. 새 라우터에 장치 연결
: 라우터의 하단 라벨에 있는 SSID를 사용하여 WiFi 지원 장치(예:
방법 1
스마트폰)를 새 라우터의 WiFi 네트워크에 연결합니다. 기본으로
설정된 WiFi 암호가 없습니다.
방법 2: 이더넷 케이블을 사용하여 유선 장치(예: 컴퓨터)를 라우터의 LAN
포트(포트 1, 2, IPTV/3)에 연결합니다. LAN LED 표시등이 켜집니다.
1. 라우터에 연결된 장치에서 웹 브라우저를 시작하고tendawif i.com을
방문하십시오.
요령:
라우터의 웹 UI에 로그인할 수 없는 경우 FAQ 의 Q1을 참조하십시오.
2. 시작하기
3. 라우터가 인터넷 연결 형태를 자동으로 탐지합니다. 필요한 파라미터를
설정하고 다음
4 . 필요에 따라 WiFi 이름(SSID), WiFi 비밀번호 및 로그인 비밀번호를
사용자 지정하고 다음
했음.
을 클릭합니다.
을 클릭합니다.
주:
여기 PPPoE는 설명을 위해 사용됩니다. 원래 라우터에서 PPPoE
사용자 이름과 비밀번호를 마이그레이션한 경우, 이 라우터는 통신사
사용자 이름 및 통신사 비밀번호를 자동으로 채웁니다.
을 클릭합니다.
주:
WiFi 비밀번호는 WiFi 네트워크에 연결하는 데 사용되며 로그인
비밀번호는 라우터의 웹 UI에 로그인하는 데 사용됩니다.
27
Page 31

IV. 인터넷에 액세스합니다
WiFi 지원 장치: 설정한 WiFi 이름 및 WiFi 비밀번호를 사용하여 WiFi 지원
장치를 라우터의 WiFi 네트워크에 연결합니다.
요령:
2.4GHz 및 5GHz의 WiFi 이름은 기본적으로 동일합니다. WiFi 이름 및
WiFi 비밀번호를 수정하려면 FAQ의 Q4를 참조하십시오.
유선 장치: 라우터에 연결된 유선 장치로 지금 인터넷에 직접 액세스할 수
있습니다
잭, 포트 및 버튼
상세잭/포트/버튼
POWER
WPS/RST
WAN
1/2
IPTV/3
파워잭.
포함된 전원 어댑터에 연결하는 데 사용됩니다.
라우터의 WPS 협상 프로세스를 시작하거나 공유기를 재설정하는 데
사용됩니다.
WPS: 라우터의 버튼을 1~3초 누릅니다. 2분 내에 다른 WPS 지원 장치의
WPS 기능을 활성화하여 WPS 연결을 설정합니다.
재설정: SYS
모든 LED 표시등이 한 번 깜박일때 성공합니다.
라우터를 인터넷에 연결하는 데 사용됩니다.
컴퓨터나 스위치 등의 유선 장치에 연결하는 데 사용되는 LAN 포트입니다.
기본적으로 LAN 포트의 기능을 합니다.
라우터의 IPTV 기능이 활성화되면 셋톱박스에 연결하는 데 사용되는 IPTV
포트의 역할만 합니다.
LED 표시등이 깜박이면, 버튼을 약 8초 동안 누르고 있다가
LED 표시등
LED 표시등
SYS
WAN
LAN
WiFi
T
상태
켜짐
깜박임
꺼짐
켜짐
깜박임
꺼짐
켜짐
두 번 깜박임
꺼짐
켜짐
빠르게 깜박임
느리게 깜박임
꺼짐
한국어
상세
라우터를 시작하는 중입니다.
라우터가 시작된 후에도 표시등이 계속 켜져
있는 경우 라우터가 인터넷에 성공적으로
연결되었음을 나타냅니다.
라우터는 제대로 작동하지만 인터넷에 연결하지
못합니다.
시스템 오류입니다.
WAN 포트가 올바르게 연결되었지만 데이터가
전송되지 않습니다.
WAN 포트를 통해 데이터가 전송되고 있습니다.
WAN 포트가 분리되었거나 올바르게 연결되어
있지 않습니다.
하나의 LAN 포트가 올바르게 연결되었습니다.
새 유선 장치가 라우터에 연결되었습니다.
라우터의 LAN 포트에 올바르게 연결된 장치가
없습니다.
2.4GHz 또는 5GHz WiFi 네트워크가
활성화되었습니다.
데이터가 무선으로 전송되고 있습니다.
라우터가 WPS 협상을 수행하고 있습니다.
2.4GHz 및 5GHz 무선 네트워크가 모두
비활성화되었습니다.
LED는 예약되었습니다.
28
Page 32

FAQ
Q1: I cannot log in to the web UI of the router after entering tendawif i.com,
what should I do?
A1: Try the following solutions and log in again:
• Ensure that tendawif i.com is entered correctly in the address bar of the web browser,
or you can try entering 192.168.0.1.
• If you use a WiFi-enabled device to log in to the web UI of the router, ensure that it is
connected to the router’s SSID, and mobile data (if any) is disabled.
• If you use a computer to log in to the web UI of the router, ensure that it is connected to
port 1, 2 or IPTV/3 of the router properly by an Ethernet cable. And it is set to Obtain an
IP address automatically and Obtain DNS server address automatically.
• Replace the web browser.
• Reset the router.
Q2: I cannot access the internet after the conguration, what should I do?
A2: Try the following methods:
• Check if the WAN port of the router is connected properly, and the WAN LED indicator
is solid on or blinking.
• Check if the SYS LED indicator blinks, log in to the web UI of the router, and navigate
to the Internet Settings page, follow the on-screen instructions to solve it.
• If your wired devices cannot access the internet:
– Check if your computer is connected to port 1, 2, IPTV/3 properly.
– Check if your computer is set to obtain an IP address automatically and Obtain
DNS server address automatically.
• If your WiFi-enabled devices cannot access the internet:
– Check if your WiFi-enabled devices are connected to the WiFi network of the router
with the SSID you set.
– Change your WiFi name and WiFi password on Wireless Settings page. Then try again.
Q3: How to reset the router?
A3: When the SYS indicator lights on or blinks, hold down the WPS/ RST button for about 8
seconds. Release it when all the LED indicators blink once. The router is reset successfully.
Q4: How to change my WiFi names and passwords?
A4: Log in to the web UI of the router on your wired or WiFi-enabled device, navigate to
Wireless Settings > WiFi Name & Password Page, and customize your WiFi names and
passwords.
Q5: Why cannot my phone f ind 5 GHz signal?
A5: Only devices supporting 5 GHz signal can nd and connect to the 5GHz network.
By default, the WiFi name for 2.4 GHz is the same with 5 GHz. To change it, please follow the
instructions in Q4.
CE Mark Warning
This is a Class B product. In a domestic environment, this product may cause radio interference,
in which case the user may be required to take adequate measures.
Operations in the 5.15-5.25GHz band are restricted to indoor use only.
This equipment should be installed and operated with minimum distance 20cm between the
device and your body.
The mains plug is used as disconnect device, the disconnect device shall remain readily operable.
NOTE: (1) The manufacturer is not responsible for any radio or TV interference caused by
unauthorized modications to this equipment. (2) To avoid unnecessary radiation interference,
it is recommended to use a shielded RJ45 cable.
Declaration of Conformity
Hereby, SHENZHEN TENDA TECHNOLOGY CO., LTD. declares that the radio equipment type
AC21 is in compliance with Directive 2014/53/EU.
The full text of the EU declaration of conformity is available at the following internet address:
http://www.tendacn.com/en/service/download-cata-101.html
Operating Frequency:
2.4 GHz: EU/2400-2483.5MHz (CH1-CH13)
5 GHz: EU/5150-5250MHz (CH36-CH48)
EIRP Power (Max.):
2.4 GHz: 19.86 dBm
5 GHz: 22.96 dBm
Software Version: V16.03.07.XX
Caution:
Adapter Model: BN037-A18012E/BN037-A18012B/BN074-A18012E/BN074-A18012B
Manufacture: SHENZHEN HEWEISHUN NETWORK TECHNOLOGY CO., LTD.
Input: 100 - 240V AC, 50/60Hz, 0.6A
Output: 12V 1.5A
: DC Voltage
Page 33

FCC Statement
This equipment has been tested and found to comply with the limits for a Class B digital device,
pursuant to Part 15 of the FCC Rules. These limits are designed to provide reasonable protection
against harmful interference in a residential installation. This equipment generates, uses and can
radiate radio frequency energy and, if not installed and used in accordance with the instructions,
may cause harmful interference to radio communications. However, there is no guarantee that
interference will not occur in a particular installation. If this equipment does cause harmful
interference to radio or television reception, which can be determined by turning the equipment
o and on, the user is encouraged to try to correct the interference by one or more of the
following measures:
— Reorient or relocate the receiving antenna.
— Increase the separation between the equipment and receiver.
— Connect the equipment into an outlet on a circuit different from that to which
the receiver is connected.
— Consult the dealer or an experienced radio/TV technician for help.
The device is for indoor usage only.
Operation is subject to the following two conditions: (1) this device may not cause harmful
interference, and (2) this device must accept any interference received, including interference that
may cause undesired operation.
Radiation Exposure Statement
This device complies with FCC radiation exposure limits set forth for an uncontrolled environment
and it also complies with Part 15 of the FCC RF Rules.
This equipment should be installed and operated with minimum distance 20cm between the
device and your body.
Caution:
Any changes or modications not expressly approved by the party responsible for compliance
could void the user's authority to operate this equipment.
This transmitter must not be co-located or operating in conjunction with any other antenna or
transmitter.
Operating frequency: 2412-2462MHz, 5150-5250MHz, 5725-5850MHz
NOTE: (1) The manufacturer is not responsible for any radio or TV interference caused by
unauthorized modications to this equipment. (2) To avoid unnecessary radiation interference, it
is recommended to use a shielded RJ45 cable.
RECYCLING
This product bears the selective sorting symbol for Waste electrical and electronic equipment
(WEEE). This means that this product must be handled pursuant to European directive 2012/19/EU
in order to be recycled or dismantled to minimize its impact on the environment.
User has the choice to give his product to a competent recycling organization or to the retailer
when he buys a new electrical or electronic equipment.
For EU/EFTA, this product can be used in the following countries:
Operating Temperature: 0°C - 40°C Operating Humidity: (10% - 90%) RH, non-condensing
Copyright
© 2019 Shenzhen Tenda Technology Co., Ltd. All rights reserved.
Tenda is a registered trademark legally held by Shenzhen Tenda Technology Co., Ltd. Other brand
and product names mentioned herein are trademarks or registered trademarks of their respective
holders. Specications are subject to change without notice.
Page 34

Deutsch
VEREINFACHTE EU-KONFORMITÄTSERKLÄRUNG
Hiermit erklärt SHENZHEN TENDA TECHNOLOGY CO., LTD., dass der Funkanlagentyp
AC21 der Richtlinie 2014/53/EU entspricht.
Der vollständige Text der EU-Konformitätserklärung ist unter der folgenden
Internetadresse verfügbar:
http://www.tendacn.com/en/service/download-cata-101.html
Italiano
DICHIARAZIONE DI CONFORMITÀ UE SEMPLIFICATA
Il fabbricante, SHENZHEN TENDA TECHNOLOGY CO., LTD., dichiara che il tipo di apparecchiatura
radio AC21 è conforme alla direttiva 2014/53/UE.
Il testo completo della dichiarazione di conformità UE è disponibile al seguente indirizzo Internet:
http://www.tendacn.com/en/service/download-cata-101.html
Español
DECLARACIÓN UE DE CONFORMIDAD SIMPLIFICADA
Por la presente, SHENZHEN TENDA TECHNOLOGY CO., LTD., declara que e1 tipo de
equipo radioelectrico AC21 es conforme con 1a Directiva 2014/53/UE.
El texto completo de la declaratión UE de conformidad está disponible en la direcctión
Internet siguiente:
http://www.tendacn.com/en/service/download-cata-101.html
Čeština
ZJEDNODUŏENÉ EU PROHLÁŏENÍ O SHODč
Tímto SHENZHEN TENDA TECHNOLOGY CO., LTD., prohlaŐuje, Ŭe typ rádiového zaňízení
AC21 je v souladu se smĎrnicí 2014/53/EU. Úplné znĎní EU prohláŐení o shodĎ je k
dispozici na této internetové adrese:
http://www.tendacn.com/en/service/download-cata-101.html
Français
DECLARATION UE DE CONFORMITE SIMPLIFIEE
Le soussigné, SHENZHEN TENDA TECHNOLOGY CO., LTD., déclare que l'équipement
radioélectrique du type AC21 est conforme à la directive 2014/53/UE.
Le texte complet de la déclaration UE de conformité est disponible à l'adresse internet
suivante:
http://www.tendacn.com/en/service/download-cata-101.html
Português
DECLARAÇÃO UE DE CONFORMIDADE SIMPLIFICADA
O(a) abaixo assinado(a) SHENZHEN TENDA TECHNOLOGY CO., LTD. declara que o
presente tipo de equipamento de rádio AC21 está em conformidade com a Diretiva
2014/53/UE. O texto integral da declaração de conformidade está disponível no seguinte
endereço de Internet:
http://www.tendacn.com/en/service/download-cata-101.html
Magyar
EGYSZERŰSÍTETT EU-MEGFELELŐSÉGI NYILATKOZAT
SHENZHEN TENDA TECHNOLOGY CO., LTD. igazolja, hogy a AC21 típusú rádióberendezés
megfelel a 2014/53/EU irányelvnek.
Az EU-megfelelőségi nyilatkozat teljes szövege elérhető a következő internetes címen:
http://www.tendacn.com/en/service/download-cata-101.html
Română
DECLARAȚIA UE DE CONFORMITATE SIMPLIFICATĂ
Prin prezenta, SHENZHEN TENDA TECHNOLOGY CO., LTD. declară că tipul de echipamente radio
AC21 este în conformitate cu Directiva 2014/53/UE. Textul integral al declarației UE de
conformitate este disponibil la următoarea adresă internet:
http://www.tendacn.com/en/service/download-cata-101.html
Polski
UPROSZCZONA DEKLARACJA ZGODNOŚCI UE
SHENZHEN TENDA TECHNOLOGY CO., LTD. niniejszym oświadcza, że typ urządzenia radiowego
AC21 jest
zgodny z dyrektywą 2014/53/UE.
Pełny tekst deklaracji zgodności UE jest dostępny pod następującym adresem internetowym:
http://www.tendacn.com/en/service/download-cata-101.html
Nederlands
VEREENVOUDIGDE EU-CONFORMITEITSVERKLARING
Hierbij verklaar ik, SHENZHEN TENDA TECHNOLOGY CO., LTD., dat het type radioapparatuur
AC21 conform is met Richtlijn 2014/53/EU.
De volledige tekst van de EU-conformiteitsverklaring kan worden geraadpleegd op het
volgende internetadres:
http://www.tendacn.com/en/service/download-cata-101.html
Türkçe
Uygunluk Beyanı
Burada, SHENZEN TENDA TECHNOLOGY CO. LTD., AC21 radio ekipman tipinin 2014/53/EU
direktierine uygun olduğunu beyan eder.
Avrupa uygunluk beyannamesinin tam metni takip eden internet adresinde mevcuttur.
http://www.tendacn.com/en/service/download-cata-101.html
Page 35

Page 36

Technical Support
Shenzhen Tenda Technology Co., Ltd.
6-8 Floor, Tower E3, NO.1001, Zhongshanyuan Road,
Nanshan District, Shenzhen, China. 518052
USA hotline: 1-800-570-5892
Toll Free: 7 x 24 hours
Canada hotline: 1-888-998-8966
Toll Free: Mon - Fri 9 am - 6 pm PST
Hong Kong hotline: 00852-81931998
Global hotline: +86 755-2765 7180 (China Time Zone)
Website: www.tendacn.com
E-mail: support@tenda.com.cn
 Loading...