

Page 1
Wireless AC1750 Dual-band Gigabit Router
0
Page 2

Wireless AC1750 Dual-band Gigabit Router
Copyright Statement
is the registered trademark of Shenzhen Tenda
Technology Co., Ltd. All the products and product names
mentioned herein are the trademarks or registered trademarks of
their respective holders. Copyright of the whole product as
integration, including its accessories and software, belongs to
Shenzhen Tenda Technology Co., Ltd. Without prior expressed
written permission from Shenzhen Tenda Technology Co., Ltd,
any individual or party is not allowed to copy, plagiarize,
reproduce, or translate it into other languages.
All photos and product specifications mentioned in this manual
are for references only. Upgrades of software and hardware may
occur; Tenda reserves the right to revise this publication and to
make changes in the content hereof without obligation to notify
any person or organization of such revisions or changes. If you
would like to know more about our product information, please
visit our website at http://www.tendacn.com.
1
Page 3

Wireless AC1750 Dual-band Gigabit Router
TABLE OF CONTENTS
TABLE OF CONTENTS ..................................................................................................2
CHAPTER 1 PRODUCT OVERVIEW .............................................................................5
1.1 WHAT IT DOES .........................................................................................................5
1.2 FEATURES ..............................................................................................................5
CHAPTER 2 QUICK INTERNET CONNECTION SETUP ...............................................7
2.1 PACKAGE CONTENTS ..............................................................................................7
2.2 MINIMUM SYSTEM REQUIREMENTS: ..........................................................................7
2.3 HARDWARE INSTALL ................................................................................................8
2.4 WEB UTILITY LOGIN .............................................................................................. 11
2.5. INTERNET CONNECTION SETUP ............................................................................. 14
2.6 VERIFY INTERNET CONNECTION SETTINGS ............................................................. 15
2.7 WIRELESS SETTINGS ............................................................................................. 19
2.7.1 Wireless-Basic Settings ............................................................................... 19
2.7.2 Wireless-Security Settings ........................................................................... 20
2.8 CONNECT TO DEVICE WIRELESSLY ......................................................................... 21
CHAPTER 3 RUNNING STATUS .................................................................................. 24
3.1 WAN STATUS ....................................................................................................... 25
3.2 LAN STATUS ........................................................................................................ 27
3.3 WIRELESS STATUS ................................................................................................ 27
3.4 SYSTEM INFO........................................................................................................ 29
CHAPTER 4 NETWORK ............................................................................................... 29
4.1.LAN SETTINGS ..................................................................................................... 30
4.2.WAN SETTINGS .................................................................................................... 31
4.3 DHCP SERVER ..................................................................................................... 38
4.4 DHCP CLIENTS .................................................................................................... 40
4.5 STATIC ASSIGNMENT ............................................................................................. 40
4.6 MAC CLONE ........................................................................................................ 41
4.7 PORT MODE ......................................................................................................... 42
2
Page 4

Wireless AC1750 Dual-band Gigabit Router
CHAPTER 5 SECURITY ............................................................................................... 44
5.1 IP GROUP ............................................................................................................ 44
5.2 TIME GROUP......................................................................................................... 45
5.3 CLIENT FILTER ...................................................................................................... 46
5.4 URL FILTER .......................................................................................................... 52
5.5 MAC FILTER ................................................................ ......................................... 55
5.6 REMOTE WEB MANAGEMENT ................................................................................. 59
CHAPTER 6 ADVANCED ............................................................................................. 61
6.1 VIRTUAL SERVER .................................................................................................. 61
6.2 DMZ .................................................................................................................. 64
6.3 UPNP .................................................................................................................. 65
6.4 DDNS ................................................................................................................. 66
6.5 ROUTING .............................................................................................................. 69
6.6 STATIC ROUTING ................................................................................................... 69
6.7 BANDWIDTH SETTINGS .......................................................................................... 70
CHAPTER 7 WIRELESS SETTINGS ............................................................................ 71
7.1 BASIC SETTINGS ................................................................................................... 72
7.2 WIRELESS SECURITY ............................................................................................ 76
7.3 WPS ................................................................................................................. 81
7.4 WDS ................................................................................................................. 83
7.5 GUEST NETWORK ................................................................................................. 85
7.6 WIRELESS ACCESS CONTROL ................................................................................ 86
7.7 CONNECTION LIST ................................................................................................. 88
7.8 ADVANCED SETTINGS ............................................................................................ 88
CHAPTER 8 USB .......................................................................................................... 90
8.1 USB STORAGE ..................................................................................................... 90
8.2 USB PRINTING ..................................................................................................... 93
8.3 DLNA ................................................................................................................ 101
CHAPTER 9 IPTV ....................................................................................................... 102
CHAPTER 10 TOOLS ................................................................................................. 105
3
Page 5

Wireless AC1750 Dual-band Gigabit Router
10.1 TIME & DATE .................................................................................................... 106
10.2 FIRMWARE UPDATE ........................................................................................... 107
10.3 BACKUP & RESTORE ......................................................................................... 108
10.4. RESTORE TO DEFAULT ...................................................................................... 108
10.5 USER NAME & PASSWORD ................................................................................. 109
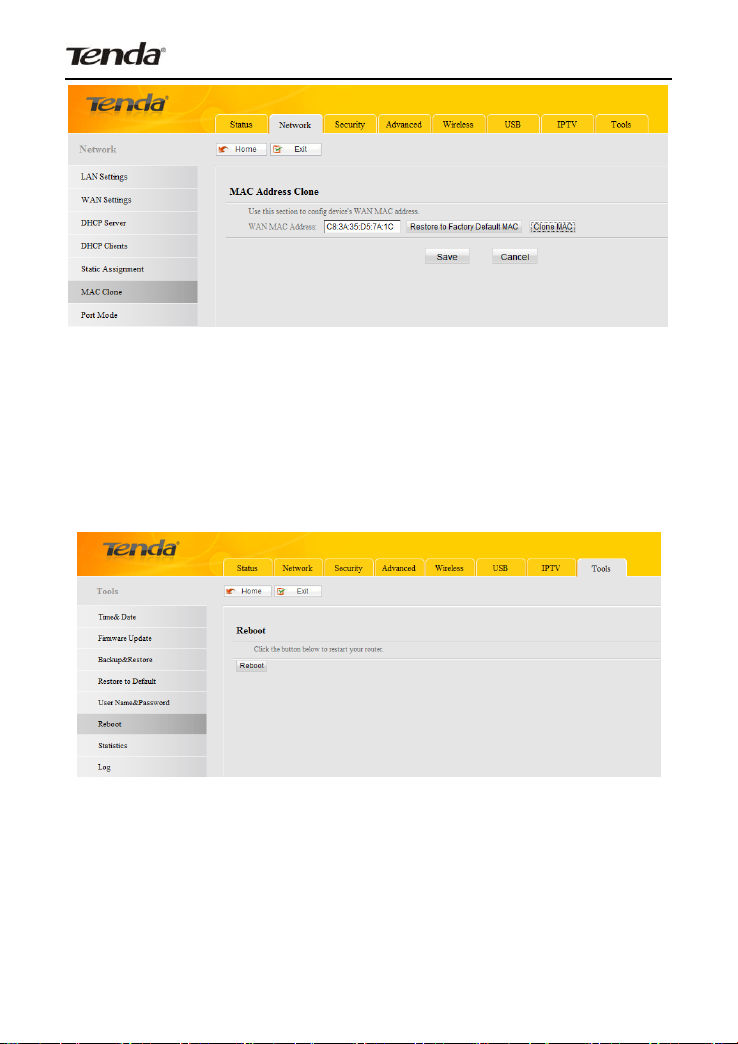
10.6 REBOOT ........................................................................................................... 109
10.7 STATISTICS ....................................................................................................... 110
10.8 LOG ................................................................................................................. 111
APPENDIX 1 CONFIG TCP/IP SETTINGS ................................................................. 111
APPENDIX 2 GLOSSARY .......................................................................................... 119
APPENDIX 3 TROUBLESHOOTING .......................................................................... 125
APPENDIX 4 REMOVE WIRELESS NETWORK FROM YOUR PC ........................... 128
APPENDIX 5 SAFETY AND EMISSION STATEMENT ............................................... 131
4
Page 6

Wireless AC1750 Dual-band Gigabit Router
CHAPTER 1 PRODUCT OVERVIEW
1.1 What it does
Thanks for purchasing this Tenda W1800R Wireless AC1750
Dual-band Gigabit Router! The Tenda W1800R is a 5th
generation dual-band Wi-Fi router that delivers wireless speeds
up to 1750Mbps, currently the fastest available. Compatible with
next generation WiFi devices and backward compatible with
802.11 a/b/g and n devices, it enables HD streaming throughout
your home. The W1800R with simultaneous dual band WiFi
technology offers speeds up to 450+1300Mbps and avoids
interference, ensuring top WiFi speeds and reliable connections.
This makes it ideal for larger homes with multiple devices. In
addition, four Gigabit Ethernet ports offer ultra-fast wired
connections. Wirelessly access and share USB hard drive and
USB printer using the two USB 2.0 ports. Plus, the DLNA media
server feature enables sharing of digital media such as music,
photos and videos between consumer devices such as
computers, TVs, printers, cameras, cell phones, and other
multimedia devices.
1.2 Features
2.4GHz: IEEE802.11n, IEEE802.11g, IEEE 802.11b;
5GHz: IEEE 802.11n, IEEE 802.11a, IEEE 802.11ac;
IEEE802.3, IEEE802.3u;
5
Page 7

Wireless AC1750 Dual-band Gigabit Router
Operate in 2.4GHz and 5GHz wireless bands
simultaneously;
Wireless rate up to1.3Gbps;
1 * Gigabit WAN port for Internet connection;
3 * Gigabit LAN ports for LAN connection; 1* IPTV port for
IPTV service;
2* USB ports for storage or wireless printing service sharing;
Support DLNA media server;
3* high gain external antennas;
WDS support for extending existing wireless coverage;
Supports WEP, WPA-PSK, WPA2-PSK and Mixed
WPA/WPA2-PSK encryption methods to secure your
wireless network;
Hidden/invisible SSID;
MAC-based wireless access control;
WPS one-touch encryption;
Provides Wireless guest network feature;
WMM streams your video and audio;
Combines the function of a wireless AP, router, switch and
firewall;
Provides Internet connection types: Dynamic/ static
IP,L2TP,PPTP,PPPOE/ PPPOE dual access;
Built-in firewall supports domain name/MAC address filter
SNTP to synchronize local time with Internet time servers;
6
Page 8

Wireless AC1750 Dual-band Gigabit Router
Bandwidth control;
Supports UPnP and DDNS features;
Provides virtual server and DMZ features;
Provides logs to record device's usage status;
CHAPTER 2 QUICK INTERNET CONNECTION
SETUP
2.1 Package Contents
Unpack the box and verify the following items:
W1800R Wireless AC1750 Dual-band Gigabit Router;
Power Adapter
Quick Install Guide
Resource CD
3* 5dBi omni-directional antennas
Ethernet Cable
If any of the above items are incorrect, missing, or damaged,
please contact your Tenda reseller for immediate
replacement.
2.2 Minimum System Requirements:
200MHz or better CPU
64MB or larger memory
Windows 98/2000/XP/Vista/7
Installed Network Adapter
Internet Explorer 6.0 or higher
7
Page 9
Wireless AC1750 Dual-band Gigabit Router
Netscape Navigator 4.7 or higher
Broadband Internet Service (through xDSL/Cable
Modem/Ethernet)
2.3 Hardware Install
1. Connect one end of the included power adapter to the Device
and plug the other end into a wall outlet nearby. (Using a power
adapter with a different voltage rating than the one included with
the Device will cause damage to the Device.)
2. Connect one of the LAN ports on the Device to the NIC port on
your PC using an Ethernet cable.
8
Page 10
Wireless AC1750 Dual-band Gigabit Router
LED
Icon
Status
Description
Power
Solid
Indicates a proper connection
to the power supply
Sys
Blinking
Indicates system is functioning
properly
USB
Solid
USB port connected correctly
3. Connect the Ethernet cable from your ISP side to device's
WAN port.
4. Observe status of LEDs on the device and ensure that they
are functioning correctly as stated in the table below.
Front Panel:
LED Overview:
9
Page 11

Wireless AC1750 Dual-band Gigabit Router
WAN
Solid
WAN port connected correctly
Blinking
WAN port is transferring data
LAN
(1/2/3)
Solid
LAN port connected correctly
Blinking
LAN port is transferring data
IPTV
Solid
IPTV port connected correctly
Blinking
IPTV port is transferring data
2.4G
Solid
2.4G wireless radio is on
Blinking
Data being transferred over
2.4G wireless network
5G
Solid
5G wireless radio is on
Blinking
Data being transferred over 5G
wireless network
WPS
Blinking
Device is performing WPS
authentication on a client
device.
Off
WPS function is disabled or
WPS authentication
negotiation is completed
Back Panel:
10
Page 12

Wireless AC1750 Dual-band Gigabit Router
1) USB: USB port for connection to a USB device such as a
USB printer or storage device;
2) WAN: Internet port (RJ-45)for connection to an
Internet-enabled xDSL Modem/Cable Modem or existing
Ethernet;
3) LAN/1/2/3: 3 LAN ports (RJ-45) for connection to PC’s NIC
or uplink to a hub, switch or wireless AP;
4) IPTV:IPTV port for connection to a network set-top box.
However such port can function as a LAN port if IPTV STB
port is not enabled;
5) WPS/Reset: WPS/Reset button; the WPS LED will display a
blinking light if you enabled the WPS function from device
web utility. Pressing this button for about 7 seconds restores
the Device to factory defaults.
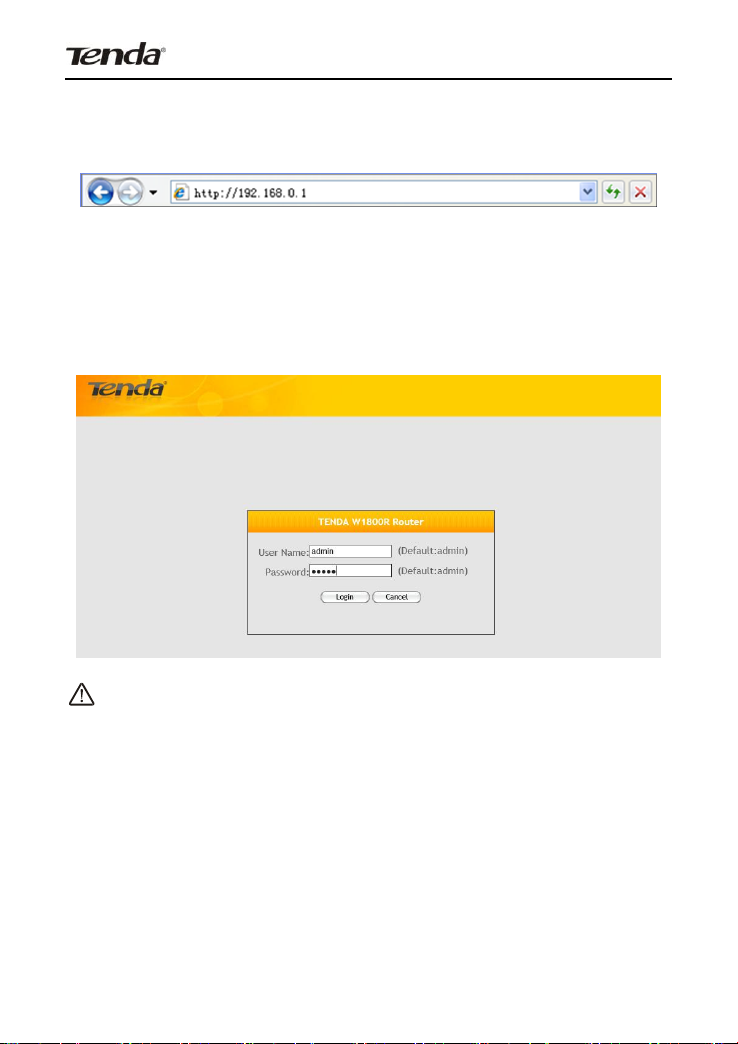
2.4 Web Utility Login
The device’s default IP is 192.168.0.1. You can change it to
accommodate your own needs. Here in this manual, we use the
default IP.
Connect you PC to the Device and config your PC’s TCP/IP
settings following instructions in appendix 1 hereto. And then do
as follows to run a Ping command to test connectivity between
your PC and the Device.
Click "Start"-> "Run", input "cmd" and press "Enter".
11
Page 13
Wireless AC1750 Dual-band Gigabit Router
Enter “ping 192.168.0.1” and press “Enter”. If you see the
following screen, it means the router is reachable on your
PC. If you don’t get the following screen, verify router’s
power supply, Ethernet cable connections and your PC’s
TCP/IP settings.
Login to Web Utility
12
Page 14
Wireless AC1750 Dual-band Gigabit Router
Launch a web browser, in the address bar,input 192.168.0.1 and
press “Enter”.
When connected to the Device successfully, you shall see
the login window below. Enter user name and password in
corresponding fields on window below (Default user name and
password are respectively set to admin).
Note:
For security purpose, please change the default user name and
password after you logged in to web utility.
You will see the following interface if you entered a correct user
name and a correct password.
13
Page 15
Wireless AC1750 Dual-band Gigabit Router
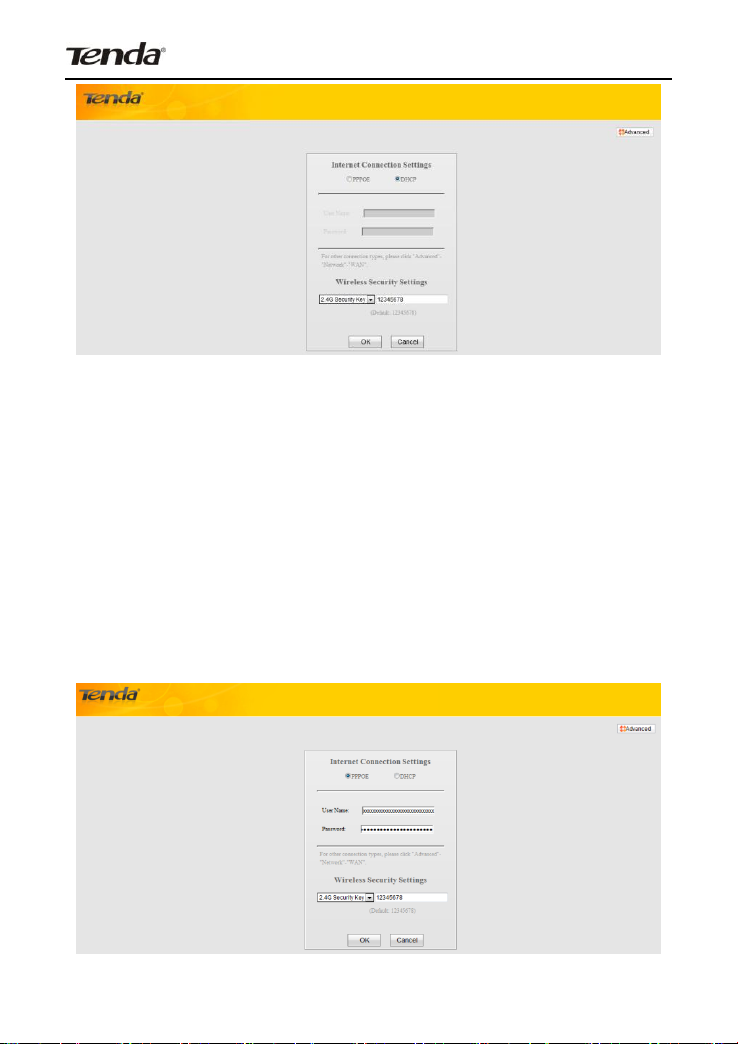
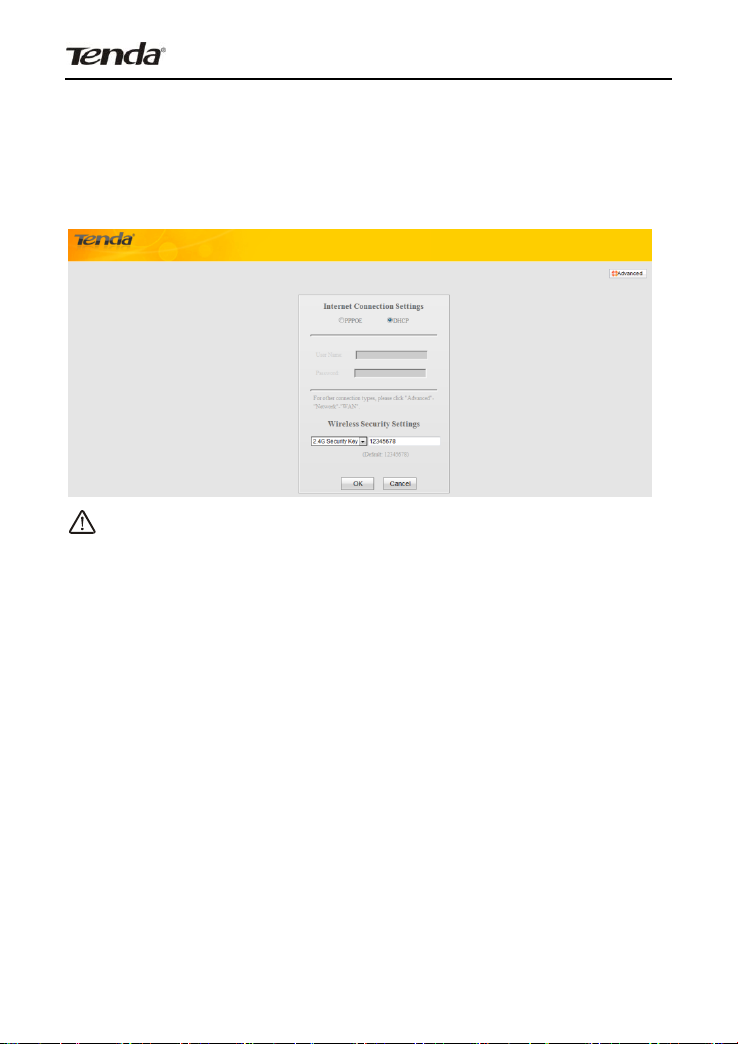
2.5. Internet Connection Setup
There are 2 Internet connection types on home page: PPPoE
and DHCP.
If you used to create a broadband connection on your PC that is
directly connected to a modem and provide a user name and a
password for Internet access, then select PPPoE, enter the user
name and password and then click OK.
14
Page 16
Wireless AC1750 Dual-band Gigabit Router
If you used to access Internet simply by connecting your PC
directly to the modem with no need to configure any settings on
your PC. Then select DHCP, enter a security key and then click
OK.
Note:
DHCP is the default Internet connection type. If you need other
connection types, please go to Chapter 4> WAN settings.
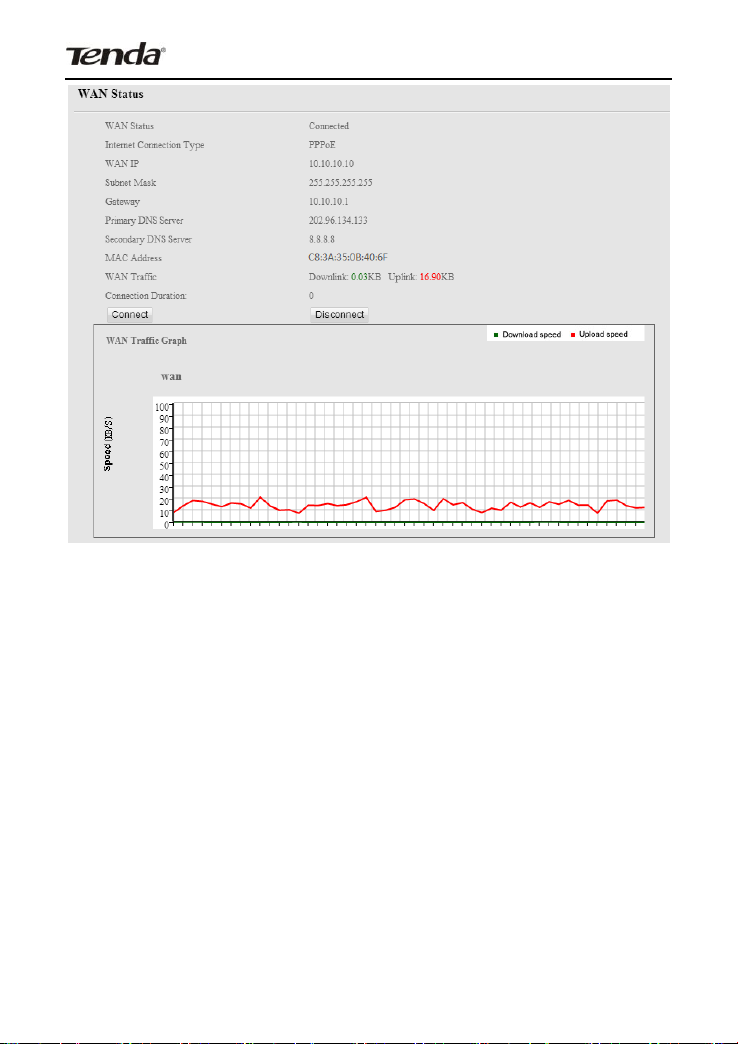
2.6 Verify Internet Connection Settings
After finishing settings on home page, click the Advanced button
from right top corner there and then click Running Status-> WAN
Status to check the Internet connection status.
A. If you find "Connected" and a WAN IP address displayed
there (as shown below), you can now connect to the device
using an Ethernet cable to access Internet.
15
Page 17
Wireless AC1750 Dual-band Gigabit Router
B. If "Disconnected" (or "Not connected") and no WAN IP
address are displayed (as seen below), connection between
the Internet-enabled modem (or broadband service) and your
device may have failed. Please double check or re-connect all
involved devices and cables properly and then refresh the
page. If nothing is wrong, "Connecting" or "Connected" will be
displayed.
16
Page 18
Wireless AC1750 Dual-band Gigabit Router
C. If "Connecting" is displayed and no WAN IP address is
seen, try refreshing the page five times. And if it still displays
"Connecting" try the following steps:
a. Click the Network menu and then click "MAC Clone". On
the MAC Clone interface, click on the "Clone MAC" button, and
then click "Save". Settings will take effect after device reboot.
17
Page 19
Wireless AC1750 Dual-band Gigabit Router
b. Go back to the Status screen, refresh it a few times. If you find
"Connected" and a WAN IP address displayed there, you can
now connect to the device using an Ethernet cable to access
Internet. If you still see "Connecting" there, please click Tools->
Reboot to reboot the device.
c. After device reboot, go back to the Status screen, refresh it a
few times. If you find "Connected" and a WAN IP address
displayed there, you can now connect to the device using an
Ethernet cable to access Internet. If you still see "Connecting"
after trying above solutions, verify that your PC is able to access
18
Page 20
Wireless AC1750 Dual-band Gigabit Router
Internet when it is directly connected to the modem and contact
our technical staff for help.
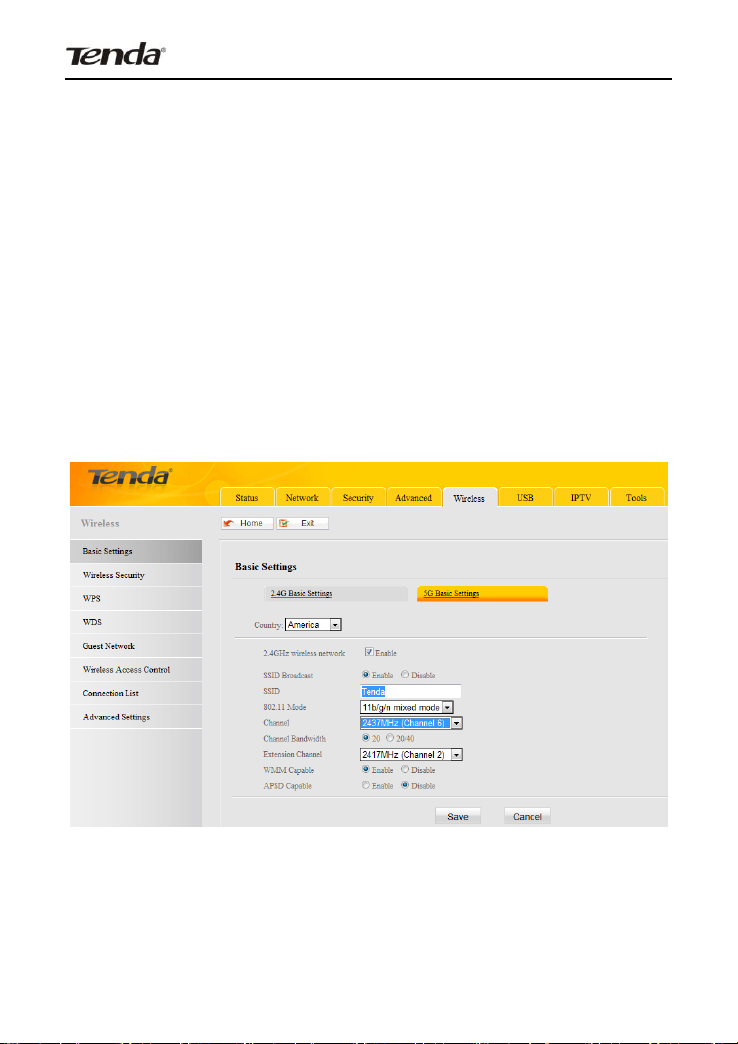
2.7 Wireless Settings
2.7.1 Wireless-Basic Settings
If you want to create a WLAN, simply click Wireless-> Basic
Settings. Please change the SSID (Wireless Network name),
you can name it whatever you like. Leave other options
unchanged unless necessary and then click OK. You can also
change the SSID and channel settings for the 5G wireless
network if you like.
19
Page 21
Wireless AC1750 Dual-band Gigabit Router
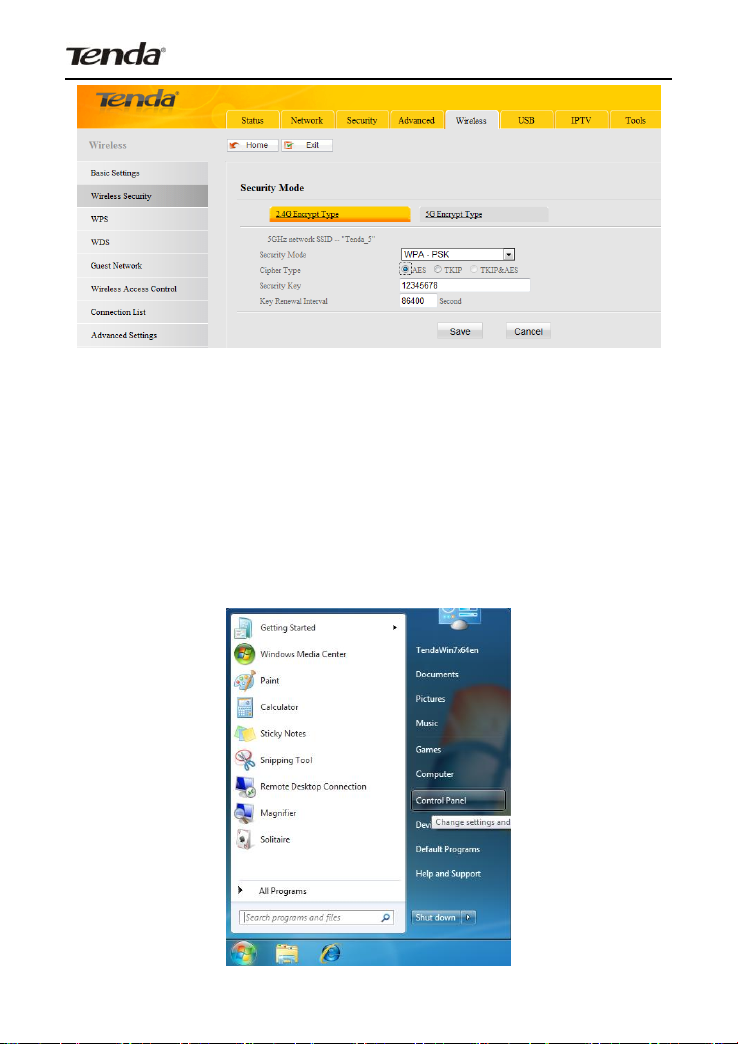
2.7.2 Wireless-Security Settings
If you want to encrypt your wireless network, click
Wireless-Wireless Security, select a band: 2.4G or 5G, and then
configure proper security settings. For example: Security Mode:
WPA-PSK; Cipher Type: AES; Security Key: enter down to 8
characters. And then click Save.
20
Page 22
Wireless AC1750 Dual-band Gigabit Router
2.8 Connect to Device Wirelessly
Having finished above settings, you can search the device's
wireless network (SSID) from your wireless devices (notebook,
iPad, iPhone, etc) and enter a security key to connect to it
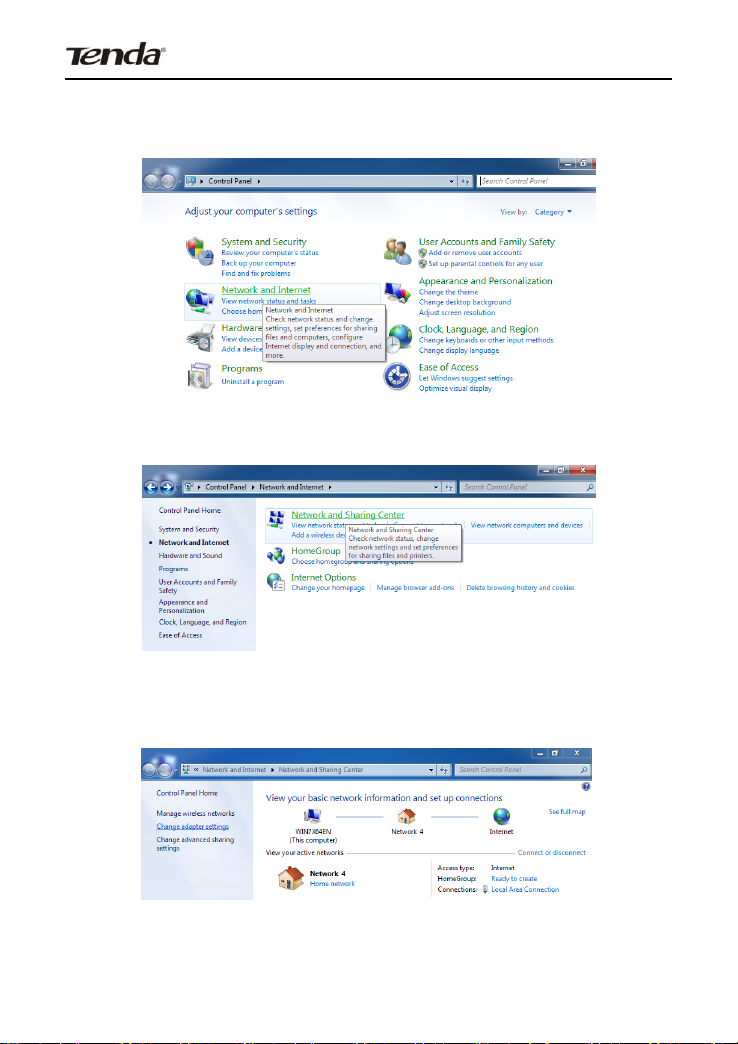
wirelessly. If you are using Windows 7 OS, do as follows:
A. Click Start and select Control Panel.
21
Page 23
Wireless AC1750 Dual-band Gigabit Router
B. Click Network and Internet.
C. Click Network and Sharing Center.
D. Click Change adapter settings.
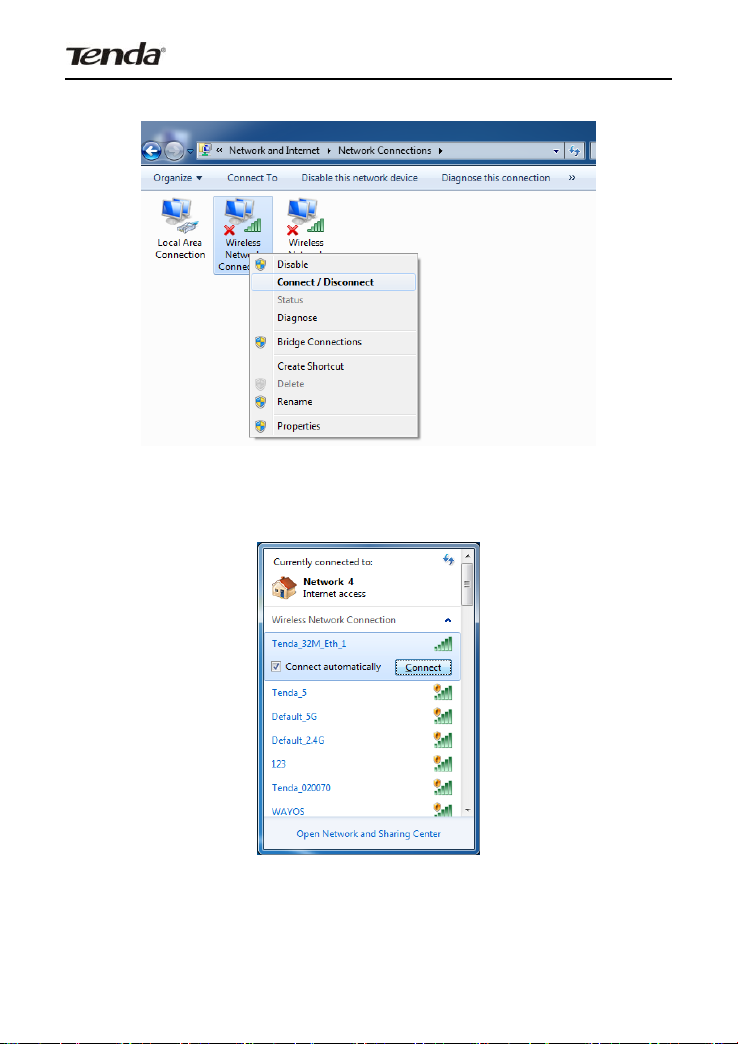
E. Select a desired wireless connection and click
22
Page 24
Wireless AC1750 Dual-band Gigabit Router
Connect/Disconnect.
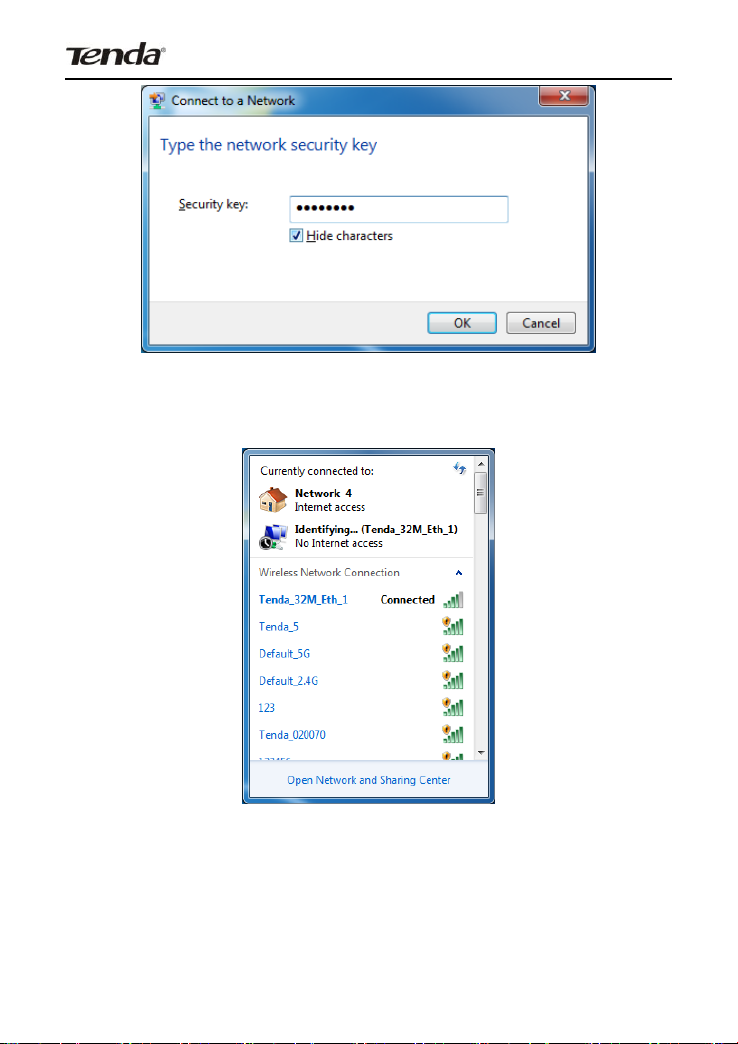
F. Select the desired wireless network, click Connect, enter the
security key and then click OK.
23
Page 25
Wireless AC1750 Dual-band Gigabit Router
G. You can access Internet via the device when "Connected"
appears next to the wireless network name you selected.
CHAPTER 3 RUNNING STATUS
There are 4 subdues under the Status tab: "WAN Status", "LAN
Status", “Wireless Status" and "System Info", which are
explained in details below.
24
Page 26

Wireless AC1750 Dual-band Gigabit Router
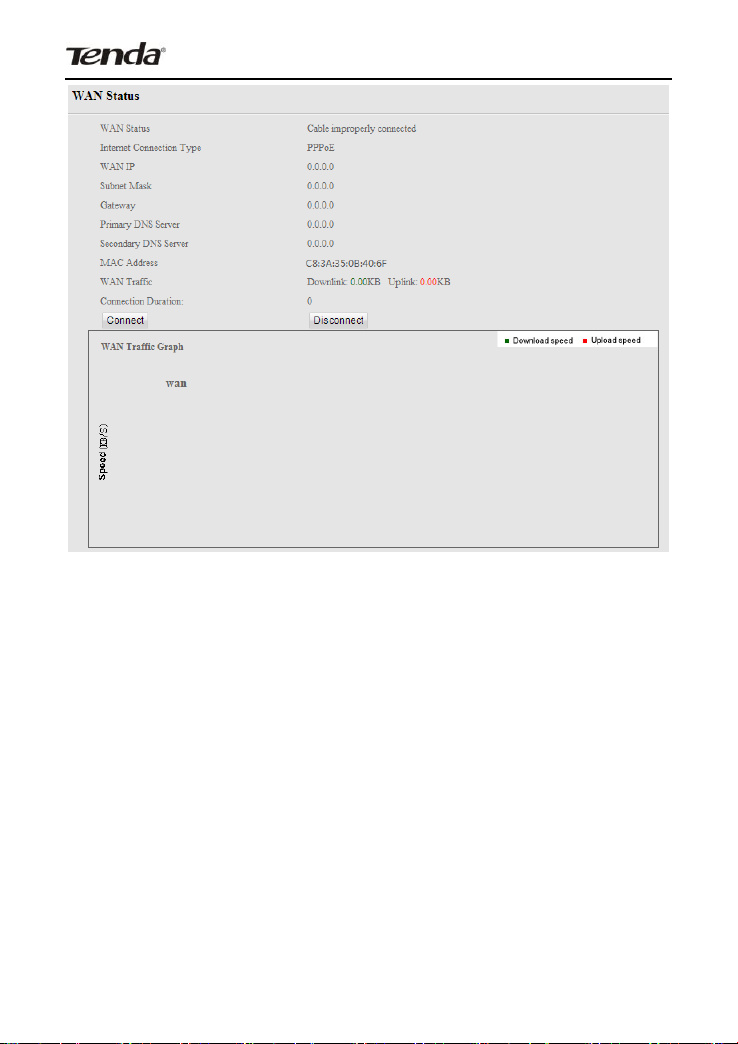
3.1 WAN Status
This section allows you to view WAN Status, Internet Connection
Type, WAN IP, Subnet Mask, Gateway, Primary DNS Server,
Secondary DNS Server, MAC Address, WAN Traffic and
Connection Duration. It also presents you a vivid impression of
WAN traffic usage in a graph.
25
Page 27

Wireless AC1750 Dual-band Gigabit Router
WAN Status: Displays WAN connection status.
Cable improperly connected: Indicates that the Ethernet
cable from your ISP side is not correctly connected to the
WAN port on the Device or the Device is not logically
connected to your ISP.
Connecting: Indicates that the WAN port is correctly
connected and is requesting an IP address from your ISP.
Connected: Indicates that the router has been connected to
your ISP.
Internet Connection Type: Displays current Internet
connection type.
WAN IP: Displays WAN (Internet) IP address provided by
your ISP.
Subnet Mask: Displays WAN subnet mask provided by your
ISP.
Gateway: Displays WAN gateway address provided by your
ISP.
Primary DNS Server: Displays primary WAN DNS address
provided by your ISP.
Secondary DNS Server: Displays secondary WAN DNS
address (if any) provided by your ISP.
MAC Address: Displays WAN MAC address.
WAN Traffic: Displays current WAN uplink traffic and
downlink traffic.
26
Page 28
Wireless AC1750 Dual-band Gigabit Router
Connect: Click to renew current IP address.
Disconnect: Click to release current IP address and Internet
connection will be disconnected.
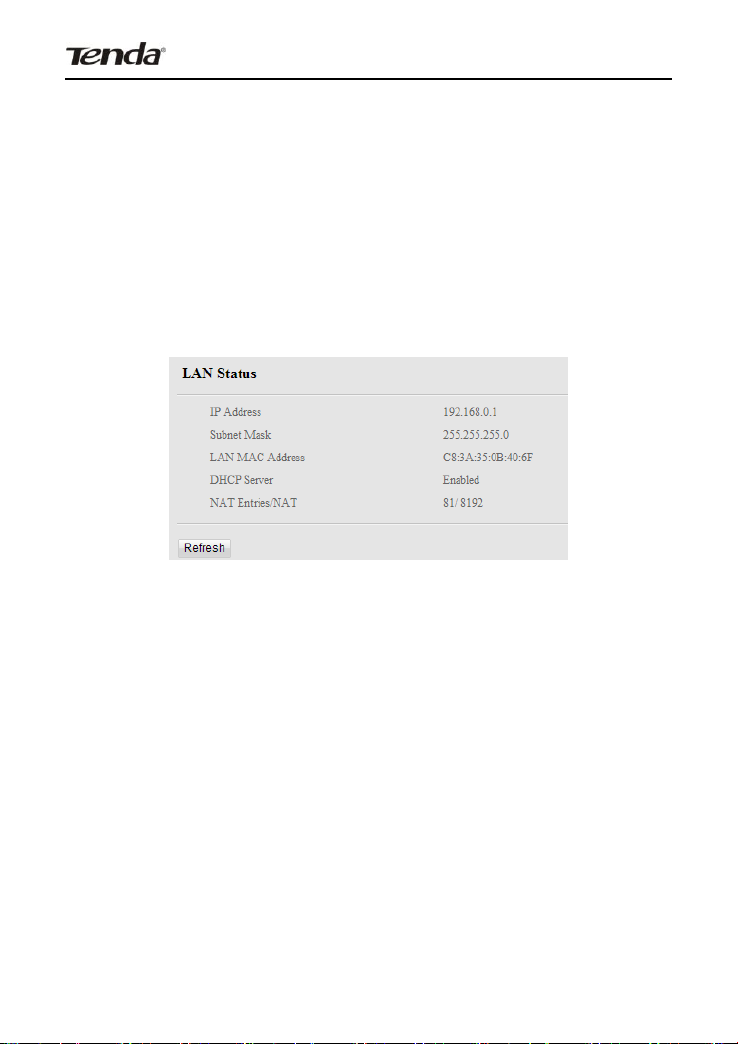
3.2 LAN Status
This section displays information of device LAN IP Address,
Subnet Mask, LAN MAC Address, DHCP Server and NAT
Entries/NAT.
IP Address:Displays current LAN IP address.
Subnet Mask: Displays current LAN subnet mask.
LAN MAC Address: Displays Device’s LAN MAC address.
DHCP Server: Displays whether DHCP server on the device
is enabled or not.
NAT Entries/NAT: Displays the number of NAT entries
already used and the number of NAT entries still available.
3.3 Wireless Status
This section displays the status of 2.4G Wireless radio and 5G
Wireless radio, Wireless MAC address, SSID, 802.11 Mode,
27
Page 29
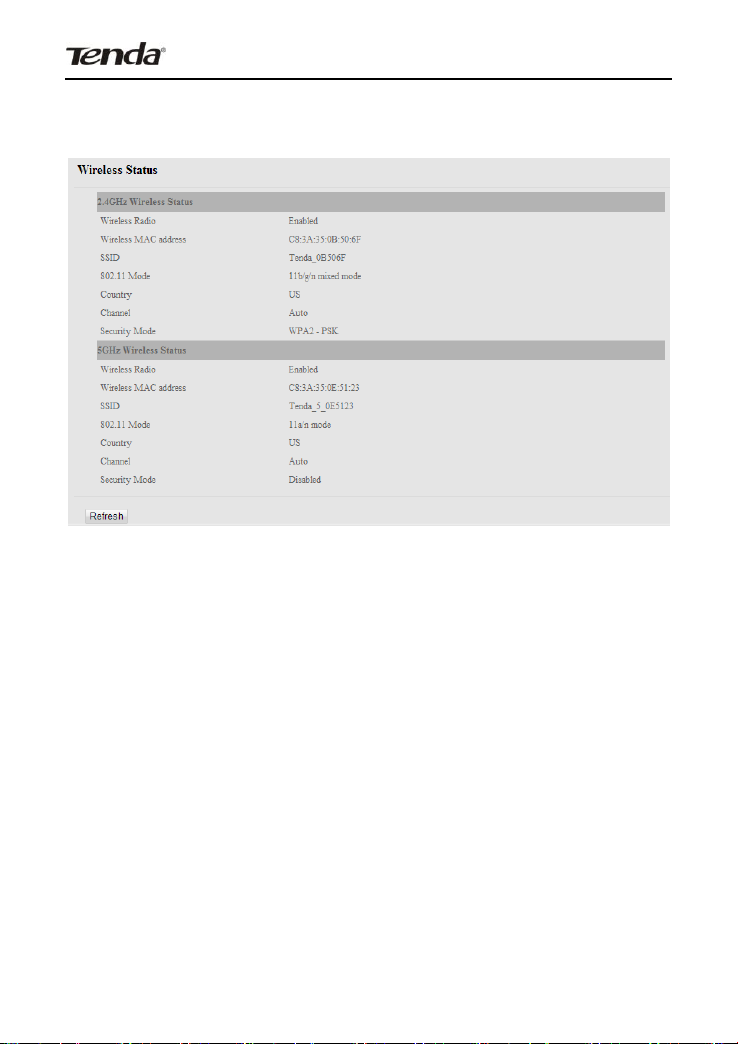
Wireless AC1750 Dual-band Gigabit Router
Country, Channel and Security Mode information.
Wireless Radio: Displays whether wireless is enabled or not.
Wireless MAC address: Displays the MAC address of the
Device’s wireless interface.
SSID: Displays current SSID.
802.11 Mode: Displays currently active network mode.
Country: Displays the country selected currently.
Channel: Displays the channel that device is currently
operating on.
Security Mode: Displays current security Mode.
28
Page 30
Wireless AC1750 Dual-band Gigabit Router
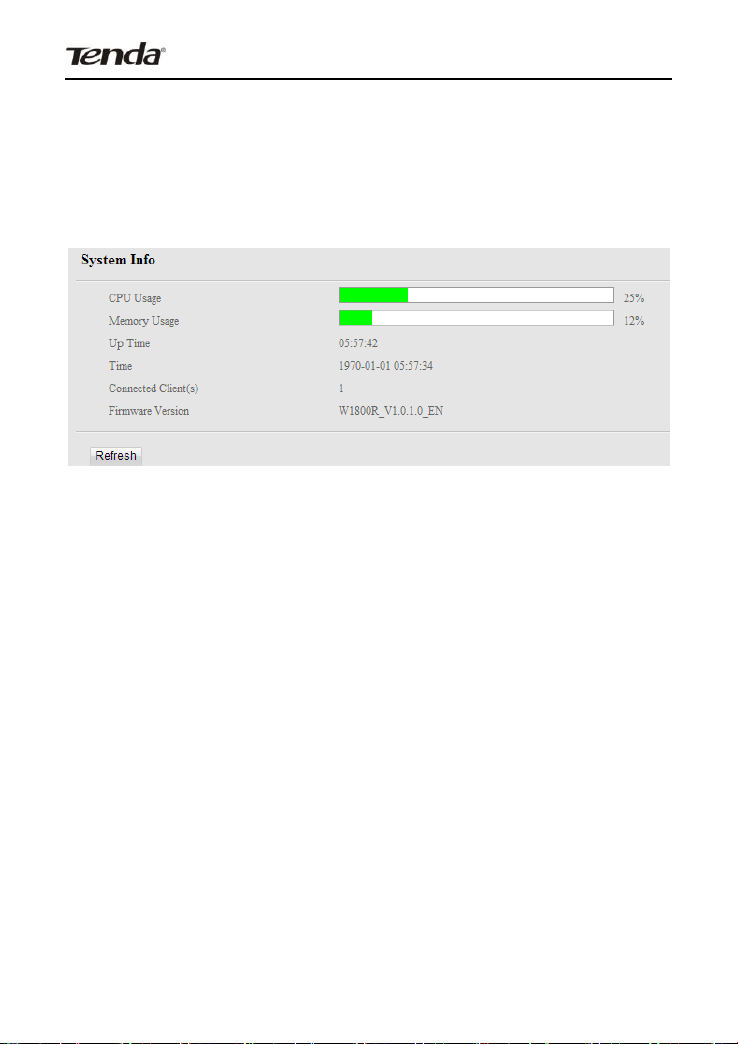
3.4 System Info
This section displays current CPU usage, memory usage, up
time, system time, connected client(s) and firmware version info.
CPU Usage: Displays current CPU usage.
Memory Usage: Displays current memory usage.
Up Time: Displays the uptime since device is powered up.
Time: Displays Device’s current system time.
Connected Client(s): Displays the number of currently
connected clients.
Firmware Version:Displays Device’s current firmware
version.
CHAPTER 4 NETWORK
Network includes the following five submenus: LAN Settings,
WAN Settings, DHCP Server, DHCP Clients, Static Assignment,
MAC Clone and Port Mode. Clicking any of them enters
corresponding interface for configuration. Below explains, in
29
Page 31

Wireless AC1750 Dual-band Gigabit Router
details, each such feature.
4.1.LAN Settings
IP Address: Device’s LAN IP. The default is 192.168.0.1. You
can change it according to your need.
Subnet Mask: Device’s LAN subnet mask.
30
Page 32

Wireless AC1750 Dual-band Gigabit Router
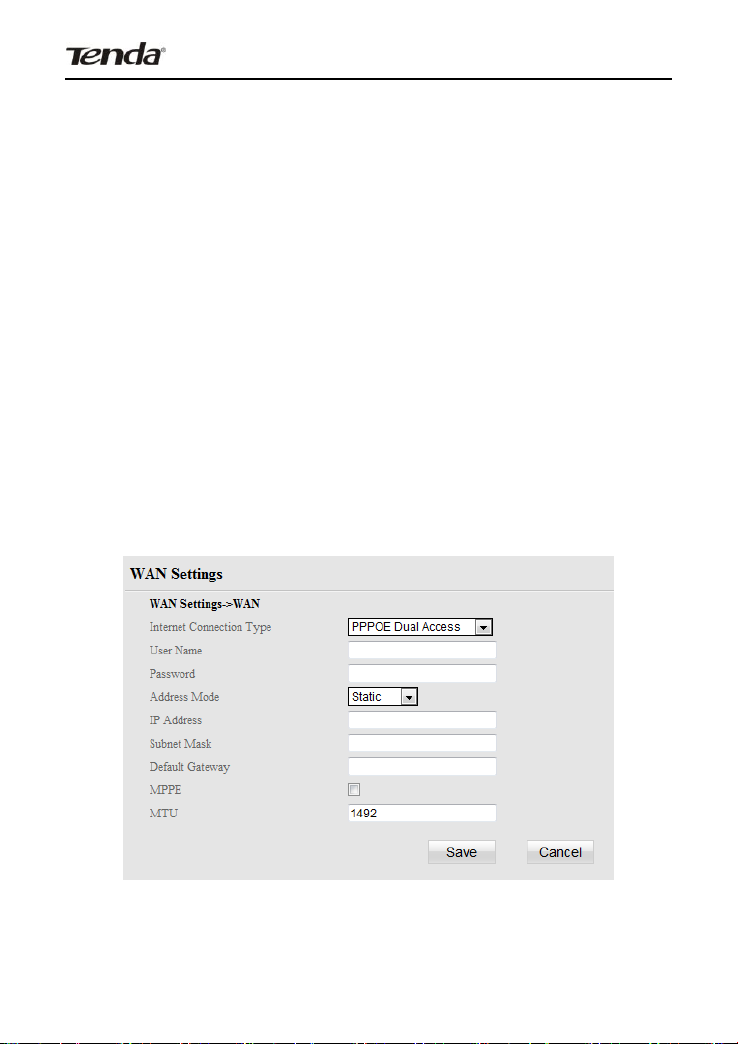
4.2.WAN Settings
There are 6 types of Internet connection: DHCP ( Dynamic IP),
PPPoE and PPPoE dual access, PPTP, L2TP and Static IP
available for your choice.
Interface: Displays the interface used currently;
Connection Status: Displays WAN current connection status:
Disconnected, Connecting or Connected.
Info: Displays the currently used Internet connection type,
gateway, IP address and subnet mask information.
1) DHCP: Select DHCP (Dynamic IP) to obtain IP Address info
automatically from your ISP. Select this option if your ISP does
not provide you with any IP info.
Internet connection Type: Displays a list of available Internet
31
Page 33

Wireless AC1750 Dual-band Gigabit Router
connection types.
MTU: Maximum Transmission Unit. The default value
is1500.
2) Static IP: Select Static IP Address if your ISP provides all the
connection info. You will need to enter the provided IP address,
subnet mask, gateway address, and DNS address(es) in
corresponding fields.
Internet connection Type: Displays a list of available Internet
connection types.
IP Address: Enter the IP address provided by your ISP.
Consult your local ISP if you are not clear.
Subnet mask: Enter the subnet mask provided by your ISP.
Consult your ISP if you are not clear.
Default Gateway: Enter the gateway address provided by
32
Page 34

Wireless AC1750 Dual-band Gigabit Router
your ISP. Consult your local ISP if you are not clear.
Primary/Secondary DNS Server: Enter the Primary and
Secondary DNS Server Addresses. Consult your local ISP if
you are not clear.
MTU: Maximum Transmission Unit.The factory default is
1500.
3) PPPoE: Select PPPoE (Point to Point Protocol over Ethernet)
if your ISP uses a PPPoE connection and provides you with a
PPPoE user name and a PPPoE password. Simply enter them in
corresponding fields.
Internet connection Type: Displays a list of available Internet
connection types.
User Name: Enter the PPPoE User Name provided by your
ISP. Consult your ISP if you are not clear.
Password: Enter the PPPoE Password provided by your ISP.
Consult your ISP if you are not clear.
33
Page 35

Wireless AC1750 Dual-band Gigabit Router
MPPE: Select whether to enable the MPPE authentication
method.
MTU: Maximum Transmission Unit.The factory default is
1492.
4) PPTP: Select PPTP (Point-to-Point-Tunneling Protocol) if your
ISP uses a PPTP connection. The PPTP connects a router to a
VPN server. For example:A corporate branch and headquarter
can use this connection type to implement mutual and secure
access to each other’s resources.
Internet connection Type: Displays a list of available Internet
connection types.
PPTP Server: Enter the IP address of a PPTP server.
34
Page 36

Wireless AC1750 Dual-band Gigabit Router
User Name: Enter your PPTP User Name.
Password: Enter your Password.
Address mode: Select “Dynamic” if you don’t get any IP info
from your ISP, otherwise select “Static”. Consult your ISP if
you are not clear.
IP Address: Enter the IP address provided by your ISP.
Consult your local ISP if you are not clear.
Subnet Mask: Enter the subnet mask provided by your ISP.
Consult your ISP if you are not clear.
Default Gateway: Enter the gateway provided by your ISP.
Consult your local ISP if you are not clear.
Primary/Secondary DNS Server: Enter the Primary and
Secondary DNS Server Addresses. Consult your local ISP if
you are not clear.
MPPE: Select whether to enable the MPPE authentication
method.
MTU: Maximum Transmission Unit.The factory default is
1460.
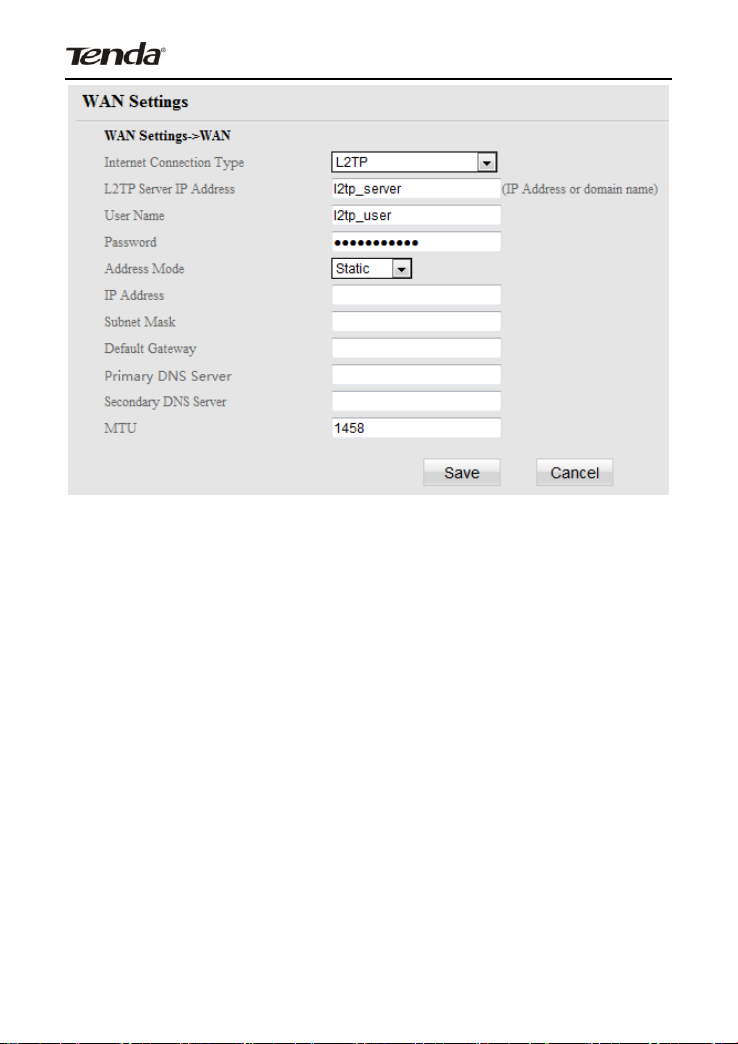
5) L2TP: Select L2TP (Layer 2 Tunneling Protocol) if your ISP
uses an L2TP connection. The L2TP connects your router to a
L2TP server. For example:A corporate branch and
headquarter can use this connection type to implement mutual
and secure access to each other’s resources.
35
Page 37
Wireless AC1750 Dual-band Gigabit Router
Internet connection Type: Displays a list of available Internet
connection types.
L2TP Server: Enter the L2TP IP address provided by your
ISP.
User Name: Enter your L2TP User Name.
Password: Enter your Password.
Address mode: Select “Dynamic” if you don’t get any IP info
from your ISP, otherwise select “Static”. Consult your ISP if
you are not clear.
IP Address: Enter the IP address provided by your ISP.
Consult your local ISP if you are not clear.
Default Gateway: Enter the gateway provided by your ISP.
36
Page 38
Wireless AC1750 Dual-band Gigabit Router
Consult your local ISP if you are not clear.
Primary/Secondary DNS Server: Enter the Primary and
Secondary DNS Server Addresses. Consult your local ISP if
you are not clear.
MTU: Maximum Transmission Unit. The factory default is
1458.
PPPoE Dual Access: Select PPPoE (Point to Point Protocol
over Ethernet) Dual Access if your ISP uses a PPPoE Dual
Access connection and provides you with a PPPoE user
name and a PPPoE password. Simply enter them in
corresponding fields. In the mean time, you can also use
static address mode or dynamic address mode for MAN
access.
Internet connection Type: Displays a list of available Internet
connection types.
37
Page 39

Wireless AC1750 Dual-band Gigabit Router
User Name: Enter the PPPoE User Name provided by your
ISP. Consult your ISP if you are not clear.
Password: Enter the PPPoE Password provided by your ISP.
Consult your ISP if you are not clear.
Address mode: Select “Dynamic” if you don’t get any IP info
from your ISP, otherwise select “Static”. Consult your ISP if
you are not clear.
IP Address: Enter the IP address provided by your ISP.
Consult your local ISP if you are not clear.
Subnet mask: Enter the subnet mask provided by your ISP.
Consult your ISP if you are not clear.
Default Gateway: Enter the gateway address provided by
your ISP. Consult your local ISP if you are not clear.
MPPE: Select whether to enable the MPPE authentication
method.
MTU: Maximum Transmission Unit.The factory default is
1492.
Note:
It is not advisable to change the factory default MTU value unless
necessary as an improper MTU value may degrade your network
performance or even lead to network malfunction.
4.3 DHCP Server
The Dynamic Host Configuration Protocol (DHCP) is an
38
Page 40

Wireless AC1750 Dual-band Gigabit Router
automatic configuration protocol used on IP networks. If you
enable the built-in DHCP server on this device, it will
automatically configure TCP/IP protocol settings for all
DHCP-Client-enabled PCs in your LAN, including IP address,
subnet mask, gateway and DNS etc.
DHCP Server: Select whether to enable or disable the
Device’s DHCP server feature.
Start IP: Enter the starting IP address for the DHCP server’s
IP assignment.
End IP: Enter the ending IP address for the DHCP server’s
IP assignment.
Lease Time: The length of time for the IP address lease.
Primary DNS Server: Specify a primary DNS server address
that will be assigned to DHCP clients upon request.
Secondary DNS Server: Specify a secondary DNS server
address that will be assigned to DHCP clients upon request.
39
Page 41

Wireless AC1750 Dual-band Gigabit Router
Note:
To apply the DHCP server settings to all PCs on your LAN, you
must set all PCs to "Obtain an IP address automatically" and
"Obtain DNS server address automatically" respectively.
4.4 DHCP Clients
This section displays a DHCP dynamic client list, which includes
host name, IP address, MAC address and lease time info.
Host name: Displays clients' host names.
IP Address: Displays IP address(s) that client(s) obtained
from the DHCP server.
MAC Address: Displays MAC address of a given host.
Lease Time: Remaining time for a corresponding IP address
lease.
4.5 Static Assignment
The DHCP server provides DHCP static IP address reservation
feature. If you would like some devices on your network to
always have fixed IP addresses, you can use this feature and
manually add a static DHCP assignment entry for each such
device.
40
Page 42

Wireless AC1750 Dual-band Gigabit Router
For example: If you want a PC at the MAC address of
00:15:58:C0:D4:3F (on your internal network) to always receive
the IP address of 192.168.0.150 from the device's DHCP server.
First, enter the IP address and MAC address in corresponding
fields as seen below. Second, click Add and Save to save your
settings.
IP Address: Enter the IP address for static DHCP
assignment.
MAC Address: Enter the MAC address of a computer to
always receive the same IP address you specify.
Add: Click it to add a new IP-MAC static assignment entry to
list.
Edit: Click it to change an existing entry.
Delete: Click to remove an existing entry.
4.6 MAC Clone
This section allows you to configure Device’s WAN MAC
address.
41
Page 43

Wireless AC1750 Dual-band Gigabit Router
WAN MAC Address: Config Device’s WAN MAC address.
Restore to Factory Default MAC: Reset Device’s WAN MAC
to factory default.
Clone MAC: Click to copy your PC's MAC address to the
WAN MAC Address field on the Device.
Note:
1. Normally you don't need to change the default WAN MAC
value. However, some ISP may bind client PC’s MAC address for
Internet connection authentication. In this case, simply enter
such MAC in the WAN MAC Address field or click the “Clone
MAC” button. Note that the WAN MAC address in "Status"
interface will be updated accordingly once you changed it.
2. Do remember to reboot the router to activate the new WAN
MAC. DO NOT use the “Clone MAC” feature unless required by
your ISP.
3. Only the MAC addresses of the PCs on LAN can be cloned to
the Device.
4.7 Port Mode
This page lets you set speed and duplex mode for device's WAN
42
Page 44

Wireless AC1750 Dual-band Gigabit Router
port. It is advisable to keep the default settings.
Auto: Keep the default of Auto, unless the cable to the WAN
port is excessively long, which may deduce drive capability.
10M full-duplex: Select to set WAN port to 10M full-duplex to
enhance the driving ability.
10M half-duplex: Select to set WAN port to 10M half-duplex.
If your WAN port is properly connected but does not function
correctly, it may be caused by poor driving capacity of the
cable. Please set the WAN port to 10M half-duplex to
improve drive capability.
100M full-duplex: Select to set WAN port to 100M
full-duplex.
100M half-duplex: Select to set WAN port to 100M
half-duplex.
1000M full-duplex: Select to set WAN port to 1000M
full-duplex.
1000M half-duplex: Select to set WAN port to 1000M
half-duplex.
43
Page 45

Wireless AC1750 Dual-band Gigabit Router
CHAPTER 5 SECURITY
The "Security" tab includes 6 submenus: IP Group, Time Group,
Client Filter, URL Filter ,MAC Filter and Remote Web
Management. Clicking any of them enters corresponding
interface for configuration. Below explains, in details, each such
feature.
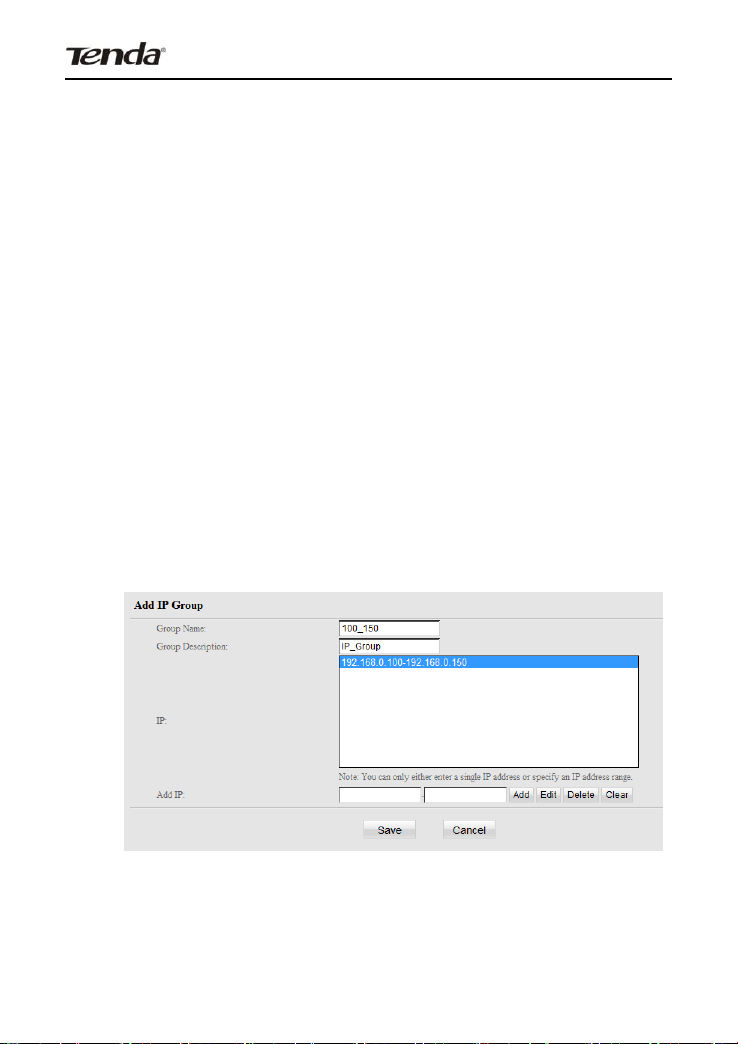
5.1 IP Group
Here you can set up a IP group and define a name for it or briefly
describe it. An IP group determines which IP address or IP
addresses specific rules of other related features are to be
enabled on.
44
Page 46

Wireless AC1750 Dual-band Gigabit Router
Group Name: Define a name for a corresponding group.
Group Description: Briefly describe a corresponding group.
IP: Displays the added IP address or an IP range;
Add IP: Enter an identical IP address or two different IP
addresses in both fields and then click Add to add a single IP
address or a range of IP addresses.
Edit: Click to edit an existing IP address or IP range.
Delete: Click to delete an existing IP address or IP range.
Clear: Click to clear all info on the page.
5.2 Time Group
Here you can set up a time group and define a name for it or
briefly describe it. A time group determines when specific rules of
other related features are to take effect.
45
Page 47

Wireless AC1750 Dual-band Gigabit Router
Group Name: Define a name for a corresponding group.
Group Description: Briefly describe a corresponding group.
To select a time or time group, simply click corresponding area.
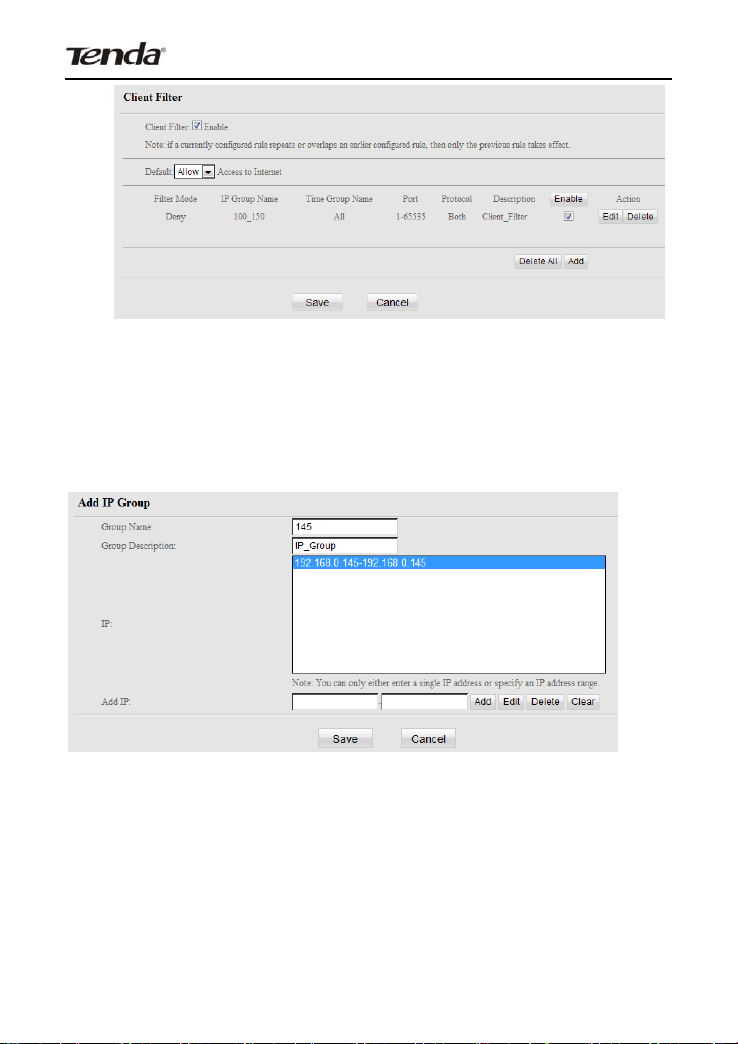
5.3 Client Filter
To better manage PCs in LAN, you can allow or disallow
such PCs to access certain ports on Internet using the Client
Filter functionality. Before you can set up a client filter rule, you
must set an IP group and a time group.
46
Page 48

Wireless AC1750 Dual-band Gigabit Router
Filter Mode: Select Deny or Allow.
Enable: Check to enable or uncheck to disable a
corresponding filter rule (allow/disallow matched packets to
pass through router).
Description: Briefly describe the current rule.
IP Group: Select an IP group for the corresponding rule to
apply to.
Time Group: Select a time group for the corresponding rule
to apply to.
WAN Port Range: Enter TCP/UDP protocol port number (s);
it can be a range of ports or a single port.
Protocol: Select a protocol or protocols for the traffic
(TCP/UDP/Both).
All client filter rules will be summarized in a list.
Client Filter: Check to enable the feature.
Default: Default filter mode; select Allow or Deny from the
drop-down list. For example, if Deny is selected from the
47
Page 49
Wireless AC1750 Dual-band Gigabit Router
Default drop-down list (i.e. default mode is "Deny Access to
Internet"), then all clients will be denied from accessing
Internet at any time. And if Deny is selected from the Filter
Mode drop-down list, then all clients will be denied from
accessing Internet at any time. However, if Allow is selected
from the Filter Mode drop-down list, then only clients whose
IP addresses are included in the specified IP group will be
allowed to access Internet during the time period specified
by the time group in the rule.
Example 1: To forbid PCs at the IP addresses between
192.168.0.100 and 192.168.0.150 inclusive from accessing
Internet at any time, do as follows:
Step 1. Set an IP group: 192.168.0.100-192.168.0.150.
Step 2. Set a time group: select "All".
48
Page 50

Wireless AC1750 Dual-band Gigabit Router
Step 3. Set a client filter rule as shown below.
Step 4. Enable the Client Filter feature and select "Allow" from
the "Default" drop-down list as shown below.
49
Page 51
Wireless AC1750 Dual-band Gigabit Router
Example 2: To allow only the PC at an IP address of 192.168.
0.145 to browse webpages from 8:00 to 18:00, do as follows:
Step 1. Set an IP group: enter 192.168.0.145 in both fields.
Step 2. Set a time group: select "08"-"18" and "Mon"-"Sun".
50
Page 52

Wireless AC1750 Dual-band Gigabit Router
Step 3. Set a client filter rule as shown below.
Step 4. Enable the Client Filter feature and select "Deny" from
the "Default" drop-down list as shown below.
51
Page 53
Wireless AC1750 Dual-band Gigabit Router
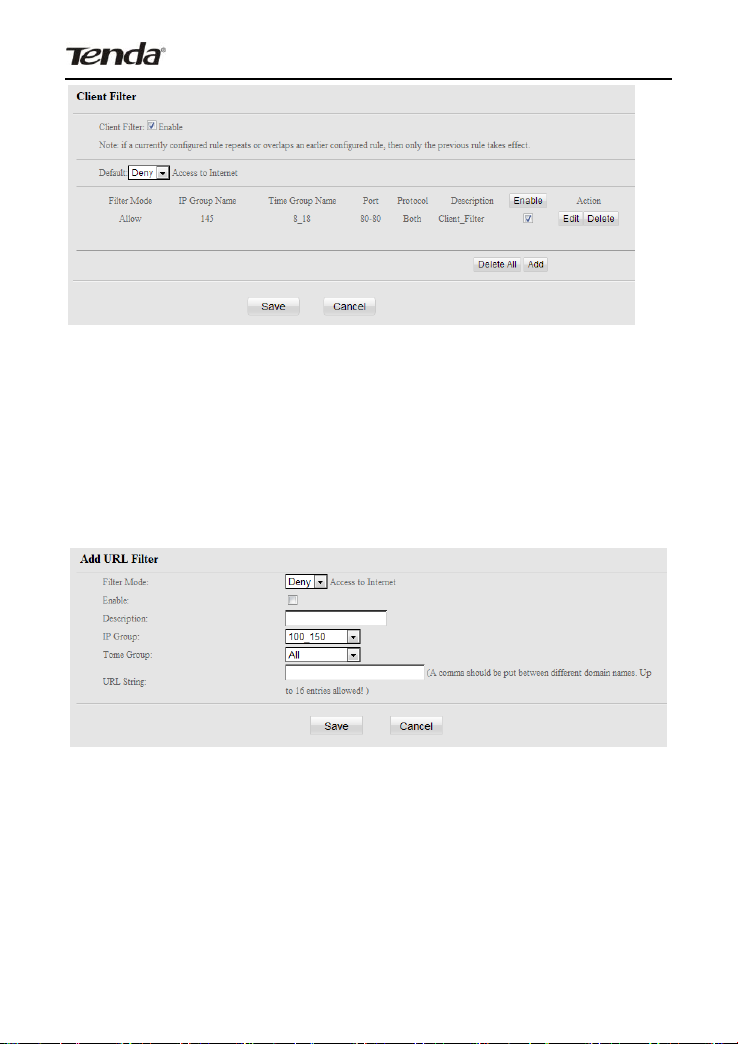
5.4 URL Filter
To better control LAN PCs, you can use the URL filter
functionality to allow or disallow such PC to access certain
websites within a specified time range. Before you can set up a
URL filter rule, you must set an IP group and a time group.
Filter Mode: Select Deny or Allow.
Enable: Check to enable or uncheck to disable a
corresponding filter rule (allow/disallow matched packets to
pass through router).
Description: Briefly describe the current entry/rule.
52
Page 54
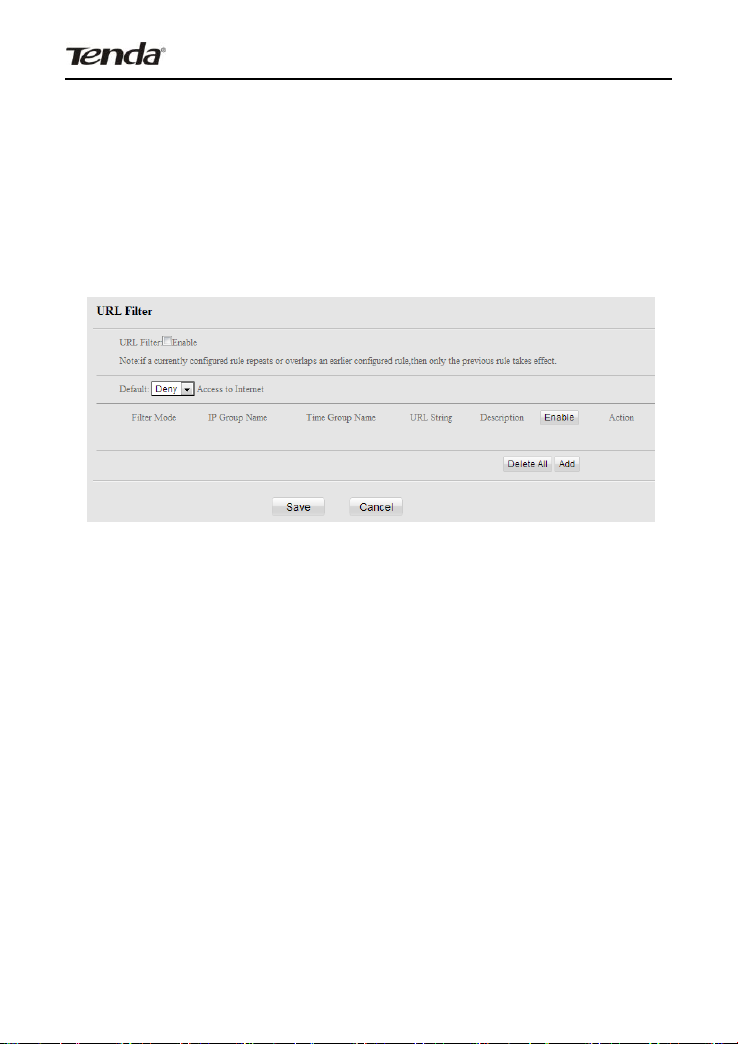
Wireless AC1750 Dual-band Gigabit Router
IP Group: Select a proper IP group for the corresponding
rule to apply to.
Time Group: Select a proper time group for the
corresponding rule to apply to.
URL String: Enter domain names or a part of a domain name
to be filtered out.
All rules will be summarized in a list.
URL Filter: Check to enable the feature.
Default: Default filter mode; select Allow or Deny from the
drop-down list. For example, if Deny is selected from the
Default drop-down list (i.e. default mode is "Deny Access to
Internet"), then all clients will be denied from accessing
Internet at any time. And if Deny is selected from the Filter
Mode drop-down list, then all clients will be denied from
accessing Internet at any time. However, if Allow is selected
from the Filter Mode drop-down list, then only clients whose
IP addresses are included in the specified IP group will be
allowed to access corresponding websites during the time
53
Page 55

Wireless AC1750 Dual-band Gigabit Router
period specified by the time group in the rule.
If you want to disallow all computers on your LAN to access
Google and facebook from 8:00 to 18:00 during working days
(Monday- Friday), then do as follows:
Step 1. Set an IP group: 192.168.0.2-192.168.0.254.
Step 2. Set a time group: select "08"-"18" and "Mon"-"Fri".
Step 3. Set a filter rule as shown below.
54
Page 56

Wireless AC1750 Dual-band Gigabit Router
Step 4. Enable the URL Filter feature and select "Allow" from the
"Default" drop-down list as shown below.
Note:
Each entry can include up to 16 domain names, each of which
must be separated by " ".
5.5 MAC Filter
To better manage PCs in LAN, you may use the MAC
Address Filter function to allow/disallow such PCs to access to
Internet.
55
Page 57

Wireless AC1750 Dual-band Gigabit Router
Filter Mode:
Deny Access to Internet: Disallow only specified packets to
access Internet; other packets are not restricted.
Allow Access to Internet: Allow only specified packets to
access Internet; other packets are denied.
Description: Briefly describe the current rule.
MAC: Specify the MAC address of the PC for the
corresponding rule to take effect. MAC Address list: Displays
MAC addresses of all clients connected to the device.
Simply select the desired MAC address and add it to the
MAC field. Or you can also add it manually.
Time: Specify a time range for a current rule to take effect.
Day: Select a day or several days for a current rule to take
effect.
56
Page 58

Wireless AC1750 Dual-band Gigabit Router
All rules will be summarized in a list.
MAC Filter: Check to enable the feature.
Default: Select Allow or Deny from the drop-down list. For
example, if Deny is selected from the Default drop-down list
(i.e. default mode is "Deny Access to Internet"), then all
clients at specified MAC addresses will be denied from
accessing Internet at any time. And if Deny is selected from
the Filter Mode drop-down list, then all clients at specified
MAC addresses will be denied from accessing Internet at
any time. However, if Allow is selected from the Filter Mode
drop-down list, then only clients at specified MAC addresses
will be allowed to access Internet during the time period
specified by the time group in the rule.
Example1: To prevent a PC at the MAC address of
00:E0:4C:69:A4:10 from accessing Internet between 8:00
and16:00 during working days (Monday -Friday). Do as follows:
Step 1. Set a MAC filter rule as shown below.
Step 2. Enable the MAC Filter feature and select "Allow" from the
57
Page 59

Wireless AC1750 Dual-band Gigabit Router
"Default" drop-down list as shown below.
Example2: To allow a PC at the MAC address of
00:E4:A5:44:35:69 to access Internet from Monday to Friday. Do
as follows:
Step 1. Set a MAC filter rule as shown below.
Step 2. Enable the MAC Filter feature and select "Deny" from the
"Default" drop-down list as shown below.
58
Page 60

Wireless AC1750 Dual-band Gigabit Router
5.6 Remote Web Management
The Remote Web management allows the Router to be
configured from the Internet by a web browser.
Enable: Select whether to enable the Remote Web-based
Management feature.
IP Address: Enter a trusted IP address of a PC from Internet
or other external networks which you want to authorize to
manage the device remotely via a web browser.
Port: Remote admin port; the port used by trusted hosts from
59
Page 61

Wireless AC1750 Dual-band Gigabit Router
Internet or other external networks to access and manage
the device remotely via a web browser.
For example: If you want to allow only the PC at the IP address of
218.88.93.33 from Internet to access Device’s web-based utility
via port: 8080, then configure the same settings as shown on the
screenshot below on your Device.
Note:
1. To access the device via port 8080, enter "http://x.x.x.x:8080"
where "x.x.x.x" represents the the device's Internet IP address
and 8080 is the remote admin port. Assuming the device's
Internet IP address is 220.135.211.56, then, simply replace the
"x.x.x.x" with "220.135.211.56" (namely,
http://220.135.211.56:8080).
Leaving the IP address field at "0.0.0.0" makes the device
remotely accessible to all the PCs on Internet or other external
networks; populating it with a specific IP address, say,
218.88.93.33, makes the device only remotely accessible to the
PC at the specified IP address.
60
Page 62

Wireless AC1750 Dual-band Gigabit Router
CHAPTER 6 ADVANCED
The "Advanced" tab includes the following 7 submenus:Virtual
Server, DMZ, UPnP, DDNS, Routing, Static Routing and
Bandwidth Settings. Clicking any of them enters corresponding
interface for configuration. Below explains, in details, each such
feature.
6.1 Virtual Server
The Virtual Server feature grants Internet users access to
61
Page 63

Wireless AC1750 Dual-band Gigabit Router
services on your LAN. It is useful for hosting online services such
as FTP, Web, or game servers. For each Virtual Server, you
define a WAN port on your router for redirection to an internal
LAN IP Address.
WAN Port: WAN service port;
LAN Port: LAN service port;
Private IP: The IP address of a computer used as a server in
LAN.
Protocol: Includes TCP, UDP and Both. Select “Both” if you
are not sure about which protocol to use.
Enable: The corresponding entry takes effect only if you
checked this option.
Well-Known Service Port: The “Well-Known Service Port”
lists widely used protocol ports. Simply select a port, an entry ID
and click the "Add to" button to populate the selected port to the
corresponding fields of the selected entry. In case that you don’t
find the port you need, enter it manually.
62
Page 64

Wireless AC1750 Dual-band Gigabit Router
Example: You want to share some large files with your friends
who are not in your LAN; however it is not convenient to transfer
such large files across network. Then, you can set up your own
PC as a FTP server and use the Virtual server to let your friends
access these files. Assuming that the static IP address of the
FTP server (Namely, your PC) is 192.168.0.10, you want your
friends to access this FTP server on the default port of 21 using
the TCP protocol, then do as follows:
1. Enter 21 in both WAN Port and LAN Port fields or select FTP
from "Well-known Service Port" and an entry ID, 21 will be
automatically populated to corresponding fields of the selected
entry.
2. Enter 192.168.0.10 in the corresponding field, select "TCP"
and then check "Enable” as seen below.
3. Click "Save" to save your settings.
Now, your friends only need to enter ftp://xxx.xxx.xxx.xxx:21 in
their browsers to access your FTP server. xxx.xxx.xxx.xxx is the
63
Page 65

Wireless AC1750 Dual-band Gigabit Router
router's WAN IP address. Assuming it is 172.16.102.89, then
your friends need to enter "ftp://172.16.102.89: 21" in their
browsers.
Note:
If you include port 80 on this section, you must set the port for
remote (web-based) management to a different number than 80,
such as 8080, otherwise the virtual server feature may not take
effect.
6.2 DMZ
In some cases such as playing Internet games or holding video
conferences, you may need to have your computer completely
exposed to external networks for implementation of a
bidirectional communication. To do so, set it as a DMZ host. Note
that you should assign a static IP address to the PC designated
as a DMZ host (DHCP Server> DHCP Client List> DHCP
Reservation) before using the feature.
DMZ Host IP address: Enter the IP address of a computer
64
Page 66

Wireless AC1750 Dual-band Gigabit Router
on your LAN which you want to set as a DMZ host. The DMZ
host should be connected to a LAN port on the Device.
Enable: Check/uncheck to enable/disable the DMZ host
feature.
Note:
1. Once enabled, the DMZ host will no longer be protected by
device's firewall and thus may become vulnerable to attacks.
2. Users on WAN access the DMZ host through a corresponding
WAN IP address.
6.3 UPnP
UPnP (Universal Plug and Play) allows a network device to
discover and connect to other devices on the network. With this
feature enabled, hosts in LAN can request the device to perform
special port forwarding so as to enable external hosts to access
resources on internal hosts.
Enable UPnP: Check/uncheck to enable/disable the UPnP
feature.
UPnP Mapping List: Displays info of external/internal port,
65
Page 67

Wireless AC1750 Dual-band Gigabit Router
private (internal) IP, protocol and description, etc.
Note:
Note: UPnP works in Windows XP, Windows ME or later
(NOTE: Operational system needs to be integrated with or
installed with Directx 9.0) or in an environment with installed
application software that supports UPnP.
6.4 DDNS
Dynamic DNS or DDNS is a term used for the updating in real
time of Internet Domain Name System (DNS) name servers. We
use a numeric IP address allocated by Internet Service Provider
(ISP) to connect to Internet; the address may either be stable
("static"), or may change from one session on the Internet to the
next ("dynamic"). However, a numeric address is inconvenient to
remember; an address which changes unpredictably makes
connection impossible. The DDNS provider allocates a static
host name to the user; whenever the user is allocated a new IP
address this is communicated to the DDNS provider by software
running on a computer or network device at that address; the
provider distributes the association between the host name and
the address to the Internet's DNS servers so that they may
resolve DNS queries. Thus, uninterrupted access to devices and
services whose numeric IP address may change is maintained.
66
Page 68

Wireless AC1750 Dual-band Gigabit Router
DDNS Settings: Enable/Disable the DDNS feature.
DDNS Server Provider: Select your DDNS service provider
from the drop-down menu.
User Name: Enter the DDNS user name registered with your
DDNS service provider.
Password: Enter the DDNS Password registered with your
DDNS service provider.
Domain Name: Enter the DDNS domain name with your
DDNS service provider.
Connection Status: Displays current status of connection
with the DDNS server.
Click "Save" to save your settings.
For example: If you have registered a DDNS service from
no-ip.com for a web server on the host at 192.168.0.10 and get
67
Page 69

Wireless AC1750 Dual-band Gigabit Router
User Name
Tenda
Password
123456
Domain Name
tenda.zapto.org
below info:
First set a mapping rule on Virtual Server interface (For details,
see Virtual Server section) and then enter the registered user
name, password and domain name as shown below:
Click Save to save the settings. Simply input
"http://tenda.zapto.org" in a launched web browser and your web
server will be accessible.
68
Page 70

Wireless AC1750 Dual-band Gigabit Router
6.5 Routing
This section displays the routing table content.
6.6 Static Routing
Use this section to customize static routes of data through your
network.
Destination Network: The IP address of a destination
network.
Subnet Mask: The Subnet Mask that corresponds to the
specified destination IP address.
Gateway: The IP address for next hop.
69
Page 71

Wireless AC1750 Dual-band Gigabit Router
6.7 Bandwidth Settings
To better manage bandwidth allocation and optimize network
performance, use the Bandwidth Control feature.
Enable the bandwidth control feature, click Add and below
screen will appear:
Enable: Check/uncheck to enable/disable current entry.
When disabled, corresponding entry will not take effect
though existing in fact.
IP Range: Enter a single IP or an IP range.
Upstream Bandwidth Limit: Max uplink traffic.
70
Page 72

Wireless AC1750 Dual-band Gigabit Router
Downstream Bandwidth Limit: Max downlink traffic.
P2P Download Control: Regulates P2P download rate to
ensure each user a guaranteed share of bandwidth.
Allocation Mode: Select either "Individual (Each member of
the IP range shall utilize the allocated bandwidth
individually)" or "Collective (All members of the IP range
shall share the allocated bandwidth collectively)";
Allocation Policy: Select either "Utilize only the allocated
bandwidth" or "Utilize more bandwidth if available".
Description: Briefly describe the current rule.
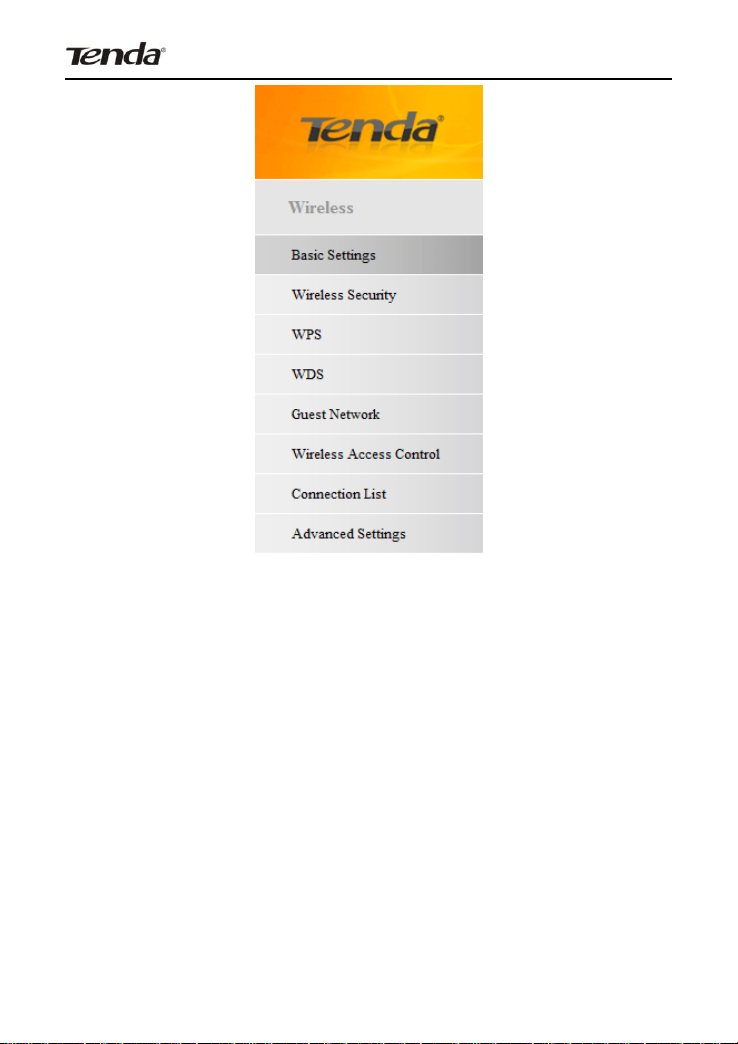
CHAPTER 7 WIRELESS SETTINGS
The "Wireless" tab includes 8 submenus: Basic Settings,
Wireless Security, WPS, WDS, Guest Network, Wireless Access
Control, Connection List and Advanced Settings. Clicking any of
them enters corresponding interface for configuration. Below
explains, in details, each such feature.
71
Page 73
Wireless AC1750 Dual-band Gigabit Router
7.1 Basic Settings
This section allows you to manage your wireless network
(2.4G or 5G). You can select your country (Unavailable for 5G
wireless network), config wireless network name (SSID), network
mode and channel settings, etc the way you want.
Basic Settings--2.4G
72
Page 74

Wireless AC1750 Dual-band Gigabit Router
Select 2.4G Basic Settings or 5GHz Basic Settings to
configure basic settings on corresponding band.
Country: Select your country from the drop-down list. There
are 11 options available.
2.4GHz Wireless Network: Check/uncheck to enable/disable
the 2.4GHz wireless feature. If disabled, all 2.4GHz-based
features will be disabled accordingly.
SSID Broadcast: This option is enabled By default. Select
“Enable”/“Disable” to make your wireless network visible/
invisible to any wireless clients within coverage when they
perform a scan to see what’s available. When disabled,
73
Page 75

Wireless AC1750 Dual-band Gigabit Router
wireless clients will have to first know this SSID and
manually enter it on their devices if they want to connect to
the SSID.
SSID: A SSID (Service Set Identifier) is the unique name of
a wireless network.
802.11 Mode: Select a right mode according to your wireless
client. The default mode is 11b/g/n mixed.
Channel: For an optimal wireless performance, you may
select the least interferential channel. It is advisable that you
select an unused channel or “Auto” to let device detect and
select the best possible channel for your wireless network to
operate on from the drop-down list.
Channel Bandwidth: Select a proper channel bandwidth to
enhance wireless performance. When there are 11b/g and
11n wireless clients, please select the 802.11n mode of
20/40M frequency band; when there are only non-11n
wireless clients, select 20M frequency band mode; when the
wireless network mode is 11n mode, please select 20/40
frequency band to boost its throughput.
Extension Channel:Available only in 11b/g/n mixed mode.
WMM Capable: WMM is QoS for your wireless network.
Enabling this option may better stream wireless multimedia
data (such as video or audio).
ASPD Capable:Select to enable/disable the auto power
74
Page 76

Wireless AC1750 Dual-band Gigabit Router
saving mode.
Basic Settings--5G
Select 2.4G Basic Settings or 5GHz Basic Settings to
configure basic settings on corresponding band.
5GHz Wireless Network: Check/uncheck to enable/disable
the 5GHz wireless feature. If disabled, all 5GHz-based
features will be disabled accordingly.
SSID Broadcast: This option is enabled By default. Select
“Enable”/“Disable” to make your wireless network visible/
invisible to any wireless clients within coverage when they
perform a scan to see what’s available. When disabled,
wireless clients will have to first know this SSID and
75
Page 77

Wireless AC1750 Dual-band Gigabit Router
manually enter it on their devices if they want to connect to
the SSID.
SSID: A SSID (Service Set Identifier) is the unique name of
a wireless network; it is configurable.
802.11 Mode: Select a right mode according to your wireless
client. The default mode is 11a/n.
Channel: For an optimal wireless performance, you may
select the least interferential channel. It is advisable that you
select an unused channel or “Auto” to let device detect and
select the best possible channel for your wireless network to
operate on from the drop-down list.
Channel Bandwidth: Select a proper channel bandwidth to
enhance wireless performance. For best throughput, 80MHz
is recommended.
WMM Capable: WMM is QoS for your wireless network.
Enabling this option may better stream wireless multimedia
data (such as video or audio).
ASPD Capable: Select to enable/disable the auto power
saving mode. By default, this option is disabled.
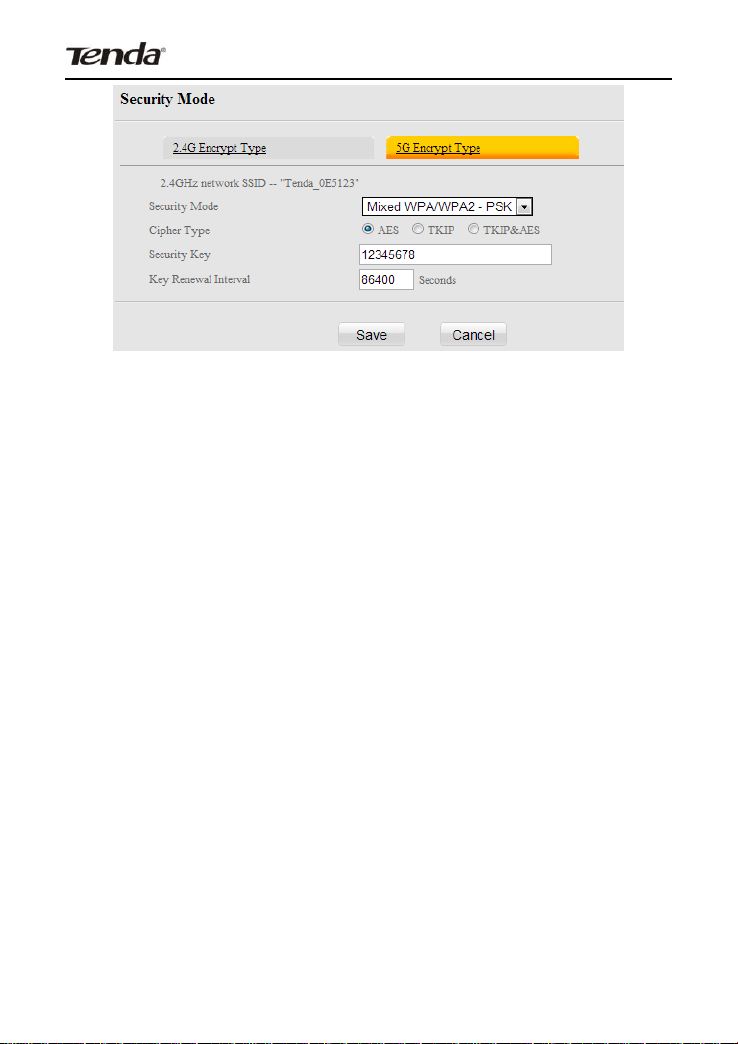
7.2 Wireless Security
This section allows you to encrypt your wireless network to block
unauthorized accesses and malicious packet sniffing.
The security feature applies to both 2.4GHz wireless and 5GHz
76
Page 78

Wireless AC1750 Dual-band Gigabit Router
wireless networks. Depending on which band your wireless
network is operating on, select the right option: 2.4G or 5G.
Six security modes are available: None (Disable), Open, Shared
and WPA-PSK, WPA2-PSK and Mixed WPA-PSK/WPA2-PSK.
1、 Open
WEP is intended to provide data confidentiality comparable to
that of a traditional wired network.
Security Mode: Select a proper security mode from the
drop-down list.
Default Key: Select a key from the preset keys 1-4 for
77
Page 79

Wireless AC1750 Dual-band Gigabit Router
current use.
2、 Shared
WEP is intended to provide data confidentiality comparable to
that of a traditional wired network.
Security Mode: Select a proper security mode from the
drop-down list.
Encrypt Type: WEP by default.
Default Key: Select a key from the preset keys 1-4 for
current use.
3、WPA-PSK
The WPA protocol implements the majority of the IEEE
802.11i standard. It enhances data encryption through the
Temporal Key Integrity Protocol (TKIP) which is a 128-bit
per-packet key, meaning that it dynamically generates a new key
for each packet. WPA also includes a message integrity check
feature to prevent data packets from being hampered with. Only
78
Page 80
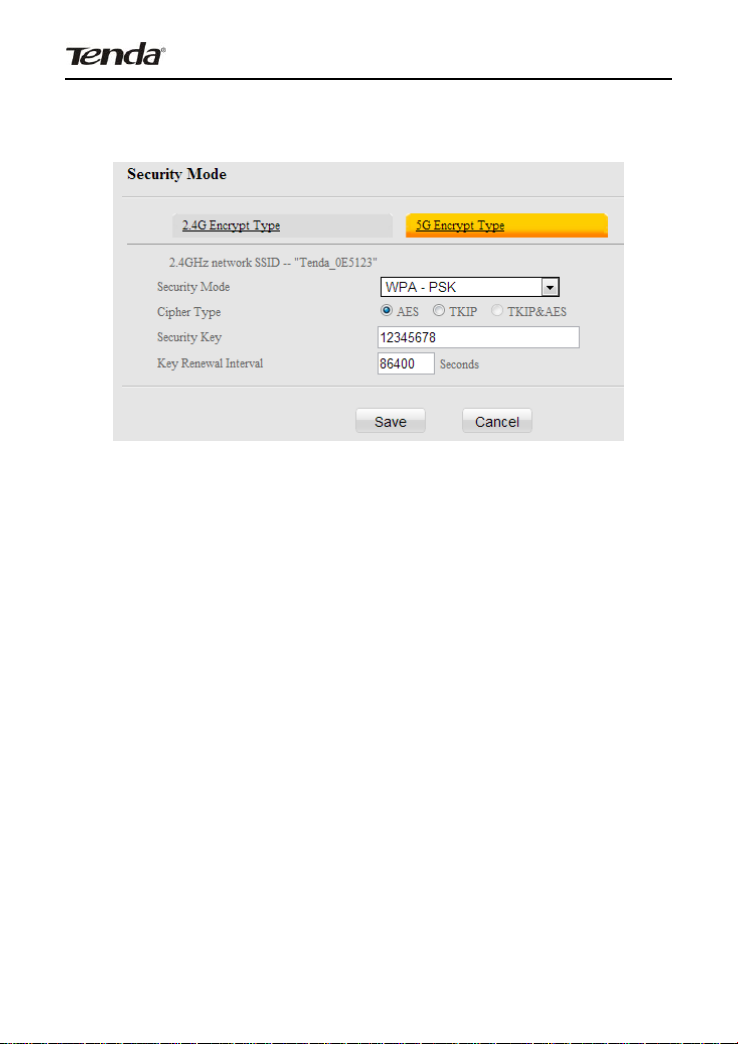
Wireless AC1750 Dual-band Gigabit Router
authorized network users can access the wireless network. WPA
adopts enhanced encryption algorithm over WEP.
Security Mode: Select a proper security mode from the
drop-down list.
Cipher Type: Select AES (advanced encryption standard) or
TKIP (temporary key integrity protocol) &AES.
Security Key: Enter a security key, which must be between
8-63 ASCII characters long.
Key Renewal Interval: Enter a valid time period for the key.
4、WPA2-PSK
WPA2 is based on 802.11i and uses Advanced Encryption
Standard (AES) instead of TKIP. It is more secured than WPA
and WEP.
79
Page 81

Wireless AC1750 Dual-band Gigabit Router
Security Mode: Select a proper security mode from the
drop-down list.
Cipher Type: Select AES (advanced encryption standard) or
TKIP (temporary key integrity protocol) &AES.
Security Key: Enter a security key, which must be between
8-63 ASCII characters long.
Key Renewal Interval: Enter a valid time period for the key.
3、Mixed WPA/WPA2-PSK
Mixed WPA/WPA2-PSK provides both WPA-PSK
WPA2-PSK security modes with AES, TKIP and TKIP&AES
cipher types.
80
Page 82
Wireless AC1750 Dual-band Gigabit Router
Security Mode: Select a proper security mode from the
drop-down list.
Cipher Type: Select AES (advanced encryption standard),
TKIP or TKIP (temporary key integrity protocol) &AES.
Security Key: Enter a security key, which must be between
8-63 ASCII characters long.
Key Renewal Interval: Enter a valid time period for the key.
7.3 WPS
Wi-Fi Protected Setup makes it easy for home users who know
little of wireless security to establish a secure wireless home
network, as well as to add new devices to an existing network
without entering long passphrases or configuring complicated
settings. Simply enter a PIN code or press the software PBC
button or hardware WPS button (if any) and a secure wireless
connection is established.
81
Page 83

Wireless AC1750 Dual-band Gigabit Router
Enable WPS: Select to enable/disable the WPS encryption.
WPS Mode: Select PBC (Push-Button Configuration) or PIN.
Reset OOB: When clicked, the WPS LED turns off; WPS
function will be disabled automatically; WPS server on the
Router enters idle mode and will not respond to client’s WPS
connection request.
Operation Instructions:
PBC: (Before you start the following operations, make sure you
have enabled the WPS feature on the device from the web utility.)
Press the hardware WPS button on the device for 1 second and
if the WPS LED keeps blinking for about 2 minutes, it indicates
that PBC encryption mode is successfully enabled. And an
authentication will be performed between your device and the
other WPS/PBC-enabled wireless client during this time; if it
succeeds, the wireless client connects to your device, and the
WPS LED turns off. Repeat steps mentioned above if you want to
add more wireless clients to the device.
PIN: To use this option, you must know the PIN code from the
82
Page 84
Wireless AC1750 Dual-band Gigabit Router
wireless client and enter it in the corresponding field on your
device while using the same PIN code on client side for such
connection.
Note: To use the WPS encryption, the wireless adapter must
be WPS-capable. The PIN code can be found on the label
attached to device.
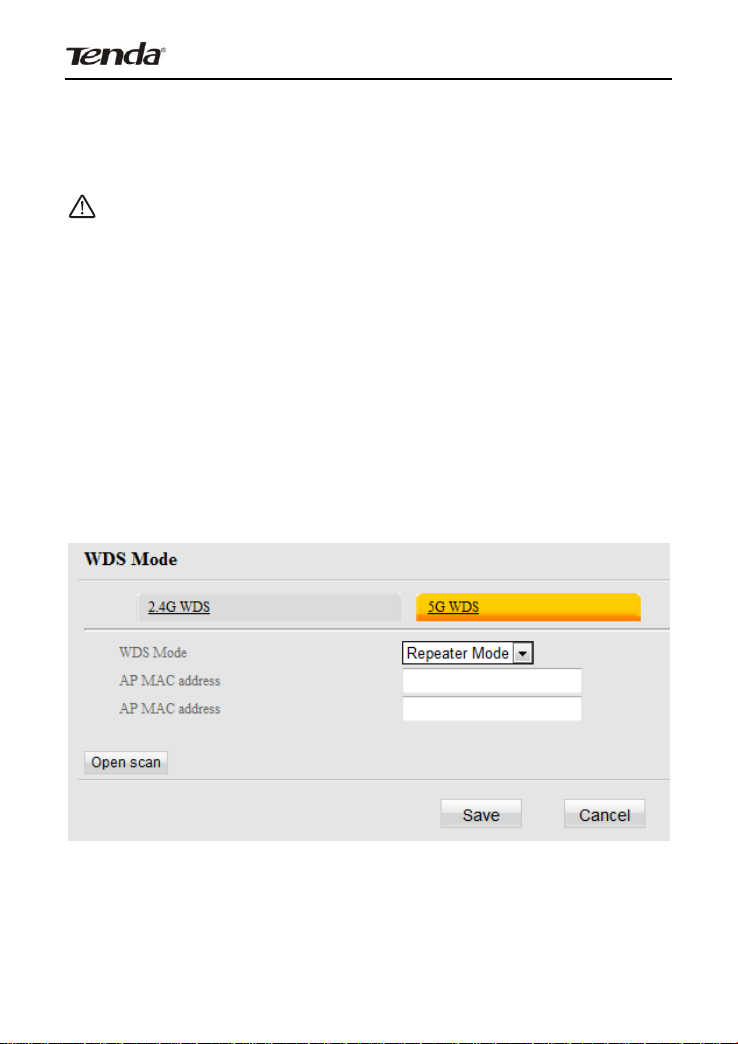
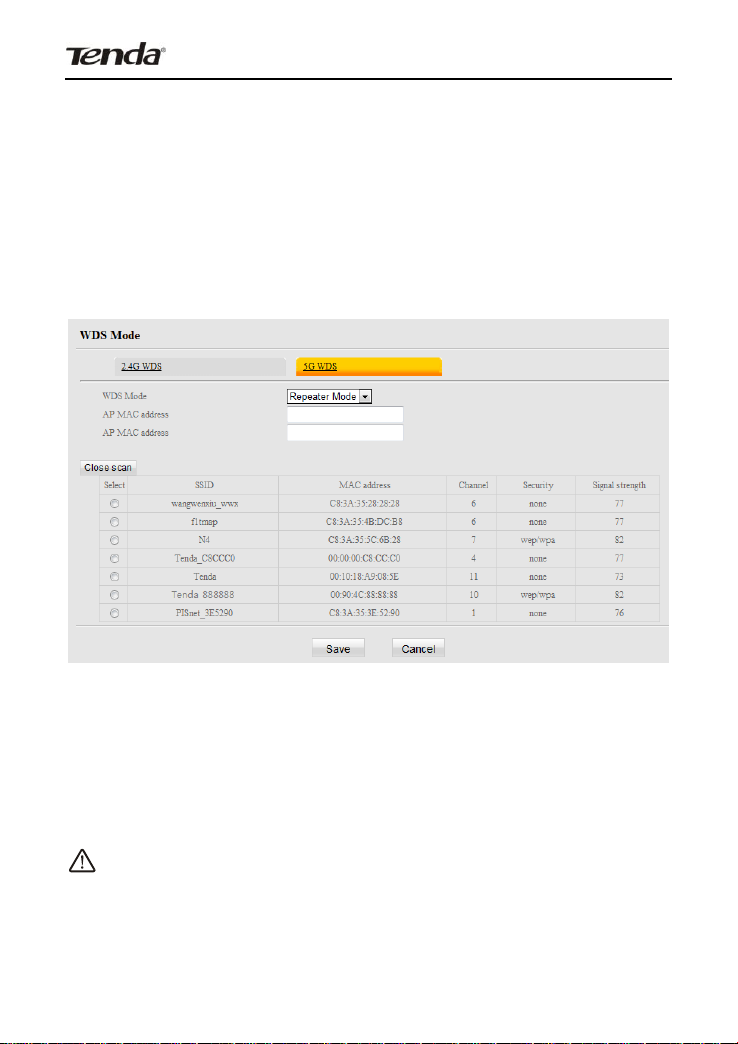
7.4 WDS
WDS (Wireless Distribution System) feature can be used to
extend your existing 2.4G or 5G wireless network coverage.
Here we present you how to config such feature in 2.4GHz,
which also applies to 5GHz.
Select 2.4G WDS or 5G WDS.
WDS Mode: Select Disable or Repeater Mode.
AP MAC address: Displays the MAC address of the router
83
Page 85
Wireless AC1750 Dual-band Gigabit Router
that is successfully bridged.
For example: select Repeater Mode and click Open Scan to scan
all available wireless networks (To ensure that both devices
involved communicate through the same channel, set the
channel to "Auto" before scanning.).
Simply check the wireless network you want to connect to. After
successfully completing settings on the Device, repeat above
operations on the other device. When the two devices added
each other's MAC address, the WDS may be implemented
successfully.
Note:
1. WDS feature can only be implemented between 2
WDS-capable wireless devices. Plus, SSID, channel, security
84
Page 86

Wireless AC1750 Dual-band Gigabit Router
settings and security key must be exactly the same on both such
devices.
Note that you may need to change one of the router's LAN IP to
avoid an IP address collision. It is advisable to disable the DHCP
server on either of the two routers involved.
7.5 Guest Network
The Guest Network feature allows guests to access Internet and
other users on the guest network while disallowing them to
access Device web manager, users on master network and
clients behind the LAN ports. Thus the wireless master network
is secured. You can find the guest network available in both 2.4G
and 5G networks. Here we present you how to config such
feature on 2.4GHz band, which also applies to 5GHz.
85
Page 87

Wireless AC1750 Dual-band Gigabit Router
Select 2.4GHz or 5GHz Guest Network.
Guest Network: Select to enable/disable the guest network
feature.
SSID Broadcast: This option is enabled By default. Select
“Enable”/“Disable” to make your wireless network visible/
invisible to any wireless clients within coverage when they
perform a scan to see what’s available. When disabled,
wireless clients will have to first know this SSID and
manually enter it on their devices if they want to connect to
the SSID.
AP Isolation: If enabled, clients connecting to the guest
network will be mutually inaccessible.
SSID :A SSID (Service Set Identifier) is the unique name
of a wireless network.
Security Mode: Select a proper security mode to encrypt the
guest network. For details, see section 7.2 hereof.
7.6 Wireless Access Control
The MAC-based Wireless Access Control feature can be used to
allow or disallow clients to connect to your 2.4G or 5G wireless
network. Here we present you how to config such feature in
2.4GHz band, which also applies to 5GHz network.
86
Page 88

Wireless AC1750 Dual-band Gigabit Router
Filter Mode:
Allow Access to Wireless Network: Allow only PCs at
specified MAC addresses to connect to your wireless
network.
Deny Access to Wireless Network: Block only PCs at
specified MAC addresses from connecting to your wireless
network.
MAC address: Specify the MAC address that is to be filtered
out.
Add: Click to add specified MAC address to the MAC list.
Example: To allow only the PC at the MAC address of
00:E8:C8:A4:56:75 to connect to your wireless network, do as
follows:
87
Page 89

Wireless AC1750 Dual-band Gigabit Router
A. Enter 00:E8:C8:A4:56:75 in the MAC address field and then
click Add.
B. The MAC address will then be displayed in the MAC list. Now
click the Save button.
7.7 Connection List
This interface displays the information of currently connected
wireless clients (if any).
7.8 Advanced Settings
This section allows you to config advanced settings, including AP
Isolation, Beacon interval,Fragment threshold,RTS threshold
88
Page 90

Wireless AC1750 Dual-band Gigabit Router
and DTIM interval, etc, for both 2.4G and 5G wireless networks.
AP Isolation: Isolates clients connecting to master SSID.
Beacon Interval: A time interval between any 2 consecutive
Beacon packets sent by an Access Point to synchronize a
wireless network. Do NOT change the default value of 100
unless necessary.
Fragment Threshold: Specify a Fragment Threshold value.
Any wireless packet exceeding the preset value will be
divided into several fragments before transmission. DO NOT
change the default value of 2346 unless necessary.
RTS Threshold: If a packet exceeds such set value,
RTS/CTS scheme will be used to reduce collisions. Set it to
a smaller value provided that there are distant clients and
interference. For normal SOHO, it is recommended to keep
the default value unchanged; otherwise, device performance
may be degraded.
89
Page 91

Wireless AC1750 Dual-band Gigabit Router
DTIM Interval: A DTIM (Delivery Traffic Indication Message)
Interval is a countdown informing clients of the next window
for listening to broadcast and multicast messages. When
such packets arrive at device’s buffer, the device will send
DTIM (delivery traffic indication message) and DTIM interval
to wake clients up for receiving these packets.
CHAPTER 8 USB
The Router provides two USB interfaces for USB device
connection. The "USB" tab includes three submenus: "USB
Storage" "USB Printer" and DLNA.
8.1 USB Storage
The storage sharing feature allows you to share files on the
storage device attached to the Device.
90
Page 92

Wireless AC1750 Dual-band Gigabit Router
Enable: Check/uncheck to enable/disable storage sharing
feature.
Device Name: Define a meaningful name to you for the
device.
Workgroup: Define a work group name for the device.
Add: Click to add a user account. Up to 5 accounts can be
added.
Edit: Click to edit an existing account.
Delete: Click to delete an existing account.
Operation Instructions:
Before sharing files on a USB storage device, you must create a
user account.
1. Create account:
1). Click “Add” to display a dialogue box as seen below:
91
Page 93

Wireless AC1750 Dual-band Gigabit Router
2) a. Enter a user name and a password, which will be used to
authenticate users trying to access the USB storage device for
sharing files. b. Re-type to confirm password. Click the “OK”
button and below screen will appear:
2. Set Access Right
Select a desired account, click Disk and select sda1 or sdb1.
Select a proper access right:
Read/Write:The right to Read and Write.
Read: The right to Read.
92
Page 94

Wireless AC1750 Dual-band Gigabit Router
No right: No right to share corresponding file.
Click “Save” to apply all settings.
3. Access shared file
To access resources on such storage device, double click “My
Computer” on your PC and enter \\192.168.0.1.
8.2 USB Printing
The USB printing service allows you to connect a USB printer to
the device and thus all clients on your network can print anything
they want on their PCs. The Router can identify a printer
automatically as long as it is successfully connected.
93
Page 95

Wireless AC1750 Dual-band Gigabit Router
Enable Printer: Check/uncheck to enable/disable USB printing
service.
Operation Instructions:
1. Correctly connect your USB printer to the USB port on the
device.
2. Enable Printing Service
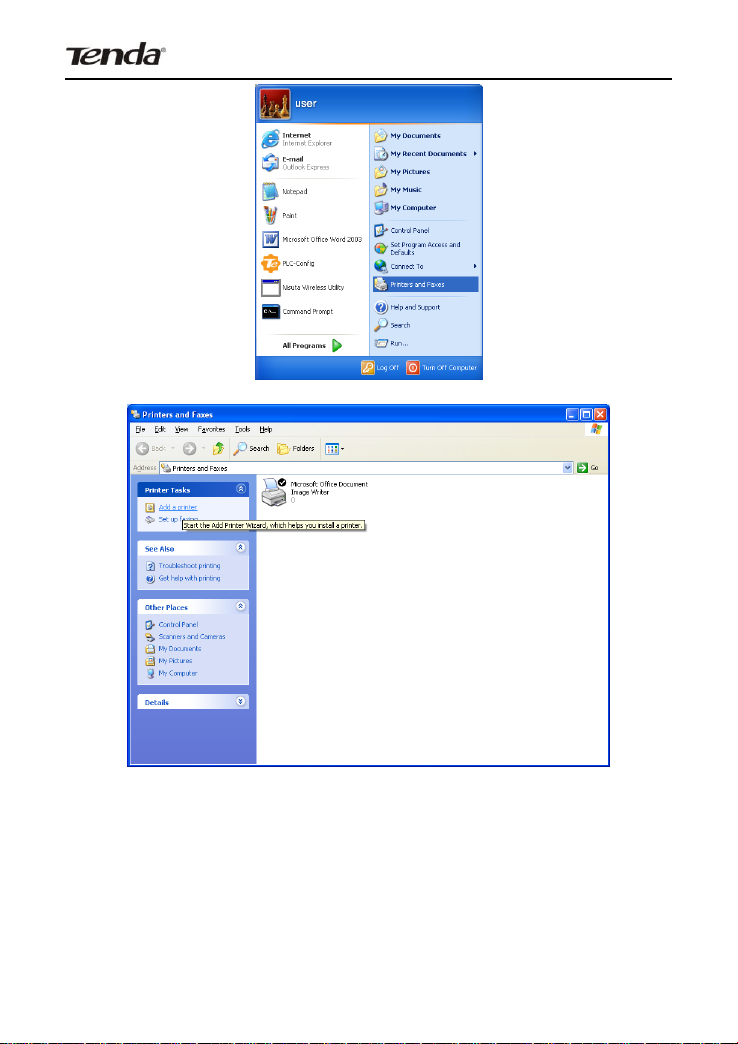
3. On your PC (connected to the device), click
“Start”——“Settings”——“Printers and Faxes” and select “Add a
printer” on appearing window.
94
Page 96
Wireless AC1750 Dual-band Gigabit Router
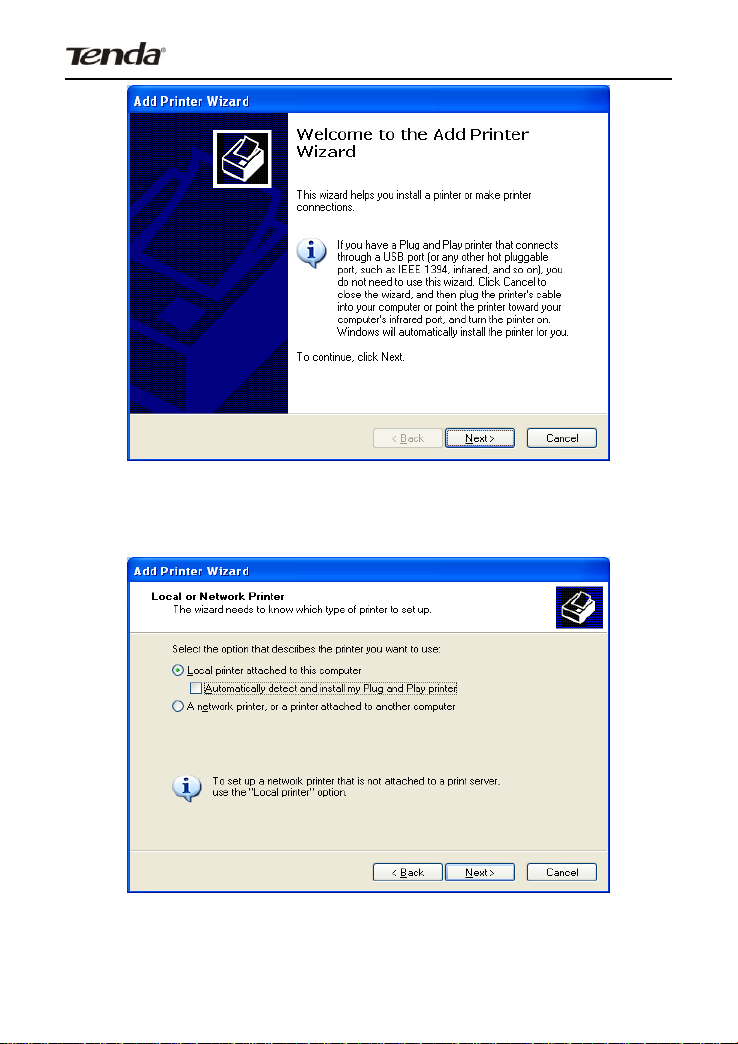
4. Click “Next”.
95
Page 97
Wireless AC1750 Dual-band Gigabit Router
5. Select “Local printer attached to this computer” and click
“”Next.
6. Select “Create a new port”, Type of port: “Standard TCP/IP
96
Page 98

Wireless AC1750 Dual-band Gigabit Router
Port” and click “Next”.
7. Click “Next”.
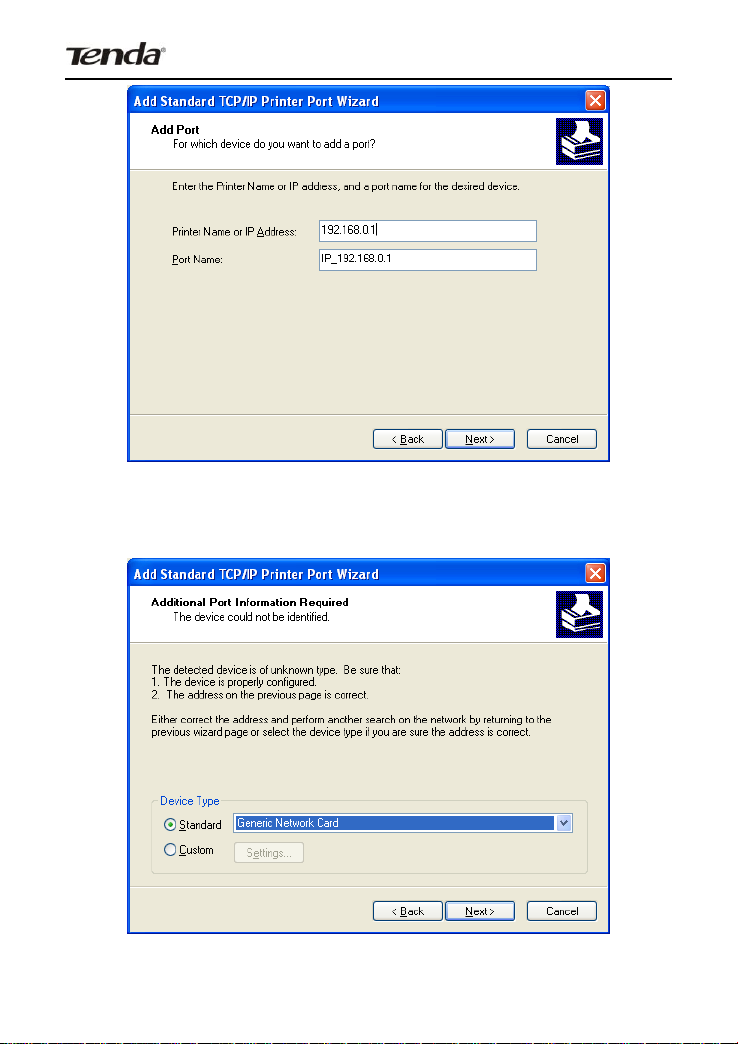
8. Enter Router’s LAN IP address and click “Next”.
97
Page 99
Wireless AC1750 Dual-band Gigabit Router
9. Click “Standard” under Device Type and select “Generic
Network Card”, then click “Next”.
98
Page 100

Wireless AC1750 Dual-band Gigabit Router
10. Click “Finish”.
11. Select “Have Disk”.
99
 Loading...