

Page 1

TEMPUR‑Up™ Foundation
Complete Reference Guide
Patents pending
© 2014 Tempur-Pedic Management, LLC. All Rights Reserved.
TUF-100-04 2014/02/01
Page 2

TEMPUR‑Up™ Foundation
Table of Contents
SAFETY PRECAUTIONS .................................................................................................... 3
COMMONLY ASKED QUESTIONS AND ANSWERS ............................................................. 7
SPECIFICATIONS .............................................................................................................. 8
INSTALLATION
Installation Instructions ........................................................................................... 9
Pre-Delivery Procedure .......................................................................................... 10
Delivery Procedure ................................................................................................. 11
Joining Two Foundations ........................................................................................ 13
OPERATION
Wired Remote Control Features ............................................................................. 14
Operating Instructions ............................................................................................ 15
SPECIAL FUNCTIONS
Emergency Power-Down ........................................................................................ 16
Change from Tandem System to Single System ...................................................... 16
TROUBLESHOOTING ...................................................................................................... 17
Operating electronics and
motors are UL-approved
CUSTOMER SERVICE: 1–800–887–4321CUSTOMER SERVICE: 1–800–887–4321
2
2
Page 3

Safety Precautions
Safety Precautions
WARNING!
IMPORTANT SAFETY
INSTRUCTIONS.
PLEASE
READ THESE
INSTRUCTIONS
THOROUGHLY BEFORE
USING THIS PRODUCT.
SAVE THESE INSTRUCTIONS!
The TEMPUR-Up™ Foundation has been designed to
provide you with the reliable operation and durability
you expect. This product has been inspected and
tested prior to shipment.
When using an electrical furnishing, basic precautions
should always be followed, including the following:
READ ALL INSTRUCTIONS BEFORE USING YOUR
TEMPUR‑UP FOUNDATION.
DANGER
To reduce the risk of electric shock:
• Always unplug this furnishing from the electrical
outlet before cleaning.
WARNING!
To reduce the risk of burns, re, electric shock, or injury
to persons:
• Unplug from outlet before putting on or taking off parts.
• Close supervision is necessary when this furnishing is
used by, or near children, invalids, or disabled persons.
• Use this furnishing only for its intended use
as described in these instructions. Do not use
attachments not recommended by the manufacturer.
• Never operate this furnishing if it has a damaged cord
or plug, is not working properly, has been dropped or
damaged, or dropped in water. Return the furnishing to a
service center for examination and repair.
• Keep the cord away from heated surfaces.
• Never operate the furnishing with the air openings blocked.
Keep the air openings free of lint, hair and the like.
• Never drop or insert any object into any opening.
• Do not use outdoors.
• Do not operate where aerosol (spray) products are
being used or where oxygen is being administered.
• To disconnect, turn all controls to the off position,
then remove plug from outlet.
WARNING!
Risk of Injury — keep children away from extended
head support (or other similar parts).
CUSTOMER SERVICE: 1–800–887–4321
3
Page 4

SAVE THESE
INSTRUCTIONS!
GROUNDING SAFETY
SERVICING OF DOUBLE-INSULATED PRODUCTS
In a double-insulated product, two systems of insulation
are provided instead of grounding. No grounding
means is provided on a double-insulated product, nor
is a means for grounding to be added to the product.
Servicing a double-insulated product requires extreme
care and knowledge of the system, and is to be done
only by qualied service personnel. Replacement parts
for a double-insulated product must be identical to
the parts they replace. A double-insulated product is
marked with the words “DOUBLE INSULATION” or
“DOUBLE INSULATED”. The symbol (square within a
square) is also to be marked on the product.
Unauthorized modifications could void the electrical
portion of your warranty.
TEMPUR‑Up™ Foundation
FOR BEST RESULTS, THE TEMPUR‑UP™
FOUNDATION SHOULD BE PLUGGED INTO A
SURGE PROTECTOR (not included).
WARRANTY PRECAUTION!
Do not open control box, motors or remote control
(with the exception of the battery compartments). The
warranty is void if these units are tampered with. Any
repair or replacement of TEMPUR-Up Foundation parts
must be performed by an authorized service person.
IN-HOME USE AND HOSPITAL DISCLAIMER
Your TEMPUR-Up Foundation is strictly designed for
in‑home use only. It is NOT designed for hospital
use and is NOT designed to meet hospital standards.
DO NOT USE this bed with TENT TYPE oxygen
therapy equipment or near explosive gases.
WARNING!
FOR HOUSEHOLD / RESIDENTIAL USE ONLY. DO NOT
USE OUTDOORS.
CAUTION!
Risk of electric shock. Dry location use only.
CUSTOMER SERVICE: 1–800–887–4321
4
Page 5

IMPORTANT SAFETY FEATURES
Use this furnishing only for its intended use as
described in these instructions. Do not use attachments
not recommended by the manufacturer.
If there is an overload weight condition on the head
mechanism, the control unit will automatically stop the
corresponding functions. Once the excess weight is
removed, the control unit will automatically allow all
functions to resume.
Legs and locking casters are available for aftermarket
purchase. In order to prevent the movement of this
product with casters, all four casters should be in the
locked position. This can be accomplished by pushing
down the locking latch on the caster. To resume mobility
of the product, lift the locking latch up. You are strongly
encouraged to place rubber caster cups or carpet
squares under the casters in addition to locking them in
place if the product is positioned on a hard surface oor
such as hardwood, tile or linoleum. Although the casters
are locked and will not roll, they may slide.
USER-SERVICEABLE PARTS
This product is specically designed to be
maintenance-free for the user. Therefore, you are
encouraged not to open any motors, alter the wiring,
or adjust, modify or change the structure of the
product, as it will void the warranty.
Safety Precautions
SMALL CHILDREN AND
PETS WARNING
After the TEMPUR-Up™ Foundation has been unboxed,
immediately dispose of packaging as it can smother
small children and pets. To avoid injury, children and
pets should not be allowed to play on or under the
bed. Children should not operate this product without
adult supervision. Close supervision is necessary when
this furnishing is used by, or near children, invalids, or
disabled persons.
SAVE THESE INSTRUCTIONS!
Your TEMPUR‑Up Foundation has been designed to
provide you with the reliable operation and durability
you expect. This product has been inspected and
tested prior to shipment.
SERVICE REQUIREMENTS
Service technicians are not responsible for moving
furniture, removing headboards and footboards or
any items required to perform maintenance on your
TEMPUR-Up Foundation. In the event the technician is
unable to perform service due to lack of accessibility, the
service call will be billed to the purchaser and the service
will be re-scheduled.
POWER RATINGS:
MODEL NO: TUF-100
INPUT: AC 120V VAC, 60 HZ, 3 A MAX
OUTPUT: DC 24V – 1.5A
CONTROL ACCUATOR: 1
CUSTOMER SERVICE: 1–800–887–4321
5
Page 6

TEMPUR‑Up™ Foundation
PRODUCT RATINGS
The lift motor in the TEMPUR-Up™ Foundation is NOT
designed for continuous use. Reliable operation and
full life expectancy will be attained as long as the lift
motor does not operate more than two (2) minutes
over a 20-minute period, or approximately 10% duty
cycle. Any attempt to circumvent or exceed this rating
will shorten the life expectancy of this product and
may void the warranty. The recommended weight
restrictions on our TEMPUR-Up Foundations are as
follows: Twin Long, Double, and Queen foundations
– up to 650 lbs each. This TEMPUR-Up Foundation
will structurally support the recommended weight
distributed evenly across the the entire length of the
foundation. This product is not designed to support or
lift this amount of weight in the head section alone.
NOTE: Exceeding the recommended weight
restrictions could damage your TEMPUR‑Up
Foundation and void your warranty.
For best performance, you should enter and exit the
TEMPUR-Up Foundation while it is in the at or fully
lowered position.
INTENDED USAGE
The electric adjustable bed should be installed with
the head of the frame positioned close to a wall.
CUSTOMER SERVICE: 1–800–887–4321
6
Page 7

Questions and Answers
Commonly asked Questions and Answers
WHAT IS THE HEIGHT OF THE TEMPUR-UP™
FOUNDATION?
The TEMPUR-Up Foundation arrives ready to place
within a standard bedframe. The total height will vary
based on your bedframe. The height of the foundation
alone is 9 inches.
IS IT POSSIBLE TO RAISE THE HEIGHT OF THE
TEMPUR-UP FOUNDATION?
Legs and/or casters can be attached to the Tempur-Up
Foundation by using leg brackets in conjunction with
leg and/or caster sets. Brackets, legs, and casters are
available for purchase from Tempur-Pedic. The leg
height of the TEMPUR-Up Foundation ranges from
approximately 3 ¼" to 11 ½". See the chart on page 8
for available options.
DOES THE TEMPUR-UP FOUNDATION COME WITH
HEADBOARD OR FOOTBOARD ATTACHMENTS?
No, you cannot attach a headboard or footboard
directly to the TEMPUR-Up Foundation. However, you
can use a “freestanding” bed including headboard,
footboard and side rails by placing the complete
TEMPUR-Up Foundation within the assembled
bed. The TEMPUR-Up Foundation can be used in
conjunction with bed slats. You should measure the
inside dimensions of the assembled bed to be sure the
foundation will t. It may be easiest to assemble the
bed around the foundation. One of our riser leg sets
may be required in some cases.
WILL THE TEMPUR-UP FOUNDATION FIT INSIDE
EXISTING FURNITURE?
The TEMPUR-Up Foundation is designed to t into
most “freestanding” beds. We always recommend you
measure the inside dimensions of the assembled bed
to be sure the TEMPUR-Up Foundation will t. Please
refer to the specications on page 8 for dimensions
of the foundation. One of our aftermarket riser leg sets
may be required in some cases. The TEMPUR-Up
Foundation can be used in conjunction with bed slats.
WHERE IS THE SERIAL NUMBER ON THE TEMPUR-UP
FOUNDATION?
The serial number can be found in two locations of the
foundation — on the back of the right side of the head
section (visible when the head section is raised), and on
the law tag attached to the foot section.
DOES THE UNIT HAVE AC OR DC MOTORS?
The lift motors used on the TEMPUR-Up Foundation
are DC motors. The foundation’s power supply converts
the AC power from the wall outlet to DC power.
WHO DO I CALL FOR SERVICE OR SUPPORT IF NEEDED?
Service and technical support are available by calling our
dedicated customer service group at 1-800-887-4321.
An owner’s manual is included with each foundation
including other information for making claims.
IS AN EXTENDED WARRANTY AVAILABLE?
No.
DO I GET A FULL WARRANTY IF I PURCHASE A FLOOR
MODEL?
Yes. However, your warranty start date is the date of
manufacture which is clearly marked on the law tag
attached to the foundation (not your actual purchase
date).
WHAT ARE THE ELECTRICAL REQUIREMENTS OF THE
TEMPUR-UP FOUNDATION?
During normal operation, the foundation can draw up to
3 A of electricity from a normal AC wall outlet.
CUSTOMER SERVICE: 1–800–887–4321
7
Page 8
TEMPUR‑Up™ Foundation
Specifications
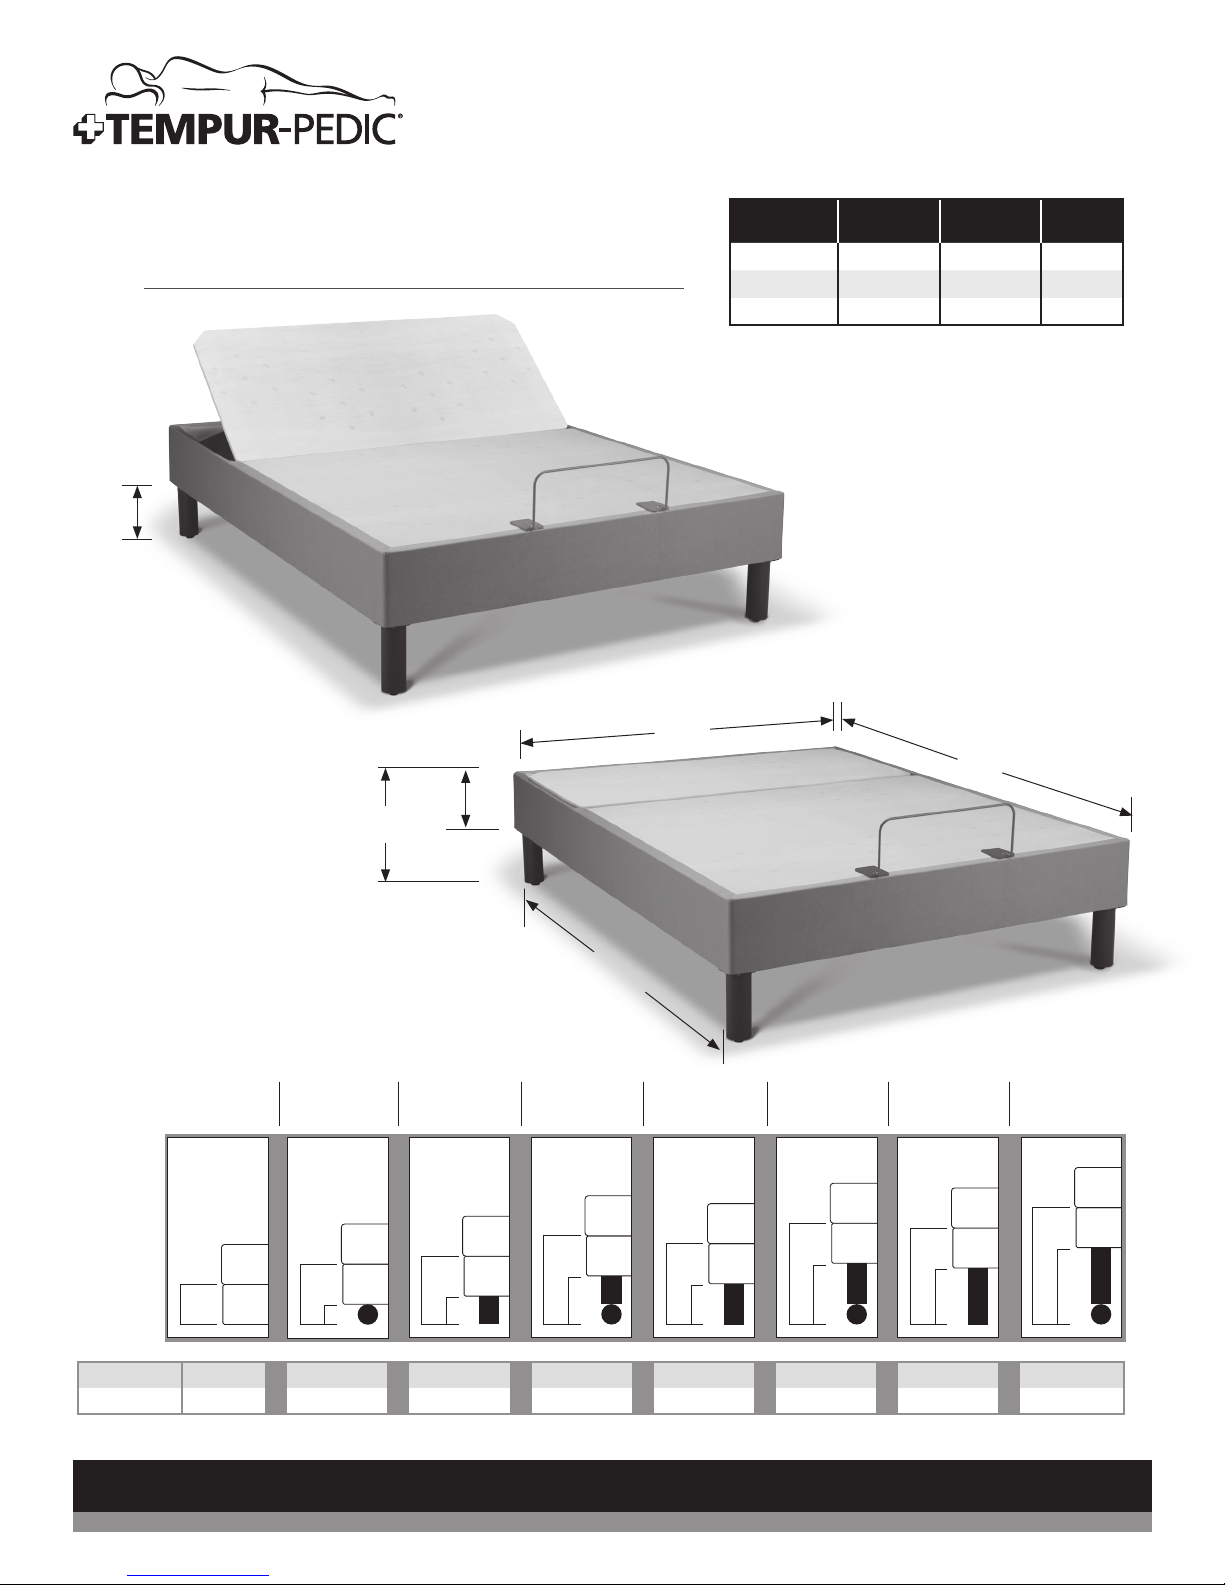
9"*
18"*
Bed Type A. Foundation
Width
B. Foundation
Length
Weight
Twin Long 37 1/2" 79" 119 lb
Double 53 1/4" 75" 139 lb
Queen 58 1/4" 79" 151 lb
* Brackets are required to attach
legs or casters and are available as
aftermarket purchase.
A
B
9"
Measurements are approximate and based on 9" riser leg kit.
*Legs and casters are optional and available as aftermarket purchases.
No Leg
C) To Foundation
D) To Mattress
(standard)
D
0" 3 1/4" 4 1/2" 7" 6 1/2" 9" 9" 11 1/2"
9" 12 1/4" 13 1/2" 16" 15 3/4" 18" 18" 20 1/2"
Caster Only*
D
C
4 1/2" Riser Leg*
(without caster)
CUSTOMER SERVICE: 1–800–887–4321
8
54 3/4"
4 1/2" Riser Leg
(with caster)*
D
D
C
C
6 1/2" Riser Leg*
(without caster)
D
C
6 1/2" Riser Leg
(with caster)*
D
C
9" Riser Leg*
(without caster)
D
C
9" Riser Leg
(with caster)*
D
C
Page 9
Installation Instructions
Installation
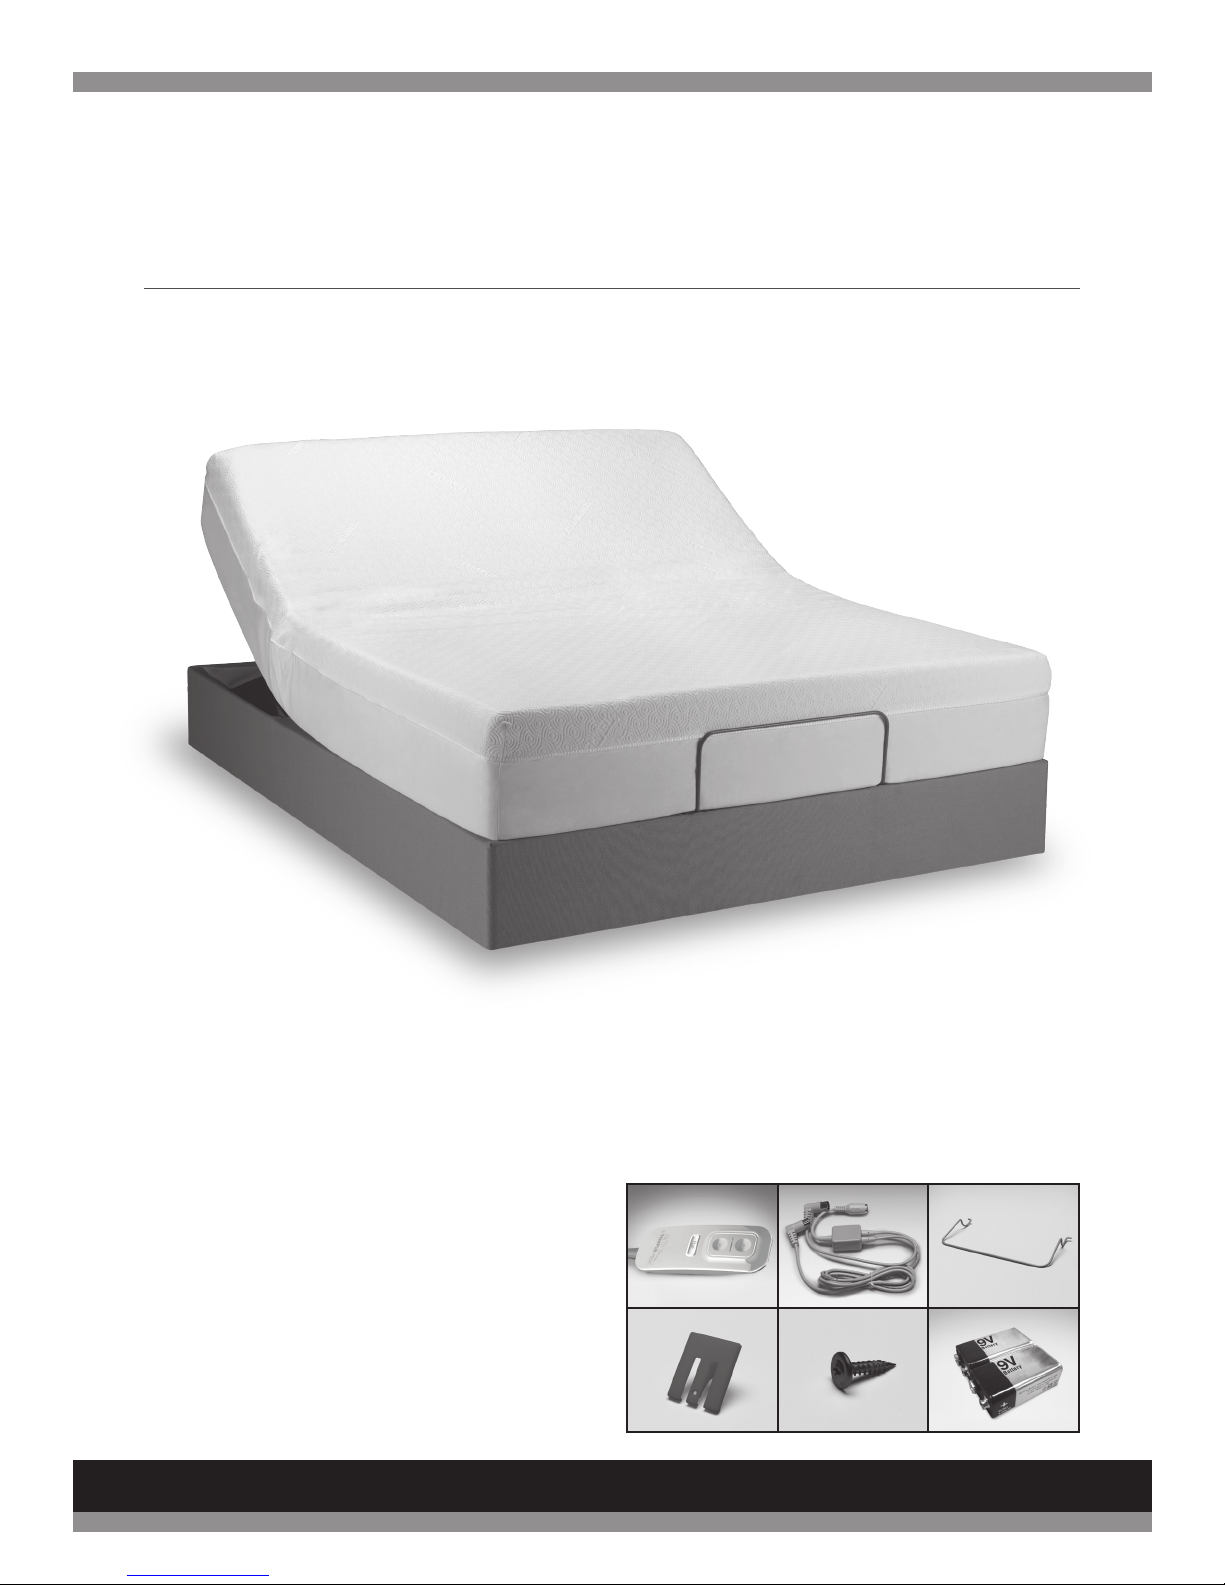
Before discarding any packing materials, check the
TEMPUR-Up™ Foundation carton and verify the
following items in the parts list are included:
PARTS LIST
A. Wired Remote Control – hardwired to bed (1)
B. Connection Y-Cable (1)
C. Mattress Retainer Bar (1)*
D. Retainer Bar Plate (2)*
E. Retainer Bar Screw (2)*
F. 9-Volt Batteries (2)
CUSTOMER SERVICE: 1–800–887–4321
*Attached to foundation for shipping.
Appearance of some parts may differ from photos.
A. B. C.
E. F.D.
9
Page 10
Pre-Delivery Procedure
TEMPUR‑Up™ Foundation
STEP 1
Lift carton top off box to reveal the bottom of the
foundation.
STEP 2
Using a power extension cord to reach the
foundation, plug in the foundation’s power cord.
NOTE: Do not uncoil the foundation power cord
which is packaged for shipment.
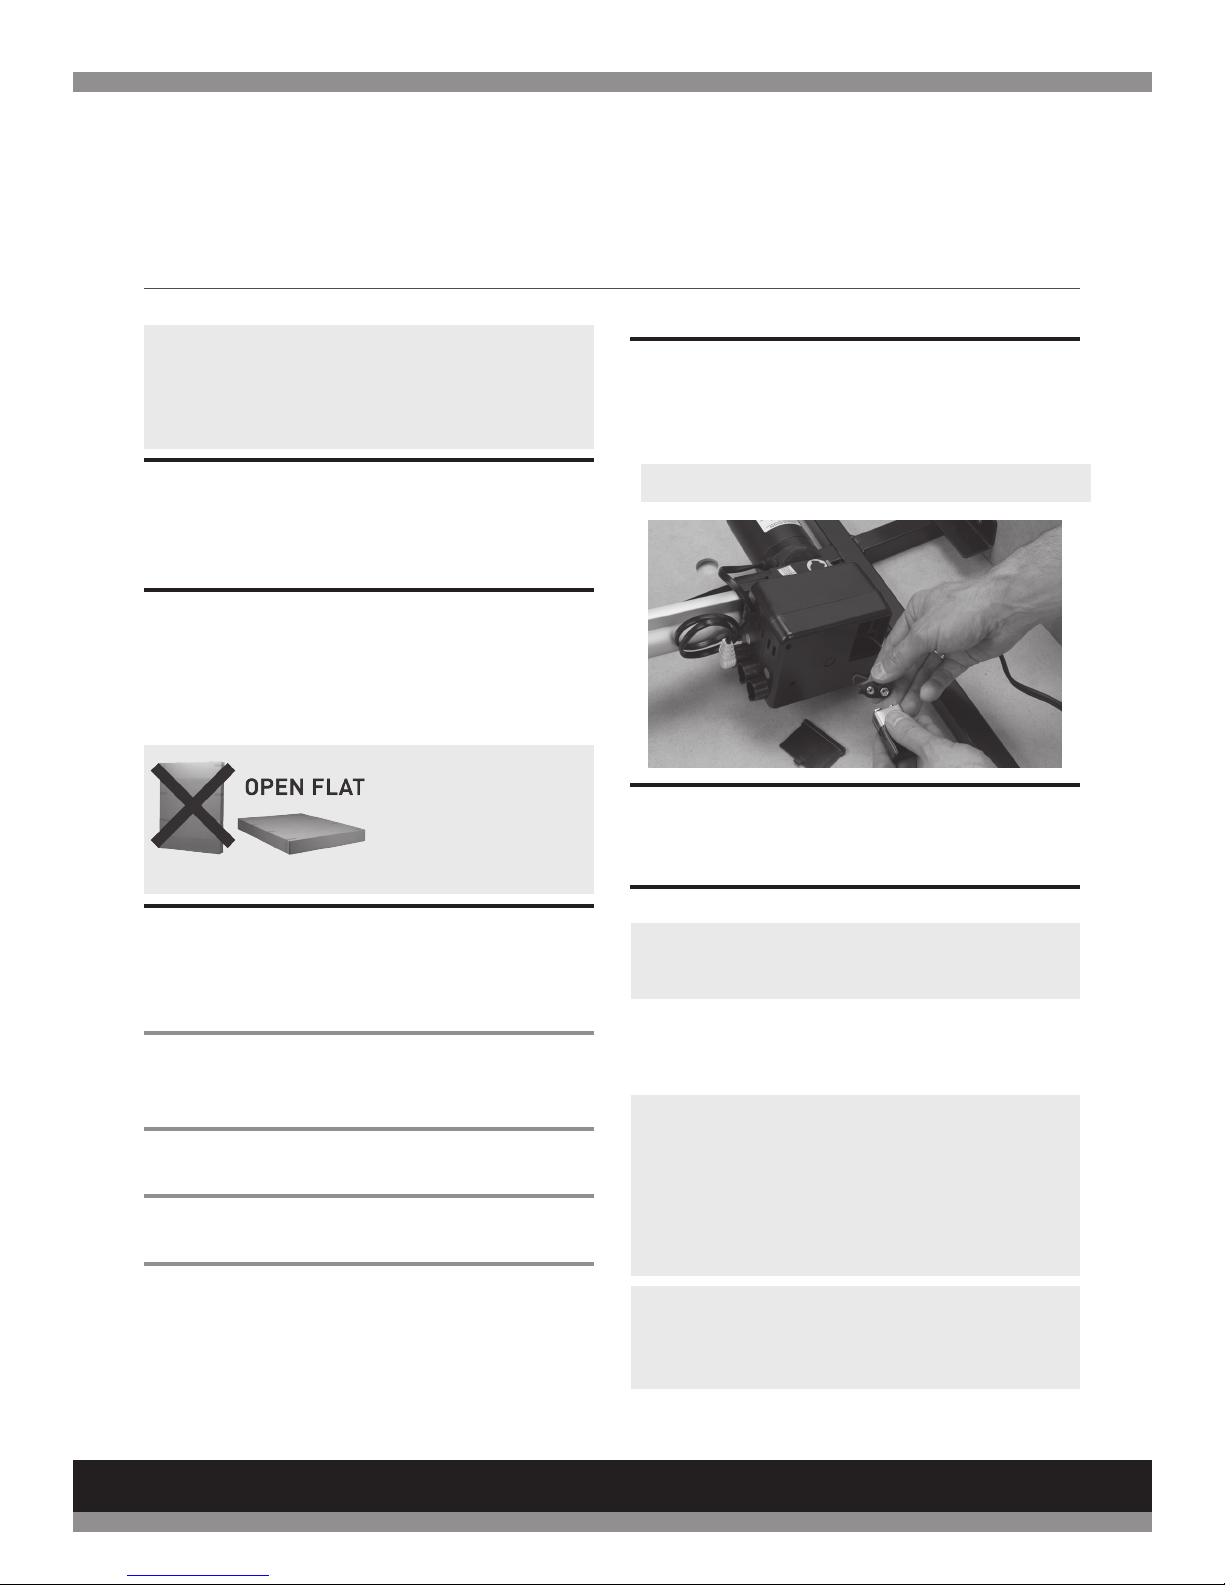
STEP 3
Slide the cover off the battery compartment on the
power supply and install the provided (2) 9-Volt
Batteries (F). Replace the battery compartment
cover.
NOTE: Do not mix old and new batteries.
STEP 4
Cut the plastic strapping on each Wired Remote
Control from the foundation frame. Ensure that the
wired remote is connected to the foundation.
STEP 6
Once the warehouse test is successful and complete:
• Unplug the power extension cord
• Place the lid back on the outer carton and secure
for delivery
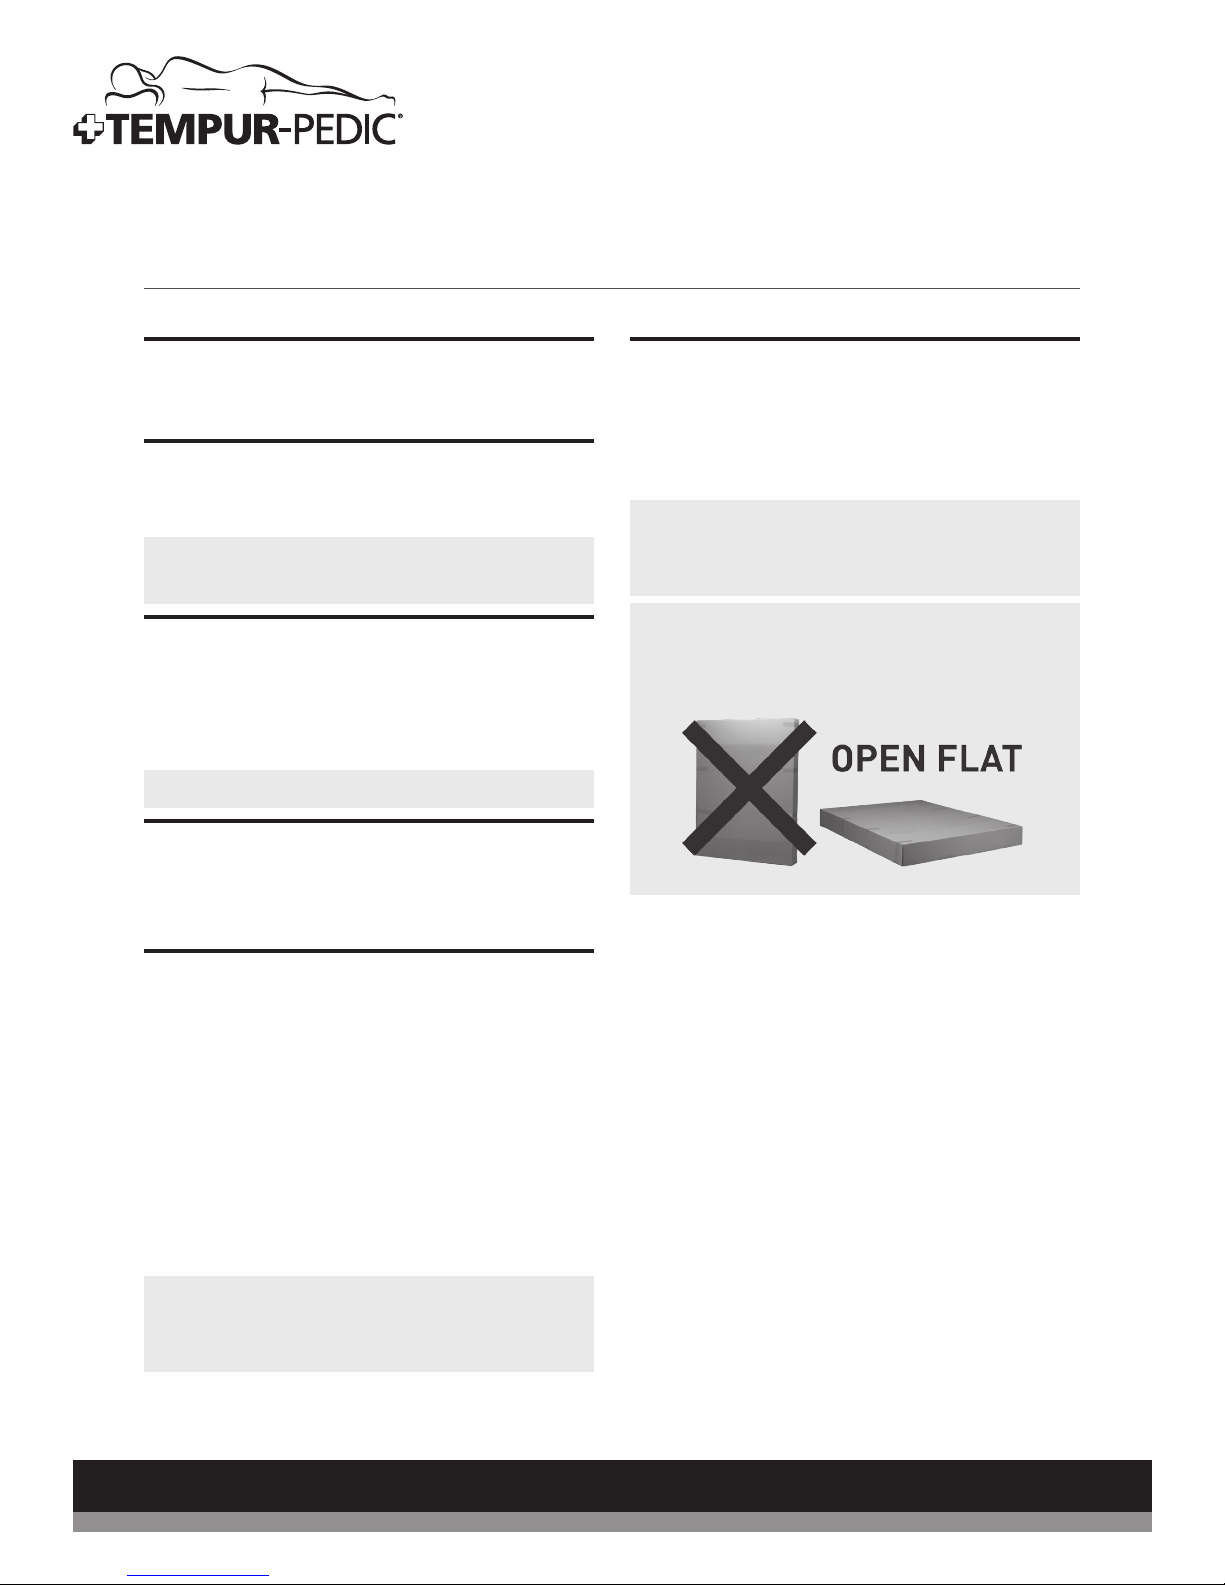
NOTE: Always keep the foundation in a flat,
horizontal position during transportation and
delivery.
NOTE: To avoid damage to the TEMPUR‑Up™
Foundation, always open the carton while the
bed is in the flat position.
STEP 5
Power Test Procedure:
Press each of the following buttons long enough to
illuminate the blue LED backlight on the remote
control, and watch/listen for the foundation to
activate. This ensures you will be delivering a
foundation that is fully functional. Test the
foundation by pressing the buttons in the following
sequence.
1. Head Lift
2. Flat
NOTE: Only press each button long enough
to hear or see the function activate on the
foundation.
CUSTOMER SERVICE: 1–800–887–4321
10
Page 11
Delivery Procedure
Installation
NOTE: Always keep the TEMPUR‑Up™
Foundation in a flat, horizontal position during
transportation and delivery. Always open the
box in the flat position.
STEP 1
Carefully take the foundation in the carton to the
bedroom and place next to where the customer
wants it set up.
STEP 2
Carefully lift the TEMPUR-Up Foundation out of the
shipping carton, keeping the unit topside down.
For safety reasons, this should be performed by
twopeople.
NOTE: To avoid damage
to the foundation,
always open the carton
while the bed is in the
flat position.
STEP 3
The products come packed in a cardboard box.
Some components are also sealed in plastic lm.
To unpack, proceed as follows:
STEP 3A
Remove the cardboard and plastic lm from the
components.
STEP 3B
Check the package contents.
STEP 3C
Dispose of the packaging materials.
STEP 3D
Keep the user manual at hand for the operators.
STEP 4
Remove the Wired Remote Control from the frame.
Verify the (2) 9-Volt Batteries were installed into the
battery compartment of the power supply.
NOTE: Do not mix old and new batteries.
STEP 5
Connect the power cord from the power supply to
the surge protector (not included).
STEP 6
NOTE: Aftermarket legs and casters are
available for purchase.
If purchased, attach TEMPUR-Up Foundation Legs
by following instructions included with accessories.
NOTE: Hand tighten the legs securely to the
frame. DO NOT over tighten. Make sure the legs
are screwed completely into the frame. Legs
that are not securely attached may become
unsafe. DO NOT unscrew a leg to compensate
for an uneven floor.
NOTE: In order to prevent the movement of this
product, all four casters should be in the locked
position.
CUSTOMER SERVICE: 1–800–887–4321
11
Page 12
TEMPUR‑Up™ Foundation
STEP 7
If this delivery involves dual foundations and/or
split mattresses, see instructions for joining two
foundations on page 15.
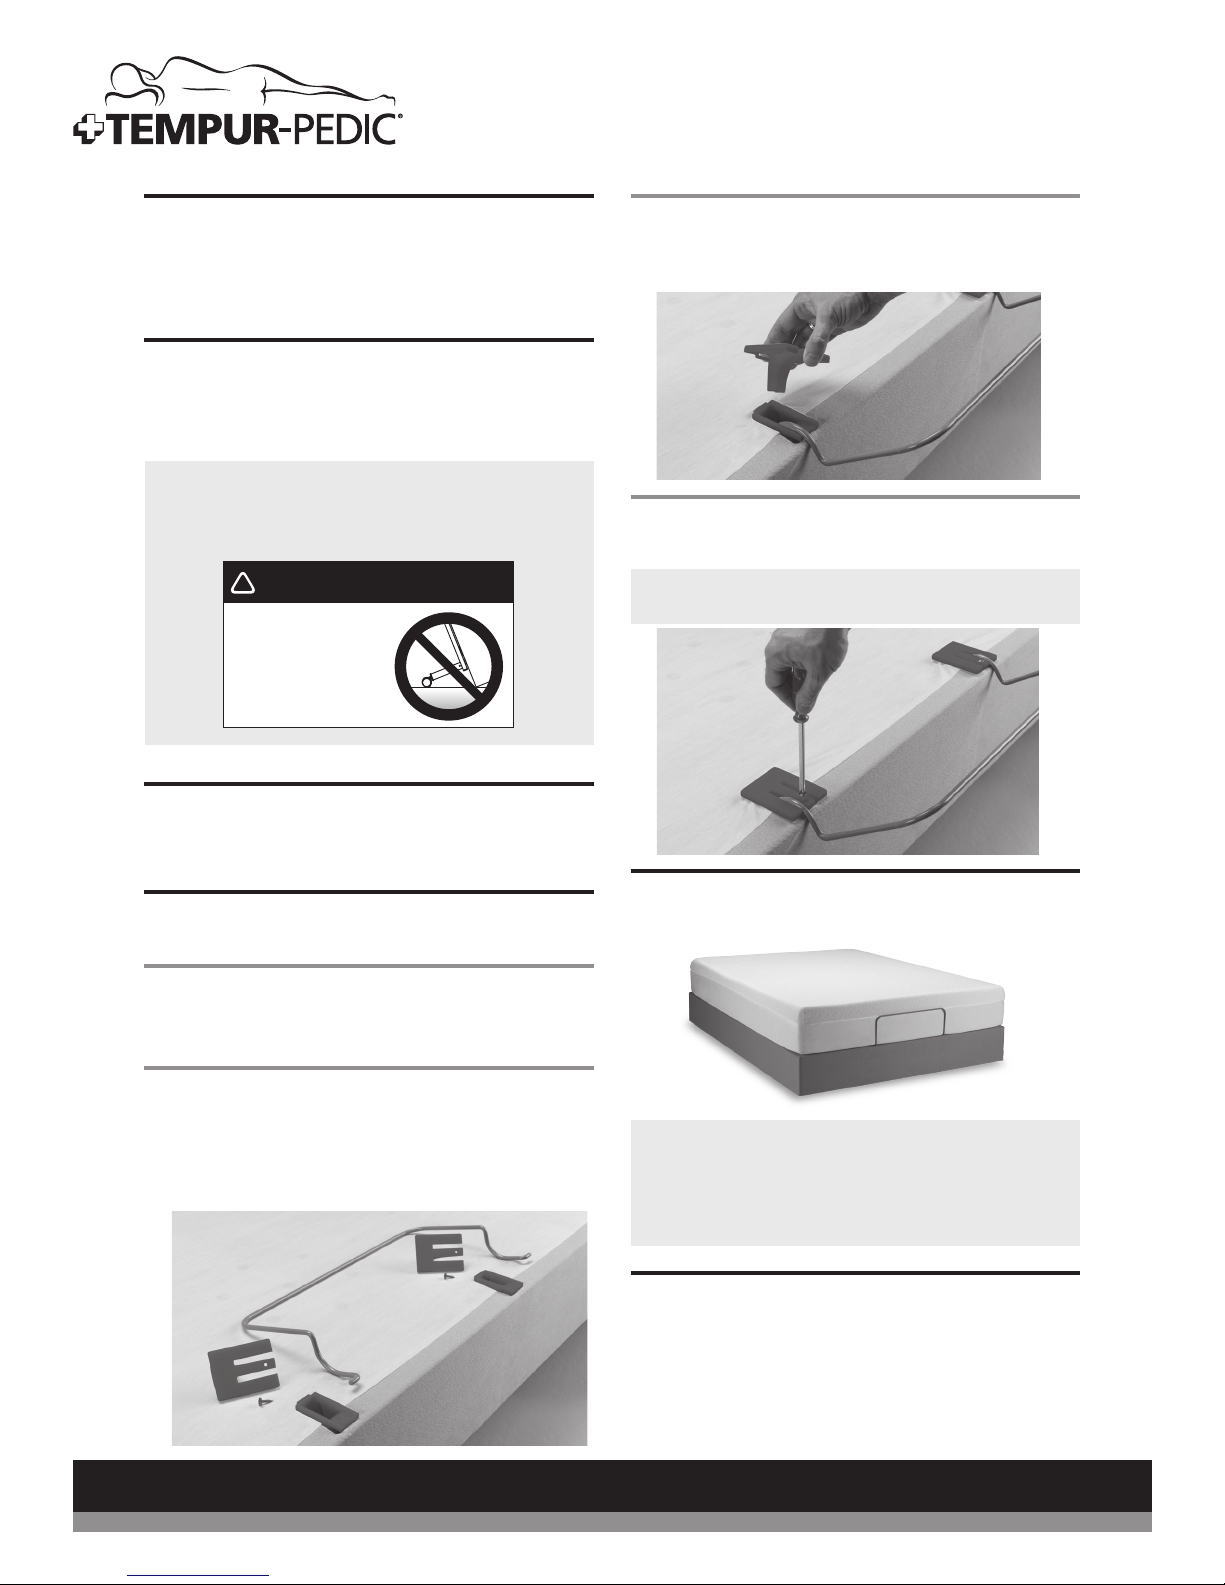
STEP 8
Carefully ip the TEMPUR-Up™ Foundation(s) over to
the topside up position.
NOTE: Make sure to lift the foundation(s) off the
ground before flipping over. DO NOT use legs as
a leverage point to ensure they do not break.
!
ATTENTION ! Improper handling
DO NOT
lean the bed against the
installed legs to flip it over.
STEP 10C
Install Mattress Retainer Bar (C) and install Retainer Bar
Plate (D).
STEP 10D
Hand tighten Retainer Bar Screw (E) with screw driver.
NOTE: Do not overtighten or use power tools for
installation.
STEP 9
Route the control box cable to your preferred side of
the bed.
STEP 10
Install the Mattress Retainer Bar (C).
STEP 10A
Remove Mattress Retainer Bar (C) from the bottom of
the foundation.
STEP 10B
Remove the Retainer Bar Plates (D) and Retainer Bar
Screws (E) from the accessory bag also attached to the
bottom of the foundation..
STEP 11
Place the mattress(es) on the foundation(s).
WARNING: When placing the foundation(s)
within a bedframe, verify the space between
the headboard cross member and the top of the
mattress is no more than 3 inches.
STEP 12
Ensure the power switch on the surge protector is in
the “on” position and that it is plugged into the wall
outlet. Check the system for functionality with the
mattress in place.
CUSTOMER SERVICE: 1–800–887–4321
12
Page 13
Instructions For Joining Two Foundations
Installation
ONE WIRED REMOTE CONTROL AND TWO TEMPUR-UP™
FOUNDATIONS
Assembling Split/Dual Foundations (Frame A and
Frame B) to be used together as a single King system.
NOTE: The use of “Frame A” and “Frame B” is
for description purposes only and the beds will
not actually be labeled “Frame A” or “Frame B”.
NOTE: Wired Remote Control and Y‑Cable
are attached to underside of the TEMPUR‑Up
Foundation for shipping.
STEP 1
Carefully unplug the Wired Remote Controls from
FrameA and FrameB.
STEP 2
Remove both Wired Remote Controls and set aside.
Place the spare remote control in a safe place for
any future use.
STEP 5
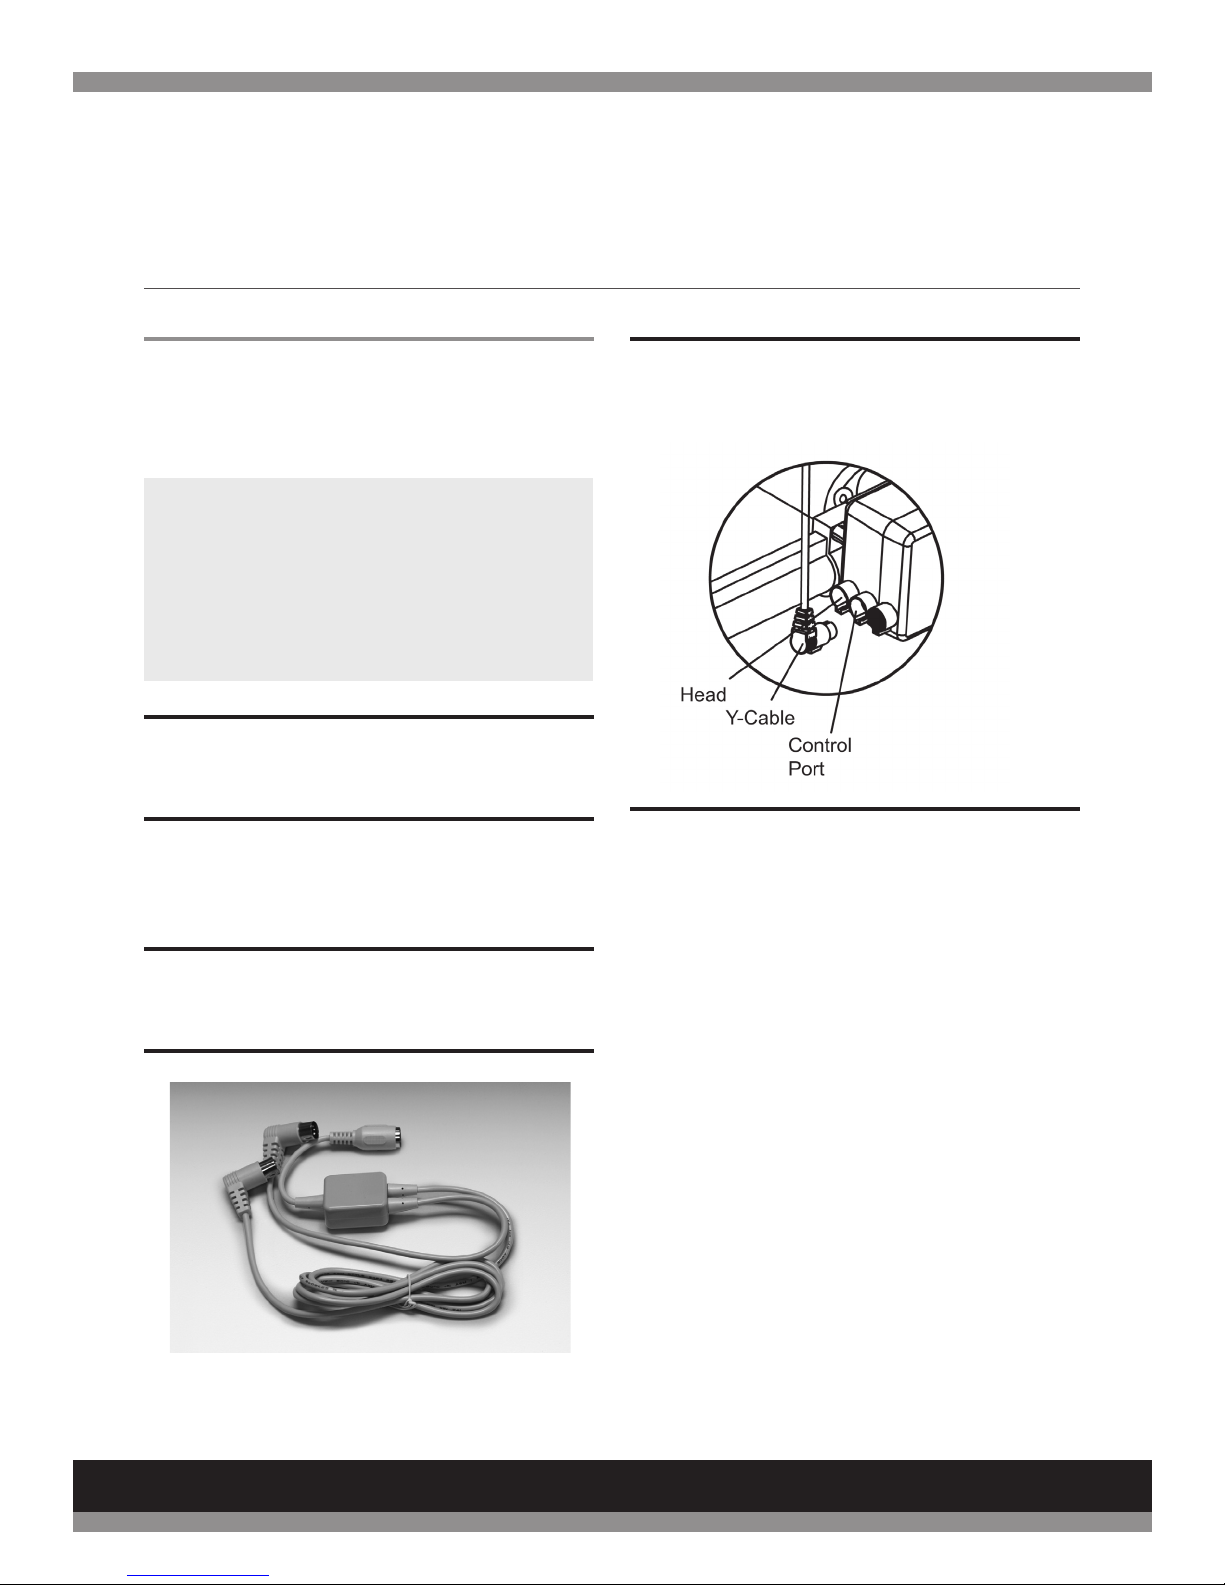
Plug in the “B” output of the Y-Cable into FrameB
control port.
STEP 6
Plug one of the provided Wired Remote Controls
into the “Control Input” side of the Y-Cable.
STEP 3
Remove and extend one of the provided Y-Cables
from the frame.
STEP 4
Plug in the “A” output of the Y-Cable into FrameA
control port.
CUSTOMER SERVICE: 1–800–887–4321
13
Page 14
TEMPUR‑Up™ Foundation
Wired Remote Control Features
READ ADVISORY INFORMATION IN THE SAFETY PRECAUTIONS SECTION OF THIS GUIDE CAREFULLY BEFORE
USING THIS PRODUCT. THE POTENTIAL FOR ELECTRIC SHOCK EXISTS IF ELECTRICAL COMPONENTS ARE NOT
INSTALLED OR OPERATED PROPERLY.
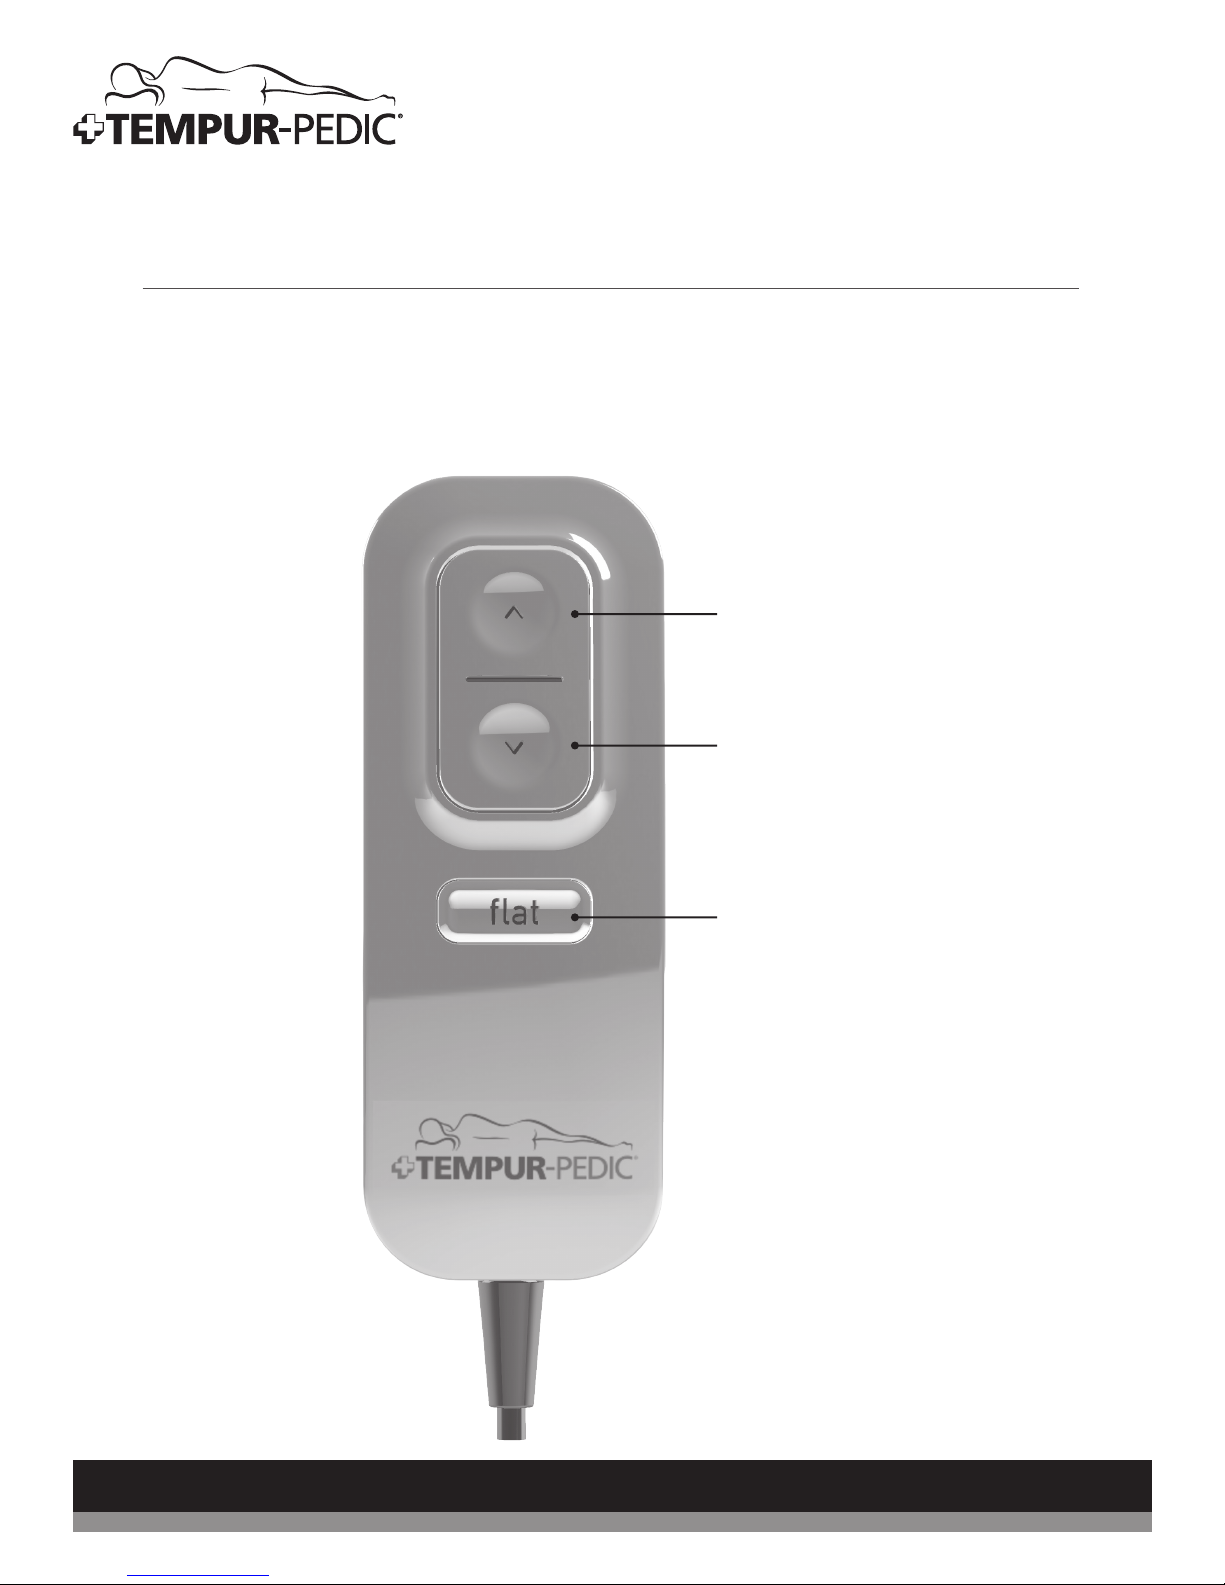
1. HEAD UP (HU)
2. HEAD DOWN (HD)
3. FLAT (F)
CUSTOMER SERVICE: 1–800–887–4321
14
Page 15
Operation
Operating Instructions
To ensure safe operation of the system, please observe the following safety instructions:
CAUTION: Keep children away from electrically adjustable beds and control units. There is risk of injury
and electric shock.
CAUTION: Unplug the power cord during a thunderstorm or if you do not intend to use the system for an
extended period of time.
NOTE: Do not put the remote control button‑side down.
NOTE: The actuators will continue moving until you release button or the maximum height is reached.
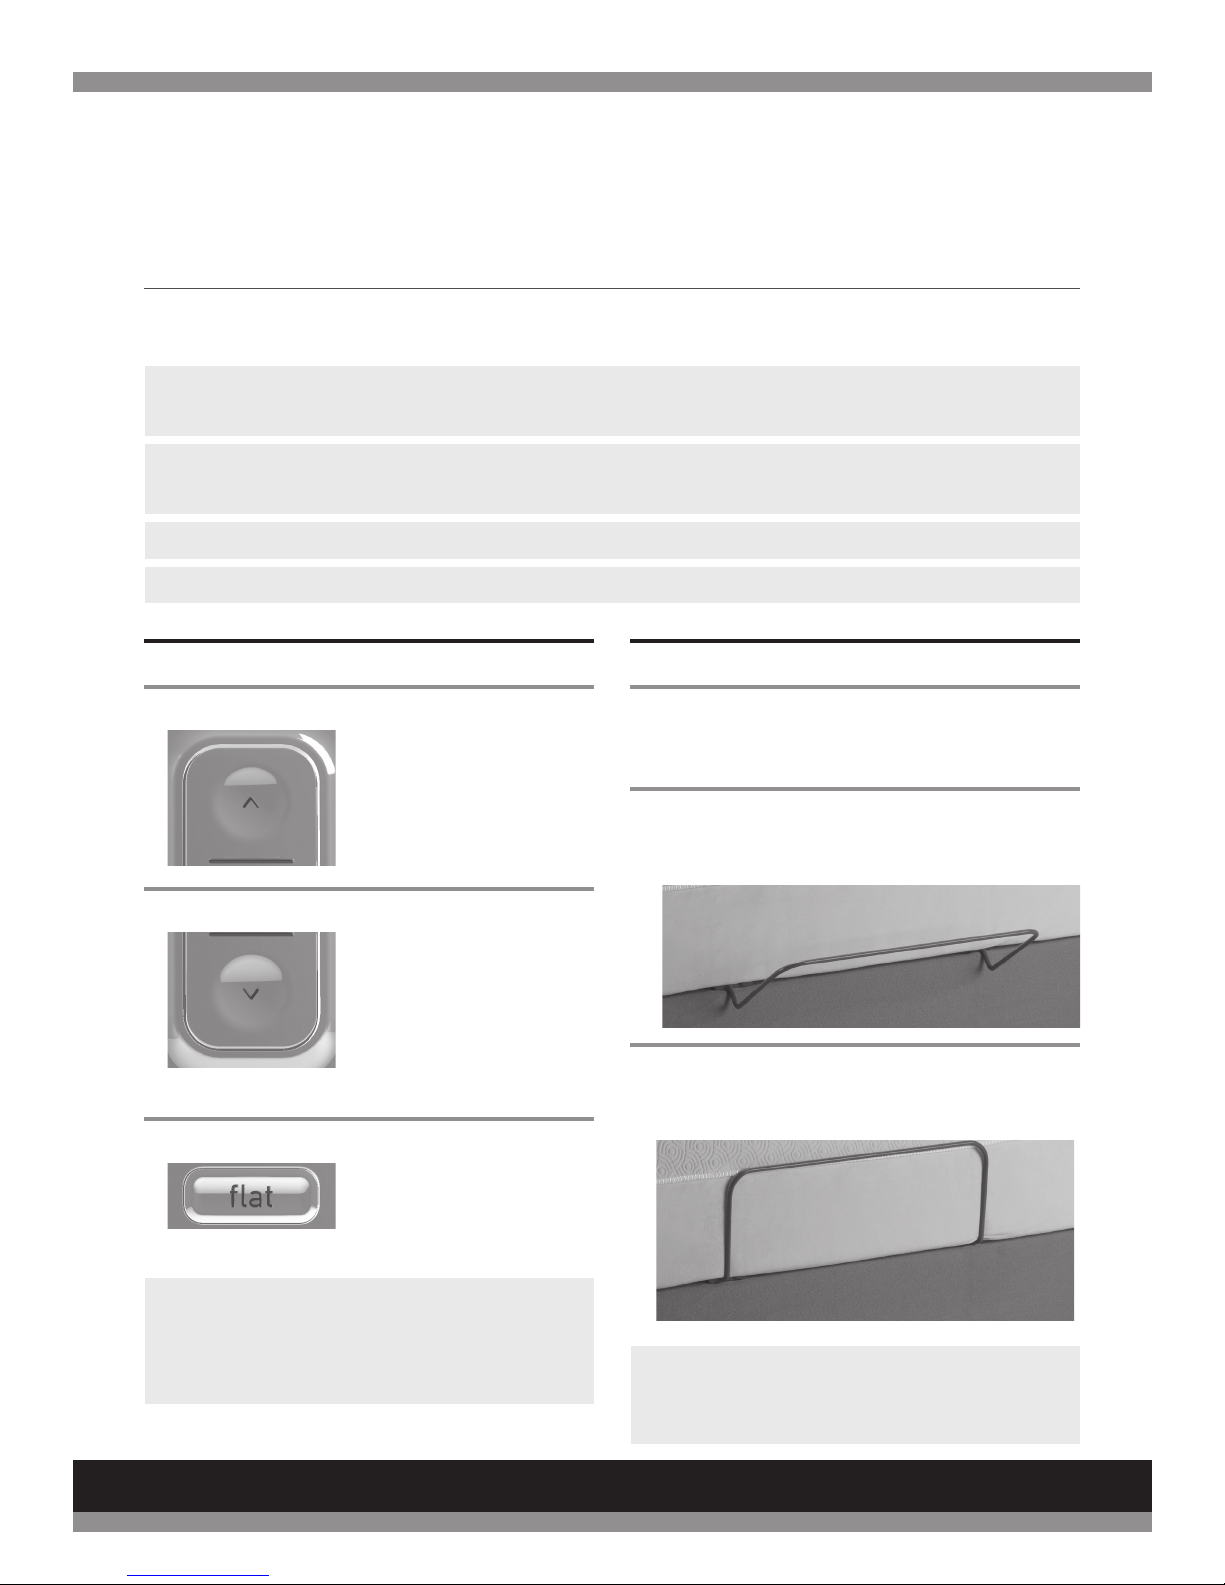
MANUAL ADJUSTMENT OF HEAD
Head Up (1)
This function raises the Head
section to the desired position.
Press the HEAD UP button (1).
Keep pressing the button until
the desired height is reached.
Head Down (2)
This function lowers the Head
section to the desired position.
Press the HEAD DOWN
button (2).
Keep pressing the button until
the desired height is reached.
Flat (3)
Press the FLAT button (3) and
the bed frame will
automatically move to its
complete at position.
CHANGING LINENS
STEP 1
Begin in the at position. If necessary, use the FLAT
button (3) to lower the Head section.
STEP 2
Lower the Mattress Retainer Bar to gain access to
the foot of the mattress.
STEP 3
After replacing the linens make sure the Mattress
Retainer Bar is raised to the upright locked position.
NOTE: Ensure all obstructions are clear of
the foundation’s undercarriage when lifting or
lowering the foundation’s head section to avoid
risk of pinching or damage.
CUSTOMER SERVICE: 1–800–887–4321
NOTE: Ensure that the Mattress Retainer Bar
is in the upright locked position to prevent
mattress slippage during operation.
15
Page 16
Special Functions
TEMPUR‑Up™ Foundation
EMERGENCY POWER-DOWN
The power-down button on the power supply unit gives
the user the ability to move the bed to a at position
during power failure.
SINGLE SYSTEM
Press the Power‑Down button on the power supply
until the bed arrives at the at position. After this
procedure the two (2) 9-Volt Batteries must be
changed.
DANGER: Risk of pinching!
NOTE: During the emergency power‑down
procedure the lowering speed will be reduced.
NOTE: Do not mix old and new batteries.
TANDEM OPERATION
Each foundation must be moved to the at
position separately by following the single system
instructions.
After this procedure the two (2) 9-Volt Batteries of
both power supplies must be changed.
CHANGE FROM A TANDEM SYSTEM TO A SINGLE
SYSTEM
STEP 1
Disconnect both foundations from wall outlet.
STEP 2
Remove connections for Y-Cable from each control
port.
NOTE: Store Y‑Cable in a safe place for future
use.
NOTE: Locate spare Wired Remote Control
from storage for use on second base.
STEP 3
Reconnect Wired Remote Control cable to the
control port of each base.
NOTE: Do not mix old and new batteries.
CUSTOMER SERVICE: 1–800–887–4321
16
Page 17

Special Functions and
Troubleshooting
Troubleshooting
In the event that the TEMPUR-Up™ Foundation fails to operate properly, investigate the symptoms and possible
solutions provided in the chart below:
SYMPTOM SOLUTION
Wired Remote Control backlit LED
illuminates and appears to be operable
but will not activate the TEMPUR-Up
Foundation.
No features of the TEMPUR-Up
Foundation will activate.
Head section will elevate but will not
return to the horizontal (Flat) position.
Head lift function has minor
interference during operation.
• Verify that the power cord is plugged into a working electrical
outlet. A grounded, electrical surge protection device is
recommended. Test the outlet by plugging in another working
appliance.
• Unplug the power cord, wait 60 seconds and plug the power
cord back in to reset the electronic components.
• Your surge protection device and/or electrical circuit breaker
may be tripped. Check both to verify.
• Your surge protection device and/or electrical outlet may
be defective. Test the outlet by plugging in another working
appliance.
• The TEMPUR-Up Foundation may be obstructed. Elevate and
check for an obstruction. Remove the obstruction.
• The head section may be too close to the wall.
• Make sure that you are following the duty cycle of the motors
(do not operate more than 2 minutes over a 20-minute period,
or approximately 10% duty cycle).
• Press the lift button squarely and accurately.
A clicking noise is heard under the bed
when raising or lowering.
CUSTOMER SERVICE: 1–800–887–4321
• This is normal. The lift motor relays “click” when they are
engaged. No action is required.
17
Page 18

Manufacture Date :
Serial Number:
FOR TECHNICAL SUPPORT OR SERVICE,
QUESTIONS ABOUT YOUR TEMPUR-PEDIC® MATTRESS,
OR TO ORDER TEMPUR-UP™ FOUNDATION ACCESSORIES:
Write Serial Number here for future reference.
CUSTOMER SERVICE: 1–800–887–4321
1-800-887-4321
OR VISIT WWW.TEMPURPEDIC.CA
8934b-TEM v2
 Loading...